The scent of cinnamon, ginger, and melting butter is the true signal that the Christmas season has arrived. There is nothing quite so comforting as spending a cozy afternoon in the kitchen, filling tins with treats for family, friends, and Santa. This cherished tradition brings warmth and nostalgia to the coldest winter days.

Cookie baking is an essential part of creating those lasting festive memories. Whether you are searching for a straightforward drop cookie or an elegant stamped shortbread, this collection has a recipe that is just right for you. We have gathered fifty of the most beloved and traditional holiday recipes.
Get ready to preheat your oven and dust off your rolling pin. From tender German Springerle to decadent chocolate crinkles and buttery shortbread, we promise delicious results. These classics guarantee a beautiful and flavorful array on your Christmas cookie platter this year.
1. Old Fashioned Molasses Crinkles

These classic holiday treats bring a warmth that truly signals the start of the baking season. The deep, rich color comes from the signature use of molasses, an ingredient that evokes nostalgic holiday memories. You will love the way the strong, spicy aroma of ginger, cinnamon, and cloves fills your entire kitchen as they bake.
Notice the beautiful crackled texture across the surface of each cookie, a hallmark of a great crinkle recipe. Before going into the oven, the dough balls are rolled in coarse granulated sugar, which not only gives them a lovely sparkle but also enhances that delightful crispy edge.
The contrast between the crisp, sugary exterior and the wonderfully chewy center makes these immensely satisfying. These cookies are a required addition to any festive plate, offering a bold flavor that stands out among the sweeter, more delicate holiday options.
Required Ingredients
- 2 and 1/4 cups all purpose flour
- 2 teaspoons baking soda
- 1/2 teaspoon salt
- 1 teaspoon ground cinnamon
- 1 teaspoon ground cloves
- 2 teaspoons ground ginger
- 3/4 cup (1 and 1/2 sticks) unsalted butter, softened
- 1/2 cup granulated sugar, plus 1/4 cup extra for rolling
- 1/2 cup packed brown sugar
- 1 large egg
- 1/4 cup molasses
Equipment List
- Large mixing bowl
- Electric mixer (handheld or stand mixer)
- Measuring cups and spoons
- Rubber spatula
- Two small bowls (one for the extra sugar, one for dry ingredients)
- Baking sheets
- Parchment paper
- Wire cooling rack
DIY Instruction
Follow these simple steps to create a batch of these traditional, warmly spiced crinkle cookies.
- Prepare the Dry Ingredients: Take your flour, baking soda, salt, cinnamon, cloves, and ginger, and place them all together in one of your small bowls. Use a whisk to gently mix these ingredients thoroughly until the spices are evenly distributed throughout the flour. Set this bowl aside for a moment.
- Cream the Butter and Sugars: Get out your large mixing bowl. Add the softened butter, the granulated sugar, and the brown sugar into the bowl. Using your electric mixer, beat these ingredients together on medium speed. Keep mixing until the mixture becomes pale and fluffy, which should take about 3 to 4 minutes. Stop and scrape down the sides of the bowl often with your rubber spatula.
- Add Wet Ingredients: Now, beat in the egg until it is fully incorporated into the butter mixture. After that, slowly pour in the molasses and continue mixing until the dough is smooth and the color is consistent. Be sure everything is completely combined.
- Combine Wet and Dry: Turn your mixer speed to low. Gradually add the prepared dry ingredient mixture (from Step 1) into the wet ingredients. Mix just until the flour streaks disappear and a soft, cohesive dough forms. Be careful not to overmix the dough at this stage.
- Chill the Dough (Optional but Recommended): While you can bake immediately, chilling the dough for at least 30 minutes can help prevent the cookies from spreading too much. Cover the bowl with plastic wrap and place it in the refrigerator.
- Preheat and Prep: Set your oven temperature to 375 degrees F. Line your baking sheets with parchment paper to prevent sticking. Pour the extra 1/4 cup of granulated sugar into your second small bowl for rolling.
- Roll the Cookies: Scoop out dough using a spoon. Roll the dough between your palms to form balls that are about 1 inch in diameter. Roll each dough ball thoroughly in the granulated sugar until it is completely coated.
- Bake: Arrange the sugared dough balls on the prepared baking sheets, leaving about 2 inches of space between each one to allow for spreading. Place the baking sheets in the preheated oven. Bake for 8 to 10 minutes. The cookies are done when they have spread, have a cracked appearance, and the edges look set, but the centers still look soft.
- Cool: Let the cookies cool on the baking sheet for 5 minutes right out of the oven. This allows them to firm up. Then, carefully transfer them to a wire rack to cool completely before enjoying.
2. Swedish Spice Wafers

These delicate cookies, known for their ultra thin structure, make a truly impressive addition to any Christmas spread. The wafer like texture is due to their generous use of butter and the fine milling of the sugar, creating a crispness that snaps delightfully with every bite. The star shapes here add a festive flair, making them wonderful for gifting or decorating.
Look closely at the surface and you’ll see a slightly pebbled texture, which holds onto the beautiful blend of warming spices. Here, the fragrant, unique essence of cardamom plays a central role, distinguishing these from more common ginger or cinnamon cookies. We have also scattered whole green cardamom pods and a cinnamon stick nearby to hint at the aromatic flavors packed inside.
When stacked high, these wafers create a magnificent centerpiece. Their robustness makes them easy to package, and their flavor only seems to deepen over time. They are the perfect accompaniment to a hot cup of coffee or traditional Swedish glögg.
Required Ingredients
- 1/2 cup (1 stick) unsalted butter, softened
- 1/2 cup granulated sugar
- 2 tablespoons dark molasses
- 1 large egg
- 1/2 teaspoon vanilla extract
- 1 and 1/2 cups all purpose flour
- 1 teaspoon baking soda
- 1 teaspoon ground cinnamon
- 1/2 teaspoon ground ginger
- 1/4 teaspoon ground cardamom
- Pinch of salt
Equipment List
- Electric mixer (handheld or stand mixer)
- Large mixing bowl
- Medium bowl
- Measuring cups and spoons
- Rolling pin
- Assorted Christmas themed cookie cutters (stars, hearts)
- Baking sheets
- Parchment paper
- Wire cooling rack
DIY Instruction
Follow these steps carefully to bake these thin, crispy, and flavorful spice wafers.
- Prepare the Dough Base: In your large mixing bowl, place the softened butter and granulated sugar. Use your electric mixer to beat them together on medium speed for about 3 minutes until the mixture is lightened in color and texture.
- Add Wet Flavorings: Add the molasses, egg, and vanilla extract into the creamed mixture. Continue beating on medium speed until all these wet components are thoroughly combined, making sure to scrape down the sides of the bowl with a spatula.
- Combine Dry Ingredients: In the medium bowl, whisk together the flour, baking soda, cinnamon, ginger, cardamom, and salt. Whisking ensures that the leavening agent and spices are fully distributed.
- Finish the Dough: Turn your mixer speed to low. Gradually add the dry ingredients into the wet mixture, mixing just until the flour is incorporated and a stiff dough has formed. Be careful not to overmix the dough at this stage.
- Chill and Divide: Divide the dough into two even portions. Shape each portion into a flat disk, wrap them tightly in plastic wrap, and refrigerate for at least 1 hour. This step is necessary to prevent spreading and maintain sharp shapes.
- Preheat and Prepare: Set your oven to 350 degrees F. Line your baking sheets with parchment paper.
- Roll and Cut: On a lightly floured surface, take one disk of dough and roll it out very thinly—aim for about 1/16 of an inch thick. Use your festive cookie cutters to cut out the shapes, carefully transferring the cutouts to the prepared baking sheets. Place the cookies at least 1 inch apart.
- Bake: Bake the wafers for 6 to 8 minutes. They are done when the edges look crisp and the centers are deep golden brown. Since they are so thin, watch them closely to avoid burning.
- Cool: Let the cookies rest on the baking sheet for just 1 minute. Then, carefully transfer them gently to the wire cooling rack to cool completely.
3. Elegant Spice Rounds

These visually appealing cookies are a magnificent fusion of rich, complex winter spices and creamy white glaze. The base of the cookie features a dark, deeply flavored dough, likely infused with cocoa and warm holiday seasonings like cloves and star anise. The rough texture around the edges indicates the dough was rolled in finely chopped nuts, adding a delightful crunch.
The top of the cookie is artfully dipped or drizzled with a simple, opaque white glaze, creating a striking contrast against the dark base. This subtle sweetness helps balance the strong, pungent spice flavors below. The decoration is completed with a piece of candied citrus peel and a whole star anise, transforming each cookie into a miniature edible masterpiece.
Their sophisticated appearance and robust flavor profile make these cookies particularly well suited for a grown up Christmas gathering. They look stunning arranged on a platter, truly embodying the elevated spirit of festive entertaining.
Required Ingredients
- 1 cup (2 sticks) unsalted butter, softened
- 3/4 cup granulated sugar
- 1 large egg
- 1 teaspoon vanilla extract
- 2 cups all purpose flour
- 1/4 cup unsweetened cocoa powder
- 1 teaspoon ground cloves
- 1/2 teaspoon ground allspice
- 1/4 teaspoon ground star anise (or 1/2 teaspoon whole star anise, finely ground)
- 1/2 cup finely chopped almonds or hazelnuts
- For the Glaze:
- 1 cup powdered sugar
- 2 tablespoons milk or water
- For Garnish:
- Candied orange peel, diced
- Whole star anise (optional)
Equipment List
- Electric mixer
- Large and medium mixing bowls
- Measuring cups and spoons
- Small, shallow dish for nuts
- Rolling pin
- 2 inch round cookie cutter
- Baking sheets
- Parchment paper
- Wire cooling rack
- Small whisk for the glaze
DIY Instruction
Create these beautiful, sophisticated spice rounds with ease by following these instructions.
- Cream Butter and Sugar: In your large mixing bowl, beat the softened butter and granulated sugar together using the electric mixer on medium speed. Continue mixing until the mixture is light and fluffy, which should take about 3 minutes. Beat in the egg and vanilla extract until they are well combined. Scrape down the sides of the bowl often with a spatula.
- Combine Dry Ingredients: In the medium bowl, whisk together the flour, cocoa powder, ground cloves, allspice, and ground star anise. Be sure the cocoa powder is fully broken up and mixed evenly.
- Form the Dough: Gradually add the dry ingredient mixture into the wet ingredients, mixing on the lowest speed until a thick, uniform dough forms.
- Prep the Nuts: Pour the finely chopped nuts into the small, shallow dish.
- Roll and Coat: Take sections of the dough and roll them out to about 1/4 inch thickness on a lightly floured surface. Use the 2 inch round cookie cutter to cut out the shapes. Dip the sides of each dough round into the chopped nuts, pressing gently so the nuts stick.
- Bake: Place the prepared dough rounds on baking sheets lined with parchment paper. Bake in an oven preheated to 350 degrees F for 10 to 12 minutes. The cookies are done when the edges look firm.
- Cool: Allow the cookies to cool completely on a wire rack before attempting to glaze them.
- Make the Glaze: In a small bowl, whisk together the powdered sugar and milk (or water) until a smooth, thick glaze forms. If it is too thick, add a few drops more liquid; if too thin, add a small spoonful of powdered sugar.
- Glaze and Garnish: Dip one half of the top of each cooled cookie into the glaze, or drizzle the glaze over the top half. Immediately place a few pieces of diced candied orange peel and one star anise (if using) onto the wet glaze. Let the glaze set completely before serving or storing.
4. Snowy Gingersnap Bites

These inviting, dome shaped cookies offer a lovely contrast between a warmly spiced, chewy interior and a beautiful, snowy coating. Unlike some flatter varieties, these maintain a charming rounded shape, giving them a softer texture that is very satisfying. The dough’s dark color suggests the use of rich molasses and a generous amount of warm spices.
The most striking feature is the liberal dusting of powdered sugar, which settles into the cracked surface of the baked cookie. The sugar coating mimics fresh winter snowfall, making them instantly recognizable as a festive favorite. This sweet, fine layer also balances the sharp, zesty kick of the ginger within.
They are small and easily held, making them wonderful for grabbing quickly from a holiday platter. The rich, earthy flavors of the spice combined with the sweetness of the sugar create a truly comforting bite, embodying the cozy feeling of the season.
Required Ingredients
- 2 cups all purpose flour
- 2 teaspoons baking soda
- 1 teaspoon ground cinnamon
- 1 teaspoon ground ginger
- 1/2 teaspoon ground cloves
- 1/4 teaspoon salt
- 3/4 cup (1 and 1/2 sticks) unsalted butter, softened
- 1/2 cup granulated sugar
- 1/2 cup packed brown sugar
- 1 large egg
- 1/4 cup dark molasses
- For Coating:
- 1/2 cup powdered sugar
Equipment List
- Electric mixer
- Large mixing bowl
- Medium bowl
- Measuring cups and spoons
- Small, deep bowl for powdered sugar
- Baking sheets
- Parchment paper
- Small cookie scoop or teaspoon
- Wire cooling rack
DIY Instruction
Follow these steps carefully to bake these chewy, warmly spiced gingersnap bites dusted with a snowy coating.
- Combine Dry Ingredients: Take your medium bowl and whisk together the flour, baking soda, cinnamon, ginger, cloves, and salt. Make certain all the spices are evenly distributed.
- Cream Wet Ingredients: In the large mixing bowl, beat the softened butter, granulated sugar, and brown sugar together with your electric mixer on medium speed. Mix until the mixture is light and fluffy, which should take about 3 minutes. Beat in the egg and then the molasses until they are fully incorporated and the mixture is smooth.
- Form the Dough: Gradually add the dry ingredients into the wet mixture, mixing on low speed until the dough comes together. Be careful not to overmix it. The dough will be slightly sticky.
- Chill the Dough: Cover the dough bowl and chill it in the refrigerator for at least 30 minutes. Chilling is important to help the cookies retain their round shape and prevent excessive spreading.
- Preheat and Prep: Set your oven to 350 degrees F. Line your baking sheets with parchment paper. Place the powdered sugar into the small, deep bowl.
- Scoop and Coat: Use a small cookie scoop or a teaspoon to form the chilled dough into 1 inch balls. Roll each ball completely in the powdered sugar, ensuring it is thoroughly coated. Do not flatten the dough balls.
- Bake: Arrange the sugared dough balls on the prepared baking sheets, leaving 2 inches between each. Bake for 10 to 12 minutes. The cookies are ready when they have cracked beautifully on the surface and the edges are set, but the center still feels slightly soft.
- Cool and Re-dust: Let the cookies cool on the baking sheet for 5 minutes. Transfer them to the wire cooling rack. Once they are fully cool, you may dust them lightly with extra powdered sugar for an even snowier look before serving.
5. Sparkling Molasses Crinkles

These attractive cookies feature a wonderfully crinkled surface that captures the light beautifully. The deep, rich color comes from the inclusion of molasses, which also imparts a satisfyingly soft and chewy texture. This variety is visually similar to a traditional gingersnap but is defined by the prominent, coarse sugar coating.
The generous crystals of white sugar rolled around the dough before baking ensure a delightful crunch with every bite. As the cookie bakes and spreads, the sugar forms those signature cracks, creating a striking contrast against the dark spice dough. This texture combination—crisp edges and chewy centers—is simply irresistible.
Spices like ginger, cinnamon, and cloves give these a traditional, comforting taste, making them a cornerstone of any holiday baking lineup. They are hearty, full flavored, and hold up exceptionally well for storage or for adding to gift baskets.
Required Ingredients
- 2 and 1/2 cups all purpose flour
- 2 teaspoons baking soda
- 1 teaspoon ground cinnamon
- 1 teaspoon ground cloves
- 2 teaspoons ground ginger
- 1/2 teaspoon salt
- 3/4 cup (1 and 1/2 sticks) unsalted butter, softened
- 1/2 cup granulated sugar
- 1/2 cup packed brown sugar
- 1 large egg
- 1/4 cup molasses
- For Coating:
- 1/2 cup coarse decorating sugar or regular granulated sugar
Equipment List
- Large mixing bowl
- Electric mixer
- Medium bowl
- Measuring cups and spoons
- Small, shallow dish for sugar
- Baking sheets
- Parchment paper
- Small cookie scoop
- Wire cooling rack
DIY Instruction
Bake these classic, chewy, and visually stunning molasses crinkles using these instructions.
- Mix Dry Ingredients: In your medium bowl, whisk together the flour, baking soda, cinnamon, cloves, ginger, and salt. Set the combined dry ingredients aside.
- Cream the Fats and Sugars: In the large mixing bowl, beat the softened butter, granulated sugar, and brown sugar with the electric mixer on medium speed. Continue beating until the mixture looks pale and light in texture, usually about 3 minutes.
- Add Liquid Ingredients: Mix in the egg thoroughly. Then, pour in the molasses and continue mixing until the entire dough mixture is smooth and evenly colored a rich brown.
- Finish the Dough: Turn the mixer speed to low. Gradually incorporate the dry ingredient mixture into the wet ingredients. Mix only until the flour is fully incorporated and the dough comes together. Avoid overmixing.
- Chill (Recommended): Cover the dough and place it in the refrigerator for at least 30 minutes. This chilling process ensures the cookies maintain a thick shape and crinkle nicely.
- Preheat and Prep: Set your oven temperature to 375 degrees F. Line your baking sheets with parchment paper. Place the coarse decorating sugar into the small, shallow dish.
- Scoop and Roll: Use a small cookie scoop (about 1 tablespoon size) to portion the chilled dough. Roll the dough between your palms into uniform balls. Roll each dough ball completely and heavily in the coarse sugar until the surface is fully coated and sparkling.
- Bake: Arrange the sugared dough balls on the prepared baking sheets, spacing them about 2 inches apart. Bake for 8 to 10 minutes. They are finished when the surface is covered in beautiful cracks and the edges are set, leaving the centers soft.
- Cool: Let the cookies rest on the baking sheet for 5 minutes before transferring them gently to a wire cooling rack to cool completely.
6. Classic Butter Shortbread

Here we have a timeless Christmas favorite, the pure, buttery shortbread. These cookies are recognized by their pale, golden color, a testament to the high ratio of butter that defines the recipe. This generous amount of butter is what gives them their signature melt in your mouth texture and rich flavor.
Presented in traditional finger and round shapes, the pieces are often pricked with a fork or pin before baking, creating a uniform, decorative pattern. The simplicity of the recipe allows the quality of the butter and a hint of vanilla to truly shine. Notice the light dusting of sugar crystals around the edges, adding just a touch of extra sparkle and subtle sweetness.
Shortbread is a staple holiday treat because it travels extremely well and its flavor profile pairs beautifully with almost any festive beverage. They embody the elegant simplicity of traditional holiday baking.
Required Ingredients
- 1 cup (2 sticks) unsalted butter, softened
- 1/2 cup granulated sugar
- 2 cups all purpose flour
- 1/4 teaspoon salt
Equipment List
- Electric mixer
- Large mixing bowl
- Measuring cups and spoons
- Rolling pin
- Ruler or knife for cutting
- Fork or skewer for pricking
- Baking sheets
- Parchment paper
- Wire cooling rack
DIY Instruction
Follow these steps to create a batch of simple, crisp, and wonderfully buttery shortbread.
- Cream Butter and Sugar: In your large mixing bowl, place the softened butter and granulated sugar. Use your electric mixer to beat them together on medium speed for about 3 minutes until the mixture is light and fluffy.
- Add Flour and Salt: Reduce the mixer speed to low. Gradually add the flour and salt into the butter mixture. Mix only until the dough comes together into a cohesive ball. Do not overmix, as this can develop the gluten and make the shortbread tough.
- Shape and Chill: Press the dough into a cohesive mass. You can either press it into an 8×8 inch square baking pan, or shape it into a disc or rectangle about 1/2 inch thick on a piece of parchment paper. Wrap the dough tightly and chill it in the refrigerator for at least 30 minutes.
- Preheat and Prep: Set your oven temperature to 325 degrees F. Line your baking sheets with parchment paper.
- Cut the Shortbread: If you pressed the dough into a pan, cut it into fingers or squares. If you shaped it into a rectangle on paper, transfer it to the prepared baking sheet and use a ruler and sharp knife to cut it into the traditional shortbread finger shapes (about 3 x 1 inch rectangles).
- Prick the Cookies: Use a fork or a skewer to prick a line of holes down the center of each shortbread finger. This practice allows steam to escape, preventing puffing and helping the shortbread keep its shape.
- Bake: Bake for 18 to 22 minutes. The shortbread is done when the edges are set and lightly golden brown, but the center remains pale.
- Cool and Finish: Remove the shortbread from the oven. While they are still warm, you may sprinkle a small amount of extra granulated sugar over the top. Let them cool completely on the baking sheet before carefully transferring them to a wire rack.
7. Classic Holiday Cutouts

These simple, elegant cutouts form the foundation of countless Christmas baking traditions. The plain, light colored dough is typically a classic sugar cookie recipe, providing a lovely, neutral canvas for any decoration. This type of dough is essential because it holds its shape very well during baking.
The image shows the dough rolled out and ready to be cut into festive shapes like trees and stars. Notice the metal cookie cutters resting nearby, which are key to achieving those crisp holiday outlines. A light sprinkle of granulated sugar is visible, adding a simple, appealing sparkle to the baked shapes.
These cookies are fun to make for all ages, offering a straightforward yet satisfying baking experience. The final, baked cookie offers a crisp edge and a tender center, ready to be enjoyed as is, or decorated with royal icing for a more elaborate treat.
Required Ingredients
- 2 cups all purpose flour
- 1/2 teaspoon baking powder
- 1/4 teaspoon salt
- 3/4 cup (1 and 1/2 sticks) unsalted butter, softened
- 3/4 cup granulated sugar
- 1 large egg
- 1 teaspoon vanilla extract
- 1 tablespoon milk
Equipment List
- Electric mixer
- Large mixing bowl
- Medium bowl
- Measuring cups and spoons
- Rolling pin
- Assorted Christmas cookie cutters (tree, star)
- Baking sheets
- Parchment paper
- Wire cooling rack
DIY Instruction
Here is the simple method for creating perfect holiday cutout cookies that hold their shape.
- Prepare Dry Ingredients: In the medium bowl, whisk together the flour, baking powder, and salt.
- Cream Butter and Sugar: In your large mixing bowl, beat the softened butter and granulated sugar with the electric mixer on medium speed until the mixture is light and fluffy (about 3 minutes).
- Add Wet Ingredients: Beat in the egg, vanilla extract, and milk until they are well combined. Scrape down the sides of the bowl as needed.
- Form the Dough: Gradually add the flour mixture into the wet ingredients, mixing on low speed until a soft, cohesive dough forms. It should pull away from the sides of the bowl.
- Chill: Divide the dough into two equal portions. Flatten each portion into a disk, wrap them tightly in plastic wrap, and refrigerate for at least 1 hour, or until firm. Chilling is necessary to prevent the cookies from spreading.
- Preheat and Prep: Set your oven to 350 degrees F. Line your baking sheets with parchment paper.
- Roll and Cut: On a lightly floured surface, roll out one chilled disk of dough to about 1/4 inch thickness. Dip your cookie cutters in flour before pressing firmly into the dough to cut out your festive shapes.
- Transfer and Decorate: Carefully lift the cutouts and place them on the prepared baking sheets. Reroll and cut any remaining dough scraps. If desired, sprinkle the raw cutouts lightly with granulated sugar for a subtle sparkle.
- Bake: Bake for 8 to 11 minutes. The cookies are ready when the edges are just beginning to turn golden brown.
- Cool: Let the cookies rest on the baking sheet for 2 minutes before transferring them to a wire rack to cool completely before decorating or serving.
8. Stamped Spice Cookies

These cookies feature beautifully impressed, intricate, festive designs. This technique uses special rolling pins or stamps to give each cookie a uniquely elegant pattern before it even enters the oven. The dough itself has a warm, inviting color, suggesting a blend of ginger, cinnamon, and perhaps brown sugar or molasses.
The texture of the dough looks pliable and smooth, which is essential for successfully transferring the detailed designs from the stamps without tearing or sticking. This method elevates a simple round cookie into a decorative work of art, with patterns ranging from abstract florals to detailed snowflakes.
Baking stamped cookies adds a refined, artisan touch to your holiday assortment. They require careful dough preparation to ensure the designs remain sharp and visible after baking. They are lovely served plain or dusted very lightly with powdered sugar.
Required Ingredients
- 2 cups all purpose flour
- 1 teaspoon ground ginger
- 1/2 teaspoon ground cinnamon
- 1/4 teaspoon ground cloves
- 1/2 teaspoon baking powder
- 3/4 cup (1 and 1/2 sticks) unsalted butter, softened
- 1/2 cup packed brown sugar
- 1/4 cup granulated sugar
- 1 large egg
- 1 teaspoon vanilla extract
Equipment List
- Electric mixer
- Large mixing bowl
- Medium bowl
- Measuring cups and spoons
- Rolling pin
- Decorative cookie stamps or embossed rolling pin
- 2 to 3 inch round cookie cutter (optional, for shaping)
- Baking sheets
- Parchment paper
DIY Instruction
Follow these steps to create beautifully detailed and stamped holiday spice cookies.
- Cream Butter and Sugars: In the large mixing bowl, beat the softened butter, brown sugar, and granulated sugar together with the electric mixer until they are light and fluffy (about 3 minutes). Beat in the egg and vanilla extract until they are well combined and the mixture is smooth.
- Combine Dry Ingredients: In the medium bowl, whisk together the flour, ginger, cinnamon, cloves, and baking powder. Be sure all dry components are evenly mixed.
- Form the Dough: Gradually add the dry ingredients into the wet mixture, mixing on low speed until a cohesive dough forms. Do not overmix.
- Chill: Wrap the dough tightly in plastic wrap and chill it for at least 30 minutes. The dough must be firm enough to accept the stamp designs without sticking.
- Preheat and Prep: Set your oven to 350 degrees F. Line your baking sheets with parchment paper.
- Roll and Stamp: On a lightly floured surface, roll out the chilled dough to about 1/4 inch thickness. If using a large embossed rolling pin, roll the pin firmly over the dough to create the overall pattern. If using individual stamps, form the dough into 1/4 inch thick rounds (or use a cutter) and press the stamp firmly onto the top of the dough round.
- Cut and Transfer: Use a round cookie cutter (if needed) to cut out the stamped designs. Carefully transfer the stamped cookies to the prepared baking sheets.
- Bake: Bake for 8 to 10 minutes. The cookies are done when the edges look firm, but the centers still look slightly soft.
- Cool: Allow the cookies to cool completely on the baking sheet before moving them, as the detailed designs are delicate when warm.
9. Chocolate Dipped Shortbread Wedges

These festive shortbread cookies offer a sophisticated update on a classic recipe. The base is a tender, pale shortbread, often cut into charming triangular wedges. This neutral, buttery base provides the necessary stability and flavor for the delicious finishing touches.
Each wedge is dramatically dipped into a glossy coating of melted dark or semi sweet chocolate, covering roughly half of the cookie. The rich, dark chocolate layer not only adds a wonderful depth of flavor but also creates a beautiful contrast with the pale cookie. The final flourish is a scattering of tiny, shiny silver nonpareils over the wet chocolate, giving them an impressive, jewel like sparkle.
The combination of the crumbly, buttery cookie, the smooth chocolate, and the delicate crisp of the nonpareils creates a complex and very enjoyable texture. They are truly an eye catching treat that perfectly balances simple flavors with elegant presentation.
Required Ingredients
- 1 cup (2 sticks) unsalted butter, softened
- 1/2 cup granulated sugar
- 2 cups all purpose flour
- 1/4 teaspoon salt
- For Dipping:
- 8 ounces semi sweet or dark chocolate, chopped
- 1 teaspoon vegetable oil or coconut oil (optional, for smoother dipping)
- For Decoration:
- Silver nonpareils (small, round sprinkles)
Equipment List
- Electric mixer
- Large mixing bowl
- Measuring cups and spoons
- 8 inch round cake pan or pie dish
- Baking sheets
- Parchment paper
- Sharp knife
- Double boiler or microwave safe bowl for melting chocolate
- Wire cooling rack
- Small, shallow bowl for nonpareils
DIY Instruction
Create these delightful, chocolate dipped wedges for an elevated holiday treat.
- Cream Butter and Sugar: In your large mixing bowl, beat the softened butter and granulated sugar together with your electric mixer until light and fluffy (about 3 minutes).
- Add Flour and Salt: Reduce the mixer speed to low. Gradually mix in the flour and salt. Mix until the dough comes together into a cohesive ball.
- Press and Chill: Press the dough evenly into an ungreased 8 inch round cake pan or pie dish. Cover and chill in the refrigerator for at least 30 minutes.
- Preheat and Prep: Set your oven to 325 degrees F.
- Score and Prick: Remove the chilled dough from the pan (it should slide out easily) and place it on a prepared baking sheet lined with parchment paper. Use a sharp knife to gently score the dough into 12 or 16 equal wedges, but do not cut all the way through. Prick each wedge multiple times with a fork.
- Bake: Bake for 25 to 30 minutes. The shortbread is done when the edges are set and lightly golden brown, but the center remains pale.
- Cut and Cool: Immediately after removing the shortbread from the oven, use a sharp knife to cut all the way through the scored lines, separating the wedges completely. Let the wedges cool completely on the baking sheet before moving them.
- Melt Chocolate: Melt the chopped chocolate using a double boiler or in the microwave in 30 second intervals, stirring until smooth. If using, stir in the oil for a smoother consistency.
- Dip and Decorate: Holding one wedge, dip one corner or half of the cookie into the melted chocolate. Allow the excess chocolate to drip off. Immediately sprinkle the wet chocolate with silver nonpareils.
- Set: Place the decorated wedges on the wire cooling rack or a piece of parchment paper until the chocolate has completely set and hardened.
10. Tender Lemon Rings

These bright, cheerful cookies offer a lovely citrusy contrast to the typical spice and chocolate flavors of the season. The rounded, donut like shape with a central hole is attractive, and the pale yellow hue hints at the vibrant lemon flavor packed inside. The dough has a tender, almost cake like appearance.
The surface shows a lovely, fine texture and a gentle cracking, suggesting a soft chewiness. A faint dusting of sugar further enhances the simple sweetness and complements the tartness of the lemon zest and juice. They look light and airy, making them a refreshing addition to a heavier holiday dessert spread.
The subtle elegance of the lemon flavor and the simple ring shape make these a delightful option for those who enjoy a brighter flavor during the Christmas season. They are easy to make and a guaranteed crowd pleaser.
Required Ingredients
- 2 and 1/4 cups all purpose flour
- 1 teaspoon baking powder
- 1/2 teaspoon salt
- 1 cup (2 sticks) unsalted butter, softened
- 1 cup granulated sugar
- 1 large egg
- 2 teaspoons lemon zest (about 2 lemons)
- 1 tablespoon fresh lemon juice
- For Coating (optional):
- 1/4 cup granulated sugar mixed with 1 teaspoon lemon zest
Equipment List
- Electric mixer
- Large and medium mixing bowls
- Measuring cups and spoons
- Rubber spatula
- Piping bag fitted with a large star tip (or a round tip)
- Baking sheets
- Parchment paper
- Wire cooling rack
DIY Instruction
Bake these bright, tender lemon rings following this straightforward method.
- Prepare Dry Ingredients: In the medium bowl, whisk together the flour, baking powder, and salt.
- Cream Butter and Sugar: In your large mixing bowl, beat the softened butter and granulated sugar together with the electric mixer until light and fluffy (about 3 minutes).
- Add Wet Ingredients: Beat in the egg, lemon zest, and lemon juice until they are well combined. Scrape down the sides of the bowl as needed.
- Form the Dough: Gradually add the flour mixture into the wet ingredients, mixing on low speed until a soft, pipeable dough forms.
- Chill (Important): Place the dough into a piping bag fitted with your chosen tip. Refrigerate the piping bag for at least 1 hour. This stiffens the dough and makes piping much easier, ensuring the rings hold their shape.
- Preheat and Prep: Set your oven to 350 degrees F. Line your baking sheets with parchment paper.
- Pipe the Rings: Take the chilled piping bag and pipe the dough into ring shapes, about 2 inches in diameter, onto the prepared baking sheets.
- Bake: Bake for 10 to 12 minutes. The cookies are ready when the edges are set and very lightly golden.
- Garnish (Optional): While the cookies are still warm, gently press them top side down into the lemon sugar mixture (if using) for a sweet, zesty coating.
- Cool: Allow the lemon rings to cool completely on a wire rack before serving.
11. Jam Filled Sandwich Cookies

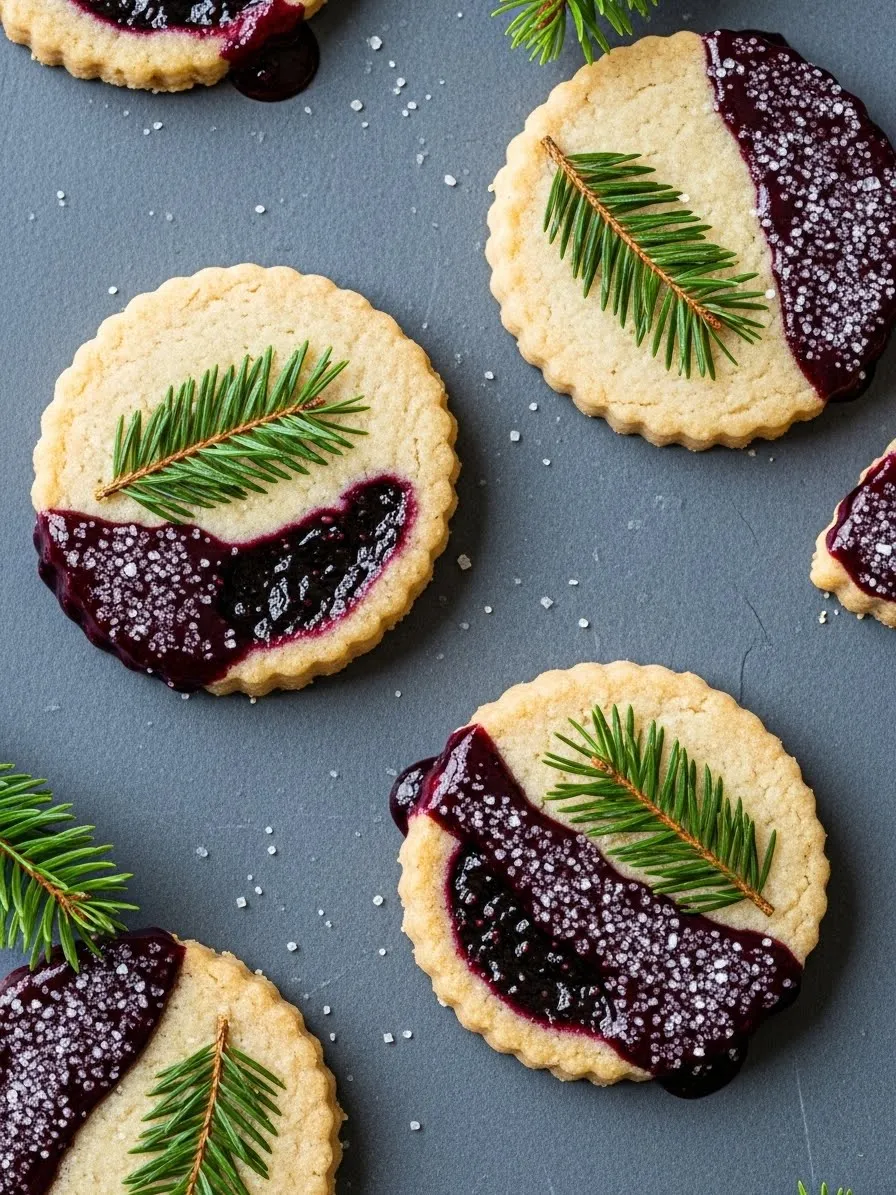
These charming, beautiful cookies are a festive delight, known for their tender, buttery shortbread layers filled with bright red jam. The tops feature an intricate, scalloped edge and a small cutout, often star shaped or round, allowing a peek at the vibrant fruit filling below. A delicate dusting of powdered sugar across the top completes the snowy, wintry appearance.
The contrasting colors—the pale cookie, the deep red jam, and the white sugar—make these extremely visually appealing on a holiday platter. The small opening on the top piece is essential, ensuring the final sandwich reveals the luscious filling. The raspberry or strawberry jam adds a tangy burst that cuts through the richness of the cookie dough.
They are an enduring classic because they are both satisfyingly sturdy and sweetly elegant. These delightful sandwich cookies taste best when allowed to sit for a few hours after assembly, which softens the shortbread slightly and allows the flavors to truly marry.
Required Ingredients
- 2 cups all purpose flour
- 1/2 teaspoon baking powder
- 1/4 teaspoon salt
- 1 cup (2 sticks) unsalted butter, softened
- 3/4 cup granulated sugar
- 1 large egg
- 1 teaspoon vanilla extract
- 1/2 cup raspberry or strawberry jam
- For Dusting:
- 1/4 cup powdered sugar
Equipment List
- Electric mixer
- Large and medium mixing bowls
- Measuring cups and spoons
- Rolling pin
- 2 inch scalloped edge cookie cutter
- Small cookie cutter for the center hole (star or circle)
- Baking sheets
- Parchment paper
- Wire cooling rack
- Small sieve or shaker for powdered sugar
DIY Instruction
Follow these steps to create beautiful, jam filled sandwich cookies that melt in your mouth.
- Combine Dry Ingredients: Whisk together the flour, baking powder, and salt in the medium mixing bowl. Set the mixture aside.
- Cream Butter and Sugar: In your large mixing bowl, beat the softened butter and granulated sugar with the electric mixer on medium speed for about 3 minutes until the mixture is light and fluffy. Beat in the egg and vanilla extract until everything is smooth.
- Form the Dough: Gradually add the dry ingredients into the wet mixture, mixing on low speed until the dough comes together.
- Chill: Divide the dough in half. Shape each half into a flat disk, wrap tightly in plastic wrap, and refrigerate for at least 1 hour. This ensures the cookies hold their shape perfectly.
- Preheat and Prep: Set your oven to 350 degrees F. Line your baking sheets with parchment paper.
- Roll and Cut: On a lightly floured surface, roll out one chilled disk of dough to about 1/8 inch thickness. Use the large scalloped cutter to cut out an even number of shapes. For half of these shapes, use the small cookie cutter to punch out a center hole.
- Bake: Place the cutouts on the prepared baking sheets. Bake for 8 to 10 minutes. The cookies are done when the edges are set and a very light golden color.
- Cool: Let the cookies cool on the baking sheet for 5 minutes before transferring them to the wire rack to cool completely.
- Dust and Fill: Once completely cool, take all the cookies with the center cutout and dust them generously with powdered sugar using the sieve. Spread a small spoonful of jam onto the bottom side of the solid cookies. Gently top the jam with the sugared cookie piece that has the cutout.
12. Vanilla Crescent Cookies

These classic crescent shaped cookies, known as Vanillekipferl in some traditions, are a delicate and required addition to the holiday season. The pale, sandy color of the cookie base comes from a combination of finely ground nuts, typically almonds or walnuts, and a high ratio of butter. This makes the texture very tender and slightly crumbly.
Their distinctive curve is immediately recognizable, and the generous coating of powdered sugar provides a snowy finish. The powdered sugar is usually applied while the cookies are still warm, allowing it to adhere to the slightly textured surface, enhancing the rich, nutty flavor. They are often arranged in a charming pile, creating a wonderful display of wintery goodness.
They offer a refined, comforting flavor—rich in vanilla and nuttiness—that is deeply associated with European Christmas baking. These cookies are extremely fragile and absolutely melt in your mouth when eaten.
Required Ingredients
- 2 cups all purpose flour
- 1/2 teaspoon salt
- 3/4 cup (1 and 1/2 sticks) unsalted butter, softened
- 1/2 cup powdered sugar
- 1 teaspoon vanilla extract
- 1 large egg yolk
- 1 cup finely ground almonds or walnuts
- For Coating:
- 1 cup powdered sugar, for rolling
Equipment List
- Electric mixer
- Large mixing bowl
- Medium bowl
- Measuring cups and spoons
- Baking sheets
- Parchment paper
- Wire cooling rack
- Small, shallow bowl for powdered sugar
DIY Instruction
Follow this detailed instruction to make these wonderfully tender and nutty vanilla crescents.
- Combine Dry Ingredients: In the medium bowl, whisk together the flour and salt. Add the finely ground nuts and stir them in until well combined.
- Cream Butter and Sugar: In your large mixing bowl, beat the softened butter and 1/2 cup of powdered sugar with the electric mixer until the mixture is light and fluffy (about 2 minutes).
- Add Wet Ingredients: Beat in the vanilla extract and the egg yolk until the mixture is smooth and evenly colored.
- Form the Dough: Gradually add the flour and nut mixture into the wet ingredients, mixing on the lowest speed until a soft dough forms. It should be pliable but not sticky.
- Chill: Wrap the dough tightly in plastic wrap and refrigerate for at least 1 hour. This makes the delicate crescent shaping much easier.
- Preheat and Prep: Set your oven to 350 degrees F. Line your baking sheets with parchment paper. Pour the extra powdered sugar for coating into the small, shallow bowl.
- Shape the Crescents: Pinch off small pieces of the chilled dough (about 1 tablespoon each). Roll the piece between your palms into a short rope, then gently bend it into a crescent shape. Place the crescents on the prepared baking sheets.
- Bake: Bake for 10 to 12 minutes. The cookies are done when the edges are a very light golden color, but the cookie still looks pale overall. Avoid over baking.
- Coat while Warm: Immediately after removing the baking sheet from the oven, and while the cookies are still quite warm, roll each crescent gently but thoroughly in the bowl of extra powdered sugar. Be careful as they are fragile.
- Cool: Transfer the coated crescents to a wire rack to cool completely. You may dust them again with powdered sugar after they cool for an extra snowy effect.
13. Snowy Walnut Butter Balls

These delightful holiday cookies, often called Snowball Cookies or Russian Tea Cakes, are famed for their deeply nutty flavor and tender, melt away texture. They are typically made with a generous amount of finely chopped nuts, such as walnuts or pecans, combined with a simple butter and sugar dough. The dough base is firm and easy to handle.
The finished cookies are rolled into balls and completely coated in powdered sugar, creating a beautiful, wintery look. The sugar coating is often applied twice: first while warm to help it adhere, and then again when cooled to provide a thick, snowy layer. We see here a cut cookie, revealing the crunchy texture provided by the nuts inside.
Their richness and straightforward preparation make them a festive favorite year after year. The contrast between the plain white exterior and the rich, savory nutty interior is truly satisfying, especially alongside a warm cup of cocoa.
Required Ingredients
- 1 cup (2 sticks) unsalted butter, softened
- 1/2 cup powdered sugar
- 1 teaspoon vanilla extract
- 2 cups all purpose flour
- 1/4 teaspoon salt
- 1 cup finely chopped walnuts or pecans
- For Coating:
- 1 cup powdered sugar, for rolling
Equipment List
- Electric mixer
- Large and medium mixing bowls
- Measuring cups and spoons
- Small cookie scoop or teaspoon
- Baking sheets
- Parchment paper
- Wire cooling rack
- Sieve and small bowl for powdered sugar
DIY Instruction
Create these famous, melt in your mouth snowy butter balls with this easy to follow recipe.
- Cream Butter and Sugar: In your large mixing bowl, beat the softened butter and the 1/2 cup of powdered sugar together with the electric mixer until the mixture is very light and fluffy. Beat in the vanilla extract until combined.
- Add Flour and Nuts: In the medium bowl, whisk together the flour and salt. Add the finely chopped walnuts to the flour mixture and stir to coat them evenly.
- Form the Dough: Gradually add the flour and nut mixture into the wet ingredients, mixing on low speed until the dough comes together. Do not overmix. The dough will be stiff.
- Chill (Optional): While not strictly required, chilling the dough for 30 minutes can make rolling easier.
- Preheat and Prep: Set your oven to 400 degrees F. Line your baking sheets with parchment paper. Place the 1 cup of powdered sugar for coating into a small, deep bowl.
- Roll the Balls: Use a small cookie scoop or a teaspoon to form the dough into 1 inch balls. Roll the balls completely in the powdered sugar, ensuring a thorough coating. Place the balls about 1 inch apart on the prepared baking sheets.
- Bake: Bake for 10 to 12 minutes. The cookies are done when the bottoms are lightly golden, but the tops remain pale.
- First Sugar Coating (Warm): As soon as the cookies come out of the oven, and while they are still warm, roll them gently but thoroughly in the powdered sugar. The sugar will stick to the warm surface.
- Cool and Second Coating: Transfer the sugar coated balls to the wire rack to cool completely. Once fully cooled, roll them in the powdered sugar a second time. This creates a beautiful, thick snowy layer that remains visible.
14. Apricot Rugelach Croissants

These delicious, rolled pastries are a European classic, featuring a tender, slightly flaky cream cheese based dough wrapped around a sweet filling. The appearance is that of a miniature croissant, cut open here to reveal the luscious apricot preserve filling. The warm, golden color of the jam spills out beautifully, showing its thick, fruity consistency.
The dough itself is light and soft, often enhanced by a light egg wash before baking to create a subtle shine. A delicate drizzle of thin white icing and a light dusting of powdered sugar are applied after baking, adding sweetness and a finished look. These delightful cookies offer a unique texture that is more pastry than cookie.
The fruit filling provides a tangy sweetness that complements the rich cream cheese dough exceptionally well. They are a wonderful addition to a Christmas dessert table, offering a break from heavier spiced cookies.
Required Ingredients
- For the Dough:
- 8 ounces cream cheese, softened
- 1 cup (2 sticks) unsalted butter, softened
- 2 cups all purpose flour
- 1/4 teaspoon salt
- For the Filling:
- 1/2 cup apricot preserves or jam
- 1 teaspoon lemon juice (optional)
- For Glaze:
- 1/2 cup powdered sugar
- 1 tablespoon milk or water
Equipment List
- Electric mixer
- Large mixing bowl
- Measuring cups and spoons
- Rolling pin
- Pizza cutter or sharp knife
- Baking sheets
- Parchment paper
- Wire cooling rack
- Small whisk for the glaze
DIY Instruction
Create these flaky, fruit filled rugelach using this simple dough recipe and technique.
- Make the Dough: In your large mixing bowl, beat the softened cream cheese and softened butter together with the electric mixer until the mixture is completely smooth and creamy.
- Add Flour: Gradually add the flour and salt, mixing on low speed until the dough comes together. Do not overmix.
- Chill and Divide: Divide the dough into four equal portions. Shape each portion into a small flat disk, wrap them tightly in plastic wrap, and refrigerate for at least 1 hour.
- Preheat and Prep: Set your oven to 375 degrees F. Line your baking sheets with parchment paper.
- Roll and Fill: On a lightly floured surface, roll out one disk of chilled dough into a thin 9 inch circle. Spread about 2 tablespoons of apricot preserves evenly over the circle, leaving a small border. Use the pizza cutter or sharp knife to cut the circle into 12 wedges, like a pizza.
- Roll Up: Starting at the wide edge of each wedge, roll it up toward the point, forming a miniature crescent shape.
- Bake: Place the rugelach on the prepared baking sheets. Bake for 18 to 20 minutes, or until they are golden brown.
- Make the Glaze: While the rugelach are cooling, whisk together the powdered sugar and milk (or water) in a small bowl until a thin, smooth glaze forms.
- Glaze and Cool: Immediately after removing the rugelach from the oven, or after they have cooled slightly, drizzle the glaze over the tops of the pastries. Let them cool completely on the wire rack so the glaze sets.
15. Raspberry Thumbprint Cookies

These wonderfully classic cookies are a holiday mainstay, featuring a tender, buttery vanilla base with a vibrant jewel like filling. The cookie base has a beautiful golden edge and a soft, chewy interior, created from a simple dough often stabilized with ground nuts or just plenty of butter. A distinctive crackled surface surrounds the central indentation.
The deep crimson of the raspberry jam filling sits prominently in the center of each cookie, providing a burst of fruity tanginess. The indentation, made by a thumb or the back of a measuring spoon before baking, holds the luscious jam securely in place. The color of the jam here is stunning and truly festive.
These simple yet elegant cookies are easy to prepare and are always warmly received. They offer a delightful textural contrast between the smooth, sweet filling and the crumbly, rich cookie.
Required Ingredients
- 1 cup (2 sticks) unsalted butter, softened
- 1/2 cup granulated sugar
- 1 large egg, separated (use yolk for dough, white for rolling)
- 1 teaspoon vanilla extract
- 2 cups all purpose flour
- 1/4 teaspoon salt
- 1/2 cup finely chopped nuts (optional, for coating)
- 1/2 cup raspberry jam or preserves
Equipment List
- Electric mixer
- Large mixing bowl
- Medium bowl
- Measuring cups and spoons
- Small bowl for egg white (if using nut coating)
- Small bowl for jam
- Baking sheets
- Parchment paper
- Wire cooling rack
- Small spoon or measuring spoon (for thumbprints)
DIY Instruction
Follow these steps to make these beautiful, jam filled raspberry thumbprint cookies.
- Cream Butter and Sugar: In your large mixing bowl, beat the softened butter and granulated sugar together with the electric mixer until the mixture is light and fluffy (about 3 minutes).
- Add Wet Ingredients: Beat in the egg yolk and vanilla extract until the mixture is smooth.
- Form the Dough: Gradually add the flour and salt into the wet mixture, mixing on low speed until a soft dough forms.
- Chill (Recommended): Wrap the dough and refrigerate for at least 30 minutes to make shaping easier and prevent spreading.
- Preheat and Prep: Set your oven to 350 degrees F. Line your baking sheets with parchment paper.
- Roll and Coat (Optional Nut Coat): If using nuts, lightly beat the egg white in a small bowl and place the chopped nuts in another. Roll the chilled dough into 1 inch balls. Dip each ball first into the egg white, letting excess drip off, and then roll in the chopped nuts. If not using nuts, simply roll into balls.
- Create the Thumbprint: Place the cookie balls on the prepared baking sheets. Use your thumb or the back of a 1/2 teaspoon measuring spoon to gently press an indentation into the center of each ball. Be careful not to press all the way through.
- Fill and Bake: Spoon about 1/2 teaspoon of raspberry jam into each indentation. Bake for 12 to 15 minutes. The cookies are ready when the edges are lightly golden.
- Cool: Let the cookies rest on the baking sheet for 5 minutes before transferring them to the wire cooling rack to cool completely.
16. Chocolate Crinkle Snowcaps

These striking holiday cookies are instantly recognized by their wonderful contrast between a dark, rich chocolate interior and a thick, snowy powdered sugar coating. The dough itself is dark brown, indicating a high concentration of cocoa, yielding a deep, fudgy flavor and a moist texture. The dough balls are heavily rolled in powdered sugar before baking.
During the baking process, the dough expands, causing the surface to crack open. The thick coating of sugar stays in place, highlighting the dark crevices beneath. This cracking effect gives them their signature look, resembling a snow covered mountain peak. The texture is usually soft, chewy, and slightly cake like.
They are an absolutely essential cookie for chocolate lovers during the holiday season. The intense flavor of the chocolate is nicely balanced by the sweet, cool taste of the powdered sugar exterior.
Required Ingredients
- 2 cups all purpose flour
- 3/4 cup unsweetened cocoa powder
- 2 teaspoons baking powder
- 1/2 teaspoon salt
- 1 cup granulated sugar
- 1/2 cup vegetable oil
- 4 large eggs
- 2 teaspoons vanilla extract
- For Coating:
- 1 cup powdered sugar
Equipment List
- Electric mixer
- Large and medium mixing bowls
- Measuring cups and spoons
- Small, deep bowl for powdered sugar
- Baking sheets
- Parchment paper
- Wire cooling rack
DIY Instruction
Make these delicious, fudgy, and visually stunning chocolate crinkles with these steps.
- Combine Dry Ingredients: In the medium bowl, whisk together the flour, cocoa powder, baking powder, and salt.
- Mix Wet Ingredients: In your large mixing bowl, combine the granulated sugar and vegetable oil. Beat the mixture with the electric mixer until combined. Beat in the eggs one at a time, ensuring each is fully incorporated before adding the next. Stir in the vanilla extract.
- Form the Dough: Gradually add the dry ingredients into the wet mixture, mixing on low speed until a soft, sticky dough forms.
- Chill (Crucial): Cover the dough bowl and refrigerate the dough for at least 4 hours, or preferably overnight. The dough must be very firm for rolling and to achieve the crinkle effect.
- Preheat and Prep: Set your oven to 350 degrees F. Line your baking sheets with parchment paper. Place the powdered sugar for coating into the small, deep bowl.
- Roll and Coat: Scoop the chilled dough into 1 inch balls (about 1 tablespoon each). Roll each ball first in your hands to smooth it. Then, roll it heavily and thoroughly in the powdered sugar. The coating must be thick to ensure a good snowy look. Do not flatten the balls.
- Bake: Arrange the coated dough balls on the prepared baking sheets, leaving 2 inches between them. Bake for 10 to 12 minutes. They are done when the sugar coating is heavily cracked and the edges are set, but the center still feels soft.
- Cool: Let the cookies cool on the baking sheet for 5 minutes, then transfer them to the wire cooling rack to cool completely.
17. Peanut Butter Chocolate Blossoms

These iconic cookies are a beloved Christmas classic, combining the salty sweetness of peanut butter with a rich milk chocolate center. The base is a classic peanut butter dough, identifiable by its light brown color and the subtle crosshatch pattern often pressed into the surface. A simple coating of granulated sugar around the edges adds texture and sparkle.
The star of the show is the chocolate candy drop pressed immediately into the center of the warm cookie after baking. This creates a recognizable “blossom” shape. The contrast between the soft, chewy peanut butter base and the smooth, melting chocolate is the key to their immense popularity.
They are simple to make and their universally loved flavor makes them one of the most highly anticipated cookies on any holiday platter. The simple, delightful design is instantly recognizable and very festive.
Required Ingredients
- 1 and 3/4 cups all purpose flour
- 1 teaspoon baking soda
- 1/2 teaspoon salt
- 1/2 cup (1 stick) unsalted butter, softened
- 1/2 cup granulated sugar
- 1/2 cup packed brown sugar
- 1/2 cup creamy peanut butter
- 1 large egg
- 1 teaspoon vanilla extract
- For Coating and Topping:
- 1/4 cup granulated sugar, for rolling
- Approximately 40 chocolate candy kisses (unwrapped)
Equipment List
- Electric mixer
- Large and medium mixing bowls
- Measuring cups and spoons
- Small, shallow dish for sugar
- Baking sheets
- Parchment paper
- Wire cooling rack
DIY Instruction
Follow these steps to create the classic, chocolate topped peanut butter blossoms.
- Combine Dry Ingredients: In the medium bowl, whisk together the flour, baking soda, and salt.
- Cream Butter and Sugars: In your large mixing bowl, beat the softened butter, granulated sugar, and brown sugar with the electric mixer until the mixture is light and fluffy (about 3 minutes).
- Add Peanut Butter and Egg: Beat in the peanut butter, egg, and vanilla extract until the mixture is thoroughly combined and smooth.
- Form the Dough: Gradually add the dry ingredients into the wet mixture, mixing on low speed until the dough comes together.
- Preheat and Prep: Set your oven to 375 degrees F. Line your baking sheets with parchment paper. Pour the 1/4 cup of rolling sugar into the small, shallow dish. Unwrap all the chocolate kisses before beginning the next step.
- Roll and Coat: Roll the dough into 1 inch balls (about 1 tablespoon each). Roll each ball in the granulated sugar until completely coated. Place the sugared dough balls on the prepared baking sheets, leaving 2 inches between each.
- Bake: Bake for 8 to 10 minutes. The cookies are done when the edges look lightly golden and the centers are set.
- Add Chocolate: Immediately upon removing the baking sheets from the oven, gently press one unwrapped chocolate kiss into the center of each warm cookie. The heat will cause the cookie to slightly crack around the chocolate.
- Cool: Let the cookies cool completely on the baking sheet. The chocolate will harden as the cookie cools.
18. Fudgy Chocolate Squares

These intensely chocolatey squares offer a rich, brownie like experience in a cookie form. The deep, dark brown color signifies a generous use of cocoa and melted chocolate, giving them a dense, fudgy texture that is distinct from a traditional cookie. They are cut into neat square or round shapes, emphasizing their thickness and decadence.
A striking white drizzle is piped across the surface of each piece, creating a beautiful diagonal striped pattern. This white drizzle, likely melted white chocolate or a thin powdered sugar glaze, offers a nice visual contrast to the dark base and adds a subtle extra sweetness. The texture appears chewy and moist.
These squares are a fantastic option for serious chocolate lovers during the holidays. Their sturdy nature makes them easy to stack and display, and their strong flavor holds up well next to other rich holiday desserts.
Required Ingredients
- 1/2 cup (1 stick) unsalted butter, melted
- 1 cup granulated sugar
- 2 large eggs
- 1 teaspoon vanilla extract
- 3/4 cup unsweetened cocoa powder
- 1/2 cup all purpose flour
- 1/2 teaspoon baking powder
- 1/4 teaspoon salt
- For Drizzle:
- 1/2 cup white chocolate chips or candy melts
- 1 teaspoon vegetable oil or shortening
Equipment List
- Large and medium mixing bowls
- Rubber spatula
- Whisk
- Measuring cups and spoons
- 8×8 inch square baking pan
- Parchment paper
- Small microwave safe bowl for melting chocolate
- Piping bag or small zip top bag with the corner snipped
DIY Instruction
Create these rich, fudgy chocolate squares with an elegant white drizzle.
- Prepare the Pan: Set your oven to 350 degrees F. Line an 8×8 inch baking pan with parchment paper, leaving an overhang on two sides for easy removal.
- Combine Wet Ingredients: In your large mixing bowl, whisk together the melted butter and granulated sugar until well combined. Whisk in the eggs one at a time, followed by the vanilla extract.
- Add Dry Ingredients: In the medium bowl, whisk together the cocoa powder, flour, baking powder, and salt.
- Form the Batter: Gradually add the dry ingredients into the wet mixture, mixing with a rubber spatula until the batter is just combined and smooth. Be careful not to overmix.
- Bake: Pour the batter evenly into the prepared baking pan. Bake for 20 to 25 minutes. A toothpick inserted into the center should come out with moist crumbs attached (not raw batter).
- Cool and Cut: Let the entire square cool completely in the pan on a wire rack. Use the parchment paper overhang to lift the cooled square out of the pan. Use a sharp knife to cut the square into even pieces (e.g., 16 squares or the desired number of rounds).
- Make the Drizzle: In the small microwave safe bowl, melt the white chocolate chips with the oil in 30 second intervals, stirring until smooth.
- Drizzle and Set: Pour the melted white chocolate into the piping bag or snipped zip top bag. Drizzle the white chocolate across the top of the cut squares in a zigzag pattern. Allow the chocolate to set completely before serving or storing.
19. Chocolate Dipped Coconut Macaroons

These cookies are a delightful textural contrast, featuring a wonderfully chewy, golden brown toasted coconut mound sitting atop a dark, glossy chocolate base. The macaroons themselves are made primarily from shredded coconut, sweetened condensed milk, and egg whites, giving them a rich, sweet flavor and a lovely haystack appearance. The tops often acquire a beautiful toasted color.
Each macaroon is dipped halfway into a thick layer of melted dark chocolate, which solidifies around the base. The dark chocolate provides a sturdy foundation and a decadent richness that beautifully complements the tropical flavor of the coconut. This chocolate coating also prevents the soft cookie from sticking to the platter.
Macaroons are naturally gluten free and offer a unique texture for the holiday cookie assortment—soft, chewy, and irresistibly moist. They are easy to make and hold their shape well, making them a very rewarding bake.
Required Ingredients
- 7 ounces sweetened shredded coconut (about 2 and 1/2 cups)
- 2/3 cup sweetened condensed milk
- 1 teaspoon vanilla extract
- 2 large egg whites, slightly beaten
- 1/4 teaspoon salt
- For Dipping:
- 8 ounces semi sweet or dark chocolate, chopped
- 1 teaspoon vegetable oil or coconut oil (optional)
Equipment List
- Large mixing bowl
- Rubber spatula
- Measuring cups and spoons
- Baking sheets
- Parchment paper
- Small cookie scoop or two spoons
- Wire cooling rack
- Double boiler or microwave safe bowl for melting chocolate
DIY Instruction
Create these chewy, chocolate dipped coconut macaroons with ease.
- Combine Macaroon Mix: In the large mixing bowl, stir together the shredded coconut, sweetened condensed milk, vanilla extract, lightly beaten egg whites, and salt. Stir until all ingredients are fully combined and the mixture is uniformly moist.
- Preheat and Prep: Set your oven to 325 degrees F. Line your baking sheets with parchment paper.
- Scoop the Macaroons: Use a small cookie scoop or two spoons to drop the mixture onto the prepared baking sheets. Form small mounds, about 1 and 1/2 inches wide and 1 inch high. Ensure they are compact.
- Bake: Bake for 20 to 25 minutes. The macaroons are done when the edges and tops are lightly golden brown.
- Cool: Let the macaroons cool completely on the baking sheet. They must be completely cool before dipping.
- Melt Chocolate: Melt the chopped chocolate using a double boiler or in the microwave in 30 second intervals, stirring until completely smooth. If using, stir in the oil for a smoother consistency.
- Dip and Set: Hold a cooled macaroon and dip the base into the melted chocolate. Lift it out, allowing any excess chocolate to drip back into the bowl. Place the dipped macaroons on a clean piece of parchment paper or a wire cooling rack.
- Harden: Let the chocolate set completely before serving or storing. You can speed this up by placing them in the refrigerator for 15 minutes.
20. Black and White Frosted Rounds

These cookies are a stunning visual representation of balance, featuring two contrasting flavors artfully swirled onto a soft cookie base. The base is a plain sugar cookie, baked until golden brown and slightly tender, providing a stable foundation for the generous frosting.
The frosting is applied in a classic yin and yang pattern, with half being rich, dark chocolate and the other half creamy white vanilla or almond frosting. The swooping swirl where the two colors meet adds a sophisticated, decorative touch. This dual frosting provides a unique flavor experience in every bite.
They are a delightful variation of a black and white cookie, often associated with bakeries but easily recreated at home for the holidays. The contrasting textures of the soft cake like base and the smooth, thick frosting make these a standout treat.
Required Ingredients
- For the Cookie Base:
- 2 cups all purpose flour
- 1/2 teaspoon baking powder
- 1/4 teaspoon salt
- 3/4 cup (1 and 1/2 sticks) unsalted butter, softened
- 3/4 cup granulated sugar
- 1 large egg
- 1 teaspoon vanilla extract
- For the Frosting:
- 2 cups powdered sugar
- 1/2 cup (1 stick) unsalted butter, softened
- 2 tablespoons milk
- 1 teaspoon vanilla extract
- 2 tablespoons unsweetened cocoa powder
Equipment List
- Electric mixer
- Large mixing bowls (2)
- Medium bowl
- Measuring cups and spoons
- Rolling pin
- 3 inch round cookie cutter
- Baking sheets
- Parchment paper
- Wire cooling rack
- Rubber spatula or small offset spatula
DIY Instruction
Make these attractive, two toned black and white frosted rounds.
- Make the Cookie Dough: In the medium bowl, whisk together the flour, baking powder, and salt. In one large mixing bowl, beat the butter and granulated sugar until light and fluffy. Beat in the egg and vanilla. Gradually add the dry ingredients to form the base dough.
- Chill and Prep: Wrap the dough and chill for 30 minutes. Set your oven to 350 degrees F. Roll the dough to 1/4 inch thickness and cut out 3 inch rounds. Place on prepared baking sheets and bake for 8 to 10 minutes until edges are set. Cool completely on a wire rack.
- Make the Frosting: In the second large mixing bowl, beat the 1/2 cup softened butter until creamy. Gradually add the powdered sugar, milk, and vanilla, beating until a smooth, fluffy vanilla frosting forms.
- Divide and Color: Scoop exactly half of the vanilla frosting into a separate small bowl. Stir the cocoa powder into the remaining vanilla frosting in the large bowl, mixing until a smooth chocolate frosting forms.
- Frosting Design: Take one cooled cookie. Using a small spatula or the back of a spoon, spread the chocolate frosting neatly over half of the cookie surface. Next, spread the vanilla frosting over the other half, gently swirling the edges where they meet to create the signature pattern.
- Set: Allow the frosting to set slightly before stacking or serving.
21. Italian Pignoli Cookies

These impressive cookies are a classic Italian holiday offering, instantly recognizable by their dense coating of pine nuts. The base of the cookie is a rich, chewy almond paste dough, which typically includes a small amount of cocoa powder or espresso to give it a darker color and depth of flavor. The chocolate brown interior contrasts beautifully with the pale nuts.
The sheer volume of pine nuts pressed onto the exterior creates a wonderful texture: crunchy and slightly toasted on the outside, and wonderfully soft and chewy within. The nuts cover the entire rounded surface, making each piece look like a small, savory pine cone. They often have a rich, slightly domed shape.
Pine nut cookies are often expensive to buy but are surprisingly simple to make, relying on the quality of the almond paste and the generous coating of nuts for their unique, sophisticated flavor. They are a must have for any authentic European holiday platter.
Required Ingredients
- 7 ounces almond paste, crumbled
- 3/4 cup granulated sugar
- 2 large egg whites
- 1 teaspoon vanilla extract
- 1/4 teaspoon salt
- 1 teaspoon unsweetened cocoa powder (optional, for color)
- For Coating:
- 4 ounces (about 1 cup) pine nuts
Equipment List
- Electric mixer
- Large mixing bowl
- Measuring cups and spoons
- Small bowl for the pine nuts
- Baking sheets
- Parchment paper
- Small cookie scoop or teaspoon
- Wire cooling rack
DIY Instruction
Create these delicious, nutty Italian cookies following these simple steps.
- Prepare the Dough: In your large mixing bowl, break up the crumbled almond paste. Add the granulated sugar, egg whites, vanilla extract, salt, and cocoa powder (if using). Use your electric mixer to beat these ingredients together on medium speed until a smooth, slightly sticky dough forms. This may take about 2 to 3 minutes.
- Preheat and Prep: Set your oven to 350 degrees F. Line your baking sheets with parchment paper. Pour the pine nuts into the small bowl and spread them out.
- Scoop and Roll: Use a small cookie scoop or a teaspoon to form the dough into 1 inch balls. The dough will be sticky, so wet your hands slightly if needed.
- Coat Thoroughly: Roll each dough ball immediately in the pine nuts. Gently press the nuts onto the entire surface of the ball to ensure a generous and complete coating. Do not flatten the dough balls.
- Bake: Arrange the coated dough balls on the prepared baking sheets, leaving 1 inch between them. Bake for 12 to 15 minutes. The cookies are ready when the pine nuts look nicely toasted and the edges of the cookie are a light golden brown.
- Cool: Let the cookies cool completely on the wire rack. The bottoms will be soft when warm but will firm up as they cool.
22. Chocolate Hazelnut Rounds

These luxurious cookies are characterized by their rich, dark brown color, indicating a generous use of ground hazelnuts and cocoa. The cookie base has a coarse, crumbly texture from the nuts, giving it a melt in your mouth quality. They are shaped into neat, small rounds, making them the perfect single bite treat.
Each cookie is topped with a smooth, glossy dollop of dark chocolate ganache or melted chocolate, which pools beautifully in the center. A whole, toasted hazelnut is pressed into the soft chocolate topping, giving the cookie a lovely contrast in texture and a refined look. The combination of chocolate and hazelnut is a classic pairing, offering a deeply satisfying nutty cocoa flavor.
These sophisticated rounds are an elegant addition to any holiday table. Their intense flavor makes them well suited for serving with strong espresso or coffee after a festive meal.
Required Ingredients
- 1 cup all purpose flour
- 1/2 cup unsweetened cocoa powder
- 1 teaspoon baking powder
- 1/4 teaspoon salt
- 3/4 cup (1 and 1/2 sticks) unsalted butter, softened
- 1/2 cup granulated sugar
- 1/4 cup packed brown sugar
- 1 large egg
- 1 teaspoon vanilla extract
- 1/2 cup finely ground hazelnuts
- For Topping:
- 4 ounces semi sweet chocolate, chopped
- 40 whole, peeled, toasted hazelnuts
Equipment List
- Electric mixer
- Large and medium mixing bowls
- Measuring cups and spoons
- 1 and 1/2 inch round cookie cutter (optional)
- Baking sheets
- Parchment paper
- Wire cooling rack
- Small piping bag or spoon for chocolate
DIY Instruction
Follow these steps to create decadent chocolate hazelnut rounds with a simple chocolate topping.
- Combine Dry Ingredients: In the medium bowl, whisk together the flour, cocoa powder, baking powder, and salt. Add the ground hazelnuts and stir to combine evenly.
- Cream Butter and Sugars: In your large mixing bowl, beat the softened butter, granulated sugar, and brown sugar with the electric mixer until light and fluffy. Beat in the egg and vanilla extract until smooth.
- Form the Dough: Gradually add the dry ingredients into the wet mixture, mixing on low speed until the dough forms a cohesive mass.
- Chill and Prep: Shape the dough into a disk, wrap it, and refrigerate for 30 minutes. Set your oven to 350 degrees F. Line your baking sheets with parchment paper.
- Roll and Cut: On a lightly floured surface, roll the chilled dough to about 1/4 inch thickness. Cut out rounds using the cookie cutter or simply roll the dough into balls and flatten them slightly on the baking sheet.
- Bake: Bake for 10 to 12 minutes. The cookies are ready when the edges are set and they look firm.
- Cool: Transfer the cookies to the wire rack to cool completely.
- Prepare Topping: Melt the chopped chocolate using a double boiler or microwave safe bowl, stirring until completely smooth.
- Garnish: Using a small spoon or a piping bag, carefully place a small dollop of melted chocolate onto the center of each cooled cookie. Immediately press one whole toasted hazelnut into the center of the wet chocolate.
- Set: Allow the chocolate topping to set completely before serving or storing.
23. Almond Orange Biscotti

This elegant cookie is characterized by its long, rustic loaf shape and its crunchy, dry texture, resulting from being baked twice. The base of the cookie is a light, golden brown, speckled with visible pieces of bright orange zest. Large, whole blanched almonds are embedded throughout the dough, providing a satisfying crunch.
The loaf is sliced into thick diagonal pieces, revealing the beautiful interior texture and the neatly placed almonds. The top of the loaf is often brushed with an egg wash before the first bake, giving it a slight shine and a deep color. A scattering of orange zest curls over the top adds a fresh, zesty aroma.
Biscotti are wonderful for the holidays because they keep extremely well and are perfect for dipping into coffee, tea, or even sweet wine. The classic combination of almond and orange citrus notes makes them uniquely festive and flavorful.
Required Ingredients
- 2 cups all purpose flour
- 1 teaspoon baking powder
- 1/4 teaspoon salt
- 1/2 cup (1 stick) unsalted butter, softened
- 3/4 cup granulated sugar
- 2 large eggs
- 1 teaspoon vanilla extract
- 1 tablespoon orange zest
- 1 tablespoon fresh orange juice
- 3/4 cup whole blanched almonds (or slivered)
Equipment List
- Electric mixer
- Large and medium mixing bowls
- Measuring cups and spoons
- Baking sheet
- Parchment paper
- Sharp serrated knife
- Wire cooling rack
DIY Instruction
Follow these steps to create beautiful, crunchy biscotti that are baked twice.
- Combine Dry Ingredients: In the medium bowl, whisk together the flour, baking powder, and salt.
- Cream Butter and Sugar: In your large mixing bowl, beat the softened butter and granulated sugar with the electric mixer until combined. Beat in the eggs one at a time, followed by the vanilla extract, orange zest, and orange juice.
- Form the Dough: Gradually add the dry ingredients into the wet mixture, mixing on low speed until a sticky dough forms. Fold in the almonds using a rubber spatula.
- First Bake Prep: Line your baking sheet with parchment paper. Lightly flour your hands and shape the dough into a log on the prepared baking sheet. The log should be approximately 12 inches long and 2 inches wide.
- First Bake: Bake the log at 350 degrees F for 25 to 30 minutes, or until the log is firm to the touch and lightly golden brown.
- Slice: Remove the log from the oven and let it cool on the baking sheet for 10 minutes. Reduce the oven temperature to 300 degrees F. Using a sharp serrated knife, carefully slice the log diagonally into pieces about 1/2 inch thick.
- Second Bake: Lay the sliced biscotti pieces cut side up on the baking sheet. Bake for another 10 minutes. Flip the pieces over and bake for an additional 10 minutes.
- Cool: The biscotti are finished when they feel firm and crunchy. Transfer them to the wire rack to cool completely.
24. Pistachio Cherry Shortbread

These vibrant, eye catching cookies bring a splash of festive color to the holiday platter. The rich green hue comes from a generous amount of finely ground pistachios, which also imparts a subtle, earthy flavor and a sandy, crumbly texture characteristic of shortbread. The surface of the cookie has a slight cracking, typical of a buttery dough.
Each round is garnished with a sprinkling of coarsely chopped pistachios and a single, bright red maraschino cherry placed perfectly in the center. The contrast between the deep green of the cookie and the vivid red cherry is intensely Christmassy. They have a tender, shortbread base that melts in your mouth.
Their cheerful color and sophisticated flavor make them a unique and memorable holiday treat. They are easy to display and pair wonderfully with plain tea or milk.
Required Ingredients
- 1 cup (2 sticks) unsalted butter, softened
- 1/2 cup powdered sugar
- 1 teaspoon vanilla extract
- 2 cups all purpose flour
- 1/4 teaspoon salt
- 1/2 cup finely ground pistachios
- 1 teaspoon almond extract (optional, enhances pistachio flavor)
- Green food coloring (optional, for brighter color)
- For Topping:
- 20 maraschino cherries, drained and halved
- 1/4 cup chopped pistachios
Equipment List
- Electric mixer
- Large and medium mixing bowls
- Measuring cups and spoons
- Small cookie scoop
- Baking sheets
- Parchment paper
- Wire cooling rack
DIY Instruction
Make these uniquely colored and flavored pistachio cherry shortbread cookies.
- Cream Butter and Sugar: In your large mixing bowl, beat the softened butter and powdered sugar with the electric mixer until the mixture is light and fluffy. Beat in the vanilla and almond extract (if using). If you desire a brighter color, add a few drops of green food coloring and mix until combined.
- Add Dry Ingredients: In the medium bowl, whisk together the flour, salt, and ground pistachios.
- Form the Dough: Gradually add the dry ingredients into the wet mixture, mixing on low speed until the dough comes together. Do not overmix.
- Preheat and Prep: Set your oven to 350 degrees F. Line your baking sheets with parchment paper.
- Scoop and Shape: Use the cookie scoop to form the dough into 1 inch balls. Place the balls on the prepared baking sheets, leaving 2 inches between each. Flatten the balls slightly with the palm of your hand.
- Garnish: Gently press one cherry half into the center of each flattened cookie. Sprinkle the surrounding dough with the chopped pistachios.
- Bake: Bake for 12 to 15 minutes. The cookies are ready when the edges are lightly set and the center is still soft.
- Cool: Allow the cookies to cool completely on the wire rack before storing or serving.
25. Gingerbread Springerle

This beautiful cookie is a classic German Christmas creation, distinguished by the sharply impressed image of Santa Claus next to a Christmas tree. These cookies are historically made using carved wooden molds or rolling pins, which emboss the dough with intricate seasonal scenes. The brown specks visible in the dough suggest the presence of finely ground spices like cinnamon and cloves, giving it a gingerbread flavor.
The square shape and framed border enhance the decorative nature of the cookie, making the central image the focal point. The surface texture is smooth, but the baked image is crisp and clearly defined, showing the quality of the dough. The pale color suggests a subtle spice flavor rather than an overpowering one.
Springerle cookies often require a long drying time before baking to ensure the embossed design holds its shape perfectly in the oven. They are a true labor of love and a highly valued treat on any traditional holiday table.
Required Ingredients
- 2 and 1/2 cups all purpose flour, plus extra for dusting
- 1 teaspoon baking powder
- 1/2 teaspoon ground ginger
- 1/2 teaspoon ground cinnamon
- 1/4 teaspoon ground cloves
- 1/2 cup (1 stick) unsalted butter, softened
- 1 cup granulated sugar
- 2 large eggs
- 1 teaspoon vanilla extract
- For Stamping:
- Fine brush and oil (optional, for molds)
Equipment List
- Electric mixer
- Large and medium mixing bowls
- Measuring cups and spoons
- Springerle mold or patterned rolling pin
- Baking sheets
- Parchment paper
- Sharp knife or square cutter
DIY Instruction
Follow these steps for beautifully embossed Springerle cookies.
- Combine Dry Ingredients: In the medium bowl, whisk together the flour, baking powder, ginger, cinnamon, and cloves.
- Cream Butter and Sugar: In your large mixing bowl, beat the softened butter and granulated sugar with the electric mixer until very light and fluffy (about 4 minutes). Beat in the eggs one at a time, followed by the vanilla.
- Form the Dough: Gradually add the dry ingredients into the wet mixture, mixing on low speed until a smooth, firm dough forms.
- Chill (Crucial): Wrap the dough and refrigerate for at least 1 hour. A cold, firm dough is required to hold the intricate stamped pattern.
- Preheat and Prep: Set your oven to 350 degrees F. Line your baking sheets with parchment paper. Lightly flour your work surface and the Springerle mold or rolling pin.
- Stamp and Cut: Roll out the chilled dough to about 1/4 inch thickness. Press the Springerle mold or rolling pin firmly and evenly across the dough to create the embossed pattern. Use a sharp knife or square cutter to cut out the individual stamped designs.
- Dry (Highly Recommended): Place the cut stamped cookies on the prepared baking sheets and let them air dry for at least 6 hours, or overnight, uncovered. This step helps the designs remain sharp during baking.
- Bake: Bake the dried cookies for 12 to 15 minutes. The cookies are done when the edges are set and a light golden color, and the top remains mostly pale.
- Cool: Cool completely on the baking sheet.
26. Cinnamon Sugar Snickerdoodles

These homey, classic cookies are recognized by their wonderfully soft texture and their signature coating of cinnamon sugar. The base is a simple butter dough, which achieves a soft, slightly puffy texture due to the use of cream of tartar, giving them a distinct tanginess. The round, domed shape makes them look invitingly chewy.
The entire surface is covered in a beautiful crackled pattern, with the cinnamon and sugar mixture nestled into every crevice. The warm golden brown color of the dough contrasts perfectly with the sparkle of the sugar coating. The combination of cinnamon and sweet creaminess is a truly comforting flavor profile.
Snickerdoodles are a favorite for children and adults alike because of their tender chewiness and sweet, familiar taste. They are simple to prepare and an absolute staple in many American holiday baking traditions.
Required Ingredients
- 2 and 3/4 cups all purpose flour
- 2 teaspoons cream of tartar
- 1 teaspoon baking soda
- 1/2 teaspoon salt
- 1 cup (2 sticks) unsalted butter, softened
- 1 and 1/2 cups granulated sugar
- 2 large eggs
- 1 teaspoon vanilla extract
- For Coating:
- 1/4 cup granulated sugar
- 2 teaspoons ground cinnamon
Equipment List
- Electric mixer
- Large and medium mixing bowls
- Measuring cups and spoons
- Small, shallow dish for coating mixture
- Baking sheets
- Parchment paper
- Small cookie scoop
- Wire cooling rack
DIY Instruction
Follow these steps to create soft, chewy, and perfectly coated snickerdoodle cookies.
- Combine Dry Ingredients: In the medium bowl, whisk together the flour, cream of tartar, baking soda, and salt.
- Cream Butter and Sugar: In your large mixing bowl, beat the softened butter and 1 and 1/2 cups of granulated sugar with the electric mixer until the mixture is light and fluffy (about 3 minutes). Beat in the eggs one at a time, followed by the vanilla extract.
- Form the Dough: Gradually add the dry ingredients into the wet mixture, mixing on low speed until a soft dough forms.
- Prepare Coating: In the small, shallow dish, whisk together the 1/4 cup granulated sugar and the ground cinnamon.
- Preheat and Prep: Set your oven to 400 degrees F. Line your baking sheets with parchment paper.
- Roll and Coat: Scoop the dough into 1 and 1/2 inch balls (about 2 tablespoons each). Roll each dough ball thoroughly in the cinnamon sugar mixture until it is completely coated. Do not flatten the balls.
- Bake: Arrange the coated dough balls on the prepared baking sheets, leaving 2 inches between each. Bake for 8 to 10 minutes. The cookies are done when they have puffed up, have a cracked appearance, and the edges look set, but the center still seems soft and pillowy.
- Cool: Let the cookies rest on the baking sheet for 5 minutes before transferring them to the wire cooling rack to cool completely.
27. Christmas Rainbow Pinwheels

These dramatic, spiral cookies are a stunning visual centerpiece, showcasing the vibrant festive colors of red, white, and green. The raw dough log is sliced to reveal concentric circles of vanilla, chocolate, red, and green dyed sugar cookie dough, creating a gorgeous swirl pattern. The edges of the log show a final, pale vanilla layer that encapsulates the bright colors.
The careful layering and rolling of the different colored doughs give the cookie its signature pinwheel look. When baked, the colors remain distinct and vibrant, offering a playful and celebratory appearance. The uniformity of the slices indicates the dough was well chilled and handled properly before slicing.
These are a fun, festive alternative to traditional cutouts and offer a combination of vanilla and cocoa flavors. They are best made when you have time for chilling, which is essential to achieving those sharp, beautiful spiral edges.
Required Ingredients
- 3 cups all purpose flour
- 1 teaspoon baking powder
- 1/2 teaspoon salt
- 1 cup (2 sticks) unsalted butter, softened
- 1 cup granulated sugar
- 1 large egg
- 1 teaspoon vanilla extract
- For Coloring/Flavoring:
- 2 tablespoons unsweetened cocoa powder
- Red and green gel food coloring
Equipment List
- Electric mixer
- Large mixing bowl
- Medium bowls (3)
- Measuring cups and spoons
- 2 pieces of plastic wrap (about 15 inches square)
- Rolling pin
- Sharp knife
- Baking sheets
- Parchment paper
DIY Instruction
Follow these steps for a beautiful, multi colored Christmas pinwheel cookie.
- Make Base Dough: In the medium bowl, whisk together the flour, baking powder, and salt. In the large bowl, beat the softened butter and sugar until light and fluffy. Beat in the egg and vanilla. Gradually add the dry ingredients to form the base dough.
- Divide and Color: Divide the base dough into three equal portions. Leave one portion plain white. Place the second portion in a medium bowl and mix in enough red gel coloring to achieve a bright red. Place the third portion in a medium bowl and mix in enough green gel coloring to achieve a rich green.
- Flavor the Center (Optional): Take a small piece of the white dough (about 1/4 cup) and mix in the cocoa powder to make a small chocolate center dough.
- Assemble Layers: Roll the red dough into a rectangle about 8×10 inches between two sheets of parchment paper. Repeat with the green dough, rolling it to the same size. Layer the green dough over the red dough. If using the chocolate center, roll it into a thin log and place it along the long 10 inch edge of the dough.
- Roll: Starting from the side with the chocolate log (if used), carefully roll the stacked dough into a tight log, peeling off the parchment paper as you roll. Wrap the log tightly in plastic wrap.
- Chill (Crucial): Refrigerate the dough log for at least 4 hours, or until it is very firm. Chilling is necessary to prevent the swirl from distorting.
- Preheat and Prep: Set your oven to 375 degrees F. Line your baking sheets with parchment paper.
- Slice and Bake: Unwrap the chilled log. Use a very sharp knife to slice the dough into rounds about 1/4 inch thick. Place the slices on the prepared baking sheets. Bake for 8 to 10 minutes. The cookies are ready when the edges are lightly set.
- Cool: Cool completely on the wire rack before serving.
28. Cranberry Orange Pecan Rounds

These cookies are a festive blend of classic holiday flavors and textures, making them a wonderfully cheerful addition to the dessert spread. The cookie base is a soft, pale, sugar dough, lightly spiced and buttery. The surface is generously studded with vibrant jewel toned dried cranberries, roughly chopped pecans, and bright orange zest curls.
The visible ingredients on the surface give the cookie a rich, rustic appearance. The cranberries add a tart chewiness, the pecans contribute a necessary crunch and nuttiness, and the orange zest offers a bright, fragrant aroma that lifts the overall flavor. The slight surface cracking shows the cookies have a soft, chewy texture.
They are an excellent choice for those who love complex texture and flavor in one cookie. This dough bakes up beautifully and the festive toppings make them especially appealing for gifting.
Required Ingredients
- 2 cups all purpose flour
- 1 teaspoon baking soda
- 1/2 teaspoon salt
- 1 cup (2 sticks) unsalted butter, softened
- 3/4 cup granulated sugar
- 1/2 cup packed brown sugar
- 1 large egg
- 1 teaspoon vanilla extract
- 1 teaspoon orange zest
- 1/2 cup dried cranberries, chopped
- 1/2 cup chopped pecans
Equipment List
- Electric mixer
- Large and medium mixing bowls
- Measuring cups and spoons
- Small cookie scoop
- Baking sheets
- Parchment paper
- Wire cooling rack
DIY Instruction
Follow these steps to create festive, loaded cranberry orange pecan cookies.
- Combine Dry Ingredients: In the medium bowl, whisk together the flour, baking soda, and salt.
- Cream Butter and Sugars: In your large mixing bowl, beat the softened butter, granulated sugar, and brown sugar with the electric mixer until the mixture is light and fluffy (about 3 minutes). Beat in the egg and vanilla extract. Beat in the orange zest.
- Form the Dough: Gradually add the dry ingredients into the wet mixture, mixing on low speed until the dough comes together. Fold in the chopped dried cranberries and pecans using a rubber spatula.
- Preheat and Prep: Set your oven to 375 degrees F. Line your baking sheets with parchment paper.
- Scoop and Flatten: Use a cookie scoop to form the dough into 2 inch balls. Place the balls on the prepared baking sheets, leaving 2 inches between each. Gently press the tops of the dough balls down slightly with the palm of your hand.
- Garnish (Optional): Press a few extra pecan pieces, cranberries, and orange zest curls onto the top of each dough ball for a beautiful finished look.
- Bake: Bake for 10 to 12 minutes. The cookies are ready when the edges are set and lightly golden brown, but the centers still look slightly soft.
- Cool: Let the cookies rest on the baking sheet for 5 minutes before transferring them to the wire cooling rack to cool completely.
29. Chewy Oatmeal Raisin Cookies

This comforting, classic cookie offers a satisfyingly chewy texture and a wholesome flavor, making it a wonderful addition to the Christmas lineup. The base is a soft, brown spiced dough, featuring visible rolled oats and plump, dark raisins. The natural texture of the oats gives the surface a rustic, home baked appearance.
The oats and raisins contribute to the cookie’s signature chewiness, while warm spices like cinnamon and perhaps nutmeg give it a cozy, familiar aroma. A few whole nutmegs are visible nearby, hinting at the traditional holiday spice blend within the dough. These cookies are hearty and slightly thicker than a typical sugar cookie.
Oatmeal raisin cookies are an excellent counterpoint to sweeter, heavily frosted holiday treats. They travel well and are particularly enjoyable alongside a hot cup of tea or a cold glass of milk.
Required Ingredients
- 1 and 1/2 cups all purpose flour
- 1 teaspoon baking soda
- 1 teaspoon ground cinnamon
- 1/2 teaspoon ground nutmeg
- 1/2 teaspoon salt
- 1 cup (2 sticks) unsalted butter, softened
- 1 cup packed brown sugar
- 1/2 cup granulated sugar
- 2 large eggs
- 1 teaspoon vanilla extract
- 3 cups rolled oats (not instant)
- 1 cup raisins
Equipment List
- Electric mixer
- Large and medium mixing bowls
- Measuring cups and spoons
- Small cookie scoop
- Baking sheets
- Parchment paper
- Wire cooling rack
DIY Instruction
Create these hearty and chewy oatmeal raisin cookies with this simple method.
- Combine Dry Ingredients: In the medium bowl, whisk together the flour, baking soda, cinnamon, nutmeg, and salt.
- Cream Butter and Sugars: In your large mixing bowl, beat the softened butter, brown sugar, and granulated sugar with the electric mixer until the mixture is light and fluffy (about 3 minutes). Beat in the eggs one at a time, followed by the vanilla extract.
- Form the Dough: Gradually add the dry ingredients into the wet mixture, mixing on low speed until the dough comes together. Use a rubber spatula to fold in the rolled oats and the raisins until they are evenly distributed throughout the dough.
- Preheat and Prep: Set your oven to 350 degrees F. Line your baking sheets with parchment paper.
- Scoop and Bake: Use a cookie scoop to form the dough into 2 inch balls. Place the balls on the prepared baking sheets, leaving 2 inches between each. These cookies will not spread excessively.
- Bake: Bake for 10 to 12 minutes. The cookies are ready when the edges are set and a rich golden brown, but the centers still look slightly soft.
- Cool: Let the cookies rest on the baking sheet for 5 minutes before transferring them to the wire cooling rack to cool completely.
30. Classic Butter Spritz Cookies

These dainty, buttery cookies are a cornerstone of traditional Christmas baking, instantly recognized by their distinct, often wreath or star like shapes. The dough is a simple, high quality butter recipe, which allows it to hold the intricate details created by a cookie press. The pale yellow color highlights the purity of the butter flavor.
The cookies are shown in various shapes, including stars, wreaths, and ribbons, showcasing the versatility of the cookie press. Many of the shapes are lightly topped with coarse granulated sugar and small green sprinkles, adding a subtle sparkle and a classic festive color scheme. They have a crisp texture and a wonderfully tender, snappy bite.
Spritz cookies are famous for their melt in your mouth texture and mild, buttery flavor, making them suitable for decorating with sprinkles and candies before or after baking. They are a beloved tradition and look beautiful arranged on a tray.
Required Ingredients
- 2 and 1/4 cups all purpose flour
- 1/2 teaspoon salt
- 1 cup (2 sticks) unsalted butter, softened
- 3/4 cup granulated sugar
- 1 large egg
- 1 teaspoon vanilla extract
- 1/2 teaspoon almond extract (optional)
- For Decorating:
- Sprinkles, nonpareils, or coarse sugar
Equipment List
- Electric mixer
- Large and medium mixing bowls
- Measuring cups and spoons
- Cookie press with various discs (wreath, star, etc.)
- Baking sheets (ungreased or lined with parchment)
- Wire cooling rack
DIY Instruction
Create these traditional, pressed butter spritz cookies with a cookie press.
- Combine Dry Ingredients: In the medium bowl, whisk together the flour and salt.
- Cream Butter and Sugar: In your large mixing bowl, beat the softened butter and granulated sugar with the electric mixer until the mixture is light and fluffy (about 3 minutes). Beat in the egg, vanilla extract, and almond extract (if using) until combined.
- Form the Dough: Gradually add the dry ingredients into the wet mixture, mixing on low speed until a soft, uniform dough forms. The dough should be soft enough to press, but not sticky.
- Load the Press: Load the dough into the barrel of your cookie press, selecting your desired disc shape.
- Press and Decorate: Press the dough directly onto an ungreased baking sheet (or one lined with parchment). The dough must stick to the sheet. If using an ungreased sheet, the cookies will stick better. Add sprinkles or coarse sugar immediately to the pressed shapes.
- Bake: Bake at 375 degrees F for 8 to 10 minutes. The cookies are done when the edges are set and just barely beginning to turn golden.
- Cool: Immediately transfer the baked spritz cookies to the wire cooling rack to cool completely.
31. Fudgy Chocolate Fruit and Nut Bars

These dense, rich squares offer a deeply satisfying, almost brownie like texture, loaded with festive fruit and nuts. The base is a dark, chocolatey slab, hinting at a fudgy consistency rather than a crumbly cookie. Scattered liberally throughout the dough are plump, dark raisins, lighter golden raisins, and large, visible walnut pieces.
The incorporation of both dried fruits and nuts creates a wonderful textural contrast—the chewiness of the raisins balances the crunchy firmness of the walnuts. The dark chocolate base provides a deep, slightly bittersweet backdrop that highlights the natural sweetness of the dried fruit. These squares are substantial and quite rich.
These bars are simple to bake in a single pan and then cut into uniform pieces, making them excellent for serving a crowd. They are a robust, full flavored treat that stands out on any Christmas dessert platter.
Required Ingredients
- 1 cup (2 sticks) unsalted butter, softened
- 1 cup granulated sugar
- 2 large eggs
- 1 teaspoon vanilla extract
- 1/2 cup unsweetened cocoa powder
- 1 and 1/2 cups all purpose flour
- 1 teaspoon baking powder
- 1/2 teaspoon salt
- 1/2 cup dark raisins
- 1/4 cup golden raisins
- 1 cup chopped walnuts
Equipment List
- Electric mixer
- Large and medium mixing bowls
- Measuring cups and spoons
- 9×13 inch baking pan
- Parchment paper
- Rubber spatula
- Sharp knife
DIY Instruction
Create these rich, fruit and nut loaded chocolate bars following this straightforward method.
- Prepare the Pan: Set your oven to 350 degrees F. Line the 9×13 inch baking pan with parchment paper, leaving an overhang on two sides to simplify lifting the baked product out later.
- Combine Dry Ingredients: In the medium bowl, whisk together the cocoa powder, flour, baking powder, and salt.
- Cream Butter and Sugar: In your large mixing bowl, beat the softened butter and granulated sugar with the electric mixer until the mixture is light and fluffy (about 3 minutes). Beat in the eggs one at a time, followed by the vanilla extract.
- Form the Batter: Gradually add the dry ingredients into the wet mixture, mixing on low speed until a thick, uniform batter forms. Use a rubber spatula to fold in the dark raisins, golden raisins, and chopped walnuts, ensuring they are evenly distributed.
- Bake: Spread the batter evenly into the prepared baking pan. Bake for 25 to 30 minutes. The bars are ready when a toothpick inserted into the center comes out with moist crumbs attached (not raw batter).
- Cool and Cut: Let the entire bar cool completely in the pan on a wire rack. Once cool, use the parchment paper overhang to lift the slab out of the pan. Cut the slab into even squares or rectangles using a sharp knife.
32. Salted Caramel Almond Crumble Bars

These sophisticated dessert bars feature layers of satisfying flavor and texture, built upon a soft shortbread crust. The golden brown base is topped with a thick, chewy layer of caramel, studded generously with sliced and chopped almonds. The surface is beautifully textured from the nuts and the buttery crumble topping.
A delicate drizzle of dark chocolate zigzags across the top, enhancing the richness and adding an extra layer of sweetness that contrasts with the sea salt often included in the caramel. The sliced almonds provide a wonderful crunch, complementing the gooey caramel and tender base.
These decadent bars are cut into neat squares, displaying the distinct layers—base, caramel, nuts, and drizzle. They are a rich, indulgent treat that is always popular during the festive season.
Required Ingredients
- For the Crust:
- 2 cups all purpose flour
- 1/2 cup granulated sugar
- 1/4 teaspoon salt
- 1 cup (2 sticks) cold unsalted butter, cut into pieces
- For the Topping:
- 1/2 cup packed brown sugar
- 1/2 cup all purpose flour
- 1/4 cup cold unsalted butter, cut into pieces
- 1/2 cup sliced almonds
- For the Filling:
- 1 cup soft caramel candies (or homemade caramel sauce)
- 2 tablespoons milk
- For Drizzle (Optional):
- 2 ounces dark chocolate, melted
Equipment List
- Electric mixer or food processor
- Large mixing bowls (2)
- Measuring cups and spoons
- 9×13 inch baking pan
- Parchment paper
- Rubber spatula
- Small microwave safe bowl for caramel
- Piping bag or small zip top bag for chocolate
DIY Instruction
Make these complex layered caramel almond bars following these step by step instructions.
- Prepare the Crust: Set your oven to 350 degrees F. Line the 9×13 inch baking pan with parchment paper. In the large bowl, combine the crust flour, sugar, and salt. Cut in the cold butter pieces using your fingers, a pastry blender, or a food processor until the mixture resembles coarse crumbs. Press two thirds of this mixture evenly into the prepared pan.
- Make the Crumble Topping: In the second large bowl, combine the brown sugar and 1/2 cup flour for the topping. Cut in the 1/4 cup cold butter until coarse crumbs form. Stir in the sliced almonds. Set this mixture aside.
- Pre bake the Crust: Bake the pressed crust for 12 to 15 minutes, or until the edges are lightly golden.
- Prepare Filling: While the crust is baking, melt the caramel candies with the milk in a microwave safe bowl, stirring every 30 seconds until the mixture is smooth and fluid.
- Assemble and Bake: Remove the pre baked crust from the oven. Pour the warm caramel mixture evenly over the crust. Sprinkle the reserved almond crumble topping evenly over the caramel. Return the pan to the oven and bake for another 20 to 25 minutes, or until the topping is golden brown and the filling is bubbling.
- Cool and Drizzle: Let the bars cool completely in the pan on a wire rack. Once cool, use the parchment paper overhang to lift the slab out. Melt the dark chocolate (if using) and drizzle it artfully over the cooled bars. Let the chocolate set before cutting into squares.
33. Loaded Holiday Magic Bars

These incredible layered bars are a feast for the eyes and the palate, featuring a striking stack of sweet and savory textures. The base is a simple graham cracker crust, topped with layers of pecans, butterscotch chips, chocolate chips, and thick, shredded coconut. The sweetness is typically bound together with a generous pour of sweetened condensed milk.
The top of each square is decorated with whole pecan halves and extra chocolate chips, making the ingredients visible and appealing. The different components—the chewy coconut, the crunchy pecans, the melting chips, and the soft crust—create an intensely satisfying bite.
Magic bars are extremely easy to prepare because the ingredients are simply layered and baked, making them a wonderful time saver during busy holiday baking. They are rich, very sweet, and a guaranteed holiday favorite for their combination of classic flavors.
Required Ingredients
- 1 and 1/2 cups graham cracker crumbs
- 1/2 cup (1 stick) unsalted butter, melted
- 1 (14 ounce) can sweetened condensed milk
- 1 cup semi sweet chocolate chips
- 1 cup butterscotch chips
- 1 cup chopped pecans
- 1 and 1/2 cups sweetened shredded coconut
Equipment List
- 9×13 inch baking pan
- Parchment paper
- Small mixing bowl
- Measuring cups and spoons
- Rubber spatula
- Wire cooling rack
- Sharp knife
DIY Instruction
Follow these simple, layering instructions to create decadent holiday magic bars.
- Prepare the Crust: Set your oven to 350 degrees F. Line the 9×13 inch baking pan with parchment paper. In the small mixing bowl, combine the graham cracker crumbs and melted butter, stirring until the mixture is uniformly moistened. Press this mixture firmly into the bottom of the prepared pan to form the crust.
- Layer the Toppings: Sprinkle the chocolate chips and the butterscotch chips evenly over the crust. Next, scatter the chopped pecans across the chips. Finally, spread the shredded coconut in an even layer across the top.
- Bind and Bake: Pour the entire can of sweetened condensed milk evenly over the layered ingredients. This milk will bind all the layers together as it bakes. Bake for 25 to 30 minutes, or until the edges are golden brown and the coconut topping is a light golden color.
- Cool and Cut: Let the bars cool completely in the pan on a wire rack. This is crucial for the bars to set and hold their shape. Once cool, use the parchment paper overhang to lift the slab out and cut into squares using a sharp knife.
34. Festive Candied Fruit Rounds

These bright, festive cookies feature a light colored, butter rich dough as their base, which achieves a soft, chewy texture. The dough is colorfully decorated with classic holiday components: bright red and green candied cherries and contrasting brown pecan halves. This simple arrangement creates a cheerful, traditional Christmas look.
The visible ingredients are gently pressed into the surface of the dough before baking, ensuring they become part of the finished cookie. The candied cherries provide a sweet, soft chewiness, while the pecans add a satisfying crunch and nutty depth. The overall appearance is hearty and homemade.
These cookies are often called Christmas Jewels or Fruitcake Drops and are valued for their straightforward elegance and traditional festive colors. They are easy to make, transport well, and are a delightful part of any classic holiday spread.
Required Ingredients
- 2 and 1/2 cups all purpose flour
- 1 teaspoon baking powder
- 1/2 teaspoon salt
- 1 cup (2 sticks) unsalted butter, softened
- 1 cup granulated sugar
- 2 large eggs
- 1 teaspoon vanilla extract
- 1/2 cup candied red cherries, halved
- 1/2 cup candied green cherries, halved
- 1/2 cup pecan halves, for decorating
Equipment List
- Electric mixer
- Large and medium mixing bowls
- Measuring cups and spoons
- Small cookie scoop
- Baking sheets
- Parchment paper
- Wire cooling rack
DIY Instruction
Bake these classic, decorative candied fruit rounds using these simple steps.
- Combine Dry Ingredients: In the medium bowl, whisk together the flour, baking powder, and salt.
- Cream Butter and Sugar: In your large mixing bowl, beat the softened butter and granulated sugar with the electric mixer until the mixture is light and fluffy (about 3 minutes). Beat in the eggs one at a time, followed by the vanilla extract.
- Form the Dough: Gradually add the dry ingredients into the wet mixture, mixing on low speed until a soft dough forms.
- Preheat and Prep: Set your oven to 375 degrees F. Line your baking sheets with parchment paper.
- Scoop and Place: Use a cookie scoop to form the dough into 1 and 1/2 inch balls. Place the balls on the prepared baking sheets, leaving 2 inches between each.
- Decorate: Gently press down on each dough ball to flatten it slightly. Arrange the halved red and green cherries and a few pecan halves decoratively onto the top surface of each cookie, gently pressing them into the dough.
- Bake: Bake for 10 to 12 minutes. The cookies are ready when the edges are set and lightly golden brown.
- Cool: Let the cookies rest on the baking sheet for 5 minutes before transferring them to the wire cooling rack to cool completely.
35. Traditional Danish Butter Rings

These beautiful, pale cookies are a perfect example of classic Danish Christmas baking. Their recognizable shapes—wreaths, pretzels, and sometimes simple rounds—are typically achieved using a piping bag or a cookie press, ensuring sharp, corrugated edges. The light, golden color and fine texture signify a very high proportion of butter.
A subtle sparkle comes from the granulated sugar sprinkled lightly over the dough before baking, enhancing the mild, buttery sweetness. The different shapes add variety to the presentation, making them look elegant when served together on a tray. The texture is designed to be crisp and snappy.
Danish butter cookies are a foundational holiday cookie, known for their pure flavor and delicate structure. They keep well in airtight tins and are an enduring Christmas tradition worldwide.
Required Ingredients
- 2 and 1/2 cups all purpose flour
- 1/2 teaspoon salt
- 1 cup (2 sticks) unsalted butter, softened
- 3/4 cup granulated sugar
- 1 large egg
- 1 teaspoon vanilla extract
- 2 tablespoons milk
- For Topping:
- 1 tablespoon coarse granulated sugar
Equipment List
- Electric mixer
- Large and medium mixing bowls
- Measuring cups and spoons
- Piping bag fitted with a large star tip or a cookie press
- Baking sheets
- Parchment paper
- Wire cooling rack
DIY Instruction
Follow these steps to create beautifully shaped, crisp Danish butter cookies.
- Combine Dry Ingredients: In the medium bowl, whisk together the flour and salt.
- Cream Butter and Sugar: In your large mixing bowl, beat the softened butter and granulated sugar with the electric mixer until the mixture is light and fluffy (about 3 minutes). Beat in the egg, vanilla extract, and milk until completely combined.
- Form the Dough: Gradually add the dry ingredients into the wet mixture, mixing on low speed until a soft, smooth dough forms. The dough should be soft enough to pipe, but still hold its shape.
- Load and Pipe: Load the dough into the piping bag fitted with a large star tip. Pipe the dough into small wreath or pretzel shapes onto baking sheets lined with parchment paper. Ensure the shapes are cleanly separated.
- Garnish and Chill: Sprinkle the shapes lightly with coarse granulated sugar. Place the baking sheets in the refrigerator to chill for at least 15 minutes. This chilling step helps the piped shapes retain their definition during baking.
- Bake: Set your oven to 375 degrees F. Bake for 10 to 12 minutes. The cookies are ready when the edges are lightly set and a very light golden brown.
- Cool: Immediately transfer the baked cookies to the wire cooling rack to cool completely.
36. Elegant Wreath Cutouts

These cookies are a festive and decorative variation of a simple sugar cookie, cut into the shape of a wreath, star, and Christmas tree. The dough is a light, tender butter cookie base, which maintains its crisp edges perfectly after baking. The pale, golden brown color provides a great backdrop for simple embellishments.
The large wreath cookie is the focal point, adorned with a simple, sweet holly decoration made from green leaves and a small red candy. Surrounding the wreath are simple star and tree shapes, left plain to emphasize the central design. The slight crispness around the edges suggests a wonderful texture.
These are excellent cookies for decorating and displaying during the holidays. Their simple shape and structure are truly timeless and essential for a classic Christmas cookie plate.
Required Ingredients
- 2 cups all purpose flour
- 1/2 teaspoon baking powder
- 1/4 teaspoon salt
- 3/4 cup (1 and 1/2 sticks) unsalted butter, softened
- 3/4 cup granulated sugar
- 1 large egg
- 1 teaspoon vanilla extract
- For Decoration:
- Small holly shaped candies or sprinkles
- Simple icing (powdered sugar mixed with water)
Equipment List
- Electric mixer
- Large and medium mixing bowls
- Measuring cups and spoons
- Rolling pin
- Wreath, star, and tree shaped cookie cutters
- Baking sheets
- Parchment paper
- Wire cooling rack
DIY Instruction
Make these festive, elegant wreath and shape cutout cookies.
- Combine Dry Ingredients: In the medium bowl, whisk together the flour, baking powder, and salt.
- Cream Butter and Sugar: In your large mixing bowl, beat the softened butter and granulated sugar with the electric mixer until the mixture is light and fluffy (about 3 minutes). Beat in the egg and vanilla extract until combined.
- Form the Dough: Gradually add the dry ingredients into the wet mixture, mixing on low speed until a soft dough forms.
- Chill and Prep: Divide the dough into two disks, wrap tightly, and refrigerate for at least 1 hour. Set your oven to 350 degrees F. Line your baking sheets with parchment paper.
- Roll and Cut: On a lightly floured surface, roll out one chilled disk of dough to about 1/4 inch thickness. Use the wreath, star, and tree cookie cutters to cut out the shapes.
- Bake: Carefully transfer the cutouts to the prepared baking sheets. Bake for 8 to 11 minutes. The cookies are ready when the edges are set and a very light golden color.
- Cool and Decorate: Let the cookies cool completely on a wire rack. Prepare a simple icing (powdered sugar and a few drops of water) and use it to affix the small holly candies to the wreath cookies.
37. Zesty Lemon Glazed Rounds

These cheerful cookies are the essence of brightness, featuring a tender, soft baked round base topped with a smooth, sunny yellow glaze. The cookie base has a delicate crackled surface and a warm, golden color that contrasts beautifully with the opaque citrus glaze. The slight spread of the cookie suggests a chewy texture.
The glaze itself is likely made from lemon juice and powdered sugar, providing a necessary tartness that balances the cookie’s sweetness. A few strands of fresh lemon zest are often sprinkled over the wet glaze as a garnish, adding intense aroma and confirming the citrus flavor profile.
These light, zesty cookies are an excellent alternative to heavier spiced options during the holidays. Their simple round shape and cheerful color make them a delightful addition to any festive plate.
Required Ingredients
- For the Cookie:
- 2 cups all purpose flour
- 1/2 teaspoon baking soda
- 1/4 teaspoon salt
- 3/4 cup (1 and 1/2 sticks) unsalted butter, softened
- 1 cup granulated sugar
- 1 large egg
- 2 teaspoons lemon zest
- 1 teaspoon vanilla extract
- For the Glaze:
- 1 and 1/2 cups powdered sugar
- 3 tablespoons fresh lemon juice
Equipment List
- Electric mixer
- Large and medium mixing bowls
- Measuring cups and spoons
- Small cookie scoop
- Baking sheets
- Parchment paper
- Wire cooling rack
- Small whisk for the glaze
DIY Instruction
Bake these soft, zesty lemon cookies with a sweet citrus glaze.
- Combine Dry Ingredients: In the medium bowl, whisk together the flour, baking soda, and salt.
- Cream Butter and Sugar: In your large mixing bowl, beat the softened butter and granulated sugar with the electric mixer until the mixture is light and fluffy (about 3 minutes). Beat in the egg, lemon zest, and vanilla extract until fully combined.
- Form the Dough: Gradually add the dry ingredients into the wet mixture, mixing on low speed until a soft dough forms.
- Preheat and Prep: Set your oven to 350 degrees F. Line your baking sheets with parchment paper.
- Scoop and Bake: Use a cookie scoop to form the dough into 1 and 1/2 inch balls. Place the balls on the prepared baking sheets. Bake for 10 to 12 minutes. The cookies are ready when the edges are set and the centers look softly baked.
- Make the Glaze: While the cookies are baking, whisk the powdered sugar and lemon juice together in a small bowl until a smooth, thick glaze forms. Adjust with more sugar or juice if needed.
- Glaze and Cool: Let the cookies cool on the baking sheet for 5 minutes. Transfer them to the wire rack. While still warm, or after they are completely cooled, spoon or drizzle a generous amount of glaze onto the top of each cookie. Allow the glaze to set completely before serving.
38. Simple Glazed Sugar Drops

These easygoing, buttery cookies feature a tender, slightly dome shaped base with a charming crackled surface. The light golden color suggests a rich butter and vanilla flavor. Each cookie is topped with a generous dollop of simple white glaze that drips appealingly down the sides.
The glaze provides a smooth, sweet contrast to the cookie’s slight crispness and soft chewiness. The simple elegance of the white glaze against the light cookie makes them very approachable and versatile for any holiday gathering. They are often made quickly as drop cookies, which contributes to their casual, homemade look.
These are a comforting, unpretentious holiday favorite, perfect for bakers looking for a tasty result without elaborate shaping or decorating. Their classic flavor makes them appealing to everyone.
Required Ingredients
- For the Cookie:
- 2 and 1/2 cups all purpose flour
- 1 teaspoon baking powder
- 1/2 teaspoon salt
- 1 cup (2 sticks) unsalted butter, softened
- 1 cup granulated sugar
- 2 large eggs
- 1 teaspoon vanilla extract
- For the Glaze:
- 1 and 1/2 cups powdered sugar
- 3 tablespoons milk or water
Equipment List
- Electric mixer
- Large and medium mixing bowls
- Measuring cups and spoons
- Small cookie scoop
- Baking sheets
- Parchment paper
- Wire cooling rack
- Small whisk for the glaze
DIY Instruction
Bake these simple, classic sugar drop cookies with a white glaze.
- Combine Dry Ingredients: In the medium bowl, whisk together the flour, baking powder, and salt.
- Cream Butter and Sugar: In your large mixing bowl, beat the softened butter and granulated sugar with the electric mixer until the mixture is light and fluffy (about 3 minutes). Beat in the eggs one at a time, followed by the vanilla extract.
- Form the Dough: Gradually add the dry ingredients into the wet mixture, mixing on low speed until a soft dough forms.
- Preheat and Prep: Set your oven to 375 degrees F. Line your baking sheets with parchment paper.
- Scoop and Bake: Use a cookie scoop to form the dough into 1 and 1/2 inch balls. Place the balls on the prepared baking sheets, leaving 2 inches between each. Do not flatten them. Bake for 10 to 12 minutes. The cookies are ready when the edges are set and very lightly golden.
- Make the Glaze: While the cookies are baking, whisk the powdered sugar and milk or water together in a small bowl until a smooth, thick glaze forms.
- Glaze and Cool: Let the cookies cool on the baking sheet for 5 minutes. Transfer them to the wire rack. Spoon or drizzle a generous amount of glaze onto the top of each cookie, allowing it to naturally spread and drip down the sides. Allow the glaze to set completely before serving.
39. Cinnamon Iced Star Cutouts

These pretty, star shaped cookies are a festive blend of vanilla and spice, featuring a light colored dough that holds a cinnamon flavor. The dough is rolled and cut into multi pointed star shapes, providing a lovely, intricate outline. The pale hue and tight shape retention suggest a simple, classic shortbread or sugar cookie base.
Each star is elegantly decorated with a thin, white outline of simple icing, following the curves of the star. The center of the icing is then dusted heavily with ground cinnamon, creating a beautiful contrast and an appealing warmth. A spiral cut cookie dough log is also visible, hinting at how these stars might be created from a simple dough roll.
They are a delicate, visually appealing cookie that offers a sophisticated cinnamon flavor without being too sweet. They are excellent for stacking and look particularly lovely on a mixed cookie platter.
Required Ingredients
- For the Cookie:
- 2 cups all purpose flour
- 1 teaspoon ground cinnamon
- 1/2 teaspoon baking powder
- 1/4 teaspoon salt
- 3/4 cup (1 and 1/2 sticks) unsalted butter, softened
- 3/4 cup granulated sugar
- 1 large egg
- 1 teaspoon vanilla extract
- For Decoration:
- 1 cup powdered sugar
- 2 tablespoons milk or water
- 1 teaspoon ground cinnamon, for dusting
Equipment List
- Electric mixer
- Large and medium mixing bowls
- Measuring cups and spoons
- Rolling pin
- Star shaped cookie cutters (fluted or plain)
- Baking sheets
- Parchment paper
- Wire cooling rack
- Small whisk and small sieve for dusting
DIY Instruction
Create these elegant, cinnamon dusted star cutout cookies.
- Combine Dry Ingredients: In the medium bowl, whisk together the flour, the 1 teaspoon of cinnamon, baking powder, and salt.
- Cream Butter and Sugar: In your large mixing bowl, beat the softened butter and granulated sugar with the electric mixer until the mixture is light and fluffy. Beat in the egg and vanilla extract until combined.
- Form the Dough: Gradually add the dry ingredients into the wet mixture, mixing on low speed until a soft dough forms.
- Chill and Prep: Divide the dough into two disks, wrap tightly, and refrigerate for at least 1 hour. Set your oven to 350 degrees F. Line your baking sheets with parchment paper.
- Roll and Cut: On a lightly floured surface, roll out one chilled disk of dough to about 1/4 inch thickness. Use the star shaped cookie cutters to cut out the shapes.
- Bake: Carefully transfer the cutouts to the prepared baking sheets. Bake for 8 to 10 minutes. The cookies are ready when the edges are set and a light golden color.
- Cool and Make Icing: Let the cookies cool completely on a wire rack. Whisk the powdered sugar and milk or water together in a small bowl until a thick, smooth icing forms.
- Decorate: Use a small spoon or piping bag to carefully pipe a thin border of icing around the edge of each star cookie. While the icing is still wet, use the small sieve to lightly dust the entire center of the cookie with ground cinnamon. Allow the icing to fully set before handling.
40. Citrus Crinkle Snowballs

These are a zesty, bright variation on the classic crinkle cookie, identified by their pale, cake like interior and the contrasting powdered sugar exterior. The dough has a noticeable light yellow hue, confirming the inclusion of fresh citrus, likely lemon or orange zest and juice, which gives them a tangy flavor.
The dough balls are rolled heavily in powdered sugar before baking, which is what creates that signature cracked appearance as the cookies puff up. The cracks reveal the soft, golden interior beneath the snowy coating. A few strands of orange zest are scattered around, highlighting the primary flavor.
These cookies are soft, chewy, and provide a refreshing burst of flavor that cuts through the richness of other holiday sweets. They are easy to make and the bright citrus scent fills the kitchen wonderfully while baking.
Required Ingredients
- 2 cups all purpose flour
- 2 teaspoons baking powder
- 1/4 teaspoon salt
- 1 cup granulated sugar
- 1/2 cup vegetable oil
- 2 large eggs
- 2 tablespoons fresh orange or lemon juice
- 2 teaspoons orange or lemon zest
- For Coating:
- 1/2 cup granulated sugar, for first roll
- 1 cup powdered sugar, for final roll
Equipment List
- Electric mixer
- Large and medium mixing bowls
- Measuring cups and spoons
- Small, shallow dishes (2) for the two sugars
- Baking sheets
- Parchment paper
- Wire cooling rack
DIY Instruction
Bake these soft, zesty citrus crinkle cookies with a snowy exterior.
- Combine Dry Ingredients: In the medium bowl, whisk together the flour, baking powder, and salt.
- Mix Wet Ingredients: In your large mixing bowl, combine the granulated sugar and vegetable oil. Beat the mixture with the electric mixer until combined. Beat in the eggs one at a time, followed by the citrus juice and zest.
- Form the Dough: Gradually add the dry ingredients into the wet mixture, mixing on low speed until a soft, sticky dough forms.
- Chill (Crucial): Cover the dough bowl and refrigerate the dough for at least 3 hours, or until it is very firm. Chilling is necessary to prevent excessive spreading.
- Preheat and Prep: Set your oven to 350 degrees F. Line your baking sheets with parchment paper. Place the granulated sugar in one shallow dish and the powdered sugar in the second.
- Roll and Double Coat: Scoop the chilled dough into 1 inch balls. Roll each ball first in the granulated sugar. Then, roll it heavily and thoroughly in the powdered sugar. The coating must be thick to ensure a good snowy look.
- Bake: Arrange the coated dough balls on the prepared baking sheets, leaving 2 inches between them. Bake for 10 to 12 minutes. They are finished when the powdered sugar is heavily cracked and the edges are set, but the center still seems soft.
- Cool: Let the cookies cool on the baking sheet for 5 minutes, then transfer them to the wire cooling rack to cool completely.
41. Rich Chocolate Pecan Truffles
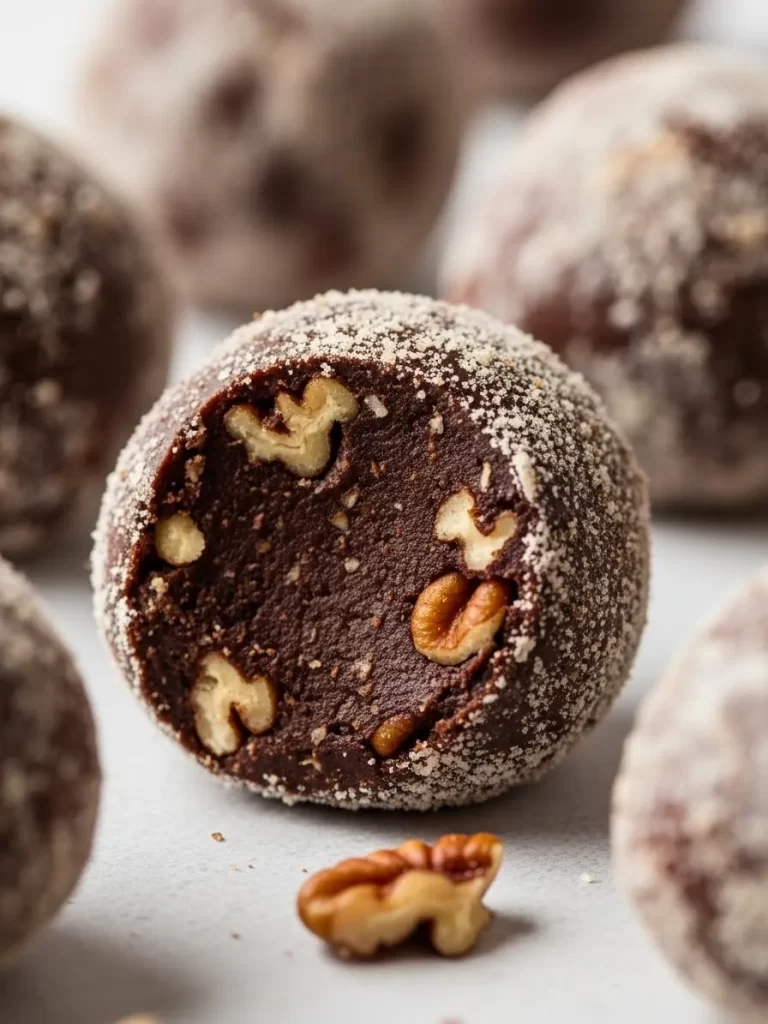
These tempting treats offer a rich, intensely fudgy experience without requiring any baking. The dark, dense interior is made from a combination of cocoa, powdered sugar, and liquid, often including a liquor like rum or brandy for depth of flavor. The texture is thick and chewy, similar to a soft truffle.
The center of the ball is studded with chunky pieces of pecans, which provide a welcome crunch against the smooth, fudgy base. The exterior is coated in a simple dusting of powdered sugar or finely chopped cocoa powder, giving them a rustic, snowy appearance. Cutting the truffle reveals the distribution of the nutty pieces.
Rum balls or bourbon balls are a classic holiday confection, requiring no oven time and making them a simple yet elegant addition to a holiday platter. They are best when prepared ahead of time, allowing the flavors to fully meld.
Required Ingredients
- 2 cups finely crushed vanilla wafers or chocolate wafers
- 1 cup finely chopped pecans
- 1/2 cup powdered sugar, plus extra for rolling
- 1/4 cup unsweetened cocoa powder
- 1/4 cup dark rum or bourbon (or substitute with orange juice for non-alcoholic)
- 2 tablespoons light corn syrup
- 1 teaspoon vanilla extract
Equipment List
- Large mixing bowl
- Measuring cups and spoons
- Rubber spatula
- Food processor (optional, for crushing wafers and chopping nuts)
- Small, shallow dish for powdered sugar
- Wax paper or parchment paper
- Small cookie scoop or teaspoon
DIY Instruction
Create these simple, rich, no bake chocolate pecan truffles.
- Prepare the Base: If not already crushed, process the vanilla wafers or chocolate wafers in a food processor until they are fine crumbs. In the large mixing bowl, combine the wafer crumbs, finely chopped pecans, 1/2 cup powdered sugar, and cocoa powder. Stir these dry ingredients together thoroughly.
- Add Liquid Flavoring: In a separate small bowl, combine the rum (or juice), corn syrup, and vanilla extract. Pour the liquid mixture over the dry ingredients.
- Form the Dough: Use a rubber spatula or your hands to mix the ingredients until a thick, moist dough forms. It should hold together easily when pressed.
- Roll the Balls: Pour the extra powdered sugar for rolling into the shallow dish. Use a small cookie scoop or teaspoon to form the dough into 1 inch balls.
- Coat: Roll each dough ball thoroughly in the powdered sugar until it is completely coated.
- Chill and Set: Place the coated truffles on a piece of wax paper or parchment paper. Refrigerate for at least 1 hour to allow them to firm up before serving.
42. Peppermint Bark Rounds

These cheerful cookies are a bright, contrasting topping that instantly shouts “Christmas.” The base is a simple, pale sugar cookie, baked until set and slightly tender. A thick layer of creamy white frosting or melted white chocolate is spread over the top, covering the entire surface.
The most striking feature is the liberal coating of crushed red and white striped peppermint candies or candy canes. The pieces are scattered haphazardly over the wet frosting, creating a wonderful, crunchy texture and a cooling burst of mint flavor. The red and white topping against the pale cookie is incredibly festive.
Peppermint cookies are a classic seasonal flavor that is always in high demand. They are easy to make using store bought candy canes and add a great textural element to a cookie platter.
Required Ingredients
- For the Cookie:
- 2 cups all purpose flour
- 1/2 teaspoon baking powder
- 1/4 teaspoon salt
- 3/4 cup (1 and 1/2 sticks) unsalted butter, softened
- 3/4 cup granulated sugar
- 1 large egg
- 1 teaspoon vanilla extract
- For Topping:
- 8 ounces white chocolate, chopped (or white candy melts)
- 1 teaspoon vegetable oil or shortening
- 1/2 cup crushed peppermint candies or candy canes
Equipment List
- Electric mixer
- Large and medium mixing bowls
- Measuring cups and spoons
- Rolling pin
- 2 to 3 inch round cookie cutter
- Baking sheets
- Parchment paper
- Wire cooling rack
- Small microwave safe bowl for chocolate
DIY Instruction
Create these festive, crunchy peppermint bark cookie rounds.
- Make the Cookie Dough: In the medium bowl, whisk together the flour, baking powder, and salt. In the large mixing bowl, beat the butter and sugar until light and fluffy. Beat in the egg and vanilla. Gradually add the dry ingredients to form the dough.
- Chill and Prep: Shape the dough into a disk, wrap it, and refrigerate for 1 hour. Set your oven to 350 degrees F. Line your baking sheets with parchment paper.
- Roll and Cut: On a lightly floured surface, roll the chilled dough to about 1/4 inch thickness. Use the round cookie cutter to cut out shapes. Place the cutouts on the prepared baking sheets.
- Bake: Bake for 8 to 10 minutes, until the edges are lightly golden. Cool completely on a wire rack.
- Prepare Topping: Melt the white chocolate with the oil or shortening using a double boiler or in the microwave in 30 second intervals, stirring until smooth.
- Coat and Decorate: Spread a generous amount of melted white chocolate evenly over the top of each cooled cookie. Immediately sprinkle the wet chocolate heavily with the crushed peppermint candies.
- Set: Allow the chocolate topping to set completely before stacking or serving. You can place them in the refrigerator briefly to speed this process.
43. Classic Gingerbread Man

This iconic holiday cookie is the ultimate symbol of Christmas baking. The deep brown color comes from the signature use of molasses and rich spices like ginger, cinnamon, and allspice. The large, person shaped cutout is instantly recognizable and very sturdy.
This particular gingerbread man is elegantly decorated with simple white royal icing, outlining the arms, legs, and forming a charming bow tie and buttons. The icing is applied in crisp, clean lines, which stand out against the dark, slightly rough texture of the cookie. A piece of red and white baker’s twine looped through a hole indicates it is ready to be hung as a kitchen decoration.
Gingerbread men are a traditional treat that fills the home with a wonderfully warm, spicy aroma. They are fun to decorate and are a necessary feature of any classic holiday baking tradition.
Required Ingredients
- 3 cups all purpose flour
- 1 tablespoon ground ginger
- 1 teaspoon ground cinnamon
- 1/2 teaspoon ground cloves
- 1/2 teaspoon baking soda
- 1/4 teaspoon salt
- 3/4 cup (1 and 1/2 sticks) unsalted butter, softened
- 1/2 cup packed brown sugar
- 1/2 cup molasses
- 1 large egg
- For Decoration:
- Royal icing (made from powdered sugar, meringue powder, and water)
Equipment List
- Electric mixer
- Large and medium mixing bowls
- Measuring cups and spoons
- Rolling pin
- Gingerbread man cookie cutter (about 4 inches tall)
- Baking sheets
- Parchment paper
- Wire cooling rack
- Piping bag with a small round tip
DIY Instruction
Bake and decorate this classic, warmly spiced gingerbread man cookie.
- Combine Dry Ingredients: In the medium bowl, whisk together the flour, ginger, cinnamon, cloves, baking soda, and salt.
- Cream Butter and Sugar: In your large mixing bowl, beat the softened butter and brown sugar with the electric mixer until light and fluffy (about 3 minutes). Beat in the egg and molasses until completely combined.
- Form the Dough: Gradually add the dry ingredients into the wet mixture, mixing on low speed until a stiff dough forms.
- Chill and Prep: Divide the dough into two disks, wrap tightly, and refrigerate for at least 1 hour. Set your oven to 350 degrees F. Line your baking sheets with parchment paper.
- Roll and Cut: On a lightly floured surface, roll out one chilled disk of dough to about 1/4 inch thickness. Use the gingerbread man cutter to cut out the shapes. If you plan to hang them, use a skewer to poke a small hole at the top of the head before baking.
- Bake: Carefully transfer the cutouts to the prepared baking sheets. Bake for 8 to 10 minutes. The cookies are ready when the edges are set and slightly darker brown.
- Cool and Decorate: Let the cookies cool completely on a wire rack. Prepare your royal icing. Use the piping bag fitted with a small round tip to outline the body, add wavy lines for cuffs and hems, and pipe on buttons and a bow tie. Allow the icing to dry completely (this may take several hours) before handling or storing.
44. Holiday Cereal Drops

These fun, textured cookies are a nostalgic favorite, combining a chewy cookie base with crunchy cereal and dried fruit. The cookie base has a soft, golden brown color and a generous scattering of crunchy cornflakes, chopped walnuts, and red maraschino cherry pieces.
The cornflakes and walnuts contribute a wonderful crispness and nutty flavor to the soft, chewy cookie dough. The bright red cherry in the center of each cookie provides a visual focal point and a sweet chewiness. The overall texture is complex and highly satisfying.
Cereal cookies are a great, casual holiday treat that is very popular at cookie swaps. They offer a unique, comforting texture and a classic holiday blend of cherry and nuts.
Required Ingredients
- 2 cups all purpose flour
- 1 teaspoon baking soda
- 1/2 teaspoon salt
- 1 cup (2 sticks) unsalted butter, softened
- 1 cup granulated sugar
- 1 large egg
- 1 teaspoon vanilla extract
- 1 cup crushed cornflakes, plus extra for rolling
- 1/2 cup chopped walnuts
- 1/2 cup chopped dried cranberries or cherries
- 15 whole maraschino cherries, drained
Equipment List
- Electric mixer
- Large and medium mixing bowls
- Measuring cups and spoons
- Small cookie scoop
- Baking sheets
- Parchment paper
- Wire cooling rack
DIY Instruction
Make these crunchy, nostalgic holiday cereal drop cookies.
- Combine Dry Ingredients: In the medium bowl, whisk together the flour, baking soda, and salt.
- Cream Butter and Sugar: In your large mixing bowl, beat the softened butter and granulated sugar with the electric mixer until the mixture is light and fluffy (about 3 minutes). Beat in the egg and vanilla extract until combined.
- Form the Dough: Gradually add the dry ingredients into the wet mixture, mixing on low speed until the dough comes together. Use a rubber spatula to fold in the crushed cornflakes, chopped walnuts, and dried cranberries or cherries.
- Preheat and Prep: Set your oven to 375 degrees F. Line your baking sheets with parchment paper. Pour the extra cornflakes onto a plate for rolling.
- Scoop and Coat: Use a cookie scoop to form the dough into 1 and 1/2 inch balls. Gently roll the outside of each ball in the extra cornflakes to coat the surface. Place the balls on the prepared baking sheets.
- Garnish and Bake: Gently press one whole maraschino cherry into the center of each dough ball. Bake for 10 to 12 minutes. The cookies are ready when the edges are set and a rich golden brown.
- Cool: Let the cookies rest on the baking sheet for 5 minutes before transferring them to the wire cooling rack to cool completely.
45. Impressed Spiced Squares

This square cookie is baked from dough that has been rolled flat and beautifully imprinted with a geometric, checkerboard pattern. This design is achieved using a special patterned rolling pin or a large stamp, ensuring the finished baked square retains the detailed texture. The deep, rich brown color and the visible grain suggest a gingerbread or molasses based dough.
The texture of the dough is firm, which is essential for successfully transferring and holding the intricate design without losing definition. The square shape, neatly cut from the imprinted sheet, emphasizes the pattern’s precision. A simple wooden rolling pin rests nearby, the tool required for this task.
Baking cookies with this level of detail elevates a simple square into a refined treat. They are meant to be enjoyed for their texture and depth of spice flavor, often served without frosting to keep the pattern visible.
Required Ingredients
- 3 cups all purpose flour
- 1 tablespoon ground ginger
- 1 teaspoon ground cinnamon
- 1/2 teaspoon ground cloves
- 1/2 teaspoon baking soda
- 1/4 teaspoon salt
- 3/4 cup (1 and 1/2 sticks) unsalted butter, softened
- 1/2 cup packed brown sugar
- 1/2 cup molasses
- 1 large egg
Equipment List
- Electric mixer
- Large and medium mixing bowls
- Measuring cups and spoons
- Embossed or patterned rolling pin or cookie stamp
- Sharp square cutter or knife
- Baking sheets
- Parchment paper
DIY Instruction
Create these beautifully patterned and spiced square cookies.
- Combine Dry Ingredients: In the medium bowl, whisk together the flour, ginger, cinnamon, cloves, baking soda, and salt.
- Cream Butter and Sugar: In your large mixing bowl, beat the softened butter and brown sugar with the electric mixer until light and fluffy (about 3 minutes). Beat in the egg and molasses until completely combined.
- Form the Dough: Gradually add the dry ingredients into the wet mixture, mixing on low speed until a stiff dough forms.
- Chill (Crucial): Divide the dough into two disks, wrap tightly, and refrigerate for at least 1 hour. A cold, firm dough is required for stamping.
- Preheat and Prep: Set your oven to 350 degrees F. Line your baking sheets with parchment paper.
- Roll and Stamp: On a lightly floured surface, roll out one chilled disk of dough to about 1/4 inch thickness. Firmly and evenly press the embossed rolling pin or stamp over the dough to create the full pattern.
- Cut and Bake: Use a sharp square cutter or knife to cut out the individual patterned squares. Carefully transfer the cutouts to the prepared baking sheets. Bake for 8 to 10 minutes. The cookies are ready when the edges are set and slightly darker brown.
- Cool: Cool completely on the baking sheet to preserve the sharp pattern.
46. Layered Almond Florentine

This sophisticated creation is more of a confectionary pastry than a typical cookie, featuring thin, caramelized layers and a rich fruit and nut filling. The base is a thin, crisp almond lace cookie, and the entire piece is layered and built into a multi story treat. The dark caramel color is rich and glossy.
The layers are separated by a filling of candied orange peel or apricot, and topped with sliced almonds. The bottom layer is dipped in rich, dark chocolate, giving it a stable base and a contrasting flavor. The combination of caramelized sugar, chewy fruit, crunchy nuts, and smooth chocolate is truly decadent.
Florentine cookies are a refined European classic, often served for special occasions. They are crunchy, intensely flavorful, and look spectacular when stacked this way.
Required Ingredients
- For the Florentine Discs:
- 1/4 cup unsalted butter
- 1/4 cup granulated sugar
- 2 tablespoons honey or light corn syrup
- 1 tablespoon milk
- 1/2 cup sliced almonds
- 2 tablespoons all purpose flour
- For Filling and Base:
- 1/4 cup candied orange peel, chopped
- 4 ounces dark chocolate, chopped
Equipment List
- Small saucepan
- Measuring cups and spoons
- Small silicone mat or parchment paper
- Small offset spatula
- 2 inch round cookie cutter or glass (for shaping)
- Double boiler or microwave safe bowl for melting chocolate
DIY Instruction
Create these complex, refined layered almond Florentine cookies.
- Make the Florentine Base: In the small saucepan, combine the butter, granulated sugar, honey, and milk. Heat over medium low heat, stirring until the butter is melted and the sugar is dissolved. Remove from heat. Stir in the sliced almonds and flour until just combined.
- Bake the Discs: Set your oven to 350 degrees F. Drop teaspoon sized amounts of batter onto a silicone mat or parchment paper lined baking sheet, spacing them well apart. Use the back of a spoon to spread the batter very thinly into small circles (about 2 inches wide). Bake for 8 to 10 minutes until deeply golden brown.
- Shape and Cool: Immediately after removing the sheet from the oven, use a small round cutter or the rim of a glass to gently press the edges and neaten the rounds. Let them cool completely. They will be crisp. Repeat until all batter is used.
- Melt Chocolate: Melt the chopped dark chocolate using a double boiler or microwave safe bowl, stirring until completely smooth.
- Assemble the Layers: Dip the bottom of one cooled Florentine disc into the melted chocolate and set it aside to harden. Take two plain discs and spread a small amount of chopped candied orange peel between them to create a filling. Place the chocolate dipped disc on the bottom. Stack the layers to create a multi level confection.
- Set: Allow the chocolate base to set completely before serving.
47. Festive Meringue Drops

These airy, cloud like cookies are light and crisp, offering a wonderfully different texture than their buttery counterparts. The bright white color and piped swirl shape are characteristic of meringue cookies, which are essentially baked egg whites and sugar. They look delicate and fragile.
The piped swirls are neat and attractive, holding their shape perfectly after baking. Small red and green nonpareils are sprinkled over the tops of the white meringue, giving them a traditional holiday color scheme and adding a slight textural crunch. The light structure makes them incredibly easy to eat.
Meringues are naturally fat free and a lovely, delicate inclusion on a Christmas plate. They are best prepared on a dry day to ensure they bake correctly into a crisp, non sticky texture.
Required Ingredients
- 3 large egg whites, room temperature
- 1/4 teaspoon cream of tartar
- 3/4 cup granulated sugar
- 1 teaspoon vanilla extract
- For Decorating:
- Red and green nonpareils or sprinkles
Equipment List
- Electric mixer (stand mixer is best)
- Large, clean mixing bowl (must be completely free of grease)
- Measuring cups and spoons
- Piping bag fitted with a large star tip
- Baking sheets
- Parchment paper
- Small bowl for sprinkles
DIY Instruction
Create these light, festive, and crisp meringue drop cookies.
- Prepare Egg Whites: Place the room temperature egg whites in the large, grease free mixing bowl. Beat the egg whites with the electric mixer on medium speed until they become foamy. Add the cream of tartar and continue beating until soft peaks form.
- Add Sugar: Gradually add the granulated sugar, 1 tablespoon at a time, while continuing to beat on high speed. Continue beating for about 5 to 7 minutes until the meringue is very stiff, glossy, and holds its shape in firm peaks. Beat in the vanilla extract at the end.
- Preheat and Prep: Set your oven to 225 degrees F. Line your baking sheets with parchment paper.
- Pipe and Decorate: Scoop the meringue into the piping bag fitted with the large star tip. Pipe the meringue into small mounds onto the prepared baking sheets, swirling the tip upward to create a defined peak. Immediately sprinkle the tops with the red and green nonpareils.
- Bake: Bake for 60 to 90 minutes. The meringues are ready when they feel firm and lift easily from the parchment paper. Turn off the oven, prop the door open slightly, and let the meringues cool completely inside the oven (about 1 hour). This prevents cracking and helps them dry out.
- Cool: Store in an airtight container once completely cool.
48. Chocolate Peppermint Rounds

These dark, rich cookies are a wintery classic, featuring a deep chocolate base offset by a clean, white glaze. The cookie itself is a dark brown, suggesting a rich cocoa flavor and possibly a hint of mint or spice in the dough. The texture appears chewy and dense.
The white glaze is applied in a thick ring around the edge, leaving a dark, rich chocolate center exposed. This simple two toned decoration gives them a striking, festive appearance, reminiscent of a snowy ring. The glaze is likely a powdered sugar icing, offering a sweet counterpoint to the bittersweet chocolate base.
They are a straightforward, delicious choice for chocolate lovers during the holidays. The clean, defined edges and contrasting colors make them appealing and easy to display.
Required Ingredients
- For the Cookie:
- 1 and 1/2 cups all purpose flour
- 1/2 cup unsweetened cocoa powder
- 1 teaspoon baking soda
- 1/2 teaspoon salt
- 1 cup (2 sticks) unsalted butter, softened
- 1 cup granulated sugar
- 1 large egg
- 1 teaspoon vanilla extract
- 1/2 teaspoon peppermint extract (optional)
- For the Glaze:
- 1 cup powdered sugar
- 2 tablespoons milk or water
Equipment List
- Electric mixer
- Large and medium mixing bowls
- Measuring cups and spoons
- 2 inch round cookie cutter (optional)
- Baking sheets
- Parchment paper
- Wire cooling rack
- Small whisk and small bowl for the glaze
DIY Instruction
Bake these dark, rich chocolate rounds with a simple white glaze ring.
- Combine Dry Ingredients: In the medium bowl, whisk together the flour, cocoa powder, baking soda, and salt.
- Cream Butter and Sugar: In your large mixing bowl, beat the softened butter and granulated sugar with the electric mixer until the mixture is light and fluffy. Beat in the egg, vanilla extract, and peppermint extract (if using).
- Form the Dough: Gradually add the dry ingredients into the wet mixture, mixing on low speed until a dark, stiff dough forms.
- Chill and Prep: Shape the dough into a disk, wrap it, and refrigerate for 30 minutes. Set your oven to 350 degrees F. Line your baking sheets with parchment paper.
- Roll and Cut: On a lightly floured surface, roll the chilled dough to about 1/4 inch thickness. Use the round cookie cutter to cut out the shapes.
- Bake: Place the cutouts on the prepared baking sheets. Bake for 8 to 10 minutes. The cookies are ready when the edges are set. Cool completely on a wire rack.
- Make the Glaze: Whisk the powdered sugar and milk or water together in a small bowl until a thick, smooth glaze forms.
- Glaze Decorate: Using a small spoon or piping bag, carefully drizzle or pipe a thick ring of white glaze around the edge of the top of each cooled cookie, leaving the center exposed. Allow the glaze to set completely before serving.
49. Checkerboard Butter Squares

These highly structured cookies are a delightful visual puzzle, featuring a striking checkerboard pattern of alternating vanilla and chocolate squares. This effect is achieved by chilling and assembling logs of the two different colored doughs and then slicing them. The precise, neat corners show the care taken in the assembly.
The texture of both the dark chocolate and pale vanilla squares appears crisp and buttery, a classic shortbread or butter cookie base. The perfect alignment of the squares makes them very elegant and visually appealing on a platter. They offer a simple yet satisfying contrast of flavors in every bite.
Checkerboard cookies, or Neapolitan cookies, are a fun holiday project that result in a beautiful, uniform finished product. They are sturdy, hold their flavor well, and are always impressive.
Required Ingredients
- 2 and 1/2 cups all purpose flour
- 1/2 teaspoon salt
- 1 cup (2 sticks) unsalted butter, softened
- 1 cup granulated sugar
- 1 large egg
- 1 teaspoon vanilla extract
- 3 tablespoons unsweetened cocoa powder
Equipment List
- Electric mixer
- Large mixing bowls (2)
- Measuring cups and spoons
- Ruler
- Sharp knife
- Plastic wrap
- Baking sheets
- Parchment paper
DIY Instruction
Create these striking, two toned checkerboard butter squares.
- Make Base Dough: In the large mixing bowl, beat the softened butter and granulated sugar until light and fluffy. Beat in the egg and vanilla extract. Gradually add the flour and salt, mixing until a soft dough forms.
- Divide and Flavor: Divide the dough exactly in half. Set one half aside (this is the vanilla dough). Into the second half, mix in the cocoa powder until a uniformly dark chocolate dough forms.
- Shape the Logs: Roll both the vanilla and chocolate doughs into long, thin logs, each approximately 1 x 1 x 12 inches. Wrap and chill them for at least 30 minutes until firm.
- Assemble the Checkerboard: Cut both logs into three equal 1 x 1 x 4 inch strips. To assemble one block, lay one chocolate strip, then one vanilla strip, then one chocolate strip side by side, pressing them gently together. For the second layer, alternate: vanilla, chocolate, vanilla. For the third layer, repeat the first layer: chocolate, vanilla, chocolate. Gently press the three layers together to form a large 3 x 3 x 4 inch log. Repeat this with the remaining strips to form a second log.
- Chill (Crucial): Wrap both assembled logs tightly in plastic wrap and chill for at least 2 hours, or until very firm. This is essential for clean slicing.
- Preheat and Slice: Set your oven to 350 degrees F. Line your baking sheets with parchment paper. Use a sharp knife to slice the chilled log into 1/4 inch thick squares.
- Bake: Place the slices on the prepared baking sheets. Bake for 10 to 12 minutes. The cookies are ready when the edges are set and lightly golden.
- Cool: Cool completely on the wire rack.
50. Orange Almond Biscotti

This recipe completes our collection with a stunning presentation of the traditional twice baked Italian cookie. The rich, golden brown slices feature a dry, crunchy texture and are studded with whole almonds and visible pieces of orange zest. The flavor profile is warmly citrusy and nutty.
The cross section of the slices beautifully reveals the scattered almonds and the cake like interior, which becomes crisp during the second bake. This particular display stacks the cooled biscotti artfully, garnished with curls of fresh orange zest to emphasize the flavor. The color is deep and inviting.
Biscotti are wonderful for the holidays because of their longevity and their texture, which is perfect for dipping into espresso or Vin Santo. The almond and orange combination is truly timeless and festive.
Required Ingredients
- 2 cups all purpose flour
- 1 teaspoon baking powder
- 1/4 teaspoon salt
- 1/2 cup (1 stick) unsalted butter, softened
- 3/4 cup granulated sugar
- 2 large eggs
- 1 teaspoon vanilla extract
- 2 tablespoons orange zest
- 1 tablespoon fresh orange juice
- 3/4 cup whole blanched almonds
Equipment List
- Electric mixer
- Large and medium mixing bowls
- Measuring cups and spoons
- Baking sheet
- Parchment paper
- Sharp serrated knife
- Wire cooling rack
DIY Instruction
Follow these steps to create beautiful, crunchy orange almond biscotti.
- Combine Dry Ingredients: In the medium bowl, whisk together the flour, baking powder, and salt.
- Cream Butter and Sugar: In your large mixing bowl, beat the softened butter and granulated sugar with the electric mixer until combined. Beat in the eggs one at a time, followed by the vanilla extract, orange zest, and orange juice.
- Form the Dough: Gradually add the dry ingredients into the wet mixture, mixing on low speed until a sticky dough forms. Fold in the almonds using a rubber spatula.
- First Bake Prep: Line your baking sheet with parchment paper. Lightly flour your hands and shape the dough into a log on the prepared baking sheet. The log should be approximately 12 inches long and 2 inches wide.
- First Bake: Bake the log at 350 degrees F for 25 to 30 minutes, or until the log is firm to the touch and lightly golden brown.
- Slice: Remove the log from the oven and let it cool on the baking sheet for 10 minutes. Reduce the oven temperature to 300 degrees F. Using a sharp serrated knife, carefully slice the log diagonally into pieces about 1/2 inch thick.
- Second Bake: Lay the sliced biscotti pieces cut side up on the baking sheet. Bake for another 10 minutes. Flip the pieces over and bake for an additional 10 minutes.
- Cool: The biscotti are finished when they feel firm and crunchy. Transfer them to the wire rack to cool completely.
Key Takeaways
- Timeless Classics Reign Supreme: The most popular holiday cookies often rely on simple, high quality ingredients like butter, sugar, and classic spices (ginger, cinnamon, nutmeg).
- Texture is Key to Variety: Offer a range of textures on your platter, including crunchy Biscotti, chewy Molasses Crinkles, and tender Shortbread, to satisfy every preference.
- Chilling Ensures Success: For precise shapes like cutouts and pinwheels, always chill the dough as instructed; this prevents spreading and keeps patterns sharp.
- Start Simple and Build: Do not feel obligated to tackle complex layered recipes right away. Simple drop cookies like Snickerdoodles or Chocolate Blossoms are just as beloved and satisfying to make.
- Gifting Requires Sturdy Cookies: When packaging cookies for gifts, choose sturdier varieties like Biscotti, Shortbread, and Magic Bars, as they travel and keep better than delicate meringues or heavily frosted treats.
You have now journeyed through the fifty most essential and classic Christmas cookie recipes, each one guaranteed to bring cheer to your holiday table. Baking is truly a wonderful way to connect with the past and create joy in the present. This list provides every tool you need to succeed.
Remember, the most important ingredient in any holiday recipe is the love and care you put into making it. Do not worry about achieving absolute uniformity; embrace the homemade charm! Every pinwheel, crinkle, and cutout you bake contributes to the warmth and magic of the season.
We hope these traditional recipes inspire you to begin your holiday baking adventure today. Gather your ingredients, put on some festive music, and start creating memories that will last long after the last cookie has been eaten. Happy baking!