The holidays bring a special kind of warmth, and giving a thoughtful present is part of the joy. Finding gifts that truly resonate with loved ones can sometimes feel challenging. Fortunately, there is a whole world of homemade, edible treasures waiting to be shared.
Edible Food Gifts
Gifts you make in your own kitchen feel deeply personal and carry a flavor that mass-produced items simply cannot match. Creating an edible treat saves you a trip to the busy shopping centers, allowing you to focus on the pleasure of making something by hand. It is a wonderful way to express affection during the festive season.
This collection of 45 easy recipes offers a wide range of options, whether you need a quick assembly project or a delicious baked good. From cozy spice mixes to rich confectionery and savory dips, these recipes ensure everyone on your list receives a memorable, delicious offering. Get ready to wrap up some warmth and cheer this year!
This homemade gift feels incredibly special and elevates any holiday meal instantly. Offering something unique and utterly delicious shows how much thought you put into their present. This butter is so easy to prepare, making it a wonderful option for busy gifting seasons.
The bright colors of the sun-dried tomatoes and fresh herbs create an eye-catching spiral when sliced. Imagine spreading this flavorful, rich butter on crusty bread, slathering it over grilled steak, or melting it onto roasted vegetables. It’s an easy way for your recipient to add gourmet flair to their cooking.
Giving a consumable item like this is always a hit because it’s something people genuinely enjoy using. Present it tied with twine and placed inside a small linen bag for a rustic, charming presentation. This is truly a standout item in the world of easy edible presents.
Required Ingredients
1 cup (2 sticks) unsalted butter, softened to room temperature
1/2 cup sun-dried tomatoes packed in oil, drained and chopped finely
1/4 cup fresh basil leaves, finely chopped
2 tablespoons fresh parsley, finely chopped
1 teaspoon minced garlic or garlic powder
1/2 teaspoon kosher salt
1/4 teaspoon black pepper
(Optional) 1-2 tablespoons grated Parmesan cheese
Required Equipment
Medium mixing bowl
Rubber spatula or wooden spoon
Plastic wrap or parchment paper
Measuring cups and spoons
Sharp knife and cutting board
DIY Instruction Steps
Soften the Butter: Take the two sticks of butter out of the refrigerator and let them sit at room temperature until they are thoroughly softened. This might take one to two hours. The butter needs to be soft enough to easily mix with the other ingredients, but not melted.
Chop the Savory Fillings: On a cutting board, use a sharp knife to finely chop the drained sun-dried tomatoes, fresh basil, and fresh parsley. Mince the garlic if you are using fresh. Place all these chopped ingredients into your medium mixing bowl.
Combine Ingredients: Add the softened butter to the bowl with the chopped herbs and sun-dried tomatoes. Sprinkle in the kosher salt, black pepper, and the optional Parmesan cheese.
Mix Thoroughly: Use a rubber spatula or wooden spoon to thoroughly combine all the ingredients. You need to mix until the butter is uniformly seasoned and the savory components are evenly distributed throughout the mixture.
Prepare for Rolling: Tear off a long sheet of plastic wrap or parchment paper, roughly 12 to 15 inches long. Lay it flat on your counter.
Shape the Log: Scoop the entire butter mixture onto the center of the plastic wrap or parchment paper. Use the spatula to roughly shape the butter into a log or cylinder shape, approximately 6 to 8 inches long.
Roll and Tighten: Carefully lift the edge of the wrap or paper closest to you and fold it over the butter. Gently roll the log forward, using the wrap to help maintain the cylindrical shape. Once fully rolled, twist the ends of the wrap tightly, like a candy wrapper, to compact the butter and make a firm, clean log.
Chill Until Firm: Place the tightly wrapped butter log into the refrigerator. Allow it to chill for at least three to four hours, or until it is completely firm and holds its shape when unwrapped.
Present and Store: Before gifting, you can remove the plastic wrap and re-wrap the log in a fresh piece of parchment paper, tying the ends with natural twine for a charming look. Advise the recipient to keep the butter refrigerated.
2. Festive Fruity Cereal Treats
Edible Food Gifts
These bright, colorful treats immediately capture the fun spirit of the season. They are shaped like stars and holiday trees, offering a delightful twist on a classic childhood snack. They are quite easy to make and the colors are naturally eye-catching.
Drizzled with white chocolate and sprinkled with extra holiday cheer, these squares look stunning when packaged. Giving a gift like this brings a cheerful, nostalgic touch to anyone’s holiday celebration. The simple preparation process means you can easily make a large batch for many friends and neighbors.
Wrap each shape individually in cellophane bags, tied with a cheerful red ribbon for a neat, sanitary presentation. These squares are a surefire hit with families, making a lovely item to share around the table. They are a delightful, no-bake option for your homemade gift list.
Required Ingredients
4 tablespoons unsalted butter
1 package (10 ounces) marshmallows
6 cups fruity ring-shaped cereal
1/2 cup white chocolate melting wafers or chips
Holiday sprinkles (optional)
Required Equipment
Large saucepan
Rubber spatula
9×13 inch baking pan
Parchment paper
Holiday-themed cookie cutters (star, tree)
Small microwave-safe bowl
DIY Instruction Steps
Prepare the Pan: Line your 9×13 inch baking pan with parchment paper, leaving an overhang on the sides. This helps immensely when lifting the mixture out later. Set this prepared pan aside.
Melt the Butter: Place a large saucepan over medium-low heat. Add the four tablespoons of butter and allow it to melt completely. Swirl the pan occasionally so the butter melts evenly without browning.
Add Marshmallows: Once the butter is melted, add the entire bag of marshmallows. Continuously stir them using a rubber spatula until the marshmallows are completely melted and the mixture is smooth and gooey. Remove the saucepan from the heat immediately.
Combine with Cereal: Gently pour the six cups of fruity cereal into the marshmallow mixture. Working quickly, use the spatula to fold the cereal into the marshmallow mix until every piece of cereal is coated. Take care not to crush the cereal too much while mixing.
Press into Pan: Transfer the entire warm mixture into your prepared baking pan. Use the back of the spatula or a piece of parchment paper to gently press the mixture down into an even layer. Do not press too hard, as this can result in a hard texture. Let the mixture cool completely for about one hour at room temperature.
Cut the Shapes: Once cooled and firm, lift the block of treats out of the pan using the parchment paper overhang. Place it on a cutting board. Press your holiday-themed cookie cutters deeply into the treat block to cut out various shapes. Remove the excess around the shapes.
Decorate: Place the white chocolate melting wafers in a small microwave-safe bowl. Heat them in 30-second intervals, stirring between each, until the chocolate is smooth and fully melted. Drizzle the melted white chocolate over the cut-out shapes using a spoon or a piping bag with a tiny tip. Add sprinkles immediately if using.
Package for Gifting: Let the chocolate drizzle set completely (about 15 minutes). Carefully slide each decorated treat into a clear cellophane bag and tie the top closed with a festive ribbon.
3. Gourmet Mulled Wine Spice Kit
Edible Food Gifts
This gift is incredibly thoughtful and provides a wonderful, cozy experience right out of the box. Giving someone a bottle of their favorite red wine paired with pre-measured spice sachets makes preparing a warm holiday beverage effortless. The presentation, nestled in a box with natural filler, looks polished and high-end.
The aroma of cinnamon, star anise, and cardamom immediately evokes feelings of comfort and winter celebrations. Each little cloth bag holds the correct proportions of warming spices needed to infuse a bottle of wine. This kit is far more personal than just handing over a bottle of wine.
It encourages the recipient to slow down and enjoy a relaxing evening. Simply include a small tag with easy heating instructions so they know exactly what to do. This gift is a charming expression of holiday cheer and easily customizable to fit your budget.
Required Ingredients
Whole star anise
Cinnamon sticks
Whole cloves
Green cardamom pods
Dried orange peel or dried ginger slices (optional)
A bottle of medium-bodied red wine (like Merlot or Cabernet Sauvignon)
Required Equipment
Small, breathable cloth or muslin bags with drawstrings (sachets)
Measuring spoons
Small funnel (optional, for filling bags)
Gift box with crinkle cut paper or straw filler
Twine and small card tags
DIY Instruction Steps
Measure the Spices: Decide on a basic recipe for one bottle of wine (about 750ml). A good starting mix is 2 cinnamon sticks, 4 star anise, 10 whole cloves, 5 cardamom pods, and a teaspoon of dried orange peel. Prepare enough of this mixture for the number of sachets you wish to include.
Fill the Sachets: Using a measuring spoon, add one batch of the spice mixture to each cloth or muslin bag. If the opening is small, a small funnel can assist in placing the spices without making a mess.
Secure the Sachets: Pull the drawstrings tightly on each bag to seal the spices inside securely. If the bags do not have drawstrings, gather the top and tie them tightly closed with a small piece of natural twine.
Create Tags: Write or print simple, appealing tags that say “Mulled Wine Spice Sachets.” Punch a hole in the tag and attach one to each sachet with a piece of twine.
Prepare the Box: Place a layer of crinkle-cut paper or straw filler into the bottom of your gift box to provide cushioning and visual appeal.
Arrange the Contents: Carefully place the bottle of red wine inside the box. Arrange the filled spice sachets around the bottle. You can also include a few extra decorative whole spices, like a couple of cinnamon sticks or a few slices of fresh ginger, for added charm.
Add Instructions: Include a simple instruction card for the recipient: “Combine the bottle of wine and one spice sachet in a pot. Heat gently for 20 minutes (do not boil). Remove the sachet before serving.” Close the box and tie it with a festive ribbon.
4. Festive Layered Chocolate Bark
Edible Food Gifts
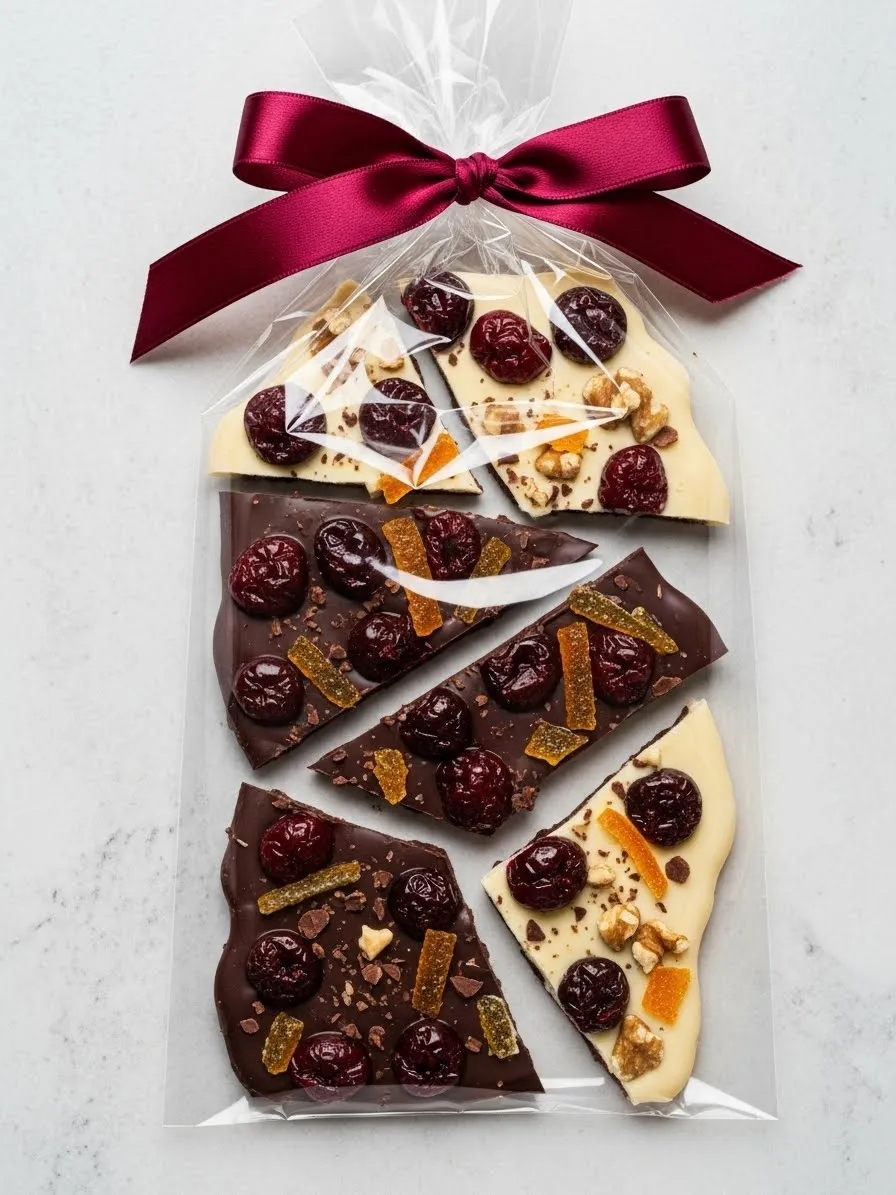
Chocolate bark is a stunning and customizable confection that looks gourmet but requires very little skill. This layered version, featuring both dark and white chocolate, offers a beautiful contrast and rich flavor profile. Topped with bright red cherries, candied orange, and crunchy walnuts, it looks incredibly festive.
This gift is satisfying because you can easily tailor the toppings to the preferences of your friends and family. The asymmetrical, broken pieces give the bark an artisanal, handcrafted appearance. Breaking the chocolate into varied shapes and sizes adds character to the final presentation.
Pack the bark pieces in a clear cellophane bag and secure the top with a luxurious ribbon for an elegant touch. The combination of rich, dark chocolate and sweet, creamy white chocolate is always a crowd-pleaser. It’s an effortless holiday treat that feels expensive and luxurious to receive.
Required Ingredients
8 ounces good quality dark chocolate (chips or chopped bars)
8 ounces good quality white chocolate (chips or chopped bars)
1/2 cup dried cherries or cranberries
1/4 cup chopped walnuts or pecans
1/4 cup finely chopped candied orange peel or finely crushed brittle
Required Equipment
Baking sheet
Parchment paper
Two microwave-safe bowls (or a double boiler setup)
Rubber spatula
Sharp knife (for breaking the bark)
DIY Instruction Steps
Prepare the Surface: Line a large baking sheet with parchment paper. This will prevent the chocolate from sticking and make removal much easier. Set the sheet aside.
Melt the Dark Chocolate: Place the dark chocolate in one of the microwave-safe bowls. Heat it in 30-second intervals, stirring thoroughly after each interval, until the chocolate is smooth and completely melted. Be careful not to overheat it.
Spread the First Layer: Pour the melted dark chocolate onto the center of the prepared baking sheet. Use the rubber spatula to quickly spread the chocolate into a thin, even layer, roughly 1/8 to 1/4 inch thick. Work quickly before it sets.
Chill Slightly: Place the baking sheet into the refrigerator for approximately 15 to 20 minutes, allowing the dark chocolate to set just enough so that the white chocolate layer won’t completely blend into it.
Melt the White Chocolate: While the dark chocolate sets, place the white chocolate in the second bowl and melt it using the same careful 30-second interval method. Stir until fully smooth.
Layer and Top: Remove the baking sheet from the refrigerator. Pour the melted white chocolate directly over the set dark chocolate layer. Spread it gently to cover the dark layer, being careful not to disturb the bottom layer too much.
Add Toppings: Immediately and generously sprinkle the dried cherries, chopped nuts, and candied orange peel over the warm white chocolate surface. Gently press the toppings into the chocolate so they adhere securely.
Cool Completely: Return the baking sheet to the refrigerator for at least two hours, or until the entire slab of chocolate is completely hard and cool.
Break and Package: Once fully set, lift the bark off the pan using the parchment paper. Place it on a cutting board and use a sharp knife or your hands to break the large slab into smaller, rustic pieces. Package the pieces into clear plastic bags and tie the top with a colorful, wide ribbon.
5. Spicy Kimchi Savory Pancake Mix
Edible Food Gifts
Giving a savory mix is a fresh, thoughtful change from the usual sweet holiday treats. This Korean-inspired pancake mix allows your recipient to quickly whip up a satisfying and flavorful meal. The bright, inviting packaging shows the unique product inside.
The beauty of a mix is its convenience; the person receiving it only needs to add a couple of wet ingredients to have a fresh, hot meal. It’s a great gift for the food lover who appreciates global flavors and easy cooking. The focus on kimchi means the resulting pancakes will be spicy, tangy, and crunchy.
Making a mix in a jar or a sealed, labeled bag is an easy assembly line project that saves you cooking time. Simply be sure to include a clear list of the wet ingredients they need to add (like kimchi and water) and basic cooking instructions. This provides a creative, homemade option that extends beyond just desserts.
Required Ingredients (For the Dry Mix)
1 1/2 cups all-purpose flour
1/2 cup rice flour (optional, but makes a crispier pancake)
1 tablespoon garlic powder
1 tablespoon onion powder
2 teaspoons salt
1 teaspoon cayenne pepper or Korean chili flakes (Gochugaru)
1 teaspoon black pepper
(Optional) Dried, shredded kimchi or dried scallions for extra flavor
Required Equipment
Large mixing bowl
Whisk
Airtight, resealable bag or jar for gifting
Measuring cups and spoons
DIY Instruction Steps
Measure Dry Ingredients: Carefully measure all the dry ingredients: the all-purpose flour, rice flour (if using), garlic powder, onion powder, salt, cayenne pepper (or chili flakes), and black pepper. Place all these measured items into a large mixing bowl.
Whisk Thoroughly: Use a whisk to vigorously blend all the ingredients together. This step is extremely important to ensure the salt, spices, and flours are evenly distributed throughout the entire mix. Whisk for at least two minutes.
Add Dried Flavoring (Optional): If you are including any dried kimchi or dried scallions, add them now and stir them into the mix using the whisk or a spoon.
Package the Mix: Carefully pour the entire prepared mix into the clean, airtight gift container, whether it’s a jar or a resealable bag. Seal it tightly to maintain freshness.
Create the Label: Print or write a clear, attractive label that states what the mix is (“Spicy Kimchi Pancake Dry Mix”).
Write Instructions: On the back of the label or on a separate card, provide the simple instructions for use. Example Instructions to include: “To make pancakes, combine the entire dry mix with 1 cup of drained, chopped kimchi and 1 1/2 cups of cold water. Mix just until combined. Cook 1/4 cup portions on a lightly oiled skillet over medium heat for 3-4 minutes per side, until golden brown.”
Finalize the Gift: Affix the label and instruction card to the container. Present it as is, or tie a colorful ribbon around the jar opening or the bag seal.
6. Sea Salted Coffee Nut Fudge Squares
Edible Food Gifts
Fudge is the quintessential holiday treat, and this version, featuring rich coffee flavor, crunchy nuts, and a sprinkle of sea salt, is a true indulgence. These neat, dark squares are visually appealing, especially when topped with the contrasting white salt flakes. Placing them in decorative cupcake liners makes them easy to handle and adds a finished look.
Gifting homemade fudge shows significant care and attention to detail. This recipe is surprisingly quick, relying on condensed milk rather than a temperamental sugar thermometer. The deep, rich taste of chocolate blended with the slight bitterness of coffee is incredibly satisfying.
Presentation is key for fudge; try packing a few squares in a small, decorated box, tied with a ribbon for a stunning gift. This treat is especially suited for those who appreciate a luxurious, rich sweet with a touch of savory saltiness.
1/2 teaspoon instant coffee granules or espresso powder
3/4 cup chopped walnuts or pecans
Flaky sea salt (like Maldon) for topping
Required Equipment
8×8 inch baking pan
Parchment paper
Medium saucepan or microwave-safe bowl
Rubber spatula
Sharp knife
DIY Instruction Steps
Prepare the Pan: Line an 8×8 inch baking pan with parchment paper, allowing the paper to overhang on two opposite sides. This will act as a sling to lift the fudge out later. Lightly grease the exposed pan edges if needed.
Combine and Melt: In a medium saucepan over low heat, combine the chocolate chips, sweetened condensed milk, and butter. Alternatively, you can use a microwave-safe bowl and heat in 30-second bursts, stirring in between. The key is to melt the mixture slowly until it is completely smooth and glossy.
Add Flavoring: Once melted, remove the mixture from the heat. Stir in the vanilla extract and the instant coffee or espresso powder until they are fully dissolved and incorporated into the chocolate base.
Fold in Nuts: Gently fold in the chopped walnuts or pecans until they are evenly distributed throughout the fudge mixture.
Pour and Press: Quickly pour the warm fudge mixture into your prepared 8×8 inch pan. Use the rubber spatula to spread it into an even layer.
Sprinkle Salt: Immediately sprinkle the top of the fudge evenly with flaky sea salt. The salt must be added before the surface cools and sets.
Chill: Place the pan in the refrigerator and chill for at least three to four hours, or until the fudge is completely firm and set.
Cut and Package: Use the parchment paper overhang to lift the entire block of fudge out of the pan. Place it on a cutting board and use a sharp knife to cut it into neat, approximately 1-inch squares. Place each square into a small decorative paper liner (like a mini cupcake wrapper) and pack them into a sturdy, festive gift container.
7. Custom Spicy Chili & Garlic Oil
Edible Food Gifts
Infused oils are an incredibly useful and impressive homemade gift, perfect for the avid cook. This particular blend, featuring vibrant chili flakes and aromatic garlic, makes a stunning visual statement in a clear glass bottle. The intense red color and visible seeds look appealingly spicy.
This oil can be used as a finishing drizzle over noodles, pizza, eggs, or roasted vegetables. It adds a wonderful depth of flavor and a manageable kick of heat to simple dishes. Creating a homemade blend like this shows your appreciation for their culinary interests.
The presentation with a clean, attractive label and a bright ribbon tied around the neck elevates this item considerably. Be sure to use clean, high-quality ingredients and a good quality, mild-flavored oil as the base. This spicy condiment is a gift they will reach for again and again.
1/2 cup dried red chili flakes (adjust amount for desired heat)
4-6 cloves fresh garlic, thinly sliced
1 teaspoon salt
(Optional) 1-2 teaspoons Sichuan peppercorns or dried spices for complexity
Required Equipment
Medium saucepan
Fine-mesh sieve or cheesecloth
Clean, sterile glass bottle with a tight-sealing cap or cork (like a hot sauce bottle)
Small funnel
DIY Instruction Steps
Prepare the Aromatics: Peel and thinly slice the fresh garlic cloves. Gather your chili flakes and any optional spices you wish to include.
Heat the Oil: Pour the neutral oil into a medium saucepan. Add the sliced garlic and the chili flakes. Place the saucepan over low heat. The goal is to gently warm the oil and infuse the flavor, not to deep-fry the contents.
Infuse Slowly: Allow the oil to gently heat for about 15 to 20 minutes. You should see very small, slow bubbles forming around the garlic, which will turn a light golden color. Do not let the garlic brown or the oil smoke, as this will lead to a bitter flavor. Remove the saucepan from the heat immediately.
Cool and Steep: Stir in the salt and any optional spices. Let the mixture cool completely to room temperature. It is essential to let the mixture steep for at least 3-4 hours or even overnight to allow the flavors to deepen fully.
Strain (Optional but Recommended): Place a fine-mesh sieve (or a sieve lined with cheesecloth) over a clean bowl. Carefully pour the cooled oil mixture through the sieve to remove the solid pieces of garlic and chili flakes. For a spicier, more rustic oil, you can leave some of the chili flakes in the bottle.
Bottle the Oil: Using a small funnel, pour the strained oil into the clean, sterile glass bottle. Fill the bottle to just below the neck. Seal it tightly.
Label and Present: Create an attractive label with the name “Spicy Chili & Garlic Infused Oil.” Attach the label to the bottle, and tie a festive ribbon around the neck. Crucial Safety Note: If leaving fresh garlic in oil, advise the recipient to store it in the refrigerator and use it within one week to prevent the risk of botulism. For longer shelf life, ensure you strain all fresh solids out or rely only on dried ingredients.
8. Layered Earl Grey & Lemon Scone Mix
Edible Food Gifts
A jar mix is a beautifully layered gift that is both visually appealing and highly practical. This mix features the elegant flavors of Earl Grey tea and bright lemon zest, promising a lovely morning or afternoon tea experience. The distinct layers of dry ingredients create a charming and rustic look.
Giving a baking mix simplifies the process for the recipient, who only needs to add basic wet ingredients like butter and an egg. This gift encourages a moment of cozy baking and results in a delicious, moist loaf perfect for sharing during the holidays. The warm aroma of citrus and bergamot while baking will fill their home with holiday cheer.
Secure the contents with a tightly sealed lid and a decorative fabric cover, fastened with twine. Make sure your instructions clearly state how to combine the mix and what baking temperature to use. This is a cozy, sophisticated gift perfect for anyone who loves baking or afternoon tea.
Medium-sized, wide-mouth glass jar (approximately 1 quart/liter)
Measuring cups and spoons
Small bowl or container for pre-mixing
Funnel (optional, for easy layering)
DIY Instruction Steps
Prepare the Tea and Zest: Measure out the loose-leaf Earl Grey tea. If using tea bags, cut them open and empty the contents. Combine the tea with the measured dried lemon zest.
Combine Flour Layer: In a separate bowl, whisk together the flour, baking powder, and salt. This ensures the leavening agent is evenly dispersed.
Layer the Mix: The visual appeal comes from distinct layering. Using a funnel or spoon, carefully add the ingredients to the jar in the following order, pressing each layer down gently with the back of a spoon before adding the next:
Layer 1: The raisins/currants.
Layer 2: Half of the brown sugar.
Layer 3: Half of the pre-mixed flour/baking powder/salt mixture.
Layer 4: The tea and lemon zest mixture (this layer is thinner but stands out).
Layer 5: The remaining half of the flour mixture.
Layer 6: The remaining half of the brown sugar.
Layer 7: The granulated sugar.
Seal and Decorate: Screw the lid on the jar tightly. Cover the lid with a circle of decorative cloth or linen, securing it around the rim with a piece of twine.
Attach Instructions: Write or print out the simple baking instructions on a nice card and tie it to the jar with the twine. Example Instructions to include: “Preheat oven to 400 deg F (200 deg C). Empty jar contents into a bowl. Cut 1/2 cup (1 stick) of cold butter into the mix. Add 1 beaten egg and 1/2 cup milk. Mix until just combined. Shape dough, cut into wedges, and bake for 12-15 minutes.”
9. Spicy Five-Spice Candied Ginger
Edible Food Gifts
These beautiful, chewy pieces of candied ginger, dusted in warm five-spice powder, make an exquisite homemade confection. They are presented in a charmingly decorated tin, which adds to the luxurious, artisanal feel of the gift. The deep amber color of the ginger is highly appealing.
Candied ginger is known for its sweet heat, offering a warm, soothing quality that is especially appreciated during the winter season. The addition of five-spice (which typically includes cinnamon, cloves, fennel, star anise, and peppercorns) adds layers of complex, earthy flavor. This is a unique and elevated item to share.
This gift is a thoughtful option for those who enjoy sophisticated, slightly unconventional flavors. The small tin is easily portable, making it a lovely stocking stuffer or small offering. It truly demonstrates a commitment to creating something memorable and unusual.
Required Ingredients
1 pound fresh ginger root, peeled
4 cups granulated sugar, divided
4 cups water
2 teaspoons Chinese Five-Spice Powder
1/2 teaspoon kosher salt
Required Equipment
Saucepan
Sharp knife and cutting board
Slotted spoon
Wire rack
Parchment paper
Small, airtight decorative tins for gifting
DIY Instruction Steps
Prepare the Ginger: Carefully peel the ginger root using a vegetable peeler or the edge of a spoon. Slice the peeled ginger into pieces approximately 1/4 inch thick.
First Boil (Blanching): Place the sliced ginger in a saucepan and cover it with cold water. Bring the water to a boil, then immediately drain the water off the ginger. Repeat this step two more times. This crucial step removes some of the intense heat and mellows the ginger’s flavor.
Make the Syrup: Return the blanched ginger to the saucepan. Add the four cups of water and two cups of the granulated sugar. Bring the mixture to a slow boil, then reduce the heat to a simmer. Simmer the ginger gently for approximately 30 to 45 minutes, or until the ginger is translucent and soft.
Drain the Syrup: Remove the saucepan from the heat. Carefully use a slotted spoon to transfer the soft, syrupy ginger pieces onto a wire rack that has been placed over a sheet of parchment paper. Let the pieces sit for about 10 minutes to drain off excess syrup.
Prepare the Coating: In a shallow bowl, combine the remaining two cups of granulated sugar, the Chinese Five-Spice Powder, and the salt. Whisk these ingredients together until they are evenly mixed.
Coat the Ginger: While the ginger pieces are still tacky and slightly warm, toss them gently in the five-spice sugar mixture until each piece is fully and evenly coated.
Dry and Set: Return the coated ginger pieces to the parchment-lined wire rack. Allow them to air dry at room temperature for at least 12 hours, or until the coating is dry to the touch and the ginger is chewy.
Package the Gift: Carefully transfer the finished candied ginger pieces into small, airtight, decorative tins. Close the lid securely and add a decorative label or bow.
10. Dill Pickle Popcorn Seasoning
Edible Food Gifts
A homemade seasoning blend is a creative, useful gift that encourages a cozy movie night at home. This dill pickle flavor is unconventional and fun, offering a tangy, savory twist on a classic snack. Presented in neat shaker bottles next to a bag of freshly popped kernels, it makes a complete and charming package.
This spice mix is easy to assemble and requires no cooking, making it a low-effort, high-impact item for your gift list. The bright green color of the seasoning looks vibrant and appealing through the shaker bottle. This is a surefire hit for anyone who enjoys bold, punchy flavors.
The containers are small, making them easy to transport and store, and they are reusable. Simply attach a tag with a suggestion to coat freshly popped corn generously after spraying it lightly with oil or butter. This savory gift is both unique and incredibly practical.
Required Ingredients
1/4 cup dried dill
1/4 cup dried chives (optional, for extra onion flavor)
1/4 cup powdered buttermilk or skim milk powder
2 tablespoons fine salt (or half salt, half powdered sugar for a balanced flavor)
Two small, clean shaker bottles with tight-fitting lids
Small funnel (optional, for filling)
DIY Instruction Steps
Measure the Ingredients: Accurately measure all the dry seasoning ingredients: dried dill, chives (if using), powdered buttermilk, fine salt, garlic powder, onion powder, and the crucial citric acid powder. Place them all into a small mixing bowl.
Mix the Blend: Use a whisk to blend all the ingredients thoroughly. This is important to ensure the citric acid and salt are evenly distributed throughout the green herbs, so every shake delivers consistent flavor. Whisk for at least two minutes.
Prepare the Shaker Bottles: Ensure your shaker bottles are clean and completely dry. You can sanitize them by washing them in hot, soapy water and letting them air dry fully.
Fill the Bottles: Using a small funnel (this prevents spills), carefully pour the prepared seasoning mix into the shaker bottles. Fill them up to the neck.
Seal and Label: Screw the lids on tightly. Create a clean, attractive label that clearly states “Dill Pickle Popcorn Seasoning.” Apply the label to the front of each bottle.
Package for Gifting: Place the finished seasoning bottle(s) alongside a bag of unpopped kernels or a small, clear cellophane bag of pre-popped popcorn. You can tie the top of the popcorn bag with a bright green ribbon to match the label.
11. Custom Lemon & Poppy Seed Loaf Mix
Edible Food Gifts
This beautifully layered jar offers a ready-to-bake experience, combining bright lemon flavor with the subtle nuttiness of poppy seeds. The distinct layers of dry ingredients, separated by color and texture, create a stunning visual gift that looks homemade and thoughtful. The jar, complete with a small bag of lemon extract, makes for an attractive and complete present.
Giving a baking mix simplifies the process for the recipient, who only needs to add basic wet ingredients like eggs and butter. This gift encourages a moment of cozy baking and results in a delicious, moist loaf perfect for sharing during the holidays. It is a fantastic option for friends who enjoy baking but are short on time.
The clear glass jar allows the beautiful textures—from the fine yellow lemon powder to the tiny black poppy seeds and rustic grain—to shine through. This mix provides a sophisticated, citrusy break from the heavier holiday chocolate and spice flavors.
Required Ingredients (For the Dry Mix)
1 3/4 cups all-purpose flour
3/4 cup granulated sugar
1 tablespoon baking powder
1/2 teaspoon salt
1/4 cup poppy seeds
2 tablespoons dried lemon zest or yellow lemon cake powder
1/2 cup coarsely ground oats or whole wheat flour (for layering texture)
(Optional) 1 small bottle of lemon extract (for attaching to the jar)
Required Equipment
Large, wide-mouth glass jar (approximately 1 quart/liter)
Measuring cups and spoons
Small mixing bowl for pre-mixing
Funnel (optional, for neat layering)
DIY Instruction Steps
Prepare the Base Flour: In a separate bowl, whisk together the all-purpose flour, baking powder, and salt. This ensures the leavening agent is evenly dispersed.
Layer the Mix: The visual impact relies on careful layering. Using a spoon or a funnel, gently add the ingredients to the jar in the following order. Press each layer down lightly with the back of a spoon before adding the next one:
Layer 1: Half of the granulated sugar.
Layer 2: All of the poppy seeds.
Layer 3: Half of the pre-mixed base flour.
Layer 4: The dried lemon zest or yellow powder (to create a distinct color band).
Layer 5: The coarse ground oats or whole wheat flour.
Layer 6: The remaining half of the pre-mixed base flour.
Layer 7: The remaining half of the granulated sugar.
Seal and Decorate: Screw the lid onto the jar tightly. Tie a piece of twine or ribbon around the neck of the jar.
Attach Extract and Instructions: If using, attach the small bottle of lemon extract to the twine. Create an instruction tag that clearly outlines the wet ingredients the recipient needs to add. Example Instructions to include: “To bake the loaf: Preheat oven to 350 deg F (175 deg C). Empty jar contents into a bowl. Add 2 large eggs, 1/2 cup milk, 1/2 cup melted butter, and 1 teaspoon lemon extract (if provided). Mix until just combined. Pour into a greased loaf pan and bake for 50-60 minutes.”
12. Pomegranate & Pink Peppercorn Vinegar
Edible Food Gifts
This infused vinegar is a gorgeous, deep-red condiment that makes an exquisite and unique culinary gift. The whole pink peppercorns floating in the vibrant liquid add delicate visual appeal. Presenting it in a clean glass bottle with a clear label showcases the beautiful, ruby-red color.
Infused vinegars are useful for making salad dressings, deglazing pans for sauces, or even adding a bright tang to winter cocktails. The sweet-tart notes of pomegranate paired with the mild spice of pink peppercorns create a complex flavor profile that elevates everyday cooking. This is an advanced and thoughtful item for the gourmet cook on your list.
This gift is incredibly easy to make, as it mostly requires patience for the infusion process. Be sure to use high-quality ingredients, and present the bottle with a bow for an elegant, artisanal look.
Required Ingredients
2 cups high-quality white wine vinegar or apple cider vinegar
1 cup fresh or frozen pomegranate arils (seeds)
2 tablespoons whole pink peppercorns
1 tablespoon pomegranate molasses (optional, for deeper flavor)
Required Equipment
Clean, glass bottle with a tight-fitting stopper or lid (approximately 16 ounces)
Saucepan (optional, for quick infusion)
Small funnel
Measuring cups and spoons
Fine-mesh sieve
DIY Instruction Steps
Prepare the Flavoring: Gently crush the pomegranate arils to release some juice and place them into the clean glass bottle using a funnel. Add the whole pink peppercorns and the optional pomegranate molasses.
Infusion Method (Cold or Hot):
Cold (Slower, Brighter Flavor): Simply pour the white wine vinegar over the arils and peppercorns. Seal the bottle and let it sit in a cool, dark place for 1 to 2 weeks, shaking gently every day.
Hot (Faster, Deeper Flavor): Pour the vinegar into a saucepan and gently warm it over low heat (do not boil). Pour the warm vinegar over the arils and peppercorns in the bottle. Let it cool completely before sealing.
Strain and Bottle: Once the flavor is to your liking (usually 1-2 weeks for cold infusion), pour the contents of the bottle through a fine-mesh sieve into a clean bowl, discarding the solids.
Final Bottling: Using the funnel, pour the strained pomegranate vinegar into the final clean gift bottle. If you wish to keep some visual appeal, add a small pinch of fresh, new pink peppercorns to the bottle before sealing.
Label and Present: Create a professional-looking label that includes the name of the vinegar and advises the recipient to store it in a cool, dark place. Tie a ribbon around the neck of the bottle for a finished look.
13. Homemade Tropical Nut Granola
Edible Food Gifts
Homemade granola is a fantastic consumable gift that feels nourishing and wholesome. This mix, featuring tropical accents like dried apricots and coconut flakes alongside hearty nuts and seeds, provides a delicious twist on breakfast or snacking. The large, clear cellophane bag tied with raffia makes the colorful contents the star of the presentation.
Offering a gift that supports healthy eating is a wonderful way to show care. This granola is much tastier and crunchier than store-bought versions. The versatility means it can be eaten with yogurt, milk, or simply enjoyed by the handful.
Creating granola involves a simple oven baking process and requires minimal cleanup. This batch recipe easily scales up, allowing you to quickly prepare many gifts. Ensure the granola is completely cool before packaging to maintain its crispness.
Required Ingredients
3 cups rolled oats (not instant)
1 cup mixed nuts (almonds, walnuts), chopped
1/2 cup pumpkin seeds or sunflower seeds
1/2 cup unsweetened coconut flakes
1/2 cup dried apricots, chopped
1/4 cup neutral oil (like canola or coconut oil)
1/4 cup maple syrup or honey
1 teaspoon vanilla extract
1/2 teaspoon cinnamon
1/4 teaspoon salt
Required Equipment
Large baking sheet
Parchment paper
Large mixing bowl
Measuring cups and spoons
Airtight cellophane bags or glass jars for gifting
DIY Instruction Steps
Preheat and Prep: Preheat your oven to 300 deg F (150 deg C). Line a large baking sheet with parchment paper.
Mix Dry Ingredients: In the large mixing bowl, combine the rolled oats, chopped nuts, pumpkin seeds, coconut flakes, cinnamon, and salt. Stir these items together until everything is evenly distributed.
Mix Wet Ingredients: In a separate, small bowl, whisk together the neutral oil, maple syrup (or honey), and vanilla extract until they are fully combined.
Combine Wet and Dry: Pour the wet mixture over the dry ingredients in the large bowl. Use a rubber spatula to mix thoroughly until all the dry ingredients are evenly coated with the liquid mixture.
Bake: Spread the granola mixture in a thin, even layer onto the prepared baking sheet. Bake for 25 to 35 minutes, stirring the granola gently halfway through (around the 15-minute mark) to promote even browning.
Cool Completely: Remove the granola from the oven and let it cool completely, without stirring, right on the baking sheet. This cooling process is essential for achieving maximum crunch.
Add Dried Fruit: Once completely cooled, break up any large clusters and transfer the granola back to the mixing bowl. Add the chopped dried apricots (or other dried tropical fruit) and toss gently.
Package: Spoon the finished granola into the clean cellophane bags or airtight jars. Seal the bag with a raffia ribbon or secure the jar lid, and add a simple handwritten gift tag.
14. Rich Chocolate Gingerbread Cookie Kit
Edible Food Gifts
This scene captures the essence of holiday baking excitement, showing rich gingerbread dough ready to be transformed into festive shapes. The dark, cocoa-rich color of the dough, flecked with chopped nuts, suggests a deep, satisfying flavor. Presenting this dough already made saves the recipient a messy preparation step.
Giving the recipient prepared dough, along with a set of decorative cookie cutters, is a fun, interactive gift. It provides the joy of holiday baking without the effort of measuring and mixing dry ingredients. These cookies are sure to fill the home with the warm, comforting scent of ginger and spices.
Package the refrigerated dough log wrapped tightly in wax paper and twine, and place the cookie cutters alongside it in a small box. This is a wonderfully thoughtful gift for families with children or anyone who loves the activity of decorating holiday sweets.
Combine Dry Ingredients: In a large bowl, whisk together the flour, ground ginger, cinnamon, cloves, and baking soda. If using, stir in the chopped nuts. Set the bowl aside.
Cream Butter and Sugar: In a separate bowl (or the bowl of a stand mixer), beat the softened butter and brown sugar together until the mixture is light and fluffy.
Add Wet Ingredients: Beat in the egg and then the molasses until the mixture is fully incorporated and smooth.
Mix Dry into Wet: Gradually add the dry ingredient mixture to the wet mixture, mixing on low speed or by hand until a stiff, dark dough forms. Do not overmix.
Shape the Dough: Divide the dough in half. Shape each half into a thick, flat disc or a log. Wrap each piece tightly in plastic wrap or wax paper.
Chill: Place the wrapped dough in the refrigerator and chill for at least two hours (or overnight) until it is firm and easy to handle.
Package for Gifting: Place the wrapped, chilled dough log(s) into a sturdy gift box. Include the cookie cutters. Attach a small card with simple baking instructions. Example Instructions to include: “Preheat oven to 350 deg F (175 deg C). Roll dough to 1/4 inch thickness on a floured surface. Cut out shapes and bake on a parchment-lined sheet for 8-10 minutes. Cool completely before decorating.”
15. Cozy Baked Caramelized Onion Dip Kit
Edible Food Gifts
This savory gift is a luxurious treat that elevates any appetizer spread. Showing a creamy, baked dip topped with intensely dark, caramelized onions and served with crackers and fresh fruit creates a picture of holiday entertaining. Gifting this means you are providing a moment of delicious comfort.
The core gift here is the jar of homemade caramelized onions and perhaps a special cheese blend, allowing the recipient to quickly assemble and bake the warm appetizer. Savory gifts like this are a welcome departure from the abundance of holiday sweets. The richness of the onions pairs beautifully with the creamy cheese base.
Package the components neatly on a small wooden cutting board or in a basket with accompanying gourmet crackers and a recipe card. This gift is especially suitable for a host or anyone who appreciates effortless, gourmet appetizers.
Required Ingredients (For the Onions & Instructions)
3 large yellow onions, thinly sliced (for the caramelized onions)
3 tablespoons butter
1 teaspoon salt
1/2 teaspoon sugar
(The gift includes the jar of onions and the recipe for the dip mix.)
Recipe card to include (Ingredients the recipient adds):
1 block (8 ounces) cream cheese, softened
1/2 cup sour cream
1 cup shredded Gruyere or Swiss cheese
1/2 cup grated Parmesan cheese
Required Equipment
Large skillet (for caramelizing onions)
Airtight jar (for the onions)
Wooden cutting board or basket (for presentation)
Small oven-safe ceramic baking dish (optional, for inclusion)
DIY Instruction Steps (Caramelized Onions)
Slice the Onions: Peel the onions and slice them very thinly. Uniformity in slicing is important for even caramelization.
Start the Cooking: Melt the butter in a large skillet over medium-low heat. Add the sliced onions and the salt. Cook the onions, stirring frequently.
Caramelize Slowly: Reduce the heat to low. Continue to cook, stirring every 5-10 minutes. This process takes patience—about 45 to 60 minutes—until the onions are deep golden brown, soft, and sweet. If they stick, add a tablespoon of water or broth. Add the sugar near the end to aid browning.
Cool and Jar: Once the onions are dark and fully caramelized, remove them from the heat and let them cool completely. Spoon the cooled onions into a clean, airtight jar, reserving a small amount if the recipe calls for layering.
Package the Gift: Include the jar of caramelized onions. Attach a printed recipe card with detailed instructions for the recipient to complete the dip. Example Instructions to include: “To make the dip: Preheat oven to 375 deg F (190 deg C). Mix softened cream cheese, sour cream, Gruyere, and Parmesan. Stir in most of the caramelized onions (save some for the top). Spread into a small oven-safe dish. Top with the remaining onions and bake for 20-25 minutes until bubbly. Serve with crackers.”
16. Spiced Fruit & Nut Mini Loaves
Edible Food Gifts
Mini loaves, wrapped in shiny gold foil and tied with a wide green ribbon, look incredibly sophisticated and festive. These individual cakes, flecked with dark fruit and crunchy nuts, are a rich, spiced sweet treat that are easy to give to multiple people. Their small size makes them manageable and prevents waste.
A gift of freshly baked goods carries a powerful sense of warmth and holiday comfort. The aroma of spices like cinnamon and nutmeg baked into a moist loaf is instantly inviting. The gold packaging provides a luxurious touch, making the effort feel even more worthwhile.
Mini loaves freeze very well, allowing you to prepare them well in advance of the holiday rush. These are substantial gifts that are perfect for colleagues, neighbors, or anyone deserving of a personal, delicious treat.
Required Ingredients
2 cups all-purpose flour
1 teaspoon baking soda
1 teaspoon ground cinnamon
1/2 teaspoon ground nutmeg
1/4 teaspoon ground cloves
1/2 teaspoon salt
1/2 cup (1 stick) unsalted butter, softened
1 cup packed light brown sugar
2 large eggs
1 teaspoon vanilla extract
1/2 cup plain yogurt or buttermilk
1/2 cup chopped walnuts or pecans
1/2 cup dried cranberries or chopped raisins
Required Equipment
Mini loaf pans (typically 3×5 inches)
Large mixing bowl (or stand mixer)
Whisk, spatula, measuring cups
Gold foil wrapping paper or mini foil loaf liners
Wide green ribbon
DIY Instruction Steps
Preheat and Prep Pans: Preheat your oven to 350 deg F (175 deg C). Grease and flour your mini loaf pans, or line them with foil mini loaf liners.
Combine Dry Ingredients: In a medium bowl, whisk together the flour, baking soda, cinnamon, nutmeg, cloves, and salt.
Cream Butter and Sugar: In a large mixing bowl, beat the softened butter and brown sugar together until light and fluffy. Beat in the eggs one at a time, followed by the vanilla extract.
Alternate Wet and Dry: Gradually add the dry mixture and the yogurt/buttermilk to the wet ingredients, alternating between them (start and end with the dry). Mix on low speed until just combined.
Fold in Extras: Gently fold in the chopped walnuts and dried cranberries using a spatula.
Fill and Bake: Spoon the batter evenly into the prepared mini loaf pans, filling them about two-thirds full. Bake for 30 to 40 minutes, or until a wooden pick inserted into the center comes out clean.
Cool and Wrap: Let the loaves cool in the pans for about 10 minutes, then carefully remove them and let them cool completely on a wire rack. Once cool, wrap each loaf tightly in gold foil.
Decorate: Tie a festive, wide green ribbon around each wrapped loaf, securing it with a bow on top. Arrange the finished loaves for gifting.
17. Luxurious Hot Chocolate Spoons
Edible Food Gifts
These elegantly crafted chocolate spoons make a charming and festive gift, perfect for creating a luxurious cup of hot cocoa. Each spoon is individually wrapped, highlighting the smooth chocolate and the beautiful toppings like sea salt flakes or a mini marshmallow. The presentation in a long white box suggests a high-quality confection.
This gift provides a fun, interactive treat; the recipient simply stirs the spoon into a mug of hot milk to create a rich, indulgent beverage. Adding unique toppings like cardamom or chili flakes offers a gourmet twist on a classic favorite. This is an easy assembly project that yields stunning results.
The individual wrapping makes them great for gifting to many people, perhaps as small party favors or stocking stuffers. They are delightful, sweet tokens of holiday cheer that offer a warm, comforting experience.
Required Ingredients
10 ounces high-quality chocolate (milk, dark, or white), chopped or chips
Toppings: Mini marshmallows, flaky sea salt, ground cinnamon, cardamom pods, chili powder, or crushed peppermint
Long-handled disposable spoons or decorative wooden spoons
Required Equipment
Silicone or disposable spoon molds (optional, you can use regular spoons)
Small microwave-safe bowl (or double boiler)
Small cellophane bags
Twine or ribbon
DIY Instruction Steps
Prepare Spoons: If using silicone molds, place them on a tray. If using regular spoons, line a tray with parchment paper and have the spoons ready.
Melt the Chocolate: Place the chopped chocolate in a small, microwave-safe bowl. Heat in 30-second intervals, stirring well between each, until the chocolate is smooth and fully melted. Alternatively, use a double boiler over simmering water.
Fill the Spoons: Carefully pour the melted chocolate into the spoon molds or spoon it onto the regular spoons, ensuring the spoon bowl is full. If using regular spoons, allow a small amount of chocolate to overflow and harden around the bowl of the spoon for a nice finish.
Add Toppings: Immediately sprinkle the tops of the chocolate spoons with your desired toppings (sea salt, spices, or press a mini marshmallow gently onto the center of each spoon). Work quickly before the chocolate sets.
Set: Place the tray of spoons in the refrigerator for at least one hour, or until the chocolate is completely hard.
Unmold and Package: Carefully remove the hardened chocolate spoons from the molds or lift them off the parchment paper. Slide each finished spoon into a small, clear cellophane bag and tie it shut with a piece of twine or festive ribbon tied in a bow.
18. Basil & Pine Nut Pesto Kit
Edible Food Gifts
Giving the components for homemade pesto is a thoughtful gift for anyone who appreciates fresh, vibrant Italian flavors. This kit features dried basil, pine nuts, and a small bottle of high-quality olive oil, making it easy for the recipient to prepare fresh pesto at home. The dry ingredients are elegantly packaged in a reusable jar.
A gift like this provides convenience without compromising quality, as fresh garlic and Parmesan cheese are the only items the recipient needs to add. It is a fantastic option that moves beyond the typical holiday sweets. The bright green ribbon and clean label enhance the professional appearance.
This kit provides a lovely, non-perishable base that is ready when they need it, providing a beautiful meal component. Include a clear recipe card with instructions for adding the fresh items and blitzing the mixture in a food processor.
Required Ingredients (For the Dry Mix)
1 cup dried basil flakes (or a mix of basil and parsley)
1/2 cup pine nuts (or walnuts/cashews)
1 teaspoon dried oregano
1/2 teaspoon garlic powder
1/2 teaspoon salt
(The gift includes a small bottle of high-quality extra virgin olive oil)
Recipe card to include (Ingredients the recipient adds):
2 cloves fresh garlic
1/2 cup grated Parmesan cheese
Required Equipment
Medium-sized jar with a wide mouth
Measuring cups and spoons
Small funnel (optional)
Small bottle of Extra Virgin Olive Oil
DIY Instruction Steps
Measure Dry Ingredients: Accurately measure the dried basil, pine nuts, oregano, garlic powder, and salt.
Mix Dry Ingredients: Place all the measured dry ingredients into a small bowl and stir them together using a whisk or spoon until the flavors are evenly blended.
Jar the Mix: Carefully pour the entire dry mix into the wide-mouth glass jar. Seal the lid tightly.
Assemble the Kit: Place the jar of the pesto mix and the small bottle of olive oil together. Tie a festive green ribbon around the jar or the neck of the oil bottle.
Attach Instructions: Write or print out a clear instruction card and tie it to the jar. Example Instructions to include: “To make fresh pesto: Empty the jar contents into a food processor. Add 2 fresh garlic cloves and 1/2 cup grated Parmesan cheese. While the processor is running, slowly drizzle in the attached olive oil until the mixture reaches your desired consistency. Serve immediately over pasta or spread on bread. Add salt and pepper to taste.”
19. Spicy BBQ Rub Shaker
Edible Food Gifts
Homemade spice rubs are a thoughtful gift that adds instant flavor to meats, vegetables, or even popcorn. This spicy BBQ blend, presented in a large shaker container, looks professional and hints at smoky, rich flavors. The plaid ribbon tied around the lid adds a cozy, rustic holiday touch.
This gift is useful and encourages outdoor cooking or oven roasting, which is welcome any time of year. Creating your own rub allows you to customize the heat and flavor profile. It is a wonderful option for the grill master or aspiring chef in your life.
The generous size of the shaker bottle ensures the recipient will have plenty of rub for many meals. Simply make sure all ingredients are completely dry before blending and jarring to prevent clumping. This is a practical, flavorful present.
Required Ingredients
1/2 cup packed light brown sugar
1/4 cup smoked paprika
2 tablespoons chili powder
2 tablespoons garlic powder
2 tablespoons onion powder
1 tablespoon ground cumin
1 tablespoon cayenne pepper (adjust for desired heat)
1 tablespoon kosher salt
1 tablespoon black pepper
Required Equipment
Small bowl
Whisk or spoon
Large shaker bottle with a wide opening
Small funnel (optional, for filling)
DIY Instruction Steps
Measure and Combine: Accurately measure all the dry ingredients, ensuring the brown sugar is packed firmly. Place all the spices, sugar, and salt into a small bowl.
Whisk Thoroughly: Use a whisk or fork to combine the ingredients, breaking up any clumps of brown sugar or spice. Whisk vigorously for at least two minutes to ensure the heat (cayenne) and the sugar are uniformly mixed throughout the blend.
Jar the Rub: Ensure the large shaker bottle is completely clean and dry. Use a funnel to carefully pour the prepared seasoning mix into the bottle. Fill it up to the neck.
Seal and Label: Screw the lids on tightly. Create an attractive label that clearly states “Spicy BBQ Shaker Rub.” Apply the label to the front of the bottle.
Final Presentation: Tie a festive, plaid ribbon around the neck of the shaker or around the lid to complete the presentation. Advise the recipient to rub the blend generously onto meat or vegetables before cooking.
20. Spiced Baked Apple Chips Stack
Edible Food Gifts
These thin, delicate baked apple slices, stacked high and tied with twine, offer a simple yet elegant edible gift. The light dusting of spice (likely cinnamon and cardamom) suggests a warm, comforting flavor. Presenting them tied in a neat stack makes them visually appealing, like a tiny rustic cake.
Apple chips are a naturally wholesome snack that is both crunchy and sweet. They are an excellent option for health-conscious friends or families looking for easy treats. The dehydration process concentrates the natural apple sweetness.
Making these requires only patience and a low-temperature oven or food dehydrator. They look charming presented in the stack or placed inside a clear windowed craft bag. This is a light, crunchy, and delightful holiday offering.
Required Ingredients
4 medium apples (such as Fuji, Gala, or Honeycrisp)
1 tablespoon fresh lemon juice
1 teaspoon ground cinnamon
1/2 teaspoon ground cardamom (optional)
1 tablespoon granulated sugar (optional)
Required Equipment
Mandoline slicer or very sharp knife
Large bowl
Baking sheets
Parchment paper
Wire cooling rack
Natural twine or ribbon
DIY Instruction Steps
Preheat and Prep: Preheat your oven to a very low temperature, around 200 deg F (95 deg C). Line two large baking sheets with parchment paper.
Slice the Apples: Wash the apples well. Using a mandoline slicer (the easiest method) or a very sharp knife, slice the apples as thinly as possible (about 1/8 inch thick). You can use an apple corer before slicing or remove the seeds from the center of each slice afterward.
Flavor the Slices: Place the thin apple slices in a large bowl. Drizzle them with lemon juice to prevent browning. In a separate tiny bowl, mix the cinnamon, cardamom, and sugar (if using). Sprinkle this spice mixture over the apple slices and toss gently until they are evenly coated.
Arrange and Bake: Arrange the apple slices in a single layer on the prepared baking sheets. They should not overlap. Bake for approximately 1.5 to 3 hours, flipping the slices halfway through. Baking time varies based on thickness; the goal is to make them dry, firm, and crisp.
Cool and Crisp: Once baked, turn off the oven but leave the chips inside for another 30 minutes to cool slowly and crisp up. Remove and let them cool completely on a wire rack.
Stack and Package: Once cooled, carefully stack the crisp apple chips into small piles. Tie a piece of natural twine or a thin ribbon securely around the stack to hold the shape. You can place the stack in a clear cellophane bag or a small kraft box for gifting.
21. Gingerbread Spice Pancake Mix
Edible Food Gifts
This beautifully packaged mix offers the wonderful, comforting scent of gingerbread in a quick breakfast format. The warm colors and festive snowflake motif on the packaging immediately evoke the feeling of a cozy winter morning. Giving a dry mix like this makes a home-cooked holiday breakfast effortless for the recipient.
The mix contains all the dry ingredients needed for fluffy, spiced pancakes or waffles. Simply including instructions to add milk and eggs turns this gift into a delightful, ready-made experience. This is a thoughtful present for busy families or anyone who appreciates the flavor of gingerbread beyond just cookies.
Packaging the mix in a sturdy, well-labeled bag or jar ensures freshness. This is a very easy and cost-effective homemade item to mass-produce for a large gift list. It delivers maximum holiday cheer with minimal effort required from the giver or the receiver.
Required Ingredients (For the Dry Mix)
2 cups all-purpose flour
1/4 cup light brown sugar, packed
1 tablespoon baking powder
1 teaspoon baking soda
1 tablespoon ground ginger
2 teaspoons ground cinnamon
1 teaspoon ground cloves
1/2 teaspoon ground nutmeg
1/2 teaspoon salt
Required Equipment
Large mixing bowl
Whisk
Measuring cups and spoons
Airtight bag or jar for gifting
DIY Instruction Steps
Measure and Combine: Carefully measure all the flour, sugars, spices, salt, baking powder, and baking soda. Place all these dry ingredients into a large mixing bowl.
Whisk Thoroughly: Use a large whisk to blend all the ingredients completely. It is important to mix vigorously for at least one or two minutes to ensure the baking powder and spices are evenly distributed throughout the flour base.
Package the Mix: Using a spoon or a funnel, carefully transfer the entire prepared mix into a clean, airtight bag or jar. Seal it tightly to maintain freshness.
Create the Label and Instructions: Design an attractive label that clearly names the mix. On the label or on a separate card, provide simple instructions for use. Example Instructions to include: “To make pancakes: Empty the mix into a large bowl. Add 1 3/4 cups milk (or buttermilk), 2 large eggs, and 2 tablespoons of melted butter or oil. Mix until just combined (lumps are okay). Cook 1/4 cup portions on a hot, oiled griddle for 2-3 minutes per side, until golden brown.”
Finalize the Gift: Attach the instruction card and a decorative ribbon or bow to the packaging.
22. Chocolate Peanut Swirl Cookies
Edible Food Gifts
These beautiful pinwheel cookies feature a striking swirl of chocolate and peanut butter dough, providing a satisfying blend of flavors. The edges are coated in crunchy chopped peanuts, adding texture and reinforcing the nutty flavor profile. Arranging these neat, uniform slices in a tin creates a lovely, traditional presentation.
These cookies are relatively sturdy and travel well, making them an excellent choice for mailing or dropping off. The swirl technique, while simple, gives the cookies a sophisticated, bakery-bought appearance. They satisfy that deeply comforting combination of sweet, salty, and chocolatey goodness.
Baking a large batch of these cookies is an efficient way to cover your holiday gift list. Package them carefully in layers separated by wax paper inside a reusable decorative tin. They are always a welcome, nostalgic treat during the festive season.
Prepare Base Dough: In a medium bowl, whisk together the flour, baking soda, and salt. Set aside. In a large bowl, cream the butter, granulated sugar, and brown sugar until light. Beat in the eggs and vanilla. Gradually add the flour mixture until a soft dough forms.
Divide the Dough: Divide the dough exactly in half into two separate bowls.
Flavor the Doughs: To the first half, beat in the cocoa powder until uniformly chocolate brown. This is your chocolate dough. To the second half, beat in the peanut butter until smooth. This is your peanut butter dough.
Shape and Chill: Roll each dough half into a flat rectangle, about 10×12 inches, between sheets of parchment paper. Chill both flat rectangles in the refrigerator for at least 30 minutes until firm.
Assemble the Swirl: Remove the doughs from the fridge. Peel the top parchment from the peanut butter dough. Flip the chocolate dough rectangle directly onto the peanut butter dough, and carefully peel off the top parchment paper from the chocolate dough.
Roll the Pinwheel: Starting from a long side, tightly roll the layered dough into a log. Moisten the seam with a little water and press it to seal.
Coat and Chill: Roll the entire log in the chopped peanuts, pressing gently so the nuts adhere to the dough. Wrap the log tightly in plastic wrap and chill for at least 4 hours (or overnight) until very firm.
Slice and Bake: Preheat the oven to 375 deg F (190 deg C). Slice the chilled log into 1/4 inch thick rounds. Place them on a parchment-lined baking sheet and bake for 8 to 10 minutes until lightly set. Cool completely on a wire rack.
Dip and Decorate: Once fully cool, melt the semi-sweet chocolate. Dip half of each cookie (or just the edge) into the melted chocolate. Let the chocolate set completely before layering them in a decorative tin.
23. Savory Parmesan & Herb Twists
Edible Food Gifts
These tall, golden, flaky twists are beautifully dusted with savory herbs, making an appetizing, crunchy snack. Displayed upright in a clear glass jar tied with a patterned ribbon, they look elegant and rustic at the same time. These are wonderful for serving with wine, cheese, or soups.
Gifting a savory baked item is a great choice during a season saturated with sweet treats. The crispy texture and salty, cheesy flavor are highly satisfying and universally appealing. Using store-bought puff pastry simplifies the preparation immensely, making this a very quick DIY project.
Packaging them standing tall in a jar protects their delicate shape. They offer a unique, non-sweet addition to any food-centric gift basket. This is truly a simple, yet impressive, addition to your edible gift repertoire.
Prep Pastry: Preheat the oven to 400 deg F (200 deg C). Line a large baking sheet with parchment paper. Unfold the thawed puff pastry sheet onto the parchment.
Make the Herb Mix: In a small bowl, combine the grated Parmesan cheese, chopped sage (or dried herbs), olive oil, salt, and pepper. Stir until the mixture forms a moist, crumbly paste.
Season the Pastry: Brush one side of the puff pastry sheet lightly and evenly with the beaten egg. Sprinkle the entire surface of the pastry sheet with the prepared Parmesan and herb mixture.
Slice the Strips: Using a sharp knife or a pizza cutter, cut the pastry sheet into strips about 1/2 inch wide and 10 inches long.
Twist the Strips: Take each strip and gently twist it several times to create the signature spiral shape. Place the twisted strips onto the prepared baking sheet, leaving a small space between them.
Bake: Bake for 12 to 15 minutes, or until the twists are puffed, golden brown, and crisp.
Cool and Jar: Let the twists cool completely on the baking sheet. Once cooled, gather the twists and gently place them upright into a clean glass jar.
Decorate: Secure a decorative, wide ribbon around the neck of the jar, tying it in a neat bow.
24. Rosewater & Pistachio Meringue Kisses
Edible Food Gifts
These delicate, cloud-like meringues are infused with subtle rosewater and studded with bright green pistachios. The pale pink color and small, piped shape make them look beautifully ethereal and sophisticated. Arranging them neatly in cupcake liners inside a decorative tin gives them a polished, artisanal finish.
Meringues are naturally gluten-free and very light, offering an elegant sweet option that isn’t too heavy. The fragrant rosewater provides a unique and memorable flavor often associated with luxury desserts. These melt gently in your mouth, leaving behind a subtle floral and nutty taste.
Meringues require a long, slow bake and careful storage in an airtight container to maintain their crispness. They are a lovely choice for a friend who appreciates refined, subtle flavors. The finished tin looks stunning and protects these fragile, beautiful treats.
Required Ingredients
3 large egg whites, at room temperature
3/4 cup granulated sugar
1/4 teaspoon cream of tartar (optional, but helps stabilization)
1 teaspoon rosewater
1-2 drops pink or red food coloring (optional, for pale color)
1/4 cup chopped pistachios (plus extra for topping)
Dried rose petals (optional, for garnish)
Required Equipment
Electric mixer (handheld or stand)
Large mixing bowl (must be very clean and grease-free)
Piping bag fitted with a star tip (or a simple Ziploc bag with the corner snipped)
Baking sheets
Parchment paper
DIY Instruction Steps
Preheat and Prep: Preheat your oven to a very low setting, 225 deg F (105 deg C). Line two large baking sheets with parchment paper.
Whip the Egg Whites: Place the room-temperature egg whites in the very clean mixing bowl. Beat on medium speed until soft peaks form.
Add Sugar and Stabilizer: Gradually, about one tablespoon at a time, add the granulated sugar and the cream of tartar (if using). Increase the speed to high and continue beating until the mixture is glossy, stiff peaks form, and the sugar is completely dissolved (test by rubbing a small amount between two fingers—it should feel smooth, not gritty).
Add Flavor and Color: Gently fold in the rosewater and the optional food coloring until barely combined. Then, gently fold in the chopped pistachios.
Pipe the Meringues: Scoop the meringue mixture into the prepared piping bag. Pipe small “kisses” or dollops onto the prepared parchment-lined baking sheets. Sprinkle the top of each kiss with a few extra chopped pistachios and optional dried rose petals.
Bake Slowly: Place the meringues in the oven and bake for about 60 to 90 minutes. Do not open the oven door during baking. The meringues should feel firm when gently touched.
Dry and Cool: Once baked, turn off the oven, but leave the meringues inside for 30 minutes to cool completely and dry out further. Remove and cool completely on a wire rack.
Package: Place each delicate meringue kiss into a small decorative cupcake liner and arrange them inside a pretty, airtight cookie tin.
25. Sichuan Spicy Chili-Garlic & Shallot Oil
Edible Food Gifts
This dense, textural chili oil is a bold and flavorful gourmet gift, instantly recognizable by its rich red color and visible pieces of crisp shallots and chili flakes. Jars of this oil, sealed with an airtight clasp, look authentic and highly appealing to food enthusiasts. The custom label adds a thoughtful, personal touch.
This oil offers more than just heat; the caramelized shallots and garlic provide deep, savory umami flavors. It’s fantastic drizzled on fried rice, used as a dumpling dipping sauce, or mixed into noodles. This condiment is a versatile and exciting addition to any kitchen.
Making a batch of chili oil is a simple process of heating oil and aromatics. Be careful to ensure the heat is low to prevent bitterness. This spicy, complex oil is a standout savory item that will be appreciated long after the holidays are over.
Required Ingredients
2 cups neutral-flavored oil (canola or sunflower)
1 cup red chili flakes (Korean Gochugaru or a mix of mild and hot)
1/2 cup thinly sliced shallots or onions
1/4 cup chopped fresh garlic
1 tablespoon whole Sichuan peppercorns (optional)
2 teaspoons salt
1 teaspoon sugar
Required Equipment
Large, deep saucepan or pot
Fine-mesh sieve
Measuring cups and spoons
Clean, sterilized airtight jars (swing-top or mason jars)
DIY Instruction Steps
Prepare the Aromatics: Thinly slice the shallots and chop the fresh garlic. Place the chili flakes, Sichuan peppercorns (if using), salt, and sugar in a heatproof bowl.
Fry the Shallots and Garlic: Pour the oil into the saucepan. Place it over medium heat. Add the sliced shallots and garlic. Fry them gently, stirring often, until they are golden brown and crispy (about 10-15 minutes). Do not burn them, as this will make the oil taste bitter. Remove the saucepan from the heat.
Pour and Infuse: Let the oil cool slightly (about 5 minutes) to prevent scorching the chili. Carefully pour the hot oil, along with the crisp shallots and garlic, over the chili flake mixture in the heatproof bowl. The oil should sizzle and bubble gently. Stir thoroughly.
Cool and Steep: Allow the oil to cool completely to room temperature, stirring occasionally to ensure the ingredients are evenly distributed. It should steep for at least 4 hours, or ideally overnight, for maximum flavor infusion.
Jar the Oil: If you want a clear oil, strain out all solids (shallots, garlic, chili flakes) and pour the oil into the jar, then add a few fresh chili flakes for decoration. For a textural oil (like the image), stir well and spoon the entire mixture (solids and oil) directly into the clean, sterilized jars.
Label and Present: Seal the jar tightly. Create a clean, informative label detailing the contents (“Spicy Chili-Garlic & Shallot Oil”). Tie a ribbon or string around the jar’s neck. Advise the recipient to store the oil in the refrigerator for longevity and flavor preservation.
26. Coconut & Lime Margarita Salt
Edible Food Gifts
This vibrant green salt blend is a fun, tropical departure from traditional holiday flavors. The colorful salt, with flecks of coconut and lime zest, makes a unique gift for anyone who enjoys cocktails or mocktails. Presenting it mounded up in a clear jar looks incredibly festive and high-quality.
The combination of tangy lime, sweet coconut, and crunchy salt is the essential element for rimming a glass. This gift offers a little piece of sunshine during the cold winter months. It’s a very simple assembly project that requires no cooking at all.
This item looks best when packaged in small jars, which are easy to display and store. Include a small card with cocktail ideas or instructions on how to properly rim a glass. This is a creative, unconventional homemade item that adds a celebratory touch to any gathering.
Required Ingredients
1 cup coarse salt (like kosher or sea salt)
Zest of 4-5 fresh limes
1/4 cup finely shredded sweetened or unsweetened coconut flakes
1-2 drops green food coloring (optional, for vibrant color)
Required Equipment
Small mixing bowl
Citrus zester
Baking sheet
Parchment paper
Small glass jar with a tight-fitting lid
DIY Instruction Steps
Zest the Limes: Use a fine grater or zester to remove the bright green zest from the limes. Avoid the white pith, as it is bitter. Place the zest in a small mixing bowl.
Combine Flavoring: Add the shredded coconut flakes to the bowl with the lime zest. Add the green food coloring (if using). Use your fingers to rub the zest into the coconut and work the color through, which releases the lime oil.
Add the Salt: Add the coarse salt to the mixing bowl. Mix all the ingredients thoroughly with a spoon or your hands until the salt is evenly coated in the zest, coconut, and color.
Dry the Salt: Spread the mixture in a thin, even layer onto a baking sheet lined with parchment paper. Leave it to air dry at room temperature for 12 to 24 hours. Alternatively, place it in a very low oven (200 deg F / 95 deg C) for about 30 minutes, stirring occasionally, until the mixture is completely dry. This prevents clumping.
Jar and Seal: Once completely dry, transfer the margarita salt mixture into the clean glass jar. Fill it right up to the top and seal the lid tightly.
Label and Gift: Create a tropical or festive label for the jar. Tie a piece of raffia or a fun ribbon around the neck. Suggest rimming a glass with a lime wedge before dipping it into the salt.
27. Maple-Pecan Pie Filling Mix
Edible Food Gifts
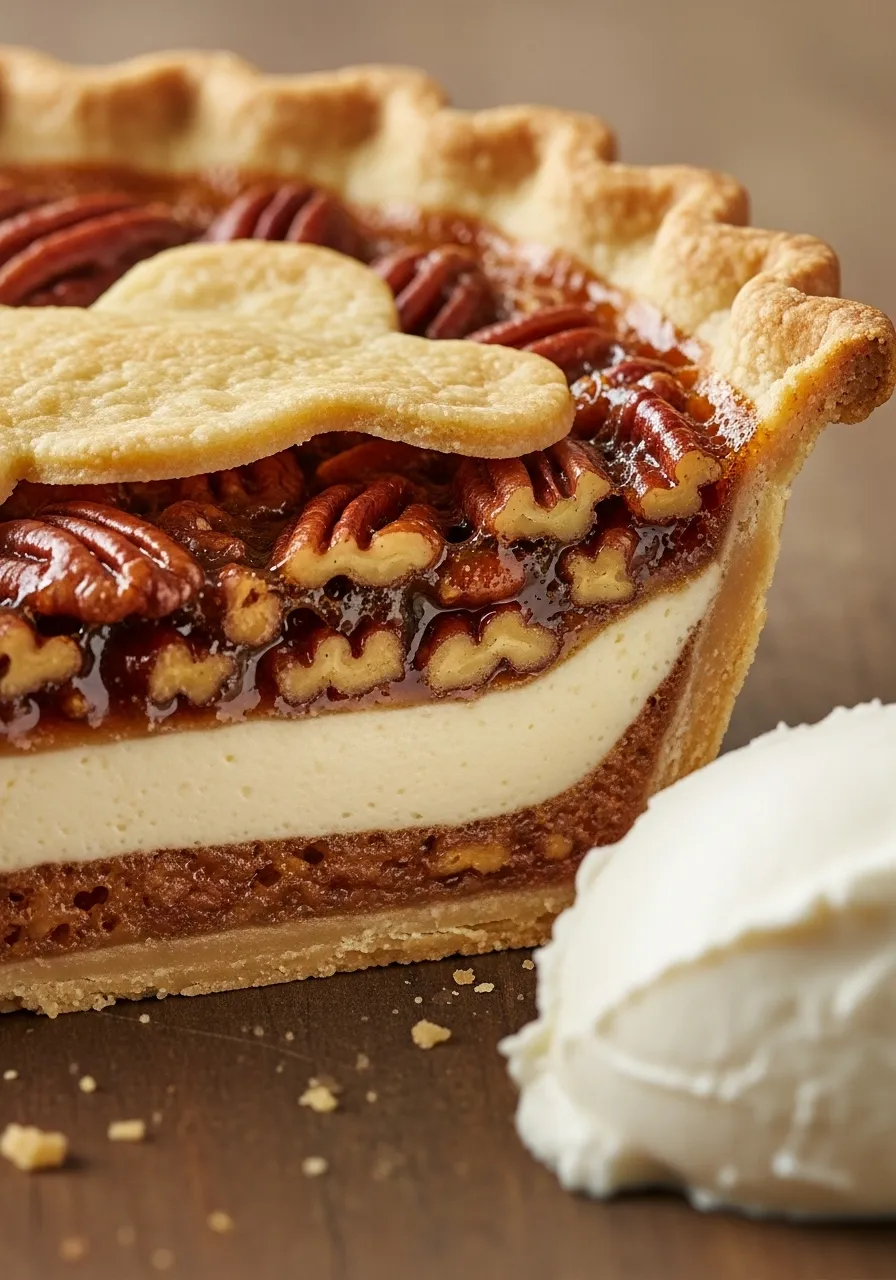
This layered mix provides all the key dry ingredients needed to make a warm, rich maple-pecan pie. The jar, featuring a visually appealing mix of brown sugar, spices, and chopped pecans, looks enticing and ready for baking. The festive leaf pattern on the label immediately suggests cozy autumn and winter flavors.
Giving a baking mix makes a wonderful, comforting present that saves the recipient time on measuring. It enables them to easily bake a classic holiday dessert without the fuss. This is especially helpful for people who love the taste of homemade pie but lack time for complicated recipes.
The pecans on top are arranged beautifully, offering a peek at the delicious finished texture. Ensure your instructions clearly guide the user on adding the wet ingredients (like eggs and butter) to complete the filling. This is a convenient and genuinely enjoyable gift.
Required Ingredients (For the Dry Mix)
1 cup packed light or dark brown sugar
1/2 cup granulated sugar
2 tablespoons all-purpose flour
1/2 teaspoon ground cinnamon
1/4 teaspoon salt
1 1/2 cups chopped pecans, plus 1/2 cup whole pecans for topping
Required Equipment
Large wide-mouth glass jar (approximately 1 quart/liter)
Measuring cups and spoons
Funnel (optional, for neat layering)
DIY Instruction Steps
Prepare the Flour Base: In a small bowl, whisk together the flour, cinnamon, and salt. Set aside.
Layer the Mix: The visual appeal relies on distinct layering. Using a spoon or a funnel, gently add the ingredients to the jar in the following order. Press each layer down lightly with the back of a spoon before adding the next one:
Layer 1: The chopped pecans.
Layer 2: Half of the brown sugar.
Layer 3: The granulated sugar.
Layer 4: The flour and spice mixture (this is a thin layer but prevents settling).
Layer 5: The remaining half of the brown sugar.
Layer 6: The whole pecans (arrange these attractively at the top).
Seal and Decorate: Screw the lid onto the jar tightly. Cover the lid with a decorative fabric and secure it with a piece of twine.
Attach Instructions: Create a detailed instruction tag and tie it to the jar. Example Instructions to include: “To bake the pie: Preheat oven to 350 deg F (175 deg C). Empty jar contents into a bowl. Add 3 large beaten eggs, 1/2 cup melted butter, and 1/4 cup maple syrup (optional, for extra flavor). Mix well. Pour mixture into an unbaked 9-inch pie shell. Bake for 45-55 minutes until the center is set. Cool completely.”
28. Raspberry Fruit Leather Rolls
Edible Food Gifts
These vividly colored, chewy fruit leathers are an excellent homemade snack, especially appealing for families or anyone who enjoys healthy treats. Rolling the thin sheets and standing them upright in small, decorative boxes gives them a playful, charming presentation. The deep raspberry red color is quite striking.
Giving a homemade snack like this shows both creativity and a focus on wholesome ingredients. Fruit leather is essentially pureed, dried fruit, making it a naturally sweet and fun alternative to candy. It’s an easy project that involves blending and a low-temperature bake.
The rolls are easy to package individually, making them great for stocking stuffers or party favors. Tie each roll with a piece of natural twine for a rustic yet polished look. This is a delightful, bright, and unexpected sweet treat.
Required Ingredients
4 cups fresh or frozen raspberries (or other berries), thawed
1/4 cup water
1-2 tablespoons honey or maple syrup (optional, for extra sweetness)
1 tablespoon chia seeds (optional, for nutrition and texture)
Required Equipment
Blender or food processor
Fine-mesh sieve (optional, for removing seeds)
Baking sheet
Parchment paper
Spatula or offset knife
Decorative small boxes for gifting
DIY Instruction Steps
Puree the Fruit: Combine the raspberries and water in a blender or food processor. Blend until the mixture is completely smooth. If you desire a seedless leather, press the mixture through a fine-mesh sieve into a clean bowl, discarding the seeds.
Sweeten and Add Seeds: Stir in the optional honey/maple syrup and chia seeds (if using) into the smooth puree.
Prepare for Drying: Preheat your oven to its lowest setting, usually 170 deg F (75 deg C). Line a large baking sheet with parchment paper, allowing it to slightly hang over the edges.
Spread Evenly: Pour the fruit puree onto the center of the parchment paper. Use a spatula or offset knife to spread the puree into a thin, even rectangle, about 1/8 inch thick. Do not spread it all the way to the edges of the pan, as it will dry quicker there.
Bake/Dehydrate: Bake the leather for 4 to 8 hours, or until the leather is dry to the touch, not sticky, but still pliable. The edges should not be brittle or cracked.
Cool and Roll: Remove the leather from the oven and let it cool completely. Once cool, peel the parchment paper off the back of the leather. Lay the leather flat and cut it into strips about 1 inch wide and 6-8 inches long. Roll each strip tightly.
Package: Stand the rolled leathers upright in the small decorative boxes. Tie a piece of twine around the outside of the box or around each individual roll.
29. Holiday Popcorn & Pretzel Crunch
Edible Food Gifts
This fun, festive mix combines salty pretzels, light popcorn, and a sweet drizzle of white chocolate, all tossed with colorful sprinkles. This is a delightful mix of sweet and savory flavors, making it irresistible. Packaging the large volume in a clear bag tied with bright, curly ribbons makes a charming, casual presentation.
Gifting a crunchy snack mix is always appreciated, especially when it’s as visually appealing as this one. It’s a great choice for movie nights, casual parties, or sharing with an office. The ease of preparation makes it a highly efficient item to check off your gift list.
This mix requires only a few ingredients and minimal cooking time (just melting the chocolate). Ensure the mix is completely cooled and the chocolate is set before packaging to avoid sticking. This is a cheerful, celebratory homemade treat.
Required Ingredients
12 cups popped plain popcorn (about 1/2 cup kernels)
4 cups small pretzels (mini twists or sticks)
1 cup mixed nuts (optional)
12 ounces white chocolate melting wafers or chips
2 tablespoons neutral oil (like canola or coconut)
1/4 cup holiday sprinkles (red, green, and white)
1/2 teaspoon flaky sea salt
Required Equipment
Large roasting pan or two large baking sheets
Parchment paper
Large mixing bowl
Small microwave-safe bowl (or double boiler)
Large cellophane bag for gifting
DIY Instruction Steps
Prepare the Mix: Pop the popcorn and let it cool completely. In the very large mixing bowl or on a large baking sheet, gently combine the cooled popcorn, pretzels, and optional nuts.
Melt the Chocolate: Place the white chocolate wafers or chips in the small microwave-safe bowl. Add the oil. Heat in 30-second intervals, stirring between each, until the chocolate is smooth and fully melted. The oil helps the chocolate stay smooth for drizzling.
Drizzle and Sprinkle: Pour the melted white chocolate over the popcorn and pretzel mixture, working quickly. Use a rubber spatula to toss gently until everything is lightly coated.
Spread and Set: Spread the mixture onto a parchment-lined baking sheet in a single layer. Immediately sprinkle generously with the holiday sprinkles and flaky sea salt.
Cool Completely: Allow the mixture to cool and harden completely at room temperature for at least one hour, or briefly in the refrigerator (about 15 minutes).
Break and Package: Once the chocolate is completely set, break the mixture into small, manageable pieces. Transfer the entire volume into the large, clear cellophane bag. Gather the top of the bag and tie it tightly with the red and green curly ribbons.
30. Spiced Cranberry & Orange Conserve Jars
Edible Food Gifts
These small jars of glistening, ruby-red conserve make a truly classic and traditional homemade gift. The conserve, brimming with whole cranberries, spices, and orange zest, looks beautiful in the mason jars. Adding a simple twine bow and a hand-written tag completes the charming, rustic aesthetic.
Homemade conserves and jams are a timeless gift that feel special and require a bit of effort. The combination of tart cranberries, bright orange, and warm spices like cardamom and star anise is distinctly festive. This preserve can be used as a spread, a topping for cheese, or a glaze for meats.
Making jam requires a careful, hot cooking process, and ensuring the jars are properly sterilized is essential for safety. This item is wonderfully versatile and keeps well, making it a reliable choice for gifting. The beautiful color and texture truly encapsulate the holiday spirit.
Required Ingredients
4 cups fresh or frozen cranberries
2 cups granulated sugar
1 cup fresh orange juice
Zest of 1 large orange
1/2 teaspoon ground cinnamon
1/4 teaspoon ground cloves or nutmeg
1/4 teaspoon salt
Required Equipment
Large, heavy-bottomed pot
Wooden spoon
Canning funnel
6-8 small mason jars (8-ounce size) with new lids and rings
Tongs
Large pot for sterilizing and processing jars
DIY Instruction Steps
Sterilize Jars: Wash the jars, lids, and rings in hot, soapy water. Rinse well and allow them to air dry completely. Place the jars (without the lids) in a large pot, cover them with water, and bring the water to a boil. Boil for 10 minutes. Keep the jars in the hot water until ready to fill. Place the lids and rings in a separate saucepan and keep them warm (do not boil).
Prepare the Conserve: In the heavy-bottomed pot, combine the cranberries, granulated sugar, orange juice, orange zest, cinnamon, cloves, and salt. Bring the mixture to a boil over medium-high heat, stirring constantly until the sugar is dissolved.
Simmer and Thicken: Reduce the heat to medium-low and simmer gently. Cook for approximately 15 to 20 minutes, stirring occasionally. The cranberries will pop and the mixture will thicken.
Fill the Jars: Carefully remove a hot, sterilized jar from the water using tongs. Use a canning funnel to fill the jar with the hot cranberry conserve, leaving about 1/2 inch of headspace (space between the conserve and the rim).
Seal and Process: Wipe the rim of the jar clean with a damp cloth. Place a warm lid and ring on the jar and screw the ring on finger-tip tight. Repeat for all jars.
Process Jars (For Shelf Stability): Place the filled and sealed jars back into the large pot of boiling water, ensuring they are covered by at least one inch of water. Bring the water back to a full, rolling boil and process the jars for 10 minutes.
Cool and Set: Carefully remove the jars and place them on a towel on the counter to cool completely for 12-24 hours. You should hear the lids “pop,” indicating a good seal.
Decorate: Once cooled, label the jars with the conserve name and tie a piece of twine and a small handwritten tag around the neck.
31. Rich Salted Caramel Sauce
Edible Food Gifts
This glossy, decadent sauce, presented in a beautifully sealed bottle with a deep red ribbon, makes a luxurious homemade gift. The rich, dark amber color suggests an intense, deeply satisfying flavor. The way the caramel has dripped down the bottle gives it an artisanal, handcrafted appearance.
Gifting a quality sauce like this provides a wonderful topping for many desserts, including ice cream, cakes, or coffee. It feels incredibly decadent and is a lovely indulgence during the colder months. This recipe is simple to execute, provided you have a little patience for the sugar caramelization process.
The glass bottle can be sterilized and reused, making this an eco-conscious choice as well. Presenting it with a small whisk tied to the neck is a charming way to complete the package. This is a genuinely comforting and thoughtful edible present.
Required Ingredients
1 cup granulated sugar
1/4 cup water
1/2 cup heavy cream (warmed)
4 tablespoons unsalted butter, cut into 4 pieces
1 teaspoon vanilla extract
1/2 teaspoon flaky sea salt (or more, to taste)
Required Equipment
Medium, heavy-bottomed saucepan
Wooden spoon or heatproof spatula
Whisk
Measuring cups and spoons
Clean, sterilized glass bottles with airtight cork or cap (approximately 8-10 ounces)
Funnel
DIY Instruction Steps
Prepare Sugar Syrup: Place the granulated sugar and water in the heavy-bottomed saucepan. Stir them together just until the sugar is dissolved; stop stirring once it starts heating.
Caramelize the Sugar: Heat the mixture over medium-high heat. Allow it to boil without stirring. Swirl the pan occasionally to ensure even cooking. Watch closely as the sugar begins to change color, turning from clear to a pale amber, then to a deep, rich reddish-brown. This process takes approximately 8-10 minutes. Remove it from the heat immediately once it reaches the desired dark amber color.
Add Butter: Carefully drop in the butter pieces, one at a time, whisking constantly. The mixture will bubble vigorously; this is normal. Continue whisking until all the butter is fully melted and incorporated.
Add Warm Cream: Slowly pour the warm heavy cream into the caramel mixture while whisking. Again, the mixture will bubble up. Whisk until the sauce is smooth and uniform.
Flavor and Salt: Stir in the vanilla extract and the flaky sea salt. Taste the sauce and add more salt if desired.
Cool Slightly and Bottle: Let the caramel sauce cool for about 15 minutes in the saucepan. Use a funnel to pour the warm sauce into the clean, sterilized glass bottles. Seal them tightly.
Decorate: Once the sauce has cooled completely, tie a decorative red velvet ribbon around the neck of the bottle. Advise the recipient to store the caramel in the refrigerator.
32. Mediterranean Herb Infused Olive Oil
Edible Food Gifts
This clear bottle of infused olive oil, studded with bright green herbs and red chilies, is a stunning culinary gift. The sunlit color and visible aromatics give it a rustic, high-end appearance, making it beautiful displayed on a kitchen counter. This oil adds an effortless burst of Mediterranean flavor to any dish.
Using a high-quality extra virgin olive oil as the base ensures a smooth, rich taste. The blend of rosemary, thyme, oregano, and dried chili provides a warming, savory depth. This is a very useful item for dipping crusty bread or drizzling over roasted vegetables and salads.
It is simple to assemble and relies on a long, slow infusion for the best flavor. Be sure to use only fully dried herbs, as fresh herbs can introduce moisture that may cause spoilage. The tall, elegant bottle makes a sophisticated and deeply flavorful present.
Required Ingredients
2 cups high-quality extra virgin olive oil
4 sprigs dried rosemary
4 sprigs dried thyme
1 tablespoon dried oregano
1 teaspoon whole black peppercorns
1-2 small dried red chilies (optional, for heat)
Required Equipment
Clean, tall glass bottle with a tight-fitting lid or stopper
Small funnel
Tongs (optional, for placing herbs)
Measuring spoons
DIY Instruction Steps
Sterilize the Bottle: Wash the glass bottle and lid in hot, soapy water. Rinse well and allow them to air dry completely. Ensuring the bottle is completely dry is crucial for safety.
Assemble the Herbs: Gently place the dried rosemary and thyme sprigs into the bottle. Add the dried oregano, peppercorns, and dried chilies (if using) using a small funnel.
Add the Oil: Use the funnel to carefully pour the extra virgin olive oil into the bottle, covering all the herbs completely. Fill the bottle to just below the neck.
Infuse: Seal the bottle tightly with the stopper or cap. Place the oil in a cool, dark location (like a pantry) to infuse for at least one to two weeks. The flavor will deepen over this time.
Taste and Gift: After one week, taste a small amount to check the strength of the flavor. If you want a more subtle flavor, strain the oil now. If you want it stronger, leave the herbs in.
Label and Present: Create an attractive label with the oil name. Tie a sprig of dried rosemary and a small ribbon around the neck of the bottle. Safety Note: Use only dried herbs; fresh herbs can harbor bacteria.
33. Cozy Hot Chocolate Snowman Kit
Edible Food Gifts
This incredibly cute and creative jar is a complete experience for making a fun, festive mug of hot cocoa. The layering of rich cocoa mix, followed by fluffy marshmallows, creates a delightful presentation. The miniature snowman built from marshmallows on top is absolutely charming.
This gift is particularly well-suited for families and anyone who loves a bit of holiday whimsy. It provides warmth and a fun activity on a cold winter evening. The visual appeal makes it a standout homemade gift that shows ingenuity and cheer.
The layered dry mix is easy to assemble in large batches. Attaching small, colorful buttons and a simple instruction tag enhances the homemade appeal. This truly is a delightful and practical consumable present.
Required Ingredients (For the Mix)
1 cup high-quality cocoa powder (unsweetened)
1 cup granulated sugar
1 cup powdered milk (optional, for creaminess)
1/2 teaspoon salt
1 1/2 cups mini marshmallows (plus 3 regular size for the snowman)
Decorations: Small candy buttons or chocolate chips for eyes and mouth; an orange candy piece for the nose
Required Equipment
Quart (32 oz) wide-mouth mason jar
Measuring cups and spoons
Small mixing bowl
Twine and cardstock for tagging
DIY Instruction Steps
Make the Cocoa Mix: In a small bowl, whisk together the cocoa powder, sugar, powdered milk (if using), and salt. Ensure all ingredients are fully combined.
Layer the Mix: Pour the entire cocoa mix into the bottom of the clean, dry mason jar. Smooth the top of the mix gently.
Add Marshmallows: Carefully layer the mini marshmallows on top of the cocoa mix, filling the jar about two-thirds full.
Build the Snowman: Use three regular-sized marshmallows. “Glue” them together using a tiny dab of water or melted white chocolate. Press the small candy buttons or chocolate chips onto the top marshmallow for eyes and mouth, and add the small orange candy piece for the nose.
Place and Seal: Gently place the finished marshmallow snowman on top of the mini marshmallows in the jar. Screw the lid on loosely or secure a piece of cloth over the opening with twine. Attach the small buttons to the twine for a scarf detail.
Attach Instructions: Write or print out a tag that clearly states “Hot Chocolate Mix” and includes instructions. Example Instructions to include: “Remove the snowman before heating. Mix 1/3 cup of the dry mix with 1 cup of hot milk or water. Top with the remaining marshmallows and enjoy!”
34. Spicy Chili-Garlic Candied Nuts
Edible Food Gifts
These vividly colored, deeply seasoned nuts make a bold, crunchy snack that is highly addictive. The dark red glaze coating suggests a rich, spicy, and savory flavor profile. Presenting them in small, individual paper-lined trays makes them an easy and attractive item for sharing.
Gifting a savory-spicy nut mix is a welcome change from sweet treats and appeals strongly to a wide audience. The combination of heat, savory garlic, and a hint of sweetness from the coating is intensely satisfying. These are excellent served with drinks or added to a cheese board.
They are relatively easy to make, involving a simple coating and baking process. The uniform color shows that the nuts are completely covered in the flavorful glaze. This is a robust, flavor-packed gift that is memorable and unique.
Required Ingredients
3 cups raw mixed nuts (cashews, almonds, peanuts)
1 large egg white
1 tablespoon water
1/4 cup granulated sugar
1/4 cup light brown sugar, packed
1 tablespoon smoked paprika
1 tablespoon garlic powder
1 teaspoon cayenne pepper (adjust for heat)
1 teaspoon salt
Required Equipment
Large mixing bowl
Baking sheet
Parchment paper
Small bowl or whisk
Measuring cups and spoons
Small paper-lined trays or cellophane bags
DIY Instruction Steps
Preheat and Prep: Preheat your oven to 300 deg F (150 deg C). Line a large baking sheet with parchment paper.
Coat with Egg White: In a large mixing bowl, whisk the egg white and water until they are slightly frothy. Add the raw nuts to the bowl and toss thoroughly until every nut is evenly coated with the egg white mixture.
Make the Spice Blend: In a separate, small bowl, combine the granulated sugar, brown sugar, smoked paprika, garlic powder, cayenne pepper, and salt. Whisk these spices together until they are completely uniform.
Coat with Spice: Pour the entire spice mixture over the egg white-coated nuts. Use your hands or a spatula to toss the nuts until they are fully and generously coated in the spice and sugar mix.
Bake: Spread the coated nuts onto the prepared baking sheet in a single layer. Bake for 30 to 40 minutes, stirring the nuts every 10 minutes to prevent sticking and ensure even cooking. The coating should be dry and crunchy.
Cool Completely: Remove the nuts from the oven. Let them cool completely on the baking sheet; they will crisp up further as they cool. Break up any large clusters.
Package: Scoop the cooled nuts into the small, paper-lined trays or cellophane bags. Secure the packaging and add a festive tag.
35. Rosemary & Parmesan Savory Shortbread
Edible Food Gifts
These neat, round shortbread cookies offer a refined, savory counterpoint to holiday sweets. The visible flecks of green rosemary and the promise of salty Parmesan make them excellent companions for a cheese board. Packaging them in clear bags tied with a ribbon, or in a decorative tin, shows them off beautifully.
Savory shortbread is an unexpected and sophisticated gift that pairs wonderfully with wine or a charcuterie spread. The crisp, buttery texture of the shortbread, combined with the sharp cheese and aromatic herb, is deeply satisfying. They are a much-appreciated choice for friends who enjoy savory flavors.
This dough is sturdy and easy to shape into logs for uniform slicing and baking. Including a tag that suggests using them with cheese and olives enhances their appeal as a gourmet item. These are elegant, versatile, and highly impressive homemade crackers.
Required Ingredients
1 cup (2 sticks) unsalted butter, softened
1/2 cup finely grated Parmesan cheese
2 tablespoons fresh rosemary, finely chopped
1/2 teaspoon salt
1/4 teaspoon black pepper
2 cups all-purpose flour
Required Equipment
Electric mixer (handheld or stand)
Large mixing bowl
Plastic wrap
Sharp knife
Baking sheet
Parchment paper
Decorative tins or cellophane bags
DIY Instruction Steps
Cream Butter and Cheese: In a large bowl, use an electric mixer to beat the softened butter until it is smooth. Beat in the finely grated Parmesan cheese, chopped rosemary, salt, and pepper until well combined.
Add Flour: Gradually add the flour to the butter mixture, mixing on low speed until a shaggy dough forms. You may need to finish mixing by hand to bring the dough together into a cohesive ball.
Shape the Logs: Divide the dough in half. On a piece of plastic wrap, shape each half into a tight, uniform log approximately 1 1/2 inches in diameter. Wrap the logs tightly.
Chill: Place the wrapped dough logs into the refrigerator and chill for at least two hours (or overnight) until they are very firm.
Slice and Bake: Preheat the oven to 375 deg F (190 deg C). Remove the dough log from the plastic wrap. Use a sharp knife to slice the log into rounds about 1/4 inch thick. Place the rounds onto a parchment-lined baking sheet.
Bake: Bake for 12 to 15 minutes, or until the shortbread is lightly golden around the edges and set.
Cool and Package: Let the shortbread cool completely on the baking sheet. Once cooled, stack the cookies in batches and place them inside decorative tins or clear cellophane bags, securing the bags with a simple green ribbon.
36. Golden Milk (Turmeric) Spice Mix
Edible Food Gifts
This beautiful spice mix, featuring the vibrant yellow-orange color of turmeric, offers a comforting, health-conscious gift. The mix is presented neatly in a small jar with a wooden spoon tied to the side, suggesting an easy, ready-to-use preparation. This is a thoughtful item for promoting wellness and cozy evenings.
Golden milk, also known as turmeric latte, is a popular Ayurvedic beverage known for its warming properties. This mix contains all the essential dry spices; the recipient only needs to add hot milk and a sweetener. It provides a unique, non-sweet drink alternative for the holidays.
The small jar is easy to package and store. The array of fresh spices and cookies surrounding the jar helps sell the concept immediately. This is a must-have for any baker who loves warm, sweet, and comforting holiday flavors.
Required Ingredients
1/2 cup ground turmeric
1/4 cup ground cinnamon
1 tablespoon ground ginger
1 teaspoon ground cardamom
1 teaspoon black pepper (crucial for activating turmeric)
1/2 teaspoon ground cloves (optional)
Required Equipment
Small mixing bowl
Whisk
Measuring cups and spoons
Small, clean spice jar with a tight-fitting lid
Small wooden serving spoon
DIY Instruction Steps
Measure and Combine: Accurately measure all the ground spices, including the turmeric, cinnamon, ginger, cardamom, black pepper, and cloves (if using). Place all the measured spices into a small mixing bowl.
Whisk Thoroughly: Use a small whisk to blend the spices completely. Mixing thoroughly ensures that the black pepper (which increases the bioavailability of turmeric) is evenly distributed throughout the mix. Whisk for at least one minute.
Jar the Mix: Carefully spoon or pour the entire spice mixture into the clean, dry spice jar. Seal the lid tightly.
Attach Spoon and Instructions: Tie a small wooden spoon to the neck of the jar using a piece of twine. Create a tag that clearly identifies the product and provides simple preparation steps. Example Instructions to include: “To make Golden Milk: Gently heat 1 cup of milk (dairy or non-dairy). Whisk in 1 teaspoon of the spice mix. Sweeten to taste with honey or maple syrup.”
Finalize the Gift: Attach the instruction tag to the twine securing the spoon.
37. Lemon Thyme Finishing Salt
Edible Food Gifts
This small jar of vibrant, herb-infused salt makes a wonderful, unique seasoning for the enthusiastic cook. The bright green color of the thyme mixed with the white salt creates a rustic, earthy look. The small glass jar with a cork stopper gives it an appealing, handcrafted quality.
Finishing salts are used at the very end of cooking to add a final burst of flavor and texture. This blend, with the aromatic lift of lemon zest and fresh thyme, is fantastic sprinkled on roasted chicken, steamed vegetables, or eggs. It’s a simple item that adds sophisticated flair to a meal.
Making this salt is straightforward, requiring only a gentle drying period to ensure the final product remains flaky and non-clumpy. Placing the jar in a small wooden crate with other specialty salts or seasonings makes a lovely presentation.
Required Ingredients
1 cup flaky sea salt (like Maldon)
Zest of 2 large lemons
2 tablespoons fresh thyme leaves, removed from stems
Required Equipment
Citrus zester or fine grater
Small mixing bowl
Baking sheet
Parchment paper
Small glass jar with a cork stopper
DIY Instruction Steps
Zest the Lemons: Use a fine grater or zester to remove only the bright yellow part of the lemon peel. Place the zest in a small mixing bowl.
Strip the Thyme: Gently remove the fresh thyme leaves from their stems. Add the leaves to the bowl with the lemon zest.
Combine Ingredients: Add the flaky sea salt to the bowl. Use your fingers to rub the lemon zest and thyme into the salt. This action releases the fragrant oils and ensures the salt is fully seasoned.
Dry the Salt: Spread the moistened salt mixture in a thin, even layer onto a parchment-lined baking sheet. Leave it to air dry at room temperature for at least 12 to 24 hours. The mixture must be completely dry before jarring to prevent mold and clumping. Alternatively, place it in a very low oven (under 200 deg F / 95 deg C) for 30 minutes, stirring occasionally.
Jar and Seal: Once fully dry, carefully transfer the seasoned salt into the clean glass jar. Seal the jar with the cork stopper.
Label and Decorate: Write or print a label that clearly states “Lemon Thyme Finishing Salt.” Tie a piece of twine around the neck of the jar, possibly securing a small sprig of dried thyme as a garnish.
38. Homemade Limoncello Kit
Edible Food Gifts
This image shows the makings of a classic Italian liqueur, presented as an elegant and sophisticated kit. The fresh lemons, clear high-proof spirit, and empty glass bottles suggest the recipient is about to embark on a fun, aromatic DIY project. Gifting a homemade liqueur is a truly memorable and impressive gesture.
Limoncello, with its bright, intense lemon flavor, is a refreshing after-dinner drink that is popular during the holidays. This kit provides the core ingredients—the spirit and the lemons—along with clear instructions for the infusion process. It’s an exciting, hands-on present that results in a delicious homemade drink.
Be sure to include high-quality, high-proof grain alcohol for the base. Provide very clear instructions on the multi-week infusion process and the final step of adding a sugar syrup. This is a wonderfully sunny, unique, and long-lasting gift.
Required Ingredients (For the Kit)
7-8 large, organic, thick-skinned lemons
1 bottle (750ml) high-proof grain alcohol (like vodka or Everclear)
4-5 small, clean glass bottles with corks (for the finished product)
Small packet of sugar (1 cup)
Recipe card to include (Ingredients the recipient adds):
3 cups water (for the simple syrup)
Required Equipment
Sharp vegetable peeler (or zester)
Large, airtight container (to hold the alcohol and zest during infusion)
Fine-mesh sieve or cheesecloth
Measuring cups
Small saucepan (for simple syrup)
DIY Instruction Steps
Peel the Lemons: This step is usually completed by the recipient, but ensure the instructions emphasize removing only the bright yellow zest from the lemons using a vegetable peeler or microplane. They must avoid the bitter white pith beneath the zest.
Start the Infusion: Instruct the recipient to place the lemon zest into the large airtight container. Pour the entire bottle of high-proof alcohol over the zest. Seal the container tightly.
The Wait (Infusion): Provide instructions to let the mixture infuse in a cool, dark place for at least 7 to 14 days, or up to 30 days. Shaking the container gently once a day is recommended. The alcohol should turn a pale yellow color.
Prepare Simple Syrup: Instruct the recipient to boil the 3 cups of water and the 1 cup of sugar (provided in the kit) in a saucepan, stirring until the sugar is fully dissolved. Let the syrup cool completely to room temperature.
Mix and Strain: Instruct them to mix the cooled simple syrup into the lemon-infused alcohol. Then, strain the entire mixture through a fine-mesh sieve lined with cheesecloth to remove all the zest.
Bottle the Limoncello: Using a small funnel, pour the finished Limoncello into the small, clean gift bottles provided in the kit. Cork or cap them tightly.
Final Instructions: Advise the recipient to age the Limoncello for a few more days, then store it in the freezer and serve it chilled. Attach the instruction card and a festive tag to the kit.
39. Chocolate Dipped Pretzel Bouquet
Edible Food Gifts
This attractive bouquet features chocolate-dipped pretzels arranged upright in a festive holiday mug, creating a colorful and charming display. The pretzels are covered in both white and dark chocolate and drizzled with contrasting colors and crushed peppermint. They look cheerful and perfectly suited for holiday giving.
A pretzel bouquet is a fun, creative way to gift a crunchy, sweet, and salty treat. The combination of the salty pretzel crunch and the smooth, sweet chocolate is always a crowd-pleaser. They are individually wrapped, making them easy to share and maintaining freshness.
Making these requires simple chocolate melting and dipping, which is easy to do in large batches. The mug serves as the reusable container, adding extra value to the gift. These make wonderful desk presents or small tokens of appreciation.
Required Ingredients
2 bags of mini pretzel twists and/or pretzel rods
12 ounces dark chocolate melting wafers or chips
8 ounces white chocolate melting wafers or chips
1 tablespoon neutral oil (optional, for thinning chocolate)
1/4 cup crushed candy canes or peppermint candies
Small, clear cellophane bags
Decorative holiday mug
Required Equipment
Baking sheet
Parchment paper
Two small microwave-safe bowls (or double boiler)
Tongs or dipping tool
Spoon (for drizzling)
Twine or ribbon
DIY Instruction Steps
Prepare the Surface: Line a large baking sheet with parchment paper.
Melt the Chocolate: Place the dark chocolate in one bowl and the white chocolate in the second bowl. Add a small amount of oil to each (optional) to aid in melting. Heat in 30-second intervals, stirring between each, until both chocolates are completely smooth.
Dip the Pretzels: Using tongs or a dipping tool, dip the pretzels (twists or rods) into the dark chocolate, coating about two-thirds of the pretzel. Allow the excess chocolate to drip off, then lay them gently on the parchment paper. Repeat with the white chocolate, dipping the remaining pretzels.
Decorate: While the chocolate is still wet, sprinkle the dark chocolate pretzels with crushed peppermint. Drizzle the white chocolate pretzels with some of the remaining dark chocolate and sprinkle them with peppermint.
Set: Allow the pretzels to set completely at room temperature or chill them briefly in the refrigerator (about 15 minutes).
Wrap and Arrange: Once set, carefully slide each finished pretzel into a small, clear cellophane bag and tie it shut with twine. Arrange the individually wrapped pretzels upright in the holiday mug, creating a cheerful bouquet shape. Secure a large, festive ribbon around the mug’s base.
40. Artisan Focaccia Herb Mix
Edible Food Gifts
This beautifully layered mix offers a rustic, aromatic blend of dried herbs and seasoning for making savory focaccia bread. The distinct layers—likely salt, rosemary, thyme, and oregano—are visually captivating in the corked glass bottle. The finished, seasoned focaccia in the foreground illustrates the gift’s delicious result.
This mix is a wonderful choice for the bread baker or savory food lover. It contains all the necessary flavoring elements, saving the recipient time in gathering and measuring. The aroma of Mediterranean herbs is comforting and instantly appealing.
The corked bottle provides a lovely, non-perishable presentation that looks great on a shelf. Provide clear instructions on how to incorporate the herbs into the focaccia dough and how much oil and salt to add for the final topping. This is a sophisticated and highly useful kitchen gift.
Required Ingredients (For the Dry Mix)
1/2 cup coarse salt (kosher or sea salt)
1/4 cup dried rosemary leaves
1/4 cup dried oregano
1/4 cup dried thyme
1/4 cup garlic powder (for a layered look)
1/4 cup red pepper flakes (optional, for color and heat)
Required Equipment
Large, corked glass bottle or jar
Measuring cups and spoons
Funnel (optional, for neat layering)
DIY Instruction Steps
Measure and Prepare: Accurately measure all the dry ingredients. Ensure all the herbs are completely dry (not fresh).
Layer the Mix: The visual appeal comes from distinct layering. Using a spoon or funnel, gently add the ingredients to the bottle in the following order. Press each layer down lightly before adding the next one:
Layer 1: The coarse salt.
Layer 2: The garlic powder (or any other fine white layer).
Layer 3: The dried oregano.
Layer 4: The dried thyme.
Layer 5: The red pepper flakes (optional, for a thin color band).
Layer 6: The dried rosemary leaves (to fill the rest of the bottle).
Seal and Decorate: Insert the cork tightly into the bottle. Tie a piece of twine around the neck, securing a small cardstock tag that says “Artisan Focaccia Herb Mix.”
Attach Instructions: Write or print out a clear instruction card and tie it to the jar. Example Instructions to include: “To use for Focaccia: Before baking, mix 2 tablespoons of the blend with 1/4 cup of olive oil. Drizzle the herbed oil over the dimpled dough before the final rise. Sprinkle generously with extra salt from the jar.”
41. Cozy Coconut Curry Kit
Edible Food Gifts
This thoughtful kit provides all the essential non-perishable components for creating a warm, fragrant curry meal. Arranged neatly in a wooden crate, the ingredients—noodles, curry paste, coconut, lime, and ginger—look inviting and exotic. This gift is a wonderful alternative to traditional sweets.
Giving a meal kit offers the fun of cooking with the convenience of pre-measured ingredients and a clear recipe card. The intense red curry paste and fresh ginger promise a bold, warming flavor that is perfectly suited for a cold evening. This is a culinary experience wrapped up in a box.
The presentation, with the recipe card clearly visible and all components nestled in natural filler, is highly appealing and makes for an impressive host gift. This is a very creative and useful item for the food enthusiast who appreciates global cuisine.
Required Ingredients (For the Kit)
1 small jar of quality red or yellow curry paste
1 package of noodles (rice noodles or thin egg noodles)
1 whole coconut and/or 1 can (13.5 oz) coconut milk
1 lime
1 piece of fresh ginger root (about 2 inches)
Small bunch of fresh cilantro
1-2 red chili peppers
Required Equipment
Small wooden crate or basket
Natural straw or crinkle-cut paper filler
Twine
Clear recipe card
DIY Instruction Steps
Gather Components: Collect all the required ingredients listed above. If you are including a whole coconut, ensure the recipient knows how to access the milk/meat inside, or include the canned coconut milk for convenience.
Prepare Perishables: The lime, ginger, and chili peppers are perishable; they should be added right before gifting or placed in a small, separate breathable bag. Wrap the ginger root in a small piece of cling film to help maintain moisture.
Arrange the Kit: Line the wooden crate with the natural straw or crinkle-cut paper filler. Artfully arrange the jar of curry paste, the package of noodles, the coconut, and the fresh produce into the crate.
Create the Recipe Card: Write or print a clear recipe card titled “Cozy Coconut Curry.” The recipe should detail the cooking method and portion sizes. Example Instructions to include: “To Cook: Heat 1 tablespoon of oil. Saute 2 tablespoons of curry paste and 1 teaspoon of grated ginger. Add the coconut milk and 1/2 cup of water. Simmer for 10 minutes. Cook noodles separately. Stir in lime juice and fresh cilantro. Serve curry over the noodles.”
Finalize Presentation: Tie the noodles with a simple piece of twine. Secure the recipe card to the side of the crate or place it clearly on top of the filler.
42. Lavender & Orange Calming Syrup
Edible Food Gifts
These elegant, small dropper bottles hold a beautifully colored lavender syrup, offering a sophisticated and calming gift. The pale purple liquid, garnished with a sprig of dried lavender and tied with natural raffia, looks delicate and artisan-made. This syrup is a lovely, unique consumable item.
This syrup is versatile and can be used to flavor tea, sparkling water, or even cocktails. The combination of floral lavender and bright citrus (orange is implied by the setting) is known for its soothing properties. It is a thoughtful item that promotes relaxation during the busy holiday season.
The small, dark glass dropper bottles are protective and attractive, giving the syrup a medicinal or apothecary feel. This gift is a charming option for friends who appreciate subtle flavors and self-care. It truly stands out among more traditional holiday sweets.
Required Ingredients
1 cup water
1 cup granulated sugar
1/4 cup dried culinary lavender buds
Zest of 1 orange
1-2 drops food-grade lavender or purple food coloring (optional)
Required Equipment
Small saucepan
Fine-mesh sieve or cheesecloth
Measuring cups and spoons
Small dropper bottles (or small decorative glass vials)
Small funnel
DIY Instruction Steps
Make the Simple Syrup: In the small saucepan, combine the water and the granulated sugar. Heat over medium heat, stirring until the sugar is completely dissolved. Remove from the heat immediately once dissolved.
Infuse the Flavor: Stir in the dried culinary lavender buds and the orange zest into the hot sugar syrup. Let the mixture sit and steep at room temperature for at least 30 minutes, or up to several hours, until the desired flavor strength is achieved.
Strain and Color: Strain the mixture through a fine-mesh sieve (or a sieve lined with cheesecloth) into a clean bowl, discarding the lavender buds and zest. Stir in the optional purple food coloring if you desire a lavender shade.
Bottle the Syrup: Using a small funnel, carefully pour the finished syrup into the clean dropper bottles. Seal the bottles tightly with the dropper cap and silver foil (as pictured).
Decorate and Present: Tie a piece of natural raffia or twine around the neck of each bottle. Tuck a small dried lavender sprig beneath the knot. Advise the recipient to store the syrup in the refrigerator.
43. Maple Pecan & Peanut Brittle
Edible Food Gifts
This brittle is a dark, glossy, and crunchy confection featuring whole pecans and peanuts. The broken pieces, scattered artfully, highlight the rich, caramelized coating and the generous amount of nuts. This classic sweet gift is always appreciated during the holidays.
The dark, caramelized sugar and deep brown color of the nuts make this brittle look rich and intensely flavorful. This is a treat that offers a highly satisfying crunch and a complex balance of sweet, smoky, and nutty tastes. The wax seal on the tag gives the presentation a truly artisanal touch.
Wrap the pieces in parchment paper and place them in a rustic tin or metal pail for a charming presentation. While making brittle requires working with hot sugar, it is a straightforward process that results in a sturdy, non-perishable gift that keeps well.
Required Ingredients
1 cup granulated sugar
1/2 cup pure maple syrup (or light corn syrup)
1/2 cup water
1 1/2 cups mixed nuts (pecans, peanuts), toasted
1 tablespoon unsalted butter
1 teaspoon baking soda
1/2 teaspoon salt
4 ounces dark chocolate (optional, for coating the bottom)
Required Equipment
Heavy-bottomed saucepan
Candy thermometer (highly recommended)
Large baking sheet
Silicone baking mat or parchment paper
Wooden spoon
Small metal tin or pail
DIY Instruction Steps
Prepare Surface and Nuts: Line a large baking sheet with a silicone baking mat or parchment paper. Scatter the toasted nuts evenly across the prepared surface.
Cook the Syrup: In the heavy-bottomed saucepan, combine the granulated sugar, maple syrup (or corn syrup), and water. Stir them until the sugar is dissolved. Clip the candy thermometer to the side of the pan. Cook over medium-high heat until the syrup reaches 300 deg F (150 deg C), which is the hard crack stage. Do not stir while boiling; just swirl the pan occasionally.
Add Butter and Nuts: Remove the pan from the heat immediately. Stir in the butter and salt until melted. Quickly stir in the toasted nuts until they are fully coated.
Add Baking Soda (Crucial Step): Immediately sprinkle the baking soda over the mixture and stir quickly and vigorously once or twice. The mixture will foam up dramatically; this is what creates the brittle texture.
Pour and Cool: Immediately pour the mixture onto the prepared baking sheet over the scattered nuts. Use the back of a wooden spoon to quickly spread it into a thin layer. Let it cool completely until it is hard and brittle (about 30-45 minutes).
Coat (Optional): If coating the bottom with chocolate, melt the dark chocolate. Flip the cooled brittle over and spread the melted chocolate evenly on the bottom surface. Let it set.
Break and Package: Once fully set, break the brittle into rustic pieces. Place the pieces in the small metal tin or pail, lining it with tissue paper or wax paper. Seal with a festive tag and wax seal.
44. Cookie Butter Spice Mix
Edible Food Gifts
This jar holds a unique, highly fragrant spice blend that captures the comforting essence of spiced European butter cookies. The rich brown-orange color, surrounded by the individual spices (ginger, cinnamon, nutmeg, cloves), emphasizes the custom blend. This is a wonderfully sophisticated seasonal flavor.
Gifting a custom spice blend like this allows the recipient to easily create the signature taste of beloved holiday cookies in their own baking. This mix can be used in cookies, cakes, whipped cream, or even stirred into coffee or oatmeal. It is a creative, unusual, and highly useful kitchen item.
The small jar is easy to package and store. The array of fresh spices and cookies surrounding the jar helps sell the concept immediately. This is a must-have for any baker who loves warm, sweet, and comforting holiday flavors.
Required Ingredients
1/4 cup ground cinnamon
2 tablespoons ground ginger
1 tablespoon ground nutmeg
1 tablespoon ground cloves
1 tablespoon ground allspice
1 teaspoon ground white pepper (optional, for authentic flavor)
Required Equipment
Small mixing bowl
Whisk
Measuring cups and spoons
Small spice jar with a tight-fitting lid
DIY Instruction Steps
Measure and Combine: Accurately measure all the ground spices listed. Place the ground cinnamon, ginger, nutmeg, cloves, allspice, and white pepper (if using) into a small mixing bowl.
Whisk Thoroughly: Use a whisk to blend all the spices together completely. Mixing thoroughly ensures that the black pepper (which increases the bioavailability of turmeric) is evenly distributed throughout the mix. Whisk for at least one minute.
Jar the Mix: Carefully spoon or pour the entire blended spice mixture into the clean, dry spice jar. Fill it up to the neck. Seal the lid tightly.
Create the Label and Instructions: Create a label with the name “Cookie Butter Spice Mix.” Attach the label to the front of the jar. On a small accompanying card, include suggestions for use. Example Instructions to include: “Use 1-2 teaspoons of the mix in your favorite sugar cookie recipe, or stir 1/2 teaspoon into whipped cream for a festive topping.”
Finalize the Gift: Attach the instruction card and a simple decorative ribbon or twine around the neck of the jar.
45. Pistachio & Cherry White Chocolate Biscotti
Edible Food Gifts
These crisp, double-baked biscotti look elegant, especially with their ends dipped in contrasting white and dark chocolate. The bright green pistachios and red cherries visible in the cross-section add beautiful holiday color. Bundling the stacks with a sheer, festive ribbon makes a refined presentation.
Biscotti are wonderful gifts because they are naturally sturdy and keep well for weeks. They are the quintessential dipping cookie, making them an excellent accompaniment for coffee or the hot chocolate spoons from item 17. The flavors here are sophisticated and distinctly celebratory.
The neat stacking and clear wrapping give these cookies a professional, bakery-level finish. This requires two rounds of baking but is a simple dough to handle. This is a classic, durable, and highly appealing treat to gift.
Required Ingredients
2 cups all-purpose flour
1 1/2 teaspoons baking powder
1/2 teaspoon salt
1/2 cup granulated sugar
1/4 cup vegetable oil
2 large eggs
1 teaspoon vanilla extract
1/2 cup raw pistachios, roughly chopped
1/2 cup dried cherries or cranberries, chopped
4 ounces white chocolate chips or melting wafers
4 ounces dark chocolate chips or melting wafers
Required Equipment
Large mixing bowl
Baking sheet
Parchment paper
Sharp serrated knife
Small microwave-safe bowls (2)
Sheer ribbon and cellophane wrap
DIY Instruction Steps
Preheat and Prep: Preheat your oven to 350 deg F (175 deg C). Line a baking sheet with parchment paper.
Combine Dry Ingredients: In a large bowl, whisk together the flour, baking powder, and salt. Set aside.
Combine Wet Ingredients: In a separate bowl, whisk together the sugar, vegetable oil, eggs, and vanilla extract until smooth.
Form the Dough: Pour the wet ingredients over the dry ingredients. Mix until a shaggy dough forms. Fold in the chopped pistachios and dried cherries until they are evenly distributed.
First Bake (The Logs): Divide the dough in half. On the prepared baking sheet, shape each half into a log approximately 10 inches long and 2 inches wide. Bake for 25 to 30 minutes, or until the logs are firm and lightly golden.
Cool and Slice: Remove the logs from the oven and let them cool on the pan for about 10 minutes. Reduce the oven temperature to 300 deg F (150 deg C). Transfer the logs to a cutting board. Using a sharp serrated knife, slice the logs diagonally into 1/2 inch thick pieces.
Second Bake (The Crisp): Lay the slices cut-side up on the baking sheet. Bake for another 10 minutes, flip them over, and bake for 10 minutes more. They should be dry and crisp. Let them cool completely.
Dip and Decorate: Melt the white chocolate in one bowl and the dark chocolate in the second bowl. Dip one end of each biscotti into either the white or dark chocolate. Lay them on parchment paper to set completely.
Package: Stack a few biscotti together and wrap the stack tightly in clear cellophane. Tie the bundle securely with a wide, sheer ribbon.
Key Takeaways
Thoughtful Gifting Made Simple: Homemade food gifts feel personal and unique, proving that the most meaningful presents do not have to be expensive or complicated.
Variety for Every Skill Level: The list includes options ranging from simple assembly mixes (like spice blends and hot chocolate kits) to easy bakes and confectionery (like biscotti and fudge).
Convenience is Key: Many recipes allow for batch preparation or freezing, making it easier to manage a large holiday gift list without feeling overwhelmed.
Embrace Both Sweet and Savory: Moving beyond just cookies, the guide offers great ideas for savory items like infused oils, shortbread, and dip mixes that are always welcome.
Creating a batch of homemade edible gifts is a rewarding way to navigate the holiday season. The effort you put into stirring, baking, or blending these treats is always felt and appreciated by those who receive them. Instead of giving something generic, you offer a moment of cozy indulgence.
These 45 simple ideas prove that you do not need extensive culinary experience to craft something extraordinary. The range includes items that are sturdy enough for mailing and quick mixes that give the gift of an easy future activity. Choose a few recipes that suit your schedule and start spreading the sweetness.
Remember that the most valuable gift you can give is your time and care. By sharing one of these easy edible presents, you are giving a flavorful experience that will warm hearts and kitchens long after the holidays have ended. Happy mixing, wrapping, and gifting!
Spread the loveThere is nothing quite like a traditional pecan pie, with its buttery crust and sweet, nutty filling. This classic dessert is a hallmark of holiday tables and celebratory gatherings. However, many home bakers…
Spread the loveValentine’s Day often feels like a high pressure search for the right gift. You want to show him how much you care without spending all day in the kitchen. These sweet treats offer…
Spread the loveValentine Day often arrives much faster than we expect. You might find yourself searching for a sweet treat at the very last second. Do not panic because you can still create something wonderful…