Building a gingerbread house is a beloved holiday tradition, but nothing ruins the festive mood like a roof sliding off or walls buckling. You spend hours on detail only to watch your masterpiece crumble into a pile of crumbs. It feels like you need an engineering degree just to keep a cookie upright.
Gingerbread House Ideas
Structural failure usually happens because of heavy toppings or weak “glue.” Many people use icing that is too thin or candies that weigh more than the gingerbread can handle. The secret to a stable home is choosing the right materials and following a solid assembly plan.
This guide offers 36 creative ways to decorate your holiday house without the stress of a collapse. From lightweight cereal shingles to sturdy pretzel log cabins, these ideas prioritize stability. You can create a stunning winter manor or a colorful cottage that stays standing until the season ends.
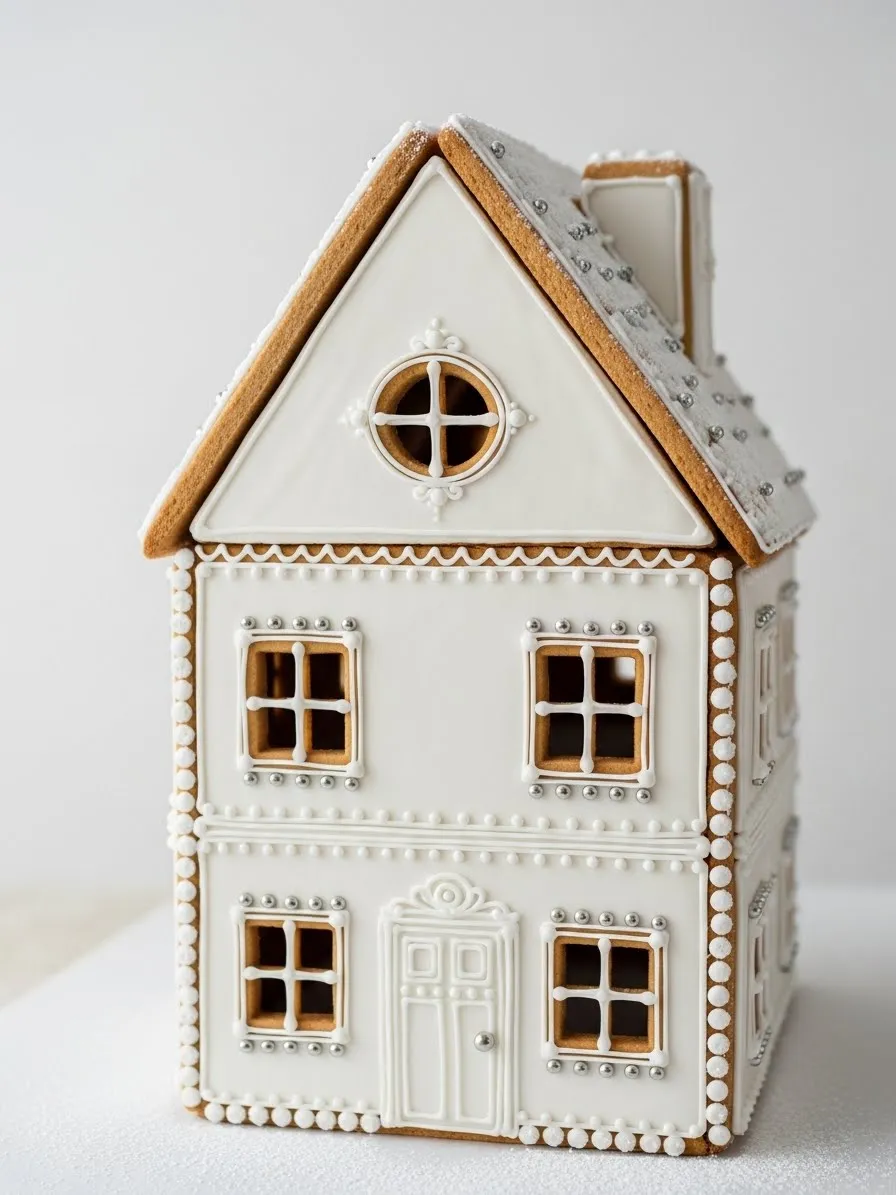
This gingerbread house looks like a sophisticated snowy estate. Instead of using messy candies, the design relies on smooth white icing and silver beads to create a clean look. The thick icing on the walls acts as a sturdy glue, ensuring your structure remains stable throughout the season.
Tiny silver dragées add a touch of sparkle to the roof and window frames. This style proves that you do not need bright colors to make a statement. Small piped dots along the edges hide the seams where the cookies meet, which helps prevent the house from collapsing.
The monochrome palette feels modern and fresh. Using white flood icing creates a flat surface that mimics a freshly painted home. It is a smart way to cover any bumps in the gingerbread cookies while adding extra support to the entire build.
Required Ingredients
Pre-baked gingerbread panels: Two roof pieces, two side walls, one front piece, one back piece, and a chimney set.
Royal Icing: A large batch of stiff-peak icing for structural assembly and a thinner flood-consistency icing for the walls.
Silver Dragées: Small edible silver beads for decoration.
White Sanding Sugar: To give the roof a shimmering, snowy texture.
Equipment List
Piping Bags: Two or three bags fitted with small round tips.
Small Squeeze Bottle: Useful for flooding large wall areas smoothly.
Toothpicks: To pop air bubbles in the icing or move silver beads into place.
Sturdy Base: A cake board or large flat platter to hold the weight.
DIY Step-by-Step Instructions
Prepare the Walls: Lay your front, back, and side pieces flat on a table. Using the squeeze bottle or a piping bag, fill the center of each wall with white flood icing. Let these dry completely for several hours until the icing is hard to the touch.
Assemble the Base: Pipe a thick line of stiff royal icing along the bottom and side edges of the front wall. Press it onto your base. Prop it up with a heavy glass or jar while you attach the side walls. Repeat this until all four walls are standing and glued together.
Reinforce the Seams: Run a thick bead of icing along the inside corners of the house. This acts like internal scaffolding. Wait about 30 minutes for the base to set before you try to add the roof.
Attach the Roof: Apply a generous amount of stiff icing to the top edges of the wall panels. Gently place the roof pieces on top. Hold them in place for a few minutes with your hands to ensure they do not slide off.
Decorate the Roof: Brush a thin layer of icing over the roof panels and sprinkle them with white sanding sugar. While the icing is wet, carefully drop silver dragées across the surface to look like fallen stars or snow.
Add Final Details: Use a fine-tip piping bag to create the window frames and the front door. Place silver beads around the windows for extra flair. Finish by piping small white dots along every corner and edge to hide any gaps.
2. Rustic Pretzel Log Cabin
Gingerbread House Ideas
This charming log cabin replaces traditional smooth walls with crunchy pretzel sticks. Using pretzels creates a textured, woody appearance that looks like a real forest retreat. The dark chocolate frosting acts as the mortar between the logs, providing a rich color contrast that makes the structure pop.
A simple graham cracker roof keeps the build lightweight and stable. This prevents the heavy leaning often seen with thick gingerbread slabs. The open doorway and window invite the eye to look inside, making it a great centerpiece for a rustic holiday display.
Using edible “logs” is a clever trick for beginners. You do not need to worry about perfectly smooth icing on the walls. The natural variations in the pretzels hide any small mistakes, making the assembly process stress-free and fun.
Required Ingredients
Pretzel Rods or Sticks: Thick sticks work best for the “log” look.
Graham Crackers: Four large rectangles for the roof and base.
Chocolate Frosting: Stiff consistency to act as glue.
Mini Chocolate Chips: To create a stone path or doorknob.
Equipment List
Piping Bag: Fitted with a medium round tip.
Butter Knife: For spreading frosting on the base.
Cardboard Base: To provide a sturdy foundation for the crackers.
DIY Step-by-Step Instructions
Secure the Floor: Lay one large graham cracker flat on your base. Use a small amount of chocolate frosting to glue it down so it does not slide.
Build the Corners: Pipe four vertical dots of frosting on the corners of your cracker base. These will hold your first layer of pretzel sticks in place.
Stack the Logs: Lay pretzels horizontally to form the walls. Apply a line of chocolate frosting between every layer. This “mortar” is what keeps the cabin from falling over.
Create the Door: Leave a gap in the center of the front wall. Use shorter pretzel pieces to build up the sides of the entrance.
Set the Roof Gables: Cut a graham cracker into two triangles for the front and back peaks. Glue these to the top of your pretzel walls with plenty of frosting.
Add the Roof: Apply frosting to the top edges of your triangles. Lean two full graham crackers against each other to form the peaked roof. Hold them for a minute until the “glue” sets.
3. Colorful Gumdrop Roof Cottage
Gingerbread House Ideas
This house features a vibrant roof covered in sugar-coated gumdrops. The bright colors stand out against the simple tan walls, creating a playful and classic look. Thick green licorice ropes line the roof edges and windows, giving the house a finished, professional appearance.
The brick-patterned walls add a level of detail that makes the house look more realistic. By using large, soft candies on the roof, you add weight that actually helps press the roof panels down into the glue. This ensures a tight seal at the peak.
The white icing “donuts” under each gumdrop act as a double-securing agent. This prevents the candies from sliding off before the icing dries. It is a brilliant way to add both style and structural integrity to your holiday creation.
Required Ingredients
Gingerbread House Panels: Basic four-wall and two-roof set.
Multi-colored Gumdrops: Use different sizes for variety.
Green Licorice Twists: For the borders and window frames.
White Royal Icing: Stiff-peak consistency for maximum grip.
Equipment List
Piping Bag: With a large round tip for the “donut” bases.
Kitchen Shears: To trim the licorice to the right length.
Tweezers: Helpful for placing smaller candies precisely.
DIY Step-by-Step Instructions
Construct the Shell: Glue your gingerbread walls together on a flat board. Let this dry for at least one hour so the base is rock solid before adding the roof.
Attach the Roof Panels: Apply a thick bead of icing to the top of the walls. Place the roof slabs on and hold them. Use cans or jars to prop up the eaves while they dry.
Pipe the Licorice Borders: Measure the green licorice against the roof edges. Cut them to size and glue them down with white icing to hide the gaps where the roof meets the walls.
Create the Gumdrop Grid: Pipe rows of white icing “dots” across the roof. Start from the bottom edge and work your way up toward the peak.
Place the Candies: Press a gumdrop into each icing dot. Mix the colors randomly to create a festive, scattered look.
Detail the Windows: Pipe icing squares on the side walls. Press trimmed licorice pieces into the icing to frame the windows and add a pop of green.
4. Golden Cereal Shingle House
Gingerbread House Ideas
This design uses square wheat cereal to create a beautiful, layered shingle effect. The golden brown tones of the cereal match the gingerbread perfectly, creating a warm and cozy aesthetic. It is a great alternative to heavy candies that might cause a roof to sag.
Small circular cereal pieces frame the windows and the roofline. This adds a whimsical touch while keeping the color palette simple and natural. The repetitive pattern of the shingles is very satisfying to look at and covers any imperfections in the gingerbread panels.
Because cereal is very light, you can pile it high without worrying about the house collapsing. The texture of the wheat squares mimics real wooden shingles found on a country cottage. This makes the house look like it belongs in a snowy forest clearing.
Required Ingredients
Gingerbread Wall and Roof Panels: Pre-baked and cooled.
Square Wheat Cereal: For the roof and wall shingles.
Circular Honey Cereal: For window trim and the roof peak.
White Royal Icing: Medium consistency.
Equipment List
Piping Bag: With a medium star or round tip.
Offset Spatula: For spreading thin layers of icing on large surfaces.
Level or Straight Edge: To keep your cereal rows straight.
DIY Step-by-Step Instructions
Build the Main Structure: Assemble your walls and roof using thick icing. Allow the entire house to sit for two hours. A dry house is a sturdy house.
Shingle the Walls: Spread a thin layer of icing on one wall. Start at the bottom and press square cereal pieces in a straight row.
Overlap the Rows: Place the next row of cereal slightly over the top of the first row. This overlapping technique creates the “shingle” look and adds extra stability.
Roofing Work: Apply the same overlapping technique to the roof. Work from the gutters up to the peak. This ensures that any “snow” (icing) you add later will sit naturally on the edges.
Trim the Windows: Pipe circles of icing around the window openings. Press the circular cereal pieces into the icing. These act as “frames” and hide any rough cookie edges.
Finish the Peak: Line the very top of the roof with a row of circular cereal. This hides the seam where the two roof panels meet and completes the look.
5. Peppermint Pathway Manor
Gingerbread House Ideas
This manor stands out with its clean white walls and striking red accents. The use of round peppermint candies and candy canes gives it a classic “North Pole” feel. The path leading to the door is paved with colorful mints, creating a sense of depth and scale.
The text on the front is a fun way to personalize your project. Using small red letters makes the house feel like a real business or family estate. The chimney is built from small white blocks, adding a different texture that breaks up the flat surfaces.
Fluffy white icing or coconut flakes on the base look like a fresh blanket of snow. This hides the board and makes the house look like it is part of a winter wonderland. The red and green shutters around the windows add just the right amount of holiday color.
Required Ingredients
White Fondant or Thick Flood Icing: For the smooth white walls.
Assorted Peppermint Rounds: Red, green, and yellow varieties.
Candy Canes: Standard size for the corners and mini ones for the door.
Letter Candies or Red Icing: For the house name.
Shredded Coconut: To create the snowy yard.
Equipment List
Piping Bag: With a fine tip for lettering and a medium tip for borders.
Small Brush: To apply water or corn syrup if using fondant.
Ruler: To keep your peppermint path perfectly straight.
DIY Step-by-Step Instructions
Coat the Walls: Cover your gingerbread pieces in white fondant or thick icing before you put the house together. This ensures a perfectly smooth finish without any drips.
Assemble and Brace: Glue the walls together using white icing. Place candy canes vertically on each corner. These act as pillars that reinforce the structure and hide the seams.
Add the Door and Windows: Use red and green square candies to create shutters. Frame the door with curved peppermint sticks or thick icing to make it a focal point.
Install the Peppermint Path: Pipe two long lines of icing from the door to the edge of the board. Place peppermint rounds between the lines in a neat pattern to create the walkway.
Personalize: Carefully pipe your chosen name onto the front of the house. If you are nervous, you can use pre-made candy letters and stick them on with a tiny bit of icing.
Snow the Yard: Spread a layer of icing all around the base of the house. Sprinkle shredded coconut or sanding sugar over the wet icing to create a textured, snowy lawn.
6. Marshmallow Igloo Village
Gingerbread House Ideas
This unique design trades gingerbread for a rounded, dome-shaped cake or cookie base. Covering the dome in mini marshmallows creates a soft, bubbly texture that looks exactly like blocks of ice. It is a fantastic project for those who struggle with the sharp angles of traditional houses.
The blue icing accents provide a chilly, frozen vibe. Using small “ice” blocks makes the structure feel sturdy and thick. Because marshmallows are so light, there is zero risk of them falling off or pulling the walls down.
A small marshmallow entryway adds a 3D element that makes the igloo feel real. Surrounding the main igloo with smaller “baby” igloos creates a full village scene. This is a great way to use up extra materials and fill space on your display board.
Required Ingredients
Rounded Cake or Dome-shaped Cookies: To act as the internal base.
Mini Marshmallows: At least two large bags.
Blue Royal Icing: For the colorful borders.
Powdered Sugar: To dust the top for a “frosted” look.
Equipment List
Spatula: To coat the base in icing.
Piping Bag: With a small round tip for the blue details.
Round Cutter: If you need to trim the base cake.
DIY Step-by-Step Instructions
Prepare the Base: Place your dome-shaped cake on a sturdy board. If you do not have a dome, you can stack round cookies and carve the edges with a knife to get a curved shape.
Crumb Coat: Spread a thick layer of white frosting over the entire dome. This acts as the “snow” that will hold your marshmallow blocks in place.
Lay the First Row: Start at the bottom of the dome. Press mini marshmallows side-by-side in a circle all the way around the base.
Stack the Blocks: Add the next row of marshmallows, staggering them like real bricks. Continue this pattern until you reach the very top of the dome.
Build the Entry Tunnel: Glue a few marshmallows together to form a small arch. Attach this to the front of the igloo to create the entrance.
Blue Accents: Pipe a line of blue icing around the base of the entryway and the bottom of the igloo. This adds a pop of color and makes the “ice” look cold and crisp.
7. Rainbow Dot Modern Block
Gingerbread House Ideas
This house focuses on a minimalist, modern aesthetic. By using a simple rectangular shape, you eliminate the stress of a slanting roof. The focus here is on the repetitive, colorful pattern of icing dots that look like modern art.
The clean white background makes the rainbow colors look incredibly vivid. This style is very easy for beginners because it only requires one skill: piping a steady dot. There are no heavy candies or complicated structures to worry about.
Varying the colors in a grid pattern keeps the design organized and neat. It is a great way to practice your piping consistency. This house is less about “baking” and more about “design,” making it a hit for those who love a clean look.
Required Ingredients
Rectangular Gingerbread or Sugar Cookie Panels: To form a tall block shape.
Royal Icing in Multiple Colors: Pink, blue, purple, orange, green, and red.
White Royal Icing: For the base coat.
Equipment List
Multiple Piping Bags: One for each color.
Small Round Piping Tips: Size 2 or 3 works best for neat dots.
Grid Template: To help mark where the dots should go.
DIY Step-by-Step Instructions
Create the Box: Assemble your four rectangular panels into a tall, chimney-like box. Use thick white icing on the inside to ensure it stays upright.
Apply the White Base: Once the structure is dry, coat the outside in a smooth layer of white royal icing. Let this dry completely until it has a matte finish.
Mark the Grid: Use a toothpick to lightly mark tiny dots in a grid pattern on the walls. This will act as your guide so your rows don’t end up crooked.
Pipe the Colors: Starting from the top, pipe a single dot of colored icing over your guide marks. Move horizontally, changing colors for every dot.
Maintain Pressure: Keep the same amount of pressure on the piping bag for every dot. This ensures they are all the same size and shape.
Let it Set: Do not touch the dots until they are fully dry. Because they are raised, they can easily smudge if you move the house too soon.
8. Chocolate Wafer Cabin
Gingerbread House Ideas
Chocolate wafers are the secret weapon for a sturdy house. Their flat, textured surface makes them incredibly easy to glue together. The dark chocolate color provides a deep, rich base that looks beautiful with simple brown frosting accents.
The roof is made of lighter-colored wafers, creating a “shingle” look that contrasts with the dark walls. This house feels more like a cozy cabin than a traditional gingerbread cottage. The wafer texture naturally mimics siding or shingles without any extra effort.
Using chocolate chips for details like doorknobs and path stones adds a nice organic touch. This house is quite small, which means it is less likely to collapse under its own weight. It is the perfect size for an individual table decoration.
Required Ingredients
Chocolate Wafer Cookies: Square or rectangular ones for the walls.
Vanilla or Caramel Wafers: For the roof shingles.
Chocolate Ganache or Stiff Frosting: To use as mortar.
Chocolate Chips: For the door and path.
Equipment List
Serrated Knife: To gently saw the wafers into triangles for the roof gables.
Piping Bag: With a medium round tip.
Small Spatula: For spreading frosting.
DIY Step-by-Step Instructions
Base Layer: Glue a large flat wafer or graham cracker to your board. This provides a stable floor for your cabin.
Wall Assembly: Pipe chocolate frosting along the edges of your dark wafers. Stand them up to form a square. The texture of the wafers helps the frosting “grip” better than smooth cookies.
Cut the Gables: Very carefully, use a serrated knife to cut two wafers into triangles. These will support your roof. Glue them to the front and back walls.
Roofing: Layer the lighter wafers on the roof. Start at the bottom and let them overlap slightly as you move up. This mimics a real tiled roof.
The Door: Use a single wafer for the door. Attach a chocolate chip with a tiny dot of frosting to serve as the handle.
Landscaping: Sprinkle cocoa powder around the base for “dirt” and place chocolate chips to create a little walkway leading to the front door.
9. Sprinkled Celebration House
Gingerbread House Ideas
This house is all about joy and color. Instead of piping intricate designs, you simply cover the entire surface in multi-colored nonpareils. It is the ultimate “cheat code” for a beautiful house that requires zero artistic skill.
The sprinkles add a layer of texture that hides any cracks or bumps in your gingerbread. By using a hand-tossing method, you get an organic, “encrusted” look that shines under holiday lights. It looks like a candy shop come to life.
A few white stars or larger sprinkles can be added at the end for extra detail. This design is great for kids because they can get messy and the result still looks amazing. It is a vibrant, happy house that will be the talk of the party.
Required Ingredients
Standard Gingerbread House: Assembled and dried.
Rainbow Nonpareil Sprinkles: You will need a lot—at least two large jars.
White Royal Icing: Thinned slightly so it is easy to spread but not runny.
Large Star Sprinkles: For accents.
Equipment List
Large Baking Sheet: To catch the excess sprinkles (this is vital!).
Offset Spatula: To coat the house in icing.
Small Spoon: To help pour sprinkles into tight corners.
DIY Step-by-Step Instructions
Stabilize the House: Make sure your gingerbread house is fully assembled and the “glue” is dry. Place the entire house and its base on a large baking sheet.
Apply the Glue: Spread a medium-thick layer of white icing over one section of the house (start with the roof). Do not do the whole house at once or the icing will dry too fast.
The Sprinkle Shower: Take a handful of sprinkles and gently press or throw them onto the wet icing. Let the excess fall onto the baking tray.
Cover the Walls: Repeat the process for each wall. Work quickly but carefully. If a spot is bare, add a little more icing and more sprinkles.
Fill the Gaps: Use a small spoon to pour sprinkles into the corners and around the door. This ensures every single inch of the gingerbread is hidden.
Add Accents: Once the house is covered, “spot-glue” a few larger star sprinkles or candies on top for a final touch of magic.
10. Red Licorice Lattice Lodge
Gingerbread House Ideas
This house uses long strands of red licorice to create a striking lattice pattern on the roof. The contrast between the tan cookies and the bright red “ropes” is very bold. It is a geometric design that looks much harder to create than it actually is.
The licorice also acts as a structural frame. Running the strands down the corners and around the windows reinforces the joints. This makes the house much less likely to shift or collapse if it needs to be moved.
Small white icing dots at every intersection of the lattice add a “button” effect. This mimics the look of a tufted cushion or a designer handbag. It is a very clean, high-fashion take on a traditional holiday craft.
Required Ingredients
Gingerbread House Panels: Plain, without any pre-decorating.
Pull-and-Peel Red Licorice: Separate the strands carefully.
White Royal Icing: Stiff consistency for the dots and assembly.
Square Cereal or Cookies: To create the textured wall effect.
Equipment List
Piping Bag: With a small round tip.
Sharp Scissors: To cut the licorice strands to exact lengths.
Ruler: To ensure your diagonal lines are evenly spaced.
DIY Step-by-Step Instructions
Build the Foundation: Assemble your house using thick white icing. If you want the textured walls shown, glue small square cookies or cereal to the panels before you stand them up.
Frame the Edges: Glue red licorice strands vertically along the four corners of the house. This hides the seams and adds instant color.
Start the Lattice: Cut several strands of licorice to the length of your roof. Glue them diagonally across the roof, spacing them about an inch apart.
Cross the Lines: Glue a second set of licorice strands in the opposite diagonal direction. This creates the diamond “lattice” pattern.
The Intersection Dots: Pipe a small, neat dot of white icing everywhere two licorice strands cross. This covers the spots where the licorice might be lifting and looks very polished.
Window and Door Trim: Use the remaining licorice to outline the door and window openings. This ties the whole red-and-tan theme together perfectly.
11. Lush Green Garden Villa
Gingerbread House Ideas
This gingerbread home features a striking contrast between deep reddish-brown walls and a vibrant green yard. Instead of a traditional snowy base, this design uses green-tinted coconut or sprinkles to mimic a manicured lawn. The tiny pretzel fence adds a structural border that keeps the design contained and neat.
Small square cookies are used as decorative accents on the roof and walls, giving the house a unique texture. The chimney is tall and robust, anchored firmly with thick frosting to prevent it from tipping. This color scheme is a refreshing break from the usual white-and-red holiday palette.
Detailed greenery around the windows and doors makes the house feel like a living cottage. It shows how you can use different textures, like shredded coconut, to create a believable outdoor scene. The brown base icing provides a warm foundation that makes the green elements stand out.
Required Ingredients
Brown Royal Icing: Stiff consistency for the walls and chimney.
Green Shredded Coconut: Tinted with food coloring for the grass and roof moss.
Mini Pretzel Sticks: For the perimeter fence.
Small Square Crackers: For roof shingles and wall details.
Yellow and Blue Candies: For small lighting or flower accents.
Equipment List
Wide Spatula: For smoothing the brown icing over large panels.
Tweezers: To place the tiny square crackers precisely.
Small Bowl: For mixing the green coconut.
Piping Bag: With a small leaf tip for the greenery.
DIY Step-by-Step Instructions
Coat the Foundation: Assemble your house and chimney. Spread a thick layer of brown icing over every outer surface. Let it set until it feels firm but still slightly tacky.
Add Roof Shingles: Press the small square crackers into the roof icing in neat rows. Leave space at the top to fill with your green “moss” later.
Install the Fence: Pipe a thick line of icing around the edge of your base board. Stand the pretzel sticks upright in the icing, side-by-side, to create a sturdy wooden fence.
Plant the Grass: Carefully spread green icing over the base board inside the fence. Generously sprinkle the green shredded coconut over the wet icing to create the lawn.
Detail the Windows: Pipe small green “bushes” under each window using a leaf tip. Press small colored candies into these bushes to look like blooming flowers.
The Mossy Roof: Apply a layer of icing to the gaps between your roof crackers and the peak. Press more green coconut into these areas to simulate a lush, overgrown roof.
12. Pastel Button Cottage
Gingerbread House Ideas
This house uses a soft, whimsical theme centered around pastel colors and button-shaped candies. The cream-colored walls provide a neutral backdrop that allows the pink, blue, and yellow accents to shine. It feels like a dollhouse brought to life with edible decorations.
The roof is the main attraction, covered entirely in round chocolate buttons. This repetitive pattern is very calming to look at and surprisingly easy to achieve. Each button is placed with a small dot of icing, ensuring they stay put even if the house is moved.
Rainbow-colored sour strips frame the door and windows, adding a different texture and a bit of tang. This design is excellent for those who prefer a “shabby chic” or vintage holiday look. It is light, airy, and full of charming details.
Required Ingredients
Light Cream Royal Icing: For the walls.
Pastel Chocolate Buttons: In pink, yellow, and blue.
Rainbow Sour Belts: Trimmed for the door and window frames.
Pink and Green Mini Candies: For the flower boxes.
Equipment List
Piping Bag: With a medium round tip.
Kitchen Scissors: For precise cutting of the sour belts.
L-shaped Offset Spatula: To get those walls perfectly flat.
DIY Step-by-Step Instructions
Prep the Walls: Apply a smooth coat of cream icing to your gingerbread panels. If you want the “plank” look seen in the image, use a toothpick to score vertical lines while the icing is wet.
Assemble the Frame: Connect your walls and roof. Use a generous amount of icing on the inside corners to prevent any structural failure.
Shingle the Roof: Start at the bottom edge of the roof. Pipe a small dot of icing on the back of a pastel button and press it onto the cookie. Alternate colors as you move across and up.
Frame the Door: Cut the sour belts into thin strips. Glue them around the door and window openings to create a colorful, soft border.
Add the Flower Boxes: Pipe a small line of icing under the windows. Press pink and green candies into the line to look like a window garden.
Final Touches: Place a large button candy on the front door to act as a decorative wreath. Dust the base with a little powdered sugar for a light “sugar frost” finish.
13. Golden Noodle Shingle House
Gingerbread House Ideas
This creative design uses short, crunchy noodles or cereal sticks to create a thatched roof appearance. The tan-on-tan color scheme is very sophisticated and organic. It mimics the look of a traditional European cottage found in the countryside.
Deep red cranberries provide a beautiful pop of color against the neutral tones. They are used as “stones” around the base and accents on the windows. This house avoids the “candied” look for something more natural and rustic.
The texture of the roof is the standout feature. Because the noodle pieces are small and light, they don’t put any strain on the roof peak. This is a very safe design for those worried about their roof panels sliding or cracking.
Required Ingredients
Gingerbread House Panels: Standard set.
Fried Chow Mein Noodles or Cereal Sticks: For the roof and trim.
Dried Cranberries: For the base and window accents.
Tan Royal Icing: To match the cookie color.
Equipment List
Large Bowl: To hold the noodles.
Piping Bag: With a large open tip.
Small Brush: To clear away any stray crumbs.
DIY Step-by-Step Instructions
Build the House: Glue your panels together using the tan icing. Ensure the roof is centered and let it dry for one hour before adding heavy decorations.
Apply Roof “Thatch”: Spread a thick layer of icing over one roof panel. Grab a handful of the noodles and press them gently into the wet icing. Don’t worry about making them neat; the random look is part of the charm.
Trim the Windows: Frame the windows with small square cookie pieces or icing. Press a dried cranberry into the center of the window trim for a rustic “ruby” look.
Create the Base Border: Pipe a line of icing all around the base of the house. Press dried cranberries into the icing, spacing them out like landscaping stones.
Add Detail to the Walls: Use the noodles to outline the corners of the house. This covers the seams and adds to the “hand-built” cabin vibe.
The Front Walkway: Use more cranberries to create a path leading from the door to the edge of your display board.
14. Snowy Pearl Cottage
Gingerbread House Ideas
This house is a study in texture and monochrome beauty. It is completely covered in small white nonpareils, giving it the appearance of being carved out of a solid block of snow. The soft, rounded edges make it look incredibly inviting and cozy.
Using different sizes of white pearls adds depth to the design. Larger “snowballs” are placed at the base to look like piles of fresh snow. The chimney is also encrusted, making it look like it has been through a heavy blizzard.
This style is very forgiving. If your gingerbread has any cracks or the icing is a bit messy, the pearls will cover everything perfectly. It glows beautifully under white lights and creates a very high-end holiday atmosphere.
Required Ingredients
White Royal Icing: Stiff for assembly, slightly thinner for coating.
Small White Nonpareils: One or two large bottles.
Medium White Pearl Candies: For the base and chimney accents.
Equipment List
Deep Baking Tray: To catch the millions of tiny pearls.
Spoon: To pour the pearls over the house.
Clean Paintbrush: To move pearls away from the door and window openings.
DIY Step-by-Step Instructions
Assemby: Put your house together and let the structural icing dry completely. Place the house inside a deep tray to manage the mess.
Coat the Sections: Brush a layer of white icing onto the walls first. Do not do the whole house yet.
The Pearl Pour: While the wall icing is wet, pour the white nonpareils over the surface. Use your fingers to gently press them in so there are no bare spots.
Repeat for the Roof: Apply a very thick “dripping” layer of icing to the roof edges. Pour more pearls over the top. The thickness of the icing will make it look like heavy snow.
Detail the Chimney: Cover the chimney in icing and larger pearl candies. This gives it a different texture than the rest of the house.
Ground Snow: Spread a thick, lumpy layer of icing on the base board. Drop large white pearls into the “snow” to look like decorative snowdrifts.
15. Stained Glass Window Manor
Gingerbread House Ideas
The focal point of this house is the stunning “stained glass” windows. By using crushed hard candies or gummy bits, you create a translucent effect that catches the light. Bright yellow icing frames each window, making the colors look even more vivid.
The house walls are kept simple and white to ensure the windows remain the star of the show. This design feels very architectural and grand. It is a great way to showcase your ability to handle fine details and bright colors.
Small caramel-colored candies at the bottom of the windows look like decorative planters. This adds a bit of warmth to the otherwise cool-toned house. The arched window shapes add a sense of history and elegance to the overall build.
Required Ingredients
Gingerbread Panels with Arched Cutouts: For the window spaces.
Crushed Hard Candies (Red and Green): Or gummy bits for the glass effect.
Bright Yellow Royal Icing: Stiff consistency for the frames.
Small Tan Candies: For the window boxes.
Equipment List
Piping Bag: With a very fine writing tip.
Baking Parchment: If you are melting the “glass” in the oven.
Small Tongs: To place the “glass” fragments.
DIY Step-by-Step Instructions
Create the Glass: If using hard candies, place them in the window cutouts on a parchment-lined tray and bake at 300°F for a few minutes until melted. If using gummies, simply press the crushed bits into a thin layer of clear icing inside the window frame.
Assemble the Structure: Once the windows are set and cool, glue the walls together. Be careful not to get fingerprints on the “glass.”
Frame the Arches: Pipe a thick line of yellow icing around the outside of every window. Use a steady hand to create the “cross” bars inside the window for a realistic look.
Add the Planters: Pipe a small ledge at the base of the windows. Press three or four tan candies into the icing to look like wooden or stone flower boxes.
Outline the House: Use the yellow icing to run a line down the corners of the manor. This ties the yellow theme together across the whole project.
Backlight It: For a truly magical effect, place a small battery-operated LED tea light inside the house before you glue the roof on.
16. Swirling Star Forest
Gingerbread House Ideas
This scene features a grove of vibrant green trees made from stacked waffle cones. Using a star tip and green frosting creates a lush, needle-like texture that looks like a real evergreen. Small white star sprinkles act as delicate ornaments, making the forest feel festive and bright.
The trees are grouped around a simple gingerbread house to create a sense of scale. A light dusting of powdered sugar over the base mimics a fresh snowfall in the woods. This is an excellent way to decorate a large board without needing to build multiple complex structures.
Varying the heights of the trees makes the landscape look natural. You can easily trim the bottom of the waffle cones to create different sizes. This setup adds a professional touch to your holiday display while remaining very simple to assemble.
Required Ingredients
Sugar or Waffle Cones: Various sizes to create different tree heights.
Green Frosting: Stiff consistency to hold the star shapes.
White Star Sprinkles: Small edible stars for the “ornaments.”
Powdered Sugar: To create the final snow effect.
Equipment List
Piping Bag: Fitted with a medium star tip.
Serrated Knife: To gently trim the cones to size.
Cake Board: A large base to fit the house and the forest.
DIY Step-by-Step Instructions
Prepare the Cones: Decide how many trees you want. Use a serrated knife to saw the bottom off some cones so they are shorter than others.
Anchor the Trees: Pipe a large dollop of frosting on your base board. Press the open end of a cone into the frosting so it stands upright.
Start Piping: Begin at the bottom of the cone. Pipe a small star of green frosting, pull away quickly, and repeat until you complete a full circle around the base.
Work Upward: Continue piping rows of stars as you move toward the point of the cone. Overlap each row slightly to hide the cone underneath.
Decorate: While the frosting is still wet, carefully press white star sprinkles into the green “branches.” Place a larger star on the very top.
Snow the Forest: Once the trees are dry, sift powdered sugar over the entire scene. This adds a beautiful winter finish to the green needles.
17. Garden Bloom Cottage
Gingerbread House Ideas
This house celebrates the beauty of a spring garden in the middle of winter. Large gummy flowers with bright candy centers line the walls, creating a cheerful and colorful look. Green sour strips act as tall grass, giving the base a textured and organic feel.
The roof is decorated with long green licorice “vines” that run horizontally. This breaks up the tan color of the graham crackers and ties into the garden theme. Using round candy rings at the base creates a whimsical border that looks like a decorative stone path.
A single large flower on the front gable acts as a focal point. This design is perfect for those who love bold colors and want to move away from traditional holiday motifs. It is a happy, vibrant build that is sure to stand out.
Required Ingredients
Graham Cracker Sheets: For the walls and roof.
Flower-shaped Gummy Candies: In various bright colors.
Green Sour Belts or Strips: To create the grass and stems.
Round Candy Rings: For the base border.
Bright Green Royal Icing: To act as the vine “glue.”
Equipment List
Kitchen Shears: To cut the sour belts into leaf and stem shapes.
Piping Bag: With a small round tip.
Tweezers: For placing small candy centers into the flowers.
DIY Step-by-Step Instructions
Build the Shell: Assemble your graham cracker house using stiff icing. Let it dry completely so the flat surfaces are ready for heavy candy decorations.
Create the Vines: Pipe horizontal lines of green icing across the roof. Press green licorice or thin sour strips into the lines.
Plant the Grass: Cut green sour belts into jagged strips. Glue them along the bottom of the house walls to look like tall garden grass.
Grow the Flowers: Glue gummy flowers above the grass. Use a thin strip of sour belt to create a stem connecting the flower to the ground.
Add the Path: Lay candy rings flat along the edge of the base board. Use dots of icing to keep them from sliding.
Finish the Gable: Glue one large, colorful flower in the center of the front triangle. This draws the eye and completes the floral theme.
18. Raisin Stone Mansion
Gingerbread House Ideas
This mansion uses dark raisins and chocolate-covered nuts to create a sophisticated “stone” texture. The deep colors provide a rich, earthy look that feels very different from traditional candy houses. The chimney is built from the same dark materials, making the structure look solid and grand.
A light-colored icing border around the door and windows makes the dark “stones” pop. The path leading to the entrance is made of flat chocolate discs, resembling large slate paving stones. This design is perfect for an adult-focused holiday party or a rustic centerpiece.
The roof features chocolate bar shingles that add a different geometric element. Using natural-looking ingredients like raisins creates a house that feels like it belongs in a mountain landscape. It is a sturdy build with a lot of visual weight.
Required Ingredients
Dark Raisins: For the “stone” wall texture.
Chocolate Covered Nuts or Raisins: For the chimney and base details.
Flat Chocolate Discs: For the front walkway.
Chocolate Bars: Broken into rectangles for the roof shingles.
Tan or White Royal Icing: Stiff-peak for assembly.
Equipment List
Offset Spatula: To spread icing on the walls.
Piping Bag: With a small round tip for window detailing.
Ruler: To help align the chocolate roof shingles.
DIY Step-by-Step Instructions
Foundation and Walls: Assemble your gingerbread house. Spread a layer of icing on one wall at a time.
Apply the Stones: Press raisins into the wet icing, packing them tightly together. The irregular shapes of the raisins will look like natural fieldstone.
Build the Chimney: Coat your chimney piece in icing and cover it with chocolate-covered nuts. This gives it a heavier, more robust appearance.
Roof with Chocolate: Glue chocolate bar rectangles to the roof starting at the bottom. Overlap them slightly as you move toward the peak.
Pave the Way: Create a path from the door using the flat chocolate discs. Use a little icing to secure each one to the board.
Highlight Features: Use white or tan icing to outline the windows and door. This provides contrast against the dark raisins and makes the architectural details visible.
19. Red Brick Chimney Peak
Gingerbread House Ideas
This design focuses on a bold, red brick chimney that serves as the centerpiece of the roof. The bright red blocks contrast sharply with the clean white roof tiles, creating a modern and crisp look. A fluffy “puff” of white cotton candy or wool at the top simulates real smoke.
The roof is made from perfectly square white chocolate or fondant tiles. This creates a neat, grid-like pattern that looks very professional. The chimney is built from red cereal treats or dyed gingerbread, providing a pop of holiday color.
Small tan cereal pieces on top of the chimney act as decorative “pots.” This adds a level of realism and height to the build. It is a great way to practice precision piping while working with bold, contrasting colors.
Required Ingredients
Red Cereal Treats or Red Gingerbread: Cut into small rectangles for the bricks.
White Chocolate Squares: For the roof tiles.
Tan Square Cereal: For the chimney pots.
White Cotton Candy: For the “smoke” effect.
White Royal Icing: In a piping bag.
Equipment List
Sharp Knife: To cut the red bricks to the same size.
Piping Bag: With a fine tip for the “mortar” lines.
Level: To ensure your chimney stands perfectly straight.
DIY Step-by-Step Instructions
Tile the Roof: Glue white chocolate squares in neat rows across the roof. Ensure they are perfectly aligned for a modern look.
Construct the Chimney: Build a tall rectangular box from red treats or gingerbread. Glue it firmly to the roof slope using plenty of icing.
Pipe the Mortar: Use a fine-tip piping bag to draw white lines between the red bricks. This “mortar” makes the chimney look like real masonry.
Add the Chimney Pots: Glue two tan square cereal pieces to the very top of the chimney. This adds a nice architectural finish.
Seal the Base: Pipe a thick line of white icing where the chimney meets the roof to hide any gaps and add extra stability.
Create Smoke: Just before displaying, place a small tuft of cotton candy on top of the chimney. This provides a whimsical, “just-lit” fireplace vibe.
20. Pastel Shutters Row
Gingerbread House Ideas
This collection of houses uses a soft pastel palette of pink, mint, and sky blue. The focus is on the beautiful decorative shutters and doors, which give the houses a cozy, inhabited feel. Small pink icing “stones” at the base provide a soft and pretty border.
Each house features a different color combination, making them look like a row of coastal cottages. The roof texture is subtle, allowing the bright doors and shutters to take center stage. This style is very feminine and elegant.
The use of small gold beads for doorknobs adds a tiny touch of luxury. These houses are taller and thinner than average, which makes them feel like high-end boutique homes. It is a wonderful project for someone who enjoys detail-oriented decorating.
Required Ingredients
Gingerbread House Panels: Taller than they are wide.
Pastel Fondant or Icing: Pink, mint green, and light blue.
Small Gold Sprinkles: For the doorknobs.
Pink Heart Sprinkles: For the yard area.
White Royal Icing: For assembly.
Equipment List
Small Rectangular Mold: To create the shutter shapes.
Piping Bag: With a medium round tip for the base stones.
Toothpick: To add fine details to the doors.
DIY Step-by-Step Instructions
Color the Panels: Coat your walls in a very light cream or white icing. Let them dry so you can attach the colorful shutters later.
Craft the Shutters: Cut small rectangles out of pink or mint fondant. Use a toothpick to press horizontal lines into them so they look like wooden slats.
Attach Doors and Windows: Glue a bright pink or green door to the front of each house. Place the shutters on either side of the window openings.
Add the Hardware: Press one tiny gold sprinkle onto each door to serve as the handle. This small detail makes a big difference.
Pipe the Base: Use pink icing to pipe small, round dots all along the bottom of the house. These look like decorative garden stones.
Landscape the Board: Scatter pink heart-shaped sprinkles around the base of the houses to complete the soft, romantic holiday look.
21. Popcorn Puff Cottage
Gingerbread House Ideas
This cottage features a thick, fluffy roof made entirely from popped corn. The irregular shapes of the popcorn create a realistic snowy texture that looks soft and voluminous. It is a fantastic way to add height to your house without using heavy candies that might cause the roof to buckle.
White icing acts as the perfect adhesive, peeking through the kernels like fresh frost. A popcorn archway over the door adds a welcoming, 3D element to the front of the home. This design is very budget-friendly and uses simple pantry staples to achieve a high-impact look.
The light weight of the popcorn makes it a very safe choice for older gingerbread structures. You can pile it high to hide any unevenness in your baking. It brings a cozy, old-fashioned charm to your holiday display that reminds everyone of stringing popcorn for the tree.
Required Ingredients
Popped Corn: Plain, unsalted works best for a clean white look.
Gingerbread Panels: One standard house set.
White Royal Icing: Stiff-peak consistency.
Powdered Sugar: For a final dusting of “fine snow.”
Equipment List
Piping Bag: With a large round tip.
Small Spoon: To help tuck popcorn into small gaps.
Large Bowl: To hold your popcorn supply while you work.
DIY Step-by-Step Instructions
Stable Base: Assemble your gingerbread house and let it dry until the joints are completely solid.
Roof Glue: Spread a generous layer of white icing over one side of the roof. Work in sections so the icing doesn’t dry before you finish.
Apply the Popcorn: Press handfuls of popcorn into the wet icing. Don’t worry about being neat; the random placement makes it look more natural.
Create the Arch: Pipe a thick curve of icing around the front door. Stick individual pieces of popcorn into the icing to build a 3D frame.
Fill the Gaps: Look for any brown cookie spots showing through. Dab a little icing on a popcorn kernel and plug the hole.
The Snow Finish: Lightly sift powdered sugar over the entire roof. This fills the tiny spaces between the kernels and gives it a professional, frosted finish.
22. Gummy Bear Guardhouse
Gingerbread House Ideas
This playful design uses a colorful army of gummy bears to protect the perimeter. The bright red door stands out against the natural wood-toned walls, creating a bold focal point. Using gummy bears is a fun way to add personality and a bit of humor to your project.
The house itself features clean, minimalist lines and dark chocolate accents. The repetition of the bears along the base creates a vibrant border that anchors the structure to its foundation. It is a simple yet very effective way to use soft candies for structural decoration.
The text above the door adds a custom touch that makes the house feel like a real destination. Using bold black icing for the letters ensures the name is easy to read. This is a great project for families who want to create something fun and interactive.
Required Ingredients
Large Gummy Bears: A variety of colors for the “guard” line.
Red Fondant or Thick Icing: For the vibrant front door.
Black Royal Icing: For the lettering and doorknob.
Chocolate Melts: For the roof and window accents.
Equipment List
Fine-Tip Piping Bag: For the lettering.
Small Spatula: To smooth the door surface.
Ruler: To keep your line of bears perfectly straight.
DIY Step-by-Step Instructions
Wall Preparation: Assemble your house. If your gingerbread is light-colored, keep it natural to let the red door pop.
The Entryway: Cut a piece of red fondant to fit the door space. Glue it down with a thin layer of icing and add a white icing frame around it.
Lettering: Carefully pipe the “BEAR GUARDHOUSE” text on the front gable. Take your time with each letter to keep the spacing even.
Chocolate Trim: Use melted chocolate to pipe the window frames and the dark roof edges. This provides a clean, professional finish.
Post the Guards: Pipe a line of white icing along the front base of the house. Press your gummy bears into the icing, standing them upright side-by-side.
Final Details: Add a tiny dot of black icing for the door handle and small chocolate dots under the windows to look like decorative planters.
23. Candy Cane Column Estate
Gingerbread House Ideas
This grand estate features tall candy cane pillars that support a festive red-and-white porch. The use of red sanding sugar on the flat surfaces gives the house a shimmering, velvety texture. It is a sophisticated design that uses traditional holiday candies in an architectural way.
Green shutters provide a classic color contrast against the bright red walls. The white swirling icing along the roofline looks like decorative molding or heavy snow. This house feels very upscale and would make a stunning centerpiece for a formal holiday table.
The candy cane columns aren’t just for looks; they provide extra support to the porch roof. This prevents the overhanging piece from sagging or breaking off. It is a smart engineering trick that adds both beauty and strength to the build.
Required Ingredients
Full-Size Candy Canes: Choose straight ones if possible.
Red Sanding Sugar: For the textured porch and roof.
Green Cardstock or Fondant: For the window shutters.
White Royal Icing: Stiff consistency for the columns and swirls.
Equipment List
Piping Bag: Fitted with a medium star tip for the swirls.
Small Level: To make sure your columns are vertical.
Kitchen Shears: To trim the candy canes to the correct height.
DIY Step-by-Step Instructions
Build the Porch: Glue a flat piece of gingerbread or a heavy cracker to the front of the house at the “second floor” level. Support it with tall jars until dry.
Install the Pillars: Measure the distance from the porch to the base. Trim your candy canes to fit and glue them under the corners using thick icing.
Sugar the Surfaces: Spread a thin layer of icing on the porch and roof. Sprinkle red sanding sugar over the top until the surface is completely covered and sparkly.
Add the Shutters: Glue green rectangles next to each window. Use a toothpick to score horizontal lines into them for a realistic shutter look.
Pipe the Trim: Use the star tip to pipe a continuous line of white swirls along the edge of the porch and the roof. This covers any rough edges.
The Steps: Stack two small rectangular cookies at the front door. Cover them in icing and red sugar to match the porch.
24. Jelly Bean Rainbow Lodge
Gingerbread House Ideas
This lodge is a burst of color, covered from top to bottom in glossy jelly beans. By placing the beans in a tight, repetitive pattern, you create a vibrant mosaic effect. The white icing seams between the beans make the colors stand out like stained glass.
A chimney made of the same colorful beans ties the whole design together. The use of clear sanding sugar on the roof peak adds a touch of icy sparkle that mimics real frost. It is a very cheerful house that celebrates a wide variety of flavors and colors.
Silver bead accents around the door and windows add a touch of elegance to the playful bean theme. This house is heavy because of all the candy, so a thick gingerbread base is a must. The result is a sturdy, colorful structure that looks good from every angle.
Required Ingredients
Assorted Jelly Beans: At least three large bags.
White Royal Icing: Medium-stiff consistency.
Silver Dragées: For the decorative borders.
Coarse White Sugar: For the roof frost.
Equipment List
Piping Bag: With a small round tip.
Tweezers: To place the beans and silver beads precisely.
Sturdy Cake Board: To support the weight of the candy.
DIY Step-by-Step Instructions
Mosaic Walls: Apply a layer of icing to one wall. Press jelly beans into the icing in neat, horizontal rows. Try to mix the colors randomly for a scattered rainbow look.
The Doorway: Frame the door with a single row of white icing dots. Press a silver bead into each dot to create a shining entrance.
Construct the Chimney: Build your chimney separately. Cover it in jelly beans and let it dry before gluing it to the roof.
Roofing: You can cover the roof in beans or leave it white with sugar accents. The image shows a bean-covered chimney with a snowy, sugared roof peak.
Structural Check: Because jelly beans are heavy, make sure you let each wall dry completely before moving to the next one. This prevents the “sliding candy” problem.
Finishing Touches: Pipe a line of white icing along all the corners of the house. This hides the seams where the walls meet and gives the house a clean outline.
25. Blue Shingle Seaside Cottage
Gingerbread House Ideas
This cottage features a stunning roof with pointed blue shingles that look like waves or fish scales. The bright turquoise sugar adds a coastal, breezy vibe to the holiday season. Yellow cereal pieces or cookies on the walls provide a warm, sandy contrast.
The thick white icing along the roof edges looks like sea foam or heavy snowdrifts. This design uses repetitive geometric shapes to create a very clean and professional appearance. It is a great way to use colored sanding sugar to transform basic cereal into something magical.
Small white dots along the door frame and corners mimic the look of pearls or sea shells. This house is very sturdy because the shingles are layered, which adds thickness to the roof panels. It is a beautiful, unique take on the traditional cottage.
Required Ingredients
Pointed Cereal or Triangle Cookies: For the roof shingles.
Blue Sanding Sugar: For the vibrant roof color.
Yellow Round Cereal: For the textured walls.
White Royal Icing: Stiff-peak consistency.
Equipment List
Piping Bag: With a medium round tip.
Small Bowl: For coating the shingles in sugar.
Spatula: For spreading the wall “glue.”
DIY Step-by-Step Instructions
Sugar the Shingles: Dip your triangle pieces in a little thinned icing, then roll them in the blue sanding sugar. Let them dry before you start roofing.
Wall Texture: Spread icing over the walls. Press the yellow round cereal pieces into the icing, packing them close together like a honeycomb.
Lay the Roof: Start at the bottom of the roof. Glue a row of blue shingles so the points face downward.
Overlap the Rows: Place the next row of shingles slightly higher, overlapping the first row. This creates the “scale” effect that makes the roof so interesting.
Snow Drifts: Pipe a very thick, wavy line of white icing along the gutters and the peak of the roof. Let it “drip” slightly for a natural look.
Border Details: Pipe small white dots down the corners of the house and around the arched doorway to finish the coastal theme.
26. Animal Cracker Forest Home
Gingerbread House Ideas
This house is a dream for animal lovers, featuring a parade of animal crackers across the walls and roof. Bright green frosting “grass” covers the peaks and the yard, making the house look like it is nestled in a lush meadow. It is a whimsical and very easy design for beginners.
The use of different animal shapes adds variety and keeps the eye moving around the project. Small pink and yellow flower sprinkles in the grass add a pop of color and a touch of sweetness. This house is less about precision and more about creating a fun story.
The animal crackers are very light, so you can decorate the walls before you even assemble the house. This makes it a great project for small children who might find a standing house difficult to work on. It is a happy, lively design that everyone will love.
Required Ingredients
Animal Crackers: A variety of lions, bears, and elephants.
Green Frosting: Medium consistency for the “grass.”
Flower Sprinkles: Small colorful blooms.
Gingerbread Panels: One standard set.
Equipment List
Piping Bag: Fitted with a grass tip or a small star tip.
Small Spatula: For spreading the base layer of icing.
Tweezers: For placing the tiny flowers.
DIY Step-by-Step Instructions
Decorate the Panels: While the gingerbread pieces are still flat, glue your animal crackers onto the walls using small dots of icing.
Assemble the House: Once the animals are secure, glue the walls and roof together. Let the structure set for at least an hour.
Grow the Grass: Use the green frosting to pipe “tufts” of grass along the roof peak and the edges of the base board.
Animal Roof: Glue a few more animal crackers onto the roof, nestling them into the green frosting so they look like they are climbing the hills.
Plant the Flowers: While the green frosting is wet, use tweezers to drop flower sprinkles into the grass. Space them out for a natural meadow look.
Pathway: Use leftover animal crackers or small cookie crumbs to create a little path leading up to the front door.
27. Sunflower Seed Rustic Cabin
Gingerbread House Ideas
This cabin uses natural sunflower seeds and chocolate candies to create a rugged, woodland look. The dark brown walls look like mud or bark, while the seeds on the roof mimic traditional thatched roofing. It is a very organic design that uses muted, earthy tones.
Green icing “vines” wind around the windows and the door, adding a bit of life to the rustic structure. The chimney is built from round chocolate candies, giving it a heavy, stone-like appearance. This house is perfect for a cabin-in-the-woods theme.
The seeds are a very clever way to add texture without adding much weight. By alternating the direction of the seeds, you can create interesting patterns on the roof. It is a sophisticated, mature take on gingerbread decorating that avoids the usual sugar-heavy look.
Required Ingredients
Sunflower Seeds: Natural, unsalted in the shell.
Round Chocolate Candies: For the “stone” chimney and wall accents.
Brown Royal Icing: For the base walls.
Green Royal Icing: For the vines.
Equipment List
Piping Bag: With a very fine writing tip for the vines.
Spatula: To coat the house in brown icing.
Tweezers: To align the seeds in neat rows.
DIY Step-by-Step Instructions
Base Coat: Cover your assembled house in a smooth layer of brown icing. This will act as the “dirt” or “bark” that holds your decorations.
The Seed Roof: Starting at the bottom, press sunflower seeds into the roof icing. Point them all in the same direction for a neat, thatched look.
Stone Walls: Press round chocolate candies into the walls in a random pattern to look like natural fieldstone.
Build the Chimney: Cover your chimney in icing and pack it tightly with the chocolate candies. Glue it to the roof and fill any gaps with extra icing.
Grow the Vines: Pipe thin, swirling green lines around the arched door and windows. Add a few tiny dots of green to look like leaves.
The Base: Sprinkle extra sunflower seeds and chocolate candies around the bottom of the house to look like a rocky forest floor.
28. Pearl Shingle Birdhouse
Gingerbread House Ideas
This design is the height of elegance, featuring a clean white roof with large, smooth shingles and delicate pearl accents. The circular window and soft color palette make it look more like a designer birdhouse than a cookie cottage. It is a very polished and high-end look.
A single green-and-pink sour belt along the roof peak adds just a tiny splash of color. The repetitive use of white pearls around the window creates a beautiful, glowing frame. This house is all about precision and the beauty of simple, clean shapes.
The large, flat shingles on the roof provide a very smooth surface that is easy to work with. Using fondant or white chocolate for these pieces ensures they are all the same size and shape. It is a sophisticated project for someone who loves the “shabby chic” aesthetic.
Required Ingredients
White Fondant or White Chocolate Squares: For the roof shingles.
Edible White Pearls: Various sizes.
Green and Pink Sour Belt: For the roof peak.
White Royal Icing: For assembly and detailing.
Equipment List
Circular Cutter: To create the round birdhouse window.
Piping Bag: With a very fine tip.
Tweezers: For the pearl placement.
DIY Step-by-Step Instructions
Cut the Window: Before assembling, use a circular cutter to remove a small hole from the front gingerbread panel. This creates the “birdhouse” look.
White Walls: Cover the walls in a smooth layer of white icing or fondant. Let it dry completely for a matte finish.
Shingle the Roof: Cut rounded squares out of white fondant. Glue them to the roof in overlapping rows.
Pearl Accents: Glue small white pearls at the corners of each shingle. Frame the circular window with a tight ring of pearls to make it stand out.
The Roof Peak: Lay a long sour belt along the very top of the roof. Secure it with a thin line of icing to hide the seam.
Final Polish: Wipe away any stray icing with a damp brush to ensure the house looks perfectly clean and professional.
29. Rainbow Ribbon Cabin
Gingerbread House Ideas
This house is wrapped in vibrant, multi-colored sour belts that look like festive ribbons. The horizontal stripes of color give the house a modern, graphic look that is very different from traditional designs. It is a great way to use long, flexible candies for maximum coverage.
The rainbow theme continues over the door with a perfectly arched sour belt frame. This design is very fast to execute because the large candy strips cover a lot of surface area quickly. It is a fun, “pop art” style house that will be the brightest thing in the room.
Because the belts are slightly sticky, they stay in place very well. The white icing between the strips acts as a bright border that makes each color transition pop. It is a high-energy house that is perfect for a children’s holiday party.
Required Ingredients
Rainbow Sour Belts: At least four long packages.
White Royal Icing: In a piping bag.
Gingerbread Panels: One standard set.
Equipment List
Sharp Scissors: To trim the belts to the exact width of your walls.
Ruler: To make sure your horizontal stripes stay level.
Spatula: To apply the base layer of icing.
DIY Step-by-Step Instructions
Striped Walls: Apply a thin layer of icing to a wall. Cut sour belts to match the width and press them on horizontally, leaving a tiny white gap between each color.
Assemble the House: Once the walls are “wrapped,” glue them together. The thickness of the sour belts helps hide the corner seams.
Roofing: Repeat the striped pattern on the roof. Start from the bottom and work up to the peak for a clean, shingled look.
The Rainbow Door: Cut a short piece of sour belt and curve it into an arch. Glue it over the door opening with a thick bead of white icing.
Window Frames: Use thin strips of the belts to outline the windows. This ties the whole rainbow theme together.
Seal the Edges: Pipe a final line of white icing along the corners and the roof peak to give the house a finished, boxed look.
30. Peppermint Bark Manor
Gingerbread House Ideas
This manor features a striking red-and-white theme with a roof made of real peppermint bark squares. The “snow” dripping from the eaves looks thick and cold, while the green shutters provide a traditional holiday touch. it is a very classic look that smells as good as it looks.
The roof tiles are broken into irregular squares, giving the house a handcrafted, artisan feel. A bowl of crushed peppermint nearby suggests that this house is ready for a winter feast. The bright red walls make the white “snow” and candy accents look incredibly crisp.
Using peppermint bark is a great way to add a different flavor profile to your gingerbread project. The white chocolate in the bark matches the icing perfectly, creating a seamless look. It is a grand, festive house that feels very traditional.
Required Ingredients
Peppermint Bark: Broken into 1-inch squares.
Red Royal Icing or Fondant: For the bold house walls.
White Royal Icing: Stiff consistency for the “snow.”
Green Fondant: For the window shutters.
Equipment List
Piping Bag: With a large round tip for the dripping snow.
Small Hammer: To gently break the peppermint bark into squares.
Spatula: For the red wall coating.
DIY Step-by-Step Instructions
Red Walls: Coat your house walls in deep red icing or fondant. This provides the classic holiday backdrop for the white accents.
Install the Bark: Glue the peppermint bark squares to the roof in a slightly overlapping pattern. The white chocolate side should face up for a snowy look.
Dripping Snow: Pipe thick “icicles” of white icing along the bottom edge of the roof. Let the icing hang over the edge so it looks like it is melting.
Window Details: Glue green shutters next to each window. Use white icing to create the cross-bars on the glass.
Snow Base: Spread a thick layer of white icing around the base of the house. Sprinkle crushed peppermint into the “snow” for extra color and texture.
The Front Door: Pipe a white arched frame around the door and add a tiny red candy for the handle.
31. Sky Blue Lattice Estate
Gingerbread House Ideas
This grand two-story estate uses soft blue and white tones to create a refreshing winter look. The walls are covered in a clean, white grid pattern that mimics expensive architectural tiling. Using bright blue shutters provides a pop of color that makes the white windows stand out beautifully.
The roof is constructed from a lattice of crunchy pretzels, giving it a heavy, textured feel. This design proves that you can mix sweet and savory elements for a sophisticated finish. Small yellow accents, like the sun detail on the front gable, add a touch of warmth to the cool color palette.
Every corner of this house is outlined with thick white icing to ensure the structure is rock solid. The use of repetitive geometric shapes makes the house look organized and professional. It is a wonderful project for those who enjoy a more structured, clean-lined decorating style.
Required Ingredients
White Fondant or Square Cereal: For the grid-patterned walls.
Large Rectangular Pretzels: For the lattice roof.
Blue Fondant: For the shutters and front door.
Yellow Icing: For the sun and window accents.
White Royal Icing: Stiff consistency for the borders.
Equipment List
Piping Bag: With a small round tip for the grid lines.
Square Cutter: If using fondant for the wall tiles.
Tweezers: To place the pretzel “shingles” accurately.
DIY Step-by-Step Instructions
Tile the Walls: Before assembling, apply your white squares to the gingerbread panels. Use a fine-tip piping bag to run vertical and horizontal lines between them to create the grid.
Assemble the Frame: Glue your four walls together on a sturdy base. Use a thick bead of icing on the interior seams to prevent leaning.
Lattice the Roof: Spread a thick layer of white icing on the roof panels. Press the pretzels into the icing in neat rows, starting from the bottom and working your way up.
Install the Blue Details: Glue your blue shutters next to the windows. Attach the blue door to the side or front, adding small silver beads for the handles.
Add the Sun Symbol: Pipe a small yellow square on the top front gable. Draw thin yellow lines radiating outward to create a simple, cheerful sun detail.
Frame the Windows: Use the white icing to pipe a border around every blue shutter. This hides the edges and makes the colors pop against the white walls.
32. Shredded Coconut Snowdrift Villa
Gingerbread House Ideas
This villa looks like it was caught in a heavy mountain blizzard. Thick white icing drips from the roof like melting snow, while a generous layer of shredded coconut adds a soft, fuzzy texture. The golden brown of the gingerbread peeks through just enough to give it a warm, homey feel.
Small marshmallow snowmen stand guard in the front yard, adding a whimsical touch to the scene. Bright blue candy dots around the windows look like decorative holiday lights or frozen berries. This design is all about embracing the messiness of a real winter storm.
The use of coconut is a smart way to hide any structural flaws or uneven icing. It provides a natural “blanket” that makes the whole build feel cohesive and cozy. It is a very sensory house that looks soft to the touch and smells delicious.
Required Ingredients
Shredded Sweetened Coconut: Two large bags.
Marshmallows (Large and Mini): To build the snowmen.
Blue Round Candies: For the window and door trim.
White Royal Icing: Slightly thinned so it can “drip.”
Equipment List
Small Sifter: To help distribute the coconut evenly.
Toothpicks: To pin the marshmallow snowmen together.
Spatula: For spreading the base layer of “snow.”
DIY Step-by-Step Instructions
Structure Setup: Build your gingerbread house and let the joints dry completely. A stable house is essential when adding heavy “snow” layers.
Apply the Slush: Spread a thick, irregular layer of icing over the roof. Let some of it hang over the edges to create natural-looking icicles.
The Coconut Shower: While the icing is very wet, grab handfuls of shredded coconut and press them into the roof and the base of the house.
Window Lighting: Glue blue candy rounds around the window frames. The blue contrast against the white coconut makes the house look “chilly.”
Build the Snowmen: Stack one large marshmallow on top of another using a toothpick. Use mini marshmallows for the heads and draw faces with a tiny bit of icing or edible markers.
Yard Work: Spread a lumpy layer of icing on the base board. Sprinkle more coconut over it and place your snowmen into the “drifts” to complete the winter scene.
33. Cocoa Dusted Brownie Estate
Gingerbread House Ideas
This estate uses a rich, chocolatey palette that looks incredibly decadent. The roof is made of dark chocolate shingles dusted with a fine layer of cocoa powder, giving it a velvety appearance. Large chocolate spheres line the roof edges and doorway, adding a bold, geometric weight to the build.
The walls are covered in thick, white-ruffled icing that mimics the look of a classic wedding cake or a Victorian manor. This house moves away from bright candies in favor of sophisticated chocolate tones. It feels like a luxury dessert transformed into a holiday decoration.
A simple chocolate bar door provides a dark contrast to the white-piped walls. This house is quite heavy due to the chocolate spheres, so extra care must be taken when gluing them down. The result is a stunning, edible piece of architecture.
Required Ingredients
Dark Chocolate Rectangles: For the roof shingles.
Cocoa Powder: To dust the roof.
Large Chocolate Spheres (Truffles): For the borders and entryway.
White Royal Icing: Stiff consistency for the ruffled walls.
Chocolate Bar: To use as the front door.
Equipment List
Piping Bag: With a star or ruffle tip.
Fine Mesh Strainer: For dusting the cocoa powder.
Offset Spatula: To smooth the icing before ruffling.
DIY Step-by-Step Instructions
Ruffle the Walls: Use a star tip to pipe vertical ruffles of white icing over all the gingerbread wall panels. This should be done before adding the roof.
Chocolate Shingles: Glue your chocolate rectangles to the roof in neat rows. Once they are set, use a strainer to lightly dust them with cocoa powder.
Install the Spheres: Pipe a thick dot of icing along the roofline and press a chocolate sphere into each one. Do the same around the front door to create a grand entrance.
Hang the Door: Glue your chocolate bar into the door opening. Use a tiny white icing dot for the doorknob to make it visible.
Window Accents: Pipe four small chocolate spheres under each window. This mimics the look of stone planters and adds to the mansion’s grand feel.
Clean Up: Use a dry brush to remove any stray cocoa powder from the white ruffled walls to keep the contrast sharp.
34. Starry Night Painted Cottage
Gingerbread House Ideas
This house is a true work of art, featuring a hand-painted roof inspired by famous impressionist paintings. Swirls of blue, yellow, and white icing create a mesmerizing “Starry Night” effect. Small white star sprinkles are scattered across the sky, adding a 3D element to the masterpiece.
The walls are kept a natural gingerbread brown with simple yellow window frames to let the roof be the star. A matching blue sanding sugar base makes the house look like it is floating in a magical night sky. This is a great project for those who enjoy painting and fine detail work.
A tall, thin chimney with matching blue swirls completes the look. This design shows that you can use icing like paint to tell a story. It is a sophisticated and very unique take on holiday decorating that will surely impress any guest.
Required Ingredients
Food Coloring (Blue, Yellow, White): To tint your royal icing.
White Star Sprinkles: In various sizes.
Blue Sanding Sugar: For the magical base.
Yellow Royal Icing: For the window and door outlines.
Equipment List
Small Paintbrushes: Food-safe brushes for swirling the colors.
Toothpicks: To drag the icing colors together for the “swirl” effect.
Piping Bag: With a very fine writing tip.
DIY Step-by-Step Instructions
Paint the Sky: Spread a base of dark blue icing on the roof. While it is wet, add dots of yellow and white. Use a toothpick or brush to swirl them into circles.
Add the Stars: Carefully press your white star sprinkles into the wet “sky” on the roof. Place some in the center of the yellow swirls to look like glowing stars.
Window Details: Use yellow icing to outline the windows and door. This makes the house look like the lights are on inside, contrasting with the dark roof.
Construct the Chimney: Paint the chimney panels with the same swirling blue pattern before attaching them to the roof.
The Base: Spread a thin layer of icing on your board and cover it with blue sanding sugar. Add a few star sprinkles to the “ground” to reflect the sky.
Wall Accents: Pipe small clusters of white stars onto the side walls. This ties the theme together and adds a touch of magic to the plain brown gingerbread.
35. Candy Corn Spire Castle
Gingerbread House Ideas
This vibrant castle uses the iconic orange, yellow, and white of candy corn to create a bold, tiered look. The roof is covered in rows of orange icing shingles that mimic the look of dragon scales. Tall spires topped with candy corn give the castle a sense of height and fantasy.
Yellow nonpareils cover the gables, providing a shimmering texture that looks like golden stone. The use of repetitive orange and yellow tones makes the house feel warm and energetic. It is a fantastic way to use leftover seasonal candy for a striking holiday display.
The spires are reinforced with extra icing to ensure they don’t tip over. By stacking the candy corn, you create a unique architectural detail that is very easy to achieve. This house is a fun, colorful departure from the traditional red-and-green palette.
Required Ingredients
Candy Corn: At least two large bags.
Orange Royal Icing: Stiff consistency for the shingles.
Yellow Nonpareils: For the textured gable walls.
Orange Sanding Sugar: To add extra sparkle to the spires.
Equipment List
Piping Bag: With a petal tip for the shingles.
Small Cardboard Cones: To act as the base for the tall spires.
Tweezers: To place the candy corn accurately.
DIY Step-by-Step Instructions
Shingle the Roof: Use your petal tip to pipe overlapping orange scales across the roof. Start at the bottom and work your way up to the peak.
Gold Gables: Brush a layer of icing onto the front and side gables. Pour yellow nonpareils over the wet icing until the surface is completely covered.
Build the Spires: Coat your small cardboard cones in orange icing and roll them in orange sanding sugar. Glue them firmly to the roof corners.
Crown the Towers: Glue a ring of candy corn around the base and top of each spire. The points should face upward to create a sharp, castle-like silhouette.
Roofline Detail: Press a row of candy corn along the very top peak of the roof. Alternate the direction of the colors for a striped effect.
Window Vents: Use a small knife to cut tiny triangular windows into the gables. Frame them with a single candy corn to keep the theme consistent.
36. Red Twizzler Tundra Hut
Gingerbread House Ideas
This final house features a minimalist look with a focus on bold red accents. Long red licorice strands act as a dramatic crown for the chimney, looking like holiday sparks or frozen vines. The entire structure is dusted with a heavy layer of powdered sugar to simulate a deep tundra frost.
The house itself is simple and sturdy, with a bright red door that serves as the main focal point. Using powdered sugar instead of thick icing for the snow gives the house a soft, matte finish that feels very realistic. It is a clean and modern way to end your gingerbread collection.
The licorice strands are lightweight, so they don’t put any stress on the chimney. This allows you to create a high-impact visual without worrying about a collapse. It is a perfect design for those who want a professional look with very few ingredients.
Required Ingredients
Red Pull-and-Peel Licorice: To create the chimney “sparks.”
Powdered Sugar: For the heavy frost effect.
Red Royal Icing: For the front door and window trim.
White Royal Icing: For the snowy roof base.
Equipment List
Fine Mesh Sieve: For the most important step—the sugar dusting.
Kitchen Shears: To trim the licorice to different heights.
Small Spatula: To smooth the red door icing.
DIY Step-by-Step Instructions
Red Accents: Paint your front door with smooth red icing. Use the same color to pipe thin frames around the windows.
Snowy Roof: Apply a thin, even layer of white icing to the roof. You want it to be sticky but not dripping for this specific look.
The Great Dusting: Use your sieve to shower the entire house with powdered sugar. Do this until the roof and base look like they are covered in fine, dry snow.
Licorice Chimney: Separate the licorice strands and cut them to various lengths. Glue the bottoms into the chimney opening so they stand up and curve outward.
Clean the Door: Use a damp Q-tip to carefully wipe the powdered sugar off the red door. This ensures the bright red pops against the white “frost.”
Final Base: Pile extra powdered sugar around the bottom of the house to create “snowdrifts.” This hides the board and completes the tundra theme.
Key Takeaways
Prioritize Structural Integrity: Use stiff-peak royal icing for assembly and allow the base to dry completely before adding a roof.
Choose Lightweight Toppings: Ingredients like popcorn, cereal, and marshmallows add great volume without putting dangerous weight on the structure.
Reinforce the Seams: Piping thick beads of icing along the inside corners acts like internal scaffolding to prevent leaning.
Decorate in Stages: Apply heavy wall decorations while the panels are flat on the table to avoid putting pressure on a standing house.
Hide Gaps with Trim: Use licorice, candy canes, or thick piped dots to cover seams and add extra layers of “glue” to joints.
Creating a holiday gingerbread house should be a joyful experience rather than a battle against gravity. By selecting smart decorating materials and giving your structure time to set, you can avoid the heartbreak of a mid-season collapse. Each of these 36 ideas proves that you do not need complex tools to build something beautiful and durable.
Whether you prefer a minimalist modern block or a rustic log cabin, the focus remains on fun and stability. Gather your family, prep your icing, and start building with confidence. Your gingerbread estate will finally be the sturdy, festive centerpiece you have always wanted it to be.
Spread the loveThere is nothing quite like a traditional pecan pie, with its buttery crust and sweet, nutty filling. This classic dessert is a hallmark of holiday tables and celebratory gatherings. However, many home bakers…
Spread the loveFinding the right snack for a school party often feels stressful. You want something that looks amazing but does not take all night to finish. These creative cupcakes offer a fun way to…
Spread the loveValentine Day 2026 deserves something more memorable than a standard supermarket sponge. Shaking up your tradition with unique shapes can turn a simple gift into a lasting memory. The Recipe Fork brings you…