Finding the right balance for your Christmas menu often feels like a daunting task. You want to serve something traditional that honors family history while keeping the preparation simple enough to enjoy the day. This collection of sides offers a variety of flavors that will satisfy every guest at your table.

Each recipe focuses on fresh ingredients and straightforward methods. Whether you crave the crunch of roasted vegetables or the creamy texture of a classic casserole, you will find a dish that fits your needs. These selections ensure your holiday feast is both memorable and stress-free.
Preparing a festive meal should be about connection rather than kitchen exhaustion. These thirty-eight options provide the reliability you need for a busy holiday schedule. Let these easy sides take the spotlight alongside your main roast this season.
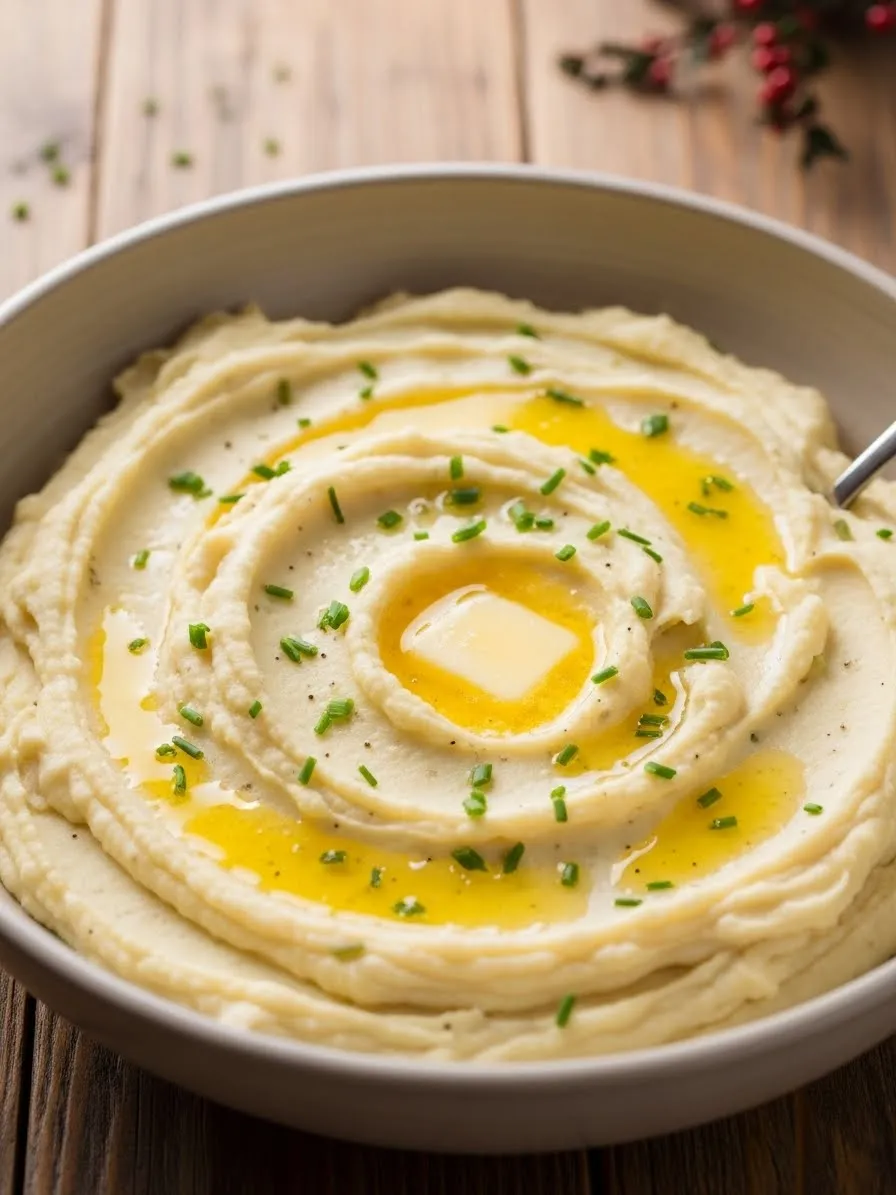
1. Creamy Garlic Mashed Potatoes with Chives

Creamy mashed potatoes bring a sense of comfort to any holiday table. This version focuses on a velvety texture that pairs beautifully with roasted meats and rich gravy. Fresh chives add a bright pop of color and a mild onion flavor that cuts through the richness of the butter.
Guests often gravitate toward this classic side because it feels familiar and indulgent. The golden pools of melted butter on top create a visual treat that promises a satisfying bite. You can easily adjust the thickness to match your personal preference.
Simple ingredients make this dish a reliable choice for busy cooks. It requires minimal prep time but delivers a high impact during the Christmas feast. Everyone will appreciate the smooth finish and savory garlic aroma.
Required Ingredients
- 5 pounds Yukon Gold potatoes
- 1 cup whole milk or heavy cream
- 1/2 cup unsalted butter (plus extra for topping)
- 4 cloves garlic, peeled
- 1/4 cup fresh chives, finely chopped
- Salt and black pepper to taste
Equipment List
- Large stockpot
- Vegetable peeler
- Sharp knife
- Potato masher or ricer
- Small saucepan
- Serving bowl
DIY Instructions
- Prepare the potatoes: Start by washing the potatoes under cold water. Use a peeler to remove all the skin, then cut each potato into even cubes about one inch thick. Keeping the sizes consistent ensures they all cook at the same rate.
- Boil until tender: Place the potato cubes and the whole garlic cloves into your large stockpot. Fill it with enough cold water to cover the potatoes by at least an inch. Add a generous pinch of salt and bring the water to a boil over high heat. Reduce the heat slightly and simmer for 15 to 20 minutes until a fork slides easily into a potato.
- Warm the liquids: While the potatoes cook, place your milk and butter into a small saucepan. Heat it over low settings until the butter melts and the liquid is warm. Do not let it reach a full boil.
- Drain and mash: Pour the cooked potatoes into a colander to drain all the water. Return them to the warm pot for a minute to let any remaining moisture evaporate. Use a potato masher or a ricer to crush the potatoes and garlic until no large lumps remain.
- Combine for creaminess: Slowly pour the warm milk and butter mixture into the potatoes. Stir gently with a large spoon until the liquid is fully absorbed and the texture is silky.
- Season and serve: Fold in half of your chopped chives and add salt and pepper to your liking. Transfer the mash to a serving bowl. Use the back of a spoon to create a swirl pattern, then place a pat of butter in the center and sprinkle the remaining chives over the top.
2. Glazed Honey Roasted Carrots with Sea Salt

Bright orange carrots offer a vibrant splash of color to your holiday dinner spread. This recipe transforms simple root vegetables into a sweet and savory masterpiece using a lush honey glaze. Whole carrots with small green tops remain intact to provide an elegant, rustic appearance that looks beautiful on any serving platter.
Roasting these vegetables brings out their natural sugars and creates a tender yet firm bite. The sticky glaze clings to each carrot, ensuring every mouthful is packed with flavor. You can see how the light reflects off the honey, making them an irresistible choice for children and adults alike.
Finishing the dish with a sprinkle of flaky sea salt creates a wonderful balance against the sweetness. These carrots serve as a refreshing lighter option amidst heavier casseroles and roasted meats. They are a staple for anyone seeking a traditional side dish with a modern, polished presentation.
Required Ingredients
- 2 pounds whole carrots (with green tops if possible)
- 3 tablespoons honey
- 2 tablespoons olive oil
- 1 tablespoon melted butter
- 1/2 teaspoon garlic powder
- 1/2 teaspoon flaky sea salt
- 1/4 teaspoon cracked black pepper
Equipment List
- Large baking sheet
- Parchment paper
- Small mixing bowl
- Whisk or fork
- Vegetable peeler
- Serving platter
DIY Instructions
- Clean and peel: Wash your carrots thoroughly under cool running water to remove any dirt. Trim the green tops so only about an inch of the stem remains. Use a vegetable peeler to remove the outer skin of each carrot until they are smooth and bright.
- Heat the oven: Turn your oven to 400°F and let it warm up while you prepare the glaze. Line your baking sheet with parchment paper to prevent the honey from sticking and burning on the pan.
- Mix the glaze: Combine the honey, olive oil, melted butter, garlic powder, and black pepper in a small mixing bowl. Whisk these ingredients together until the honey is fully incorporated and the liquid looks smooth.
- Coat the carrots: Lay the carrots in a single layer on your prepared baking sheet. Pour the honey mixture over them. Use your hands or a pastry brush to ensure every inch of each carrot is well-coated in the sticky glaze.
- Roast to perfection: Place the tray in the oven and roast for 20 to 25 minutes. About halfway through the cooking time, use tongs to roll the carrots over so they brown evenly on all sides. They should be tender enough to pierce with a fork.
- Final touch: Remove the tray from the oven and transfer the carrots to a serving platter. Drizzle any remaining warm glaze from the pan over the top. Sprinkle the flaky sea salt over the carrots right before serving to keep the crunch.
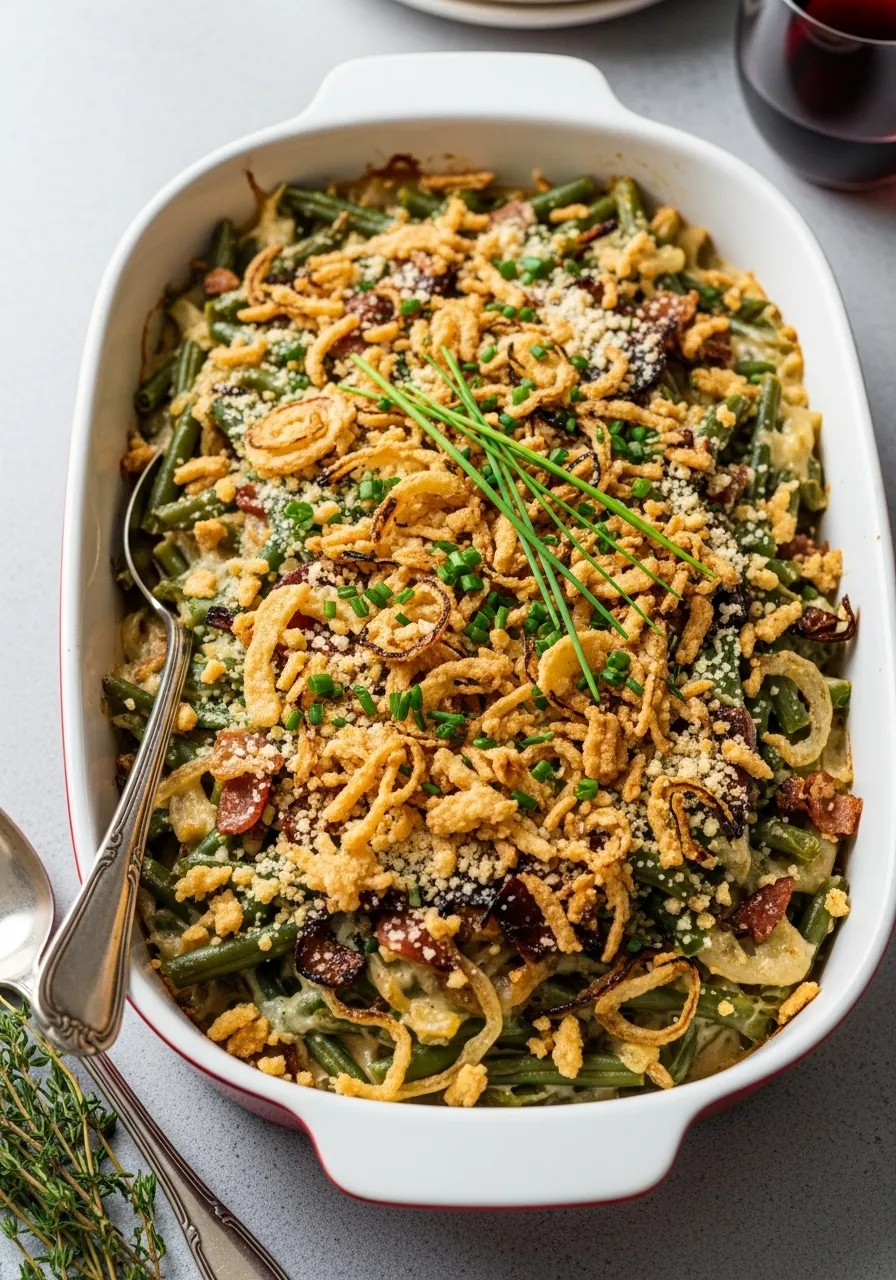
3. Creamy Green Bean Casserole with Crispy Onions

This iconic holiday side dish features tender green beans smothered in a rich, velvety mushroom sauce. The highlight is the thick layer of golden-brown fried onions that provides a satisfying crunch in every spoonful. It is a nostalgic favorite that captures the essence of a traditional Christmas feast.
Bubbling sauce seeps through the beans, creating a decadent texture that pairs well with turkey or ham. You can see the steam rising from the dish, indicating a hot and comforting meal ready to be shared. The addition of sliced mushrooms adds an earthy depth that elevates the overall flavor profile.
Preparing this casserole is straightforward, making it a go-to for many home cooks during the busy season. It holds heat well and can easily be transported to a potluck. Everyone loves the contrast between the soft, creamy center and the salty, crispy topping.
Required Ingredients
- 1 1/2 pounds fresh green beans (trimmed)
- 10.5 ounces cream of mushroom soup
- 1/2 cup whole milk
- 1 cup sliced white mushrooms
- 1 1/2 cups crispy fried onions
- 1/2 teaspoon soy sauce
- 1/4 teaspoon black pepper
Equipment List
- 9×13 inch baking dish
- Large mixing bowl
- Large pot
- Colander
- Stirring spoon
DIY Instructions
- Blanch the beans: Fill a large pot with water and a pinch of salt, then bring it to a boil. Add your trimmed green beans and cook them for about 5 minutes until they turn bright green. Drain them in a colander and immediately run cold water over them to stop the cooking process.
- Prepare the oven: Set your oven to 350°F so it is ready when you finish mixing the ingredients.
- Create the base: In a large mixing bowl, combine the cream of mushroom soup, milk, soy sauce, and black pepper. Stir these together until the sauce is uniform. Fold in the sliced mushrooms and the blanched green beans.
- Add the first layer of crunch: Measure out 1/2 cup of the crispy fried onions and stir them directly into the bean mixture. This adds flavor and a bit of texture to the inside of the casserole.
- Bake the casserole: Pour the mixture into your baking dish and spread it out evenly. Place the dish in the oven and bake for 25 minutes. The sauce should be bubbling around the edges of the pan.
- Add the topping: Carefully remove the dish from the oven. Sprinkle the remaining 1 cup of crispy fried onions over the entire top surface. Return it to the oven for another 5 minutes until the onions are golden and fragrant. Serve while hot.
4. Cheesy Scalloped Hasselback Potatoes

These potatoes offer a stunning visual twist on a standard gratin or scalloped dish. Each potato is sliced into thin ridges that allow the creamy cheese sauce to seep deep inside. The tops become beautifully toasted and crisp, while the bottoms remain soft and infused with garlic and herbs.
A rich blend of melted cheese creates a gooey layer that binds the potato fans together. Fresh green chives sprinkled over the top provide a sharp contrast to the golden, bubbling surface. This side dish is often the star of the table because it looks as impressive as it tastes.
You can serve these directly from the baking dish for a cozy, rustic feel. The thin slices make it easy for guests to pull apart their portions without needing a knife. It is a hearty, indulgent choice that complements any holiday protein perfectly.
Required Ingredients
- 6 large Russet or Yukon Gold potatoes
- 2 cups heavy cream
- 2 cups shredded sharp cheddar cheese
- 3 cloves garlic, minced
- 1 tablespoon fresh thyme leaves
- 2 tablespoons melted butter
- Salt and pepper to taste
- Fresh chives for garnish
Equipment List
- Round or rectangular baking dish
- Sharp chef’s knife
- Two wooden spoons (as slicing guides)
- Medium mixing bowl
- Whisk
DIY Instructions
- Slice the potatoes: Wash and dry your potatoes thoroughly. Place a potato between two wooden spoon handles on a cutting board. Slice thin vertical lines into the potato; the spoon handles will stop your knife from cutting all the way through, keeping the base intact.
- Prepare the dish: Grease your baking dish with a little butter or oil. Arrange the sliced potatoes in the dish, fanning them out slightly so the ridges open up.
- Make the cream sauce: In a mixing bowl, whisk together the heavy cream, minced garlic, thyme, salt, and pepper. Pour this mixture over the potatoes, making sure some of the liquid gets into the sliced ridges.
- First bake: Cover the dish tightly with aluminum foil and bake at 400°F for about 45 minutes. This steams the potatoes until they are tender.
- Add the cheese: Remove the foil and brush the tops of the potatoes with melted butter. Sprinkle the shredded cheddar cheese generously over the potatoes, encouraging some to fall into the slits.
- Final crisp: Return the dish to the oven uncovered. Bake for another 15 to 20 minutes until the cheese is melted and bubbling, and the potato edges are golden brown. Garnish with chopped chives before serving.
5. Loaded Red Potato Salad with Bacon and Cheese

This hearty potato salad is a colorful and filling addition to a Christmas buffet. It features tender red-skinned potatoes tossed in a cool, creamy dressing that mimics the flavors of a loaded baked potato. Large chunks of crispy bacon and shredded cheddar cheese provide savory depth in every bite.
Green onions and red onions add a mild crunch and a bit of zest to the dish. The creamy white dressing acts as a smooth base that holds all the toppings together beautifully. This is a great “make-ahead” side dish because the flavors actually improve after sitting in the refrigerator for a few hours.
You can see the variety of textures in the clear glass bowl, from the soft potatoes to the crunchy bacon bits. It feels much more substantial than a standard salad, making it a popular choice for hungry guests. It serves as a great chilled balance to the hot dishes on the table.
Required Ingredients
- 3 pounds red potatoes, cut into bite-sized chunks
- 1 cup sour cream
- 1/2 cup mayonnaise
- 1 cup shredded cheddar cheese
- 8 slices bacon, cooked and crumbled
- 1/2 cup chopped green onions
- 1/4 cup diced red onion
- Salt and black pepper to taste
Equipment List
- Large pot
- Colander
- Large mixing bowl
- Small mixing bowl
- Spatula or large spoon
DIY Instructions
- Boil the potatoes: Place your red potato chunks into a large pot and cover them with cold water. Add a pinch of salt and bring the water to a boil. Cook for about 10 to 12 minutes until they are fork-tender but not falling apart.
- Drain and cool: Pour the potatoes into a colander and let the water drain away. It is important to let the potatoes cool completely before adding the dressing, otherwise, the sour cream will melt and become oily.
- Mix the dressing: In a small bowl, whisk together the sour cream and mayonnaise until smooth. Add salt and pepper to taste. You can also add a splash of vinegar if you prefer a slight tang.
- Combine ingredients: Place the cooled potatoes into a large mixing bowl. Add the red onions and half of the green onions. Pour the dressing over the top and fold everything together gently with a spatula so you don’t mash the potatoes.
- Add the toppings: Stir in the shredded cheddar cheese and most of the crumbled bacon. Save a little bit of bacon and green onions for the final presentation.
- Chill and serve: Cover the bowl and place it in the fridge for at least one hour. Right before serving, sprinkle the remaining bacon and green onions over the top to keep them looking fresh and appetizing.
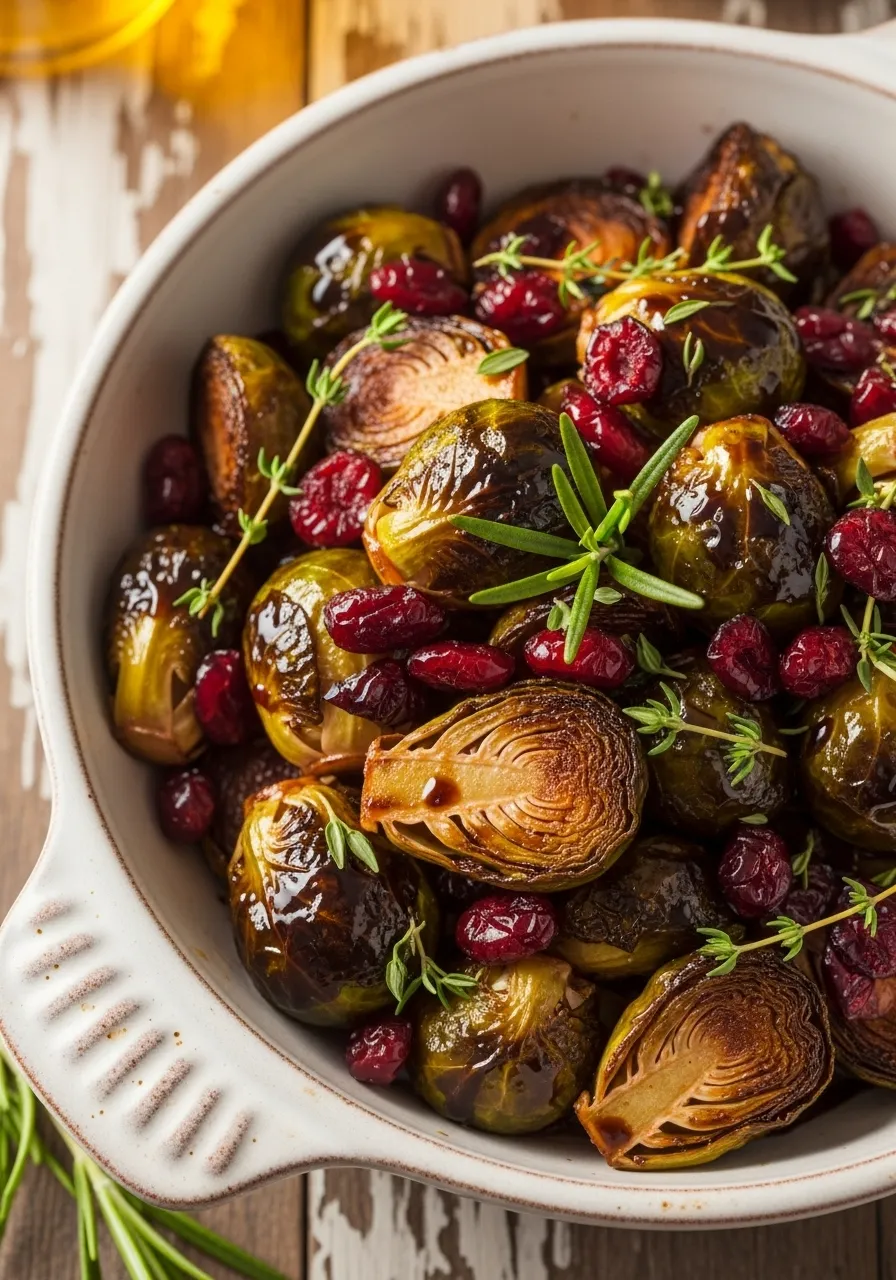
6. Roasted Brussels Sprouts with Crispy Bacon and Pine Nuts

Roasted Brussels sprouts take on a whole new character when paired with salty bacon and toasted pine nuts. The high heat of the oven caramelizes the outer leaves, turning them a deep, flavorful brown while the centers remain tender. This dish is a far cry from the boiled sprouts of the past.
The addition of thick-cut bacon adds a smoky richness that seeps into the vegetables as they roast. Pine nuts provide a subtle, buttery crunch that contrasts with the leafy texture of the sprouts. This side dish looks sophisticated in a cast iron skillet and brings an earthy aroma to the kitchen.
A final sprinkle of sea salt enhances the natural nuttiness of the ingredients. It is a savory, low-carb option that feels very festive and high-end. Guests who usually avoid sprouts are often won over by this crispy, salty combination.
Required Ingredients
- 1.5 pounds Brussels sprouts, halved
- 6 slices thick-cut bacon, chopped
- 1/4 cup pine nuts
- 2 tablespoons olive oil
- 1 tablespoon balsamic glaze (optional)
- Salt and black pepper to taste
Equipment List
- Cast iron skillet or baking sheet
- Sharp knife
- Cutting board
- Small skillet (for pine nuts)
DIY Instructions
- Prep the sprouts: Trim the woody ends off the Brussels sprouts and remove any yellowed outer leaves. Slice each sprout in half vertically. If they are very large, you can cut them into quarters to ensure they cook evenly.
- Prepare the bacon: Chop your raw bacon into small squares or strips. You don’t need to cook it beforehand, as it will crisp up perfectly in the oven alongside the vegetables.
- Toss and season: Place the halved sprouts and the bacon pieces into your cast iron skillet or on a baking sheet. Drizzle with olive oil and a healthy pinch of salt and pepper. Use your hands to toss everything together so each sprout is lightly oiled.
- Roast: Place the skillet in a 400°F oven for 20 to 25 minutes. Every 10 minutes, give the pan a shake or use a spoon to stir the sprouts. You want the leaves to look charred and the bacon to be crispy.
- Toast the nuts: While the sprouts roast, place your pine nuts in a small skillet over medium heat. Shake the pan constantly for 2 or 3 minutes until the nuts turn golden brown and smell fragrant. Watch them closely as they can burn very quickly.
- Serve: Remove the sprouts from the oven. Toss in the toasted pine nuts and drizzle with balsamic glaze if you like a bit of sweetness. Serve them warm directly from the pan.
7. Festive Confetti Corn with Bell Peppers

This vibrant side dish brings a cheerful “confetti” look to your holiday table with its mix of golden corn and colorful bell peppers. It is a light, crunchy, and slightly sweet option that balances out the heavier starches usually found at Christmas. The steam rising from the bowl shows off the freshness of the vegetables.
Small bits of red and green peppers act as holiday jewels scattered throughout the dish. Sautéing the corn in a little butter brings out its natural sweetness and adds a rich finish. It is a quick and easy recipe that doesn’t take up valuable oven space during a busy cooking day.
A simple seasoning of salt and cracked black pepper is all you need to let the natural flavors shine. This dish is especially popular with kids because of the bright colors and familiar taste. It is a reliable, crowd-pleasing side that takes only minutes to prepare.
Required Ingredients
- 4 cups corn kernels (fresh, frozen, or canned)
- 1/2 red bell pepper, finely diced
- 1/2 green bell pepper, finely diced
- 2 tablespoons unsalted butter
- 1/4 cup finely chopped onion
- Salt and black pepper to taste
Equipment List
- Large skillet
- Stirring spoon
- Sharp knife
- Serving bowl
DIY Instructions
- Prepare the peppers: Wash your red and green bell peppers. Cut them into very small, uniform cubes. Doing this ensures they cook at the same speed as the corn and gives the dish its “confetti” appearance.
- Sauté the aromatics: Melt the butter in a large skillet over medium heat. Add the chopped onions and cook them for about 3 minutes until they become translucent and soft.
- Cook the peppers: Stir in the diced red and green peppers. Sauté them for another 2 to 3 minutes. You want them to soften slightly but still retain a bit of their crisp texture and bright color.
- Add the corn: Pour the corn kernels into the skillet. If using frozen corn, you don’t need to thaw it first, but it may take an extra minute or two to heat through. Stir everything together so the butter and onions are well distributed.
- Season: Sprinkle in your salt and black pepper. Continue cooking for 5 to 7 minutes, stirring occasionally, until the corn is hot and the flavors have blended together.
- Serve: Transfer the mixture to a serving bowl. For an extra festive touch, you can garnish with a little fresh parsley or a sprig of holly on the side of the platter (just don’t eat the holly!).
8. Brown Sugar Roasted Butternut Squash with Pecans

Butternut squash takes on a candy-like quality when roasted with a touch of brown sugar and cinnamon. The squash cubes develop caramelized edges in the oven, creating a soft and sweet interior. Toasted pecan halves are scattered throughout to add a deep, nutty crunch that screams holiday comfort.
The deep orange color of the squash looks beautiful against the dark, earthy tones of the pecans. You can see the light glisten off the caramelized sugar coating, making it look incredibly appetizing. This dish often sits somewhere between a side dish and a light dessert.
A small copper pot of extra maple syrup or melted butter on the side allows guests to add even more richness. It is a warm, cozy recipe that fills the house with the scent of autumn and winter spices. Everyone will enjoy the balance of the naturally savory squash and the sweet glaze.
Required Ingredients
- 1 large butternut squash (peeled and cubed)
- 3 tablespoons brown sugar
- 2 tablespoons melted butter
- 1/2 teaspoon ground cinnamon
- 1/2 cup pecan halves
- A pinch of salt
Equipment List
- Baking sheet
- Parchment paper
- Large mixing bowl
- Vegetable peeler
- Sharp heavy knife
DIY Instructions
- Prepare the squash: Cut the ends off the butternut squash and use a sturdy peeler to remove the tough skin. Cut it in half, scoop out the seeds, and then chop the flesh into even one-inch cubes.
- Oven setup: Preheat your oven to 400°F. Line a large baking sheet with parchment paper so the sugar doesn’t stick to the metal as it caramelizes.
- Coat the cubes: In a large mixing bowl, toss the squash cubes with melted butter, brown sugar, cinnamon, and a tiny pinch of salt. Use your hands or a large spoon to make sure every piece is sticky and coated in the spice mixture.
- First roast: Spread the squash in a single layer on the baking sheet. Bake for 20 minutes. The squash should start to soften and the sugar will begin to bubble.
- Add the pecans: Remove the tray from the oven and use a spatula to flip the squash pieces. Sprinkle the pecan halves over the tray. Return it to the oven for another 10 to 15 minutes. This toasts the pecans without burning them.
- Serve: The squash is ready when it is tender enough to mash with a fork and the edges are slightly browned. Transfer to a warm bowl and serve immediately while the sugar is still gooey.
9. Savory Herb and Cornbread Stuffing

This stuffing features chunks of golden cornbread and traditional white bread toasted to a light crisp. It is packed with aromatic herbs like sage and thyme, which provide that classic holiday scent. Sautéed celery and onions add a nice textural contrast to the soft, broth-soaked bread.
Steam curls up from the baking dish, highlighting the moist and fluffy center of the dressing. Large sage leaves are tucked between the bread cubes for a beautiful, rustic presentation. The top layer is baked until it is crunchy, while the bottom remains rich and savory.
This recipe is a must-have for those who prefer a slightly sweeter stuffing thanks to the cornbread base. It pairs exceptionally well with poultry and cranberry sauce. It is a hearty, comforting dish that brings everyone together at the dinner table.
Required Ingredients
- 4 cups cubed cornbread
- 4 cups cubed white bread (slightly stale)
- 2 cups chicken or vegetable broth
- 1/2 cup unsalted butter
- 1 cup chopped celery
- 1 cup chopped yellow onion
- 2 tablespoons fresh sage, chopped
- 1 tablespoon fresh thyme leaves
- Salt and black pepper to taste
Equipment List
- 9×13 inch baking dish
- Large skillet
- Very large mixing bowl
- Measuring cups
DIY Instructions
- Dry the bread: If your bread cubes aren’t already dry, spread them on a baking sheet and bake at 300°F for 10 minutes. This prevents the stuffing from becoming a soggy mess when you add the liquid.
- Sauté the vegetables: In a large skillet, melt the butter over medium heat. Add your chopped celery and onions. Cook them for about 8 minutes until they are soft and fragrant.
- Season the mix: Stir the fresh sage and thyme into the butter and vegetable mixture. Cook for just one more minute to release the oils from the herbs.
- Combine everything: Place all your bread cubes into a very large mixing bowl. Pour the butter and vegetable mixture over the bread. Slowly add the broth one cup at a time, tossing gently. You want the bread to be moist but not swimming in liquid. Season with salt and pepper.
- Bake: Butter your baking dish and pour the stuffing mixture inside. Cover with foil and bake at 350°F for 20 minutes.
- Final crunch: Remove the foil and bake for another 15 to 20 minutes. This allows the top bread cubes to become golden brown and crispy while keeping the inside soft. Serve hot alongside your main course.
10. Soft Salted Butter Dinner Rolls

These dinner rolls are the ultimate comfort food for a Christmas dinner. They have a golden, slightly shiny crust that is brushed with melted butter and sprinkled with coarse sea salt. The interior is incredibly soft and fluffy, making them the best tool for soaking up extra gravy on your plate.
A gentle pull reveals the airy texture and the steam escaping from the warm center. They are served in a basket lined with a clean white cloth to keep them warm throughout the meal. The simple contrast of the rich butter and the sharp salt makes them disappear quickly.
Making your own rolls from scratch adds a special touch to the holiday. The smell of fresh bread baking in the oven creates a welcoming atmosphere for your guests. These rolls are a timeless staple that no traditional meal is complete without.
Required Ingredients
- 4 cups all-purpose flour
- 1/4 cup granulated sugar
- 1 packet (2 1/4 tsp) active dry yeast
- 1 cup warm milk (not hot)
- 1/4 cup melted butter (for dough)
- 1 large egg
- 1 teaspoon salt
- Extra melted butter and coarse sea salt for the top
Equipment List
- Stand mixer with dough hook (or a large bowl)
- Clean kitchen towel
- Baking pan
- Pastry brush
DIY Instructions
- Activate the yeast: Pour the warm milk into your mixing bowl and stir in the sugar and yeast. Let it sit for about 5 to 10 minutes until it looks foamy. If it doesn’t foam, your yeast might be old, and you should start over with a fresh packet.
- Mix the dough: Add the melted butter, egg, salt, and half of the flour to the bowl. Mix until combined. Gradually add the rest of the flour until a soft dough forms that pulls away from the sides of the bowl.
- Knead: If using a mixer, knead on low speed for 5 minutes. If doing it by hand, turn the dough onto a floured surface and knead for 8 to 10 minutes until it feels smooth and stretchy.
- First rise: Place the dough in a greased bowl and cover it with a warm, damp cloth. Let it sit in a warm spot for about one hour or until it has doubled in size.
- Shape the rolls: Punch the dough down to release the air. Divide it into 12 to 15 equal pieces and roll them into smooth balls. Place them in a greased baking pan, leaving a little space between each one. Cover and let them rise again for 30 minutes.
- Bake and finish: Bake at 375°F for 15 to 18 minutes until the tops are golden brown. Immediately after taking them out, brush the tops with melted butter and sprinkle with coarse sea salt. Serve them while they are still warm and soft.
11. Savory Sausage and Herb Skillet Stuffing

This rustic stuffing brings a hearty and savory element to your holiday spread. It combines crumbled breakfast sausage with golden cubes of cornbread and traditional herbs like sage. Cooking the mixture in a cast iron skillet creates a wonderful contrast between the moist center and the crisp, toasted edges.
The aroma of sizzling sausage and earthy sage fills the kitchen as this dish bakes. You can see the vibrant green of the fresh herbs scattered throughout the golden-brown bread. It offers a more substantial bite than lighter vegetable-based sides, making it a favorite for those who love deep, complex flavors.
Serving this directly from the skillet adds a cozy, home-style feel to your Christmas table. The texture is varied, with soft pockets of bread soaked in rich broth and crunchy bits of browned meat. It is a robust side that pairs beautifully with roasted turkey or a holiday ham.
Required Ingredients
- 1 pound bulk breakfast sausage
- 6 cups cornbread cubes (slightly dry)
- 1 large yellow onion, diced
- 2 stalks celery, chopped
- 1 green bell pepper, diced
- 2 cups chicken broth
- 2 tablespoons fresh sage leaves
- 1/2 teaspoon black pepper
Equipment List
- 12-inch cast iron skillet
- Wooden spoon
- Large mixing bowl
- Measuring cups
- Sharp knife
DIY Instructions
- Brown the meat: Place your cast iron skillet over medium heat. Add the crumbled sausage and cook it until no pink remains. Use your wooden spoon to break the meat into small, bite-sized pieces as it browns.
- Sauté the vegetables: Push the cooked sausage to one side of the pan. Add the onions, celery, and green peppers into the rendered fat. Cook these for about 5 to 7 minutes until the onions look clear and the peppers are soft.
- Mix the base: Turn off the heat. In a large mixing bowl, combine your dry cornbread cubes with the sausage and vegetable mixture. Toss them gently so you do not turn the bread into crumbs.
- Add the liquid: Slowly pour the chicken broth over the bread mixture. Stir it lightly until the bread has absorbed the liquid but still holds its shape. Add the fresh sage and black pepper at this stage.
- Assemble for baking: Clean out your skillet if needed, or simply spread the mixture back into the pan evenly. Press down very lightly with the back of your spoon.
- Bake to crisp: Place the skillet in a 350°F oven. Bake for 30 minutes. If you want a crunchier top, leave it in for an extra 5 minutes until the peaks of the cornbread are dark golden brown.
12. Garlic Herb Pull-Apart Pizza Rolls

These pull-apart rolls are a fun and interactive addition to any Christmas meal. Each roll is stuffed with a savory filling and topped with a delicate lattice of melted cheese and fresh parsley. The circular arrangement makes it easy for guests to grab a piece without needing a serving spoon.
The bread has a soft, pillowy texture that contrasts with the slightly chewy, golden exterior. You can see the herbs baked into the dough, promising a burst of flavor in every bite. A side of rich tomato sauce provides a bright, acidic dip that cuts through the buttery bread.
Kids and adults will both flock to this dish because of its familiar and comforting flavors. It works well as a side dish or even a festive appetizer while waiting for the main course. The presentation is naturally impressive due to the intricate pattern of the dough swirls.
Required Ingredients
- 1 pound refrigerated pizza dough
- 1/2 cup garlic butter, melted
- 1 cup shredded mozzarella cheese
- 1/4 cup grated Parmesan cheese
- 2 tablespoons fresh parsley, minced
- 1 cup marinara sauce (for dipping)
Equipment List
- Bundt pan or round baking dish
- Pastry brush
- Small bowl
- Rolling pin
- Pizza cutter
DIY Instructions
- Prepare the dough: Roll out your pizza dough on a floured surface until it forms a large rectangle. Use a pizza cutter to slice the dough into long strips about two inches wide.
- Add the flavor: Brush the strips generously with your melted garlic butter. Sprinkle a thin layer of mozzarella and some parsley over the buttered surface.
- Roll them up: Starting at one end, roll each strip tightly into a spiral shape. This creates the “cinnamon roll” look but with savory ingredients.
- Arrange the pan: Grease your Bundt pan or round dish. Place the rolls side-by-side in the pan so they are touching. They will expand and fuse together as they bake.
- Bake until golden: Place the pan in a 375°F oven. Bake for 20 to 25 minutes. The tops should be a light golden brown and the dough should feel firm to the touch.
- Final cheese layer: Remove the pan from the oven. Sprinkle the remaining cheese and parsley over the top. Return to the oven for 2 minutes to melt the cheese, then serve with a bowl of warm marinara in the center.
13. Gourmet Leek and Sausage Stuffing with Dried Fruit

This elegant stuffing offers a sophisticated blend of flavors for a formal Christmas dinner. It uses buttery leeks instead of standard onions and adds dried cranberries and apricots for small bursts of sweetness. Large chunks of savory sausage provide a meaty foundation that feels very indulgent.
The golden-brown bread cubes soak up the rich juices from the sausage and leeks, staying moist and flavorful. You can see the different colors from the fruit and herbs, making it a visually stunning side. It is often served in individual portions or a large stylish casserole dish.
Pairing this with a glass of red wine enhances the earthy tones of the leeks and the richness of the meat. It is a complex dish that balances sweet, salty, and savory notes perfectly. This recipe is a great choice if you want to move away from basic boxed stuffings.
Required Ingredients
- 8 cups sourdough bread cubes
- 2 large leeks (white and light green parts only), sliced
- 1/2 pound Italian sausage, casings removed
- 1/2 cup dried cranberries
- 1/4 cup chopped dried apricots
- 2 cups chicken stock
- 2 tablespoons fresh thyme
- 4 tablespoons butter
Equipment List
- Large baking dish
- Large skillet
- Mixing spoon
- Measuring cups
- Sharp knife
DIY Instructions
- Prep the leeks: Cut the leeks in half lengthwise and rinse them thoroughly under cold water to remove any hidden dirt. Slice them into thin half-moons.
- Cook the protein: In your skillet, cook the sausage over medium heat until it is fully browned. Remove the meat with a slotted spoon and set it aside, but keep the fat in the pan.
- Sauté the leeks: Add the butter to the skillet with the sausage fat. Toss in the leeks and cook them slowly for about 10 minutes until they are very soft and sweet.
- Combine the ingredients: In a large bowl, mix your sourdough cubes with the cooked sausage, sautéed leeks, cranberries, and apricots. The fruit will add a nice chew to the dish.
- Moisten the bread: Pour the chicken stock over the mixture. Add your fresh thyme and a bit of salt. Let it sit for 5 minutes so the bread can fully absorb the liquid.
- Bake: Transfer everything to your baking dish. Bake at 350°F for 35 minutes. The top should be slightly crisp while the interior remains soft and pudding-like.
14. Ultra Creamy Slow Cooker Corn

This recipe delivers a rich and velvety corn dish that is incredibly easy to manage on a busy holiday. It features sweet corn kernels swimming in a thick, buttery cream sauce that is seasoned simply with salt and pepper. The slow cooking process allows the flavors to meld together into a smooth, comforting side.
Steam rises from the pot, indicating a warm and satisfying addition to the meal. You can see the glossy finish of the sauce, which coats every single kernel of corn perfectly. It is a hands-off recipe that frees up your stove and oven for other important tasks.
The texture is much more decadent than standard canned or frozen corn. It feels like a treat and pairs well with almost any main course, from turkey to prime rib. Your guests will love the simple sweetness and the luscious, creamy consistency.
Required Ingredients
- 2 packages (16 oz each) frozen whole kernel corn
- 8 ounces cream cheese, cubed
- 1/2 cup unsalted butter, sliced
- 1/2 cup whole milk
- 1 tablespoon granulated sugar
- 1/2 teaspoon salt
- 1/4 teaspoon black pepper
Equipment List
- Slow cooker (Crockpot)
- Wooden spoon or spatula
- Measuring spoons
DIY Instructions
- Fill the pot: Place the frozen corn directly into your slow cooker. There is no need to thaw it first, which saves you a lot of time.
- Add the rich bits: Lay the cubes of cream cheese and the slices of butter on top of the corn. Pour the milk evenly over everything.
- Season: Sprinkle the sugar, salt, and black pepper over the ingredients. The sugar helps to highlight the natural sweetness of the corn.
- Set the timer: Cover the slow cooker with its lid. Set it to “High” for 2 hours or “Low” for 4 hours.
- Stir for creaminess: About halfway through the cooking time, open the lid and give everything a good stir. The cheese and butter will be melted, and stirring helps create that uniform, creamy sauce.
- Final check: Once the time is up, stir one last time to ensure the sauce is smooth. Keep it on the “Warm” setting until you are ready to serve.
15. Cheesy Broccoli and Ritz Cracker Casserole

This casserole is a nostalgic classic that brings together tender broccoli florets and a rich, golden cheese sauce. The star of the show is the topping of crushed buttery crackers that provides a salty, crisp finish. It is a colorful dish that makes eating vegetables feel like an indulgence.
The bright green broccoli pops against the orange of the melted cheese, creating a very appetizing look. You can see the steam coming off the dish, showing it is fresh and hot. The crunchy cracker crumbs are scattered unevenly to give it a rustic, homemade appearance.
This side dish is a fantastic way to ensure everyone gets their greens during the holiday feast. It is hearty enough to stand on its own but light enough to not overshadow the main roast. The combination of soft vegetables and crunchy topping is always a hit with guests.
Required Ingredients
- 4 cups fresh broccoli florets
- 1 can (10.5 oz) cheddar cheese soup
- 1/2 cup sour cream
- 1 cup shredded sharp cheddar cheese
- 1 sleeve Ritz crackers, crushed
- 4 tablespoons butter, melted
Equipment List
- 9×9 inch baking dish
- Large pot
- Mixing bowl
- Plastic bag (for crushing crackers)
DIY Instructions
- Steam the broccoli: Bring a pot of water to a boil. Add the broccoli florets and cook for 3 to 4 minutes. You want them to be slightly soft but still bright green. Drain them well.
- Mix the sauce: In a mixing bowl, combine the cheese soup, sour cream, and half of the shredded cheese. Stir until the mixture is thick and smooth.
- Combine: Fold the drained broccoli into the cheese sauce. Make sure every floret is well-coated. Pour the mixture into your greased baking dish.
- Prepare the topping: Place the crackers in a plastic bag and crush them into coarse crumbs. Mix these crumbs with the melted butter in a small bowl until they look like wet sand.
- Layer it up: Sprinkle the remaining shredded cheese over the broccoli, then cover everything with the buttery cracker crumbs.
- Bake: Place in a 350°F oven for 20 to 25 minutes. The cheese should be bubbling and the cracker topping should be a deep golden brown.
16. Stovetop White Cheddar Macaroni and Cheese

This stovetop macaroni and cheese features a sophisticated white cheddar sauce that is incredibly smooth and creamy. It uses large elbow noodles that trap the rich sauce inside every curve. A light dusting of toasted breadcrumbs on top adds a subtle crunch without the need for baking.
The sauce has a glossy, white appearance that looks clean and elegant on the plate. You can see the cheese pulling apart as a spoonful is lifted, showing off its gooey texture. It is a much more refined version of the classic childhood favorite.
Fresh parsley adds a hint of color and freshness to the rich dish. Because it is made on the stove, you have total control over the consistency of the sauce. It stays creamy longer than baked versions, making it a reliable side for a long holiday dinner.
Required Ingredients
- 1 pound elbow macaroni
- 3 cups shredded sharp white cheddar cheese
- 2 cups whole milk
- 4 tablespoons unsalted butter
- 1/4 cup all-purpose flour
- 1/2 teaspoon dry mustard
- Salt and white pepper to taste
Equipment List
- Large pasta pot
- Medium saucepan (for sauce)
- Whisk
- Colander
DIY Instructions
- Cook the pasta: Boil a large pot of salted water. Cook the macaroni according to the package directions until it is “al dente,” which means it still has a slight bite. Drain the pasta but do not rinse it.
- Make a roux: In your saucepan, melt the butter over medium heat. Whisk in the flour and cook for 1 minute. This creates a paste that will thicken your sauce.
- Add the milk: Slowly pour the milk into the pan while whisking constantly. Continue to cook and stir until the liquid becomes thick and starts to bubble slightly.
- Melt the cheese: Turn the heat to low. Stir in the dry mustard, salt, and white pepper. Add the white cheddar cheese one handful at a time, stirring until it is completely melted and the sauce is silky.
- Toss together: Pour the cheese sauce over the cooked macaroni. Use a large spoon to fold them together until every noodle is submerged in the white cheddar.
- Serve: Transfer to a bowl and top with a few fresh herbs if you like. Serve immediately while the sauce is at its creamiest.
17. Toasted Marshmallow Sweet Potato Casserole

This sweet potato casserole is a holiday classic that bridges the gap between a side dish and a dessert. It features a base of whipped, buttery sweet potatoes topped with a dense layer of perfectly toasted marshmallows. The golden-brown tops of the marshmallows create a beautiful, pillowy landscape.
The heat from the oven makes the marshmallows soft and stretchy, creating a fun texture for guests to enjoy. Underneath, the sweet potatoes are smooth and infused with warm spices like nutmeg. It is a vibrant orange dish that adds a bright spot of color to the Christmas table.
Serving this in a white ceramic dish allows the toasted colors to stand out. It is a nostalgic recipe that many people look forward to all year long. The sweetness provides a lovely counterpoint to savory turkey and salty gravy.
Required Ingredients
- 4 large sweet potatoes, peeled and cubed
- 1/2 cup brown sugar
- 1/4 cup softened butter
- 1/4 cup milk
- 1/2 teaspoon ground nutmeg
- 3 cups miniature marshmallows
Equipment List
- Large pot
- Potato masher
- 9×13 inch baking dish
- Large mixing bowl
DIY Instructions
- Boil the potatoes: Place your sweet potato cubes in a large pot of water. Bring to a boil and cook for 15 minutes until they are very tender. Drain the water away.
- Mash until smooth: Place the hot potatoes in a bowl. Add the butter, brown sugar, milk, and nutmeg. Use a masher or an electric mixer to whip them until they are fluffy and free of lumps.
- Spread the base: Spread the potato mixture evenly into the bottom of your baking dish. Smooth out the top with a spatula.
- Add the topping: Cover the entire surface of the potatoes with a thick layer of miniature marshmallows. You shouldn’t be able to see the potatoes through the white layer.
- Toast: Place the dish in a 375°F oven for about 10 to 12 minutes. You must watch it closely during the last few minutes. You want the marshmallows to turn a light golden brown without burning.
- Rest and serve: Let the dish sit for 5 minutes before serving. This allows the potatoes to set slightly so they are easier to scoop.
18. Classic Creamed Spinach with Parmesan

Creamed spinach is an elegant, steakhouse-style side dish that feels very luxurious. It features tender leaves of spinach folded into a rich, garlic-infused cream sauce. A generous dusting of grated Parmesan cheese and cracked black pepper on top adds a sharp, savory finish.
The deep green of the spinach looks beautiful against the white, velvety sauce. It is a soft and comforting dish that provides a nice break from the more textured root vegetables on the table. It is often served in small, deep bowls to keep the heat in.
This recipe is a great way to include nutrient-dense greens in a way that feels like a treat. The sauce is thick enough to hold its shape on the plate without running into other foods. It is a timeless side that brings a touch of class to any Christmas dinner.
Required Ingredients
- 20 ounces fresh baby spinach
- 1 cup heavy cream
- 2 tablespoons butter
- 2 cloves garlic, minced
- 1/4 cup grated Parmesan cheese
- A pinch of ground nutmeg
- Salt and black pepper to taste
Equipment List
- Large skillet or sauté pan
- Tongs
- Small whisk
- Serving bowl
DIY Instructions
- Wilt the spinach: Place a large skillet over medium heat. Add the spinach in batches with a splash of water. Use tongs to toss the leaves until they are wilted and dark green. Remove the spinach and squeeze out as much water as possible using a clean towel.
- Sauté the aromatics: Wipe out the skillet and melt the butter. Add the minced garlic and cook for 1 minute until it smells wonderful but is not browned.
- Thicken the cream: Pour the heavy cream into the skillet. Bring it to a gentle simmer and let it cook for 5 minutes until it has thickened slightly.
- Combine: Stir the wilted spinach back into the cream sauce. Use your tongs to break up any clumps of spinach so it is evenly distributed in the liquid.
- Season: Add the nutmeg, salt, and pepper. Stir in half of the Parmesan cheese until it melts and makes the sauce even thicker.
- Serve: Transfer the spinach to a bowl. Sprinkle the remaining Parmesan and a bit of extra black pepper over the top before bringing it to the table.
19. Pecan Crumble Sweet Potato Casserole

This version of sweet potato casserole replaces the marshmallows with a crunchy, buttery pecan crumble. The topping is made of chopped nuts, brown sugar, and flour, which bakes into a crisp layer that contrasts with the soft potatoes. It offers a more mature, nutty flavor profile for the holiday table.
Steam rises from the center of the dish, showing off the warm and inviting texture. The deep brown of the toasted pecans and the bright orange of the potatoes look earthy and festive. It is a hearty side dish that feels substantial and rich.
Many people prefer this style because the nuts add a much-needed crunch to the meal. It stores and reheats very well, making it a great option for leftovers the next day. The smell of toasted pecans and cinnamon will make your kitchen feel like a holiday bakery.
Required Ingredients
- 4 cups mashed sweet potatoes (cooked and peeled)
- 1/2 cup granulated sugar
- 2 large eggs, beaten
- 1/2 cup melted butter
- For the topping:
- 1 cup chopped pecans
- 1 cup brown sugar
- 1/3 cup all-purpose flour
- 1/3 cup softened butter
Equipment List
- 9×13 inch baking dish
- Two mixing bowls
- Fork or pastry cutter
- Large spoon
DIY Instructions
- Prepare the potato base: In a large bowl, mix your mashed sweet potatoes with the granulated sugar, beaten eggs, and melted butter. Stir until the mixture is uniform and smooth.
- Fill the dish: Pour the potato mixture into your baking dish and level it off with the back of a spoon.
- Make the crumble: In a separate smaller bowl, combine the pecans, brown sugar, and flour. Use a fork or a pastry cutter to work the softened butter into the dry ingredients until it looks like coarse crumbs.
- Top the potatoes: Sprinkle the pecan mixture evenly over the top of the sweet potatoes. Make sure the edges are well-covered.
- Bake: Place the dish in a 350°F oven. Bake for 30 to 35 minutes. You will know it is done when the topping is brown and the potatoes are set.
- Cool slightly: Let the casserole sit for about 10 minutes before serving. This helps the crumble layer stay crisp when you scoop into it.
20. Fresh Orange and Cranberry Relish

This bright and zesty relish is a refreshing alternative to the traditional cooked cranberry sauce. It is made by pulsing fresh cranberries and whole oranges together, creating a coarse and vibrant texture. The addition of orange zest provides a citrusy punch that wakes up the palate.
The deep red color of the berries and the flecks of orange peel make it a beautiful jewel-toned side dish. It is served cold, which provides a great temperature contrast to the hot meats and gravies. It is a simple, raw preparation that preserves the natural tartness of the fruit.
Using a glass bowl allows the bright colors to shine through on the table. This relish is not only great with turkey but also works well as a topping for crackers and cream cheese. It is a quick, five-minute recipe that adds a lot of flavor to your Christmas feast.
Required Ingredients
- 12 ounces fresh cranberries (washed)
- 1 large navel orange (unpeeled, cut into chunks)
- 3/4 cup granulated sugar (adjust to taste)
- 1/4 teaspoon ground ginger (optional)
Equipment List
- Food processor
- Rubber spatula
- Serving bowl with a lid
DIY Instructions
- Prep the fruit: Wash your cranberries and remove any that look soft or bruised. Cut your orange into small chunks, leaving the peel on (just remove any seeds). The peel is where all the flavorful oils are stored.
- Pulse together: Place the cranberries and orange chunks into your food processor. Pulse the machine in short bursts. You want a coarse, pebbly texture, not a smooth puree.
- Sweeten: Pour the mixture into a bowl. Stir in the sugar and the ground ginger if you are using it. Start with half a cup of sugar and taste it; add more if it is too tart for your liking.
- Melt the sugar: Cover the bowl and let it sit at room temperature for about 30 minutes. This gives the sugar time to dissolve into the fruit juices.
- Chill: Place the relish in the refrigerator for at least two hours before serving. This allows the flavors to meld together and the texture to thicken slightly.
- Serve: Give it one last stir before placing it on the table. It can be made up to two days in advance, which is a huge help during holiday prep.
21. Fresh Spinach and Pomegranate Holiday Salad

This vibrant salad brings a festive touch to your table with its brilliant colors and crisp textures. Deep green baby spinach leaves act as a lush base for ruby red pomegranate seeds and creamy goat cheese crumbles. Each bite offers a refreshing burst of juice from the fruit that cuts through the richness of the holiday meat dishes.
Large walnut halves are scattered throughout to provide a deep, earthy crunch. You can see how the light catches the glistening pomegranate arils, making them look like small holiday jewels. It serves as a light and sophisticated option that balances out the heavier starches on the menu.
The dressing remains light to allow the natural flavors of the fresh produce to shine. Serving this in a dark bowl makes the contrasting greens and reds pop visually. It is a simple yet elegant side dish that requires no cooking time at all.
Required Ingredients
- 6 cups fresh baby spinach
- 1 cup pomegranate seeds
- 1/2 cup crumbled goat cheese
- 1/2 cup walnut halves
- 3 tablespoons balsamic vinaigrette
- 1 tablespoon honey
Equipment List
- Large salad bowl
- Salad tongs
- Small jar (for dressing)
- Measuring cups
DIY Instructions
- Prepare the spinach: Wash the baby spinach leaves in cool water and use a salad spinner to dry them completely. Excess water will make the salad soggy, so ensure they are crisp.
- De-seed the pomegranate: If you are using a whole fruit, cut it into quarters and submerge it in a bowl of water. Gently use your thumbs to pop the seeds out; they will sink to the bottom while the white pith floats. Drain and dry the seeds.
- Toast the nuts: Place the walnut halves in a dry pan over medium heat for about 3 minutes. Shake the pan constantly until you smell a nutty aroma. Let them cool before adding them to the greens.
- Mix the dressing: In a small jar, combine your balsamic vinaigrette and honey. Shake vigorously until the honey is fully dissolved into the vinegar and oil.
- Assemble the salad: Place the dried spinach in your large salad bowl. Drizzle half of the dressing over the leaves and toss gently with tongs until lightly coated.
- Add the toppings: Sprinkle the pomegranate seeds, goat cheese crumbles, and toasted walnuts over the top. Drizzle the remaining dressing just before you bring the bowl to the table to keep the leaves from wilting.
22. Lemon Garlic Roasted Asparagus with Red Pepper Flakes

Long green asparagus spears look incredibly elegant when laid out in a uniform row on a white platter. This recipe uses high heat to quickly roast the stalks until they are tender but still have a satisfying snap. Slices of toasted garlic and bright lemon zest add layers of savory and citrusy notes.
Thinly sliced lemon rounds garnish the side of the dish, providing a hint of what is inside. A light dusting of red pepper flakes adds a tiny amount of heat that wakes up the palate without being overwhelming. You can see the light glisten off the olive oil coating each spear.
This side dish is a fantastic way to add a healthy, green element to your Christmas feast. It cooks in under ten minutes, making it a great last-minute addition to the meal. The simple flavors make it a versatile companion for roast beef or turkey.
Required Ingredients
- 1 pound fresh asparagus (woody ends trimmed)
- 3 tablespoons olive oil
- 4 cloves garlic, thinly sliced
- 1 lemon (zested and sliced)
- 1/2 teaspoon red pepper flakes
- Salt and black pepper to taste
Equipment List
- Large baking sheet
- Parchment paper
- Small bowl
- Serving platter
DIY Instructions
- Trim the stalks: Wash the asparagus and pat it dry. Hold a spear at both ends and bend it until it snaps; discard the tough, woody bottom part. Use this as a guide to trim the rest of the bunch with a knife so they are all the same length.
- Season the spears: Place the asparagus on a baking sheet lined with parchment paper. Drizzle with olive oil and sprinkle with salt, pepper, and the red pepper flakes. Toss with your hands to ensure every spear is oiled.
- Add the garlic: Scatter the thin garlic slices over the asparagus. Try to keep the garlic on top of the spears so it toasts rather than burning against the hot metal of the pan.
- Roast: Place the tray in a 425°F oven. Roast for 8 to 10 minutes. The tips should be slightly crispy and the stalks should be tender when pierced with a fork.
- Add the citrus: Remove the tray from the oven. Immediately sprinkle the fresh lemon zest over the hot asparagus. The heat will release the oils from the zest for maximum aroma.
- Serve: Transfer the spears to a platter and arrange the lemon slices around the edges. Serve while warm.
23. Crisp Apple and Walnut Slaw with Honey Dressing

This slaw offers a sweet and crunchy alternative to traditional heavy salads. It features thin slivers of green apple and shredded cabbage that provide a refreshing texture. The walnuts and pumpkin seeds add a hearty, rustic feel that fits perfectly with a winter holiday theme.
The bright green colors and whole walnuts make the dish look fresh and inviting. A light honey and vinegar dressing keeps the ingredients crisp rather than weighing them down with heavy mayo. It is a colorful addition to a buffet table that cleanses the palate between bites of rich gravy.
You can prepare the base of this slaw in advance, making it a stress-free option for a busy cook. The flavors develop as it sits, though the apples should be added last to keep them white. It is a healthy, fiber-rich side that everyone will appreciate.
Required Ingredients
- 4 cups shredded green cabbage
- 2 Granny Smith apples, julienned (cut into matchsticks)
- 1/2 cup walnut halves
- 2 tablespoons pumpkin seeds
- 1/4 cup apple cider vinegar
- 2 tablespoons honey
- 1 tablespoon olive oil
Equipment List
- Large mixing bowl
- Sharp knife or mandoline
- Small whisk
- Measuring spoons
DIY Instructions
- Shred the base: Use a sharp knife or a mandoline to thinly slice the green cabbage. Place the shredded cabbage into a large mixing bowl.
- Cut the apples: Wash the apples and leave the skin on for color. Cut them into thin matchsticks. To prevent them from turning brown, you can toss them in a little lemon juice if you aren’t serving the slaw immediately.
- Whisk the dressing: In a small bowl, combine the apple cider vinegar, honey, and olive oil. Whisk until the honey is completely incorporated into the vinegar.
- Combine the crunch: Add the apple matchsticks, walnuts, and pumpkin seeds to the bowl with the cabbage.
- Toss together: Pour the dressing over the ingredients. Use large spoons to toss the slaw until every piece of cabbage and apple is lightly coated.
- Chill: Let the slaw sit in the refrigerator for at least 20 minutes before serving. This allows the cabbage to soften slightly and the flavors to meld together.
24. Roasted Pear and Blue Cheese Salad with Pecans

This salad is a beautiful marriage of sweet and savory flavors that feels very high-end. Half-roasted pears act as the centerpiece, offering a soft texture that melts in your mouth. Pockets of sharp blue cheese and bitter radicchio leaves create a complex flavor profile that guests will love.
Large pecan halves provide a deep, toasted crunch that contrasts with the soft fruit. You can see the distinct layers of the salad, from the dark purple leaves to the pale, creamy cheese. It is a sophisticated starter or side dish that elevates the entire Christmas menu.
A light drizzle of balsamic glaze over the roasted pears adds a touch of acidity and sweetness. This dish is best served while the pears are still slightly warm from the oven. It is a memorable recipe that looks like it came from a professional kitchen.
Required Ingredients
- 3 ripe pears, halved and cored
- 4 cups mixed greens (including radicchio)
- 1/2 cup blue cheese chunks
- 1/2 cup toasted pecan halves
- 2 tablespoons honey
- 1 tablespoon balsamic vinegar
Equipment List
- Baking sheet
- Large salad platter
- Small spoon
- Measuring cups
DIY Instructions
- Roast the pears: Slice the pears in half and use a small spoon to scoop out the seeds and core. Place them cut-side up on a baking sheet. Drizzle with a little honey and bake at 375°F for 15 minutes until they are soft.
- Prepare the bed: Arrange your mixed greens and radicchio leaves on a large serving platter. The purple radicchio adds a lovely holiday color.
- Toast the pecans: Briefly heat the pecans in a pan until they are fragrant. This step is essential for the best flavor.
- Add the pears: Place the warm, roasted pear halves on top of the greens. Space them out evenly so each guest can easily take one.
- Crumble the cheese: Scatter large chunks of blue cheese around the pears. The heat from the pears will slightly soften the cheese, making it even creamier.
- Final garnish: Sprinkle the toasted pecans over the top. Whisk the remaining honey and balsamic vinegar together and drizzle it over the entire salad right before serving.
25. Brown Sugar Glazed Sweet Potato Rounds with Pecan Topping

These sweet potato rounds are a beautiful and organized way to serve a holiday favorite. Each slice is tender and coated in a dark, sticky brown sugar glaze that caramelizes in the oven. A thick topping of crushed pecans adds a satisfying crunch to every single bite.
Steam rises from the dish, showing off the hot and gooey texture of the glaze. You can see the deep orange of the potatoes through the rich, brown nut topping. It is a much more elegant presentation than a standard mashed casserole.
This side dish is easy to portion out, making it great for a formal sit-down dinner. The combination of warm spices and toasted nuts makes the kitchen smell incredible. It is a sweet, indulgent treat that pairs perfectly with a savory holiday ham.
Required Ingredients
- 3 large sweet potatoes, peeled and sliced into 1-inch rounds
- 1/2 cup brown sugar
- 1/4 cup melted butter
- 1 teaspoon ground cinnamon
- 1 cup chopped pecans
- 1/4 cup maple syrup
Equipment List
- 9×13 inch baking dish
- Large mixing bowl
- Measuring cups
- Spatula
DIY Instructions
- Prep the potatoes: Peel the sweet potatoes and slice them into thick, even rounds. Try to keep the thickness consistent so they all cook through at the same time.
- Coat the slices: In a large bowl, toss the potato rounds with melted butter, brown sugar, and cinnamon. Ensure both sides of every slice are sticky and well-coated.
- Arrange the dish: Layer the slices in your baking dish, overlapping them slightly like shingles on a roof. Pour any extra butter and sugar from the bowl over the top.
- First bake: Cover the dish with foil and bake at 375°F for 30 minutes. This softens the potatoes without burning the sugar.
- Add the crunch: Remove the foil. Mix the chopped pecans with the maple syrup and spoon this mixture over the top of the potatoes.
- Final roast: Bake uncovered for another 15 minutes. The potatoes should be fork-tender and the pecan topping should be bubbly and crisp. Serve while hot.
26. Honey Roasted Carrots and Parsnips with Thyme

This dish features a beautiful mix of orange carrots and pale parsnips, providing a lovely visual variety. Roasting these root vegetables at a high temperature brings out their natural sweetness and creates charred, flavorful edges. Fresh thyme sprigs add an earthy, herbal aroma that is quintessential for a holiday meal.
The honey glaze creates a glossy finish that makes the vegetables look vibrant and appetizing. You can see the different shapes and sizes on the platter, giving it a rustic and homemade feel. It is a simple preparation that results in a very polished-looking side dish.
Parsnips offer a slightly peppery flavor that balances the sweetness of the carrots and honey. This is a great choice for a traditional Christmas dinner because it uses seasonal winter produce. It is a healthy and colorful addition to any festive plate.
Required Ingredients
- 1 pound carrots, peeled and sliced lengthwise
- 1 pound parsnips, peeled and sliced lengthwise
- 3 tablespoons honey
- 2 tablespoons olive oil
- 1 tablespoon fresh thyme leaves
- Salt and black pepper to taste
Equipment List
- Large baking sheet
- Vegetable peeler
- Sharp knife
- Small bowl
DIY Instructions
- Prepare the roots: Peel both the carrots and the parsnips. Slice them in half lengthwise; if they are very thick, slice them into quarters. Keeping them in long strips looks more elegant on the serving platter.
- Make the glaze: In a small bowl, whisk together the honey, olive oil, and half of the fresh thyme.
- Toss the vegetables: Place the carrots and parsnips on a large baking sheet. Pour the honey mixture over them and use your hands to coat them thoroughly. Season with a good pinch of salt and pepper.
- Roast: Spread the vegetables into a single layer. Bake at 400°F for 25 to 30 minutes.
- Turn for even browning: Halfway through the cooking time, use a spatula to flip the vegetables over. This ensures they get those nice dark, caramelized edges on all sides.
- Garnish and serve: Transfer to a white platter and sprinkle the remaining fresh thyme over the top. The green leaves look beautiful against the roasted orange and white vegetables.
27. Buttery Sugar Snap Peas with Pearl Onions and Mint

This light and bright side dish is a wonderful way to add a pop of green to your holiday table. Crisp sugar snap peas are sautéed with sweet, translucent pearl onions until they are just tender. Fresh mint leaves are torn and scattered over the top to provide a cool, refreshing finish.
The gloss from the butter makes the peas look fresh and vibrant in the bowl. You can see the different textures, from the snappy pods to the soft, rounded onions. It is a much lighter option than the typical heavy holiday casseroles.
The mint adds a surprising and sophisticated layer of flavor that clears the palate. This dish takes very little time to prepare on the stove, making it ideal for the final moments before dinner is served. It is a simple, clean recipe that celebrates the natural taste of the vegetables.
Required Ingredients
- 1 pound sugar snap peas, trimmed
- 1 cup frozen pearl onions, thawed
- 2 tablespoons unsalted butter
- 1 tablespoon fresh mint leaves, torn
- Salt and black pepper to taste
Equipment List
- Large skillet
- Colander
- Slotted spoon
- Small bowl
DIY Instructions
- Blanch the peas: Bring a pot of water to a boil. Drop the sugar snap peas in for just 2 minutes until they turn a bright, electric green. Immediately drain them and put them in a bowl of ice water to keep them crunchy.
- Cook the onions: In a large skillet, melt the butter over medium heat. Add the pearl onions and sauté them for about 5 minutes until they are soft and slightly golden.
- Sauté together: Add the blanched and drained sugar snap peas to the skillet with the onions. Toss them in the butter for 2 to 3 minutes just to heat them through.
- Season: Add salt and black pepper to your liking. Be careful not to overcook the peas; you want them to keep their “snap.”
- Add the herbs: Turn off the heat. Toss in the torn mint leaves and give the mixture one final stir. The heat from the pan will release the mint’s aroma without wilting it too much.
- Serve: Transfer to a white bowl and serve immediately. The green and white colors look very clean and festive.
28. Crispy Parmesan Roasted Cauliflower Florets

These cauliflower florets are roasted until they develop a deep golden color and a nutty flavor. A generous coating of grated Parmesan cheese creates a savory, salty crust that is absolutely addictive. It is a simple yet high-impact way to serve a humble vegetable during the holidays.
You can see the crispy bits of cheese clinging to the edges of the cauliflower. A sprinkle of red pepper flakes and fresh herbs adds a touch of color and a tiny bit of zip. This side dish is a great low-carb alternative to roasted potatoes.
The texture is a perfect balance of a soft interior and a crunchy, cheesy exterior. It is best served warm directly from the oven while the cheese is still crisp. It is a crowd-pleasing dish that even people who don’t usually like cauliflower will enjoy.
Required Ingredients
- 1 large head of cauliflower, cut into florets
- 1/2 cup grated Parmesan cheese
- 3 tablespoons olive oil
- 1/2 teaspoon garlic powder
- 1/4 teaspoon red pepper flakes
- Salt and black pepper to taste
Equipment List
- Large baking sheet
- Large mixing bowl
- Sharp knife
- Measuring cups
DIY Instructions
- Cut the florets: Remove the leaves and stem from the cauliflower. Cut the head into small, bite-sized florets. Try to keep them roughly the same size so they roast evenly.
- Toss with oil: In a large bowl, combine the cauliflower with olive oil, garlic powder, salt, and pepper. Toss until every piece is shiny and well-oiled.
- Add the cheese: Sprinkle the Parmesan cheese over the oiled cauliflower. Toss again; the oil will help the cheese stick to the florets.
- Spread them out: Place the cauliflower on a large baking sheet. Make sure they aren’t crowded together, or they will steam instead of getting crispy.
- Roast: Place in a 400°F oven for 25 to 30 minutes. Every 10 minutes, give the tray a shake or use a spatula to turn the pieces over.
- Final touch: When the cauliflower is dark golden brown and the cheese looks toasted, remove the tray. Sprinkle with red pepper flakes and serve while hot and crunchy.
29. Honey Glazed Green Bean Bundles Wrapped in Bacon

These green bean bundles are an elegant and savory side dish that looks beautiful on an individual dinner plate. Each small bunch of beans is wrapped in a strip of smoky bacon and brushed with a sweet honey glaze. The bacon becomes crispy in the oven, infusing the beans with a rich, salty flavor.
The contrast of the bright green beans and the dark, caramelized bacon is visually striking. You can see the glistening honey coating that promises a sweet and salty bite. It is a sophisticated way to serve a traditional vegetable.
This dish is perfect for hosting because the bundles can be assembled ahead of time and popped into the oven right before dinner. They are easy for guests to pick up and add to their plates. It is a hearty and indulgent side that everyone will love.
Required Ingredients
- 1 pound fresh green beans, trimmed
- 8 slices of bacon, cut in half
- 1/4 cup honey
- 2 tablespoons melted butter
- 1/2 teaspoon garlic salt
Equipment List
- Baking sheet
- Pastry brush
- Small bowl
- Tongs
DIY Instructions
- Blanch the beans: Briefly boil the green beans for 3 minutes until they are bright green but still firm. Drain them and run cold water over them to stop the cooking.
- Assemble the bundles: Take about 6 to 8 green beans and wrap a half-slice of bacon around the middle. Place the bundle on a baking sheet with the bacon seam facing down so it stays closed.
- Make the glaze: In a small bowl, whisk together the honey, melted butter, and garlic salt.
- Brush the tops: Use a pastry brush to generously coat each bacon-wrapped bundle with the honey mixture.
- Roast: Place the tray in a 400°F oven. Bake for 15 to 20 minutes. You want the bacon to be crispy and the beans to be tender.
- Serve: Use tongs to carefully transfer the bundles to a platter. Serve them warm as a beautiful and delicious holiday side.
30. Wild Rice Pilaf with Cranberries and Almonds

This wild rice pilaf is a hearty and colorful side dish that brings earthy flavors to your Christmas table. It features a blend of long-grain wild rice, tart dried cranberries, and toasted almond slivers. The combination of textures—chewy rice, soft fruit, and crunchy nuts—makes every bite interesting.
Fresh parsley and a hint of cinnamon add a festive aroma and a bright green color to the dish. You can see the steam rising from the wooden bowl, indicating a warm and comforting addition to the meal. It is a great alternative to traditional bread-based stuffings.
This pilaf is naturally gluten-free, making it a thoughtful choice for guests with dietary restrictions. The flavors are balanced between savory broth and sweet fruit. It is a substantial side that pairs beautifully with roasted poultry or pork.
Required Ingredients
- 2 cups wild rice blend
- 4 cups chicken or vegetable broth
- 1/2 cup dried cranberries
- 1/2 cup toasted almond slivers
- 1/4 cup chopped fresh parsley
- 2 tablespoons butter
- A pinch of cinnamon
Equipment List
- Large saucepan with a lid
- Small skillet (for almonds)
- Serving bowl
- Measuring cups
DIY Instructions
- Cook the rice: Combine the wild rice and broth in a large saucepan. Bring to a boil, then reduce the heat to low and cover with a lid. Simmer for 45 minutes or until the rice is tender and the liquid is absorbed.
- Toast the almonds: While the rice cooks, place the almond slivers in a small skillet over medium heat. Stir constantly for 2 to 3 minutes until they are light brown and smell nutty.
- Fluff and season: Once the rice is done, turn off the heat and let it sit for 5 minutes. Fluff the rice with a fork and stir in the butter and a pinch of cinnamon.
- Add the mix-ins: Fold in the dried cranberries and the toasted almonds. The heat from the rice will soften the berries slightly.
- Garnish: Stir in the fresh chopped parsley. The green color looks beautiful against the dark rice and red berries.
- Serve: Transfer the pilaf to a wooden serving bowl. It is best served warm and can be easily reheated if made in advance.
31. Balsamic Glazed Whole Roasted Onions

Roasted onions offer a deep, savory sweetness that balances the rich meats of a Christmas feast. These whole onions are baked until the layers become soft and translucent. A balsamic reduction provides a dark, sticky finish that enhances the natural sugars of the vegetable.
Fresh rosemary sprigs tucked into the serving bowl add a woody aroma. You can see the charred edges of the onion skins, which give the dish a rustic, home-style appeal. This side is surprisingly light and provides a tangy contrast to buttery mashed potatoes or heavy gravies.
Preparing these requires very little hands-on work, making them a great choice for a busy host. They hold their heat well and look beautiful when served in a simple ceramic pot. Guests will enjoy the tender texture and the complex, vinegary glaze.
Required Ingredients
- 6 medium yellow or red onions
- 1/4 cup balsamic vinegar
- 2 tablespoons olive oil
- 1 tablespoon brown sugar
- 3 sprigs fresh rosemary
- Salt and black pepper to taste
Equipment List
- Small saucepan
- Baking dish
- Sharp knife
- Aluminum foil
DIY Instructions
- Clean the onions: Peel the outer papery skin off each onion. Trim a small slice off the top and bottom so they can stand upright in your baking dish without rolling around.
- Make the glaze: In a small saucepan, combine the balsamic vinegar, olive oil, and brown sugar. Simmer over low heat for about 5 minutes until the liquid thickens slightly and looks like syrup.
- Season and wrap: Place the onions in your baking dish. Drizzle the balsamic mixture over the top of each onion, letting it seep down the sides. Sprinkle with salt, pepper, and add the rosemary sprigs to the bottom of the pan.
- Initial bake: Cover the dish tightly with aluminum foil. Bake at 375°F for 45 minutes. This steams the onions until they are completely soft in the center.
- Caramelize: Remove the foil and use a spoon to baste the onions with the juices from the bottom of the pan. Bake uncovered for another 15 minutes. This helps the glaze thicken and creates those lovely dark, charred edges.
- Final touch: Transfer the onions to a serving bowl. Pour any remaining glaze over them and garnish with fresh rosemary before bringing them to the table.
32. Golden Yorkshire Puddings with Rich Beef Gravy

Yorkshire puddings are a traditional Christmas staple that everyone looks forward to. These individual puddings are baked at a high temperature until they rise into tall, airy cups with a deep golden crunch. The hollow center is designed to hold a generous pour of savory beef gravy.
The texture is light and crisp on the outside while remaining slightly soft and custardy at the base. You can see the steam rising as the dark, glossy gravy is poured over the top. This side dish is the ultimate way to enjoy every drop of holiday roast juices.
Achieving the perfect rise requires a hot pan and a steady hand. Once you master the technique, these will become the most requested item on your holiday menu. They are best served piping hot right out of the oven for maximum crispness.
Required Ingredients
- 1 cup all-purpose flour
- 1 cup whole milk (room temperature)
- 2 large eggs (room temperature)
- 1/2 teaspoon salt
- 4 tablespoons beef drippings or vegetable oil
- 2 cups prepared beef gravy
Equipment List
- Large mixing bowl
- Whisk
- 12-cup muffin tin or Yorkshire pudding tin
- Measuring cups
DIY Instructions
- Mix the batter: In a large bowl, whisk together the flour and salt. Make a well in the center and add the eggs and half of the milk. Whisk until smooth, then gradually add the remaining milk until the batter looks like thin cream.
- Let it rest: This is a vital step. Let the batter sit at room temperature for at least 30 minutes. This allows the gluten to relax and ensures a better rise in the oven.
- Heat the tin: Place a teaspoon of beef drippings or oil into each cup of your muffin tin. Place the tin in a 425°F oven for 10 minutes until the oil is smoking hot.
- Pour quickly: Carefully remove the hot tin from the oven. Quickly pour the batter into the cups, filling them about halfway. You should hear a sizzle as the batter hits the hot oil.
- Bake undisturbed: Slide the tin back into the oven. Bake for 20 to 25 minutes. Do not open the oven door during this time, or the puddings will collapse.
- Serve hot: Once they are tall and dark golden brown, remove them from the oven. Serve them immediately with a hot pitcher of gravy to pour into the centers.
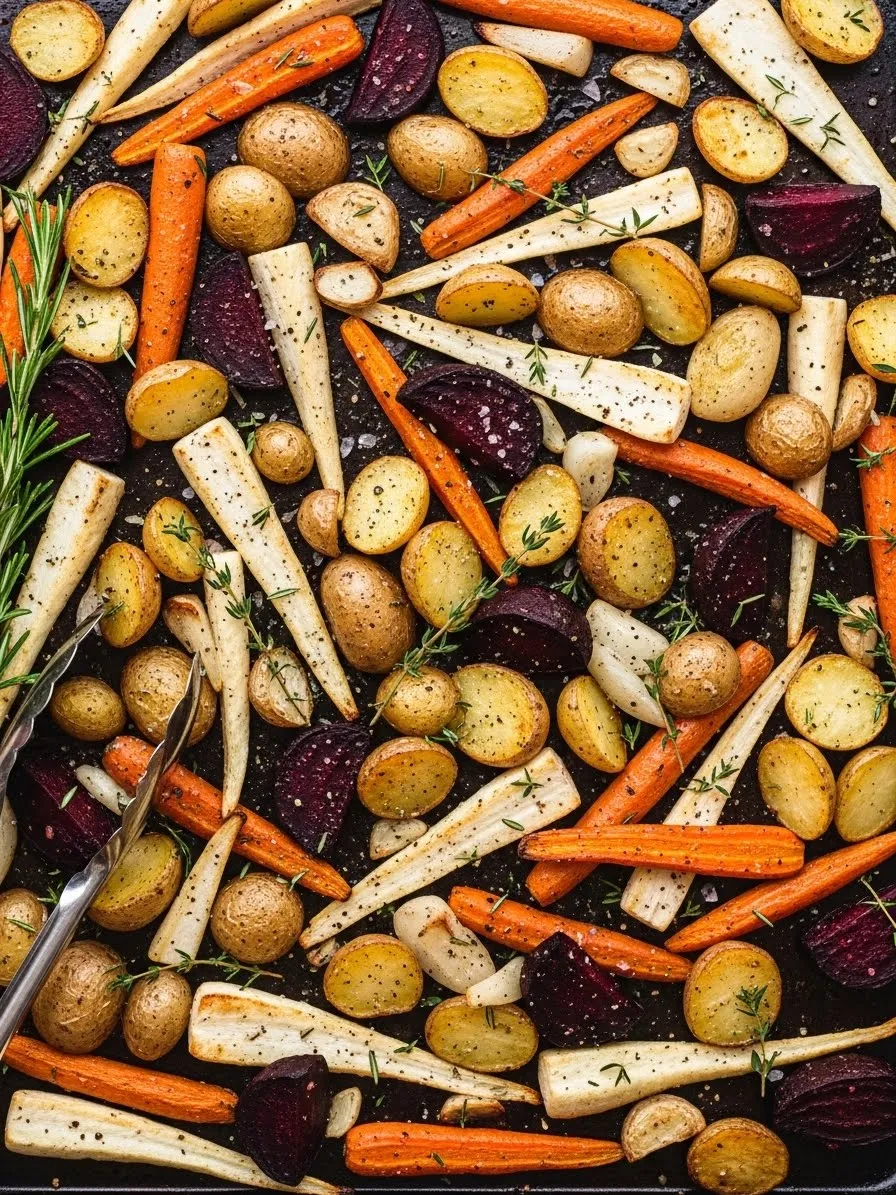
33. Sheet Pan Roasted Root Vegetables and Garlic

This colorful medley of root vegetables brings a variety of earthy flavors and textures to the plate. Beets, carrots, and parsnips are roasted together with whole cloves of garlic until they are tender and caramelized. The natural colors remain vibrant, creating a beautiful presentation on a simple piece of parchment paper.
Fresh rosemary sprigs add a fragrant, pine-like aroma that complements the sweet vegetables. You can see the dark, roasted edges that indicate deep flavor. This dish is a healthy and rustic option that balances the richer, creamier sides of a Christmas dinner.
Using a sheet pan makes cleanup easy and allows the vegetables to roast evenly. The whole garlic cloves become soft and spreadable, offering a mild, buttery flavor. It is a simple preparation that honors the natural beauty of winter produce.
Required Ingredients
- 2 large beets, peeled and wedged
- 3 carrots, sliced into thick sticks
- 2 parsnips, sliced into thick sticks
- 1 head of garlic, top sliced off to expose cloves
- 3 tablespoons olive oil
- 2 sprigs fresh rosemary
- Salt and black pepper to taste
Equipment List
- Large baking sheet
- Parchment paper
- Vegetable peeler
- Sharp knife
DIY Instructions
- Prep the vegetables: Peel your beets, carrots, and parsnips. Cut them into uniform pieces so they all cook at the same rate. Keep the beet pieces separate until you are ready to roast to avoid staining the other vegetables too early.
- Season the mix: Place all the vegetables on your parchment-lined baking sheet. Drizzle generously with olive oil and sprinkle with salt and pepper. Toss them directly on the tray to coat them well.
- Add the garlic: Place the garlic head (with the top cut off) in the center of the tray. Drizzle a little oil over the exposed cloves. Place the rosemary sprigs among the vegetables.
- Roast: Place the tray in a 400°F oven. Roast for 35 to 40 minutes.
- Turn for evenness: Use a spatula to toss the vegetables halfway through the cooking time. The beets will bleed some color onto the parsnips now, which adds to the festive look.
- Serve: The vegetables are done when they are tender and have browned edges. Squeeze the roasted garlic out of its skin and toss it with the vegetables before serving for a burst of flavor.
34. Savory Baked Corn Pudding

Corn pudding is a classic comforting side that features a soft, custard-like texture. This version includes whole corn kernels baked into a golden, slightly sweet base that feels light and airy. It has a beautifully browned top that hides a moist and creamy interior.
You can see the whole kernels peeking through the fluffy crumb, promising a burst of sweetness in every bite. It is served in a fluted white dish that looks elegant on a holiday table. This side dish is a fantastic bridge between savory and sweet flavors.
This recipe is simple to put together and bakes into a consistent, reliable dish. It is a great alternative to standard corn on the cob or sautéed corn. Guests of all ages will love the gentle texture and the familiar, homey taste.
Required Ingredients
- 2 cups corn kernels (fresh or frozen)
- 1 can (14 oz) cream-style corn
- 1/2 cup melted butter
- 2 large eggs, beaten
- 1 cup sour cream
- 1 box (8.5 oz) corn muffin mix
Equipment List
- 2-quart baking dish
- Large mixing bowl
- Spatula
- Measuring cups
DIY Instructions
- Preheat and prep: Set your oven to 350°F. Grease your baking dish with a little butter or non-stick spray to ensure easy serving later.
- Mix the wet ingredients: In a large bowl, stir together the whole corn, cream-style corn, melted butter, and beaten eggs.
- Add the creaminess: Fold in the sour cream until the mixture is smooth and well-combined.
- Incorporate the dry mix: Add the corn muffin mix to the bowl. Stir just until the dry ingredients are moistened. Do not overmix, as you want the pudding to remain light and tender.
- Bake: Pour the batter into your prepared dish and smooth the top with a spatula. Bake for 45 to 50 minutes.
- Test for doneness: The pudding is ready when the center is set and the top is a light golden brown. Let it stand for 5 to 10 minutes before serving so it firms up slightly.
35. Sautéed Wild Mushrooms with Herb Butter

This dish is a mushroom lover’s dream, featuring a variety of textures and deep, earthy tones. Sliced cremini and whole shiitake mushrooms are sautéed until they are dark and savory. A large dollop of herb-flecked butter melts over the top, creating a rich sauce that coats every piece.
Fresh thyme and rosemary add a garden-fresh aroma to the pan. You can see the glistening butter and the golden-brown seared edges of the mushrooms. This side dish is a sophisticated addition that pairs wonderfully with steak or roasted poultry.
Using a cast iron skillet helps achieve a perfect sear on the mushrooms, locking in their juices. The garlic and herbs infused into the butter provide a high-impact flavor with very little effort. It is a quick-cooking side that feels truly indulgent.
Required Ingredients
- 1 pound mixed wild mushrooms (cremini, shiitake, oyster)
- 4 tablespoons unsalted butter
- 2 cloves garlic, minced
- 1 tablespoon fresh thyme leaves
- 1 teaspoon fresh rosemary, chopped
- Salt and black pepper to taste
Equipment List
- Large cast iron skillet
- Wooden spoon
- Small bowl
DIY Instructions
- Clean the mushrooms: Use a damp paper towel to wipe any dirt off the mushrooms. Do not soak them in water, or they will become soggy. Slice the larger ones and leave the smaller ones whole for texture.
- Sear the mushrooms: Heat your skillet over medium-high heat with a splash of oil. Add the mushrooms in a single layer. Let them sit for 3 minutes without stirring so they develop a dark brown crust.
- Sauté: Toss the mushrooms and continue cooking for another 5 minutes until they have released their moisture and shrunk slightly.
- Make herb butter: In a small bowl, mashing the softened butter with the minced garlic, thyme, and rosemary.
- Finish the dish: Turn the heat down to low. Add the herb butter to the skillet and toss the mushrooms until the butter is melted and everything is fragrant.
- Season and serve: Add salt and pepper to taste. Transfer the mushrooms to a warm bowl and serve immediately while the herb butter is still bubbling.
36. Parmesan Crusted Zucchini Rounds with Lemon

These zucchini rounds offer a light and zesty vegetable option for your holiday meal. Each slice is topped with a crunchy mixture of breadcrumbs and Parmesan cheese that bakes into a savory crust. Fresh lemon wedges on the side allow guests to add a bright, acidic finish.
The bright green of the zucchini contrasts beautifully with the golden-brown topping. You can see the herbs mixed into the crust, adding flecks of color and flavor. This is a great way to serve a lighter green vegetable that still feels like a treat.
Baking these in a white dish makes the colors pop and keeps the presentation clean. They cook quickly and maintain a nice firm texture. It is a refreshing side that balances out the more starch-heavy items on the Christmas menu.
Required Ingredients
- 3 medium zucchini, sliced into 1/2 inch rounds
- 1/2 cup grated Parmesan cheese
- 1/4 cup Panko breadcrumbs
- 1 teaspoon dried oregano
- 2 tablespoons olive oil
- 1 lemon, cut into wedges
Equipment List
- Large baking dish
- Small mixing bowl
- Pastry brush
DIY Instructions
- Slice the zucchini: Wash your zucchini and trim the ends. Cut them into even rounds about half an inch thick.
- Prepare the topping: In a small bowl, mix together the Parmesan cheese, breadcrumbs, and dried oregano.
- Oil the rounds: Arrange the zucchini slices in a single layer in your baking dish. Use a pastry brush to lightly coat the top of each slice with olive oil.
- Add the crust: Spoon a small amount of the Parmesan mixture onto each zucchini round. Press it down slightly with the back of the spoon so it stays in place during baking.
- Bake: Place the dish in a 400°F oven for 15 to 18 minutes. The zucchini should be tender and the topping should be golden and crispy.
- Garnish: Squeeze a little fresh lemon juice over the top just before serving. Place the remaining lemon wedges in the dish for a pretty presentation.
37. Loaded Cheesy Mashed Potato Bake with Bacon

This decadent casserole takes traditional mashed potatoes to a whole new level of indulgence. It features a thick layer of melted cheddar cheese pulled into gooey strands as it is served. Topped with crispy bacon bits and fresh chives, it has all the flavors of a loaded baked potato in a shareable format.
The steam rising from the dish highlights the creamy, whipped texture of the potatoes underneath the cheese. You can see the vibrant green chives scattered over the golden surface. This is a hearty, crowd-pleasing side that will likely be the first dish to disappear.
Baking the mashed potatoes with the toppings allows the flavors to meld together and ensures every bite is hot and cheesy. It is a robust dish that pairs perfectly with roasted meats. This is the ultimate comfort food for a festive gathering.
Required Ingredients
- 5 pounds Yukon Gold potatoes, mashed with butter and milk
- 2 cups shredded sharp cheddar cheese
- 1 cup sour cream
- 1/2 pound bacon, cooked and crumbled
- 1/4 cup fresh chives, chopped
- Salt and black pepper to taste
Equipment List
- 9×13 inch baking dish
- Large mixing bowl
- Spatula
DIY Instructions
- Prepare the base: Start with your favorite smooth mashed potatoes. In a large bowl, fold the sour cream into the warm potatoes to make them extra tangy and rich.
- Season: Add salt and pepper to taste. Stir in half of the crumbled bacon and half of the chopped chives so the flavor is inside the mash as well as on top.
- Assemble: Spread the potato mixture evenly into a greased baking dish. Use a spatula to smooth it out.
- Add the toppings: Cover the entire surface with the shredded cheddar cheese. Sprinkle the remaining bacon bits over the cheese.
- Bake: Place in a 350°F oven for 20 minutes. You want the cheese to be completely melted and bubbling around the edges.
- Garnish and serve: Remove from the oven and sprinkle the rest of the fresh chives over the top. Serve immediately while the cheese is stretchy and hot.
38. Mini Gingerbread Houses in a Snowy Landscape

These adorable mini gingerbread houses create a magical and festive finale to your Christmas spread. Each house is intricately decorated with white royal icing that mimics dripping snow and icicles. They are set in a “snowy” landscape of powdered sugar, surrounded by small evergreen trees.
The warm brown of the gingerbread looks cozy against the crisp white icing and sugar snow. You can see the light glowing from inside the tiny windows, making the scene feel alive and welcoming. This is as much a centerpiece as it is a delicious holiday treat.
Creating this display is a wonderful way to involve the family in holiday preparations. The spicy scent of ginger and cloves will fill your home as these bake. It is a whimsical touch that captures the heart of the Christmas spirit and delights guests of all ages.
Required Ingredients
- 1 batch gingerbread cookie dough (rolled thin)
- 2 cups royal icing (stiff consistency)
- 1 cup powdered sugar (for snow)
- Small silver candies or sprinkles
- Small decorative pine trees (non-edible)
Equipment List
- Gingerbread house cookie cutters
- Piping bag with a small round tip
- Large wooden board or tray
- Small sifter or sieve
DIY Instructions
- Bake the pieces: Roll out your gingerbread dough and use cutters to create the walls and roofs for your mini houses. Bake them until firm and let them cool completely on a wire rack.
- Assemble the walls: Use a piping bag of royal icing to “glue” the four walls together on a flat surface. Hold them in place for a minute until the icing begins to set. Let the walls dry for at least an hour before adding the roof.
- Add the roof: Pipe icing along the top edges of the walls and carefully place the roof pieces on top. Support them if necessary until the icing is dry.
- Decorate: Once the houses are sturdy, use the icing to draw windows, doors, and snowy icicles hanging from the roof. Add silver sprinkles or candies to the icing while it is still wet for extra sparkle.
- Create the scene: Place your finished houses on a large wooden board. Arrange your small decorative pine trees around them to create a forest.
- Make it snow: Use a sifter to dust a thick layer of powdered sugar over the entire board, including the roofs of the houses and the trees. This creates a beautiful, unified snowy landscape that looks like a winter wonderland.
Key Takeaways
- Prep Ahead: Many of these dishes, like the cranberry relish or potato salad, can be made a day in advance to save you time on Christmas morning.
- Texture Balance: Aim for a mix of creamy, crunchy, and soft textures to make your plate more interesting and satisfying.
- Seasonal Produce: Utilizing winter staples like root vegetables and hardy greens ensures the best flavor and keeps your grocery bill manageable.
- Simple Swaps: Feel free to adjust cheese types or nut varieties based on what you already have in your pantry.
Creating a beautiful Christmas dinner does not require professional chef skills or rare ingredients. By choosing a few of these reliable side dishes, you can build a menu that feels abundant and thoughtful. The best meals are those that allow the host to spend time with loved ones instead of being stuck at the stove.
We hope these recipes inspire you to try something new while keeping your favorite traditions alive. From the first bite of a buttery roll to the last spoonful of corn pudding, these dishes celebrate the joy of the season. May your holiday table be filled with warmth, laughter, and truly delicious food.