The daily rush from the classroom to the kitchen table often leaves parents searching for inspiration. Finding a balance between nutritious ingredients and flavors that children actually enjoy can feel like a daunting task. These moments require quick solutions that bridge the gap between school and dinner without spoiling the appetite.
Easy After-School Snacks
This collection of fifty creative recipes offers a diverse range of textures and tastes to satisfy every young eater. You will find everything from refreshing frozen fruit treats to warm, savory mini pizzas that use simple pantry staples. Each idea is designed to be approachable for busy schedules while keeping the fun factor high for your little ones.
Getting kids involved in the preparation can also turn snack time into a rewarding afternoon activity. Whether you are assembling whimsical celery butterflies or stacking golden waffle towers, these snacks provide the fuel needed for homework and play. Let these easy ideas take the stress out of your post school routine.
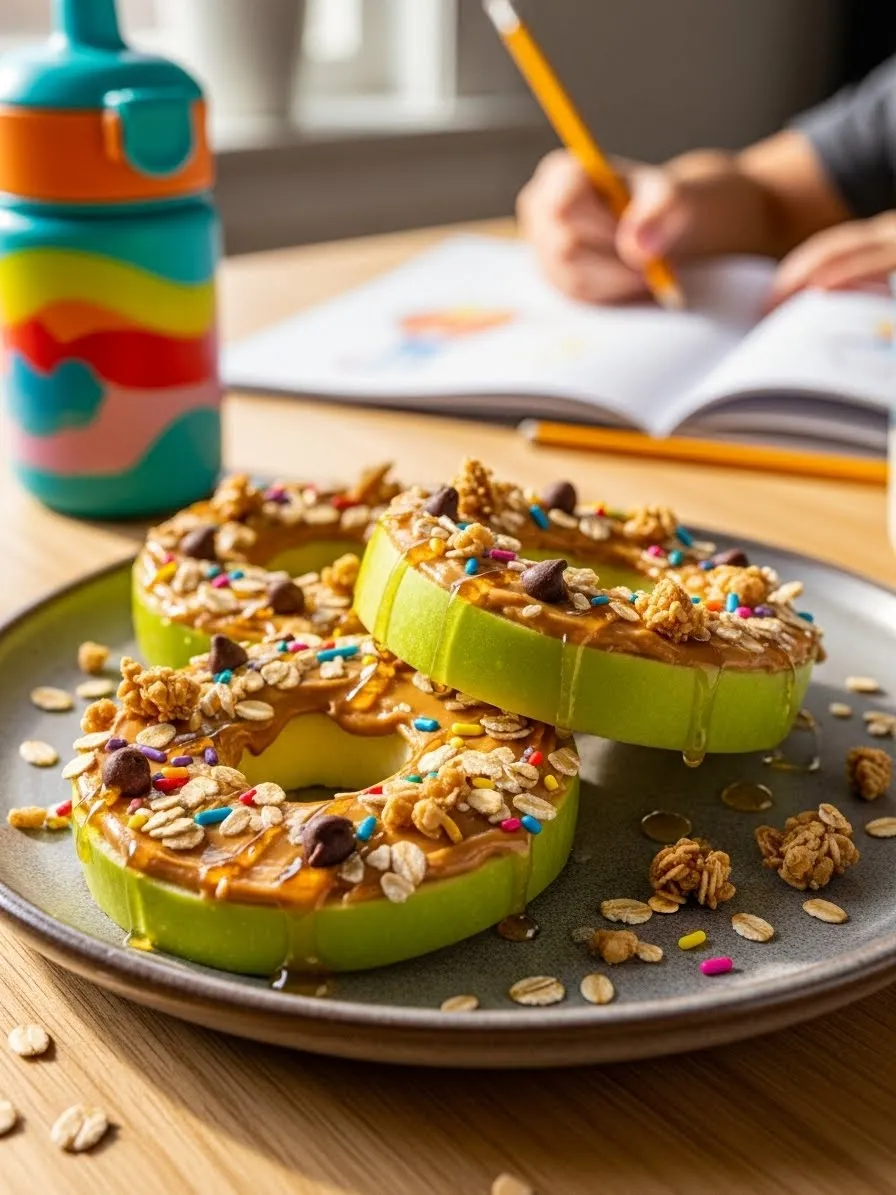
Crispy green apple rings serve as a fresh base for these creative treats. A thick layer of creamy peanut butter covers each slice to provide a satisfying protein boost for growing kids. Scattered oats and colorful sprinkles add a delightful crunch that makes healthy eating feel like a celebration.
Tiny chocolate chips and a drizzle of golden honey finish the snack with just the right amount of sweetness. These rings look like real donuts but offer much better nutrition for a busy afternoon. You can easily customize the toppings based on what your children enjoy most.
Small hands will find these easy to grab while they finish up their homework or crafts. The bright colors catch the eye and encourage picky eaters to try something new. It takes very little time to assemble a plate of these fun circles for the whole family to share.
Ingredients
2 Large green apples
1/2 Cup creamy peanut butter
1/4 Cup rolled oats
2 Tablespoons chocolate chips
1 Tablespoon rainbow sprinkles
1 Tablespoon honey
Equipment
Sharp kitchen knife
Apple corer or a small round cookie cutter
Cutting board
Butter knife or small spatula
Serving plate
DIY Instructions
Wash the green apples thoroughly under cool water and pat them dry with a clean towel.
Place the apple on the cutting board and slice it horizontally into thick rounds about half an inch wide.
Use an apple corer to remove the center seeds from each slice or carefully cut a small circle out of the middle with a knife.
Spread a generous amount of peanut butter over the top surface of every apple ring using your butter knife.
Sprinkle the rolled oats evenly across the peanut butter so they stick well to the surface.
Add the chocolate chips and rainbow sprinkles on top of the oats to decorate your donuts.
Drizzle a small amount of honey over the finished rings to add extra flavor and shine.
Place the treats on a plate and serve them immediately while the fruit is still crisp.
2. Supreme Pizza Quesadillas
Easy After-School Snacks
Golden, toasted tortillas hold together a mountain of melted mozzarella cheese and savory pepperoni slices. Bright green peppers add a fresh crunch to every bite of this warm afternoon treat. Each layer stacks high to create a filling snack that satisfies even the biggest post-school appetite.
A rich tomato dipping sauce sits on the side to provide a tangy kick. Fresh basil leaves garnish the bowl to give the dish a professional touch. Your kids will love the stretchy cheese pulls that happen with every single piece.
This recipe transforms basic pantry staples into a fun meal in just minutes. It offers a much more exciting alternative to a plain sandwich or a bag of chips. You can easily adjust the fillings to include your family’s favorite pizza toppings.
Ingredients
2 Large flour tortillas
1 Cup shredded mozzarella cheese
15 Slices mini pepperoni
1/2 Cup diced green bell peppers
1/2 Cup marinara or pizza sauce
1 Teaspoon dried oregano
Fresh basil for garnish
Equipment
Large non-stick skillet
Spatula
Pizza cutter or sharp knife
Small dipping bowl
Cutting board
DIY Instructions
Place one flour tortilla flat on your cutting board and sprinkle half of the mozzarella cheese evenly over the surface.
Layer the mini pepperoni slices and diced green peppers on top of the cheese layer.
Cover the fillings with the remaining shredded cheese and place the second tortilla on top to create a sandwich.
Heat your non-stick skillet over medium heat and carefully slide the quesadilla into the pan.
Cook for about three minutes until the bottom tortilla turns a light golden brown color.
Use a large spatula to flip the quesadilla over and cook the other side for another two minutes until the cheese melts completely.
Transfer the hot quesadilla back to the cutting board and let it rest for sixty seconds so the cheese sets.
Slice the circle into six triangles using a pizza cutter and serve warm with a side of marinara sauce.
3. Frozen Yogurt Ants on a Log
Easy After-School Snacks
Classic celery sticks receive a modern makeover with a swirl of light Greek yogurt. This version replaces traditional nut butter with a refreshing, creamy filling that kids find irresistible. Deep red dried cranberries sit neatly on top to mimic the look of little ants marching in a row.
A thin drizzle of fruit syrup adds a pop of color and extra sweetness to the snack. The bright green celery remains crisp and cold for a refreshing contrast to the smooth topping. These treats look beautiful on a plate and provide a great way to serve more vegetables.
Packing these in a lunchbox or serving them at the kitchen table takes almost no effort at all. The design is playful enough to capture any child’s imagination during snack time. You can prepare a large batch quickly for playdates or school events.
Ingredients
4 Large stalks of fresh celery
1/2 Cup thick Greek yogurt
1/4 Cup dried cranberries
1 Tablespoon strawberry or raspberry syrup
1 Teaspoon lemon juice
Equipment
Vegetable peeler or knife
Piping bag with a star tip
Small mixing bowl
Paper towels
Serving platter
DIY Instructions
Wash the celery stalks under cold running water and dry them completely with paper towels.
Trim the ends of the celery and cut each long stalk into three smaller sections of equal length.
Mix the Greek yogurt with a splash of lemon juice in a small bowl to keep the flavor bright.
Spoon the yogurt into a piping bag fitted with a star tip for a decorative look.
Squeeze the yogurt into the hollow center of each celery stick until the groove is completely filled.
Place three to four dried cranberries on top of the yogurt swirl to represent the ants.
Drizzle the fruit syrup in thin lines across the cranberries to add a bit of flair.
Serve these immediately or keep them in the refrigerator until your kids are ready to eat.
4. Berry Blast Yogurt Bark
Easy After-School Snacks
Colorful swirls of berry puree decorate this frozen sheet of creamy vanilla yogurt. Bold blackberries and sliced strawberries create a beautiful mosaic across the surface. This snack provides a cold and crunchy texture that feels like eating a piece of candy.
Crunchy pistachios and dark chocolate chips are scattered throughout for extra depth of flavor. Every broken piece offers a unique combination of fruit and nuts. It serves as a great healthy alternative to ice cream on a warm day.
Making this treat is a great way to involve children in the kitchen. They can help drop the berries onto the yogurt or sprinkle the toppings. The bark stays good in the freezer for weeks so you always have a snack ready.
Ingredients
2 Cups plain or vanilla Greek yogurt
1/2 Cup fresh strawberries sliced
1/2 Cup fresh blueberries
1/4 Cup blackberries
2 Tablespoons shelled pistachios
2 Tablespoons dark chocolate chips
2 Tablespoons honey
Equipment
Large baking sheet
Parchment paper
Spatula
Small bowl
Freezer space
DIY Instructions
Line a large baking sheet with a piece of parchment paper to prevent sticking.
Pour the Greek yogurt onto the center of the paper and use a spatula to spread it into a flat rectangle about half an inch thick.
Drop small spoonfuls of honey onto the yogurt and use a toothpick to swirl it into the surface.
Press the sliced strawberries, blueberries, and blackberries gently into the yogurt layer.
Sprinkle the pistachios and dark chocolate chips over the top so they are evenly distributed.
Place the baking sheet flat in your freezer and leave it there for at least four hours or until the yogurt is rock solid.
Remove the sheet from the freezer and lift the parchment paper to peel the bark away.
Break the frozen sheet into large, irregular shards with your hands and serve them right away before they melt.
5. Turkey and Cheese Sushi Rolls
Easy After-School Snacks
Slices of deli turkey wrap around a core of sharp cheddar cheese and crisp cucumber. This clever design mimics the look of gourmet sushi but uses familiar sandwich ingredients. A tiny dot of yellow mustard on top provides a savory finish to each round.
Dried herbs are sprinkled over the outside to add a touch of earthy flavor. These bite-sized circles are easy for little fingers to pick up and eat without making a mess. They look fantastic in a bento box or on a wooden serving board.
This snack is naturally low in carbohydrates and high in protein to keep energy levels steady. You can assemble them in seconds using leftovers from your fridge. Most kids enjoy the novelty of eating their lunch in such a fun shape.
Ingredients
4 Large slices of deli turkey breast
2 Slices of cheddar cheese
1 Small cucumber
1 Tablespoon yellow mustard
1 Teaspoon dried parsley
Equipment
Cutting board
Sharp knife
Paper towels
Small spoon
DIY Instructions
Peel the cucumber and cut it into long, thin strips that are about the same width as your turkey slices.
Lay one slice of deli turkey flat on a clean cutting board and pat it dry with a paper towel.
Place a half slice of cheddar cheese on top of the turkey slice so it covers the middle.
Put one or two cucumber strips at the very edge of the turkey and cheese stack.
Roll the turkey tightly around the cucumber and cheese to create a long cylinder shape.
Use a sharp knife to slice the cylinder into four or five individual “sushi” rounds.
Use a small spoon to place a tiny dot of mustard on the top center of each roll.
Sprinkle a pinch of dried parsley over the rolls and arrange them upright on a plate for serving.
6. Rainbow Hummus Cucumber Boats
Easy After-School Snacks
Crispy green cucumbers act as a natural vessel for a smooth and creamy hummus filling. This refreshing snack offers a wonderful crunch that pairs beautifully with the velvety texture of the chickpea spread. Bright red peppers and dark olive rings add a burst of color to every single boat.
Tiny sprouts on top bring a fresh garden feel to the plate while adding extra nutrients. These vegetable treats are light enough for a pre-dinner snack but filling enough to curb hunger. You can easily swap the toppings for corn or peas to suit different tastes.
Serving these on a wooden board makes them look like a fancy appetizer at a party. Kids love the “boat” shape and find it much more interesting than eating a standard salad. It is a simple way to introduce more plant based proteins into their daily routine.
Ingredients
2 Medium cucumbers
1 Cup roasted garlic hummus
1/2 Cup diced red bell peppers
1/4 Cup sliced black olives
1 Teaspoon paprika
A handful of fresh microgreens or sprouts
Equipment
Small spoon
Sharp kitchen knife
Cutting board
Serving platter
Paper towels
DIY Instructions
Rinse the cucumbers under cold water and dry them well with paper towels.
Slice each cucumber in half lengthwise to create two long pieces.
Use a small spoon to gently scrape out the watery seeds from the center of each half to create a hollow groove.
Fill the hollow center of the cucumbers with a generous layer of hummus using your spoon or a piping bag.
Sprinkle the diced red bell peppers along the top of the hummus for a bright pop of color.
Arrange the black olive slices at even intervals across the length of the cucumber boats.
Dust a small amount of paprika over the top to add a hint of smoky flavor.
Garnish with a few microgreens and cut each long boat into smaller two inch pieces for easier handling.
7. Frosty Grape Skewers
Easy After-School Snacks
Cold grapes offer a burst of sweet juice that feels like a frozen treat on a warm afternoon. This snack uses a mix of purple and green grapes to create a beautiful visual pattern on every stick. A light dusting of sugar crystals adds a frosty look and a satisfying crunch to the fruit.
A side of honey yogurt dip provides a creamy balance to the icy fruit. These skewers are fun to eat and help keep kids hydrated after a long day of school activities. The frozen texture makes them last longer than regular fruit so they can be enjoyed slowly.
You can prepare these well in advance and keep them in the freezer for a quick grab and go option. They are a fantastic replacement for sugary popsicles or processed fruit snacks. Kids will enjoy the chilly sensation as the fruit melts in their mouths.
Ingredients
1 Bunch red seedless grapes
1 Bunch green seedless grapes
1/2 Cup plain Greek yogurt
2 Tablespoons honey
1 Tablespoon granulated sugar
Equipment
Wooden skewers
Baking sheet
Small dipping bowl
Colander
Freezer bag
DIY Instructions
Pull the grapes off their stems and wash them thoroughly in a colander.
Pat the grapes dry with a towel so the sugar will stick to the skin properly.
Slide the grapes onto the wooden skewers one by one while alternating between red and green colors.
Lightly dampen the surface of the grapes and sprinkle the granulated sugar over them until they look frosty.
Lay the skewers flat on a baking sheet lined with parchment paper.
Place the tray in the freezer for about two to three hours until the grapes are firm and icy.
Mix the Greek yogurt and honey in a small bowl to create a sweet dipping sauce.
Remove the skewers from the freezer and serve them immediately with the yogurt dip on the side.
8. Banana Sushi Crunch Rolls
Easy After-School Snacks
Soft banana centers are wrapped in a rich layer of almond butter for a protein packed afternoon snack. A coating of puffed rice cereal adds a crispy texture that contrasts perfectly with the creamy fruit. These rolls look just like real sushi but offer a sweet and nutty flavor profile.
A drizzle of dark chocolate sauce on the plate makes this snack feel like a special dessert. These bite sized rounds are easy to share and fun for children to dip. You can use sunflower butter instead of almond butter if there are nut allergies in your home.
This recipe is a great way to use up bananas that are just starting to ripen. The combination of healthy fats and fruit provides a steady stream of energy for homework time. It only takes a few minutes to transform a simple piece of fruit into a creative masterpiece.
Ingredients
2 Firm ripe bananas
1/2 Cup almond or peanut butter
1 Cup puffed rice cereal or granola
2 Tablespoons dark chocolate sauce for dipping
1 Teaspoon hemp seeds
Equipment
Butter knife
Shallow bowl
Cutting board
Sharp knife
Small dipping dish
DIY Instructions
Peel the bananas and remove any stringy bits from the sides of the fruit.
Spread a thick, even layer of almond butter over the entire outside of each banana using a butter knife.
Pour the puffed rice cereal into a shallow bowl or onto a flat plate.
Roll the buttered banana in the cereal while pressing gently so the grains stick to the surface.
Place the coated banana on a cutting board and slice it into rounds about one inch thick.
Arrange the slices on a dark plate to make the colors stand out.
Pour a small amount of chocolate sauce into a side dish for dipping.
Sprinkle a few hemp seeds over the top for extra nutrition and serve right away.
9. Broccoli Tree Forests
Easy After-School Snacks
Large broccoli florets stand tall like tiny trees in a whimsical forest scene. A warm blanket of melted cheddar cheese drips down the sides to create a delicious and savory canopy. This playful presentation turns a simple vegetable into an exciting adventure for young explorers.
A dusting of seasoned salt or garlic powder adds extra flavor to the stems. Tiny toy dinosaurs or animals on the board can make the snack even more engaging for little ones. It is an effective way to make greens look appetizing and fun to eat.
These “trees” are easy to hold by the stem, making them a mess free finger food. The cheese provides a boost of calcium while the broccoli offers plenty of vitamins. You can steam the broccoli slightly if your kids prefer a softer texture.
Ingredients
1 Large head of fresh broccoli
1/2 Cup shredded sharp cheddar cheese
1/4 Teaspoon garlic salt
1/4 Cup whole almonds
1 Tablespoon milk
Equipment
Small microwave safe bowl
Cutting board
Sharp knife
Serving board
Steamer basket (optional)
DIY Instructions
Cut the broccoli into large florets with long stems so they can stand upright on their own.
Steam the broccoli for three minutes if you want them slightly tender or leave them raw for maximum crunch.
Stand the broccoli “trees” up on a wooden serving board to create your forest.
Place the shredded cheese and a splash of milk in a small bowl and microwave in twenty second bursts until melted.
Stir the cheese until it is smooth and then carefully spoon it over the tops of the broccoli florets.
Sprinkle the garlic salt over the melted cheese for extra seasoning.
Scatter the whole almonds around the base of the trees to represent forest rocks or seeds.
Serve the forest immediately while the cheese is warm and gooey.
10. Sweet and Salty Popcorn Medley
Easy After-School Snacks
Light and airy popcorn serves as the base for this ultimate snack mix. Crunchy pretzels and colorful chocolate buttons are tossed throughout the bowl for a variety of textures. Dark raisins add a chewy sweetness that balances out the salty elements of the mix.
This snack is perfect for sharing during a family movie or a group study session. The vibrant colors make it look festive and inviting on any table. You can easily customize the ingredients by adding dried apricots or different types of nuts.
Making a large batch of this medley saves time during a busy week. You can portion it out into small bags for easy grabbing on the way to practice. It provides a satisfying mix of flavors that keeps everyone reaching for more.
Ingredients
4 Cups air popped popcorn
1/2 Cup mini pretzels
1/2 Cup colorful chocolate candies
1/2 Cup raisins
1/2 Teaspoon sea salt
Equipment
Large mixing bowl
Measuring cups
Serving bowl
Large spoon
DIY Instructions
Pop the popcorn kernels using an air popper or a stovetop pot and place them in a large mixing bowl.
Remove any unpopped kernels from the bottom of the bowl so they do not cause a surprise during snacking.
Add the mini pretzels to the bowl and toss them gently with the popcorn.
Pour in the chocolate candies and the raisins to add sweetness and color to the mix.
Sprinkle a small amount of sea salt over the top to enhance all the different flavors.
Use a large spoon to stir the ingredients together until they are evenly distributed.
Transfer the mixture into a wooden serving bowl or individual snack containers.
Keep any leftovers in an airtight container to ensure the popcorn stays fresh and crispy.
11. Towering Berry Waffles
Easy After-School Snacks
Fluffy, golden waffles stack high to create a mountain of deliciousness. Thick layers of whipped cream sit between each section to provide a light and airy contrast to the crisp edges. Bright red strawberry halves and deep blue blueberries add a fresh, tart kick to this breakfast-inspired snack.
Golden syrup cascades down the sides of the stack in a slow and tempting drizzle. A light dusting of powdered sugar coats the entire plate like a fresh fall of winter snow. This treat feels incredibly special but remains very simple to assemble in your own kitchen.
Kids will enjoy the impressive height and vibrant colors of this sweet afternoon pick-me-up. It offers a wonderful way to use seasonal berries and favorite pantry staples. You can serve this on a bright yellow plate to make the fruit colors pop even more.
Ingredients
3 Large toasted waffles
1 Cup heavy whipping cream
1/2 Cup fresh strawberries
1/4 Cup fresh blueberries
2 Tablespoons maple syrup
1 Tablespoon powdered sugar
Equipment
Toaster or oven
Hand mixer or whisk
Large mixing bowl
Kitchen knife
Serving plate
DIY Instructions
Toast the waffles in your toaster until they reach a warm and slightly crispy texture.
Pour the heavy cream into a large bowl and whisk it vigorously until it forms soft, white peaks.
Slice the fresh strawberries into neat halves and set the blueberries aside in a small dish.
Place one warm waffle on the center of your serving plate to start the base.
Spread a thick layer of the whipped cream over the waffle and top it with a few fruit pieces.
Repeat the stacking process with the remaining waffles and cream until you reach the top.
Drizzle the maple syrup slowly over the stack so it runs down the sides into the waffle holes.
Shake a small amount of powdered sugar through a sieve over the top and serve the tower immediately.
12. Honey Nut Apple Wedges
Easy After-School Snacks
Crisp red apple slices serve as the sturdy foundation for this elegant and healthy snack. Rectangular pieces of mild white cheese sit perfectly on top of each fruit wedge. A single whole walnut sits in the center of the cheese to provide a satisfying earthy crunch.
Clear golden honey glazes the top of the nuts and cheese to tie all the flavors together. Tiny seeds are scattered across the surface to add extra texture and visual appeal. This combination offers a sophisticated balance of sweet and savory notes in every bite.
Small hands can easily grab these wedges during a study break or after outdoor play. The presentation looks beautiful on a dark slate board and appeals to both kids and adults. It is a smart way to serve protein and fruit without any complicated cooking.
Ingredients
2 Large red apples
4 Ounces white cheddar or Havarti cheese
1/2 Cup whole walnut halves
2 Tablespoons liquid honey
1 Teaspoon chia or sesame seeds
Equipment
Sharp kitchen knife
Cutting board
Small spoon
Slate board or serving platter
Paper towels
DIY Instructions
Wash the red apples and cut them into thick, even wedges while removing the core and seeds.
Pat the fruit slices dry with a paper towel so the toppings do not slide off the skin.
Slice the block of cheese into thin rectangles that are slightly smaller than your apple wedges.
Place one piece of cheese flat against the flesh side of every apple slice.
Press a whole walnut half into the center of the cheese so it stays firmly in place.
Use a small spoon to drizzle a tiny amount of honey over the walnut and the cheese.
Sprinkle the seeds over the honey while it is still sticky so they stay attached.
Arrange the finished wedges in a circle on your serving board and enjoy the fresh flavors.
13. Hard Boiled Chick Nests
Easy After-School Snacks
Bright white eggs are transformed into adorable little chicks with just a few simple garnishes. Tiny black peppercorns serve as eyes while small carrot triangles create cute orange beaks. A sprig of fresh dill sits on top of one chick to look like a tuft of green hair.
A vibrant bed of shredded kale and purple cabbage provides a colorful “nest” for the eggs to rest in. Long strips of green and orange vegetables wind through the greens to add even more texture. This playful dish makes protein-packed eggs much more exciting for young children to eat.
You can hide these in a lunchbox as a surprise or serve them as a festive spring snack. The “Lunch from Mom” note adds a personal touch that will make any child smile. It is a creative way to encourage kids to eat their greens along with their eggs.
Ingredients
3 Large hard-boiled eggs
1 Small carrot
6 Whole black peppercorns
1 Cup shredded kale
1/2 Cup shredded purple cabbage
1 Sprig fresh dill
Equipment
Small pot for boiling
Vegetable peeler
Sharp paring knife
Small basket or bowl
Tweezers (optional for eyes)
DIY Instructions
Boil the eggs for ten minutes and then shock them in cold water before peeling the shells away.
Place the shredded kale and purple cabbage into a small basket to create a soft vegetable nest.
Cut a thin slice of carrot and then trim it into three tiny triangles to serve as beaks.
Use the tip of your knife to make two very small holes in the upper part of each egg.
Carefully press two peppercorns into the holes to create the eyes for your chicks.
Make a tiny horizontal slit below the eyes and slide the carrot triangle into the opening.
Place a small piece of fresh dill into the top of one egg to give your chick a fun hairstyle.
Nestled the finished egg chicks into the bed of greens and serve them as a healthy and fun treat.
14. Mini Bagel Pepperoni Pizzas
Easy After-School Snacks
Toasted mini bagels provide a crunchy and chewy base for these bite-sized snacks. A thick layer of rich tomato sauce covers the surface to bring a bold and savory flavor. Melted mozzarella cheese bubbles over the edges to hold everything together in a gooey embrace.
Small circles of pepperoni and fresh green basil leaves add a classic pizza look to each round. Plumes of steam rise from the hot snacks to show they are fresh from the oven. These are the perfect solution when your kids want a warm meal but you are short on time.
Serving these on a wire rack keeps the bottoms crispy and prevents them from getting soggy. They are easy to customize with whatever vegetables or meats your family likes best. Your children will love having their own personal pizzas that are just the right size for them.
Ingredients
3 Mini bagels
1/2 Cup pizza sauce
1 Cup shredded mozzarella cheese
12 Slices mini pepperoni
4 Fresh basil leaves
1/2 Teaspoon dried oregano
Equipment
Baking sheet or toaster oven
Small spoon
Wire cooling rack
Cutting board
Knife
DIY Instructions
Slice the mini bagels in half and place them on a baking sheet with the cut side facing up.
Spoon a generous amount of pizza sauce onto each bagel half and spread it to the edges.
Sprinkle the shredded mozzarella cheese over the sauce until it is completely covered.
Top the cheese with three or four slices of mini pepperoni and a pinch of dried oregano.
Bake the pizzas in a preheated oven at 375 degrees for about eight minutes until the cheese bubbles.
Remove the tray from the oven and carefully transfer the pizzas to a wire rack to cool slightly.
Tear the fresh basil leaves into small pieces and scatter them over the hot cheese.
Serve the pizzas while they are still warm and the cheese is perfectly stretchy.
15. Creamy Pickle Pinwheels
Easy After-School Snacks
Thick slices of savory ham wrap around a core of cool and tangy pickles. A generous layer of whipped cream cheese acts as the glue to keep each colorful ring in place. The bright green center provides a satisfying crunch that contrasts with the soft outer layers.
These bite-sized rolls look like professional appetizers but take only minutes to prepare. They are naturally low in carbs and packed with a unique flavor that many kids find addictive. You can see the beautiful spiral pattern in every piece when they are sliced and served.
This snack is a great way to use up deli meats and sandwich staples in a new way. They stay fresh in the fridge for a long time, making them a great make-ahead option. Your family will enjoy the salty and creamy combination that these pinwheels offer.
Ingredients
4 Large slices of deli ham
1/2 Cup whipped cream cheese
4 Long dill pickles
1/4 Teaspoon black pepper
Equipment
Butter knife or spatula
Paper towels
Cutting board
Sharp knife
Serving plate
DIY Instructions
Remove the dill pickles from their jar and pat them very dry with a paper towel.
Lay one slice of deli ham flat on a clean cutting board and dry any moisture from the surface.
Spread a thick, even layer of whipped cream cheese over the entire top of the ham slice.
Sprinkle a tiny bit of black pepper over the cream cheese for a little extra seasoning.
Place one whole pickle at the short edge of the ham slice and roll it up tightly toward the other side.
Press the edge of the ham firmly into the cream cheese to seal the roll completely.
Use a sharp knife to cut the long roll into slices that are about one inch wide.
Arrange the pinwheels upright on a plate to show off the green pickle centers.
16. Fruit and Seed Rice Cakes
Easy After-School Snacks
Crispy white rice cakes provide a light and airy base for these nutritious open-faced snacks. One cake features a thick layer of dark almond butter topped with creamy banana slices. A heavy dusting of tiny chia seeds adds a wonderful crunch and a boost of healthy fats.
The second rice cake offers a bright contrast with smooth peanut butter and fresh strawberry hearts. The red fruit slices are arranged in a beautiful star pattern to make the snack look like art. This duo provides a great mix of flavors that will keep kids full and focused.
You can serve these on a dark plate to make the white rice and bright fruit stand out. They are excellent for a quick breakfast or a post-school energy boost. Experimenting with different nut butters and fruits makes this snack endlessly customizable.
Ingredients
2 Plain rice cakes
2 Tablespoons almond butter
2 Tablespoons peanut butter
1 Small banana
3 Fresh strawberries
1 Tablespoon chia seeds
Equipment
Butter knife
Small kitchen knife
Cutting board
Serving plate
DIY Instructions
Place two rice cakes side by side on a clean cutting board or a serving plate.
Spread the almond butter over the first rice cake until the surface is fully covered.
Peel the banana and slice it into thin rounds, then layer them over the almond butter.
Shake the chia seeds over the banana slices so they stick to the nut butter underneath.
Spread the peanut butter over the second rice cake in an even and smooth layer.
Wash the strawberries and slice them vertically to create beautiful heart-shaped pieces.
Arrange the strawberry slices in a circular pattern on top of the peanut butter.
Serve both rice cakes together for a colorful and satisfying snack that kids will love.
17. Frozen Melon and Mozzarella Skewers
Easy After-School Snacks
Icy cubes of watermelon and sweet cantaloupe provide a refreshing base for these colorful snacks. Smooth mozzarella pearls sit between the fruit to add a creamy texture and a boost of protein. A single fresh mint leaf garnishes the plate to bring a cool aroma to the dish.
Frosty sugar crystals coat the watermelon cubes to make them look like sparkling jewels. These skewers sit on a bed of crushed ice to stay perfectly chilled during a warm afternoon outdoors. The combination of sweet fruit and mild cheese offers a sophisticated flavor profile that kids actually enjoy.
You can serve these at a backyard party or as a quick post-practice refresher. The bright red and orange colors look beautiful against the white cheese and green mint. It is a creative way to keep children hydrated while they have fun in the sun.
Ingredients
2 Cups watermelon cubes
1 Cup cantaloupe melon balls
12 Fresh mozzarella pearls
1 Tablespoon granulated sugar
Fresh mint leaves for garnish
Equipment
Wooden skewers
Melon baller or sharp knife
Large bowl
Serving tray
Crushed ice
DIY Instructions
Use a melon baller to create uniform rounds of cantaloupe and a knife to cut the watermelon into equal squares.
Place the watermelon cubes on a tray and sprinkle them lightly with sugar before freezing for one hour.
Remove the mozzarella pearls from their liquid and pat them dry with a clean paper towel.
Slide a frozen watermelon cube onto the wooden skewer followed by a white mozzarella pearl.
Add a cantaloupe ball to the top of the stack to complete the three-layer pattern.
Repeat this process until you have used all your fruit and cheese pieces.
Fill a shallow serving bowl with crushed ice to create a cold bed for the snacks.
Arrange the skewers upright on the ice and add a few mint leaves around the base for a fresh look.
18. Tropical Cottage Cheese Bowl
Easy After-School Snacks
Creamy cottage cheese serves as a protein-rich foundation for this bright and sunny snack. A mountain of sweet pineapple chunks is piled high in the center of the glass bowl to provide a juicy burst of flavor. Golden honey ribbons through the cheese to add a natural sweetness that ties everything together.
Crunchy sunflower seeds are scattered generously over the top of the fruit for an earthy finish. This snack provides a wonderful mix of soft and crispy textures in every single spoonful. It is a fantastic option for a quick breakfast or a filling afternoon treat.
The vibrant yellow and white colors make the dish look inviting and fresh. You can see the weekly chore chart in the background, making this a great reward for a job well done. It takes almost no time to prepare and keeps kids energized for their evening activities.
Ingredients
1 Cup low-fat cottage cheese
1/2 Cup fresh or canned pineapple chunks
1 Tablespoon sunflower seeds
2 Teaspoons liquid honey
1 Pinch of ground cinnamon (optional)
Equipment
Small glass serving bowl
Measuring cups
Spoon
DIY Instructions
Scoop the cottage cheese into a clear glass bowl and smooth out the top with the back of your spoon.
Drain any excess juice from the pineapple chunks if you are using canned fruit.
Pile the pineapple pieces into a neat pyramid shape right in the middle of the cottage cheese.
Drizzle the honey slowly over the pineapple so it drips down into the white cheese below.
Sprinkle the sunflower seeds over the entire bowl to add a layer of healthy crunch.
Add a tiny pinch of cinnamon if your child enjoys a warm spice flavor.
Serve the bowl immediately while the cheese is cold and the fruit is fresh.
Encourage your kids to mix the layers together as they eat to get a bit of everything in each bite.
19. Sunshine Orange Toasts
Easy After-School Snacks
Thick slices of toasted English muffins provide a warm and sturdy base for this citrus-themed treat. A layer of bright orange marmalade covers the surface to give it a sweet and tangy glow. Fresh orange slices are arranged in the center like a glowing sun to brighten up any plate.
Small almond slivers radiate outward from the center to look like golden sunbeams. This snack looks like a piece of sunshine and tastes just as bright and cheerful. It offers a great way to serve vitamin C in a fun and crunchy format.
You can see the colorful rain boots in the background, suggesting this is the best snack for a gloomy day. The toasted edges of the muffin provide a satisfying crunch that pairs well with the soft fruit. It is a simple yet creative way to make a basic piece of toast feel like a special event.
Ingredients
2 English muffin halves
4 Tablespoons orange marmalade
1 Large navel orange
2 Tablespoons toasted almond slivers
1 Teaspoon honey
Equipment
Toaster or oven
Butter knife
Small kitchen knife
Cutting board
Serving plate
DIY Instructions
Toast the English muffin halves until the edges are golden brown and the center is warm.
Spread a generous layer of orange marmalade over the top of each toasted muffin.
Peel the navel orange and slice it into thin, round circles using your kitchen knife.
Place one large orange slice directly in the center of each muffin half.
Arrange the almond slivers in a circle around the orange slice so they point toward the edges.
Drizzle a tiny bit of honey over the almonds to help them stay in place and add extra shine.
Cut any remaining orange slices into small triangles to fill in any empty gaps on the toast.
Serve these sunshine treats on a bright blue plate to make the orange colors really stand out.
20. Savory Beef and Cheese Board
Easy After-School Snacks
Long strips of seasoned beef jerky provide a salty and chewy centerpiece for this high-protein snack. Cubes of sharp cheddar and mild white cheese are piled neatly on the side for a satisfying balance. This board is designed for kids who prefer savory flavors over sweet treats.
Crunchy multi-seed crackers sit in a tall stack to provide a sturdy base for the meat and cheese. The variety of textures and flavors makes this a great option for a long study session. It looks like a miniature charcuterie board that is sized just right for a child.
This snack is easy to assemble using items you likely already have in your pantry. It is a mess-free option that works well for eating while doing homework or playing games. The high protein content helps keep hunger away until it is time for dinner.
Ingredients
4 Strips of high-quality beef jerky
1/2 Cup cheddar cheese cubes
1/2 Cup Monterey Jack cheese cubes
6 Multi-seed crackers
1 Teaspoon cracked black pepper (optional)
Equipment
Large black serving plate
Cutting board
Sharp knife
DIY Instructions
Cut your blocks of cheese into small, even cubes that are easy for small hands to pick up.
Lay the beef jerky strips flat on one side of the black serving plate in a neat row.
Stack the multi-seed crackers next to the jerky so they are easy to reach.
Create two separate piles of cheese cubes to keep the different flavors organized.
Sprinkle a little extra black pepper over the meat if your kids like a bit of spice.
Arrange the items so the colors contrast against the dark surface of the plate.
Serve this board as a filling afternoon snack that requires no cooking at all.
Keep any extra jerky in a sealed bag to ensure it stays chewy and fresh for next time.
21. Butterfly Garden Celery Sticks
Easy After-School Snacks
Playful butterfly shapes emerge from simple celery stalks to transform snack time into a garden adventure. Each green base holds a generous amount of creamy peanut butter that acts as the body for these edible insects. Salty pretzels and sweet strawberry slices create distinct wing patterns that catch every child’s attention.
Dark raisins march down the center to add a chewy texture and natural sweetness to the treat. Bright red pepper strips serve as tiny antennae that give each butterfly its own unique personality. This creative arrangement sits on a rustic wooden slice to complete the nature themed presentation.
Building these treats is a wonderful way to let your kids play with their food in a healthy way. The mix of salty, sweet, and crunchy elements ensures that every bite is exciting. You can easily swap the nut butter for sunflower butter to keep the snack safe for school environments.
Ingredients
3 Large celery stalks
1/2 Cup creamy peanut butter
6 Twist pretzels
2 Large strawberries
12 Raisins
1 Small red bell pepper
Equipment
Sharp kitchen knife
Cutting board
Butter knife
Small scissors
DIY Instructions
Rinse the celery stalks under cold water and cut them into three inch long sections.
Fill the hollow center of each celery stick with a thick layer of peanut butter using a butter knife.
Place four raisins in a vertical row down the center of the peanut butter to form the butterfly body.
Cut thin slivers of red bell pepper and tuck two pieces into the top of the peanut butter to serve as antennae.
Snap the bottom loops off two pretzels and press the remaining large loops into the sides of one celery stick to make crunchy wings.
Slice a strawberry vertically into thin hearts and press them into the sides of another celery stick for fruit wings.
Arrange the finished butterflies on a flat surface or a wooden board for a whimsical display.
Serve immediately while the celery is crisp and the fruit is fresh.
22. Layered Bean Dip Fiesta
Easy After-School Snacks
A warm ceramic bowl holds a colorful mountain of melted cheese and savory refried beans. Bright green jalapeño rings and diced red peppers dot the surface to provide a festive look and a mild spicy kick. The gooey cheese pulls away in long strands as a crunchy corn chip dips into the center of the bowl.
Hidden beneath the golden crust are layers of cool sour cream and seasoned beans that provide a hearty base. This snack is robust enough to satisfy hungry kids after a long day of sports or play. It sits on a vibrant striped textile that brings a pop of international flair to your kitchen table.
You can easily adjust the heat level by removing the seeds from the peppers before adding them to the top. This dip works beautifully as a center piece for a group of friends to share. It transforms basic pantry staples into a warm and comforting meal in minutes.
Ingredients
1 Can refried beans
1/2 Cup sour cream
1 Cup shredded Mexican blend cheese
1 Fresh jalapeño
1/4 Cup diced red bell peppers
1 Bag corn tortilla chips
Equipment
Microwave safe ceramic bowl
Spoon
Cutting board
Sharp knife
DIY Instructions
Spoon the refried beans into the bottom of a deep ceramic bowl and spread them into an even layer.
Spread the sour cream over the top of the beans to create a cool middle section.
Cover the top of the bowl with a thick layer of shredded Mexican blend cheese.
Slice the jalapeño and red bell pepper into small pieces and scatter them across the cheese.
Place the bowl in the microwave and heat it on high for two minutes or until the cheese bubbles.
Remove the hot bowl carefully and let it sit for sixty seconds so the layers can set.
Arrange a pile of crunchy tortilla chips on a plate next to the dip.
Serve the dip warm and encourage your kids to scoop deep to get every single layer.
23. Strawberry Cream Finger Sandwiches
Easy After-School Snacks
Elegant white bread squares are stacked high to reveal a beautiful pink and red interior. A thick layer of whipped strawberry cream filling holds fresh berry slices in a neat vertical pattern. Tiny mint leaves sit on top to add a splash of green and a fresh scent to the sweet stack.
A dusting of pink sugar crystals gives the crustless sandwiches a sparkling and festive finish. These treats look like they belong at a fancy tea party but are simple enough for any afternoon. The soft bread and airy cream create a melt in your mouth experience that children find irresistible.
You can prepare these ahead of time for a special birthday treat or a weekend surprise. The precise geometry of the fruit inside makes every slice look like a miniature work of art. It is a light and fruity alternative to standard peanut butter and jelly sandwiches.
Ingredients
4 Slices soft white bread
1/2 Cup heavy whipping cream
2 Tablespoons strawberry jam
6 Large fresh strawberries
1 Teaspoon pink decorating sugar
4 Fresh mint leaves
Equipment
Electric hand mixer
Mixing bowl
Serrated bread knife
Cutting board
Small spatula
DIY Instructions
Pour the heavy cream into a bowl and whip it with the mixer until it becomes very thick and stiff.
Gently fold the strawberry jam into the whipped cream to create a light pink filling.
Trim the brown crusts off all four slices of white bread using a serrated knife.
Spread a thick layer of the pink cream over two slices of bread.
Cut the strawberries into thick vertical slices and stand them upright in the cream.
Place the remaining bread slices on top and press down gently to secure the fruit.
Slice each large sandwich into four small squares or rectangles to show off the inside pattern.
Sprinkle with pink sugar and add a mint leaf before serving on a decorative floral plate.
24. Cheesy Tuna Melt Crackers
Easy After-School Snacks
Golden buttery crackers serve as the base for these savory and warm bite sized treats. A scoop of creamy tuna salad sits under a blanket of perfectly melted sharp cheddar cheese. Every cracker is topped with a tiny sprig of fresh dill to add a professional touch to a simple snack.
Long strings of melted mozzarella stretch from the crackers as they are lifted from the black skillet. This snack provides a great balance of protein and crunch that keeps kids full until dinner time. The warm and gooey texture makes it a comforting choice for a chilly afternoon indoors.
You can assemble a large batch of these on a single tray to feed a hungry group of children. The red onion in the tuna provides a subtle crunch and a pop of color to the filling. It is a clever way to serve a classic sandwich favorite in a fun and manageable size.
Ingredients
12 Rectangular butter crackers
1 Can tuna drained
2 Tablespoons mayonnaise
1 Tablespoon diced red onion
4 Slices sharp cheddar cheese
1 Tablespoon fresh dill
Equipment
Small mixing bowl
Cast iron skillet or baking sheet
Spoon
Knife
DIY Instructions
Mix the drained tuna with mayonnaise and diced red onion in a small bowl until smooth.
Place the butter crackers flat in a single layer inside your skillet or on a baking sheet.
Spoon a small mound of the tuna mixture onto the center of every cracker.
Cut the cheese slices into small squares that are just large enough to cover the tuna.
Place a square of cheese on top of each mound and press down slightly.
Put the skillet under a broiler for two minutes until the cheese is bubbling and golden.
Remove the tray carefully and top each hot cracker with a small piece of fresh dill.
Let the snacks cool for two minutes before serving them directly from the pan.
25. Blueberry Granola Yogurt Jars
Easy After-School Snacks
Clear glass jars show off the beautiful layers of a healthy and vibrant fruit parfait. Thick Greek yogurt sits at the base while a deep purple berry compote adds a rich swirl of color. A mountain of crunchy oat granola is piled high on top to provide a satisfying texture.
Whole blueberries and sliced almonds are tucked into the granola for extra flavor and nutrition. A single large blueberry and a thin coconut flake garnish the very top of each serving. These jars look beautiful and are perfect for kids who need a snack they can take to their room or on the go.
The combination of creamy, crunchy, and fruity elements makes this a highly satisfying choice. You can see ballet shoes in the background which shows this is a great fuel for active children. Preparing these in jars helps with portion control and makes cleanup incredibly easy.
Ingredients
1 Cup plain Greek yogurt
1/2 Cup blueberry preserves or compote
1 Cup honey oat granola
1/2 Cup fresh blueberries
2 Tablespoons sliced almonds
2 Coconut flakes
Equipment
2 Small glass jars
Spoon
Measuring cups
DIY Instructions
Spoon a thick layer of Greek yogurt into the bottom of each glass jar.
Add a layer of blueberry preserves on top of the yogurt and use a spoon to swirl it slightly.
Drop a few fresh blueberries into the jar so they sit against the glass.
Fill the rest of the jar with honey oat granola until it reaches the rim.
Scatter the sliced almonds over the granola to add a nutty crunch.
Place one large blueberry and a coconut flake on the very top for a decorative finish.
Set a small spoon inside the jar or serve it on the side.
Keep these in the refrigerator if you are not planning to serve them immediately.
26. Golden Corn Dog Muffins
Easy After-School Snacks
Soft, honey-sweetened cornbread wraps around a juicy savory center in these bite-sized snacks. Each golden muffin features a thick slice of high-quality hot dog nestled perfectly in the middle. Wisps of steam rise from a freshly cut muffin to show off the light and airy texture of the bread.
A playful squiggle of yellow mustard sits on the side to provide a tangy dipping option. These handheld treats are much easier for children to eat than traditional corn dogs on a stick. They offer a nostalgic flavor that brings a smile to everyone at the table.
The bright red and white checkered liner adds a fun carnival feel to your afternoon routine. You can see a gaming console in the background, making these the ultimate choice for a quick break. These muffins stay moist and delicious even if you pack them in a lunchbox for later.
Ingredients
1 Box corn muffin mix
1/3 Cup milk
1 Large egg
4 Standard hot dogs
2 Tablespoons melted butter
1/4 Cup honey
Equipment
Mini muffin tin
Large mixing bowl
Whisk
Sharp knife
Cutting board
DIY Instructions
Preheat your oven to 375 degrees and grease the holes of a mini muffin tin with butter or oil.
Pour the corn muffin mix into a large bowl and whisk in the milk, egg, and melted butter.
Stir a generous drizzle of honey into the batter to give the bread a sweet and southern flavor.
Slice each hot dog into small rounds that are about one inch thick using a sharp knife.
Fill each muffin cup about two-thirds full with the prepared golden corn batter.
Press one hot dog round firmly into the center of each batter-filled cup until it is level with the top.
Bake the tray for twelve minutes until the muffin edges turn a beautiful light brown color.
Let the muffins cool in the tin for five minutes before popping them out to serve with mustard.
27. Cinnamon Apple Pita Pockets
Easy After-School Snacks
Warm whole wheat pita bread holds a bubbling mixture of sautéed apples and crunchy walnuts. A thick cinnamon glaze coats every fruit cube to create a filling that tastes like a homemade apple pie. The steam rising from the open pocket carries a sweet and spicy aroma throughout the kitchen.
A soft plaid napkin and a sharpened pencil suggest this is a great snack for a focused study session. These pockets are sturdy enough to hold the juicy filling without falling apart in small hands. The combination of soft fruit and crunchy nuts provides a very satisfying mouthfeel.
Using pita bread makes this treat feel substantial and hearty for a growing child. It is a fantastic way to serve fruit in a warm and comforting format during the cooler months. You can add a dollop of Greek yogurt inside for a bit of extra creaminess if you like.
Ingredients
2 Small whole wheat pita breads
2 Large honeycrisp apples
1/4 Cup chopped walnuts
1 Tablespoon brown sugar
1 Teaspoon ground cinnamon
1 Tablespoon butter
Equipment
Small skillet
Wooden spoon
Knife
Cutting board
Toaster or oven
DIY Instructions
Peel the apples and cut the flesh into small, even cubes while discarding the core.
Melt the butter in a small skillet over medium heat and add the apple cubes to the pan.
Sprinkle the brown sugar and cinnamon over the fruit and stir well to coat every piece.
Cook the apples for five minutes until they become tender and the sugar turns into a thick syrup.
Stir in the chopped walnuts and remove the pan from the heat to let the mixture cool slightly.
Warm the pita bread in a toaster or oven and carefully slice it in half to create two pockets.
Open the pockets gently and spoon the warm apple mixture into each opening until full.
Serve the pockets immediately on a napkin while the filling is still warm and gooey.
28. Crispy Chickpea Poppers
Easy After-School Snacks
Tiny golden spheres of roasted chickpeas leap into the air in a display of crunchy goodness. These protein-packed bites are coated in a savory spice blend that gives them a bold and smoky flavor. A small ceramic bowl holds a mountain of these treats for easy grabbing during a busy afternoon.
The rustic texture of the chickpeas provides a much healthier alternative to greasy potato chips. Every bite offers a loud and satisfying crunch that kids find incredibly fun to eat. A Rubik’s cube and colorful pencils in the background show that this is a smart snack for active minds.
You can easily customize the seasoning to be as mild or as spicy as your family prefers. These poppers are naturally gluten-free and vegan, making them safe for almost any dietary need. They keep their crunch for days when stored in a simple airtight container.
Ingredients
2 Cans chickpeas (garbanzo beans)
2 Tablespoons olive oil
1 Teaspoon garlic powder
1 Teaspoon smoked paprika
1/2 Teaspoon sea salt
Equipment
Large baking sheet
Paper towels
Small bowl
Oven
Serving dish
DIY Instructions
Drain the chickpeas into a colander and rinse them thoroughly under cool running water.
Spread the beans onto a layer of paper towels and pat them until they are completely dry to the touch.
Place the dry chickpeas in a bowl and toss them with olive oil until every bean is shiny.
Spread the beans in a single layer on a large baking sheet and bake at 400 degrees for twenty minutes.
Remove the tray and sprinkle the garlic powder, smoked paprika, and sea salt over the hot beans.
Shake the tray to distribute the spices and return it to the oven for another ten minutes.
Turn off the oven and crack the door open, leaving the chickpeas inside to get extra crispy as they cool.
Pour the finished poppers into a bowl and serve them as a healthy and addictive snack.
29. Pear and Pomegranate Sunburst
Easy After-School Snacks
Thin slices of juicy pear are arranged in a wide circle to create a stunning floral pattern on a wooden board. A thick swirl of creamy almond butter sits in the center like the heart of a blooming flower. Dark chocolate chips and bright red pomegranate seeds are scattered across the fruit for a burst of flavor.
Coconut flakes and extra seeds fall like snow around the edges of the plate to add a whimsical touch. This snack provides a wonderful mix of hydrating fruit, healthy fats, and antioxidants. The elegant presentation makes it feel like a gourmet treat even though it uses simple ingredients.
A metronome and music books nearby suggest this is a great light snack before a piano lesson. The crisp texture of the pear pairs perfectly with the smooth and salty nut butter. It is a beautiful way to encourage children to try different types of fruit and toppings.
Ingredients
2 Large ripe pears
1/2 Cup almond or cashew butter
2 Tablespoons pomegranate seeds
1 Tablespoon dark chocolate chips
1 Tablespoon unsweetened coconut flakes
Equipment
Sharp knife
Cutting board
Large wooden serving platter
Small spoon
DIY Instructions
Wash the pears and slice them vertically into thin, even wedges while removing the seeds.
Arrange the pear slices in a large circle on the wooden board with the points facing outward.
Use a spoon to place a large mound of almond butter right in the center of the pear circle.
Swirl the top of the nut butter with your spoon to create a decorative spiral shape.
Sprinkle the bright pomegranate seeds over the pear slices so they look like little jewels.
Add the dark chocolate chips and coconut flakes across the entire arrangement for extra flavor.
Drizzle a tiny bit of extra nut butter over the fruit if you want a more decadent look.
Serve the board in the middle of the table so everyone can dip their pear slices into the center.
30. Turkey and Spinach Tortilla Spirals
Easy After-School Snacks
Soft flour tortillas are rolled tightly around layers of savory turkey breast and mild white cheese. Fresh green spinach leaves provide a vibrant inner ring that adds both color and a boost of iron. Every slice reveals a perfect spiral pattern that makes these wraps look like professional party appetizers.
A bright red decorative pick holds the central stack together to keep the layers from unrolling. These pinwheels are the best choice for a tidy snack that won’t leave crumbs on a scout uniform. You can see colorful merit badges in the background, celebrating a day of learning and achievement.
These bite-sized rounds are much more exciting than a standard sandwich and easier to pack in a bag. The cream cheese layer acts as a savory glue to keep the spinach and meat firmly in place. They are a fantastic way to sneak a few extra greens into your child’s afternoon meal.
Ingredients
2 Large flour tortillas
4 Slices deli turkey
2 Slices provolone cheese
1/2 Cup fresh baby spinach
1/4 Cup whipped cream cheese
Equipment
Butter knife
Cutting board
Sharp knife
Decorative toothpicks
DIY Instructions
Lay one flour tortilla flat on your cutting board and spread a thin layer of cream cheese to the very edges.
Place two slices of turkey in the center of the tortilla followed by a single layer of provolone cheese.
Cover the cheese with a handful of fresh baby spinach leaves while making sure they lie flat.
Start at one edge and roll the tortilla as tightly as possible to create a long cylinder.
Wrap the cylinder in plastic wrap and let it sit in the fridge for ten minutes to help it hold its shape.
Remove the wrap and use a sharp knife to slice the cylinder into rounds that are one inch thick.
Secure the center of each spiral with a decorative toothpick to make them easy to pick up.
Arrange the pinwheels on a wooden board and serve them as a fresh and healthy snack.
31. Rainbow Veggie Dip Cups
Easy After-School Snacks
Crispy vegetable batons stand tall in clear individual cups for a mess-free dipping experience. Deep purple carrots and bright orange peppers provide a vibrant spectrum of colors that instantly attract young eyes. A cool base of herby ranch dressing sits at the bottom to ensure every bite is flavorful and refreshing.
These portable cups work great for busy afternoons or as a tidy side during a study session. The vertical presentation makes it easy for kids to see exactly what they are eating. You can feel good about serving a snack that is packed with vitamins and hydrating fiber.
A shiny spelling bee trophy in the background suggests this is a smart choice for brain power. This recipe transforms raw vegetables into a fun and accessible treat. It is a simple way to clear out the crisper drawer while keeping the family happy.
Ingredients
2 Large purple carrots
2 Large orange carrots
1 Red bell pepper
4 Celery stalks
1 Cup Greek yogurt ranch dip
1 Small head of broccoli for garnish
Equipment
4 Clear plastic or glass cups
Sharp kitchen knife
Cutting board
Small spoon
DIY Instructions
Wash all the vegetables thoroughly under cool running water and pat them dry with a clean towel.
Peel the purple and orange carrots and cut them into long, thin sticks about four inches in length.
Slice the bell pepper into thin strips and cut the celery stalks into matching lengths.
Spoon two tablespoons of the ranch dip into the bottom of each individual cup.
Stand the vegetable sticks upright in the dip while alternating the colors to create a rainbow effect.
Tuck a small broccoli floret into any empty spaces to add extra volume and color.
Place the cups on a serving tray so they are easy for little hands to grab.
Serve immediately or keep them chilled in the refrigerator until snack time begins.
32. No-Bake Power Bites
Easy After-School Snacks
Dark, chewy energy spheres are stacked in a tempting pyramid on a rustic slate board. Rolled oats and flax seeds create a hearty texture that is held together by rich, creamy nut butter. A surprise center of sweet honey and white coconut flakes makes every bite a delightful discovery.
Scattered chocolate chips add just the right amount of sweetness to these protein-packed rounds. This snack provides a steady stream of energy for kids heading to soccer practice or dance class. You can see a goal net in the distance, marking this as the best pre-game fuel.
These bites require zero time in the oven and can be made in one large batch. They store beautifully in the fridge and taste even better after the flavors have time to meld. Your children will love helping you roll the dough into these fun and bite-sized shapes.
Ingredients
2 Cups rolled oats
1 Cup creamy peanut or almond butter
1/2 Cup honey
1/4 Cup ground flax seeds
1/2 Cup mini chocolate chips
1/4 Cup shredded coconut for the center
Equipment
Large mixing bowl
Wooden spoon
Small cookie scoop
Slate board or plate
Airtight container
DIY Instructions
Combine the rolled oats, nut butter, honey, and flax seeds in a large mixing bowl.
Stir the mixture vigorously with a wooden spoon until it forms a thick and sticky dough.
Fold in the chocolate chips so they are evenly distributed throughout the dough.
Take a small tablespoon of the mixture and flatten it in the palm of your hand.
Place a pinch of shredded coconut in the center and fold the dough over it to create a ball.
Roll the ball between your palms until it is smooth and about the size of a golf ball.
Place the finished bites on a slate board and chill them in the freezer for twenty minutes to set.
Store the remaining bites in an airtight container for a quick snack throughout the week.
33. Garden Fresh Caprese Skewers
Easy After-School Snacks
Bright red cherry tomatoes and pearly white mozzarella balls alternate on elegant wooden picks. Fresh basil leaves are tucked between each layer to provide a burst of aromatic green color. A rich balsamic glaze is drizzled over the top to add a sweet and tangy finish.
These skewers offer a light and sophisticated snack that feels like a summer garden party. Splotches of pink sea salt add a subtle crunch and enhance the natural flavors of the produce. This is a fantastic way to introduce children to classic flavor combinations in a handheld format.
The outdoor setting and magnifying glass nearby suggest an afternoon of exploration and discovery. This snack is naturally gluten-free and provides a healthy dose of calcium and antioxidants. It takes only a few minutes to assemble a platter that looks truly impressive.
Ingredients
1 Pint cherry tomatoes
1 Container mini mozzarella pearls
1 Bunch fresh basil leaves
2 Tablespoons balsamic glaze
1 Teaspoon pink sea salt
Equipment
Decorative wooden skewers
Serving platter
Paper towels
DIY Instructions
Rinse the cherry tomatoes and basil leaves under cold water and dry them carefully.
Drain the mozzarella pearls and pat them with a paper towel to remove any excess liquid.
Slide one cherry tomato onto the wooden skewer and push it toward the bottom.
Fold a fresh basil leaf in half and slide it onto the pick after the tomato.
Add a mozzarella pearl next and then repeat the pattern with another tomato and leaf.
Lay the finished skewers in a neat row on a white marble or ceramic serving board.
Drizzle the thick balsamic glaze in a zig-zag pattern over all the skewers.
Sprinkle a tiny pinch of pink sea salt over the top and serve as a fresh afternoon treat.
34. Warm Pretzel Bites and Mustard
Easy After-School Snacks
Dark, salty pretzel nuggets spill out of a rustic brown paper bag in an inviting display. These soft and chewy bites feature a beautiful golden crust that hides a light and fluffy interior. A small bowl of creamy yellow mustard sits nearby for the ultimate dipping experience.
Wisps of steam rise from a freshly broken pretzel to show it is warm and ready to eat. This snack is a favorite for kids who love a savory treat after a long day of school. A “No Homework” note in the background makes this moment feel even more like a celebration.
The coarse salt crystals on the surface provide a satisfying crunch with every single mouthful. You can easily bake these in the oven or warm them up for a quick and comforting snack. They are the best companion for a cozy afternoon spent relaxing at home.
Ingredients
1 Package frozen soft pretzel bites
2 Tablespoons melted butter
1 Tablespoon coarse sea salt
1/4 Cup honey mustard or yellow mustard
Equipment
Baking sheet
Pastry brush
Small dipping bowl
Brown paper bag for serving
DIY Instructions
Preheat your oven according to the instructions on the pretzel package.
Place the pretzel bites in a single layer on a baking sheet while making sure they do not touch.
Bake the bites for about five to eight minutes until they are hot and slightly toasted.
Remove the tray from the oven and use a pastry brush to coat each bite with melted butter.
Sprinkle the coarse sea salt over the buttered pretzels while they are still wet so the salt sticks.
Transfer the warm nuggets into a clean brown paper bag to keep them cozy.
Pour the mustard into a small bowl and place it next to the pretzels for easy dipping.
Serve them immediately while they are soft and the steam is still rising.
35. Peanut Butter and Jelly Sliders
Easy After-School Snacks
Golden, toasted brioche buns are stacked high to showcase a thick and gooey filling. A layer of creamy almond butter sits on top of a generous serving of bright red strawberry jam. These miniature sandwiches are the best upgrade to a classic lunchbox staple.
A glass of cold milk and a yellow school bus in the background hint at the perfect post-school routine. The soft bread and sweet filling provide a comforting and nostalgic flavor that kids never tire of. These sliders are easy to handle and satisfy even the pickiest eaters.
You can customize the nut butter or use different fruit preserves to keep things interesting. The small size makes them great for a quick energy boost between activities. It is a simple way to make a familiar meal feel like a special treat.
Ingredients
4 Mini brioche buns or dinner rolls
1/2 Cup creamy nut butter
1/2 Cup strawberry or grape jelly
1 Tablespoon butter for toasting
1 Glass of cold milk for serving
Equipment
Toaster or small skillet
Butter knife
Cutting board
Serving plate
DIY Instructions
Slice the mini brioche buns in half horizontally using a serrated knife.
Spread a little bit of butter on the cut side of the buns and toast them in a skillet until golden.
Lay the bottom halves of the buns on a cutting board and spread a thick layer of jelly.
Apply a generous amount of nut butter to the top halves of the buns.
Press the two halves together firmly so the filling starts to peek out from the sides.
Slice the sliders in half if your child prefers smaller, bite-sized triangles.
Arrange the sandwiches on a bright orange plate to make the colors stand out.
Serve with a tall glass of milk to wash down the sweet and salty goodness.
36. Everything Avocado Toast
Easy After-School Snacks
Thick slices of artisan grain bread are toasted to a deep golden brown and topped with a mountain of smashed avocado. A vibrant garnish of fresh cilantro and a thin radish slice adds a professional look to this healthy snack. Everything bagel seasoning is scattered across the top to provide a savory and garlicky crunch.
The dark plate creates a beautiful contrast with the bright green fruit and white radish. An artist’s tablet in the background shows this is a great snack for fueling a creative afternoon. This dish is packed with healthy fats and fiber to keep kids focused on their work.
You can easily adjust the toppings by adding a squeeze of lime or a dash of red pepper flakes. The crunchy seeds and soft avocado create a wonderful texture that feels very satisfying. It is a quick and modern snack that turns a simple piece of bread into a nutritious meal.
Ingredients
3 Slices multi-grain artisan bread
2 Ripe avocados
1 Tablespoon everything bagel seasoning
3 Thin slices of red radish
Fresh cilantro leaves for garnish
1 Teaspoon lemon juice
Equipment
Toaster
Small bowl
Fork
Sharp knife
Serving plate
DIY Instructions
Place the grain bread in the toaster and cook it until it is very crispy and dark gold.
Cut the avocados in half, remove the pits, and scoop the green flesh into a small bowl.
Add a splash of lemon juice to the bowl and mash the avocado with a fork until it is chunky but spreadable.
Spread a thick layer of the mashed avocado over each slice of warm toast.
Sprinkle the everything bagel seasoning generously over the top of the green layer.
Place one thin radish slice in the center of each toast for a pop of white and pink color.
Add a single cilantro leaf on top of the radish to complete the garden look.
Serve these on a large black plate for a snack that looks as good as it tastes.
37. Frozen Yogurt Fruit Drops
Easy After-School Snacks
A colorful pyramid of frozen yogurt treats sits on a shimmering silver foil base. These teardrop-shaped snacks come in beautiful shades of pale yellow, soft pink, and deep purple. A cross-section of one drop reveals a creamy, solid interior that looks like a miniature scoop of ice cream.
The icy texture provides a refreshing and cold sensation that is perfect for a sunny day by the pool. These treats are a great way to serve fruit and protein in a fun, candy-like format. You can see a bottle of sunscreen in the background, making this the best snack for outdoor playtime.
Making these drops is a fun project that kids can help with on a weekend. They melt slowly in the mouth and offer a burst of real fruit flavor in every bite. They are a much healthier alternative to processed frozen desserts or sugary popsicles.
Ingredients
1 Cup Greek yogurt
1/2 Cup blended strawberries
1/2 Cup blended blueberries
1/2 Cup blended mango or pineapple
2 Tablespoons honey
Equipment
3 Small mixing bowls
Piping bags or zip-top bags
Baking sheet
Aluminum foil
DIY Instructions
Divide the Greek yogurt into three separate bowls and add a little honey to each one.
Stir the blended strawberries into the first bowl, the blueberries into the second, and the mango into the third.
Transfer each colored yogurt mixture into a piping bag and snip a small hole in the tip.
Line a baking sheet with aluminum foil to prevent the drops from sticking.
Squeeze small, teardrop-shaped mounds of yogurt onto the foil in neat rows.
Place the tray in the freezer for at least three hours until the drops are completely solid.
Peel the frozen drops off the foil and pile them into a mountain on a cold plate.
Serve them immediately before they start to soften so they stay perfectly crunchy and cold.
38. Salami and Cheese Puzzler Sticks
Easy After-School Snacks
Thick cubes of marbled cheese and chunky dill pickle sections are threaded onto tall wooden picks. A ruffle of savory salami sits at the very top like a small hat for each snack tower. These sticks are stood upright in a glass jar to create a fun and edible bouquet.
A crossword puzzle and a red pencil in the background suggest a quiet and thoughtful afternoon activity. This snack provides a satisfying mix of salty, tangy, and creamy flavors that keep the taste buds engaged. It is a mess-free way to enjoy a classic meat and cheese plate.
The vertical presentation makes these very easy for kids to grab while they are playing games or doing puzzles. You can swap the pickles for olives or peppers to vary the flavor profile. It is a hearty and protein-rich snack that helps bridge the gap between lunch and dinner.
Ingredients
12 Thick cubes of cheddar cheese
2 Large dill pickles
6 Slices of hard salami
1 Teaspoon dried dill for garnish
Equipment
Tall wooden skewers
Sharp knife
Cutting board
Glass mason jar for serving
DIY Instructions
Cut the large dill pickles into thick rounds that are about the same width as your cheese cubes.
Lay a slice of salami flat and fold it into quarters to create a ruffled, fan-like shape.
Slide one pickle round onto the wooden skewer followed by a cube of cheddar cheese.
Add another pickle round and another cheese cube to create a tall, alternating stack.
Top the skewer with the ruffled salami piece to finish the snack tower.
Sprinkle a tiny bit of dried dill over the cheese cubes to add extra herb flavor.
Stand the finished sticks upright in a glass jar so they look like a bunch of flowers.
Serve the jar in the middle of the table for a fun and interactive savory snack.
39. Sweet Potato Toasts Three Ways
Easy After-School Snacks
Toasted slices of vibrant orange sweet potato serve as a nutritious and gluten-free base for three different toppings. One slice features a cloud of fluffy white ricotta cheese dusted with a warm blanket of ground cinnamon. The center toast offers a classic combination of almond butter, banana rounds, and a golden honey drizzle.
A third slice is topped with crumbly feta cheese and a sprig of fresh thyme for a more savory experience. These toasts sit on a dark slate board next to a cozy orange sweater and a warm cup of tea. It is a beautiful and comforting snack for a rainy or cool afternoon indoors.
Using sweet potato instead of bread adds extra vitamins and a natural sweetness to the meal. Every slice provides a different flavor journey that keeps snack time from becoming boring. This recipe is a great way to use up leftover baked potatoes in a creative and healthy way.
Ingredients
1 Large sweet potato
1/4 Cup ricotta cheese
1/4 Cup almond butter
1 Small banana
2 Tablespoons feta cheese
1 Teaspoon cinnamon
1 Teaspoon honey
Fresh thyme for garnish
Equipment
Sharp knife
Toaster or baking sheet
Cutting board
Small spoons
DIY Instructions
Wash the sweet potato and slice it lengthwise into flat planks about half an inch thick.
Toast the slices in a toaster on high for two cycles or bake them in the oven until tender.
Place the warm sweet potato slices on a slate board to begin adding the toppings.
Spread ricotta cheese on the first slice and sprinkle it generously with ground cinnamon.
Cover the second slice with almond butter, add banana rounds, and finish with a drizzle of honey.
Top the third slice with crumbled feta cheese and a single sprig of fresh thyme.
Arrange the toasts in a row so the different colors and textures are easy to see.
Serve this warm and hearty snack alongside a favorite beverage for a cozy afternoon break.
40. Berry Swirl Rice Pudding
Easy After-School Snacks
A deep gray bowl holds a creamy and comforting portion of white rice pudding. Bold swirls of bright pink raspberry sauce wind through the center to create a beautiful marble effect. A cluster of fresh blackberries and raspberries is piled on top to add a burst of juicy flavor.
A light dusting of cinnamon adds a touch of warmth to this classic and soothing dessert-style snack. The spoon resting in the bowl shows a perfect bite of the thick and velvety pudding. Puzzle pieces in the background suggest a slow and relaxing afternoon spent at home.
This snack is a wonderful way to use up leftover rice and turn it into something special for your kids. It provides a great balance of creamy texture and tart fruit that is very satisfying. You can serve it warm on a cold day or chilled for a refreshing summer treat.
Ingredients
2 Cups cooked white rice
1 Cup whole milk
1/4 Cup honey or maple syrup
1/2 Cup raspberry puree or jam
1/2 Cup fresh mixed berries
1/2 Teaspoon ground cinnamon
Equipment
Small saucepan
Wooden spoon
Serving bowl
Spoon
DIY Instructions
Place the cooked rice, milk, and honey in a small saucepan over medium heat.
Stir the mixture constantly for about ten minutes until the milk has thickened into a creamy pudding.
Remove the pan from the heat and stir in a pinch of cinnamon for extra flavor.
Pour the warm pudding into a deep gray bowl and let it sit for a minute to set.
Spoon the raspberry puree over the top and use the tip of a spoon to swirl it into the white pudding.
Pile the fresh blackberries and raspberries in the center of the swirl for a beautiful finish.
Sprinkle a little more cinnamon over the fruit to tie the whole dish together.
Serve the pudding while it is still warm and fragrant for the best experience.
41. Pesto Tortellini Skewers
Easy After-School Snacks
Green, herb-filled pasta knots sit stacked on thin bamboo picks. Rich sun-dried tomatoes provide a chewy and tangy layer between each soft tortellini. This savory snack brings the flavors of a classic Italian kitchen to a child-friendly handheld format.
The skewers stand tall in a heavy block of aged Parmesan cheese for a creative presentation. A violin case and sheet music in the background suggest this is a wonderful fuel for a talented young musician. Every bite offers a satisfying mix of earthy basil and salty tomato.
You can serve these at room temperature or slightly chilled for a refreshing afternoon treat. The vibrant colors make the plate look festive and high-end without much effort. It is a smart way to offer a filling snack that feels much more special than a bowl of plain pasta.
Ingredients
1 Package cheese-filled tortellini
1/2 Cup basil pesto sauce
1 Jar sun-dried tomatoes in oil
1 Block Parmesan cheese for a stand
1 Tablespoon olive oil
Equipment
Small pot
Colander
Mixing bowl
Bamboo skewers
Serving board
DIY Instructions
Boil a pot of water and cook the tortellini for about five minutes until they are tender.
Drain the pasta in a colander and rinse with cool water to stop the cooking process.
Place the pasta in a bowl and toss it with olive oil and pesto until every piece is coated.
Slice the sun-dried tomatoes into small pieces if they are too large for the skewers.
Slide one pesto-coated tortellini onto the bamboo pick followed by a piece of sun-dried tomato.
Repeat the pattern until you have three pasta knots and two tomatoes on each stick.
Press the bottom of the skewers into a solid block of Parmesan cheese so they stand upright.
Arrange the cheese block on a marble board and serve with extra pesto on the side for dipping.
42. Chocolate Chip Walnut Muffins
Easy After-School Snacks
Deep golden muffin tops are studded with melting dark chocolate chips and crunchy walnut halves. The soft, cake-like center reveals a hidden treasure of warm chocolate and nutty goodness when broken open. These treats provide a comforting aroma that will fill your home with sweetness.
A pair of glasses and a stack of books nearby show this is a great companion for a long reading session. The butter knife resting on a cloth napkin is ready to add a smear of creamy goodness to every slice. These muffins offer a more substantial snack for kids who need a bit of extra energy.
Baking a batch of these on the weekend ensures you have a quick grab-and-go option for busy mornings. The contrast between the soft crumb and the crunchy nuts makes every mouthful interesting. You can easily swap the walnuts for pecans or almonds depending on your child’s preference.
Ingredients
2 Cups all-purpose flour
1/2 Cup sugar
1 Tablespoon baking powder
1/2 Cup melted butter
1 Cup milk
1/2 Cup chocolate chips
1/2 Cup chopped walnuts
4 Whole walnut halves for the top
Equipment
Muffin tin
Paper liners
Large mixing bowl
Whisk or spoon
Wire cooling rack
DIY Instructions
Preheat your oven to 375 degrees and line a muffin tin with paper cupcake liners.
Mix the flour, sugar, and baking powder in a large bowl until the dry ingredients are combined.
Pour in the milk and melted butter, then stir gently until the batter is just smooth.
Fold in the chocolate chips and the chopped walnuts using a large spoon or spatula.
Scoop the batter into the muffin liners until each cup is about three-quarters full.
Press a whole walnut half and a few extra chocolate chips into the top of each muffin.
Bake for twenty minutes until a toothpick inserted into the center comes out clean.
Let the muffins rest on a wire rack for ten minutes before serving with a pat of butter.
43. Frosted Watermelon Glaciers
Easy After-School Snacks
Thick wedges of ice-cold watermelon sit on a bed of crushed ice to stay perfectly chilled. A vibrant red strawberry syrup drips down the sides of the fruit to add an extra layer of sweetness. Frosty sugar crystals and tiny mint leaves garnish the top to create a beautiful winter-in-summer look.
This snack is the best refresher for an afternoon spent playing near the pool. A lime slice on the side provides a zesty kick that balances the sweet melon and syrup. It is a hydrating and visually stunning treat that children will find incredibly exciting.
The bright green rind and deep red flesh look fantastic against the clear blue ice. You can prepare the fruit wedges in advance and keep them in the freezer for an icy texture. Serving this in a bright yellow bowl makes the tropical colors pop even more.
Ingredients
1 Small seedless watermelon
1/2 Cup strawberry syrup
1/4 Cup granulated sugar
1 Lime
Fresh mint leaves
4 Cups crushed ice
Equipment
Large kitchen knife
Cutting board
Serving bowl
Small spoon
DIY Instructions
Cut the watermelon into thick, triangular wedges while keeping the green rind attached.
Place the wedges in the freezer for thirty minutes to give them a firm and icy texture.
Fill a wide serving bowl with a thick layer of crushed ice to act as a cold base.
Stand the watermelon wedges upright in the ice so they stay cold and easy to grab.
Drizzle the red strawberry syrup over the top points of the melon so it runs down the sides.
Sprinkle the granulated sugar over the syrup to give the fruit a frosted, sparkling appearance.
Squeeze a little lime juice over the melon and add a few mint leaves for a fresh scent.
Serve the bowl immediately while the ice is solid and the fruit is at its coldest point.
44. Cheesy Herb Popcorn
Easy After-School Snacks
Fluffy white popcorn kernels are tossed in a savory coating of melted cheese and dried herbs. Every handful offers a satisfying crunch and a bold flavor that beats any store-bought snack. Tiny green flecks of parsley add a fresh look to the golden, cheesy mounds.
Some kernels fly through the air toward a sleek metal bowl for a fun and energetic display. A gaming controller in the background suggests this is a great fuel for an afternoon of digital adventure. The light and airy texture makes it easy to enjoy a large portion without feeling heavy.
This recipe allows you to control the amount of salt and fat your children consume. You can experiment with different types of hard cheese like Parmesan or Pecorino for varied flavors. It is a quick and budget-friendly way to satisfy a craving for something salty and crunchy.
Ingredients
6 Cups air-popped popcorn
1/4 Cup melted butter
1/2 Cup finely grated Parmesan cheese
1 Teaspoon dried parsley
1/2 Teaspoon garlic powder
Equipment
Popcorn popper or large pot
Small microwave-safe bowl
Large mixing bowl
Metal serving bowl
DIY Instructions
Pop your corn kernels using an air popper or a pot on the stove and place them in a large bowl.
Melt the butter in a small bowl and pour it slowly over the warm popcorn.
Toss the popcorn with a large spoon to ensure the butter coats as many kernels as possible.
Sprinkle the grated Parmesan cheese, dried parsley, and garlic powder over the buttery popcorn.
Shake the bowl vigorously or stir well so the cheese and herbs stick to the kernels.
Transfer the seasoned popcorn into a clean metal serving bowl for a modern look.
Remove any unpopped kernels from the bottom to prevent any surprises while eating.
Serve the popcorn immediately while it is still warm and the cheese is fragrant.
45. Frozen Berry Power Pops
Easy After-School Snacks
Deep purple and red popsicles are packed with whole blueberries and sliced strawberries for a fruit-filled treat. The frosty surface shows off the beautiful swirls of real fruit juice and creamy yogurt. These popsicles offer a much healthier and more refreshing alternative to sugary store-bought ice cream.
A blender in the background shows how easy it is to create these nutritious snacks at home. Scattered blackberries and raspberries on the white marble board add a touch of natural beauty to the scene. These treats are the best way to keep kids cool after a long bike ride or a game of tag.
You can customize the base with different types of milk or juice to suit your family’s needs. The visible fruit pieces make the popsicles look artisanal and high-quality. Kids will love the icy texture and the sweet, tangy flavor of the mixed berries.
Place one cup of the mixed berries, the juice, yogurt, and honey into a blender.
Pulse the mixture until it is smooth and has a vibrant purple or red color.
Drop a few whole blueberries and a strawberry slice into the bottom of each popsicle mold.
Pour the blended fruit mixture into the molds while leaving a little space at the very top.
Tap the molds gently on the counter to remove any air bubbles trapped inside the liquid.
Slide a wooden stick into the center of each mold and secure the lid if your mold has one.
Place the tray in the freezer for at least six hours or until the pops are rock solid.
Run the molds under warm water for a few seconds to loosen the popsicles before serving.
46. Loaded Taco Zucchini Boats
Easy After-School Snacks
Tender green zucchini shells are filled to the brim with seasoned ground meat and black beans. A thick layer of melted cheddar cheese covers the top to create a gooey and savory crust. Bright red salsa and cool sour cream dots add a festive look to this healthy vegetable dish.
Fresh green onion rings and diced tomatoes provide a final pop of color and a fresh crunch. This snack is a clever way to serve classic taco flavors while including more green vegetables in the diet. It looks fantastic on a rustic clay plate and appeals to kids who love Mexican food.
The map in the background suggests a fun geography lesson or a travel-themed afternoon. These boats are sturdy enough to be eaten as finger food or with a small fork. You can easily adjust the spice level to make sure it is comfortable for every child.
Ingredients
2 Medium zucchinis
1/2 Pound ground beef or turkey
1/2 Cup black beans
1/2 Cup shredded cheddar cheese
1/4 Cup salsa
2 Tablespoons sour cream
1 Green onion
Equipment
Small spoon
Skillet
Baking sheet
Sharp knife
Cutting board
DIY Instructions
Cut the zucchinis in half lengthwise and use a small spoon to scoop out the seeds.
Brown the ground meat in a skillet over medium heat and drain away any excess fat.
Stir the black beans and a little taco seasoning into the meat until the mixture is warm.
Spoon the meat and bean mixture into the hollowed-out centers of the zucchini halves.
Place the zucchini boats on a baking sheet and cover them with a layer of shredded cheese.
Bake in a 375-degree oven for fifteen minutes until the zucchini is tender and the cheese is bubbly.
Remove the boats and add small dollops of salsa and sour cream along the top of each one.
Garnish with sliced green onions and diced tomatoes before serving warm on a plate.
47. Peanut Butter Banana Tacos
Easy After-School Snacks
Soft flour tortillas are folded into small purple stands to hold a sweet and crunchy filling. A thick layer of creamy peanut butter provides a protein-rich base for fresh banana slices. Deep purple berry jam and a sprinkle of granola add extra depth and a satisfying texture.
The bright yellow table and superhero toy nearby make this a fun and energetic snack for playtime. These “tacos” are easy for kids to hold and offer a creative twist on a traditional sandwich. The combination of soft fruit and crunchy oats makes every bite a delight.
Using a taco holder keeps the snack organized and prevents the fillings from spilling out. This recipe is a great way to use up extra tortillas from your last taco night. It takes only a few minutes to assemble a plate of these for a group of hungry children.
Ingredients
3 Small flour tortillas
1/2 Cup creamy peanut butter
1 Large banana
1/4 Cup mixed berry jam
1/4 Cup honey granola
Equipment
Small skillet
Taco holder or small bowls
Butter knife
Cutting board
DIY Instructions
Warm the flour tortillas in a dry skillet for thirty seconds on each side so they are flexible.
Place the warm tortillas into a taco holder or prop them up between two small bowls.
Spread a generous amount of peanut butter down the center of every tortilla.
Peel the banana and slice it into thin rounds, then tuck them into the peanut butter.
Spoon a line of berry jam over the banana slices to add a pop of color and sweetness.
Sprinkle the honey granola over the top so it sticks to the jam and peanut butter.
Fold the sides of the tortilla up slightly to create a taco shape.
Serve these sweet tacos immediately while the tortillas are still warm and soft.
48. Turkey and Cheese Sliders
Easy After-School Snacks
Golden brioche buns are stacked in a tempting pyramid to showcase a classic and savory filling. Thin slices of deli turkey and sharp white cheese sit between fresh lettuce and juicy tomato rounds. A decorative green pick holds the top slider in place to keep the tower steady.
A glass of iced tea and a school jacket in the background hint at a relaxing afternoon after classes. These miniature burgers are the best size for smaller appetites and offer a great mix of protein and vegetables. The toasted sesame seeds on the bun add a nice nutty flavor to every bite.
Serving these on a silver tray makes a simple snack feel like a professional catering event. You can add a little mustard or mayonnaise inside to suit your child’s taste. These sliders are easy to make in large batches for playdates or family gatherings.
Ingredients
3 Mini brioche buns
6 Slices deli turkey
3 Slices provolone or Swiss cheese
3 Large lettuce leaves
1 Roma tomato
1 Tablespoon sesame seeds
Equipment
Serrated knife
Small skillet
Decorative toothpicks
Serving tray
DIY Instructions
Slice the mini brioche buns in half and toast the cut sides in a skillet until they are golden.
Place a piece of crisp lettuce on the bottom half of each toasted bun.
Slice the tomato into thin rounds and place one on top of the lettuce.
Fold two slices of turkey and one slice of cheese to fit the size of the small bun.
Stack the meat and cheese on top of the tomato and cover with the top half of the bun.
Dampen the top of the bun slightly and press a few sesame seeds into the surface.
Slide a decorative toothpick through the center of the slider to hold all the layers together.
Stack the sliders in a pyramid on a tray and serve with a side of chips or fruit.
49. Chocolate Dipped Mandarin Segments
Easy After-School Snacks
Bright orange mandarin segments are partially dipped in a rich and glossy dark chocolate coating. Some pieces feature a dusting of crushed green pistachios while others are finished with sparkling sea salt. These bite-sized treats offer a wonderful contrast between tart citrus and sweet chocolate.
The white marble board and watercolor paints nearby suggest a creative and artistic afternoon break. A whole orange with its peel curling away shows how fresh and natural this snack really is. It is a light and elegant way to satisfy a sweet tooth without reaching for a candy bar.
You can see the juice starting to peek through the chocolate on one piece, showing how succulent the fruit is. These segments look beautiful when arranged in neat rows for a party or a special occasion. They take very little time to prepare but look like they came from a gourmet shop.
Ingredients
3 Mandarin oranges
1/2 Cup dark chocolate chips
1 Teaspoon coconut oil
2 Tablespoons crushed pistachios
1 Teaspoon flaky sea salt
Equipment
Small microwave-safe bowl
Parchment paper
Baking sheet
Small spoon
DIY Instructions
Peel the mandarin oranges and carefully separate them into individual segments while removing any white stringy bits.
Place the dark chocolate chips and coconut oil in a small bowl and microwave in thirty-second bursts until melted.
Stir the chocolate until it is completely smooth and glossy.
Dip one half of each mandarin segment into the warm chocolate and let the excess drip off.
Lay the dipped fruit on a baking sheet lined with parchment paper.
Sprinkle crushed pistachios over half of the segments and sea salt over the other half while the chocolate is still wet.
Place the tray in the refrigerator for fifteen minutes until the chocolate shell is hard and firm.
Arrange the colorful segments on a serving board and enjoy the mix of sweet and salty flavors.
50. Deviled Egg Cracker Bites
Easy After-School Snacks
Creamy mounds of yellow egg salad sit atop crispy whole-wheat crackers for a protein-packed snack. A thin slice of radish and a sprig of fresh dill garnish every bite to provide a pop of color and a fresh crunch. Tiny green onion bits are mixed into the filling to add a subtle savory flavor.
The white marble board and professional water bottle suggest a snack designed for a focused and active lifestyle. These bites are the best way to serve eggs in a mess-free and attractive format. The crunch of the cracker pairs perfectly with the soft and velvety egg center.
You can prepare the egg mixture in advance and assemble the crackers right before serving to keep them crispy. A calendar in the background shows that this is a smart choice for a busy week filled with activities. It is a classic flavor combination that feels modern and fresh in this bite-sized presentation.
Ingredients
12 Whole-wheat crackers
4 Hard-boiled eggs
2 Tablespoons mayonnaise
1 Teaspoon yellow mustard
2 Red radishes
1 Tablespoon chopped green onions
Fresh dill for garnish
Equipment
Small mixing bowl
Fork
Sharp knife
Cutting board
Serving platter
DIY Instructions
Peel the hard-boiled eggs and place them in a small bowl, then mash them thoroughly with a fork.
Stir in the mayonnaise, yellow mustard, and chopped green onions until the mixture is creamy and smooth.
Place twelve whole-wheat crackers in a single layer on a clean serving board or platter.
Use a small spoon to place a neat mound of the egg mixture onto the center of every cracker.
Slice the red radishes into very thin circles using a sharp kitchen knife.
Press one radish slice into the top of the egg mound so it stands upright.
Add a small sprig of fresh dill next to the radish for a touch of green color and herb flavor.
Serve these bites immediately so the crackers stay perfectly crunchy and the eggs stay fresh.
Key Takeaways
Nutritional Balance: These snacks combine healthy proteins, fats, and fiber to keep energy levels steady throughout the evening.
Visual Appeal: Using bright colors and fun shapes like “sushi” rolls or “donuts” encourages even the pickiest eaters to try new foods.
Time Efficiency: Most recipes require minimal prep time and utilize common household ingredients for maximum convenience.
Engagement: Simple assembly steps allow children to help in the kitchen, building their confidence and interest in healthy eating.
Transforming the afternoon slump into a highlight of the day does not require hours of cooking or expensive specialty items. By focusing on fresh fruit, lean proteins, and creative presentation, you can provide snacks that nourish and delight. These fifty options ensure that you will never have to face the “I’m hungry” plea with uncertainty again.
Experimenting with different toppings and seasonal produce keeps the menu fresh and exciting all year long. Remember that the best snacks are those that bring a smile to your child’s face while giving them the nutrients they need to thrive. Happy snacking as you explore these easy and delicious kitchen adventures.
Spread the loveGathering your closest companions for a Friendsgiving celebration is one of the most heartwarming traditions of the season. Forget the stress of cooking a massive turkey feast alone; the spirit of this holiday…
Spread the loveEating snacks often feels like a constant battle between your cravings and your health goals. You want that satisfying crunch but you dread the heavy oils and the unwanted calories. Your kitchen should…
Spread the loveStarting a detox does not mean you have to stop snacking or settle for bland food. Many people find that their kitchen cupboards are hidden traps for processed sugars and salty cravings. You…