Valentine Day 2026 deserves something more memorable than a standard supermarket sponge. Shaking up your tradition with unique shapes can turn a simple gift into a lasting memory.
Valentines Cake Ideas
The Recipe Fork brings you a collection of designs that defy convention. From hidden hearts to botanical towers, these treats speak the language of love better than words ever could.
Get ready to explore a world of sugary artistry. These creative cakes will leave your sweetheart speechless this year.
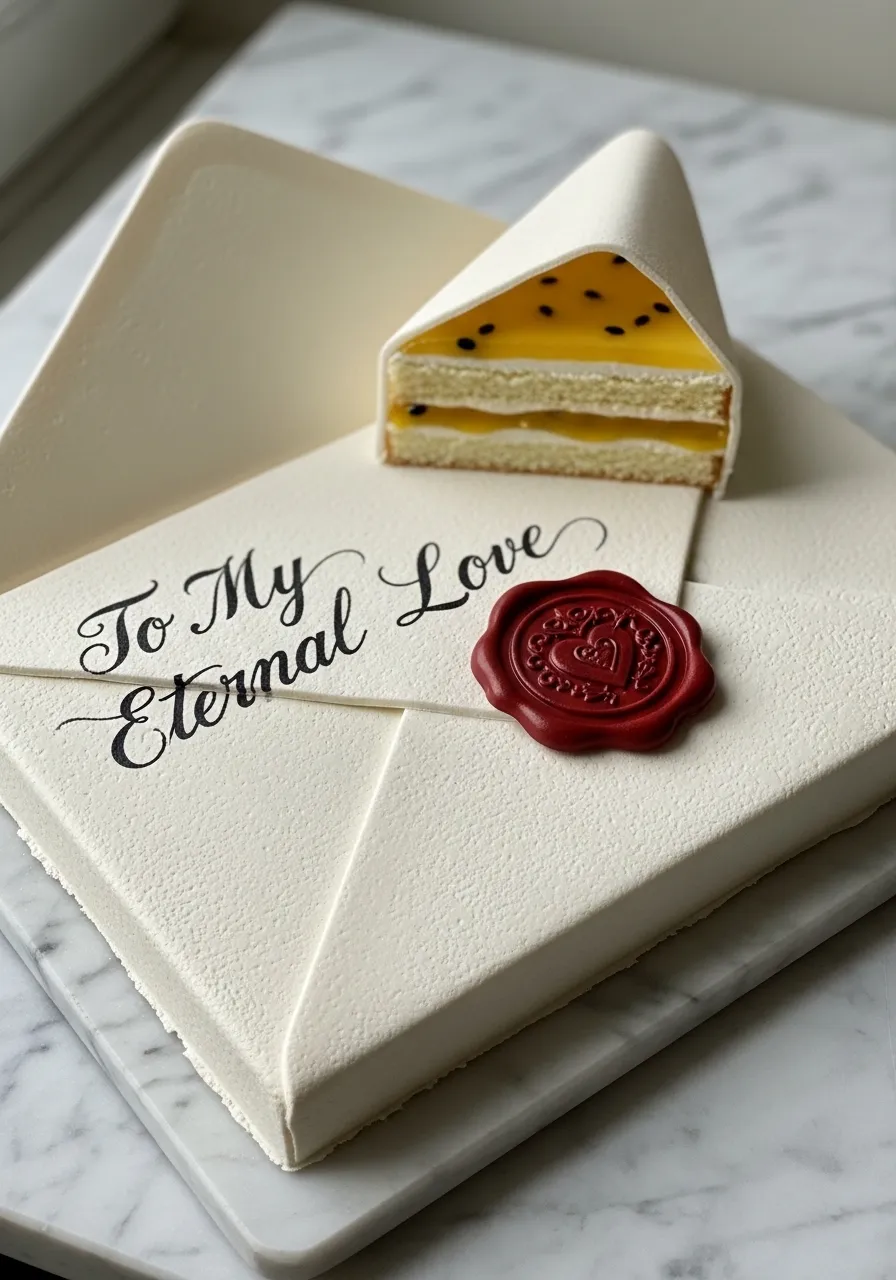
1. The ‘Love Letter’ Passion Fruit Cake
Valentines Cake Ideas
Forget standard round cakes this year. Show your affection with a dessert that tells a romantic story. This unique creation is shaped like a classic love letter, complete with a heartfelt inscription. A realistic red wax seal adds a touch of old world charm to the pristine white fondant finish.
Slicing into this masterpiece reveals a delightful surprise. Layers of light vanilla sponge alternate with a vibrant, tangy passion fruit curd. The seeds in the filling provide a satisfying texture that contrasts with the smooth cream layers.
This is a wonderful choice for a heartfelt celebration. The combination of visual artistry and bright, tropical flavors will make a lasting impression on your special someone. It is a sweet gesture they won’t soon forget.
Ingredients Needed
For the Vanilla Sponge Cake:
1 and 1/2 cups all-purpose flour
1 cup granulated sugar
1/2 cup unsalted butter, softened
2 large eggs
1/2 cup whole milk
1 and 1/2 teaspoons baking powder
1 teaspoon vanilla extract
1/4 teaspoon salt
For the Passion Fruit Filling:
1/2 cup passion fruit pulp (with seeds)
1/4 cup granulated sugar
1 tablespoon cornstarch
1 tablespoon water
For the Buttercream & Decoration:
1 cup unsalted butter, softened
3 cups powdered sugar
1 teaspoon vanilla extract
2 to 3 tablespoons milk or cream
1.5 lbs white rolled fondant
Small amount of red fondant or red candy melts
Black edible ink pen or black food coloring with a fine brush
Equipment Needed
9 by 13 inch rectangular baking pan
Mixing bowls
Electric hand mixer or stand mixer
Rubber spatula
Serrated bread knife
Rolling pin for fondant
Fondant smoother (optional)
Small food-safe stamp or mold for the wax seal (optional)
DIY Step-by-Step Instructions
Bake the Cake: Preheat your oven to 350°F (175°C). Grease and flour a 9 by 13 inch baking pan. In a bowl, whisk together flour, baking powder, and salt. In a separate large bowl, cream the softened butter and sugar until light and fluffy. Beat in the eggs one at a time, then stir in the vanilla. Gradually mix in the dry ingredients alternating with the milk until just combined. Pour the batter into the prepared pan and bake for 25 to 30 minutes, or until a toothpick inserted comes out clean. Let the cake cool completely.
Prepare the Filling: While the cake cools, combine the passion fruit pulp and sugar in a small saucepan over medium heat. In a small cup, mix the cornstarch and water to create a slurry. Add this to the saucepan. Stir constantly until the mixture thickens and becomes glossy. Remove from heat and let it cool completely in the fridge.
Make the Buttercream: Beat the softened butter until creamy. Gradually add powdered sugar, vanilla, and a tablespoon of milk at a time, beating on high until smooth and spreadable.
Shape and Assemble: Once the cake is cool, level the top with a serrated knife. Cut a large rectangle for the envelope body and a separate triangle piece for the flap. Slice the rectangle horizontally to create two layers. Spread buttercream and then a layer of passion fruit filling on the bottom layer. Place the top layer over it. Cover the entire rectangular cake and the separate triangle piece with a thin layer of buttercream (crumb coat) and chill for 30 minutes.
Decorate with Fondant: Roll out the white fondant on a surface dusted with powdered sugar to about 1/4 inch thickness. Drape it over the rectangular cake, smoothing it down the sides and trimming excess. Do the same for the triangle piece. Position the triangle on top of the rectangle to look like an open envelope flap.
Add Final Touches: Use the black edible ink pen to carefully write “To My Eternal Love” or your desired message on the lower part of the envelope. For the seal, you can either mold a small disk of red fondant and stamp it with a food-safe design, or melt red candy melts, pour a small puddle onto parchment paper, stamp it as it sets, and attach it to the cake with a dab of buttercream.
2. The ‘Twice as Sweet’ Raspberry Number Cake
Valentines Cake Ideas
Celebrate a special milestone with a number shaped dessert that stands tall. This blush pink number two captures the essence of a blossoming relationship. Red piped borders and dainty bows add a playful vintage feel to the design.
Lush layers of yellow sponge hide vibrant raspberry jam and silky white cream. Shimmering pearls and fresh berries decorate the top curve for a sophisticated finish. It makes a bold statement on any dessert table.
Ingredients Needed
For the Sponge Cake
3 cups all purpose flour
2 cups granulated sugar
1 cup unsalted butter at room temperature
4 large eggs
1 cup whole milk
1 tablespoon baking powder
1 teaspoon salt
2 teaspoons vanilla extract
For the Raspberry Filling
2 cups fresh raspberries
1/2 cup granulated sugar
1 tablespoon lemon juice
For the Frosting and Decor
2 cups unsalted butter
6 cups powdered sugar
Pink and red food coloring
Fresh raspberries
Edible sugar pearls
Pre-made red fondant for bows
Equipment Needed
Number 2 shaped cake pan or a large rectangular pan
Large mixing bowl
Electric hand mixer
Piping bags with star and round tips
Offset spatula
Small saucepan
DIY Step-by-Step Instructions
Start by heating your oven to 350 degrees Fahrenheit. Grease your number 2 pan thoroughly so the edges do not stick. Cream the butter and sugar in your large bowl until the mixture looks pale and fluffy. Add your eggs one at a time while mixing slowly. Stir in the vanilla and milk. Gradually add the flour, baking powder, and salt until the batter is smooth. Pour it into the pan and bake for about 35 minutes. Let the cake cool completely before moving to the next step.
Prepare the fruit filling by simmering raspberries, sugar, and lemon juice in a saucepan. Mash the berries as they cook for about 10 minutes until the liquid thickens into a jam. Let this cool in the fridge.
Make the buttercream by whipping the butter and powdered sugar together until it is very light. Separate a small amount to dye red and leave the rest a soft pink.
Slice your cooled cake horizontally into three even layers using a long serrated knife. Place the bottom layer on a board. Spread a thin circle of pink frosting around the edge to act as a wall. Fill the center with your raspberry jam. Repeat this for the next layer.
Cover the entire outside of the cake with pink frosting using your spatula. Use the red frosting in a piping bag with a star tip to create the ruffled borders along the edges.
Place your fresh berries and sugar pearls along the top of the cake. Roll out your red fondant and cut out small bow shapes. Press these bows into the sides of the cake to complete the look.
3. The Infinite Love Mirror Glaze Cake
Valentines Cake Ideas
Dark elegance takes center stage with this striking infinity symbol creation. A deep navy mirror glaze provides a glossy surface that reflects every light in the room. Delicate gold leaf accents trail across the curves like a path of stardust.
Smooth chocolate mousse hides beneath the sleek exterior for a rich tasting experience. Its continuous loop represents a love that knows no boundaries or end points. Guests will marvel at the modern artistry of this centerpiece.
Ingredients Needed
For the Mousse Base
10 ounces dark chocolate chips
2 cups heavy whipping cream
3 large egg yolks
1/4 cup sugar
1 tablespoon gelatin powder dissolved in 2 tablespoons water
For the Mirror Glaze
1 cup sugar
1 cup light corn syrup
1/2 cup water
2/3 cup sweetened condensed milk
2 cups white chocolate chips
Navy blue gel food coloring
5 teaspoons gelatin powder dissolved in 1/2 cup water
For Decoration
Edible gold leaf sheets
Equipment Needed
Infinity symbol silicone mold
Small saucepan
Glass bowl
Immersion blender
Fine mesh strainer
Wire cooling rack
Baking sheet
DIY Step-by-Step Instructions
Create the mousse by melting the dark chocolate in a glass bowl over a pot of simmering water. Whisk the egg yolks and sugar in a separate bowl until thick. Gently stir the yolks into the melted chocolate. Add the dissolved gelatin while the mixture is still warm. Whip your heavy cream in another bowl until it holds soft peaks. Fold the cream into the chocolate mixture very slowly so you do not lose the air. Pour this into your infinity mold and freeze it overnight until it is rock solid.
Make the glaze by boiling the sugar, water, and corn syrup in a saucepan for one minute. Remove it from the heat and stir in the condensed milk and the second batch of dissolved gelatin. Pour this hot liquid over your white chocolate chips. Let it sit for five minutes. Use your immersion blender to make it perfectly smooth but keep the blade submerged to avoid bubbles. Add the navy blue coloring and stir.
Let the glaze cool until it reaches 90 degrees Fahrenheit. It should feel slightly warm but thick like honey.
Place a wire rack over a clean baking sheet. Take your frozen mousse out of the mold and set it on the rack.
Pour the navy glaze over the frozen cake in one continuous motion. Ensure every side is covered. Let the excess drip off for ten minutes.
Use a pair of clean tweezers to gently pick up small pieces of gold leaf. Press them onto the side of the cake in a swirling pattern to mimic a galaxy.
4. The Vintage Lavender Storybook Cake
Valentines Cake Ideas
Antique charm meets culinary art in this stunning open book design. The pages look weathered and worn as if they hold years of romantic poetry. A hand painted lavender sprig decorates the left side to bring a touch of nature to the table.
Faint script on the right page adds a layer of mystery and nostalgia. Delicate gold corners anchor the blue book cover beneath the edible pages. It feels like a treasure pulled straight from a library shelf.
Ingredients Needed
For the Cake
2 cups all purpose flour
1 and 1/2 cups sugar
3/4 cup cocoa powder
2 teaspoons baking soda
1 teaspoon salt
1 cup buttermilk
2 eggs
1/2 cup vegetable oil
1 cup hot coffee
For the Decoration
2 lbs white fondant
1/2 lb blue fondant
Edible gold paint
Purple and green food coloring
Black edible ink pen
Brown petal dust or cocoa powder for aging
Equipment Needed
Rectangular baking pan
Rolling pin
Small clean paintbrush
Sculpting tool or a dull knife
Large cake board
DIY Step-by-Step Instructions
Mix all your dry cake ingredients in a large bowl. Whisk in the buttermilk, eggs, and oil. Pour in the hot coffee last and stir until the batter is thin and smooth. Bake in a rectangular pan at 350 degrees Fahrenheit for 30 minutes. Let it cool completely.
Carve the top of the cake once it is cool. Use a knife to create a slight dip down the middle of the rectangle so it looks like an open spine. Shave the sides at an angle to look like stacked pages.
Cover the cake board with blue fondant to act as the book cover. Place your carved cake on top.
Roll out a large sheet of white fondant. Drape it over the cake and press it into the center dip. Use a sculpting tool or the back of a knife to press horizontal lines into the sides of the cake. These lines will look like individual paper pages.
Mix a tiny bit of brown petal dust with water. Brush this very lightly along the edges of the fondant pages to make them look old and toasted.
Draw a lavender plant on the left side using purple and green food coloring mixed with a drop of vodka or lemon juice. Use your edible ink pen to write messy script on the right page. Paint the four corners of the blue cover with gold paint to finish the vintage look.
5. The Modern Botanical Pillar Cake
Valentines Cake Ideas
Geometric precision defines this contemporary dessert that challenges traditional shapes. Three vertical pillars of varying heights create a striking architectural silhouette. Soft gradients of green and peach give the exterior a velvet-like texture.
Edible pansies and micro-greens climb the center gap like a vertical garden. A single golden drip adds a touch of luxury to the tallest column. Inside, you will find light matcha sponge paired with a tart berry center.
Ingredients Needed
For the Matcha Sponge
1 and 1/2 cups cake flour
2 tablespoons matcha powder
1 cup sugar
3 eggs
1/2 cup melted butter
1/2 cup milk
For the Velvet Spray
1/2 cup cocoa butter
1/2 cup white chocolate
Green and peach oil based food coloring
For the Filling and Decor
Raspberry jelly
White chocolate ganache
Fresh edible pansies
Small sprigs of mint or micro-greens
Edible gold luster dust
Equipment Needed
Tall rectangular pillar molds
Microwave safe bowls
Food grade spray gun or velvet spray cans
Offset spatula
Tweezers
DIY Step-by-Step Instructions
Whisk your matcha powder with the flour. Beat the eggs and sugar until they are very bubbly. Fold in the dry ingredients and then the butter and milk. Bake in your pillar molds at 325 degrees Fahrenheit for 25 minutes. If you do not have molds, bake a flat cake and cut it into three tall, thin blocks of different heights.
Core the center of each pillar using a small round cutter. Fill the holes with raspberry jelly and seal the ends with a bit of extra cake or ganache. Cover each pillar in a thin layer of white chocolate ganache to make them smooth. Put them in the freezer for one hour.
Melt the cocoa butter and white chocolate together. Divide the mixture and add your colors. Use a spray gun to coat the frozen pillars. The cold surface will turn the spray into a fuzzy velvet texture instantly.
Stand the pillars upright on a flat plate. Place them close together but leave a small vertical gap in the center.
Use tweezers to carefully tuck edible pansies and greens into the center crack. Start from the bottom and work your way up.
Mix your gold dust with a drop of oil. Let one large drop fall from the top of the tallest pillar so it runs down the side slowly.
6. The Eternal Flame Taper Candle Cake
Valentines Cake Ideas
Light up your celebration with a dessert that mimics a glowing taper candle. This tall and slender design features realistic wax drips cascading down the sides. A bright orange sugar flame sits atop the “wick” to create a warm atmosphere.
The pristine cream exterior hides a surprisingly rich interior of spiced honey cake. It sits elegantly on a vintage silver candlestick holder for a dramatic presentation. This choice is wonderful for a cozy, candlelit dinner for two.
Ingredients Needed
For the Spiced Honey Cake
2 cups flour
1/2 cup honey
1/2 cup brown sugar
1/2 cup sour cream
2 eggs
1 teaspoon cinnamon
1/2 teaspoon ginger
1 teaspoon baking soda
For the Wax and Flame
1 cup white chocolate melts
1/4 cup heavy cream
1 large marshmallow
Orange and yellow hard candies (like Jolly Ranchers)
One pretzel stick
Equipment Needed
Tall cylindrical cake tin or a clean soda can with the top removed
Small saucepan
Baking parchment
Vintage candlestick or a sturdy small stand
DIY Step-by-Step Instructions
Combine your honey, sugar, and sour cream in a bowl. Whisk in the eggs and spices. Stir in the flour and baking soda until the batter is thick. Pour it into your tall cylindrical tin. Bake at 350 degrees Fahrenheit for about 40 minutes. Once it is cool, remove it from the tin. You may need to stack two smaller rounds to get the desired height.
Carve the very top of the cake so it is slightly rounded like the top of a candle. Cover the whole cylinder in a smooth layer of white chocolate ganache.
Melt your white chocolate with a splash of cream to create a thick pouring consistency. Use a spoon to drizzle this mixture over the top edge of the cake. Let it run down the sides naturally to look like melted wax.
Create the flame by crushing your orange and yellow candies. Place them on a parchment lined tray in a flame shape. Bake at 350 degrees for five minutes until they melt together. While the sugar is still warm and soft, press a pretzel stick into the bottom of the flame. Let it harden completely.
Push the pretzel stick into the center of the top of the cake. This serves as the wick.
Place the finished cake onto your candlestick. Ensure it is balanced and secure before displaying it.
7. The Royal Tasseled Heart Cake
Valentines Cake Ideas
Give the gift of royalty with this plush red velvet heart. The exterior has a deep crimson texture that looks like expensive fabric. Golden tassels on the corners add a sense of luxury and opulence to the piece.
Gold beads trace the curves of the heart for a jewelry-like finish. Slicing into it reveals the classic pairing of red sponge and white cream cheese frosting. It is a timeless symbol of love with a high-end twist.
Ingredients Needed
For the Red Velvet Cake
2 and 1/2 cups flour
1 and 1/2 cups sugar
1 teaspoon cocoa powder
1 cup buttermilk
2 eggs
1 and 1/2 cups vegetable oil
1 teaspoon white vinegar
1 tablespoon red food coloring
For the Decor
Cream cheese frosting
Red velvet cocoa butter spray
Yellow fondant for tassels
Edible gold paint
Small gold sugar balls
Equipment Needed
Heart shaped baking pan
Large mixing bowl
Velvet spray machine or pre-made can
Small paintbrush
Clay extruder or knife for tassels
DIY Step-by-Step Instructions
Mix your oil, sugar, and eggs until combined. Add the red food coloring and vinegar to the buttermilk. Alternately add the flour and the red liquid to the egg mixture. Bake in a heart pan at 350 degrees Fahrenheit for 30 minutes. Let the cake cool and then slice it into layers.
Fill the layers with a thick coating of cream cheese frosting. Cover the entire outside of the heart with frosting and smooth it out. Put the cake in the freezer for two hours so the surface is very cold.
Spray the frozen cake with the red cocoa butter spray. The tiny droplets will freeze on contact to create that fabric-like texture.
Make the tassels by rolling out yellow fondant. Cut a rectangle and fringe the bottom half with a knife. Roll it up to create a tassel shape. Paint the entire tassel with edible gold paint.
Attach a tassel to each “shoulder” of the heart using a tiny dab of frosting. Attach a third tassel to the bottom point of the heart.
Carefully press gold sugar balls in a line along the top edge and sides of the heart. This creates a beaded border that makes the cake look like a royal pillow.
8. The Unlock My Heart Bronze Padlock Cake
Valentines Cake Ideas
Show that your heart is safely guarded with this rustic padlock design. The dark bronze finish features realistic wood grain and metallic hardware. Heavy rivets on the corners give it a sturdy and antique appearance.
A bright turquoise key sits beside the lock to provide a pop of modern color. The keyhole in the center glows with a warm golden light. This chocolate-based cake is as sturdy as it is delicious.
Ingredients Needed
For the Chocolate Cake
2 cups flour
2 cups sugar
1 cup cocoa powder
1 cup coffee
1/2 cup oil
2 eggs
1 teaspoon baking powder
For the Structure
Chocolate ganache
Dark brown fondant
Light blue fondant
Bronze and gold luster dust
Vodka or lemon juice for mixing paint
Equipment Needed
Square baking pan
Large marshmallow or circular cake piece for the handle
Knife for carving
Clean paintbrushes
DIY Step-by-Step Instructions
Bake your chocolate cake in a square pan. Once it is cool, trim the sides to make a clean cube. Use a small knife to cut a keyhole shape out of the center of one side. Fill the hole with a bit of yellow frosting.
Cover the square cake in dark brown fondant. Use a dry paintbrush to drag lines through the fondant while it is soft. This creates a realistic wood or brushed metal texture.
Create the top handle by covering a curved piece of cake or a series of large marshmallows in brown fondant. Shape it into a “U” and attach it to the top of the square block using wooden skewers for support.
Mix bronze luster dust with a drop of vodka. Paint the entire lock and the handle until it shines like metal.
Roll out small circles of brown fondant and stick them to the corners to look like rivets. Paint these with gold dust.
Sculpt a large key out of light blue fondant. You can use a template or just freehand a classic skeleton key shape. Place the key on the board next to your finished lock.
9. The Amethyst Geode Marble Tower
Valentines Cake Ideas
Bring the beauty of natural crystals to your table with this marble pillar. The sleek white and grey exterior looks exactly like polished stone. A dramatic purple geode crack runs down the side to reveal shimmering amethyst-like sugar.
A large translucent crystal sits on top to catch the light. The inside features lavender-scented sponge and honeycomb crunch for a unique flavor profile. It is a sophisticated choice for someone who loves geology or modern decor.
Ingredients Needed
For the Lavender Cake
2 cups flour
1 cup sugar
1/2 cup butter
2 eggs
1 tablespoon dried culinary lavender
1/2 cup milk
For the Geode Effect
2 cups purple rock candy or crushed lollipops
Silver leaf or silver paint
White and black fondant for marbling
Large clear sugar crystal for the top
Equipment Needed
Tall rectangular cake pan
Small carving knife
Clear piping gel or corn syrup
Paintbrush
DIY Step-by-Step Instructions
Steep your lavender in warm milk for ten minutes and then strain it. Cream the butter and sugar. Add the eggs and then the lavender milk. Stir in the flour. Bake in a tall rectangular pan at 350 degrees Fahrenheit.
Once the cake is cool, stand it upright. Use a knife to carve a jagged, deep “V” shape into one corner of the pillar. This will be the home for your crystals.
Marble your fondant by twisting white and black pieces together. Do not over-mix or it will just turn grey. Roll it out and cover the entire pillar except for the jagged hole you carved.
Brush the inside of the carved hole with clear piping gel or corn syrup. This acts as glue.
Press your purple rock candy into the hole. Start with larger pieces in the center and use smaller crumbs toward the edges to look like a real geode.
Paint the very edge of the fondant where it meets the crystals with silver paint. This hides the seam and adds a metallic sparkle. Place your clear sugar crystal on the very top of the tower to finish.
10. The Bohemian Sunset Archway Cake
Valentines Cake Ideas
Capture the warmth of a desert sunset with this trendy arch shape. Earthy tones of terracotta and sand create a relaxing and natural vibe. The arch stands on a base of textured “stones” made from soft cake trimmings.
Dried palm leaves and delicate baby’s breath decorate one side for a boho-chic aesthetic. Flakes of gold leaf add a shimmering highlight to the curved top. This honey spice cake is the ultimate choice for a stylish and modern Valentine.
Ingredients Needed
For the Honey Spice Cake
2 cups flour
1 cup honey
1/2 cup butter
1 teaspoon ginger
1 teaspoon cloves
2 eggs
1/2 cup Greek yogurt
For the Decor
Terracotta and cream colored frosting
Dried mini palm spears
Fresh or dried baby’s breath
Gold leaf
Crushed graham crackers for “sand”
Equipment Needed
Large round cake pan
Small round cutter for the center
Offset spatula
Tweezers for flowers
DIY Step-by-Step Instructions
Mix your honey, butter, and yogurt until smooth. Stir in your spices and flour. Bake in a large round pan at 350 degrees Fahrenheit.
Cut the round cake in half once it is cool to create two semi-circles. Stack them on their flat sides. Use a small round cutter to remove the center of the stack so you are left with an arch shape. Use a long skewer through the top to keep the two halves from sliding apart.
Cover the outside of the arch with cream frosting on the front and terracotta frosting on the sides. Smooth it out as much as possible with your spatula.
Mix your cake scraps with a little frosting to make “cake balls.” Press these around the base of the arch to look like desert stones.
Press small flakes of gold leaf onto the top curve of the arch. Let them look random and natural.
Use tweezers to push the stems of your dried palm leaves and baby’s breath into the side of the cake. Arrange them in a cluster that follows the curve of the arch. Sprinkle crushed graham crackers around the base to look like sand.
11. The ‘Cozy Cabin’ Winter Lodge Cake
Valentines Cake Ideas
Escape to a romantic snowy retreat without leaving your kitchen. This stunning A-frame cabin design mimics a rustic mountain lodge tucked away in a pine forest. Textured chocolate shingles and white frosting accents create a cozy winter atmosphere.
Warm light glows from the circular windows, suggesting a crackling fireplace waiting inside. Edible skis leaned against the front door add a charming detail for adventure lovers. It is a whimsical way to celebrate a Valentine’s getaway at home.
Chocolate layers hide beneath the woodsy exterior for a rich and comforting treat. Your partner will appreciate the intricate details of this miniature mountain home. Serving this dessert feels like a trip to a secluded ski resort.
Ingredients Needed
For the Chocolate Sponge:
2 cups all purpose flour
2 cups granulated sugar
3/4 cup cocoa powder
2 teaspoons baking powder
1 teaspoon salt
1 cup buttermilk
2 large eggs
1/2 cup vegetable oil
1 cup boiling water
For the Decoration:
2 cups chocolate buttercream
1 cup white marshmallow fluff or thick royal icing
Dark chocolate candy melts for shingles
Yellow fondant for windows
Pretzel sticks for skis
Powdered sugar for snow
Equipment Needed
Two 8 inch square baking pans
Sharp serrated knife
Small spatula
Piping bag with a round tip
Ruler
DIY Step by Step Instructions
Mix your dry ingredients in a large bowl and whisk in the milk, eggs, and oil. Pour the boiling water in last and stir until the batter is thin. Bake in square pans at 350 degrees for 30 minutes. Let the cakes cool completely before you start carving.
Stack your two square cakes with a layer of buttercream in the middle. Use a ruler to find the center point of the top. Cut from that center point down to the bottom corners on each side to create a tall triangle shape.
Cover the slanted sides with a thin layer of chocolate frosting. Press your chocolate candy melts onto the sides starting from the bottom. Overlap them slightly as you move upward to look like real roof shingles.
Cut small circles out of yellow fondant. Press them onto the front of the cake to look like glowing windows. Use a bit of chocolate frosting to draw a cross shape on each window for the frames.
Spoon your marshmallow fluff or thick white icing over the peak of the roof. Let it drip down naturally so it looks like heavy, fresh snow.
Lean two pretzel sticks against the front of the cabin at an angle. Sprinkle the entire board with powdered sugar to complete the winter forest scene.
12. The ‘Cloud Nine’ Berry Dream Cake
Valentines Cake Ideas
Float away on a sugary daydream with this ethereal cloud shaped dessert. Soft, billowy spheres form the base, finished with a delicate lavender and blue gradient. Shimmering silver stars orbit the cake to give it a magical, celestial feel.
Cutting into the center reveals a bright yellow sponge with a deep, hidden berry core. Silky white cream balances the tart fruit for a light and airy tasting experience. This design is a breath of fresh air for those seeking something truly unique.
A custom heart topper sits on top to remind your sweetheart they make you feel weightless. Every bite is soft and pillowy like a literal cloud. It is a sophisticated choice for a modern Valentine.
Ingredients Needed
For the Yellow Cake:
1 and 1/2 cups cake flour
1 cup sugar
1/2 cup softened butter
2 eggs
1/2 cup milk
1 teaspoon vanilla
For the Filling and Finish:
1 cup mixed berry jam
2 cups white chocolate mousse
Purple and blue velvet food spray
Silver cardstock for stars
Clear acrylic rods
Equipment Needed
Sphere silicone molds
Small offset spatula
Food grade velvet spray gun
Circle cutter
Tweezers
DIY Step by Step Instructions
Prepare your yellow cake batter and bake it in the sphere molds at 325 degrees. Once they are cool, cut a small hole in the center of each ball. Fill the space with your berry jam and seal it with a small piece of extra cake.
Coat each cake ball in a smooth layer of white chocolate mousse. Use your spatula to make the surface as even as possible. Place these in the freezer for at least four hours until they are solid.
Arrange the frozen balls on a cake board in a clustered group. Press them together so they stick and form one large, fluffy cloud shape.
Spray the bottom of the cloud with blue velvet spray. Use the purple spray for the middle section and leave the top white. This creates a beautiful sunset gradient effect.
Glue your silver stars to small clear rods. Push the rods into different parts of the cloud at varying heights.
Place your “Cloud 9” heart topper in the center of the tallest sphere. Keep the cake in the fridge until you are ready to serve.
13. The ‘Greatest Hits’ Vinyl Record Cake
Valentines Cake Ideas
Spin a sweet melody for your favorite music enthusiast with this realistic record design. The glossy black surface features tiny grooves that look exactly like a vintage vinyl disc. A custom pink and yellow label celebrates the unique soundtrack of your relationship.
Dark chocolate layers inside provide a rich, bold flavor that matches the striking exterior. Whipped cream dollops along the edge of the slice add a classic touch to the modern look. It is a groovy centerpiece for any retro themed Valentine’s celebration.
Music lovers will appreciate the nostalgia of this edible masterpiece. The contrast between the black glaze and the bright label makes the colors pop. Your Valentine will definitely want to keep this one on repeat.
Ingredients Needed
For the Dark Chocolate Cake:
2 cups flour
2 cups sugar
1 cup dark cocoa powder
1 cup strong hot coffee
1/2 cup oil
2 eggs
For the Record Glaze:
1 cup black cocoa mirror glaze
1 cup white chocolate ganache for the filling
Printed edible paper for the label
Whipped cream for garnish
Equipment Needed
10 inch round cake pan
Large circular cake board
Rotating cake stand
Small toothpick or sculpting tool
Offset spatula
DIY Step by Step Instructions
Bake your chocolate cake in the round pan and let it cool. Level the top so it is completely flat. Place it on your rotating cake stand.
Cover the cake in a very thin, smooth layer of black frosting. Pour your black mirror glaze over the top while the cake is cold. Let the excess drip off the sides.
Wait five minutes for the glaze to set slightly. Spin the cake stand slowly. Hold a toothpick very still against the top of the cake as it spins to carve circular grooves into the glaze.
Cut out your edible paper label. Center it carefully on the middle of the cake and press it down gently.
Remove a single triangular slice from the record. This shows off the inside layers and makes it look like a real party treat.
Pipe small mounds of white whipped cream along the back edge of the removed slice. Serve the slice on a small plate next to the main record.
14. The ‘Hidden Heart’ Checkerboard Loaf
Valentines Cake Ideas
Surprise your guests with a colorful secret hidden inside this artistic loaf. The top features playful sweeps of sage green, blush pink, and cream frosting. While the outside looks modern and simple, the real magic happens once you take a slice.
A vibrant red heart sits tucked inside a pink and white checkerboard pattern. Achieving this look requires patience but results in a stunning geometric masterpiece. Every bite offers a mix of tender vanilla and strawberry sponge.
This cake is great for sharing at a casual brunch or afternoon tea. The clean lines of the interior will impress any baking fan. It is a heartfelt gesture that literally puts love at the center.
Ingredients Needed
For the Cake Layers:
3 cups vanilla cake batter
Red and pink food coloring
1/2 cup strawberry puree
For the Frosting:
2 cups vanilla buttercream
Sage green and pink gel colors
Equipment Needed
Two loaf pans
Small heart shaped cookie cutter
Long serrated knife
Small spatula
DIY Step by Step Instructions
Divide your batter into three bowls. Dye one red, one pink, and leave the last one white. Bake the red batter in a shallow pan. Once it is cool, use your heart cutter to snap out several small red hearts.
Bake the pink and white batters in separate loaf pans. Slice these loaves into long, square logs.
Stack the logs in a 3 by 3 grid inside a clean loaf pan. Use a little bit of frosting between each log to glue them together. Swap colors to create the checkerboard look.
Leave a space in the very center of your checkerboard. Line up your red heart cutouts inside that center gap so they form one long heart tube.
Fill any remaining gaps with extra frosting or cake scraps. Cover the entire loaf in a thick layer of white buttercream to hide the pattern.
Use a spatula to swipe green and pink frosting across the top in a messy, artistic way. Slice the loaf thick so the heart and checkers are clearly visible.
15. The ‘Surprise Stack’ Gift Box Cake
Valentines Cake Ideas
Stacked gift boxes in soft pastel shades make this dessert look almost too good to eat. Clean lines and smooth fondant create the illusion of three wrapped presents. A flowing sage green ribbon ties the whole composition together with an elegant bow.
Lifting the lid of the top box reveals a hidden golden chocolate truffle tucked inside. This interactive design allows you to hide a small gift or extra treat for your sweetheart. It combines the joy of unwrapping a present with the delight of a gourmet cake.
Three different flavors can be used for each box to keep things exciting. This towering treat makes a wonderful statement piece for a grand celebration. Your partner will feel truly pampered by this thoughtful creation.
Ingredients Needed
For the Cakes:
Three square cakes (4 inch, 6 inch, and 8 inch)
Vanilla frosting for the crumb coat
For the Decoration:
3 lbs fondant (peach, yellow, and mint green)
One golden chocolate truffle (like Ferrero Rocher)
Edible glue or water
Equipment Needed
Square cake boards in matching sizes
Rolling pin
Fondant smoother
Sharp craft knife
Wooden dowels for support
DIY Step by Step Instructions
Bake and frost your three square cakes. Cover the 8 inch cake in peach fondant, the 6 inch in yellow, and the 4 inch in mint green. Smooth the edges so they look like sharp cardboard boxes.
Stack the boxes on top of each other. Insert wooden dowels into the bottom two cakes to support the weight of the ones above.
Roll out a long strip of mint green fondant. Drape it over the entire stack from top to bottom to look like a continuous ribbon.
Create a large loopy bow out of the same green fondant. Use crumpled paper towels to hold the loops open until they dry and stay in place.
Cut a separate square of mint fondant to act as a lid. Prop it up at an angle on top of the smallest box using a small piece of cake.
Place the golden truffle inside the opening of the top box. It should look like the gift is being revealed as the lid opens.
16. The ‘Hidden Gem’ Obsidian Heart
Valentines Cake Ideas
Dramatic black textures give this heart cake a bold and edgy personality. The rough, stone like exterior resembles volcanic glass or dark obsidian. A jagged rift runs down the center to reveal a treasure trove of glistening red gems.
Bright pomegranate seeds provide a sharp contrast to the dark outer shell. Flecks of genuine gold leaf sparkle within the crack like a rare find. This piece represents a love that is strong, deep, and full of inner beauty.
The rich chocolate interior matches the intensity of the visual design. It is an excellent choice for a partner who prefers unconventional and modern aesthetics. This cake is a true work of culinary art.
Ingredients Needed
For the Base:
One 8 inch heart shaped chocolate cake
2 cups dark chocolate ganache
For the Geode Effect:
1 cup fresh pomegranate seeds or red rock candy
Black cocoa powder or charcoal powder
Edible gold leaf
1 cup crushed chocolate cookies
Equipment Needed
Small carving knife
Tweezers
Small paintbrush
Cooling rack
DIY Step by Step Instructions
Bake your heart cake and let it cool. Use a small knife to carve a jagged, shallow trench down the center of the heart.
Mix your chocolate ganache with crushed cookies and black cocoa powder. This creates a thick, lumpy frosting that looks like rough stone. Cover the entire heart with this mixture but leave the trench empty.
Brush the inside of the trench with a little bit of plain ganache. Use your tweezers to press pomegranate seeds or red candy into the gap. Pack them tightly so no cake shows through.
Dab a tiny bit of water onto the edges of the “rock” where it meets the red gems. Apply small pieces of gold leaf along that border.
Let the cake sit for an hour so the ganache firms up. This makes the “stone” look more realistic and matte.
Serve the heart on a dark slate board to enhance the moody and mysterious vibe.
17. The ‘Love Bug’ Floral Beetle
Valentines Cake Ideas
Hit the road toward romance with this adorable pink car creation. This miniature vehicle features a metallic rose finish and colorful retro flower decals. Bright headlights and silver bumpers add a realistic touch to the whimsical automotive design.
The car sits on a path of crushed chocolate cookie soil beneath a sky of marshmallow clouds. It is a nostalgic nod to classic summer road trips and vintage charm. Kids and adults alike will fall in love with this playful treat.
Strawberry sponge inside makes every slice as sweet as the exterior. The shiny finish is achieved using a special edible luster dust. It is a fun and energetic way to celebrate your Valentine.
Ingredients Needed
For the Car Body:
Two 9 inch rectangular strawberry cakes
2 cups strawberry buttercream
For the Details:
2 lbs white fondant
Pink edible luster dust
Black fondant for tires
Small colorful flower sprinkles
Silver edible paint
Equipment Needed
Bread knife for carving
Small paintbrush
Round cookie cutter for wheels
Cake board
DIY Step by Step Instructions
Stack your rectangular cakes with frosting in between. Use your bread knife to shave the top into a dome shape. Carve the front and back at a steep angle to mimic the classic beetle car silhouette.
Cover the carved cake in a smooth layer of buttercream. Roll out a large sheet of white fondant and drape it over the car. Trim the excess at the bottom.
Mix your pink luster dust with a drop of lemon juice. Paint the entire car body until it is bright and metallic.
Roll out black fondant and cut four thick circles for the tires. Attach them to the sides of the car using a little water.
Paint the bumpers and headlights with silver edible paint. Use white fondant for the windows and a black edible pen to draw the windshield wipers.
Press your flower sprinkles onto the sides of the car in a random pattern. Place the car on a board covered in crushed cookies to look like a dirt road.
18. The ‘Admit One’ Movie Ticket Cake
Valentines Cake Ideas
Grab the popcorn for a cinematic celebration featuring this creative ticket design. The golden brown surface looks like aged paper from a classic theater. Bold black lettering invites your “plus one” to a very special romantic showing.
A jagged tear down the center adds a realistic vintage feel to the rectangular cake. Surround the base with actual popcorn to complete the movie night theme. It is a fantastic choice for couples who love a cozy evening at the cinema.
Vanilla and caramel flavors inside provide a sweet treat that feels like a concession stand favorite. The simple shape makes this a great project for beginners. It is a star quality dessert for your leading lady or man.
Ingredients Needed
For the Ticket:
One 9 by 13 inch vanilla cake
2 cups salted caramel frosting
For the Finish:
1 lb tan or light orange fondant
Black edible ink marker
2 cups popped popcorn
Cocoa powder for shading
Equipment Needed
Rectangular cake board
Small knife
Ruler
Clean dry paintbrush
DIY Step by Step Instructions
Bake your rectangular cake and cover it in a thin layer of caramel frosting. Roll out your tan fondant so it is slightly larger than the cake.
Drape the fondant over the cake and smooth the top. Use a ruler to help you cut straight edges. Cut small semi-circles out of the short ends to look like a real ticket stub.
Use your knife to create a jagged, wavy tear right down the middle of the cake. Pull the two halves apart just an inch so the cake inside is visible.
Write “ADMIT TO MY ONE” and “VALENTINE’S SPECIAL” in large black letters using your edible marker. Copy the look of a vintage ticket with serial numbers on the sides.
Dip your dry paintbrush into a little cocoa powder. Lightly rub it around the edges of the ticket to make it look old and handled.
Scatter fresh popcorn all around the base of the cake on the board. This adds texture and a wonderful salty aroma to the presentation.
19. The ‘Sweet Kisses’ Glazed Lips Cake
Valentines Cake Ideas
Make a bold statement with these giant, high gloss red lips. The mirror like finish catches the light and looks like fresh strawberry glaze. Realistic white teeth and a tempting drip of jam add a playful and provocative touch.
Dark chocolate sponge hides inside, paired with a vibrant red fruit filling. This artistic design is sure to be the talk of any Valentine’s party. It is a fun and modern way to share a literal “sweet kiss” with your partner.
Small portions are very filling due to the rich chocolate and sugar glaze. The smooth curves require careful carving but the result is breathtaking. It is a passionate choice for a memorable night.
Ingredients Needed
For the Lips:
Two 8 inch round chocolate cakes
1 cup strawberry jam
For the Glaze:
2 cups red mirror glaze
White fondant for teeth
Red gel food coloring
Equipment Needed
Sharp carving knife
Wire cooling rack
Baking sheet
Small spatula
DIY Step by Step Instructions
Stack your round cakes and carve them into a long oval. Cut a deep “V” into the top center for the cupid’s bow. Shave the sides so they taper to points at the ends.
Slice the oval horizontally and spread a thick layer of jam in the middle. Put the top back on and carve a horizontal line across the front to separate the top and bottom lip.
Cover the lips in a very smooth layer of buttercream and freeze for two hours. Place the frozen cake on a wire rack over a baking sheet.
Pour the red mirror glaze over the cake in one steady motion. Make sure every curve is covered and let the excess drip off.
Cut small rectangular pieces of white fondant. Push them into the gap between the lips to look like teeth.
Drizzle a little extra red jam from the corner of the mouth so it looks like a glossy drip. Serve on a dark plate for maximum contrast.
20. The ‘Everlasting Bond’ Swan Duo
Valentines Cake Ideas
Elegant white swans face each other to form a graceful heart shape with their necks. Each bird features hundreds of delicate edible feathers for a stunning, lifelike texture. Tiny golden crowns sit atop their heads to signify a royal and lasting union.
These majestic creatures sit on a mirrored base that reflects their beauty. The combination of soft white textures and gold accents creates a peaceful and sophisticated mood. This is the ultimate centerpiece for a truly romantic celebration.
Light lemon sponge provides a refreshing flavor that matches the airy look. The intricate feather work takes time but creates a “wow” factor. It is a beautiful tribute to a love that is pure and steady.
Ingredients Needed
For the Swans:
Two small oval lemon cakes
4 cups lemon buttercream
For the Feathers and Heads:
1 lb white modeling chocolate or fondant
Black edible marker
Gold luster dust
Yellow food coloring
Equipment Needed
Small carving knife
Petal shaped cookie cutter
Toothpicks
Mirror cake board
DIY Step by Step Instructions
Carve your small cakes into smooth egg shapes to act as the swan bodies. Cover them in white buttercream and place them on the mirror board facing each other.
Roll out your modeling chocolate very thin. Use the petal cutter to snap out hundreds of small “feathers.”
Start at the back of each swan and overlap the feathers as you move toward the front. This creates a realistic, fluffy appearance.
Roll two long snakes of modeling chocolate for the necks. Bend them into “S” shapes and insert a toothpick into the bottom of each.
Push the necks into the front of the bodies so the heads are close together. Use the black marker to draw the eyes and orange frosting for the beaks.
Sculpt two tiny crowns and paint them with gold luster dust. Place one on each swan’s head. The reflection on the mirror board will make the scene look twice as magical.
21. The ‘Secret Message’ Nautical Bottle
Valentines Cake Ideas
Send your sweetheart a romantic discovery from the shore. This turquoise glass bottle appears to have washed up on a beach of edible sand. Inside the translucent shell sits a tender sponge cake wrapped in a tiny sugar scroll.
Seashells and pearls decorate the base to enhance the tropical feel. The cork at the top is fully edible and crafted from textured chocolate. You will love how the light catches the blue candy exterior to reveal the hidden treat inside.
Ingredients Needed
Vanilla sponge cake layers: 2 cups
Teal candy melts: 2 cups
Crushed graham crackers: 1 cup
White fondant: 3 ounces
Edible black ink pen: 1
White sugar pearls: 1 tablespoon
Chocolate ganache: 1/2 cup
Equipment Needed
3D bottle silicone mold
Small paintbrush
Rolling pin
Small bowl
Baking sheet
DIY Step by Step Instructions
Melt the teal candy wafers in a microwave safe bowl using thirty second intervals. Stir until the liquid is smooth and free of lumps.
Pour the melted candy into both halves of a clean bottle mold. Rotate the mold so the candy coats the entire surface and pour out any extra liquid. Let this set in the fridge for twenty minutes.
Crumble your vanilla sponge cake into a bowl and mix it with a little ganache until it holds together. Press this mixture firmly into the center of the hardened candy shells. Leave a small gap in the middle of one side.
Roll out a small rectangle of white fondant until it is very thin. Write your short love note using the edible ink pen. Roll the fondant into a scroll and place it inside the gap you left in the cake.
Apply a thin line of melted candy to the edges of the shells and press them together to seal the bottle. Remove the cake from the mold once it is solid.
Spread crushed graham crackers on your serving board to look like sand. Place the bottle on top and add sugar pearls or fondant shells to finish the seaside look.
22. The ‘Love Letter’ Vintage Typewriter
Valentines Cake Ideas
Capture the charm of old school romance with this striking teal typewriter. A long scroll of sugar paper emerges from the top with a repeated message of affection. Realistic keys and silver accents make this look like a functional antique.
Rich chocolate cake hides beneath the colorful fondant exterior for a satisfying bite. Every detail from the ribbon spools to the space bar adds to the nostalgic vibe. It serves as a beautiful tribute to your unique love story.
Ingredients Needed
Chocolate rectangular cake: 1
Dark chocolate ganache: 2 cups
Teal fondant: 2 lbs
Black fondant: 8 ounces
White fondant: 4 ounces
Silver edible paint: 1 bottle
Black edible ink marker: 1
Equipment Needed
Small round cookie cutter
Square cake board
Sharp knife
Small paintbrush
Ruler
DIY Step by Step Instructions
Bake a rectangular chocolate cake and let it cool completely. Cut the cake into a stepped shape by removing a smaller rectangle from the front half. This creates the slanted area where the keys will sit.
Cover the entire cake in a layer of dark chocolate ganache to act as glue. Roll out your teal fondant and drape it over the cake. Press it firmly into the corners and trim the excess at the bottom.
Roll out the black fondant and cut several small circles using your round cutter. Paint a silver border around each circle and write letters on them using the edible marker. These will be your typewriter keys.
Attach the keys to the slanted front of the cake in rows using a tiny drop of water. Use a long strip of teal fondant for the space bar at the bottom.
Create the paper by rolling out a long, thin strip of white fondant. Write your message repeatedly on the strip and drape it over the back of the typewriter.
Sculpt small cylinders for the side knobs and paint them silver. Place your finished masterpiece on a sturdy board and surround it with a few scattered fondant “paper scraps” for a realistic touch.
23. The ‘Origami’ Geometric Citrus Heart
Valentines Cake Ideas
Geometric precision meets bright flavor in this stunning modern heart. The white exterior features sharp facets that mimic a piece of folded paper or a rare crystal. A jagged opening reveals a vibrant orange center that looks like glowing embers.
Tangy citrus sponge provides a refreshing contrast to the sweet white chocolate shell. A single flake of silver leaf adds a touch of luxury to the center point. This design is excellent for those who appreciate clean lines and bold aesthetics.
Ingredients Needed
Orange zest sponge cake: 1
White chocolate candy melts: 2 cups
Orange fruit jam or curd: 1/2 cup
Silver leaf: 1 sheet
White velvet food spray: 1 can
Equipment Needed
Geometric heart silicone mold
Small spatula
Mixing bowl
Baking sheet
DIY Step by Step Instructions
Melt the white chocolate melts until they are completely liquid. Pour a generous amount into your geometric heart mold. Tilt the mold so the chocolate covers every facet and corner.
Turn the mold upside down over a bowl to remove the extra chocolate. Wipe the edges clean with a spatula and put the mold in the freezer for ten minutes.
Crumble your orange cake and mix it with the citrus curd until it is moist. Pack the cake mixture into the heart mold but stop about a quarter inch from the top.
Pour more melted white chocolate over the back of the cake to seal it. Scrape the surface flat and freeze the whole heart for another thirty minutes.
Carefully peel the silicone mold away from the hardened heart. Place the heart on a clean surface and coat it with the white velvet spray to give it a matte finish.
Use a small knife to gently scrape away a few of the center facets to reveal the orange cake inside. Attach a small piece of silver leaf to the center to finish the look.
24. The ‘Modern Art’ Stacked Cubes
Valentines Cake Ideas
Challenge traditional dessert shapes with this architectural cube display. Vibrant pink and deep purple blocks stack together in a playful and artistic arrangement. Gleaming mirror glazes and soft velvet textures provide a feast for the eyes.
Each block contains layers of rich chocolate mousse and light vanilla sponge. Silver leaf accents catch the light and add a high fashion feel to the presentation. It is a sophisticated choice for a trendy and stylish celebration.
Ingredients Needed
Vanilla sponge cake: 1 sheet
Chocolate mousse: 2 cups
Pink mirror glaze: 1 cup
Purple velvet food spray: 1 can
Silver leaf: 1 sheet
White chocolate ganache: 1 cup
Equipment Needed
Square silicone cube molds
Offset spatula
Cooling rack
Baking sheet
Tweezers
DIY Step by Step Instructions
Cut your vanilla sponge into small squares that fit inside your cube molds. Fill the molds halfway with chocolate mousse and press a sponge square into each. Fill the rest with mousse and freeze them overnight.
Remove the frozen cubes from the molds. Place half of them on a cooling rack over a baking sheet. Pour the warm pink mirror glaze over these cubes until they are fully coated.
Spray the remaining frozen cubes with the purple velvet spray. The cold temperature will create a fuzzy texture immediately.
Assemble the blocks on a flat board by stacking them in an uneven pile. Use a small dab of white chocolate ganache between the cubes to keep them from sliding.
Ensure the arrangement looks balanced and interesting from all sides. Use your tweezers to apply tiny flakes of silver leaf to random corners of the cubes.
Keep the cake in the fridge for two hours so the mousse can soften before you serve it to your guests.
25. The ‘Cupid’s Aim’ Heart Arrow
Valentines Cake Ideas
Hit the mark this year with a dessert that represents the ultimate shot of love. This long cylindrical cake features a stunning gradient of red, orange, and peach. A golden arrow pierces a small red heart at one end for a dramatic finish.
Feathered white chocolate details at the back of the arrow add a delicate and realistic touch. The sleek exterior hides a decadent red velvet interior with cream cheese filling. It is a bold and romantic choice for a true standout centerpiece.
Ingredients Needed
Red velvet cake roll: 1
Cream cheese frosting: 1 cup
Red and orange velvet spray: 1 can each
Gold luster dust: 1 teaspoon
White chocolate melts: 4 ounces
Red fondant: 2 ounces
Equipment Needed
Long cylindrical mold
Small paintbrush
Piping bag
Baking parchment
Tweezers
DIY Step by Step Instructions
Bake a thin red velvet sheet cake and spread it with cream cheese frosting. Roll the cake tightly and place it into a cylindrical mold. Freeze this for three hours until it is very firm.
Remove the cake from the mold and set it on a stand. Spray the left side with red velvet spray and the middle with orange. Use a light peach color for the right side to create a smooth gradient.
Melt the white chocolate and pipe small feathered shapes onto parchment paper. Let these harden to create the arrow fletching. Paint a long wooden skewer with gold luster dust mixed with a drop of oil.
Sculpt a small heart out of red fondant and a small triangle for the arrow tip. Paint the triangle gold and attach it to the front of the skewer. Push the skewer through the red fondant heart.
Insert the gold skewer through the center of the cake cylinder. It should look like the arrow is flying through the air and hitting the heart.
Use tweezers to attach the white chocolate feathers to the back end of the gold skewer. Place the finished cake on a white marble board for a clean and professional look.
26. The ‘Botanical’ Succulent Terrarium
Valentines Cake Ideas
Bring the beauty of a greenhouse to your table with this edible garden. A hexagonal glass container holds layers of “soil” and vibrant greenery. Every succulent and flower inside is crafted from delicious buttercream and cake trimmings.
Detailed textures and dusty colors make the plants look amazingly realistic. Small purple pansies add a pop of color to the earthy green and grey tones. This is a wonderful choice for a nature lover or a gardener.
Ingredients Needed
Chocolate cake crumbs: 2 cups
Vanilla buttercream: 2 cups
Green, purple, and pink food coloring
White sugar crystals: 1/4 cup
Heart shaped candy: 1
Equipment Needed
Hexagonal glass or acrylic bowl
Piping bags
Leaf and star piping tips
Small spoon
DIY Step by Step Instructions
Fill the bottom of your clean glass bowl with a layer of white sugar crystals to look like drainage rocks. Top this with a thick layer of chocolate cake crumbs to mimic rich potting soil.
Dye your buttercream into several shades of sage green, dusty pink, and deep purple. Use a piping bag with a star tip to create small rosettes that look like succulents on top of the soil.
Use a leaf tip to add small pointed leaves around the base of the succulents. Create different heights and shapes to make the garden look natural.
Pipe small purple pansies in the corners of the bowl. Add a tiny yellow dot in the center of each flower for a realistic detail.
Place a single grey heart shaped candy in the center of the soil to represent a garden stone. This adds a sweet hidden message to the design.
Wipe the inside of the glass with a damp paper towel to remove any stray crumbs. Serve the bowl in the center of the table so everyone can admire the details.
27. The ‘High Fashion’ Designer Handbag
Valentines Cake Ideas
Celebrate in style with a luxury accessory you can actually eat. This bright red handbag features realistic leather textures and meticulous white stitching. A large golden heart lock and coin accents provide a rich and opulent finish.
A floral silk scarf made of sugar is tied to the handle for a touch of elegance. This vanilla and strawberry cake is a dream come true for any fashion enthusiast. It stands tall and proud as a symbol of high end romance.
Ingredients Needed
Vanilla rectangular cake: 1
Strawberry buttercream: 2 cups
Red fondant: 3 lbs
Gold luster dust: 1 teaspoon
Edible floral paper: 1 sheet
White edible ink pen: 1
Equipment Needed
Textured fondant roller (leather pattern)
Stitching tool or toothpick
Small paintbrush
Square cake board
Knife
DIY Step by Step Instructions
Stack your vanilla cake layers with strawberry buttercream in between. Use a knife to carve the top of the cake into a slightly rounded shape like a classic satchel bag.
Cover the cake in a thin layer of buttercream. Roll out your red fondant using the textured roller to give it a leather appearance. Drape the fondant over the cake and smooth the sides.
Use your stitching tool or a toothpick to create small indentations along the seams of the bag. Trace over these lines with the white edible pen to look like real thread.
Sculpt two long handles out of red fondant and insert wire or skewers into the ends. Push the handles into the top of the cake so they stand upright.
Create a large heart shaped lock out of fondant and paint it with gold luster dust. Attach it to the front of the bag along with several small gold “coins.”
Cut a strip of edible floral paper and tie it gently around one of the handles. This sugar scarf completes the designer look and adds a soft texture to the piece.
28. The ‘First Valentine’ Polaroid Cake
Valentines Cake Ideas
Relive your favorite memories with a dessert that doubles as a photo album. A square white cake serves as the backdrop for a realistic Polaroid snapshot. The image features a romantic couple holding hands, complete with a handwritten date.
Fresh strawberries and mint leaves decorate the corner for a splash of color and flavor. This simple and heartfelt design is a wonderful way to celebrate a first year together. It turns your history into a sweet and edible masterpiece.
Ingredients Needed
Square vanilla cake: 1
White fondant: 1 lb
Edible ink printer paper: 1 sheet
Fresh strawberries: 3
Fresh mint leaves: 3
Black edible marker: 1
Equipment Needed
Square cake board
Offset spatula
Small knife
Ruler
DIY Step by Step Instructions
Frost your square cake with a smooth layer of vanilla icing and chill it for one hour. Roll out your white fondant and cover the cake, ensuring the edges are sharp and clean.
Print your favorite photo onto a sheet of edible paper. Cut the photo into a square shape.
Cut a larger rectangle out of white fondant to act as the Polaroid frame. The bottom part of the frame should be wider than the other three sides.
Dampen the back of the edible photo with a tiny bit of water and press it onto the fondant frame. Place the finished “Polaroid” in the center of the cake.
Use the black edible marker to write “Our First Valentine’s” and the year on the bottom of the frame. Make the handwriting look casual and natural.
Slice two strawberries in half and arrange them in the top left corner of the cake. Add the mint leaves to create a fresh and vibrant garnish that frames the photo.
29. The ‘Over the Moon’ Celestial Display
Valentines Cake Ideas
Take your love to another galaxy with this breathtaking crescent moon cake. One half features a deep navy sky with sparkling constellations and craters. The other half shines in brilliant silver like a glowing lunar surface.
A miniature Earth hangs from the top point to represent your whole world. The entire structure stands on a sleek marble base for a museum quality look. This honey and lavender cake is a stellar choice for a dreamers’ celebration.
Ingredients Needed
Honey lavender cake: 1
Navy blue fondant: 1 lb
Silver luster dust: 2 teaspoons
White sugar stars: 1 tablespoon
Blue and green fondant (for Earth): 1 ounce
Vodka or lemon juice: 1 teaspoon
Equipment Needed
Large round cake cutter
Small round ball tool (for craters)
Fine silver wire
Small paintbrush
Square marble board
DIY Step by Step Instructions
Bake a large round cake and use a circular cutter to remove a moon shape from the side. Stand the crescent upright on a small support block.
Cover the top half of the moon in navy blue fondant. Use your ball tool to press small craters into the surface. Attach the sugar stars to form a constellation.
Mix the silver luster dust with a drop of vodka to create a thick paint. Coat the bottom half of the moon until it is bright and metallic.
Roll a tiny ball of blue fondant and add small green patches to create a miniature Earth. Attach a thin silver wire to the ball.
Insert the other end of the wire into the top tip of the crescent moon so the Earth hangs freely.
Place a shooting star made of white fondant above the moon using a separate wire. This adds movement and a magical feel to the entire celestial scene.
30. The ‘Missing Piece’ Jigsaw Puzzle
Valentines Cake Ideas
Show your partner that they are the part that completes you with this clever puzzle cake. Each large jigsaw piece features a different texture, from glossy red to textured gold. A heart shaped gap in the center represents the bond that holds everything together.
One white marble piece sits slightly apart to show how the puzzle fits. This interactive and colorful design is a fun way to celebrate your unique connection. The variety of flavors in each piece keeps every bite exciting.
Ingredients Needed
Sheet cake (multiple flavors): 1
Red mirror glaze: 1/2 cup
Green velvet spray: 1 can
Gold luster dust: 1 teaspoon
White and black fondant (for marble): 4 ounces
Red fruit jam: 1/4 cup
Equipment Needed
Jigsaw puzzle cookie cutters
Heart shaped cutter
Offset spatula
Large flat board
DIY Step by Step Instructions
Bake several small cakes in different flavors like chocolate, vanilla, and pistachio. Use your jigsaw cutters to snap out six large interlocking pieces.
Coat two pieces in a deep red mirror glaze and let them set. Spray one piece with green velvet spray to create a fuzzy, mossy texture.
Cover another piece in white fondant and paint it with gold luster dust. For the marble piece, twist white and black fondant together and roll it flat before covering the cake.
Use your heart cutter to remove a heart shape from the center where the four middle pieces meet. Fill this heart shaped hole with bright red fruit jam.
Arrange the pieces on a large grey board so they almost touch. Leave the marble piece a few inches away from the rest to highlight the puzzle theme.
Add a few silver leaf flakes to the green piece for extra detail. This colorful and modern display is a great conversation starter for any party.
31. The ‘Pulse of Passion’ Glass Cube
Valentines Cake Ideas
Transparent elegance meets a striking heart frozen in time. A red, velvet-textured heart appears suspended within a crystal-clear square. Delicate pink petals float around the center, adding a soft touch to the sharp modern shape.
This design uses a clear gelatin or sugar base to create a window into your affection. Its clean lines and minimalist aesthetic make it a standout choice for a contemporary celebration. You will love how the light catches the bubbles trapped inside the “glass.”
Your partner will be amazed by the floating effect of the internal layers. Every angle offers a new view of the romantic scene inside. It is a sophisticated way to show that your heart belongs to them.
Ingredients Needed
For the Internal Heart:
1 cup red velvet cake crumbs
2 tablespoons cream cheese frosting
Red cocoa butter spray
For the Clear Cube:
4 cups water
1 cup granulated sugar
10 sheets of platinum grade leaf gelatin
Pink edible rose petals
Equipment Needed
Small heart shaped silicone mold
Square glass or silicone mold
Large mixing bowl
Small saucepan
Tweezers
DIY Step by Step Instructions
Start by making the small heart. Mix your red velvet crumbs with the frosting until it feels like clay. Press this mixture into a small heart mold and freeze it for one hour. Once it is solid, remove it and spray it with red cocoa butter for a fuzzy texture.
Prepare the clear base by soaking your gelatin sheets in cold water for five minutes. Heat the four cups of water and sugar in a saucepan until the sugar dissolves. Squeeze the water out of the gelatin and stir it into the warm syrup until it disappears. Let this liquid cool to room temperature.
Pour a small layer of the clear liquid into the bottom of your square mold. Place this in the fridge for twenty minutes until it is firm.
Use tweezers to place a few pink petals on the first firm layer. Pour another thin layer of liquid over them and chill again.
Set your red heart in the center of the mold once the second layer is firm. Slowly pour the rest of the clear liquid around it until the heart is covered.
Chill the entire cube overnight. To remove it, dip the bottom of the mold in warm water for five seconds and flip it onto a plate.
32. The ‘Marry Me’ Jewelry Box
Valentines Cake Ideas
Open up a world of luxury with this deep blue velvet box. The lid stays propped open to reveal a massive, sparkling sugar diamond sitting on a white quilted cushion. Red roses crawl up the side for a classic romantic finish.
Soft fabric textures are achieved through a special coating on the outside. Small golden studs highlight the quilting on the internal white surface. This cake creates a dramatic and high end atmosphere for an evening of romance.
Guests will find the contrast between the dark blue and bright red very striking. It looks like a treasure pulled straight from a boutique. This is a grand gesture for a milestone Valentine’s Day.
Ingredients Needed
For the Box:
Two 8 inch square vanilla cakes
2 cups white chocolate ganache
Blue velvet cocoa spray
White fondant
For the Diamond and Roses:
2 cups clear isomalt nibs
Red gum paste for flowers
Gold sugar pearls
Equipment Needed
Sharp knife
Fondant stitching tool
Small rose petal cutters
Large diamond silicone mold
Cake board
DIY Step by Step Instructions
Bake your square cakes and stack them with a layer of ganache. Trim the sides so they are perfectly straight. Use a knife to cut a shallow square hole out of the top of the cake.
Cover the whole cake in white chocolate ganache and smooth it flat. Freeze the cake for one hour. Spray the entire outside with blue velvet spray to get the fabric look.
Roll out a square of white fondant to fit inside the hole you carved earlier. Use a stitching tool to press diagonal lines across it to create a quilted pattern. Press a gold sugar pearl into every corner where the lines cross.
Melt your isomalt nibs in a microwave safe bowl in thirty second bursts. Pour the hot liquid into a diamond mold and let it harden completely.
Shape your red gum paste into small roses by rolling thin petals together. Attach these to the corner of the blue box using a little bit of melted chocolate.
Place the large sugar diamond in the center of the white quilted area. Prop a separate thin piece of blue cake or cardboard covered in blue fondant against the back to act as the open lid.
33. The ‘Master Key’ Bronze Relic
Valentines Cake Ideas
Antique charm shines through in this metallic masterpiece. An oversized, ornate bronze key sits atop weathered edible paper and a dark chocolate base. A small matching padlock rests nearby to complete the treasure hunt theme.
The key features complex swirls and heart shapes within the handle. Deep bronze and gold dust provide a realistic weathered metal appearance. It feels like a romantic artifact found in a secret garden.
Rich chocolate sponge provides a dark and moody flavor to match the visuals. This design is wonderful for those who love history or vintage aesthetics. It tells a story of a love that is safe and protected.
Ingredients Needed
For the Base:
One 9 by 13 inch chocolate sheet cake
1 cup dark chocolate frosting
For the Metal Details:
1 lb chocolate modeling clay
Bronze luster dust
Gold luster dust
Edible wafer paper
Brown food coloring
Equipment Needed
Small paintbrush
Sculpting tool
Scissors
Ruler
DIY Step by Step Instructions
Bake your chocolate sheet cake and let it cool. Trim it into a long, thin rectangle. Cover the top and sides with a thin layer of dark frosting.
Dip a small brush into brown food coloring mixed with water. Lightly brush the edges of your wafer paper to make it look like old, burnt parchment. Layer several pieces of this paper on top of the cake.
Roll your chocolate modeling clay into a long tube for the key stem. Sculpt a large heart shape with swirls inside for the top handle. Attach a small square block at the bottom with two notches for the key teeth.
Mix your bronze luster dust with a drop of clear alcohol or lemon juice. Paint the entire key until it looks like heavy metal.
Create a small heart shaped block of clay for the padlock. Paint this the same bronze color and add a small keyhole using a black edible pen.
Place the heavy key across the “paper” on the cake. Scatter a few gold flakes around the base to look like buried treasure.
34. The ‘Love is in the Air’ Balloon
Valentines Cake Ideas
Take your celebrations to new heights with this whimsical hot air balloon. The red and cream striped sphere floats above a woven basket filled with soft roses. Little gray sandbags hang from the side for a playful, realistic touch.
A bright orange flame glows at the base of the balloon to show it is ready for flight. The basket features a detailed weave pattern that looks just like real wicker. This design brings a sense of adventure and wonder to your table.
Vanilla sponge inside makes this a light and cheerful treat. It is a fantastic choice for a partner who loves travel or whimsical stories. You can almost imagine it drifting across a summer sky.
Ingredients Needed
For the Balloon:
One sphere shaped vanilla cake
Red and white fondant
For the Basket:
One 4 inch square chocolate cake
Brown buttercream
Pink and white fondant for roses
Gray fondant for sandbags
Equipment Needed
Four thick white skewers
Small basket weave piping tip
Piping bag
Cake stand
DIY Step by Step Instructions
Cover your square chocolate cake with brown buttercream. Use a basket weave piping tip to create horizontal and vertical lines until it looks like a woven basket.
Roll out gray fondant into small balls. Pinch the tops to look like bags and tie a tiny piece of string or fondant around the neck. Hang these from the corners of the basket.
Cover your sphere cake in white fondant. Cut long, thin triangles of red fondant and stick them vertically around the sphere to create the stripes.
Push four thick skewers into the corners of the basket. Ensure they are straight and strong.
Carefully lower the striped sphere cake onto the tops of the skewers so it sits high above the basket.
Fill the top of the basket with small pink and white roses made from fondant. Place a small piece of orange candy under the balloon to represent the burner flame.
35. The ‘Eternal Knot’ Cardamom Cake
Valentines Cake Ideas
Seamless loops create a symbol of never ending devotion. This white glazed knot features a single, bold gold stripe that follows the entire curve. A sprinkle of crushed pistachios at the base adds an earthy texture and flavor.
Light cardamom sponge offers a sophisticated and aromatic tasting experience. The smooth mirror glaze reflects the surroundings like a piece of polished marble. It is a modern and minimalist way to celebrate a deep connection.
This design is great for those who prefer clean lines over busy decorations. The gold accent provides just enough luxury without being overwhelming. It is a calm and beautiful centerpiece for a quiet dinner.
Ingredients Needed
For the Knot:
2 cups cardamom sponge cake batter
1 cup white mirror glaze
1/2 cup crushed pistachios
For the Gold Detail:
Gold luster dust
One teaspoon of vegetable oil
Equipment Needed
Infinity or knot shaped silicone mold
Wire cooling rack
Small paintbrush
Baking sheet
DIY Step by Step Instructions
Pour your cardamom cake batter into the knot mold and bake at 325 degrees for twenty minutes. Let it cool completely and then freeze it for two hours.
Place the frozen knot on a wire rack over a baking sheet. Pour your warm white mirror glaze over the cake in a slow, steady circle until it is fully covered.
Let the glaze drip for ten minutes. Use a small spatula to tidy up the bottom edges.
Mix your gold luster dust with a tiny drop of oil to create a thick paint.
Use a small brush to draw a single line along the very top ridge of the knot. Follow the curve all the way around so the gold line never ends.
Press crushed pistachios around the very bottom edge of the cake. This covers the seam and adds a lovely green color to the white and gold.
36. The ‘Folk Art’ Painted Heart
Valentines Cake Ideas
Vibrant colors and traditional patterns make this heart a standout piece of art. Intricate swirls of blue, yellow, and white icing cover the bright red surface. A small white dove sits peacefully on top to symbolize harmony and affection.
The style mimics classic European embroidery or wood painting. Every leaf and flower is hand piped to create a textured and rich appearance. It feels warm, handcrafted, and deeply personal.
Red velvet cake hides beneath the colorful exterior for a familiar and beloved flavor. This choice is wonderful for a partner who appreciates tradition and heritage. It is a colorful explosion of love.
Ingredients Needed
For the Heart:
One 8 inch heart shaped red velvet cake
2 cups red buttercream
For the Art:
1 cup royal icing (divided)
Blue, yellow, and white food coloring
One small white chocolate bird
Equipment Needed
Piping bags
Very small round piping tips
Offset spatula
Toothpick
DIY Step by Step Instructions
Cover your heart cake in red buttercream. Use an offset spatula to make the surface as smooth and flat as possible.
Dye your royal icing into bright blue and yellow. Keep one portion white. Fill your piping bags and use the smallest tips you have.
Start in the center of the heart by piping a large blue flower. Use the yellow icing to add dots and small petals around it.
Draw long, sweeping white swirls that move from the center toward the outer edges of the heart. Add small blue leaves and yellow buds along these white vines.
Use a toothpick to gently drag through any wet icing dots to create a “teardrop” or “leaf” shape. This gives it a more professional look.
Place your white chocolate dove on the top curve of the heart. Surround the base of the bird with a few extra white icing swirls so it looks like it is nesting in the flowers.
37. The ‘Whole World’ Travel Globe
Valentines Cake Ideas
Tell your partner they mean everything with a globe that celebrates your journeys. Teal oceans contrast with shimmering gold continents and dotted heart flight paths. Small paper planes fly between the gold hearts to mark your favorite memories.
A golden compass sits at the very top of the sphere to guide the way. The entire globe rests in a sturdy vintage stand made of painted chocolate. It is a grand and meaningful tribute to your adventures together.
Spiced honey cake inside provides a warm and comforting flavor. This design is excellent for couples who love to explore and see the world. It turns your history into a sweet destination.
Ingredients Needed
For the Globe:
One sphere shaped honey spice cake
1 lb teal fondant
Gold leaf or gold luster dust
For the Base and Planes:
1 lb dark chocolate modeling clay
White fondant for planes
Gold paint
Equipment Needed
Sphere cake mold
Small paintbrush
Toothpick
Compass shaped mold or small knife
DIY Step by Step Instructions
Cover your sphere cake in a smooth layer of teal fondant. This represents the oceans of your globe.
Look at a map and cut out the shapes of the continents from gold leaf or gold painted fondant. Stick these onto the teal sphere with a tiny bit of water.
Pipe a dotted line using white icing to connect different cities on the globe. At the end of each line, pipe a small heart shape.
Fold tiny pieces of white fondant into the shape of paper airplanes. Use a toothpick to attach these “planes” along the dotted lines.
Sculpt a large ring and a base out of chocolate modeling clay. Paint the whole stand gold and let it harden.
Set the teal globe into the golden stand. Attach a small gold compass to the top of the sphere to complete the look.
38. The ‘L’Amour Fromage’ Savory Illusion
Valentines Cake Ideas
Fool your guests with a dessert that looks like a high end cheese board. This white “Brie” wheel features a jammy red center that spills out when sliced. Realistic purple sugar grapes and crackers finish the sophisticated savory-sweet illusion.
The exterior has a slightly dusty, matte finish to mimic the rind of soft cheese. A small sign on top confirms this is a “Love Cheese” celebration. It is a clever and humorous choice for a foodie Valentine.
Vanilla cheesecake provides the creamy texture that makes the illusion even better. Your partner will love the surprise when they cut into the first slice. It is a gourmet experience with a sugary twist.
Ingredients Needed
For the Cheese:
One 6 inch round vanilla cheesecake
1 cup thick raspberry jam
White velvet food spray
For the Garnish:
Purple fondant for grapes
Graham crackers
Small piece of white cardstock
Equipment Needed
Circle cutter
Small spatula
Tweezers
Wooden serving board
DIY Step by Step Instructions
Bake a standard vanilla cheesecake and let it set in the fridge. Use a small circle cutter to remove a hole from the center of the cake.
Fill the center hole with thick raspberry jam. Cover the top with a small piece of cheesecake you removed earlier to hide the jam.
Smooth the sides of the cheesecake with a spatula. Spray the entire cake with white velvet food spray to give it that fuzzy Brie rind look.
Roll purple fondant into small, round grapes. Use tweezers to cluster them together and attach a small real grape vine if you have one.
Place the “cheese” wheel on a wooden board. Lean a few graham crackers against the side.
Cut a small wedge out of the cake so the red jam spills out onto the board. Write “L’Amour Fromage” on your cardstock and stick it into the top of the cake.
39. The ‘Love is the Cure’ Capsule
Valentines Cake Ideas
Modern medicine gets a sweet makeover with this oversized pill design. One half glows with a glossy blue finish, while the other features a soft red texture. A silver center bar splits the cake to reveal rich, multi-layered chocolate and caramel.
The giant capsule stands upright to show off the intricate internal layers. Small silver plus and minus signs decorate the ends for a clinical but cute feel. This piece is a fun way to say that your partner is the best medicine.
Alternating layers of chocolate and vanilla sponge make every bite interesting. It is a unique and edgy design for a science lover. This cake will certainly be the talk of the evening.
Ingredients Needed
For the Capsule:
Three 6 inch round chocolate cakes
Blue mirror glaze
Red velvet cocoa spray
Silver luster dust
For the Filling:
Salted caramel sauce
Vanilla buttercream
Equipment Needed
Tall cylindrical cake stand
Sharp knife
Small spatula
Wire cooling rack
DIY Step by Step Instructions
Stack your cakes with layers of caramel and buttercream. Use a knife to carve the top and bottom into rounded domes so you have a long capsule shape.
Cut the capsule in half horizontally. Cover the top half in smooth buttercream and chill. Cover the bottom half and chill as well.
Pour blue mirror glaze over the top half while it is sitting on a wire rack. Let it set until it is shiny and firm.
Spray the bottom half with red velvet spray to give it a matte, fabric-like appearance.
Sculpt a thin ring of fondant and paint it silver. Place this between the two halves of the capsule.
Stand the bottom red half on a plate. Use a few skewers to help the blue half stay upright on top of the silver ring. Cut a small slice out of the middle to show off the layers inside.
40. The ‘Galaxy Constellation’ Heart
Valentines Cake Ideas
Peer into the night sky with a deep, textured dark cake that mimics space. A constellation of stars forms a glowing heart shape across the front. A silver shooting star leaves a trail of dust, making the entire piece feel cosmic and grand.
The dark “stone” texture is achieved with black cocoa and crushed cookies. Small purple and blue nebula clouds are painted onto the surface for added depth. It is a breathtaking tribute to a love that was written in the stars.
Dark chocolate and mint layers provide a cool and refreshing taste. This design is wonderful for those who love astronomy or stargazing. It is a piece of the universe on a plate.
Ingredients Needed
For the Galaxy:
One large square chocolate mint cake
Black cocoa powder
Crushed chocolate cookies
Silver leaf
For the Stars:
White sugar pearls
Silver luster dust
Blue and purple gel colors
Equipment Needed
Small sponge for painting
Tweezers
Fine mesh strainer
Cake board
DIY Step by Step Instructions
Cover your square cake in black buttercream mixed with crushed cookies. Use a strainer to dust the whole thing with extra black cocoa powder for a matte look.
Use a small sponge to dab tiny amounts of blue and purple food coloring onto the front of the cake. This creates the look of distant space clouds.
Use tweezers to place white sugar pearls in the shape of a heart constellation. Connect the dots using a very fine brush and silver paint.
Apply a large piece of silver leaf to the top corner. Drag a little bit of the silver down the cake to look like the tail of a shooting star.
Sprinkle a tiny amount of edible silver glitter over the entire cake to look like distant, twinkling stars.
Cut a jagged corner out of the bottom of the cake to show the mint green and dark chocolate layers inside. This makes it look like a piece of space rock that has been broken open.
41. The ‘Floating Affection’ Balloon Cake
Valentines Cake Ideas
Reach new heights of romance with this striking balloon design. A metallic pink heart floats gracefully above a festive base covered in colorful sprinkles. This creation captures the joy and lightness of being in love.
The smooth finish mimics a real party balloon. It stands out as a bold centerpiece for any modern celebration. You will find that the sprinkle base adds a playful crunch to every single slice.
Ingredients Needed
For the Base Cake:
2 cups all purpose flour
1.5 cups granulated sugar
3.5 teaspoons baking powder
1 teaspoon salt
1 cup whole milk
0.5 cup unsalted butter
1 tablespoon vanilla extract
2 large eggs
1 cup rainbow sprinkles
For the Decoration:
2 cups white chocolate ganache
Pink metallic food spray
1 lb white modeling chocolate
White royal icing
Equipment Needed
6 inch round cake pan
Heart shaped balloon mold or large heart silicone mold
Mixing bowls
Electric hand mixer
Long sturdy plastic or glass rod
Small offset spatula
Turntable
DIY Step by Step Instructions
Start by baking your sprinkle cake base. Whisk the dry ingredients together and then mix in the butter and milk. Add the eggs and vanilla last. Fold in half of your sprinkles. Bake at 350 degrees for 25 minutes. Let it cool completely.
Prepare your heart shape using modeling chocolate. Press the modeling chocolate into your heart mold and ensure it is smooth. Freeze this for thirty minutes to make it firm.
Remove the heart from the mold and insert your sturdy rod into the bottom point. Secure the rod with a bit of melted white chocolate.
Spray the entire heart with pink metallic food spray. Rotate it slowly to get an even coat on all sides. Let the color dry for ten minutes.
Cover your cooled round cake with white royal icing. Press the remaining rainbow sprinkles into the sides of the cake until it is fully covered.
Push the other end of the heart rod into the center of the sprinkle cake. Ensure the rod goes all the way to the bottom board for stability. Finish by piping a tiny knot of modeling chocolate where the rod meets the heart to look like a balloon tie.
42. The ‘Love Potion No. 9’ Flask
Valentines Cake Ideas
Brew some magic this year with a laboratory inspired dessert. This tall flask holds a bubbling pink concoction that seems to smoke with passion. A tattered paper label confirms that you have finally found the right recipe for romance.
The glossy exterior shines under the lights. It looks exactly like glass but tastes like sweet strawberry heaven. Your guests will be spellbound by the realistic vapor effects and vibrant colors.
Ingredients Needed
For the Strawberry Cake:
1.5 cups fresh strawberry puree
3 cups cake flour
2 cups sugar
1 cup unsalted butter
4 large eggs
1 teaspoon baking soda
For the Flask and Vapor:
3 cups clear isomalt or hard candy mix
Pink food coloring
White cotton candy
Edible wafer paper
Brown food coloring for aging
Equipment Needed
Erlenmeyer flask silicone mold
Small saucepan
Candy thermometer
Small paintbrush
Heat resistant gloves
DIY Step by Step Instructions
Bake your strawberry cake in the flask mold. If you do not have a mold, bake a tall cylinder and carve it into a cone shape with a narrow neck. Let the cake cool and crumb coat it with a thin layer of pink frosting.
Melt your isomalt in a saucepan until it reaches 320 degrees. Use extreme caution because the liquid is very hot. Add a tiny drop of pink coloring to the liquid.
Pour the hot isomalt over your chilled cake carefully. The cold cake will help the sugar set quickly into a glass like shell. Ensure the neck of the flask is fully coated.
Cut a small rectangle out of the wafer paper. Use a dry brush with a tiny bit of brown coloring to smudge the edges so the paper looks old. Write your potion name on the label with an edible ink pen.
Attach the label to the front of the flask using a dab of corn syrup. Sculpt a small cork out of brown fondant and place it on top of the flask neck.
Pull apart a few pieces of white cotton candy. Arrange the fluffy pieces around the opening of the flask to look like rising steam. Serve this immediately as cotton candy can melt in high humidity.
43. The ‘Checkmate My Heart’ Chess Duo
Valentines Cake Ideas
Strategy meets sweetness in this grand chess display. A towering black king and a graceful white queen stand together on a classic marble board. Tiny gold butterflies and pearls decorate the queen for a touch of royal elegance.
This design celebrates a partnership that is truly winning. The matte finish of the pieces gives them a sophisticated and high end look. It is the ultimate choice for couples who enjoy a quiet evening of games.
Ingredients Needed
For the Chess Pieces:
4 cups chocolate cake crumbs
1 cup chocolate frosting
2 lbs white modeling chocolate
1 lb black fondant
For the Decor:
White sugar pearls
Edible gold leaf
Black cocoa powder
White velvet food spray
Equipment Needed
Large chess piece molds
Sculpting tools
Large square cake board
Rolling pin
Ruler
DIY Step by Step Instructions
Create a cake pop mixture by combining your chocolate cake crumbs and frosting. Press this mixture firmly into the large king and queen molds. Freeze these for two hours until they are rock solid.
Remove the pieces from the molds. Cover the king in black fondant and use a small tool to smooth out any seams. Dust him with black cocoa powder for a deep matte finish.
Cover the queen in white modeling chocolate. Spray her with white velvet food spray to give her a soft and luxurious texture.
Use a tiny bit of water to attach white sugar pearls around the base of the queen’s crown. Apply small flakes of gold leaf to her body to look like butterflies.
Create your chessboard by covering a large square board with white fondant. Use a ruler and black edible ink to draw the grid pattern.
Stand the king and queen in the center of the board. Scatter a few small chocolate “pawns” around them to make the scene look like an active game.
44. The ‘Main Squeeze’ Lemon Crate
Valentines Cake Ideas
Freshness takes on a new meaning with this hyper realistic lemon crate. These bright yellow fruits look like they were just picked from a sun drenched grove. A tiny sign reminds your partner that they are your only squeeze.
Slicing into a lemon reveals a hidden pink and white center. This unexpected color pop makes for a wonderful surprise during dessert time. The wooden crate base is fully edible and adds a rustic charm to the table.
Ingredients Needed
For the Lemon Cakes:
2 cups lemon flavored cake batter
Pink food coloring
White buttercream
For the Crate and Finish:
12 large graham crackers
Dark chocolate ganache
Yellow modeling chocolate
Clear piping gel
Equipment Needed
Small oval cake molds
Small wood grain texture mat
Small wooden dowel
Tweezers
DIY Step by Step Instructions
Divide your cake batter and dye half of it bright pink. Bake small pink and white rounds and stack them with buttercream. Use an oval mold to shape these into small lemon sized cakes.
Coat each oval cake in a thin layer of buttercream and chill. Roll out your yellow modeling chocolate and wrap it around the cakes. Use a toothpick to poke tiny dots all over the surface to create a lemon skin texture.
Brush the yellow lemons with a little bit of clear piping gel. This makes them look like they have fresh dew on them.
Construct your crate using graham crackers. Glue the crackers together in a square shape using dark chocolate ganache. Press a texture mat into the ganache before it sets to create a wood grain look.
Fill the bottom of the crate with a few extra cake scraps or shredded paper. Place your edible lemons inside the crate in a neat pile.
Write your message on a small piece of wafer paper and glue it to a wooden dowel. Stick the sign into the corner of the crate so your Valentine can see the heartfelt note.
45. The ‘Eternal Flame’ Torch
Valentines Cake Ideas
Ignite the night with a dessert that glows with intensity. A tall black cone erupts with vibrant sugar flames and shimmering sparks of gold. This piece represents a passion that burns bright and never fades away.
The textured dark base contrasts beautifully with the warm orange hues. It stands as a powerful symbol of your enduring commitment. Every guest will stop to admire the dramatic movement captured in the sugar work.
Ingredients Needed
For the Torch Base:
3 cups dark chocolate cake batter
1 cup black cocoa buttercream
Black sanding sugar
For the Fire:
2 cups granulated sugar
1 cup light corn syrup
Orange and red food coloring
Edible gold glitter
Equipment Needed
Tall cone shaped cake mold
Baking parchment
Large baking sheet
Small fan (optional)
DIY Step by Step Instructions
Bake your dark chocolate cake in a tall cone mold. Once it is cool, stand it upright on a heavy plate. Use a bit of melted chocolate on the bottom to keep it from tipping over.
Cover the cone in black buttercream. While the frosting is still wet, roll the cake in black sanding sugar. This gives the torch a rough and volcanic stone appearance.
Combine the sugar and corn syrup in a pot and heat until it reaches 300 degrees. Divide the liquid and add red and orange coloring.
Pour the hot sugar onto a baking sheet lined with parchment paper in long and thin splatters. Use a toothpick to pull the edges into sharp flame shapes. Sprinkle the gold glitter over the wet sugar.
Let the sugar flames cool and harden completely. Carefully peel them off the parchment paper.
Push the bottom of each sugar flame into the top of the cake cone. Arrange them so the taller red flames are in the center and the shorter orange ones are on the outside. This creates a realistic and flickering fire effect.
Key Takeaways
Creative shapes like books and locks offer a modern twist on classic romance.
Instructions stay simple so that even beginners can master complex looking designs.
Bold colors and unique textures create a visual feast for your eyes.
Personalized elements add a deep emotional layer to every dessert.
Bringing a little extra flair to your kitchen makes this holiday feel truly special. You do not need to be a master baker to attempt these creative shapes and textures.
The Recipe Fork hopes these ideas spark your imagination and sweeten your season. We invite you to try something bold and watch your partner face light up.
Love resides in the details. These cakes prove that devotion tastes as good as it looks.
Spread the loveFinding the right gift for February fourteenth can feel like a chore. Shops often fill with the same red boxes and tired flowers. You want to give something that shows real thought and…
Spread the loveValentine’s Day often feels like a high pressure search for the right gift. You want to show him how much you care without spending all day in the kitchen. These sweet treats offer…
Spread the loveFinding the right gift for the holidays often feels like a puzzle. You want something personal, yet you might not have hours to spend in a hot kitchen. Easy fudge is the ultimate…