Valentine Day offers a wonderful chance to get messy in the kitchen with your little ones. These bite sized treats bring smiles to every face and fill your home with sweetness. You do not need fancy skills to create something memorable.
Valentines Cake Pops
Cake pops are a great choice for holiday parties or school swaps. Kids love rolling the dough and choosing vibrant colors for the shell. Every stick holds a tiny piece of edible art that looks amazing.
This guide features a wide variety of designs to suit any skill level. You will find everything from silly monsters to elegant roses. Grab your apron and get ready to celebrate the season of love with these recipes.
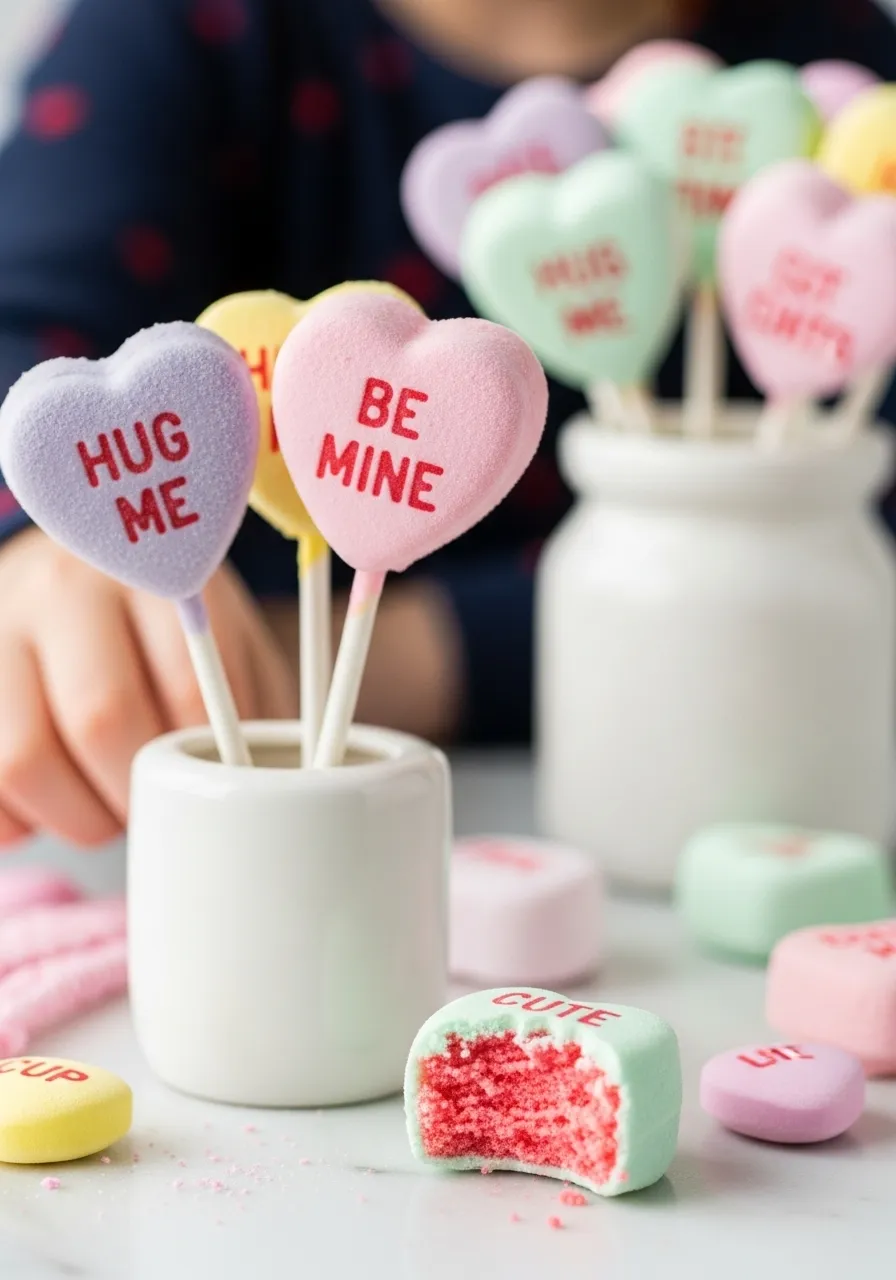
These colorful treats mimic those classic chalky candies we all know. Your kids can help choose their favorite phrases to write on each heart. Bright pinks and soft purples make this snack stand out on any dessert table.
Every bite reveals a moist center hidden beneath a crunchy shell. Baking together creates lasting memories during the holiday of love. You can easily customize the colors to match your party theme.
Friends and family will enjoy these portable sweets at school parties or home gatherings. Using simple ingredients makes the process stress free for busy parents. Kids feel a sense of pride when they see their handiwork displayed in a cute jar.
Ingredients
1 box of strawberry cake mix
Half a cup of vanilla frosting
Pink purple and green candy melts
Edible food markers in red
Paper lollipop sticks
Equipment
Large mixing bowl
Baking pan
Small microwave safe bowl
Styrofoam block or cake pop stand
Heart shaped cookie cutter
DIY Instructions
Bake the cake using the box instructions and let it cool completely.
Crumble the cooled cake into tiny pieces inside a large bowl.
Add a small amount of frosting and mix until the texture feels like damp sand.
Press the mixture into a flat layer about one inch thick on a tray.
Use your heart cutter to stamp out small shapes from the cake dough.
Place the shapes in the freezer for twenty minutes to firm them up.
Melt your candy coatings in the microwave using thirty second intervals.
Dip the end of a stick into the melted candy and push it into a heart.
Submerge the entire heart into the melted coating and tap off any extra liquid.
Stick the pops into your foam block and wait for the shell to harden.
Write sweet messages on the front using your edible food markers.
2. Love Bug Ladybug Cake Pops
Valentines Cake Pops
Children will adore these bright red ladybug treats. Each little bug features a friendly face and tiny spots. You can use black candy melts for the head and red for the body.
Tiny sugar eyes bring these insects to life instantly. Red sprinkles or edible glitter add a festive shimmer to the shell. These bugs make a wonderful addition to any school party.
Baking with your little ones becomes a joy with this design. You only need a few colors to create a professional look. Guests will smile when they see these crawling across your dessert platter.
Ingredients
1 baked vanilla cake
4 ounces cream cheese frosting
Red candy wafers
Black candy wafers
Candy eyeball decorations
Chocolate sprinkles for spots
Equipment
Mixing bowl
Cookie scoop
Microwave safe bowls
Lollipop sticks
Parchment paper
Toothpicks
DIY Instructions
Crumble the baked cake into a bowl until it looks like fine crumbs.
Mix in the frosting until the cake feels like soft dough.
Roll the mixture into round balls about the size of a golf ball.
Melt a small amount of black candy coating in the microwave.
Dip the tip of a stick into the black coating and push it into a cake ball.
Chill the balls in the fridge for thirty minutes so they stay firm.
Melt the red candy coating in a deep bowl.
Submerge the cake ball into the red coating until it is fully covered.
Let the red shell dry completely on the parchment paper.
Dip one side of the ball into melted black candy to create the head.
Attach the candy eyes using a tiny drop of melted candy as glue.
Use a toothpick to add black dots or sprinkles onto the red back.
3. Cuddly Valentine Teddy Bear Pops
Valentines Cake Pops
Soft brown tones make these teddy bears look incredibly huggable. Tiny heart sprinkles held in their paws send a sweet message. You can create different expressions with just a bit of frosting.
Small chocolate chips work well for the ears and snout. These treats are thick and satisfying for kids of all ages. Your kitchen will smell like sweet cocoa throughout the process.
Displaying these bears in a jar filled with red candy hearts looks beautiful. Simple shapes make this an excellent project for beginners. Everyone loves a gift they can actually eat.
Ingredients
1 chocolate cake
Half a cup of chocolate frosting
Light brown candy melts
Dark chocolate chips
Red heart shaped sprinkles
White icing pen
Equipment
Large bowl
Baking sheet
Small bowls for melting
Cake pop sticks
Foam block for drying
DIY Instructions
Break the chocolate cake into small pieces in your large bowl.
Blend the frosting with the cake until it forms a thick paste.
Shape the dough into round balls for the bear heads.
Chill these rounds in your freezer for fifteen minutes.
Melt the brown candy coating until it is smooth and liquid.
Dip a stick into the coating and insert it into a cake ball.
Place two chocolate chips on top of the head to act as ears.
Coat the entire head by dipping it into the brown liquid.
Tap the stick gently to remove any excess coating.
Press a red heart sprinkle onto the front while the shell is wet.
Add a white icing dot for the nose once the brown shell dries.
Use the icing pen to draw small eyes and a mouth.
4. Sparkly Galaxy Love Orbs
Valentines Cake Pops
Vibrant swirls of purple and blue create a stunning cosmic effect. Silver edible stars make these treats shine like the night sky. Each orb feels like a tiny piece of art on a stick.
Kids will enjoy watching the colors mix together in the bowl. No two pops will ever look exactly the same. This design is excellent for older children who love science and space.
Glossy finishes give these sweets a high end appearance. You can add pink streaks to emphasize the Valentine theme. These will certainly be the talk of your holiday gathering.
Ingredients
1 yellow cake
4 ounces vanilla buttercream
Navy blue candy melts
Purple and pink candy melts
Silver edible glitter
Edible star sprinkles
Equipment
Deep bowl for dipping
Microwave
Cake pop stand
Spatula
DIY Instructions
Mix your cake crumbs and buttercream together in a bowl.
Form the mixture into smooth round balls.
Put the balls in the refrigerator to keep them cold.
Melt the navy blue candy coating in a deep container.
Melt the purple and pink coatings in separate smaller bowls.
Drizzle streaks of purple and pink over the top of the blue coating.
Dip a stick into the blue coating and push it into a cake ball.
Submerge the ball into the multicolored coating and twist it slowly.
Lift the pop out to see the marbled galaxy pattern.
Sprinkle silver glitter and stars over the wet surface.
Set the pops upright in a stand to dry.
5. Cupid’s Bullseye Arrow Pops
Valentines Cake Pops
White chocolate discs serve as the base for this clever target design. Bright red rings indicate where Cupid has struck his mark. These flat pops are easier for small hands to decorate.
Red arrows made of candy or paper pierce through the center. This playful theme fits the Valentine holiday very well. You can use a steady hand to draw the concentric circles.
Baking these as flat circles prevents them from rolling off the sticks. Your family will enjoy the mix of textures in every bite. They look wonderful when wrapped in clear plastic bags with ribbons.
Ingredients
1 box of white cake mix
3 tablespoons of frosting
White chocolate coating
Red edible ink marker
Red candy hearts for the arrow tip
Equipment
Circular cookie cutter
Rolling pin
Parchment paper
Small paint brush
DIY Instructions
Combine the cake crumbs and frosting to make a dough.
Roll the dough out on parchment paper until it is half an inch thick.
Cut out circles using your cookie cutter.
Freeze these circles for ten minutes so they become sturdy.
Melt your white chocolate and dip the sticks into it.
Press the sticks into the cake circles and let them set.
Dip each circle into the white chocolate to cover it fully.
Lay them flat on parchment paper to harden completely.
Draw three red circles on the face using the edible marker.
Place a small red dot in the very center.
Attach a toothpick with a candy heart on one end to look like an arrow.
6. “Bee Mine” Honey Bee Pops
Valentines Cake Pops
Bright yellow bodies make these honey bees look cheerful and sweet. Chocolate stripes add a fun contrast to the sunny color. These treats provide a cute way to ask someone to be yours.
Almond slices or small candy pieces create delicate wings. A tiny red heart at the mouth adds a romantic touch. Your kids will love making these busy little creatures.
Soft yellow candy melts create a smooth and inviting finish. These pops look fantastic when grouped together in a flower pot. Everyone will appreciate the effort put into these tiny details.
Ingredients
1 lemon cake
4 ounces lemon frosting
Yellow candy melts
Dark chocolate frosting
Sliced almonds
Tiny red heart sprinkles
Equipment
Piping bag with a small tip
Mixing bowl
Microwave safe container
Lollipop sticks
DIY Instructions
Mash the lemon cake and frosting together until smooth.
Shape the mixture into oval bodies rather than circles.
Chill the ovals in the fridge for twenty minutes.
Melt the yellow candy coating in your microwave.
Dip a stick in the yellow coating and insert it into a cake oval.
Dip the entire oval into the yellow liquid to coat it.
Let the yellow shell dry on a piece of parchment paper.
Pipe three thin chocolate lines across the back for stripes.
Insert two almond slices into the top while the chocolate is wet.
Add two small chocolate dots for eyes near the front.
Glue a red heart sprinkle to the front for the mouth.
7. Overloaded Valentine Sprinkle Pops
Valentines Cake Pops
Colorful sprinkles cover these pops from top to bottom. This design is the best choice for children who love lots of texture. You can use a mix of hearts, pearls, and classic jimmies.
White chocolate underneath makes the bright colors pop beautifully. These are very simple to assemble even for the youngest bakers. You do not need any special drawing skills for this style.
Every bite offers a satisfying crunch followed by soft cake. These treats bring a burst of energy to any Valentine celebration. You can vary the sprinkle colors to create a rainbow effect.
Ingredients
1 vanilla cake
4 ounces vanilla frosting
White candy melts
Assorted Valentine sprinkles (hearts and red pearls)
Equipment
Large bowl for sprinkles
Deep bowl for dipping
Cake pop sticks
Baking tray
DIY Instructions
Crumble your cake and mix it with the vanilla frosting.
Roll the dough into firm round balls.
Refrigerate the balls for at least fifteen minutes.
Melt the white candy coating until it flows easily.
Fill a separate bowl with your favorite Valentine sprinkles.
Dip a stick into the coating and place it into a cake ball.
Submerge the ball into the white coating to cover it.
Lift it out and let the excess drip off for a moment.
Roll the wet pop in the bowl of sprinkles until fully covered.
Press the sprinkles gently with your fingers to make them stick.
Place the finished pops in a stand to dry completely.
8. “Whooo” Loves You Owl Pops
Valentines Cake Pops
Pink owls with large eyes look absolutely charming on a dessert table. Heart shaped bellies emphasize the Valentine’s Day theme perfectly. You can use different shades of pink for the feathers.
Small candy pieces work well for the ears and beak. These wise little birds are sure to capture everyone’s heart. Using a cake pop stand helps keep their ears from touching anything.
Baking these together allows kids to practice their fine motor skills. The detailed faces look impressive but are easy to achieve. Your guests will be amazed by your creative kitchen skills.
Ingredients
1 strawberry cake
4 ounces cream cheese icing
Pink candy melts
White fondant or large white sprinkles
Small orange candy for the beak
Black edible ink pen
Equipment
Small circle cutter
Toothpicks
Microwave safe bowls
Sticks
DIY Instructions
Mix your strawberry cake crumbs and icing together.
Roll the mixture into egg shapes for the owl bodies.
Chill the shapes in your freezer for ten minutes.
Melt the pink candy coating in a deep bowl.
Dip your stick in the pink coating and push it into the cake egg.
Submerge the entire egg into the pink liquid.
Attach two small white circles for the eyes while wet.
Place a tiny orange candy in the middle for the beak.
Draw two black dots on the white circles for pupils.
Add a heart shaped sprinkle to the chest for the belly.
Use two small dollops of candy on top to form the ears.
9. Magical Valentine Unicorn Pops
Valentines Cake Pops
Gold horns and pastel manes turn these cake pops into a fantasy. Sparkling glitter adds a touch of magic that kids will love. These treats are great for a themed Valentine party.
Swirled frosting manes create a beautiful and colorful look. Each unicorn can have a unique personality based on the colors you choose. This design is very popular and looks very high end.
Children will feel like they are in a fairy tale while eating these. You can use pre made gold horns to save time. These pops are almost too pretty to eat but too tasty to resist.
Ingredients
1 white cake
4 ounces vanilla frosting
White candy melts
Pink blue and purple buttercream
Gold edible glitter
Fondant for horns and ears
Equipment
Piping bags with star tips
Small paintbrush
Lollipop sticks
Foam block
DIY Instructions
Blend the white cake and frosting to create a dough.
Roll the dough into round balls and chill them.
Melt the white candy coating in a deep container.
Dip a stick into the coating and insert it into a ball.
Submerge the ball in white coating and let it dry.
Roll a small piece of fondant into a cone for the horn.
Paint the horn with gold glitter and attach it to the top.
Cut two small triangles for ears and stick them on.
Pipe small swirls of pink blue and purple frosting for the mane.
Draw closed eyes with lashes using a black edible pen.
Add a tiny bit of pink dust for the cheeks.
10. Puppy Love Paw Print Pops
Valentines Cake Pops
Tan colored pops with brown paw prints are simply adorable. A small red heart in the center of the paw adds a sweet touch. These are the best choice for any animal lover in your family.
Simple shapes make this a great project for younger children. You can use chocolate chips for the toes to make it even easier. These treats look wonderful displayed in a dog bowl filled with candy.
Your kitchen will feel full of “puppy love” with these sweets. These are very easy to handle and eat on the go. Everyone will want to take a bite out of these cute paws.
Ingredients
1 vanilla cake
4 ounces vanilla frosting
Tan or peanut butter candy melts
Dark chocolate melting wafers
Small red heart sprinkles
Equipment
Microwave safe bowls
Sticks
Parchment paper
Toothpicks
DIY Instructions
Mix the cake crumbs and frosting until a dough forms.
Roll the dough into round balls and press them slightly flat.
Chill the flattened balls in the fridge for twenty minutes.
Melt the tan candy coating in a deep bowl.
Dip the stick in the coating and push it into the cake disc.
Submerge the disc in the tan coating until covered.
Let the base coat dry on a piece of parchment paper.
Melt the dark chocolate wafers in a small bowl.
Use a toothpick to draw a large triangle for the main paw pad.
Add four small chocolate dots above the triangle for toes.
Place a red heart sprinkle in the middle of the large pad.
11. Sealed with a Kiss Lip Pops
Valentines Cake Pops
Bold red colors make these lip shaped treats stand out immediately. Red sugar crystals add a glittering texture that shines under any light. Your kids will have fun posing with these before taking a big bite.
Dipping the shaped cake into deep red chocolate creates a smooth base for the decorations. Small hands can help shake the red sprinkles over the wet surface. This design is a classic choice for the holiday of love.
Friends will laugh when they see these playful snacks at your gathering. Each bite provides a sweet crunch followed by a soft center. You can use any cake flavor to fill these bright red lips.
Ingredients
1 red velvet cake
4 ounces cream cheese frosting
Red candy melts
Red sugar sprinkles or sanding sugar
Black lollipop sticks
Equipment
Lip shaped cookie cutter
Baking sheet
Deep microwave safe bowl
Small spoon
DIY Instructions
Crumble your red velvet cake into fine pieces in a large bowl.
Add the frosting and mix until the dough stays together when pressed.
Roll the dough out flat on a tray until it is one inch thick.
Cut out lip shapes using your cookie cutter and place them on a tray.
Put the tray in the freezer for fifteen minutes to harden the shapes.
Melt the red candy coating in the microwave until it is liquid.
Dip the end of a stick into the red candy and push it into the base of the lips.
Submerge the entire lip shape into the red coating and let the extra drip off.
Hold the pop over a bowl and cover the wet coating with red sugar sprinkles.
Place the pops in a stand to dry completely.
12. Tickled Pink Monster Pops
Valentines Cake Pops
Three silly eyes and a bright blue smile give this monster a friendly personality. Pink coconut flakes create a fuzzy texture that looks soft and inviting. Little ones can help stick the horns on to complete the look.
Using shredded coconut is a smart way to add volume without extra weight. These characters look like they jumped right out of a storybook. You can vary the number of eyes to make each monster unique.
Colors can be swapped for blue or green if your kids prefer those tones. This project encourages creativity and playfulness in the kitchen. Everyone will enjoy the tropical taste of the coconut coating.
Ingredients
1 coconut cake
4 ounces vanilla frosting
Pink candy melts
Shredded coconut dyed pink
Candy eyeballs
Blue icing tube
Cashews or almond slivers for horns
Equipment
Large bowl
Shallow dish for coconut
Microwave
Cake pop sticks
DIY Instructions
Mix the coconut cake crumbs and frosting until you have a thick dough.
Roll the mixture into round balls and chill them for ten minutes.
Melt the pink candy coating in a deep bowl.
Dip a stick into the pink liquid and insert it into a cake ball.
Submerge the entire ball into the pink coating.
Roll the wet pop in the pink shredded coconut until it looks fuzzy.
Press three candy eyes onto the front while the coating is still sticky.
Push two cashews into the top of the head to act as horns.
Let the pop dry completely in a stand.
Use the blue icing tube to draw a wide and happy smile.
13. Piece of My Heart Pizza Pops
Valentines Cake Pops
These clever treats look just like miniature pizza slices but taste like sweet vanilla. White chocolate drizzles act as melted cheese over a bright red strawberry sauce. Tiny heart sprinkles serve as the most adorable pepperoni you have ever seen.
Slicing a round cake into triangles makes this design very easy to achieve. You do not need to roll balls or worry about them falling off the sticks. This flat shape is stable and easy for younger kids to decorate.
Placing these on a checkered napkin adds to the fun pizza theme. Your family will enjoy the mix of fruity and creamy flavors. These are a great conversation starter for any party.
Ingredients
1 round vanilla cake
Red strawberry jam or red candy melts
White chocolate chips
Small red heart sprinkles
Popsicle sticks
Equipment
Large knife
Piping bag or small plastic bag
Microwave safe bowls
DIY Instructions
Bake a flat round cake and let it cool completely.
Use a sharp knife to cut the cake into eight even triangle slices.
Spread a thin layer of red jam or melted red candy over the top of each slice.
Leave a small edge at the wide end of the triangle to look like a crust.
Melt the white chocolate chips in the microwave.
Snip a tiny corner off a plastic bag and fill it with the melted white chocolate.
Drizzle the white chocolate over the red layer in a zigzag pattern to look like cheese.
Place several red heart sprinkles on top while the white chocolate is wet.
Insert a popsicle stick into the wide end of the cake slice.
Let the decorations set before serving.
14. Dainty Drip Donut Pops
Valentines Cake Pops
Mini donuts on a stick bring a classic breakfast favorite to your Valentine celebration. Pink glaze drips down the sides for a mouthwatering appearance. Rainbow sprinkles and white hearts add a festive touch to every single bite.
Baking these in a donut pan ensures they have the correct shape every time. You can use a cake pop stick or a thicker dowel for a different look. These treats are thick and satisfying for kids who want a larger snack.
Stacking these in a box makes them look like they came from a high end bakery. Using a strawberry glaze adds a natural pink color and a great scent. They are a wonderful surprise for a Valentine morning.
Ingredients
1 batch of cake donut batter
Pink strawberry glaze
White heart sprinkles
Multicolored jimmies
White lollipop sticks
Equipment
Mini donut baking pan
Cooling rack
Small deep bowl for dipping
DIY Instructions
Bake the mini donuts in your pan and let them cool on a wire rack.
Prepare your pink glaze so it is thick but still pourable.
Dip the top half of each donut into the pink glaze.
Lift the donut out and let the glaze drip naturally down the sides.
Scatter the white hearts and jimmies over the wet glaze.
Allow the glaze to harden for about ten minutes.
Gently push a lollipop stick into the bottom of the donut.
If the donut feels loose, use a drop of melted candy to secure the stick.
Stand the pops upright to finish drying.
15. Hidden Rainbow Heart Pops
Valentines Cake Pops
Bright stripes on the outside hint at the colorful surprise waiting within the cake. Every layer of the rainbow represents a different fun color for the holiday. Kids will love seeing the vibrant pattern reveal itself as they eat.
Creating the striped exterior requires patience and a steady hand. You can use a toothpick to drag the colors together for a marbled effect. These hearts are bold and symbolize a big, happy love.
Baking several small cakes in different colors is the secret to the inside. This design is a bit more advanced but the results are worth the effort. Everyone will wonder how you fit so much color into one small treat.
Ingredients
4 small cakes in red, orange, yellow, and blue
Vanilla frosting
Candy melts in all rainbow colors
White frosting for the base
Equipment
Heart shaped mold
Small bowls for each color
Sticks
DIY Instructions
Crumble each colored cake into separate bowls and mix with a bit of frosting.
Press small amounts of each color into a heart mold to create a layered effect.
Chill the hearts until they are very firm.
Melt the rainbow candy coatings in separate bowls.
Dip a stick into melted candy and insert it into a cake heart.
Pipe or paint thin horizontal stripes of each color across the heart.
Use a clean toothpick to smooth the edges between the colors.
Let the stripes dry before adding the next one to prevent bleeding.
Set the heart on a base of white frosting to make the colors stand out.
16. Glittering Red Velvet Orbs
Valentines Cake Pops
Deep crimson sugar crystals cover these round treats for a sophisticated yet fun look. A simple red ribbon tied to the stick adds a touch of class. These pops provide a wonderful pop of color for your dessert display.
Using a red velvet cake inside matches the outside theme perfectly. The dark red tone is elegant and fits the Valentine’s Day spirit. Kids will love how the sugar sparkles like tiny rubies.
Baking these is a simple way to practice basic dipping skills. You only need one color of candy coating to get this look. These are the best choice for a quick but beautiful holiday gift.
Ingredients
1 red velvet cake
4 ounces cream cheese frosting
Dark red candy melts
Red sanding sugar
Red ribbon
Equipment
Cookie scoop
Microwave safe bowl
Sticks
DIY Instructions
Combine the red velvet cake crumbs and frosting in a large bowl.
Roll the dough into smooth, round balls using a cookie scoop for even sizes.
Chill the balls in the refrigerator for thirty minutes.
Melt the red candy coating until it is smooth and thin.
Dip the end of a stick into the coating and insert it into a ball.
Submerge the entire ball in the red coating.
Immediately roll the wet pop in a bowl of red sanding sugar.
Shake off any extra sugar gently.
Place the pop in a holder to dry.
Tie a small red ribbon in a bow around the stick once dry.
17. Pucker Up Penguin Pair
Valentines Cake Pops
These sweet birds feature white heart bellies and tiny orange feet. One penguin even wears a tiny chocolate bow tie for a formal Valentine date. Kids will enjoy making these feathered friends come to life with simple decorations.
Dark chocolate coating provides the classic black and white look. A small orange sprinkle makes a quick and easy beak. These characters look best when displayed in pairs to show off their love.
Baking these for a winter themed party is a great idea. The heart shapes on their chests connect them to the Valentine theme. You can even add a tiny pink bow for a feminine touch.
Ingredients
1 chocolate cake
4 ounces chocolate frosting
Black or dark chocolate candy melts
White fondant
Orange heart sprinkles for feet and beaks
Tiny edible bow tie decoration
Equipment
Small heart cutter
Toothpicks
Microwave safe bowls
Sticks
DIY Instructions
Mix your chocolate cake and frosting to form a dough.
Shape the dough into oval bodies and chill them.
Melt the dark chocolate coating in a deep bowl.
Dip a stick into the chocolate and insert it into an oval.
Submerge the entire oval in dark chocolate and let it dry.
Cut a small heart out of white fondant and press it onto the belly.
Use two orange heart sprinkles at the bottom for feet.
Attach one orange sprinkle in the center of the head for a beak.
Use a toothpick to add two small white dots for eyes.
Glue the bow tie onto one penguin using a drop of melted candy.
18. Love Letter Envelope Pops
Valentines Cake Pops
Rectangular shapes mimic a real envelope filled with a secret romantic message. A red heart seal in the center holds the design together beautifully. This creative snack is a great way to deliver a sweet treat to friends.
White chocolate creates a clean and crisp background for the red details. You can use a red edible marker to draw the seams of the envelope. This design is unique and very easy to transport.
Kids can imagine they are sending a real letter with every pop. Using a flat popsicle stick makes them look even more like stationery. They are a wonderful addition to any school exchange.
Ingredients
1 vanilla cake
4 ounces vanilla frosting
White candy melts
Red edible ink pen
Red heart shaped candy for the seal
Equipment
Square or rectangular cookie cutter
Popsicle sticks
Parchment paper
DIY Instructions
Mix the cake crumbs and frosting together to make a firm dough.
Roll the dough out on parchment paper to half an inch thick.
Cut out small rectangles using your cutter.
Chill the rectangles in the freezer for fifteen minutes.
Melt the white candy coating in a microwave safe bowl.
Dip a popsicle stick in white candy and slide it into the cake base.
Submerge the entire rectangle in white coating and lay it on parchment paper.
Once the coating is hard, use the red pen to draw an “X” on the back.
Draw a small dashed line along the edges to look like stitching.
Attach a red heart candy in the center of the “X” with melted chocolate.
19. Blooming Rose Bouquet Pops
Valentines Cake Pops
Layers of pink and red petals create a stunning floral design that looks like a real rose. Green fondant leaves add a realistic touch to the base of each flower. These edible blossoms are a wonderful alternative to traditional flowers this year.
Using a piping bag with a petal tip is the key to this look. You can start in the center and work your way out in a circle. Each flower becomes a unique work of art that tastes delicious.
Displaying these in a vase makes a beautiful centerpiece for your table. Your kids will love helping you “plant” these in a foam block. They are much sweeter than a bouquet from the florist.
Ingredients
1 strawberry cake
4 ounces strawberry frosting
Pink and red buttercream frosting
Green fondant for leaves
White lollipop sticks
Equipment
Piping bag with a petal tip (number 104)
Small leaf cutter
Styrofoam block
DIY Instructions
Mix the strawberry cake and frosting to create a dough.
Roll the dough into small round balls and chill them.
Dip a stick into melted candy and insert it into a ball to secure it.
Fill a piping bag with pink or red buttercream frosting.
Hold the pop and pipe a small cone in the very center of the top.
Wrap small “petals” around the cone by moving the tip in a C shape.
Continue adding layers of petals until the ball is covered.
Cut two small leaves out of green fondant.
Press the leaves onto the base of the rose near the stick.
Place the finished flowers in a foam block to set in the fridge.
20. Cozy Cocoa Cup Treats
Valentines Cake Pops
Tiny edible mugs filled with chocolate ganache look like a warm winter drink. Mini marshmallows and a single pink heart float on the surface for extra cuteness. Your family will adore these comforting and creative bite sized snacks.
Creating the mug handle is a fun challenge for older children. You can use a small piece of a pretzel or a loop of candy. This theme is great for a cold February afternoon spent indoors.
Baking these as cylinders instead of balls gives them a realistic mug shape. The rich chocolate center provides a deep and satisfying flavor. They look wonderful served alongside a real cup of hot cocoa.
Ingredients
1 chocolate cake
4 ounces chocolate frosting
White candy melts for the mug
Chocolate ganache or melted dark chocolate for the “cocoa”
Mini marshmallows
Small pink heart sprinkles
Equipment
Cylinder shaped mold or hand shape them
Small round candy or pretzel for the handle
Sticks
DIY Instructions
Combine your chocolate cake crumbs and frosting.
Shape the dough into short, thick cylinders.
Chill the shapes for twenty minutes in the refrigerator.
Melt the white candy coating in a deep bowl.
Dip a stick into the white candy and insert it into the bottom of the cylinder.
Submerge the cylinder in white coating and let it dry.
Attach a small candy loop to the side for the mug handle using melted candy.
Spoon a small amount of dark chocolate ganache onto the top surface.
Spread it to the edges so it looks like a full cup of cocoa.
Place three mini marshmallows and one pink heart on the wet chocolate.
Let everything set before serving.
21. Slow and Sweet Snail Pops
Valentines Cake Pops
This charming snail brings a slow and steady pace to your Valentine’s Day celebration. Its soft pink body and purple shell create a lovely color combination for the holiday. Kids will laugh when they see the sparkly glitter trail left behind on the table.
A spiraled shell adds a touch of whimsy to this little creature. Using pretzel sticks for the eyes gives it a curious and friendly expression. These snacks are almost too cute to eat but will surely delight everyone at home.
Every bite is full of sweet flavor and a satisfying crunch. Making these together allows children to explore their artistic side with edible glitter. You can easily set these up on a wooden board for a rustic look.
Ingredients
1 strawberry cake
4 ounces cream cheese frosting
Pink and purple candy melts
Small pretzel sticks
Tiny candy eyes
Clear edible glitter
Equipment
Large mixing bowl
Microwave safe bowls
Parchment paper
Small spoon
DIY Instructions
Crumble your strawberry cake into a large bowl until it looks like fine dirt.
Add the frosting and mix it with your hands until it feels like soft play dough.
Shape most of the dough into small ovals to act as the snail bodies.
Roll the remaining dough into small circles for the shells and press them slightly flat.
Put all the shapes in the freezer for fifteen minutes to make them firm.
Melt the pink candy coating in the microwave and dip the bodies into it.
Place the pink bodies on parchment paper to dry.
Melt the purple candy and dip the flat circles into it to cover them.
Use a toothpick to draw a white spiral on the purple shells once they are dry.
Attach the shell to the side of the body using a drop of melted candy.
Break a pretzel stick in half and dip the ends in candy to attach the eyes.
Push the pretzels into the head of the snail and let the whole thing set.
Spread a little clear edible glitter behind the snail to look like a trail.
22. Love You to the Moon Rocket Pops
Valentines Cake Pops
Blast off into a world of sweetness with these shimmering silver rocket ships. A bright red heart on the side shows everyone exactly where this ship is headed. The fiery fruit leather at the bottom makes it look like it is ready for launch.
Children who love space will find these treats especially exciting to build. Shimmering silver coating gives the cake pops a high tech and modern feel. These are a great way to tell someone they are truly out of this world.
Using fruit leather for the flames adds a nice chewy texture to the snack. You can use different colors for the rockets if your kids have a favorite shade. These stand out beautifully against a dark background or a starry napkin.
Ingredients
1 chocolate cake
4 ounces chocolate frosting
Silver or light grey candy melts
Large red heart sprinkles
Orange and red fruit leather
White candy wafers
Equipment
Sharp kitchen knife
Scissors
Microwave safe containers
Cake pop sticks
DIY Instructions
Mix your chocolate cake crumbs and frosting until you have a thick paste.
Form the dough into tall cylinders that are slightly pointed at one end.
Chill these rocket shapes in the fridge for twenty minutes.
Melt your silver candy coating until it is thin and smooth.
Dip the stick into the coating and push it into the flat bottom of the rocket.
Submerge the entire rocket in the silver liquid and let the extra drip off.
Attach a red heart sprinkle to the middle of the silver body while it is wet.
Cut small triangles out of white candy wafers to use as the rocket fins.
Glue the fins to the bottom sides of the rocket using melted candy.
Cut thin strips of red and orange fruit leather using your scissors.
Bunch the strips together and attach them to the bottom of the stick.
Make sure the fruit leather looks like flickering flames coming out of the engine.
23. Fancy Flamingo Love Birds
Valentines Cake Pops
Bright pink feathers made of candy shards give this flamingo a textured and stylish look. A small gold heart around its neck adds a bit of luxury to the design. This bird stands tall on its stick and brings a tropical vibe to your holiday.
Younger bakers can help attach the pink shards to create a messy but beautiful feathery look. Its curved neck is easy to shape with a bit of extra cake dough. These pops will make your dessert table look like a summer paradise.
A teal ribbon tied at the base provides a nice contrast to the hot pink body. These are wonderful for a Valentine party with a beach or zoo theme. Everyone will enjoy the fruity strawberry flavor inside the pink shell.
Ingredients
1 strawberry cake
4 ounces vanilla frosting
Bright pink candy melts
Black and white candy melts for the beak
Gold heart shaped sprinkles
Teal ribbon
Equipment
Small bowl for candy shards
Microwave
Cake pop sticks
Toothpicks
DIY Instructions
Combine the strawberry cake crumbs and frosting in a bowl.
Roll a large ball for the body and a small curved tube for the neck.
Attach the neck to the body and chill them in the freezer for ten minutes.
Melt some pink candy and spread it thin on parchment paper to harden.
Break that hardened candy into small uneven shards once it is cold.
Melt the rest of the pink candy in a deep bowl.
Dip the flamingo into the pink liquid and let the excess drip away.
Press the pink shards all over the back of the flamingo to look like feathers.
Use a toothpick to add a white and black tip to the end of the neck for a beak.
Glue a gold heart sprinkle to the neck with a tiny dot of melted candy.
Tie a teal ribbon around the stick to finish the look.
24. Tiny “Rawr” Dinosaur Treats
Valentines Cake Pops
These green dinosaurs are far more friendly than they are scary. A cute speech bubble tells your Valentine exactly how you feel in dinosaur language. White chocolate spikes along the back add a fun and crunchy texture to the snack.
Using green sprinkles gives the body a slightly bumpy look like real lizard skin. Kids will enjoy putting the tiny white dots on for the toes. These prehistoric pals are certain to be a huge hit with any young explorer.
The bright green color is very eye catching on any dessert platter. You can vary the expressions on their faces to make some look happy and others look surprised. These are a creative way to move away from traditional heart shapes.
Ingredients
1 vanilla cake
4 ounces vanilla frosting
Green candy melts
White candy wafers
Green sanding sugar
Pink and black icing pens
Equipment
Circle cutter
Microwave safe bowls
Sticks
Parchment paper
DIY Instructions
Mix the vanilla cake and frosting to form a sturdy dough.
Roll the dough into large balls for the body and smaller ovals for the head.
Attach the head to the body using a toothpick and chill the shapes.
Melt the green candy coating until it is smooth and liquid.
Dip the dinosaur into the green coating and immediately roll it in green sugar.
Cut white candy wafers into small triangles to act as spikes.
Press the spikes into the back of the dinosaur while the coating is still soft.
Draw a white circle on a piece of parchment paper and let it harden for the speech bubble.
Use the icing pens to write “RAWR!” on the white circle.
Attach the speech bubble to the side of the head with melted candy.
Add eyes and a smile using the black icing pen.
25. Fluttering Butterfly Wing Pops
Valentines Cake Pops
Colorful wings in pink and yellow make these butterflies look like they are ready to fly away. A soft purple body provides a calm contrast to the bright and happy wings. These treats look wonderful when arranged in a pattern on a white plate.
Every butterfly features tiny eyes that give it a sweet and gentle personality. Creating the wing patterns allows for lots of creative freedom with different icing colors. These are a lovely choice for a spring themed Valentine celebration.
A light dusting of edible glitter makes the wings shimmer as if they are in motion. You can use different flavors for the body to surprise your guests. These are a hit with children who love nature and garden creatures.
Ingredients
1 vanilla cake
4 ounces cream cheese frosting
Purple candy melts
Pink and yellow icing
Edible silver glitter
Chocolate sticks or dark lollipop sticks
Equipment
Piping bags with small tips
Microwave
Parchment paper
Toothpicks
DIY Instructions
Mix your cake crumbs and frosting to make a dough.
Shape the dough into long ovals to serve as the butterfly bodies.
Put the ovals in the fridge for fifteen minutes to set.
Melt the purple candy coating and dip the bodies into it.
Place the purple bodies on parchment paper to dry completely.
Draw butterfly wing shapes on parchment paper using the pink and yellow icing.
Fill in the wings with beautiful patterns and let them harden in the fridge.
Use a drop of melted candy to attach the wings to the sides of the purple body.
Sprinkle a little silver glitter over the wings for a magical finish.
Draw two tiny eyes on the top of the purple body.
Carefully insert the stick into the bottom of the butterfly.
26. “Stuck on You” Cactus Pops
Valentines Cake Pops
This green cactus is much softer than a real one and far tastier too. A single pink heart sits right on top to show it is full of love. White chocolate spikes cover the plant to give it a realistic but safe texture.
Placing the pop in a tiny pot filled with crushed cookies creates a very convincing desert scene. It is a creative way to serve a snack that also works as a decoration. Your family will enjoy the clever pun that goes along with this treat.
The dark “soil” made of cookies adds a rich chocolate flavor to the experience. You can use different cactus shapes like round ones or tall ones with arms. These are unique gifts that will not prick your fingers.
Ingredients
1 chocolate cake
4 ounces chocolate frosting
Green candy melts
White icing or melted white chocolate
Pink heart sprinkles
Chocolate sandwich cookies
Equipment
Tiny terracotta pots or small cups
Piping bag with a very fine tip
Sticks
DIY Instructions
Combine the chocolate cake and frosting to make a dough.
Shape the dough into cactus shapes with one large center and two small arms.
Chill the shapes in the freezer until they are very sturdy.
Melt the green candy coating and dip the cactus into it.
Stick the cactus into a foam block and let it dry.
Use a fine tip to pipe tiny white dots or lines all over the green surface for spikes.
Place a pink heart sprinkle on one of the cactus arms or the very top.
Crush the chocolate cookies into fine crumbs to look like dirt.
Fill your small pots with the cookie crumbs.
Push the stick of your cactus pop into the center of the pot.
Make sure it stands up straight and looks like it is growing.
27. Surprise Heart Confetti Pops
Valentines Cake Pops
Biting into this white orb reveals a hidden world of color and a secret red heart. The rainbow confetti inside makes every mouthful feel like a small party. Golden star sprinkles on the outside hint at the magic that stays tucked away inside.
Achieving this look is easier than it seems and creates a wonderful moment for your guests. You can use any colors you like for the confetti to match your personal style. This treat is the ultimate way to show someone what is truly in your heart.
The contrast between the clean white exterior and the bright interior is very striking. These are great for gender reveals or just a fun holiday surprise. Your kids will be amazed when they see the heart hidden right in the middle.
Ingredients
1 white cake
1 small red cake
4 ounces vanilla frosting
Rainbow sprinkles
White candy melts
Gold star sprinkles
Equipment
Small heart shaped cookie cutter
Large mixing bowl
Microwave
Sticks
DIY Instructions
Bake your red cake and let it cool completely.
Use the heart cutter to stamp out small red hearts from the cake.
Crumble the white cake into a bowl and mix with frosting and rainbow sprinkles.
Take a handful of the white confetti dough and flatten it in your palm.
Place a red heart in the center of the white dough and wrap the dough around it.
Roll it gently into a ball so the heart is completely hidden.
Freeze these balls for twenty minutes to keep them from falling apart.
Melt the white candy coating in a deep container.
Dip the stick into the candy and then into the cake ball.
Submerge the ball in the white coating and let it set.
Place a few gold star sprinkles on top while the coating is wet.
28. Lovely Llama Wooly Pops
Valentines Cake Pops
Shredded coconut gives this llama a fuzzy and soft appearance that is hard to resist. A bright saddle made of tiny sprinkles adds a splash of color to the white “wool”. Pink ears and a friendly face make this character look very approachable and sweet.
Adding colorful tassels to the neck gives the llama a festive and adventurous spirit. This design is excellent for those who love unique and trendy animal themes. Everyone will appreciate the different textures found in this creative holiday snack.
The coconut adds a tropical flavor that pairs perfectly with a vanilla center. You can use different colors for the tassels to match your party decorations. These look wonderful standing up in a jar of colorful candies.
Ingredients
1 vanilla cake
4 ounces vanilla frosting
White candy melts
Shredded coconut
Multicolored nonpareil sprinkles
Pink fondant for ears
Colorful embroidery thread or thin yarn for tassels
Equipment
Small bowl for coconut
Microwave
Sticks
Toothpicks
DIY Instructions
Mix the vanilla cake crumbs and frosting to make a firm dough.
Shape the dough into ovals for the body and smaller tubes for the neck.
Connect the neck to the body and chill them in the fridge.
Melt the white candy coating until it is thin and smooth.
Dip the llama into the white coating and immediately roll it in shredded coconut.
Press the coconut down gently to make sure it sticks well.
Cut a small rectangle of fondant or use melted candy to create a “saddle” on the back.
Cover the saddle area with the multicolored sprinkles.
Shape two small pink ears from fondant and attach them to the head.
Draw a simple face with closed eyes using a toothpick and black icing.
Tie a small piece of colorful thread around the neck to look like a festive collar.
29. Floating Heart Balloon Bunch
Valentines Cake Pops
This bouquet of heart shaped balloons looks like it could float away into the blue sky. Vibrant shades of red pink and white create a classic Valentine’s Day color palette. Curling ribbons tied to the sticks add a sense of movement and celebration.
Holding a whole bunch of these feels like carrying a bundle of joy in your hand. They are easy to share with friends since each one is a single serving. These pops make for a very photogenic and happy addition to any party.
Varying the heights of the sticks makes the bunch look more like a real group of balloons. You can add a few glittery ones for extra sparkle. They are the best choice for a lively and colorful centerpiece.
Ingredients
Various flavored cakes
4 ounces vanilla frosting
Red pink and white candy melts
Red and pink curling ribbon
White lollipop sticks
Equipment
Heart shaped mold or cutter
Microwave safe bowls
Scissors
DIY Instructions
Combine your cake crumbs and frosting to make a smooth dough.
Press the dough into heart shaped molds or cut them out with a cutter.
Freeze the hearts for fifteen minutes so they stay in shape.
Melt your red pink and white coatings in separate bowls.
Dip a stick into the coating and insert it into the bottom of a heart.
Submerge the hearts in their respective colors and let them dry completely.
Cut long strips of curling ribbon and tie them around the base of each stick.
Use the edge of your scissors to curl the ends of the ribbons.
Gather several finished pops together to form a bunch.
Use a larger ribbon to tie the sticks together at the bottom for easy carrying.
30. Geometric Gold Heart Pops
Valentines Cake Pops
Modern angles give this red heart a very sophisticated and trendy look. A golden crack running down the center reveals a rich and dark chocolate interior. This design is a bold choice for anyone who likes a bit of drama with their dessert.
Using a geometric mold is the easiest way to get those clean and sharp edges every time. The gold leaf adds a touch of sparkle that catches the light beautifully. These hearts are a striking way to celebrate the holiday with a modern twist.
The deep red color looks very elegant against the bright gold details. You can serve these on a black slate board for a high end restaurant feel. They are as beautiful as they are delicious.
Ingredients
1 chocolate cake
4 ounces chocolate ganache
Deep red candy melts
Edible gold leaf or gold luster dust
Wood or dark brown sticks
Equipment
Geometric heart silicone mold
Microwave
Small clean paintbrush
DIY Instructions
Melt your red candy coating and pour a small amount into each heart mold.
Tilt the mold so the candy coats all the sides and let it harden.
Mix the chocolate cake crumbs and ganache to form a rich dough.
Press the dough into the center of the hardened candy shells.
Pour more red candy over the top to seal the cake inside and let it set.
Pop the hearts out of the mold carefully to see the sharp angles.
Use a toothpick to scrape a jagged line down the center to look like a crack.
Use a small brush to apply gold leaf or gold dust into the crack you made.
Lightly brush some gold dust over the other edges of the heart.
Dip a stick in melted candy and push it into the base of the heart.
Let everything dry completely before serving.
31. Tiny Forest Toadstool Pops
Valentines Cake Pops
Red toadstools add a touch of magic to your Valentine party. These little mushrooms look like they came straight from a fairy tale. Your children can help place the white dots on the bright red caps.
Every stem provides a sturdy base for the wide mushroom top. You can use green coconut at the bottom to look like grass. These treats are whimsical and catch everyone’s eye immediately.
Baking these involves two different shapes for the base and the cap. Tiny hands find them easy to hold and eat. Guests will enjoy the playful forest theme you have created.
Ingredients
1 white cake
4 ounces vanilla frosting
Red candy melts
White chocolate chips
Shredded coconut dyed green
White candy wafers
Equipment
Large mixing bowl
Microwave safe bowls
Cake pop sticks
Parchment paper
DIY Instructions
Mix your white cake crumbs and frosting until a dough forms.
Shape half the dough into thick cylinders for the stems.
Roll the other half into flat dome shapes for the mushroom caps.
Chill both shapes in the freezer for fifteen minutes.
Melt your red candy coating in a deep bowl.
Dip the dome shapes into the red coating and let them dry on parchment paper.
Melt a small amount of white candy and dip the ends of the cylinders into it.
Press the red cap onto the white stem and hold until it sticks.
Use a toothpick to add small white dots of melted candy to the red cap.
Dip the bottom of the stem into white candy and then into the green coconut.
Insert a stick into the bottom to finish the pop.
32. Beep Boop Love Bot Pops
Valentines Cake Pops
Silver square robots bring a modern and fun twist to your holiday sweets. A bright red heart mouth shows that even machines can feel love. Your kids will enjoy giving these robots unique personality traits with candy eyes.
Smooth metallic coating gives these treats a high tech appearance. You can use small candy pieces to create buttons and gears on the chest. These are great for children who love science and building things.
Every robot stands tall on its stick like a tiny metal soldier. The square shape makes them very stable and easy to decorate. Friends will find these futuristic snacks absolutely charming.
Ingredients
1 chocolate cake
4 ounces chocolate frosting
Silver or grey candy melts
Candy eyeballs
Red heart sprinkles
Small square candy pieces
Equipment
Square cookie cutter or knife
Microwave
Sticks
Foam block
DIY Instructions
Combine the chocolate cake and frosting to make a firm dough.
Press the dough into a flat rectangle on a baking sheet.
Use a knife to cut the dough into small, even squares.
Freeze the squares for twenty minutes so they become very solid.
Melt the silver candy coating until it flows smoothly.
Dip a stick into the coating and slide it into the base of a square.
Submerge the entire square in silver coating and let it dry.
Attach two candy eyes to the front using a drop of melted candy.
Place a red heart sprinkle below the eyes for a mouth.
Add small square candies to the sides for ears or arms.
Draw a small grid on the chest using a toothpick to look like buttons.
33. Sweet Summer Pineapple Pops
Valentines Cake Pops
Bright yellow pineapples with pink heart glasses look ready for a tropical vacation. Green leafy tops add a burst of color to the sunny yellow base. These treats bring a bit of warmth to a cold February afternoon.
Crisscross patterns on the shell make the fruit look very realistic. Your family can help pipe the lines to create the texture. These are a wonderful choice for a beach themed Valentine gathering.
Every bite is full of sweet flavor and a satisfying crunch. The pink sunglasses add a trendy and cool personality to each pop. Guests will appreciate the creative effort put into these island snacks.
Ingredients
1 vanilla cake
4 ounces pineapple flavored frosting
Yellow candy melts
Green fondant for leaves
Pink heart shaped candy or icing
Yellow icing tube
Equipment
Leaf shaped cutter
Piping bag with a fine tip
Sticks
Microwave safe bowls
DIY Instructions
Mix the vanilla cake and frosting to form a dough.
Roll the dough into oval shapes that look like small pineapples.
Chill the ovals in your refrigerator for twenty minutes.
Melt the yellow candy coating in a deep container.
Dip a stick into the coating and insert it into a cake oval.
Submerge the entire oval in yellow coating and let it set.
Use the yellow icing tube to pipe diagonal lines across the pop.
Pipe more lines in the opposite direction to create a diamond grid.
Cut several leaf shapes from the green fondant.
Attach the leaves to the top of the pineapple using melted candy.
Glue the pink heart glasses onto the front with a tiny drop of frosting.
34. Elegant Valentine Swan Pops
Valentines Cake Pops
Graceful white swans with golden crowns look stunning on a mirror platter. Their long curved necks give them a very sophisticated and beautiful silhouette. These are the best choice for a formal or fancy Valentine tea party.
Soft white coating creates a clean and polished finish for the body. You can add edible glitter to the wings for a bit of extra shimmer. These elegant birds symbolize deep and lasting love.
Baking these allows you to practice more advanced shaping techniques. Tiny black eyes give the swan a gentle and calm expression. Everyone will be impressed by the high end look of these holiday treats.
Ingredients
1 white cake
4 ounces vanilla buttercream
White candy melts
Orange candy for the beak
Gold edible crowns
Black edible ink marker
Equipment
Small paintbrush
Toothpicks
Microwave
Sticks
DIY Instructions
Blend the white cake and buttercream until you have a smooth dough.
Shape a large ball for the body and a long, thin “S” shape for the neck.
Attach the neck to the body carefully and chill them in the freezer.
Melt the white candy coating in a deep bowl.
Dip the swan into the white coating and let it dry on parchment paper.
Use a toothpick to carve small feather details into the sides while wet.
Place a tiny gold crown on top of the head using melted candy.
Add a small orange sprinkle to the front of the face for a beak.
Draw a closed eye with long lashes using the black marker.
Attach a stick to the bottom of the body to turn it into a pop.
35. You Are My Sunshine Pops
Valentines Cake Pops
Cheerful yellow suns wearing heart sunglasses bring a smile to everyone. Bright orange and yellow rays pipe out from the center for a lively look. These treats are a sweet way to tell someone they brighten your life.
Swirled icing creates a sense of heat and energy around the sun. Kids will love helping you draw the wavy rays around the edge. This design is simple to make but has a huge visual impact.
Every pop feels like a warm hug on a stick. You can use different shades of yellow to create depth in the sun. They look fantastic when displayed against a light blue background.
Ingredients
1 yellow cake
4 ounces lemon frosting
Yellow candy melts
Orange and yellow icing pens
Black heart shaped sunglasses (candy or fondant)
Equipment
Round cookie cutter
Microwave safe bowls
Sticks
Foam block
DIY Instructions
Mix your yellow cake and frosting to create a dough.
Shape the dough into flat circles and chill them.
Melt the yellow candy coating until it is liquid.
Dip a stick into the coating and push it into a cake circle.
Submerge the entire circle in yellow coating and let it set.
Use the yellow and orange icing pens to draw wavy lines around the edge.
Make sure the rays vary in length to look natural.
Attach the black heart sunglasses to the center of the sun.
Draw a tiny smile below the glasses with the orange pen.
Let the decorations dry completely before serving.
36. One in a Melon Watermelon Slices
Valentines Cake Pops
Triangular cake slices look just like juicy pieces of fresh watermelon. Green rinds and pink centers create a very realistic and refreshing design. Chocolate chip seeds add a classic touch to every single slice.
Baking a flat cake and cutting it into triangles makes the process very quick. This shape is easy for kids to handle without the cake falling off. These are a fun and fruity addition to your Valentine dessert lineup.
Colors are bright and festive for the holiday of love. You can use a strawberry flavored cake to match the pink theme. Everyone will enjoy the playful pun that goes along with this snack.
Ingredients
1 strawberry cake
White and green frosting
Mini chocolate chips
Green candy melts
Popsicle sticks
Equipment
Large knife
Spatula
Baking pan
DIY Instructions
Bake a flat strawberry cake and let it cool completely.
Cut the cake into even triangles using a large knife.
Melt the green candy coating in a shallow dish.
Dip the bottom edge of the triangle into the green coating to look like a rind.
Spread a thin line of white frosting just above the green rind.
Cover the rest of the triangle with pink strawberry frosting.
Press several mini chocolate chips into the pink area for seeds.
Insert a popsicle stick into the bottom of the green rind.
Let the coating harden on a piece of parchment paper.
Serve these flat on a plate for a cute display.
37. Cherry Much Love Pops
Valentines Cake Pops
Two bright red cherries joined by a single stem make a very romantic treat. Glossy red coating makes them look like they were just picked from a tree. A single green leaf adds a fresh and natural detail to the pair.
Children will enjoy rolling the small round balls for the cherry fruit. You can use a bit of chocolate or a real twig for the stems. These are a sweet way to show that you and your Valentine are a great pair.
Every bite offers a burst of cherry flavor hidden inside the red shell. These are simple to assemble and look very professional. They are a wonderful gift for a close friend or family member.
Ingredients
1 cherry flavored cake
4 ounces vanilla frosting
Deep red candy melts
Green fondant for the leaf
Chocolate pocky sticks or pretzel rods for stems
Equipment
Small leaf cutter
Microwave
Sticks
Toothpicks
DIY Instructions
Combine the cherry cake crumbs and frosting to make a dough.
Roll the dough into small, round balls about the size of a real cherry.
Chill the balls in the freezer for fifteen minutes.
Melt the red candy coating until it is smooth and shiny.
Dip two balls into the red coating and let them dry on parchment paper.
Use a toothpick to make a small hole in the top of each cherry.
Dip the ends of your chocolate stick into melted candy.
Push one end into each cherry to join them together in a V shape.
Cut a small leaf out of green fondant.
Attach the leaf to the top of the V where the stems meet.
Let the entire assembly dry before picking it up by the stem.
38. Heart at Home Pink House Pops
Valentines Cake Pops
Tiny pink houses with white snowy roofs look very cozy and sweet. Red heart windows show that love lives inside every single home. Your kids will enjoy building these little structures and decorating the doors.
Square shapes provide a sturdy base for the triangular roof on top. You can use white sprinkles to look like falling snow on the pink walls. These are a creative way to celebrate the holiday at home.
Every house can be customized with different colors for the door and roof. These treats feel very personal and thoughtful for a Valentine gift. They look wonderful when lined up like a small village on a tray.
Ingredients
1 vanilla cake
4 ounces strawberry frosting
Pink candy melts
White icing for the roof
Red heart sprinkles for windows
Small rectangular candy for the door
Equipment
Knife
Piping bag
Sticks
Microwave safe bowls
DIY Instructions
Mix your vanilla cake and frosting to form a thick dough.
Shape the dough into a cube and add a triangle on top for the roof.
Chill the house shapes until they are very firm.
Melt the pink candy coating in a deep bowl.
Dip a stick into the coating and insert it into the bottom of the house.
Submerge the entire house in pink coating and let it dry.
Pipe thick white icing over the triangular roof to look like snow.
Attach two red heart sprinkles to the front for windows.
Glue a small candy rectangle to the bottom center for a door.
Add a tiny dot of white icing for a doorknob.
39. Sweet Lattice Strawberry Pops
Valentines Cake Pops
Red strawberry shaped treats with a yellow lattice design look very classic. A green leafy top completes the look of this garden favorite fruit. These are the best choice for a traditional Valentine dessert table.
Piping the thin yellow lines requires a bit of focus but looks very impressive. Your family can help place the tiny green leaves on the very top. These pops are vibrant and full of holiday spirit.
Every bite reveals a moist center that tastes just like fresh berries. The textured shell provides a fun contrast to the soft cake inside. These are a timeless way to celebrate the season of love.
Ingredients
1 strawberry cake
4 ounces strawberry icing
Red candy melts
Yellow icing tube
Green fondant for leaves
Equipment
Leaf cutter
Microwave
Sticks
Piping bag with a small tip
DIY Instructions
Mix the strawberry cake crumbs and icing until a dough forms.
Shape the dough into teardrop shapes that look like large strawberries.
Put the shapes in the freezer for twenty minutes to harden.
Melt the red candy coating in a deep container.
Dip a stick into the coating and insert it into the wide end of the cake.
Submerge the entire strawberry in red coating and let it set.
Use the yellow icing tube to pipe thin diagonal lines over the red shell.
Pipe another set of lines in the opposite direction to create a lattice.
Cut three small leaves out of green fondant.
Attach the leaves to the top of the strawberry near the stick.
Let the decorations dry completely before serving.
40. Glimmering Gold Heart Orbs
Valentines Cake Pops
Glistening gold coating makes these round treats look very expensive and chic. A single red heart in the center provides a bold and romantic focal point. These are a sophisticated choice for an adult Valentine party.
Using a metallic dust over the candy coating creates a beautiful shine. You can leave the bottom half of the cake visible for a unique “naked” look. These pops are simple but feel very high end.
Every orb catches the light and adds a touch of luxury to your display. They are the best way to add some sparkle to your holiday celebration. Your guests will love the mix of gold and red colors.
Ingredients
1 yellow cake
4 ounces vanilla frosting
White candy melts
Edible gold luster dust
Large red heart sprinkles
Equipment
Small clean paintbrush
Microwave safe bowls
Sticks
Foam block
DIY Instructions
Combine the yellow cake crumbs and frosting to make a dough.
Roll the dough into smooth, round balls and chill them.
Melt the white candy coating until it is thin and liquid.
Dip a stick into the coating and push it into a cake ball.
Submerge the top half of the ball into the white coating.
Let the white shell dry completely in a stand.
Use a small brush to apply the gold luster dust over the white area.
Make sure the gold is even and very shiny.
Attach a red heart sprinkle to the center of the gold area with melted candy.
Place the pops in a stand to finish drying.
41. Rainbow Cloud Dream Pops
Valentines Cake Pops
Fluffy white clouds bring a sense of wonder to your Valentine table. These treats use a custom shape to mimic a soft cumulus puff. Silver glitter adds a touch of magic to the snowy white surface.
Sparkling blue sugar crystals line the bottom to resemble a clear morning sky. Every pop features a bright rainbow ribbon tied around the stick to complete the cheerful look. Parents will appreciate how these whimsical shapes spark imagination in the kitchen.
Ingredients
1 white cake
4 ounces vanilla frosting
White candy melts
Light blue sanding sugar
Edible silver glitter
Rainbow colored ribbons
Equipment
Large mixing bowl
Microwave safe container
Baking sheet
Lollipop sticks
Small paint brush
DIY Instructions
Bake your white cake and let it cool down all the way.
Rub the cake between your hands to make very small crumbs.
Blend in the frosting until the cake feels like soft clay.
Press three or four tiny balls of dough together to make a bumpy cloud shape.
Chill these clouds in the freezer for twenty minutes.
Melt the white candy coating in a deep bowl.
Push a stick into the bottom of each cold cloud to secure it.
Submerge the cloud in the white liquid and let the extra drip off.
Press the bottom half into the blue sugar while the coating is still wet.
Use a brush to add silver glitter to the top peaks once dry.
Knot a rainbow ribbon around the stick for a colorful finish.
42. Tic Tac Toe Love Game Pops
Valentines Cake Pops
Playing with your food becomes encouraged with this interactive dessert set. Round cake pops serve as the zeros while flower shaped cookies act as the crosses. Vibrant red and white tones keep the holiday spirit alive on your display.
Setting up a simple grid on a dark platter creates an instant game station. Guests of all ages will love competing for a win before taking a bite. This project offers a fun way to engage kids during your Valentine party.
Ingredients
1 vanilla cake
4 ounces vanilla frosting
White candy melts
Red icing pen
Flower shaped sugar cookies
White icing tube
Equipment
Cookie scoop
Flat serving board or platter
Microwave
Cake pop sticks
Parchment paper
DIY Instructions
Combine your vanilla cake crumbs and frosting in a large bowl.
Roll the dough into smooth round balls about one inch wide.
Put the balls in the refrigerator for thirty minutes to make them firm.
Melt your white candy coating until it is smooth and runny.
Dip a stick into the melted candy and push it into a cake ball.
Coat the entire ball in the white liquid and let it dry on parchment paper.
Draw a large red circle on the front of each pop using the icing pen.
Take your flower cookies and pipe a white cross on the center of each one.
Let the icing on the pops and cookies dry for at least one hour.
Find a flat board and draw a grid with two vertical and two horizontal lines.
Place your edible pieces on the grid to start a friendly game.
Key Takeaways
Engagement remains high when kids help choose colors and toppings.
Chilling the cake dough ensures the shapes stay sturdy during the dipping process.
Simple tools like toothpicks make adding tiny details very manageable.
Varying your decorations allows every child to express their unique personality.
Baking with your family creates bonds that last much longer than the treats themselves. These forty two recipes prove that holiday desserts can be both simple and stunning. Your kitchen will become a hub of creativity and laughter.
We hope these ideas inspire you to start a new tradition this year. Each pop represents a small gesture of affection for friends and family. Share your favorites and enjoy every sweet moment together.
Spread the loveGetting a party started for kids often feels like a puzzle with too many pieces. You want something that looks exciting but does not take all day to prepare. These colorful candy drinks…
Spread the loveBuilding a gingerbread house is a beloved holiday tradition, but nothing ruins the festive mood like a roof sliding off or walls buckling. You spend hours on detail only to watch your masterpiece…
Spread the loveValentine’s Day deserves something more exciting than a box of store bought candy. Most people stick to simple chocolate coating when they dip fruit at home. You can transform a basic berry into…