The holiday season often leaves our refrigerators overflowing with various wedges, blocks, and bags of artisanal dairy. You might find yourself staring at half-eaten wheels of Brie or stray crumbles of blue cheese. Instead of letting these premium ingredients go to waste, you can transform them into something fresh and exciting.

Repurposing your leftovers is a smart way to extend the festive spirit without spending more hours in the kitchen. These simple recipes focus on high impact with minimal effort. You can turn those lingering scraps into sophisticated bites that look intentional rather than like yesterday’s party tray.
This guide provides creative solutions for every type of cheese, from creamy goat cheese to sharp aged cheddar. Whether you are hosting a casual post-holiday hangout or just want a gourmet snack, these 42 ideas have you covered. Let’s clear out the fridge and start snacking.
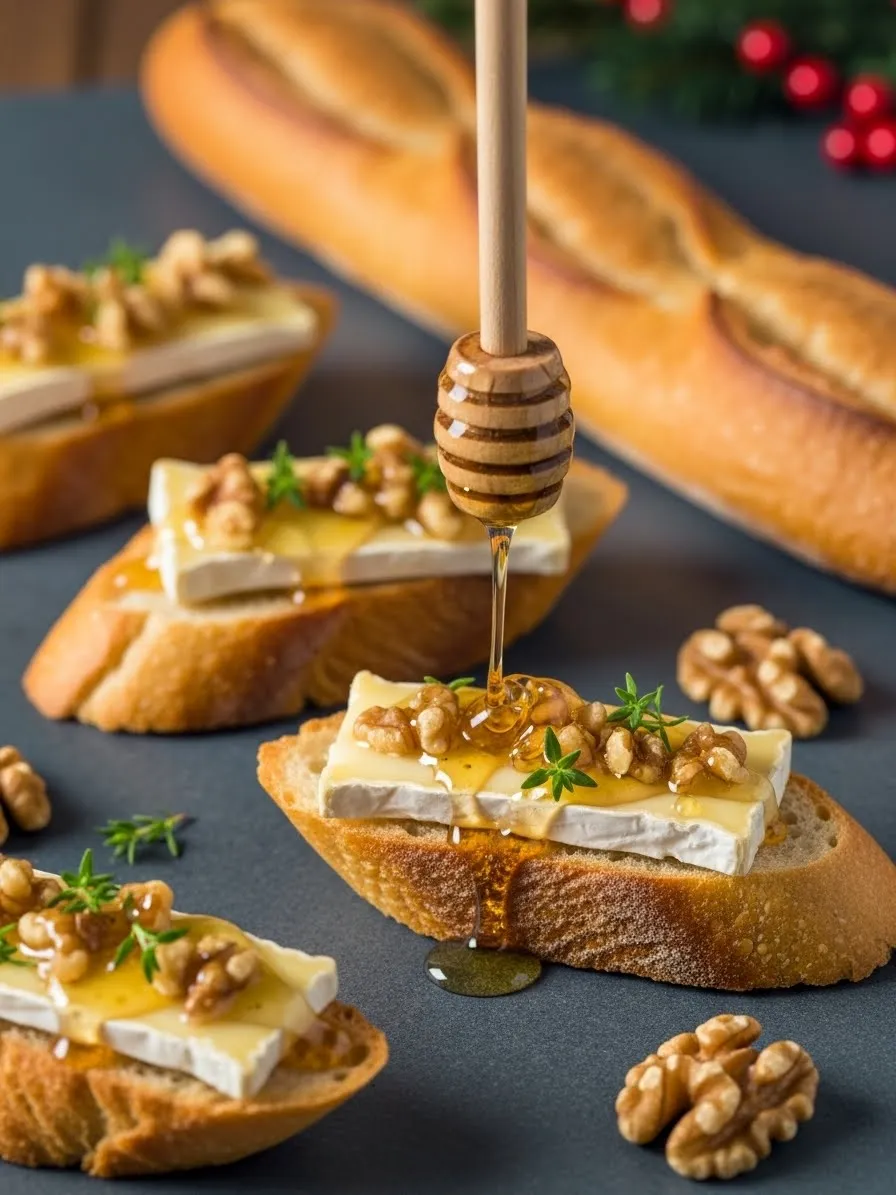
1. Honey Drizzled Brie and Walnut Crostini

Brie often sits forgotten in the fridge after holiday parties end. You can transform those leftover wedges into a sophisticated snack with very little effort. This recipe pairs the creamy texture of the cheese with crunchy nuts for a satisfying bite.
A light drizzle of honey adds just enough sweetness to balance the earthy notes of the Brie. Fresh thyme sprigs provide a pop of color and a subtle herbal aroma. It serves as a great way to use up crusty bread or a baguette that is starting to lose its freshness.
Serve these at your next gathering or enjoy them as a quick afternoon treat. The combination of flavors feels upscale but takes only minutes to assemble. Using leftover holiday cheese has never looked or tasted this good.
Ingredients
- Leftover Brie cheese (chilled)
- 1 Baguette or loaf of crusty bread
- Raw walnut halves or pieces
- Liquid honey
- Fresh thyme sprigs
Equipment
- Bread knife
- Baking sheet
- Small spreading knife
- Honey dipper or teaspoon
DIY Instructions
- Turn your oven to 375 degrees Fahrenheit to let it warm up.
- Slice the baguette into rounds about half an inch thick using a serrated bread knife.
- Place the bread slices on a flat baking sheet in a single layer.
- Toast the bread in the oven for about 5 to 7 minutes until the edges feel firm and slightly golden.
- Cut the cold Brie into thin slices or small chunks that fit the size of your bread.
- Lay one piece of cheese onto each warm toasted bread round.
- Press two or three walnut pieces firmly into the top of the cheese so they stay in place.
- Hold a honey dipper over the crostini and let a small amount of honey flow over the walnuts and cheese.
- Garnish each piece with a few tiny leaves of fresh thyme before serving immediately.
2. Whipped Feta and Herb Mini Peppers

Bell peppers often remain in the produce drawer after holiday vegetable trays are finished. You can repurpose these colorful gems by stuffing them with a tangy cheese filling. This dish provides a refreshing crunch that cuts through the richness of typical party snacks.
A blend of creamy feta and cream cheese creates a smooth base for your favorite seasonings. Topping the peppers with everything bagel seasoning adds a savory depth and interesting texture. These bite-sized treats are naturally colorful and look beautiful on any serving platter.
They work well as a light appetizer for guests or a healthy midday snack for yourself. Using up those leftover mini peppers helps reduce food waste while keeping your menu vibrant. This recipe turns simple ingredients into a gourmet-style finger food in minutes.
Ingredients
- Mini sweet bell peppers (assorted colors)
- Leftover feta cheese
- Cream cheese (softened)
- Everything bagel seasoning
- Fresh chives (finely chopped)
Equipment
- Small paring knife
- Mixing bowl
- Hand mixer or sturdy spoon
- Small spoon or piping bag
DIY Instructions
- Wash all the mini bell peppers under cool water and pat them dry with a clean towel.
- Cut each pepper in half lengthwise using a small knife.
- Remove the seeds and any white ribs from the inside to create a clean hollow space.
- Place the softened cream cheese and crumbled feta into a medium mixing bowl.
- Mix the two cheeses together until the texture is mostly smooth and well combined.
- Use a small spoon to scoop the cheese mixture into each pepper half until it is level with the top.
- Sprinkle a generous amount of everything bagel seasoning over the cheese surface.
- Add a few pieces of chopped fresh chives on top for extra flavor and color.
- Arrange the stuffed peppers on a plate and keep them cold until you are ready to eat.
3. Cheddar and Green Apple Cracker Bites

Sharp cheddar is a staple of holiday cheese boards that almost always leaves behind a few extra blocks. Pairing this bold cheese with crisp green apples creates a classic flavor profile that never goes out of style. The addition of a salty almond on top provides a satisfying finish to every bite.
These towers are incredibly easy to build and require no cooking at all. The tartness of the Granny Smith apple balances the savory notes of the aged cheddar beautifully. It is a smart way to clear out the pantry and the fruit bowl at the same time.
You can assemble these seconds before guests arrive to ensure the crackers stay crisp. They offer a light and fruity alternative to heavier, fried appetizers. This combination proves that leftover ingredients can still feel fresh and exciting.
Ingredients
- Leftover sharp cheddar cheese blocks
- Granny Smith apples
- Round whole-grain crackers
- Whole roasted almonds
- Sea salt or cinnamon (optional)
Equipment
- Sharp kitchen knife
- Cutting board
- Small round cookie cutter (optional, for apple circles)
DIY Instructions
- Set your crackers out on a flat workspace or a large serving board.
- Slice the cheddar cheese into thick cubes or rectangles that fit comfortably on your crackers.
- Place one piece of cheese directly onto the center of each cracker.
- Wash the green apple and slice it into thin rounds.
- Remove any seeds from the apple slices or use a small round cutter to make even circles.
- Stack one or two thin apple slices on top of the cheese blocks.
- Place a single whole almond on the very top of the apple slice.
- Press down gently so the stack stays stable and doesn’t tip over.
- Dust the top with a tiny pinch of sea salt or cinnamon if you want an extra layer of flavor.
4. Crispy Parmesan and Herb Cheese Crisps

Hard cheeses like Parmesan or Romano often linger in the fridge after the holiday pasta dishes are gone. You can transform these grated scraps into delicate, lacy crisps that provide a massive flavor punch. These are much more impressive than store-bought chips and take very little effort to bake.
The cheese melts down in the oven to form a golden, toasted disc with a unique texture. Adding a dash of black pepper or dried herbs elevates the simple savory taste. These crisps are naturally low in carbs and high in satisfying protein.
They make a wonderful addition to a salad or can be served as a standalone crunchy snack. Since they only require one main ingredient, they are the ultimate solution for clearing out cheese containers. Watch them closely in the oven, as they go from golden to burnt very quickly.
Ingredients
- Leftover Parmesan or Romano cheese (finely grated)
- Coarse ground black pepper
- Dried oregano or thyme (optional)
Equipment
- Baking sheet
- Parchment paper or silicone baking mat
- Tablespoon measure
DIY Instructions
- Heat your oven to 400 degrees Fahrenheit before you start preparing the cheese.
- Line a large baking sheet with a piece of parchment paper to prevent the cheese from sticking.
- Scoop one level tablespoon of grated cheese and pour it onto the baking sheet.
- Pat the cheese pile down slightly with your fingers to form a flat circle about two inches wide.
- Repeat this process, leaving at least two inches of space between each cheese circle.
- Sprinkle a small amount of black pepper or dried herbs over each pile of cheese.
- Slide the tray into the oven and bake for about 3 to 5 minutes.
- Look for the edges to turn golden brown and the centers to stop bubbling vigorously.
- Let the crisps cool completely on the tray for several minutes until they become firm and crunchy before moving them.
5. Creamy Labneh Dip with Toasted Pine Nuts

Soft white cheeses or thick yogurts left over from holiday brunches can be turned into a luscious dip. This Mediterranean-inspired spread is velvety and serves as a blank canvas for high-quality oils and herbs. It is a fantastic way to use up the last bit of dairy in your refrigerator.
Topping the dip with warm olive oil and toasted pine nuts creates a luxury experience for your palate. Fresh dill adds a bright, grassy note that makes the whole dish feel vibrant. This appetizer is best enjoyed with warm pita bread or crunchy crackers.
The presentation is simple but elegant enough for any occasion. It takes less than five minutes to assemble if you already have the cheese on hand. Transforming your leftovers into this silky spread ensures nothing goes to waste.
Ingredients
- Leftover Labneh or thick Greek yogurt
- Extra virgin olive oil
- Toasted pine nuts
- Fresh dill sprigs
- Pinch of salt and black pepper
Equipment
- Shallow serving bowl
- Small skillet (for toasting nuts)
- Spoon
DIY Instructions
- Place the cold Labneh or thick yogurt into a shallow serving bowl.
- Use the back of a spoon to spread the cheese toward the edges of the bowl, creating a well in the center.
- Make a few decorative swirls in the surface of the cheese to catch the oil.
- Put the pine nuts in a small skillet over medium heat for 2 minutes until they smell nutty and turn brown.
- Pour a generous amount of olive oil into the center well you created in the cheese.
- Scatter the warm toasted pine nuts over the top of the oil and cheese.
- Add a light sprinkle of salt and freshly cracked black pepper across the surface.
- Tear small pieces of fresh dill and place them around the bowl for garnish.
- Serve the dip immediately with your choice of bread or vegetable sticks.
6. Pear and Blue Cheese Savory Flatbread

Blue cheese has a strong personality that can sometimes be overwhelming on a cheese board. However, when melted onto a flatbread with sweet pears and balsamic glaze, it becomes beautifully balanced. This recipe is a clever way to finish off those pungent crumbles and any leftover fruit.
The red onions provide a slight sharpness that complements the creamy, salty pockets of blue cheese. Walnuts add a necessary crunch that ties all the textures together. Every slice offers a mixture of sweet, salty, and earthy flavors that guests will enjoy.
This flatbread looks like it came from a high-end bistro but uses basic ingredients from your kitchen. It is an excellent choice for a quick dinner or a shared appetizer. Using your holiday leftovers in this way makes for a truly gourmet meal.
Ingredients
- Leftover blue cheese crumbles
- 1 Pre-made flatbread or pizza crust
- 1 Ripe pear (thinly sliced)
- Red onion (thinly sliced)
- Walnut halves
- Balsamic glaze
Equipment
- Baking sheet
- Sharp knife
- Cutting board
DIY Instructions
- Preheat your oven to 425 degrees Fahrenheit to ensure a crispy crust.
- Place the pre-made flatbread onto a large baking sheet.
- Scatter thin slices of red onion across the surface of the dough.
- Lay the thin pear slices in a circular or decorative pattern over the onions.
- Sprinkle the blue cheese crumbles evenly into the gaps between the pear slices.
- Add a handful of walnut halves over the top for extra texture.
- Bake the flatbread in the oven for 8 to 10 minutes until the cheese is melted and the crust is golden.
- Remove the flatbread from the oven and let it sit for one minute.
- Drizzle balsamic glaze in a zigzag pattern over the entire flatbread before slicing it into pieces.
7. Caprese Salad Skewers with Balsamic

Mozzarella pearls are frequently left over after making holiday pizzas or salads. These small cheese balls are the star of these simple skewers, which bring a taste of summer to your winter table. They are incredibly easy to assemble and require no heat at all.
Using different colors of cherry tomatoes makes the skewers look festive and appetizing. The fresh basil leaves provide a burst of aromatics that pair naturally with the mild cheese. This is a light, healthy option that balances out the heavier appetizers on your menu.
These are great for grazing because they are easy to hold and eat while mingling. You can prepare a large batch in very little time. Repurposing your extra mozzarella into these skewers is a smart and tasty move.
Ingredients
- Leftover mozzarella pearls (Bocconcini)
- Cherry tomatoes (red, orange, and dark varieties)
- Fresh basil leaves
- Bamboo skewers or toothpicks
Equipment
- Small bamboo skewers
- Colander (for washing produce)
DIY Instructions
- Rinse the cherry tomatoes and fresh basil leaves under cold water and let them dry.
- Drain the mozzarella pearls from any liquid they were stored in.
- Take a bamboo skewer and slide a cherry tomato onto the sharp end.
- Fold a fresh basil leaf in half and slide it onto the skewer next to the tomato.
- Add one mozzarella pearl onto the skewer so it sits against the basil leaf.
- Repeat the pattern by adding another tomato and another cheese ball if your skewers are long enough.
- Make sure the items are snug but not squashed together.
- Arrange the finished skewers on a clean plate or board.
- Serve them plain or with a side of balsamic vinegar for dipping.
8. Crispy Fried Brie with Jam and Walnuts

If you have a large wheel of Brie that didn’t get finished, frying it is a game-changer. This method creates a crunchy exterior that hides a gooey, molten center. It is a decadent way to breathe new life into holiday cheese that might be getting soft.
Topping the warm cheese with a dollop of fruit jam adds a sweet contrast to the savory crust. A single walnut and a tiny edible flower can make this look like a professional dish. This appetizer is all about the satisfying “pull” of the melted cheese.
Serve this immediately while the center is still warm and flowing. It feels like a special treat and is sure to be the first thing to disappear at the table. Your leftover cheese will be the star of the show in this crispy format.
Ingredients
- Leftover Brie cheese (cut into thick rounds)
- All-purpose flour
- 1 Egg (beaten)
- Panko breadcrumbs
- Fruit jam or preserves
- Walnut halves
Equipment
- Three small bowls (for breading station)
- Frying pan or skillet
- Tongs or a slotted spoon
DIY Instructions
- Cut your leftover Brie into thick circles or wedges while the cheese is very cold.
- Set up three bowls: one with flour, one with the beaten egg, and one with breadcrumbs.
- Dip a piece of cheese into the flour first, shaking off any extra.
- Submerge the floured cheese into the egg wash until it is fully coated.
- Press the cheese firmly into the breadcrumbs until the entire surface is covered.
- Heat a small amount of oil in a frying pan over medium-high heat.
- Carefully place the breaded cheese into the hot oil and fry for about 1 minute per side.
- Remove the cheese when the outside is a deep golden brown and place it on a paper towel.
- Top the warm cheese with a spoonful of jam and a walnut before serving.
9. Skillet Jalapeño Cheese Dip

Shredded cheese blends and leftover cream cheese are the foundation of a great warm dip. This skillet recipe uses those scraps to create a bubbly, spicy appetizer that is hard to resist. The heat from the jalapeños cuts through the rich dairy for a balanced flavor.
The top of the dip gets a nice crust in the oven, especially if you add a few extra cheese crumbles. Serving it straight from the cast iron skillet keeps the cheese warm and stretchy for a long time. It is a crowd-pleasing way to empty out multiple bags of half-used cheese.
Grab some tortilla chips and get ready for a mess-free snacking experience. This dip is thick enough to hold up to heavy dipping without breaking your chips. Turning your holiday cheese into a hot dip is a classic move that never fails.
Ingredients
- Leftover shredded cheese (Cheddar, Monterey Jack, or Pepper Jack)
- Cream cheese (softened)
- Fresh jalapeño (sliced into rounds)
- Crushed crackers or breadcrumbs (for the top)
Equipment
- Small cast iron skillet or oven-safe dish
- Mixing bowl
- Spatula
DIY Instructions
- Set your oven to 375 degrees Fahrenheit.
- In a mixing bowl, stir together the softened cream cheese and your leftover shredded cheese.
- Add half of your sliced jalapeños into the mixture for heat throughout the dip.
- Spread the cheese mixture evenly into a small cast iron skillet.
- Sprinkle a layer of crushed crackers or extra shredded cheese over the top.
- Place the remaining jalapeño slices in a pattern on top of the dip.
- Bake in the oven for 15 to 20 minutes until the edges are bubbling and the top is golden.
- If you want a darker top, turn the broiler on for the last 60 seconds of cooking.
- Remove carefully with oven mitts and serve while hot with chips or bread.
10. Savory Stuffed Mushrooms with Melted Cheese

Mushroom caps provide a natural bowl for holding a savory mixture of cheese and herbs. If you have various bits of hard and soft cheese left, you can combine them for a custom filling. This appetizer is earthy, salty, and incredibly satisfying.
The mushrooms soften in the oven while the cheese topping melts and turns golden. A sprinkle of fresh parsley adds a touch of brightness to the finished dish. These are easy to pop into your mouth and offer a substantial bite for hungry guests.
This recipe is very flexible, allowing you to use whatever herbs or breadcrumbs you have in the pantry. Stuffed mushrooms are a time-tested favorite that makes leftovers feel intentional. They are a great way to use up those extra vegetables and cheese in one go.
Ingredients
- Large white or Cremini mushrooms
- Leftover cheese (Gouda, Swiss, or Fontina)
- Breadcrumbs
- Garlic (minced)
- Fresh parsley (chopped)
Equipment
- Baking sheet
- Small spoon
- Cutting board
DIY Instructions
- Preheat your oven to 400 degrees Fahrenheit.
- Gently pull the stems out of the mushroom caps and set the caps aside.
- Finely chop the mushroom stems and sauté them in a pan with a little garlic until soft.
- In a small bowl, mix the cooked stems with your leftover cheese and a few breadcrumbs.
- Place the mushroom caps onto a baking sheet with the open side facing up.
- Use a small spoon to fill each cap with a generous amount of the cheese and stem mixture.
- Press an extra small slice of cheese on the very top of each mushroom.
- Bake for 12 to 15 minutes until the mushrooms are tender and the cheese has melted over the sides.
- Garnish with a little fresh parsley and serve them warm on a platter.
11. Sweet and Savory Prosciutto Wrapped Dates

Holiday platters often leave behind small blocks of firm yellow cheese and half-full packs of deli meats. You can tuck those cheese slices inside sweet dates to create a snack that hits every flavor note. Wrapping them in salty prosciutto provides a crispy shell that balances the natural sugars of the fruit.
These bite-sized treats are excellent for a quick energy boost or a party appetizer. The cheese melts slightly inside the date, creating a creamy center that surprises your guests. Using a toothpick makes them easy to grab and keeps the wrap secure while they bake.
You will find that the contrast between the chewy fruit and the crispy meat is highly addictive. It is a smart way to clear out the pantry and the deli drawer at the same time. This simple combination feels upscale but requires very little preparation.
Ingredients
- Leftover firm yellow cheese (like Gouda or Sharp Cheddar)
- Pitted Medjool dates
- Thin slices of prosciutto or bacon
- Honey (optional for drizzling)
Equipment
- Baking sheet
- Parchment paper
- Small paring knife
- Bamboo toothpicks
DIY Instructions
- Heat your oven to 400 degrees Fahrenheit so it is ready for baking.
- Line your baking sheet with parchment paper to prevent the dates from sticking.
- Slice each date lengthwise on one side to create a small pocket, making sure not to cut all the way through.
- Cut your leftover cheese into small rectangular slivers that fit easily inside the dates.
- Stuff one piece of cheese into the center of each pitted date and press the fruit closed.
- Cut your prosciutto slices into long strips about one inch wide.
- Wrap one strip of meat tightly around the middle of each stuffed date.
- Push a toothpick through the center of the wrap to hold the meat and date together.
- Place the dates on the baking sheet and bake for 10 to 12 minutes until the prosciutto looks crispy.
12. Creamy Pesto and Cheese Tortilla Triangles

Leftover tortillas and jars of pesto can quickly become a boring lunch, but they make a fantastic warm appetizer. Layering them with melted white cheese creates a gooey filling that feels like a gourmet quesadilla. The green swirls of pesto add a fresh, herbal depth to the savory dairy.
These triangles are easy to slice and serve to a crowd on short notice. The outside of the tortilla becomes crisp and golden while the inside stays soft and melted. It serves as a great base for adding other leftovers like shredded chicken or spinach if you have them.
The presentation is naturally beautiful thanks to the contrast of the green pesto against the pale cheese. You can whip these up in a skillet or the oven in under ten minutes. Repurposing your holiday wraps in this way keeps your snack menu exciting.
Ingredients
- Flour tortillas
- Leftover shredded mozzarella or Monterey Jack cheese
- Basil pesto (store-bought or homemade)
- Fresh basil leaves (for garnish)
Equipment
- Large skillet or griddle
- Pizza cutter or sharp knife
- Spatula
DIY Instructions
- Place a large skillet on the stove over medium heat.
- Lay one tortilla flat on a clean workspace or cutting board.
- Spread a thin, even layer of basil pesto over the entire surface of the tortilla.
- Sprinkle a generous amount of shredded cheese over the top of the pesto.
- Place a second tortilla on top of the cheese to create a sandwich.
- Put the tortilla sandwich into the warm skillet and cook for about 2 minutes.
- Flip the wrap carefully using a spatula once the bottom is golden brown.
- Cook the other side for another 2 minutes until the cheese is bubbling and melted.
- Slide the tortilla onto a board and use a pizza cutter to slice it into eight even triangles.
13. Ricotta and Fresh Berry Toast Points

Ricotta cheese is a holiday staple for lasagnas, but the extra often goes to waste. You can spread that creamy leftover cheese on toasted bread for a light and refreshing snack. Topping the toast with fresh blackberries or strawberries creates a beautiful balance of flavors.
A drizzle of honey or a sprinkle of crushed pistachios adds texture and just the right amount of sweetness. This appetizer works perfectly for a post-holiday brunch or a healthy afternoon treat. The mild flavor of the ricotta allows the brightness of the fruit to stand out.
Adding a few mint leaves gives the dish a professional look and a cooling finish. It is an effortless way to use up bread and dairy while keeping things light. Your guests will love the simple, clean taste of these fruit-topped bites.
Ingredients
- Leftover ricotta cheese
- Slices of brioche or white bread
- Fresh blackberries or sliced strawberries
- Shelled pistachios (crushed)
- Liquid honey
- Fresh mint leaves
Equipment
- Toaster or oven
- Butter knife or small spatula
- Small bowl
DIY Instructions
- Toast your bread slices until they are a light golden brown and firm to the touch.
- Let the toast cool for one minute so the ricotta doesn’t melt and become watery.
- Spread a thick, smooth layer of ricotta cheese over each slice of toast.
- Arrange your fresh berries on top of the cheese in a decorative pattern.
- Use a heavy object or a knife handle to crush the pistachios into small bits.
- Sprinkle the nut pieces over the berries to add a salty crunch.
- Drizzle a small amount of honey in a zigzag motion across the toast.
- Tear a few small mint leaves and place them on top for a pop of green color.
- Cut the toast into squares or triangles and serve them immediately while the bread is crisp.
14. Cucumber Rounds with Rolled Cheese and Capers

If you have slices of deli cheese and a cucumber, you have the start of a very elegant appetizer. Rolling the cheese into tight spirals makes it look much more sophisticated than a standard slice. This low-carb option is crisp, cooling, and provides a salty punch from the capers.
The cucumber serves as a sturdy, hydrating base that holds the cheese and toppings perfectly. Adding a sprig of fresh dill brings an earthy aroma that complements the tangy capers. This is a mess-free finger food that stays fresh on a platter for a long time.
It is a wonderful choice for those looking for a lighter snack after heavy holiday meals. You can assemble a dozen of these in just a few minutes using simple kitchen staples. This recipe proves that leftovers can be transformed into something truly graceful.
Ingredients
- 1 Large English cucumber
- Leftover slices of Swiss or Provolone cheese
- Capers (drained)
- Fresh dill sprigs
Equipment
- Sharp kitchen knife
- Cutting board
- Paper towels
DIY Instructions
- Wash the cucumber and pat it dry with a paper towel.
- Slice the cucumber into rounds that are about half an inch thick.
- Lay the cucumber slices out on a plate or board.
- Take a slice of cheese and cut it into strips about one inch wide.
- Roll each strip of cheese tightly to create a small spiral or rose shape.
- Place one cheese roll directly onto the center of each cucumber round.
- Gently press a single caper into the middle of the cheese spiral so it stays put.
- Tuck a small piece of fresh dill into the side of the cheese.
- Serve these chilled for the best flavor and a maximum crunch.
15. Savory Cheese and Corn Cake Squares

Cornbread or corn-based side dishes are common during the holidays and can easily be repurposed. These savory squares are dense, moist, and packed with pockets of melted cheese. The addition of fresh rosemary gives them a sophisticated herbal note that pairs well with the sweet corn.
Topping the warm squares with a dusting of finely grated hard cheese adds a savory finish. They are substantial enough to satisfy a crowd and work well as a side for soup or a standalone snack. The steam rising from a fresh batch makes them completely irresistible.
Using your leftover cheese in the batter ensures every bite is rich and flavorful. These squares are easy to handle and won’t crumble apart when picked up. It is a comforting way to make sure no holiday side dish goes to waste.
Ingredients
- Leftover cornbread batter or corn muffin mix
- Leftover shredded cheddar or jack cheese
- Fresh rosemary sprigs
- Grated Parmesan (for topping)
- 1 Small can of corn kernels (drained)
Equipment
- Square baking pan
- Mixing bowl
- Wooden spoon
- Parchment paper
DIY Instructions
- Turn your oven to 350 degrees Fahrenheit and line your baking pan with parchment paper.
- In a mixing bowl, combine your corn batter with the drained corn kernels.
- Fold in your leftover shredded cheese until it is distributed evenly through the mix.
- Pour the batter into the prepared pan and smooth the top with a spoon.
- Strip the leaves off a rosemary sprig and sprinkle them over the top of the batter.
- Bake for 20 to 25 minutes until a toothpick inserted in the center comes out clean.
- Remove the pan from the oven and immediately sprinkle the grated Parmesan over the hot surface.
- Let the cake cool in the pan for at least ten minutes to help it firm up.
- Lift the parchment paper to remove the cake and slice it into even squares for serving.
16. Loaded Sheet Pan Cheese Nachos

Nachos are the ultimate solution for finishing off several bags of half-used cheese and pantry staples. Spreading chips across a baking sheet allows every single bite to get covered in melted goodness. This dish is meant for sharing and brings a fun, casual energy to your table.
The addition of black beans, corn, and jalapeños provides a variety of textures and heat levels. A few dollops of sour cream and fresh cilantro brighten up the heavy cheese for a balanced snack. It is a great way to clear out the fridge after a large gathering.
You can customize these with whatever leftover proteins you have, like taco meat or shredded pork. The key is to bake them until the cheese is bubbly and the edges of the chips are toasted. This sheet pan method ensures easy cleanup and happy guests.
Ingredients
- 1 Large bag of tortilla chips
- Leftover shredded cheese blend
- Black beans (rinsed and drained)
- Corn kernels
- Sliced jalapeños
- Sour cream
- Fresh cilantro
Equipment
- Large rimmed baking sheet
- Parchment paper
- Small bowl (for dipping)
DIY Instructions
- Heat your oven to 400 degrees Fahrenheit.
- Line a large baking sheet with parchment paper to make cleanup easier later.
- Spread the tortilla chips in an even layer across the entire baking sheet.
- Scatter the black beans and corn over the top of the chips.
- Cover everything with a thick, even layer of your leftover shredded cheese.
- Place the sliced jalapeños on top of the cheese layer.
- Bake in the oven for 8 to 10 minutes until the cheese is completely melted and bubbling.
- Remove the tray and add small dollops of sour cream over the warm nachos.
- Garnish with fresh cilantro leaves and serve the tray directly on the table for everyone to enjoy.
17. Quince Paste and Cheese Skewers

For a snack that looks like it belongs in a high-end tapas bar, try pairing firm cheese with quince paste. The deep red color of the fruit paste looks stunning against the pale blocks of cheese. This combination offers a sophisticated balance of salty, sweet, and floral notes.
Topping the skewer with a salted almond provides a crunch that finishes the bite perfectly. These are very sturdy and easy to assemble well in advance of your guests arriving. They provide a unique flavor profile that stands out from more traditional appetizers.
A tiny drizzle of honey and a pinch of sea salt can elevate the flavors even further. Using a bamboo skewer makes them easy to pick up without getting your hands sticky. This is a smart way to use up those specialty items left over from a holiday grazing board.
Ingredients
- Leftover firm cheese (Manchego or Aged White Cheddar)
- Quince paste (Membrillo)
- Whole roasted almonds
- Sea salt
- Honey (for drizzling)
Equipment
- Sharp knife
- Cutting board
- Bamboo skewers or decorative picks
DIY Instructions
- Slice your firm cheese into uniform cubes about one inch in size.
- Cut the quince paste into slightly thinner squares that match the width of the cheese.
- Lay out your skewers on a clean surface.
- Slide one cube of cheese onto the skewer first.
- Add a square of quince paste so it sits flat against the cheese.
- Add a second cube of cheese and another layer of quince paste if you want a taller stack.
- Carefully push the skewer through the center of a whole roasted almond and place it on top.
- Lightly drizzle a tiny bit of honey over the almond and the sides of the stack.
- Add a small pinch of sea salt to the very top and arrange the skewers upright on a platter.
18. Warm Beer Cheese Dip with Soft Pretzels

Liquid gold in a bowl is the best way to describe this rich, velvety beer cheese dip. It is a fantastic use for any sharp cheddar scraps and that last half-bottle of ale from the party. The dip stays smooth and pourable, making it a favorite for dipping warm bread or salty pretzels.
A dash of smoked paprika gives the dip a beautiful orange hue and a subtle depth of flavor. Serving it in a ceramic crock keeps the heat in so the cheese stays melted for your guests. It is the ultimate comfort food for a chilly post-holiday evening.
This recipe is very forgiving, so feel free to mix different types of cheese for a custom blend. The smell of the warm cheese and toasted pretzels will fill your kitchen with a cozy aroma. It is a classic appetizer that turns simple leftovers into a crowd favorite.
Ingredients
- Leftover sharp cheddar cheese (shredded)
- Cream cheese (softened)
- 1/2 Cup of beer (lager or ale)
- Garlic powder
- Smoked paprika
- Large soft pretzels or crusty bread
Equipment
- Small saucepan
- Whisk
- Serving bowl
DIY Instructions
- Place a small saucepan over medium-low heat on the stove.
- Pour the beer into the pan and let it come to a very gentle simmer.
- Add the softened cream cheese to the beer and whisk until the mixture is smooth.
- Gradually add your shredded cheddar cheese one handful at a time.
- Keep whisking constantly until all the cheese is melted and the sauce is velvety.
- Stir in a pinch of garlic powder and a bit of smoked paprika for flavor.
- If the dip is too thick, add a tiny splash more beer or milk to thin it out.
- Pour the warm dip into a serving bowl and sprinkle a little extra paprika on top.
- Serve immediately with warm, salted pretzels or chunks of toasted bread for dipping.
19. Creamy Salami and Pickle Pinwheels

Tortilla roll-ups, often called pinwheels, are a smart way to use up deli meats and cream cheese. These bite-sized spirals are packed with savory salami and topped with a tangy olive for a classic flavor. They are easy to make in large batches and hold their shape well on a serving tray.
The cream cheese acts as the “glue” that keeps all the layers together when you slice them. Adding a bit of chopped green onion to the spread provides a fresh crunch in every bite. These are a nostalgic favorite that always seems to disappear quickly at parties.
You can prepare the rolls the night before and slice them right before your guests arrive. This helps the flavors meld together and makes the slicing process much cleaner. It is a simple, satisfying way to clear out the sandwich supplies in your fridge.
Ingredients
- Flour tortillas
- Cream cheese (softened)
- Salami or ham slices
- Green onions (finely chopped)
- Stuffed green olives (for garnish)
Equipment
- Butter knife
- Sharp knife
- Plastic wrap
- Toothpicks
DIY Instructions
- Spread a thin, even layer of softened cream cheese over the entire surface of a tortilla.
- Sprinkle the chopped green onions over the cheese layer.
- Lay the salami or ham slices over the cheese, slightly overlapping them to cover the surface.
- Starting at one edge, roll the tortilla up as tightly as possible into a long log shape.
- Wrap the log tightly in plastic wrap and place it in the fridge for at least 30 minutes.
- Once chilled, remove the plastic and use a sharp knife to slice the log into rounds about one inch thick.
- Lay the rounds flat on a plate so the spiral pattern is visible.
- Place a toothpick through a stuffed green olive and push it into the center of each pinwheel.
- Arrange them in neat rows on a platter and serve cold.
20. Burrata with Roasted Tomatoes and Garlic Toast

Burrata is a luxurious cheese that often makes a guest appearance during holiday dinners. If you have an extra ball of this creamy delight, pairing it with warm roasted tomatoes is a winning move. The center of the cheese is soft and buttery, which contrasts beautifully with the acidic fruit.
A drizzle of high-quality olive oil and some fresh basil leaves make this dish feel like a summer escape. Serving it with charred garlic toast provides the perfect vessel for scooping up the melted cheese. This is a sophisticated appetizer that looks much harder to make than it actually is.
The roasted tomatoes release their juices as they cook, creating a natural sauce for the bread. It is a communal dish that encourages guests to dig in together. Using your leftover holiday burrata in this way creates a truly memorable dining experience.
Ingredients
- 1 Ball of leftover Burrata cheese
- Cherry tomatoes
- Fresh garlic cloves (peeled)
- Extra virgin olive oil
- Fresh basil leaves
- Baguette slices
Equipment
- Small baking dish
- Skillet or grill pan
- Serving platter
DIY Instructions
- Preheat your oven to 400 degrees Fahrenheit.
- Place the cherry tomatoes and whole garlic cloves into a small baking dish.
- Coat them generously with olive oil and a pinch of salt.
- Roast the tomatoes for about 15 minutes until they are soft and the skins start to pop.
- While the tomatoes roast, brush your bread slices with oil and toast them in a pan until charred.
- Rub a raw garlic clove over the warm toasted bread for extra flavor.
- Place the cold Burrata ball in the center of a large serving platter.
- Carefully pour the hot roasted tomatoes and their oil around the cheese.
- Use a knife to gently break open the top of the Burrata so the creamy center spills out.
- Top with fresh basil leaves and serve immediately with the warm garlic toast.
21. Golden Crispy Mozzarella Sticks

Mozzarella sticks are a beloved classic that makes excellent use of leftover blocks or string cheese from holiday snack trays. You can create a restaurant-quality experience right in your kitchen with just a few simple pantry staples. These sticks offer a deep golden crunch on the outside that yields to a warm, stretchy center.
A dusting of dried herbs and Parmesan cheese over the hot crust adds an extra layer of savory flavor. They pair beautifully with a side of warm marinara sauce for dipping. This appetizer is always a hit with both kids and adults, ensuring your leftover cheese does not go to waste.
Keep your cheese very cold before breading to ensure it doesn’t leak out during the frying process. The contrast between the salty cheese and tangy tomato sauce is truly satisfying. Your guests will reach for these first at any gathering.
Ingredients
- Leftover mozzarella cheese (cut into sticks)
- 2 Eggs (beaten)
- 1 Cup all-purpose flour
- 1 Cup Panko breadcrumbs
- 1 Teaspoon dried oregano
- 1/2 Cup marinara sauce (for serving)
Equipment
- Deep frying pan or heavy pot
- Three shallow bowls
- Tongs
- Paper towels
DIY Instructions
- Cut your mozzarella into sticks about 3 inches long and half an inch thick.
- Set up three bowls in a row: one with flour, one with beaten eggs, and one with breadcrumbs mixed with oregano.
- Roll each cheese stick in the flour first, shaking off the excess.
- Dip the floured stick into the egg wash until it is completely wet.
- Press the stick into the breadcrumbs until every side is covered in a thick layer.
- Place the breaded sticks in the freezer for 20 minutes to help them hold their shape.
- Heat about 2 inches of oil in your pan over medium-high heat.
- Fry the sticks for 1 to 2 minutes, turning once, until they are golden brown.
- Drain them on paper towels and serve immediately with a bowl of warm marinara.
22. Blue Cheese and Walnut Celery Boats

Celery stalks provide a refreshing and crisp vessel for rich, creamy cheese fillings left over from holiday platters. This combination of pungent blue cheese and crunchy walnuts creates a sophisticated flavor profile. A light drizzle of honey over the top balances the sharpness of the dairy.
Tiny sprigs of celery leaves or chives add a pop of bright green color to the presentation. These boats are naturally low in carbs and offer a lighter alternative to bread-based appetizers. You can assemble a large batch in just a few minutes without any cooking required.
The smooth texture of the whipped cheese contrast beautifully with the firm celery and toasted nuts. Using up your extra celery and cheese this way feels intentional and gourmet. It is a smart move for a quick snack or a party tray.
Ingredients
- Celery stalks (washed and trimmed)
- Leftover blue cheese or gorgonzola (softened)
- Cream cheese (for a milder base)
- Toasted walnut halves
- Honey
Equipment
- Sharp knife
- Mixing bowl
- Spoon or piping bag
DIY Instructions
- Wash the celery stalks and cut them into 3-inch or 4-inch long segments.
- Pat the celery completely dry with a towel so the cheese sticks better.
- In a bowl, mix the blue cheese and cream cheese together until the mixture is smooth.
- Fill the hollow center of each celery piece with the cheese mixture using a small spoon.
- If you want a fancy look, use a piping bag to squeeze the cheese into the stalks.
- Press two or three walnut pieces into the top of the cheese on each boat.
- Drizzle a very thin line of honey over the nuts and cheese.
- Add a tiny piece of celery leaf or a few chopped chives for decoration.
- Arrange them on a platter and serve cold for the best crunch.
23. Cheesy Pull-Apart Garlic Bread

A whole loaf of bread becomes a centerpiece when stuffed with leftover shredded cheddar and herbs. This “Hasselback” style of slicing allows the cheese to melt into every crevice, creating a decadent, shared experience. The steam rising from the bread as you pull it apart is enough to make anyone hungry.
Freshly chopped parsley and garlic butter elevate the simple flavors of the toasted crust. It is the best way to use up those half-bags of shredded cheese blends taking up space in your fridge. This dish is meant to be placed in the middle of the table for everyone to dig in.
Every bite offers a mix of crunchy edges and soft, cheesy centers. This recipe is very forgiving, so feel free to use any melting cheese you have on hand. It turns a simple loaf into a warm, comforting masterpiece.
Ingredients
- 1 Round sourdough or Italian bread loaf
- Leftover shredded cheddar or Monterey Jack
- 1/2 Cup butter (melted)
- 3 Cloves garlic (minced)
- Fresh parsley (chopped)
Equipment
- Bread knife
- Baking sheet
- Aluminum foil
- Small bowl
DIY Instructions
- Heat your oven to 350 degrees Fahrenheit.
- Use a bread knife to cut a grid pattern into the top of the loaf, but do not cut all the way through the bottom crust.
- Mix the melted butter, minced garlic, and chopped parsley in a small bowl.
- Use a spoon or brush to drizzle the garlic butter into all the cuts you made in the bread.
- Stuff generous pinches of shredded cheese into every gap between the bread cubes.
- Wrap the entire loaf loosely in aluminum foil to prevent the top from burning.
- Bake for 15 minutes, then remove the foil and bake for another 10 minutes to crisp up the crust.
- The cheese should be completely melted and bubbling when you take it out.
- Serve it hot so the cheese stays stretchy as people pull the bread apart.
24. Classic Pimiento Cheese Cracker Bites

Pimiento cheese is a southern staple that works perfectly for using up extra blocks of sharp cheddar. This creamy spread is bold, tangy, and slightly sweet thanks to the diced peppers. Smearing a dollop onto a buttery cracker creates an instant, no-fuss appetizer for any occasion.
This spread keeps well in the fridge, making it a great “make-ahead” solution for leftover holiday cheese. You can garnish each bite with a small piece of pimiento or a slice of jalapeño for a bit of heat. It is a nostalgic snack that remains a favorite for a reason.
The texture should be slightly chunky rather than completely smooth for the best experience. Using high-quality crackers ensures the bite has a sturdy and salty base. This recipe is a fantastic way to transform plain cheddar into a crowd-pleasing dip.
Ingredients
- Leftover sharp cheddar (grated)
- Cream cheese (softened)
- Mayonnaise
- Diced pimientos (drained)
- Garlic powder
- Round butter crackers
Equipment
- Mixing bowl
- Grater (if cheese is in blocks)
- Spatula or spoon
DIY Instructions
- Grate your leftover cheddar cheese into a large mixing bowl.
- Add the softened cream cheese and a few tablespoons of mayonnaise to the bowl.
- Stir in the diced pimientos, garlic powder, and a pinch of black pepper.
- Mix everything vigorously until the spread is well combined but still has texture.
- Taste the mixture and add more mayo if you prefer a creamier consistency.
- Place a neat scoop of the cheese spread onto the center of each cracker.
- Top with an extra piece of pimiento or a small herb leaf for a finished look.
- Serve the crackers immediately or store the cheese in a jar for later use.
- Keep the spread chilled until you are ready to assemble the bites.
25. Grilled Halloumi with Honey and Sesame

Halloumi is a unique cheese that maintains its shape even when placed directly on a hot grill. Searing the slices creates beautiful charred marks and a salty, savory crust. This appetizer is both visually stunning and packed with a firm, satisfying texture.
A heavy drizzle of honey over the warm cheese adds a sweet contrast to the saltiness. Black sesame seeds provide a nutty finish and a sophisticated look to the stacked slices. Fresh mint leaves add a cooling element that ties the whole dish together.
This is a fantastic option for a quick but impressive warm appetizer. You only need a few minutes of cooking time to achieve the perfect golden exterior. Using up your leftover holiday halloumi in this way creates a gourmet experience with minimal effort.
Ingredients
- Leftover Halloumi cheese (sliced thick)
- Honey
- Black sesame seeds
- Fresh mint leaves
- Olive oil
Equipment
- Grill pan or non-stick skillet
- Tongs
- Serving plate
DIY Instructions
- Slice your Halloumi into thick rectangles about half an inch thick.
- Brush both sides of the cheese slices lightly with olive oil.
- Heat a grill pan or skillet over medium-high heat until it is very hot.
- Place the cheese slices in the pan and cook for 2 to 3 minutes without moving them.
- Flip the slices once you see dark grill marks and a golden color on the bottom.
- Cook the other side for another 2 minutes until the cheese is warm throughout.
- Stack the warm slices on a plate and drizzle a generous amount of honey over the top.
- Sprinkle black sesame seeds over the honey while it is still warm and sticky.
- Garnish with fresh mint leaves and serve immediately while the cheese is firm.
26. Crispy Phyllo Cups with Ricotta and Jam

Miniature phyllo shells are a lifesaver when you need to turn leftover ricotta into a fast appetizer. These delicate, flaky cups provide a light crunch that complements the creamy cheese center. Topping them with a dark fruit preserve creates a beautiful jewel-toned finish.
A single walnut half and a sprig of rosemary add a professional touch to these bite-sized treats. They are elegant enough for a formal gathering but simple enough to make for a weekday snack. Using your holiday leftovers this way ensures nothing goes to waste.
The combination of savory cheese and sweet jam is a classic for a reason. You can bake the shells for a few minutes first to make them even artistically. These treats look like they came from a bakery but take only minutes to assemble.
Ingredients
- Pre-baked mini phyllo shells
- Leftover ricotta cheese
- Fig or blackberry jam
- Walnut halves
- Fresh rosemary sprigs
Equipment
- Small spoon
- Baking sheet (optional)
- Serving tray
DIY Instructions
- Place your phyllo shells on a flat surface or a baking sheet if you want to warm them.
- Whisk the ricotta cheese in a small bowl until it is smooth and light.
- Fill each shell with a rounded teaspoon of the ricotta cheese.
- Add a small dollop of your favorite fruit jam directly on top of the cheese.
- Press a walnut half gently into the jam so it stays in place.
- Tuck a tiny piece of fresh rosemary into the side of the cup for aroma and color.
- If you prefer a warm snack, pop the filled cups into a 350-degree oven for 5 minutes.
- Arrange the finished cups on a dark plate to make the colors pop.
- Serve them at room temperature or warm, depending on your preference.
27. Savory Cheddar and Chive Biscuits

Extra shredded cheddar and a handful of fresh chives are all you need to upgrade basic biscuit dough. These warm, flaky rounds are packed with melted cheese and a subtle onion flavor. The golden crust on the top hides a soft and airy center that is perfect for spreading with butter.
A pinch of coarse sea salt on top before baking adds a lovely crunch and boosts the savory notes. These biscuits are a great side for a post-holiday stew or can be enjoyed on their own. Using up your leftover cheese in the dough makes the flavor much richer than standard biscuits.
The smell of baking cheese will fill your home and bring everyone to the kitchen. You can see the pockets of orange cheddar throughout the bread, making them look very appetizing. It is a hearty way to clear out the dairy drawer.
Ingredients
- 2 Cups all-purpose flour
- 1 Tablespoon baking powder
- 1/2 Cup cold butter (cubed)
- 1 Cup leftover shredded cheddar
- 1/2 Cup fresh chives (chopped)
- 3/4 Cup milk or buttermilk
Equipment
- Mixing bowl
- Pastry cutter or fork
- Baking sheet
- Round biscuit cutter
DIY Instructions
- Preheat your oven to 425 degrees Fahrenheit.
- Mix the flour and baking powder in a large bowl.
- Use a pastry cutter or fork to blend the cold butter into the flour until it looks like crumbs.
- Stir in the shredded cheddar cheese and the chopped chives.
- Pour in the milk and stir gently until a soft dough forms; do not overmix.
- Turn the dough out onto a floured surface and pat it down to about one inch thick.
- Use a round cutter to stamp out biscuits and place them on a baking sheet.
- Sprinkle a little extra cheese and a dash of sea salt on the top of each round.
- Bake for 12 to 15 minutes until the tops are golden brown and the cheese is melted.
28. Honeyed Goat Cheese and Peach Crostini

Goat cheese offers a tangy, creamy base that pairs wonderfully with the natural sweetness of ripe fruit. Spreading it over charred bread creates a sophisticated appetizer that feels light and fresh. The addition of sliced peaches and honey makes this a standout dish for any season.
Fresh thyme and a crack of black pepper add an unexpected savory depth to the sweet toppings. This recipe is a fantastic way to use up any leftover logs of goat cheese from your holiday boards. The vibrant colors of the fruit make these crostini look beautiful on a serving platter.
You can use fresh or grilled peaches depending on how much time you have. The warmth of the toasted bread softens the cheese just enough to make it spreadable. It is an effortless way to create a high-end snack from simple ingredients.
Ingredients
- Baguette slices
- Leftover goat cheese (softened)
- Fresh peaches (sliced thin)
- Honey
- Fresh thyme
- Black pepper
Equipment
- Toaster or grill pan
- Spreading knife
- Cutting board
DIY Instructions
- Toast your baguette slices until they are golden and have visible char marks.
- Spread a thick layer of softened goat cheese over each piece of warm bread.
- Lay two or three thin slices of peach on top of the cheese.
- Drizzle a small amount of honey in a slow stream over the fruit.
- Strip the leaves from a few thyme sprigs and scatter them over the top.
- Add a tiny pinch of freshly cracked black pepper for a bit of contrast.
- Press the peaches down slightly so they don’t slide off the cheese.
- Serve these immediately while the bread is still crunchy.
- You can substitute the peaches for pears or figs if that is what you have on hand.
29. Cheesy Roasted Corn Dip with Cilantro

This warm, bubbling dip is a great way to use up leftover white cheeses like Monterey Jack or Mozzarella. Mixing the melted dairy with charred corn and chili flakes creates a smoky and spicy appetizer. It is a hearty dish that pairs perfectly with sturdy tortilla chips.
Fresh cilantro and a squeeze of lime juice brighten up the rich flavors of the cheese. Serving it in a white ceramic dish allows the golden corn and red pepper flakes to stand out. It is the ultimate comfort food for sharing with a group.
The cheese provides a long, satisfying pull as you scoop it up with a chip. This recipe turns basic pantry items into a vibrant and flavor-packed snack. It is a smart way to clear out those extra cheese shreds after a holiday party.
Ingredients
- 2 Cups corn kernels (roasted or canned)
- Leftover shredded white cheese (Monterey Jack or Mozzarella)
- 1/2 Cup sour cream
- Red pepper flakes
- Fresh cilantro (chopped)
Equipment
- Oven-safe baking dish
- Mixing bowl
- Spatula
DIY Instructions
- Set your oven to 375 degrees Fahrenheit.
- In a mixing bowl, combine the corn, sour cream, and most of your shredded cheese.
- Stir in a teaspoon of red pepper flakes for a bit of heat.
- Transfer the mixture to a small baking dish and smooth out the top.
- Sprinkle the remaining cheese over the surface for a golden crust.
- Bake for 15 to 20 minutes until the edges are bubbling and the top is melted.
- Remove from the oven and let it sit for two minutes to thicken slightly.
- Garnish with a generous amount of fresh cilantro before serving.
- Provide a bowl of purple or yellow tortilla chips for dipping.
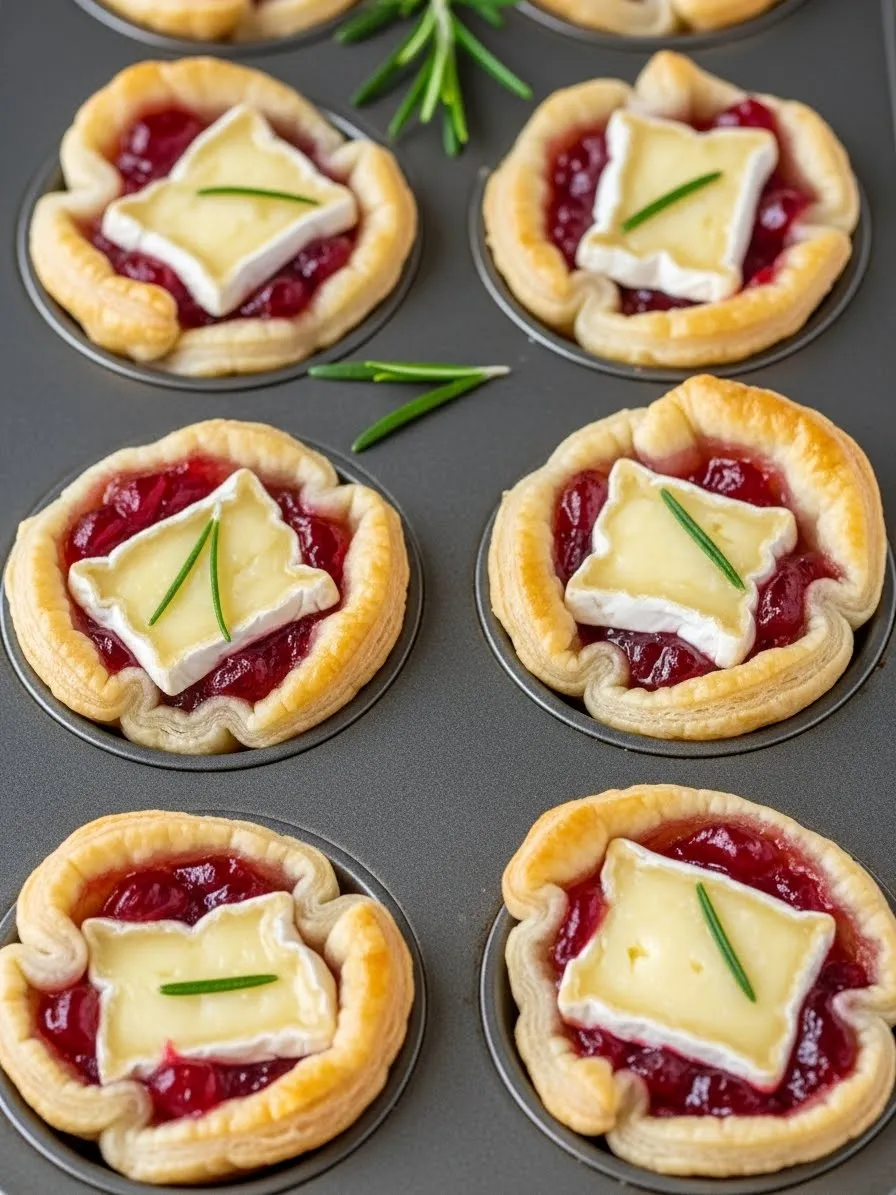
30. Cranberry and Brie Phyllo Tartlets

These tiny tartlets are the definition of a “holiday in a bite,” using up extra Brie and cranberry sauce. The buttery, flaky shells hold a pocket of melted cheese topped with a tart fruit preserve. A single pecan half on top adds a necessary crunch and an earthy flavor.
The red and white colors look festive and elegant on any appetizer tray. These are incredibly easy to assemble in bulk and bake in under ten minutes. Using your leftover holiday supplies for these tartlets is a clever way to extend the celebration.
Each bite offers a mixture of creamy, crunchy, and tangy textures. You can add a small sprig of rosemary for a woody aroma that complements the Brie. These are always a favorite and disappear quickly from the plate.
Ingredients
- Mini phyllo shells
- Leftover Brie cheese (cut into small cubes)
- Cranberry sauce or jam
- Whole pecans
- Fresh rosemary (optional)
Equipment
- Baking sheet
- Small spoon
- Knife
DIY Instructions
- Preheat your oven to 350 degrees Fahrenheit.
- Place the mini phyllo shells in rows on a large baking sheet.
- Cut the Brie into small cubes that fit easily inside the shells.
- Place one piece of cheese into the bottom of each tartlet.
- Top the cheese with a small spoonful of cranberry sauce.
- Press a single pecan half firmly into the top of the cranberry sauce.
- Bake for 5 to 8 minutes until the cheese is melted and the shells are extra crisp.
- Remove from the oven and garnish with a tiny bit of fresh rosemary if you like.
- Serve them warm for the best “gooey” cheese experience.
31. Sweet Heat Apple and Cheddar Quesadillas

Holiday fruit baskets often leave behind crisp apples that pair beautifully with remaining blocks of sharp cheddar. These quesadillas offer a sophisticated twist on a childhood favorite by balancing melted savory dairy with fresh fruit slices. The heat from the pan softens the apples just enough to release their natural sugars without losing their signature crunch.
Every wedge provides a mixture of gooey cheese and warm, tart apple that satisfies both sweet and savory cravings. These are simple to assemble and cook in under ten minutes, making them an efficient way to clear out your refrigerator. Serving them warm ensures the cheese stays stretchy and the tortillas remain light and flaky.
You can customize these by adding a swipe of honey or a sprinkle of cinnamon inside for extra depth. They work well as a quick lunch or a shared appetizer for guests who enjoy unique flavor combinations. This recipe turns basic holiday leftovers into a vibrant snack that feels entirely fresh.
Ingredients
- Leftover sharp cheddar cheese (sliced or shredded)
- 1 Large crisp apple (such as Honeycrisp or Granny Smith)
- Flour tortillas
- Butter (for the pan)
- Honey (optional)
Equipment
- Non-stick skillet or griddle
- Sharp kitchen knife
- Spatula
- Cutting board
DIY Instructions
- Wash your apple and use a sharp knife to cut it into very thin, uniform slices.
- Grate or thinly slice your leftover cheddar cheese so it melts quickly and evenly.
- Place a flour tortilla on a clean workspace and layer half of it with a generous amount of cheese.
- Arrange the apple slices over the cheese in a single layer so the tortilla can still fold properly.
- Add another light layer of cheese over the apples to act as “glue” for the top fold.
- Fold the empty half of the tortilla over the filling to create a half-moon shape.
- Melt a small knob of butter in a skillet over medium heat until it begins to sizzle.
- Carefully place the quesadilla in the pan and cook for 2 to 3 minutes until the bottom is golden brown.
- Flip the tortilla with a spatula and cook the other side until the cheese is completely melted and bubbling.
- Slide the quesadilla onto a board, let it rest for one minute, and then slice it into triangles for serving.
32. Parmesan Crusted Cauliflower with Garlic Dip

Cauliflower florets left over from holiday veggie trays can be transformed into a crispy, savory snack with a simple cheese coating. Roasting them at high heat allows the cheese to form a toasted crust that mimics the texture of breading. This appetizer is naturally gluten-free and offers a much more interesting way to eat your vegetables.
The golden-brown finish provides a satisfying crunch that pairs naturally with a cooling yogurt or garlic dip. Adding a squeeze of fresh lemon over the hot florets brightens the earthy flavors of the roasted brassica. It is a smart way to use up those hard cheese scraps like Parmesan or Romano lingering in your deli drawer.
These are best served straight from the oven while the cheese is still firm and crispy. They make a great alternative to traditional fries or chips and look beautiful on a rustic serving tray. Your guests will love the salty, nutty profile of this simple vegetable dish.
Ingredients
- 1 Head of cauliflower (cut into florets)
- Leftover Parmesan cheese (finely grated)
- Extra virgin olive oil
- Garlic powder
- Salt and black pepper
- Fresh lemon wedges (for serving)
Equipment
- Large rimmed baking sheet
- Parchment paper
- Large mixing bowl
DIY Instructions
- Turn your oven to 400 degrees Fahrenheit and line a baking sheet with parchment paper.
- Cut the cauliflower into bite-sized florets, ensuring they are mostly uniform in size for even cooking.
- Place the florets into a large bowl and drizzle them with olive oil until they are well coated.
- Add a generous amount of grated Parmesan cheese, garlic powder, salt, and pepper to the bowl.
- Toss the cauliflower vigorously to ensure the cheese and spices stick to the oiled surfaces.
- Spread the florets out on the prepared baking sheet in a single layer with space between them.
- Bake for 20 to 25 minutes, turning halfway through, until the edges are dark golden and crispy.
- Remove from the oven and immediately sprinkle a little extra cheese over the hot florets.
- Serve warm on a platter with lemon wedges and your favorite creamy dipping sauce.
33. Spinach and Artichoke Stuffed Pull-Apart Bread

A round loaf of bread is the ultimate vessel for repurposing leftover cream cheese and mozzarella from the holidays. Slicing the bread into a grid allows you to stuff every opening with a rich, savory spinach and artichoke mixture. This communal dish is designed for sharing and provides a dramatic look on any dining table.
The cheese melts deep into the bread, creating a soft and gooey interior that contrasts with the toasted, herb-crusted top. Red pepper flakes add a subtle hint of heat that cuts through the creamy texture of the filling. It is a hearty solution for using up various cheese shreds and that last bunch of greens.
The steam and aroma that release as you pull away a segment are completely irresistible. This recipe turns simple pantry staples into a decadent, bubbly masterpiece that guests will talk about. Using your holiday leftovers this way ensures a crowd-pleasing result every time.
Ingredients
- 1 Round artisan bread loaf
- Leftover mozzarella and cream cheese
- Frozen spinach (thawed and squeezed dry)
- Artichoke hearts (chopped)
- Red pepper flakes
- Melted butter and garlic
Equipment
- Serrated bread knife
- Baking sheet
- Aluminum foil
- Small bowl
DIY Instructions
- Heat your oven to 350 degrees Fahrenheit.
- Use a serrated knife to slice the bread loaf in a grid pattern, stopping about half an inch before the bottom.
- In a bowl, mix your softened cream cheese, mozzarella, spinach, and chopped artichokes.
- Stir in a pinch of red pepper flakes and some minced garlic for extra flavor.
- Gently pull the bread segments apart and use a spoon to stuff the cheese mixture deep into the cracks.
- Brush the top of the entire loaf with melted garlic butter to help it brown.
- Wrap the loaf in aluminum foil and bake for 15 minutes to melt the internal cheese.
- Open the foil and bake for another 10 minutes to make the crust golden and crispy.
- Serve immediately while the cheese is hot and stretchy for the best experience.
34. Pesto and Burrata Flatbread with Roasted Tomatoes

Burrata is a star ingredient that adds a touch of luxury to any leftover holiday flatbread or pizza crust. When placed over a base of herbaceous pesto and warm roasted tomatoes, the cheese breaks open to create a creamy sauce. A drizzle of balsamic glaze provides a sweet and tangy finish that balances the rich dairy perfectly.
The vibrant colors of the red tomatoes and green pesto make this dish look like it came from a professional kitchen. Fresh basil leaves added at the end provide an aromatic punch that ties all the Mediterranean flavors together. This is a sophisticated way to use up specialty cheeses and garden-fresh produce.
Sharing this flatbread is a great way to enjoy a light but satisfying meal after the heavy holiday season. The textures range from the crunchy crust to the silky, molten center of the Burrata. Repurposing your extra ingredients in this format is both simple and impressive.
Ingredients
- 1 Pre-made flatbread or pizza dough
- 1 Ball of leftover Burrata cheese
- Basil pesto
- Cherry tomatoes
- Balsamic glaze
- Fresh basil leaves
Equipment
- Baking sheet or pizza stone
- Spoon
- Sharp knife
DIY Instructions
- Preheat your oven to 425 degrees Fahrenheit.
- Place your flatbread on a baking sheet and spread a thick, even layer of pesto over the surface.
- Slice the cherry tomatoes in half and scatter them across the pesto.
- Bake the flatbread for 8 to 12 minutes until the edges are golden and the tomatoes look soft.
- Remove the flatbread from the oven and place the whole Burrata ball in the very center.
- Use a knife to gently slice into the top of the cheese so the cream begins to flow out over the tomatoes.
- Drizzle balsamic glaze in a zigzag pattern across the entire flatbread.
- Garnish with fresh basil leaves and a pinch of black pepper.
- Slice the flatbread into pieces and serve immediately while the bread is hot and the cheese is creamy.
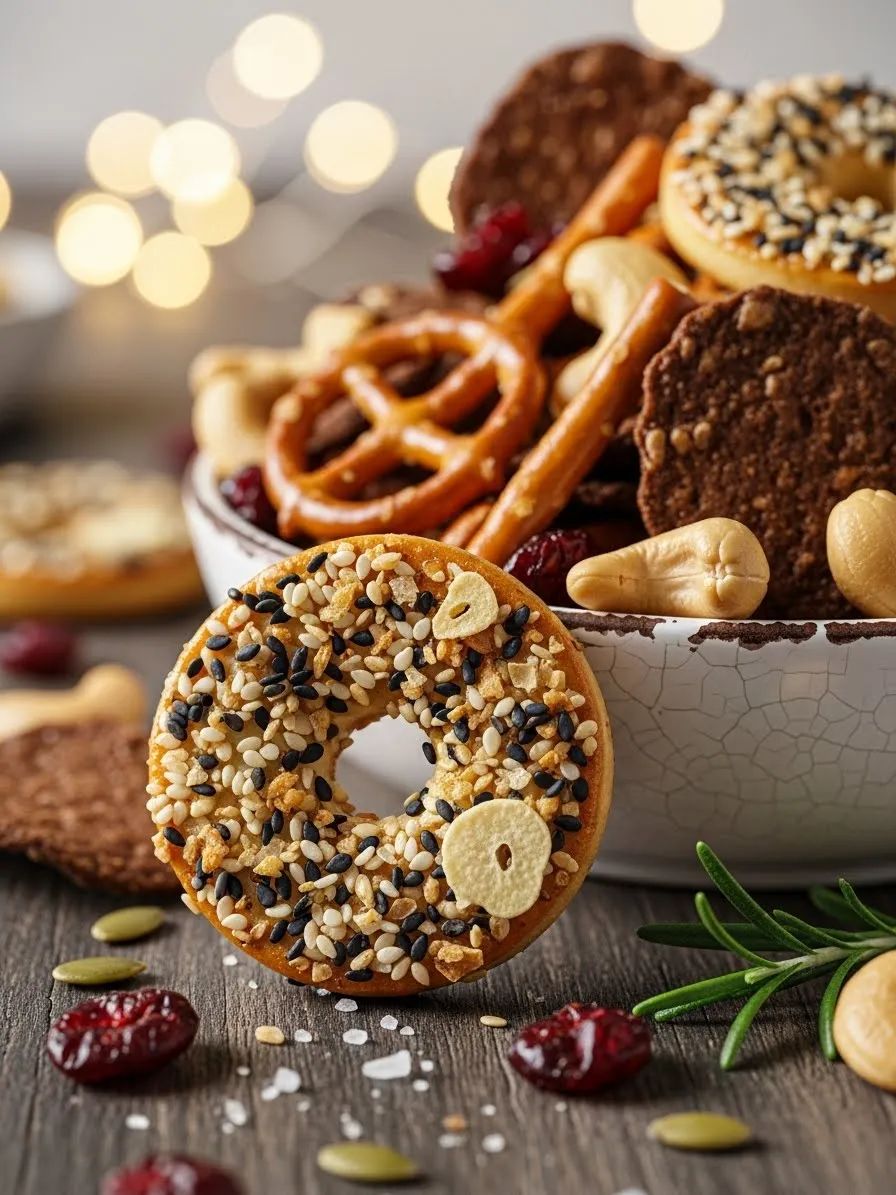
35. Herb and Parmesan Stuffed Popcorn

Popcorn is a versatile canvas for any leftover hard cheeses you have in your pantry after holiday snacking. Finely grating Parmesan or Pecorino over warm, buttered popcorn creates a savory snack that is far superior to store-bought versions. Freshly chopped chives add a mild onion flavor and a bright green color that makes the bowl look inviting.
This lightweight appetizer is perfect for a casual movie night or a low-key gathering with friends. The heat from the freshly popped kernels helps the cheese stick to every surface for a consistent flavor in every bite. It is a smart way to use up those small, hard ends of cheese blocks that are difficult to slice.
You can toss in a bit of garlic powder or smoked paprika to customize the flavor profile even further. The combination of salty cheese and fresh herbs is simple but highly addictive. This recipe turns a basic pantry staple into a gourmet treat in under five minutes.
Ingredients
- 1 Bag of plain popcorn kernels (or pre-popped)
- Leftover Parmesan cheese (very finely grated)
- Unsalted butter (melted)
- Fresh chives (finely chopped)
- Sea salt
Equipment
- Large mixing bowl with a lid
- Small saucepan (to melt butter)
- Fine grater
DIY Instructions
- Pop your corn using your preferred method (stovetop or air popper) and place it in a large bowl.
- Melt a few tablespoons of butter in a small pan or the microwave.
- Pour the warm butter over the popcorn while tossing it with a large spoon to ensure even coverage.
- Immediately sprinkle the finely grated Parmesan cheese over the buttery popcorn.
- Add the chopped chives and a small pinch of sea salt to the bowl.
- Place a lid on the bowl or use another large bowl to cover it and shake vigorously for 30 seconds.
- Shaking the corn ensures the cheese and herbs reach the bottom of the pile.
- Taste a piece and add more cheese or salt if needed.
- Pour the seasoned popcorn into a clean serving bowl and enjoy immediately.
36. Watermelon and Feta Skewers with Mint

Leftover feta cheese from holiday salads can be paired with sweet watermelon for a refreshing and hydrating snack. This classic combination offers a beautiful contrast between the salty, crumbly cheese and the juicy, sugary fruit. A single mint leaf on each skewer adds a cooling finish that makes this appetizer feel like a summer breeze.
The vibrant red and white colors look clean and professional on a white serving platter. These are incredibly easy to assemble and require no heat, making them a great last-minute option for guests. A light dusting of black pepper over the top can add an unexpected savory depth to the bite.
These skewers are best served chilled to maintain the crispness of the watermelon. They provide a light alternative to heavier, cheese-laden holiday appetizers. Using your extra feta in this way is a clever move that highlights the cheese’s tangy profile.
Ingredients
- Leftover feta cheese (cut into cubes)
- Fresh watermelon (seedless)
- Fresh mint leaves
- Extra virgin olive oil (optional)
- Black pepper
Equipment
- Sharp knife
- Cutting board
- Bamboo skewers or toothpicks
DIY Instructions
- Cut your watermelon into uniform cubes about one inch in size, removing any stray seeds.
- Slice your feta cheese into cubes that match the size of the watermelon pieces.
- Wash the fresh mint leaves and pat them dry with a paper towel.
- Take a skewer and slide on a cube of watermelon first.
- Fold a mint leaf in half and slide it onto the skewer next to the fruit.
- Add a cube of feta cheese to the skewer so it sits snugly against the mint leaf.
- Repeat this process until the skewer is full or you have used up your ingredients.
- Arrange the finished skewers on a plate and drizzle a tiny bit of olive oil over them if you like.
- Add a final crack of black pepper and keep them in the fridge until you are ready to serve.
37. Salami and Cream Cheese Sun-Dried Tomato Rolls

Deli meats and softened cream cheese are the stars of these savory, bite-sized rolls. Repurposing holiday salami slices by filling them with a herb-infused cheese mixture creates a protein-packed snack that is easy to eat. A single sun-dried tomato on top provides a concentrated burst of tangy flavor and a touch of color.
The cream cheese acts as a smooth base for whatever chopped peppers or herbs you have left in the fridge. Using a toothpick to secure each roll makes them mess-free for guests to grab during a party. These are sturdy enough to be made several hours in advance and stored in the refrigerator.
Each bite offers a mixture of creamy, salty, and chewy textures that satisfy. You can vary the meat used depending on what is left over from your holiday charcuterie boards. This recipe is a fantastic way to turn standard sandwich supplies into an elegant appetizer.
Ingredients
- Leftover salami or ham slices
- Cream cheese (softened)
- Sun-dried tomatoes (packed in oil)
- Bell peppers (finely diced)
- Toothpicks
Equipment
- Small bowl
- Spatula or spoon
- Paper towels
DIY Instructions
- In a small bowl, mix the softened cream cheese with your finely diced bell peppers.
- Lay the salami slices flat on a clean surface or a piece of parchment paper.
- Spread a thin, even layer of the cheese mixture over each slice of meat.
- Roll the meat up tightly to form a small cylinder or “cigar” shape.
- Drain your sun-dried tomatoes and pat them dry with a paper towel to remove excess oil.
- Place one sun-dried tomato on top of each rolled salami piece.
- Push a toothpick through the tomato and the center of the roll to hold everything together.
- Trim any uneven edges of meat for a cleaner presentation if desired.
- Arrange the rolls on a platter and serve chilled.
38. Baked Camembert with Garlic and Rosemary

A whole wheel of Camembert or Brie is a holiday luxury that can easily be revived into a molten, dipping masterpiece. Slicing a grid into the top rind allows garlic slivers and fresh rosemary to infuse the cheese as it bakes. The result is a velvety, aromatic dip that stays warm inside its own edible container.
Serving the warm cheese with crusty baguette slices or crackers creates a cozy and indulgent experience. The woody scent of the rosemary and the pungent garlic make this dish feel rustic and handcrafted. It is the perfect centerpiece for a small gathering or a quiet night in.
Watching the cheese flow out of the rind as you dip into it is highly satisfying for any cheese lover. This method is much more impressive than serving cold cheese and takes very little actual work. Your leftover holiday wheels will be the highlight of the meal in this format.
Ingredients
- 1 Wheel of leftover Camembert or Brie cheese
- 2 Cloves of garlic (thinly sliced)
- Fresh rosemary sprigs
- Olive oil
- Baguette or crusty bread (for dipping)
Equipment
- Small baking dish or oven-safe ceramic bowl
- Sharp paring knife
- Parchment paper
DIY Instructions
- Turn your oven to 350 degrees Fahrenheit.
- Place your cheese wheel in a small baking dish that fits it snugly to prevent it from spreading too much.
- Use a sharp knife to cut a shallow grid pattern or several small slits into the top rind of the cheese.
- Tuck the thin slices of garlic into the slits so they are partially submerged in the cheese.
- Pull small tufts of rosemary off the sprig and press them into the slits alongside the garlic.
- Drizzle a tiny bit of olive oil over the top of the cheese to help it brown.
- Bake for 12 to 15 minutes until the center of the cheese feels very soft and liquid when pressed.
- Remove from the oven and let it sit for two minutes so you don’t burn your tongue.
- Serve the warm dish in the center of a board surrounded by bread slices for easy dipping.
39. Radish and Cucumber Cottage Cheese Toast

Cottage cheese is often overlooked, but it serves as a high-protein, creamy base for a refreshing savory toast. Topping the cheese with paper-thin slices of radish and cucumber adds a clean crunch and a beautiful visual pattern. This appetizer is light enough for a post-holiday detox but flavorful enough to share.
A sprinkle of everything bagel seasoning or black sesame seeds adds a nutty finish and a professional look. Fresh microgreens or cilantro provide a burst of color and a grassy aroma that complements the mild dairy. This is a smart way to use up the last bit of a large cottage cheese container.
The textures of the toasted multigrain bread and the soft cheese create a satisfying mouthfeel in every bite. You can assemble these in seconds for a healthy snack or a brunch side. It proves that simple, fresh ingredients can be just as exciting as complex recipes.
Ingredients
- 1 Slice of multigrain or sourdough bread
- Leftover cottage cheese
- Radishes (thinly sliced)
- Cucumber (thinly sliced)
- Everything bagel seasoning
- Fresh microgreens or cilantro
Equipment
- Toaster
- Mandoline or sharp knife
- Spreading knife
DIY Instructions
- Toast your bread until it is a dark golden brown and firm enough to support the toppings.
- Spread a thick, even layer of cottage cheese across the surface of the warm toast.
- Use a mandoline or a very sharp knife to create thin rounds of radish and cucumber.
- Lay the vegetable slices over the cheese, alternating them to create a colorful pattern.
- Sprinkle a generous amount of everything bagel seasoning over the top for flavor and crunch.
- Add a few small pinches of fresh microgreens or cilantro for garnish.
- Drizzle a single drop of olive oil over the center for a glossy finish.
- Cut the toast into quarters or smaller rectangles to serve as bite-sized appetizers.
- Serve immediately while the bread is still warm and the vegetables are crisp.
40. Blue Cheese and Pear Endive Boats

Crisp endive leaves are the perfect low-carb vessel for a sophisticated mixture of blue cheese, pears, and walnuts. The slight bitterness of the greens balances the sweet fruit and the pungent, salty dairy beautifully. A drizzle of balsamic reduction or honey over the top ties all the complex flavors together.
These boats are naturally elegant and require no cooking, making them a stress-free addition to your menu. Using different colored endives, like red and pale green, makes the platter look vibrant and festive. It is a fantastic way to finish off those lingering crumbles of gorgonzola or stilton.
The addition of dried cranberries provides a chewy texture and a pop of tartness in every bite. These appetizers are easy to hold and eat while mingling at a party. Your guests will appreciate the clean, upscale flavors of this simple leftover transformation.
Ingredients
- 2 Heads of endive (leaves separated)
- Leftover blue cheese or gorgonzola (crumbled)
- 1 Ripe pear (diced)
- Walnut halves (toasted)
- Dried cranberries
- Balsamic glaze
Equipment
- Sharp knife
- Cutting board
- Large serving platter
DIY Instructions
- Gently peel the leaves off the endive heads, washing them and patting them dry with a towel.
- Dice your pear into very small cubes, leaving the skin on for extra color and nutrition.
- Arrange the endive leaves on a large platter with the hollow side facing up like small boats.
- Place a few small crumbles of blue cheese into the base of each leaf.
- Add a spoonful of the diced pears over the cheese.
- Top each boat with one toasted walnut half and a couple of dried cranberries.
- Hold the balsamic glaze bottle high and drizzle a thin line over the entire row of boats.
- If you want more sweetness, a tiny drop of honey can be added to each piece.
- Serve these chilled for the best flavor and a maximum crunch from the greens.
41. Crispy Toasted Ravioli with Marinara

Store-bought ravioli often hides in the back of the freezer after holiday dinners. You can give these pasta pockets a second life by breading and frying them until they reach a golden crunch. This appetizer is hearty and provides a satisfying texture that traditional boiled pasta lacks.
A dusting of finely grated cheese and fresh basil ribbons makes the dish look restaurant-quality. These are easy to grab and dip, making them a favorite for casual gatherings or game nights. Using your leftover holiday pasta in this way creates a comforting snack that everyone will enjoy.
The center stays warm and soft while the outside provides a loud, savory crunch. Pair these with a bowl of zesty tomato sauce to cut through the richness of the breading. It is a smart and filling way to clear out your freezer stocks.
Ingredients
- Leftover cheese ravioli (fresh or thawed from frozen)
- 1 Cup Panko breadcrumbs
- 1/2 Cup grated Parmesan cheese
- 2 Eggs (beaten)
- Fresh basil leaves (thinly sliced)
- Marinara sauce (for dipping)
Equipment
- Shallow bowls for breading
- Large skillet
- Tongs
- Paper towels
DIY Instructions
- Set up your breading station with one bowl of beaten eggs and another bowl containing the breadcrumbs mixed with half of the Parmesan.
- Pat the ravioli dry with a paper towel so the coating sticks better.
- Dip each ravioli into the egg wash, ensuring all sides are wet.
- Press the pasta firmly into the breadcrumb mixture until it is fully coated.
- Heat about an inch of vegetable oil in a skillet over medium-high heat.
- Fry the ravioli in batches for 2 to 3 minutes per side until they turn a deep golden brown.
- Place the finished pieces on a paper towel to drain any excess oil.
- Sprinkle the remaining Parmesan and fresh basil over the top while they are still hot.
- Serve immediately with a small bowl of warm marinara sauce on the side.
42. Whipped Blue Cheese Crock with Toasted Baguette

Pungent blue cheese can be intimidating on a platter, but whipping it makes it light and approachable. This spread is creamy and bold, perfect for those who enjoy a complex flavor profile. Storing it in a ceramic crock allows it to be served at room temperature for easy spreading.
One variation shown here includes a toasted version with dark, caramelized spots that add a smoky depth. These toast points are topped with a balsamic drizzle or honey to balance the saltiness of the dairy. It is a sophisticated way to finish off the last of your holiday cheese boards.
The texture is velvety and pairs beautifully with the crunch of a well-toasted baguette. This appetizer feels like a specialty item from a high-end deli. Using your leftovers this way ensures a gourmet finish to your post-holiday snacking.
Ingredients
- Leftover blue cheese (Gorgonzola or Stilton)
- 4 Ounces cream cheese (softened)
- 1 Baguette (sliced)
- Olive oil
- Honey or balsamic glaze (for drizzling)
Equipment
- Food processor or hand mixer
- Small ceramic crock or jar
- Baking sheet
- Spreading knife
DIY Instructions
- Place the blue cheese and softened cream cheese into a food processor.
- Blend the mixture until it reaches a smooth, whipped consistency.
- Scoop the cheese into a small crock and let it sit at room temperature for 30 minutes before serving.
- Brush your baguette slices with a little olive oil and place them on a baking sheet.
- Toast the bread in a 400-degree oven for 5 to 7 minutes until the edges are brown.
- For the decorative version, top a few slices with cheese and place them under the broiler for 60 seconds until the cheese bubbles and darkens.
- Spread a generous amount of the cold whipped cheese onto the remaining warm toast.
- Drizzle a small amount of honey or balsamic glaze over the top for a sweet finish.
- Serve the crock in the center of a platter surrounded by the toasted bread.
Key Takeaways
- Reduce Food Waste: Transform holiday leftovers into high-quality appetizers instead of discarding expensive artisanal cheeses.
- Versatile Ingredients: Most recipes allow you to swap cheese types based on what you actually have in your refrigerator.
- Minimal Prep Time: These snacks are designed to be assembled quickly, with many requiring no actual cooking.
- Flavor Balancing: Learn to pair salty cheeses with sweet fruits, crunchy nuts, and acidic glazes for a professional taste profile.
Clearing out your refrigerator after a big celebration does not have to be a chore. By using these 42 creative ideas, you can give your holiday cheese a second chance to shine. Each recipe proves that a little bit of creativity can turn simple scraps into a gourmet experience.
From the gooey pull of a skillet dip to the crisp bite of a fruit-topped crostini, there is a flavor here for everyone. These appetizers are perfect for keeping the cozy winter vibes alive well into the new year. You will save money and reduce waste while enjoying some of the best snacks of the season.
Grab your crackers, slice up some fruit, and start experimenting with those leftover wedges today. Your next favorite snack is likely sitting right there on your fridge shelf. Happy snacking and enjoy the process of making something new from something old.