Finding the right centerpiece for your holiday table often feels like a daunting task. You want something that captures the magic of the season without spending your entire vacation in the kitchen. This collection offers a diverse range of flavors and styles to suit any gathering.

Christmas is a time for sharing joy through food and creative presentation. Whether you love the deep spice of a traditional fruitcake or the modern flair of a peppermint cheesecake, there is a recipe here for you. We focus on simple techniques that produce high-impact results for your festive celebration.
The following guide provides forty distinct ways to sweeten your December. These ideas range from quick traybakes to elegant tiered masterpieces. Prepare to impress your guests with treats that taste even better than they look.
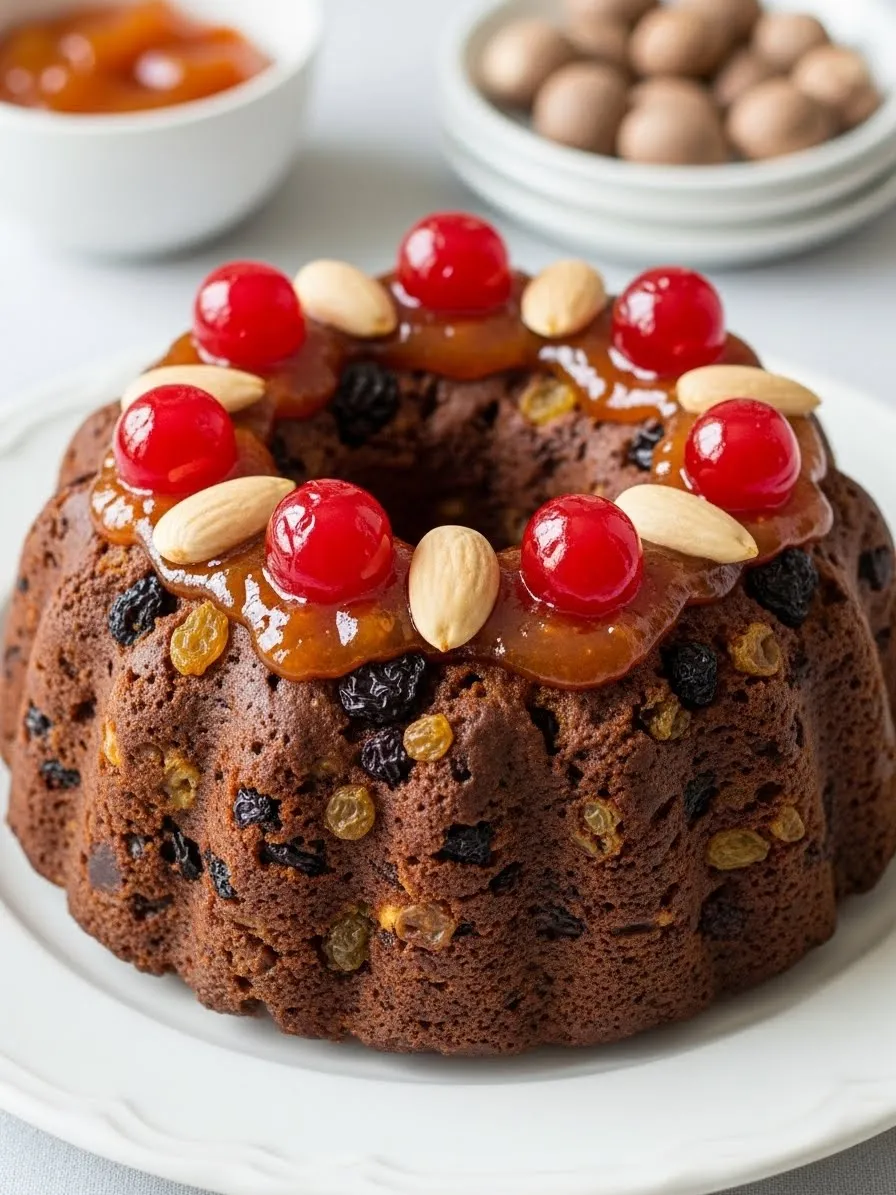
1. Traditional Glazed Christmas Fruitcake

This classic holiday wreath cake brings a nostalgic feel to any dessert table. It features a rich, dense sponge packed with golden raisins and dark currants that provide a burst of natural sweetness in every bite. The deep mahogany color of the crumb suggests a complex flavor profile rooted in warm spices and brown sugar.
Glossy apricot jam creates a shimmering crown atop the cake, acting as a sweet adhesive for the festive decorations. Bright red glacé cherries and blanched whole almonds are arranged in a rhythmic pattern around the ring. This simple yet effective decorating style offers a professional look without requiring advanced piping skills or heavy frosting.
The texture remains moist and hearty, making it a wonderful companion for a cup of tea or coffee. Serving this cake connects your guests to long-standing holiday traditions through its timeless appearance and comforting aroma. It serves as a beautiful centerpiece that tastes just as good as it looks on a white ceramic platter.
Ingredients
- 1 cup unsalted butter, softened
- 1 cup packed brown sugar
- 4 large eggs
- 2 cups all-purpose flour
- 1 teaspoon baking powder
- 1 tablespoon ground cinnamon
- 1/2 teaspoon ground nutmeg
- 2 cups mixed dried fruits (golden raisins and currants)
- 1/2 cup apricot jam (for the glaze)
- 10-12 glacé cherries
- 10-12 whole blanched almonds
Equipment
- 10-inch Bundt or ring cake pan
- Large mixing bowl
- Electric hand mixer or stand mixer
- Small saucepan
- Pastry brush
- Wire cooling rack
DIY Instructions
- Preheat your oven to 325 degrees Fahrenheit and generously grease your ring pan with butter to prevent sticking.
- Beat the softened butter and brown sugar in a large bowl until the mixture looks fluffy and light in color.
- Add the eggs one at a time, mixing well after each addition to ensure the batter stays smooth.
- Sift the flour, baking powder, cinnamon, and nutmeg into the wet mixture, then fold gently with a spoon until just combined.
- Stir in the raisins and currants until they are evenly distributed throughout the thick batter.
- Spoon the batter into your prepared pan and smooth the top with the back of a spoon.
- Bake for 50 to 60 minutes or until a toothpick inserted into the center comes out clean.
- Let the cake cool in the pan for 15 minutes before flipping it onto a wire rack to cool completely.
- Heat the apricot jam in a small saucepan over low heat until it becomes liquid and runny.
- Brush the warm jam over the top of the cooled cake using a pastry brush.
- Press the red cherries and whole almonds into the jam in an alternating circular pattern before the glaze sets.
2. Festive Raspberry and Cream Victoria Sponge

This elegant dessert puts a seasonal spin on the traditional Victoria sponge. Two light, golden cake layers sandwich a generous filling of velvety whipped cream and tart raspberry jam. The vibrant red fruit filling peeks out from the sides, creating a beautiful color contrast that looks wonderful on any holiday table.
A fine dusting of powdered sugar covers the top like a fresh layer of winter snow. For a simple organic touch, a single sprig of fresh rosemary sits in the center to mimic a small evergreen tree. This minimalist decorating style is excellent for those who want a professional look without spending hours on intricate frosting designs.
The flavor remains light and refreshing, providing a welcome break from heavier chocolate desserts. It pairs wonderfully with a warm pot of tea during a cozy afternoon gathering. Each slice offers a balanced mix of airy sponge, sweet cream, and acidic fruit that will delight your guests.
Ingredients
- 1 cup unsalted butter, softened
- 1 cup granulated sugar
- 4 large eggs
- 2 cups self-rising flour
- 1 teaspoon vanilla extract
- 1 cup heavy whipping cream
- 1/2 cup high-quality raspberry jam
- 2 tablespoons powdered sugar
- 1 fresh rosemary sprig
Equipment
- Two 8-inch round cake pans
- Parchment paper
- Large mixing bowl
- Electric hand mixer
- Spatula
- Sieve or flour sifter
DIY Instructions
- Preheat your oven to 350 degrees Fahrenheit and line the bottoms of your cake pans with parchment paper.
- Beat the softened butter and granulated sugar together in a large bowl until the mixture is pale and fluffy.
- Whisk in the eggs one at a time, followed by the vanilla extract, ensuring the batter stays smooth.
- Gently fold in the self-rising flour using a spatula until no white streaks remain.
- Divide the batter equally between the two pans and smooth the tops with your spatula.
- Bake for 20 to 25 minutes until the cakes are golden brown and spring back when lightly pressed.
- Let the cakes cool completely on a wire rack before you begin the filling process.
- Whip the heavy cream in a chilled bowl until it forms stiff peaks that hold their shape.
- Place one cake layer on a serving plate and spread a thick, even layer of raspberry jam over it.
- Spoon the whipped cream over the jam and gently place the second cake layer on top.
- Sift powdered sugar over the top of the cake and finish by placing the rosemary sprig in the very center.
3. Glazed Lemon Ginger Bundt Cake

This aromatic Bundt cake features a warm, golden crumb infused with the zesty brightness of lemon and the subtle heat of ginger. The distinctive fluted shape creates natural ridges that catch the thick, opaque white glaze as it cascades down the sides. It is a sophisticated choice for those who enjoy citrus-forward holiday bakes.
The stark white icing provides a clean, modern aesthetic against the deep gold of the baked sponge. Fresh lemons and ginger roots in the background emphasize the natural ingredients used in the recipe. This cake is sturdy enough for transport, making it a great option for gifting to friends or neighbors.
The texture is dense yet tender, ensuring it stays moist for several days. A thin slice delivers a punchy flavor that cuts through the richness of typical holiday meals. Serving this on a white marble slab enhances its bright appearance and makes the glaze pop.
Ingredients
- 1.5 cups unsalted butter, softened
- 2 cups granulated sugar
- 4 large eggs
- 3 cups all-purpose flour
- 1 tablespoon ground ginger
- 2 tablespoons fresh lemon zest
- 1/4 cup fresh lemon juice
- 1 cup Greek yogurt
- 2 cups powdered sugar (for glaze)
- 3 tablespoons milk (for glaze)
Equipment
- 10-cup Bundt pan
- Mixing bowls
- Zester or fine grater
- Measuring cups and spoons
- Wire cooling rack
- Whisk
DIY Instructions
- Preheat your oven to 325 degrees Fahrenheit and grease your Bundt pan thoroughly, making sure to hit every ridge.
- Cream the butter and sugar together until the mixture is light and airy.
- Add eggs one by one, mixing well, then stir in the lemon zest and ginger.
- Alternate adding the flour and the Greek yogurt into the bowl, starting and ending with the flour.
- Pour the thick batter into the pan and tap it on the counter to remove any air bubbles.
- Bake for 55 to 65 minutes until a skewer comes out clean from the thickest part of the cake.
- Allow the cake to cool in the pan for exactly 10 minutes before carefully inverting it onto a wire rack.
- While the cake cools, whisk the powdered sugar, lemon juice, and milk together to create a thick glaze.
- Ensure the glaze is thick enough to coat a spoon; if it is too thin, add more powdered sugar.
- Pour the glaze over the completely cooled cake, allowing it to drip naturally down the fluted grooves.
4. Snow-Capped Coconut Layer Cake

This striking layer cake looks like a giant snowball, making it a centerpiece for a winter-themed celebration. Three layers of dark chocolate or velvet cake are hidden beneath thick coats of creamy white frosting. The entire exterior is pressed with shredded coconut, adding a wonderful fuzzy texture that mimics fallen snow.
The contrast between the dark interior layers and the bright white frosting creates a beautiful “naked cake” effect on the sides. It stands tall on a white pedestal, offering a clean and sophisticated look for a holiday party. This design is forgiving for beginners because the coconut flakes easily hide any imperfections in the frosting.
Every bite offers a tropical twist on winter flavors, combining rich cocoa with the sweet nuttiness of coconut. The cake remains soft and moist, while the coconut adds a pleasant chewiness to the exterior. It is a grand dessert that feels both celebratory and cozy.
Ingredients
- 1 box chocolate cake mix (or your favorite recipe)
- 3 cups white buttercream frosting
- 2 cups sweetened shredded coconut
- 1/2 cup coconut milk (for moisture)
- 1 teaspoon coconut extract
Equipment
- Three 6-inch round cake pans
- Offset spatula
- Cake stand or large flat plate
- Large bowl
DIY Instructions
- Bake your three cake layers according to your recipe and let them cool completely.
- Level the tops of the cakes with a serrated knife so they sit flat on top of each other.
- Place the first layer on your cake stand and brush it lightly with a little coconut milk for extra moisture.
- Spread a layer of buttercream frosting over the top, then place the second cake layer on top of that.
- Repeat the frosting and layering process for the final cake piece.
- Cover the entire outside of the stacked cake with a thin “crumb coat” of frosting and chill for 20 minutes.
- Apply a final thick layer of frosting over the top and sides until the cake is fully white.
- Take handfuls of shredded coconut and gently press them into the frosting on the sides and top.
- Continue until no frosting is visible and the cake looks completely covered in white flakes.
5. Peppermint Chocolate Bark Cake

This deep chocolate cake is a dream for peppermint lovers, featuring a dramatic crown of homemade chocolate bark. The dark, cocoa-rich sponge is topped with swirls of white peppermint frosting that look like festive ruffles. Crushed candy canes are pressed into the base and sprinkled over the top for a vibrant red and white color scheme.
The chocolate bark shards are studded with peppermint bits and stand upright to create a “crown” effect. This height adds a sense of luxury and excitement to the dessert table. The dark background of the cake makes the bright red candy pieces stand out beautifully in holiday photos.
The flavor is a classic combination of rich, dark chocolate and cool, refreshing mint. The crunch from the candy and the bark provides a great textural contrast to the soft, velvety cake. It is a bold, festive treat that captures the spirit of the season in every slice.
Ingredients
- 2 cups all-purpose flour
- 2 cups granulated sugar
- 3/4 cup unsweetened cocoa powder
- 2 teaspoons baking soda
- 1 cup buttermilk
- 1/2 cup vegetable oil
- 2 large eggs
- 1 teaspoon peppermint extract
- 1 cup hot coffee
- 2 cups peppermint buttercream
- 1/2 cup crushed candy canes
- 4 ounces dark chocolate (melted for bark)
Equipment
- Two 6-inch deep cake pans
- Parchment paper
- Offset spatula
- Piping bag with a star tip
- Baking sheet
DIY Instructions
- Preheat your oven to 350 degrees Fahrenheit and prepare your cake pans with grease and parchment.
- Mix the dry ingredients in one bowl and the wet ingredients (except coffee) in another.
- Combine the two mixtures, then slowly stir in the hot coffee until the batter is thin and smooth.
- Bake for 30 to 35 minutes, then cool the cakes completely.
- To make the bark, spread melted chocolate on a baking sheet, sprinkle with crushed peppermint, and freeze until hard.
- Break the frozen chocolate into large, jagged triangles.
- Frost your stacked cake layers with a smooth coat of peppermint buttercream.
- Press crushed candy canes into the bottom two inches of the cake to create a festive border.
- Pipe large swirls of frosting around the top edge of the cake.
- Stick the chocolate bark shards into the frosting swirls so they stand up vertically.
6. Chocolate Orange Drip Loaf

This sophisticated loaf cake combines the zesty brightness of citrus with the indulgence of dark chocolate. A rich, moist cocoa sponge is smothered in a glossy chocolate ganache that drips artfully down the sides. Topped with candied orange slices, it presents a beautiful contrast of deep brown and vibrant amber.
The loaf is tied with a simple twine bow, giving it a rustic, “handmade gift” appearance that is charming and unpretentious. The orange slices are translucent and catch the light, adding a touch of natural elegance. This format is much easier to slice and serve than a large round cake, making it great for casual holiday brunches.
The flavor profile is mature and balanced, as the bitterness of the cocoa perfectly offsets the sweet citrus. The ganache adds a silkiness to every bite, while the orange zest in the batter provides a lasting aroma. It is a simple yet stunning bake that feels high-end without the need for complex tools.
Ingredients
- 1.5 cups all-purpose flour
- 1/2 cup cocoa powder
- 1 cup granulated sugar
- 1 teaspoon baking powder
- 2 large eggs
- 1/2 cup melted butter
- 1/2 cup milk
- Zest of 2 oranges
- 1/2 cup semi-sweet chocolate chips (for ganache)
- 1/4 cup heavy cream (for ganache)
- 4-5 dried or candied orange slices
Equipment
- 9×5 inch loaf pan
- Mixing bowls
- Whisk
- Small microwave-safe bowl
- Decorative twine
DIY Instructions
- Preheat your oven to 350 degrees Fahrenheit and line your loaf pan with parchment paper.
- Whisk together the flour, cocoa powder, sugar, and baking powder in a large bowl.
- In a separate bowl, beat the eggs, melted butter, milk, and orange zest.
- Combine the wet and dry ingredients until you have a smooth, dark batter.
- Pour the batter into the pan and bake for 45 to 50 minutes until a toothpick comes out clean.
- Let the loaf cool completely on a wire rack before adding the topping.
- Make the ganache by heating the chocolate chips and cream together in 30-second bursts in the microwave, stirring until smooth.
- Spoon the warm ganache over the top of the loaf, letting it run down the sides in thick drips.
- Lay the orange slices along the top of the wet ganache in an overlapping pattern.
- Once the chocolate is set, tie a piece of twine around the center of the loaf for a festive presentation.
7. Black Forest Swiss Roll

This stunning Swiss roll is a playful take on the classic Black Forest gateau. A light cocoa sponge is rolled around a cloud-like whipped cream filling with a hidden center of juicy black cherries. The exterior is decorated with elegant chocolate stripes and a light dusting of powdered sugar to resemble a snowy log.
Swirls of whipped cream sit along the top, each acting as a pedestal for a single bright red cherry with the stem still attached. The spiral pattern seen in each slice makes this a visually impressive dessert for any holiday party. Using a silicone mat or parchment paper makes the rolling process much easier than it looks.
The combination of tart cherries, rich chocolate, and light cream creates a timeless flavor that everyone loves. Each bite is light and airy, making it an excellent choice for a multi-course holiday meal. It looks beautiful when served on a simple white platter with a few extra cherries on the side.
Ingredients
- 4 large eggs
- 3/4 cup granulated sugar
- 1 teaspoon vanilla extract
- 1/2 cup all-purpose flour
- 1/4 cup cocoa powder
- 1 cup heavy whipping cream
- 1/2 cup cherry preserves or canned black cherries
- 2 ounces melted dark chocolate (for drizzling)
- 6-8 fresh cherries with stems
Equipment
- 10×15 inch jelly roll pan or baking sheet
- Clean kitchen towel or silicone rolling mat
- Hand mixer
- Offset spatula
- Piping bag
DIY Instructions
- Preheat your oven to 350 degrees Fahrenheit and line your pan with parchment paper.
- Beat eggs and sugar for about 5 minutes until the mixture is thick, pale, and triples in volume.
- Sift the flour and cocoa over the egg mixture and fold in very gently to keep the air inside.
- Spread the batter thinly in the pan and bake for only 10 to 12 minutes.
- While hot, flip the cake onto a kitchen towel dusted with cocoa and roll it up tightly starting from the short end.
- Let the rolled cake cool completely in this shape to prevent cracking later.
- Unroll the cooled cake and spread a thick layer of whipped cream over the surface, leaving a small border.
- Place a line of cherries along one edge and roll the cake back up tightly.
- Drizzle melted chocolate in thin lines across the top of the roll.
- Pipe small dollops of cream along the top and place a fresh cherry on each one.
8. Salted Caramel Chocolate Drip Cake

This decadent layer cake is a showstopper for any celebration, featuring a dramatic salted caramel drip. Two thick layers of dark chocolate cake are filled and covered with a smooth chocolate frosting. A pool of golden caramel sits on top, overflowing into long, beautiful beads that reach all the way to the base.
Coarse sea salt crystals are sprinkled over the warm caramel, adding a sparkling texture and a hit of savory flavor. The interior reveals a hidden layer of caramel between the cake sponges, ensuring every bite is rich and gooey. This cake is a fantastic choice for those who want a modern and indulgent holiday dessert.
The deep cocoa flavor pairs perfectly with the buttery, salty notes of the caramel. It is a heavy, satisfying dessert that feels truly special for a New Year’s Eve or Christmas Eve dinner. Placing it on a wooden board adds a warm, rustic touch to the presentation.
Ingredients
- 2 layers of 8-inch chocolate cake
- 3 cups chocolate buttercream frosting
- 1 cup salted caramel sauce (thick)
- 1 tablespoon coarse sea salt
- 1/4 cup extra caramel for the filling
Equipment
- 8-inch cake boards
- Offset spatula
- Squeeze bottle or spoon (for drips)
- Rotating cake stand (optional)
DIY Instructions
- Place your first chocolate cake layer on a plate and pipe a ring of frosting around the outer edge.
- Fill the center of that ring with a layer of extra caramel sauce, then place the second cake layer on top.
- Cover the entire cake in a smooth, even layer of chocolate buttercream frosting.
- Chill the cake in the fridge for at least 30 minutes so the frosting is cold and firm.
- Warm your caramel sauce slightly so it is pourable but not hot.
- Use a spoon or squeeze bottle to apply the caramel to the very edge of the cake, letting it fall naturally.
- Fill in the center of the cake top with the remaining caramel and smooth it out.
- Immediately sprinkle the coarse sea salt over the wet caramel so it sticks.
- Let the caramel set at room temperature before slicing into the cake.
9. Spiced Pear and Star Anise Cake

This rustic single-layer cake is a celebration of winter fruits and warm spices. Thinly sliced pears are arranged in a beautiful starburst pattern across the top, nestling into a golden, spiced sponge. Whole cloves and a single star anise are placed in the center to create a stunning, natural mosaic.
A light dusting of powdered sugar highlights the edges of the fruit, while fresh rosemary sprigs and cardamom pods on the board add to the sensory experience. This cake skips heavy frosting in favor of the fruit’s natural beauty and the cake’s golden crust. It is a sophisticated, less-sweet option that highlights seasonal ingredients.
The crumb is infused with cinnamon, nutmeg, and cardamom, creating a fragrant aroma that fills the kitchen as it bakes. The pears become soft and caramelized in the oven, providing a juicy contrast to the dense cake. It is a wonderful dessert for a winter dinner party where you want something elegant but grounded.
Ingredients
- 1.5 cups all-purpose flour
- 1 teaspoon baking powder
- 1 teaspoon ground cinnamon
- 1/2 teaspoon ground cardamom
- 3/4 cup granulated sugar
- 2 large eggs
- 1/2 cup melted butter
- 2 ripe pears, peeled and thinly sliced
- 1 star anise and 6 whole cloves (for decoration)
- 1 tablespoon powdered sugar
Equipment
- 9-inch round springform pan
- Mixing bowls
- Whisk
- Sharp knife for slicing pears
DIY Instructions
- Preheat your oven to 350 degrees Fahrenheit and grease your springform pan with butter.
- Whisk the eggs and sugar until pale, then stir in the melted butter and spices.
- Fold in the flour and baking powder until the batter is thick and consistent.
- Pour the batter into the pan and smooth the top.
- Arrange the pear slices in a circular pattern on top of the batter, pressing them in slightly.
- Place the star anise in the center and tuck the cloves into the pears for a decorative look.
- Bake for 40 to 45 minutes until the cake is golden and firm to the touch.
- Allow the cake to cool in the pan for 10 minutes before removing the sides.
- Dust the entire cake lightly with powdered sugar before serving.
- Remove the whole cloves and star anise before eating, as they are for flavor and decoration only.
10. Cranberry Orange Chiffon Cake

This bright and airy chiffon cake is a burst of color and flavor, featuring a light sponge dotted with tart red cranberries. A snowy coating of powdered sugar covers the top, decorated with sparkling sugared cranberries and fresh orange zest. The cake is baked in a ring shape, which allows for even baking and a beautiful presentation.
The interior reveals a soft, yellow crumb with pops of vibrant pink where the fruit has baked into the sponge. Fresh rosemary sprigs are tucked around the base of the cake to add a pop of green and a woody fragrance. This cake is incredibly light, making it a great palate cleanser after a heavy holiday meal.
The combination of citrus and berry is a holiday classic that feels fresh and modern. Sugaring the cranberries gives them a frosted, jewel-like appearance that catches the light beautifully. It is a cheerful dessert that looks as though it was plucked from a winter garden.
Ingredients
- 2 cups cake flour
- 1.5 cups granulated sugar
- 1 tablespoon baking powder
- 1/2 teaspoon salt
- 1/2 cup vegetable oil
- 7 large eggs (separated)
- 3/4 cup orange juice
- 2 tablespoons orange zest
- 1 cup fresh cranberries
- 1/2 cup powdered sugar (for dusting)
Equipment
- 10-inch tube pan (uncreased)
- Two large mixing bowls
- Whisk or electric mixer
- Cooling rack
DIY Instructions
- Preheat your oven to 325 degrees Fahrenheit; do not grease the tube pan, as the cake needs to “climb” the walls to rise.
- Whisk the flour, sugar, baking powder, and salt in a large bowl.
- Make a well in the center and add the oil, egg yolks, orange juice, and zest; whisk until smooth.
- In a separate clean bowl, beat the egg whites until very stiff peaks form.
- Gently fold the egg whites into the batter in three stages to keep the mixture light and airy.
- Toss the cranberries in a little flour to prevent sinking, then fold them into the batter.
- Pour the batter into the pan and bake for 55 to 60 minutes.
- Immediately invert the pan onto a wire rack or a bottle neck and let it cool completely upside down.
- Run a thin knife around the edges to release the cake and place it on a serving plate.
- Sift a heavy layer of powdered sugar over the top and garnish with extra cranberries and orange zest.
11. Vibrant Mandarin Orange Winter Sponge

This bright and citrusy cake brings a burst of sunshine to the winter months. The golden, airy sponge is baked with fresh mandarin segments tucked inside, ensuring a juicy surprise in every slice. A delicate dusting of powdered sugar coats the top, creating a beautiful contrast against the bright orange fruit.
Fresh mandarin segments are arranged in a circular crown around the edge, each still attached to a tiny green leaf for a natural touch. This vibrant decoration reflects the fresh ingredients used in the batter. It is a refreshing alternative to the rich, heavy desserts typically served during the holidays.
The texture is light and tender, making it a wonderful accompaniment to a hot cup of herbal tea. Using whole fruit segments provides a concentrated pop of flavor that balances the sweetness of the sponge. It serves as a cheerful centerpiece that brightens up a snowy afternoon gathering.
Ingredients
- 1.5 cups all-purpose flour
- 1 cup granulated sugar
- 3 large eggs
- 1/2 cup vegetable oil
- 1/2 cup fresh orange juice
- 1 tablespoon orange zest
- 1 teaspoon baking powder
- 10-12 fresh mandarins or clementines
- 2 tablespoons powdered sugar
Equipment
- 9-inch round cake pan
- Large mixing bowl
- Whisk or electric hand mixer
- Sieve for dusting
DIY Instructions
- Preheat your oven to 350 degrees Fahrenheit and grease your cake pan thoroughly.
- Peel the mandarins and remove as much of the white stringy pith as possible from the segments.
- Beat the eggs and granulated sugar in a large bowl until the mixture is pale and slightly thickened.
- Pour in the vegetable oil, orange juice, and orange zest, then whisk until fully combined.
- Sift the flour and baking powder into the bowl and fold gently until no dry clumps remain.
- Pour half of the batter into the pan and arrange a layer of mandarin segments on top.
- Cover with the remaining batter and smooth the surface with a spoon.
- Bake for 35 to 40 minutes until a toothpick comes out clean from the center.
- Let the cake cool in the pan for 10 minutes before moving it to a serving plate.
- Arrange the remaining mandarin segments in a circle on top and finish with a heavy dusting of powdered sugar.
12. Pistachio and Pomegranate Celebration Cake

This striking green and red cake is a visual tribute to holiday colors. Three layers of nutty pistachio sponge are separated by thick, silky layers of white cream frosting. Vibrant red pomegranate seeds are tucked between the layers and piled high in the center for a jewel-like effect.
A ring of crushed green pistachios sits atop a crown of whipped cream swirls, framing the pomegranate center beautifully. The bright red juice from the fruit drips naturally down the side, adding a sense of organic elegance. This cake is a sophisticated choice for a New Year’s Eve celebration or a grand Christmas dinner.
The flavor is a sophisticated mix of earthy nuts and tart, bursting fruit. The pistachio sponge provides a unique density that stands up well to the light cream. It is a colorful and flavorful dessert that will surely impress guests who appreciate refined holiday treats.
Ingredients
- 2 cups all-purpose flour
- 1 cup finely ground pistachios
- 1.5 cups granulated sugar
- 1 cup unsalted butter, softened
- 4 large eggs
- 1 cup buttermilk
- 2 cups heavy whipping cream
- 1 cup fresh pomegranate seeds
- 1/4 cup pomegranate juice (for the drip)
- 1/4 cup chopped pistachios (for garnish)
Equipment
- Three 6-inch round cake pans
- Stand mixer or electric hand mixer
- Offset spatula
- Piping bag with a star tip
DIY Instructions
- Preheat your oven to 350 degrees Fahrenheit and line your pans with parchment paper.
- Cream the butter and sugar until light, then add the eggs one at a time.
- Mix the ground pistachios with the flour and baking powder.
- Alternate adding the flour mixture and the buttermilk to the butter mixture, beginning and ending with flour.
- Divide the batter between the three pans and bake for 25 to 30 minutes.
- Allow the cakes to cool completely before you begin the assembly.
- Whip the heavy cream until stiff peaks form and use it to frost between each layer, adding a sprinkle of pomegranate seeds as you go.
- Cover the outside of the cake with a smooth layer of cream and pipe swirls around the top edge.
- Spoon the pomegranate seeds into the center of the swirls and sprinkle crushed pistachios on the cream.
- Carefully pour a small amount of pomegranate juice over the seeds to allow it to drip down the side for a dramatic finish.
13. Matcha Forest Cone Cake

This creative cake looks like a miniature winter forest, featuring bright green “trees” made from frosting and wafer cones. The interior reveals layers of vibrant green matcha sponge, which provides a unique earthy flavor and a stunning color contrast. It is a whimsical and modern design that kids and adults will both enjoy.
Three inverted ice cream cones sit on top, covered in thick swirls of green matcha buttercream to resemble evergreen trees. A light dusting of green tea powder or sugar over the white frosting mimics a forest floor. This cake is an excellent way to use natural colors to achieve a festive holiday look.
The matcha flavor is subtle and sophisticated, balancing the sweetness of the buttercream. The “naked” style frosting on the sides keeps the cake from feeling too heavy or overwhelming. It is a playful yet elegant dessert that acts as a conversation starter at any holiday gathering.
Ingredients
- 2 cups all-purpose flour
- 2 tablespoons matcha green tea powder
- 1.5 cups granulated sugar
- 1 cup milk
- 3/4 cup vegetable oil
- 2 large eggs
- 2 cups vanilla buttercream
- 1 cup matcha-flavored buttercream (green)
- 3 sugar wafer cones
Equipment
- Two 8-inch round cake pans
- Offset spatula
- Piping bag with a small star tip
- Cake stand
DIY Instructions
- Preheat your oven to 350 degrees Fahrenheit and grease your cake pans.
- Whisk the eggs, sugar, oil, and milk together until the mixture is smooth.
- Sift the flour and matcha powder into the wet ingredients and stir until just combined.
- Bake the sponges for 30 minutes and let them cool completely on a wire rack.
- Stack the layers with a filling of white vanilla buttercream in between.
- Frost the outside of the cake thinly so the green layers just barely show through the sides.
- Place the three sugar cones upside down on top of the cake.
- Using the green buttercream and a star tip, pipe small “leaves” all over the cones from bottom to top.
- Continue until the cones look like fluffy evergreen trees.
- Sprinkle a little extra matcha powder around the base of the trees for a finished forest look.
14. Reindeer Christmas Sweater Sheet Cake

This fun and festive sheet cake is decorated to look like a classic “ugly” Christmas sweater. The surface is covered in intricate piping that mimics knit patterns, featuring tiny reindeer, snowflakes, and colorful zig-zags. The cake itself features a beautiful marble interior that is revealed once you cut into it.
The bright red, green, blue, and yellow frosting colors make this cake stand out on any buffet table. Small chocolate reindeer faces with red noses add a cute and personal touch to the design. This style of decorating is a wonderful way to practice your piping skills while creating something truly unique.
A sheet cake is a practical choice for large parties because it is easy to transport and serves many guests. The marbled chocolate and vanilla sponge ensures there is a flavor for everyone to enjoy. It is a joyful, high-energy dessert that perfectly captures the fun of the holiday season.
Ingredients
- 1 box vanilla cake mix
- 1 box chocolate cake mix
- 4 cups white vanilla buttercream
- Food coloring (red, green, blue, yellow)
- 1/2 cup chocolate frosting (for reindeer)
- Red candy pearls (for noses)
Equipment
- 9×13 inch rectangular baking pan
- Several piping bags
- Small round and star piping tips
- Spatula
DIY Instructions
- Prepare both the vanilla and chocolate cake batters according to the package instructions.
- Drop spoonfuls of each batter into the greased rectangular pan in an alternating pattern.
- Use a knife to gently swirl the colors together to create a marble effect, then bake as directed.
- Once the cake is cooled, cover the entire top with a smooth, thick layer of white buttercream.
- Divide the remaining buttercream into several bowls and tint them with your food colors.
- Fill your piping bags and start by drawing horizontal lines across the cake to create “rows” for your sweater pattern.
- Pipe small zig-zags, dots, and “V” shapes in different colors to look like a knitted fabric.
- Use the chocolate frosting to pipe small reindeer heads in the center row.
- Place a red candy pearl on each reindeer head for a nose and add tiny white dots for eyes.
- Finish the edges with a decorative white border to frame your “sweater” design.
15. Red Velvet Poinsettia Cake

This elegant dessert features a deep red velvet sponge that perfectly matches the iconic holiday flower. A massive, intricate poinsettia made of red and green buttercream covers the entire top of the cake. The vibrant petals are textured and layered to create a realistic and stunning floral centerpiece.
The sides of the cake are frosted in a smooth, clean white buttercream that makes the red flower pop. This classic color combination is sophisticated and fits any traditional Christmas theme. While it looks complex, using the right piping tip makes creating the petals much easier than it appears.
The rich cocoa flavor of the red velvet pairs beautifully with the tangy cream cheese frosting. It is a dense and moist cake that feels luxurious with every bite. Serving this on a delicate lace doily or a silver platter enhances its classic and festive appeal.
Ingredients
- 2.5 cups all-purpose flour
- 1.5 cups granulated sugar
- 1 teaspoon cocoa powder
- 1 cup buttermilk
- 2 large eggs
- 1.5 cups vegetable oil
- 1 teaspoon red food coloring
- 3 cups cream cheese frosting
- Red and green food coloring (for the flower)
- Yellow candy pearls (for the flower center)
Equipment
- Two 8-inch round cake pans
- Large leaf piping tip
- Piping bags
- Offset spatula
DIY Instructions
- Preheat your oven to 350 degrees Fahrenheit and prepare your pans with parchment paper.
- Mix your dry ingredients in one bowl and whisk your wet ingredients, including the red dye, in another.
- Combine them into a smooth, bright red batter and bake for 30 minutes.
- Once cooled, stack the layers with a generous amount of white frosting in the center.
- Cover the top and sides of the cake with the remaining white frosting until smooth.
- Tint a portion of frosting deep red and another portion dark green.
- Using the leaf tip, pipe a circle of green leaves around the outer edge of the cake top.
- Switch to the red frosting and pipe several layers of red petals moving toward the center, overlapping them slightly.
- Make the petals in the center smaller and more upright to give the flower depth.
- Place a cluster of yellow candy pearls in the very center to complete the poinsettia look.
16. Strawberry Gold Bauble Cake

This glamorous cake is topped with an impressive mountain of chocolate spheres and fresh strawberries. The “naked” style layers feature light pink sponge and white cream, with thin slices of fresh strawberry visible around the edges. It is a high-end dessert that looks like it belongs in a professional bakery window.
The chocolate baubles are dusted with edible gold glitter, making them sparkle under holiday lights. A few fresh mint leaves add a touch of green to the red and gold color palette. This cake is a fantastic choice for a sophisticated holiday gala or a milestone winter birthday.
The fresh fruit keeps the cake feeling light and airy, while the chocolate ornaments add a touch of indulgence. The layers are perfectly even, creating a clean and modern silhouette. It is a beautiful blend of natural ingredients and celebratory shimmer that will delight your guests.
Ingredients
- 2 cups cake flour
- 1.5 cups granulated sugar
- 1/2 cup strawberry puree
- 1 cup unsalted butter, softened
- 4 large eggs
- 2 cups heavy whipping cream
- 1 cup fresh strawberries, sliced
- 10-12 hollow chocolate spheres (various sizes)
- Edible gold luster dust
- Fresh mint leaves
Equipment
- Three 6-inch round cake pans
- Small paintbrush (for gold dust)
- Offset spatula
- Cake stand
DIY Instructions
- Bake your strawberry-infused sponge layers and let them cool completely.
- Whip your heavy cream into a stiff frosting.
- Place the first layer down and spread a layer of cream, then arrange strawberry slices around the very edge so they are visible.
- Repeat this for the second layer and place the final sponge on top.
- Frost the top of the cake with a smooth, thick layer of white cream.
- Use a small brush to coat your chocolate spheres with the gold luster dust until they shine.
- Arrange the gold baubles in a pile in the center of the cake, using a little frosting to stick them together.
- Tuck whole strawberries and fresh mint leaves into the gaps between the chocolate spheres.
- Lightly sprinkle a tiny bit of gold dust over the fruit for extra sparkle.
- Keep the cake chilled until you are ready to serve to maintain the structure of the cream.
17. Mini Holiday Loaf Gifts

These adorable mini loaves are the ultimate “shareable” holiday treat. Each small cake is wrapped neatly in parchment paper and tied with a festive red and white baker’s twine. These are excellent for holiday gift baskets or as individual place settings at a Christmas brunch.
A small “Happy Holidays” tag is attached to each loaf, giving them a personal and thoughtful touch. The cakes are a golden honey color with a fine, moist crumb that promises a sweet and comforting flavor. This simple presentation proves that you don’t need heavy frosting to create a beautiful holiday gift.
These loaves are often flavored with seasonal spices like cinnamon and nutmeg or a splash of vanilla. They are sturdy enough to be handled and transported without losing their shape. It is a charming and rustic way to spread holiday cheer to friends, family, and neighbors.
Ingredients
- 2 cups all-purpose flour
- 1 cup granulated sugar
- 1/2 cup honey
- 1/2 cup melted butter
- 2 large eggs
- 1/2 cup milk
- 1 teaspoon vanilla extract
- 1 teaspoon ground cinnamon
Equipment
- Mini loaf baking pan (8-10 cavities)
- Parchment paper
- Red and white baker’s twine
- Small gift tags
DIY Instructions
- Preheat your oven to 350 degrees Fahrenheit and grease your mini loaf cavities.
- Whisk the eggs, sugar, honey, and melted butter together until smooth.
- Stir in the milk, vanilla, and cinnamon until combined.
- Add the flour and mix until you have a thick, consistent batter.
- Fill each mini loaf cavity about 3/4 of the way full.
- Bake for 20 to 25 minutes until the tops are golden and a toothpick comes out clean.
- Let the loaves cool completely before removing them from the pan.
- Cut small strips of parchment paper and wrap them around the center of each loaf.
- Tie a piece of baker’s twine around the parchment and secure it with a bow.
- Slide a “Happy Holidays” tag onto the string before tying the final knot.
18. Spiced Eggnog Traybake

This cozy traybake is the epitome of winter comfort, featuring a moist sponge infused with the flavors of classic eggnog. A thick, wavy layer of spiced cream frosting covers the top, finished with a generous dusting of nutmeg and cinnamon. The rectangular shape makes it incredibly easy to slice into squares for a large crowd.
The frosting is applied in thick, decorative swoops that give the cake a rustic and inviting look. The warm brown tones of the spices contrast beautifully with the creamy white topping. It is a simple, no-fuss dessert that focuses on deep, nostalgic flavors rather than complex decorating.
The cake itself is rich and slightly dense, mimicking the creamy texture of the holiday drink. It is a fantastic option for a casual office party or a family game night. Serving it straight from the baking pan adds to its cozy, home-baked charm.
Ingredients
- 2 cups all-purpose flour
- 1.5 cups granulated sugar
- 1 cup prepared eggnog
- 1/2 cup unsalted butter, softened
- 2 large eggs
- 1 teaspoon nutmeg
- 1/2 teaspoon cinnamon
- 2 cups whipped cream or cream cheese frosting
- 1 tablespoon extra nutmeg (for dusting)
Equipment
- 9×13 inch rectangular baking pan
- Large mixing bowl
- Spatula or back of a spoon (for the wavy frosting)
DIY Instructions
- Preheat your oven to 350 degrees Fahrenheit and grease your baking pan.
- Cream the butter and sugar together, then beat in the eggs and the eggnog.
- Fold in the flour, nutmeg, and cinnamon until the batter is smooth.
- Pour the batter into the pan and bake for 30 to 35 minutes.
- Allow the cake to cool completely in the pan before you add the frosting.
- Spoon the frosting onto the cake and use the back of a large spoon to create deep “waves” and texture.
- Ensure the frosting reaches all the way to the edges of the pan.
- Sprinkle the extra nutmeg and cinnamon over the top so it settles into the grooves of the frosting.
- Cut the cake into even squares and serve directly from the tray.
19. Sticky Toffee Pecan Pudding Cake

This indulgent dessert is a warm, gooey masterpiece that is traditional for winter celebrations. The dark, date-infused sponge is topped with a generous amount of crunchy pecans and a thick, buttery toffee sauce. A large scoop of melting vanilla ice cream on the side adds a cool, creamy contrast to the warm cake.
The toffee sauce is poured over the cake while it is still warm, allowing it to soak into the sponge for maximum flavor. The dark, glossy caramel creates a mouth-watering appearance that is hard to resist. This is a hearty dessert that is meant to be served warm and enjoyed slowly.
The deep flavors of molasses and dates provide a rich sweetness that is balanced by the salty crunch of the pecans. It is a sophisticated, rustic dish that feels like a warm hug on a cold night. This cake is best served in a deep dish to contain all the delicious extra sauce.
Ingredients
- 1.5 cups chopped dates
- 1 cup boiling water
- 1 teaspoon baking soda
- 1/2 cup unsalted butter, softened
- 3/4 cup brown sugar
- 2 large eggs
- 1.5 cups all-purpose flour
- 1 cup chopped pecans
- 1 cup toffee sauce (store-bought or homemade)
- Vanilla ice cream (for serving)
Equipment
- 9-inch square baking dish
- Small bowl (to soak dates)
- Small saucepan (for toffee sauce)
DIY Instructions
- Preheat your oven to 350 degrees Fahrenheit and grease your square baking dish.
- Place the chopped dates in a bowl with boiling water and baking soda; let them sit for 10 minutes, then mash them with a fork.
- Cream the butter and brown sugar, then add the eggs and the date mixture.
- Fold in the flour until combined and pour the batter into the dish.
- Sprinkle the chopped pecans evenly over the top of the batter.
- Bake for 35 to 40 minutes until the center is firm.
- While the cake is hot, poke several holes in the surface with a fork.
- Pour half of the toffee sauce over the cake and let it soak in for 5 minutes.
- Serve warm slices with an extra drizzle of sauce and a big scoop of vanilla ice cream.
20. White Chocolate Raspberry Swirl Loaf

This elegant loaf cake features a beautiful marbled interior with bright red raspberry swirls and chunks of white chocolate. A thick, opaque white chocolate glaze is poured over the top, decorated with a vibrant dusting of freeze-dried raspberry powder. It is a stunning combination of tart fruit and creamy sweetness.
Fresh raspberries are scattered around the base of the loaf to emphasize the fresh ingredients used inside. The slice reveals a beautiful “ripple” effect that makes every piece look like a work of art. This cake is a wonderful choice for a holiday morning or as a sophisticated afternoon snack.
The white chocolate chunks provide little pockets of creamy texture within the soft, buttery sponge. The raspberry powder on top adds a modern, professional finish without the need for complex piping. It is a bright and flavorful loaf that brings a touch of luxury to your holiday table.
Ingredients
- 1.5 cups all-purpose flour
- 1 cup granulated sugar
- 1/2 cup unsalted butter, melted
- 2 large eggs
- 1/2 cup Greek yogurt
- 1/2 cup fresh raspberries (mashed for the swirl)
- 1/2 cup white chocolate chunks
- 1/2 cup melted white chocolate (for glaze)
- 1 tablespoon freeze-dried raspberry powder
Equipment
- 9×5 inch loaf pan
- Parchment paper
- Mixing bowls
- Sieve (for the raspberry powder)
DIY Instructions
- Preheat your oven to 350 degrees Fahrenheit and line your loaf pan with parchment paper.
- Mix the melted butter, sugar, eggs, and yogurt until smooth.
- Gently fold in the flour and white chocolate chunks.
- Pour two-thirds of the batter into the pan.
- Mix the mashed raspberries into the remaining batter and drop spoonfuls on top.
- Use a knife to swirl the red batter into the white batter to create a marble look.
- Bake for 50 to 55 minutes and let the loaf cool completely.
- Pour the melted white chocolate over the top of the loaf, letting it drip down the sides.
- Immediately sift the raspberry powder over the wet chocolate for a vibrant red stripe.
- Serve with extra fresh raspberries on the side for a beautiful presentation.
21. Melting Marshmallow Snowman Cake

This whimsical dessert features a friendly snowman seemingly melting atop a snowy white peak. The cake uses a “naked” frosting style where thin layers of white cream peek through the golden sponge, mimicking shifting winter frost. A thick, white chocolate ganache overflows from the top, creating a playful “puddle” effect that coats the snowman’s base.
The snowman itself is crafted from oversized marshmallows, decorated with tiny chocolate chip buttons and a carved carrot nose. Pretzel sticks serve as rustic arms, adding a salty crunch to the sweet presentation. This design is a fantastic way to engage children in the kitchen while creating a memorable holiday centerpiece.
The overall look is clean and modern, focusing on bright whites and warm wooden tones. It provides a lighthearted touch to a formal holiday dinner or a fun addition to a children’s party. You can easily adapt the size to fit any gathering, making it a versatile choice for the season.
Ingredients
- 2 layers of 6-inch vanilla sponge cake
- 2 cups vanilla buttercream
- 1/2 cup white chocolate chips
- 1/4 cup heavy cream
- 3 large marshmallows
- 5-7 mini chocolate chips (for eyes and mouth)
- 2 pretzel sticks
- 1 small sliver of a real carrot
Equipment
- Offset spatula
- Small microwave-safe bowl
- Toothpicks (to secure the snowman)
- Cake board or flat plate
DIY Instructions
- Place your first cake layer on a plate and spread a thick layer of buttercream on top.
- Stack the second cake layer on top and cover the sides with a very thin layer of frosting so you can still see the cake through it.
- Heat the white chocolate chips and heavy cream in the microwave for 30 seconds, then stir until it forms a smooth, thick liquid.
- Pour the white chocolate mixture onto the center of the cake and let it drip naturally over the edges.
- While the chocolate is still wet, stack two marshmallows in the center to form the snowman’s body.
- Cut the third marshmallow in half and place it on top for the head.
- Use a toothpick to carefully poke small holes for the chocolate chip eyes, mouth, and buttons, then press the chips in.
- Stick the pretzel sticks into the sides of the middle marshmallow for the arms.
- Carefully insert the tiny carrot sliver into the face for the nose.
- Let the cake sit at room temperature for 20 minutes to allow the “melting” chocolate to set firmly.
22. Chocolate Pretzel Reindeer Bundt

This adorable reindeer cake turns a simple chocolate Bundt into a character full of holiday personality. A rich, dark cocoa glaze is draped over the top, serving as the perfect “glue” for the festive facial features. The deep brown of the cake mimics a reindeer’s coat, creating a delicious and thematic treat.
The face is made using simple vanilla wrapper cookies for the eyes and a large wafer for the snout. A bright red candy sits in the center of the snout to represent Rudolph’s famous nose. Twist pretzels are inserted into the top of the cake to act as tall, branched antlers, giving the dessert impressive height and texture.
This recipe is excellent for those who want a high-impact design without needing expert piping skills. It is a sturdy cake that travels well, making it a great option for office potlucks or school events. The combination of soft cake, smooth chocolate, and crunchy pretzels offers a delightful mix of flavors.
Ingredients
- 1 chocolate Bundt cake (pre-baked and cooled)
- 1 cup chocolate ganache or thick fudge frosting
- 3 vanilla wafer cookies
- 2 brown chocolate candies (for pupils)
- 1 large red chocolate candy (for the nose)
- 2 large twist pretzels
Equipment
- Small bowl
- Spoon
- Serving board
DIY Instructions
- Place your cooled Bundt cake on a serving board.
- Warm your chocolate ganache until it is thick but pourable.
- Spoon the ganache over the top of the cake, allowing it to run down the sides in thick, wavy drips.
- Take two vanilla wafers and use a tiny dab of frosting to stick a brown candy onto each one to make eyes.
- Press these eyes into the front side of the cake while the glaze is still wet.
- Take the third vanilla wafer and stick the red candy onto it to create the snout and nose.
- Press the snout into the cake just below the eyes.
- Gently push two large pretzels into the top of the cake, spaced apart like antlers.
- If the antlers feel loose, use a little extra frosting at the base to hold them upright.
- Allow the glaze to set for 30 minutes before moving the cake so the decorations stay in place.
23. Candy Cane Forest Layer Cake

This tall and majestic cake is a true winter wonderland, featuring a striking border of upright candy canes. The “naked” chocolate layers are filled with snowy white frosting and coated in a layer of shredded coconut that looks like fresh snow. It is a sophisticated yet playful design that captures the essence of Christmas morning.
The top of the cake is adorned with elegant white buttercream swirls and bright red cranberries for a pop of traditional color. Small sprigs of evergreen are tucked into the sides to complete the forest theme. This cake stands high on a wooden pedestal, making it a fantastic focal point for a holiday dessert table.
The peppermint flavor from the candy canes subtly infuses the surrounding frosting, creating a refreshing taste profile. Each slice provides a beautiful contrast between the dark chocolate sponge and the bright white exterior. It is a celebratory bake that feels both grand and nostalgic.
Ingredients
- 3 layers of 6-inch chocolate cake
- 4 cups white peppermint buttercream
- 2 cups shredded coconut
- 15-20 small candy canes
- 1/2 cup fresh cranberries
- 4-5 small sprigs of rosemary or edible pine
Equipment
- 6-inch cake board
- Offset spatula
- Piping bag with a star tip
- Cake stand
DIY Instructions
- Level your cake layers so they are flat and even.
- Stack the layers on a cake board, spreading a thick layer of peppermint frosting between each one.
- Frost the outside of the cake with a thin layer of buttercream, leaving some of the chocolate cake visible through the “snow.”
- Press handfuls of shredded coconut into the bottom half and the top of the cake.
- Gently press candy canes vertically around the middle layer of the cake, spacing them evenly.
- Tuck small rosemary sprigs behind every third candy cane to look like little trees.
- Fill a piping bag with the remaining frosting and pipe large, fluffy swirls around the top edge of the cake.
- Place a single red cranberry on top of each frosting swirl.
- Sprinkle a little extra coconut over the top to look like falling snow.
- Chill the cake for one hour to ensure the candy canes and greenery remain secure.
24. Santa’s Belt Red Velvet Loaf

This fun and vibrant loaf cake is designed to look like Santa Claus’s iconic red suit. The interior features a deep, velvety red crumb that is revealed when sliced, perfectly matching the bright red frosting on the outside. A thick black fondant “belt” and a bright yellow “buckle” wrap around the center to complete the look.
This cake is a fantastic way to bring a bit of North Pole magic to your table without making a massive round cake. The frosting is applied with a rustic, textured finish that gives the “suit” a soft, fabric-like appearance. Small white chocolate curls are scattered around the base to represent the fluffy white trim of Santa’s coat.
The flavor is classic red velvet—rich, slightly cocoa-based, and very moist. It is a simple shape to frost, making it a great project for beginners who want to try working with small amounts of fondant. It is a cheerful, recognizable design that will put a smile on everyone’s face.
Ingredients
- 1 red velvet loaf cake (pre-baked and cooled)
- 2 cups red-tinted buttercream
- 4 ounces black fondant
- 2 ounces yellow or gold fondant
- 1/4 cup white chocolate curls or sprinkles
Equipment
- Rolling pin
- Small knife
- Offset spatula
DIY Instructions
- Place your cooled loaf cake on a wooden board.
- Cover the entire top and sides of the cake with the red buttercream, using a spatula to create a slightly textured finish.
- Roll out the black fondant into a long, thin strip about two inches wide.
- Wrap the black strip around the center of the cake like a belt, trimming the ends so they meet underneath.
- Roll out the yellow fondant and cut out a small square.
- Cut a smaller square out of the middle of the yellow piece to create a hollow “buckle” shape.
- Use a tiny drop of water to stick the yellow buckle onto the center of the black belt.
- Scatter white chocolate curls along the bottom edge of the cake and on the serving board.
- Slice the cake into thick pieces to show off the beautiful red interior.
- Keep the cake in a cool place so the fondant belt remains firm and holds its shape.
25. Golden Apricot Panettone

This towering Italian-style bread cake is a hallmark of a traditional European Christmas. It features a light, brioche-like texture that is incredibly airy and studded with golden raisins and dried apricots. The top is encrusted with a crunchy pearl sugar topping that provides a wonderful textural contrast to the soft interior.
The panettone is presented in a decorative paper mold, giving it a professional and gift-ready appearance. Slicing into it reveals a beautiful yellow crumb and an even distribution of fruit. This is a less-sweet option that works perfectly for a holiday breakfast or a sophisticated afternoon snack.
The aroma of citrus and sweet dough fills the house as this bakes, creating a true holiday atmosphere. It is a tall, impressive loaf that looks beautiful when placed on a rustic wooden cutting board. Serving it with a side of mascarpone cream or a glass of dessert wine is a wonderful way to enjoy this classic.
Ingredients
- 4 cups all-purpose flour
- 1/2 cup granulated sugar
- 1 tablespoon active dry yeast
- 1/2 cup warm milk
- 3 large eggs
- 1/2 cup unsalted butter, softened
- 1 cup mixed golden raisins and chopped dried apricots
- 1/2 cup pearl sugar (for the top)
- 1 tablespoon orange zest
Equipment
- Large mixing bowl
- Stand mixer with a dough hook
- High-sided panettone paper mold (6-inch wide)
- Plastic wrap
DIY Instructions
- Mix the warm milk and yeast in a bowl and let it sit for 5 minutes until it becomes foamy.
- In a stand mixer, combine the flour, sugar, eggs, and yeast mixture until a soft dough forms.
- Add the softened butter one tablespoon at a time, mixing until the dough is smooth and stretchy.
- Fold in the orange zest, raisins, and chopped apricots by hand until they are evenly spread out.
- Place the dough in a greased bowl, cover it, and let it rise in a warm spot for two hours.
- Punch the dough down and place it into the tall paper mold.
- Cover and let it rise again for another hour until it reaches the top of the mold.
- Brush the top with a little water and sprinkle a heavy layer of pearl sugar over the surface.
- Bake at 350 degrees Fahrenheit for 40 to 45 minutes until the top is deep golden brown.
- Let the panettone cool completely before slicing it vertically into long wedges.
26. Classic Marzipan Christmas Stollen

This traditional German holiday bread offers a dense, buttery crumb filled with rum-soaked raisins and citrus peel. A thick rope of sweet almond marzipan runs through the center, creating a rich and gooey heart in every slice. The exterior is coated in a heavy layer of powdered sugar, giving it a beautiful, snowy appearance that is synonymous with winter markets.
The shape of the loaf is folded over itself to represent the swaddling clothes of the infant Christ, a hallmark of its historical roots. Because it is a yeast-based bake, it has a hearty texture that holds up well when toasted. It is a fantastic “make-ahead” treat as the flavors actually improve and deepen after sitting for a few days.
Serving this stollen brings a sense of old-world charm to your holiday spread. The contrast between the dark, fruity interior and the stark white sugar coating makes it a visual delight. It pairs wonderfully with a warm mug of spiced mulled wine or a strong afternoon coffee.
Ingredients
- 3.5 cups all-purpose flour
- 1/2 cup granulated sugar
- 1 tablespoon active dry yeast
- 3/4 cup warm milk
- 1 cup unsalted butter, softened
- 1 cup raisins soaked in rum
- 1/2 cup candied orange and lemon peel
- 7 ounces almond marzipan
- 1 cup powdered sugar (for coating)
- 1/2 cup melted butter (for brushing)
Equipment
- Large mixing bowl
- Baking sheet
- Parchment paper
- Pastry brush
- Sieve
DIY Instructions
- Mix the warm milk and yeast in a small bowl and let it sit for 5 minutes until foamy.
- Combine the flour, sugar, and yeast mixture in a large bowl, then knead in the softened butter until the dough is smooth.
- Fold in the rum-soaked raisins and candied peels until they are distributed evenly.
- Cover the dough and let it rise in a warm place for about one hour or until it doubles in size.
- Roll the dough out into a large oval on a floured surface.
- Shape the marzipan into a long log and place it slightly off-center on the dough oval.
- Fold the dough over the marzipan log, leaving the bottom edge slightly visible to create the traditional tapered shape.
- Place the loaf on a baking sheet and bake at 350 degrees Fahrenheit for 35 to 40 minutes until golden.
- While the loaf is still hot, brush it generously with melted butter and sift a thick layer of powdered sugar over the top.
- Let the stollen cool completely, then wrap it tightly in foil and let it rest for at least 24 hours before slicing.
27. Grand Marnier Orange Layer Cake

This sophisticated cake is a celebration of citrus and top-shelf liqueur, featuring three layers of moist orange-scented sponge. A glossy, amber-colored Grand Marnier glaze is poured over the top, cascading down the sides in beautiful, thick ribbons. It is a high-end dessert that feels incredibly indulgent and perfect for a formal holiday party.
The decoration is minimalist and elegant, using curls of fresh orange zest and a single vanilla bean pod for a natural look. Tiny flakes of edible gold leaf are scattered across the glaze to catch the light and add a touch of luxury. The white cream filling between the layers provides a clean, bright contrast to the golden sponge and orange topping.
Every bite delivers a punch of bright citrus balanced by the warm, oaky notes of the brandy-based liqueur. The texture is light and airy, ensuring it doesn’t feel too heavy after a large holiday meal. It is a stunning centerpiece that smells as incredible as it looks.
Ingredients
- 3 layers of 8-inch orange sponge cake
- 2 cups vanilla bean buttercream
- 1/2 cup Grand Marnier liqueur
- 1/2 cup orange marmalade (strained)
- 1/4 cup heavy cream
- 1 tablespoon orange zest
- Edible gold leaf (optional)
Equipment
- Small saucepan
- Offset spatula
- Cake stand
- Whisk
DIY Instructions
- Place your first cake layer on a stand and brush it with a tablespoon of Grand Marnier for extra flavor.
- Spread a layer of vanilla buttercream over the top and repeat the stacking process for all three layers.
- Frost the outside of the cake with a smooth, thin layer of the remaining buttercream.
- In a small saucepan, whisk the orange marmalade, heavy cream, and two tablespoons of Grand Marnier over low heat.
- Simmer the mixture for 3 minutes until it becomes a thick, pourable glaze, then let it cool slightly.
- Pour the warm glaze over the center of the cake, using a spoon to help it drip down the sides.
- Garnish the top with fresh orange zest curls and the vanilla bean pod.
- Carefully apply tiny pieces of gold leaf using a toothpick for a shimmering finish.
- Let the glaze set in the refrigerator for 20 minutes before serving.
- Serve at room temperature to allow the orange aromas to fully bloom.
28. Glazed Almond Semolina Cake

This rustic, single-layer cake is a beautiful example of how simple ingredients can create a stunning holiday dessert. The base is a golden semolina and almond flour sponge, which provides a unique, slightly nutty texture and a rich yellow hue. A translucent white sugar glaze is drizzled over the top, creating a sweet and crunchy finish.
A generous mountain of sliced and whole toasted almonds is piled onto the center of the cake while the glaze is still wet. These nuts provide a wonderful crunch that complements the soft, moist crumb underneath. This cake is an excellent gluten-free option if you substitute the semolina for a certified gluten-free grain or extra almond meal.
The flavor is clean and comforting, with hints of honey and vanilla that feel very traditional. It is a sturdy cake that stays fresh for several days, making it great for snacking throughout the holiday week. Placing it on a simple blue pedestal highlights the golden tones of the toasted nuts.
Ingredients
- 1.5 cups almond flour
- 1/2 cup semolina flour
- 1 cup granulated sugar
- 3 large eggs
- 1/2 cup olive oil or melted butter
- 1 teaspoon vanilla extract
- 1 cup powdered sugar
- 2 tablespoons milk
- 1 cup mixed sliced and whole blanched almonds
Equipment
- 9-inch round springform pan
- Small bowl (for glaze)
- Toaster oven or pan (to toast almonds)
DIY Instructions
- Preheat your oven to 350 degrees Fahrenheit and grease your springform pan.
- Whisk the eggs and granulated sugar until light, then stir in the oil and vanilla.
- Fold in the almond flour and semolina until the batter is thick and smooth.
- Pour the batter into the pan and bake for 30 to 35 minutes until a toothpick comes out clean.
- While the cake bakes, toast your almonds in a dry pan over medium heat until they are fragrant and golden.
- Let the cake cool completely before you remove it from the pan.
- Whisk the powdered sugar and milk together in a small bowl to create a thick, white glaze.
- Pour the glaze over the top of the cake and let it run naturally down the fluted sides.
- Immediately pile the toasted almonds onto the center of the cake so they stick to the glaze.
- Allow the glaze to harden for 15 minutes before slicing and serving.
29. Spiced Cinnamon Snowflake Traybake

This cozy traybake is a simple yet high-impact dessert that is perfect for large holiday gatherings. The moist, spiced sponge is covered in a thick, wavy layer of cream cheese frosting that looks like a fresh snowdrift. A large, intricate snowflake is stenciled onto the center using ground cinnamon, creating a beautiful seasonal design.
The rectangular shape makes this cake very easy to transport and portion out for guests. The cinnamon stencil provides a professional look without requiring any difficult piping or drawing skills. It is a warm and inviting dessert that focuses on the classic holiday flavors of cloves, nutmeg, and cinnamon.
The crumb is soft and tender, making it a hit with both children and adults. Using a traybake format ensures every piece has a generous amount of frosting and spice. It is the kind of cake that feels right at home at a casual family dinner or a cozy Christmas Eve celebration.
Ingredients
- 2.5 cups all-purpose flour
- 1.5 cups brown sugar
- 1 cup buttermilk
- 2/3 cup vegetable oil
- 2 large eggs
- 2 teaspoons ground cinnamon
- 1 teaspoon ground ginger
- 2 cups cream cheese frosting
- 1 tablespoon extra cinnamon (for the stencil)
Equipment
- 9×13 inch rectangular baking pan
- Large spoon or spatula
- Snowflake stencil (cardboard or plastic)
- Fine-mesh sieve
DIY Instructions
- Preheat your oven to 350 degrees Fahrenheit and grease your rectangular pan.
- Mix the wet ingredients and sugar in a large bowl, then fold in the flour and spices.
- Pour the batter into the pan and bake for 25 to 30 minutes.
- Let the cake cool completely in the pan before you start the frosting.
- Spread the cream cheese frosting over the top, using a spoon to create thick, organic waves and peaks.
- Gently place your snowflake stencil in the center of the frosted cake.
- Put the extra cinnamon into a sieve and lightly tap it over the stencil until the shape is filled in.
- Carefully lift the stencil straight up to avoid blurring the edges of the cinnamon design.
- Dust a little extra cinnamon around the edges of the pan for a finished look.
- Cut the cake into squares and serve directly from the baking dish.
30. Bourbon Bacon Bundt Cake

This bold and savory-sweet cake is a unique choice for those who want to break away from traditional fruitcakes. A rich, dark brown sugar sponge is infused with smoky bourbon and topped with a glossy caramel glaze. The most striking feature is the crown of crispy, candied bacon strips that stand upright around the center.
Crushed bacon bits are sprinkled over the glaze, adding a salty pop to the sweet caramel and oaky bourbon flavors. This cake is a fantastic conversation piece and is often a favorite among guests who enjoy complex, modern flavor pairings. The deep ridges of the Bundt shape catch the caramel drips beautifully, making it look incredibly appetizing.
The interior of the cake is dense and moist, similar to a pound cake but with more depth of flavor. It is a masculine and sophisticated dessert that pairs excellently with a glass of neat bourbon or a dark roast coffee. This is a great option for a New Year’s Eve party or a “grown-up” holiday dinner.
Ingredients
- 1.5 cups unsalted butter, softened
- 2 cups brown sugar
- 4 large eggs
- 3 cups all-purpose flour
- 1/2 cup high-quality bourbon
- 1/2 cup buttermilk
- 1 cup salted caramel sauce
- 8-10 strips of thick-cut bacon
- 2 tablespoons maple syrup (for the bacon)
Equipment
- 10-cup Bundt pan
- Baking sheet (for bacon)
- Small saucepan
- Wire cooling rack
DIY Instructions
- Preheat your oven to 350 degrees Fahrenheit and grease your Bundt pan very well.
- Cream the butter and brown sugar, then add the eggs and bourbon.
- Alternate adding the flour and buttermilk until you have a thick, fragrant batter.
- Pour into the pan and bake for 50 to 60 minutes, then let it cool completely.
- While the cake bakes, lay the bacon on a baking sheet, brush with maple syrup, and bake until very crispy.
- Cut 6 strips of bacon into long pieces and crumble the remaining strips into small bits.
- Warm the caramel sauce in a small saucepan until it is easy to pour.
- Invert the cooled cake onto a board and pour the warm caramel over the top.
- Stick the long bacon strips vertically into the center hole of the Bundt cake so they stand up like a crown.
- Sprinkle the crumbled bacon bits over the wet caramel on the shoulders of the cake.
31. Honey Glazed Lemon Rosemary Loaf

Bright citrus notes and earthy herbs combine in this sophisticated holiday loaf. A golden, tender crumb is saturated with a sticky honey glaze that pools slightly at the base. Fresh lemon slices and sprigs of aromatic rosemary decorate the top, offering a rustic yet refined aesthetic.
Thin, translucent citrus rounds act as natural jewels against the burnished crust of the cake. This bake avoids heavy frostings, relying instead on the shine of the glaze and the texture of the herbs. It is a wonderful choice for a winter morning brunch or a light afternoon treat with tea.
The scent of rosemary and lemon will fill your home as this bakes, creating a cozy atmosphere. It is a sturdy cake that travels well, making it a great handmade gift for friends. Serving it on a wooden board emphasizes its simple, natural beauty and seasonal appeal.
Ingredients
- 1.5 cups all-purpose flour
- 1 teaspoon baking powder
- 1/2 teaspoon salt
- 1 cup granulated sugar
- 2 large eggs
- 1/2 cup Greek yogurt
- 1/2 cup vegetable oil
- 2 tablespoons fresh lemon zest
- 1/4 cup lemon juice
- 1/2 cup honey (for glaze)
- 2-3 fresh rosemary sprigs
Equipment
- 9×5 inch loaf pan
- Parchment paper
- Mixing bowls
- Whisk
- Small saucepan
DIY Instructions
- Preheat your oven to 350 degrees Fahrenheit and line your loaf pan with parchment paper.
- Whisk the sugar, eggs, yogurt, oil, lemon zest, and lemon juice in a large bowl until smooth.
- Gently fold in the flour, baking powder, and salt until just combined.
- Pour the batter into the pan and tuck a few small needles of rosemary into the surface.
- Bake for 50 to 55 minutes until a skewer comes out clean from the center.
- Let the loaf cool in the pan for 10 minutes before moving it to a wire rack.
- Warm the honey in a small saucepan over low heat until it is very runny.
- Brush the warm honey generously over the top and sides of the cake.
- Arrange thin lemon slices and fresh rosemary sprigs on top while the honey is still sticky.
- Allow the glaze to set completely before slicing into thick, fragrant pieces.
32. Toasted Marshmallow Chocolate Cake

This decadent layer cake features a dramatic crown of toasted meringue peaks that resemble small snowy mountains. Three layers of rich chocolate sponge are held together by a smooth vanilla bean filling. A glossy chocolate ganache drips down the sides, adding an extra layer of indulgence to the presentation.
A kitchen torch is used to lightly brown the edges of the marshmallow frosting, giving it a toasted, campfire-inspired finish. This technique adds depth to the flavor and a professional look to the overall design. It is a show-stopping dessert that feels both modern and deeply nostalgic.
The contrast between the dark cocoa cake and the bright white toasted topping is visually striking. Every bite offers a mix of soft sponge, silky ganache, and chewy, sweet meringue. It is a fantastic centerpiece for a festive New Year’s Eve party or a grand Christmas dinner.
Ingredients
- 3 layers of 6-inch chocolate cake
- 2 cups vanilla buttercream
- 1/2 cup chocolate ganache
- 4 large egg whites
- 1 cup granulated sugar
- 1/4 teaspoon cream of tartar
- 1 teaspoon vanilla extract
- Ground cinnamon (for dusting)
Equipment
- Kitchen blowtorch
- Stand mixer or hand mixer
- Piping bag with a large round tip
- Offset spatula
DIY Instructions
- Stack your chocolate cake layers with vanilla buttercream in between each one.
- Frost the outside of the cake with a thin layer of buttercream to act as a base.
- Pour the chocolate ganache over the top edge so it drips down the sides naturally.
- To make the topping, whisk egg whites, sugar, and cream of tartar in a heatproof bowl over simmering water.
- Whisk constantly for about 3 minutes until the sugar dissolves and the mixture is warm to the touch.
- Remove from heat and beat with a mixer on high speed until stiff, glossy peaks form.
- Fill a piping bag with the meringue and pipe large, pointed dollops all over the top of the cake.
- Use a kitchen torch to carefully brown the tips of the meringue until they are golden.
- Lightly dust the top with a tiny bit of cinnamon for a finished, warm look.
- Serve immediately to enjoy the contrast between the cool cake and the toasted topping.
33. Peppermint Swirl Holiday Cheesecake

This vibrant cheesecake features a beautiful marbled pattern of pink and white cream cheese on a dark chocolate crust. A ring of fluffy whipped cream swirls decorates the edge, each topped with a classic striped peppermint candy. It is a refreshing and creamy dessert that captures the iconic flavors of the season.
The smooth, dense texture of the cheesecake provides a luxurious mouthfeel that melts away. The bright pink swirls add a playful pop of color that looks beautiful on any holiday table. It is a fantastic no-bake or baked option for those who want a break from traditional sponges.
The cool mint flavor balances the richness of the cheese, making it a crowd-pleasing choice. Serving it chilled ensures the cleanest slices and the best flavor experience. It is a festive treat that looks like it came straight from a professional confectionery.
Ingredients
- 2 cups crushed chocolate cookies (for crust)
- 1/2 cup melted butter
- 24 ounces cream cheese, softened
- 1 cup granulated sugar
- 3 large eggs
- 1 teaspoon peppermint extract
- Red food coloring
- 1 cup whipped cream
- 12-15 peppermint candies
Equipment
- 9-inch springform pan
- Electric mixer
- Small bowl (for tinting batter)
- Toothpick or skewer
DIY Instructions
- Mix the cookie crumbs and melted butter, then press firmly into the bottom of the springform pan.
- Beat the cream cheese and sugar until smooth, then add eggs one at a time.
- Stir in the peppermint extract and divide the batter into two bowls.
- Add a few drops of red food coloring to one bowl and stir until it reaches a bright pink hue.
- Drop spoonfuls of white and pink batter into the pan in an alternating pattern.
- Use a toothpick to gently swirl the colors together to create a marble effect.
- Bake at 325 degrees Fahrenheit for 50 to 55 minutes, then cool completely in the fridge.
- Once chilled, pipe small mounds of whipped cream around the top edge.
- Place a peppermint candy on top of each whipped cream mound.
- Run a warm knife around the edge of the pan before releasing the sides for a smooth finish.
34. Gingerbread Cookie Stack Cake

This unique dessert is built from layers of soft gingerbread cake sandwiched between thick clouds of spiced cream. The top is finished with a rustic mountain of crushed gingerbread cookie pieces, adding a wonderful textural crunch. It is a vertical masterpiece that celebrates the most iconic flavor of the holidays.
The layers are visible from the side, giving it a trendy “naked cake” appearance that feels home-baked and cozy. This style is very forgiving for beginners because it doesn’t require perfectly smooth outer frosting. The warm brown tones of the ginger cake contrast beautifully with the bright white filling.
Every slice offers a punch of ginger, cinnamon, and cloves that feels like a holiday hug. The gingerbread crumbs on top provide a concentrated burst of spice and a satisfying snap. It is a hearty, flavorful dessert that pairs perfectly with a glass of cold milk or a hot latte.
Ingredients
- 3 layers of 8-inch gingerbread cake
- 3 cups spiced whipped cream (with cinnamon and nutmeg)
- 1 cup crushed gingerbread cookies
- 1/4 cup molasses (for drizzling)
Equipment
- 8-inch cake board
- Large offset spatula
- Rolling pin (to crush cookies)
DIY Instructions
- Level your gingerbread cake layers so they sit flat when stacked.
- Place the first layer on a plate and spread a thick, even layer of spiced whipped cream.
- Repeat the process with the remaining cake layers, finishing with a flat layer of cream on top.
- Take your gingerbread cookies and crush them into a mix of small bits and larger chunks.
- Pile the cookie pieces high in the center of the cake, letting some fall toward the edges.
- If you want a bit of extra shine, drizzle a small amount of molasses over the cookie pile.
- Use a spatula to lightly smooth the cream on the sides so the cake layers still peek through.
- Keep the cake refrigerated until about 30 minutes before you plan to serve it.
- Slice into tall wedges to show off the clean layers of cake and cream.
35. Berry Pavlova Holiday Wreath

This stunning meringue-based dessert is stacked high to create a light and airy holiday centerpiece. Crisp white meringue nests are layered with rich lemon curd and a vibrant assortment of fresh winter berries. It is a gluten-free and elegant option that feels incredibly celebratory.
The bright red currants, blackberries, and raspberries cascade down the sides like edible ornaments. Fresh mint leaves add a touch of green to complete the traditional holiday color palette. This dessert is best assembled just before serving to maintain the perfect crunch of the meringue.
The combination of tart fruit and sweet, melt-in-your-mouth meringue is a sophisticated flavor profile. It is a light alternative to heavy holiday cakes that still offers a grand presentation. A final dusting of powdered sugar adds a “frosted” look that enhances the wintry theme.
Ingredients
- 6 large egg whites
- 1.5 cups granulated sugar
- 1 teaspoon white vinegar
- 1 tablespoon cornstarch
- 1 cup lemon curd
- 2 cups mixed berries (raspberries, blackberries, red currants)
- Fresh mint leaves
- Powdered sugar (for dusting)
Equipment
- Baking sheet
- Parchment paper
- Hand mixer or stand mixer
- Large serving platter
DIY Instructions
- Preheat your oven to 250 degrees Fahrenheit and line a baking sheet with parchment paper.
- Beat egg whites until stiff peaks form, then gradually add sugar one tablespoon at a time.
- Fold in the vinegar and cornstarch until the meringue is thick and glossy.
- Spoon the meringue into three circles of varying sizes on the parchment paper.
- Bake for 60 to 75 minutes, then turn off the oven and let them cool completely inside with the door closed.
- Place the largest meringue circle on a platter and spread a layer of lemon curd.
- Top with a handful of fresh berries, then place the medium meringue circle on top.
- Repeat the curd and berry layers for the remaining meringues to build a tower.
- Decorate the very top with a cluster of berries and fresh mint leaves.
- Dust the entire tower with powdered sugar and serve immediately while the meringue is crisp.
36. Chocolate Salami Dessert Log

This clever treat is designed to look exactly like a rustic cured meat log, but it is actually made of rich chocolate and biscuits. The interior is packed with crunchy hazelnuts and broken cookie pieces that create a realistic “marbled” look when sliced. It is a fun, conversational dessert that is very popular in European holiday traditions.
The log is rolled in powdered sugar to mimic the white casing of a real salami and tied with kitchen twine for a finished look. It is a no-bake recipe that is perfect for preparing days in advance. Serving it on a wooden board with a sharp knife adds to the playful illusion.
The flavor is an intense blend of dark chocolate, buttery biscuits, and roasted nuts. It is a dense, fudge-like treat that is meant to be enjoyed in small, satisfying slices. It makes for an excellent addition to a holiday charcuterie board or a unique gift for a host.
Ingredients
- 7 ounces dark chocolate, melted
- 1/2 cup unsalted butter, softened
- 1/2 cup granulated sugar
- 1 large egg
- 1 cup digestive biscuits or shortbread, broken into bits
- 1/2 cup toasted hazelnuts, whole
- 1/2 cup powdered sugar (for coating)
Equipment
- Plastic wrap
- Kitchen twine
- Large bowl
DIY Instructions
- Whisk the softened butter and sugar together, then beat in the egg and melted chocolate.
- Fold in the broken biscuit pieces and whole hazelnuts until they are completely coated.
- Spoon the thick chocolate mixture onto a large sheet of plastic wrap.
- Roll it up tightly into a long cylinder shape, twisting the ends of the plastic to secure it.
- Place the log in the refrigerator for at least 4 hours until it is completely firm.
- Once set, remove the plastic wrap and roll the log in a plate of powdered sugar until white.
- Tie a piece of kitchen twine around the log in a decorative pattern to mimic a real salami.
- Use a sharp knife to cut the log into rounds, showing off the “fatty” biscuit and nut center.
- Store any leftovers in the fridge, though it is best served at room temperature for the best texture.
37. Spiced Cranberry Mousse Tart

This elegant tart features a vibrant, deep pink cranberry mousse nestled in a buttery shortcrust base. A glossy layer of tart cranberry jam is spread over the top, decorated with sugared cranberries and a sprig of rosemary. It is a sophisticated dessert that perfectly balances sweet and acidic flavors.
A dollop of thick whipped cream on the side provides a cool, mellow contrast to the punchy fruit. The crisp pastry base offers a satisfying snap that pairs beautifully with the light, airy mousse. This individual-sized presentation is excellent for formal holiday dinner parties.
The bright red color is naturally derived from the berries, making it a standout visual on the plate. It is a refreshing, fruit-forward option for those who find chocolate desserts too heavy. The sugared berries add a touch of winter frost and a sweet crunch to every bite.
Ingredients
- 1 pre-baked 9-inch tart shell (or individual shells)
- 2 cups fresh cranberries
- 1 cup granulated sugar
- 1/2 cup water
- 1 cup heavy whipping cream
- 1 tablespoon gelatin powder
- 1/4 cup cranberry jam (for the top)
- Fresh rosemary (for garnish)
Equipment
- Small saucepan
- Blender or food processor
- Sieve
- Whisk
DIY Instructions
- Simmer the cranberries, sugar, and water in a saucepan until the berries burst and the mixture thickens.
- Blend the cooked berries until smooth and press through a sieve to remove the skins.
- Stir the gelatin powder into 2 tablespoons of warm water and add it to the warm cranberry puree.
- Let the puree cool to room temperature.
- Whip the heavy cream until stiff peaks form and gently fold it into the cooled cranberry mixture.
- Pour the mousse into your pre-baked tart shell and smooth the top.
- Chill in the refrigerator for at least 3 hours until the mousse is set and firm.
- Carefully spread a thin layer of cranberry jam over the top of the set mousse.
- Garnish with a few extra cranberries and a small rosemary sprig.
- Serve with a spoonful of whipped cream on the side for a professional look.
38. Salted Caramel Pecan Layer Cake

This towering layer cake is an indulgence for the senses, featuring a rich, nutty sponge and a dramatic caramel drip. Three thick layers are filled with a smooth, salted caramel buttercream that peeks through the sides in a “naked” style. A mountain of toasted pecan halves sits on top, held in place by a pool of golden caramel.
The drips are thick and intentional, reaching all the way to the base of the cake for a mouth-watering appearance. This design is perfect for those who love the combination of sweet, salty, and crunchy. It stands tall on a white pedestal, making it a grand finale for a holiday celebration.
The toasted pecans add an earthy depth that keeps the sweet caramel in balance. Every slice reveals a perfect ratio of soft cake to silky frosting. It is a sophisticated, high-energy dessert that will be the talk of any gathering.
Ingredients
- 3 layers of 6-inch brown sugar sponge cake
- 3 cups salted caramel buttercream
- 1/2 cup thick salted caramel sauce
- 1 cup toasted pecan halves
Equipment
- 6-inch cake board
- Offset spatula
- Squeeze bottle (for the drips)
- Cake stand
DIY Instructions
- Stack your cake layers with a generous amount of caramel buttercream between each one.
- Use a spatula to spread a very thin layer of frosting around the outside of the cake for a rustic look.
- Chill the cake for 20 minutes to make sure the frosting is firm.
- Warm your caramel sauce until it is pourable but not hot.
- Carefully apply the caramel along the top edge of the cake, letting it run down the sides in thick lines.
- Fill in the center of the cake top with the remaining caramel.
- Arrange the toasted pecans in a decorative pile on top of the wet caramel.
- Sprinkle a tiny pinch of sea salt over the pecans for extra flavor.
- Let the caramel set at room temperature for 15 minutes before serving.
- Use a warm knife to get clean slices through the crunchy pecan topping.
39. Checkerboard Tiramisu Cake

This impressive dessert features a hidden checkerboard pattern of vanilla and chocolate sponge inside. The exterior is coated in a light mascarpone cream and finished with a heavy dusting of cocoa powder. A single dollop of cream on top is garnished with whole coffee beans for a classic coffee-house look.
Slicing into this cake provides a “wow” moment for your guests as the geometric pattern is revealed. It combines the sophisticated flavors of a traditional tiramisu with the structure of a grand layer cake. A sprig of holly on the side adds a simple, festive touch to the plate.
The sponge layers are soaked in a rich espresso syrup, ensuring the cake remains incredibly moist. The mascarpone filling is light and airy, balancing the bold flavors of the cocoa and coffee. it is a refined choice for a holiday dinner party where you want to show off your baking skills.
Ingredients
- 2 layers of 8-inch vanilla sponge
- 2 layers of 8-inch chocolate sponge
- 1/2 cup strong brewed espresso
- 2 cups mascarpone cheese
- 1 cup heavy whipping cream
- 1/2 cup powdered sugar
- 1/4 cup unsweetened cocoa powder
- Whole coffee beans (for garnish)
Equipment
- Two round cookie cutters (one 6-inch and one 4-inch)
- Offset spatula
- Sieve
DIY Instructions
- Use your cookie cutters to cut each cake layer into three rings (an outer, middle, and inner ring).
- Swap the rings between the vanilla and chocolate cakes to create alternating color circles.
- Place a chocolate outer ring on your plate, insert a vanilla middle ring, and a chocolate center.
- Brush the entire layer with espresso syrup.
- Spread a thin layer of mascarpone cream (whipped with heavy cream and sugar) over the top.
- Repeat the process with the next layer, but start with a vanilla outer ring to create the checkerboard effect.
- Once all layers are stacked, cover the entire cake in the remaining mascarpone cream.
- Use a sieve to dust a thick, even layer of cocoa powder over the top of the cake.
- Pipe one large dollop of cream in the center and place three coffee beans on top.
- Chill for at least 4 hours to allow the espresso to soak in and the pattern to set.
40. White Chocolate Fruit and Nut Loaf

This dense and hearty loaf is packed with a treasure trove of holiday treats like walnuts, pecans, and dried apricots. Large chunks of white chocolate are scattered throughout the batter, creating sweet, creamy pockets in every bite. The top is decorated with even more nuts and chocolate, making it look like a festive mosaic.
The loaf is finished with a light dusting of powdered sugar to highlight the textures of the fruit and nuts. It is a sturdy cake that is perfect for slicing and sharing during a busy holiday morning. Because it is so packed with ingredients, a small slice goes a long way.
The flavor is a complex mix of toasted nuts, chewy fruit, and sweet white chocolate. It is an excellent alternative to a traditional fruitcake, offering a lighter and more modern profile. Serving it on a rustic board with a red bow makes it look like a beautiful, edible gift.
Ingredients
- 2 cups all-purpose flour
- 1 cup granulated sugar
- 1/2 cup melted butter
- 2 large eggs
- 1/2 cup milk
- 1 cup mixed nuts (walnuts, pecans, hazelnuts)
- 1/2 cup dried fruit (apricots, raisins, cranberries)
- 1/2 cup white chocolate chunks
- 1 tablespoon powdered sugar
Equipment
- 9×5 inch loaf pan
- Large mixing bowl
- Spatula
DIY Instructions
- Preheat your oven to 350 degrees Fahrenheit and grease your loaf pan thoroughly.
- Mix the melted butter, sugar, eggs, and milk until the mixture is smooth.
- Fold in the flour until just combined, being careful not to overmix.
- Stir in the mixed nuts, dried fruit, and white chocolate chunks until they are evenly spread.
- Pour the thick batter into the pan and smooth the top with a spatula.
- Press a few extra nuts and chocolate chunks into the surface for decoration.
- Bake for 55 to 65 minutes until the loaf is deep golden brown and firm.
- Let the cake cool completely in the pan to prevent it from crumbling when sliced.
- Once cool, remove from the pan and sift powdered sugar over the top.
- Slice into thick pieces to reveal the beautiful cross-section of fruits and nuts inside.
Key Takeaways
- Prioritize Preparation: Many of these cakes, like the Stollen or Fruitcake, actually taste better when made a few days in advance.
- Embrace Simple Decor: You do not need professional piping skills when ingredients like fresh berries, rosemary sprigs, and powdered sugar create such a natural holiday look.
- Balance Your Flavors: Pair rich chocolate or caramel desserts with tart elements like cranberries or citrus to keep your palate refreshed.
- Texture Matters: Adding crunchy elements like toasted pecans, candy canes, or cookie crumbles provides a satisfying contrast to soft cake layers.
The holidays are ultimately about creating memories with the people you love most. Serving a handmade cake is a beautiful way to show your care and keep seasonal traditions alive. Each of these forty recipes offers a unique path to making your Christmas dinner unforgettable.
Don’t be afraid to experiment with different decorations or flavor twists to make these recipes your own. Whether you are baking for a large party or a quiet night by the fire, these treats bring a touch of wonder to the table. We hope these ideas inspire your most delicious holiday season yet.