The temperature drops and the daylight fades fast during the winter months. You arrive home exhausted and crave something that warms you from the inside out. Spending hours over a hot stove is rarely an option when the schedule is tight.

You need dishes that deliver deep, savory comfort without the long wait times. This collection of forty recipes focuses on high-quality ingredients and smart techniques. Every meal is designed to go from the cutting board to the dinner table in thirty minutes or less.
From silky pastas to hearty grain bowls, these options prove that fast food can be wholesome. You can enjoy restaurant-quality flavors in the comfort of your own warm kitchen. These cozy meals provide the restorative embrace you need on a freezing day.
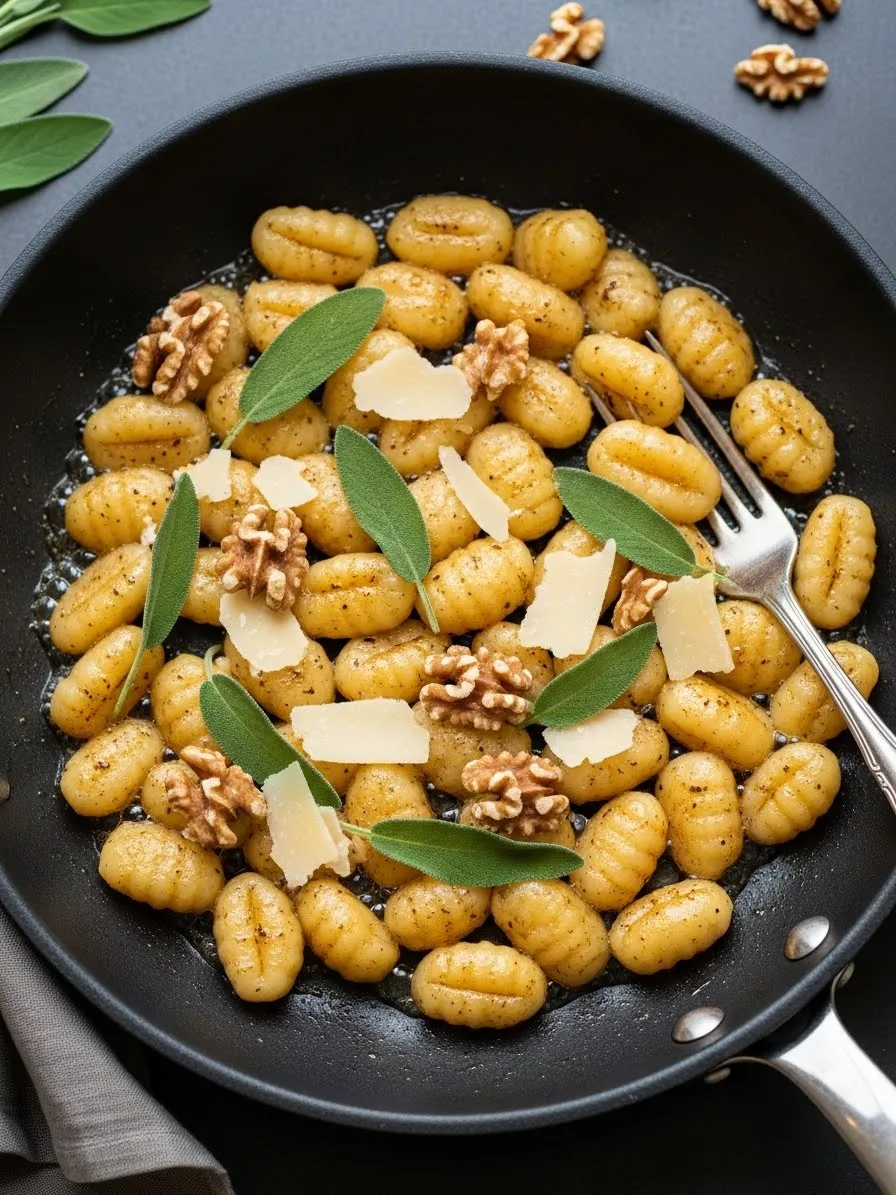
1. Brown Butter Sage Gnocchi with Toasted Walnuts

Crispy potato gnocchi sizzles in a dark, nutty butter sauce within a sleek black skillet. Fresh green sage leaves scatter across the golden dumplings, releasing an earthy aroma that fills the kitchen. This dish captures the essence of comfort with every bite.
Large shavings of salty parmesan cheese melt slowly over the warm pasta. Toasted walnut halves add a necessary crunch to the soft, pillowy texture of the gnocchi. It looks elegant yet feels like a warm hug on a freezing winter evening.
This meal relies on simple ingredients that pack a massive punch of flavor. You can achieve this restaurant-quality result in less time than it takes to order takeout. It serves as a wonderful solution for busy weeknights when you crave something fancy but feel exhausted.
Required Ingredients
- 1 package (16 ounces) potato gnocchi
- 4 tablespoons unsalted butter
- 10 to 12 fresh sage leaves
- 1/4 cup walnut halves
- 1/4 cup shaved parmesan cheese
- Salt and black pepper to taste
Equipment List
- Large non-stick skillet
- Slotted spoon or spatula
- Small bowl
- Chef’s knife
DIY Instructions
- Toast the walnuts first. Place your dry skillet over medium heat. Toss the walnut halves into the pan and stir them for about 3 minutes until they smell fragrant and look slightly darker. Pour them into a small bowl and set them aside.
- Brown the butter. Put the same skillet back on the heat and add the butter. Let it melt and begin to bubble. Watch it closely for about 2 minutes. When you see little brown specks on the bottom and it smells like toasted nuts, it is ready.
- Crisp the sage. Drop the fresh sage leaves into the hot butter. They will sizzle immediately. Let them cook for 1 minute until they turn dark green and become crispy. Take them out with a spoon and place them on a paper towel.
- Cook the gnocchi. Add the gnocchi directly into the brown butter in the pan. You do not need to boil them first if you use the vacuum-sealed kind. Spread them out in a single layer.
- Develop the golden crust. Let the gnocchi sit undisturbed for 3 minutes so the bottoms turn golden brown. Stir them gently and cook for another 4 minutes until they are soft on the inside but crispy on the outside.
- Assemble the dish. Turn off the heat. Stir the toasted walnuts and crispy sage leaves back into the pan. Season the mixture with a pinch of salt and black pepper.
- Add the final touch. Sprinkle the large parmesan shavings over the top right before you serve. The heat from the pan will soften the cheese just enough.
2. Hearty White Bean and Kale Stew with Pesto

Steam rises from a deep skillet filled with a thick, savory broth and tender white beans. Vibrant green kale leaves wilt into the mixture, adding a fresh contrast to the rich red tomato base. This rustic stew provides a satisfying warmth that lingers long after the meal ends.
Bright red tomatoes sit nestled among the beans, bursting with concentrated juice. A generous swirl of green pesto and crumbles of salty feta cheese sit right in the center, ready to be stirred into the pot. This combination creates a complex profile of Mediterranean flavors in minutes.
Thick slices of crusty bread wait on the side to soak up every drop of the seasoned liquid. It offers a nutrient-dense option that requires very little prep work. You can assemble this wholesome dinner quickly using mostly pantry staples found in your kitchen.
Required Ingredients
- 2 cans (15 ounces) Cannellini beans, drained and rinsed
- 1 bunch fresh kale, stems removed and chopped
- 1 can (14 ounces) fire-roasted diced tomatoes
- 4 cups vegetable broth
- 2 tablespoons basil pesto
- 1/4 cup crumbled feta cheese
- 1 tablespoon olive oil
- 2 cloves garlic, minced
Equipment List
- Large deep skillet or Dutch oven
- Wooden spoon
- Measuring cups and spoons
- Can opener
DIY Instructions
- Sauté the aromatics. Heat the olive oil in your large skillet over medium heat. Add the minced garlic and cook for about 1 minute until it smells fragrant but does not turn brown.
- Build the base. Pour the vegetable broth and the diced tomatoes into the skillet. Stir them together and turn the heat up to medium-high to bring the liquid to a gentle simmer.
- Simmer the beans. Add the rinsed white beans to the pot. Let the mixture bubble for about 10 minutes so the flavors can merge and the liquid thickens slightly.
- Wilt the kale. Toss the chopped kale into the skillet. Use your spoon to push the leaves down into the hot broth. Cook for 3 to 5 minutes until the kale is soft and bright green.
- Garnish the stew. Turn off the heat. Place a large dollop of pesto in the middle of the skillet and sprinkle the crumbled feta cheese around it.
- Serve with bread. Ladle the thick stew into deep bowls. Serve it immediately with toasted crusty bread for dipping.
3. Spicy Shrimp Ramen with Soft Boiled Egg

Curly ramen noodles swim in a creamy, spice-infused broth that glows with a warm orange hue. Plump pink shrimp are arranged neatly on top, seasoned with a hint of chili and lime. This bowl brings the heat and comfort needed to combat a chilly afternoon.
A perfectly soft-boiled egg sits on the side, its golden yolk ready to enrich the soup. Fresh cilantro leaves and sliced green onions provide a burst of color and a crisp finish to the silken noodles. Each spoonful offers a balance of savory, spicy, and tangy notes.
A side of red chili paste and fresh lime wedges allows you to customize the intensity of the flavor. This meal feels like a treat but comes together with incredible speed. It is a smart way to upgrade basic noodles into a high-quality feast.
Required Ingredients
- 2 packs instant ramen noodles (discard seasoning packets)
- 1/2 pound large shrimp, peeled and deveined
- 3 cups chicken or seafood broth
- 1/2 cup coconut milk
- 1 tablespoon red curry paste
- 1 soft-boiled egg, halved
- Fresh cilantro and sliced green onions for garnish
- Lime wedges
Equipment List
- Medium saucepan
- Small pot (for the egg)
- Tongs
- Ladle
DIY Instructions
- Boil the egg. Place an egg in a small pot of boiling water for exactly 6 and a half minutes. Remove it and put it in ice water. Peel it carefully and slice it in half when cooled.
- Prepare the broth. In your saucepan, whisk together the broth, coconut milk, and red curry paste. Bring it to a boil over medium heat.
- Cook the noodles. Drop the ramen noodles into the boiling broth. Cook them for about 2 to 3 minutes until they are tender but still have a bit of a bite.
- Poach the shrimp. Add the raw shrimp directly into the bubbling soup. They will cook very fast. Remove the pan from the heat once the shrimp turn pink and opaque, which takes about 2 minutes.
- Assemble the bowl. Pour the noodles and broth into a large bowl. Arrange the shrimp on top and place the egg halves on the side.
- Add fresh toppings. Scatter the cilantro and green onions over the top. Squeeze a fresh lime wedge over everything and add extra chili paste if you want more heat.
4. Glazed Salmon with Steamed Bok Choy

A glossy, honey-colored glaze coats a thick fillet of flaky salmon. Toasted sesame seeds and rings of bright red chili pepper decorate the fish, adding texture and a gentle kick. This elegant plate looks like a masterpiece but takes very little effort.
Crisp-tender bok choy sits alongside the salmon, steamed to a perfect vibrant green. The leaves are light and refreshing, balancing the richness of the glazed seafood. A bowl of fluffy white rice stays close by to catch the extra savory sauce.
The combination of sweet ginger and salty soy sauce creates a deep umami flavor. This dish provides a healthy and light alternative to heavy winter stews while remaining incredibly cozy. It serves as a great introduction to cooking fish at home.
Required Ingredients
- 1 large salmon fillet (about 6 ounces)
- 2 heads baby bok choy, sliced lengthwise
- 2 tablespoons honey
- 1 tablespoon soy sauce
- 1 teaspoon grated fresh ginger
- 1 teaspoon sesame seeds
- Sliced red chilies for garnish
- Cooked white rice for serving
Equipment List
- Non-stick frying pan with a lid
- Small mixing bowl
- Spatula
DIY Instructions
- Make the glaze. In a small bowl, whisk together the honey, soy sauce, and grated ginger until smooth.
- Sear the salmon. Heat your pan over medium heat. Place the salmon skin-side down in the pan. Cook for 4 minutes until the skin is crispy.
- Add the glaze. Flip the fish carefully. Pour the honey mixture over the salmon. Let it bubble and thicken for 2 to 3 minutes while you spoon the sauce over the top of the fish.
- Steam the greens. Move the salmon to one side of the pan. Place the bok choy halves in the empty space and add a splash of water. Cover the pan with a lid for 2 minutes to steam the greens.
- Check for doneness. Remove the lid. The salmon should flake easily with a fork, and the bok choy should be soft but still bright.
- Plate the meal. Serve the salmon and bok choy over a bed of warm rice. Pour the remaining pan sauce over everything.
- Garnish. Sprinkle sesame seeds and sliced red chilies over the top for a professional look.
5. Broccoli and Cheddar Stuffed Potato Skins

Crispy potato halves act as natural bowls for a mountain of melted cheddar cheese. Bright green broccoli florets are tucked into the fluffy potato centers, creating a classic flavor duo. These handheld treats are a fun way to enjoy a vegetable-heavy snack or light meal.
The cheese is piled high, stretching as you take a bite. Sliced green onions are sprinkled over the top, adding a sharp, fresh finish to the savory base. This dish is a great way to use up leftover baked potatoes during a busy week.
Each skin is seasoned simply to let the natural flavors of the potato and sharp cheddar shine. They are satisfyingly crunchy on the outside and soft on the inside. This meal is a guaranteed hit for both children and adults on a cold day.
Required Ingredients
- 4 medium Russet potatoes, pre-baked
- 1 cup chopped broccoli florets, steamed
- 1.5 cups shredded sharp cheddar cheese
- 2 tablespoons sliced green onions
- 1 tablespoon melted butter
- Salt and pepper to taste
Equipment List
- Baking sheet
- Spoon
- Pastry brush or small spoon
DIY Instructions
- Prep the potatoes. Take your pre-baked potatoes and cut them in half lengthwise. Use a spoon to scoop out some of the middle, leaving about a quarter-inch of potato on the skin.
- Crisp the skins. Brush the inside of the skins with melted butter and a pinch of salt. Place them on a baking sheet and broil them in the oven for 3 minutes until the edges are golden.
- Fill the shells. Take the potatoes out of the oven. Fill each hollow center with a few pieces of steamed broccoli.
- Add the cheese. Pile a generous amount of shredded cheddar cheese over the broccoli. Ensure it covers the filling completely.
- Melt and bubble. Put the tray back under the broiler for 2 to 4 minutes. Watch closely until the cheese is melted and starts to bubble.
- Top and serve. Remove from the oven. Scatter the fresh green onions over the hot cheese. Serve them while they are still warm and the cheese is gooey.
6. Lemon Herb Chicken and Orzo Skillet

Golden-brown chicken thighs nestle into a creamy bed of orzo pasta. A bright lemon slice sits in the center, infusing the entire dish with a zesty aroma. This one-pan meal offers both convenience and a heartwarming embrace on a cold evening.
Sprinkles of dried herbs coat the chicken skin, adding a rustic fragrance to the savory chicken and pasta. Small pieces of colorful bell pepper peek out from the orzo, providing a subtle sweetness. It looks like a slow-cooked feast, yet comes together in a flash.
The tender chicken pairs wonderfully with the small, rice-shaped pasta, soaking up all the flavorful broth. This dish is a simple solution for families seeking a complete meal without multiple pots and pans. It delivers comfort with every spoonful.
Required Ingredients
- 4 bone-in, skin-on chicken thighs
- 1 cup orzo pasta
- 3 cups chicken broth
- 1/2 onion, chopped
- 1/2 bell pepper (any color), chopped
- 1 lemon, sliced (one slice for garnish, rest for juice)
- 1 tablespoon olive oil
- 1 teaspoon dried oregano (or other herbs like thyme, Italian seasoning)
- Salt and black pepper to taste
- Fresh parsley for garnish (optional)
Equipment List
- Large oven-safe skillet with a lid
- Tongs
- Wooden spoon
DIY Instructions
- Sear the chicken. Heat the olive oil in your large skillet over medium-high heat. Season the chicken thighs generously with salt, pepper, and oregano. Place them skin-side down in the hot pan. Cook for 6 to 8 minutes until the skin is crispy and golden.
- Sauté the vegetables. Remove the chicken from the skillet and set it aside. Add the chopped onion and bell pepper to the pan, cooking for 3 to 4 minutes until they soften.
- Add the orzo and broth. Stir the orzo pasta into the vegetables in the skillet for 1 minute. Pour in the chicken broth and squeeze in the juice from half of the lemon. Bring the liquid to a simmer.
- Return the chicken. Place the seared chicken thighs back into the skillet, nestled into the simmering orzo. Make sure the chicken is skin-side up. Add the lemon slice on top or in the middle.
- Cook until tender. Cover the skillet with a lid and reduce the heat to low. Let it gently simmer for 15 to 20 minutes, or until the orzo is cooked and the chicken reaches an internal temperature of 165°F.
- Rest and serve. Turn off the heat and let the dish rest, covered, for 5 minutes. Garnish with fresh parsley if you desire. Serve directly from the skillet.
7. Spiced Sweet Potato and Chickpea Salad

A vibrant swirl of creamy white dressing zigzags across a bed of fresh arugula. Roasted sweet potato cubes and hearty chickpeas are scattered beneath, offering a satisfying texture and earthy flavor. This colorful salad brings warmth and wholesome goodness to your table.
Golden-brown sweet potatoes, caramelized from roasting, contrast with the soft, tender chickpeas. Specks of dark cumin seeds and vibrant pomegranate arils are sprinkled throughout, adding bursts of flavor and a gentle crunch. It transforms a simple salad into a substantial and exciting meal.
This dish marries sweet, savory, and tangy notes, creating a balanced and flavorful experience. It serves as a hearty vegetarian option that feels surprisingly rich and filling. You can enjoy this versatile salad warm or at room temperature for comfort.
Required Ingredients
- 2 medium sweet potatoes, peeled and diced into 1-inch cubes
- 1 can (15 ounces) chickpeas, drained and rinsed
- 5 ounces fresh arugula
- 1/4 cup pomegranate arils
- 2 tablespoons olive oil
- 1 teaspoon ground cumin
- 1 teaspoon whole cumin seeds
- Salt and black pepper to taste
- For the Dressing: 1/4 cup tahini, 2 tablespoons lemon juice, 2 tablespoons water, 1 clove garlic minced, salt to taste
Equipment List
- Baking sheet
- Large mixing bowl
- Small whisk or fork
- Oven
DIY Instructions
- Roast the sweet potatoes. Preheat your oven to 400°F (200°C). Toss the diced sweet potatoes with 1 tablespoon of olive oil, ground cumin, salt, and pepper on a baking sheet. Roast for 20 minutes, flipping halfway, until tender and lightly browned.
- Prepare the dressing. While the potatoes roast, whisk together the tahini, lemon juice, water, minced garlic, and a pinch of salt in a small bowl. Add more water if needed until the dressing is smooth and pourable.
- Warm the chickpeas. In a pan, gently warm the drained chickpeas with the remaining 1 tablespoon of olive oil and the whole cumin seeds for 3 to 5 minutes until fragrant.
- Assemble the salad base. Arrange the fresh arugula on a large serving platter or in a wide bowl.
- Add the warm elements. Scatter the roasted sweet potatoes and the warmed chickpeas over the arugula.
- Garnish and dress. Sprinkle the pomegranate arils over the top. Drizzle the tahini dressing generously over the entire salad in a decorative pattern. Serve immediately.
8. French Onion Grilled Cheese

Golden, crusty bread holds a generous layer of caramelized onions and melting white cheese. Fresh green thyme sprigs add a delicate herbaceous aroma, cutting through the richness of the filling. This sandwich takes a classic soup’s flavor and puts it between two slices of bread.
The cheese stretches in long, tempting strands as you pull the halves apart. Deeply caramelized onions, sweet and savory, are piled high, making each bite incredibly satisfying. A small bowl of rich, dark balsamic glaze awaits for dipping, adding another layer of flavor.
This grilled cheese offers a sophisticated twist on a beloved comfort food. It feels substantial and elegant, yet cooks up with remarkable ease. It presents an innovative way to enjoy the warmth of French onion without the fuss of a full soup.
Required Ingredients
- 4 slices crusty bread (sourdough or rustic white)
- 2 large yellow onions, thinly sliced
- 4 tablespoons butter, divided
- 4 slices Gruyère cheese (or Swiss)
- Fresh thyme sprigs for garnish
- Optional: Small bowl of balsamic glaze for dipping
- Salt and black pepper to taste
Equipment List
- Large skillet
- Spatula
DIY Instructions
- Caramelize the onions. Melt 2 tablespoons of butter in a large skillet over medium-low heat. Add the thinly sliced onions, a pinch of salt, and cook them slowly for 20 to 25 minutes. Stir occasionally until they are deeply browned, very soft, and sweet. Set them aside.
- Assemble the sandwiches. Butter one side of each slice of bread with the remaining 2 tablespoons of butter. Place two slices, butter-side down, in the skillet over medium heat.
- Layer the cheese and onions. On each slice in the pan, place a slice of Gruyère cheese, followed by a generous spoonful of the caramelized onions. Top with another slice of cheese.
- Close and grill. Place the remaining two slices of bread, butter-side up, on top of the cheese.
- Cook until golden. Grill the sandwiches for 4 to 5 minutes on each side until the bread is golden brown and crispy, and the cheese is thoroughly melted and bubbly.
- Serve with flair. Remove the sandwiches from the pan. Cut them in half. Garnish with fresh thyme sprigs. Serve immediately with a small bowl of balsamic glaze if desired.
9. Savory Beef and Mushroom Stroganoff

Broad, golden egg noodles form a comforting base for a rich, hearty beef and mushroom sauce. A dollop of cool, creamy sour cream sits atop the savory mixture, ready to be swirled in. This dish embodies classic comfort food, satisfying even the deepest cravings.
Tender ground beef crumbles merge with slices of earthy mushrooms, all swimming in a velvety brown sauce. Fresh green chives are sprinkled over the top, adding a gentle onion flavor and a pop of color. It presents a simple yet sophisticated weeknight dinner.
The sauce clings beautifully to the wide noodles, ensuring every bite is flavorful. This meal delivers a substantial warmth that is especially welcome when temperatures drop. It offers a quick way to enjoy a traditional, beloved recipe without a long cooking process.
Required Ingredients
- 1 pound ground beef
- 8 ounces egg noodles
- 1 tablespoon olive oil
- 1 onion, chopped
- 8 ounces cremini mushrooms, sliced
- 1/2 cup beef broth
- 1/2 cup sour cream
- 1 tablespoon all-purpose flour
- 1 tablespoon Worcestershire sauce
- Fresh chives, chopped, for garnish
- Salt and black pepper to taste
Equipment List
- Large skillet
- Large pot (for noodles)
- Wooden spoon
DIY Instructions
- Cook the noodles. Bring a large pot of salted water to a boil. Add the egg noodles and cook according to package directions until al dente. Drain and set aside.
- Brown the beef. While the noodles cook, heat the olive oil in your large skillet over medium-high heat. Add the ground beef and cook, breaking it up with a spoon, until it is no longer pink. Drain off any excess fat.
- Sauté the vegetables. Add the chopped onion and sliced mushrooms to the skillet with the beef. Cook for 5 to 7 minutes until the vegetables soften and the mushrooms release their liquid.
- Make the sauce base. Sprinkle the flour over the beef and vegetable mixture. Stir well and cook for 1 minute. Pour in the beef broth and Worcestershire sauce. Bring the mixture to a simmer, stirring until the sauce thickens slightly.
- Finish with sour cream. Remove the skillet from the heat. Stir in the sour cream until it is fully combined and the sauce is smooth and creamy. Season with salt and black pepper to your preference.
- Combine and serve. Add the cooked egg noodles directly into the skillet with the stroganoff sauce. Toss everything together. Serve immediately, garnished with fresh chopped chives.
10. Garlic Shrimp and Soba Noodles

Plump, glistening shrimp are arranged on a bed of dark, earthy soba noodles. Bright red chili slices and vibrant green onions dot the dish, adding both color and a gentle spicy kick. This Asian-inspired meal offers a light yet deeply flavorful option.
The springy soba noodles are coated in a savory sauce that hints at soy and subtle sweetness. A side of dark soy sauce and a bottle of chili flakes allow for personal customization of the flavor. Fresh garlic cloves promise a robust aroma for the meal.
This dish balances fresh seafood with wholesome noodles for a satisfying experience. It is a quick and healthy option that delivers complex flavors without a lengthy cooking process. You can prepare this elegant dinner in very little time.
Required Ingredients
- 8 ounces soba noodles
- 1 pound large shrimp, peeled and deveined
- 2 cloves garlic, minced
- 2 tablespoons soy sauce
- 1 tablespoon honey (or brown sugar)
- 1 tablespoon sesame oil
- 1 tablespoon olive oil
- 2 tablespoons sliced green onions
- Sliced red chilies for garnish (optional)
- Red pepper flakes for serving (optional)
Equipment List
- Large pot
- Large skillet
- Small mixing bowl
- Tongs
DIY Instructions
- Cook the soba noodles. Bring a large pot of water to a boil. Add the soba noodles and cook according to package directions, usually 4 to 6 minutes. Drain them, rinse with cold water to stop cooking, and set aside.
- Make the sauce. In a small bowl, whisk together the soy sauce, honey, and sesame oil.
- Cook the shrimp. Heat the olive oil in a large skillet over medium-high heat. Add the minced garlic and cook for 30 seconds until fragrant. Add the shrimp to the pan and cook for 2 to 3 minutes per side until they turn pink and opaque.
- Combine with noodles. Add the cooked soba noodles and the prepared sauce to the skillet with the shrimp. Toss everything together using tongs until the noodles and shrimp are fully coated in the sauce. Cook for another 1 to 2 minutes to heat everything through.
- Garnish and serve. Remove from heat. Transfer the garlic shrimp and soba noodles to a serving plate. Sprinkle with sliced green onions and sliced red chilies. Offer extra soy sauce and red pepper flakes on the side for those who want more flavor or heat.
11. Creamy Sausage and Spinach Tortellini Soup

Silken, cheese-filled tortellini float in a rich, golden broth that warms the soul instantly. Hearty crumbles of savory sausage are scattered throughout the pot, providing a salty depth to every spoonful. This one-pan wonder brings the essence of an Italian kitchen to your table in record time.
Vibrant green spinach leaves wilt gently into the warm cream, adding a fresh contrast to the dense pasta. Tiny flecks of red bell pepper and onion peek through the liquid, offering subtle sweetness and texture. It is a thick, restorative meal that feels like a luxury on a gloomy, freezing afternoon.
This recipe relies on simple techniques to create a complex, layered flavor profile. You can achieve this velvety consistency without hours of simmering on the stove. It serves as a reliable go-to for those evenings when you need maximum comfort with minimal cleanup.
Required Ingredients
- 1 package (10 ounces) refrigerated cheese tortellini
- 1 pound ground Italian sausage
- 4 cups chicken broth
- 1 cup heavy cream
- 2 cups fresh baby spinach
- 1/2 onion, finely diced
- 1/2 red bell pepper, diced
- 1 tablespoon olive oil
- Salt and black pepper to taste
Equipment List
- Large soup pot or Dutch oven
- Wooden spoon
- Ladle
- Chef’s knife
DIY Instructions
- Brown the meat. Heat the olive oil in your large pot over medium-high heat. Add the ground sausage and cook it until it turns brown and crispy. Use your wooden spoon to break the meat into small, bite-sized crumbles as it cooks.
- Sauté the aromatics. Toss the diced onion and red bell pepper into the pot with the sausage. Stir them for about 4 minutes until the onions look clear and the peppers are soft.
- Simmer the base. Pour the chicken broth into the pot. Turn the heat up to bring the liquid to a rolling boil.
- Cook the pasta. Drop the tortellini into the boiling broth. Let them cook for about 5 to 7 minutes. You will know they are ready when they float to the surface and feel tender.
- Cream it up. Lower the heat to medium. Pour in the heavy cream and stir gently. Let the soup sit for 2 minutes to thicken slightly, but do not let it reach a hard boil again.
- Add the greens. Stir in the fresh baby spinach. The heat from the soup will wilt the leaves in about 60 seconds.
- Season and serve. Taste the broth and add salt or pepper if you like. Ladle the hot soup into deep bowls and serve immediately while it is steaming.
12. Halloumi and Quinoa Power Bowl

Salty, golden-brown slabs of grilled halloumi cheese sit atop a fluffy bed of quinoa. Bright red rings of chili pepper and fresh cilantro leaves decorate the cheese, adding a spicy spark to the earthy base. This bowl provides a vibrant mix of temperatures and textures that wake up the palate.
Roasted red peppers and a pile of sautéed spinach add a burst of garden-fresh flavor to the meal. A generous dollop of creamy hummus sits on the side, topped with a drizzle of olive oil and crunchy pumpkin seeds. It represents a balanced approach to a quick lunch or a light, cozy dinner.
The combination of protein-rich quinoa and satisfying cheese keeps you full for hours. This dish proves that healthy eating can be incredibly indulgent and visually stunning. You can assemble this nutrient-dense feast with very little actual cooking time.
Required Ingredients
- 1 block (8 ounces) halloumi cheese, sliced
- 1 cup cooked quinoa
- 1 cup fresh spinach, lightly sautéed
- 1/2 cup roasted red bell peppers, sliced
- 1/4 cup hummus
- 1 tablespoon pumpkin seeds
- 1 red chili, sliced
- Fresh cilantro for garnish
- 1 tablespoon olive oil
Equipment List
- Small non-stick frying pan
- Large serving bowl
- Tongs
DIY Instructions
- Warm the base. Place your pre-cooked quinoa in a large serving bowl. If it is cold, you can warm it in the microwave for a minute or serve it at room temperature.
- Sauté the greens. Put a tiny splash of oil in your pan over medium heat. Toss in the spinach and cook for 1 minute until it shrinks. Place the spinach on top of the quinoa.
- Fry the cheese. Wipe the pan clean and add the olive oil. Place the halloumi slices in the pan. Cook them for 2 to 3 minutes on each side. They are finished when the outside is dark golden and the inside is soft.
- Arrange the bowl. Lay the warm halloumi slices over the quinoa and spinach. Add the roasted red peppers and a large scoop of hummus to the side of the bowl.
- Add the crunch. Sprinkle the pumpkin seeds over the hummus. This adds a nice contrast to the creamy texture.
- Garnish for heat. Scatter the sliced red chilies and cilantro leaves over the cheese.
- Final touch. Drizzle any remaining oil from the pan over the bowl and enjoy your meal while the cheese is still warm and squeaky.
13. Black Bean and Corn Quesadillas

Crispy, toasted tortillas are folded over a gooey center of melted cheese and hearty black beans. Golden corn kernels provide a sweet pop against the savory beans and spicy sauce peeking from the edges. These handheld triangles are the ultimate solution for a fast, comforting snack or meal.
The tortillas show beautiful dark brown spots from the heat of the pan, indicating a perfect crunch. Layers of beans and corn are packed tightly inside, ensuring every bite is substantial. They sit stacked on a dark surface, looking rustic and deeply inviting for a casual family night.
Using simple pantry staples makes this dish incredibly accessible at any time. You can customize the spice level to suit your mood by adding more or less sauce inside. It is a crowd-pleasing option that requires almost no effort to prepare.
Required Ingredients
- 4 large flour tortillas
- 1 can (15 ounces) black beans, drained and rinsed
- 1 cup frozen or canned corn
- 2 cups shredded Mexican blend cheese
- 2 tablespoons taco sauce or salsa
- 1 tablespoon butter or oil for the pan
Equipment List
- Large flat skillet or griddle
- Spatula
- Pizza cutter or sharp knife
DIY Instructions
- Prepare the filling. In a small bowl, mix the black beans, corn, and taco sauce together so the flavors are well distributed.
- Heat the pan. Place your skillet over medium heat and add a little butter or oil to coat the surface.
- Build the quesadilla. Lay one tortilla flat in the pan. Sprinkle a thin layer of cheese over the whole surface.
- Add the heart. Spread a few spoonfuls of the bean and corn mixture over one half of the tortilla.
- Fold and crisp. Fold the empty half of the tortilla over the filling to create a half-moon shape.
- Brown both sides. Press down with your spatula. Cook for about 3 minutes until the bottom is golden and crispy. Flip it carefully and cook the other side for another 2 minutes.
- Slice and serve. Slide the quesadilla onto a cutting board. Use a pizza cutter to slice it into three triangles. Serve while the cheese is hot and stretchy.
14. Pesto Penne with Crispy Bacon and Peas

Bright green pesto coats every inch of the ridged penne pasta, creating a bold and aromatic base. Plump green peas are scattered throughout the dish, adding a natural sweetness and a soft texture. This plate balances the freshness of herbs with the savory richness of classic comfort food.
Large strips of crispy, reddish-brown bacon rest on top, providing a smoky crunch that elevates the entire meal. A mountain of fluffy white ricotta cheese sits in the center, garnished with lemon zest and pine nuts. It looks like a sophisticated bistro dish but takes almost no time to create.
The ridges on the pasta are specifically designed to hold onto the thick, nutty sauce. This meal is a fantastic way to brighten up a dark winter evening with vibrant colors. You can easily pull this together using a few high-quality store-bought ingredients.
Required Ingredients
- 12 ounces penne pasta
- 1/2 cup basil pesto
- 4 strips bacon, cooked until crispy
- 1 cup frozen peas, thawed
- 1/4 cup ricotta cheese
- 1 tablespoon toasted pine nuts
- 1 teaspoon lemon zest
- Salt and pepper to taste
Equipment List
- Large pot
- Mixing bowl
- Colander
- Small pan (for bacon)
DIY Instructions
- Boil the pasta. Cook the penne in a large pot of salted water according to the box instructions.
- Prep the bacon. While the water boils, fry your bacon in a small pan until it is very crunchy. Set it on a paper towel to drain, then break it into large pieces.
- Warm the peas. About 2 minutes before the pasta is done, toss the frozen peas into the boiling water with the noodles. This thaws them perfectly without extra pots.
- Drain and mix. Save a small splash of the pasta water, then drain the rest. Return the pasta and peas to the pot.
- Sauce the noodles. Add the pesto to the warm pasta. Stir well until every noodle is green and glossy. If it feels too dry, add that splash of saved pasta water.
- Plate the dish. Scoop the pasta into a wide bowl. Place the crispy bacon pieces on top.
- Add the creamy finish. Put a big spoonful of ricotta right in the middle. Sprinkle the lemon zest and pine nuts over the top for a fresh, professional finish.
15. Red Lentil Dahl with Warm Naan

A deep pot is filled with a thick, aromatic red lentil dahl that glows with the color of turmeric and spices. A smooth swirl of white yogurt and fresh cilantro leaves decorate the center of the hearty stew. This dish offers a soul-warming experience that is both healthy and incredibly satisfying.
The texture of the lentils is soft and creamy, perfect for scooping with the charred pieces of naan bread on the side. A small bowl of extra turmeric powder sits nearby, emphasizing the rich, earthy flavors within the pot. It is a rustic, plant-based meal that feels substantial enough for the coldest days.
This recipe simplifies traditional methods to fit into a busy schedule. The lentils cook down quickly, creating a natural sauce that is full of protein. It serves as a wonderful way to introduce bold, international spices into your weekly routine.
Required Ingredients
- 1 cup dry red lentils, rinsed
- 1 can (14 ounces) coconut milk
- 2 cups vegetable broth
- 1 tablespoon yellow curry powder or turmeric
- 1 tablespoon olive oil
- 1/2 onion, finely chopped
- 2 cloves garlic, minced
- 1/4 cup plain yogurt for topping
- Fresh naan bread for serving
Equipment List
- Medium saucepan
- Wooden spoon
- Measuring cups
DIY Instructions
- Sauté the base. Heat the olive oil in your saucepan over medium heat. Add the onion and garlic. Stir them for 3 minutes until they become soft and smell great.
- Toast the spices. Stir the curry powder or turmeric into the onions. Let it cook for 30 seconds to wake up the flavors.
- Add the liquids. Pour the dry, rinsed lentils into the pan. Follow with the vegetable broth and the coconut milk.
- Simmer until soft. Bring the mixture to a boil, then turn the heat down to low. Cover the pan with a lid and let it simmer for about 15 to 20 minutes.
- Check the texture. The lentils should be very soft and the liquid should be mostly absorbed, creating a thick porridge-like consistency. Stir it well to make it extra creamy.
- Top it off. Spoon the dahl into bowls. Add a dollop of yogurt and some fresh cilantro on top.
- Serve with bread. Warm your naan bread in the oven or a toaster for a minute. Use the bread to scoop up the warm lentils directly from the bowl.
16. Brie and Turkey Cranberry Baguettes

Toasted baguette rolls overflow with thick slices of roasted turkey and creamy, melting brie cheese. A deep red cranberry sauce drips down the sides, adding a sweet and tangy layer to the savory sandwich. These warm rolls capture the best flavors of a holiday feast in a convenient, handheld form.
Fresh peppery green arugula leaves peek out from the bottom, providing a crunch that cuts through the rich cheese. The bread has a beautiful golden crust that shatters slightly with every bite. It is an elegant solution for using leftovers or creating a fancy lunch during the work week.
The heat from the toasted bread softens the brie until it reaches a velvety consistency. This meal feels incredibly festive yet requires very little actual cooking. You can assemble these impressive sandwiches in minutes to brighten up a gray winter afternoon.
Required Ingredients
- 2 small baguette rolls or ciabatta buns
- 6 ounces sliced roasted turkey breast
- 4 ounces brie cheese, sliced
- 1/4 cup cranberry sauce
- 1 cup fresh arugula
- 1 tablespoon honey mustard
- 1 tablespoon butter
Equipment List
- Serrated bread knife
- Small baking sheet
- Oven or toaster oven
DIY Instructions
- Slice the bread. Use your serrated knife to cut the baguette rolls in half lengthwise. Spread a thin layer of butter on the inside of both halves.
- Toast the crust. Place the bread on a baking sheet under a broiler for 2 minutes. Remove them once the edges look golden and feel crunchy.
- Layer the base. Spread a teaspoon of honey mustard on the bottom half of each roll. Add a generous handful of fresh arugula.
- Add the turkey. Pile the turkey slices high on top of the greens. You can fold the slices to create more volume and texture.
- Melt the cheese. Place the slices of brie cheese over the turkey. Put the open sandwiches back under the broiler for 1 minute until the cheese starts to bubble and run.
- Apply the sauce. Spoon the red cranberry sauce over the warm, melted brie.
- Assemble and serve. Close the sandwiches with the top halves of the bread. Press down gently so the flavors merge and serve while the cheese is still gooey.
17. Spicy Korean Rice Cakes (Tteokbokki)

Chewy, cylindrical rice cakes swim in a thick, vibrant red sauce that packs a serious spicy punch. A single hard-boiled egg sits on the side, offering a cooling contrast to the intense heat of the chili base. This popular street food dish provides a unique texture and deep warmth for cold days.
A square of melted American cheese sits in the center, slowly dissolving into the sauce to create a creamy finish. Freshly sliced green onions and a sprinkle of sugar garnish the top, balancing the savory and spicy notes. It is a bold, energetic meal that satisfies cravings for something different and exciting.
The sauce clings to the dense rice cakes, ensuring a burst of flavor with every chew. This dish is surprisingly easy to replicate at home using a few specialty ingredients. It serves as a fantastic way to experience authentic international flavors in under thirty minutes.
Required Ingredients
- 1 pound dried Korean rice cakes (soaked in water for 10 minutes)
- 2 cups water or dashi stock
- 3 tablespoons Gochujang (Korean red chili paste)
- 1 tablespoon soy sauce
- 1 tablespoon sugar
- 1 slice American cheese
- 1 hard-boiled egg, halved
- 2 tablespoons chopped green onions
Equipment List
- Medium skillet or shallow pot
- Wooden spoon
- Small bowl
DIY Instructions
- Prepare the sauce. In a small bowl, whisk together the Gochujang, soy sauce, and sugar until the mixture is smooth.
- Boil the liquid. Pour the water or stock into your skillet and bring it to a gentle boil over medium heat.
- Cook the cakes. Drain the soaked rice cakes and add them to the boiling liquid. Let them cook for about 8 to 10 minutes. They are ready when they feel soft and chewy all the way through.
- Thicken the sauce. Pour your prepared chili mixture into the skillet. Stir constantly so the sauce coats every rice cake.
- Reduce the heat. Keep stirring for another 5 minutes over low heat. The sauce will naturally thicken into a glossy, dark red glaze.
- Add the creamy element. Place the slice of cheese right in the middle of the pan. Do not stir it; let the heat melt it slowly.
- Final assembly. Top the dish with the hard-boiled egg halves and a generous amount of green onions. Serve hot directly from the pan.
18. Spinach and Ricotta Stuffed Portobello Mushrooms

Large, earthy portobello mushroom caps serve as the perfect vessel for a creamy spinach and ricotta filling. A thick layer of melted mozzarella cheese covers the top, browned to a perfect golden hue under the broiler. These stuffed mushrooms offer a meaty texture without the actual meat.
Crunchy golden breadcrumbs are sprinkled over the cheese, adding a necessary texture to the soft filling. The spinach is finely chopped and folded into the savory cheese, creating a vibrant green interior. It is a sophisticated vegetarian option that looks beautiful on any dinner plate.
The mushrooms release their natural juices as they bake, keeping the entire dish moist and flavorful. This recipe is a great way to enjoy a low-carb meal that still feels incredibly indulgent. You can prepare the filling ahead of time to make the final cooking process even faster.
Required Ingredients
- 4 large portobello mushroom caps, stems removed
- 1 cup ricotta cheese
- 2 cups fresh spinach, sautéed and squeezed dry
- 1/2 cup shredded mozzarella cheese
- 1/4 cup grated parmesan cheese
- 1/4 cup panko breadcrumbs
- 1 tablespoon olive oil
- 1 clove garlic, minced
Equipment List
- Baking sheet
- Mixing bowl
- Spoon
DIY Instructions
- Clean the mushrooms. Use a damp paper towel to wipe the mushroom caps. Carefully scrape out the dark gills with a spoon and remove the stems to create a hollow space.
- Brush with oil. Lightly coat the outside of the mushrooms with olive oil and place them gill-side up on a baking sheet.
- Mix the filling. In a bowl, stir together the ricotta, chopped spinach, minced garlic, and parmesan cheese. Season the mixture with a little salt and pepper.
- Stuff the caps. Spoon a large amount of the ricotta mixture into each mushroom cap. Press it down firmly so it fills the entire cavity.
- Add the toppings. Sprinkle the shredded mozzarella over the top of the filling. Finish with a dusting of panko breadcrumbs for a crunchy crust.
- Bake and brown. Place the sheet in a 400°F (200°C) oven for 15 minutes. Switch to the broiler for the last 2 minutes to turn the cheese golden brown.
- Rest and serve. Let the mushrooms sit for 3 minutes before serving so the juices can settle. They are great as a main dish or a heavy side.
19. Poached White Fish with Bok Choy and Ginger

Two tender fillets of white fish simmer gently in a light, aromatic coconut broth. Large slices of fresh ginger and lime sit in the pan, infusing the liquid with a clean and zesty fragrance. This steaming dish offers a refreshing and healthy way to stay warm during the winter months.
Crisp baby bok choy halves surround the fish, absorbing the savory flavors of the poaching liquid. The broth is clear and delicate, seasoned with just a few cracks of black pepper and a hint of citrus. It presents a light yet deeply satisfying meal that leaves you feeling energized.
This cooking method ensures the fish remains incredibly moist and flaky. Using a single pan makes the process simple and keeps the kitchen clean. It is an ideal choice for a quiet, cozy evening when you want a restaurant-quality meal without the heavy calories.
Required Ingredients
- 2 white fish fillets (like cod, tilapia, or halibut)
- 2 heads baby bok choy, sliced in half
- 1 can (14 ounces) light coconut milk
- 1-inch piece of ginger, sliced into rounds
- 1 lime, sliced into rounds
- 1/2 cup water or fish stock
- Salt and black pepper to taste
Equipment List
- Large deep skillet with a lid
- Tongs
- Spatula
DIY Instructions
- Create the broth. Pour the coconut milk and water into your skillet. Add the ginger slices and half of the lime rounds.
- Bring to a simmer. Heat the liquid over medium heat until it begins to bubble gently. Do not let it reach a hard boil.
- Season the fish. Lightly salt and pepper both sides of your fish fillets.
- Poach the fish. Carefully lower the fillets into the simmering liquid. The broth should cover at least half of the fish.
- Add the greens. Place the bok choy halves in the pan around the fish.
- Cover and cook. Put the lid on the skillet. Let everything steam and simmer for 8 to 10 minutes. The fish is done when it is opaque and flakes easily with a fork.
- Plate and garnish. Use a spatula to lift the fish into a shallow bowl. Pour some of the warm broth over the top and arrange the bok choy on the side. Finish with a fresh squeeze of lime.
20. Mediterranean Sheet Pan Frittata

A large, golden frittata fills a dark skillet, decorated with perfectly fried eggs and crispy strips of bacon. Rounds of bright green leeks and dollops of white goat cheese are scattered across the surface, creating a mosaic of color. This hearty egg dish works perfectly for a quick “breakfast for dinner” on a cold night.
The edges of the frittata are crisp and brown, while the center remains light and fluffy. Tiny cherry tomatoes and fresh herbs provide a burst of acidity and freshness to the savory egg base. It is a versatile meal that allows you to use up whatever vegetables you have in the fridge.
Slicing into the frittata reveals a rich, seasoned interior that is incredibly filling. This one-pan strategy makes it easy to serve a whole family at once. You can enjoy it hot from the oven or at room temperature with a side salad.
Required Ingredients
- 8 large eggs
- 1/2 cup whole milk or heavy cream
- 4 strips bacon, pre-cooked and sliced
- 1 large leek, white and light green parts sliced into rounds
- 1/4 cup crumbled goat cheese
- 1/2 cup cherry tomatoes, halved
- 1 tablespoon olive oil
- Salt and black pepper to taste
Equipment List
- Large oven-safe skillet
- Whisk
- Large bowl
DIY Instructions
- Whisk the base. In a large bowl, beat the 8 eggs with the milk or cream until the mixture is very smooth. Season with a good pinch of salt and pepper.
- Sauté the leeks. Heat the olive oil in your oven-safe skillet over medium heat. Add the leek rounds and cook for 5 minutes until they are soft and fragrant.
- Add the toppings. Scatter the bacon pieces and cherry tomatoes over the leeks in the pan.
- Pour the eggs. Carefully pour the egg mixture into the skillet. Use a fork to ensure the bacon and vegetables are evenly distributed.
- Add the cheese. Drop small dollops of goat cheese all over the top of the liquid eggs.
- Set the bottom. Let the frittata cook undisturbed on the stove for 3 minutes. This creates a solid crust on the bottom.
- Bake to finish. Transfer the skillet to a 375°F (190°C) oven. Bake for 10 to 12 minutes until the center is set and no longer jiggles. Slice it into wedges like a pizza and serve immediately.
21. Creamy Mushroom Spaghetti with Fresh Thyme

Golden brown mushroom slices mingle with perfectly twirled spaghetti in a shallow white bowl. Shavings of sharp parmesan cheese melt into the light, peppery sauce, creating a rich and savory coating for every strand. A fresh sprig of thyme sits on top, releasing an earthy aroma that promises a high-quality comfort meal.
The combination of woody mushrooms and fresh herbs provides a deep umami flavor that feels sophisticated yet grounded. This dish offers a wonderful vegetarian alternative for a busy evening when you want something substantial. It looks like it came from a professional kitchen but requires very little actual effort from the cook.
Light and dark textures play together on the plate, making the meal visually striking. You can easily adjust the seasoning with extra black pepper or herbs to suit your specific taste. It is a reliable solution for anyone needing a warm, filling dinner that comes together in a flash.
Required Ingredients
- 8 ounces spaghetti noodles
- 2 cups cremini mushrooms, sliced
- 2 tablespoons unsalted butter
- 1/2 cup heavy cream
- 1/4 cup shaved parmesan cheese
- 2 cloves garlic, minced
- 3 sprigs fresh thyme
- Salt and black pepper to taste
Equipment List
- Large pot for pasta
- Medium skillet
- Tongs
- Chef’s knife
DIY Instructions
- Boil the pasta. Fill a large pot with water and a pinch of salt. Bring it to a rolling boil and cook the spaghetti according to the package directions. Drain the water but save a small cup of the starchy liquid for later.
- Sauté the mushrooms. Melt the butter in your skillet over medium-high heat. Add the sliced mushrooms in a single layer. Let them sit for 3 minutes without stirring so they turn dark golden brown and develop a deep flavor.
- Add the aromatics. Stir in the minced garlic and the leaves from two thyme sprigs. Cook for just 1 minute until you can smell the garlic clearly.
- Create the sauce. Pour the heavy cream into the skillet with the mushrooms. Turn the heat down to low and let the liquid bubble gently for about 3 minutes until it starts to thicken.
- Combine the dish. Use your tongs to transfer the cooked spaghetti directly into the mushroom sauce. Toss everything together so the noodles are fully coated.
- Adjust the texture. If the sauce seems too thick, add a splash of the saved pasta water. This makes the sauce silky and helps it stick to the spaghetti.
- Garnish and serve. Plate the pasta and top it with the shaved parmesan cheese. Add the final fresh thyme sprig on top for a beautiful presentation.
22. Zesty Buffalo Cauliflower Tacos

Crispy cauliflower florets, coated in a bright orange buffalo sauce, take center stage in these vibrant corn tortillas. A generous dollop of cool ranch dressing and crumbles of blue cheese sit on top to balance the spicy heat. This meal provides a fresh and energetic twist on traditional taco night.
Shredded purple cabbage and fresh cilantro leaves add a satisfying crunch and a burst of garden color to every bite. These tacos offer a nutrient-heavy alternative that feels just as indulgent as a meat-based version. It serves as a fantastic option for a quick, healthy lunch or a light dinner on a cold day.
The contrast between the warm, spicy cauliflower and the cold, creamy toppings creates an exciting flavor profile. You can assemble these in minutes using pre-chopped vegetables to save even more time. It is a colorful and festive way to bring some excitement to your winter menu.
Required Ingredients
- 1 medium head cauliflower, cut into small florets
- 1/2 cup buffalo hot sauce
- 6 small corn tortillas
- 1 cup shredded purple cabbage
- 1/4 cup blue cheese crumbles
- 1/4 cup ranch or blue cheese dressing
- Fresh cilantro for garnish
- 1 tablespoon olive oil
Equipment List
- Large baking sheet
- Medium mixing bowl
- Small frying pan (to warm tortillas)
DIY Instructions
- Roast the cauliflower. Preheat your oven to 400°F. Toss the cauliflower florets with olive oil and a pinch of salt on a baking sheet. Roast them for 15 to 20 minutes until the edges are dark and crispy.
- Sauce the florets. Transfer the hot cauliflower into a mixing bowl. Pour the buffalo sauce over them and toss until every piece is bright orange and fully covered.
- Warm the tortillas. Place your corn tortillas in a dry pan over medium heat for about 30 seconds on each side. This makes them soft and prevents them from breaking when you fold them.
- Build the base. Lay the warm tortillas flat. Place a small handful of shredded purple cabbage in the center of each one.
- Add the filling. Divide the spicy cauliflower florets evenly among the tortillas, placing them right on top of the cabbage.
- Top it off. Drizzle the ranch or blue cheese dressing over the cauliflower. Sprinkle the blue cheese crumbles over the sauce for extra tang.
- Final garnish. Add a few fresh cilantro leaves to each taco. Serve them immediately while the cauliflower is still hot and the cabbage is crunchy.
23. Sheet Pan Roasted Sausage and Apples

Thick, juicy sausages rest on a bed of caramelized apple slices and rings of red onion. Small clusters of whole grain mustard are scattered across the pan, adding a sharp and savory bite to the sweet fruit. This rustic one-pan meal captures the heart of autumn and winter flavors with ease.
The sausages have a beautiful snap and golden color from the high heat of the oven. The apples become soft and honey-like, soaking up the savory juices from the meat as they cook together. It is a simple and wholesome dinner that requires almost no active preparation time.
Cleaning up is a breeze since everything stays on a single sheet of parchment paper. This dish offers a balanced mix of sweet and savory notes that will satisfy the whole family. It is a reliable go-to for those evenings when you want a warm, home-cooked meal without the mess.
Required Ingredients
- 4 to 6 large bratwurst or Italian sausages
- 2 large honeycrisp apples, sliced into half-moons
- 1 large red onion, sliced into rings
- 2 tablespoons whole grain mustard
- 1 tablespoon olive oil
- 1 teaspoon dried thyme
- Salt and black pepper to taste
Equipment List
- Large rimmed baking sheet
- Parchment paper
- Small bowl
DIY Instructions
- Prepare the oven. Preheat your oven to 425°F. Line a large baking sheet with parchment paper to make cleaning much easier later.
- Prep the produce. Slice your apples and red onions. Spread them out across the prepared baking sheet in a single layer.
- Oil and season. Drizzle the olive oil over the apples and onions. Sprinkle them with the dried thyme, salt, and black pepper. Toss them gently with your hands to coat them evenly.
- Add the sausages. Place the sausages directly on top of the fruit and onion mixture. Use a knife to poke a few small holes in the sausages to prevent them from bursting.
- Add the mustard. Drop small spoonfuls of the whole grain mustard around the pan. This will melt into the juices as everything roasts.
- Roast until golden. Place the pan in the oven for 20 to 25 minutes. You will know it is done when the sausages are browned and the apples look soft and translucent.
- Serve warm. Transfer the sausages and apples to a serving platter. Pour any remaining juices from the pan over the top for extra flavor.
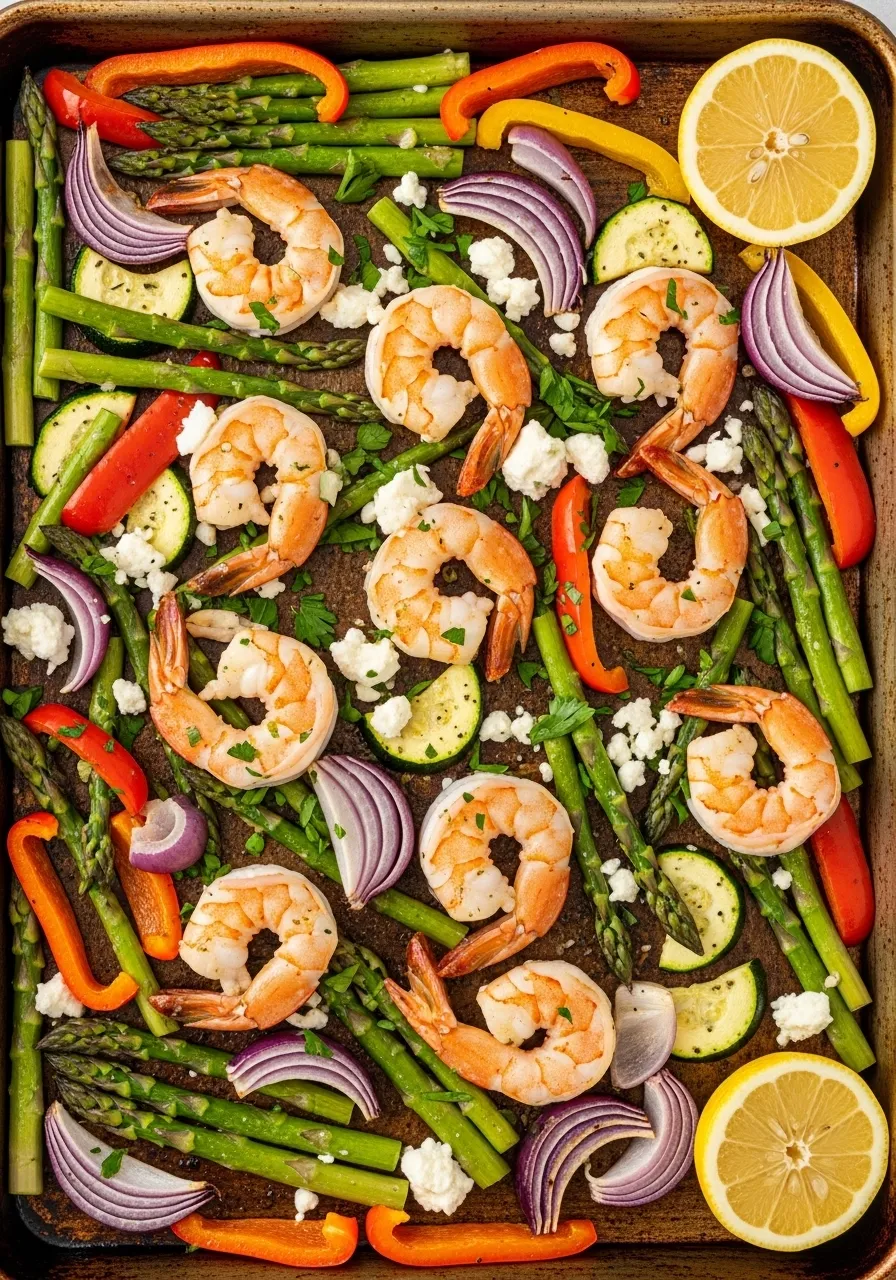
24. Mediterranean Shrimp and Feta Skillet

Plump pink shrimp are nestled in a thick, bubbling tomato sauce within a dark skillet. Large blocks of salty feta cheese sit on top, garnished with dried herbs that release a savory fragrance. This dish brings a bright Mediterranean flair to your kitchen, offering a light but deeply satisfying experience.
Thick slices of crusty baguette sit on the side, ready to soak up the rich, seasoned tomato base. The contrast between the soft, melting cheese and the firm, juicy shrimp creates a wonderful variety of textures. It looks like an impressive restaurant dish but comes together in just one pan.
The sauce is packed with garlic and herbs, providing a robust flavor that warms you from the inside out. This meal serves as a fantastic option for a quick date night dinner or a special weeknight treat. It is a vibrant and healthy way to enjoy seafood during the colder months.
Required Ingredients
- 1 pound large shrimp, peeled and deveined
- 1 can (15 ounces) crushed tomatoes
- 6 ounces feta cheese, cut into thick squares
- 2 cloves garlic, minced
- 1 tablespoon olive oil
- 1 teaspoon dried oregano
- Fresh parsley for garnish
- 1 crusty baguette for serving
Equipment List
- Large oven-safe skillet
- Wooden spoon
- Bread knife
DIY Instructions
- Sauté the garlic. Heat the olive oil in your skillet over medium heat. Add the minced garlic and cook for about 1 minute until it starts to smell wonderful.
- Build the sauce. Pour the crushed tomatoes into the skillet. Stir in the dried oregano and a pinch of salt. Let the sauce simmer gently for about 5 minutes to thicken.
- Add the shrimp. Place the raw shrimp into the sauce in a single layer. Push them down slightly so they are mostly covered by the tomatoes.
- Add the cheese. Arrange the feta squares on top of the shrimp and sauce. Sprinkle a little more oregano over the cheese for extra flavor.
- Cook until pink. Let the skillet sit on the heat for about 5 to 7 minutes. The shrimp are finished when they turn pink and opaque. The feta will soften but keep its shape.
- Toast the bread. While the shrimp cooks, slice your baguette and give it a quick toast in the oven or a toaster until it is crunchy.
- Garnish and enjoy. Sprinkle fresh parsley over the skillet. Serve it hot right in the middle of the table with the bread on the side for dipping.
25. Savory Oatmeal with Fried Egg and Spinach

A bowl of hearty, steel-cut oats provides a savory base for a perfectly fried egg with a bright yellow yolk. A pile of sautéed green spinach sits on the side, adding a fresh and healthy element to the dish. This meal proves that oatmeal can be a fantastic and filling option for a cozy dinner.
A sprinkle of black and white sesame seeds and a dash of red chili flakes add a subtle crunch and a hint of heat. The runny yolk creates a natural sauce that blends beautifully with the seasoned oats. It is a nutrient-dense and comforting choice for those who crave something warm and simple.
This dish is incredibly versatile and allows you to use up whatever greens you have in your refrigerator. It feels wholesome and restorative, making it a great solution for a quiet evening at home. You can prepare this entire meal in one pot and one pan for minimal cleanup.
Required Ingredients
- 1 cup quick-cooking steel-cut oats
- 2 cups water or vegetable broth
- 1 large egg
- 2 cups fresh baby spinach
- 1 tablespoon olive oil
- 1 teaspoon sesame seeds
- 1/2 teaspoon red chili flakes
- Salt and black pepper to taste
Equipment List
- Small saucepan
- Non-stick skillet
- Spatula
DIY Instructions
- Cook the oats. Bring your water or broth to a boil in the small saucepan. Stir in the oats and reduce the heat to low. Simmer for about 5 to 7 minutes until the liquid is absorbed and the oats are soft. Season with a pinch of salt.
- Wilt the spinach. Heat a tiny splash of oil in your skillet over medium heat. Toss in the spinach and cook for 1 minute until it shrinks and turns dark green. Move the spinach to a small plate.
- Fry the egg. Add the remaining oil to the same skillet. Crack the egg into the pan and cook for 3 minutes. For a runny yolk, leave it alone until the whites are set.
- Prepare the bowl. Scoop the warm oats into a deep bowl.
- Assemble the toppings. Place the sautéed spinach on one side of the oats. Carefully slide the fried egg onto the center of the bowl.
- Add the seasoning. Sprinkle the sesame seeds and red chili flakes over the egg. Add a crack of fresh black pepper for extra flavor.
- Serve immediately. Break the yolk with your spoon so it runs into the oats, creating a creamy and savory breakfast-for-dinner experience.
26. Creamy White Chicken Chili with Crunchy Toppings

Tender shreds of chicken and hearty white beans simmer in a thick, savory broth. Vibrant green jalapeño rings and a mountain of shredded cheese sit on top, ready to melt into the warm mixture. This bowl offers a lighter, creamier alternative to traditional red chili while providing just as much satisfaction.
A large dollop of cool sour cream and a handful of salty tortilla chips add a necessary crunch to the soft texture of the stew. A sprinkle of dark chili powder provides a gentle heat that lingers on the tongue. It is a rustic and filling meal that comes together quickly using a single pot.
The combination of spicy peppers and rich cream creates a balanced profile that feels restorative on a freezing day. You can easily adjust the spice level by adding more or fewer jalapeños to the pot. This dish serves as a wonderful solution for a casual family dinner that requires minimal cleanup.
Required Ingredients
- 1 pound cooked chicken breast, shredded
- 2 cans (15 ounces) Great Northern beans, drained
- 3 cups chicken broth
- 1/2 cup heavy cream or sour cream
- 1 small onion, diced
- 1 jalapeño, sliced
- 1/2 cup shredded Monterey Jack cheese
- 1 tablespoon olive oil
- Tortilla chips for serving
Equipment List
- Large soup pot
- Wooden spoon
- Chef’s knife
DIY Instructions
- Sauté the aromatics. Heat the olive oil in your pot over medium heat. Add the diced onion and half of the jalapeño slices. Cook for 5 minutes until the onion is soft.
- Build the base. Pour the chicken broth into the pot and bring it to a gentle simmer.
- Add the heart. Stir in the shredded chicken and the white beans. Let the mixture bubble for 10 minutes so the flavors can merge.
- Make it creamy. Turn the heat down to low. Stir in the heavy cream or sour cream until the broth looks white and opaque. Do not let it boil again.
- Thicken slightly. Use the back of your spoon to mash a few of the beans against the side of the pot. This releases starch and makes the chili thicker.
- Top and melt. Ladle the hot chili into bowls. Sprinkle a generous amount of cheese over the top so it melts from the heat of the soup.
- Garnish. Add the remaining fresh jalapeño slices and a few crushed tortilla chips for a perfect finish.
27. Seared Scallops over Sweet Corn Puree

Four golden-brown scallops sit elegantly on a bed of bright yellow corn puree. Small crumbles of crispy bacon and a pat of melting butter decorate the plate, adding a rich and smoky depth. This dish looks like a high-end restaurant appetizer but is surprisingly fast to prepare at home.
The scallops have a perfect crust that yields to a soft, buttery center. Freshly chopped chives add a pop of green and a mild onion flavor to the sweet and savory base. It presents a sophisticated and light option for a quiet, cozy evening when you want something special.
Using frozen or canned corn makes the puree process incredibly simple and fast. The natural sweetness of the corn pairs beautifully with the salty bacon and delicate seafood. It is a visually stunning meal that proves 30 minutes is all you need for true elegance.
Required Ingredients
- 4 to 6 large sea scallops, patted dry
- 2 cups corn kernels (fresh or thawed)
- 2 strips bacon, cooked and crumbled
- 2 tablespoons unsalted butter
- 1/4 cup heavy cream
- 1 tablespoon fresh chives, chopped
- 1 tablespoon olive oil
- Salt and black pepper to taste
Equipment List
- Small blender or food processor
- Non-stick skillet
- Small saucepan
DIY Instructions
- Make the puree. Place the corn and heavy cream in a small saucepan. Simmer for 5 minutes. Pour the mixture into a blender and pulse until it is very smooth. Season with salt and set aside.
- Prep the scallops. Ensure your scallops are very dry by patting them with a paper towel. Season both sides with salt and pepper.
- Heat the pan. Add olive oil to your skillet over medium-high heat. Wait until the oil is shimmering and very hot.
- Sear the seafood. Place the scallops in the pan. Do not move them for 2 minutes. This creates that beautiful golden crust.
- Flip and finish. Flip the scallops over and add a pat of butter to the pan. Cook for 1 more minute while spooning the melted butter over them.
- Plate the dish. Spread a large circle of the warm corn puree on a plate.
- Assemble. Place the seared scallops on top of the puree. Sprinkle the bacon crumbles and fresh chives over everything before serving.
28. Roasted Red Pepper and Tomato Soup

A deep white bowl holds a smooth, vibrant orange soup that glows with warmth. A delicate swirl of cream and a fresh basil leaf sit in the center, adding a touch of elegance to the rustic dish. This soup captures the concentrated flavors of roasted vegetables in a silken, comforting form.
A jar of roasted peppers and a few cloves of garlic stay nearby, hinting at the simple ingredients within. This meal offers a restorative experience that is both healthy and deeply satisfying on a chilly day. It pairs wonderfully with a simple grilled cheese or a thick slice of sourdough bread.
The sweetness of the peppers balances the acidity of the tomatoes perfectly. This recipe is a fantastic way to enjoy a gourmet-style soup without spending hours at the stove. You can achieve this velvety texture in minutes using a simple kitchen blender.
Required Ingredients
- 1 jar (12 ounces) roasted red peppers, drained
- 1 can (28 ounces) crushed tomatoes
- 2 cups vegetable broth
- 1/2 cup heavy cream
- 2 cloves garlic, minced
- 1 tablespoon olive oil
- Fresh basil leaves for garnish
Equipment List
- Large pot
- Immersion blender (or regular blender)
- Wooden spoon
DIY Instructions
- Sauté the garlic. Heat the olive oil in your pot over medium heat. Add the minced garlic and stir for 1 minute until fragrant.
- Combine ingredients. Add the drained roasted peppers, crushed tomatoes, and vegetable broth to the pot.
- Simmer. Bring the liquid to a boil, then turn the heat down. Let it simmer gently for 10 minutes to allow the flavors to blend.
- Blend until smooth. Use an immersion blender directly in the pot to puree the soup. If using a regular blender, let the soup cool slightly before blending in batches.
- Add the cream. Stir in the heavy cream. This will turn the soup from deep red to a beautiful, creamy orange.
- Season. Taste the soup and add salt and pepper as needed.
- Serve. Ladle the soup into bowls. Add a small swirl of extra cream and a fresh basil leaf on top for a professional look.
29. Butter-Basted Garlic Steak Bites

Cubed pieces of tender beef sizzle in a dark skillet alongside thick slices of bright green zucchini. Two large cloves of garlic and a dish of melting butter wait to be stirred into the mix for a rich finish. This meal provides a high-protein, low-carb solution that feels incredibly indulgent.
The steak bites are seared to a perfect brown, locking in all the savory juices. The zucchini absorbs the garlic butter as it cooks, becoming soft and flavorful in just a few minutes. It is a simple and masculine dish that delivers a massive amount of flavor with very little effort.
Using a single pan ensures that the vegetables benefit from the delicious drippings of the meat. This recipe is an ideal choice for a fast post-workout dinner or a quick weeknight treat. It offers a restaurant-quality steak experience in a fraction of the time.
Required Ingredients
- 1 pound sirloin steak, cut into 1-inch cubes
- 2 medium zucchinis, sliced into rounds
- 3 tablespoons unsalted butter
- 3 cloves garlic, smashed
- 1 tablespoon olive oil
- Salt and black pepper to taste
Equipment List
- Large cast iron or heavy skillet
- Tongs or spatula
- Chef’s knife
DIY Instructions
- Prep the meat. Pat the steak cubes dry with a paper towel and season them generously with salt and pepper.
- Sear the steak. Heat the olive oil in your skillet over high heat. Add the steak bites in a single layer. Cook for 2 minutes without moving them to get a good crust.
- Flip and add flavor. Stir the steak and add the butter and smashed garlic cloves to the pan. Cook for another 2 minutes, spooning the melting butter over the meat.
- Remove the steak. Use your tongs to move the steak bites to a plate. Leave the garlic and butter in the pan.
- Cook the zucchini. Toss the zucchini rounds into the hot garlic butter. Sauté them for 4 to 5 minutes until they are tender and slightly browned.
- Combine. Add the steak bites back into the pan with the zucchini for 30 seconds to warm them through.
- Serve. Discard the whole garlic cloves and serve the steak and zucchini immediately while the butter is still hot and glossy.
30. Peanut Satay Tofu with Steamed Broccoli

Crispy rectangular slabs of golden tofu are arranged neatly in a dark skillet. A thick, creamy peanut sauce is drizzled over the top, garnished with crunchy whole peanuts and sliced green onions. This plant-based meal offers a wonderful balance of sweet, salty, and spicy notes.
Vibrant green broccoli florets sit on the side, steamed to a perfect crunch to provide a fresh contrast. This dish is an excellent way to enjoy a high-protein vegetarian meal that feels substantial and exciting. It brings a popular Southeast Asian flavor profile to your dinner table in less than half an hour.
The tofu has a satisfyingly firm exterior that holds the rich sauce beautifully. This recipe is a great introduction for those looking to cook more meatless meals during the week. It is a colorful and wholesome option that satisfies both the eyes and the appetite.
Required Ingredients
- 1 block (14 ounces) extra-firm tofu, pressed and sliced
- 3 cups broccoli florets
- 1/2 cup creamy peanut butter
- 2 tablespoons soy sauce
- 1 tablespoon honey or maple syrup
- 1 teaspoon sriracha or chili paste
- 1/4 cup crushed peanuts
- 1 tablespoon olive oil
Equipment List
- Large non-stick skillet
- Small mixing bowl
- Steamer basket or microwave-safe bowl
DIY Instructions
- Prep the tofu. Slice your tofu into long rectangles. Press them between paper towels to remove as much water as possible.
- Fry the tofu. Heat the olive oil in your skillet over medium-high heat. Add the tofu and cook for 5 minutes on each side until the edges are golden and crispy.
- Steam the broccoli. While the tofu fries, place the broccoli in a steamer basket for 5 minutes. Alternatively, microwave it with a splash of water for 3 minutes until bright green.
- Whisk the sauce. In a small bowl, mix the peanut butter, soy sauce, honey, and sriracha. Add a splash of warm water if it is too thick to pour.
- Glaze the tofu. Pour the peanut sauce over the tofu in the skillet. Turn the heat to low and toss gently so the sauce thickens and coats the tofu.
- Plate the meal. Arrange the saucy tofu on one side of a plate and the steamed broccoli on the other.
- Garnish. Sprinkle the crushed peanuts and sliced green onions over the tofu for a professional and crunchy finish.
31. Honey Apple and Brie Flatbread

Crispy flatbread acts as a warm canvas for thin slices of sweet red apples and creamy brie cheese. Tiny green thyme leaves are scattered across the top, adding an earthy fragrance that balances the sugary fruit. A rich drizzle of golden honey glazes the entire surface, catching the light beautifully.
The heat from the oven softens the brie until it reaches a velvety consistency, merging with the crisp apple slices. This handheld meal offers a sophisticated blend of flavors that feel like a luxury snack or a light dinner. It presents a wonderful way to enjoy seasonal produce in a simple, elegant format.
Each bite delivers a satisfying crunch followed by a smooth, sweet finish. This recipe is a fantastic solution for a quick solo meal or a fast appetizer for guests. You can assemble this gourmet flatbread in minutes using a few high-quality pantry staples.
Required Ingredients
- 1 large pre-baked flatbread or naan
- 1 red apple (like Gala or Fuji), thinly sliced
- 4 ounces brie cheese, sliced
- 2 tablespoons honey
- 1 teaspoon fresh thyme leaves
- 1 tablespoon olive oil
Equipment List
- Baking sheet
- Pastry brush or spoon
- Chef’s knife
DIY Instructions
- Prep the base. Preheat your oven to 400°F. Place the flatbread on a baking sheet and brush the top lightly with olive oil to help it crisp up.
- Layer the cheese. Arrange the slices of brie cheese evenly across the flatbread, leaving a small border around the edges.
- Add the fruit. Lay the thin apple slices over the cheese. You can overlap them slightly in a decorative pattern.
- Season. Sprinkle the fresh thyme leaves over the apples and cheese.
- Bake to melt. Place the sheet in the oven for 8 to 10 minutes. You want the cheese to be bubbly and the edges of the flatbread to turn golden brown.
- Glaze. Remove from the oven and immediately drizzle the honey over the warm apples.
- Slice and serve. Use a knife to cut the flatbread into wedges. Serve while the cheese is still warm and stretchy.
32. Cheeseburger Macaroni Skillet

Tender macaroni noodles swim in a savory beef sauce, topped with a mountain of shredded cheddar cheese. Vibrant yellow mustard and bright red ketchup are swirled into the center, mimicking the classic flavors of a backyard burger. Diced green pickles and crunchy breadcrumbs add a necessary pop of texture to this hearty bowl.
Ground beef crumbles are evenly distributed throughout the pasta, ensuring every spoonful is filling and rich. This one-pan meal is a childhood favorite upgraded for a fast and cozy adult dinner. It captures the essence of comfort food while being incredibly easy to prepare after a long day.
The cheese melts into a silken sauce that clings to the ridged noodles. This dish serves as a reliable crowd-pleaser for both kids and adults on a cold winter night. You can achieve this deep, savory flavor in less time than it takes to visit a drive-thru.
Required Ingredients
- 1 pound ground beef
- 8 ounces elbow macaroni
- 2 cups beef broth
- 1.5 cups shredded cheddar cheese
- 2 tablespoons ketchup
- 1 tablespoon yellow mustard
- 1/4 cup diced pickles
- 1/4 cup crushed crackers or breadcrumbs
Equipment List
- Large deep skillet
- Wooden spoon
- Measuring cups
DIY Instructions
- Brown the beef. Heat your skillet over medium-high heat. Add the ground beef and cook until it is no longer pink. Drain off the excess grease.
- Simmer the pasta. Pour the beef broth and the dry macaroni noodles directly into the skillet with the meat.
- Cook through. Bring the liquid to a boil, then turn the heat to medium-low. Cover the pan and let it simmer for 10 minutes until the noodles are soft and the broth is mostly gone.
- Add the flavor. Stir in the ketchup and mustard until the sauce is smooth and orange.
- Melt the cheese. Sprinkle the shredded cheddar over the top. Put the lid back on for 2 minutes to let the cheese melt completely.
- Add the toppings. Scatter the diced pickles and crushed crackers over the melted cheese.
- Serve. Scoop the macaroni into bowls while it is hot and creamy.
33. Lemon Butter Ravioli with Asparagus

Large, pillowy ravioli are arranged neatly on a plate, topped with shavings of salty parmesan cheese. A bunch of vibrant green asparagus spears sits on the side, seasoned with black pepper and a hint of citrus. This light yet satisfying meal offers a clean and refreshing flavor profile for a chilly evening.
A small dish of melted lemon butter waits to be drizzled over the pasta, promising a zesty and rich finish. The contrast between the soft cheese-filled pasta and the crisp-tender vegetables creates a balanced dining experience. It looks like a professional bistro plate but requires very little active cooking time.
The bright yellow lemon slices provide a burst of color and a fresh aroma to the dish. This recipe is an excellent choice for a quick vegetarian dinner that still feels special. You can prepare this elegant meal using store-bought ravioli to save time without sacrificing quality.
Required Ingredients
- 1 package (10 ounces) cheese ravioli
- 1 bunch thin asparagus, woody ends trimmed
- 3 tablespoons unsalted butter
- 1 lemon (juice and zest)
- 1/4 cup shaved parmesan cheese
- Salt and black pepper to taste
Equipment List
- Large pot
- Medium skillet
- Tongs
DIY Instructions
- Boil the ravioli. Cook the ravioli in a large pot of salted water according to the package directions. Drain and set aside.
- Steam the asparagus. While the pasta cooks, place the asparagus in a skillet with a splash of water. Cover and cook over medium heat for 4 minutes until they are bright green and tender. Remove from the pan.
- Make the sauce. Wipe the skillet dry and melt the butter over low heat. Stir in the lemon juice and half of the lemon zest.
- Toss the pasta. Add the cooked ravioli to the lemon butter. Toss gently with tongs to coat them without breaking the pasta.
- Plate the meal. Divide the ravioli between two plates and place the asparagus spears alongside them.
- Garnish. Sprinkle the shaved parmesan cheese and the remaining lemon zest over the pasta.
- Season. Finish with a crack of black pepper and serve immediately.
34. Sesame Ginger Beef Stir-Fry

Thin strips of tender beef sizzle in a dark skillet filled with colorful julienned carrots and green beans. A glossy, dark sauce coats every ingredient, seasoned with fresh ginger and toasted sesame seeds. This energetic stir-fry brings a bold and savory Asian-inspired flavor to your 30-minute meal rotation.
Fresh green onions are scattered over the top, providing a crisp and sharp finish to the warm meat and vegetables. A small bowl of red chili paste sits on the side for those who want to add an extra kick of heat. It is a nutrient-dense option that feels light yet remarkably filling on a cold day.
The high heat of the pan ensures the vegetables stay crunchy while the beef stays juicy. This dish is a great way to use up whatever garden vegetables you have in your crisper drawer. You can serve this flavorful mixture over a bed of rice or enjoy it on its own for a low-carb dinner.
Required Ingredients
- 1 pound flank steak, thinly sliced across the grain
- 2 cups mixed vegetables (carrots, green beans, broccoli)
- 3 tablespoons soy sauce
- 1 tablespoon honey
- 1 tablespoon grated fresh ginger
- 1 tablespoon sesame oil
- 2 tablespoons sliced green onions
- 1 teaspoon sesame seeds
Equipment List
- Large skillet or wok
- Small mixing bowl
- Spatula
DIY Instructions
- Mix the sauce. In a small bowl, whisk together the soy sauce, honey, ginger, and sesame oil.
- Sear the beef. Heat a tablespoon of oil in your skillet over high heat. Add the beef strips in a single layer. Cook for 2 minutes until browned, then remove the beef from the pan.
- Cook the vegetables. Add the carrots and green beans to the same hot pan. Stir-fry for 5 to 7 minutes until they are soft but still have a bit of a snap.
- Combine. Return the beef to the skillet and pour the sauce over everything.
- Thicken. Toss the mixture constantly for 2 minutes as the sauce bubbles and becomes thick and glossy.
- Top it off. Stir in the green onions and sesame seeds.
- Serve. Scoop the stir-fry into bowls and serve while it is steaming hot.
35. Creamy Polenta with Balsamic Mushrooms

A bowl holds a smooth, golden bed of creamy polenta, topped with a mountain of sautéed brown mushrooms. A large dollop of white cream sits in the center, decorated with a rich drizzle of dark balsamic glaze. This rustic vegetarian dish offers a deep, earthy comfort that is perfect for a freezing afternoon.
The mushrooms are cooked until dark and savory, releasing a wonderful aroma that fills the kitchen. Tiny flecks of fresh herbs are sprinkled over the top, adding a touch of garden freshness to the heavy, warm base. It is a sophisticated take on simple ingredients that delivers a restaurant-quality experience.
The contrast between the soft, silken polenta and the meaty mushrooms makes every bite satisfying. This recipe is a great way to enjoy a gluten-free meal that still feels incredibly substantial. You can prepare this entire dish in one pan to keep your evening simple and stress-free.
Required Ingredients
- 1 cup quick-cooking polenta
- 3 cups vegetable broth
- 2 cups cremini mushrooms, sliced
- 2 tablespoons butter
- 2 tablespoons balsamic glaze
- 1/4 cup heavy cream or mascarpone
- 1 teaspoon dried thyme
- Salt and black pepper to taste
Equipment List
- Medium saucepan
- Medium skillet
- Whisk
DIY Instructions
- Cook the polenta. Bring the vegetable broth to a boil in your saucepan. Slowly whisk in the polenta. Reduce the heat to low and stir for 5 minutes until it is thick and creamy. Stir in a tablespoon of butter and a pinch of salt.
- Sauté the mushrooms. While the polenta simmers, melt the remaining butter in a skillet over medium-high heat. Add the mushrooms and thyme.
- Brown the fungi. Cook the mushrooms for 8 minutes without moving them too much. You want them to turn dark brown and look slightly crispy on the edges.
- Add the glaze. Pour the balsamic glaze over the mushrooms and toss them for 1 minute until they are coated and glossy.
- Prepare the base. Scoop the warm polenta into a large shallow bowl or skillet.
- Top the dish. Pile the balsamic mushrooms right in the center of the polenta.
- Finish. Add a large spoonful of cream or mascarpone on top of the mushrooms. Serve immediately while it is hot and velvety.
36. Crispy Chicken Sliders with Special Sauce

Four golden, breaded chicken nuggets sit nestled inside soft, toasted slider buns. A generous drizzle of creamy pink sauce and a thick pickle slice decorate each sandwich, creating a classic and inviting look. These handheld bites are a fun and fast way to satisfy a craving for high-quality fast food at home.
Fresh shredded lettuce provides a cool crunch beneath the warm, crispy chicken. These sliders are an excellent solution for a quick family dinner or a festive game-day snack on a cold afternoon. They look simple yet offer a satisfying mix of textures and savory flavors in every bite.
Using pre-cooked or frozen chicken breast pieces makes this recipe come together with incredible speed. You can easily customize the sauce to be as spicy or mild as you prefer. It is a reliable crowd-pleaser that requires almost no cleanup and very little active effort.
Required Ingredients
- 8 frozen breaded chicken nuggets or tenders
- 4 slider buns
- 1 cup shredded iceberg lettuce
- 4 large pickle slices
- For the Sauce: 2 tablespoons mayonnaise, 1 tablespoon ketchup, 1 teaspoon yellow mustard, a dash of paprika
Equipment List
- Baking sheet
- Small mixing bowl
- Toaster or skillet
DIY Instructions
- Cook the chicken. Follow the package instructions to bake or air-fry your chicken nuggets until they are very crispy and hot.
- Make the sauce. In a small bowl, whisk together the mayonnaise, ketchup, mustard, and paprika until smooth.
- Toast the buns. Slice the slider buns and give them a quick toast in a dry pan or a toaster until the insides are golden.
- Layer the bottom. Spread a teaspoon of the special sauce on the bottom half of each toasted bun.
- Add the crunch. Place a small handful of shredded lettuce over the sauce.
- Assemble. Put one hot chicken nugget on each bun. Top the chicken with a pickle slice and another small dollop of sauce.
- Close and serve. Put the top buns on and serve the sliders while the chicken is still crunchy and warm.
37. Cheesy Broccoli and Orzo Risotto

A large black skillet is filled with a creamy, pale green mixture of orzo pasta and tender broccoli florets. Crunchy golden-brown onion bits are scattered across the top, adding a savory depth and a necessary texture. This “cheat’s risotto” offers all the creaminess of the traditional dish in a fraction of the time.
Small green peas and tiny flecks of lemon zest peek through the silken sauce, providing bursts of freshness. This one-pan meal is a fantastic way to hide extra vegetables in a dish that feels like pure comfort food. It presents a warm and filling option that is specifically designed for busy, chilly weeknights.
The orzo absorbs the broth perfectly, creating a velvety consistency that rivals any slow-cooked rice dish. This recipe is a great choice for families who want a wholesome, vegetarian dinner without the fuss. You can achieve this rich, cheesy result using just a few simple kitchen staples.
Required Ingredients
- 1 cup orzo pasta
- 2 cups chicken or vegetable broth
- 1.5 cups chopped broccoli florets
- 1/2 cup frozen peas
- 1/2 cup shredded white cheddar cheese
- 1/4 cup crispy fried onions (store-bought)
- 1 tablespoon butter
- 1 teaspoon lemon zest
Equipment List
- Large skillet with a lid
- Wooden spoon
- Measuring cups
DIY Instructions
- Toast the pasta. Melt the butter in your skillet over medium heat. Add the dry orzo and stir for 2 minutes until it smells slightly nutty.
- Add the liquid. Pour the broth into the skillet. Bring it to a boil, then reduce the heat to medium-low.
- Add the greens. Stir in the chopped broccoli and peas.
- Simmer. Cover the pan with a lid and let it cook for 8 to 10 minutes. Stir once or twice to make sure the pasta doesn’t stick to the bottom.
- Cream it up. Once the liquid is mostly absorbed, turn off the heat. Stir in the cheese and lemon zest until the sauce is smooth and stretchy.
- Add the crunch. Sprinkle the crispy fried onions generously over the top of the skillet.
- Serve. Dish the warm orzo into bowls and enjoy the creamy, cheesy goodness immediately.
38. Cheesy Sausage and Pepper Hoagies

Two long, toasted hoagie rolls are stuffed with juicy grilled sausages and a mountain of sautéed peppers. A thick layer of melted white cheese blankets the meat, creating a gooey and indulgent filling. These substantial sandwiches offer a bold and savory experience that is sure to warm you up.
Vibrant rings of red, yellow, and green bell peppers spill out from the sides, adding a sweet and slightly charred flavor. The bread is toasted to a perfect golden brown, providing a sturdy base for the heavy, savory ingredients. It looks like a classic deli favorite but takes very little time to recreate in your own kitchen.
The combination of smoky sausage and sweet onions creates a deep flavor profile that feels like a full meal. This recipe is an ideal choice for a casual dinner that feels rewarding after a long day. You can prepare the filling in one pan to keep your cooking process fast and tidy.
Required Ingredients
- 2 large Italian sausages (links)
- 2 hoagie or sub rolls
- 1 bell pepper (any color), sliced into strips
- 1/2 onion, sliced into rings
- 2 slices provolone or mozzarella cheese
- 1 tablespoon olive oil
- 1 tablespoon butter
Equipment List
- Large skillet
- Spatula
- Bread knife
DIY Instructions
- Cook the sausage. Heat the olive oil in your skillet over medium-high heat. Add the sausage links and cook for about 10 minutes, turning often, until they are browned and cooked through. Remove them from the pan.
- Sauté the vegetables. Add the sliced peppers and onions to the same pan. Cook for 6 minutes until they are soft and have some dark charred spots.
- Toast the bread. Slice your rolls open and butter the inside. Toast them in a separate pan or under a broiler for 2 minutes until crunchy.
- Slice the meat. Cut the cooked sausages in half lengthwise so they lay flat in the bun.
- Assemble. Place the sausage halves in the toasted rolls. Top them with a generous pile of the sautéed peppers and onions.
- Melt the cheese. Lay a slice of cheese over the hot vegetables. Put the open sandwiches under the broiler for 1 minute until the cheese is bubbly.
- Serve. Close the sandwiches and serve them hot while the cheese is still melting.
39. Shredded Chicken Tortilla Soup

A deep black pot holds a steaming, dark red broth filled with tender shreds of chicken and black beans. A large mound of creamy green avocado and a dollop of sour cream sit in the center, garnished with crunchy tortilla strips. This soup provides a vibrant and spicy kick that is specifically designed to combat a cold winter day.
Fresh cilantro leaves and a squeeze of lime add a bright, zesty finish to the rich and savory base. This one-pot meal is an excellent way to use a pre-cooked rotisserie chicken for an even faster dinner. It presents a beautiful mix of temperatures and textures that makes every spoonful exciting.
A jar of thick salsa stays close by, hinting at the simple secret to the soup’s complex flavor. This recipe is a fantastic choice for a healthy and filling meal that requires very little active prep work. You can assemble this festive and warming soup in just one pot in less than half an hour.
Required Ingredients
- 2 cups shredded cooked chicken
- 1 jar (16 ounces) chunky salsa
- 4 cups chicken broth
- 1 can (15 ounces) black beans, drained
- 1 avocado, diced
- 1/4 cup sour cream
- 1/2 cup tortilla chips, crushed
- Fresh cilantro and lime wedges for garnish
Equipment List
- Large soup pot
- Wooden spoon
- Ladle
DIY Instructions
- Combine the base. Pour the chicken broth and the entire jar of salsa into your large pot.
- Add the heart. Stir in the shredded chicken and the drained black beans.
- Simmer. Bring the soup to a boil over medium-high heat. Turn the heat down to low and let it bubble gently for 10 to 15 minutes to let the spices from the salsa flavor the broth.
- Prep the toppings. While the soup simmers, dice your avocado and chop the cilantro.
- Assemble the bowl. Ladle the hot soup into deep bowls.
- Add the creamy finish. Place a large spoonful of sour cream in the middle, then top it with the diced avocado.
- Add the crunch. Sprinkle the crushed tortilla chips and fresh cilantro over the top. Serve with a lime wedge on the side to squeeze in right before eating.
40. Caramelized Onion and Goat Cheese Tarts

Two golden, flaky puff pastry squares rest on a baking sheet, topped with a rich layer of dark caramelized onions. A large log of white goat cheese sits in the center, garnished with fresh thyme and a drizzle of balsamic glaze. This elegant vegetarian meal offers a sophisticated balance of sweet and tangy flavors for a cozy night in.
The pastry edges are puffed and crispy, providing a light and buttery base for the heavy toppings. A fresh arugula salad sits on the side, adding a peppery crunch that cuts through the richness of the cheese. It looks like a gourmet bakery item but comes together with surprising speed using store-bought dough.
The heat from the oven softens the goat cheese until it is creamy and spreadable. This recipe is a wonderful option for a light dinner or a fancy lunch that feels like a special treat. You can achieve this professional result in minutes by using pre-made puff pastry sheets.
Required Ingredients
- 1 sheet frozen puff pastry, thawed
- 1 cup caramelized onions (pre-made or sautéed quickly)
- 4 ounces goat cheese (log or crumbles)
- 1 tablespoon honey or balsamic glaze
- 1 teaspoon fresh thyme
- 1 egg (for egg wash)
Equipment List
- Baking sheet
- Parchment paper
- Pastry brush
- Knife
DIY Instructions
- Prep the pastry. Preheat your oven to 400°F. Line a baking sheet with parchment paper. Cut your puff pastry into four equal squares.
- Score the edges. Use a knife to lightly draw a smaller square inside each piece, about half an inch from the edge. Do not cut all the way through. This helps the edges puff up.
- Add the onions. Spread a spoonful of caramelized onions inside the center square of each pastry piece.
- Add the cheese. Place a thick slice or a large crumble of goat cheese right on top of the onions.
- Egg wash. Beat the egg in a small bowl. Brush the outer edges of the pastry with the egg to make them turn dark golden brown.
- Bake. Place the sheet in the oven for 15 to 18 minutes until the pastry is high and crispy.
- Final touch. Remove from the oven. Sprinkle with fresh thyme and a drizzle of balsamic glaze or honey. Serve warm while the pastry is at its flakiest.
Key Takeaways
- Pantry Staples are Essential: Many of these recipes rely on canned beans, dry pasta, and frozen vegetables to cut down on prep time.
- One-Pan Efficiency: Utilizing a single skillet or sheet pan reduces cleanup and helps flavors merge more effectively.
- Customizable Heat: Adjusting the amount of chili flakes, jalapeños, or hot sauce allows you to control the warmth of every dish.
- Fresh Finishes: Adding a squeeze of lime, fresh herbs, or a dollop of cream at the end elevates a simple meal into something special.
Winter does not have to mean a cycle of frozen dinners and heavy takeout. You have the power to create vibrant, steaming meals that satisfy your cravings in half an hour. These recipes offer a diverse range of flavors to keep your weekly routine exciting and fresh.
The next time a cold front hits, you will be prepared with a plan for dinner. Choose a recipe that speaks to your mood and enjoy the process of cooking. There is nothing quite like a bowl of home-cooked goodness to make a chilly house feel like a home.
Gather your ingredients and light the stove to begin your journey toward better weeknight eating. These forty cozy meals are ready to help you navigate the season with ease and flavor. Stay warm and eat well.