Valentine’s Day often feels like a high pressure search for the right gift. You want to show him how much you care without spending all day in the kitchen. These sweet treats offer the best solution for a memorable date night.
Cute Valentines Desserts
Most of these recipes require only a few minutes of active work. You can create stunning results that look like they came from a fancy bakery. Your partner will appreciate the effort and the delicious flavors you serve.
This list features everything from rich chocolate cakes to fresh fruit kabobs. Every item is designed to look adorable and taste even better. You do not need to be a master baker to win his heart this year.
Surprise your favorite person with these stunning red velvet cake bombs. They feature a vibrant red center hidden inside a crisp white chocolate shell. Each bite offers a rich cocoa flavor paired with a satisfying crunch from the sandwich cookies tucked inside.
Making these treats feels like a creative project rather than a chore. You only need a few simple ingredients to achieve this professional look. The combination of creamy white chocolate and moist cake makes this a top choice for any Valentine’s Day celebration.
Red cake crumbs scattered on top add a beautiful texture that looks like rubies. Small edible flower petals provide an elegant finish that will surely catch his eye. These little spheres of joy prove that high quality desserts do not require hours in the kitchen.
Ingredients
Red velvet cake mix baked and cooled
Cream cheese frosting
White chocolate melting wafers
Chocolate sandwich cookies
Red velvet cake crumbs for topping
Edible dried rose petals
Equipment
Silicone dome molds
Microwave safe bowl
Large mixing bowl
Small spoon or pastry brush
Baking sheet
DIY Instructions
Crumble your baked red velvet cake into a large mixing bowl until it reaches a fine texture.
Add a few spoonfuls of cream cheese frosting to the crumbs and mix with your hands until the mixture holds together.
Melt the white chocolate wafers in a microwave safe bowl using short thirty second bursts until the liquid is smooth.
Spoon a small amount of melted chocolate into each cavity of the silicone dome mold.
Use the back of a spoon to spread the chocolate up the sides of the mold until fully coated.
Place the mold into the refrigerator for ten minutes to allow the chocolate shell to harden.
Scoop a tablespoon of the red velvet cake mixture and press it firmly into the bottom of each chocolate shell.
Place half of a chocolate sandwich cookie in the center of the cake mixture for an extra crunch.
Add more cake mixture over the cookie until the dome is almost full but leaves a small gap at the top.
Pour more melted white chocolate over the cake mixture to create a flat base and seal the bomb.
Return the mold to the fridge for another fifteen minutes until the entire treat is solid.
Carefully peel the silicone mold away from the cake bombs and set them on a clean tray.
Drizzle any remaining white chocolate over the tops and immediately sprinkle with cake crumbs and flower petals.
2. Raspberry Swirl White Chocolate Bark
Cute Valentines Desserts
This stunning chocolate bark is a visual treat that tastes as good as it looks. The vibrant red swirls against the creamy white chocolate create a beautiful marble effect that is unique every time. It is a simple yet sophisticated dessert that requires minimal effort but delivers a big impact.
Tart freeze-dried raspberries break through the richness of the chocolate, adding a burst of flavor and a lovely crunch. The addition of small gold leaf flakes gives it a luxurious finish that feels extra special. You can break it into shards of any size, making it easy to package for gifts or serve on a platter.
This recipe is a fantastic option when you are short on time but still want to create something handmade. It does not involve any baking and sets up quickly in the refrigerator. You will love how the sweet and tangy flavors balance each other out in every bite.
Ingredients
White chocolate bars or high-quality chips
Red or pink candy melts
Freeze-dried raspberries, roughly crushed
Edible gold leaf sheets
Small heart-shaped sprinkles
Equipment
Large baking sheet
Parchment paper
Two microwave-safe bowls
Toothpick or wooden skewer
Rubber spatula
DIY Instructions
Line a large baking sheet with a piece of parchment paper, making sure it lies flat.
Place the white chocolate in one microwave-safe bowl and the red candy melts in another.
Melt the white chocolate in the microwave using short thirty-second intervals, stirring well between each one until completely smooth.
Repeat the same melting process for the red candy melts until they are liquid and free of lumps.
Pour the melted white chocolate onto the prepared baking sheet and use a spatula to spread it into an even, thin layer, about a quarter-inch thick.
Take a spoon and drizzle lines or dollops of the melted red candy over the surface of the wet white chocolate.
Immediately take a toothpick or skewer and drag it through the red and white chocolate in a swirling motion to create a marbled pattern.
While the chocolate is still wet, scatter the crushed freeze-dried raspberries and heart sprinkles evenly over the top.
Gently press small pieces of edible gold leaf onto various spots on the bark for a touch of elegance.
Place the baking sheet flat in the refrigerator for at least thirty minutes, or until the chocolate is firm and snaps when bent.
Once set, remove the bark from the parchment paper and use your hands to break it into irregular pieces.
Serve the bark immediately or store it in an airtight container at room temperature.
3. Mini Raspberry Mousse Shooters
Cute Valentines Desserts
These individual raspberry mousse shooters are a delightful and airy dessert that feel light after a meal. The vibrant pink color is all-natural, coming directly from fresh raspberries, which also provide a wonderful tart flavor. Each little glass is a personal serving, making them easy to handle and serve at a gathering.
A layer of buttery graham cracker crumbs at the bottom adds a necessary crunch that contrasts beautifully with the smooth mousse. The mousse itself is fluffy and creamy, made by folding whipped cream into a fresh raspberry puree. It is a no-bake treat that looks elegant and requires very little active time in the kitchen.
Top each shooter with a fresh raspberry and a small mint leaf for a professional-looking garnish. The combination of textures and fresh flavors makes this a refreshing choice for a romantic evening. You can prepare these a day in advance, which is a great timesaver.
Ingredients
Graham cracker crumbs
Unsalted butter, melted
Fresh raspberries (plus extra for garnish)
Granulated sugar
Heavy whipping cream, cold
Unflavored gelatin powder
Water
Fresh mint leaves for garnish
Equipment
Small glass jars or shot glasses
Food processor or blender
Small saucepan
Fine-mesh sieve
Large mixing bowl
Electric hand mixer or stand mixer
Piping bag or small spoon
DIY Instructions
In a small bowl, combine the graham cracker crumbs with the melted butter and mix until the crumbs resemble wet sand.
Spoon a small amount of the crumb mixture into the bottom of each small glass and press it down gently to create a crust layer.
Place the fresh raspberries and sugar in a food processor and blend until you have a smooth puree.
Pass the puree through a fine-mesh sieve into a bowl to remove the seeds, using a spoon to press as much liquid through as possible.
In a small saucepan, sprinkle the gelatin powder over a couple of tablespoons of water and let it sit for five minutes to bloom.
Gently heat the gelatin mixture over low heat just until the gelatin has completely dissolved, but do not let it boil.
Whisk the warm gelatin mixture thoroughly into the seedless raspberry puree.
In a large, chilled mixing bowl, whip the cold heavy cream with an electric mixer until stiff peaks form.
Gently fold the raspberry mixture into the whipped cream in three additions, being careful not to deflate the cream, until the color is uniform.
Transfer the mousse to a piping bag or use a small spoon to fill each glass over the graham cracker crust, leaving a little space at the top.
Place the glasses on a tray and refrigerate them for at least two hours, or until the mousse is set and firm.
Before serving, top each mousse shooter with a fresh raspberry and a small sprig of mint.
4. Valentine’s Chocolate Dipped Pretzel Rods
Cute Valentines Desserts
Sweet and salty is a classic flavor combination that everyone loves, and these chocolate-dipped pretzel rods are a prime example. The long, crunchy pretzels are coated in rich chocolate, offering a satisfying snap with every bite. They are incredibly fun to make and can be decorated in countless ways to match your theme.
For a festive Valentine’s touch, a drizzle of pink candy and a shower of heart-shaped sprinkles make them look adorable. You can use milk, dark, or white chocolate for the base dip, depending on your partner’s preference. These treats look fantastic standing up in a jar or wrapped individually in cellophane bags.
This is a fantastic no-bake recipe that is easy enough for anyone to master. The process is quick, and the cleanup is minimal, leaving you more time to enjoy the day. They are a playful and snackable dessert that is sure to bring a smile to his face.
Ingredients
Large pretzel rods
Semi-sweet or milk chocolate chips
Pink candy melts
Assorted Valentine’s Day sprinkles (hearts, jimmies, nonpareils)
Equipment
Tall, narrow glass or jar for dipping
Microwave-safe bowls
Baking sheet
Parchment paper or wax paper
Small spoon or piping bag for drizzling
DIY Instructions
Line a large baking sheet with parchment paper or wax paper and set it aside.
Place the chocolate chips in a tall, narrow, microwave-safe glass or jar.
Melt the chocolate in the microwave in thirty-second increments, stirring after each one, until it is completely smooth and runny.
Holding a pretzel rod by one end, dip it into the melted chocolate, tilting the glass to coat about two-thirds of the pretzel.
Lift the pretzel out and let the excess chocolate drip back into the glass, giving it a gentle shake.
Lay the chocolate-coated pretzel onto the prepared baking sheet.
Repeat this process with the remaining pretzel rods, spacing them out so they do not touch.
Place the baking sheet in the refrigerator for about fifteen minutes to let the chocolate base set completely.
While the pretzels are chilling, melt the pink candy melts in a small microwave-safe bowl until smooth.
Remove the pretzels from the fridge. Using a small spoon or a piping bag with a tiny corner cut off, drizzle the pink candy back and forth over the chocolate section of each pretzel.
Immediately sprinkle your chosen Valentine’s sprinkles over the wet pink drizzle so they stick.
Return the tray to the refrigerator for another ten to fifteen minutes until all the chocolate and candy drizzle is firm.
Once set, peel the pretzels off the paper and serve them standing in a jar or lay them on a platter.
5. Raspberry Sorbet Champagne Floats
Cute Valentines Desserts
For a dessert that doubles as a celebratory toast, these raspberry sorbet champagne floats are an excellent choice. They are elegant, refreshing, and possess a sophisticated flair that is perfect for a special occasion. The vibrant pink color of the sorbet against the golden bubbly creates a stunning visual.
As the champagne is poured over the sorbet, it creates a beautiful, frothy foam that is fun to sip. The sorbet slowly melts into the drink, infusing it with a sweet and tangy raspberry flavor that gets better with every minute. It is a light dessert that won’t leave you feeling overly full after a nice dinner.
This recipe is incredibly simple, requiring only two main ingredients and zero cooking. It is all about the assembly right before serving to maximize the fizz and fresh appearance. A fresh raspberry and a tiny sprig of herbs like thyme add a gourmet touch to the final presentation.
Ingredients
Raspberry sorbet, well-chilled
Champagne, Prosecco, or sparkling wine, chilled
Fresh raspberries for garnish
Fresh thyme or mint sprigs for garnish
Equipment
Champagne flutes or tall glasses
Small ice cream scoop or melon baller
DIY Instructions
Ensure your champagne flutes are clean and have been chilled in the refrigerator for about fifteen minutes.
Take the raspberry sorbet out of the freezer a few minutes before you are ready to assemble to let it soften slightly.
Using a small ice cream scoop or a melon baller, place two small scoops of the sorbet into the bottom of each champagne flute.
Hold the glass at a slight angle and very slowly pour the chilled champagne over the sorbet.
Pour just a little at a time to allow the foam to subside, then continue pouring until the glass is nearly full.
Gently drop a fresh raspberry into each glass; it will likely float within the foam or rest on the sorbet.
Tuck a small sprig of fresh thyme or mint into the top of the glass for an aromatic and colorful garnish.
Serve these floats immediately while they are still fizzy and the sorbet is frozen.
6. Ultimate Valentine’s Dessert Charcuterie Board
Cute Valentines Desserts
This dessert board is a fun and interactive way to end your Valentine’s Day meal. It is essentially a platter filled with an assortment of sweet treats centerd around a delicious dip, encouraging grazing and sharing. The variety ensures there is something for every taste, from fruity and fresh to crunchy and chocolatey.
The centerpiece is a creamy, pink dip that ties the whole theme together. You can surround it with a colorful array of items like fresh strawberries, various cookies, pretzels for a salty kick, and fluffy marshmallows. The visual appeal of an overflowing board is undeniable and makes for a great conversation piece.
Building this board is more about assembly and arrangement than complicated cooking. It allows you to be creative with your choices and presentation. You can easily customize the components based on what you and your partner enjoy the most, making it a personalized treat.
Large wooden board, slate platter, or serving tray
Small bowl for the dip
Hand mixer or spoon for mixing the dip
Small spoons or spreaders for serving
DIY Instructions
To make the dip, combine the softened cream cheese and marshmallow fluff in a medium bowl.
Use a hand mixer or a sturdy spoon to beat the mixture until it is completely smooth and free of lumps.
Add a very small drop of pink gel food coloring and mix well. Add more color, one drop at a time, until you reach your desired shade of pink.
Transfer the pink dip into a small serving bowl and place it in the center of your large board or platter.
Wash and dry the fresh strawberries thoroughly, leaving the green tops on for easy handling.
Begin arranging the larger items, such as graham crackers and wafer cookies, in piles around the dip bowl.
Fill in the gaps with fresh strawberries, creating colorful clusters on different parts of the board.
Add piles of pretzels, ensuring they are accessible for dipping.
Scatter the various marshmallows and any other small candies you are using to fill any remaining empty spaces on the board, making it look abundant.
Place small spoons or spreaders in the dip bowl and serve the board immediately for grazing.
7. Stuffed Heart Rice Crispy Treats
Cute Valentines Desserts
Give a classic childhood favorite a romantic makeover with these heart-shaped rice crispy treats. They possess that beloved gooey, marshmallow-y texture that is impossible to resist. Cutting them into heart shapes makes them instantly festive for the holiday.
The real surprise lies inside, where a sweet, creamy filling is hidden between two layers of the cereal treat. This unexpected center takes the simple dessert to a new level of deliciousness. A coating of bright red sugar on the edges adds a fun crunch and a pop of vibrant color.
These treats are easy to make and do not require baking, just a little bit of stovetop melting. They are sturdy enough to be wrapped up in small bags as gifts. It is a nostalgic comfort food that has been dressed up to impress your Valentine.
Ingredients
Unsalted butter
Mini marshmallows (divided use)
Crisped rice cereal
Vanilla extract
Marshmallow fluff or prepared vanilla frosting for filling
Red sanding sugar or sprinkles
Equipment
Large pot or Dutch oven
9×13 inch baking pan
Parchment paper
Cooking spray
Heart-shaped cookie cutter
Rubber spatula
Small microwave-safe bowl
DIY Instructions
Line a 9×13 inch baking pan with parchment paper, leaving some overhang on the sides for easy removal later, and lightly coat it with cooking spray.
In a large pot, melt the butter over low heat. Add all but one cup of the mini marshmallows and stir constantly until they are completely melted and smooth.
Remove the pot from the heat and stir in the vanilla extract.
Immediately add the crisped rice cereal and the reserved cup of mini marshmallows. Fold everything together quickly with a rubber spatula until the cereal is evenly coated.
Transfer half of the cereal mixture into the prepared pan. Use a piece of wax paper or a buttered spatula to press it firmly and evenly into the bottom.
Spread a thin, even layer of marshmallow fluff or vanilla frosting over the pressed cereal layer, leaving a small border around the edges.
Top with the remaining cereal mixture, pressing it down gently to cover the filling completely and create a flat top surface.
Let the treats set at room temperature for at least an hour until they are firm and cool.
Use the parchment paper overhang to lift the large block of treats out of the pan onto a cutting board.
Use a heart-shaped cookie cutter to cut out as many hearts as possible from the block.
Place a small amount of marshmallow fluff in a small bowl and microwave it for ten seconds so it becomes sticky.
Pour the red sanding sugar onto a small plate.
Lightly dab the edges of each heart treat into the sticky marshmallow, then immediately dip the edges into the red sugar to coat them.
Place the finished hearts on a sheet of wax paper to let the edges set before serving.
8. Nutella Filled Puff Pastry Hearts
Cute Valentines Desserts
These flaky puff pastry hearts are a warm and comforting dessert that looks like it came from a bakery. The golden-brown exterior is crisp and airy, composed of many delicate layers. Inside, a generous filling of rich chocolate hazelnut spread awaits, oozing out with every bite.
The contrast between the unsweetened pastry and the sweet, luscious filling is simply delectable. They are shaped into cute hearts, making them perfectly themed for Valentine’s Day. A light dusting of powdered sugar on top gives them a lovely, finished appearance.
Using store-bought puff pastry makes this recipe incredibly simple and fast to put together. It is a great option for a last-minute dessert that still feels special and homemade. Serve them warm from the oven for the absolute best gooey chocolate experience.
Ingredients
Store-bought puff pastry sheets, thawed according to package directions
Preheat your oven to 400°F (200°C) and line a baking sheet with parchment paper.
Unfold the thawed puff pastry sheets onto a lightly floured surface. Use a rolling pin to flatten any seams gently.
Use the heart-shaped cookie cutter to cut out an even number of hearts from the pastry sheets.
Place half of the pastry hearts onto the prepared baking sheet, spacing them a couple of inches apart.
Spoon about a teaspoon of Nutella into the center of each heart on the baking sheet, leaving a clear border around the edge.
In a small bowl, whisk the egg with a teaspoon of water to create an egg wash.
Lightly brush a small amount of the egg wash around the clean border of the hearts with the filling.
Place the remaining plain pastry hearts directly on top of the filled ones, lining up the edges as closely as possible.
Use the tines of a fork to press down firmly around the entire perimeter of each heart to seal the two layers of pastry together.
Brush the top of each assembled heart with the remaining egg wash. This will give them a shiny, golden color when baked.
Bake for fifteen to twenty minutes, or until the pastries are puffed up tall and are a deep golden brown color.
Allow them to cool on the baking sheet for a few minutes before transferring them to a wire rack.
Once they have cooled slightly but are still warm, use a fine-mesh sieve to dust a layer of powdered sugar over the tops before serving.
9. Elegant Red Velvet Macarons
Cute Valentines Desserts
Macarons are the epitome of an elegant dessert, and these red velvet ones are sure to impress. They feature the signature smooth, crisp shell and a soft, slightly chewy interior that macaron lovers crave. The deep red color is striking and immediately sets a romantic tone.
They are filled with a tangy and sweet cream cheese frosting that perfectly complements the mild cocoa flavor of the shells. The contrast between the red cookie and the white filling is visually appealing. A tiny piece of edible gold leaf on top adds a final touch of luxury and sophistication.
While macarons have a reputation for being tricky, following the steps carefully can lead to great results. This recipe yields a treat that looks like it came from a high-end Parisian patisserie. They are a delicate and precious gift that shows you put in extra effort.
Ingredients
For the Macaron Shells:
Super fine almond flour
Powdered sugar
Egg whites, at room temperature
Granulated sugar
Red gel food coloring
Unsweetened cocoa powder
For the Cream Cheese Filling:
Unsalted butter, softened
Cream cheese, softened
Powdered sugar
Vanilla extract
For Decoration:
Edible gold leaf
Equipment
Food processor
Fine-mesh sieve
Stand mixer with whisk attachment or electric hand mixer
Large mixing bowl
Rubber spatula
Piping bags with a round tip
Baking sheets
Silicone baking mats or parchment paper
DIY Instructions
Place the almond flour, powdered sugar, and cocoa powder in a food processor and pulse several times until combined. Sift this mixture through a fine-mesh sieve into a large bowl and set aside. Discard any large pieces that won’t pass through the sieve.
In the clean bowl of a stand mixer, whip the room temperature egg whites on medium speed until they become foamy.
Gradually add the granulated sugar, a tablespoon at a time, while continuing to whip. Once all sugar is added, increase the speed to high and whip until stiff, glossy peaks form.
Add a generous amount of red gel food coloring to the meringue and whip briefly to incorporate it. You want a very deep red color as it will fade slightly during baking.
Gently fold the dry ingredient mixture into the red meringue in three batches using a rubber spatula. Continue folding until the batter flows off the spatula like slow-moving lava and you can form a figure-eight shape without the stream breaking.
Transfer the batter to a piping bag fitted with a round tip. Pipe small, uniform circles onto baking sheets lined with silicone mats or parchment paper, spacing them out well.
Firmly tap each baking sheet on the counter two or three times to release any trapped air bubbles.
Let the macarons sit out at room temperature for thirty to sixty minutes until a dry skin forms on the surface and they do not stick to your finger when lightly touched.
Preheat your oven to 300°F (150°C). Bake one sheet at a time for fifteen to eighteen minutes. They are done when they have developed “feet” at the bottom and do not wiggle when gently nudged.
Let the shells cool completely on the baking sheets before carefully peeling them away from the mat or paper.
To make the filling, beat the softened butter and cream cheese together until smooth. Gradually add the powdered sugar and vanilla, beating until light and fluffy.
Match up the cooled macaron shells in pairs of similar size. Pipe a dot of the cream cheese filling onto the flat side of one shell and sandwich it with its mate.
Using a pair of tweezers or a small dry brush, gently apply a tiny piece of edible gold leaf to the top of each assembled macaron.
Place the macarons in an airtight container in the fridge for at least twenty-four hours to “mature” before serving, which gives them their signature texture.
10. Cupid’s Arrow Donut Kabobs
Cute Valentines Desserts
For a dessert that is as cute as it is tasty, try these Cupid’s arrow donut kabobs. They are a playful and whimsical treat that will bring out the inner child in anyone. Mini donuts are threaded onto a skewer, resembling the fletching and shaft of an arrow.
The donuts are dipped in a bright pink icing and covered in Valentine’s themed sprinkles for a festive look. Adding a paper arrow tip and tail to the ends of the skewer completes the clever effect. It’s a creative presentation that turns a simple snack into a themed centerpiece.
This is an assembly-only recipe that requires no cooking or baking if you use store-bought donuts. It’s a fun little craft project that results in an edible reward. These are perfect for a casual Valentine’s party or as a fun surprise gift.
Ingredients
Mini plain cake or vanilla donuts
Pink candy melts or vanilla icing tinted pink
Assorted Valentine’s Day sprinkles (X’s and O’s, hearts, nonpareils)
Cardstock paper (red, pink, or white)
Wooden skewers (approx. 8-10 inches long)
Equipment
Microwave-safe bowl
Wax paper or parchment paper
Baking sheet
Scissors
Glue stick or strong tape
Pencil
DIY Instructions
Place the pink candy melts or icing in a microwave-safe bowl. Microwave in short thirty-second bursts, stirring in between, until the mixture is completely melted and smooth.
Line a baking sheet with a piece of wax paper or parchment paper.
Take a mini donut and dip the top half into the melted pink icing. Lift it out and give it a gentle shake to let excess icing drip off.
Immediately place the dipped donut back onto the wax paper, icing side up.
While the icing is still wet, generously scatter your chosen sprinkles over the top so they stick.
Repeat this process with all of your mini donuts.
Allow the icing on the donuts to set completely at room temperature or place the tray in the fridge for about ten minutes to speed up the process.
While the donuts are setting, prepare the arrow parts. Draw simple triangle shapes for the arrow tips and feathered shapes for the fletching (tails) on your cardstock paper. You will need two identical pieces for each tip and two for each tail to sandwich the skewer. Cut them out with scissors.
Once the donuts are set, carefully thread three or four of them onto each wooden skewer, pushing them down towards the center.
Apply glue or double-sided tape to one of the paper arrow tip pieces. Place the pointed end of a skewer on it, then press the matching paper piece on top to seal the skewer inside.
Repeat this process on the other end of the skewer with the paper fletching pieces.
Your Cupid’s arrow donut kabobs are now ready to be served or packaged.
11. Pink Rose Chocolate Cupcakes
Cute Valentines Desserts
These elegant cupcakes feature a rich cocoa base topped with a stunning buttercream rose. The vibrant pink frosting creates a romantic look that is sure to catch his eye. Each flower is piped with precision to mimic the delicate petals of a real bloom. It is a classic combination that feels both timeless and sophisticated for your special evening.
You do not need a culinary degree to make these flowers look great. Using the right piping tip does most of the hard work for you. These treats are small enough to enjoy without feeling heavy after a big meal. They provide a high quality finish that looks like it came from a professional bakery.
His face will light up when he sees the effort you put into the presentation. The deep chocolate flavor pairs wonderfully with the sweet vanilla icing. You can even use a store bought cake mix to save time while focusing on the floral decoration.
Ingredients
Chocolate cake mix or your favorite recipe
Large eggs
Vegetable oil
Water
Softened unsalted butter
Powdered sugar
Pink food coloring gel
Vanilla extract
Heavy cream
Equipment
Cupcake tin
Paper liners
Large mixing bowl
Electric hand mixer
Piping bag
Large petal piping tip
Small offset spatula
DIY Instructions
Turn your oven on and set it to 350 degrees so it is ready for baking.
Place paper liners into each hole of the cupcake tin to prevent sticking.
Mix the cake batter in a large bowl according to the box instructions or your recipe.
Fill each liner about halfway with the chocolate batter so they have room to rise.
Bake the cupcakes until a wooden toothpick comes out clean from the center.
Let the cakes cool completely on a counter before you start the frosting process.
Beat the softened butter with an electric mixer until it is very pale and fluffy.
Add the powdered sugar and a splash of cream slowly until the icing is thick.
Stir in a tiny drop of pink food coloring gel until the color is uniform.
Place the petal tip into the piping bag and fill it with your pink frosting.
Hold the bag vertically and pipe a small mound in the center of the cupcake.
Move the tip in short curved motions around the center to create layers of petals.
Keep rotating the cupcake as you work outward until the entire top is covered.
12. Rustic Strawberry Galette
Cute Valentines Desserts
A warm fruit tart offers a cozy and rustic feel for your Valentine’s date. The golden crust is folded by hand over a bed of fresh sliced strawberries. It looks professional yet has a charming homemade quality that feels very personal. This dessert is a wonderful way to showcase the natural beauty of seasonal fruit.
The pastry is incredibly flaky and contrasts well with the softened berries inside. A light sprinkle of coarse sugar on the edges adds a satisfying crunch to every bite. Since it is a free form tart, you do not need to worry about making it look symmetrical.
Steam rising from the fresh tart makes it even more inviting when served warm. You can add a scoop of ice cream on top for a truly decadent experience. It is a simple recipe that delivers a lot of flavor with very little stress in the kitchen.
Ingredients
One refrigerated pie crust dough
Fresh strawberries
White granulated sugar
Cornstarch
One large egg
Coarse sparkling sugar
Flour for dusting
Equipment
Large baking sheet
Parchment paper
Rolling pin
Sharp knife
Small bowl
Pastry brush
DIY Instructions
Set your oven to 400 degrees and line a baking sheet with parchment paper.
Rinse your strawberries under cool water and remove the green tops with a knife.
Cut the berries into thin even slices and place them in a bowl with sugar and cornstarch.
Toss the berries gently so they are coated in the sugar mixture.
Dust a clean flat surface with a little flour and roll out your dough into a circle.
Transfer the dough circle to the center of your prepared baking sheet.
Pile the strawberry slices in the middle of the dough but leave a two inch border.
Fold the edges of the dough up and over the berries, overlapping the pastry as you go.
Press the folds gently so they stay in place but leave the center fruit exposed.
Beat one egg with a teaspoon of water in a small bowl to make an egg wash.
Brush the egg wash over the exposed pastry edges using a small brush.
Sprinkle the coarse sugar over the wet pastry for extra crunch and sparkle.
Bake for twenty five minutes until the crust is a deep golden brown.
13. Heart Shaped Fruit Pizza
Cute Valentines Desserts
This fruit pizza is a colorful and fresh way to celebrate the holiday. A soft sugar cookie base serves as the canvas for a creamy frosting and a rainbow of fresh fruit. Shaping the dough into a large heart makes it a festive centerpiece for any dessert table. It is a lighter option that still feels like a total indulgence.
The combination of tart kiwi and sweet berries provides a burst of flavor in every slice. White chocolate shavings scattered over the top add a touch of elegance and extra sweetness. It is very easy to slice and share, making it great for a romantic night in.
You can arrange the fruit in any pattern you like to make it look unique. The bright colors make it a very photogenic treat that will surely impress him. This recipe is also quite fast to assemble once the cookie base is cool.
Ingredients
Store bought sugar cookie dough
Softened cream cheese
Powdered sugar
Vanilla extract
Fresh strawberries
Fresh blueberries
Kiwi fruit
White chocolate bar for shavings
Equipment
Heart shaped pizza pan or large baking sheet
Electric mixer
Small knife
Vegetable peeler
Offset spatula or large spoon
DIY Instructions
Heat your oven to 350 degrees and lightly grease your heart shaped pan.
Press the room temperature cookie dough into the pan to create an even layer.
Bake the cookie for twelve minutes or until the edges are just starting to brown.
Take the pan out and let the large cookie cool completely before adding toppings.
Mix the cream cheese, powdered sugar, and vanilla in a bowl until very smooth.
Spread the cream cheese mixture over the cool cookie heart using an offset spatula.
Peel the kiwi and slice it into thin rounds, then cut those rounds in half.
Slice the strawberries into thin pieces and keep the blueberries whole.
Arrange the fruit in rows or patterns across the white frosting to cover the surface.
Use a vegetable peeler to create thin shavings from the white chocolate bar.
Sprinkle the chocolate shavings over the fruit for a finished look.
Slice the pizza into wedges or small hearts and serve immediately.
14. Classic Espresso Affogato
Cute Valentines Desserts
Simplicity meets sophistication with this quick Italian classic. A scoop of cold vanilla bean ice cream gets drenched in a shot of hot espresso. The combination of temperatures and flavors creates a luxurious experience without any actual baking. It is the best choice for a busy evening when you still want a gourmet finish.
The bitter coffee balances the sweet creaminess of the ice cream as it begins to melt. Adding a few chocolate curls or a dusting of cocoa powder makes the presentation look intentional. It is a light yet bold dessert that feels very adult and refined.
You can serve this in clear glass bowls or mugs to see the beautiful marbling effect. It takes less than five minutes to prepare but tastes like something from a high end cafe. This treat is excellent for ending a dinner on a high note.
Ingredients
Premium vanilla bean ice cream
Freshly brewed hot espresso or very strong coffee
Dark chocolate shavings
Cocoa powder
Equipment
Clear glass bowls or coffee mugs
Espresso machine or coffee brewer
Ice cream scoop
DIY Instructions
Place your serving glasses or bowls in the freezer for ten minutes so they are cold.
Brew two shots of hot espresso or a small cup of very concentrated coffee.
Take the glasses out of the freezer and place two large scoops of ice cream in each.
Pour the hot espresso slowly over the ice cream right before you plan to eat it.
Watch as the coffee creates a delicious sauce around the base of the cold cream.
Sprinkle a little cocoa powder over the top of the foam.
Add a few chocolate shavings for a bit of texture and extra flavor.
Serve the dessert immediately with a long spoon while it is still melting.
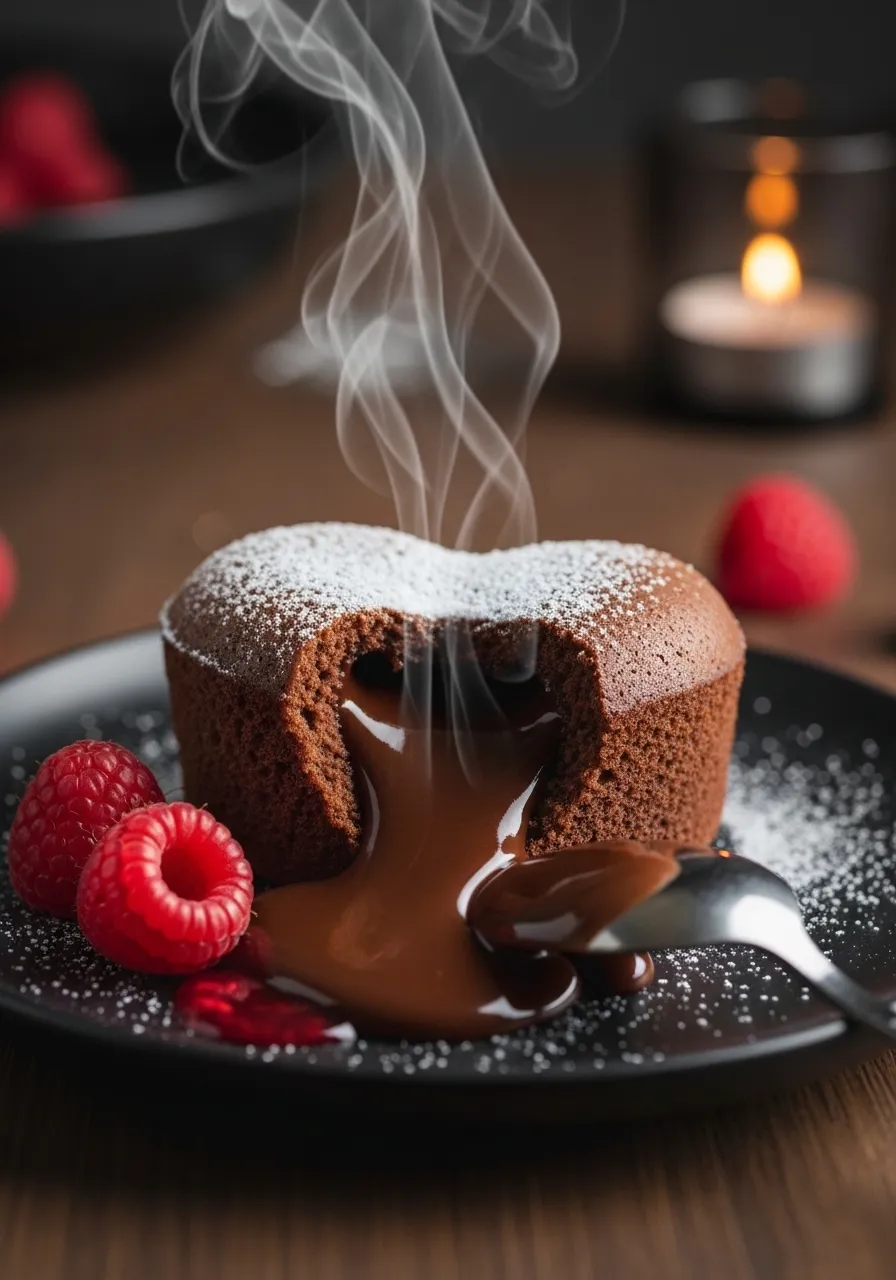
15. Heart Molten Lava Cake
Cute Valentines Desserts
This chocolate lava cake is the ultimate romantic gesture for a sweet tooth. The outside is a light sponge, while the center holds a warm and gooey chocolate surprise. Using a heart mold makes it look like it came straight from a gourmet restaurant. It is a rich and decadent treat that is best served warm.
A dusting of powdered sugar helps the heart shape stand out against the dark plate. Fresh raspberries on the side add a tartness that cuts through the intense chocolate flavor. It is a showstopping dessert that is surprisingly simple to make at home.
The sight of the melted center flowing out is sure to win him over. You can prepare the batter in advance and bake it just as you finish dinner. This ensures the cake is fresh and the center is perfectly liquid when you serve it.
Ingredients
Dark chocolate baking bars
Unsalted butter
Large eggs plus extra yolks
Granulated sugar
All purpose flour
Pinch of salt
Fresh raspberries for garnish
Equipment
Heart shaped ramekins or molds
Microwave safe bowl
Whisk
Baking sheet
Sifter for powdered sugar
DIY Instructions
Turn your oven to 425 degrees and grease your heart shaped ramekins with butter.
Dust the inside of the greased molds with a little cocoa powder and shake out the excess.
Melt the chocolate and butter together in a microwave safe bowl using short bursts.
Whisk the eggs, yolks, sugar, and salt in a separate bowl until the mixture is thick.
Fold the melted chocolate mixture into the egg mixture until the color is dark and even.
Stir in the flour gently until you no longer see any white streaks in the batter.
Divide the batter evenly between the prepared ramekins.
Place the ramekins on a baking sheet and put them in the oven.
Bake for twelve minutes until the sides are firm but the center still jiggles.
Let the cakes sit for one minute before carefully turning them over onto a plate.
Lift the mold off to reveal the heart shaped cake.
Top with powdered sugar and serve with a handful of fresh berries.
16. Raspberry White Chocolate Blondies
Cute Valentines Desserts
These blondies are a thick and buttery treat that everyone will enjoy. They feature tart raspberries and sweet white chocolate chips swirled throughout the golden batter. The pink fruit makes a beautiful contrast against the pale cake. It is a chewy and satisfying dessert that is easy to transport or gift.
Each square is packed with flavor and has a slightly crackly top. You get a nice balance of textures from the soft fruit and the firm chocolate pieces. They are a great alternative if you want something different than a traditional brownie.
The bright red swirls make them look very festive for Valentine’s Day. You can stack them high on a plate for a beautiful presentation. They stay moist for several days, so you can even make them a day early.
Ingredients
Melted unsalted butter
Light brown sugar
Large egg
Vanilla extract
All purpose flour
White chocolate chips
Fresh or frozen raspberries
Equipment
Square baking pan
Parchment paper
Large mixing bowl
Rubber spatula
Cooling rack
DIY Instructions
Set your oven to 350 degrees and line a square pan with parchment paper.
Stir the melted butter and brown sugar together in a large bowl until smooth.
Add the egg and vanilla and whisk until the mixture looks shiny.
Fold in the flour and a pinch of salt until the dough is thick.
Stir in the white chocolate chips so they are spread evenly throughout the batter.
Spread the batter into the prepared pan and smooth the top with a spatula.
Press the raspberries into the top of the batter in rows or a random pattern.
Bake for twenty five to thirty minutes until the edges are golden brown.
Let the pan cool completely on a wire rack before you try to cut them.
Use the parchment paper to lift the entire block of blondies out of the pan.
Slice them into even squares using a sharp knife.
17. Almond and Cherry Dark Chocolate Bark
Cute Valentines Desserts
Handcrafted chocolate bark is a sophisticated snack for a cozy night in. Rich dark chocolate is topped with crunchy sliced almonds and tangy dried cherries. A sprinkle of sea salt on top balances the flavors beautifully. It is a high quality treat that requires almost no effort to assemble.
The irregular shards look very rustic and artistic when piled in a bowl. You can easily customize the toppings based on whatever nuts or fruits he likes best. This recipe is a great way to enjoy a sweet treat that feels a bit more grown up.
The snap of the cold chocolate is very satisfying. It makes a wonderful gift when placed in a clear bag with a pretty ribbon. You can make a large batch very quickly to share with friends or keep for yourself.
Ingredients
Dark chocolate melting wafers or chopped bars
Sliced almonds
Dried cherries
Flaky sea salt
Equipment
Large baking sheet
Parchment paper
Microwave safe bowl
Spatula
DIY Instructions
Line a large baking sheet with parchment paper so the chocolate does not stick.
Melt the dark chocolate in a microwave safe bowl using thirty second intervals.
Stir the chocolate well each time until it is completely liquid and smooth.
Pour the melted chocolate onto the parchment paper in a large pool.
Use a spatula to spread the chocolate into a thin and even layer.
Scatter the sliced almonds and dried cherries over the wet chocolate immediately.
Sprinkle a small amount of flaky sea salt over the entire surface.
Place the baking sheet in the refrigerator for twenty minutes to let the chocolate harden.
Once it is solid, peel the chocolate off the paper.
Use your hands to snap the chocolate into various sized irregular pieces.
Store the bark in a cool place until you are ready to serve it.
18. Hershey Kiss Chocolate Cupcakes
Cute Valentines Desserts
These moist chocolate cupcakes are topped with a swirl of fudge frosting. Each one is finished with a classic chocolate kiss candy for an iconic look. They are easy to grab and enjoy during a casual Valentine’s celebration. This is a nostalgic treat that will remind him of childhood favorites.
The double chocolate flavor is intense and sure to satisfy any craving. You can use a star tip to create a tall and professional looking frosting swirl. These cupcakes are sturdy enough to take to a party or a small gathering.
The little paper flags on the candy add a cute and playful touch. You can even use different flavored kisses like caramel or almond for variety. They are a simple yet effective way to show someone you care.
Ingredients
Chocolate cupcake batter
Chocolate buttercream frosting
Hershey’s Kisses candies
Sprinkles (optional)
Equipment
Cupcake pan
Paper liners
Piping bag
Large star piping tip
DIY Instructions
Bake a batch of chocolate cupcakes using your favorite recipe or a box mix.
Let the cupcakes cool completely on a rack so the frosting does not melt off.
Fill a piping bag fitted with a star tip with your chocolate buttercream.
Start at the outer edge of the cupcake and pipe a circle moving toward the center.
Continue spiraling upward to create a tall and pointed swirl of frosting.
Unwrap several chocolate kiss candies and set them aside.
Press one candy firmly into the very top of each frosted cupcake.
Add a few themed sprinkles around the base of the candy if you want more color.
Serve them on a pretty tray or in a decorative box.
19. Caramel Dipped Salted Pears
Cute Valentines Desserts
Dipped pears offer a unique and elegant alternative to standard candy. Whole fruit is coated in smooth dark chocolate and drizzled with a rich amber caramel. Large salt crystals on the surface provide a gourmet finish that looks very impressive. This is a great choice if you want a dessert that feels healthy and indulgent at the same time.
The juicy fruit pairs perfectly with the crunchy chocolate shell. It is a sophisticated treat that looks like it belongs in a luxury food magazine. You can use different types of pears depending on what is in season.
These pears make a stunning centerpiece for a dessert platter. They are best served with a knife and fork for easy eating. The combination of sweet, salty, and fruity is truly exceptional.
Ingredients
Whole ripe pears
Dark chocolate melting wafers
Prepared caramel sauce
Coarse sea salt
Equipment
Small saucepan
Parchment paper
Wooden skewers or sticks
Small spoon
DIY Instructions
Wash and dry your pears thoroughly so the chocolate sticks well to the skin.
Melt the dark chocolate in a bowl until it is smooth and runny.
Insert a wooden skewer into the top of each pear near the stem for a handle.
Dip the bottom half of each pear into the melted chocolate.
Place the dipped pears onto a piece of parchment paper to set.
Warm up your caramel sauce until it is thin enough to drizzle.
Use a spoon to wave the caramel back and forth over the chocolate part of the pear.
Sprinkle a few grains of coarse sea salt over the wet caramel.
Let the pears sit until the coating is completely firm and dry.
Remove the skewers before serving if you prefer a cleaner look.
20. Chocolate Dipped Strawberry Bouquet
Cute Valentines Desserts
Skip the flowers and give a bouquet of delicious strawberries instead. These fresh berries are dipped in milk chocolate and decorated with elegant white chocolate stripes. Arranging them on skewers makes them look like a stunning edible floral arrangement. It is a romantic gift that is as beautiful as it is tasty.
The red berries peeking through the chocolate look vibrant and appetizing. Wrapping the skewers in paper and a ribbon completes the look of a real bouquet. This is a fantastic DIY project that feels very thoughtful and personal.
He will love the effort you put into the presentation of this classic treat. You can use different colors of chocolate to match your Valentine’s theme. It is a fun and interactive way to enjoy one of the most iconic desserts of the season.
Ingredients
Large fresh strawberries with stems
Milk chocolate melting wafers
White chocolate melting wafers
Wooden skewers
Decorative ribbon
Tissue paper or wrapping paper
Equipment
Microwave safe bowls
Parchment paper
Tall glass for drying
Scissors
DIY Instructions
Wash the strawberries and pat them completely dry with a paper towel.
Melt the milk chocolate in a bowl until it is smooth and liquid.
Push a wooden skewer into the green top of each strawberry.
Dip each berry into the milk chocolate until it is mostly covered.
Place the skewers into a tall glass or a foam block so the berries can dry without touching anything.
Melt the white chocolate in a separate small bowl.
Drizzle the white chocolate in thin lines across the dried milk chocolate for a striped effect.
Once all the berries are dry, gather the skewers together in a bunch.
Wrap the stems of the skewers in tissue paper or pretty wrapping paper.
Tie a large ribbon around the paper to hold the bouquet together.
Present the edible bouquet to your Valentine for a sweet surprise.
21. Red Velvet Whoopie Pies
Cute Valentines Desserts
These red velvet whoopie pies are soft and pillowy. They feature a bright red color and a creamy white filling. Each bite is a mix of cocoa flavor and sweet cream cheese. They look beautiful on a plate and are easy to hold. The contrast between the red cake and white frosting makes them stand out.
You will love how simple they are to assemble for a quick treat. These handheld delights provide a fun twist on traditional cake. He will enjoy the soft texture and rich filling in every mouthful. It is a classic flavor that feels festive and cozy for a night in. This dessert is a high quality choice for a romantic evening.
Ingredients
One box red velvet cake mix
Half cup vegetable oil
Two large eggs
Eight ounces softened cream cheese
Four tablespoons softened butter
Two cups powdered sugar
One teaspoon vanilla extract
Equipment
Two large baking sheets
Parchment paper
Large mixing bowl
Electric hand mixer
Small cookie scoop
Wire cooling rack
DIY Instructions
Preheat your oven to 350 degrees and line your baking sheets with parchment paper.
Combine the cake mix and oil and eggs in a large bowl.
Mix the ingredients until a thick dough forms.
Use a small scoop to drop rounded tablespoons of dough onto the sheets.
Bake for ten minutes until the tops spring back when touched.
Let the cakes cool completely on a wire rack.
Beat the cream cheese and butter and vanilla in a clean bowl until smooth.
Add the powdered sugar slowly and mix until the frosting is fluffy.
Spread a large spoonful of frosting on the flat side of one cake.
Press another cake on top to create a sandwich.
22. Matchstick Pretzel Treats
Cute Valentines Desserts
These creative pretzel sticks look just like real matches. They have a salty crunch and a sweet red candy tip. Placing them in a small box makes for a very clever presentation. You only need a few ingredients to put these together. The bright red coating on the ends pops against the golden pretzels.
It is a playful snack that shows off your creative side. This treat is excellent for someone who enjoys a mix of sweet and savory flavors. The tiny heart detail on one match adds a romantic touch. You can make a large batch in very little time. They are fun to share and easy to eat.
Ingredients
One bag thin pretzel sticks
One cup red candy melts
One small pink heart sprinkle
Equipment
Microwave safe bowl
Small spoon
Parchment paper
Small cardboard box for display
DIY Instructions
Place the red candy melts in a microwave safe bowl.
Heat the candy in thirty second intervals until it is smooth and liquid.
Dip the end of a pretzel stick into the red candy.
Coat about half an inch of the tip to look like a match head.
Place the dipped pretzel onto a piece of parchment paper.
Repeat this process with the rest of the pretzel sticks.
While the candy is wet on one stick and add a tiny heart sprinkle.
Let the candy harden completely at room temperature for twenty minutes.
Arrange the finished matches inside a small box.
23. Cherry Heart Chocolate Cake
Cute Valentines Desserts
This rich chocolate cake has a hidden surprise in the middle. A bright red cherry heart is tucked inside the moist sponge. It looks like a work of art when you slice into it. The dark chocolate flavor is deep and satisfying. A glossy chocolate glaze on top makes it look very professional.
It is a small cake that packs a lot of flavor and love. This dessert proves that you can make something impressive with just a little extra care. He will be amazed by the secret heart hidden within the cake. You can serve it on a dark plate for a moody and romantic look. Every slice tells a story of effort and affection.
Ingredients
Two cups chocolate cake batter
One cup cherry pie filling
Half cup heavy cream
One cup dark chocolate chips
Red sugar crystals
Equipment
Small rectangular cake pan
Heart shaped cookie cutter
Small saucepan
Cooling rack
DIY Instructions
Bake a thin layer of chocolate cake in a rectangular pan and let it cool.
Use a heart shaped cutter to create several small cake hearts.
Pour a small amount of fresh batter into a clean loaf pan.
Stand the cake hearts up in a row in the center of the batter.
Pour the remaining batter over the hearts until they are covered.
Bake the loaf until a toothpick comes out clean.
Heat the heavy cream in a small pan until it starts to simmer.
Pour the hot cream over the chocolate chips and stir until smooth.
Drizzle the warm chocolate glaze over the cooled cake.
Sprinkle red sugar over the top before the glaze sets.
24. Pink Lemonade Bars
Cute Valentines Desserts
These pink lemonade bars are a refreshing and colorful treat. They have a buttery shortcake base and a zesty pink filling. A dusting of powdered sugar adds a sweet finish. The tart lemon flavor is balanced by the sweet crust. Each bar is topped with a fresh raspberry and a lemon slice for extra flair.
They are easy to cut into squares and serve on a tray. This bright dessert is a great way to add some sunshine to your Valentine’s Day. The pink hue makes them look very festive and inviting. He will enjoy the crisp texture of the base and the smooth filling. It is a light option for a sweet ending.
Ingredients
Two cups all purpose flour
Half cup powdered sugar
One cup softened butter
Four large eggs
Two cups granulated sugar
One third cup lemon juice
One drop red food coloring
Fresh raspberries and lemon slices
Equipment
Square baking pan
Parchment paper
Large mixing bowl
Whisk
Sifter
DIY Instructions
Preheat your oven to 350 degrees and line a pan with parchment paper.
Mix the flour and powdered sugar and butter until a crumbly dough forms.
Press the dough into the bottom of the pan to make a flat crust.
Bake the crust for twenty minutes until the edges are light brown.
Whisk the eggs and granulated sugar and lemon juice and food coloring in a bowl.
Pour the pink lemon mixture over the warm crust.
Bake for another twenty minutes until the filling is set.
Let the bars cool completely in the pan.
Dust the top with powdered sugar using a sifter.
Slice into squares and top each one with a berry and a lemon piece.
25. Chocolate Peanut Butter Hearts
Cute Valentines Desserts
These chocolate hearts are filled with smooth peanut butter. They have a shiny dark chocolate shell that snaps when you bite it. A little sea salt on top brings out the flavors. Making your own candy is easier than you might think. These hearts look like they came from a fancy chocolate shop.
They are a classic flavor combination that everyone loves. You can serve them on a white plate to make the dark chocolate stand out. This rich treat is a high quality way to show your affection. He will appreciate the creamy center and the rich outer coating. It is a decadent bite for any chocolate lover.
Ingredients
Two cups dark chocolate melting wafers
Half cup creamy peanut butter
Two tablespoons powdered sugar
One teaspoon melted butter
Flaky sea salt
Equipment
Silicone heart mold
Microwave safe bowl
Small spoon
Small mixing bowl
DIY Instructions
Melt the chocolate wafers in a bowl using short bursts in the microwave.
Spoon a small amount of chocolate into each heart cavity.
Spread the chocolate up the sides of the mold to create a shell.
Place the mold in the fridge for ten minutes to set.
Mix the peanut butter and powdered sugar and melted butter in a small bowl.
Roll small balls of the peanut butter mixture and press them into the shells.
Pour more melted chocolate over the top to seal the hearts.
Sprinkle a tiny bit of sea salt on the wet chocolate.
Chill the mold for twenty minutes until the hearts are solid.
Gently pop the candies out of the mold and serve.
26. Strawberry Shortcake Kabobs
Cute Valentines Desserts
These fruit and cake skewers are a light and fun dessert option. They feature cubes of yellow cake and fresh strawberries and fluffy marshmallows. A drizzle of white chocolate ties all the flavors together. You can put these together in just a few minutes. They are easy to eat while sitting on the couch or at a table.
The red berries look vibrant against the white marshmallows. This is a fresh choice that won’t leave you feeling too full. He will enjoy the mix of textures in every bite of these kabobs. It is a colorful addition to your Valentine’s Day menu. The presentation is simple yet very effective.
Ingredients
One store bought pound cake
One pint fresh strawberries
One bag large marshmallows
Half cup white chocolate chips
Graham cracker crumbs
Equipment
Wooden skewers
Sharp knife
Microwave safe bowl
Parchment paper
DIY Instructions
Cut the pound cake into small one inch squares.
Wash the strawberries and remove the green stems.
Slide a piece of cake onto a wooden skewer.
Add a marshmallow and then a whole strawberry.
Repeat the pattern until the skewer is full.
Place the finished skewers on a sheet of parchment paper.
Melt the white chocolate chips in the microwave until smooth.
Use a spoon to drizzle the white chocolate over the skewers.
Sprinkle graham cracker crumbs over the wet chocolate.
Let the chocolate set for five minutes before serving.
27. Red Velvet Mug Cake
Cute Valentines Desserts
This red velvet mug cake is a warm and cozy treat for one or two. It is cooked in a microwave for a quick and easy dessert. The cake is topped with a creamy white glaze and chocolate chips. It takes less than five minutes from start to finish.
This is a great option when you want a homemade dessert without the mess. The steam rising from the mug makes it feel very comforting. You can enjoy it while curled up under a blanket together. It is a simple way to satisfy a sweet craving instantly. He will love the soft and moist texture of this mug cake.
Ingredients
Four tablespoons all purpose flour
Two tablespoons granulated sugar
One tablespoon cocoa powder
Three tablespoons milk
One tablespoon vegetable oil
One drop red food coloring
One tablespoon white chocolate chips
Equipment
Large ceramic mug
Small spoon
Microwave
DIY Instructions
Add the flour and sugar and cocoa powder to a large mug.
Stir the dry ingredients until they are mixed well.
Pour in the milk and oil and food coloring.
Whisk with a spoon until the batter is smooth and bright red.
Drop the white chocolate chips into the center of the batter.
Place the mug in the microwave.
Cook on high for ninety seconds.
Let the mug sit for one minute as it will be very hot.
Add a spoonful of frosting or a sprinkle of sugar on top.
Serve with a spoon while it is still warm.
28. White Chocolate Dipped Madeleines
Cute Valentines Desserts
These delicate madeleines are dipped in smooth white chocolate. They have a classic shell shape and a light buttery flavor. Crushed dried rose petals on top add a romantic look. The white coating gives them an extra layer of sweetness. They look very elegant when stacked on a small plate.
You will love how the floral topping adds a unique touch. These French cookies are great for a sophisticated dessert experience. He will appreciate the delicate texture and beautiful presentation of these treats. They are a high quality snack for a tea or coffee date. This recipe is fast if you use pre baked cookies.
Ingredients
One dozen large madeleine cookies
One cup white chocolate melting wafers
Two tablespoons dried edible rose petals
Gold leaf flakes
Equipment
Microwave safe bowl
Parchment paper
Small spoon
DIY Instructions
Melt the white chocolate in a bowl until it is completely liquid.
Dip half of a madeleine cookie into the melted chocolate.
Let the excess chocolate drip back into the bowl.
Place the cookie onto a piece of parchment paper.
Sprinkle a few dried rose petals over the wet chocolate.
Add a tiny piece of gold leaf for extra sparkle.
Repeat this for all the cookies.
Let the chocolate harden for fifteen minutes at room temperature.
Stack them neatly on a decorative plate for serving.
29. Raspberry Swirl Cheesecake Bars
Cute Valentines Desserts
These cheesecake bars feature a beautiful red raspberry swirl. They have a dark chocolate cookie crust and a creamy filling. Each square is topped with a single fresh raspberry. The tangy cheesecake pairs wonderfully with the sweet fruit. They are easy to make in a large batch and slice into bars.
The red and white pattern looks very festive for the holiday. This is a rich and decadent dessert that is sure to please. You can store them in the fridge until you are ready to serve. He will enjoy the smooth texture and the fruity flavor. It is a showstopping treat for any Valentine’s party.
Ingredients
Two cups crushed chocolate sandwich cookies
Four tablespoons melted butter
Sixteen ounces softened cream cheese
Half cup granulated sugar
Two large eggs
Half cup raspberry jam
Fresh raspberries
Equipment
Square baking pan
Parchment paper
Electric mixer
Toothpick
Large bowl
DIY Instructions
Preheat your oven to 325 degrees and line a pan with parchment paper.
Mix the cookie crumbs and melted butter in a bowl.
Press the crumbs into the bottom of the pan to form a crust.
Beat the cream cheese and sugar until the mixture is smooth.
Add the eggs one at a time and mix slowly.
Pour the cheesecake batter over the cookie crust.
Drop small spoonfuls of raspberry jam onto the top of the batter.
Use a toothpick to swirl the jam into the cheesecake for a marble look.
Bake for thirty five minutes until the center is set.
Cool the bars and then chill them in the fridge for two hours.
Slice into squares and place a fresh berry on each one.
30. Pomegranate Panna Cotta
Cute Valentines Desserts
This creamy panna cotta is topped with a vibrant red pomegranate jelly. It is a smooth and elegant dessert served in a clear glass. Fresh pomegranate seeds on top add a nice crunch. The white vanilla base is light and refreshing. It is a sophisticated choice that looks very impressive on a table.
You can prepare this ahead of time so you aren’t busy in the kitchen. The bright red layer makes it fit the Valentine’s Day theme beautifully. This dessert is a great way to end a meal on a high note. He will love the silky texture and the tart fruit topping. It is a professional quality dessert made simple.
Ingredients
One cup heavy cream
One cup whole milk
One third cup granulated sugar
One teaspoon vanilla bean paste
Two teaspoons unflavored gelatin
One cup pomegranate juice
Fresh pomegranate seeds
Equipment
Small saucepan
Four clear glass jars
Whisk
Measuring cups
DIY Instructions
Pour the milk into a small bowl and sprinkle one teaspoon of gelatin over it.
Let the gelatin sit for five minutes to soften.
Heat the cream and sugar in a saucepan until the sugar dissolves.
Stir in the milk and gelatin mixture and vanilla paste.
Whisk until the gelatin is completely melted but do not let it boil.
Pour the cream mixture into four glasses and fill them halfway.
Place the glasses in the fridge for two hours until firm.
Heat the pomegranate juice and the rest of the gelatin in a clean pan.
Pour the red juice over the white cream layer once it is cool.
Chill for another two hours and top with fresh seeds before serving.
31. Raspberry Stuffed Chocolate Chip Cookies
Cute Valentines Desserts
These cookies hide a secret center that will surprise your partner. Warm chocolate dough surrounds a molten raspberry filling for a classic flavor combination. The touch of sea salt on top cuts through the sweetness beautifully.
Each bite offers a mix of textures ranging from the soft cookie to the liquid fruit. You can easily whip these up using basic pantry staples and some fresh berries. It is a wonderful way to upgrade a standard recipe into something worthy of a special occasion.
Ingredients
Prepared chocolate chip cookie dough
Fresh raspberries or high quality raspberry jam
Flaky sea salt for garnish
Extra dark chocolate chips
Equipment
Baking sheet
Parchment paper
Small spoon
Cooling rack
DIY Instructions
Heat your oven to 350 degrees and line a baking tray with parchment paper.
Take a large tablespoon of cookie dough and flatten it into a disc in your palm.
Place one fresh raspberry or a small half teaspoon of jam in the center of the dough.
Gather the edges of the dough and pinch them together to seal the fruit inside.
Roll the dough gently between your hands to create a smooth ball.
Place the balls on the baking sheet and leave two inches of space between them.
Press a few extra chocolate chips into the top of each ball for a better look.
Bake for ten to twelve minutes until the edges are golden but the center is soft.
Remove the tray and immediately sprinkle a tiny pinch of sea salt on each hot cookie.
Allow them to cool for five minutes on the tray before moving them to a rack.
32. Tic Tac Toe Sugar Cookies
Cute Valentines Desserts
Game night gets a sweet makeover with these playful sugar cookies. You can decorate each square with pink frosting to create a soft base for your moves. The red letters add a vibrant pop of color that makes the board look very inviting.
These treats are fantastic for a casual date night at home. You only need a simple sugar cookie recipe and some colored icing to get started. It is a fun activity to share together before you eat the winners and the losers.
Ingredients
Square sugar cookies baked and cooled
Pink vanilla buttercream frosting
Red royal icing or melted red candy
Small white heart sprinkles
Equipment
Small offset spatula
Piping bags
Small round piping tip
Flat serving plate
DIY Instructions
Lay your cooled square cookies out on a flat work surface.
Use a small spatula to spread a smooth layer of pink frosting over each cookie.
Fill a piping bag with the red icing and cut a very tiny hole at the tip.
Carefully pipe a large “X” on half of the cookies.
Pipe a large “O” on the remaining half of the cookies.
Place a tiny white heart sprinkle on the corners of the letters for extra detail.
Let the icing dry for thirty minutes until it is firm to the touch.
Arrange nine cookies in a grid on a plate to look like a game board.
Keep the extra letters in a bowl nearby so you can play multiple rounds.
33. Chocolate Covered Cookie Hearts
Cute Valentines Desserts
These heart shaped treats combine the best of cookies and candy in one bite. A rich chocolate shell protects a soft chocolate chip interior. The pink drizzle on top gives them a signature holiday look that he will adore.
The salt crystals on the surface help to balance the deep cocoa flavors. These are sturdy enough to package in a box for a sweet surprise gift. You can make these quickly by using your favorite cookie recipe as the base.
Ingredients
Baked chocolate chip cookies
Dark chocolate melting wafers
Pink candy melts
Coarse sea salt
Coconut oil
Equipment
Heart shaped cookie cutter
Microwave safe bowl
Parchment paper
Fork for dipping
DIY Instructions
Bake a tray of chocolate chip cookies and let them cool until they are firm.
Use a heart shaped cutter to stamp out shapes from the large cookies.
Melt the dark chocolate with a teaspoon of coconut oil until it is very thin.
Place one cookie heart on a fork and lower it into the melted chocolate.
Lift the fork and tap it against the side of the bowl to remove excess liquid.
Slide the coated heart onto a sheet of parchment paper.
Repeat this for all your hearts and let them set in the fridge for ten minutes.
Melt the pink candy and drizzle it in thin lines back and forth over the hearts.
Sprinkle a bit of salt over the wet pink lines.
Let the treats sit until the coating is completely hard before serving.
34. Pink Pearl Raspberry Cupcakes
Cute Valentines Desserts
These cupcakes look like they belong in a high end boutique window. The tall swirls of pink frosting are decorated with shimmering gold and clear pearls. A single fresh raspberry on top adds a natural touch that is very elegant.
The base is a light and fluffy cake that pairs well with the rich buttercream. You can use a star tip to get those crisp ridges in the frosting. These are a great way to show him that you put extra care into your Valentine’s Day baking.
Ingredients
Vanilla or strawberry cupcakes
Pink vanilla frosting
Fresh raspberries
Edible gold and clear sugar pearls
Gold leaf flakes
Equipment
Piping bag
Large star piping tip
Tweezers for pearls
DIY Instructions
Bake your cupcakes and let them sit until they are no longer warm.
Fit your piping bag with a large star tip and fill it with pink frosting.
Start in the center of the cake and pipe a small mound of frosting.
Circle around the mound while moving the bag upward to create a tall peak.
Place one fresh raspberry on the side of the frosting swirl.
Use tweezers to place the gold and clear pearls around the frosting.
Add a tiny piece of gold leaf for a luxurious and shiny finish.
Set the cupcakes on a mirrored tray or gold plate to enhance the look.
35. Red Velvet Crinkle Cookies
Cute Valentines Desserts
These cookies feature a striking contrast between the deep red dough and the white sugar coating. As they bake, the surface cracks to reveal the vibrant color underneath. They have a soft and fudgy texture that is very similar to a brownie.
These are a visual delight that requires very little effort to prepare. The powdered sugar gives them a snowy finish that looks beautiful on any plate. He will enjoy the rich cocoa flavor and the sweet crunch from the outer layer.
Ingredients
Red velvet cake mix
Large eggs
Vegetable oil
Powdered sugar
Granulated sugar
Equipment
Two small bowls
Baking sheet
Parchment paper
Cooling rack
DIY Instructions
Turn on your oven to 375 degrees and line your pans with parchment paper.
Mix the cake mix and oil and eggs in a bowl until a sticky dough forms.
Place granulated sugar in one bowl and powdered sugar in another bowl.
Scoop a tablespoon of dough and roll it into a ball using your palms.
Roll the ball in the granulated sugar first to help the coating stick.
Roll the ball in the powdered sugar until it is heavily coated in white.
Place the balls on the tray and do not press them down.
Bake for nine to eleven minutes until the cookies have spread and cracked.
Let the cookies cool on the tray for a few minutes to firm up.
Transfer them to a wire rack to finish cooling completely.
36. Heart Shaped Jam Hand Pies
Cute Valentines Desserts
These hand pies are a cozy and flaky treat for a cold February day. The golden pastry is filled with a sweet red jam that peeks through a cross shaped cutout. A dusting of coarse sugar gives the crust a beautiful sparkle and a nice crunch.
You can serve these warm for a comforting dessert after dinner. They are very easy to eat with your hands and make for a great snack. The simple heart shape makes them feel very festive without being over the top.
Ingredients
Refrigerated pie crust dough
Strawberry or raspberry jam
One large egg
Coarse sanding sugar
Flour for the counter
Equipment
Heart shaped cookie cutter
Small knife
Baking sheet
Parchment paper
Fork
DIY Instructions
Set your oven to 400 degrees and put parchment paper on a baking sheet.
Roll out your pie dough on a floured surface until it is thin.
Cut out an even number of hearts using your cookie cutter.
Use a small knife to cut a small “X” or cross in the center of half the hearts.
Place a teaspoon of jam in the middle of the solid hearts.
Brush a little water around the edge of the jam to help the dough stick.
Place a heart with a cutout on top of a heart with jam.
Use the tines of a fork to press the edges together and seal the pie.
Brush the top of each pie with a beaten egg for a golden color.
Sprinkle plenty of coarse sugar over the top before baking.
Bake for fifteen minutes until the pastry is puffed and brown.
37. Frozen Yogurt Heart Bites
Cute Valentines Desserts
For a lighter and healthier option, these frozen yogurt bites are a fantastic choice. They are made by freezing colorful layers of yogurt and fresh fruit in a mold. The result is a cold and refreshing snack that looks like a bowl of jewels.
These are great for a morning treat or a post workout snack. You can use different berries to get a variety of pink and purple shades. They are very easy to make in large batches and keep in the freezer.
Ingredients
Plain or vanilla Greek yogurt
Fresh blueberries and raspberries
Honey or maple syrup
Pink food coloring (optional)
Equipment
Silicone heart mold
Small mixing bowls
Spoon
DIY Instructions
Divide your yogurt into three small bowls.
Leave one bowl white and add a drop of pink coloring to the second.
Mash a few berries into the third bowl to get a natural purple color.
Stir a little honey into each bowl if you want the bites to be sweeter.
Spoon a small amount of yogurt into each heart cavity of your mold.
Drop a whole blueberry or raspberry into the center of the yogurt.
Fill the rest of the cavity with more yogurt and smooth the top.
Tap the mold on the counter to remove any air bubbles.
Place the mold in the freezer for at least four hours until solid.
Pop the hearts out of the mold and store them in a cold bag.
38. Salted Chocolate Orange Segments
Cute Valentines Desserts
These chocolate dipped oranges offer a sophisticated balance of flavors. The bright citrus notes of the mandarin orange go perfectly with the rich dark chocolate. A sprinkle of sea salt and orange zest on top makes them look very gourmet.
This is an assembly only recipe that requires zero baking. It is a light and elegant way to end a romantic meal. He will enjoy the juicy fruit and the crisp snap of the chocolate shell.
Ingredients
Two large mandarin oranges or clementines
Dark chocolate melting wafers
Flaky sea salt
Orange zest
Equipment
Parchment paper
Microwave safe bowl
Small spoon
DIY Instructions
Peel the oranges and remove as much of the white stringy bits as you can.
Separate the fruit into individual segments.
Melt the dark chocolate in a bowl until it is smooth and liquid.
Dip half of each orange segment into the melted chocolate.
Place the dipped fruit onto a sheet of parchment paper.
Immediately sprinkle a tiny bit of salt over the wet chocolate.
Add a small pinch of orange zest to the top for extra color.
Let the segments sit for twenty minutes until the chocolate is firm.
Serve them on a dark slate or a white plate for a clean look.
39. Marshmallow Love Bug Treats
Cute Valentines Desserts
These adorable love bugs are a fun and whimsical dessert for the holiday. They use marshmallows for the body and pretzels for the colorful wings. Adding candy eyes gives them a cute personality that is sure to make him smile.
This is a great project to do if you want something playful and sweet. You can use any color of candy melts for the wings to customize your bugs. They look fantastic when grouped together on a pink or red tray.
Ingredients
Large white marshmallows
Mini pretzels
Pink candy melts
White heart sprinkles
Candy eyes
Red licorice strings
Equipment
Parchment paper
Microwave safe bowl
Toothpicks
DIY Instructions
Melt the pink candy in a bowl until it is runny and smooth.
Dip the mini pretzels into the pink candy until they are fully coated.
Place the wet pretzels on parchment paper and add white sprinkles.
Let the wings dry completely before you move to the next step.
Use a small dot of melted candy to stick two eyes onto a marshmallow.
Cut the licorice into small pieces and poke them into the top for antennae.
Dip a small part of two pink pretzels into the candy and press them onto the sides of the marshmallow.
Hold them in place for a few seconds until they stick.
Let the finished bugs rest until all the parts are secure and dry.
40. Lemon Raspberry Sorbet Sandwiches
Cute Valentines Desserts
These ice cream sandwiches are a bright and tart treat for Valentine’s Day. Thick lemon cookies hold a generous scoop of vibrant pink raspberry sorbet. The yellow and pink colors create a very cheerful and photogenic dessert.
The cold sorbet is very refreshing against the crumbly sugar cookie. You can roll the edges in sprinkles or sugar for even more detail. These are best served immediately after assembly to keep the sorbet from melting.
Ingredients
Large lemon sugar cookies
Raspberry sorbet or gelato
Fresh raspberries for garnish
Lemon slices
Equipment
Ice cream scoop
Flat tray
DIY Instructions
Place your lemon cookies in the freezer for ten minutes so they are cold.
Take the raspberry sorbet out of the freezer to soften for a few minutes.
Place one cookie flat side up on a tray.
Use a large scoop to place a round ball of sorbet in the center.
Place a second cookie on top and press down gently until the filling reaches the edges.
Use a spoon to smooth the edges of the sorbet if needed.
Add a few fresh berries and a lemon slice to the side for a pretty plate.
Serve the sandwiches right away with a napkin or a small spoon.
41. Mousse Stuffed Strawberry Hearts
Cute Valentines Desserts
These luscious stuffed strawberries combine fresh fruit with a silky chocolate filling. Each berry acts as a natural bowl for a rich cocoa swirl that looks elegant on any dessert platter. You can serve them as a light snack or a decadent final course after a romantic meal.
A small white chocolate heart sits right on top to signal your affection. Crushed hazelnuts add a pleasant crunch that breaks up the smoothness of the mousse. This treat is high quality because it uses simple ingredients to create a professional look.
His eyes will widen when he sees the beautiful arrangement of these red gems. They are light and refreshing while still satisfying a craving for something sweet. You can easily make a dozen in very little time right before your date begins.
Ingredients
One pound large fresh strawberries
One cup heavy whipping cream
Three tablespoons unsweetened cocoa powder
Four tablespoons powdered sugar
One teaspoon vanilla extract
Small white chocolate hearts
Crushed hazelnuts or walnuts
Equipment
Sharp pairing knife
Small spoon or melon baller
Large mixing bowl
Electric hand mixer
Piping bag
Large star piping tip
DIY Instructions
Rinse the strawberries under cool water and pat them dry with a clean paper towel.
Use a sharp knife to slice the green leafy tops off each strawberry so they can stand upright.
Take a small spoon or a melon baller and carefully scoop out the white center of each strawberry to create a hollow space.
Pour the cold heavy whipping cream into a large mixing bowl.
Add the cocoa powder and powdered sugar and vanilla extract to the cream.
Use an electric hand mixer to beat the mixture on high speed until it becomes thick and forms stiff peaks.
Place the large star tip into the bottom of a piping bag and fill the bag with your chocolate mousse.
Squeeze the bag gently to fill each hollowed strawberry with a tall swirl of mousse.
Press one small white chocolate heart into the top of the mousse on each strawberry.
Sprinkle a few crushed hazelnuts over the top of the mousse for a bit of texture.
Keep the strawberries in the refrigerator until you are ready to serve them so the mousse stays firm.
42. Sweet and Salty Valentine Snack Mix
Cute Valentines Desserts
Sometimes the best way to watch a movie together is with a giant bowl of themed snacks. This colorful mix blends crunchy popcorn and pretzels with sweet chocolate candies and soft marshmallows. The pink chocolate drizzle over the popcorn adds a festive touch that ties the whole theme together.
You will love how the salty pretzels balance out the sugary heart marshmallows. It is a very easy recipe to customize based on the treats he enjoys most. Simply toss everything into a large bowl and you have a shared snack that looks as good as it tastes.
Red and pink chocolate pieces provide a bright pop of color against the white popcorn. This mixture stays fresh for several days when stored in an airtight container. It is a fantastic option for a low key evening spent relaxing at home.
Ingredients
Six cups plain popped popcorn
One cup pink candy melts
Two cups mini pretzels or pretzel circles
One cup red and pink chocolate button candies
One cup heart shaped marshmallows
One cup rice cereal squares
White chocolate drizzle (optional)
Equipment
Large mixing bowl
Large baking sheet
Parchment paper
Small microwave safe bowl
Rubber spatula
Large serving bowl
DIY Instructions
Line a large baking sheet with a piece of parchment paper to prevent sticking.
Spread the popped popcorn out in a single even layer across the prepared baking sheet.
Place the pink candy melts in a small microwave safe bowl.
Heat the candy melts in the microwave for thirty seconds and then stir them with a spoon.
Continue heating in short bursts until the pink candy is completely smooth and liquid.
Use a spoon to drizzle the melted pink candy back and forth over the popcorn until it is well covered.
Let the popcorn sit at room temperature for about twenty minutes until the pink coating is hard.
Break the coated popcorn into small clusters using your hands.
Pour the popcorn clusters into a very large mixing bowl.
Add the pretzels and chocolate candies and marshmallows and cereal squares to the bowl.
Use a large spoon or your clean hands to toss the ingredients together gently so the treats are mixed well.
Transfer the entire mixture into a decorative serving bowl or small individual gift bags.
Key Takeaways
Focus on simplicity to reduce stress during your celebration. Simple steps often lead to the most enjoyable results.
Use fresh fruits and high quality chocolate for the best taste. Fresh ingredients make a massive difference in the final flavor.
Presentation counts so take a moment to add some festive sprinkles. Small details help your homemade treats look professional and polished.
Prepare some items in advance to save time on the big day. Planning ahead allows you to relax and enjoy the evening together.
Celebrating your love should be about the time you spend together. These easy desserts help you focus on the moment instead of the oven timer. You can pick one or two favorites to make your evening extra sweet.
He will love the thoughtful touch of a homemade treat. Whether you choose a classic strawberry bouquet or a playful snack mix, the gesture matters most. These recipes prove that big smiles often come from small and simple bites.
Enjoy the process of creating something special for your favorite person. Take pride in the delicious results you achieved with your own hands. Happy Valentine’s Day to you and your loved one.
Spread the loveFinding the right centerpiece for your holiday table often feels like a daunting task. You want something that captures the magic of the season without spending your entire vacation in the kitchen. This…
Spread the loveSpring weather calls for a shift in your dessert routine. You likely want something vibrant and fresh to match the changing season. Finding treats that satisfy a sweet tooth while remaining light can…
Spread the loveValentine Day often arrives much faster than we expect. You might find yourself searching for a sweet treat at the very last second. Do not panic because you can still create something wonderful…