Sticking to a healthy routine often feels impossible when your evening meals lack variety. Many home cooks fall into the “chicken and broccoli” trap, leading to burnout and expensive takeout orders. Breaking that cycle requires fresh inspiration and a plan that works for your busy schedule.
Dinner Meal Prep Ideas
This collection of 40 new dinner meal prep ideas is designed to rescue your taste buds from boredom. We focused on vibrant flavors, diverse cuisines, and ingredients that stay fresh throughout the week. Whether you crave bold spices or classic comfort, these recipes prove that batch cooking can be exciting.
By spending a little time on Sunday, you reclaim your weeknight freedom. You will enjoy restaurant-quality dinners without the stress of daily prep or cleanup. Let these ideas transform your kitchen into a source of energy rather than a source of stress.
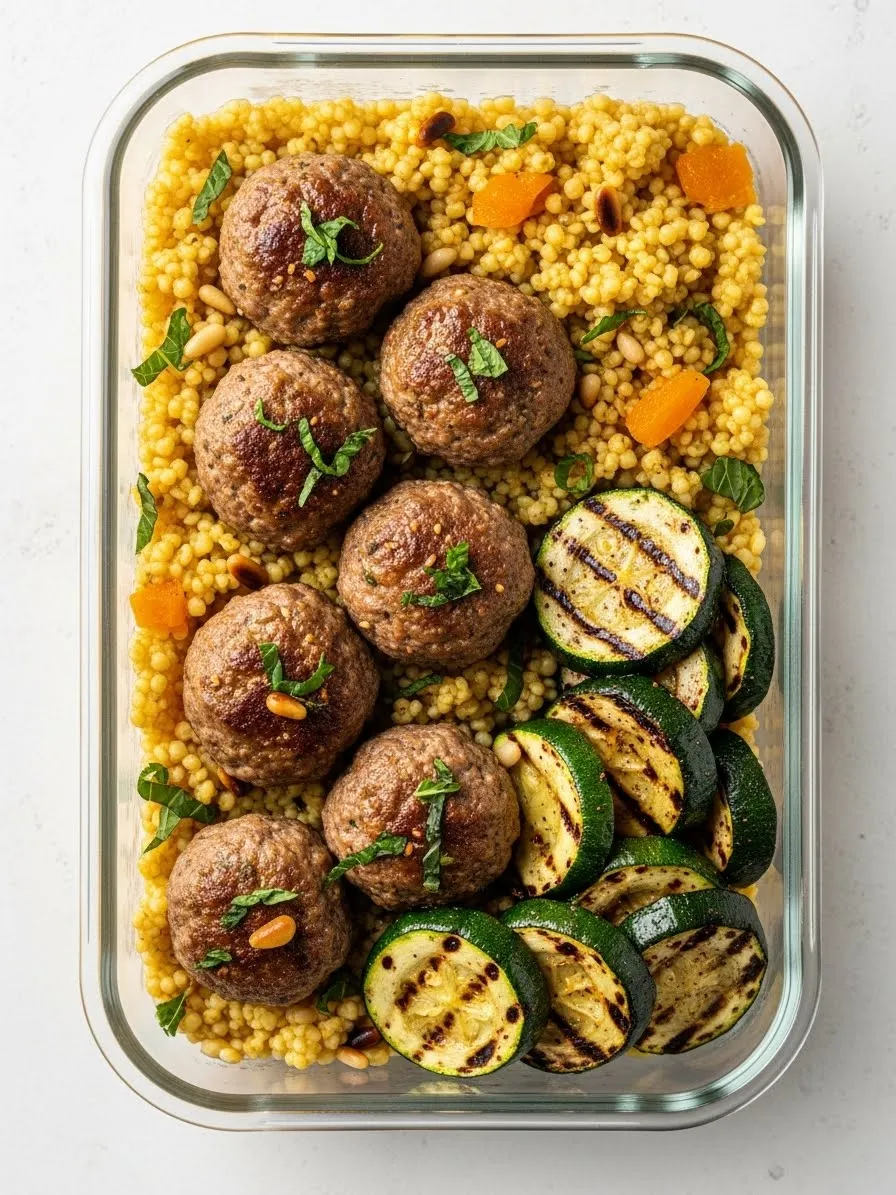
1. Moroccan Spiced Meatballs with Couscous and Grilled Zucchini
Dinner Meal Prep Ideas
Boring lunches often lead to expensive takeout choices. This Mediterranean inspired bowl brings vibrant flavors to your weekly routine without much effort. Tender beef meatballs sit atop a fluffy bed of golden couscous. Every bite offers a savory punch that keeps your taste buds excited.
Charred zucchini slices add a smoky depth to the meal. You get a nice crunch from toasted pine nuts sprinkled throughout the dish. Small bits of dried apricot provide a sudden burst of sweetness. Fresh herbs on top brighten the entire container.
Preparing this recipe ensures you have a high protein option ready in the fridge. It reheats beautifully and maintains its texture for days. You will enjoy a nutritious dinner that feels like a restaurant quality treat.
Ingredients
1 pound ground beef or lamb
1 cup dry couscous
2 medium zucchinis, sliced into rounds
1/4 cup dried apricots, chopped
2 tablespoons pine nuts
1 teaspoon ground cumin
1 teaspoon ground coriander
1/2 teaspoon cinnamon
Salt and black pepper to taste
Fresh mint or parsley for garnish
1 tablespoon olive oil
Equipment
Large mixing bowl
Medium saucepan with a tight lid
Large skillet or grill pan
Tongs
Glass meal prep containers
DIY Instructions
Place the ground meat in a large mixing bowl. Add the cumin, coriander, cinnamon, salt, and pepper. Use your hands to mix everything until the spices are evenly distributed.
Scoop small portions of the meat and roll them between your palms to form round balls. Aim for the size of a golf ball to ensure they cook quickly.
Heat a skillet over medium heat with a splash of olive oil. Place the meatballs in the pan. Cook them for about 8 to 10 minutes, turning them occasionally until the outsides are brown and the centers are no longer pink.
Boil 1 cup of water in a saucepan. Once it bubbles, stir in the dry couscous and remove the pan from the heat. Cover it with a lid and let it sit for 5 minutes. Use a fork to fluff the grains once they absorb the water.
Wipe your skillet clean or use a grill pan. Toss the zucchini rounds with a little oil and salt. Cook them over high heat for 2 minutes on each side until you see dark grill marks.
Toast the pine nuts in a dry pan for 1 minute until they smell fragrant. Watch them closely so they do not burn.
Divide the fluffy couscous into your meal prep containers. Arrange the meatballs and grilled zucchini on top. Sprinkle the chopped apricots, toasted pine nuts, and fresh herbs over each portion.
Seal the containers once the food cools down. Store them in the refrigerator for up to four days.
2. Honey Garlic Salmon with Forbidden Rice and Steamed Bok Choy
Dinner Meal Prep Ideas
Many people avoid fish for meal prep because they fear it will dry out. This glazed salmon stays moist and flavorful even after a few days in the fridge. The dark forbidden rice provides a nutty base that contrasts beautifully with the bright orange fish.
Crispy bok choy adds a refreshing green element to the container. Topping the salmon with sesame seeds and green onions creates a subtle crunch in every bite. This meal feels sophisticated but remains incredibly simple to assemble.
Using black rice boosts your fiber intake compared to white varieties. You get a balanced mix of healthy fats, complex carbs, and greens. It is a smart way to upgrade your weekly dinner rotation.
Ingredients
2 salmon fillets (6 ounces each)
1 cup black “forbidden” rice
2 large heads of baby bok choy
2 tablespoons honey
1 tablespoon soy sauce
2 cloves garlic, minced
1 teaspoon sesame seeds
1 green onion, sliced
1 tablespoon sesame oil
Salt to taste
Equipment
Medium pot with lid
Small mixing bowl
Baking sheet
Parchment paper
Steamer basket or large pot
DIY Instructions
Rinse the black rice under cold water until the water runs clear. Combine 1 cup of rice with 2 cups of water in a pot. Bring it to a boil, then reduce heat to low, cover, and simmer for 30 minutes.
Preheat your oven to 400 degrees Fahrenheit. Line a small baking sheet with parchment paper to prevent sticking.
Whisk the honey, soy sauce, minced garlic, and sesame oil in a small bowl. This sticky glaze will provide all the flavor the fish needs.
Place the salmon fillets on the baking sheet. Brush a generous amount of the honey garlic sauce over the top of each piece.
Bake the salmon for 12 to 15 minutes. The fish should flake easily with a fork when it is done.
Slice the baby bok choy in half lengthwise. Steam them over boiling water for 3 to 5 minutes until the leaves are wilted but the stems still have a slight bite.
Fluff the cooked black rice with a fork and divide it into your storage containers.
Lay the glazed salmon next to the steamed bok choy. Garnish with sesame seeds and sliced green onions for a professional look.
Allow the meals to cool completely before snapping the lids on. Store in the refrigerator for up to three days.
3. Roasted Sweet Potato and Black Bean Burrito Bowls
Dinner Meal Prep Ideas
Vegetarian meal prep does not have to be boring or leave you hungry. These vibrant bowls rely on hearty roasted sweet potatoes to provide satisfying bulk. The combination of black beans and colorful peppers creates a fiber-rich feast for the eyes.
Creamy avocado sauce brings all the individual components together. Red onion slices add a sharp tang that cuts through the sweetness of the potatoes. This dish is naturally gluten-free and stays fresh for a long time.
Preparing four containers at once saves you hours of cooking during the week. You can eat these cold or give them a quick warm-up. They are a reliable staple for any busy professional.
Ingredients
2 large sweet potatoes, cubed
1 can (15 ounces) black beans, rinsed
1 red bell pepper, sliced
1 yellow bell pepper, sliced
1 large red onion, sliced into wedges
1 ripe avocado
1/4 cup Greek yogurt or vegan cream
1 lime, juiced
2 tablespoons olive oil
1 teaspoon chili powder
1 teaspoon garlic powder
Salt and pepper to taste
Equipment
Two large rimmed baking sheets
Small food processor or blender
Large mixing bowl
Spatula
DIY Instructions
Set your oven to 425 degrees Fahrenheit. Higher heat helps the vegetables caramelize and develop better flavor.
Toss the cubed sweet potatoes in a bowl with half the olive oil, chili powder, salt, and pepper. Spread them out on one baking sheet in a single layer.
Mix the sliced bell peppers and red onion wedges with the remaining oil and garlic powder. Spread them on the second baking sheet.
Roast the sweet potatoes for 25 to 30 minutes. Roast the peppers and onions for 15 to 20 minutes until they have charred edges.
Rinse the black beans thoroughly under cold water. You do not need to cook them since the heat from the roasted vegetables will warm them later.
Make the sauce by blending the avocado, lime juice, and yogurt until completely smooth. Add a splash of water if it is too thick to drizzle.
Divide the roasted sweet potatoes, peppers, onions, and black beans into four glass containers.
Place the avocado sauce in a separate small container or a dedicated well in your prep box to keep it from browning.
Store in the fridge. When ready to eat, top with fresh cilantro or a scoop of salsa if you like extra heat.
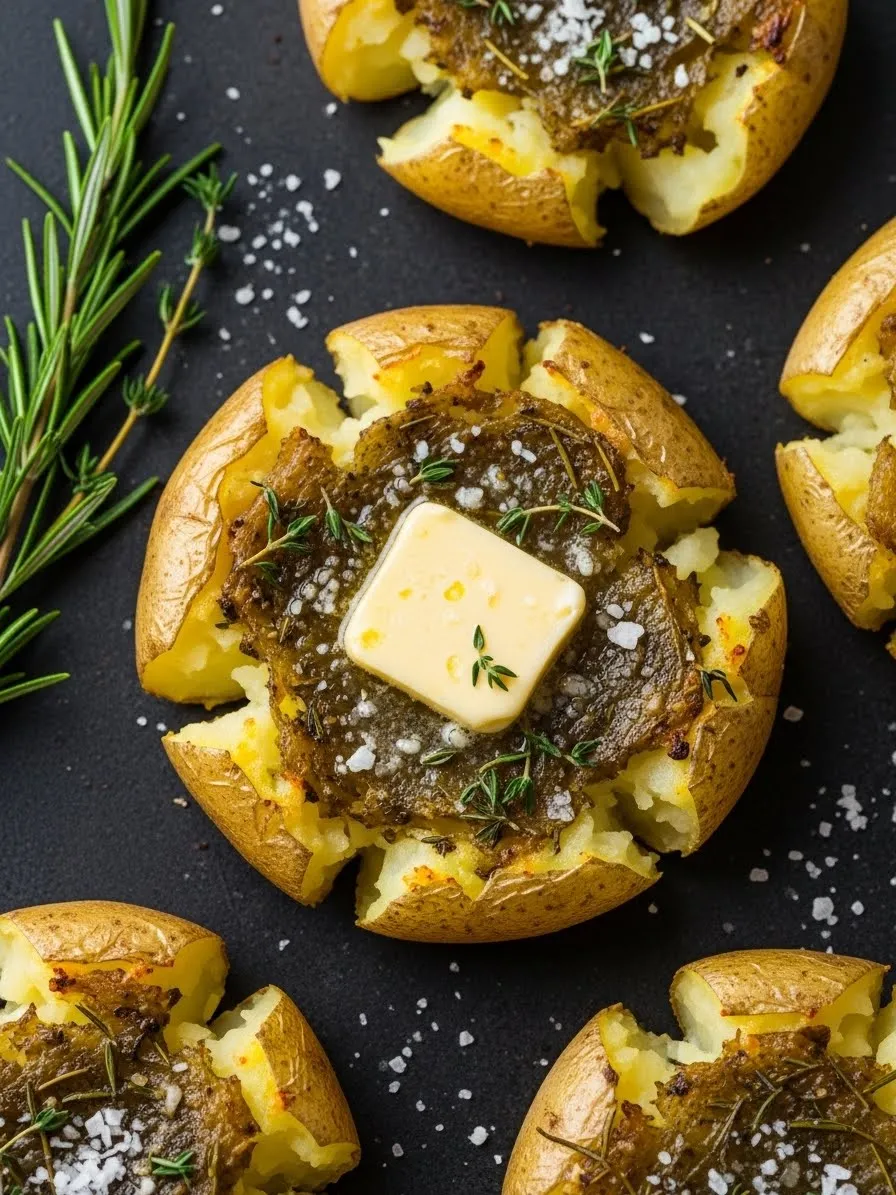
4. Garlic Butter Steak Bites with Smashed Potatoes and Pesto
Dinner Meal Prep Ideas
Steak can feel like a luxury, but cutting it into bites makes it affordable and easy to portion. These juicy cubes of beef stay tender and soak up the garlic butter perfectly. Golden smashed potatoes provide a crispy contrast to the soft meat.
A dollop of bright green pesto adds a fresh, herbal finish. Red and green bell peppers bring a splash of color and much-needed vitamins. This meal feels like a high-end steakhouse dinner in a portable box.
Smashing the potatoes increases their surface area for maximum crispiness. It is a simple technique that yields impressive results. This prep is for anyone who loves a classic “meat and potatoes” meal with a modern twist.
Ingredients
1 pound sirloin or ribeye steak, cut into 1-inch cubes
1 pound baby yellow potatoes
1 red bell pepper, sliced
1 green bell pepper, sliced
3 tablespoons butter
3 cloves garlic, minced
1/4 cup prepared basil pesto
2 tablespoons olive oil
Fresh parsley, chopped
Salt and black pepper
Equipment
Large pot
Large cast-iron skillet or heavy frying pan
Baking sheet
Small bowl or glass to smash potatoes
DIY Instructions
Place the baby potatoes in a pot of salted water. Bring to a boil and cook for 15 minutes until they are fork-tender. Drain and let them cool slightly.
Preheat your oven to 425 degrees Fahrenheit. Place the boiled potatoes on a greased baking sheet. Use the bottom of a heavy glass to gently press down on each potato until it flattens but stays in one piece.
Drizzle the potatoes with olive oil and salt. Roast them for 20 minutes until the edges are golden and crunchy.
Pat the steak cubes dry with a paper towel. Season them generously with salt and pepper. This helps create a better crust in the pan.
Heat a large skillet over high heat with a tablespoon of oil. Sear the steak bites in batches so the pan stays hot. Cook for 2 minutes per side, then remove from the pan.
Turn the heat down to medium and melt the butter in the same skillet. Stir in the minced garlic for 30 seconds. Return the steak to the pan and toss to coat in the garlic butter.
Sauté the bell pepper strips in the remaining butter for 3 minutes until they soften slightly but still have a snap.
Fill your containers with the crispy smashed potatoes and steak bites. Add the peppers to the side.
Top each portion with a spoonful of pesto and fresh parsley. Let the food cool before refrigerating for up to four days.
5. Lemon Herb Turkey Meatloaf Muffins with Almond Green Beans
Dinner Meal Prep Ideas
Traditional meatloaf takes an hour to bake, but these mini muffins are ready in half the time. Using ground turkey keeps the meal lean while feta cheese adds moisture and saltiness. These pre-portioned bites are excellent for tracking your intake.
The green beans are tossed with toasted almond slivers for a nutty crunch. Lemon zest throughout the dish provides a citrusy aroma that wakes up your palate. It is a light, healthy take on comfort food.
Muffin tins make cleaning up much easier than a traditional loaf pan. You can grab two or three for a quick dinner. This recipe is a favorite for those seeking a high-protein, low-carb lifestyle.
Ingredients
1 pound ground turkey
1/2 cup feta cheese crumbles
1 egg
1/4 cup breadcrumbs or almond flour
1 pound fresh green beans, trimmed
1/4 cup slivered almonds
1 lemon (zest and juice)
2 tablespoons fresh dill, chopped
1 tablespoon olive oil
Salt and pepper to taste
Equipment
12-cup muffin tin
Large mixing bowl
Large skillet
Tongs
DIY Instructions
Preheat your oven to 375 degrees Fahrenheit. Lightly grease six to eight cups of your muffin tin.
In a large bowl, combine the ground turkey, egg, breadcrumbs, feta cheese, fresh dill, and half of the lemon zest. Mix gently with a spoon or your hands. Over-mixing can make the turkey tough.
Scoop the turkey mixture into the muffin cups. Press down slightly to flatten the tops so they cook evenly.
Bake the turkey muffins for 20 to 25 minutes. Ensure the internal temperature reaches 165 degrees Fahrenheit.
While the meat cooks, heat a skillet over medium heat with olive oil. Add the slivered almonds and toast them for 2 minutes until they turn light brown.
Add the trimmed green beans to the skillet with the almonds. Pour in 2 tablespoons of water and cover with a lid for 3 minutes to steam.
Remove the lid and sauté the beans for another 2 minutes. Season with salt, pepper, the remaining lemon zest, and a squeeze of lemon juice.
Remove the turkey muffins from the tin carefully using a knife to loosen the edges.
Place two turkey muffins and a heap of almond green beans into each meal prep container. Store in the fridge for four to five days.
6. Shrimp Red Curry with Bamboo Shoots and Jasmine Rice
Dinner Meal Prep Ideas
Thai flavors are surprisingly easy to recreate at home for your weekly meals. This red curry features plump shrimp swimming in a creamy, spiced coconut milk sauce. Red peppers and peas add sweetness and a pop of color to the bowl.
Steaming jasmine rice serves as the foundation for this fragrant dish. Bamboo shoots provide a unique, woody texture that makes the meal feel authentic. This is a one-pan wonder that fills your kitchen with amazing scents.
Shrimp cooks in minutes, making this a great option for a fast prep session. The curry sauce keeps the seafood tender during reheating. It is an adventurous choice for someone tired of plain chicken and broccoli.
Ingredients
1 pound large shrimp, peeled and deveined
1 can (14 ounces) coconut milk
2 tablespoons red curry paste
1 cup jasmine rice
1 red bell pepper, thinly sliced
1/2 cup canned bamboo shoots, drained
1/2 cup frozen peas
1 lime, cut into wedges
Fresh basil leaves for garnish
1 tablespoon coconut oil
Equipment
Medium saucepan with lid
Large wok or deep skillet
Wooden spoon
DIY Instructions
Cook the jasmine rice by combining 1 cup of rice with 1.5 cups of water. Bring to a boil, then cover and simmer on low for 15 minutes. Let it stand for 5 minutes before fluffing.
Heat the coconut oil in a large skillet over medium heat. Stir in the red curry paste and cook for 1 minute until it becomes fragrant.
Slowly pour in the coconut milk while whisking to dissolve the paste. Bring the liquid to a gentle simmer.
Add the sliced red peppers and bamboo shoots to the simmering sauce. Cook for 5 minutes until the peppers are slightly soft.
Toss the shrimp into the pan. They only need about 3 to 4 minutes to turn pink and opaque. Do not overcook them or they will become rubbery.
Stir in the frozen peas at the very end. The heat from the sauce will thaw them instantly while keeping them bright green.
Squeeze half of a lime into the curry to balance the richness of the coconut milk.
Portion the fluffy jasmine rice into deep containers. Ladle the shrimp curry over the top so the rice can soak up the flavors.
Garnish with fresh basil and a lime wedge. Once cooled, keep in the refrigerator for up to two days.
7. Mediterranean Orzo Salad with Grilled Chicken and Olives
Dinner Meal Prep Ideas
Cold pasta salads are a lifesaver for busy nights when you do not want to use the microwave. This Mediterranean version uses tiny orzo pasta tossed with salty feta and tangy kalamata olives. Sun-dried tomatoes add a concentrated burst of savory flavor.
Sliced grilled chicken breast provides the lean protein needed to make this a full meal. Fresh cucumbers and cherry tomatoes keep every forkful feeling light and crisp. A simple lemon vinaigrette ties the whole garden of ingredients together.
This salad actually tastes better the next day as the pasta absorbs the dressing. You can eat it straight from the fridge or at room temperature. It is the ultimate choice for a refreshing, no-fuss dinner.
Ingredients
2 boneless, skinless chicken breasts
1 cup dry orzo pasta
1/2 cup feta cheese, cubed
1/2 cup kalamata olives, pitted
1/4 cup sun-dried tomatoes, chopped
1 cup cherry tomatoes, halved
1 cucumber, diced
1/2 red onion, thinly sliced
1/4 cup olive oil
2 tablespoons red wine vinegar
1 teaspoon dried oregano
Salt and pepper
Equipment
Large pot
Grill pan or outdoor grill
Large mixing bowl
Small jar for dressing
DIY Instructions
Boil a pot of salted water and cook the orzo pasta according to the package directions. Drain it and rinse under cold water to stop the cooking and prevent sticking.
Season the chicken breasts with salt, pepper, and a bit of oregano. Grill them over medium-high heat for 6 to 7 minutes per side until fully cooked. Let the meat rest for 5 minutes before slicing it into strips.
In a large mixing bowl, combine the cooled orzo, diced cucumber, cherry tomatoes, red onion, olives, and sun-dried tomatoes.
Make the dressing by shaking the olive oil, red wine vinegar, oregano, and a pinch of salt in a small jar.
Pour the dressing over the pasta and vegetable mixture. Toss everything well so the orzo is evenly coated.
Fold in the feta cheese cubes gently so they do not break apart.
Divide the orzo salad into your containers. Lay the sliced grilled chicken on top of the pasta.
Store the containers in the refrigerator. This meal stays fresh and delicious for up to four days.
8. BBQ Pulled Pork with Corn on the Cob and Purple Slaw
Dinner Meal Prep Ideas
Slow-cooked meat is the king of meal prep because it yields a massive amount of food with very little active work. This smoky pulled pork is tender enough to shred with just a fork. Pairing it with charred corn on the cob adds a sweet, summer vibe to your week.
Crispy purple cabbage slaw provides a necessary crunch and a vinegar kick. The dark colors make the plate look appetizing and professional. You can use your favorite BBQ sauce to customize the heat and sweetness levels.
Pulled pork freezes exceptionally well, so you can save half for next week. The corn stays juicy and sweet even when reheated. This meal is a crowd-pleaser for families and solo cooks alike.
Ingredients
2 pounds pork shoulder or butt
1 cup BBQ sauce
2 ears of corn, cut into thirds
2 cups shredded purple cabbage
2 tablespoons apple cider vinegar
1 tablespoon honey
1 tablespoon smoked paprika
1 teaspoon onion powder
Salt and pepper
1 tablespoon butter
Equipment
Slow cooker or Dutch oven
Large skillet
Mixing bowl
Two forks for shredding
DIY Instructions
Season the pork shoulder with smoked paprika, onion powder, salt, and pepper. Place it in a slow cooker with half a cup of water. Cook on low for 8 hours or until the meat falls apart.
Once cooked, move the pork to a large bowl. Use two forks to pull the meat into thin shreds. Stir in your BBQ sauce while the meat is still hot.
Boil the corn pieces for 5 minutes. Drain them and pat them dry.
Heat a skillet with a small amount of butter. Sear the corn pieces for 2 minutes per side until you see golden brown toasted spots.
In a mixing bowl, toss the shredded purple cabbage with apple cider vinegar, honey, and a pinch of salt. Let it sit for 10 minutes to soften the leaves.
Place a generous scoop of BBQ pulled pork into each container.
Add two or three small corn pieces and a side of the purple slaw.
Keep the slaw in a separate small cup if you prefer it extra crunchy, or let it sit next to the pork for a classic BBQ plate feel.
Store in the fridge for up to five days.
9. Teriyaki Tempeh Bowl with Edamame and Brown Rice
Dinner Meal Prep Ideas
Plant-based meal prep is incredibly cost-effective and packed with nutrients. This bowl features tempeh strips glazed in a savory-sweet teriyaki sauce. Brown rice provides a complex carbohydrate base that keeps you full for hours.
Fresh steamed broccoli and bright green edamame add plenty of plant protein and fiber. Pickled ginger and shredded nori give the dish a Japanese-inspired flair. It is a colorful, textured meal that proves vegan food can be exciting.
Tempeh has a firm, nutty texture that holds up better than tofu in meal prep containers. The sauce coats every ingredient, ensuring no bite is dry. This is an excellent choice for a healthy, earth-friendly dinner.
Ingredients
1 block (8 ounces) tempeh, sliced into strips
1 cup brown rice
1 cup broccoli florets
1/2 cup shelled edamame
1/4 cup teriyaki sauce
1 tablespoon sesame seeds
1 tablespoon pickled ginger
1 sheet nori, shredded
1 tablespoon sesame oil
1 tablespoon soy sauce
Equipment
Medium pot with lid
Large skillet
Steamer basket
DIY Instructions
Start the brown rice by simmering 1 cup of rice with 2 cups of water for 40 to 45 minutes. Turn off the heat and let it sit covered for 5 minutes.
Heat sesame oil in a skillet over medium heat. Lay the tempeh strips in the pan and fry for 4 minutes on each side until they are golden and crispy.
Pour the teriyaki sauce over the tempeh in the pan. Turn the heat to low and let the sauce bubble until it thickens into a sticky glaze.
Steam the broccoli florets and edamame for 5 minutes until they are tender but still vibrant green. Toss them with a splash of soy sauce.
Scoop the cooked brown rice into your bowls or containers.
Arrange the glazed tempeh strips across the center. Place the broccoli and edamame around the sides.
Sprinkle sesame seeds and shredded nori over the entire bowl.
Add a small pile of pickled ginger to the corner for a burst of heat and acidity.
This meal keeps well in the refrigerator for up to four days.
10. Greek Ground Turkey Bowls with Couscous and Spinach Salad
Dinner Meal Prep Ideas
Ground turkey is a versatile protein that cooks in less than ten minutes. These Greek-style bowls feature crumbled meat seasoned with garlic and oregano. Fluffy couscous acts as a light base that absorbs all the juices.
A fresh spinach salad with juicy cherry tomatoes adds a crisp, raw element. Topping the bowl with feta cheese and a creamy yogurt sauce makes it feel indulgent. This meal is high in volume but relatively low in calories.
The combination of warm meat and cool salad provides a great contrast in every bite. You can keep the sauce on the side to maintain the texture of the vegetables. It is a fast, reliable recipe for a midweek energy boost.
Ingredients
1 pound ground turkey
1 cup pearl couscous
2 cups fresh baby spinach
1 cup cherry tomatoes, halved
1/4 cup feta cheese crumbles
1/2 cup Greek yogurt
1 clove garlic, minced
1 teaspoon dried oregano
1 lemon, juiced
1 tablespoon olive oil
Salt and pepper
Equipment
Medium saucepan
Large skillet
Small bowl for sauce
DIY Instructions
Cook the pearl couscous in a saucepan with 1.25 cups of water or broth. Simmer for 8 to 10 minutes until the pearls are tender and the liquid is gone.
Heat olive oil in a skillet over medium heat. Add the ground turkey and cook it while breaking it into small crumbles with a spoon.
Stir in the minced garlic, oregano, salt, and pepper. Continue cooking until the turkey is browned and no longer pink.
Whisk the Greek yogurt with half of the lemon juice and a pinch of salt in a small bowl to create a zesty sauce.
In a separate bowl, toss the baby spinach and cherry tomatoes with the remaining lemon juice and a drizzle of olive oil.
Layer the containers by placing the couscous on the bottom. Add a large scoop of the seasoned ground turkey to one side.
Fill the rest of the space with the spinach and tomato salad.
Sprinkle feta cheese over the turkey and vegetables.
Store the yogurt sauce in a separate small container. Drizzle it over the bowl just before eating.
This meal stays fresh in the fridge for three to four days.
11. Buffalo Chickpea Stuffed Sweet Potato with Blue Cheese
Dinner Meal Prep Ideas
Struggling to find meatless options that actually satisfy your hunger? This stuffed sweet potato offers a spicy kick that rivals any traditional wing night. The creamy blue cheese crumbles melt slightly over the warm, saucy chickpeas.
Crunchy celery bits add a refreshing snap to every forkful. A cooling drizzle of ranch or blue cheese dressing balances the bold buffalo heat perfectly. This meal provides a massive amount of fiber and plant-based energy to power your evening.
Using the potato skin as a natural bowl makes this prep incredibly easy to pack. You get a complex mix of sweet, spicy, and tangy flavors in one dish. It is a creative way to turn a simple root vegetable into a gourmet dinner.
Ingredients
2 large sweet potatoes
1 can (15 ounces) chickpeas, drained and rinsed
1/4 cup buffalo hot sauce
2 stalks celery, diced
1/4 cup blue cheese crumbles
2 tablespoons ranch or blue cheese dressing
1 tablespoon olive oil
Salt and pepper to taste
Equipment
Baking sheet
Small mixing bowl
Sharp knife
Fork
DIY Instructions
Heat your oven to 400 degrees Fahrenheit. Scrub the sweet potatoes clean and pat them dry with a towel.
Poke several holes in the potatoes with a fork. Rub the skins with olive oil and a pinch of salt.
Place the potatoes on a baking sheet and bake for 45 to 50 minutes until they feel soft when squeezed.
While the potatoes bake, toss your rinsed chickpeas in a small bowl with the buffalo sauce. Make sure every chickpea is well coated.
Once the potatoes are done, let them cool for a few minutes. Slice them down the center lengthwise but do not cut all the way through.
Use a fork to gently mash the inside of the potato to create space for the filling.
Spoon a generous amount of the spicy chickpeas into the center of each potato.
Top the chickpeas with diced celery and blue cheese crumbles.
Drizzle the dressing over the top just before serving or pack it in a small side container for later.
Store in the fridge for up to four days and reheat in the microwave or oven.
12. Pesto Penne with White Beans and Sun-Dried Tomatoes
Dinner Meal Prep Ideas
Pasta prep often gets a bad reputation for being heavy, but this version stays light and zesty. This dish features al dente penne tossed in a vibrant basil pesto that clings to every ridge. Creamy white beans provide a punch of protein without any meat.
Chewy sun-dried tomatoes offer a deep, savory sweetness that elevates the entire meal. A sprinkle of parmesan cheese adds the finishing touch of saltiness. It is a Mediterranean-style feast that tastes just as good cold as it does warm.
This recipe is excellent for busy weeks because it requires minimal actual cooking. You can assemble the whole container in the time it takes to boil the pasta. It is a reliable, plant-forward staple for any home cook.
Ingredients
8 ounces penne pasta (whole wheat or gluten-free works too)
1 can (15 ounces) cannellini beans, rinsed
1/2 cup basil pesto (store-bought or homemade)
1/4 cup sun-dried tomatoes, sliced
1/4 cup grated parmesan cheese
Fresh basil leaves for garnish
Salt and pepper to taste
Equipment
Large pot
Colander
Large mixing bowl
Spoon
DIY Instructions
Fill a large pot with water and a generous pinch of salt. Bring it to a rolling boil.
Add the penne and cook according to the package instructions. Aim for “al dente,” which means the pasta still has a slight bite.
Before draining, scoop out a small cup of the starchy pasta water. You might need this to loosen the sauce later.
Drain the pasta in a colander and return it to the warm pot or a large mixing bowl.
Stir in the basil pesto while the pasta is still hot. This helps the flavors meld together.
Add the rinsed white beans and sun-dried tomato slices to the mix.
If the sauce looks too thick, add a tablespoon of the reserved pasta water and stir until creamy.
Season with a bit of salt and pepper, then top with the grated parmesan cheese.
Divide the pasta into your meal prep containers and garnish with fresh basil.
Store in the refrigerator for up to five days.
13. Ginger Soy Beef Strips with Zucchini Noodles
Dinner Meal Prep Ideas
Looking for a low-carb dinner that does not sacrifice on flavor? These tender beef strips are marinated in a ginger-soy blend that delivers a savory punch. The zucchini noodles, or “zoodles,” provide a fresh and hydrating base for the meal.
A garnish of black and white sesame seeds adds a professional look and a subtle nutty finish. Thinly sliced green onions bring a mild sharpness to the dish. It is a light alternative to heavy takeout noodles.
Using a spiralizer for the zucchini is a fun way to change up your vegetable intake. The beef stays juicy and reheats quickly without becoming tough. This meal is a great choice for anyone watching their grain intake.
Ingredients
1 pound flank steak or sirloin, thinly sliced
3 large zucchinis, spiralized into noodles
1/4 cup soy sauce
1 tablespoon fresh ginger, grated
2 cloves garlic, minced
1 tablespoon sesame oil
1 tablespoon sesame seeds (black and white)
2 green onions, sliced
1/2 teaspoon red pepper flakes (optional)
Equipment
Spiralizer (for the zucchini)
Large skillet or wok
Tongs
Paper towels
DIY Instructions
Start by spiralizing your zucchinis into long, noodle-like strands.
Place the zucchini noodles on a plate lined with paper towels. Sprinkle them with a little salt and let them sit for 10 minutes to draw out excess moisture.
In a bowl, mix the soy sauce, grated ginger, minced garlic, and red pepper flakes.
Add the sliced beef to the sauce and let it marinate for at least 15 minutes.
Heat the sesame oil in a large skillet over high heat. You want the pan very hot to sear the meat quickly.
Add the beef strips to the pan using tongs. Cook for about 2 to 3 minutes until they are browned but still tender. Remove the meat from the pan.
Wipe the pan quickly and add the zucchini noodles. Sauté them for only 1 to 2 minutes. They should be warm but still have a crunch.
Return the beef to the pan and toss everything together for 30 seconds to combine the juices.
Divide the beef and zoodles into your containers.
Top with sesame seeds and green onions. Store in the fridge for up to three days.
14. Lemon Cod en Papillote with Asparagus and Quinoa
Dinner Meal Prep Ideas
Cooking fish in parchment paper is a foolproof way to ensure it never dries out. This lemon cod remains flaky and moist as it steams inside its own little pouch. The asparagus spears cook right alongside the fish, absorbing all the citrusy juices.
Nutty quinoa provides a hearty side that completes the nutritional profile of this bowl. Thin lemon slices and fresh chives add a bright, clean aroma. This meal feels incredibly light and healthy, making it a great reset for your diet.
The “en papillote” method is a classic French technique that looks very impressive. It keeps all the smells and flavors contained until you are ready to eat. This is a sophisticated option for a quiet weeknight dinner.
Ingredients
2 cod fillets (or any firm white fish)
1 bunch thin asparagus, trimmed
1 cup cooked quinoa
1 lemon, thinly sliced
2 tablespoons olive oil
2 tablespoons fresh chives, chopped
Salt and pepper to taste
Parchment paper
Equipment
Baking sheet
Scissors
Small pot (for quinoa)
DIY Instructions
Preheat your oven to 375 degrees Fahrenheit. Cut two large squares of parchment paper.
If you have not cooked your quinoa yet, simmer 1/2 cup dry quinoa with 1 cup water for 15 minutes. Set it aside to cool.
Fold a piece of parchment paper in half, then open it back up. Place a handful of asparagus spears on one side of the fold.
Season the cod fillets with salt and pepper on both sides. Lay the fish directly on top of the asparagus.
Place two or three lemon slices over the fish and drizzle with a tablespoon of olive oil.
Fold the other half of the paper over the fish. Starting at one corner, fold and crimp the edges tightly to create a sealed half-moon pouch.
Place the pouches on a baking sheet and bake for 12 to 15 minutes depending on the thickness of the fish.
Carefully open the pouches (watch out for hot steam!) and transfer the fish and asparagus to your containers.
Add a scoop of fluffy quinoa to each container and sprinkle fresh chives over the top.
These stay fresh for two days in the refrigerator.
15. Sausage and Pepper Egg Muffins with Roasted Potatoes
Dinner Meal Prep Ideas
Breakfast for dinner is a fantastic way to simplify your meal prep schedule. These savory egg muffins are packed with crumbled sausage and colorful bell peppers. They offer a high-protein base that feels much more substantial than a standard omelet.
Golden roasted baby potatoes serve as a comforting side to the fluffy egg bites. A small dish of salsa or hot sauce provides a spicy kick to wake up the flavors. These are easy to grab and eat if you have a particularly busy evening.
Baking eggs in a muffin tin ensures every portion is exactly the same size. You can easily double this recipe to cover both breakfast and dinner for the week. It is a kid-friendly option that adults will enjoy just as much.
Ingredients
8 large eggs
1/2 pound ground sausage, cooked and crumbled
1 red bell pepper, finely diced
1/2 cup shredded cheddar cheese
1 pound baby potatoes, halved
2 tablespoons olive oil
1/4 cup milk or heavy cream
Salt, pepper, and onion powder
Equipment
12-cup muffin tin
Large mixing bowl
Baking sheet
Whisk
DIY Instructions
Heat your oven to 400 degrees Fahrenheit. Start with the potatoes first as they take longer to cook.
Toss the halved baby potatoes with olive oil, salt, pepper, and onion powder on a baking sheet.
Roast the potatoes for 20 to 25 minutes until the outsides are crispy and the insides are soft.
While the potatoes roast, grease your muffin tin thoroughly.
In a large bowl, whisk the eggs and milk together. Season with a pinch of salt and pepper.
Drop a spoonful of cooked sausage and diced peppers into each muffin cup.
Pour the egg mixture over the fillings until each cup is about three-quarters full. Top with a sprinkle of cheese.
Lower the oven temperature to 350 degrees Fahrenheit. Bake the egg muffins for 15 to 18 minutes until they are set in the middle.
Let the muffins cool for a few minutes before removing them from the tin with a butter knife.
Place two or three muffins in each container alongside a portion of roasted potatoes. Store in the fridge for up to four days.
16. Crispy Coconut Tofu with Snap Peas and Lime Rice
Dinner Meal Prep Ideas
Finding a vegetarian meal that stays crunchy in a lunch box can be difficult. This recipe solves that problem by using a thick coating of shredded coconut and breadcrumbs on firm tofu. The golden cubes provide a satisfying texture that pairs wonderfully with the soft rice.
Sweet snap peas add a fresh green crunch and a hint of natural sugar to the plate. A side of creamy lime dipping sauce cuts through the richness of the coconut. You will love how the zesty rice brightens the entire meal during your busy workday.
Baking the tofu at a high temperature ensures it gets crispy without needing a deep fryer. This plant-based dish is light enough for a spring evening but filling enough to keep you satisfied. It is a colorful way to embrace more meatless dinners.
Ingredients
1 block extra-firm tofu, pressed and cubed
1/2 cup shredded unsweetened coconut
1/2 cup Panko breadcrumbs
1 cup jasmine rice
1 cup sugar snap peas
1 lime (zest and juice)
1/4 cup coconut milk
1 tablespoon cornstarch
Salt and pepper to taste
Equipment
Baking sheet
Parchment paper
Two small shallow bowls
Medium saucepan with lid
DIY Instructions
Start by pressing your tofu between paper towels for 15 minutes to remove excess water. This is a vital step for getting a crispy texture.
Cut the tofu into small, even cubes.
In one bowl, whisk the coconut milk and cornstarch together. In the second bowl, mix the shredded coconut, breadcrumbs, salt, and pepper.
Dip each tofu cube into the milk mixture, then roll it in the coconut crumbs until fully covered.
Place the tofu on a parchment-lined baking sheet. Bake at 400 degrees Fahrenheit for 25 minutes, flipping halfway through.
Cook your jasmine rice in a saucepan with 1.5 cups of water. Once done, stir in the lime zest and a squeeze of lime juice.
Steam the snap peas in a small amount of water for 3 minutes until they turn a bright, vibrant green.
Arrange the lime rice and snap peas in your containers.
Add the crispy coconut tofu on top.
Store in the refrigerator for up to four days.
17. Taco Stuffed Bell Peppers with Black Beans and Corn
Dinner Meal Prep Ideas
Traditional tacos are hard to meal prep because the shells often get soggy. These stuffed peppers offer all the classic taco flavors in a sturdy, natural container. The colorful bell peppers remain crisp and hold the savory filling perfectly.
Inside, you will find a hearty mix of seasoned ground meat, black beans, and sweet corn. A layer of melted cheese and a dollop of salsa add the finishing touches. This meal is naturally low in carbohydrates but high in flavor.
You can customize the heat by choosing a mild or spicy salsa. These peppers reheat beautifully in the microwave and stay juicy for days. It is a fun, hand-held dinner option that requires very little cleanup.
Ingredients
3 large bell peppers (any color), halved and seeded
1 pound ground turkey or beef
1 cup cooked rice
1/2 cup black beans, rinsed
1/2 cup corn kernels
1 cup shredded Mexican blend cheese
1/2 cup salsa
1 tablespoon taco seasoning
Fresh cilantro and lime for garnish
Equipment
Large baking dish
Large skillet
Spoon
DIY Instructions
Heat your oven to 375 degrees Fahrenheit. Slice the bell peppers in half from top to bottom and remove the seeds and ribs.
Place the pepper halves in a baking dish with a splash of water at the bottom. Cover with foil and bake for 10 minutes to soften them.
While the peppers pre-bake, brown the ground meat in a skillet over medium heat. Drain any excess fat.
Stir the taco seasoning, cooked rice, black beans, corn, and salsa into the meat. Let it simmer for 2 minutes.
Remove the peppers from the oven and carefully drain the water from the dish.
Spoon the meat and bean mixture into each pepper half, pressing down gently to pack them full.
Top each pepper with a generous sprinkle of shredded cheese.
Bake uncovered for another 15 to 20 minutes until the cheese is bubbly and the peppers are tender.
Let them cool slightly before placing them into your meal prep containers.
Serve with a lime wedge and fresh cilantro on top.
18. Miso Glazed Eggplant with Soba Noodles and Edamame
Dinner Meal Prep Ideas
If you enjoy Japanese cuisine, this savory and sweet eggplant dish will become a fast favorite. The eggplant is scored and roasted until the flesh becomes buttery and tender. A rich miso glaze adds a deep umami flavor that is truly addictive.
Cold soba noodles provide a refreshing and earthy base for the meal. Shredded carrots and steamed edamame add a variety of textures and bright colors. This dish is a nutritional powerhouse that feels light on the stomach.
Soba noodles are made from buckwheat and offer a unique, nutty taste. The eggplant holds onto the glaze, making every bite flavorful. This is an elegant, plant-based option for your weekly dinner rotation.
Ingredients
1 large eggplant, halved lengthwise
2 tablespoons white or red miso paste
1 tablespoon honey or maple syrup
1 tablespoon soy sauce
8 ounces soba noodles
1 cup edamame, shelled
1/2 cup shredded carrots
1 tablespoon sesame oil
Shredded nori and sesame seeds for garnish
Equipment
Baking sheet
Small bowl for glaze
Large pot for noodles
Sharp knife
DIY Instructions
Preheat your oven to 400 degrees Fahrenheit. Score the flesh of the eggplant in a diamond pattern, being careful not to cut through the skin.
In a small bowl, whisk together the miso paste, honey, soy sauce, and a teaspoon of sesame oil.
Brush the glaze generously over the scored side of the eggplant.
Place the eggplant on a baking sheet and roast for 25 to 30 minutes until it is very soft and the top is caramelized.
While the eggplant roasts, boil a pot of water and cook the soba noodles for about 4 to 5 minutes.
Drain the noodles and rinse them immediately under cold water to keep them from sticking. Toss them with a little sesame oil.
Steam the edamame for 3 minutes.
Divide the cold soba noodles, shredded carrots, and edamame into your containers.
Place the roasted eggplant half on top of the noodles.
Garnish with sesame seeds and shredded nori before sealing the containers.
19. Cajun Shrimp and Sausage with Okra and Couscous
Dinner Meal Prep Ideas
Bring a taste of the bayou to your dinner table with this spicy and savory bowl. Plump shrimp and smoky sausage coins create a high-protein duo that is hard to beat. The bold Cajun spices provide a heat that lingers in the best way possible.
Slices of okra and red bell peppers add a nice crunch and earthy flavor. Fluffy couscous acts as a sponge, soaking up all the spicy juices from the pan. This is a fast-cooking meal that packs a massive punch of flavor.
You can adjust the spice level by using more or less Cajun seasoning. This recipe is perfect for those who want a hearty, filling meal that is easy to assemble. It stays fresh and delicious for several days in the fridge.
Ingredients
1 pound large shrimp, peeled and deveined
1/2 pound smoked sausage (like Andouille), sliced into rounds
1 cup okra, sliced into rounds
1 red bell pepper, sliced
1 cup dry couscous
2 tablespoons Cajun seasoning
1 tablespoon olive oil
1 lemon, juiced
Fresh parsley for garnish
Equipment
Large skillet
Medium bowl for couscous
Tongs
DIY Instructions
Prepare the couscous by placing 1 cup of dry grains in a bowl. Pour 1 cup of boiling water over them, cover with a plate, and let it sit for 5 minutes.
Heat the olive oil in a large skillet over medium-high heat.
Add the sausage rounds to the pan and cook for 3 minutes until they are browned on both sides.
Toss the sliced okra and red bell peppers into the skillet. Sauté for about 5 minutes until the vegetables are tender-crisp.
Add the shrimp to the pan and sprinkle the Cajun seasoning over everything.
Cook for 3 to 4 minutes, tossing frequently, until the shrimp are pink and opaque.
Squeeze the lemon juice over the mixture to brighten the flavors.
Fluff the couscous with a fork and divide it into your containers.
Top the couscous with the shrimp, sausage, and vegetable mixture.
Garnish with fresh parsley and store in the refrigerator for up to three days.
20. Lemon Dill Chicken Thighs with Roasted Root Vegetables
Dinner Meal Prep Ideas
Chicken thighs are a meal prep hero because they stay juicy even after reheating. These thighs are rubbed with fresh dill and lemon for a classic, bright flavor profile. Pairing them with a rainbow of roasted root vegetables makes for a balanced and beautiful plate.
Carrots, parsnips, and beets provide a natural sweetness that balances the savory chicken. The roasted vegetables develop a lovely caramelization in the oven. This meal is a comforting, “set it and forget it” option for your busy Sunday prep.
Using a single baking sheet for the vegetables makes cleanup a breeze. You can swap the root vegetables for whatever is in season. This dish is a reliable choice for anyone who wants a wholesome, home-cooked feel.
Ingredients
4 bone-in, skin-on chicken thighs
2 large carrots, peeled and sliced
2 parsnips, peeled and sliced
2 small beets, peeled and wedged
2 tablespoons fresh dill, chopped
1 lemon (sliced into rounds)
3 tablespoons olive oil
1 teaspoon garlic powder
Salt and pepper to taste
Equipment
Two large baking sheets
Large mixing bowl
Meat thermometer
DIY Instructions
Preheat your oven to 400 degrees Fahrenheit.
In a large bowl, toss the sliced carrots, parsnips, and beets with 2 tablespoons of olive oil, salt, and pepper.
Spread the vegetables in a single layer on a baking sheet. Roast them for 35 to 40 minutes, tossing halfway through.
Pat the chicken thighs dry with a paper towel. Rub them with the remaining olive oil, garlic powder, salt, pepper, and half of the fresh dill.
Place the chicken on a second baking sheet. Top each thigh with a lemon slice.
Bake the chicken for 25 to 30 minutes until the skin is crispy and the internal temperature reaches 165 degrees Fahrenheit.
Once the vegetables and chicken are done, let them rest for a few minutes.
Divide the roasted root vegetables into your containers and place a chicken thigh on top of each.
Sprinkle the remaining fresh dill over the meals for a final burst of flavor.
These meals will stay fresh and delicious in the fridge for up to four days.
21. Sesame Beef and Kimchi Rice Bowls
Dinner Meal Prep Ideas
Eating the same chicken and rice every day can feel like a chore. This vibrant bowl uses thinly sliced beef tossed in a savory glaze to wake up your palate. The addition of spicy kimchi adds a fermented tang that balances the richness of the meat.
Crispy cucumber slices and a sprinkle of sesame seeds provide a refreshing crunch. Steamed white rice acts as a neutral base to soak up all the bold juices. You get a balanced mix of probiotics, protein, and grains in one portable container.
This meal prep option feels like a gourmet street food find right in your kitchen. It holds up well for several days and actually develops more flavor over time. It is a smart way to add some heat to your weekly dinner routine.
Ingredients
1 pound flank steak, thinly sliced
2 cups cooked white rice
1/2 cup kimchi
1 medium cucumber, sliced into rounds
2 tablespoons soy sauce
1 tablespoon sesame oil
1 tablespoon brown sugar
1 tablespoon sesame seeds
2 green onions, sliced
1 tablespoon vegetable oil
Equipment
Large skillet or wok
Small mixing bowl
Chef’s knife
Tongs
DIY Instructions
Place the sliced beef in a small bowl. Add the soy sauce, sesame oil, and brown sugar. Mix it well and let it sit for 10 minutes to marinate.
Heat the vegetable oil in your skillet over high heat. You want the pan to be very hot so the beef sears quickly without getting tough.
Add the beef to the pan in a single layer. Cook for 2 to 3 minutes until the edges are crispy and browned. Remove the meat from the pan and set it aside.
Scoop a portion of warm, cooked rice into each of your meal prep containers.
Arrange a generous serving of the sesame beef on one side of the rice.
Place a spoonful of spicy kimchi and several cucumber rounds on the other side.
Sprinkle the entire bowl with sesame seeds and sliced green onions for a fresh finish.
Snap the lids on once the food reaches room temperature.
Store these in the refrigerator for up to three days.
22. Moroccan Chickpea and Butternut Squash Tagine
Dinner Meal Prep Ideas
Vegetarian meals should never feel like an afterthought or leave you reaching for snacks. This hearty tagine uses chickpeas and sweet butternut squash to create a filling, fiber-rich feast. The warm spices like cinnamon and cumin fill your kitchen with an incredible aroma.
Fluffy couscous serves as the base, topped with creamy yogurt and fresh cilantro. Dried raisins or apricots mixed into the stew provide little bursts of sweetness. This dish is naturally colorful and looks beautiful in glass storage containers.
This recipe is a “one-pot” style meal that simplifies your Sunday cleaning. The flavors deepen as the stew sits, making it a champion for meal prep. It is a comforting, plant-based dinner that feels like a hug in a bowl.
Ingredients
2 cups butternut squash, cubed
1 can (15 ounces) chickpeas, drained
1 can (14 ounces) diced tomatoes
1 small cauliflower, cut into florets
1 cup dry couscous
1/2 cup Greek yogurt
1/4 cup raisins
1 teaspoon ground cumin
1/2 teaspoon cinnamon
1 tablespoon olive oil
Fresh cilantro for garnish
Equipment
Large pot or Dutch oven
Small bowl for couscous
Wooden spoon
Measuring spoons
DIY Instructions
Heat the olive oil in a large pot over medium heat. Add the cubed butternut squash and cauliflower florets. Sauté for 5 minutes until they start to soften.
Stir in the cumin and cinnamon. Cook for 1 minute until you can smell the spices.
Pour in the diced tomatoes and the drained chickpeas. Bring the mixture to a gentle boil.
Reduce the heat to low, cover the pot, and simmer for 20 minutes. The squash should be tender enough to poke with a fork.
Stir in the raisins during the last 5 minutes of cooking.
Prepare the couscous by placing the dry grains in a bowl and adding 1 cup of boiling water. Cover it for 5 minutes, then fluff with a fork.
Divide the fluffy couscous into your meal prep containers.
Ladle the thick vegetable and chickpea stew over the couscous.
Add a dollop of Greek yogurt and a sprinkle of fresh cilantro to each portion.
Allow the meals to cool before refrigerating for up to four days.
23. Balsamic Glazed Chicken with Caprese Salad and Asparagus
Dinner Meal Prep Ideas
This bowl brings the flavors of a summer garden directly to your meal prep routine. The chicken breasts are seared and glazed with a thick, tangy balsamic reduction. It is a high-protein option that feels light and sophisticated.
A side of fresh Caprese salad features creamy mozzarella pearls and juicy cherry tomatoes. Tender asparagus spears provide a healthy green element with a nice snap. This combination offers a mix of warm and cool textures that keep things interesting.
Brown rice or quinoa hidden underneath the chicken provides a steady source of energy. This meal is excellent for those who want a “clean” dinner that does not taste like diet food. It is a colorful, nutrient-dense choice for a busy week.
Ingredients
2 boneless, skinless chicken breasts
1 bunch asparagus, trimmed
1 cup cherry tomatoes, halved
1/2 cup mozzarella pearls
1 cup cooked brown rice
1/4 cup balsamic glaze
1 tablespoon olive oil
Fresh basil leaves
Salt and pepper to taste
Equipment
Large skillet
Tongs
Chef’s knife
Small bowls for assembly
DIY Instructions
Season the chicken breasts with salt and pepper. Heat olive oil in a skillet over medium-high heat.
Cook the chicken for 6 to 7 minutes per side until the internal temperature reaches 165 degrees Fahrenheit.
During the last 2 minutes of cooking, pour the balsamic glaze over the chicken. Turn the pieces to ensure they are fully coated and the sauce thickens.
Remove the chicken and let it rest for 5 minutes before slicing.
In the same skillet, toss the asparagus spears. Sauté for 3 to 4 minutes until they are bright green and tender.
In a small bowl, toss the halved cherry tomatoes with mozzarella pearls and torn fresh basil leaves.
Place a scoop of brown rice into your containers.
Lay the sliced balsamic chicken on one side and the sautéed asparagus on the other.
Add the Caprese salad mixture to the remaining corner of the container.
Store in the fridge for up to three days.
24. Jerk Chicken Drumsticks with Pineapple Salsa
Dinner Meal Prep Ideas
Give your meal prep a tropical makeover with these smoky and spicy jerk chicken drumsticks. The dark meat stays incredibly juicy during reheating, making it a reliable choice for the end of the week. The charred skin provides a deep, complex flavor.
Sweet pineapple salsa offers a cooling contrast to the jerk spice heat. It is a refreshing topping that adds a burst of sunshine to your plate. This meal is a great way to use affordable cuts of meat without sacrificing quality.
Pairing the chicken with lime wedges allows you to control the acidity of the dish. It is a fun, finger-food style dinner that breaks the monotony of standard bowls. This recipe is a favorite for those who love bold, Caribbean-inspired flavors.
Ingredients
6 chicken drumsticks
2 tablespoons jerk seasoning rub
1 cup fresh pineapple, diced
1/2 red onion, finely diced
1 jalapeno, seeded and minced (optional)
1/4 cup fresh cilantro, chopped
2 limes (one for juice, one for wedges)
1 tablespoon olive oil
Equipment
Large baking sheet
Small mixing bowl
Pastry brush or spoon
DIY Instructions
Preheat your oven to 400 degrees Fahrenheit. Pat the chicken drumsticks dry with paper towels.
Rub the drumsticks with olive oil and then coat them generously with the jerk seasoning.
Place the chicken on a baking sheet and roast for 35 to 40 minutes. The skin should be dark and the meat should pull away easily from the bone.
While the chicken cooks, make the salsa by mixing the diced pineapple, red onion, jalapeno, and cilantro in a bowl.
Squeeze the juice of one lime over the salsa and stir to combine.
Once the chicken is done, let it cool for a few minutes.
Place two drumsticks in each of your meal prep containers.
Add a large scoop of the pineapple salsa on the side.
Include a fresh lime wedge in each box to squeeze over the chicken just before eating.
Refrigerate for up to four days.
25. Spinach and Feta Stuffed Salmon with Honey Glazed Carrots
Dinner Meal Prep Ideas
Elevate your weeknight dinner with this elegant stuffed salmon recipe. The fish is filled with a savory mixture of sautéed spinach and salty feta cheese. It looks like a restaurant dish but comes together in under half an hour.
The side of honey-glazed carrots adds a natural sweetness that complements the rich fish. A small pat of herb butter on the side provides an extra layer of indulgence. This meal is packed with healthy fats and vitamins to keep you feeling your best.
Using small, whole carrots makes the presentation look very professional. The stuffing keeps the salmon moist from the inside out. This is an excellent choice for a special “mid-week treat” prep.
Ingredients
2 salmon fillets (thick cut)
1 cup fresh spinach, chopped
1/4 cup feta cheese crumbles
1 pound baby carrots (with stems if possible)
1 tablespoon honey
2 tablespoons butter
1 tablespoon olive oil
Salt, pepper, and dried dill
Equipment
Small skillet
Baking dish
Sharp paring knife
Small bowl
DIY Instructions
Preheat your oven to 375 degrees Fahrenheit.
Sauté the chopped spinach in a small skillet with a drop of oil for 2 minutes until wilted. Let it cool, then mix it with the feta cheese in a bowl.
Use a sharp knife to cut a slit into the side of each salmon fillet to create a pocket. Be careful not to cut all the way through.
Stuff the spinach and feta mixture into the salmon pockets. Season the outside of the fish with salt, pepper, and dill.
Place the carrots in a baking dish. Drizzle them with olive oil, honey, and a pinch of salt.
Lay the stuffed salmon fillets on top of the carrots or in the same dish.
Bake for 15 to 18 minutes until the salmon is flaky and the carrots are tender.
Place one fillet and a portion of carrots into each container.
Add a small dollop of herb butter to the salmon while it is still warm so it melts over the top.
Store in the refrigerator for up to two days.
26. Korean Inspired Ground Beef with Broccoli and Carrots
Dinner Meal Prep Ideas
This recipe is a faster, more affordable version of traditional beef bulgogi. Using ground beef allows you to get that savory-sweet flavor profile in a fraction of the time. The meat is crumbled and cooked with ginger and garlic for a deep aroma.
A large portion of steamed broccoli and shredded carrots provides a healthy crunch. The brown rice base makes this a filling and balanced meal. It is a fantastic option for families who need to prep several days of food at once.
Adding a few slices of fresh red chili gives the dish a beautiful pop of color and a bit of heat. This meal reheats perfectly and the rice stays moist thanks to the beef juices. It is a reliable staple for any meal prep enthusiast.
Ingredients
1 pound ground beef
1/2 cup soy sauce
1/4 cup brown sugar
1 tablespoon fresh ginger, grated
3 cloves garlic, minced
2 cups broccoli florets
1 cup shredded carrots
2 cups cooked brown rice
1 teaspoon sesame seeds
1 tablespoon sesame oil
Equipment
Large skillet
Small bowl
Wooden spoon
Steamer basket
DIY Instructions
In a small bowl, whisk together the soy sauce, brown sugar, grated ginger, and minced garlic to make the sauce.
Heat a skillet over medium-high heat. Add the ground beef and cook it until it is browned, breaking it into small crumbles as you go. Drain any excess fat.
Pour the sauce over the beef and let it simmer for 3 to 5 minutes until the liquid thickens and coats the meat.
While the beef simmers, steam the broccoli and carrots for 4 to 5 minutes until they are tender but still have a bit of a bite.
Scoop the cooked brown rice into your meal prep containers.
Divide the Korean beef and the steamed vegetables into the containers.
Sprinkle sesame seeds over the beef for a professional finish.
Allow the food to cool before sealing the lids.
Store in the refrigerator for up to four days.
27. Red Lentil Dal with Spinach and Fresh Naan
Dinner Meal Prep Ideas
Indian-inspired dal is one of the most budget-friendly and healthy meals you can make. These red lentils cook down into a creamy, comforting porridge seasoned with turmeric and cumin. A swirl of coconut milk or yogurt on top adds a luxurious touch.
Folded in fresh spinach provides a boost of iron and a vibrant green color. Serving this with a piece of warm naan bread makes the meal feel like a complete experience. It is a protein-packed vegetarian option that is incredibly satisfying.
Dal is a “forgiving” dish that actually improves in flavor after a day or two. You can scoop it up with the bread or eat it like a thick stew. It is an excellent choice for a cozy, meatless dinner on a cold night.
Ingredients
1 cup dry red lentils, rinsed
1 can (14 ounces) diced tomatoes
2 cups fresh spinach
3 cups vegetable broth
1/2 cup coconut milk or plain yogurt
1 teaspoon turmeric
1 teaspoon cumin seeds
1 tablespoon ginger-garlic paste
4 pieces of naan bread
1 tablespoon oil
Equipment
Large pot
Whisk or wooden spoon
Measuring cups
DIY Instructions
Heat oil in a large pot over medium heat. Add the cumin seeds and ginger-garlic paste. Fry for 1 minute until fragrant.
Stir in the rinsed red lentils and the turmeric.
Add the diced tomatoes and vegetable broth. Bring the mixture to a boil.
Reduce the heat to low and simmer for 15 to 20 minutes. The lentils should soften and absorb most of the liquid.
Stir in the fresh spinach and let it wilt into the hot lentils for about 2 minutes.
Whisk in the coconut milk or yogurt to make the dal extra creamy.
Ladle the dal into deep meal prep containers.
Wrap the naan bread in foil or place it in a separate compartment so it stays dry.
When you are ready to eat, warm the dal and the bread together.
Store in the fridge for up to five days.
28. Classic Turkey Burger with Sweet Potato Fries
Dinner Meal Prep Ideas
Who says you can’t have a burger for your meal prep? This lean turkey patty is seasoned with herbs and grilled to stay juicy. Placing the toppings like onion and pickles on the side ensures the bun stays fresh and soft.
The side of oven-baked sweet potato fries provides a healthier alternative to deep-fried versions. A small container of ketchup or mustard is all you need for dipping. This meal feels like a weekend treat but fits perfectly into a healthy lifestyle.
Using a sturdy whole-grain bun helps the sandwich hold its shape in the fridge. You can assemble the burger in seconds once you are ready to eat. It is a great way to satisfy a fast-food craving without the extra grease.
Ingredients
1 pound ground turkey
1 teaspoon onion powder
1 teaspoon dried parsley
4 burger buns
2 large sweet potatoes, cut into wedges
1 red onion, sliced into rings
4 large pickles, sliced
Lettuce leaves and tomato slices
2 tablespoons olive oil
Salt and pepper
Equipment
Large skillet or grill pan
Baking sheet
Large mixing bowl
DIY Instructions
Preheat your oven to 400 degrees Fahrenheit for the fries.
Toss the sweet potato wedges with olive oil, salt, and pepper on a baking sheet. Roast for 25 minutes until the edges are golden.
While the fries bake, mix the ground turkey with onion powder, parsley, salt, and pepper in a bowl.
Form the turkey mixture into four even patties. Use your thumb to make a small indent in the center of each to prevent them from puffing up.
Cook the patties in a skillet over medium heat for 5 to 6 minutes per side. Ensure they are cooked all the way through.
Place the cooked turkey patties and the sweet potato fries into your containers.
In a separate small container or a dedicated section, pack the lettuce, tomato, onion, and pickles.
Keep the buns in a separate bag or on top of the patty (if you don’t mind a little moisture).
Assemble the burger just before eating for the best texture.
Store in the refrigerator for up to three days.
29. Lemon Garlic Shrimp with Spaghetti Squash
Dinner Meal Prep Ideas
If you are looking for a very light dinner, this shrimp and squash combo is a winner. The spaghetti squash strands act as a low-carb “pasta” that picks up the lemon butter sauce perfectly. Plump shrimp provide a quick-cooking protein that feels fancy.
Red pepper flakes add a tiny hint of heat that cuts through the citrus. A garnish of fresh parsley makes the whole dish look bright and inviting. This is a high-volume meal that allows you to eat a large portion for very few calories.
Cooking the squash in the microwave or oven is simple and yields a unique texture. The shrimp only take a few minutes in the pan, making this a very fast prep. It is a refreshing and healthy choice for a late-week dinner.
Ingredients
1 pound large shrimp, peeled and deveined
1 large spaghetti squash
2 tablespoons butter
3 cloves garlic, minced
1 lemon (juice and zest)
1/2 teaspoon red pepper flakes
1/4 cup fresh parsley, chopped
1 tablespoon olive oil
Salt and pepper
Equipment
Large skillet
Sharp knife and spoon
Baking sheet or microwave-safe dish
DIY Instructions
Cut the spaghetti squash in half lengthwise and scoop out the seeds.
Place the squash face down on a baking sheet and bake at 400 degrees Fahrenheit for 40 minutes (or microwave for 10 to 12 minutes).
Use a fork to scrape the inside of the squash into long, spaghetti-like strands.
Heat the olive oil and butter in a skillet over medium heat. Add the minced garlic and red pepper flakes.
Add the shrimp to the pan. Cook for 2 minutes per side until they are pink and curled.
Stir in the lemon juice, lemon zest, and fresh parsley.
Add the spaghetti squash strands to the skillet and toss everything together so the squash is coated in the garlic butter.
Divide the mixture into your meal prep containers.
Season with a final pinch of salt and pepper.
Store in the refrigerator for up to two days.
30. Sheet Pan Gnocchi with Sausage and Peppers
Dinner Meal Prep Ideas
This recipe is a game-changer for anyone who hates washing dishes. You roast the shelf-stable gnocchi directly on the pan without boiling them first. They turn out crispy on the outside and pillowy on the inside.
Savory sausage coins and colorful bell peppers roast alongside the gnocchi to create a complete meal. Red onion wedges add a sweet, charred flavor to the mix. It is a rustic, Italian-style dinner that requires almost zero active effort.
A sprinkle of dried oregano and a dash of parmesan cheese are the only seasonings you need. This meal is incredibly sturdy and holds its texture very well in the fridge. It is a fun and creative way to use a pantry staple like gnocchi.
Ingredients
1 package (16 ounces) shelf-stable potato gnocchi
1 pound smoked sausage, sliced into rounds
2 bell peppers (any color), sliced
1 red onion, cut into wedges
2 tablespoons olive oil
1 teaspoon dried oregano
1/4 cup grated parmesan cheese
Salt and pepper to taste
Equipment
Large rimmed baking sheet
Spatula
Measuring spoons
DIY Instructions
Preheat your oven to 400 degrees Fahrenheit.
Place the dry gnocchi, sausage rounds, bell pepper slices, and red onion wedges directly onto the baking sheet.
Drizzle everything with olive oil and sprinkle with oregano, salt, and pepper.
Use your hands or a spatula to toss everything together until the oil is evenly distributed. Spread it out into a single layer.
Roast for 20 to 25 minutes. Give the pan a good shake halfway through to ensure even browning.
The gnocchi should look golden and the vegetables should have slightly charred edges.
Remove the pan from the oven and immediately sprinkle the parmesan cheese over the hot food.
Divide the sheet pan mixture into your meal prep containers.
Allow it to cool before storing.
This meal stays delicious in the refrigerator for up to four days.
31. Baked Herb Falafel with Quinoa and Tahini Dressing
Dinner Meal Prep Ideas
Traditional falafel is often deep-fried, which can make it feel heavy for a weekday dinner. These baked green falafel balls offer a lighter alternative while maintaining a satisfying, crispy exterior. The vibrant herb-packed centers pair beautifully with nutty quinoa.
Crisp cucumber rounds and bright pink pickled radishes add a refreshing crunch to the bowl. A centerpiece of creamy tahini dressing provides a rich, nutty finish that ties the Mediterranean flavors together. This meal is a nutrient-dense powerhouse that keeps you feeling energized.
Preparing the falafel in the oven reduces active cooking time and mess. You can easily assemble these bowls in minutes once your components are prepped. It is a colorful, plant-based way to keep your dinner rotation fresh and exciting.
Ingredients
1 can (15 ounces) chickpeas, rinsed and patted dry
1/2 cup fresh parsley, chopped
1/2 cup fresh cilantro, chopped
1 cup cooked quinoa
1/2 cup cherry tomatoes, halved
1/2 cup cucumber, sliced
1/4 cup pickled radishes or onions
2 tablespoons tahini
1 lemon, juiced
2 cloves garlic, minced
1 teaspoon ground cumin
1 tablespoon olive oil
Salt and pepper to taste
Equipment
Food processor
Baking sheet
Parchment paper
Small bowl for dressing
Measuring spoons
DIY Instructions
Preheat your oven to 400 degrees Fahrenheit and line a baking sheet with parchment paper.
In a food processor, combine the chickpeas, parsley, cilantro, garlic, cumin, salt, and pepper. Pulse until the mixture is combined but still has some texture. Avoid turning it into a smooth paste.
Scoop about two tablespoons of the mixture at a time and roll them into small balls. Place them on the prepared baking sheet.
Lightly brush each falafel ball with olive oil to help them brown in the oven.
Bake for 20 to 25 minutes, turning them halfway through, until they are golden and firm.
While the falafel bakes, whisk together the tahini, lemon juice, and a splash of warm water in a small bowl until the dressing is smooth and pourable.
Divide the cooked quinoa among your meal prep containers.
Arrange the baked falafel, sliced cucumbers, cherry tomatoes, and pickled radishes on top of the quinoa.
Place the tahini dressing in small, separate containers to keep the rest of the meal crisp.
Store in the refrigerator for up to four days.
32. Honey Mustard Pork Tenderloin with Brussels Sprouts and Apples
Dinner Meal Prep Ideas
Pork tenderloin is an underrated meal prep protein that stays incredibly tender when roasted properly. This version features a thick, grainy honey mustard glaze that caramelizes in the oven for a sweet and savory finish. The meat remains juicy and holds up well to reheating.
Roasted Brussels sprouts and tart apple chunks provide a seasonal, earthy side dish. The apples soften and release their sweetness, balancing the slight bitterness of the sprouts. A sprig of fresh rosemary adds a fragrant, woody aroma to the entire container.
This sheet-pan style meal minimizes cleanup while maximizing flavor. You get a sophisticated, balanced dinner that feels like a cozy autumn feast. It is an excellent choice for those who want a break from standard chicken and broccoli preps.
Ingredients
1 pound pork tenderloin
2 cups Brussels sprouts, halved
1 large apple, cubed
2 tablespoons grainy Dijon mustard
1 tablespoon honey
2 tablespoons olive oil
1 teaspoon dried rosemary or 1 fresh sprig
2 cloves garlic, minced
Salt and black pepper to taste
Equipment
Large rimmed baking sheet
Small mixing bowl
Meat thermometer
Pastry brush
DIY Instructions
Preheat your oven to 400 degrees Fahrenheit.
In a small bowl, whisk together the grainy mustard, honey, minced garlic, and one tablespoon of olive oil.
Place the pork tenderloin in the center of a large baking sheet. Season it with salt and pepper, then brush the honey mustard glaze over the entire surface.
In a separate bowl, toss the halved Brussels sprouts and apple cubes with the remaining olive oil, rosemary, salt, and pepper.
Spread the sprout and apple mixture around the pork on the baking sheet in a single layer.
Roast for 20 to 25 minutes. Use a meat thermometer to ensure the pork reaches an internal temperature of 145 degrees Fahrenheit.
Let the meat rest on a cutting board for at least 5 minutes before slicing. This keeps the juices inside.
Slice the pork into thick rounds.
Divide the roasted Brussels sprouts and apples into your containers and lay the pork slices on top.
Store in the refrigerator for up to four days.
33. Lemon Herb Tuna Salad with Chickpeas and Crackers
Dinner Meal Prep Ideas
Not every meal prep needs to be a hot dinner. This refreshing tuna salad uses a base of chickpeas and celery for a high-fiber, crunchy texture. The absence of heavy mayonnaise makes it a lighter, zestier option for those busy nights when you need a quick bite.
Small pieces of red onion and capers add a sharp, salty punch to every spoonful. Serving the salad with buttery round crackers and fresh cucumber slices creates a fun, snack-style dinner. A garnish of dried seaweed or fresh dill brightens the flavor profile.
This recipe is incredibly shelf-stable and stays fresh in the fridge without losing its texture. You can easily customize it with your favorite herbs or a splash of hot sauce. It is a reliable, no-cook staple for any meal prep rotation.
Ingredients
2 cans (5 ounces each) tuna in water, drained
1 can (15 ounces) chickpeas, rinsed
2 stalks celery, finely diced
1/4 red onion, finely diced
1 tablespoon capers, drained
1 lemon, juiced
2 tablespoons olive oil
1/2 teaspoon dried dill or fresh parsley
Salt and pepper to taste
1 box round buttery crackers
1 cucumber, sliced for serving
Equipment
Medium mixing bowl
Fork
Glass storage containers with dividers
DIY Instructions
In a medium mixing bowl, use a fork to flake the drained tuna into small pieces.
Add the rinsed chickpeas, diced celery, red onion, and capers to the bowl.
Pour in the lemon juice and olive oil. Stir everything together until the ingredients are evenly coated.
Season the salad with dill, salt, and pepper. Mix again and taste to adjust the seasoning if needed.
If your meal prep containers have dividers, place the tuna salad in the largest section.
In the smaller sections, add a stack of crackers and several cucumber slices.
If your containers do not have dividers, keep the crackers in a small zip-top bag to ensure they stay crunchy.
Top the tuna salad with a little extra fresh herb or a sprinkle of black pepper for presentation.
Store in the refrigerator for up to three days.
Enjoy cold straight from the container.
34. BBQ Pulled Chicken Mac and Cheese with Peas
Dinner Meal Prep Ideas
Comfort food can be a part of your healthy meal prep routine when you balance the ingredients. This dish features creamy macaroni and cheese topped with a generous portion of smoky BBQ pulled chicken. The addition of bright green peas adds a pop of color and necessary fiber.
Stringy, melted cheddar cheese makes every bite feel indulgent and satisfying. Fresh chives sprinkled on top provide a mild onion flavor that cuts through the richness of the sauce. This meal is a guaranteed winner for families or anyone needing a morale boost during the week.
Using a slow cooker for the chicken makes the preparation almost effortless. The pasta holds up well to reheating, making this a reliable choice for late-week dinners. It is a hearty, flavorful option that will make you look forward to mealtime.
Ingredients
2 boneless, skinless chicken breasts
1/2 cup your favorite BBQ sauce
8 ounces elbow macaroni
2 cups shredded cheddar cheese
1/2 cup milk
2 tablespoons butter
1 cup frozen peas
Fresh chives, chopped
Salt and pepper to taste
Equipment
Slow cooker
Large pot
Colander
Two forks for shredding
DIY Instructions
Place the chicken breasts and BBQ sauce in a slow cooker. Cook on low for 6 hours or high for 3 hours until the meat is very tender.
Once cooked, use two forks to shred the chicken directly in the slow cooker so it soaks up all the extra sauce.
Boil a large pot of salted water and cook the elbow macaroni according to the package directions.
In the last 2 minutes of the pasta cooking time, add the frozen peas to the pot to blanch them.
Drain the pasta and peas, then return them to the warm pot.
Add the butter, milk, and shredded cheese to the pasta. Stir over low heat until the cheese is completely melted and the sauce is creamy.
Season the mac and cheese with salt and pepper as needed.
Divide the cheesy pasta and peas into your meal prep containers.
Top each portion with a large scoop of the BBQ pulled chicken.
Garnish with fresh chives. Allow the meals to cool before refrigerating for up to four days.
35. Vietnamese Inspired Chicken Bun Cha Bowls
Dinner Meal Prep Ideas
Bring the fresh, vibrant flavors of Hanoi to your kitchen with these easy-to-assemble bowls. This recipe uses seasoned ground chicken patties served alongside silky rice vermicelli noodles. The combination of warm meat and cool noodles creates a wonderful sensory experience.
A large portion of fresh mint, cilantro, and crisp lettuce leaves provides a refreshing herbal hit. Pickled carrots and daikon add a tangy crunch that balances the savory chicken. A side of sweet and spicy dipping sauce ties all the elements together.
Rice noodles are a great meal prep choice because they require very little cooking. The chicken patties stay juicy and provide a lean protein source. This is a light, fragrant dinner that won’t leave you feeling weighed down.
Ingredients
1 pound ground chicken
1 package rice vermicelli noodles
1 head romaine lettuce, shredded
1/2 cup fresh mint leaves
1/2 cup fresh cilantro
1/2 cup pickled carrots and daikon
2 tablespoons fish sauce
1 tablespoon sugar
1 lime, juiced
1 clove garlic, minced
1 red chili, sliced (optional)
Equipment
Large skillet
Medium bowl for noodles
Small jar for sauce
DIY Instructions
In a bowl, mix the ground chicken with a tablespoon of fish sauce and a pinch of pepper. Form into small, flat patties.
Heat a skillet over medium heat with a little oil. Cook the chicken patties for 4 to 5 minutes per side until fully cooked and browned.
Place the dry rice vermicelli in a large bowl and cover with boiling water. Let them sit for 3 to 5 minutes until soft, then drain and rinse with cold water.
Make the “nuoc cham” sauce by shaking the remaining fish sauce, lime juice, sugar, minced garlic, and sliced chili in a small jar with a splash of water.
Divide the cool rice noodles among your containers.
Arrange the chicken patties on one side of the noodles.
Fill the rest of the container with shredded lettuce, fresh mint, cilantro, and the pickled vegetables.
Keep the sauce in a separate small container to drizzle over the bowl just before eating.
Store in the refrigerator for up to three days.
Enjoy at room temperature or slightly chilled.
36. Creamy Golden Cauliflower Curry with Rice and Naan
Dinner Meal Prep Ideas
Curries are a staple of successful meal prepping because the flavors actually improve as they sit in the fridge. This golden version features charred cauliflower florets swimming in a creamy, spiced coconut sauce. Plump chickpeas add bulk and plant-based protein.
Steamed brown or white rice serves as the perfect base to soak up the fragrant sauce. A garnish of fresh pomegranate seeds adds a surprising burst of sweetness and color. Serving this with warm naan bread makes the meal feel like a complete restaurant experience.
Roasting the cauliflower before adding it to the sauce adds a deep, smoky flavor. This is a comforting, warming dinner that is naturally vegan and gluten-free. It is a fantastic way to eat more vegetables without feeling like you are missing out.
Ingredients
1 large head of cauliflower, cut into florets
1 can (15 ounces) chickpeas, rinsed
1 can (14 ounces) coconut milk
2 tablespoons yellow curry powder
1 cup cooked rice
1/4 cup pomegranate seeds
Fresh cilantro for garnish
2 pieces naan bread
1 tablespoon vegetable oil
Salt and pepper to taste
Equipment
Baking sheet
Large pot or deep skillet
Wooden spoon
DIY Instructions
Preheat your oven to 400 degrees Fahrenheit. Toss the cauliflower florets with oil, salt, and pepper on a baking sheet.
Roast the cauliflower for 20 minutes until the edges are charred and tender.
In a large pot, combine the coconut milk, curry powder, and a pinch of salt. Bring to a gentle simmer over medium heat.
Stir the roasted cauliflower and the rinsed chickpeas into the curry sauce. Let it simmer for 5 to 10 minutes so the flavors can meld.
Taste the sauce and adjust the seasoning if needed.
Divide the cooked rice into your containers.
Ladle the cauliflower and chickpea curry over the rice.
Sprinkle the pomegranate seeds and fresh cilantro over the top for a bright finish.
Include a piece of naan bread on the side of each container.
Store in the refrigerator for up to five days and reheat thoroughly before eating.
37. Avocado Salmon Sliders with Toasted Brioche Buns
Dinner Meal Prep Ideas
Salmon burgers are a fantastic alternative to traditional beef patties for a lighter, omega-3-rich dinner. These sliders feature pan-seared salmon cakes topped with a thick layer of creamy smashed avocado. The soft brioche buns add a touch of sweetness and luxury to the meal.
A swipe of herb-infused mayonnaise or Greek yogurt adds moisture and tang. These small sandwiches are easy to portion and stay delicious for several days. It is a modern, trendy dinner option that looks beautiful and tastes even better.
You can make the salmon patties in advance and freeze them for future weeks. The avocado stays green longer if you add a generous squeeze of lime juice. This recipe is a great way to incorporate more seafood into your weekly routine.
Ingredients
1 pound salmon, finely chopped or ground
1/4 cup breadcrumbs
1 egg, lightly beaten
1 tablespoon fresh dill, chopped
4 small brioche buns
1 ripe avocado
1 lime, juiced
2 tablespoons mayonnaise or Greek yogurt
Salt and pepper to taste
Equipment
Large skillet
Mixing bowl
Fork
Spatula
DIY Instructions
In a mixing bowl, combine the chopped salmon, breadcrumbs, egg, dill, salt, and pepper.
Form the mixture into four small patties that fit the size of your brioche buns.
Heat a skillet over medium heat with a little oil. Cook the salmon patties for 3 to 4 minutes per side until they are golden and cooked through.
In a small bowl, smash the avocado with the lime juice and a pinch of salt using a fork.
Lightly toast the brioche buns in the pan or a toaster.
Spread a little mayonnaise or yogurt on the bottom half of each bun.
Place a salmon patty on the bun and top with a large spoonful of the smashed avocado.
Place the top bun on and secure with a toothpick if needed.
Store the sliders in your containers. If you are worried about the bun getting soft, keep the avocado and patty separate until mealtime.
Refrigerate for up to two days.
38. Garlic Butter Steak Strips with Creamy Mashed Cauliflower
Dinner Meal Prep Ideas
Enjoy a steakhouse-quality dinner from the comfort of your home with this high-protein prep. These sirloin strips are seared quickly in garlic butter to keep them tender and flavorful. Sauteed mushrooms add an earthy, savory depth that perfectly complements the beef.
A base of creamy mashed cauliflower provides a low-carb alternative to traditional potatoes. It is just as satisfying and soaks up the extra garlic butter beautifully. A garnish of fresh parsley adds a final touch of brightness to the plate.
This meal is excellent for those following a keto or low-carb lifestyle. The steak reheats best if you keep it slightly undercooked during the initial prep. It is a sophisticated, filling dinner that feels far from boring.
Ingredients
1 pound sirloin steak, sliced into strips
1 large head of cauliflower, cut into florets
1 cup mushrooms, sliced
3 tablespoons butter
3 cloves garlic, minced
1/4 cup heavy cream or milk
Fresh parsley, chopped
Salt and black pepper to taste
Equipment
Large skillet
Large pot
Blender or potato masher
Tongs
DIY Instructions
Boil the cauliflower florets in a pot of salted water for 10 to 12 minutes until very soft.
Drain the cauliflower well. Use a blender or masher to combine it with one tablespoon of butter and the cream until smooth. Season with salt and pepper.
Season the steak strips generously with salt and pepper.
Heat a large skillet over high heat with a tablespoon of oil. Sear the steak strips for 1 to 2 minutes per side. Remove from the pan.
In the same skillet, melt the remaining butter. Add the sliced mushrooms and minced garlic.
Sauté the mushrooms for 5 minutes until they are brown and the garlic is fragrant.
Return the steak to the pan for 30 seconds to toss it in the garlic butter and mushrooms.
Divide the mashed cauliflower into your meal prep containers.
Top with the garlic butter steak and mushrooms.
Garnish with fresh parsley and store in the refrigerator for up to three days.
39. Baked Eggplant Parm Towers with Broccoli
Dinner Meal Prep Ideas
This Italian classic gets a healthy, portion-controlled makeover for your weekly meal prep. Instead of a large casserole, these individual towers feature layers of breaded eggplant, marinara sauce, and melted mozzarella. They are easy to grab and look beautiful on the plate.
A side of steamed broccoli florets adds a healthy green element and a nice crunch. A sprinkle of parmesan cheese on top provides a final salty kick. This vegetarian dinner is hearty enough to satisfy any appetite.
Baking the eggplant instead of frying it keeps the meal light and reduces the fat content. The layers stay intact during reheating, ensuring every bite is as good as the first. It is a creative, hand-crafted dinner that proves vegetarian food is never dull.
Ingredients
1 large eggplant, sliced into rounds
1 cup breadcrumbs
2 eggs, beaten
1 cup marinara sauce
1 cup shredded mozzarella cheese
1/4 cup grated parmesan cheese
2 cups broccoli florets
1 teaspoon dried oregano
Salt and pepper to taste
Equipment
Baking sheet
Parchment paper
Two shallow bowls
Steamer basket
DIY Instructions
Preheat your oven to 400 degrees Fahrenheit and line a baking sheet with parchment paper.
Dip each eggplant round into the beaten eggs, then coat thoroughly with breadcrumbs mixed with oregano, salt, and pepper.
Place the eggplant slices on the baking sheet and bake for 15 minutes. Flip them over and bake for another 10 minutes until crispy.
Remove the pan from the oven. To build the towers, place a spoonful of marinara sauce and a pinch of mozzarella on an eggplant slice. Top with another slice and repeat the layers.
Finish each tower with a final dollop of sauce and a sprinkle of parmesan.
Bake the towers for another 5 to 7 minutes until the cheese is melted and bubbly.
While the eggplant bakes, steam the broccoli florets for 5 minutes until tender-crisp.
Carefully move one or two towers into each meal prep container using a spatula.
Add the steamed broccoli to the side.
Store in the refrigerator for up to four days.
40. Pesto Turkey Meatballs with Zucchini Noodles
Dinner Meal Prep Ideas
Finish your meal prep week with a light, flavorful dish that is packed with fresh herbs. These turkey meatballs are mixed with basil pesto, which keeps the lean meat incredibly moist. They provide a high-protein punch that doesn’t feel heavy.
Spiralized zucchini noodles act as a hydrating, low-carb base for the savory meatballs. A side container of extra pesto or a sprinkle of toasted pine nuts adds a professional touch. This meal is a vibrant, green feast that is as healthy as it is delicious.
Zucchini noodles are best when served raw or very lightly sautéed to avoid sogging. The meatballs can be made in big batches and frozen for later. It is a fast, efficient dinner option for anyone looking to stay on track with their goals.
Ingredients
1 pound ground turkey
1/4 cup basil pesto (plus extra for serving)
1/4 cup breadcrumbs or almond flour
1 egg
3 large zucchinis, spiralized
2 tablespoons toasted pine nuts
Fresh basil leaves for garnish
Salt and pepper to taste
Equipment
Large mixing bowl
Baking sheet
Spiralizer
Tongs
DIY Instructions
Preheat your oven to 375 degrees Fahrenheit and grease a baking sheet.
In a large bowl, mix the ground turkey, pesto, breadcrumbs, egg, salt, and pepper until just combined.
Roll the mixture into small, even meatballs and place them on the baking sheet.
Bake for 18 to 20 minutes until the meatballs are cooked through and slightly browned.
While the meatballs bake, spiralize your zucchinis into long strands.
Pat the zucchini noodles dry with a paper towel to remove excess moisture.
Divide the raw zucchini noodles into your meal prep containers.
Place four or five meatballs on top of the noodles in each box.
Sprinkled with toasted pine nuts and garnish with fresh basil leaves.
Keep a small extra portion of pesto on the side to toss with the noodles just before eating. Store in the fridge for up to three days.
Key Takeaways
Flavor Diversity: Use global spices and varying cooking methods like roasting or slow cooking to keep your palate engaged.
Texture Matters: Incorporate crunchy elements like seeds, nuts, or fresh vegetables to prevent meals from feeling soggy after reheating.
Smart Storage: Keep sauces and raw greens in separate small containers to maintain the highest quality for several days.
Balanced Nutrition: Focus on high-protein bases paired with complex carbs and plenty of greens for sustained energy levels.
Mastering your weekly routine does not mean you have to settle for repetitive flavors. These 40 dinner meal prep ideas offer a roadmap to a more organized and delicious life. When you have a nutritious meal waiting in the fridge, making healthy choices becomes the easiest part of your day.
Experimenting with new proteins, grains, and sauces keeps the process fun rather than a chore. As you find your favorite recipes, you will notice a significant boost in both your health and your free time. Grab your glass containers and start building a menu that you actually look forward to eating.
Spread the loveNeed Dinner With Only 5 Ingredients? 48 Simple 5-Ingredient Dinners. You need a hearty meal fast. Busy schedules demand quick fixes, but quick fixes do not mean flavorless food. We are proving you…
Spread the loveThanksgiving dinner feels incomplete without potatoes, but that heavy, sometimes gluey mashed dish can weigh down the whole meal. This year, trade the standard bowl for something exciting, crispy, and full of flavor.…
Spread the loveWeeknight dinner fatigue is a real problem plaguing modern kitchens. We often fall back on the same three recipes, turning mealtime into a predictable and, frankly, boring chore. But the cure for this…