Christmas dinner should be memorable, but preparing it doesn’t need to be stressful. Many people struggle with finding recipes that feel festive yet are genuinely simple to execute amidst the holiday rush. This collection solves that challenge by offering 40 easy ideas, ensuring your centerpiece is truly stunning without requiring hours of work.
Easy Christmas Dinner Ideas
This article focuses on showstopping dishes that use straightforward techniques and accessible ingredients. Whether you are hosting a large family gathering or enjoying a quiet meal for two, you will find options that fit your needs. We cover everything from sheet pan wonders to elegant, easy roasts, allowing you to relax and enjoy the season.
Forget spending all day in the kitchen. These recipes are designed to maximize flavor and presentation while minimizing stress and cleanup. Get ready to discover your new favorite holiday tradition that proves ease and elegance can certainly go hand-in-hand.
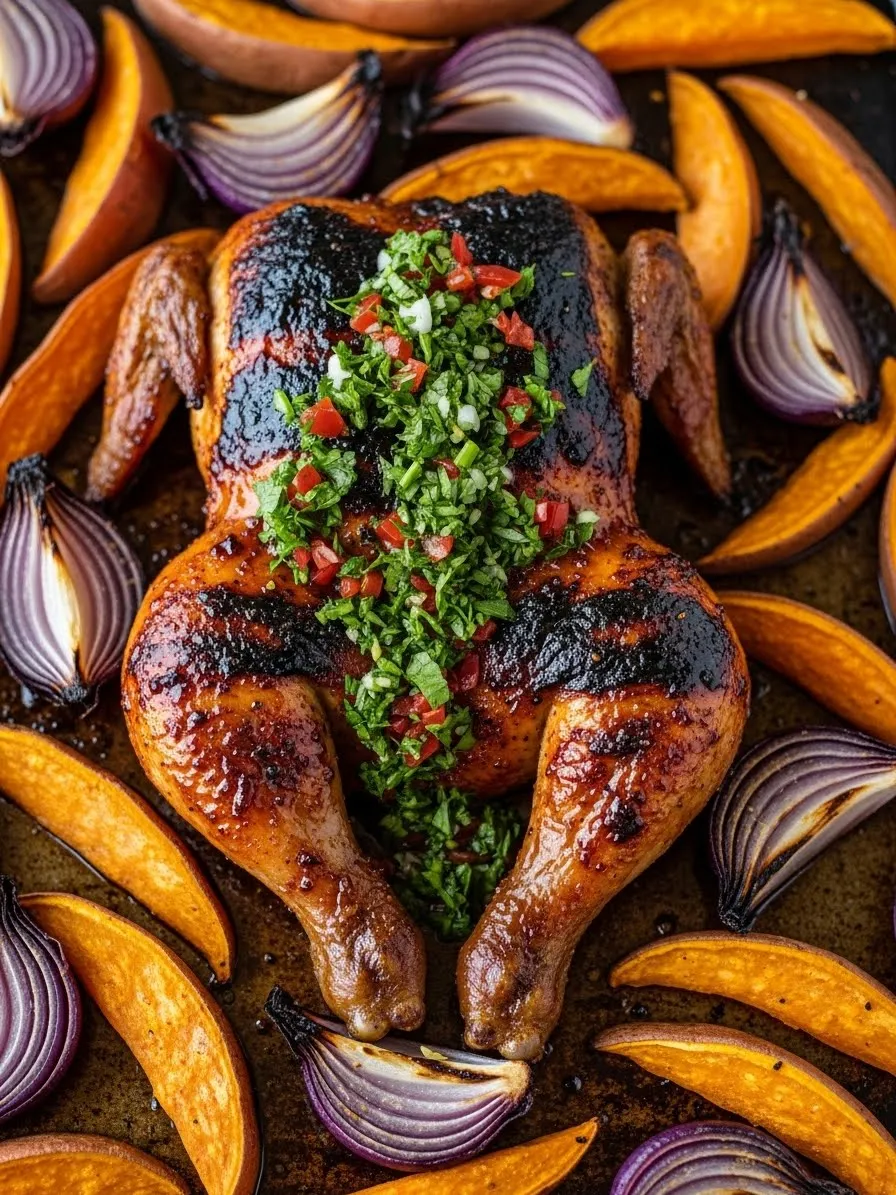
1. Cranberry-Glazed Chicken and Roasted Winter Vegetables
Easy Christmas Dinner Ideas
Image Description
This stunning sheet pan dinner offers a vibrant and easy centerpiece for your holiday table. Four golden-brown chicken thighs rest squarely on a bed of richly caramelized root vegetables and bright green Brussels sprouts. A thick, glossy cranberry glaze generously coats the chicken pieces, immediately drawing the eye to the festive colors.
Scattered across the pan are miniature carrots, chunks of rustic potato, and small florets of cauliflower, all roasted to tender sweetness. A few sprigs of fresh rosemary and bright red, whole cranberries are strategically placed, adding gorgeous aromatics and a pop of color that screams Christmas. The entire dish sits ready on a parchment-lined baking sheet, promising minimal cleanup after a joyful meal.
A serving fork rests on the side, inviting you to dig into this simple yet showstopping holiday meal. This dish perfectly balances savory protein with sweet, earthy vegetables, creating a complete and delicious dinner everyone will love without requiring multiple pots and pans.
Required Ingredients
For the Chicken and Vegetables:
4 bone-in, skin-on chicken thighs
1 pound small potatoes, chopped into 1-inch pieces
1 pound Brussels sprouts, halved
1 cup baby carrots
1 cup cauliflower florets
1/2 cup fresh or frozen cranberries (for roasting)
1/4 cup olive oil
1 teaspoon dried thyme
1 teaspoon dried rosemary
Salt and black pepper to taste
For the Cranberry Glaze:
1/2 cup cranberry sauce (store-bought or homemade)
2 tablespoons balsamic vinegar
1 tablespoon brown sugar
1 teaspoon Dijon mustard
Optional Garnish:
Fresh rosemary sprigs
Equipment List
Large, rimmed baking sheet (about 18 x 13 inches)
Parchment paper
Large mixing bowl
Small saucepan
Measuring cups and spoons
Whisk
Basting brush or spoon
DIY Instruction Step by Step
Prepare the Oven and Pan: Adjust your oven rack to the center position and preheat the oven to 400 deg F (200 deg C). Line your large, rimmed baking sheet with parchment paper to ensure easy cleanup and prevent sticking.
Toss the Vegetables: Place the chopped potatoes, halved Brussels sprouts, baby carrots, and cauliflower florets into the large mixing bowl. Drizzle the vegetables evenly with the 1/4 cup of olive oil.
Season the Vegetables: Sprinkle the dried thyme, dried rosemary, salt, and black pepper generously over the vegetables. Use your hands or a large spoon to toss everything together until the vegetables are completely coated in the oil and seasoning mixture.
Arrange and Add Cranberries: Spread the seasoned vegetables out on the prepared baking sheet in a single layer. Now, scatter the 1/2 cup of whole cranberries evenly among the vegetables.
Place the Chicken: Pat the chicken thighs dry with paper towels; this helps the skin crisp up nicely. Nestle the four chicken thighs among the vegetables on the baking sheet, leaving a little space around each piece.
Start Roasting: Place the baking sheet into the preheated oven. Allow the chicken and vegetables to roast for 20 minutes before applying the glaze.
Make the Glaze: While the dish is roasting, combine the cranberry sauce, balsamic vinegar, brown sugar, and Dijon mustard in your small saucepan. Whisk the mixture well. Place the saucepan over medium heat, bringing the glaze to a gentle simmer. Let it bubble gently for 3 to 5 minutes until the glaze thickens slightly. Remove the pan from the heat.
Glaze and Finish Cooking: After the initial 20 minutes, take the baking sheet out of the oven. Use a basting brush or spoon to generously coat the top of each chicken thigh with about half of the prepared cranberry glaze. Return the sheet pan to the oven and continue roasting for another 15 to 20 minutes.
Check for Doneness: The dish is finished when the vegetables are tender, and a meat thermometer inserted into the thickest part of the chicken registers an internal temperature of 165 deg F (74 deg C).
Serve: Take the sheet pan out of the oven. Drizzle the remaining cranberry glaze over the chicken and vegetables just before serving. Garnish the dish with a few fresh rosemary sprigs for a beautiful, final touch.
2. Mediterranean Baked Salmon with Feta and Olives
Easy Christmas Dinner Ideas
Image Description
This stunning sheet pan salmon dinner is a vibrant celebration of Mediterranean flavors and colors. Three generous fillets of pale pink salmon are nestled among a bounty of roasted vegetables, forming an effortless main course. Each piece of fish is topped with a thin, bright yellow lemon slice and a generous sprinkle of crumbled feta cheese, giving it a textural contrast and salty kick.
A scattering of plump, ruby-red cherry tomatoes and a mix of Kalamata and green olives surround the fish, having burst slightly from the heat and releasing their juices. Chunks of pale artichoke hearts and pine nuts are scattered throughout, adding earthy notes and a pleasant crunch. The entire presentation rests on a crisp white platter, creating a clean contrast against the dark background.
This dish proves that simple cooking can look incredibly elegant, making it an excellent choice for a Christmas Eve or Christmas Day meal. A beautiful lemon wedge rests nearby, ready to provide a final squeeze of acidity to this light, yet satisfying, holiday dish.
Required Ingredients
4 skin-on or skinless salmon fillets (about 6 ounces each)
1 pint cherry or grape tomatoes
1 cup marinated artichoke hearts, drained and quartered
1/2 cup pitted Kalamata olives
1/2 cup pitted green olives
1/4 cup crumbled feta cheese
2 tablespoons pine nuts
3 tablespoons olive oil
1 teaspoon dried oregano
1/2 teaspoon dried dill
1 lemon, sliced thin
Salt and black pepper to taste
Equipment List
Large baking sheet (about 18 x 13 inches)
Parchment paper
Small bowl
Measuring cups and spoons
DIY Instruction Step by Step
Prepare the Oven: Move an oven rack to the middle position and preheat your oven to 400 deg F (200 deg C). Lay a sheet of parchment paper onto your baking sheet.
Season the Salmon: Place the four salmon fillets on the prepared baking sheet. Drizzle a small amount of olive oil over the fish and season each piece lightly with salt and pepper.
Combine the Vegetables: In a small bowl, gently toss the cherry tomatoes, artichoke hearts, Kalamata olives, and green olives together. Drizzle these vegetables with the remaining olive oil, then sprinkle them with the dried oregano and dried dill.
Arrange the Dish: Scatter the seasoned vegetable mixture evenly around the salmon fillets on the baking sheet. Distribute the pine nuts across the vegetables.
Top the Fish: Carefully place one thin lemon slice directly on top of each salmon fillet. Next, sprinkle the crumbled feta cheese over the top of the salmon and the surrounding vegetables.
Bake the Meal: Slide the baking sheet into the preheated oven. Bake for approximately 12 to 15 minutes. The cooking time depends on the thickness of your salmon fillets and how well-done you prefer your fish.
Check for Doneness: The salmon is cooked when it easily flakes with a fork and the internal temperature reaches 145 deg F (63 deg C). The tomatoes should be soft and slightly blistered.
Serve: Remove the sheet pan from the oven. Transfer the salmon and the roasted vegetable mixture to a serving platter. A final drizzle of fresh lemon juice is always a welcome addition before enjoying this flavorful meal.
3. Herb-Crusted Beef Roast with Root Vegetables
Easy Christmas Dinner Ideas
Image Description
This classic beef roast offers an absolutely impressive centerpiece for a traditional holiday dinner. A large, dark-crusted beef joint is thickly coated in a savory herb rub, creating an attractive, deep mahogany color. Sliced on the platter, the meat reveals a beautiful rosy pink interior, suggesting a tender, moist texture that is cooked to medium-rare.
The roast is grandly presented on a large white platter, surrounded by a colorful array of roasted root vegetables. Chunks of yellow potatoes, orange carrots, and bright red and green peppers are caramelized and softened, soaking up the flavorful pan juices. Fresh sprigs of fragrant rosemary and thyme are generously draped over the top of the roast, providing an aromatic and beautiful garnish.
A gleaming silver ladle rests on the side of the platter, inviting guests to spoon the rich pan juices or gravy over their serving. The background features warm, festive lights from a blurry Christmas tree, establishing a cozy, holiday atmosphere. This dish successfully balances rustic presentation with high-end flavor, guaranteeing a memorable feast.
Required Ingredients
1 (3-4 pound) boneless beef bottom round roast or top round roast
2 tablespoons olive oil
4 cloves garlic, minced
2 tablespoons fresh rosemary, chopped
1 tablespoon fresh thyme leaves
1 tablespoon coarse salt
1 teaspoon black pepper
1 pound small potatoes, quartered
1 pound carrots, peeled and roughly chopped
1 large onion, quartered
2 bell peppers (any color), sliced into large chunks
1 cup beef broth (for the pan)
Equipment List
Large roasting pan or Dutch oven
Meat thermometer
Sharp carving knife
Small mixing bowl
Measuring spoons
Aluminum foil
DIY Instruction Step by Step
Prepare the Roast and Oven: Take the beef roast out of the refrigerator about one hour before cooking to let it come closer to room temperature. Preheat your oven to 425 deg F (220 deg C).
Make the Rub: In your small mixing bowl, combine the olive oil, minced garlic, chopped rosemary, thyme leaves, salt, and pepper. Stir these ingredients together until they form a coarse paste.
Season the Beef: Rub the herb mixture evenly and completely over the entire surface of the beef roast. This creates the rich, dark crust during roasting.
Prepare the Vegetables: Place the quartered potatoes, chopped carrots, quartered onion, and pepper chunks in the bottom of the roasting pan. Pour the beef broth over the vegetables.
Start Roasting: Place the seasoned beef roast directly on top of the vegetables in the pan. Transfer the roasting pan to the preheated oven. Roast the beef at 425 deg F for 15 minutes.
Reduce Heat: After the initial 15 minutes, reduce the oven temperature to 325 deg F (160 deg C). Continue roasting, approximately 12 to 15 minutes per pound, until the internal temperature reaches your desired doneness.
Tip: For Medium-Rare, aim for 130 deg F (54 deg C). For Medium, aim for 145 deg F (63 deg C). Use a meat thermometer to check.
Rest the Meat: When the roast reaches the desired temperature, immediately remove the pan from the oven. Carefully transfer the roast to a cutting board. Tent the meat loosely with aluminum foil and let it rest for at least 15 to 20 minutes before carving. This crucial step retains the flavorful juices.
Serve: Slice the rested beef across the grain with a sharp carving knife. Arrange the sliced meat on a platter, surrounding it with the roasted root vegetables from the pan. Garnish with fresh herbs before serving.
4. Spiced Pineapple and Brown Sugar Glazed Ham
Easy Christmas Dinner Ideas
Image Description
This festive ham is a magnificent, sweet, and savory centerpiece guaranteed to impress your holiday guests. The large, round ham boasts a deep, burnished mahogany glaze, suggesting a sticky sweetness from brown sugar and spices. The surface is beautifully scored in a diamond pattern, and at the intersection of many scores, a whole clove is firmly pressed in, adding visual appeal and warm aromatics.
Rows of bright, canned pineapple rings are secured to the ham’s upper half with additional cloves, creating an attractive crown. The ham rests proudly on a clean, white cake stand, giving it height and prominence on the dinner table. A colorful border of fresh orange slices and sprigs of bright green herbs circles the base of the stand, providing a lovely contrast to the dark glaze.
A small decanter of extra glaze stands ready nearby, confirming this centerpiece is as much a treat for the eyes as it is for the palate. This dish offers a wonderful balance of tradition and flavor, promising an easy yet absolutely showstopping main course.
Required Ingredients
1 (8-10 pound) pre-cooked, spiral-sliced ham
1 (20 ounce) can pineapple slices in juice, drained (reserve 1/4 cup of juice)
1/2 cup packed light brown sugar
1/4 cup reserved pineapple juice
2 tablespoons whole grain Dijon mustard
1 teaspoon ground cinnamon
1/2 teaspoon ground nutmeg
1 box whole cloves (for studding)
Fresh orange slices (for garnish, optional)
Equipment List
Roasting pan with a rack
Small saucepan
Basting brush
Measuring cups and spoons
Meat thermometer
DIY Instruction Step by Step
Prepare the Oven and Ham: Position an oven rack in the lower third of your oven and preheat to 325 deg F (160 deg C). Remove the ham from its packaging and place it cut-side down on the rack in the roasting pan.
Heat the Ham: Pour about 1/2 inch of water into the bottom of the roasting pan. Cover the ham tightly with aluminum foil. Bake for approximately 10 to 12 minutes per pound, which is about 1.5 to 2 hours for an 8-10 pound ham. This warms the ham thoroughly.
Make the Glaze: About 30 minutes before the ham is finished warming, combine the brown sugar, reserved pineapple juice, Dijon mustard, ground cinnamon, and ground nutmeg in the small saucepan. Whisk this mixture well. Bring the glaze to a gentle simmer over medium heat. Let it bubble gently for 3 to 5 minutes until the glaze thickens slightly. Remove the glaze from the heat.
Glaze and Decorate: Remove the ham from the oven and increase the oven temperature to 400 deg F (200 deg C). Remove the foil covering the ham. Brush the entire surface of the ham generously with about half of the prepared glaze using your basting brush.
Add Pineapple and Cloves: Secure the drained pineapple slices to the ham using whole cloves. Stud the remaining exposed surfaces of the ham with whole cloves, pushing them into the fat cap in a decorative diamond pattern.
Finish Baking: Return the glazed and decorated ham to the 400 deg F oven. Continue baking for an additional 15 to 20 minutes, or until the exterior is deeply caramelized.
Final Glazing and Rest: Remove the ham from the oven. Brush the remaining glaze over the top surface. Tent the ham loosely with foil and let it rest for 10 to 15 minutes before carving and serving. Garnish the platter with fresh orange slices if desired.
5. Creamy Chicken and Wild Rice Soup in Bread Bowls
Easy Christmas Dinner Ideas
Image Description
This comforting bowl of creamy soup is presented in a charming, rustic style, making it a warming starter or a light main course. A large aqua-colored Dutch oven holds the main batch of the rich, thick soup, which is visibly packed with ingredients. The soup base is a velvety, light cream color, studded with dark grains of wild rice, tender chunks of shredded chicken, bright slices of carrot, and light green celery pieces.
The soup is generously spooned into two hollowed-out, rustic bread bowls, which are sitting on a dark wooden surface. Each serving is topped with a few sliced almonds and a bit of the wild rice mixture, making for an attractive presentation. The dark, wooden spoon resting in the Dutch oven highlights the creamy texture and abundance of ingredients.
Small bowls of whole cranberries sit nearby, adding a tart, festive color contrast to the comforting soup. The combination of the hearty chicken, earthy wild rice, and creamy broth served inside a crusty bread bowl promises a cozy and satisfying holiday experience. This is a lovely, non-traditional main dish that feels both elevated and welcoming.
Required Ingredients
2 tablespoons butter
1 onion, chopped
2 carrots, sliced
2 celery stalks, sliced
8 ounces sliced mushrooms
1/2 cup uncooked wild rice, rinsed
6 cups chicken broth
1/2 cup all-purpose flour
1 cup heavy cream or half-and-half
2 cups cooked, shredded chicken (rotisserie chicken works well)
1 teaspoon dried thyme
1 teaspoon salt
1/2 teaspoon black pepper
4-6 round sourdough or crusty bread loaves (for bowls)
Sliced almonds (for garnish)
Equipment List
Large Dutch oven or heavy-bottomed pot
Wooden spoon or ladle
Cutting board
Sharp knife (for bread)
Measuring cups and spoons
DIY Instruction Step by Step
Sauté the Aromatics: Melt the butter in the large Dutch oven or pot over medium heat. Add the chopped onion, sliced carrots, and sliced celery. Cook these vegetables, stirring occasionally, for 5 to 7 minutes until they begin to soften. Stir in the sliced mushrooms and cook for another 3 minutes until they release their moisture.
Add Rice and Liquid: Stir in the rinsed wild rice, dried thyme, salt, and pepper into the vegetable mixture. Pour in the 6 cups of chicken broth. Bring the mixture to a boil, then immediately reduce the heat to low. Cover the pot and let the rice simmer for 40 to 45 minutes, or until the wild rice is tender and has burst slightly.
Thicken the Soup Base: In a small bowl, whisk the 1/2 cup of flour with 1/2 cup of the heavy cream until a smooth, thin paste forms. This is your thickening slurry.
Finish the Soup: Once the rice is tender, slowly whisk the cream and flour slurry into the soup base. Stir constantly until the soup begins to thicken. Reduce the heat again to low and stir in the remaining 1/2 cup of heavy cream and the cooked, shredded chicken. Heat the soup through for about 5 minutes, but do not allow it to boil once the cream is added.
Prepare the Bread Bowls: Using a sharp knife, carefully cut a circle from the top of each bread loaf, creating a lid. Gently scoop out the soft interior bread from the center of each loaf, leaving a thick, sturdy crust “bowl.”
Serve: Ladle the hot, creamy chicken and wild rice soup into the prepared bread bowls. Garnish each serving with a sprinkle of sliced almonds. Serve immediately with the bread tops on the side for dipping.
6. Pork Tenderloin with Fig and Port Wine Glaze
Easy Christmas Dinner Ideas
Image Description
This elegantly sliced pork tenderloin is absolutely drenched in a luxurious, dark fig and port wine sauce, making a sophisticated main course. The roast is cut into thick, uniform medallions, revealing a delicate pink interior that is cooked to tender, juicy perfection. A visible, savory crust of pepper and herbs coats the outside of the meat.
The rich, deep ruby-colored sauce, dotted with small pieces of fig, pools attractively around the slices, giving the entire presentation a gourmet feel. A single, fresh sprig of rosemary is placed on top of the meat for an aromatic and classic garnish. The pork is served on a clean white plate, creating a stunning contrast with the dark sauce.
A portion of mashed yellow root vegetables and small, roasted root vegetables are neatly placed alongside the pork, completing the meal. This dinner offers a beautiful balance of savory protein and sweet, complex fruit flavor, providing a lighter yet impressive option for a holiday gathering.
Required Ingredients
1 (1.5 pound) pork tenderloin
1 tablespoon olive oil
1 teaspoon coarse salt
1 teaspoon cracked black pepper
1/2 teaspoon dried thyme
For the Fig and Port Glaze:
1 cup Port wine (or dry red wine)
1/2 cup fig preserves or jam
1/4 cup beef or chicken broth
1 tablespoon balsamic vinegar
1 shallot, finely minced
1 clove garlic, minced
Fresh rosemary sprigs (for garnish)
Equipment List
Oven-safe skillet (cast iron or stainless steel)
Small saucepan
Meat thermometer
Sharp knife
Cutting board
Measuring cups and spoons
DIY Instruction Step by Step
Preheat and Prep the Pork: Take the pork tenderloin out of the refrigerator about one hour before cooking to let it come closer to room temperature. Preheat your oven to 400 deg F (200 deg C). Pat the pork tenderloin dry with paper towels. In a small bowl, combine the salt, pepper, and dried thyme. Rub the mixture thoroughly over the entire surface of the pork.
Sear the Pork: Heat the olive oil in the oven-safe skillet over medium-high heat. Carefully place the seasoned pork tenderloin in the hot oil. Sear the pork on all sides, turning it with tongs, until a deep golden-brown crust forms. This should take about 2 minutes per side.
Finish in the Oven: Transfer the skillet containing the seared pork to the preheated oven. Roast for 15 to 20 minutes. The pork is cooked when a meat thermometer inserted into the thickest part reads 145 deg F (63 deg C).
Rest the Meat: Once cooked, remove the skillet from the oven. Transfer the pork tenderloin to a cutting board. Tent it loosely with aluminum foil and allow it to rest for at least 10 minutes. This allows the juices to redistribute, ensuring a tender final product.
Make the Glaze: While the pork is resting, place the same skillet (or a small saucepan) over medium heat. Add the minced shallot and garlic and cook for 2 minutes until softened. Pour in the Port wine and bring it to a boil, scraping up any browned bits from the bottom of the pan. Let the wine reduce by half.
Complete the Glaze: Stir in the fig preserves, beef or chicken broth, and balsamic vinegar. Bring the mixture back to a simmer and cook for 3 to 5 minutes until the glaze thickens slightly. Taste and adjust seasoning if needed. Remove from the heat.
Serve: Slice the rested pork tenderloin into thick medallions. Arrange the slices on a serving platter and generously spoon the warm fig and port glaze over the top. Garnish with a fresh rosemary sprig and serve immediately.
7. Creamy Shrimp Scampi with Garlicky Breadcrumbs
Easy Christmas Dinner Ideas
Image Description
This stunning pasta dish transforms humble shrimp scampi into an elegant, showstopping meal for any festive gathering. Three bright white bowls are generously filled with golden-brown, thin spaghetti, perfectly coated in a savory sauce. Plump, pink, tail-on shrimp are scattered over the pasta, beautifully curled and cooked to a sweet tenderness.
A golden, toasted breadcrumb mixture sits like a crown in the center of the pasta, providing a welcome textural crunch. Bursting, ruby-red cherry tomatoes and a delicate scattering of fresh parsley are nestled throughout the dish, offering bright pops of color. Each bowl is finished with a simple, thin slice of lemon, ready to provide a final squeeze of fresh, bright acidity.
The casual arrangement of the bowls, accompanied by shiny silver forks and a white napkin, suggests this is an enjoyable and satisfying meal. This shrimp scampi is a lighter yet luxurious alternative to heavier main courses, promising rich garlic and citrus flavors.
Required Ingredients
1 pound spaghetti or linguine
1.5 pounds large shrimp, peeled and deveined (tails on or off)
4 tablespoons olive oil, divided
4 tablespoons butter
4 cloves garlic, minced
1/2 cup dry white wine or chicken broth
1 cup halved cherry tomatoes
1/4 cup fresh lemon juice
Salt and black pepper to taste
For the Breadcrumbs:
1/2 cup panko breadcrumbs
1 tablespoon olive oil
1 tablespoon chopped fresh parsley
Lemon slices and fresh parsley (for garnish)
Equipment List
Large pot (for boiling pasta)
Large skillet or frying pan
Small skillet (for breadcrumbs)
Colander
Measuring cups and spoons
DIY Instruction Step by Step
Start the Pasta: Bring a large pot of salted water to a rolling boil. Add the spaghetti and cook according to the package directions until it reaches the al dente stage. Reserve about 1 cup of the starchy pasta water before draining the pasta completely in a colander.
Toast Breadcrumbs: While the pasta cooks, heat 1 tablespoon of olive oil in a small skillet over medium heat. Add the panko breadcrumbs and toast them, stirring frequently, for 3 to 5 minutes until they are golden brown and crispy. Remove the breadcrumbs from the heat and stir in the chopped fresh parsley. Set them aside.
Cook the Shrimp: In the large skillet, heat 2 tablespoons of butter and 2 tablespoons of olive oil over medium-high heat. Add the shrimp, seasoning them lightly with salt and pepper. Cook the shrimp for 2 to 3 minutes per side until they are pink and cooked through. Remove the shrimp from the skillet and set them aside.
Build the Sauce: Reduce the heat to medium. Add the remaining 2 tablespoons of olive oil and 2 tablespoons of butter to the same skillet. Add the minced garlic and halved cherry tomatoes, cooking for about 2 minutes until the garlic is fragrant and the tomatoes soften.
Deglaze and Finish Sauce: Pour in the white wine or chicken broth, scraping up any browned bits from the bottom of the pan. Let the liquid simmer for 2 minutes. Stir in the fresh lemon juice and a few tablespoons of the reserved pasta water to create a light, emulsified sauce.
Combine: Add the cooked, drained spaghetti and the cooked shrimp back into the skillet. Toss everything together, adding more reserved pasta water if needed, until the pasta is coated in the creamy sauce.
Serve: Divide the pasta and shrimp mixture among serving bowls. Sprinkle generously with the toasted breadcrumbs. Garnish each bowl with a slice of lemon and fresh parsley.
8. Creamy Butternut Squash and Sage Risotto
Easy Christmas Dinner Ideas
Image Description
This inviting bowl of creamy risotto showcases beautiful, warm autumnal colors, making it a sophisticated side dish or a lovely vegetarian main. The risotto has a luscious, rich texture and a vibrant orange hue, confirming the generous presence of butternut squash puree. The Arborio rice grains are plump and tender, suspended in the creamy sauce.
The dish is elegantly finished with a garnish of thin, buttery slivers of shaved Parmesan cheese and several fresh, deep-green sage leaves. The sage leaves are visibly fried or crisped, providing a textural element and an earthy aroma that complements the sweetness of the squash.
A black pot sits nearby, holding the remaining risotto, with a wooden spoon resting in the bowl, suggesting the dish was recently cooked. The entire presentation, featuring the dark background and small gold utensils, feels elevated and cozy. This risotto is a warming, comforting, and visually appealing addition to any festive menu.
Required Ingredients
4 cups vegetable or chicken broth
2 tablespoons olive oil
1 small yellow onion, finely chopped
1 clove garlic, minced
1 1/2 cups Arborio rice
1/2 cup dry white wine (like Pinot Grigio)
1 cup cooked butternut squash puree
1/2 cup grated Parmesan cheese, plus extra for shaving
2 tablespoons butter
1/4 cup fresh sage leaves (for frying and garnish)
Salt and black pepper to taste
Equipment List
Large saucepan (for heating broth)
Wide, heavy-bottomed pot or Dutch oven (for risotto)
Wooden spoon
Measuring cups and spoons
DIY Instruction Step by Step
Prepare the Broth: Pour the broth into the large saucepan and bring it to a gentle simmer over medium heat. Keep the broth warm throughout the cooking process. It is important to use warm broth for successful risotto.
Sauté Aromatics: In the wide, heavy-bottomed pot, melt the butter and heat the olive oil over medium heat. Add the chopped onion and cook for 5 minutes, stirring until softened and translucent. Add the minced garlic and cook for 1 minute more until fragrant.
Toast the Rice (Tostatura): Add the Arborio rice to the pot. Stir constantly for 2 minutes to toast the grains lightly. This step helps the rice cook evenly.
Deglaze with Wine: Pour in the white wine. Stir until the wine is completely absorbed by the rice.
Add Broth Gradually: Ladle one cup of the warm broth into the rice mixture. Stir continuously with a wooden spoon until the liquid is completely absorbed before adding the next ladleful. Continue this process, adding broth one cup at a time and stirring until absorbed, until the rice is creamy and al dente (tender but still firm to the bite). This will take about 20 to 25 minutes.
Stir in Squash and Finish: Once the rice is cooked, stir in the butternut squash puree and the grated Parmesan cheese. Stir vigorously for about 1 minute until the risotto is wonderfully creamy. Add salt and pepper to taste.
Fry the Sage (Optional): If you desire crispy sage, heat a small amount of oil in a separate pan. Quickly fry the sage leaves for 30 seconds until crisp. Remove and drain on paper towels.
Serve: Serve the risotto immediately in warm bowls. Top each serving with shaved Parmesan cheese and a few crispy sage leaves.
9. Spiced Pineapple and Brown Sugar Glazed Ham
Easy Christmas Dinner Ideas
Image Description
This festive ham is a magnificent, sweet, and savory centerpiece guaranteed to impress your holiday guests. The large, round ham boasts a deep, burnished mahogany glaze, suggesting a sticky sweetness from brown sugar and spices. The surface is beautifully scored in a diamond pattern, and at the intersection of many scores, a whole clove is firmly pressed in, adding visual appeal and warm aromatics.
Rows of bright, canned pineapple rings are secured to the ham’s upper half with additional cloves, creating an attractive crown. The ham rests proudly on a clean, white cake stand, giving it height and prominence on the dinner table. A colorful border of fresh orange slices and sprigs of bright green herbs circles the base of the stand, providing a lovely contrast to the dark glaze.
A small decanter of extra glaze stands ready nearby, confirming this centerpiece is as much a treat for the eyes as it is for the palate. This dish offers a wonderful balance of tradition and flavor, promising an easy yet absolutely showstopping main course.
Required Ingredients
1 (8-10 pound) pre-cooked, spiral-sliced ham
1 (20 ounce) can pineapple slices in juice, drained (reserve 1/4 cup of juice)
1/2 cup packed light brown sugar
1/4 cup reserved pineapple juice
2 tablespoons whole grain Dijon mustard
1 teaspoon ground cinnamon
1/2 teaspoon ground nutmeg
1 box whole cloves (for studding)
Fresh orange slices (for garnish, optional)
Equipment List
Roasting pan with a rack
Small saucepan
Basting brush
Measuring cups and spoons
Meat thermometer
DIY Instruction Step by Step
Prepare the Oven and Ham: Position an oven rack in the lower third of your oven and preheat to 325 deg F (160 deg C). Remove the ham from its packaging and place it cut-side down on the rack in the roasting pan.
Heat the Ham: Pour about 1/2 inch of water into the bottom of the roasting pan. Cover the ham tightly with aluminum foil. Bake for approximately 10 to 12 minutes per pound, which is about 1.5 to 2 hours for an 8-10 pound ham. This warms the ham thoroughly.
Make the Glaze: About 30 minutes before the ham is finished warming, combine the brown sugar, reserved pineapple juice, Dijon mustard, ground cinnamon, and ground nutmeg in the small saucepan. Whisk this mixture well. Bring the glaze to a gentle simmer over medium heat. Let it bubble gently for 3 to 5 minutes until the glaze thickens slightly. Remove the glaze from the heat.
Glaze and Decorate: Remove the ham from the oven and increase the oven temperature to 400 deg F (200 deg C). Remove the foil covering the ham. Brush the entire surface of the ham generously with about half of the prepared glaze using your basting brush.
Add Pineapple and Cloves: Secure the drained pineapple slices to the ham using whole cloves. Stud the remaining exposed surfaces of the ham with whole cloves, pushing them into the fat cap in a decorative diamond pattern.
Finish Baking: Return the glazed and decorated ham to the 400 deg F oven. Continue baking for an additional 15 to 20 minutes, or until the exterior is deeply caramelized.
Final Glazing and Rest: Remove the ham from the oven. Brush the remaining glaze over the top surface. Tent the ham loosely with foil and let it rest for 10 to 15 minutes before carving and serving. Garnish the platter with fresh orange slices if desired.
10. Showstopping Lentil and Sausage Stew
Easy Christmas Dinner Ideas
Image Description
This rustic and hearty stew is a gorgeous one-pot meal that looks incredibly inviting and perfect for a colder evening. The stew is presented in a large, white enameled Dutch oven, overflowing with a rich, dark tomato and lentil base. Two plump, beautifully browned sausages rest on top of the stew, suggesting they were cooked right in the savory liquid.
The lentil stew itself is packed with texture, featuring small, earthy brown lentils, bright orange slices of carrot, and whole cherry tomatoes. Adding to the rustic charm are a few wedges of orange, a couple of meatball-like portions of crumbled sausage, and a dramatic slice of a whole roasted garlic bulb. Sprigs of fresh rosemary complete the festive look.
A large serving spoon rests in the center, inviting guests to dig in. This dish combines comfort food with deep, complex flavors, making it a simple yet satisfying main dish. It is an easy, impressive option that requires minimal side dishes for a complete holiday meal.
Required Ingredients
2 tablespoons olive oil
2 large Italian sausages (sweet or hot)
1 large yellow onion, chopped
3 carrots, sliced
3 stalks celery, sliced
4 cloves garlic, minced (or half a head of roasted garlic)
1 (28 ounce) can crushed tomatoes
4 cups vegetable or chicken broth
1 1/2 cups dried brown or green lentils, rinsed
1 teaspoon dried thyme
1 bay leaf
Salt and black pepper to taste
Orange slices and fresh rosemary (for garnish)
Equipment List
Large Dutch oven or heavy-bottomed pot
Wooden spoon
Measuring cups and spoons
Cutting board
Sharp knife
DIY Instruction Step by Step
Sear the Sausages: Heat the olive oil in the large Dutch oven over medium-high heat. Carefully place the whole sausages in the pot and sear them for about 3 minutes per side until they are nicely browned. Remove the sausages from the pot and set them aside.
Sauté the Vegetables: Reduce the heat to medium. Add the chopped onion, sliced carrots, and sliced celery to the pot. Cook the vegetables for 5 to 7 minutes, stirring until they begin to soften. Stir in the minced garlic and cook for 1 minute more until fragrant.
Add Liquid and Lentils: Pour in the crushed tomatoes and the broth. Scrape up any browned bits from the bottom of the pot. Stir in the rinsed lentils, dried thyme, and bay leaf. Season generously with salt and pepper.
Simmer the Stew: Bring the mixture to a boil, then immediately reduce the heat to low. Return the seared sausages to the pot, nestling them into the lentils. Cover the pot and let the stew simmer gently for 40 to 50 minutes, or until the lentils are tender and the sausages are cooked through.
Adjust Consistency: If the stew becomes too thick, stir in a little more broth or water. If it is too thin, remove the lid for the last 15 minutes of cooking to allow some liquid to evaporate.
Serve: Remove the bay leaf. Remove the sausages and slice them into thick pieces. Return the sausage slices to the stew. Ladle the hearty lentil and sausage stew into bowls. Garnish each serving with a fresh orange slice and a sprig of rosemary for a festive touch.
11. Mini Meatballs in Tomato Sauce
Easy Christmas Dinner Ideas
Image Description
This deeply comforting image features a pot brimming with savory, browned meatballs swimming in a rich tomato sauce. The meatballs are uniformly round and possess a textured, browned exterior that suggests a wonderful, moist interior. They are completely submerged in a vibrant, ruby-red tomato sauce, which is gently simmering.
The large black pot, viewed from above, emphasizes the abundance of this simple, classic meal. The lack of elaborate garnish focuses the attention entirely on the main components: the savory meat and the robust sauce. This is a versatile, homey dish that can be served over pasta, alongside rice, or simply with crusty bread.
Meatballs are a wonderful option for feeding a crowd, as they are universally loved and easy to prepare in large quantities. This dish promises a warm, satisfying, and easy centerpiece for a relaxed holiday get-together.
Required Ingredients
1.5 pounds ground beef (or a mix of beef, pork, and veal)
1/2 cup breadcrumbs
1/4 cup grated Parmesan cheese
1 large egg, lightly beaten
2 cloves garlic, minced
1 tablespoon dried parsley
1/2 teaspoon salt
1/4 teaspoon black pepper
1 tablespoon olive oil (for browning)
For the Sauce:
1 (28 ounce) can crushed tomatoes
1 (15 ounce) can tomato sauce
1/2 cup water or broth
Equipment List
Large mixing bowl
Large pot or Dutch oven
Measuring cups and spoons
DIY Instruction Step by Step
Mix Meatball Ingredients: In the large mixing bowl, gently combine the ground meat, breadcrumbs, grated Parmesan cheese, beaten egg, minced garlic, dried parsley, salt, and pepper. Be careful not to overmix, as this can result in tough meatballs.
Shape the Meatballs: Roll the mixture into small, uniform balls (about 1 to 1.5 inches in diameter).
Brown the Meatballs (Optional): Heat the olive oil in the large pot or Dutch oven over medium-high heat. Sear the meatballs in batches until they are browned on all sides. This deepens the flavor. Remove the seared meatballs and set them aside.
Make the Sauce: In the same pot, combine the crushed tomatoes, tomato sauce, and water or broth. Stir well and season lightly with salt and pepper. Bring the sauce to a gentle simmer.
Simmer the Meatballs: Carefully place the browned meatballs back into the simmering sauce. Reduce the heat to low. Cover the pot and let the meatballs simmer gently for 25 to 30 minutes, or until they are cooked completely through.
Serve: Serve the hot meatballs and sauce over a generous portion of cooked spaghetti, polenta, or simply with fresh bread for dipping.
12. Baked Ham and Creamy Rice Casserole
Easy Christmas Dinner Ideas
Image Description
This comforting baked casserole is a wonderful, simple way to use leftover holiday ham, presenting a creamy and hearty dish. A square ceramic baking dish holds the golden-brown casserole, which features a creamy rice base layered with chunks of savory ham. The top boasts a rich, bubbling layer of melted cheese, giving it a comforting appeal.
A thick, golden-brown crust of crushed crackers or breadcrumbs covers the entire surface, providing a substantial, crunchy texture. The dish has a neat slice removed, revealing the soft, creamy interior of rice, cheese, and ham. A silver spoon rests in the dish, ready to scoop out a serving.
Small, attractive side bowls containing chopped chives, crumbled crackers, and a side of bright green asparagus spears surround the casserole, showing how easily this dish can be paired with simple sides. This casserole offers a familiar, comforting flavor profile that is truly satisfying on a cold winter night.
Required Ingredients
2 tablespoons butter
1/2 cup chopped onion
1/4 cup all-purpose flour
2 cups milk
1 cup chicken or vegetable broth
2 cups cooked white rice
1.5 cups cooked, diced ham (leftover ham works wonderfully)
1 cup shredded cheddar or Gruyere cheese, divided
Salt and black pepper to taste
For the Topping:
1/2 cup crushed butter crackers (like Ritz)
2 tablespoons melted butter
2 tablespoons chopped chives (for garnish)
Equipment List
9×9 inch square baking dish
Large saucepan or pot
Whisk
Measuring cups and spoons
Mixing bowl
DIY Instruction Step by Step
Prepare the Oven and Dish: Preheat your oven to 350 deg F (175 deg C). Lightly grease your 9×9 inch square baking dish.
Sauté Aromatics: Melt the 2 tablespoons of butter in a large saucepan over medium heat. Add the chopped onion and cook for 5 minutes, stirring until softened.
Make the Sauce: Sprinkle the flour over the softened onions and cook for 1 minute, stirring constantly. Slowly whisk in the milk and broth until the mixture is smooth and lump-free. Continue to cook, stirring occasionally, until the sauce thickens and begins to simmer. Remove the sauce from the heat.
Combine Filling: Stir the cooked rice, diced ham, and 3/4 cup of the shredded cheese into the thickened sauce. Season the mixture generously with salt and black pepper.
Assemble Casserole: Pour the rice and ham mixture evenly into the prepared baking dish.
Prepare the Topping: In a small mixing bowl, combine the crushed butter crackers and 2 tablespoons of melted butter. Sprinkle the remaining 1/4 cup of shredded cheese evenly over the top of the rice mixture, then sprinkle the buttered cracker crumbs over the cheese.
Bake: Bake the casserole in the preheated oven for 25 to 30 minutes, or until the sauce is bubbly and the topping is golden brown and crispy.
Serve: Remove the casserole from the oven and let it rest for 5 minutes before serving. Garnish the top with the chopped chives for a fresh flavor and color.
13. Halloumi and Winter Vegetable Skewers
Easy Christmas Dinner Ideas
Image Description
These vibrant skewers offer a hearty, gorgeous vegetarian option that works beautifully as a holiday starter or main course. Cubes of golden-brown Halloumi cheese, which has been pan-seared or grilled, are threaded onto wooden skewers alternating with colorful winter vegetables. The Halloumi has an attractive, slightly charred exterior.
The vegetables include bright purple wedges of red onion, dark green roasted Brussels sprouts, and chunky pieces of sweet potato. The skewers are elegantly arranged over a bed of fresh mixed greens, adding a peppery base to the dish. A scattering of chopped walnuts and fresh rosemary needles covers the dish, providing crunch and festive aroma.
The entire plate is framed by a glass of a refreshing beverage, emphasizing the dish’s freshness and visual appeal. These skewers are simple to assemble yet deliver complex flavor and texture, featuring sweet caramelized vegetables, salty cheese, and nutty crunch.
Required Ingredients
1 (8 ounce) block Halloumi cheese, cubed
1 pound sweet potatoes, peeled and cut into 1-inch chunks
1 pound Brussels sprouts, trimmed
1 large red onion, cut into wedges
3 tablespoons olive oil
1 teaspoon smoked paprika
1/2 teaspoon dried thyme
Salt and black pepper to taste
For Serving:
1/2 cup chopped walnuts
4 cups mixed greens (like arugula or spinach)
Balsamic glaze (optional)
Wooden or metal skewers
Equipment List
Large baking sheet
Large mixing bowl
Small bowl
Measuring cups and spoons
Wooden or metal skewers (soak wooden skewers in water for 30 minutes beforehand)
DIY Instruction Step by Step
Prepare Skewers and Oven: Preheat your oven to 400 deg F (200 deg C). If using wooden skewers, remember to soak them in water for at least 30 minutes to prevent scorching.
Season Vegetables: Place the sweet potato chunks, trimmed Brussels sprouts, and red onion wedges in the large mixing bowl. Drizzle with the olive oil, then sprinkle with smoked paprika, dried thyme, salt, and pepper. Toss the vegetables until they are well coated.
Thread Skewers: Thread the cubed Halloumi cheese and the seasoned vegetables alternately onto the prepared skewers.
Roast: Arrange the skewers on the large baking sheet. Place the baking sheet in the preheated oven. Roast for 15 minutes.
Flip and Finish: Carefully flip the skewers over. Continue roasting for another 10 to 15 minutes, or until the sweet potatoes are tender, the Brussels sprouts are caramelized, and the Halloumi is golden brown.
Assemble Plate: While the skewers finish roasting, arrange the mixed greens on a large serving platter.
Serve: Carefully lay the hot skewers over the bed of greens. Sprinkle the entire dish generously with chopped walnuts and fresh herbs. A drizzle of balsamic glaze provides a lovely final touch and flavor enhancement.
14. Spicy Coconut Shrimp Curry with Basmati
Easy Christmas Dinner Ideas
Image Description
This inviting meal offers a wonderful burst of flavor and color, presenting a vibrant, slightly spicy shrimp curry. A deep blue-gray bowl is filled with fluffy, white Basmati rice, which serves as the foundation for the colorful curry. The curry itself is a rich, dark orange-red color, suggesting the presence of tomatoes and curry powder.
Large, curled pink shrimp are nestled on top of the rice, surrounded by bright green peas and chunks of tender orange carrots. A generous squeeze of fresh lime juice adds a final, crucial element of acidity and garnish, and a sprig of fresh cilantro sits prominently on top. The background features a large black skillet containing the rest of the bubbling curry, along with a stack of soft naan bread on a white plate.
The surrounding ingredients, including a dish of yogurt for cooling and a small bowl of spice powder, suggest a customizable heat level. This coconut shrimp curry is a simple yet deeply flavorful dish that makes for a cozy and satisfying main course.
Required Ingredients
1 tablespoon coconut oil or vegetable oil
1 onion, chopped
2 cloves garlic, minced
1 tablespoon curry powder or red curry paste
1 teaspoon smoked paprika
1 (14 ounce) can crushed tomatoes
1 (13.5 ounce) can full-fat coconut milk
1 cup chicken or vegetable broth
1 pound large shrimp, peeled and deveined
1/2 cup frozen peas
Salt to taste
Cooked Basmati rice (for serving)
Fresh cilantro and lime wedges (for garnish)
Equipment List
Large skillet or pot
Wooden spoon
Measuring cups and spoons
Rice cooker or small saucepan (for rice)
DIY Instruction Step by Step
Cook the Rice: Begin by cooking your Basmati rice according to package directions. Keep it warm until serving.
Sauté Aromatics: Heat the coconut oil in the large skillet or pot over medium heat. Add the chopped onion and cook for 5 minutes until softened. Stir in the minced garlic, curry powder or paste, and smoked paprika. Cook for 1 minute until the spices are fragrant.
Build the Sauce: Pour in the crushed tomatoes, coconut milk, and broth. Stir well to combine all the ingredients. Bring the sauce to a gentle simmer, then reduce the heat to low. Let the curry simmer gently for 10 minutes, allowing the flavors to meld and deepen.
Add Shrimp and Peas: Add the peeled and deveined shrimp and the frozen peas to the simmering curry sauce. Stir them in gently.
Finish Cooking: Continue to simmer the curry for 5 to 7 minutes, or until the shrimp are completely pink and cooked through. Taste the curry and add salt as needed.
Serve: Spoon a generous bed of warm Basmati rice into individual serving bowls. Ladle the shrimp curry over the rice. Garnish each serving with a wedge of fresh lime and a sprinkle of chopped cilantro. Serve alongside naan bread or a dollop of yogurt for cooling, if desired.
15. Whole Roasted Cauliflower with Herbs and Crumbs
Easy Christmas Dinner Ideas
Image Description
This spectacular whole roasted cauliflower makes an impressive and hearty vegetarian centerpiece for any holiday meal. The entire head of cauliflower is perfectly roasted to a golden-brown color, sitting proudly on a dark slate serving board. A savory herb and breadcrumb crust lightly dusts the entire surface, providing flavor and textural interest.
The cauliflower retains some of its pale green outer leaves, adding color and rustic charm. A sprig of fresh rosemary sits atop the crown of the cauliflower, enhancing the festive aroma. Three thick slices of the roasted vegetable rest on the board, revealing the tender, creamy interior.
A small black bowl of a creamy dipping sauce, possibly a garlic aioli or ranch, sits nearby, along with a gleaming silver knife. The garnish of fresh rosemary, small purple flowers, and a yellow viola makes the presentation truly memorable. This cauliflower is a simple, healthy option that looks truly dramatic when served whole.
Required Ingredients
1 large head of cauliflower, leaves trimmed (leaving some inner leaves)
4 tablespoons olive oil, divided
1/2 teaspoon garlic powder
1 teaspoon dried thyme
1 teaspoon smoked paprika
Salt and black pepper to taste
For the Crumb Topping (Optional):
1/4 cup panko breadcrumbs
1 tablespoon melted butter
1 tablespoon chopped fresh rosemary
Equipment List
Roasting pan or baking sheet
Small mixing bowl
Basting brush
Measuring cups and spoons
Sharp knife
DIY Instruction Step by Step
Prepare the Oven and Cauliflower: Preheat your oven to 400 deg F (200 deg C). Wash the cauliflower thoroughly. Remove the bottom stem but keep the head intact.
Create Seasoning Rub: In a small mixing bowl, combine 3 tablespoons of the olive oil, garlic powder, dried thyme, smoked paprika, salt, and pepper. Stir to combine.
Season the Cauliflower: Place the cauliflower in the roasting pan. Use a basting brush to generously coat the entire head of the cauliflower with the seasoned olive oil mixture, ensuring the seasoning gets into the crevices.
Initial Roast: Place the roasting pan in the preheated oven. Roast the cauliflower for 45 minutes to 1 hour, depending on the size of the head.
Prepare and Add Crumb Topping: While the cauliflower is roasting, combine the panko breadcrumbs, melted butter, and chopped fresh rosemary in a small bowl. Toss to coat the crumbs.
Add Topping and Finish: After the initial roasting time, remove the cauliflower from the oven. Sprinkle the breadcrumb mixture evenly over the top of the cauliflower. Return it to the oven and roast for another 10 to 15 minutes, or until the crumbs are golden brown and the cauliflower is very tender when pierced with a fork.
Serve: Transfer the whole roasted cauliflower to a serving platter or cutting board. Garnish with a fresh rosemary sprig. Slice the cauliflower into thick wedges for serving and enjoy with a dipping sauce of your choosing.
16. Brazilian Chicken and Cream Cheese Fritters (Coxinha)
Easy Christmas Dinner Ideas
Image Description
This platter of golden-brown fritters is a fun, unique appetizer or a creative light main dish for a festive party. Multiple teardrop-shaped fritters are arranged attractively on a plate and in a small, colorful basket lined with a checkered napkin. Each piece boasts a crunchy, textured exterior from the deep-frying process.
Small white bowls of various dipping sauces are nestled between the fritters, offering creamy garlic aioli and a bright red, spicy sauce. Wedges of fresh lime and a sprinkle of chopped parsley garnish the plate, adding color and a fresh, zesty element. The abundance of the fritters and the dipping sauces suggests a delightful communal dining experience.
These savory pockets, known as Coxinha, are a delightful departure from typical holiday appetizers. They offer a creamy, flavorful filling encased in a crunchy dough, proving that Christmas food can be both comforting and creatively presented.
Required Ingredients
For the Dough:
2 tablespoons butter
1 cup chicken broth
1 cup all-purpose flour
Salt to taste
For the Filling:
1 cup cooked, shredded chicken
4 ounces cream cheese, softened
1/4 cup chopped fresh parsley
1 teaspoon garlic powder
For Frying:
1 egg, lightly beaten
1 cup fine breadcrumbs (or panko)
Vegetable oil (for deep frying)
Equipment List
Medium saucepan
Large bowl
Shallow bowls (for dredging)
Large, heavy-bottomed pot or deep fryer
Slotted spoon or spider
Paper towels
DIY Instruction Step by Step
Make the Dough: In the medium saucepan, combine the butter, chicken broth, and salt. Bring this mixture to a boil over medium-high heat. Remove the pan from the heat and immediately add the flour all at once. Stir vigorously with a wooden spoon until a ball of dough forms and pulls away from the sides of the pan. Let the dough cool slightly in a large bowl.
Make the Filling: In a separate bowl, combine the shredded chicken, softened cream cheese, chopped parsley, and garlic powder. Mix these ingredients until they are thoroughly combined.
Shape the Fritters: Take a small portion of the cooled dough and flatten it into a small circle in the palm of your hand. Place a spoonful of the chicken and cream cheese filling in the center. Carefully fold the dough around the filling, pinching the dough together at the top to form a smooth, teardrop shape. Repeat with the remaining dough and filling.
Dredge: Set up two shallow bowls: one with the beaten egg and one with the breadcrumbs. Dip each shaped fritter first into the beaten egg, allowing any excess to drip off. Then, dredge the fritter completely in the breadcrumbs, pressing gently to ensure a firm coating.
Fry: Pour about 2 inches of vegetable oil into the large, heavy-bottomed pot or deep fryer. Heat the oil to 350 deg F (175 deg C). Carefully drop the fritters into the hot oil, working in small batches to avoid overcrowding the pot.
Finish and Serve: Fry the fritters for 3 to 5 minutes, turning occasionally, until they are deep golden brown and heated through. Use a slotted spoon to remove the fritters and place them on a plate lined with paper towels to drain excess oil. Serve the fritters immediately with your favorite dipping sauces.
17. Mini Lemon-Herb Corn Flakes
Easy Christmas Dinner Ideas
Image Description
This charming presentation features four small, whole Cornish hens, making for an absolutely special individual main course. The tiny hens are roasted to a beautiful golden-brown color, with skin that looks incredibly crisp. Each bird is elegantly crowned with a bright yellow lemon slice and a sprig of fresh thyme, adding a lovely aroma.
The four hens are nestled together in a large, black cast-iron skillet, surrounded by small, roasted yellow potatoes and whole baby carrots. The arrangement in the skillet suggests a simple, one-pan cooking method, even though the presentation is sophisticated. Two individual servings are plated below on clean white plates, accompanied by a fork and knife, ready for the meal.
The entire scene, set against a bright white background, feels fresh and elegant. The combination of the lemon and herbs promises a bright, savory flavor, offering a scaled-down version of a traditional roast bird without the fuss.
Required Ingredients
4 Cornish hens (about 1.5 pounds each)
4 tablespoons olive oil, divided
1 lemon, sliced thin (plus 1/2 lemon for juicing)
4 sprigs fresh rosemary
4 sprigs fresh thyme
1 pound small potatoes, halved
1 pound baby carrots
4 cloves garlic, minced
Salt and black pepper to taste
Equipment List
Large cast-iron skillet or roasting pan
Large mixing bowl
Basting brush
Meat thermometer
Measuring cups and spoons
DIY Instruction Step by Step
Prepare the Oven and Hens: Preheat your oven to 400 deg F (200 deg C). Pat the Cornish hens dry with paper towels; this helps ensure crispy skin.
Season the Hens: Rub the hens all over with 2 tablespoons of olive oil. Season the skin and the cavities generously with salt and pepper. Place one slice of lemon, one sprig of rosemary, and one sprig of thyme inside the cavity of each hen.
Prepare Vegetables: Place the halved potatoes and baby carrots in the large mixing bowl. Toss them with the remaining 2 tablespoons of olive oil, the minced garlic, salt, and pepper.
Arrange and Roast: Place the seasoned vegetables in the bottom of the cast-iron skillet or roasting pan. Place the four seasoned Cornish hens on top of the vegetables. Place a single lemon slice on the breast of each hen.
Bake: Roast for 50 to 60 minutes. After 30 minutes, you can baste the hens with the pan juices to keep the skin moist and flavorful.
Check for Doneness: The hens are cooked when a meat thermometer inserted into the thickest part of the thigh (avoiding the bone) registers 165 deg F (74 deg C). The juices should run clear.
Rest and Serve: Remove the hens from the oven and let them rest in the pan for 10 minutes before serving. Transfer the hens and roasted vegetables to serving plates. Drizzle the vegetables with a squeeze of fresh lemon juice from the remaining half lemon just before serving.
18. Individual Beef Wellingtons
Easy Christmas Dinner Ideas
Image Description
This stunning image showcases an elegant, restaurant-quality main course, presenting individual servings of Beef Wellington. The centerpiece is a thick slice of the golden-brown pastry, cut to reveal a perfectly cooked center of rosy-red beef tenderloin. The outer crust of the puff pastry is intricately scored with a lattice pattern, indicating skill and attention to detail.
The beef is beautifully wrapped in a thin layer of dark mushroom duxelles, which adds an earthy, savory base of flavor beneath the pastry. The surrounding pastry is flaky and crisp, a testament to the meticulous baking process. Three other whole, smaller Beef Wellingtons stand attractively in the background, also featuring the gorgeous lattice scoring.
The dish is dramatically presented on a wooden cutting board, surrounded by fresh sprigs of rosemary and thyme, enhancing the classic English charm. This Beef Wellington is the essence of a showstopping, truly memorable holiday dinner that guests will remember long after the meal is finished.
Required Ingredients
For the Beef:
1 (1.5-2 pound) center-cut beef tenderloin, tied for uniform shape
1 tablespoon olive oil
Salt and black pepper
For the Duxelles:
1 pound cremini mushrooms, finely chopped
2 shallots, finely chopped
2 tablespoons butter
1/4 cup dry sherry or red wine (optional)
For Assembly:
1 package puff pastry (thawed)
1 large egg, beaten (for egg wash)
Dijon mustard (for coating)
Equipment List
Sharp knife
Cutting board
Large skillet
Blender or food processor (for duxelles)
Baking sheet
Parchment paper
Pastry brush
Meat thermometer
DIY Instruction Step by Step
Sear the Beef: Season the beef tenderloin generously with salt and pepper. Heat the olive oil in a large skillet over high heat. Sear the beef on all sides until a deep brown crust forms (about 2 minutes per side). Remove the beef from the pan and brush it immediately all over with a thin layer of Dijon mustard. Let the beef cool completely.
Make the Duxelles: In the same skillet, melt the butter over medium heat. Add the chopped mushrooms and shallots. Cook for about 10 minutes until the moisture evaporates completely and the mixture is very dry. Stir in the dry sherry or wine, if using, and cook until it is absorbed. Let the duxelles cool completely. (You may use a food processor to pulse the mushrooms finely first).
Prepare the Pastry: Preheat the oven to 400 deg F (200 deg C). Roll out the puff pastry into a rectangle large enough to completely wrap the tenderloin.
Assemble the Wellington: Spread the cooled duxelles evenly over the puff pastry, leaving a 1-inch border. Place the cooled, seared tenderloin in the center. Brush the edges of the pastry with the egg wash. Bring the pastry up and over the tenderloin, sealing the edges tightly. Trim any excess pastry.
Decorate and Bake: Place the wrapped tenderloin, seam-side down, on a parchment-lined baking sheet. Brush the entire pastry surface with the egg wash. If desired, score the top lightly with a lattice pattern. Bake for 30 to 35 minutes for medium-rare, or until the pastry is golden brown and a meat thermometer inserted into the center reads 130 deg F (54 deg C).
Rest and Serve: Remove the Wellington from the oven and let it rest for a crucial 10 to 15 minutes before carving it into thick slices. Serve immediately with pan juices or gravy.
19. Tuscan Chicken and Creamy Gnocchi
Easy Christmas Dinner Ideas
Image Description
This inviting meal offers a bright, savory, and cozy alternative to a traditional roast, combining a classic Italian-American favorite with soft potato dumplings. The lower portion of the image features a white bowl filled with plump, soft gnocchi tossed with sauteed spinach. The gnocchi is a pale yellow, pillowy texture, lightly coated in oil or butter.
Large, white shavings of Parmesan cheese and a few fresh basil leaves garnish the gnocchi, adding a lovely final aroma and color. The background shows a non-stick skillet holding the main component: four golden-seared chicken breasts simmering in a creamy, pale pink sauce. The sauce is rich with wilted spinach and bright red sun-dried tomatoes.
This meal successfully balances the rich, creamy sauce of the Tuscan chicken with the lightness of the gnocchi. It presents a simple, comforting, yet elegant main course that is quick to prepare and absolutely satisfying for a casual holiday dinner.
Required Ingredients
1 pound potato gnocchi
2 tablespoons olive oil
2 boneless, skinless chicken breasts, sliced in half horizontally (to make 4 thin cutlets)
1/2 teaspoon dried Italian seasoning
Salt and black pepper to taste
For the Tuscan Sauce:
2 tablespoons butter
1 cup heavy cream
1/2 cup chicken broth
1/2 cup sun-dried tomatoes, packed in oil, drained and chopped
2 cups fresh spinach
1/4 cup grated Parmesan cheese, plus extra for shaving
Equipment List
Large skillet (preferably oven-safe)
Large pot
Colander
Wooden spoon
Measuring cups and spoons
DIY Instruction Step by Step
Cook the Gnocchi: Bring a large pot of salted water to a boil. Add the gnocchi and cook according to package directions, which is usually only 2 to 3 minutes, until they float to the surface. Drain the gnocchi in a colander and set them aside.
Sear the Chicken: Season the chicken cutlets generously with salt, pepper, and Italian seasoning. Heat the olive oil in the large skillet over medium-high heat. Sear the chicken for 3 to 4 minutes per side until it is golden brown. Remove the chicken from the pan and set it aside.
Make the Sauce Base: Reduce the heat to medium-low and melt the butter in the same skillet. Pour in the heavy cream and chicken broth, stirring constantly. Bring the mixture to a gentle simmer.
Add Flavorings: Stir in the chopped sun-dried tomatoes and the grated Parmesan cheese. Stir until the cheese is fully melted and the sauce is smooth.
Finish the Sauce: Add the fresh spinach to the sauce. Cook and stir until the spinach is fully wilted. Taste the sauce and add more salt or pepper as needed.
Return Chicken: Place the seared chicken cutlets back into the sauce. Simmer gently for 5 minutes, ensuring the chicken is heated through and coated in the creamy sauce.
Serve: While the chicken finishes, toss the cooked gnocchi lightly with a small amount of butter or olive oil. Serve a scoop of the gnocchi in a bowl, topped with a generous portion of the Tuscan chicken and sauce. Garnish with additional shavings of Parmesan cheese and fresh basil leaves.
20. Build-Your-Own Baked Potato Bar
Easy Christmas Dinner Ideas
Image Description
This festive setup transforms a simple baked potato into an interactive, crowd-pleasing Christmas meal. A rustic woven basket lined with a red and white checkered cloth holds several large, steaming baked potatoes split open and ready for toppings. A small blackboard sign confirms the theme: “Baked Potato – Festive Toppings!”
The table is a vibrant array of toppings served in small, attractive bowls. The selection includes crumbled bacon, shredded cheddar cheese, sour cream topped with chives, sliced bell peppers, cooked broccoli florets, and a hearty bowl of rich chili. The abundance of options ensures every guest finds something they enjoy.
The entire scene is set against a warm, holiday backdrop featuring pine boughs, red berries, and sparkling Christmas lights, creating a cozy and inviting atmosphere. This fun, casual approach offers a stress-free and delicious alternative to a traditional roast dinner, emphasizing customization and festive cheer.
Required Ingredients
6 large Russet baking potatoes
Olive oil or vegetable oil
Coarse salt
Suggested Toppings:
1 cup shredded cheddar cheese
1 cup sour cream
1/2 cup chopped chives
1 pound cooked and crumbled bacon or bacon bits
1 can chili, heated
1 cup cooked, chopped broccoli florets
Sauteed bell peppers and onions
Equipment List
Aluminum foil
Baking sheet or oven rack
Small bowls (for toppings)
Spoons and serving utensils
DIY Instruction Step by Step
Prepare the Potatoes: Preheat your oven to 400 deg F (200 deg C). Scrub the potatoes well under running water, then dry them thoroughly.
Season and Bake: Poke each potato all over several times with a fork. Rub the skin lightly with oil and sprinkle generously with coarse salt. This helps the skin get crispy. Place the potatoes directly on the oven rack or on a baking sheet. Bake for 50 to 60 minutes, or until the potatoes are tender when squeezed.
Prep the Toppings: While the potatoes bake, prepare all your chosen toppings. Shred the cheese, chop the chives, cook and crumble the bacon, and warm the chili or any other cooked toppings. Arrange all the toppings neatly in small, separate serving bowls.
Keep Warm: When the potatoes are done, wrap them loosely in aluminum foil to help them stay warm. Place the potatoes and the arranged topping bowls on your serving table.
Serve: To serve, use a knife to carefully slice each potato lengthwise down the middle. Gently squeeze the ends of the potato to open it up, fluffing the fluffy interior with a fork. Instruct guests to load their hot potatoes with their favorite festive toppings.
21. Glazed Classic Meatloaf with Festive Cranberry
Easy Christmas Dinner Ideas
Image Description
This classic meatloaf is elevated to an elegant holiday main course with a gorgeous, glossy glaze. The loaf is shaped beautifully, baked to a deep, even brown color, and sits proudly on a clean white rectangular platter. A thick, sweet, and tangy dark glaze blankets the entire surface, catching the light attractively.
Two generous slices have been cut, revealing a moist, finely textured interior. The slices are topped with a spoonful of bright red cranberry relish, which immediately signals the holiday season. The dish is finished with a delicate garnish of fresh dill sprigs and a dusting of pink peppercorns, adding visual sophistication and a gentle aromatic note.
A rich trail of the glaze and meat juices pools attractively beneath the slices, ready to be spooned over the portion. This meatloaf provides a wonderfully comforting, flavorful, and easy-to-manage alternative to traditional roasting, proving that simple comfort food can indeed be a stunning centerpiece.
Required Ingredients
For the Meatloaf:
2 pounds ground beef, or a mix of beef and pork
1 large egg, lightly beaten
1/2 cup milk
1/2 cup breadcrumbs
1 small onion, finely chopped
2 cloves garlic, minced
1 teaspoon dried thyme
1 teaspoon salt
1/2 teaspoon black pepper
For the Glaze:
1/2 cup ketchup
1/4 cup brown sugar
1 tablespoon apple cider vinegar
1 teaspoon dry mustard
For Serving:
1/4 cup cranberry sauce or relish
Equipment List
Loaf pan (about 9 x 5 inches)
Large mixing bowl
Small mixing bowl
Measuring cups and spoons
Basting brush
Meat thermometer
DIY Instruction Step by Step
Preheat Oven and Prep Pan: Preheat your oven to 350 deg F (175 deg C). Lightly grease your loaf pan.
Mix Meatloaf Ingredients: In the large mixing bowl, combine the ground beef, beaten egg, milk, breadcrumbs, chopped onion, minced garlic, dried thyme, salt, and pepper. Use your hands to gently mix all the ingredients thoroughly, being careful not to overmix, which can make the meat tough.
Shape and Place: Press the meat mixture evenly into the prepared loaf pan.
Make the Glaze: In the small mixing bowl, whisk together the ketchup, brown sugar, apple cider vinegar, and dry mustard until the mixture is smooth.
Bake the Loaf: Place the loaf pan in the preheated oven. Bake for 40 minutes.
Glaze and Finish: Remove the meatloaf from the oven. Use the basting brush to spread about half of the prepared glaze evenly over the top of the loaf. Return the meatloaf to the oven and continue baking for another 15 to 20 minutes, or until a meat thermometer inserted into the center registers 160 deg F (71 deg C).
Rest and Serve: Remove the meatloaf from the oven. Let it rest in the pan for 10 minutes before carefully slicing and transferring it to a serving platter. Drizzle the remaining glaze over the slices. Serve the meatloaf slices with a generous spoonful of cranberry sauce or relish.
22. Braised Lamb Shanks with Creamy Polenta
Easy Christmas Dinner Ideas
Image Description
This deeply comforting and hearty meal features tender braised lamb shanks, perfect for a cozy holiday feast. The image shows a large black multi-cooker pot containing a single, large lamb shank submerged in a rich, dark red tomato and vegetable sauce. A beautiful ring of bone marrow sits atop the bone, a sign of slow, proper braising.
The lamb shank is surrounded by soft, cubed carrots and celery, which have absorbed the flavor of the sauce. The meat rests on a bed of creamy, pale yellow polenta, suggesting a soft, luxurious texture. An individual serving is plated below, showcasing the shank resting on a generous helping of polenta, topped with the vibrant sauce and vegetables.
Small side bowls containing fresh spinach and grated cheese accompany the dish, adding fresh, bright green color and savory notes. This lamb shank dinner provides a rustic yet elegant main course, offering rich, fall-off-the-bone tender meat and a hearty base that guests will truly enjoy.
Required Ingredients
2 lamb shanks
1 tablespoon olive oil
1 large onion, chopped
2 carrots, chopped
2 celery stalks, chopped
2 cloves garlic, minced
1/2 cup dry red wine
1 (28 ounce) can crushed tomatoes
2 cups beef or chicken broth
1 teaspoon dried rosemary
1 bay leaf
Salt and black pepper
For the Polenta:
4 cups water or broth
1 cup coarse ground cornmeal (polenta)
1/2 cup grated Parmesan cheese
2 tablespoons butter
Equipment List
Dutch oven or heavy-bottomed pot (or pressure cooker/multi-cooker)
Tongs
Wooden spoon
Measuring cups and spoons
DIY Instruction Step by Step
Sear the Lamb: Season the lamb shanks generously with salt and pepper. Heat the olive oil in the Dutch oven or pot over medium-high heat. Sear the lamb shanks on all sides until they are deeply browned, about 3 minutes per side. Remove the shanks from the pot and set them aside.
Sauté the Vegetables: Reduce the heat to medium. Add the chopped onion, carrots, and celery to the pot. Cook the vegetables for about 7 minutes, stirring until they are softened. Add the minced garlic and cook for 1 minute more until fragrant.
Deglaze and Add Liquid: Pour in the red wine, scraping up any browned bits from the bottom of the pot. Let the wine simmer until it reduces slightly. Stir in the crushed tomatoes, broth, dried rosemary, and bay leaf. Season the sauce with a bit more salt and pepper.
Braise the Lamb (Conventional Method): Return the seared lamb shanks to the pot, ensuring they are mostly submerged in the liquid. Bring the sauce to a gentle simmer, then cover the pot tightly. Place the pot in a preheated 325 deg F (160 deg C) oven and braise for 2.5 to 3 hours, or until the meat is extremely tender and falling off the bone.
Make the Polenta: About 30 minutes before the lamb is finished, bring the 4 cups of water or broth to a boil in a separate saucepan. Slowly whisk in the cornmeal until smooth. Reduce the heat to low and continue stirring frequently for 20 to 30 minutes until the polenta is creamy and pulls away from the sides of the pan. Stir in the Parmesan cheese and butter, then keep the polenta warm.
Serve: Remove the bay leaf from the sauce. Serve a generous spoonful of warm, creamy polenta in a bowl or on a plate. Place one tender lamb shank on top of the polenta and spoon the rich tomato and vegetable sauce over the meat.
23. Roasted Whole Trout with Lemon and Almonds
Easy Christmas Dinner Ideas
Image Description
This magnificent whole roasted trout offers a lighter, yet extremely elegant, main course for a holiday gathering. The silvery trout is presented whole, baked to a beautiful light golden color, and rests on a bed of fresh herbs, thinly sliced red onion, and fennel. The entire fish is beautifully dressed with overlapping, thin slices of bright yellow lemon and toasted slivered almonds, creating a sophisticated scale-like pattern.
A generous drizzle of butter and lemon pan juices pools beneath the fish, creating a flavorful sauce for serving. The platter is an elongated white oval, emphasizing the size and elegance of the fish. A side bowl of bright green beans and a sparkling wine glass complete the appealing and healthy presentation.
Roasting a whole fish provides a dramatic tableside moment that is surprisingly simple to achieve. This dish promises a wonderfully fresh, delicate flavor profile with a delightful crunch from the toasted almonds.
Required Ingredients
1 (2-3 pound) whole trout, scaled and gutted
1/4 cup olive oil
1/2 cup white wine or chicken broth
1 lemon, sliced thin (plus 1/2 lemon for juicing)
1/2 red onion, sliced thin
1 cup fresh dill and parsley, chopped
1/4 cup slivered almonds, lightly toasted
Salt and black pepper to taste
2 tablespoons butter, cut into small pieces
Equipment List
Roasting pan or large baking sheet
Parchment paper
Sharp knife
Cutting board
Basting spoon
DIY Instruction Step by Step
Prepare the Oven and Fish: Preheat your oven to 400 deg F (200 deg C). Line a roasting pan or large baking sheet with parchment paper. Rinse the whole trout under cold water and pat it thoroughly dry inside and out. Score the skin lightly with a few diagonal cuts on both sides.
Stuff the Cavity: Rub the inside cavity of the fish with salt and pepper. Stuff the cavity loosely with half of the sliced red onion and half of the chopped herbs.
Arrange and Season: Place the remaining sliced red onion and herbs on the prepared pan. Lay the trout on top of this bed. Drizzle the fish with the olive oil and white wine or broth. Season the outside of the fish generously with salt and pepper.
Top the Fish: Shingle the thin lemon slices over the entire top surface of the trout. Dot the slices of butter evenly over the fish and the pan.
Roast: Bake for 20 to 30 minutes. The fish is cooked when the flesh flakes easily when tested with a fork and the internal temperature reaches 145 deg F (63 deg C).
Garnish and Serve: Remove the trout from the oven. Carefully transfer the fish and the pan juices to a large serving platter. Squeeze fresh lemon juice from the remaining half lemon over the fish. Sprinkle the entire dish liberally with the toasted slivered almonds and any remaining fresh dill sprigs.
24. French Onion Chicken Bake
Easy Christmas Dinner Ideas
Image Description
This deeply savory casserole offers a comforting spin on classic French Onion Soup, featuring tender chicken. A square white baking dish is filled with a rich, dark layer of caramelized onions swimming in a deeply flavorful broth. Four plump chicken thighs are nestled within the onions, each topped with a generous slice of melted, bubbly cheese.
The cheese, likely Gruyere or mozzarella, is perfectly browned around the edges and stretches attractively over the chicken and sauce. A scattering of golden-brown croutons is sprinkled around the perimeter, providing the classic crunchy element of the soup. A garnish of fresh thyme leaves adds a lovely, earthy green color.
A large serving spoon rests nearby, inviting a warm spoonful of this rich dish. This French Onion Chicken Bake is a deeply satisfying and easy-to-prepare meal that brings the complex, savory flavors of a French bistro to the holiday table.
Required Ingredients
4 boneless, skinless chicken thighs (or breasts)
4 large yellow onions, thinly sliced
4 tablespoons butter
1 teaspoon dried thyme, divided
1/2 cup dry white wine or sherry (optional)
3 cups beef broth
1 bay leaf
4 slices Gruyere or mozzarella cheese
1/2 cup croutons (French bread style works well)
Salt and black pepper
Equipment List
9×13 inch baking dish
Large skillet or Dutch oven
Measuring cups and spoons
Wooden spoon
DIY Instruction Step by Step
Caramelize the Onions: Melt the butter in the large skillet or Dutch oven over medium heat. Add the thinly sliced onions and a pinch of salt. Cook the onions, stirring frequently, for 25 to 35 minutes until they are deeply golden brown and beautifully caramelized. This step requires patience.
Build the Sauce: Stir in the minced garlic and half a teaspoon of dried thyme. Cook for 1 minute until fragrant. If using, pour in the white wine or sherry, scraping up any browned bits from the bottom of the pan, and let it reduce for 2 minutes. Pour in the beef broth and add the bay leaf. Bring the mixture to a simmer.
Prepare and Place Chicken: Preheat your oven to 400 deg F (200 deg C). Season the chicken pieces with salt and pepper. Pour the onion mixture into the 9×13 inch baking dish. Nestle the four chicken thighs gently into the onion mixture.
Bake: Bake the dish, uncovered, for 20 minutes.
Add Cheese and Finish: Remove the dish from the oven. Discard the bay leaf. Place one slice of cheese directly on top of each chicken thigh. Sprinkle the croutons around the edge of the chicken pieces. Return the dish to the oven and bake for another 5 to 10 minutes, or until the cheese is melted and bubbly and the chicken is cooked through (internal temperature of 165 deg F or 74 deg C).
Serve: Remove the casserole from the oven. Garnish the top with the remaining dried thyme. Serve the French Onion Chicken Bake immediately, spooning the rich onion sauce generously over the chicken.
25. Zesty Asian Lettuce Wraps
Easy Christmas Dinner Ideas
Image Description
This fresh, vibrant dish is a lively, customizable option that provides a fun, light holiday main course or appetizer. The image displays a large central platter surrounded by two smaller, pre-assembled servings. The main platter holds a large portion of savory, browned ground meat (likely pork or turkey) seasoned with Asian spices and topped with peanuts. The meat sits nestled in large, crisp lettuce cups.
The two side plates showcase the abundance of fresh, colorful accompaniments: mounds of thin rice noodles, shredded carrots, long slices of cucumber, and sprigs of fresh mint. Small bowls of sliced red chili peppers and chopped green onions offer customization for heat.
The overall presentation is bright, colorful, and highly textural, emphasizing the freshness of the vegetables against the savory meat. This build-your-own dish is engaging, delicious, and offers a welcome, lighter flavor profile for a festive gathering.
Required Ingredients
1 tablespoon sesame oil
1 pound ground pork, turkey, or chicken
1/4 cup soy sauce (low sodium)
2 tablespoons hoisin sauce
1 tablespoon rice vinegar
1 teaspoon minced fresh ginger
2 cloves garlic, minced
1/4 cup chopped roasted peanuts
1 head butter lettuce or romaine lettuce, separated into leaves
For Toppings (Optional):
Shredded carrots
Sliced cucumbers
Cooked rice vermicelli noodles
Fresh mint or cilantro leaves
Sliced fresh chilies
Equipment List
Large skillet or wok
Wooden spoon
Measuring cups and spoons
Cutting board
Small bowls (for toppings)
DIY Instruction Step by Step
Prepare the Toppings: Wash and dry the lettuce leaves. Slice the carrots and cucumbers into thin strips. If using rice noodles, cook them according to package directions and set them aside. Arrange all the toppings in small, separate bowls for guests to customize their wraps.
Cook the Meat: Heat the sesame oil in the large skillet or wok over medium-high heat. Add the ground meat and cook, breaking it up with a wooden spoon, until it is thoroughly browned. Drain off any excess grease from the pan.
Add Flavorings: Stir in the minced garlic and ginger into the meat and cook for 1 minute until fragrant.
Make the Sauce: In a small bowl, whisk together the soy sauce, hoisin sauce, and rice vinegar.
Combine: Pour the sauce mixture over the cooked meat. Stir and cook for 2 to 3 minutes, allowing the sauce to thicken slightly and coat the meat completely. Remove the skillet from the heat.
Serve: Transfer the seasoned meat mixture to the large serving platter. Sprinkle the chopped peanuts over the top. Serve the seasoned meat mixture alongside the bowl of fresh lettuce cups and the array of vibrant toppings, allowing everyone to build their own wrap.
26. Baked Shells with Spicy Sausage and Mozzarella
Easy Christmas Dinner Ideas
Image Description
This inviting baked pasta dish is a fantastic, comforting option that requires minimal effort for maximum crowd appeal. A rectangular ceramic baking dish holds a generous portion of medium shell pasta nestled in a rich, chunky tomato sauce. The entire top is covered in a thick, bubbly blanket of melted mozzarella cheese, creating an appetizing, golden crust.
Scattered throughout the cheese layer are slices of spicy sausage, likely pepperoni or chorizo, which add a savory, smoky flavor. The pasta shells are plump and tender, having absorbed the deep red sauce. A gentle sprinkle of chopped parsley adds a flash of bright green color.
A fork and knife rest on the side, ready to portion out this hearty casserole. This Baked Shells dish is the definition of simple, satisfying comfort food, making it a delicious and easy choice for a casual holiday dinner.
Required Ingredients
1 pound medium shell pasta
1 tablespoon olive oil
1 large onion, chopped
2 cloves garlic, minced
1 (28 ounce) can crushed tomatoes
1 cup chicken broth
1 teaspoon dried oregano
1/2 teaspoon red pepper flakes (adjust to taste)
1/2 pound cooked spicy sausage (like chorizo or pepperoni), sliced
1.5 cups shredded mozzarella cheese, divided
1/4 cup grated Parmesan cheese
Salt and black pepper
Equipment List
9×13 inch baking dish
Large pot (for boiling pasta)
Large skillet or pot (for sauce)
Colander
Wooden spoon
Measuring cups and spoons
DIY Instruction Step by Step
Cook the Pasta: Preheat your oven to 375 deg F (190 deg C). Bring a large pot of salted water to a rolling boil. Add the shell pasta and cook for 2 minutes less than the package instructions (to keep it slightly underdone). Drain the pasta in a colander.
Start the Sauce: While the pasta cooks, heat the olive oil in the large skillet over medium heat. Add the chopped onion and cook for 5 minutes until softened. Stir in the minced garlic, dried oregano, and red pepper flakes. Cook for 1 minute until fragrant.
Simmer the Sauce: Pour in the crushed tomatoes and chicken broth. Bring the sauce to a gentle simmer. Season the sauce with salt and pepper. Let it simmer gently for 10 minutes. Stir in the Parmesan cheese.
Combine and Assemble: Add the drained, slightly undercooked pasta to the sauce, stirring until the pasta is completely coated. Pour the pasta mixture evenly into the 9×13 inch baking dish.
Add Toppings and Bake: Sprinkle half of the shredded mozzarella cheese over the pasta mixture. Arrange the slices of spicy sausage evenly over the cheese. Top the casserole with the remaining shredded mozzarella cheese.
Finish Cooking: Bake for 20 to 25 minutes, or until the sauce is bubbly around the edges and the cheese is melted and golden brown. Let the casserole cool for 5 minutes before serving. Garnish with chopped fresh parsley if desired.
27. Pan-Seared Steak with Blue Cheese Crumbles
Easy Christmas Dinner Ideas
Image Description
This artfully plated steak dinner is a quick and elegant main course that looks every bit like a high-end restaurant creation. A thick, pan-seared steak is sliced into even medallions, revealing a beautiful deep pink, medium-rare interior. The slices are dramatically draped down the center of a large white plate, with a thick, dark balsamic reduction drizzled over the top.
A generous pile of vividly colored, sauteed seasonal vegetables frames one side of the steak. The vegetables include slices of zucchini, red and orange bell peppers, whole button mushrooms, and striking wedges of purple red onion. On the other side of the plate, a vibrant sprinkle of blue cheese crumbles sits atop a bed of crunchy breadcrumbs, offering a salty, tangy contrast to the richness of the beef.
The dish is garnished simply with a sprig of fresh thyme, making the entire presentation both beautiful and appetizing. This steak dinner provides bold, complex flavor with textural contrast, making it a guaranteed hit for a meat-loving holiday crowd.
Required Ingredients
1 (1.5 pound) beef tenderloin or sirloin steak, about 1.5 inches thick
1 tablespoon olive oil
2 tablespoons butter
2 cloves garlic, smashed
1 sprig fresh rosemary or thyme
For the Vegetables:
1 zucchini, sliced
1 red onion, cut into wedges
1 cup button mushrooms, sliced
1 cup green beans
2 tablespoons olive oil
Salt and black pepper
For Topping:
1/4 cup crumbled blue cheese
Balsamic glaze (store-bought or homemade)
Equipment List
Heavy-bottomed skillet (cast iron works well)
Separate large skillet (for vegetables)
Sharp knife
Cutting board
Meat thermometer
DIY Instruction Step by Step
Prepare the Steak: Remove the steak from the refrigerator 30 minutes before cooking. Season both sides generously with salt and pepper.
Sauté the Vegetables: Heat 2 tablespoons of olive oil in a large skillet over medium heat. Add the sliced zucchini, red onion wedges, mushrooms, and green beans. Saute for 5 to 7 minutes until the vegetables are tender-crisp and lightly caramelized. Season lightly with salt and pepper. Keep the vegetables warm.
Sear the Steak: Heat 1 tablespoon of olive oil in the cast-iron skillet over high heat until it just begins to smoke. Carefully place the seasoned steak in the hot pan. Sear for 3 to 4 minutes on the first side until a deep crust forms.
Baste and Finish: Flip the steak. Add the butter, smashed garlic, and herb sprig to the pan. Tilt the pan and use a spoon to continuously baste the melted butter over the steak for 2 to 3 minutes.
Check Doneness and Rest: Remove the steak from the heat when a thermometer reads 130 deg F (54 deg C) for medium-rare. Transfer the steak to a cutting board and let it rest for a full 10 minutes.
Serve: Slice the rested steak crosswise into thick medallions. Arrange the slices on the plate next to the sauteed vegetables. Drizzle the steak generously with balsamic glaze. Finish by sprinkling the blue cheese crumbles next to the meat and serve immediately.
28. Sweet Plantain and Beef Casserole (Pastelon)
Easy Christmas Dinner Ideas
Image Description
This hearty and visually appealing casserole, known as Pastelon, presents a Latin American take on lasagna, featuring savory ground beef and sweet plantains. A deep, rectangular clay-colored baking dish holds the golden-brown casserole. The top layer consists of a pale, cheesy topping and strips of sweet, cooked plantains that have been baked to a beautiful light gold color.
The surface is decorated with a pattern of browned plantain slices, giving it a vibrant color contrast. A neat square slice has been removed and plated, revealing the distinct layers: a base of richly seasoned ground beef, topped by the sweet plantains and a creamy, cheesy custard-like mixture. A garnish of fresh parsley sits on top of both the casserole and the plated slice.
A silver fork rests next to the plated slice, suggesting the tender, moist texture of the dish. This casserole provides a comforting, exciting blend of sweet and savory flavors, making it a unique and satisfying main dish for a festive dinner.
Required Ingredients
4 ripe plantains (yellow with black spots)
Vegetable oil (for frying)
1 pound ground beef
1 onion, chopped
2 cloves garlic, minced
1 (8 ounce) can tomato sauce
1 teaspoon cumin
1 teaspoon dried oregano
Salt and black pepper
For the Topping:
1 cup shredded mozzarella or Monterey Jack cheese
2 large eggs
1/4 cup milk or cream
Equipment List
8×8 or 9×9 inch square baking dish
Large skillet (for beef)
Frying pan (for plantains)
Mixing bowls
Measuring cups and spoons
DIY Instruction Step by Step
Prepare the Plantains: Peel the ripe plantains. Slice them lengthwise into 1/4-inch thick strips. Heat about 1/2 inch of vegetable oil in the frying pan over medium-high heat. Fry the plantain slices in batches for 2 to 3 minutes per side until they are golden brown and tender. Place the fried plantains on a plate lined with paper towels to drain excess oil.
Cook the Beef Filling: Preheat your oven to 375 deg F (190 deg C). Brown the ground beef in the large skillet over medium-high heat, breaking it up with a spoon. Drain any grease. Add the chopped onion and cook for 5 minutes until softened. Stir in the minced garlic, tomato sauce, cumin, oregano, salt, and pepper. Simmer the beef filling for 5 to 7 minutes.
Prepare the Topping: In a small mixing bowl, whisk together the eggs and milk or cream. Set aside.
Assemble the Pastelon: Lightly grease your baking dish. Lay half of the fried plantain slices in a single, even layer on the bottom of the dish. Spread the entire beef filling evenly over the layer of plantains. Cover the beef filling with a layer of half of the shredded cheese.
Finish the Layers: Place the remaining plantain slices in a layer over the cheese. Pour the egg and milk mixture over the top. Sprinkle the remaining shredded cheese over the egg wash.
Bake: Bake for 25 to 30 minutes, or until the casserole is set and the top is golden brown and bubbly. Let the Pastelon rest for 10 minutes before slicing and serving. Garnish with fresh parsley.
29. Bacon-Wrapped Chicken and Asparagus Skewers
Easy Christmas Dinner Ideas
Image Description
This platter of savory skewers offers an elegant, easy, and flavorful appetizer or main course. Dozens of small skewers are packed onto a large, white oval platter, each featuring a cube of chicken wrapped snugly in a strip of bacon. Alternating with the chicken are crisp, green pieces of roasted asparagus, all held together by a thin wooden skewer.
The bacon is perfectly cooked to a beautiful golden-brown crispness, and the chicken is tender and juicy beneath the wrapping. A creamy white sauce, possibly ranch or blue cheese dressing, is drizzled over the top of the skewers, adding a rich, cooling element. A dusting of black pepper provides a lovely visual contrast to the white sauce.
Fresh sprigs of rosemary sit nearby, confirming the holiday theme and adding an aromatic touch. These Bacon-Wrapped Skewers are a simple, satisfying meal that balances savory, smoky, and fresh flavors beautifully.
Required Ingredients
1.5 pounds boneless, skinless chicken breasts, cut into 1-inch cubes
1 pound thin-cut bacon slices, cut in half
1 pound fresh asparagus spears, trimmed and cut into 1-inch pieces
1/4 cup olive oil
1/2 teaspoon smoked paprika
Salt and black pepper
For Serving (Optional):
Creamy ranch or garlic aioli dressing
Equipment List
Large baking sheet
Parchment paper
Small mixing bowl
Wooden skewers (soak in water for 30 minutes)
DIY Instruction Step by Step
Prepare Oven and Skewers: Preheat your oven to 400 deg F (200 deg C). Line a large baking sheet with parchment paper. If using wooden skewers, remember to soak them in water for 30 minutes to prevent them from burning.
Season Ingredients: Place the cubed chicken in a small bowl. Drizzle with half of the olive oil and season with salt, pepper, and smoked paprika. Toss to coat. Place the asparagus pieces in a separate small bowl, drizzle with the remaining olive oil, and season lightly with salt and pepper.
Assemble the Skewers: Take a piece of seasoned chicken and wrap a half-slice of bacon tightly around it. Thread the bacon-wrapped chicken piece onto a prepared skewer, followed by a piece of asparagus. Repeat the pattern: chicken, asparagus, chicken, asparagus, etc., until the skewer is full. Repeat with the remaining ingredients.
Bake: Arrange the assembled skewers in a single layer on the prepared baking sheet. Bake for 20 minutes.
Flip and Finish: Carefully flip the skewers over. Return them to the oven and continue baking for another 10 to 15 minutes, or until the bacon is crispy and the chicken is cooked through (internal temperature of 165 deg F or 74 deg C).
Serve: Transfer the hot skewers to a serving platter. Drizzle a small amount of creamy dressing over the top of the skewers just before serving.
30. Spicy Shrimp and Grits
Easy Christmas Dinner Ideas
Image Description
This Southern-inspired dish offers a comforting and flavorful alternative to traditional roasts, making a surprisingly elegant holiday meal. Four individual white bowls are filled with a creamy, pale yellow base of grits. A generous portion of plump, perfectly cooked shrimp, coated in a rich, spicy, tomato-based sauce, sits attractively atop the grits in each bowl.
The sauce contains small pieces of visible red pepper and onion, indicating a complex, savory flavor. The dish is beautifully garnished with bright green chopped scallions, adding a fresh, slightly pungent note. The arrangement of the bowls is clean and appealing, suggesting a cozy, homestyle meal.
A small side bowl of toasted pecan pieces sits nearby, ready to be sprinkled over the dish for a welcoming crunch. Shrimp and Grits is a deeply satisfying and easy-to-customize main course, offering rich textures and a wonderful mix of spice and savory flavors.
Required Ingredients
For the Grits:
4 cups water or broth
1 cup quick-cooking or stone-ground grits
1/2 cup heavy cream
1/2 cup shredded cheddar cheese (optional)
2 tablespoons butter
Salt to taste
For the Shrimp:
1 tablespoon olive oil
1 pound large shrimp, peeled and deveined
4 slices bacon, chopped (or 1/4 cup diced ham)
1/2 cup chopped onion
2 cloves garlic, minced
1/2 cup chopped sun-dried tomatoes or fresh tomatoes
1/2 cup chicken broth
1 teaspoon hot sauce (adjust to taste)
1 teaspoon smoked paprika
Chopped scallions (for garnish)
Equipment List
Medium saucepan (for grits)
Large skillet (for shrimp)
Wooden spoon
Whisk
Measuring cups and spoons
DIY Instruction Step by Step
Start the Grits: Bring the 4 cups of water or broth to a boil in the medium saucepan. Slowly whisk in the grits and a teaspoon of salt. Reduce the heat to low and simmer, stirring frequently, until the grits are thick and creamy (15-20 minutes for stone-ground; 5-7 minutes for quick-cooking). Stir in the heavy cream, butter, and cheese (if using). Keep the grits warm.
Cook Bacon/Ham: While the grits cook, start the shrimp sauce. Cook the chopped bacon or diced ham in the large skillet over medium heat until crispy. Remove the bacon/ham bits with a slotted spoon and set aside, leaving 1 tablespoon of fat in the pan.
Sauté Aromatics: Add the chopped onion to the skillet and cook for 5 minutes until softened. Stir in the minced garlic and cook for 1 minute until fragrant.
Add Flavorings: Stir in the chopped tomatoes, chicken broth, hot sauce, and smoked paprika. Bring the mixture to a simmer and let the sauce cook gently for 5 minutes.
Cook the Shrimp: Add the peeled and deveined shrimp to the simmering sauce. Cook for 3 to 5 minutes, stirring occasionally, until the shrimp turn pink and are cooked through. Stir the reserved bacon/ham pieces back into the sauce.
Serve: Spoon the warm, creamy grits into individual serving bowls. Top each bowl generously with the spicy shrimp and sauce mixture. Garnish immediately with chopped scallions and a sprinkle of toasted pecans, if desired.
31. Stuffed Turkey Breast Roulade with Cranberry and Herb Stuffing
Easy Christmas Dinner Ideas
Image Description
This spectacular turkey breast roulade makes an absolutely beautiful and manageable centerpiece for a holiday gathering. The cylindrical roast is sliced to reveal stunning concentric layers of turkey breast, cranberry sauce, and savory stuffing. The light white meat of the turkey is perfectly moist, wrapped around a middle layer of deep red cranberry, which gives the slices a festive, ruby-colored swirl.
A thick layer of golden-brown, herbed crust covers the top of the roast, providing wonderful flavor and texture. The sliced roulade is presented on an elegant pale blue serving platter, accented by large, fresh sage leaves. The clean, defined layers confirm this dish is both simple to slice and incredibly attractive on the plate.
This preparation allows you to enjoy the traditional flavors of turkey and stuffing without needing to roast a massive bird. The roulade offers a convenient, elegant way to serve a festive meal that is guaranteed to impress your guests with its complexity and moist texture.
Required Ingredients
1 (3-4 pound) boneless, skinless turkey breast, butterflied and flattened
1 tablespoon olive oil
1 teaspoon dried thyme
Salt and black pepper
For the Stuffing:
1 cup prepared bread stuffing mix
1/2 cup chicken broth
1/4 cup dried cranberries
2 tablespoons chopped fresh sage
For the Cranberry Layer:
1/2 cup whole berry cranberry sauce (not jelly)
Equipment List
Meat pounder or rolling pin
Plastic wrap
Kitchen twine
Roasting pan with a rack
Small mixing bowl
Measuring cups and spoons
Meat thermometer
DIY Instruction Step by Step
Prepare the Turkey: Lay the butterflied turkey breast on a sheet of plastic wrap. Cover it with a second sheet of plastic wrap. Use a meat pounder or rolling pin to flatten the turkey to a uniform thickness of about 1/2 inch. Remove the top plastic wrap layer.
Make the Stuffing: In the small mixing bowl, combine the stuffing mix, chicken broth, dried cranberries, and fresh sage. Mix gently until the ingredients are just combined.
Layer the Turkey: Spread the cranberry sauce evenly over the flattened turkey breast, leaving a 1-inch border around all the edges. Next, spread the prepared stuffing mixture evenly over the cranberry sauce layer.
Roll the Roulade: Starting from one long side, tightly roll the turkey breast into a log shape. Secure the roll tightly with kitchen twine at 1-inch intervals. Rub the outside of the roulade with olive oil and season generously with salt, pepper, and dried thyme.
Roast: Place the secured turkey roulade on the rack in the roasting pan. Place the pan in a preheated 375 deg F (190 deg C) oven. Roast for 60 to 75 minutes.
Check for Doneness: The roulade is finished when a meat thermometer inserted into the center registers an internal temperature of 165 deg F (74 deg C).
Rest and Serve: Remove the roulade from the oven and let it rest on the cutting board for 10 minutes. This resting step ensures the juices are retained. Carefully remove the kitchen twine before slicing the roulade into thick medallions for serving.
32. Hungarian Slow-Cooker Beef Goulash
Easy Christmas Dinner Ideas
Image Description
This deeply comforting and hearty beef goulash is a stunning, rustic main course presented right from the slow cooker. The dark red, steaming stew is packed with tender chunks of browned beef, which float in a rich, paprika-infused sauce. Large, soft cubes of yellow potato and bright orange slices of carrot are scattered throughout the stew.
A dollop of pale sour cream sits directly in the center of the goulash, crowned with finely chopped fresh parsley and slivers of purple red onion. The arrangement of the toppings provides a fresh, cooling counterpoint to the warm, savory stew. The slow cooker itself is nestled in a festive background, with pine needles and soft holiday lights visible.
Goulash offers a wonderfully complex flavor profile achieved easily through low, slow cooking. This is a hassle-free, warming, and satisfying dish that truly embodies the spirit of a cozy winter holiday meal.
Required Ingredients
2 pounds beef stew meat (chuck or round), cut into 1-inch cubes
1 tablespoon olive oil
1 large onion, chopped
3 tablespoons sweet paprika
1 teaspoon caraway seeds (optional)
4 cups beef broth
1 (14.5 ounce) can diced tomatoes, undrained
2 potatoes, peeled and cut into 1-inch cubes
2 carrots, sliced thick
1 red bell pepper, chopped
Salt and black pepper
For Serving:
Sour cream
Chopped fresh parsley
Equipment List
Slow cooker (large capacity)
Large skillet (optional, for browning)
Measuring cups and spoons
Wooden spoon
DIY Instruction Step by Step
Prepare the Beef (Optional Browning): If time allows, brown the beef cubes in the skillet with a bit of olive oil over medium-high heat until all sides are seared. This deepens the flavor. If short on time, skip this step.
Combine Ingredients: Place the chopped onion, sliced carrots, cubed potatoes, and chopped red bell pepper into the bottom of the slow cooker insert. Add the browned or raw beef cubes on top of the vegetables.
Add Seasonings and Liquid: Sprinkle the beef and vegetables evenly with the sweet paprika, caraway seeds (if using), salt, and pepper. Pour in the beef broth and the can of diced tomatoes. Gently stir everything together to combine the ingredients and seasonings.
Cook the Goulash: Cover the slow cooker with its lid. Cook on the LOW setting for 6 to 8 hours or on the HIGH setting for 3 to 4 hours, or until the beef is extremely tender and easily shreds with a fork.
Adjust and Thicken (Optional): Taste the sauce and adjust the salt and pepper as needed. If the sauce seems too thin, you can remove the lid for the last 30 minutes of cooking or stir in 1 tablespoon of flour or cornstarch mixed with a splash of water.
Serve: Ladle the hot beef goulash into deep serving bowls. Garnish each serving with a dollop of sour cream and a sprinkle of chopped fresh parsley and red onion slices. Serve with noodles, dumplings, or crusty bread.
33. Vegetarian Black Bean and Corn Enchilada Casserole
Easy Christmas Dinner Ideas
Image Description
This vibrant vegetarian enchilada casserole offers a colorful, easy-to-manage, and delicious main dish for a festive dinner. A large rectangular casserole dish is filled with corn tortillas generously stuffed and smothered in a rich, dark red tomato and chili sauce. The sauce is packed with visible kernels of yellow corn and dark black beans.
A thick layer of melted, bubbly white cheese covers the entire surface of the casserole, creating a wonderfully appealing crust. The top is finished with a dollop of sour cream and beautifully fanned-out slices of bright green avocado, along with a few sprigs of fresh cilantro. Two cut pieces are plated at the bottom, confirming the soft, layered interior.
The simple presentation of this dish belies the complex, comforting flavors within. This enchilada casserole is an excellent, satisfying, and relatively easy main course that provides a fun, festive alternative to traditional holiday roasts.
Required Ingredients
1 tablespoon olive oil
1 onion, chopped
2 cloves garlic, minced
1 (15 ounce) can black beans, rinsed and drained
1 cup frozen or canned corn (drained)
1 (10 ounce) can red enchilada sauce, divided
1/2 cup chicken or vegetable broth
8-10 corn or flour tortillas (6-inch size)
2 cups shredded Monterey Jack or cheddar cheese, divided
For Topping:
Sour cream
Sliced avocado
Fresh cilantro
Equipment List
9×13 inch rectangular baking dish
Large skillet
Wooden spoon
Measuring cups and spoons
DIY Instruction Step by Step
Prepare Oven and Dish: Preheat your oven to 375 deg F (190 deg C). Pour about 1/4 cup of the enchilada sauce into the bottom of the 9×13 inch baking dish and spread it around to coat the bottom.
Make the Filling: Heat the olive oil in the large skillet over medium heat. Add the chopped onion and cook for 5 minutes until softened. Stir in the minced garlic and cook for 1 minute until fragrant. Add the rinsed black beans, corn, 1 cup of the enchilada sauce, and the broth. Season with salt and pepper. Bring the mixture to a simmer, then reduce the heat and let it cook for 5 minutes.
Assemble the Enchiladas: Lay a tortilla on a clean surface. Spoon a line of the black bean and corn filling down the center, followed by a light sprinkle of the shredded cheese. Roll the tortilla up tightly.
Layer the Casserole: Place the filled, rolled tortilla seam-side down in the prepared baking dish. Repeat this process until all the tortillas are filled and arranged snugly in the dish.
Finish and Bake: Pour the remaining enchilada sauce evenly over the top of the rolled tortillas. Sprinkle the remaining shredded cheese over the sauce. Bake for 20 to 25 minutes, or until the sauce is bubbly and the cheese is melted and lightly browned.
Serve: Remove the casserole from the oven and let it rest for 5 minutes. Garnish the center generously with a dollop of sour cream, slices of fresh avocado, and a sprinkle of cilantro before slicing and serving.
34. Lemon-Dill Chicken with Capers and Mashed Potatoes
Easy Christmas Dinner Ideas
Image Description
This elegantly plated dish features a pan-seared chicken breast resting on a bed of fluffy mashed potatoes, all covered in a bright, creamy sauce. The chicken is sliced and fanned out, revealing its tender, moist interior, and it sits attractively on a white plate. A thick, pale green, creamy sauce is generously spooned over the chicken and potatoes.
The sauce is visibly studded with green capers and flecks of fresh dill, offering a bright, herbaceous aroma. The potatoes are soft and creamy, catching the sauce beautifully. A garnish of fresh dill sprigs sits prominently on top of the chicken, enhancing the visual appeal.
The meal is served in a black non-stick skillet, giving it a modern, casual feel. Small side bowls of rice and lemon slices sit nearby, providing a contrast to the richness of the main dish. This Lemon-Dill Chicken provides a refreshing, quick, and sophisticated main course for a smaller holiday dinner.
Required Ingredients
2 boneless, skinless chicken breasts
1 tablespoon olive oil
2 tablespoons butter
1 shallot, minced
1 clove garlic, minced
1/2 cup chicken broth
1/2 cup heavy cream
2 tablespoons fresh lemon juice
1 tablespoon capers, drained
2 tablespoons fresh dill, chopped
Salt and black pepper
Cooked mashed potatoes or rice (for serving)
Equipment List
Large skillet
Meat pounder (optional)
Wooden spoon
Measuring cups and spoons
DIY Instruction Step by Step
Prepare the Chicken: Slice each chicken breast in half horizontally to create four thinner cutlets. Season the cutlets generously with salt and pepper.
Sear the Chicken: Heat the olive oil in the large skillet over medium-high heat. Carefully place the chicken cutlets in the hot oil. Sear for 3 to 4 minutes per side until they are golden brown and cooked through (internal temperature of 165 deg F or 74 deg C). Remove the chicken from the pan and keep it warm.
Make the Sauce Base: Reduce the heat to medium-low and add the butter to the same skillet. Add the minced shallot and cook for 3 minutes until softened. Stir in the minced garlic and cook for 1 minute until fragrant.
Build the Cream Sauce: Pour in the chicken broth and scrape up any browned bits from the bottom of the pan. Let the broth reduce slightly. Pour in the heavy cream and stir until the sauce thickens slightly.
Add Final Flavors: Stir in the fresh lemon juice, drained capers, and the chopped fresh dill. Stir to combine and allow the sauce to heat through for about 1 minute. Taste the sauce and adjust the salt and pepper as needed.
Serve: Place a generous serving of warm mashed potatoes or rice on a plate. Slice the seared chicken breast and place it on top of the potatoes. Spoon the creamy lemon-dill caper sauce generously over the chicken and potatoes. Garnish with a sprig of fresh dill.
35. Classic Ham and Potato Hash with Fried Eggs
Easy Christmas Dinner Ideas
Image Description
This classic comfort dish offers a savory, rustic, and substantial meal, presented beautifully in a dark cast-iron skillet. The hash is a mix of golden-brown potato cubes and small, caramelized chunks of savory ham. The potatoes have a crisp texture, contrasting nicely with the softer ham pieces.
The hash is crowned by two perfectly fried eggs, their yolks bright yellow and still glossy, sitting right in the center of the skillet. A sprinkle of fresh herbs adds a touch of green color. A silver fork rests against the edge of the pan, inviting a scoop of the hearty hash and a burst of the runny yolk.
The entire dish sits on a dark stovetop, enhancing the warm, home-cooked feel. This simple ham and potato hash is a hearty, flavorful dish that works wonderfully for a holiday brunch or a relaxed, easy dinner, especially utilizing leftover holiday ham.
Required Ingredients
2 tablespoons vegetable oil or bacon grease
1 large onion, chopped
3 cups cooked potatoes (leftover roasted or boiled), diced into 1/2-inch cubes
2 cups cooked ham (leftover ham works well), diced into small cubes
1/2 teaspoon smoked paprika
Salt and black pepper to taste
2 tablespoons butter
2 large eggs
Fresh parsley, chopped (for garnish)
Equipment List
Large cast-iron skillet (or heavy-bottomed frying pan)
Spatula
Measuring cups and spoons
DIY Instruction Step by Step
Sauté Aromatics: Heat the oil or bacon grease in the large cast-iron skillet over medium heat. Add the chopped onion and cook for 5 to 7 minutes until the onion is soft and translucent.
Cook the Potatoes: Add the diced, cooked potatoes to the skillet. Spread them out evenly and let them cook undisturbed for 5 minutes until they start to form a golden crust on the bottom. Flip the potatoes with the spatula and cook for another 5 minutes, continuing to turn until the potatoes are golden and crispy all over.
Add Ham and Seasoning: Stir in the diced ham and smoked paprika. Season the entire hash mixture with salt and pepper. Cook for 3 to 5 minutes, stirring occasionally, until the ham is nicely browned and heated through.
Cook the Eggs: Once the hash is ready, clear two small spaces in the hash mixture. Reduce the heat to low. Add the butter to the cleared spaces. Crack the two eggs directly into the buttered spaces.
Finish the Eggs: Cook the eggs for 3 to 5 minutes, or until the whites are set and the yolks are still runny, covering the pan with a lid for the last minute if you prefer slightly more cooked yolks.
Serve: Turn off the heat. Serve the ham and potato hash directly from the cast-iron skillet, ensuring each serving gets a perfectly cooked egg on top. Garnish with a sprinkle of fresh parsley.
36. Pesto Chicken and Roasted Cherry Tomatoes
Easy Christmas Dinner Ideas
Image Description
This sheet pan dinner is a bright, Mediterranean-inspired meal that is both healthy and visually striking. Four boneless chicken pieces are arranged on a platter, each piece generously topped with a rich, vibrant green pesto sauce. The pesto has a thick, luscious texture, and a few pale shavings of Parmesan cheese sit on top of the sauce.
The chicken pieces are surrounded by a colorful array of roasted vegetables. Slices of tender zucchini and halved cherry tomatoes, roasted to burst gently, make up the beautiful base. Fresh sprigs of bright green basil are scattered across the platter, adding a beautiful, aromatic garnish.
The white platter holds the food against a pale gray background, making the colors pop delightfully. This Pesto Chicken and Roasted Vegetables dish is a quick, flavorful, and easy main course that provides a lovely light and impressive option for a holiday table.
Required Ingredients
4 boneless, skinless chicken breasts or thighs
1 cup zucchini, sliced
1 pint cherry tomatoes, halved
2 tablespoons olive oil
1/2 teaspoon dried Italian seasoning
Salt and black pepper
1/2 cup basil pesto (store-bought or homemade)
Parmesan cheese shavings (for garnish)
Fresh basil leaves (for garnish)
Equipment List
Large baking sheet
Parchment paper
Small mixing bowl
Measuring cups and spoons
DIY Instruction Step by Step
Prepare Oven and Pan: Preheat your oven to 400 deg F (200 deg C). Line a large baking sheet with parchment paper.
Season Vegetables: Place the sliced zucchini and halved cherry tomatoes in a small mixing bowl. Drizzle with the olive oil and sprinkle with the Italian seasoning, salt, and pepper. Toss gently to coat. Spread the vegetables in a single layer on the prepared baking sheet.
Season Chicken: Place the chicken pieces on the baking sheet among the vegetables. Season the chicken lightly with salt and pepper.
Roast: Bake the chicken and vegetables for 15 minutes.
Add Pesto and Finish: Remove the baking sheet from the oven. Spoon a generous tablespoon of basil pesto evenly over the top of each chicken piece. Return the pan to the oven and continue baking for another 5 to 10 minutes, or until the chicken is cooked through (internal temperature of 165 deg F or 74 deg C).
Serve: Transfer the pesto chicken and the roasted vegetables to a large serving platter. Garnish the chicken with Parmesan cheese shavings and scatter fresh basil leaves over the vegetables before serving.
37. Sticky Asian Beef Short Ribs
Easy Christmas Dinner Ideas
Image Description
This mouthwatering dish features tender, succulent beef short ribs, offering an intense, savory flavor that is surprisingly simple to achieve. A large, black multi-cooker insert holds a generous portion of the short ribs, which are coated in a dark, glossy, mahogany-colored sauce. The meat is visibly tender, falling right off the bone.
The ribs are topped with a sprinkle of white sesame seeds and thinly sliced green onions, adding visual appeal and a fresh contrast to the rich sauce. A serving is plated below on a bed of fluffy white rice, where three ribs rest on a generous mound of the rice. Various small bowls of garlic, spicy sauce, and pickled cucumber accompany the dish.
The intense color of the sauce and the visual tenderness of the meat confirm this is a rich, satisfying main course. These Sticky Asian Beef Short Ribs are an effortless yet memorable choice that brings an exciting, contemporary flavor to the holiday table.
Required Ingredients
2 pounds beef short ribs, cut into 3-inch portions
1 tablespoon vegetable oil
1 small onion, chopped
4 cloves garlic, minced
For the Sauce:
1/2 cup soy sauce (low sodium)
1/2 cup beef broth
1/4 cup brown sugar
2 tablespoons rice vinegar
1 teaspoon grated fresh ginger
1 teaspoon sesame oil
Cooked white rice (for serving)
Sliced green onions and sesame seeds (for garnish)
Equipment List
Pressure cooker or multi-cooker (with saute function)
Whisk
Measuring cups and spoons
Tongs
DIY Instruction Step by Step
Sear the Ribs: Select the Sauté function on your pressure cooker or multi-cooker. Add the vegetable oil. Sear the beef short ribs in batches until they are nicely browned on all sides, about 3 minutes per side. Remove the ribs and set them aside.
Sauté Aromatics: Add the chopped onion to the pot and cook for 3 minutes until softened. Stir in the minced garlic and cook for 1 minute until fragrant. Turn off the Sauté function.
Make the Sauce: In a small bowl, whisk together the soy sauce, beef broth, brown sugar, rice vinegar, grated ginger, and sesame oil. Pour the sauce mixture into the pot. Scrape the bottom to lift any stuck bits.
Pressure Cook: Return the seared short ribs to the pot. Close the lid and set the valve to Sealing. Cook on HIGH pressure for 45 minutes for tender results.
Natural Release: Once the cooking cycle is complete, allow a Natural Pressure Release for 10 to 15 minutes, then turn the valve to Venting for a Quick Release of any remaining pressure.
Thicken and Serve: Remove the short ribs from the pot and set them aside. Turn the pot back to the Sauté function and let the sauce reduce and thicken slightly for 5 minutes. To serve, spoon a bed of warm white rice onto a plate. Place 2 to 3 short ribs on top of the rice and spoon the thick, sticky sauce over the meat. Garnish with sliced green onions and sesame seeds.
38. Hearty Seafood Stew (Cioppino)
Easy Christmas Dinner Ideas
Image Description
This magnificent seafood stew is a dramatic and luxurious main course, especially suited for a Christmas Eve celebration. A large, shallow Dutch oven is filled with a rich, deep red tomato and fish broth, brimming with an array of shellfish and white fish. Large, whole pieces of white flaky fish (cod or halibut), plump pink shrimp, and dark black mussels and clams are all visible.
The entire stew is beautifully garnished with a half slice of lemon and a scattering of fresh parsley, adding color and a citrus aroma. A second bowl is featured below, confirming the generous portions of seafood in the savory broth. Thick slices of toasted bread sit nearby, ready for dipping into the rich liquid.
This Cioppino offers a complex, robust flavor that is surprisingly simple to prepare. It provides a light, sophisticated, and memorable meal that truly showcases the elegance of simple, fresh ingredients.
Required Ingredients
2 tablespoons olive oil
1 onion, chopped
2 cloves garlic, minced
1/2 cup dry white wine
1 (28 ounce) can crushed tomatoes
4 cups fish stock or clam juice
1 teaspoon dried oregano
1 bay leaf
1 pound white fish fillets (cod or halibut), cut into 2-inch chunks
1/2 pound large shrimp, peeled and deveined
1 pound mussels, scrubbed and debearded
1/2 pound clams, scrubbed
Salt and black pepper
Fresh parsley and lemon slices (for garnish)
Equipment List
Large Dutch oven or heavy-bottomed pot
Wooden spoon
Ladle
Measuring cups and spoons
DIY Instruction Step by Step
Sauté Aromatics: Heat the olive oil in the large Dutch oven over medium heat. Add the chopped onion and cook for 5 minutes until softened. Stir in the minced garlic and cook for 1 minute until fragrant.
Build the Broth: Pour in the white wine, scraping the bottom of the pot to lift any browned bits. Let the wine simmer and reduce slightly. Stir in the crushed tomatoes, fish stock, dried oregano, and bay leaf. Season the broth generously with salt and pepper.
Simmer the Broth: Bring the broth to a simmer, then reduce the heat to low. Let the stew simmer, uncovered, for 15 minutes to allow the flavors to combine fully.
Add Seafood: Increase the heat to medium. First, add the scrubbed mussels and clams to the broth. Cover the pot and cook for 5 minutes until the shells begin to open. Discard any mussels or clams that do not open.
Finish Cooking: Add the chunks of white fish and the peeled shrimp to the pot. Stir gently. Cook for another 5 to 7 minutes, or until the fish is opaque and the shrimp are pink and cooked through.
Serve: Remove the bay leaf. Ladle the hearty seafood stew immediately into large, deep bowls. Garnish each serving with a sprinkle of fresh parsley and a slice of lemon. Serve with crusty bread for dipping into the flavorful broth.
39. Individual Chicken Pot Pies with Puff Pastry Lids
Easy Christmas Dinner Ideas
Image Description
These charming individual pot pies offer a comforting, elegant spin on a classic meal. Four individual white bowls, each with a handle, are topped with a golden, flaky puff pastry lid. The pastry is baked to a deep amber color and is beautifully scored with a small decorative diamond shape on top.
A dusting of dark sesame seeds over the pastry adds an attractive visual contrast. Small side bowls containing colorful mixtures of cooked beans, peas, and diced carrots accompany the main dish. The bowls are set against a soft blue background, making the golden crust pop delightfully.
This method of serving pot pie provides individual portions that maintain their presentation and temperature beautifully. These individual chicken pot pies offer the classic, comforting, creamy filling we love, wrapped in an impressive, flaky presentation that is absolutely perfect for a festive meal.
Required Ingredients
2 tablespoons butter
1 small onion, chopped
2 carrots, diced small
2 stalks celery, diced small
1/3 cup all-purpose flour
2 cups chicken broth
1/2 cup heavy cream
2 cups cooked, shredded chicken
1 cup frozen peas and corn mix
1 sheet puff pastry (thawed)
1 large egg, beaten (for egg wash)
Sesame seeds (for topping)
Salt and black pepper
Equipment List
4 oven-safe soup bowls or ramekins (about 1.5 cup capacity)
Large skillet or pot
Rolling pin
Biscuit cutter or knife
Pastry brush
Whisk
DIY Instruction Step by Step
Prepare Oven and Pastry: Preheat your oven to 400 deg F (200 deg C). Roll out the thawed puff pastry on a lightly floured surface. Use a biscuit cutter or knife to cut four circles slightly larger than the tops of your soup bowls or ramekins. Set the circles aside.
Sauté Vegetables: Melt the butter in the large skillet or pot over medium heat. Add the chopped onion, diced carrots, and diced celery. Cook for 5 to 7 minutes, stirring until the vegetables are softened.
Make the Filling: Sprinkle the flour over the vegetables and cook, stirring, for 1 minute. Slowly whisk in the chicken broth until the mixture is smooth and lump-free. Stir in the heavy cream. Bring the mixture to a gentle simmer, stirring until the sauce thickens.
Add Chicken and Season: Remove the pot from the heat. Stir in the cooked, shredded chicken and the frozen peas and corn mix. Season the filling generously with salt and pepper.
Assemble the Pies: Ladle the creamy chicken pot pie filling evenly into the four oven-safe soup bowls.
Top and Bake: Place a puff pastry circle over the top of each bowl, pressing the edges gently onto the rim to seal. Cut a small decorative steam vent in the center of the pastry. Brush the top of the pastry with the beaten egg wash and sprinkle with sesame seeds. Bake for 15 to 20 minutes, or until the pastry is puffed and golden brown.
Serve: Let the pot pies cool for a few minutes before serving, as the filling will be extremely hot. Serve individually for a charming presentation.
40. Mini Glazed Ham Steaks with Whole Grain Mustard
Easy Christmas Dinner Ideas
Image Description
This individual serving of ham is a sweet and savory masterpiece, offering a simple yet elegant holiday main course. A thick, round ham steak is perfectly seared and beautifully glazed with a sticky, dark amber coating that looks wonderfully caramelized around the edges. The ham rests proudly on a clean white plate.
A dollop of vibrant yellow, whole grain mustard sauce sits on the plate next to the ham, ready to provide a sharp, tangy contrast to the sweet glaze. The dish is garnished with a simple arrangement of fresh green chives and a sprig of rosemary, adding color and fresh aroma. The portion size is manageable and attractive, making it a wonderful option for a small gathering.
This recipe provides all the classic holiday ham flavor without requiring the effort of roasting a whole joint. It is a quick, flavorful, and sophisticated choice that is ready in minutes.
Required Ingredients
2 (6-8 ounce) fully cooked ham steaks, cut about 1 inch thick
1 tablespoon butter
For the Glaze:
1/4 cup brown sugar
2 tablespoons apple cider vinegar
1 tablespoon whole grain mustard
1 teaspoon Dijon mustard
For Serving:
Fresh chives and rosemary sprigs (for garnish)
Equipment List
Large skillet
Small saucepan
Whisk
Measuring cups and spoons
DIY Instruction Step by Step
Make the Glaze: In the small saucepan, whisk together the brown sugar, apple cider vinegar, whole grain mustard, and Dijon mustard. Place the saucepan over medium heat, stirring constantly until the sugar dissolves. Bring the mixture to a gentle simmer and let it cook for 3 to 5 minutes until the glaze thickens slightly. Remove the pan from the heat.
Sear the Ham: Melt the butter in the large skillet over medium-high heat. Place the ham steaks in the hot pan. Sear the ham for 3 to 4 minutes per side until they develop a beautiful golden-brown color.
Glaze the Ham: Reduce the heat to low. Use a basting brush to generously coat the ham steaks on both sides with the prepared glaze. Cook for 1 to 2 minutes on each side, allowing the glaze to set and caramelize slightly.
Serve: Transfer the glazed ham steaks to individual plates. Drizzle a small amount of extra glaze onto the plate and arrange the fresh chives and rosemary sprigs next to the ham for garnish. Serve immediately.
Key Takeaways
Ease Equals Elegance: Showstopping Christmas dinners do not require complex preparation or all-day cooking; simplicity is often the secret to holiday success.
One-Pan Wonders: Many options, including sheet pan chicken and roasted whole fish, drastically cut down on cleanup time, allowing for more relaxation.
Embrace Comfort and Flavor: Dishes like slow-cooker goulash and savory baked pasta offer deep, rich, comforting flavors that are perfect for a cozy winter gathering.
Impressive Alternatives: Look beyond the traditional giant turkey; options like pork roulade, beef wellington, or glazed ham steaks offer smaller, yet equally festive, main courses.
Utilize Customizable Meals: Interactive dishes, such as the baked potato bar or lettuce wraps, are fun for guests and incredibly easy for the host to manage.
We have explored 40 wonderful, simple solutions that redefine what a Christmas dinner can be. From the cozy comfort of a ham and rice casserole to the sophisticated flair of a fig-glazed pork tenderloin, every meal here guarantees high praise with minimal fuss. Your holiday table deserves a centerpiece that reflects the warmth of the season, not the weariness of the cook.
Choosing a dinner from this list means prioritizing quality time with your loved ones over kitchen complexity. Each recipe allows you to focus on the joy and connection that defines the holiday spirit. You now possess the tools and inspiration to create a genuinely stunning feast easily.
We encourage you to pick a recipe, gather your ingredients, and enjoy a stress-free Christmas meal this year. There is beauty in simplicity, and these easy dinner ideas certainly deliver on both elegance and flavor. Happy cooking, and happy holidays!
Spread the loveBoring dinners often stem from the same tired routines and lack of seasoning. You deserve a meal that excites your taste buds without leaving a mountain of dishes in the sink. Sheet pan…
Spread the loveThe holiday season brings joy, but it also brings a mountain of dishes and a crowded stovetop. Many home cooks feel the squeeze when trying to fit a turkey, three sides, and two…