Do you ever stare into your freezer, past the frozen vegetables and questionable leftovers, and wonder what quick dinner you could actually pull together? For many of us, the freezer has become a cold storage unit of forgotten ingredients rather than the powerful meal prep tool it should be. Organizing that frozen space is the first step toward transforming your hectic evening routine.

When life gets busy, homemade meals often fall by the wayside. You rush home after a long day, and the thought of chopping, measuring, and cooking from scratch feels overwhelming. That is precisely where having a well stocked arsenal of freezer meals becomes essential. They are the ultimate solution for skipping the last minute scramble and the impulse to order expensive takeout.
We have compiled 38 incredibly simple and effective recipes designed specifically for batch preparation and freezing. These are not complicated, multi step dinners; they are smart, ready to cook meals that ensure a wholesome, flavorful dinner is just an oven or slow cooker away. Get ready to conquer your kitchen chaos, organize your freezer, and enjoy stress free dinners even on your most busy nights.
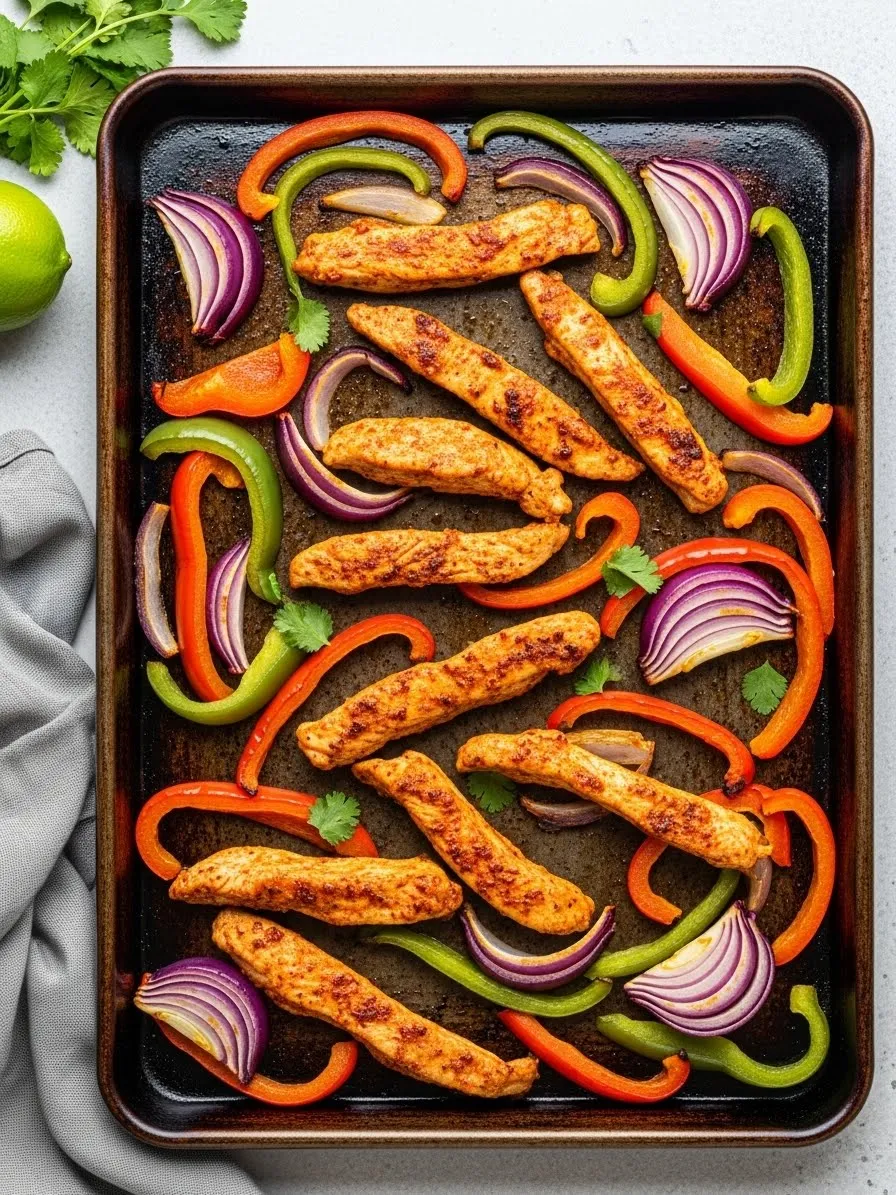
1. Speedy Sheet Pan Chicken Fajita Prep

This image truly captures the vibrant colors and exciting flavors of a fantastic freezer meal. You can see the preparation for a simple, yet satisfying, chicken fajita recipe laid out on a sheet pan. Slices of red onion and colorful bell peppers—green, yellow, and orange—are tossed together, waiting to be combined with seasoned chicken pieces. This visual reminder shows how easy it is to assemble healthy, wholesome ingredients for busy nights ahead.
Notice the small bowl of seasoning nestled among the fresh produce. That spice blend is what transforms basic chicken and vegetables into a Tex Mex favorite. Below the sheet pan, you see the prepped components organized into storage containers, including a zip top freezer bag. Preparing meals this way is a wonderful solution for making dinner fast, cutting down on effort and cleanup later in the week.
Getting your freezer organized with meals like this ensures you always have a quick option. This recipe is an incredibly straightforward example of how to make your freezer work for you. Spend just a short time prepping this on a weekend, and you will have a delicious meal ready to cook straight from the freezer when time is tight. This strategy is essential for anyone trying to manage chaotic weeknights while still enjoying flavorful, home cooked food.
Required Ingredients
- 2 lbs boneless, skinless chicken breasts, cut into bite sized chunks
- 3 large bell peppers (one red, one green, one yellow), sliced into strips
- 1 large red onion, sliced into strips
- 2 tablespoons olive oil (for cooking)
- 2 tablespoons Fajita seasoning blend (or a mix of chili powder, cumin, paprika, onion powder, and garlic powder)
- Juice of 1 lime (optional, for serving)
- Flour or corn tortillas, for serving
- Toppings: salsa, sour cream, guacamole, or shredded cheese (optional)
Equipment List
- Large cutting board
- Sharp knife
- Large baking sheet or tray
- Large zip top freezer bag (quart or gallon size)
- Mixing bowl (medium to large)
DIY Instruction: Freezer Prep Method
- Chop the Chicken: Place the chicken breasts on your cutting board. Use your sharp knife to carefully cut the chicken into uniform, bite sized chunks, roughly 1 inch in size.
- Season the Chicken: Transfer the chopped chicken to a mixing bowl. Sprinkle the 2 tablespoons of Fajita seasoning evenly over the chicken. Use your hands or a spoon to toss everything together until all the chicken pieces are thoroughly coated in the spice blend.
- Prepare the Vegetables: Take the bell peppers and red onion. Remove the seeds, stems, and papery skin. Slice all the vegetables into thin, uniform strips. Try to keep the lengths similar so they cook evenly later.
- Assemble the Freezer Bag: Open the large zip top freezer bag. You will place the seasoned chicken and the raw sliced vegetables into this single bag. The goal is to keep them together for a simple grab and cook meal.
- Fill and Seal: First, add the seasoned chicken chunks to the bottom of the bag. Next, add all the sliced bell peppers and red onion strips on top of the chicken.
- Remove Air and Freeze: Press as much air as possible out of the bag before completely sealing the zip top. Lay the bag flat on the baking sheet to ensure it freezes in a thin, easy to store shape. Transfer the bag to your freezer. This meal can be kept frozen for up to three months.
DIY Instruction: Cooking from Frozen
- Preheat the Oven: When ready to cook, preheat your oven to 400°F (200°C). Lightly grease a large baking sheet or line it with parchment paper for easy cleanup.
- Spread on the Pan: Remove the freezer bag from the freezer. Dump the entire contents of the bag (frozen chicken and vegetables) directly onto the prepared baking sheet. Drizzle the ingredients with 2 tablespoons of olive oil.
- Bake the Meal: Place the sheet pan into the preheated oven. Bake for approximately 25 to 30 minutes.
- Stir and Finish: After about 15 minutes, carefully remove the pan and give the mixture a good stir to ensure even cooking. Return the pan to the oven for the remaining time until the chicken is cooked through (no longer pink inside) and the vegetables are tender yet crisp.
- Serve Hot: Squeeze the fresh lime juice over the hot fajita mixture if desired. Serve immediately with warm tortillas and your favorite toppings.
2. Hearty Lentil Vegetable Soup Mix

This photograph beautifully illustrates how to prep a truly wholesome meal using simple layering techniques. Inside the heavy duty zip top freezer bag, you can clearly see the components for a flavorful lentil and vegetable soup, neatly stacked in colorful strata. This assembly method saves huge amounts of time later, ensuring a nutrient dense dinner is ready to go on one of those incredibly busy nights.
Look closely at the beautiful variety of ingredients, from the base layer of dry lentils to the chopped carrots, celery, and a generous layer of fresh spinach on top. A small cluster of spices, including a visible bay leaf and dried herbs, is tucked into the middle. This strategic layering keeps the ingredients separate while preparing, making for an attractive and organized freezer meal.
Having a selection of these soup bags stored flat in your freezer dramatically simplifies dinner planning. When you need a fast, comforting meal, simply grab this prepared bag and dump the contents directly into your slow cooker or pot. This approach to meal preparation ensures you always have a healthy, homemade option available, minimizing the temptation to order takeout when you are short on time.
Required Ingredients
- 2 cups brown or green lentils, rinsed
- 1 large can (28 oz) crushed tomatoes, or 2 cups tomato sauce (added later, not in the bag)
- 1 cup carrots, diced
- 1 cup celery, diced
- 1 large onion, diced (added later, not in the bag)
- 2 cups fresh spinach, packed
- 6 cups vegetable or chicken broth (added later, not in the bag)
- 2 tablespoons dried Italian seasoning
- 1 tablespoon garlic powder
- 1 teaspoon smoked paprika
- 1 bay leaf
- Salt and black pepper, to taste (added later)
Equipment List
- Large zip top freezer bag (gallon size)
- Measuring cups and spoons
- Large stockpot or slow cooker
DIY Instruction: Freezer Prep Method
- Chop the Chicken: Place the chicken breasts on your cutting board. Use your sharp knife to carefully cut the chicken into uniform, bite sized chunks, roughly 1 inch in size.
- Season the Chicken: Transfer the chopped chicken to a mixing bowl. Sprinkle the 2 tablespoons of Fajita seasoning evenly over the chicken. Use your hands or a spoon to toss everything together until all the chicken pieces are thoroughly coated in the spice blend.
- Prepare the Vegetables: Take the bell peppers and red onion. Remove the seeds, stems, and papery skin. Slice all the vegetables into thin, uniform strips. Try to keep the lengths similar so they cook evenly later.
- Assemble the Freezer Bag: Open the large zip top freezer bag. You will place the seasoned chicken and the raw sliced vegetables into this single bag. The goal is to keep them together for a simple grab and cook meal.
- Fill and Seal: First, add the seasoned chicken chunks to the bottom of the bag. Next, add all the sliced bell peppers and red onion strips on top of the chicken.
- Remove Air and Freeze: Press as much air as possible out of the bag before completely sealing the zip top. Lay the bag flat on the baking sheet to ensure it freezes in a thin, easy to store shape. Transfer the bag to your freezer. This meal can be kept frozen for up to three months.
DIY Instruction: Cooking from Frozen (Stovetop Method)
- Sauté Aromatics (Optional but Recommended): In a large stockpot, sauté the diced onion you set aside in a little olive oil over medium heat until softened, about 5 minutes.
- Add Frozen Contents: Dump the entire frozen contents of the meal prep bag into the pot (including the bay leaf).
- Add Liquids and Tomatoes: Pour in the 6 cups of vegetable or chicken broth and the 2 cups of crushed tomatoes. Bring the mixture to a boil over high heat.
- Simmer and Cook: Once boiling, reduce the heat to low, cover the pot, and let the soup simmer for approximately 45 to 60 minutes, or until the lentils are tender and soft.
- Finish and Serve: Remove the bay leaf. Taste the soup and season with salt and black pepper as needed. Ladle into bowls and enjoy this easy, warming freezer meal.
3. Grab and Go Breakfast Burrito Rolls

This image demonstrates a brilliant strategy for simplifying hectic mornings with ready to eat freezer meals. Here we see small breakfast burritos, tightly rolled and nestled into a container, ready for easy storage and reheating. The small foil rings surrounding each roll show a clever technique for keeping the perfect circular shape before they solidify in the freezer.
Inside the tortillas, you can clearly make out the filling: fluffy scrambled eggs, savory sausage slices, and a sprinkle of shredded cheddar cheese. These components combine to make a satisfying, high protein breakfast. This simple prep work performed on the weekend means you can literally grab a nutritious meal straight from your freezer on busy nights or mornings.
What a wonderful way to avoid skipping breakfast or relying on drive through food! These individual portions are perfectly sized for quick thawing and reheating in a microwave or toaster oven. Organizing your freezer with these pre made wraps eliminates guesswork and ensures that even the most rushed family members get a hearty start to their day. It is an organized and practical solution for making food management much simpler.
Required Ingredients
- 1 dozen large flour tortillas
- 1 lb breakfast sausage, cooked and crumbled (or sliced smoked sausage, as pictured)
- 12 large eggs
- 1/4 cup milk or water
- 1 cup shredded cheddar or Monterey jack cheese
- Salt and pepper, to taste
- Foil strips or parchment paper squares
Equipment List
- Large nonstick skillet
- Whisk
- Medium mixing bowl
- Baking sheet
- Large freezer safe container or bag
DIY Instruction: Freezer Prep Method
- Cook the Meat and Eggs: If using ground sausage, cook it thoroughly in a skillet, drain any excess grease, and set it aside. In the mixing bowl, whisk the 12 eggs with the milk or water, salt, and pepper until combined. Scramble the eggs in the same skillet until they are cooked through but still slightly soft.
- Assemble the Rolls: Lay a large flour tortilla flat. Place a small spoonful of scrambled eggs slightly off center. Add a few pieces of cooked sausage and a pinch of shredded cheese on top of the eggs. Do not overfill the tortilla, as it needs to be rolled tightly.
- Roll Tightly: Fold the sides of the tortilla inward, over the filling. Then, tightly roll the tortilla from the bottom edge upwards, creating a compact cylinder shape. Repeat this process for all 12 tortillas.
- Wrap for Freezing: Cut small strips of aluminum foil or squares of parchment paper. Individually wrap each breakfast burrito roll tightly in the foil or paper. This prevents freezer burn and makes reheating easier.
- Package and Freeze: Place all the individually wrapped rolls inside a large freezer meal container or zip top bag. Place the container in the freezer. When properly wrapped, these rolls will last for up to two months.
DIY Instruction: Cooking from Frozen (Microwave Method)
- Remove Wrapping: Remove one wrapped burrito roll from the freezer. Remove the foil or paper wrapping completely.
- Reheat: Place the unwrapped frozen burrito roll on a microwave safe plate. Microwave on high for approximately 1 to 2 minutes. Cooking time will vary based on your microwave and the size of the burrito.
- Check Temperature: Carefully check the center of the roll to ensure it is piping hot all the way through. If the center is still cold, continue microwaving in 30 second increments.
- Serve: Let the burrito cool for a minute before eating. This prep method provides a fast, filling breakfast for those busy nights (or mornings!).
4. Creamy Chicken and Biscuit Bake

This comforting photograph showcases a completely assembled casserole dish, ready for the oven, making it an excellent example of a prepped freezer meal. The base is a thick, creamy filling of shredded chicken and mixed vegetables (peas and carrots are visible), all topped with a beautiful, even layer of golden, unbaked biscuits. This dish promises a hearty, delicious dinner with minimal effort required on a busy night.
The convenience of having a meal like this fully assembled in an aluminum tray is unmatched. Utilizing a disposable pan makes for the simplest cleanup later, a huge benefit when you are short on time. Even the simple detail of adding a sprig of fresh thyme hints at the flavor waiting inside, reminding you that convenience does not mean compromising on taste.
This meal is designed for straightforward cooking straight from the freezer, eliminating the need to thaw. Simply place the pan in the oven, and within an hour, you will have a warm, bubbling meal ready to serve. This is a wonderfully practical strategy for keeping your freezer stocked and ensuring your family always has access to comforting, home cooked food.
Required Ingredients
- 2 cups cooked, shredded chicken (rotisserie chicken works great)
- 1 bag (16 oz) frozen mixed vegetables (peas, carrots, corn)
- 1 can (10.5 oz) cream of chicken soup
- 1/2 cup milk
- 1 teaspoon dried thyme
- Salt and black pepper, to taste
- 1 tube (16.3 oz) refrigerated large biscuits (8 count, or similar size for 12, as pictured)
- 1 tablespoon melted butter (optional, for brushing)
Equipment List
- Medium mixing bowl
- Wooden spoon or spatula
- 9×13 inch disposable aluminum baking pan
- Large spoon or ladle
DIY Instruction: Freezer Prep Method
- Prepare the Filling: In the medium mixing bowl, combine the 2 cups of shredded chicken, the entire bag of frozen mixed vegetables, the cream of chicken soup, and the 1/2 cup of milk.
- Season: Stir in the dried thyme, salt, and pepper. Mix thoroughly until all the ingredients are evenly distributed and coated in the creamy sauce.
- Assemble the Casserole: Pour the entire filling mixture into the bottom of the 9×13 inch disposable aluminum baking pan. Use the spoon to spread the mixture into an even layer across the pan.
- Top with Biscuits: Carefully open the tube of refrigerated biscuits. Arrange the biscuits evenly across the top of the filling mixture. If using large biscuits, you may have a few extra, or if using smaller biscuits, you may need a few more to cover the surface as pictured.
- Cover and Freeze: Cover the entire aluminum pan tightly with a layer of plastic wrap, pressing it down lightly so it does not touch the biscuits. Then, wrap the whole pan again tightly with aluminum foil. This double layer prevents freezer burn. Place the entire pan flat in the freezer. Label it with the name and the date. This freezer meal will last up to two months.
DIY Instruction: Cooking from Frozen (Oven Method)
- Preheat and Unwrap: Preheat your oven to 375°F (190°C). Remove the pan from the freezer. Take off the outer layer of aluminum foil and the layer of plastic wrap.
- Initial Bake (Covered): Cover the pan loosely with a fresh piece of aluminum foil. This prevents the biscuits from burning while the filling thaws and heats up. Place the pan in the preheated oven and bake for 40 minutes.
- Final Bake (Uncovered): Carefully remove the foil covering. Brush the tops of the biscuits with a little melted butter if desired for a richer brown color. Return the pan to the oven and bake uncovered for an additional 15 to 25 minutes, until the biscuits are golden brown and the filling is bubbling hot all the way through.
- Serve Hot: Let the casserole cool for a few minutes before serving. This is a comforting solution for any busy night.
5. Homemade Veggie Purée Cubes and Freezable Sticks

This image offers two smart solutions for freezer organization: frozen purée cubes and portioned vegetable sticks. On the left, a tray of solidified orange purée shows a wonderful way to prep baby food, soup bases, or even smoothie add ins. This allows you to freeze uniform, measured portions, making it easy to grab exactly what you need.
The right side of the photo displays two small zip top bags filled with pre chopped green beans, carrots, and zucchini slices. These small packages are ready to be added straight to a stir fry, soup, or side dish. This simple cutting and bagging process takes just a few minutes of planning but saves significant time on busy nights.
Both methods highlight effective ways to manage ingredients and minimize food waste. Freezing purées in cube trays and vegetables in small bags helps maintain freshness and simplifies cooking. Organizing your freezer meals this way maximizes space and convenience, ensuring you always have healthy components ready to go for any meal.
Required Ingredients
- For the Purée: 2 cups cooked sweet potato or butternut squash, puréed smooth (the orange purée in the tray)
- For the Veggie Sticks: 1 lb fresh green beans, trimmed; 4 medium carrots, peeled and cut into sticks; 1 zucchini, sliced (optional)
Equipment List
- Ice cube tray with large square compartments (or silicone muffin tin)
- Blender or food processor (for purée)
- Small zip top freezer bags (snack or sandwich size)
- Cutting board and sharp knife
DIY Instruction: Freezer Prep Method (Purée Cubes)
- Prepare the Purée: Cook your chosen vegetable (sweet potato or squash) until very soft. Transfer the cooked vegetable to a blender or food processor. Blend until the texture is completely smooth and lump free. If the purée is too thick, add a tiny bit of water or stock.
- Fill the Tray: Carefully spoon the warm purée into the compartments of the ice cube tray or silicone muffin tin. Gently tap the tray on the counter to settle the mixture and release any air bubbles.
- Flash Freeze: Place the tray in the freezer and let the purée freeze completely, which takes several hours.
- Transfer and Store: Once the cubes are fully frozen, pop them out of the tray. Transfer the cubes into a single, labeled zip top freezer bag or airtight container. Return the bag to the freezer. These cubes are excellent for adding nutrients to soups, sauces, or baby food.
DIY Instruction: Freezer Prep Method (Veggie Sticks)
- Wash and Prep: Thoroughly wash and dry all the vegetables. Trim the ends of the green beans. Peel the carrots and slice them into uniform sticks, roughly the size of the beans. Slice the zucchini into half moons or small chunks if using.
- Portion into Bags: Take the small zip top freezer bags. Create individual servings by dividing the mixed vegetable sticks evenly among the bags. A small handful of each vegetable per bag is a good guideline.
- Remove Air and Freeze: Press out as much air as possible from each bag before sealing the zip top completely. Lay the bags flat and stack them in the freezer.
- Use for Quick Meals: These pre portioned vegetables are ready to be added directly to a pot of boiling water, a skillet for a quick stir fry, or tossed into a slow cooker recipe. This simple prep makes vegetable side dishes fast on busy nights.
6. Easy Baked Spinach and Ricotta Cannelloni

This image shows a beautifully assembled Italian classic, all ready for the freezer. You can see large pasta tubes, filled with a creamy green spinach and ricotta mixture, nestled closely in a foil baking pan. The dish is generously topped with bright red marinara sauce and a final layer of shredded cheese, demonstrating that a sophisticated freezer meal is easily achievable.
Using a disposable foil pan is a smart part of this prep method, allowing the entire casserole to be frozen, baked, and served without any dish cleaning required. This level of convenience is a lifesaver on busy nights when you crave something rich and hearty but have no time to cook. The visible presentation suggests restaurant quality food ready at home.
This photograph serves as great inspiration for utilizing your freezer to store complete, comforting dinners. Preparing this dish ahead of time allows the flavors to meld beautifully while frozen. When you are ready for dinner, you simply bake it, making a substantial and delicious meal available with minimal fuss.
Required Ingredients
- 1 box (8 oz) cannelloni or manicotti pasta shells (12 to 14 shells)
- 1 container (15 oz) ricotta cheese
- 1 package (10 oz) frozen spinach, thawed and squeezed very dry
- 1 cup grated Parmesan cheese
- 1 egg
- 1 teaspoon garlic powder
- 1/2 teaspoon black pepper
- 2 jars (24 oz each) marinara or tomato sauce
- 2 cups shredded mozzarella cheese
Equipment List
- Large bowl for mixing filling
- Medium pot for boiling pasta
- Colander
- Piping bag or large zip top bag with the corner snipped (for filling)
- 9×13 inch disposable aluminum baking pan
DIY Instruction: Freezer Prep Method
- Cook the Pasta: Bring a pot of salted water to a boil. Cook the cannelloni or manicotti shells according to package directions, but remove them about 2 minutes before they are fully tender (al dente). Drain them immediately and rinse with cold water to stop the cooking process. Set aside.
- Make the Filling: In the large bowl, combine the ricotta cheese, the very dry squeezed spinach, Parmesan cheese, egg, garlic powder, and black pepper. Stir all the ingredients thoroughly until the filling is uniform and well mixed.
- Fill the Pasta: Transfer the ricotta mixture into a large zip top bag and snip a small corner off the bottom, creating a makeshift piping bag. Carefully pipe the filling mixture into each cooked pasta shell until it is full.
- Assemble the Casserole: Pour a thin layer of one jar of marinara sauce into the bottom of the disposable baking pan. Arrange the filled pasta shells tightly in the pan. Pour the remaining jar of marinara sauce evenly over the tops of the shells.
- Top and Freeze: Sprinkle the 2 cups of shredded mozzarella cheese over the sauce. Cover the pan tightly first with plastic wrap, then with a layer of aluminum foil. Label the pan with the name and the date. Place the assembled freezer meal flat in the freezer. Freeze for up to three months.
DIY Instruction: Cooking from Frozen (Oven Method)
- Preheat and Unwrap: Preheat your oven to 375°F (190°C). Remove the pan from the freezer. Remove the plastic wrap and the aluminum foil.
- Bake Covered: Cover the pan again loosely with a single piece of aluminum foil. Bake the covered cannelloni for 60 minutes. This allows the dish to thaw safely and heat through evenly.
- Finish Uncovered: Remove the foil covering. Bake uncovered for an additional 15 to 20 minutes, or until the cheese is melted, bubbly, and lightly golden brown, and the sauce is hot throughout.
- Serve: Let the casserole rest for 5 minutes before serving. Enjoy this comforting Italian prep on a busy night.
7. BBQ Pulled Beef or Pork in Sauce

This image clearly displays the incredible convenience of pre sauced, shredded meat, packaged and ready for the freezer. You can see three generously filled zip top bags containing moist, dark brown pulled meat, completely submerged in a rich barbecue sauce. This preparation is a superb way to stock your freezer meal supply with versatile, flavorful protein for future dinners.
The bags are laid flat, a crucial technique for efficient thawing and organized storage. This simple prep work—cooking and shredding the meat, then mixing it with sauce—saves hours of cooking time later in the week. Having this ready allows you to easily make sandwiches, tacos, or serve the meat over rice or potatoes on one of those demanding busy nights.
This method also showcases excellent batch cooking potential. Preparing a large roast and dividing it into smaller, manageable meal portions ensures you get the most out of your time and ingredients. When the craving hits for barbecue, simply pull a bag from the freezer, thaw it, heat it up, and dinner is served with minimal effort.
Required Ingredients
- 3 lbs beef chuck roast or pork shoulder (Boston butt)
- 1 large onion, sliced
- 1 bottle (18 oz) quality barbecue sauce
- 1/2 cup beef or chicken broth
- 1 tablespoon smoked paprika
- 1 teaspoon garlic powder
- Salt and black pepper, to taste
Equipment List
- Slow cooker (Crock Pot) or Instant Pot
- Two forks (for shredding)
- Three quart or gallon size zip top freezer bags
- Large bowl
DIY Instruction: Freezer Prep Method
- Cook the Meat: Season the roast generously with salt, pepper, smoked paprika, and garlic powder. Place the sliced onion and the roast in the slow cooker. Pour the 1/2 cup of broth over the top. Cook on low for 8 to 10 hours or on high for 4 to 5 hours, until the meat is fork tender. (If using an Instant Pot, follow the manufacturer’s directions for a large roast).
- Shred the Meat: Carefully remove the cooked meat from the slow cooker and place it in a large bowl. Use two forks to easily shred the meat. Discard any large pieces of fat. Reserve the cooking liquid.
- Mix with Sauce: Add the entire bottle of barbecue sauce to the shredded meat. Add 1/4 to 1/2 cup of the reserved cooking liquid to the meat and sauce mixture until you reach your desired consistency—it should be very moist. Stir everything together until the meat is thoroughly coated.
- Portion and Bag: Divide the sauced pulled meat evenly among the three zip top freezer bags. This creates three separate freezer meals.
- Seal and Freeze: Press out all the air from each bag, ensuring they are sealed securely. Lay the bags flat on a baking sheet and transfer them to the freezer so they freeze in a thin layer, which speeds up thawing later. Label with the date and name. Freeze for up to three months.
DIY Instruction: Cooking from Frozen (Stovetop or Slow Cooker)
- Thaw: For best results, remove one bag of pulled meat from the freezer and allow it to thaw overnight in the refrigerator. If you forget to thaw, you can heat it directly from frozen, but it will take longer.
- Reheat (Stovetop): Empty the contents of the bag into a saucepan. Cover the pan and heat the meat over medium low heat, stirring occasionally, for about 10 to 15 minutes, until the mixture is simmering and heated through completely.
- Reheat (Slow Cooker): Dump the frozen or thawed contents into a slow cooker and heat on low for 2 to 3 hours, or on high for about 1 hour, until fully heated.
- Serve: Serve the hot pulled meat on slider buns with a side of coleslaw for a quick, satisfying busy night dinner.
8. Wholesome No Bake Breakfast Cookies

This photo offers a wonderful view of prepped, healthy breakfast items, all neatly contained in a box. These are likely no bake cookies or oat cakes, featuring visible ingredients like oats, raisins or chocolate chips, and possibly mashed sweet potato or pumpkin for color and binding. This clever prep work creates easily portioned, nutrient dense grab and go snacks or breakfasts.
The way the cookies are stacked, separated by squares of parchment paper, shows an excellent strategy for preventing them from sticking together during freezing. Some are still in their circular molds, confirming they are perfectly shaped for easy storage and consumption. This organization makes them readily available for busy nights when you need a quick sweet treat or a fast morning meal.
Freezing individual portions like this is a smart way to control serving sizes and extend the shelf life of baked goods. When stored this efficiently in your freezer, these wholesome treats are always available. This simple act of filling a box with these pre made items transforms your freezer into a convenient source of healthy options.
Required Ingredients
- 2 cups rolled oats
- 1 cup pumpkin or sweet potato purée (canned or homemade)
- 1/2 cup nut butter (peanut or almond)
- 1/4 cup maple syrup or honey
- 1 teaspoon vanilla extract
- 1/2 teaspoon ground cinnamon
- 1/4 teaspoon ground nutmeg
- 1/2 cup raisins or chocolate chips (or a mix)
Equipment List
- Large mixing bowl
- Spoon or spatula
- Cookie scoop or a 1/4 cup measuring cup
- Circular metal cookie cutter (optional, for shaping)
- Parchment paper squares
- Airtight freezer safe container or box
DIY Instruction: Freezer Prep Method
- Mix Wet Ingredients: In the large mixing bowl, combine the pumpkin/sweet potato purée, nut butter, maple syrup/honey, and vanilla extract. Stir these wet ingredients until they are thoroughly blended and smooth.
- Add Dry Ingredients: Add the rolled oats, cinnamon, and nutmeg to the wet mixture. Stir everything well until the oats are completely incorporated and the mixture is very thick and stiff.
- Fold in Extras: Gently fold in the raisins or chocolate chips until they are evenly distributed throughout the dough.
- Shape the Cookies: Use a cookie scoop or 1/4 cup measure to portion the mixture. Either roll them into balls and flatten them slightly with your palm, or press them firmly into a circular metal cookie cutter (as pictured) and then release them onto a piece of parchment paper.
- Pre Freeze: Place the individual cookies on a small baking sheet and put them in the freezer for about 30 minutes to firm up. This initial freeze prevents them from sticking together.
- Package and Freeze: Once firm, stack the cookies in an airtight freezer safe container or box, using the small squares of parchment paper to separate each layer. Label the container with the date. Store this healthy freezer meal component for up to two months.
DIY Instruction: Enjoying from Frozen
- Thaw or Eat Cold: These no bake cookies can be eaten directly from the freezer if you like a firm, cold texture.
- Quick Thaw: For a softer texture, remove one or two cookies from the freezer and let them sit on the counter for about 10 to 15 minutes before eating.
- Serve: Enjoy these easy to manage prep cookies as a fast breakfast, a post workout snack, or a healthy dessert option on any busy night.
9. Layered Chili Slow Cooker Starter

This image is a perfect demonstration of efficient freezer meal preparation for a slow cooker. The zip top bag is filled with beautifully layered, raw ingredients for a hearty chili, making dinner virtually effortless later. The brown ground meat (seasoned and cooked or raw, depending on the preferred method) forms the bottom layer, topped with diced onion, chopped bell peppers, and kidney beans.
This organization is incredibly helpful on busy nights because all the measuring and chopping is done beforehand. The visible layer of spices resting on the meat adds depth and promise of flavor. Storing the ingredients this way protects them from freezer burn and keeps your freezer neatly organized.
The simplicity of this strategy is key to successful meal prep. You only need to grab the bag from the freezer, dump the contents into the slow cooker, and add liquid, such as canned tomatoes or broth. This easy solution eliminates dinner dilemmas and ensures a warm, homemade meal is ready with minimal fuss.
Required Ingredients
- 1 lb ground beef, turkey, or plant based ground, (either raw or pre cooked and drained)
- 1 large onion, diced
- 1 green bell pepper, diced
- 1 orange or red bell pepper, diced
- 1 can (15 oz) kidney beans, rinsed and drained (or a cup of dry beans, added later)
- 3 tablespoons chili powder
- 1 tablespoon ground cumin
- 1 teaspoon dried oregano
- 1/2 teaspoon salt and pepper
- 1 can (28 oz) crushed tomatoes and 1 cup water/broth (added later, not in the bag)
Equipment List
- Large zip top freezer bag (gallon size)
- Cutting board and sharp knife
- Measuring cups and spoons
- Slow cooker
DIY Instruction: Freezer Prep Method
- Prepare the Meat and Spices: If you prefer to brown your meat first, cook the ground meat in a skillet and drain the grease completely, then let it cool. If freezing raw, simply place the raw meat in the bottom of the zip top bag. Sprinkle the chili powder, cumin, oregano, salt, and pepper directly onto the meat layer.
- Dice the Vegetables: Dice the onion and both bell peppers into small, uniform pieces. Rinse and drain the kidney beans.
- Layer the Ingredients: Carefully layer the diced onion on top of the spices and meat. Follow this with the diced bell peppers, then the rinsed kidney beans. It is important to keep the layers separate until freezing for best results.
- Seal and Freeze: Press as much air as possible out of the bag and seal the zip top securely. Lay the bag flat and place it in the freezer. Label the bag with the recipe name, date, and a note to add crushed tomatoes and liquid when cooking. This freezer meal will last up to three months.
DIY Instruction: Cooking from Frozen (Slow Cooker Method)
- Add Liquid First: Pour the can of crushed tomatoes and 1 cup of water or broth into the slow cooker basin.
- Add Frozen Contents: Remove the frozen bag of chili ingredients from the freezer. Dump the entire frozen block of ingredients directly into the liquid in the slow cooker.
- Cook and Stir: Cover the slow cooker. Cook the chili on LOW for 6 to 8 hours or on HIGH for 3 to 4 hours. The frozen block will thaw and break up as it heats. After about 2 hours on high or 4 hours on low, give the chili a good stir to mix all the ingredients together.
- Serve: Once the meat is thoroughly cooked (if raw) and the chili is hot throughout, serve with your favorite toppings like shredded cheese or sour cream. This easy prep ensures a hot dinner on even the most busy nights.
10. Mini Shepherd’s Pie Cupcakes

This photo presents an ingenious way to turn a classic comfort food into perfectly portioned, single serving freezer meals. We see a standard muffin tin filled with individual portions of Shepherd’s Pie. The base is a savory layer of ground meat and vegetables (peas and carrots are visible), topped with a generous dollop of creamy mashed potatoes.
The small sprigs of thyme or rosemary garnish on top show how easily you can add a finishing touch to prepped food. By using muffin liners, these portions can be easily removed and flash frozen, preventing sticking. This individualization is absolutely ideal for quick lunches or fast dinners on exceptionally busy nights.
This method of portioning makes reheating incredibly fast and simple. You only need to pull out the exact number of “cupcakes” you need, eliminating food waste. This is a wonderfully creative and efficient strategy for managing your meal prep and stocking your freezer with comforting, ready to eat food.
Required Ingredients
- 1 lb ground beef or lamb, cooked and drained
- 1 cup frozen mixed vegetables (peas and carrots)
- 1 packet (1 oz) brown gravy mix (or 1 cup beef gravy/broth)
- 1 teaspoon Worcestershire sauce
- 3 cups prepared mashed potatoes (ensure they are thick)
- Salt and pepper, to taste
- Muffin liners (paper or foil)
Equipment List
- 12 cup standard size muffin tin
- Large skillet (if cooking meat)
- Small mixing bowl
- Cookie scoop or spoon
DIY Instruction: Freezer Prep Method
- Cook the Meat Mixture: In a large skillet, cook the ground meat until browned and completely drained of grease. Stir in the frozen mixed vegetables. If using gravy mix, prepare it according to package directions and stir it into the meat mixture along with the Worcestershire sauce, salt, and pepper. If using broth/gravy, stir it in and simmer until the mixture thickens slightly. Let the mixture cool slightly.
- Prepare the Muffin Tin: Line the cups of the muffin tin with paper or foil muffin liners. This is essential for easy removal later.
- Fill the Base: Use a spoon or scoop to place a generous layer of the cooled meat and vegetable mixture into the bottom of each muffin liner. Press the mixture down gently with the back of the spoon.
- Top with Potatoes: Use a cookie scoop or spoon to place a large dollop of the thick mashed potatoes on top of the meat mixture, resembling a cupcake frosting swirl. Ensure the potatoes completely cover the meat layer.
- Freeze: Place the entire muffin tin into the freezer for several hours until the portions are rock solid.
- Package and Store: Once frozen, carefully pop the individual mini pies out of the muffin tin. Transfer them, still in their liners, to a large zip top freezer bag or an airtight container. Label the bag with the name and date. Store this unique freezer meal for up to two months.
DIY Instruction: Cooking from Frozen (Oven Method)
- Preheat and Prepare: Preheat your oven to 375°F (190°C). Place the desired number of frozen mini pies (remove any paper liner, but foil liners can stay) on a baking sheet.
- Bake: Bake the frozen mini pies for approximately 20 to 25 minutes. The small size means they cook quickly. They are ready when the mashed potatoes are lightly golden brown on top and the filling is piping hot all the way through.
- Serve: Let the pies cool for a few minutes before serving. This smart prep provides a fast, comforting meal solution for those busy nights.
11. Freezer Ready Pizza Dough Portions

This picture captures the foundational element of many freezer meals: dough. We see perfectly proofed, rounded portions of pizza dough resting on a lightly floured surface. These neat, plump domes of dough are ready for their transformation into the freezer, demonstrating excellent foresight in prep for future pizza nights.
Freezing dough in individual portions like this is a smart way to ensure flexibility. You can pull out one or two balls for a fast weeknight dinner, eliminating the long process of mixing and kneading from scratch. These smooth, uniform balls show proper care in preparation, which translates to better texture and rise when baked.
This simple act of making a big batch of dough allows you to satisfy pizza cravings effortlessly on busy nights. Having this staple ready in your freezer removes the need for takeout and encourages fun, customized, homemade meals anytime. This strategy keeps your freezer organized and ready for fast assembly.
Required Ingredients
- 4 cups all purpose flour (plus extra for kneading)
- 2 teaspoons rapid rise or instant yeast
- 2 teaspoons salt
- 1 tablespoon sugar
- 1 1/2 cups warm water (about 105°F to 115°F)
- 2 tablespoons olive oil (plus extra for oiling bowls)
Equipment List
- Large mixing bowl
- Measuring cups and spoons
- Stand mixer with a dough hook (optional, but helpful)
- Plastic wrap
- Airtight freezer bags (quart or gallon size)
DIY Instruction: Freezer Prep Method
- Mix the Dough: In a large bowl, whisk together the flour, yeast, salt, and sugar. Add the warm water and 2 tablespoons of olive oil. Mix until a shaggy dough forms.
- Knead: Turn the dough out onto a lightly floured surface. Knead the dough by hand for about 8 to 10 minutes, or use a stand mixer with a dough hook for about 5 to 7 minutes, until the dough is smooth, elastic, and snaps back when poked.
- Divide and Shape: Divide the dough into 4 equal portions. Knead each portion slightly and shape it into a smooth, tight ball.
- First Freeze (Optional): Lightly coat the dough balls with a little olive oil. Place them individually on a small baking sheet lined with parchment paper. Flash freeze them for about 1 hour. This initial freeze prevents them from sticking together when bagged.
- Package and Freeze: Once slightly firm, transfer each dough ball into its own zip top freezer bag (or two dough balls per bag if using gallon size). Press out the air and seal tightly. Label with the date. Store the dough balls flat in your freezer. This freezer meal component will last up to three months.
DIY Instruction: Cooking from Frozen
- Thaw Overnight: The day before you want pizza, remove the desired number of dough balls from the freezer. Place the dough, still in its bag, in the refrigerator to thaw slowly overnight.
- Second Proof: On pizza day, remove the thawed dough from the bag and place it in a lightly oiled bowl. Cover the bowl loosely with plastic wrap. Let the dough rise in a warm place for 60 to 90 minutes, or until it has doubled in size.
- Bake: Punch down the dough, shape it for your pizza pan, add your favorite toppings, and bake according to your pizza recipe instructions. This easy prep ensures a fun family meal on busy nights.
12. Apple Crumble Prep in Pans

This picture shows a wonderfully organized setup for making individual freezer meals of apple crumble. The two aluminum trays are filled with chopped, seasoned apples topped with cinnamon, ready to bake. The topping ingredients—oats, brown sugar, butter chunks, and flour—are separated into a zip top bag and a glass container, showcasing a practical two part prep system.
This arrangement is brilliant for managing busy nights when you need a fast dessert or even a fun breakfast treat. By prepping the fruit and the topping separately, you ensure the topping remains crumbly and fresh, not soggy, when it is time to bake. The labeling on the oat bag also reminds users that instructions are included, promoting ease of use.
Freezing the assembled fruit base in its disposable pan, and the topping separately, is the ultimate convenience. When you are ready to cook, you simply sprinkle the frozen topping over the frozen fruit base and bake. This systematic organization makes wholesome, delicious baking achievable even when time is scarce.
Required Ingredients
- For the Filling: 8 medium apples (like Honeycrisp or Granny Smith), peeled, cored, and diced
- For the Filling: 2 tablespoons all purpose flour
- For the Filling: 1/4 cup granulated sugar
- For the Filling: 1 teaspoon ground cinnamon
- For the Topping: 1 cup rolled oats
- For the Topping: 1/2 cup all purpose flour
- For the Topping: 1/2 cup packed light brown sugar
- For the Topping: 1/2 teaspoon ground cinnamon
- For the Topping: 1/2 cup (1 stick) cold unsalted butter, cut into small cubes
Equipment List
- Large mixing bowl
- Two small disposable aluminum baking pans
- Two medium zip top freezer bags
- Cutting board and sharp knife
DIY Instruction: Freezer Prep Method
- Prepare the Filling: Peel, core, and dice the apples into uniform, small pieces. Place the diced apples in the large mixing bowl. Add the 2 tablespoons of flour, the granulated sugar, and the 1 teaspoon of cinnamon. Toss everything gently until the apples are evenly coated.
- Fill the Pans: Divide the apple mixture evenly between the two small disposable aluminum baking pans. Do not cover or freeze the pans yet.
- Prepare the Topping: In a dry mixing bowl, combine the rolled oats, the 1/2 cup of flour, brown sugar, and the 1/2 teaspoon of cinnamon. Cut the cold butter into small cubes. Add the butter cubes to the dry mixture.
- Mix the Topping: Using your fingers or a pastry blender, quickly work the butter into the dry ingredients until the mixture resembles coarse, pea sized crumbs. Do not mix it too much; you want defined crumbs.
- Package the Topping: Transfer the crumble topping mixture into a zip top freezer bag. Press out the air and label it clearly.
- Freeze the Components: Cover the apple filled pans tightly with aluminum foil. Place the foil covered pans and the labeled bag of topping in the freezer. Freeze for up to three months.
DIY Instruction: Cooking from Frozen
- Preheat and Prepare: Preheat your oven to 375°F (190°C). Remove the pan and the topping bag from the freezer.
- Assemble and Bake: Remove the foil from the apple pan. Sprinkle half of the frozen crumble topping evenly over the frozen apple filling.
- Bake: Place the assembled crumble in the preheated oven. Bake for approximately 45 to 60 minutes, or until the topping is golden brown and the apple filling is bubbling and soft when pierced with a fork.
- Serve: Let the crumble cool for about 10 minutes before serving. This sweet freezer meal is a fast reward after a busy night.
13. Marinated Salmon in Vacuum Seal Bags

This photograph showcases an extremely smart method for preparing seafood freezer meals. We see three beautiful salmon fillets, individually sealed in vacuum bags, each visibly coated with a seasoned marinade. This vacuum sealing method is arguably the best way to prep fish, as it prevents freezer burn and allows the marinade to fully penetrate the fillet.
The vibrant orange of the salmon, contrasted with the green herbs and golden oil in the marinade, makes this look incredibly appetizing. The portion control is a huge benefit; you only need to grab one or two fillets from the freezer when preparing dinner. This makes healthy eating incredibly convenient on busy nights.
This simple prep method ensures that a delicious, flavor infused fish dinner is ready to go with zero effort required later. Simply thaw the bag and cook the salmon, resulting in a perfectly seasoned meal. This organized approach to protein storage is a highly effective way to manage your freezer contents.
Required Ingredients
- 3 salmon fillets (about 6 oz each), skin on or off
- 1/4 cup olive oil
- 2 tablespoons fresh lemon juice
- 1 tablespoon dried dill
- 1 teaspoon garlic powder
- 1/2 teaspoon salt
- 1/4 teaspoon black pepper
Equipment List
- Small bowl
- Whisk
- Measuring spoons
- Vacuum sealer machine and 3 vacuum seal bags (or high quality quart size zip top bags)
DIY Instruction: Freezer Prep Method
- Make the Marinade: In the small bowl, whisk together the olive oil, lemon juice, dried dill, garlic powder, salt, and black pepper until well combined.
- Portion the Marinade: Divide the marinade evenly among the three vacuum seal bags (or zip top bags).
- Add the Salmon: Carefully place one salmon fillet into each bag, ensuring the marinade coats both sides of the fish.
- Seal and Freeze (Vacuum Seal): If using a vacuum sealer, remove all the air from the bag and seal it tightly, following the machine’s instructions. If using zip top bags, press out as much air as possible before sealing. Lay the bags flat on a baking sheet.
- Freeze Flat: Place the baking sheet with the bags in the freezer. Freeze until solid. Storing the fish flat ensures quick and even thawing. Label and date the bags. This marinated freezer meal will keep for up to four months.
DIY Instruction: Cooking from Frozen
- Thaw Slowly: Remove the desired number of salmon fillets from the freezer and place them in the refrigerator to thaw overnight. The thawing process allows the marinade to continue flavoring the fish.
- Cook: Once thawed, remove the salmon from the bag. You can bake, grill, or pan sear the salmon. For baking, place the fillet on a baking sheet and bake at 400°F (200°C) for 12 to 15 minutes, until cooked through.
- Serve: This easy prep provides a fast, healthy protein for any busy night. Discard the used marinade.
14. Bulk Seasoned Meat Rolls

This image clearly shows bulk quantities of seasoned ground meat, likely beef or turkey, formed into thick, uniform rolls. These rolls are ready for wrapping and freezing, representing a highly efficient method of meal prep. The light flecks of green herbs and seasoning visible on the meat surface indicate pre flavoring, which is a key time saver.
Forming the meat into these precise cylindrical shapes is an excellent way to portion meals and maximize freezer space. This preparation work is incredibly versatile; the rolls can be easily sliced into patties for burgers, crumbled for tacos, or used as the base for meatloaf on busy nights.
Freezing ground meat already seasoned and portioned eliminates the need for messy mixing and shaping later. This ensures a ready supply of high quality protein for various freezer meal applications. This simple act of bulk prep ensures quick access to ingredients, cutting down significantly on weeknight cooking time.
Required Ingredients
- 3 lbs ground beef, turkey, or pork (80/20 mix is good for flavor)
- 1 cup plain breadcrumbs or crushed crackers
- 1/2 cup milk or water
- 1 large egg, lightly beaten
- 1 tablespoon Worcestershire sauce
- 2 teaspoons garlic powder
- 1 teaspoon onion powder
- 1 teaspoon salt
- 1/2 teaspoon black pepper
Equipment List
- Large mixing bowl
- Measuring cups and spoons
- Plastic wrap or aluminum foil
DIY Instruction: Freezer Prep Method
- Mix Ingredients: In the large mixing bowl, combine the ground meat, breadcrumbs, milk/water, beaten egg, Worcestershire sauce, garlic powder, onion powder, salt, and pepper. Use your hands to gently mix the ingredients until they are just combined. Avoid over mixing, which can make the meat tough.
- Portion and Shape: Divide the meat mixture into 3 or 4 equal portions (depending on your preferred size). On a clean surface, shape each portion firmly into a compact, uniform log or roll, similar to the ones pictured.
- Wrap Tightly: Take a sheet of plastic wrap or heavy duty aluminum foil. Place one meat roll onto the wrap and roll it up tightly, securing the ends. You want to make sure no air can reach the meat, which prevents freezer burn.
- Label and Freeze: Label each wrapped meat roll with the contents and date. Place the rolls in a larger freezer bag or container. Transfer them to the freezer. These rolls make excellent, ready to use freezer meals and will keep for up to three months.
DIY Instruction: Using the Meat Rolls
- Thaw: Remove the wrapped roll from the freezer and place it in the refrigerator to thaw overnight.
- Slice for Patties: Once thawed, remove the plastic wrap. Use a sharp knife to slice the roll into uniform patties (about 1 inch thick) for grilling or pan frying.
- Crumble for Tacos/Sauce: Alternatively, crumble the thawed meat into a hot skillet to brown for tacos, spaghetti sauce, or chili. This simple prep provides a versatile base for many busy nights meals.
15. Freezable Jam Sandwich Cookies

This delightful image shows small, scalloped sandwich cookies, lined up neatly on a baking sheet, ready for either baking or freezing. Each cookie is assembled with a visible layer of bright red jam in the middle and topped with a drizzle or dollop of white icing. This is a wonderfully elegant freezer meal component for snacks or dessert.
The precise arrangement and uniform size highlight the quality prep work involved. Freezing baked or unbaked cookies like this is a smart way to ensure you always have a fresh tasting treat ready. Simply pulling a few from the freezer is much faster than baking an entire batch, especially on busy nights.
Baking a large batch and freezing individual servings prevents waste and ensures fresh cookies are always just a few minutes away. The inclusion of jam and icing demonstrates that even sweet freezer meals can be sophisticated and satisfying. This is a great addition to any organized freezer stash.
Required Ingredients
- 2 cups all purpose flour
- 1/2 teaspoon baking powder
- 1 cup (2 sticks) unsalted butter, softened
- 3/4 cup granulated sugar
- 1 large egg
- 1 teaspoon vanilla extract
- 1/2 cup raspberry or strawberry jam
- Icing (a mix of powdered sugar and a touch of milk)
Equipment List
- Large mixing bowl
- Electric mixer (handheld or stand)
- Rolling pin
- Scalloped cookie cutters (two sizes, or one with a center cutout)
- Baking sheet lined with parchment paper
- Piping bag or small spoon (for icing)
DIY Instruction: Freezer Prep Method (Freezing Unbaked Dough)
- Make the Dough: Cream the butter and sugar in a large bowl until light and fluffy. Beat in the egg and vanilla extract. In a separate bowl, whisk the flour and baking powder, then gradually add the dry ingredients to the wet mixture, mixing until a dough forms.
- Chill: Divide the dough in half. Wrap each half tightly in plastic wrap and chill for at least 30 minutes.
- Roll and Cut: On a lightly floured surface, roll one piece of dough out to about 1/4 inch thickness. Use the scalloped cutter to cut out an even number of cookies. Use a smaller cutter or bottle cap to cut a small center hole out of half of the cookies (these will be the tops).
- Flash Freeze: Place all the unbaked cutouts onto a parchment lined baking sheet. Flash freeze them for about 1 hour. This initial freeze prevents them from sticking together when bagged.
- Package: Transfer the frozen unbaked cookies to a large zip top freezer bag or airtight container, separating layers with parchment paper. Label and freeze.
DIY Instruction: Assembly and Freezing (Freezing Baked)
- Bake the Cookies: Bake the cutouts (with and without holes) at 350°F (175°C) for 8 to 10 minutes until the edges are lightly golden. Let them cool completely.
- Assemble: Spread a small amount of jam onto the bottom side of the solid cookies. Place a cookie with a center cutout on top of the jam to create a sandwich.
- Ice and Freeze: Drizzle or pipe a small amount of icing onto the top of the finished sandwiches. Place the cookies back on a baking sheet and flash freeze for 1 hour to set the icing. Once set, transfer them to an airtight container, separated by wax paper, and freeze.
DIY Instruction: Cooking/Eating from Frozen
- For Unbaked Dough: Thaw the frozen cutouts on the counter for 15 minutes, then bake as directed above.
- For Baked Cookies: Simply pull the desired number of cookies from the freezer and let them sit at room temperature for about 15 minutes. They are a lovely, fast treat for a busy night.
16. Pre Cooked Breakfast Sausage Patties

This photo shows pre cooked breakfast sausage patties, beautifully browned and arranged on a white plate. This is the epitome of smart prep work for simplifying morning routines. Cooking a large batch of patties and freezing them is a great way to ensure a high protein breakfast is ready to go on any busy night or rushed morning.
The uniform size and even browning indicate these patties were cooked expertly before being readied for the freezer. Freezing them individually on a tray before bagging prevents sticking, a key detail for easy portion control. A bit of syrup visible on a couple of the patties hints at the delicious, ready to eat flavor.
Stocking your freezer with these pre cooked proteins is a huge time saver. Simply reheating one or two patties eliminates the time consuming step of cooking raw meat in the morning. This straightforward approach keeps your freezer meal supply organized and ready for fast heating.
Required Ingredients
- 2 lbs ground breakfast sausage (pork, turkey, or plant based)
- 1/4 cup water (optional, for shaping)
Equipment List
- Large nonstick skillet or griddle
- Spatula
- Large baking sheet lined with parchment paper
- Airtight freezer bag (gallon size)
DIY Instruction: Freezer Prep Method
- Shape the Patties: Pinch off 2 to 3 ounce portions of the raw sausage meat. Use your hands to roll them into balls, then gently flatten them into uniform patties, about 1/2 inch thick and 3 to 4 inches wide. Making them uniform ensures they cook and reheat evenly.
- Cook the Patties: Heat the large nonstick skillet or griddle over medium heat. Cook the sausage patties for 4 to 6 minutes per side, or until they are completely browned and cooked through. Ensure the internal temperature reaches a safe level (160°F for pork).
- Cool Completely: Transfer the cooked patties to a plate lined with paper towels to drain excess grease. Let them cool completely to room temperature. This is crucial for preventing condensation and freezer burn.
- Flash Freeze: Place the cooled patties in a single layer on the parchment lined baking sheet. Place the sheet in the freezer for about 1 hour until the patties are solid.
- Package and Freeze: Transfer the frozen patties into the large zip top freezer bag. Press out any air and seal the bag tightly. Label and date. These pre cooked freezer meals are a fast breakfast prep and can be stored for up to two months.
DIY Instruction: Cooking from Frozen (Microwave or Skillet)
- Microwave: Place one or two frozen patties on a paper towel lined microwave safe plate. Microwave on high for approximately 45 to 90 seconds, flipping halfway through, until heated through.
- Skillet: Place the frozen patties in a nonstick skillet over medium low heat. Cover the skillet and heat for 5 to 8 minutes, flipping frequently, until fully heated.
- Serve: Add the reheated patties to a sandwich or serve alongside eggs for a speedy meal on a busy night or morning.
17. Mini Meatloaf Muffins

This picture presents another creative way to portion comfort food for the freezer: mini meatloaves baked in a muffin tin. The uncooked meatloaf mixture is neatly scooped into the cups, topped with a bright red dollop of ketchup or glaze. This excellent prep strategy ensures even, fast cooking times and perfect single servings.
Using a muffin tin is a genius method for creating consistent, individual freezer meals. This organization allows the meatloaves to be flash frozen easily, minimizing the risk of them sticking together. The small size also makes them reheat much faster than a large traditional loaf, which is a big win on busy nights.
This ready to bake assembly makes dinner simple. You can pull the tin straight from the freezer and bake it, or flash freeze the portions and store them in a bag for even easier storage. This clever approach to meal prep ensures a quick, hearty dinner is always within reach.
Required Ingredients
- 1.5 lbs ground beef (or a beef/pork mix)
- 1/2 cup plain breadcrumbs
- 1/4 cup milk
- 1 large egg, lightly beaten
- 1/4 cup finely chopped onion
- 1 tablespoon Worcestershire sauce
- 1 teaspoon garlic powder
- 1/2 teaspoon salt
- 1/4 teaspoon black pepper
- Topping: 1/4 cup ketchup, or a mixture of ketchup, brown sugar, and vinegar
Equipment List
- Large mixing bowl
- 24 cup mini muffin tin (or standard 12 cup tin)
- Medium cookie scoop
- Spoon
DIY Instruction: Freezer Prep Method (Unbaked)
- Mix the Meatloaf: In the large mixing bowl, combine the ground meat, breadcrumbs, milk, beaten egg, chopped onion, Worcestershire sauce, garlic powder, salt, and pepper. Use your hands to gently mix until everything is just combined. Do not over mix.
- Scoop and Fill: Use a medium cookie scoop to portion the meatloaf mixture evenly into the cups of the muffin tin. Press the meat down lightly.
- Add Topping: Spoon a small dollop of the ketchup or glaze mixture onto the top of each mini meatloaf.
- Flash Freeze: Place the entire muffin tin, uncovered, into the freezer for at least 2 hours, or until the meatloaves are solid.
- Package and Store: Once fully frozen, use a small spatula to pop the mini meatloaves out of the tin. Transfer them to a large zip top freezer bag or airtight container. Label the bag with the name, date, and baking instructions. Store this freezer meal for up to three months.
DIY Instruction: Cooking from Frozen (Oven Method)
- Preheat and Prepare: Preheat your oven to 375°F (190°C). Place the desired number of frozen mini meatloaves on a foil lined baking sheet.
- Bake: Bake the frozen meatloaves for approximately 25 to 35 minutes. The small size means they cook quickly. They are ready when they are cooked through and reach an internal temperature of 160°F.
- Serve: These single serving prep meals are ready to serve immediately with mashed potatoes or a side salad for a quick solution on a busy night.
18. Pre Portion Smoothie Packs

This image showcases the ultimate organization for healthy breakfast or snack freezer meals. We see several individual zip top bags, each filled with pre portioned ingredients for a single serving smoothie. The ingredients are visibly layered—spinach, berries, mango chunks, banana slices, and a sprinkle of flax seeds or protein powder—making them attractive and easy to identify.
This meticulous prep work eliminates morning mess and guesswork, a huge advantage on busy nights or mornings. Simply grab a bag, dump the contents into the blender, and add liquid. This system ensures consistent serving sizes and nutritional content every time.
Having these ready to blend packs stored flat in your freezer is a game changer for maintaining a healthy diet. This organization prevents your smoothie ingredients from clumping together and ensures rapid blending. This is an efficient, colorful way to keep your freezer stocked with fast, wholesome options.
Required Ingredients (Per Bag)
- 1 cup fresh spinach or kale, packed
- 1 cup mixed frozen fruit (berries, mango chunks, pineapple)
- 1/2 medium banana, sliced
- 1 tablespoon flax seeds, chia seeds, or hemp hearts
- 1 scoop protein powder (optional)
- Liquid: 1 cup milk, juice, or water (added later, not in the bag)
Equipment List
- Measuring cups and spoons
- Small zip top freezer bags (quart size)
- Blender (for cooking/consumption)
DIY Instruction: Freezer Prep Method
- Measure and Layer Greens: Begin by adding the 1 cup of fresh spinach or kale to the bottom of the quart size zip top freezer bag. Gently push the greens to the bottom.
- Add Fruits and Seeds: Add the 1 cup of frozen fruit and the 1/2 sliced banana on top of the greens. Follow this with the tablespoon of flax seeds, and the scoop of protein powder if using. The key is to keep the dry ingredients and soft ingredients (like greens) separated from the hard frozen fruit initially.
- Seal and Freeze: Press out all the excess air from the bag and seal it tightly. Lay the bags flat and stack them in your freezer. This prep method creates easily stored, complete freezer meals for fast blending. Label the bag and freeze for up to three months.
DIY Instruction: Cooking from Frozen (Blender Method)
- Add Liquid: Pour your desired liquid (milk, water, or juice) into the blender.
- Add Frozen Contents: Dump the entire contents of one frozen smoothie bag directly into the blender container.
- Blend: Secure the lid and blend the mixture until it is completely smooth and creamy. You may need to use the tamper or stop and stir the mixture once or twice.
- Serve: Pour the smoothie into a glass and enjoy immediately. This quick freezer meal is an effortless solution for a fast, healthy drink on any busy night or morning.
19. Ready to Bake Cinnamon Rolls

This picture shows two aluminum baking pans filled with unbaked cinnamon rolls, one pan even having a slice missing, suggesting it is ready to be frozen or baked. The yeast rolls are plump and evenly spaced, generously swirled with cinnamon filling and scattered with chocolate chips or crunchy sugar pieces. This is a delightful breakfast or dessert freezer meal.
The use of disposable aluminum pans for the rolls is a practical choice, allowing them to go straight from the freezer to the oven. This kind of prep ensures a warm, fresh baked treat is always just an oven away, eliminating the lengthy preparation time required for making the dough from scratch on busy nights.
A small bowl of creamy white icing sits near the pans, reminding the user to prepare the topping separately and add it after baking. Freezing the rolls before their final proof is a smart technique, allowing the yeast to activate when they thaw and warm up in the oven. This thoughtful organization is a simple way to elevate your home baking.
Required Ingredients
- For the Dough: Your favorite cinnamon roll dough recipe (or store bought frozen dough, thawed and rolled)
- For the Filling: 1/2 cup (1 stick) butter, softened
- For the Filling: 1 cup packed brown sugar
- For the Filling: 2 tablespoons ground cinnamon
- For the Topping: 1/2 cup cinnamon chips or chopped pecans (optional)
- For the Icing: Cream cheese, powdered sugar, vanilla extract, and milk (made later)
Equipment List
- Rolling pin
- Large knife or dental floss
- Two small disposable aluminum baking pans
- Plastic wrap
- Airtight container (for icing, if prepping ahead)
DIY Instruction: Freezer Prep Method (Unbaked)
- Prepare and Roll Dough: Prepare your cinnamon roll dough up to the point of filling and rolling. Roll the dough out into a large rectangle, about 1/4 inch thick.
- Spread Filling: In a small bowl, mix the softened butter, brown sugar, and cinnamon. Spread this filling evenly over the surface of the dough rectangle. Sprinkle the optional cinnamon chips or pecans over the filling.
- Roll and Slice: Tightly roll the dough into a log shape starting from the long edge. Use a sharp knife or a piece of dental floss to slice the log into 9 to 12 equal rolls (the number depends on the size of your pan).
- Place in Pans: Place the sliced rolls evenly into the two disposable aluminum baking pans, leaving a little space between them for expansion.
- Cover and Freeze: Cover the pans tightly first with a layer of plastic wrap, then with a layer of aluminum foil. Label and date. Place the pans flat in the freezer. Do not allow them to proof before freezing.
DIY Instruction: Cooking from Frozen (Oven Method)
- Thaw and Proof: Remove the aluminum foil and plastic wrap from the pan. Cover the pan loosely with plastic wrap. Place the rolls in a warm place (like a cold oven or near a warm burner) to thaw and proof for approximately 3 to 5 hours, or until they have nearly doubled in size.
- Preheat and Bake: Preheat your oven to 350°F (175°C). Remove the plastic wrap. Bake the rolls for 25 to 35 minutes, until they are golden brown and cooked through.
- Ice and Serve: While the rolls cool slightly, prepare the icing. Drizzle the warm rolls generously with the icing. Enjoy this easy prep sweet treat on a busy night.
20. Gourmet Beef Short Ribs in Sauce

This luxurious image captures two plastic containers filled with deeply flavorful braised beef short ribs submerged in a rich, dark sauce. The ribs are garnished with brightly colored vegetable rounds (carrots and celery), pearl onions, fresh herbs, and bay leaves. This complete, gourmet freezer meal looks ready to be reheated for a truly satisfying dinner.
The convenience of having a meal like this fully assembled in an aluminum tray is unmatched. Utilizing a disposable pan makes for the simplest cleanup later, a huge benefit when you are short on time. Even the simple detail of adding a sprig of fresh thyme hints at the flavor waiting inside, reminding you that convenience does not mean compromising on taste.
This meal is designed for straightforward cooking straight from the freezer, eliminating the need to thaw. Simply place the pan in the oven, and within an hour, you will have a warm, bubbling meal ready to serve. This is a wonderfully practical strategy for keeping your freezer stocked and ensuring your family always has access to comforting, home cooked food.
Required Ingredients
- 3 lbs beef chuck roast or pork shoulder (Boston butt)
- 1 large onion, sliced
- 1 bottle (18 oz) quality barbecue sauce
- 1/2 cup beef or chicken broth
- 1 tablespoon smoked paprika
- 1 teaspoon garlic powder
- Salt and black pepper, to taste
Equipment List
- Slow cooker (Crock Pot) or Instant Pot
- Two forks (for shredding)
- Three quart or gallon size zip top freezer bags
- Large bowl
DIY Instruction: Freezer Prep Method
- Cook the Meat: Season the roast generously with salt, pepper, smoked paprika, and garlic powder. Place the sliced onion and the roast in the slow cooker. Pour the 1/2 cup of broth over the top. Cook on low for 8 to 10 hours or on high for 4 to 5 hours, until the meat is fork tender. (If using an Instant Pot, follow the manufacturer’s directions for a large roast).
- Shred the Meat: Carefully remove the cooked meat from the slow cooker and place it in a large bowl. Use two forks to easily shred the meat. Discard any large pieces of fat. Reserve the cooking liquid.
- Mix with Sauce: Add the entire bottle of barbecue sauce to the shredded meat. Add 1/4 to 1/2 cup of the reserved cooking liquid to the meat and sauce mixture until you reach your desired consistency—it should be very moist. Stir everything together until the meat is thoroughly coated.
- Portion and Bag: Divide the sauced pulled meat evenly among the three zip top freezer bags. This creates three separate freezer meals.
- Seal and Freeze: Press out all the air from each bag, ensuring they are sealed securely. Lay the bags flat on a baking sheet and transfer them to the freezer so they freeze in a thin layer, which speeds up thawing later. Label with the date and name. Freeze for up to three months.
DIY Instruction: Cooking from Frozen (Stovetop or Slow Cooker)
- Thaw: For best results, remove one bag of pulled meat from the freezer and allow it to thaw overnight in the refrigerator. If you forget to thaw, you can heat it directly from frozen, but it will take longer.
- Reheat (Stovetop): Empty the contents of the bag into a saucepan. Cover the pan and heat the meat over medium low heat, stirring occasionally, for about 10 to 15 minutes, until the mixture is simmering and heated through completely.
- Reheat (Slow Cooker): Dump the frozen or thawed contents into a slow cooker and heat on low for 2 to 3 hours, or on high for about 1 hour, until fully heated.
- Serve: Serve the hot pulled meat on slider buns with a side of coleslaw for a quick, satisfying busy night dinner.
21. Crustless Mini Quiches for Breakfast

This fantastic photograph showcases uncooked, individual egg cups, neatly arranged in a standard muffin tin. These mini quiches are filled with a colorful mix of ingredients, including diced peppers, onions, ham or sausage, and a generous sprinkle of shredded cheddar cheese on top. This is an excellent example of quick and savory prep for freezer meals.
Using a muffin tin to create these individual portions ensures consistent sizing and rapid freezing. This simple strategy allows you to easily remove the portions after flash freezing and store them in a single bag, keeping your freezer organized. The small size means they bake quickly, making them a superb grab and go breakfast on even the most busy nights or mornings.
Preparing a batch of these crustless quiches eliminates the effort of preparing pastry dough and provides a high protein option for any time of day. Having these fully assembled and ready in your freezer removes guesswork from meal planning. They are an organized and practical solution for feeding a hungry crowd or just simplifying weekday breakfasts.
Required Ingredients
- 12 large eggs
- 1/4 cup milk or cream
- 1/2 teaspoon salt
- 1/4 teaspoon black pepper
- 1 cup cooked, chopped ham or crumbled sausage
- 1/2 cup diced mixed vegetables (onions, bell peppers)
- 1 cup shredded cheddar or Monterey jack cheese, divided
Equipment List
- 12 cup standard muffin tin
- Whisk
- Medium mixing bowl
- Nonstick cooking spray or paper muffin liners
- Measuring cups and spoons
DIY Instruction: Freezer Prep Method (Unbaked)
- Prepare the Muffin Tin: Line the muffin tin with paper liners or spray each cup generously with nonstick cooking spray.
- Whisk the Egg Mixture: In the medium mixing bowl, whisk the 12 eggs, milk, salt, and pepper until the mixture is light and slightly frothy.
- Layer the Fillings: Place a spoonful of the cooked ham/sausage and the diced mixed vegetables into the bottom of each prepared muffin cup. This creates a flavor base.
- Pour the Eggs: Carefully pour the whisked egg mixture evenly over the fillings, filling each cup about three quarters of the way full.
- Top with Cheese: Sprinkle the shredded cheese evenly over the top of each mini quiche.
- Flash Freeze: Place the entire muffin tin, uncovered, directly into the freezer for at least 2 hours, or until the quiches are completely frozen solid.
- Package and Store: Once frozen, remove the mini quiches (still in their liners, if used) and transfer them to a large zip top freezer bag or an airtight container. Label the bag with the name and date. Store this quick freezer meal for up to two months.
DIY Instruction: Cooking from Frozen (Oven Method)
- Preheat and Prepare: Preheat your oven to 375°F (190°C). Place the desired number of frozen quiches (remove the paper liners before baking if possible, otherwise leave foil liners on) on a baking sheet.
- Bake: Bake the frozen mini quiches for approximately 20 to 25 minutes. The small size allows them to cook quickly. They are ready when the tops are set, lightly golden, and the center is firm to the touch.
- Serve: Let them cool for a few minutes before serving. This effortless prep ensures a fast, healthy breakfast or snack for those busy nights.
22. Layered Quinoa Mexican Casserole

This impressive image features a towering, fully assembled Mexican casserole, showcasing multiple layers of filling ready for the freezer. You can clearly distinguish layers of tortillas, rice or quinoa, black beans, corn, cheese, and a rich red sauce, all stacked high in a disposable aluminum pan. The small individual portions in the foreground highlight the convenience of having this freezer meal pre portioned.
This extreme level of prep work guarantees a hearty, flavor packed dinner with zero assembly needed on a busy night. The different colors and textures demonstrate a complex flavor profile, making this much more satisfying than simple take out. Using a disposable pan for the large casserole makes for the easiest possible cleanup.
Freezing this large casserole ensures you have multiple servings ready for any occasion. The individual aluminum containers shown below are perfect for single lunches or small family dinners, extending the usefulness of this bulk preparation. This organized approach to layering ingredients is a smart way to store maximum flavor in one convenient dish.
Required Ingredients
- 1 box (8 count) large flour tortillas or corn tortillas
- 2 cups cooked quinoa or rice
- 1 can (15 oz) black beans, rinsed and drained
- 1 can (15 oz) corn, drained
- 1 jar (16 oz) enchilada sauce or thick taco sauce
- 2 cups shredded cheddar/Monterey Jack cheese, divided
- 1 cup sour cream or Greek yogurt (optional, added to some layers)
- 1 tablespoon taco seasoning (mixed into quinoa/rice)
Equipment List
- 9×13 inch disposable aluminum baking pan
- Large mixing bowl
- Spoon or spatula
- Measuring cups
DIY Instruction: Freezer Prep Method
- Prepare Components: Mix the cooked quinoa or rice with the taco seasoning. Stir the sour cream or yogurt (if using) into 1 cup of the cheese for a creamier layer.
- Layer the Sauce: Pour a thin layer of the enchilada sauce across the bottom of the disposable baking pan.
- Assemble the Layers: Begin layering the casserole in this order, starting with tortillas:
- Tortilla layer
- Quinoa/Rice layer
- Black Beans and Corn layer
- Sour cream and cheese mixture layer (if using)
- Sauce and plain cheese layer
- Repeat and Finish: Repeat the layers until the pan is full (as pictured, this can be 4 or 5 levels high). Top the final layer with the remaining sauce and a generous sprinkle of the shredded cheese.
- Cover and Freeze: Cover the entire aluminum pan tightly with plastic wrap, then wrap again completely in aluminum foil. Label with the name, date, and baking instructions. Place the fully assembled freezer meal flat in the freezer. Freeze for up to three months.
DIY Instruction: Cooking from Frozen
- Preheat and Unwrap: Preheat your oven to 375°F (190°C). Remove the pan from the freezer. Remove the plastic wrap and the aluminum foil.
- Bake Covered: Cover the pan loosely with a fresh piece of aluminum foil. Bake the casserole for 60 to 75 minutes. Baking covered prevents the top from burning while the frozen layers thaw and heat through.
- Finish Uncovered: Carefully remove the foil covering. Return the casserole to the oven and bake uncovered for an additional 15 to 20 minutes, or until the cheese is melted and bubbly and the center is piping hot.
- Serve: Let the casserole cool for 5 minutes before slicing and serving. This comprehensive prep is a hearty solution for any busy night.
23. Quinoa Stuffed Bell Peppers

This bright and colorful photo displays six beautifully assembled stuffed bell peppers, ready to be frozen in a foil baking pan. The peppers—yellow, orange, and green—are halved, filled with a savory mixture of quinoa or rice, and topped with a spoonful of rich tomato sauce and a sprinkle of dried herbs. This meal is an organized, healthy freezer meal option.
The arrangement of the peppers, snugly fitted together in the disposable aluminum pan, shows excellent freezer prep strategy. Using a disposable pan is very convenient, allowing the entire dish to go from the freezer right into the oven with minimal fuss, a huge benefit on busy nights.
This preparation method creates six complete, individual servings that are visually appealing and nutritious. The contrast between the vibrant pepper shells and the hearty grain filling ensures a satisfying dinner. Freezing them uncooked and assembled preserves the fresh texture of the peppers and locks in the flavor until you are ready to bake.
Required Ingredients
- 3 large bell peppers (various colors), halved and deseeded
- 2 cups cooked quinoa or rice
- 1/2 lb ground beef, turkey, or lentils, cooked and drained
- 1/2 cup diced onion
- 1 teaspoon garlic powder
- 1/2 teaspoon dried oregano
- Salt and black pepper, to taste
- 1 can (15 oz) tomato sauce (divided for mixing and topping)
Equipment List
- Small frying pan (if cooking meat/onions)
- Large mixing bowl
- Spoon
- 9×13 inch disposable aluminum baking pan
DIY Instruction: Freezer Prep Method (Unbaked)
- Prepare the Peppers: Cut the bell peppers in half from top to bottom and remove all the seeds and membranes. Arrange the six pepper halves cavity side up in the disposable aluminum baking pan.
- Make the Filling: In the small frying pan, sauté the diced onion until softened. Add the cooked meat/lentils, cooked quinoa/rice, garlic powder, oregano, salt, and pepper. Stir in about 1/4 cup of the tomato sauce to moisten the filling.
- Stuff the Peppers: Use a spoon to evenly divide the filling mixture among the six bell pepper halves, pressing the mixture down gently into the cavity.
- Top with Sauce: Pour the remaining tomato sauce evenly over the tops of the stuffed peppers. Sprinkle with an extra pinch of dried oregano or basil.
- Cover and Freeze: Cover the entire aluminum pan tightly with a layer of plastic wrap, then wrap completely with aluminum foil. Label the pan with the name, date, and baking instructions. Place the assembled freezer meal flat in the freezer. Freeze for up to three months.
DIY Instruction: Cooking from Frozen (Oven Method)
- Preheat and Unwrap: Preheat your oven to 375°F (190°C). Remove the pan from the freezer. Remove the plastic wrap and the aluminum foil.
- Bake Covered: Cover the pan loosely with a fresh piece of aluminum foil. Bake the peppers for 60 minutes. This allows the frozen peppers to thaw and steam safely.
- Finish Uncovered: Carefully remove the foil covering. Return the pan to the oven and bake uncovered for an additional 15 to 25 minutes, or until the peppers are tender when pierced with a fork and the filling is piping hot throughout.
- Serve: Let them cool briefly before serving. This comprehensive prep provides a healthy solution for a busy night dinner.
24. Spiced Apple Cinnamon Muffins

This cozy photo captures a batch of freshly baked muffins, cooling on a wire rack. Visible chunks of apple peek out from the cinnamon spiced tops, which are dusted lightly with powdered sugar. These prep baked goods make a wonderful grab and go breakfast, snack, or dessert freezer meal.
Baking a large batch of muffins and freezing them individually is a time saving strategy for maintaining a steady supply of wholesome treats. The uniform shape and golden brown color suggest these are soft and flavorful. Freezing them completely cooled prevents sogginess when they thaw.
Having a container of these muffins in your freezer simplifies busy mornings immensely. You can pull one out and let it thaw on the counter, or give it a quick reheat. This simple preparation ensures a comforting, homemade sweet is always available, even on those demanding busy nights.
Required Ingredients
- 2 cups all purpose flour
- 3/4 cup granulated sugar
- 1 tablespoon baking powder
- 1 teaspoon ground cinnamon
- 1/2 teaspoon salt
- 1 large egg
- 1/2 cup milk
- 1/2 cup vegetable oil or melted butter
- 1 cup chopped apple (peeled and cored)
- Optional: A sprinkle of cinnamon sugar or powdered sugar for topping
Equipment List
- 12 cup standard muffin tin
- Paper muffin liners
- 2 large mixing bowls
- Whisk and spatula
- Wire cooling rack
- Airtight freezer bag or container
DIY Instruction: Freezer Prep Method (Baked)
- Preheat and Prepare: Preheat your oven to 400°F (200°C). Line the muffin tin with paper liners.
- Mix Dry Ingredients: In the first large bowl, whisk together the flour, sugar, baking powder, cinnamon, and salt.
- Mix Wet Ingredients: In the second large bowl, whisk together the egg, milk, and oil/melted butter until combined.
- Combine and Fold: Pour the wet ingredients into the dry ingredients. Stir gently with a spatula until they are just combined. Do not over mix. Gently fold in the chopped apples.
- Fill and Bake: Divide the batter evenly among the 12 muffin cups, filling them about two thirds full. Bake for 18 to 20 minutes, or until a toothpick inserted into the center comes out clean.
- Cool Completely: Transfer the baked muffins to the wire rack immediately and let them cool completely. Sprinkle with optional cinnamon sugar or powdered sugar once cool.
- Flash Freeze: Once cooled, place the muffins on a baking sheet and flash freeze for 1 hour to prevent sticking.
- Package and Store: Transfer the frozen muffins to a large zip top freezer bag or airtight container. Press out the air and seal tightly. Label and freeze for up to two months.
DIY Instruction: Cooking from Frozen
- Thaw on Counter: Remove a muffin from the freezer and place it on the counter to thaw at room temperature for about 30 minutes.
- Quick Reheat (Optional): For a warm, fresh baked taste, reheat a frozen muffin in the microwave for 20 to 30 seconds, or in a toaster oven for a few minutes.
- Serve: Enjoy this easy prep snack or breakfast as a quick pick me up on a busy night.
25. Unbaked Tofu Scramble Starter Kit

This image displays a perfectly portioned, labeled freezer meal kit for a plant based tofu scramble. The clear zip top bag contains raw, crumbled tofu (likely visible near the top), vibrant chopped vegetables (mushrooms, onions, peppers), and dry seasoning mixes like nutritional yeast and turmeric for color. This is an expertly organized, complete prep solution.
This kit eliminates all the chopping and measuring needed for a wholesome breakfast, saving huge amounts of time on busy nights or mornings. The ingredients are visibly separated for quality preservation, and the clear labeling makes identification simple. This method showcases how easily plant based meals can be incorporated into freezer cooking.
Having this scramble kit ready in your freezer ensures a quick, healthy, and high protein meal is always accessible. Simply grab the bag, sauté the ingredients, and add a few liquids for a delicious meal. This focused approach to meal preparation minimizes waste and maximizes kitchen efficiency.
Required Ingredients (Per Kit)
- 1 block (14 oz) extra firm tofu, pressed, drained, and crumbled
- 1 cup mixed diced vegetables (onion, bell peppers, mushrooms)
- 2 tablespoons nutritional yeast
- 1 tablespoon garlic powder
- 1 teaspoon turmeric powder (for color)
- 1/2 teaspoon black salt (kala namak, for egg flavor, optional)
- Salt and black pepper, to taste
- Liquid: 1/4 cup non dairy milk or water (added later)
Equipment List
- Tofu press or heavy weights
- Large bowl
- Measuring cups and spoons
- Large zip top freezer bag (quart or gallon size)
DIY Instruction: Freezer Prep Method
- Prepare the Tofu: The most crucial step is pressing the tofu to remove as much water as possible. Once pressed, crumble the tofu into a large bowl.
- Chop Vegetables: Dice the onion, bell peppers, and mushrooms into small, uniform pieces.
- Mix Dry Spices: In a small bowl, combine the nutritional yeast, garlic powder, turmeric powder, black salt, salt, and pepper.
- Layer the Kit: Open the zip top freezer bag. First, place the diced mixed vegetables into the bottom of the bag. Next, add the crumbled tofu on top of the vegetables. Finally, pour the dry spice mixture over the tofu layer.
- Seal and Freeze: Press out all the air and seal the bag securely. Give the bag a very gentle shake to mix the spices lightly through the tofu. Lay the bag flat in the freezer. Label with the name, date, and a note to add 1/4 cup of liquid when cooking. Freeze for up to three months.
DIY Instruction: Cooking from Frozen (Stovetop Method)
- Sauté: Remove the contents of the bag from the freezer. Dump the frozen mixture directly into a large skillet with a tablespoon of oil over medium heat.
- Thaw and Cook: Break up the frozen contents with a spatula. Sauté for about 8 to 10 minutes until the vegetables are softened and the tofu is thawed and heated through.
- Finish: Pour the 1/4 cup of non dairy milk or water over the mixture and stir well to distribute the spices. Cook for 1 to 2 minutes more until the liquid has evaporated.
- Serve: This rapid prep ensures a hot, savory freezer meal is ready for a fast start on any busy night or morning.
26. Gnocchi with Pesto Cream Sauce

This beautiful, vibrant photo shows a casserole dish filled with soft, ridged gnocchi, centered with a thick, dollop of green pesto cream sauce. This dish is ready to be baked, representing a fast and comforting freezer meal option. The sprinkle of Parmesan cheese on top adds a final savory touch.
Freezing the gnocchi and sauce together in a single baking dish is a genius approach to prep, creating a hearty dinner that only requires oven time later. This method avoids the need to boil water, saving significant time on busy nights. The use of a smooth, creamy sauce ensures the gnocchi remains moist while baking.
Having this assembled dish tucked away in your freezer ensures you have a delicious, Italian inspired meal ready to go. Simply pull the dish out, bake, and serve. This simple strategy for freezing pasta dishes eliminates the mess and fuss of mixing components when you are pressed for time.
Required Ingredients
- 2 packages (16 oz each) potato gnocchi (uncooked, frozen works best)
- 1 jar (8 oz) store bought pesto
- 1 cup heavy cream or half and half
- 1/4 cup grated Parmesan cheese (plus extra for topping)
- 1/2 teaspoon garlic powder
- Salt and black pepper, to taste
Equipment List
- 9×13 inch oven safe baking dish (or a disposable foil pan)
- Medium mixing bowl
- Whisk
DIY Instruction: Freezer Prep Method (Unbaked)
- Prepare the Gnocchi: Place the frozen, uncooked gnocchi directly into the bottom of the baking dish. Spread them out into an even layer.
- Make the Sauce: In the medium mixing bowl, whisk together the jar of pesto, the heavy cream, 1/4 cup of Parmesan cheese, garlic powder, salt, and pepper until the sauce is uniform and creamy green.
- Assemble the Casserole: Pour the pesto cream sauce over the gnocchi. You can either spread the sauce evenly over the gnocchi or leave it centered as pictured. Sprinkle the top generously with extra Parmesan cheese.
- Cover and Freeze: Cover the dish tightly with a layer of plastic wrap, pressing it lightly to avoid direct contact with the cheese. Wrap the dish entirely in aluminum foil. Label with the name, date, and baking instructions. Place the assembled freezer meal flat in the freezer. Freeze for up to three months.
DIY Instruction: Cooking from Frozen (Oven Method)
- Preheat and Unwrap: Preheat your oven to 400°F (200°C). Remove the dish from the freezer and remove the plastic wrap and the aluminum foil.
- Bake Covered: Cover the dish loosely with a fresh piece of aluminum foil. Bake the gnocchi for 40 minutes. This allows the frozen gnocchi to thaw and cook without the sauce drying out.
- Finish Uncovered: Carefully remove the foil covering. Return the dish to the oven and bake uncovered for an additional 10 to 15 minutes, or until the sauce is bubbling and the gnocchi is soft and cooked through.
- Serve: Let the dish cool for 5 minutes before serving. This zero effort prep is a creamy, decadent solution for a busy night.
27. Dry Bean Soup Kit

This striking image presents a commercially packaged freezer meal kit for dry bean soup. The clear bag shows beautifully layered, dry beans and lentils of various colors, separated by packets of dry spices and seasonings. The prominent label clearly explains the contents and suggests it saves time by pre measuring and sorting ingredients.
This product demonstrates the maximum level of prep possible for a soup kit, providing a healthy, shelf stable option that only requires liquid. Although this particular version may not be a frozen kit, it perfectly illustrates the concept of pre portioning all dry ingredients to save time on busy nights.
This kind of organized meal preparation ensures you always have a wholesome soup base ready to go. Simply add the contents of the bag to a pot along with water or broth, and cook. This focused approach to stocking your pantry or freezer components makes homemade soup achievable even when time is extremely limited.
Required Ingredients (Per Kit)
- 2 cups assorted dry beans and lentils (e.g., green lentils, split peas, kidney beans, barley)
- 1/4 cup dry spice mix (e.g., chili powder, garlic powder, cumin, pepper flakes)
- 1 small packet dried herbs (bay leaf, oregano, thyme)
- Liquid: 8 cups vegetable or chicken broth (added later)
- Fresh vegetables (onion, carrots, celery, added later)
Equipment List
- Large zip top freezer bag (or specialized packaging)
- Measuring cups and spoons
- Large stockpot (for cooking)
DIY Instruction: Freezer Prep Method (Dry Kit)
- Measure and Mix Spices: In a small bowl, combine all the dry spices and herbs. Place this mixture into a very small, separate zip top bag or small container.
- Layer the Beans: Open the large zip top bag. Carefully pour the different dry beans and lentils into the bag, creating distinct layers for a visually appealing kit.
- Add Spice Packet: Tuck the small spice packet inside the larger bag, resting it visibly on top of the beans.
- Seal and Store: Press out the air and seal the bag securely. Label the bag with the recipe name, date, and note to add fresh vegetables and liquid when cooking. Store this dry prep kit in a cool, dark place or in the freezer for optimal freshness. It will last up to one year.
DIY Instruction: Cooking the Kit (Stovetop Method)
- Sauté Aromatics (Optional): In a large stockpot, sauté a diced onion, 2 diced carrots, and 2 diced celery stalks in a little olive oil until softened, about 5 minutes.
- Add Kit Contents: Dump the entire contents of the bean kit, including the spice packet, into the pot.
- Add Liquid and Cook: Pour in the 8 cups of broth or water. Bring the mixture to a boil over high heat.
- Simmer: Reduce the heat to low, cover the pot, and let the soup simmer for 1 to 2 hours, or until all the beans and lentils are tender. Cooking time depends on the types of beans used.
- Serve: Season with salt and pepper to taste. Ladle into bowls and enjoy this quick solution for a busy night.
28. Individual Chicken Pot Pie Rounds

This appealing photo showcases uncooked chicken pot pie filling placed onto rounds of pastry dough. The filling consists of generous cubes of cooked chicken, mixed with peas, carrots, and corn in a creamy sauce. This preparation is a clever way to portion a classic freezer meal into single servings.
These individual rounds are the perfect size for easy freezing and reheating. Laying them flat on a baking sheet ensures they hold their shape during the initial flash freeze. The separate round with a crimped edge and scored vents demonstrates the final assembly, emphasizing the thought put into this convenient prep work.
Freezing these pies uncooked means you get a fresh baked crust when you cook them, which is much better than reheating a previously baked pie. This method is incredibly convenient for customizing dinner on busy nights—you only bake the exact number of pies you need. This organized approach guarantees a quick, comforting dinner.
Required Ingredients
- 2 boxes (14.1 oz each) refrigerated pie crusts (yields about 12 rounds)
- 2 cups cooked, diced chicken breast
- 1 bag (10 oz) frozen mixed vegetables (peas, carrots, corn)
- 1 can (10.5 oz) cream of chicken soup or mushroom soup
- 1/4 cup milk or chicken broth
- 1 teaspoon dried thyme
- Salt and black pepper, to taste
- 1 egg, beaten (for egg wash)
Equipment List
- Large mixing bowl
- Round cookie cutter or small bowl (about 4 inches diameter)
- Fork (for crimping)
- Baking sheet lined with parchment paper
DIY Instruction: Freezer Prep Method (Unbaked)
- Make the Filling: In the large mixing bowl, combine the diced chicken, frozen mixed vegetables, cream of soup, milk/broth, dried thyme, salt, and pepper. Stir thoroughly until all components are coated in the creamy sauce.
- Cut the Dough: Roll out the refrigerated pie crusts. Use the cookie cutter or small bowl to cut out 12 to 14 uniform circles of dough. You will need one bottom and one top for each pie.
- Assemble the Pies: Place half of the dough circles on the parchment lined baking sheet—these are your bottom crusts. Spoon a generous amount of the chicken mixture onto the center of each bottom crust. Do not overfill.
- Seal and Crimp: For the remaining dough circles (the top crusts), cut a small ‘X’ or a few slits in the center for venting. Place a top crust over the filling. Use a fork to firmly crimp the edges of the top and bottom crusts together to seal the pie completely.
- Flash Freeze: Place the baking sheet with the assembled pies into the freezer for at least 2 hours, or until they are frozen solid.
- Package and Store: Once frozen, transfer the individual pies to a large zip top freezer bag or airtight container. Label the bag with the name, date, and baking instructions. Store this complete freezer meal for up to three months.
DIY Instruction: Cooking from Frozen (Oven Method)
- Preheat and Prepare: Preheat your oven to 400°F (200°C). Place the desired number of frozen pies on a clean, parchment lined baking sheet.
- Egg Wash (Optional): Brush the top of the frozen pies lightly with a beaten egg wash for a golden shine.
- Bake: Bake the frozen individual pies for approximately 30 to 40 minutes, or until the crust is golden brown and the filling is bubbling hot.
- Serve: Allow the pies to cool for a few minutes before serving. This easy prep is a comforting solution for any busy night.
29. Ready to Bake Pizza Pinwheels

This visually appealing image shows unbaked pizza pinwheels, sliced and arranged on a parchment lined baking sheet. The crescent roll dough is rolled with classic fillings—pepperoni, cheese, and sliced olives or peppers—creating perfect spirals of flavor. This is an extremely quick and fun freezer meal component.
These uniform spirals are fantastic for prep because they are small, easy to freeze, and cook incredibly fast, making them an appetizer or light meal for busy nights. The crescent roll dough makes assembly fast, allowing you to create a large batch of these snacks in minutes. Freezing them before baking ensures a fresh, soft roll when they come out of the oven.
Having a stash of these pinwheels in your freezer is a smart way to handle unexpected snack attacks or last minute meal needs. Simply pull out a few, bake, and serve with a side of dipping sauce. This organized approach to snacks ensures homemade food is always the fastest option.
Required Ingredients
- 2 packages (8 oz each) refrigerated crescent roll dough
- 1/2 cup pizza or marinara sauce
- 1 cup shredded mozzarella cheese
- 1/2 cup mini pepperoni slices
- 1/4 cup chopped green bell peppers or sliced black olives (optional)
Equipment List
- Rolling pin
- Pizza cutter or sharp knife
- Large baking sheet lined with parchment paper
- Small bowl
DIY Instruction: Freezer Prep Method (Unbaked)
- Prepare the Dough: Unroll both packages of crescent roll dough onto a piece of parchment paper. Pinch the seams together to form a large, single rectangle of dough. Use a rolling pin to gently flatten the seams and slightly thin the dough.
- Spread Filling: Spread the pizza sauce evenly over the entire dough surface, leaving about a 1/2 inch border on all edges. Sprinkle the mozzarella cheese, mini pepperoni, and any optional vegetables evenly over the sauce.
- Roll Tightly: Starting from one of the long edges, tightly roll the dough into a log shape.
- Slice and Freeze: Use a sharp knife or dental floss to slice the log into 12 to 16 equal pinwheels, approximately 1 inch thick. Place the pinwheels flat onto the parchment lined baking sheet.
- Flash Freeze: Place the baking sheet directly into the freezer for at least 2 hours until the pinwheels are solid.
- Package and Store: Transfer the frozen pinwheels to a large zip top freezer bag or airtight container, separating layers with parchment paper. Label the bag with the name, date, and baking instructions. Store this fun freezer meal component for up to two months.
DIY Instruction: Cooking from Frozen (Oven Method)
- Preheat and Prepare: Preheat your oven to 375°F (190°C). Place the desired number of frozen pinwheels on a clean, parchment lined baking sheet.
- Bake: Bake the frozen pinwheels for approximately 15 to 20 minutes, or until the dough is golden brown and cooked through and the cheese is melted and bubbly.
- Serve: Serve immediately with extra marinara sauce for dipping. This quick prep is a fun solution for a fast snack on a busy night.
30. Mini Breakfast Hand Pies (Empanadas)

This eye catching photo shows individual breakfast hand pies, assembled and ready for baking or freezing. They are small, circular, and beautifully crimped around the edges, creating a sealed pocket. The filling, shown bursting out of a stack, is a mix of scrambled egg, sausage or meatball pieces, and shredded cheese.
These hand pies are the ultimate grab and go freezer meal. The careful crimping ensures the savory filling stays sealed inside, making them easy to hold and eat. The simple process of prep work—cutting the dough, adding the filling, and sealing—is highly efficient for large batches.
Freezing these pies uncooked allows the crust to be light and flaky when baked, which is much best than reheating a baked pie. These compact, fully loaded pockets are a fast and satisfying breakfast or snack option. This organized approach makes feeding a family a wholesome, homemade meal simple, even on the most busy nights.
Required Ingredients
- 1 package (14.1 oz) refrigerated pie crusts (or prepared pastry dough)
- 1 cup cooked, scrambled eggs
- 1 cup cooked, crumbled sausage or diced ham
- 1/2 cup shredded cheddar cheese
- 1 tablespoon milk or water (for sealing)
- 1 egg, beaten (for egg wash, optional)
Equipment List
- Round cookie cutter (about 4 to 5 inches diameter)
- Small mixing bowl
- Fork (for crimping)
- Baking sheet lined with parchment paper
DIY Instruction: Freezer Prep Method (Unbaked)
- Prepare the Filling: In a small mixing bowl, combine the cooked scrambled eggs, cooked sausage/ham, and shredded cheese. Set aside.
- Cut the Dough: Unroll the refrigerated pie crusts. Use the cookie cutter to cut out as many uniform circles of dough as possible (you will likely get 8 to 10).
- Fill the Pies: Place the dough circles on the parchment lined baking sheet. Place a spoonful of the breakfast filling on one half of each circle.
- Seal and Crimp: Brush the edge of the dough circles lightly with milk or water. Fold the empty half of the dough over the filling to create a half moon shape. Use a fork to firmly crimp the edges together to seal the pie completely. Cut a small slit in the top of each pie for venting.
- Flash Freeze: Place the baking sheet with the assembled hand pies into the freezer for at least 2 hours, or until they are frozen solid.
- Package and Store: Transfer the frozen pies to a large zip top freezer bag or airtight container, separating layers with parchment paper. Label the bag with the name, date, and baking instructions. Store this complete freezer meal for up to two months.
DIY Instruction: Cooking from Frozen (Oven Method)
- Preheat and Prepare: Preheat your oven to 400°F (200°C). Place the desired number of frozen hand pies on a clean, parchment lined baking sheet.
- Egg Wash (Optional): Brush the top of the frozen pies lightly with a beaten egg wash for a golden shine.
- Bake: Bake the frozen pies for approximately 25 to 30 minutes, or until the crust is golden brown and the filling is piping hot throughout.
- Serve: Let them cool for a few minutes before serving. This easy prep is a warm, quick solution for a busy night or morning.
31. Samosa Filling Starter Packs

This inviting photograph displays small zip top bags filled with a cooked, spiced potato and pea mixture, the classic filling for samosas. The small, uniformly portioned bags represent excellent prep work for assembling a quick appetizer or snack freezer meal. A few finished, golden brown samosas sit nearby, tempting the viewer.
Freezing the filling separately is a great strategy for saving time later. It means all the cooking and seasoning is complete, and the cook only needs to focus on wrapping the pastry dough on a busy night. The filling, visible through the clear bags, appears rich with spices and soft vegetables.
This organized approach to meal components streamlines the process of making complex dishes accessible. You can easily pull out one bag of filling, thaw it quickly, and spend just a few minutes wrapping the dough. This simple prep transforms an otherwise time consuming recipe into a fast, savory snack option.
Required Ingredients
- 2 lbs Russet potatoes, peeled, boiled until tender, and diced small
- 1 cup frozen peas
- 1 tablespoon ginger, minced
- 1 teaspoon cumin seeds
- 1 teaspoon coriander powder
- 1 teaspoon turmeric powder
- 1/2 teaspoon cayenne pepper (optional)
- 1 tablespoon vegetable oil
- Salt to taste
- Samosa wrappers or pastry dough (added later)
Equipment List
- Large saucepan (for boiling potatoes)
- Large skillet (for cooking filling)
- Potato masher (optional)
- Four small zip top freezer bags (quart size)
- Measuring spoons
DIY Instruction: Freezer Prep Method
- Cook the Potatoes: Peel and dice the potatoes into small, uniform cubes (about 1/2 inch). Boil them until they are tender but still hold their shape. Drain them completely and set them aside.
- Sauté Spices: Heat the oil in a large skillet over medium heat. Add the cumin seeds and minced ginger. Cook for about 30 seconds until fragrant. Stir in the coriander powder, turmeric, cayenne (if using), and salt. Cook for 1 minute.
- Mix Filling: Add the diced, cooked potatoes to the skillet. Gently stir the potatoes until they are coated in the spices. Add the frozen peas and stir for 2 minutes until the peas are heated through. Mash the potatoes slightly, leaving some chunks for texture.
- Cool and Portion: Let the filling cool completely to room temperature. Divide the cooled filling evenly among the four small zip top freezer bags. This creates four separate portions for small batches of samosas.
- Seal and Freeze: Press out all the air and seal the bags securely. Lay the bags flat in the freezer. Label with the name and date. Freeze this prepared freezer meal component for up to two months.
DIY Instruction: Assembly and Cooking
- Thaw: Remove one bag of filling from the freezer and let it thaw in the refrigerator for a few hours or on the counter for 1 hour.
- Assemble: Prepare your samosa wrappers or pastry dough. Scoop a tablespoon or two of the thawed filling onto a wrapper. Fold and crimp the wrapper edges to seal the filling inside, forming a triangular pocket (or half moon).
- Cook: Bake the assembled samosas at 375°F (190°C) for 15 to 20 minutes or deep fry until golden brown.
- Serve: This easy prep ensures a fast, savory snack or side dish on a busy night.
32. Fudgy Chocolate Crinkle Cookies

This enticing photo features a batch of small, round chocolate cookies with characteristic crinkled tops, cooling on a baking sheet and arranged in a muffin tin. The rich, dark brown color promises a decadent chocolate flavor, making these an excellent freezer meal dessert option. Their small, uniform size ensures quick thawing and easy portion control.
Baking and freezing these cookies in large batches is a clever prep strategy for having fresh tasting dessert on demand. The muffin tin in the foreground is a great idea for ensuring even spacing and perfectly round, uniform shapes while baking. Freezing the baked cookies maintains their shape and prevents sticking.
These individual sweet treats are easy to pull out and serve when a craving hits or when unexpected guests arrive. This simple act of filling your freezer with baked goods eliminates the need for impulse buying desserts on busy nights. This approach keeps your sweet stash organized and readily available.
Required Ingredients
- 1 cup all purpose flour
- 1/2 cup cocoa powder
- 1 teaspoon baking powder
- 1/4 teaspoon salt
- 1/2 cup (1 stick) unsalted butter, softened
- 1 cup granulated sugar
- 2 large eggs
- 1 teaspoon vanilla extract
- 1/2 cup powdered sugar (for rolling)
Equipment List
- 2 large mixing bowls
- Electric mixer (handheld or stand)
- Small bowl (for powdered sugar)
- Cookie scoop (small or medium)
- Baking sheet lined with parchment paper
- Wire cooling rack
- Airtight freezer container
DIY Instruction: Freezer Prep Method (Baked)
- Mix Dry Ingredients: In the first large bowl, whisk together the flour, cocoa powder, baking powder, and salt.
- Mix Wet Ingredients: In the second large bowl, use the electric mixer to cream the butter and granulated sugar until light and fluffy. Beat in the eggs one at a time, then mix in the vanilla extract.
- Combine Dough: Gradually add the dry ingredients to the wet mixture, mixing just until a thick, dark dough forms. Cover the dough and chill in the refrigerator for at least 2 hours (or overnight). Chilling is crucial for crinkling.
- Roll and Coat: Scoop the chilled dough using a cookie scoop (or roll into 1 inch balls). Roll each ball first in granulated sugar, then generously coat it in powdered sugar.
- Bake and Cool: Place the balls on the parchment lined baking sheet, ensuring they are evenly spaced. Bake at 350°F (175°C) for 10 to 12 minutes. They will look slightly soft in the middle. Let them cool on the baking sheet for 5 minutes, then transfer them to the wire rack to cool completely.
- Package and Store: Once fully cooled, transfer the cookies to an airtight freezer container, separating layers with wax or parchment paper. Label and freeze for up to two months.
DIY Instruction: Enjoying from Frozen
- Thaw: Remove a few cookies from the freezer and place them on a plate. Allow them to sit at room temperature for about 15 to 20 minutes to thaw slightly.
- Serve: These rich, fudgy cookies are an effortless dessert ready for any occasion. They are a welcome sight on a busy night.
33. Quinoa Salad Power Packs

This image displays four clear, airtight containers filled with a colorful and nutritious freezer meal of quinoa salad. The main components—quinoa mixed with black beans, diced sweet potato, bright green broccoli florets, and edamame—are visible and perfectly portioned. This illustrates a highly organized meal prep system.
These containers are ideal for freezing because the mixture is mostly grains and hearty vegetables that hold up well to thawing. The variety of colors indicates a rich nutrient profile, making this a healthy and satisfying option for lunches or light dinners. This systematic organization simplifies eating well, even on busy nights.
Having these power packs ready in the freezer eliminates the decision making process of weekday meals. Simply thaw, possibly reheat slightly, and enjoy. This strategy ensures you always have access to a wholesome, pre portioned meal, maximizing efficiency and minimizing the temptation for unhealthy alternatives.
Required Ingredients (Per Container)
- 1 cup cooked quinoa (mixed with black beans)
- 1/2 cup roasted sweet potato, diced
- 1/2 cup broccoli florets, lightly steamed or roasted
- 1/4 cup edamame, shelled
- Dressing: A small container of citrus vinaigrette (added upon serving, not in the freezer)
Equipment List
- Large mixing bowl
- Baking sheet (for roasting)
- Four airtight, freezer safe glass or plastic containers
- Cutting board and knife
DIY Instruction: Freezer Prep Method
- Cook and Prep: Cook the quinoa, then stir in the black beans. Roast the diced sweet potato and lightly steam or roast the broccoli florets. Ensure all cooked components are completely cooled to room temperature before assembling.
- Mix Salad: In a large bowl, gently combine the quinoa/bean mixture, diced sweet potato, broccoli florets, and edamame. Mix everything until the components are evenly distributed.
- Portion the Meals: Divide the mixed salad evenly among the four airtight freezer safe containers. Press the contents down gently to ensure the container is full and little air remains.
- Seal and Freeze: Snap the lids tightly onto the containers. Label the containers with the name and date. Place the containers flat in the freezer. Do not add the dressing yet. Freeze this wholesome freezer meal for up to three months.
DIY Instruction: Enjoying from Frozen
- Thaw Overnight: Remove a container from the freezer and let it thaw overnight in the refrigerator.
- Reheat (Optional): If you prefer the meal warm, remove the lid and microwave for 1 to 2 minutes, until heated through.
- Serve: Add a portion of your favorite citrus vinaigrette dressing just before serving. This effortless prep provides a healthy meal for any busy night.
34. Unbaked Chocolate Chip Cookie Dough Portions

This classic image showcases individual portions of chocolate chip cookie dough, rounded and sitting on a baking sheet. The dough balls are plump and ready to be frozen or baked. You can clearly see the inclusion of chocolate chips and possibly nuts or toffee chunks, promising a classic, comforting flavor.
Pre scooping and freezing cookie dough is the ultimate strategy for fast baked goods. This clever prep eliminates the mess of scooping on a busy night and ensures every cookie is a uniform size. Freezing the dough balls solid before bagging prevents them from sticking together, allowing you to bake just one or two at a time.
Having a stockpile of these dough portions in your freezer is a wonderful solution for instant gratification. When the craving hits, you only need to pull out the desired number and put them straight into the oven. This simple organizational step keeps your freezer stocked with fast, comforting treats.
Required Ingredients
- 2 1/4 cups all purpose flour
- 1 teaspoon baking soda
- 1 teaspoon salt
- 1 cup (2 sticks) unsalted butter, softened
- 3/4 cup granulated sugar
- 3/4 cup packed brown sugar
- 1 tablespoon vanilla extract
- 2 large eggs
- 2 cups chocolate chips (and optional nuts or toffee)
Equipment List
- Large mixing bowl
- Electric mixer (handheld or stand)
- Medium cookie scoop (about 1.5 tablespoons size)
- Baking sheet lined with parchment paper
- Large zip top freezer bag or airtight container
DIY Instruction: Freezer Prep Method (Dough)
- Make the Dough: In a large bowl, cream the softened butter, granulated sugar, and brown sugar until light and fluffy. Beat in the vanilla extract and eggs one at a time.
- Add Dry Ingredients: In a separate bowl, whisk the flour, baking soda, and salt. Gradually add the dry ingredients to the wet mixture, mixing until just combined. Fold in the chocolate chips and any optional mix ins.
- Scoop and Freeze: Use a cookie scoop to portion the dough into even balls. Place the dough balls onto the parchment lined baking sheet, keeping them slightly separated.
- Flash Freeze: Place the baking sheet with the dough balls directly into the freezer for at least 2 hours, or until the dough balls are solid.
- Package and Store: Transfer the frozen dough balls to a large zip top freezer bag or airtight container. Press out the air and seal tightly. Label the bag with the oven temperature and baking time. Store the dough for up to three months.
DIY Instruction: Cooking from Frozen
- Preheat and Prepare: Preheat your oven to 350°F (175°C). Place the frozen dough balls about 2 inches apart on a parchment lined baking sheet. Do not thaw them first.
- Bake: Bake the cookies for approximately 12 to 15 minutes. Because the dough is frozen, you may need to add 2 to 3 minutes to the standard baking time. They are ready when the edges are set and golden.
- Serve: Let them cool briefly on the pan before eating. Enjoy this easy prep warm treat as a fast dessert on a busy night.
35. Spinach and Feta Swirls

This stunning image displays individual, unbaked pastry swirls filled with a savory mixture of spinach and crumbled white cheese, likely feta or ricotta. The rolls are arranged on a baking sheet, showing a generous amount of green filling and the distinct curl of the flaky pastry dough. A drizzle of olive oil enhances the look of this tempting freezer meal.
These savory scrolls are an excellent example of efficient prep for appetizers, snacks, or a light dinner. Their uniform shape ensures even cooking and easy portioning. Freezing them before baking ensures the pastry is light and crisp when finally cooked, providing a fresh taste.
Having a pan of these unbaked swirls ready in the freezer eliminates all the rolling and filling time required on a busy night. Simply pull out the pan and bake. This simple, organized method makes a homemade, savory pastry instantly accessible.
Required Ingredients
- 1 package (17.3 oz) frozen puff pastry, thawed (or crescent roll dough)
- 1 box (10 oz) frozen spinach, thawed and squeezed very dry
- 1 cup crumbled feta cheese (or ricotta)
- 1/4 cup grated Parmesan cheese
- 1 large egg
- 1 teaspoon dried dill or oregano
- Salt and black pepper, to taste
- 1 tablespoon olive oil (for drizzling)
Equipment List
- Large bowl
- Spatula
- Rolling pin
- Sharp knife or pizza cutter
- Baking sheet lined with parchment paper
DIY Instruction: Freezer Prep Method (Unbaked)
- Prepare the Filling: In the large bowl, combine the very dry spinach, feta cheese, Parmesan cheese, egg, dried dill/oregano, salt, and pepper. Stir thoroughly until the filling is uniform and well mixed.
- Roll and Fill: Roll the thawed puff pastry (or crescent roll dough, with seams pinched) into a large rectangle. Spread the entire spinach and cheese mixture evenly over the surface of the dough, leaving a small border around the edges.
- Roll and Slice: Tightly roll the dough into a log shape starting from the long edge. Use a sharp knife to slice the log into 8 to 10 equal spirals, about 1 inch thick.
- Flash Freeze: Place the spirals flat onto the parchment lined baking sheet. Drizzle lightly with olive oil. Flash freeze for at least 2 hours until the spirals are solid.
- Package and Store: Transfer the frozen spirals to a large zip top freezer bag or airtight container, separating layers with parchment paper. Label and freeze for up to three months.
DIY Instruction: Cooking from Frozen (Oven Method)
- Preheat and Prepare: Preheat your oven to 400°F (200°C). Place the desired number of frozen spirals on a clean, parchment lined baking sheet.
- Bake: Bake the frozen spirals for approximately 18 to 25 minutes, or until the pastry is puffed and golden brown and the filling is heated through.
- Serve: These easy prep savory scrolls are a warm, satisfying snack or side for a busy night.
36. Shredded Chicken and Wild Rice Mix

This close up photograph shows a stainless steel bowl filled with a mixture of cooked, shredded chicken and dark wild rice. Small, visible pieces of diced carrots, celery, and onion are scattered throughout the mixture. This combination is a fantastic, versatile freezer meal component.
Having this seasoned, cooked protein and grain mixture ready to go is a massive time saver. The simple act of prep—cooking the chicken, rice, and vegetables together—means this mixture is ready to become soup, a casserole filling, or a fast salad base on a busy night. The ingredients are evenly mixed, ensuring uniform flavor in every scoop.
Freezing this mixture flat in bags makes portioning and thawing incredibly efficient. This organized approach to protein and grain storage is central to successful freezer cooking. This simple step ensures you have a readily available, wholesome foundation for countless quick dinner ideas.
Required Ingredients
- 2 cups cooked wild rice blend
- 2 cups cooked, shredded chicken breast (seasoned with salt and pepper)
- 1 cup mixed cooked vegetables (diced carrots, celery, and onion)
- 1/2 cup chicken broth or stock (optional, for moisture)
Equipment List
- Large mixing bowl
- Pot or rice cooker (for rice)
- Slow cooker or Instant Pot (for chicken)
- Two large zip top freezer bags (quart size)
DIY Instruction: Freezer Prep Method
- Cook Components: Cook the wild rice blend according to package directions. Cook and shred the chicken breast (a slow cooker works well). Lightly sauté the diced carrots, celery, and onion until tender crisp. Ensure all components are completely cooled to room temperature.
- Mix the Meal: In the large mixing bowl, gently combine the cooked wild rice, shredded chicken, and cooked vegetables. If the mixture seems very dry, stir in up to 1/2 cup of chicken broth to add moisture. Season with any additional salt or pepper, if needed.
- Portion and Bag: Divide the entire mixture evenly between the two large zip top freezer bags. This creates two separate freezer meals.
- Seal and Freeze: Press out all the air from the bags, ensuring they are sealed securely. Lay the bags flat on a baking sheet and transfer them to the freezer so they freeze in a thin, even layer. Label with the name and date. Freeze for up to three months.
DIY Instruction: Cooking from Frozen (Stovetop or Microwave)
- Thaw (Recommended): For best results, thaw one bag overnight in the refrigerator.
- Reheat (Stovetop): Empty the contents of the thawed bag into a saucepan. Add a splash of broth or water. Heat gently over medium low heat, covered, for about 8 to 10 minutes, stirring occasionally, until heated through.
- Reheat (Microwave): Place the contents of the thawed bag in a microwave safe bowl. Cover and heat on high for 2 to 3 minutes, stirring halfway through.
- Serve: Use this versatile prep mix as a soup base, a fast side dish, or a filling for wraps on a busy night.
37. Raw Meatball and Sauce Kit

This close up image features a vacuum sealed bag containing raw, pre formed meatballs submerged in a thick, red marinara sauce. The clear packaging and professional label clearly identify this as a freezer meal kit, ready for cooking. Fresh basil leaves and tomatoes sit nearby, suggesting the fresh flavors within.
This is an incredibly efficient prep method for an Italian classic. The act of forming the meatballs is messy and time consuming, but freezing them already formed and immersed in sauce eliminates that step completely. This guarantees a fast, high quality dinner on any busy night.
Freezing the raw meatballs in the sauce ensures they stay moist and flavorful during storage, and they cook perfectly from frozen or thawed. This organized approach to meal kits simplifies dinner to the single step of opening the bag and putting the contents into a pot or slow cooker. This level of prep ensures a fantastic meal is always ready.
Required Ingredients
- 1 lb ground beef/pork mixture, seasoned and formed into 8 to 10 large meatballs
- 2 cups high quality marinara sauce
- 1 teaspoon dried oregano
- 1/2 teaspoon salt and black pepper
Equipment List
- Small bowl (for seasoning)
- Large mixing bowl (for forming meatballs)
- Measuring cups and spoons
- Vacuum sealer and bag (or high quality gallon zip top bag)
- Slow cooker or large pot (for cooking)
DIY Instruction: Freezer Prep Method (Raw)
- Form the Meatballs: Prepare your favorite meatball recipe (mixing in breadcrumbs, egg, etc.). Form the seasoned meat mixture into 8 to 10 uniform balls.
- Mix Sauce and Seasoning: In a small bowl, stir the dried oregano, salt, and pepper into the marinara sauce.
- Assemble the Kit: Pour about half of the seasoned marinara sauce into the bottom of the vacuum seal bag or zip top bag. Carefully arrange the raw meatballs in a single layer on top of the sauce. Pour the remaining sauce over the meatballs, ensuring they are mostly covered.
- Seal and Freeze: If using a vacuum sealer, seal the bag carefully to avoid sucking up the liquid. If using a zip top bag, press out as much air as possible before sealing. Lay the bag flat in the freezer. Label with the name, date, and cooking instructions. This freezer meal kit will last for up to three months.
DIY Instruction: Cooking from Frozen (Slow Cooker Method)
- Add to Cooker: Dump the entire frozen contents of the kit (meatballs and sauce) into the slow cooker basin.
- Cook: Cook the meatballs on LOW for 4 to 6 hours or on HIGH for 2 to 3 hours. They are ready when the meatballs are cooked through and the sauce is hot and bubbling.
- Serve: Serve the hot meatballs and sauce over spaghetti or in a submarine sandwich roll. This easy prep provides a classic dinner for a busy night.
38. Lemon Garlic Shrimp and Zucchini Noodles

This visually appealing flat lay shows all the components needed for a fast, fresh seafood dinner. On the left, spiralized zucchini noodles (zoodles) are visible, some raw and some pre portioned into a zip top bag. On the right, pre cooked shrimp is ready, and a small six section tray holds portions of lemon zest, butter, and minced garlic.
This photograph brilliantly illustrates how to prep a meal with complex flavors using simple components. The individual portions of butter, zest, and garlic in the tray show that even the flavor enhancers can be frozen, eliminating all measuring on a busy night. Freezing the zoodles flat prevents them from clumping.
Having these components ready to go ensures a quick, healthy seafood meal is easily assembled. Simply combine the shrimp, zoodles, and the frozen flavor cubes in a hot pan. This organized, measured approach to stocking your freezer meal components is a time saving trick for creating fast, flavorful dinners.
Required Ingredients
- 2 cups fresh zucchini, spiralized (zoodles)
- 1 lb large shrimp, peeled, deveined, and cooked
- 2 tablespoons minced garlic (divided into cubes)
- 4 tablespoons butter (divided into cubes)
- 2 tablespoons fresh lemon zest (divided into portions)
- 1 teaspoon dried parsley or dill (for topping)
- Salt and black pepper, to taste
Equipment List
- Spiralizer (for zoodles)
- Small zip top freezer bag (quart size)
- Ice cube tray or specialized small portion tray (as pictured)
- Small bowls
DIY Instruction: Freezer Prep Method
- Prepare the Zoodles: Spiralize the zucchini. Lay the zoodles on a towel for 15 minutes to wick away excess moisture. Transfer 2 cups of zoodles into the zip top freezer bag and sprinkle with dried parsley/dill. Press out the air and freeze flat.
- Prepare Flavor Cubes: Use the small portion tray or ice cube tray. In separate compartments, place 2 tablespoons of minced garlic, 4 tablespoons of butter, and 2 tablespoons of fresh lemon zest. (Some trays may have compartments for all three ingredients).
- Flash Freeze Cubes: Place the tray in the freezer for at least 2 hours until the cubes of garlic, butter, and zest are solid.
- Package Cubes: Once frozen, pop the cubes out of the tray and transfer them to a small, labeled zip top freezer bag or airtight container. Place the pre cooked shrimp in a separate container. Label all components. Store this freezer meal kit for up to three months.
DIY Instruction: Cooking from Frozen (Stovetop Method)
- Thaw Cubes: Remove one cube of frozen butter and one cube of frozen garlic/zest mixture (if combined) from the freezer.
- Melt Butter and Sauté: Heat a large skillet over medium high heat. Add the frozen butter cube and the frozen garlic/zest cube. Sauté for about 1 minute until fragrant.
- Add Zoodles and Shrimp: Add the frozen zoodles (no need to thaw) and the pre cooked shrimp (thawed or frozen) to the skillet.
- Cook: Sauté the mixture for approximately 5 to 7 minutes, stirring constantly, until the zoodles are tender crisp and the shrimp is hot. Season with salt and pepper.
- Serve: Serve immediately. This simple prep provides a fast, healthy dinner for a busy night.
Key Takeaways
- Prep is Power: Dedicating a few hours to batch cooking drastically reduces stress and saves time on frantic weeknights.
- Organization is Key: Properly labeling, dating, and freezing meals flat ensures your freezer stays organized and efficient.
- Variety Prevents Burnout: Freezing different components—from pre portioned smoothie kits to full casseroles—offers flexibility in your dinner choices.
- Thaw Smart: The best practice is to thaw protein based meals overnight in the refrigerator for safe and even cooking.
Congratulations—you have officially revolutionized your kitchen! By mastering these 38 simple prep techniques, you have transformed your freezer from a disorganized void into a powerful, automated dinner machine. You now have an impressive supply of wholesome, delicious freezer meals ready to deploy whenever time is short.
The true value of this effort is not just the meals themselves, but the peace of mind they provide. Knowing that a hearty dinner is ready and waiting is the single best way to manage those inevitable busy nights. This shift in strategy allows you to reclaim your evenings, enjoy better food, and save money in the process.
Now it is time to grab your bags and containers, dive into your favorite recipes from this list, and start building your own stash of weeknight wonders. Keep your freezer stocked, your evenings calm, and your family well fed!