Is your holiday baking done? Sharing homemade food is a beautiful way to show you care during the busy winter season. These 40 simple recipes help you create thoughtful gifts without spending days in the kitchen.
Homemade Food Gifts
Each recipe uses common ingredients you likely already have in your pantry. We focused on simple steps that anyone can follow. You can choose from sweet treats, savory snacks, or even practical soup mixes.
Handcrafted gifts feel more personal than store-bought items. They allow you to share a taste of your home with neighbors and friends. These ideas will keep your holiday stress low while making your loved ones feel special.
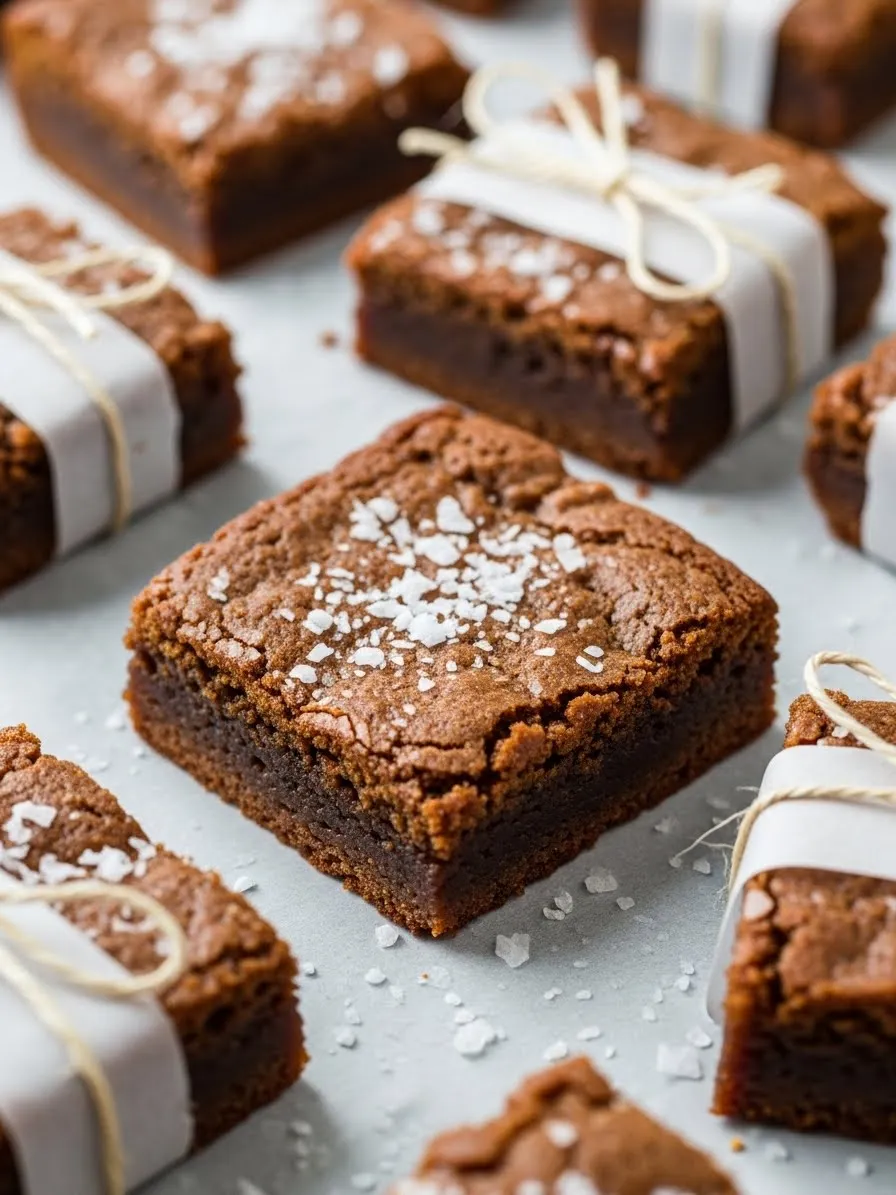
Rich squares of deep chocolate sit on a clean white surface. Each brownie shows a fudgy center and a slightly crisp top. Large flakes of sea salt catch the light as they rest on the dark surface. These treats look ready for a holiday exchange.
White paper bands wrap neatly around several pieces. A thin twine tie completes the look with a simple bow. The packaging makes each individual square feel like a meaningful gift. It is an elegant way to share a homemade snack.
Crisp edges contrast with the soft middle section of the bake. The dark brown color hints at a strong cocoa flavor. You can see the texture of the sea salt crystals clearly against the smooth chocolate.
Ingredients
1 cup unsalted butter melted
2 cups granulated sugar
4 large eggs
1 tablespoon vanilla extract
1 cup unsweetened cocoa powder
1 cup all purpose flour
1/2 teaspoon salt
1 tablespoon coarse sea salt for topping
Equipment
9 by 9 inch baking pan
Parchment paper
Large mixing bowl
Whisk or spatula
Measuring cups and spoons
Scissors and twine for gifting
DIY Instructions
Heat your oven to 350 degrees Fahrenheit before you start mixing.
Line the square baking pan with parchment paper so the edges hang over the sides.
Combine the melted butter and sugar in your large bowl and whisk them until smooth.
Add the eggs one at a time and stir well after each addition.
Mix in the vanilla extract to add a rich aroma to the batter.
Sift the cocoa powder and flour into the wet mixture to avoid lumps.
Fold the dry ingredients in gently using a spatula until you no longer see white streaks.
Pour the thick batter into your prepared pan and spread it out evenly.
Bake for 25 to 30 minutes or until a toothpick comes out with just a few moist crumbs.
Sprinkle the coarse sea salt over the top while the brownies are still warm.
Let the pan cool completely on a counter before you try to cut them.
Slice into neat squares using a sharp knife for the best presentation.
Wrap each square in a strip of parchment paper and tie it with a piece of twine.
2. Cranberry Orange Shortbread Cookies
Homemade Food Gifts
A tall stack of round, golden cookies stands inside a clear gift bag. Each biscuit is studded with deep red dried cranberries and bright flecks of citrus zest. The edges look crisp while the centers appear buttery and soft.
A vibrant red satin ribbon ties the top of the bag into a large bow. This simple packaging makes the vibrant colors of the fruit pop against the pale dough. It is a festive way to showcase a classic holiday flavor profile.
The stack shows a consistent bake across every layer. You can see the light texture of the shortbread through the transparent plastic. This treat offers a bright and tangy alternative to heavier chocolate desserts.
Ingredients
1 cup unsalted butter softened
1/2 cup granulated sugar
2 cups all purpose flour
1/2 cup dried cranberries chopped
1 tablespoon fresh orange zest
1/2 teaspoon salt
1 teaspoon vanilla extract
Equipment
Large mixing bowl
Electric hand mixer
Plastic wrap
Baking sheet
Parchment paper
Clear gift bags and red ribbon
DIY Instructions
Cream the softened butter and sugar together in a large bowl using your mixer.
Beat the mixture until it looks pale and fluffy.
Stir in the vanilla extract and the fresh orange zest.
Add the flour and salt gradually while mixing on a low speed.
Fold in the chopped dried cranberries by hand until they are spread evenly through the dough.
Roll the dough into a long log shape on a piece of plastic wrap.
Wrap the log tightly and chill it in the refrigerator for at least one hour.
Heat your oven to 325 degrees Fahrenheit.
Slice the cold dough log into rounds about half an inch thick.
Place the rounds on a baking sheet lined with parchment paper.
Bake for 12 to 15 minutes until the edges just start to turn a light golden color.
Cool the cookies on the pan for five minutes before moving them to a wire rack.
Once completely cold, stack them in a clear bag and tie with a red ribbon.
3. Spiced Cardamom and Clove Ginger Snaps
Homemade Food Gifts
Golden brown cookies fill a round metal tin lined with festive holiday paper. These treats feature a crackled surface that indicates a satisfying crunch. Whole green cardamom pods and cloves are scattered on top to highlight the aromatic spices used inside.
The tin has a brushed silver finish that looks clean and modern. Using a tin like this protects the delicate bakes from breaking during travel. It serves as a durable and reusable gift container for friends or family.
Warm tones in the cookies suggest a deep molasses and ginger base. Each piece has a unique pattern of cracks on the surface. The scent from these spices likely fills the room as soon as you open the lid.
Ingredients
3/4 cup unsalted butter softened
1 cup granulated sugar
1 large egg
1/4 cup molasses
2 cups all purpose flour
1 teaspoon baking soda
2 teaspoons ground ginger
1 teaspoon ground cardamom
1/2 teaspoon ground cloves
1/4 teaspoon salt
Equipment
Large mixing bowl
Medium mixing bowl
Whisk
Baking sheet
Parchment paper
Round metal gift tin
DIY Instructions
Set your oven to 350 degrees Fahrenheit.
Whisk the flour, baking soda, ginger, cardamom, cloves, and salt in a medium bowl.
Beat the butter and sugar in a large bowl until the mixture is light.
Add the egg and molasses to the butter mixture and stir until combined.
Pour the dry ingredients into the wet ingredients slowly.
Stir the dough until the flour is fully incorporated and the batter is dark.
Scoop small portions of dough and roll them into balls about one inch wide.
Place the balls on a baking sheet lined with parchment paper with space between them.
Bake for 10 to 12 minutes until the tops have crackled and the edges are firm.
Let the cookies rest on the hot pan for a few minutes to set their shape.
Move them to a cooling rack to become crisp.
Line a metal tin with holiday parchment or tissue paper.
Arrange the cookies inside and place the lid on tightly to keep them fresh.
4. Mini Rosemary and Sea Salt Focaccia Rounds
Homemade Food Gifts
Small circular breads rest on a sheet of white parchment paper. Each bun features deep dimples filled with fresh green rosemary needles and sparkling salt crystals. The crust has a light golden hue that looks soft and airy.
A striped kitchen towel sits off to the side, adding a cozy home feel to the scene. These savory bites offer a break from the usual sugary holiday gifts. They are the size of a palm, making them a great addition to a dinner basket.
Visible herbs on top give the bread an earthy and rustic appearance. You can see how the salt has baked into the surface of the dough. These mini loaves are a thoughtful choice for anyone who prefers savory snacks.
Ingredients
2 cups all purpose flour
1 teaspoon instant yeast
3/4 cup warm water
2 tablespoons olive oil
1 teaspoon honey
1 teaspoon salt
2 tablespoons fresh rosemary leaves
1 tablespoon flaky sea salt
Equipment
Large mixing bowl
Wooden spoon
Baking sheet
Parchment paper
Clean kitchen towel
DIY Instructions
Mix the warm water, yeast, and honey in a large bowl and let it sit for five minutes.
Add the flour, salt, and one tablespoon of olive oil to the water.
Stir the mixture with a wooden spoon until a shaggy dough forms.
Knead the dough on a floured surface for five minutes until it is smooth and stretchy.
Place the dough in a greased bowl, cover it, and let it rise for one hour.
Punch the dough down and divide it into eight equal small balls.
Flatten each ball into a thick disc on a parchment lined baking sheet.
Cover the discs with a towel and let them rise again for thirty minutes.
Heat your oven to 400 degrees Fahrenheit.
Use your fingertips to press deep dimples into the top of each dough round.
Drizzle the remaining olive oil over the top and sprinkle with rosemary and sea salt.
Bake for 15 to 18 minutes until the bread is golden and sounds hollow when tapped.
Allow them to cool slightly before wrapping them for a gift.
5. Double Chocolate Chip Gift Muffins
Homemade Food Gifts
A sturdy brown cardboard box holds several large muffins topped with dark chocolate chips. A light dusting of powdered sugar covers the tops like a thin layer of snow. One muffin is cut open to reveal a moist interior packed with more chocolate.
Small wisps of steam rise from the freshly baked muffins, suggesting they were just removed from the oven. The box features a clear window so the recipient can see the treats inside. This presentation is simple yet professional for a holiday delivery.
The dark chips stand out against the golden brown muffin tops. Each piece sits in a clean paper liner to keep hands tidy while eating. It is a hearty and comforting gift for a cold winter morning.
Ingredients
2 cups all purpose flour
1/2 cup cocoa powder
1 cup granulated sugar
1 tablespoon baking powder
1/2 teaspoon salt
1 cup whole milk
1/2 cup vegetable oil
2 large eggs
1 1/2 cups semi sweet chocolate chips
1 tablespoon powdered sugar for dusting
Equipment
Muffin tin
Paper muffin liners
Two mixing bowls
Spatula
Cardboard bakery box with window
DIY Instructions
Heat the oven to 375 degrees Fahrenheit.
Place paper liners into each hole of your muffin tin.
Whisk the flour, cocoa powder, sugar, baking powder, and salt in a large bowl.
Mix the milk, oil, and eggs in a separate medium bowl until the eggs are broken.
Pour the wet ingredients into the dry ingredients.
Stir gently with a spatula just until the flour disappears to keep the muffins soft.
Fold in one cup of the chocolate chips.
Spoon the batter into the muffin liners until they are nearly full.
Sprinkle the remaining chocolate chips over the top of each muffin.
Bake for 18 to 22 minutes until a toothpick comes out clean.
Let the muffins cool in the tin for five minutes before moving them to a rack.
Dust the tops with powdered sugar once they are no longer hot.
Arrange the muffins neatly inside the bakery box for a clean look.
6. Glazed Lemon Shortbread Rounds
Homemade Food Gifts
Bright yellow glaze drips down the sides of a tall stack of round cookies. The glaze is smooth and opaque, covering the textured shortbread underneath. A few slices of fresh lemon sit nearby on a wooden tray to hint at the flavor.
The cookies feature a fine, sandy texture on the edges that suggests a melt in your mouth experience. This stack is presented on a piece of white parchment paper within a light wood container. The contrast of the sunny yellow against the neutral wood is very cheerful.
The thickness of the glaze looks substantial and sweet. Each drop is frozen in time as it runs toward the bottom of the stack. These cookies would be a refreshing addition to a box of holiday treats.
Ingredients
1 cup unsalted butter softened
1/2 cup powdered sugar
2 cups all purpose flour
1/4 teaspoon salt
2 tablespoons fresh lemon juice
1 tablespoon lemon zest
1 cup extra powdered sugar for the glaze
2 tablespoons milk for the glaze
Equipment
Large mixing bowl
Electric mixer
Baking sheet
Parchment paper
Small bowl for glazing
Wire cooling rack
DIY Instructions
Heat your oven to 325 degrees Fahrenheit.
Beat the butter and half cup of powdered sugar until the mixture is very smooth.
Stir in the lemon zest and one tablespoon of the lemon juice.
Add the flour and salt, then mix on low until a soft dough forms.
Roll the dough out on a floured surface to about a quarter inch thickness.
Use a round cutter to create even circles and place them on a parchment lined sheet.
Bake for 12 to 15 minutes until the bottoms are barely tan.
Cool the cookies completely on a wire rack.
Mix the extra powdered sugar, remaining lemon juice, and milk in a small bowl.
Stir the glaze until it is thick but can still run off a spoon.
Dip the top of each cooled cookie into the lemon glaze.
Place them back on the rack and let the glaze drip and set for one hour.
Stack the dry cookies once the glaze is firm to the touch.
7. Zesty Lemon Glazed Holiday Loaf
Homemade Food Gifts
A dark golden loaf cake sits snugly inside a decorative paper baking mold. Thick ribbons of pale yellow glaze are drizzled back and forth across the entire top. Long curls of fresh lemon peel rest on the center as a bright garnish.
The paper mold features a festive red and white snowflake pattern on the sides. This type of packaging allows you to bake and gift the item in the same container. It is a convenient way to share a large homemade cake with neighbors.
Deep brown sides of the cake contrast with the creamy glaze. The texture of the loaf appears dense and moist, which is common for citrus breads. It looks like a classic centerpiece for a holiday brunch table.
Ingredients
1/2 cup unsalted butter softened
1 cup granulated sugar
2 large eggs
1 1/2 cups all purpose flour
1 teaspoon baking powder
1/2 teaspoon salt
1/2 cup sour cream
2 tablespoons lemon juice
1 tablespoon lemon zest
1 cup powdered sugar for glaze
1 tablespoon milk
Equipment
Decorative paper loaf pan
Large mixing bowl
Whisk
Small bowl for glaze
Vegetable peeler for lemon curls
DIY Instructions
Heat your oven to 350 degrees Fahrenheit.
Cream the butter and granulated sugar together in a large bowl.
Whisk in the eggs one at a time until the batter is smooth.
Stir in the lemon juice, zest, and sour cream.
Add the flour, baking powder, and salt to the bowl.
Mix gently until the dry ingredients are just combined.
Pour the batter into the decorative paper loaf pan and smooth the top.
Bake for 45 to 50 minutes or until a skewer comes out clean from the center.
Let the cake cool completely inside the paper mold.
Mix the powdered sugar and milk in a small bowl to make a thick glaze.
Drizzle the glaze over the top of the cooled cake in a zig zag motion.
Use a vegetable peeler to cut thin curls of lemon skin for the top.
Place the lemon curls over the wet glaze so they stick in place.
8. Maple Pecan Homemade Granola
Homemade Food Gifts
A large glass mason jar is filled to the brim with crunchy clusters of granola. Large halves of toasted pecans are visible among the golden oats and seeds. The mixture looks deeply caramelized and brittle.
A wooden spoon is tied to the side of the jar with a simple piece of brown twine. A kraft paper tag hangs from the string with the words “Maple Pecan Granola” written in cursive. This makes for a complete and thoughtful breakfast gift set.
Loose granola clusters are scattered around the base of the jar on a wooden table. The warm sunlight hitting the glass highlights the various textures of the grains. It is a healthy and rustic option for the holiday season.
Ingredients
4 cups old fashioned rolled oats
1 1/2 cups pecan halves
1/2 cup maple syrup
1/2 cup melted coconut oil
1 teaspoon vanilla extract
1/2 teaspoon ground cinnamon
1/2 teaspoon sea salt
Equipment
Large mixing bowl
Large rimmed baking sheet
Parchment paper
Spatula
Mason jar with lid
Twine and wooden spoon
DIY Instructions
Heat the oven to 300 degrees Fahrenheit to ensure the granola toasts slowly.
Combine the oats and pecan halves in a large mixing bowl.
Whisk the maple syrup, melted oil, vanilla, cinnamon, and salt in a small bowl.
Pour the liquid mixture over the oats and pecans.
Stir everything together until every oat is coated and looks shiny.
Spread the mixture onto a baking sheet lined with parchment paper in a thin layer.
Press the oats down firmly with a spatula to help form clusters.
Bake for 30 to 40 minutes, stirring halfway through the time.
Remove the pan when the granola is golden brown and smells like toasted nuts.
Let the pan cool completely without touching it so big chunks can form.
Break the cooled granola into clusters using your hands.
Fill a clean mason jar with the granola and seal it with the lid.
Tie a wooden spoon and a handwritten tag to the jar using the twine.
9. White Chocolate Peppermint Cake Truffles
Homemade Food Gifts
Small round truffles sit neatly inside white paper liners within a gold trimmed gift box. Each dark chocolate center is dipped in smooth white chocolate. Crushed red and white peppermint candies are sprinkled generously over the tops.
The lid of the box is partially open, revealing a row of festive treats. A gold glittery ribbon is tied around the white box lid in a neat bow. This presentation looks very high end and suitable for a special holiday party.
Some truffles show the dark cake filling where the white coating has cracked slightly. The contrast between the dark interior and the bright white exterior is striking. These bite sized gifts are easy to share and enjoy.
Ingredients
1 box chocolate cake mix baked and cooled
1/2 cup chocolate frosting
2 cups white chocolate melting wafers
1/2 cup crushed peppermint candies or candy canes
1/2 teaspoon peppermint extract
Equipment
Large mixing bowl
Baking sheet
Parchment paper
Fork for dipping
Small liners
Gift box with ribbon
DIY Instructions
Crumble the cooled chocolate cake into fine crumbs in a large bowl using your hands.
Add the chocolate frosting and peppermint extract to the cake crumbs.
Mix the frosting and crumbs together until the mixture feels like damp sand.
Roll the mixture into small balls about one inch in diameter.
Place the balls on a parchment lined baking sheet and freeze them for 20 minutes.
Melt the white chocolate wafers in a microwave safe bowl in 30 second bursts.
Stir the chocolate until it is completely smooth and liquid.
Use a fork to dip each cold cake ball into the melted white chocolate.
Tap the fork on the side of the bowl to let the extra chocolate drip off.
Place the truffle back on the parchment paper.
Sprinkle the crushed peppermint over the top immediately before the chocolate sets.
Allow the truffles to sit at room temperature until the coating is hard.
Place each truffle in a paper liner and arrange them inside the gift box.
10. Creamy Dark Chocolate Sea Salt Fudge
Homemade Food Gifts
A large block of dense dark chocolate fudge rests in a wooden box lined with parchment paper. A single square has been cut and placed on top to show the smooth texture of the center. Large grains of sea salt are scattered across the entire surface.
The parchment paper is crinkled at the edges, giving the gift a rustic and handmade feel. This deep brown treat looks rich and decadent against the light wood of the box. It is a classic holiday staple that travels well.
The salt crystals provide a sharp white contrast to the dark chocolate. You can see the clean edges of the cut square, which indicates a firm set. This fudge is an excellent choice for a rich and satisfying food gift.
Ingredients
3 cups semi sweet chocolate chips
1 can sweetened condensed milk (14 ounces)
1/4 cup unsalted butter
1 teaspoon vanilla extract
1 tablespoon flaky sea salt
Equipment
8 by 8 inch baking pan
Parchment paper
Medium saucepan
Rubber spatula
Sharp knife
Wooden gift box
DIY Instructions
Line your square baking pan with parchment paper so it covers the bottom and sides.
Combine the chocolate chips, condensed milk, and butter in a medium saucepan.
Turn the heat to low and stir constantly with a rubber spatula.
Continue stirring until all the chips have melted and the mixture is glossy.
Remove the pan from the heat and stir in the vanilla extract.
Pour the warm fudge into the prepared baking pan.
Spread the top with your spatula until it is level and smooth.
Sprinkle the flaky sea salt evenly over the surface while the fudge is still tacky.
Place the pan in the refrigerator for at least three hours to let it become firm.
Lift the fudge out of the pan using the edges of the parchment paper.
Use a sharp knife to cut the block into small, even squares.
Place the parchment and the fudge into a wooden gift box for a beautiful finish.
Keep the fudge in a cool place until you are ready to give it away.
11. White Chocolate Lemon and Pistachio Bark
Homemade Food Gifts
Bright yellow lemon swirls dance across a creamy white chocolate base. Each shard of bark is studded with vibrant green pistachios and thin, translucent lemon slices. The colors feel fresh and sunny against the winter backdrop.
This treat is displayed in a clear glass jar tied with a matching yellow ribbon. The large, irregular pieces show off the beautiful internal patterns of the citrus and nuts. It serves as a light and zesty alternative to traditional heavy holiday sweets.
Crisp pistachios provide a salty crunch that balances the sweet white chocolate. You can see the glossy finish on the chocolate surface. This bark is a stunning visual addition to any food gift basket.
Ingredients
20 ounces white chocolate melting wafers
1/2 cup shelled pistachios, lightly chopped
1 large lemon, sliced into very thin rounds
1/2 teaspoon lemon extract
1/2 cup granulated sugar (for candied lemons)
1/2 cup water
Equipment
Large baking sheet
Parchment paper
Small saucepan
Heat-safe glass bowl
Glass gift jar and yellow ribbon
DIY Instructions
Simmer the sugar and water in a small saucepan until the sugar dissolves completely.
Place the thin lemon slices in the syrup and cook on low for 15 minutes until translucent.
Lay the lemon slices on parchment paper to dry for at least two hours.
Line a large baking sheet with a fresh piece of parchment paper.
Melt the white chocolate wafers in a glass bowl over a pot of simmering water.
Stir the chocolate until it is completely smooth and remove it from the heat.
Stir the lemon extract into the melted chocolate for a bright aroma.
Pour the chocolate onto the prepared baking sheet and spread it to a quarter-inch thickness.
Press the dried lemon slices and chopped pistachios into the wet chocolate.
Place the tray in the refrigerator for 45 minutes until the bark is solid.
Break the chocolate into large, jagged pieces using your hands.
Stack the pieces carefully into a clean glass jar.
Tie a bright yellow bow around the neck of the jar for a finished look.
12. Dark Chocolate Peanut Butter Pretzel Bites
Homemade Food Gifts
Small round treats fill a festive tin decorated with colorful holiday illustrations. Each bite features a creamy peanut butter center sandwiched between two crisp pretzels. A thick coating of dark chocolate covers most of the snack.
A delicate drizzle of extra chocolate zig-zags across the tops for a professional finish. These snacks offer a satisfying mix of salty, sweet, and crunchy textures. The tin is packed to the brim, making it a generous gift for a neighbor.
Some pretzels remain partially visible, showing the golden baked dough beneath the dark coating. The uniform size of the bites makes them look like they came from a high-end candy shop. This is a crowd-pleasing snack that disappears quickly.
Ingredients
1 bag small waffle or twist pretzels
1 cup creamy peanut butter
1/2 cup powdered sugar
2 cups dark chocolate melting wafers
2 tablespoons unsalted butter, softened
Equipment
Large baking sheet
Parchment paper
Medium mixing bowl
Microwave-safe bowl
Fork for dipping
Holiday-themed gift tin
DIY Instructions
Mix the peanut butter, softened butter, and powdered sugar in a medium bowl.
Stir the mixture until it forms a smooth, thick paste.
Place a small spoonful of the peanut butter mixture onto the center of a pretzel.
Press a second pretzel on top to create a small sandwich.
Repeat this process until you have used all your filling.
Put the pretzel sandwiches in the freezer for 20 minutes to set the centers.
Melt the dark chocolate wafers in the microwave using 30-second intervals.
Stir the chocolate until it is silky and free of lumps.
Dip half of each cold pretzel sandwich into the melted chocolate using a fork.
Let the excess chocolate drip back into the bowl before placing the bite on parchment paper.
Drizzle any remaining chocolate over the tops in a decorative pattern.
Allow the chocolate to harden completely at room temperature.
Gently place the bites into a decorative holiday tin.
13. Chocolate Drizzled Almond Coconut Balls
Homemade Food Gifts
Two rows of round, tan-colored treats sit inside a sturdy cardboard gift box. Each ball is rolled in finely shredded coconut that looks like toasted sand. A whole toasted almond is pressed firmly into the center of every piece.
Thin lines of dark chocolate are drizzled over the top of each ball in a neat pattern. The box is lined with shredded kraft paper to keep the treats secure and cushioned. This presentation feels organic and elegant for a homemade gift.
The texture of the coconut coating appears crisp and slightly chewy. These bites are a great option for those who enjoy tropical flavors during the winter months. They are small enough to be a light snack with coffee.
Ingredients
2 cups sweetened shredded coconut
1/2 cup sweetened condensed milk
1/2 teaspoon almond extract
24 whole roasted almonds
1/2 cup semi-sweet chocolate chips
Equipment
Medium mixing bowl
Baking sheet
Parchment paper
Small microwave-safe bowl
Cardboard gift box and shredded paper
DIY Instructions
Combine the shredded coconut, condensed milk, and almond extract in a mixing bowl.
Stir the mixture until the coconut is fully moistened and holds together when pressed.
Scoop a tablespoon of the mixture and roll it into a tight ball using your palms.
Place the balls on a parchment-lined baking sheet.
Press one whole almond deep into the center of each ball.
Let the balls rest in the refrigerator for 30 minutes to firm up.
Melt the chocolate chips in a small bowl in the microwave for 45 seconds.
Stir the chocolate until it is smooth and can be drizzled from a spoon.
Use a small spoon to wave thin lines of chocolate over the tops of the balls.
Return the treats to the refrigerator for another 15 minutes to set the chocolate.
Prepare your gift box by filling the bottom with shredded kraft paper.
Arrange the coconut balls in neat rows inside the box.
Close the lid and add a label with the name of the treat.
14. Powdered Sugar Cocoa Rum Balls
Homemade Food Gifts
A glass jar with a wire bale lid is filled with dark, rich chocolate spheres. Most of the balls are heavily coated in white powdered sugar that looks like fresh snow. A few uncoated pieces at the bottom show a pebbled texture of crushed nuts and cocoa.
A small white tag is tied to the jar with a simple brown string. It features the handwritten warning “Adult-only parties” in elegant script. This indicates the treats contain a splash of festive spirit for holiday celebrations.
The contrast of the white sugar against the dark wood tabletop is very inviting. Some of the sugar has rubbed off, revealing the dense chocolate interior. These are a classic no-bake gift that stays fresh for a long time.
Ingredients
2 cups crushed vanilla wafer cookies
1 cup finely chopped pecans
1 cup powdered sugar (plus extra for rolling)
2 tablespoons unsweetened cocoa powder
2 tablespoons light corn syrup
1/3 cup dark rum
1/2 teaspoon salt
Equipment
Large mixing bowl
Glass jar with a sealing lid
Twine and cardstock tag
Shallow bowl for coating
DIY Instructions
Stir the crushed cookies, chopped pecans, one cup of powdered sugar, and cocoa in a large bowl.
Mix the corn syrup and dark rum in a small cup.
Pour the liquid mixture over the dry ingredients and stir until a stiff dough forms.
Roll the dough into small balls about one inch in diameter.
Fill a shallow bowl with extra powdered sugar.
Roll each ball in the sugar until it is completely white and heavily coated.
Place the balls on a tray and let them sit at room temperature for one hour to dry.
Roll them in the sugar a second time if you want a thicker white coating.
Stack the rum balls carefully inside the glass jar.
Wipe any excess sugar from the rim of the jar before sealing the lid.
Write your warning on a small tag and tie it to the jar with twine.
Store these in a cool place for a few days before gifting to let the flavors blend.
15. Cinnamon Sugar Roasted Pecans
Homemade Food Gifts
A tall, conical gift bag is packed with large, glossy pecan halves. Each nut is fully coated in a thick layer of sparkling cinnamon sugar. The deep brown of the pecans shines through the crystalline topping.
A bright red satin ribbon secures the top of the clear bag in a classic bow. This shape is easy to tuck into a stocking or a larger gift basket. It is a simple way to make a humble nut feel like a special holiday indulgence.
The sugar coating looks crunchy and sweet, promising a warm spice flavor. These pecans are a great snack for holiday movie nights. The clear packaging lets the beautiful texture of the roasted nuts be the main focus.
Ingredients
1 pound pecan halves
1 egg white
1 tablespoon water
1/2 cup granulated sugar
1/2 cup light brown sugar
1 tablespoon ground cinnamon
1/2 teaspoon salt
Equipment
Large mixing bowl
Small mixing bowl
Whisk
Large baking sheet
Parchment paper
Conical clear gift bags and red ribbon
DIY Instructions
Heat your oven to 250 degrees Fahrenheit.
Whisk the egg white and water in a large bowl until the mixture is very frothy.
Toss the pecans in the egg white until every nut is wet and sticky.
Mix both sugars, cinnamon, and salt in a separate small bowl.
Pour the sugar mixture over the wet pecans and toss until they are well coated.
Spread the pecans in a single layer on a baking sheet lined with parchment paper.
Bake for one hour, making sure to stir them every 15 minutes.
Remove the pecans from the oven when they smell fragrant and look dry.
Let the nuts cool completely on the tray so the sugar coating becomes crunchy.
Break apart any pecans that have stuck together.
Slide the nuts into the conical bags, filling them near to the top.
Tie the bag shut with a red ribbon and trim the ends for a neat look.
16. Smoked Paprika Roasted Almonds
Homemade Food Gifts
A small burlap sack sits on a wooden table, tied with a simple twine bow. A large white tag hangs from the front, identifying the contents as “Smoked Paprika Roasted Almonds.” A small pile of the dark, spice-covered nuts rests at the base of the bag.
The almonds have a deep reddish-brown color from the smoky seasoning. The burlap packaging gives the gift a rustic, masculine feel that stands out from sweet treats. In the background, warm holiday lights create a cozy atmosphere.
Tiny grains of salt and spice are visible on the surface of each nut. This savory snack is an excellent choice for someone who prefers bold flavors over sugar. The tag also includes helpful information about the shelf life of the snack.
Ingredients
3 cups raw whole almonds
2 tablespoons olive oil
1 1/2 tablespoons smoked paprika
1 teaspoon garlic powder
1 teaspoon sea salt
1/2 teaspoon cayenne pepper (optional for heat)
Equipment
Large mixing bowl
Baking sheet
Parchment paper
Small burlap gift bags
Cardstock tags and twine
DIY Instructions
Heat your oven to 325 degrees Fahrenheit.
Place the raw almonds in a large bowl and drizzle them with olive oil.
Toss the nuts until they are evenly coated and look shiny.
Sprinkle the smoked paprika, garlic powder, salt, and cayenne over the almonds.
Stir well to ensure the spices stick to the oil on the nuts.
Spread the almonds in a single layer on a parchment-lined baking sheet.
Roast for 15 to 20 minutes, stirring once halfway through the cooking time.
Take the tray out when the nuts smell toasted and the spices are fragrant.
Allow the almonds to cool completely on the baking sheet.
Taste one nut to ensure it is crunchy; if not, return to the oven for five more minutes.
Spoon the cooled almonds into the small burlap bags.
Write the name and “Salty Snack” on the tag before tying it to the sack with twine.
17. Everything Bagel Seasoning Gift Jars
Homemade Food Gifts
Several small glass jars with black lids stand on a white marble surface. Each jar is filled with a colorful mix of seeds, dried garlic, and salt. Clean white labels on the front clearly state “Everything Bagel Seasoning Mix.”
A small wooden spoon rests in an open jar, showing the coarse texture of the blend. A tag on the side notes that the skill level for this gift is minimal prep. This is a practical and trendy gift for anyone who loves to cook at home.
Piles of white salt and dark seeds are scattered around the jars to show the individual components. The uniform labeling makes the collection look like a professional spice set. It is a thoughtful way to help friends upgrade their morning toast or avocado.
Ingredients
1/4 cup dried minced garlic
1/4 cup dried minced onion
3 tablespoons black sesame seeds
3 tablespoons white sesame seeds
3 tablespoons poppy seeds
2 tablespoons flaked sea salt
Equipment
Small mixing bowl
Funnel (optional)
Small glass jars with lids (4 ounces)
Sticker labels
Small wooden spoons
DIY Instructions
Measure out all your seeds, dried vegetables, and salt into a small bowl.
Stir the mixture gently with a spoon until all the colors are evenly distributed.
Ensure the glass jars are completely dry before you begin filling them.
Use a funnel or a small spoon to transfer the seasoning mix into each jar.
Fill the jars almost to the top, leaving a tiny bit of space.
Wipe the rims of the jars to remove any stray seeds or salt.
Screw the black lids on tightly to keep the mixture fresh and crunchy.
Apply the “Everything Bagel Seasoning Mix” labels to the center of each jar.
Tie a small wooden spoon to the neck of the jar using a piece of string.
Include a note suggesting uses like topping eggs, hummus, or baked potatoes.
18. Savory Herb and Garlic Compound Butter
Homemade Food Gifts
A long log of creamy white butter is flecked with bright green herbs and golden bits of roasted garlic. The butter is rolled into a cylinder and wrapped in white parchment paper. The ends are twisted and tied with white string like a large holiday cracker.
The spiral pattern of the herbs is visible on the cut end of the log. This gift looks beautiful resting on a dark wooden cutting board. It is a sophisticated addition to a gift basket that includes fresh bread or a steak rub.
Small pieces of minced garlic are tucked within the herb layers. The presentation is clean and highlights the freshness of the ingredients. This is a simple way to give someone the gift of an easy, gourmet meal.
Ingredients
1 cup high-quality unsalted butter, softened
2 tablespoons fresh parsley, finely chopped
1 tablespoon fresh chives, minced
1 tablespoon fresh rosemary, very finely chopped
3 cloves garlic, roasted and mashed
1/2 teaspoon sea salt
Equipment
Medium mixing bowl
Rubber spatula
Parchment paper
Kitchen twine
Scissors
DIY Instructions
Place the softened butter in a medium bowl and mash it with a spatula until smooth.
Add the chopped parsley, chives, rosemary, and mashed garlic to the bowl.
Sprinkle the sea salt over the top of the mixture.
Fold the herbs and garlic into the butter until they are evenly spread throughout.
Lay a large piece of parchment paper flat on your counter.
Scoop the herb butter onto the center of the paper in a rough log shape.
Fold the paper over the butter and use a ruler to slide the butter into a tight cylinder.
Roll the parchment paper around the butter log until it is fully covered.
Twist the ends of the paper tightly to compress the butter into a firm shape.
Tie the twisted ends with pieces of kitchen twine to secure the “cracker” look.
Place the log in the refrigerator for at least two hours to become solid.
Keep the butter cold until you are ready to gift it to the recipient.
19. Chili Lime Popcorn Seasoning Gift Set
Homemade Food Gifts
A vibrant gift basket contains a jar of orange-tinted seasoning and a bag of golden popcorn kernels. The seasoning label features bright green limes and red chili peppers. Two whole fresh limes sit in the front, adding a pop of natural color.
A red and white checkered cloth lines the wicker basket, giving it a classic picnic feel. A white tag tied with twine proclaims this to be a “Movie Night Gift.” This set provides everything needed for a spicy and tangy snack experience.
The jar of seasoning looks finely ground and ready to sprinkle. The bag of organic kernels has a clear window to show the quality of the grains. It is a fun and interactive gift for families who enjoy staying in for a film.
Ingredients
1/2 cup nutritional yeast
2 tablespoons chili powder
1 tablespoon salt
1 teaspoon cumin
1 teaspoon onion powder
2 tablespoons dried lime zest
1 bag organic popcorn kernels
2 fresh limes
Equipment
Small glass jar with lid
Kraft paper bag with window
Wicker gift basket
Checkered fabric liner
Cardstock tag and twine
DIY Instructions
Mix the nutritional yeast, chili powder, salt, cumin, and onion powder in a small bowl.
Add the dried lime zest and stir until the mixture is a uniform orange color.
Transfer the seasoning into a small glass jar and seal the lid.
Fill a kraft paper bag with the organic popcorn kernels and fold the top down.
Place the checkered cloth inside the wicker basket so the corners hang over the sides.
Set the jar of seasoning and the bag of kernels inside the basket.
Nest the two fresh limes next to the containers for a fresh touch.
Write “The Movie Night Gift” on your tag.
Attach the tag to the handle of the basket or the bag of popcorn.
Include a small instruction card explaining how to toss the warm popcorn with the seasoning and fresh lime juice.
20. Rosemary and Sea Salt Breadsticks
Homemade Food Gifts
A tall glass cylinder holds a bundle of long, golden-brown breadsticks. Each stick is straight and thin, with visible grains of coarse salt and bits of dried rosemary on the surface. They stand upright, showing off their uniform height and bake.
A small bowl of creamy hummus and a dish of melted cheese sit on the wooden board nearby. This setup suggests the breadsticks are part of a larger appetizer spread. Sprigs of fresh rosemary are tucked between the sticks for a touch of greenery.
The breadsticks have a matte finish with occasional darker spots from the oven. They look crunchy and sturdy enough for dipping into thick sauces. This gift is a wonderful savory alternative for a holiday party host.
Ingredients
1 pound pizza dough, room temperature
2 tablespoons olive oil
2 tablespoons fresh rosemary, chopped
1 tablespoon coarse sea salt
1/2 teaspoon garlic powder
Equipment
Large baking sheet
Parchment paper
Pastry brush
Pizza cutter or sharp knife
Tall glass jar for gifting
DIY Instructions
Heat your oven to 400 degrees Fahrenheit.
Roll the pizza dough out into a large rectangle on a floured surface.
Aim for a thickness of about a quarter-inch for the best crunch.
Brush the entire surface of the dough with a thin layer of olive oil.
Sprinkle the chopped rosemary, sea salt, and garlic powder evenly over the oil.
Use a pizza cutter to slice the dough into long strips about half an inch wide.
Gently lift each strip and place it on a baking sheet lined with parchment paper.
Leave a small space between each strip so they can crisp up on all sides.
Bake for 12 to 15 minutes until they are a deep golden brown and feel firm.
Let the breadsticks cool completely on the baking sheet to ensure they stay crunchy.
Carefully stand the cooled breadsticks up inside a tall glass jar.
Tie a ribbon around the jar or tuck in a few more rosemary sprigs for decoration.
21. Tangy Pickled Red Onions
Homemade Food Gifts
A clear glass jar is packed with vibrant, neon pink onion rings. The vegetable slices are submerged in a translucent pickling liquid that highlights their curly shapes. A rustic brown paper lid cover is secured with a bright lime green string.
This jar sits on a wooden counter next to a few loose slices of raw red onion and a sprig of fresh dill. The colorful presentation makes it a standout savory gift for the holidays. It offers a sharp and acidic bite that balances out the heavy flavors of winter feasts.
The label hangs simply from the neck of the jar, identifying the contents in clear print. Using a glass container allows the beautiful natural dye of the onions to shine. It is a practical and stylish addition to any food lover’s pantry.
Ingredients
2 large red onions thin sliced
1 cup apple cider vinegar
1 cup water
1 tablespoon granulated sugar
1 1/2 teaspoons sea salt
1/2 teaspoon black peppercorns
1 clove garlic peeled
Equipment
Sharp knife or mandoline
Small saucepan
Glass mason jar with lid
Brown parchment paper and green twine
DIY Instructions
Slice your red onions into very thin rings using a sharp knife.
Peel the garlic clove and drop it into the bottom of a clean glass jar.
Pack the sliced onions tightly into the jar until it is nearly full.
Combine the water, vinegar, sugar, and salt in a small saucepan.
Heat the liquid over a medium flame and stir until the sugar and salt vanish.
Pour the hot liquid over the onions in the jar until they are fully covered.
Add the peppercorns to the jar and tap it gently to remove air bubbles.
Let the jar sit on your counter uncovered until it reaches room temperature.
Screw the lid on tight and place the jar in the refrigerator.
Wait at least three hours for the onions to turn a bright pink color.
Cut a circle of brown paper larger than the lid.
Place the paper over the lid and tie it down with the green twine.
Attach a tag and keep the jar cold until you give it away.
22. Rosemary Garlic Infused Olive Oil
Homemade Food Gifts
A tall swing-top glass bottle contains a clear, golden liquid. A single, long sprig of fresh rosemary is submerged inside, stretching from the bottom to the neck. Several large, peeled garlic cloves rest at the base among small seeds.
The bottle features a clean white label that describes the contents as a luxury pantry staple. This elegant presentation makes it look like a high-end find from a boutique shop. It is a thoughtful choice for friends who enjoy gourmet cooking.
Small bubbles cling to the rosemary needles within the oil. The clear glass showcases the high quality of the ingredients used. This infused oil is as beautiful to look at as it is delicious to use in recipes.
Ingredients
2 cups high quality extra virgin olive oil
3 sprigs fresh rosemary washed and dried
4 cloves garlic peeled
1 teaspoon dried peppercorns
Equipment
Small saucepan
Funnel
Tall glass bottle with a swing top or cork
Adhesive label
DIY Instructions
Wash the rosemary sprigs and let them dry completely on a towel.
Peel the garlic cloves but leave them whole for a cleaner look.
Pour the olive oil into a small saucepan and place it on low heat.
Warm the oil for about five minutes but do not let it boil or smoke.
Place the garlic and one sprig of rosemary into the warm oil for three minutes.
Remove the pan from the heat and let the oil cool down.
Slide a fresh, dry sprig of rosemary and the peppercorns into your clean glass bottle.
Use a funnel to pour the cooled oil and the garlic cloves into the bottle.
Seal the bottle tightly with the swing top.
Store the bottle in the refrigerator to keep the garlic safe and fresh.
Apply your custom label to the front of the bottle once it is dry.
Advise the recipient to use the oil within one week for the best flavor.
23. Crispy Honey Glazed Chickpea Snacks
Homemade Food Gifts
Small brown paper bags are tilted over, spilling golden-brown roasted chickpeas onto a light surface. Each chickpea is coated in a glistening layer of honey and spices. The bags feature a cute hand-drawn whisk illustration with a smiling face.
A hand reaches in to pick up a single grain, showing how easy these are to eat. The “Kid-friendly gift” note suggests these are a healthy and fun alternative to candy. The matte texture of the paper bags gives the gift an approachable, homemade feel.
The chickpeas look crunchy and have a consistent toasted color. Tiny grains of sugar or salt are visible on their surface. This snack is a clever way to provide a protein-filled treat during the holiday season.
Ingredients
2 cans chickpeas (15 ounces each)
2 tablespoons olive oil
3 tablespoons honey
1 teaspoon ground cinnamon
1/2 teaspoon salt
Equipment
Large baking sheet
Parchment paper
Colander
Small mixing bowl
Small brown paper gift bags
DIY Instructions
Heat your oven to 400 degrees Fahrenheit.
Drain the chickpeas in a colander and rinse them under cold water.
Pat the chickpeas very dry with a clean towel to ensure they get crunchy.
Spread the dry chickpeas on a baking sheet lined with parchment paper.
Roast them for 20 minutes until they start to feel firm.
Mix the olive oil, honey, cinnamon, and salt in a small bowl.
Remove the tray from the oven and pour the honey mixture over the hot chickpeas.
Toss them with a spoon until every grain is coated.
Return the tray to the oven for another 10 to 15 minutes.
Watch them closely so the honey does not burn.
Let the chickpeas cool completely on the tray to harden the glaze.
Draw a fun character on your paper bags using a dark marker.
Fill the bags with the cooled snacks and fold the tops down.
24. White Chocolate Christmas Popcorn
Homemade Food Gifts
A large clear bag is stuffed with fluffy popcorn covered in creamy white chocolate. Bright red and green star-shaped sprinkles are scattered throughout the mix. A massive, multi-layered ribbon in red and green stripes sits on top.
The popcorn looks chunky and sweet, with the chocolate acting as a glue for the festive toppings. This gift is a visual celebration of holiday colors. It is a great choice for a large family or a shared office treat.
You can see the drizzled patterns of chocolate over the golden kernels. The shiny packaging makes the contents look even more indulgent. It is a festive snack that combines a classic crunch with a sugary holiday twist.
Ingredients
10 cups popped plain popcorn
1 1/2 cups white chocolate melting wafers
1/4 cup red and green star sprinkles
1/2 teaspoon salt
Equipment
Large baking sheet
Parchment paper
Microwave safe bowl
Large clear gift bag
Wide festive ribbon
DIY Instructions
Spread the popped popcorn in an even layer on a parchment-lined baking sheet.
Remove any unpopped kernels so the gift is easy to eat.
Melt the white chocolate in your microwave in 30-second bursts.
Stir the chocolate until it is smooth and flows easily.
Drizzle the melted chocolate over the popcorn in a back-and-forth motion.
Shake the sprinkles over the wet chocolate immediately.
Sprinkle the salt lightly over the top to balance the sugar.
Toss the popcorn gently with your hands to coat more sides.
Let the chocolate sit for 30 minutes until it is hard to the touch.
Break the popcorn into large clumps.
Carefully slide the popcorn into the large clear bag.
Tie the bag shut with a wire tie first to keep it fresh.
Attach the large striped ribbon over the tie for a grand presentation.
25. Sugared Candied Ginger Slices
Homemade Food Gifts
A glass jar is filled with translucent, golden-orange circles of candied ginger. Each slice is heavily coated in large granules of white sugar that sparkle. A steaming cup of dark tea sits in the background, suggesting a pairing.
The label on the jar describes the treat as a “Tea Drinker’s Delight.” A few fresh ginger roots rest nearby to show the origin of the snack. These slices look chewy and have a vibrant, warm color.
Steam rises from the cup, creating a cozy and inviting mood. The sugar crystals catch the light and add a beautiful texture to the ginger. It is a sophisticated gift for those who enjoy a bit of spice with their beverages.
Ingredients
1 pound fresh ginger root
2 cups granulated sugar (plus more for coating)
2 cups water
1/4 teaspoon salt
Equipment
Vegetable peeler
Sharp knife
Medium saucepan
Wire cooling rack
Glass jar with lid
DIY Instructions
Peel the fresh ginger root using the edge of a spoon or a peeler.
Slice the ginger into thin rounds about the thickness of a coin.
Place the ginger slices in a saucepan and cover them with water.
Boil the ginger for 15 minutes, then drain the water to reduce the heat.
Add two cups of fresh water, two cups of sugar, and the salt to the pan.
Simmer the ginger in this syrup for 45 minutes until the slices are tender.
Drain the ginger and save the syrup for drinks if you like.
Toss the wet slices in a bowl of extra sugar until they are fully covered.
Spread the slices on a wire rack to dry for at least four hours.
Ensure they are no longer sticky before you pack them.
Place the sugared ginger into a clean glass jar.
Apply the “Tea Drinker’s Delight” label to the front.
26. Matcha Raspberry White Chocolate Bark
Homemade Food Gifts
Large shards of bright green chocolate are displayed in a white gift box. The surface is textured with swirls of matcha powder and dotted with dark red dried raspberries. Small crumbs of fruit are scattered across the green base.
The contrast between the earthy green and the deep red is very striking. This treat offers a modern and unique flavor profile for a holiday gift. It looks professional and artistic as it rests in the clean packaging.
Thin layers of white parchment paper separate the pieces to prevent sticking. You can see the creamy texture of the chocolate in the thick breaks. It is a vibrant and healthy-looking option for a sweet food gift.
Ingredients
16 ounces white chocolate melting wafers
2 tablespoons high quality matcha powder
1/2 cup freeze dried raspberries
1/4 teaspoon sea salt
Equipment
Baking sheet
Parchment paper
Small sieve
Spatula
White gift box
DIY Instructions
Line a baking sheet with parchment paper so the chocolate does not stick.
Melt the white chocolate in a microwave-safe bowl until it is smooth.
Sift the matcha powder into the melted chocolate using a small sieve.
Stir the powder in gently to create a solid green color or a swirled look.
Pour the green chocolate onto the baking sheet and spread it out.
Aim for a thickness of about half an inch.
Sprinkle the freeze-dried raspberries over the top while the chocolate is wet.
Add a tiny pinch of sea salt to enhance the matcha flavor.
Let the bark sit in the refrigerator for one hour to become firm.
Break the chocolate into large, irregular shards using your hands.
Line a white gift box with clean parchment paper.
Arrange the shards neatly inside the box.
Close the lid and wrap it with a simple string or ribbon.
27. Honey Toasted Salted Almonds
Homemade Food Gifts
Three small glass jars are filled with glossy, golden-brown almonds. A few loose nuts are scattered on a light wooden surface next to a sprig of green thyme. One jar is tilted over, showing the crunchy texture of the toasted snack.
A small white tag is tied to one jar with brown twine, identifying them as “Honey Toasted Almonds.” The lids of the jars are a soft gold color that matches the tone of the nuts. This set looks refined and would fit well in a gourmet gift basket.
The almonds have a shiny coating that suggests a sweet and salty glaze. Tiny flecks of salt are visible on the skin of the nuts. This savory-sweet snack is a classic choice for holiday entertaining.
Ingredients
3 cups raw whole almonds
1/4 cup honey
1 tablespoon olive oil
1 teaspoon sea salt
1/2 teaspoon vanilla extract
Equipment
Large baking sheet
Parchment paper
Medium mixing bowl
Three small glass jars with lids
Twine and tags
DIY Instructions
Heat your oven to 350 degrees Fahrenheit.
Mix the honey, olive oil, salt, and vanilla in a medium bowl.
Add the almonds to the bowl and stir until every nut is coated.
Spread the almonds in a single layer on a parchment-lined baking sheet.
Bake for 15 to 20 minutes, stirring them halfway through.
Remove the tray when the almonds look dark golden and smell sweet.
Let the almonds cool completely on the tray.
Stir them occasionally as they cool to prevent them from sticking in one big clump.
Divide the cooled nuts between the three glass jars.
Screw the gold lids on tightly.
Write your message on the white tags.
Tie the tags to the jars with a short piece of twine.
28. Ultimate Layered Hot Cocoa Mix
Homemade Food Gifts
A large mason jar shows beautiful horizontal layers of cocoa powder, sugar, and chocolate shavings. A massive pile of white mini marshmallows fills the top section of the jar. A decorative label on the front names it “The Ultimate Hot Cocoa Mix.”
A smaller tag is tied to the neck with a black and white string. It notes that this is a “Special Treat for a Special Teacher.” This gift provides several servings of comfort in a single, attractive container.
A cinnamon stick and a pile of chocolate flakes sit on the table nearby. The clear glass allows the recipient to see the high-quality ingredients inside. It is a warm and nostalgic gift that is easy for anyone to use.
Ingredients
1 cup unsweetened cocoa powder
1 cup granulated sugar
1/2 cup dark chocolate shavings
1/2 cup powdered milk
1 cup mini marshmallows
1/2 teaspoon ground cinnamon
Equipment
Large glass mason jar with lid
Funnel
Spoon
Decorative labels and twine
DIY Instructions
Clean and dry your mason jar thoroughly before starting.
Use a funnel to pour the cocoa powder into the bottom of the jar.
Tap the jar on the counter to level the first layer.
Add the powdered milk as the second layer for a clean white contrast.
Pour in the granulated sugar and the cinnamon as the third layer.
Add the dark chocolate shavings to create a rich dark band.
Fill the remaining space at the top with as many mini marshmallows as possible.
Press the marshmallows down slightly so the lid can close.
Screw the lid on tight to keep the powder dry.
Apply the main label to the center of the glass.
Tie the “Special Teacher” tag around the rim with the string.
Include a note saying to mix the contents with hot milk or water.
29. Vanilla Bean Infused Sugar Jar
Homemade Food Gifts
A wide glass jar is filled with fine, pale gold sugar grains. Several long, dark vanilla beans are tucked into the sugar, with their tips peeking out at the top. A small wooden scoop rests inside, ready to serve the aromatic crystals.
A cup of coffee and some small pastries sit in the background on a rustic wooden table. This setting suggests the sugar is intended for sweetening morning drinks or bakes. The presentation is simple, clean, and focuses on the quality of the spice.
The vanilla beans look oily and rich, indicating they are fresh. The sugar has a slightly damp texture from absorbing the oils of the beans. This is a long-lasting gift that improves in flavor over time.
Ingredients
2 cups granulated sugar or sugar in the raw
3 whole vanilla beans
1/2 teaspoon salt (optional)
Equipment
Glass jar with a tight seal
Small wooden scoop
Sharp knife
DIY Instructions
Pour one cup of sugar into the bottom of a clean glass jar.
Use a sharp knife to slice the vanilla beans open lengthwise to reveal the seeds.
Cut the beans into smaller pieces if they are too tall for your jar.
Place the beans into the jar on top of the first layer of sugar.
Pour the remaining sugar over the beans until the jar is full.
Close the lid tightly and shake the jar for a few seconds.
Let the jar sit in a cool, dark place for at least one week.
Shake the jar every few days to distribute the vanilla flavor.
The sugar will turn a light brown color as it absorbs the vanilla oils.
Place the wooden scoop inside the jar before gifting.
Tell the recipient they can refill the sugar as they use it.
30. Mulling Spices Gift Kit
Homemade Food Gifts
A green and red gift box holds three small white mesh bags. Each bag is filled with aromatic ingredients like cinnamon sticks, star anise, and dried orange slices. The box lid features gold leaf illustrations and a helpful information card.
The card notes that the kit requires minimal prep and has a shelf life of six months. This is a perfect winter gift for making spiced cider or wine at home. The presentation is organized and looks like a luxury holiday set.
The orange slices are bright and clear within the mesh. You can see the woody texture of the cinnamon sticks through the fabric. It is a fragrant and festive gift that brings the scent of the holidays into any kitchen.
Ingredients
6 long cinnamon sticks
6 whole star anise
12 dried orange slices
2 tablespoons whole cloves
2 tablespoons allspice berries
Equipment
Three small white drawstring mesh bags
Rectangular gift box
Cardstock for tags
Decorative tissue paper
DIY Instructions
Lay out your three mesh bags on a clean surface.
Place two cinnamon sticks and two star anise into each bag.
Add four dried orange slices to every bag.
Divide the cloves and allspice berries evenly between the three pouches.
Pull the drawstrings tight and tie them in a double knot.
Line your gift box with a piece of festive tissue paper.
Place the three bags side by side inside the box.
Write “Mulling Spices Kit” on a decorative tag.
Include instructions to simmer one bag with a bottle of wine or a quart of cider.
Tuck the information card into the lid of the box.
Close the box and secure it with a piece of holiday tape or a ribbon.
31. Layered Double Chocolate Cookie Mix
Homemade Food Gifts
A tall glass mason jar displays striking horizontal bands of white flour, dark cocoa, and glistening sugar. A thick middle layer of dark chocolate chips adds a rich texture to the visual display. A brown kraft paper tag hangs from a twine bow, listing the wet ingredients needed to finish the bake.
The organization of the layers makes this a beautiful and mess-free gift for busy families. It looks professional and thoughtful sitting on a white kitchen counter. Using a clear jar allows the quality of each ingredient to be the star of the presentation.
Small grains of sugar and salt are visible at the bottom of the stack. The contrast between the dark cocoa and white flour creates a clean, graphic look. This is a simple way to share a home-cooked experience with friends during the holiday season.
Ingredients
1 1/2 cups all purpose flour
1/2 cup unsweetened cocoa powder
1/2 cup granulated sugar
1/2 cup light brown sugar
1 cup semi sweet chocolate chips
1/2 teaspoon salt
1/2 teaspoon baking soda
Equipment
1 quart wide mouth mason jar
Funnel
Large spoon for packing
Kraft paper tag and twine
DIY Instructions
Clean and dry your glass jar thoroughly before you begin layering.
Use a funnel to pour the flour into the bottom of the jar as the base.
Tap the jar on a soft towel to level the flour layer.
Add the salt and baking soda on top of the flour.
Carefully pour the chocolate chips in to create a dark, chunky band.
Layer the cocoa powder next, using a spoon to press it down firmly against the glass.
Finish with the granulated sugar and then the brown sugar at the very top.
Screw the lid on tight to keep the air out.
Write the following on your tag: “Mix with 1/2 cup softened butter, 1 egg, and 1 teaspoon vanilla. Bake at 350 for 10 minutes.”
Tie the tag around the neck of the jar with a simple twine bow.
32. Slow Cooked Spiced Apple Butter
Homemade Food Gifts
A charming glass jar is filled with a thick, dark mahogany spread. A wooden spoon rests in the open jar, showing the smooth and velvety texture of the fruit butter. Two cinnamon sticks and a whole star anise sit on the rustic table nearby to hint at the warm spices used.
A custom label on the front features a small red apple and the words “Homemade Apple Butter.” This spread is shown slathered over a thick slice of crusty artisan bread in the background. It is a cozy and comforting gift that captures the essence of a winter harvest.
The rich color of the butter indicates a long, slow cooking process that has concentrated the flavors. Using a faceted glass jar adds a touch of vintage elegance to the gift. It is a wonderful savory-sweet addition to a holiday breakfast basket.
Ingredients
5 pounds sweet apples (like Fuji or Gala)
1 cup apple cider
2 cups granulated sugar
1 tablespoon ground cinnamon
1/2 teaspoon ground cloves
1/4 teaspoon salt
Equipment
Slow cooker or large heavy pot
Vegetable peeler and knife
Immersion blender or standard blender
Sterilized glass jars with lids
DIY Instructions
Peel, core, and chop your apples into small chunks.
Place the apple chunks into your slow cooker.
Pour the apple cider over the fruit to provide moisture.
Cover the pot and cook on low heat for about ten hours or overnight.
Use an immersion blender to puree the soft apples until they are completely smooth.
Stir in the sugar, cinnamon, cloves, and salt.
Cook the mixture uncovered on low for another two hours to let it thicken and darken.
Stir the butter occasionally to prevent any sticking or burning.
Spoon the hot apple butter into clean, sterilized glass jars.
Wipe the rims of the jars and secure the lids tightly.
Allow the jars to cool to room temperature before moving them to the fridge.
Label the jars and keep them chilled until you are ready to gift them.
33. Savory Rosemary and Sea Salt Blend
Homemade Food Gifts
Small, elegant glass vials are filled with a mixture of dried green herbs and coarse white salt crystals. A round brown tag is tied to each bottle with a simple twine string. The tag features the handwritten words “Savory Rosemary Salt” in dark ink.
A small wooden bowl nearby holds a pile of the loose seasoning, showcasing the rustic texture of the blend. Fresh sprigs of rosemary are tucked around the base of the bottles to emphasize the herbal scent. This gift is a sophisticated choice for anyone who loves to grill or roast vegetables.
The cork stoppers give the vials a classic, apothecary-style appearance. You can see the varied sizes of the salt grains mixed with the needle-like rosemary bits. It is a practical and beautiful gift that fits easily into a holiday stocking.
Ingredients
1 cup coarse sea salt or kosher salt
1/4 cup dried rosemary leaves
1 teaspoon black peppercorns (optional)
1/2 teaspoon garlic powder
Equipment
Small glass vials or jars with corks
Small mixing bowl
Funnel
Cardstock tags and twine
DIY Instructions
Place the dried rosemary in a clean bowl and crush it slightly with your fingers to release the oils.
Add the coarse sea salt to the bowl.
Stir in the garlic powder and peppercorns if you are using them.
Mix the ingredients thoroughly until the green herbs are spread evenly through the white salt.
Use a small funnel to guide the mixture into the glass vials.
Fill each vial nearly to the neck.
Press the cork stoppers firmly into the top of the bottles.
Cut out small circular tags from brown cardstock.
Write the name of the salt on each tag.
Use a piece of twine to tie the tag around the neck of the bottle in a neat knot.
34. Artisan Balsamic Fig Jam
Homemade Food Gifts
A dark, rich jam filled with tiny fig seeds sits inside a wide glass jar. The label on the front features a graphic of a sliced fig and the name “Balsamic Fig Jam.” This jar is surrounded by fresh figs and a wedge of creamy brie cheese on a wooden board.
Crisp crackers are scattered around the base, making the scene look like a ready-to-eat appetizer. This jam offers a complex flavor that is both sweet and tangy. It is an elevated gift for the foodie who enjoys hosting elegant parties.
The deep purple color of the jam looks beautiful against the white cheese. You can see the thick, spreadable consistency through the clear glass. It is a thoughtful and unique alternative to standard fruit preserves.
Ingredients
1 pound fresh figs, stemmed and chopped
1/2 cup granulated sugar
1/4 cup balsamic vinegar
1 tablespoon fresh lemon juice
1/4 teaspoon salt
Equipment
Medium saucepan
Wooden spoon
Glass jar with a tight lid
Potato masher (optional)
DIY Instructions
Wash your fresh figs and remove the tough stems from the tops.
Chop the figs into small pieces and place them in a saucepan.
Stir in the sugar, balsamic vinegar, and lemon juice.
Let the mixture sit for fifteen minutes to allow the fruit to release its juice.
Place the pan over medium heat and bring the mixture to a gentle boil.
Reduce the heat to low and simmer for about twenty minutes.
Use a potato masher or a spoon to crush the figs as they soften.
Cook until the jam is thick enough to coat the back of a spoon.
Stir in the salt at the very end.
Pour the hot jam into a clean glass jar.
Let the jar cool on the counter before sealing it with a lid.
Store the jam in the refrigerator until you are ready to give it as a gift.
35. Curried Lentil Soup Mix
Homemade Food Gifts
A large glass jar is packed with colorful layers of dried legumes, white rice, and bright yellow spices. A bay leaf and a sprig of dried rosemary are tucked at the very top for a rustic touch. A large paper tag provides clear instructions for turning the mix into a warm meal.
The bottom layers consist of green and orange lentils, followed by a band of long-grain rice. This visual stack is a great way to show the variety of healthy ingredients inside. It is described on the tag as a “hearty, healthy meal for busy parents.”
The tag also notes that the prep work for the recipient is minimal and the shelf life is six months. This is a practical and nourishing gift for the winter months. Using a silver lid gives the jar a clean and modern finish.
Ingredients
1 cup brown lentils
1 cup red lentils
1 cup long grain white rice
2 tablespoons curry powder
1 tablespoon dried minced onion
1 bay leaf
1 sprig dried rosemary
1 teaspoon salt
Equipment
1 quart glass jar with lid
Funnel
Kraft paper tag and twine
DIY Instructions
Clean your glass jar and make sure it is dry.
Use a funnel to pour the brown lentils into the bottom of the jar.
Add the red lentils as the second layer for a bright pop of color.
Pour the white rice over the lentils.
Mix the curry powder, dried onion, and salt in a small bowl, then pour it over the rice.
Place the bay leaf and rosemary sprig on the very top of the spices.
Seal the jar tightly with the lid.
Write the cooking instructions on your tag: “Add contents to 8 cups of water. Simmer for 30 minutes until lentils are soft.”
Tie the tag to the neck of the jar using a piece of twine.
Include a note suggesting a squeeze of fresh lemon or a dollop of yogurt on top.
36. Homemade Bourbon Vanilla Extract
Homemade Food Gifts
Six small glass bottles are filled with a dark, amber-colored liquid. Long, dark vanilla beans are visible inside each bottle, steeping in the spirits. Each bottle is topped with a clean cork and a decorative gold foil seal.
An elegant cream-colored label wraps around each bottle, calling the extract “The Gold Standard of Baking Gifts.” A few whole vanilla beans are scattered on the wooden table in the front. This presentation looks like something from a high-end specialty kitchen store.
The dark liquid glows when the light hits it, showing the richness of the infusion. These bottles are a long-lasting gift that bakers will use throughout the year. It is a simple project that yields a very high-quality product.
Ingredients
1 bottle of high quality bourbon (750ml)
15 whole vanilla beans
1 teaspoon sugar (optional)
Equipment
6 small glass bottles (about 4 to 5 ounces each)
Funnel
Sharp knife
Cutting board
Adhesive labels and corks
DIY Instructions
Wash and dry your small glass bottles.
Use a sharp knife to split each vanilla bean lengthwise.
Leave the beans attached at one end so they stay in one piece.
Place two or three split beans into each of your small bottles.
Use a funnel to pour the bourbon into the bottles, covering the beans completely.
Add a tiny pinch of sugar to each bottle if you want a slightly sweeter aroma.
Press the corks firmly into the bottles to seal them.
Apply the gold foil seals over the corks for a professional look.
Shake the bottles gently.
Store the bottles in a cool, dark place for at least eight weeks.
Shake them once a week to help the flavor develop.
Apply the custom labels once the extract is ready to be shared.
37. Spiced Pear and Star Anise Compote
Homemade Food Gifts
A large glass jar is filled with chunks of soft, golden pears submerged in a clear syrup. Several whole star anise pods are pressed against the glass, looking like dark wooden flowers. A thin silver ribbon is tied around the neck of the jar in a delicate bow.
In the background, a small glass bowl holds two scoops of white vanilla ice cream. This suggests the compote is a versatile topping for desserts or breakfast bowls. A spoonful of the pears is shown resting on top of a bowl of oatmeal in the front.
The pears have a translucent quality that shows they have been poached to softness. The star anise adds a beautiful visual element and a warm licorice scent. It is an elegant and light gift for a holiday host.
Ingredients
4 large firm pears, peeled and cubed
1/2 cup granulated sugar
1/2 cup water
4 whole star anise
1 teaspoon vanilla extract
1 tablespoon lemon juice
Equipment
Medium saucepan
Slotted spoon
Large glass jar with lid
Silver ribbon
DIY Instructions
Peel your pears and cut them into even one-inch cubes.
Combine the sugar, water, and lemon juice in a saucepan over medium heat.
Stir until the sugar is dissolved and the liquid is clear.
Add the pear cubes and the whole star anise to the pan.
Simmer the fruit gently for about ten minutes until the pears are tender but not mushy.
Remove the pan from the heat and stir in the vanilla extract.
Use a slotted spoon to transfer the pear chunks and star anise into a clean glass jar.
Pour the remaining syrup over the fruit until the jar is full.
Let the jar cool completely on your kitchen counter.
Seal the lid and tie the silver ribbon around the neck.
Keep the jar in the refrigerator until you are ready to gift it.
38. Peppermint Dark Chocolate Stirring Spoons
Homemade Food Gifts
A white mug is filled with steaming milk and a swirl of dark chocolate. A wooden spoon coated in thick chocolate and crushed candy canes is submerged in the drink. In the background, five more spoons are fanned out on a wooden board.
The chocolate on the spoons is decorated with bright red and white peppermint bits. These are designed to melt slowly into a hot beverage for a festive flavor boost. This gift is a fun and interactive way to enjoy a holiday hot cocoa.
Steam rises from the mug, making the scene feel warm and inviting. The spoons have a handmade, rustic look that is very charming. It is a simple and inexpensive gift that kids and adults will both enjoy.
Ingredients
1 cup dark chocolate melting wafers
1/2 cup crushed peppermint candies
12 wooden or heavy plastic spoons
Equipment
Microwave safe bowl
Parchment paper
Small tray
Clear gift bags and ties
DIY Instructions
Line a small tray with parchment paper.
Melt the dark chocolate wafers in your microwave using 30-second bursts.
Stir the chocolate until it is completely smooth and glossy.
Dip the bowl of each spoon into the melted chocolate.
Coat the spoon heavily on both sides.
Hold the spoon over the bowl for a second to let the extra chocolate drip off.
Lay the spoon flat on the parchment paper.
Sprinkle the crushed peppermint candies over the wet chocolate immediately.
Repeat this for all twelve spoons.
Place the tray in the refrigerator for twenty minutes to let the chocolate harden.
Once the chocolate is firm, slide each spoon into a small clear gift bag.
Tie the bag shut with a ribbon or a piece of twine.
39. Savory Sun Dried Tomato Pesto
Homemade Food Gifts
A small glass jar is filled with a textured, deep red sauce. The lid is covered with a green and white polka dot fabric and tied with a twine bow. A clean white label on the front identifies the contents as “Sun-Dried Tomato Pesto.”
A few whole walnuts and sun-dried tomatoes are scattered on the wooden table behind the jar. This savory spread is a bold and flavorful gift for those who love Italian cooking. It is a vibrant alternative to the usual sweet holiday treats.
The oil in the pesto gives it a glossy and rich appearance. You can see the small flecks of herbs and nuts within the thick sauce. It is a rustic and colorful addition to a savory food basket.
Ingredients
1 jar sun dried tomatoes in oil (8 ounces)
1/2 cup walnuts, lightly toasted
1/2 cup grated parmesan cheese
2 cloves garlic, peeled
1/4 cup fresh basil leaves
2 tablespoons olive oil
1/4 teaspoon salt
Equipment
Food processor or blender
Small glass jar with lid
Green fabric scrap and twine
Adhesive label
DIY Instructions
Place the sun-dried tomatoes and their oil into the bowl of a food processor.
Add the toasted walnuts, garlic cloves, and fresh basil leaves.
Pulse the mixture until it becomes a thick, chunky paste.
Add the parmesan cheese and salt.
Pour in the olive oil while the processor is running to help the sauce come together.
Stop when the pesto reaches your desired consistency.
Spoon the pesto into a clean glass jar and level the top.
Wipe any oil from the rim of the jar before sealing it with the lid.
Apply your “Sun-Dried Tomato Pesto” label to the front.
Place the green polka dot fabric over the lid.
Tie the fabric in place using a piece of twine and a simple bow.
Store the pesto in the refrigerator and advise the recipient to use it within two weeks.
40. Blueberry Chocolate Chip Pancake Mix
Homemade Food Gifts
A sturdy brown paper bag is filled with a fine, sandy pancake mix. A clear window on the front shows dark blue dried berries and small chocolate chips mixed with the powder. A small sprig of pine is clipped to the top of the bag with a silver metal clasp.
The label on the bag notes that the user just needs to add water or milk for a morning treat. It also states the shelf life is three months and calls it a “Holiday morning guest” favorite. This gift is a wonderful way to provide a stress-free breakfast for friends.
A few loose chocolate chips and dried blueberries are scattered around the base of the bag. The presentation is simple, rustic, and very practical. It is a thoughtful and useful gift for the morning after a holiday celebration.
Ingredients
2 cups all purpose flour
2 tablespoons granulated sugar
1 tablespoon baking powder
1/2 teaspoon salt
1/2 cup dried blueberries
1/2 cup mini chocolate chips
Equipment
Brown paper gift bag with window
Large mixing bowl
Whisk
Silver metal clip
Pine sprig for decoration
DIY Instructions
Whisk the flour, sugar, baking powder, and salt together in a large bowl.
Stir in the dried blueberries and mini chocolate chips.
Ensure the ingredients are distributed evenly through the flour.
Open your paper gift bag and make sure the window is clean.
Pour the mix into the bag carefully to avoid making a mess on the paper.
Fold the top of the bag down twice to seal it.
Place the silver metal clip over the center of the fold.
Tuck a small, fresh sprig of pine under the clip for a festive touch.
Apply the instruction label to the front of the bag.
Make sure the instructions clearly state: “Mix with 1 cup of milk and 1 egg. Cook on a hot griddle until golden.”
Key Takeaways
Simplicity is Key: You do not need professional skills to make impressive and tasty food gifts.
Personal Touch: Hand-labeled jars and festive ribbons make simple recipes look like luxury boutique items.
Variety Matters: Offering a mix of sweet, savory, and practical pantry staples ensures there is something for everyone.
Budget Friendly: Homemade gifts are often more affordable than high-end retail options while feeling more meaningful.
Plan Ahead: Many of these items, like infused oils or extracts, can be made in advance to save time.
Sharing homemade gifts does not have to be a difficult task. These 40 recipes provide a wide range of options for every person on your holiday list. You can mix and match sweet and savory items to create a truly unique gift basket.
The true value of these gifts lies in the time you spend making them. Even a simple jar of seasoned salt or a bag of roasted nuts shows great thoughtfulness. Your friends and family will surely appreciate the effort and the delicious results.
We hope these ideas inspire you to get creative in your kitchen this year. Homemade food is a gift that everyone can enjoy and remember long after the season ends. Happy holiday baking and gifting to you and yours.
Spread the loveWasting fresh fruit feels like an unnecessary loss in any kitchen. You might have extra berries sitting in your fridge after a big grocery haul. Valentine celebrations offer a wonderful excuse to transform…
Spread the loveThe turkey is carved, the sides are devoured, and the conversation is flowing—but then panic sets in. You realize, amidst the flurry of roasting and mashing, you completely forgot to plan the dessert.…
Spread the loveValentine’s Day often brings a lot of pressure to create something beautiful. Many bakers worry about their icing skills failing them at the last minute. This guide helps you move past those fears…