Few kitchen disappointments are worse than slicing into what you hoped would be a juicy chicken breast, only to find it dry, tough, and lacking in flavor. This common frustration plagues home cooks everywhere, regardless of their experience level. Chicken is one of the most popular and versatile proteins, yet its lean composition makes it particularly susceptible to drying out during cooking.
How to Cook Juicy Chicken
The good news is that dry chicken is not an inevitable consequence of cooking poultry. The problem usually boils down to a few simple errors related to heat control, preparation, or resting. Understanding the science behind moisture loss is the first step toward correcting these common mistakes in your kitchen.
We have compiled a definitive list of 38 essential tips and tricks designed to transform your chicken from dry and chewy into succulent, tender perfection every time you cook. These foolproof hacks cover everything from strategic preparation before the heat even turns on, to precision techniques during cooking, and crucial steps immediately before serving. Say goodbye to dry chicken forever!
1. The Magic of Brining: Hydration for Happy Chicken
How to Cook Juicy Chicken
Relevant Name: Basic Salt and Herb Chicken Brine
This simple technique is one of the most effective ways to guarantee a tender, juicy result, especially when roasting or grilling chicken breasts, which are prone to drying out. Brining involves soaking the poultry in a saltwater solution, which helps the muscle fibers relax and absorb moisture. The added herbs, like rosemary and thyme shown here, infuse a lovely, subtle flavor directly into the meat as it sits.
Moisture loss during cooking is the main enemy of juicy chicken; fortunately, brining creates a buffer against that inevitable process. The salt solution slightly denatures the protein structure, allowing the chicken to hold onto much more water before cooking begins. This preparation ensures that even if you slightly overcook the chicken, it will retain a delightful succulence that would otherwise be lost.
Preparing a brine only takes a few minutes, but it does require some foresight since the chicken needs time to soak up all that goodness. Make sure you plan ahead for at least a couple of hours of chilling time. This small investment in time pays off handsomely, resulting in noticeably richer flavor and a much more satisfying texture in every bite.
🧂 Ingredients
1 cup Kosher Salt
1/2 cup Granulated Sugar (optional, but helps with browning)
6 cups Hot Water
6 cups Cold Water
1 tablespoon Black Peppercorns (whole)
3 sprigs Fresh Rosemary
4 sprigs Fresh Thyme
4–6 Chicken Pieces (breasts, thighs, drumsticks, or a whole small chicken)
🥄 Equipment
Large Stockpot or Saucepan (for dissolving the salt)
Very Large Non-Reactive Bowl or Food-Grade Container (enough to submerge the chicken)
Whisk or Wooden Spoon
Measuring Cups and Spoons
🧑🍳 DIY Instruction
Step 1: Create the Brine Base
Take your large stockpot and pour in the 6 cups of hot water. Place the pot on the stovetop over medium heat, though you do not need to bring it to a boil.
Carefully measure out the cup of Kosher salt and the half cup of granulated sugar. Slowly add both of these to the hot water in the pot.
Use the whisk or wooden spoon to stir the mixture continuously until you can no longer see any salt or sugar granules at the bottom of the pot. It is very important that they fully dissolve.
Step 2: Cool and Infuse the Solution
Remove the pot from the heat source and pour the concentrated saltwater solution into your very large, non-reactive bowl.
Immediately add the 6 cups of cold water to this mixture. Stir everything well. Adding the cold water quickly brings the temperature down, which is essential for food safety.
Add the whole black peppercorns, the fresh rosemary sprigs, and the fresh thyme sprigs into the liquid. Let the entire mixture cool completely to room temperature before moving to the next step. Never place raw chicken into a warm brine.
Step 3: Brine the Chicken
Once the brine is fully cooled, carefully place your chicken pieces into the liquid, ensuring they are entirely submerged. You may need to use a small plate or a bowl placed on top of the chicken to keep it from floating.
Cover the bowl with plastic wrap or a secure lid.
Place the covered container in the refrigerator to chill. The ideal brining time varies by cut:
Chicken Breasts (Boneless): 30 minutes to 2 hours
Bone-in Pieces (Thighs/Drumsticks): 4 to 6 hours
Whole Chicken: 8 to 12 hours
Do not leave the chicken in the brine for too long, as it can make the texture spongy and overly salty.
Step 4: Final Preparation
After the proper brining time has passed, take the chicken out of the solution and discard the brine. Do not reuse the liquid.
Rinse the chicken pieces thoroughly under cold running water to remove any excess surface salt and debris. This step prevents the skin from becoming overly salty during cooking.
Pat the chicken completely dry with paper towels. A dry surface is critical for achieving a beautifully crispy skin, whether you are roasting or grilling.
The chicken is now ready to be seasoned, cooked, and enjoyed!
2. The Dry Brine Method: The Fridge Rest
How to Cook Juicy Chicken
Relevant Name: Salt-Crusted Air-Dried Chicken
For those who want extra crispy skin without the mess of a liquid solution, dry brining is a remarkable alternative to consider. This method relies on applying coarse salt directly to the surface of the chicken, allowing osmosis to work its magic over several hours in a cool environment. The salt draws moisture out from the meat initially, creating a concentrated salty liquid. This salty liquid is then reabsorbed back into the muscle tissue, tenderizing and flavoring the poultry from within.
An important step in this process is allowing the chicken to rest, uncovered, in the refrigerator after applying the salt. Air circulation around the poultry dramatically helps dry out the skin surface, which is crucial for achieving that desirable, crackly skin when it finally hits the heat. This extended chilling period also gives the salt enough time to fully penetrate the meat, leading to deeply seasoned and uniformly juicy results throughout.
This technique helps safeguard against a rubbery texture, transforming what might otherwise be a bland piece of chicken into a centerpiece worthy of any meal. By keeping the meat hydrated internally and drying the exterior simultaneously, you are setting the stage for success before the cooking even begins. Using a wire rack ensures maximum air exposure on all sides of the poultry.
🧂 Ingredients
1 Whole Chicken (about 4–6 pounds)
2 tablespoons Coarse Kosher Salt (use more or less based on size)
Optional: Black Pepper and Herbs (added after the dry brine and rinse, but before cooking)
🥄 Equipment
Baking Sheet
Wire Rack (that fits inside the baking sheet)
Paper Towels
🧑🍳 DIY Instruction
Step 1: Prep the Chicken
Remove the chicken from its packaging. Take out any giblets or neck pieces from the cavities and set them aside for stock or discard them.
Pat the entire surface of the chicken, both inside the cavity and all over the skin, very dry using paper towels. Moisture is the enemy of a crisp crust, so be thorough.
Step 2: Apply the Salt
Measure out the coarse Kosher salt. Remember, the general rule is about 1 teaspoon of salt per pound of chicken.
Liberally sprinkle the salt all over the surface of the chicken, including the breast, legs, and back. Make sure to get some salt into the cavity as well for even seasoning.
Gently rub the salt into the skin to ensure it adheres evenly to the entire surface.
Step 3: The Refrigerator Rest (The Dry Brine)
Place the wire rack onto the baking sheet. This setup allows air to circulate entirely around the chicken.
Place the salted chicken directly onto the wire rack.
Transfer the baking sheet and chicken to the refrigerator, uncovered. This rest period should last anywhere from 6 to 24 hours. Do not cover the chicken, as this traps moisture and defeats the purpose of the dry brine.
Step 4: Final Preparation
After the resting period, the skin should look noticeably drier and tighter. Before cooking, there is no need to rinse the chicken, which would add moisture back.
If the amount of visible salt seems excessive, you can gently brush some away with your fingers or a clean cloth.
Add any other desired seasonings, such as pepper or paprika, just before placing the chicken in the oven or smoker.
The chicken is now conditioned for maximum flavor and crispness.
3. The Fat Shield: Bacon-Wrapped Chicken
How to Cook Juicy Chicken
Relevant Name: Herb and Pepper Bacon-Wrapped Breasts
Lean cuts, like the boneless, skinless chicken breast shown here, often suffer from dryness because they lack internal fat to protect the muscle fibers during cooking. The simple solution is to add a natural fat layer on the outside, and flavorful bacon strips are an excellent choice for this. The bacon acts like a delicious, self-basting blanket that slowly renders its fat as the chicken cooks in the oven or on the grill.
As the bacon fat melts, it continuously lubricates the surface of the chicken, effectively keeping the meat underneath moist and succulent. Furthermore, wrapping the meat helps to moderate the high heat from the cooking environment. It ensures the delicate proteins inside cook more gently, preventing them from seizing up and expelling too much of their natural moisture before the internal temperature is reached.
The savory saltiness of the bacon penetrates the exterior of the breast meat, adding an incredible depth of flavor that complements the mild poultry taste. Remember to season the outside generously with coarse pepper and fragrant herbs, like the thyme sprigs visible here, to enhance the overall experience. This method turns a typically quick-cooking, dry cut into a truly satisfying, juicy meal.
🧂 Ingredients
2 Boneless, Skinless Chicken Breasts
6–8 slices Thinly Sliced Bacon
1 tablespoon Olive Oil or Melted Butter
1 teaspoon Dried Thyme or Rosemary
1/2 teaspoon Coarse Black Pepper
Salt (Use sparingly, as bacon is already very salty)
🥄 Equipment
Baking Sheet
Parchment Paper or Aluminum Foil
Small Bowl (for mixing oil/herbs)
Basting Brush
Tongs
🧑🍳 DIY Instruction
Step 1: Prepare the Chicken and Season
Place each chicken breast onto a clean cutting board. If the breasts are very thick on one end, you can lightly pound them with the flat side of a meat mallet to achieve a more uniform thickness. This helps the chicken cook evenly.
In the small bowl, combine the olive oil or melted butter with the dried thyme and coarse pepper. Stir this mixture well.
Brush a light coating of this seasoned oil mixture onto the exterior of both chicken breasts. You can use a very small amount of salt here if the chicken was not previously brined, but remember the bacon will add significant salinity.
Step 2: Wrap the Bacon
Take your bacon slices. Depending on the size of your chicken breast, you will need three to four strips for each piece.
Starting at one end of the chicken breast, carefully wrap a slice of bacon around the meat on a slight diagonal. The bacon should slightly overlap with itself.
Continue wrapping with the remaining slices until the entire exterior of the chicken breast is fully covered, ensuring no large gaps remain. Tuck the ends of the bacon underneath the breast to hold them in place.
Step 3: Cook the Chicken
Preheat your oven to 400°F (200°C). Line a baking sheet with parchment paper or foil for easier cleanup.
Place the bacon-wrapped breasts onto the prepared baking sheet, making sure they are spaced apart.
Bake for approximately 20 to 25 minutes. The exact cooking time will depend on the thickness of the chicken.
Monitor the internal temperature using a meat thermometer; the chicken is safely cooked when it reaches 165°F (74°C) at the thickest part. The bacon should be beautifully crisp and golden brown.
Step 4: Rest Before Serving
Remove the chicken from the oven immediately when the thermometer reads 165°F (74°C).
Transfer the chicken to a clean plate or cutting board using tongs.
Allow the wrapped breasts to rest for 5 to 10 minutes before slicing. This resting period is essential, as it allows the internal juices to redistribute throughout the meat, guaranteeing maximum moisture.
4. Even Cooking: Pounding Chicken Thin
How to Cook Juicy Chicken
Relevant Name: Uniformly Thin Chicken Cutlets
One major reason chicken breasts become tough and dry is that they cook unevenly. Chicken breasts naturally taper, meaning the thin end finishes cooking long before the thickest part is safely done. By the time the center reaches the required temperature, the edges have been drastically overcooked, resulting in that dreaded chewy, sawdust texture. Fortunately, a simple technique using a meat tenderizer can fix this issue completely.
Pounding the chicken to an even thickness ensures that every bit of the meat cooks at the exact same rate. This simple step guarantees that the entire cutlet will finish cooking at precisely the same moment, leaving no room for dry, stringy ends. Furthermore, flattening the meat shortens the overall cooking time, reducing the duration the chicken is exposed to high heat.
This process also slightly tenderizes the muscle fibers by physically breaking them down, which contributes to a more delicate and satisfying final texture. Whether you are planning to pan-fry, grill, or bake, taking the time to pound your chicken makes a considerable difference. It is a quick and straightforward preparation that leads to consistently moist results.
🧂 Ingredients
2 Boneless, Skinless Chicken Breasts
🥄 Equipment
Meat Mallet or Tenderizer (or a heavy-bottomed pan)
Large Cutting Board
Plastic Wrap or Ziploc Bags
🧑🍳 DIY Instruction
Step 1: Prepare the Work Surface
Place your cutting board on a stable counter. Lay out a large sheet of plastic wrap or grab two large, heavy-duty Ziploc bags.
Place one chicken breast in the middle of the cutting board.
Cover the chicken breast completely with a second sheet of plastic wrap or seal it inside a Ziploc bag. This protective layer prevents bacteria from spreading and keeps tiny pieces of chicken from flying around your kitchen.
Step 2: Pound the Chicken
Take your meat mallet. Use the flat side of the mallet, or the smooth side if you have a dual-sided tool. Avoid using the spiky, jagged side, as this can shred the meat.
Begin gently but firmly pounding the thickest part of the chicken breast.
Use smooth, even strokes, working outwards from the center to the edges. Do not strike the same spot repeatedly; move the mallet around systematically.
Continue pounding until the entire breast is a uniform thickness, ideally about 1/2 to 3/4 inch thick.
Step 3: Repeat and Cook
Remove the flattened chicken breast and repeat the process with the second piece.
Once all the chicken is uniformly thin, remove the plastic wrap or bag.
The pounded cutlets are now ready for seasoning and cooking via your chosen method. They will cook very quickly, so watch the time closely!
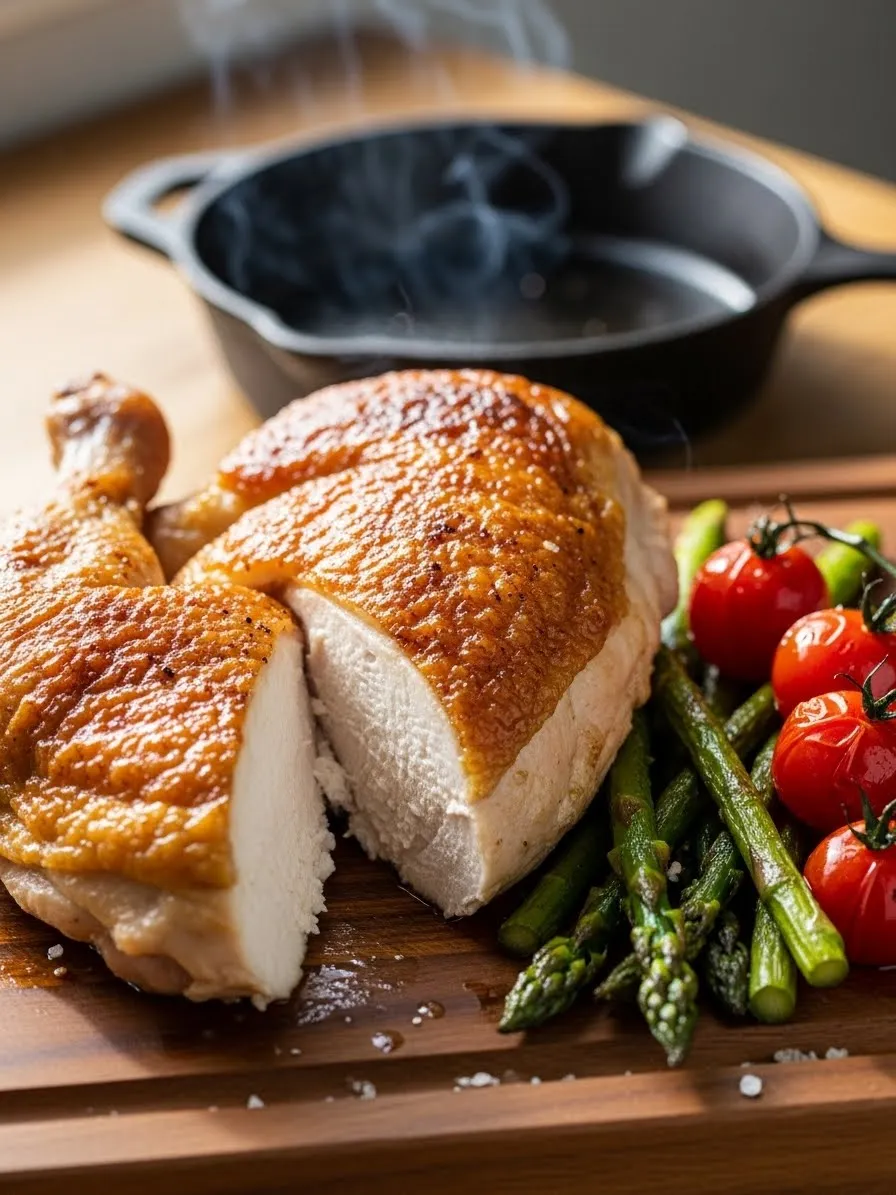
5. The Critical Pause: Post-Cook Resting
How to Cook Juicy Chicken
Relevant Name: Essential Resting Time for Juiciness
After you have cooked your chicken perfectly, the single most critical step to locking in moisture is letting the meat rest before slicing. When chicken is exposed to high heat, the muscle fibers contract forcefully, pushing all the internal juices toward the center of the meat. If you slice into the chicken immediately upon removing it from the oven, those pressured juices will escape onto the cutting board, as you can see in the image, resulting in a noticeably drier meal.
Giving the chicken time to rest allows the internal heat to stabilize slightly and, most importantly, permits the contracted muscle fibers to relax. As the fibers relax, they reabsorb and redistribute those precious internal liquids throughout the entire cut of meat. This process ensures that every slice remains incredibly tender and juicy, rather than having all the flavor pool uselessly on the board.
A whole roasted chicken, like the one pictured here, requires a minimum of fifteen minutes of resting time; individual pieces need less. Tent the chicken loosely with foil while it rests to keep it warm. This patience will be richly rewarded with maximum tenderness and succulence when you finally carve and serve your poultry.
🧂 Ingredients
Any cooked chicken (whole roast, breast, thighs, etc.)
🥄 Equipment
Cutting Board (preferably one with a groove around the edge to catch any escaping juices)
Aluminum Foil
Meat Thermometer (to verify initial doneness)
🧑🍳 DIY Instruction
Step 1: Confirm Doneness
When you believe the chicken is finished cooking, immediately insert a meat thermometer into the thickest part of the meat, avoiding the bone.
The internal temperature must read 165°F (74°C) for safe consumption. If it hasn’t reached this level, return it to the heat for a few more minutes.
Step 2: Transfer and Tent
Once the chicken reaches 165°F (74°C), remove it promptly from the oven, grill, or pan. Overcooking starts the moment it hits this temperature.
Carefully transfer the chicken to a clean cutting board.
Take a sheet of aluminum foil and loosely tent it over the chicken. The foil should not be sealed tightly; it just needs to create a small dome to trap some heat. This keeps the meat warm while allowing steam to escape gently.
Step 3: Wait Patiently
Allow the chicken to rest, undisturbed, for the appropriate time:
Whole Roasts: 15 to 20 minutes
Thick Breasts or Thighs: 10 minutes
Thin Cutlets or Small Pieces: 5 minutes
Do not rush this period. The resting time is an essential part of the cooking process.
Step 4: Slice and Serve
After the resting period is complete, remove the foil.
Slice the chicken against the grain for maximum tenderness.
Enjoy the wonderfully juicy results!
6. The Heat Secret: Accounting for Carryover
How to Cook Juicy Chicken
Relevant Name: Master the Art of Carryover Cooking
Professional cooks always remove meat from the heat source before it reaches its target internal temperature. This practice acknowledges a crucial principle called carryover cooking, which is often ignored by home chefs, resulting in dry chicken. Heat stored in the exterior of the meat continues to travel toward the cooler center after the chicken leaves the oven or stovetop. This residual cooking can raise the temperature by several degrees.
Failing to account for carryover cooking means your chicken will almost certainly be overcooked by the time you serve it. You should aim to pull the chicken from the heat when it is about 5 degrees below the final safe temperature of 165°F (74°C). The stored heat will naturally complete the cooking process during the resting period.
This technique is incredibly important for avoiding that dry line of protein that develops just beneath the skin of an overcooked breast. By understanding and utilizing the carryover factor, you guarantee the meat finishes precisely at the right point. Always use a reliable meat thermometer to monitor the internal temperature; this is the only way to successfully execute this hack and consistently achieve moist, tender results.
🧂 Ingredients
Any cut of chicken (breast, thigh, whole)
🥄 Equipment
Reliable Instant-Read Meat Thermometer
Oven, Grill, or Stovetop (Cast Iron Pan is shown)
🧑🍳 DIY Instruction
Step 1: Know Your Target Temperature
Remember that the safe final internal temperature for chicken is 165°F (74°C).
To utilize carryover cooking, your target removal temperature should be 160°F (71°C). This leaves a 5-degree window for the residual heat to finish the cooking process during the rest.
Step 2: Monitor and Remove
Begin cooking your chicken as usual, whether on the grill, in a pan, or in the oven.
About three-quarters of the way through the cooking time, start checking the internal temperature with your instant-read thermometer. Insert the probe into the thickest part of the meat.
Continue checking until the temperature reaches 160°F (71°C).
As soon as the thermometer hits this mark, remove the chicken immediately from the heat source. Do not let it sit in the hot pan or oven.
Step 3: Rest to Finish
Transfer the chicken to a clean cutting board.
Tent the meat loosely with aluminum foil.
Allow the chicken to rest for the appropriate time (10–20 minutes, depending on the size). During this rest, the temperature will slowly climb those last few degrees due to the stored heat.
Before slicing, you can quickly check the temperature one last time to ensure it reached 165°F (74°C) during the rest. Slice and enjoy the incredibly tender texture.
7. The Precise Cook: Sous Vide Method
How to Cook Juicy Chicken
Relevant Name: Low-Temperature Water Bath Cooking
For ultimate control over the cooking process and guaranteed moisture retention, the sous vide method stands unmatched. Sous vide, which means “under vacuum” in French, involves sealing food in an air-tight bag and cooking it in a precisely temperature-controlled water bath. This technique is especially useful for chicken breasts, which are notoriously easy to overcook and ruin.
Traditional cooking relies on high heat, which inevitably leads to the overcooking of the outer layers while the center catches up. This method completely eliminates that risk. You set the water temperature to the exact final temperature you desire—say, 150°F (66°C) for extra succulent chicken—and the meat simply cannot rise above that point. This gentle, extended cooking ensures the meat is cooked through, pasteurized, and unbelievably tender without losing any of its internal juices.
Since the water bath temperature is so low, you have a much larger time window to remove the chicken, meaning you can achieve mind-blowingly juicy results with almost no effort. The final, quick sear in a hot pan, often called the “finish,” creates the necessary exterior crust. The interior of the chicken, however, remains consistently moist and perfectly cooked from edge to edge.
🧂 Ingredients
2 Boneless, Skinless Chicken Breasts
1 tablespoon Olive Oil
Salt and Black Pepper to taste
Optional: Garlic and Fresh Thyme (added to the bag)
🥄 Equipment
Sous Vide Immersion Circulator
Large Pot or Food-Grade Container
Vacuum Sealer or Ziploc Freezer Bags (gallon size)
Large Skillet or Cast Iron Pan (for finishing)
Tongs
🧑🍳 DIY Instruction
Step 1: Season and Bag the Chicken
Fill your large pot or container with water and attach the immersion circulator. Turn it on and set the temperature. A range of 145°F to 155°F (63°C to 68°C) is generally preferred for very tender chicken breasts.
Season the chicken breasts generously with salt and pepper. Add a splash of olive oil, a clove of smashed garlic, and a few sprigs of thyme into the bag, if desired.
Place the seasoned chicken into a vacuum seal bag or a heavy-duty Ziploc freezer bag. If using a Ziploc bag, carefully displace the air by slowly lowering the sealed bag into the water, allowing the water pressure to push the air out just before sealing the last corner (the water displacement method).
Step 2: Cook in the Water Bath
Once the water reaches the set temperature, fully submerge the sealed bag containing the chicken.
Cook the chicken for a minimum of 1 to 2 hours. Since the temperature is precisely controlled, you do not need to worry about overcooking during this period. The longer time ensures a tender texture, but the meat will not dry out.
Step 3: Finish with a Sear
Remove the chicken from the bag and pat it extremely dry with paper towels. Discard the liquid and herbs from the bag. A dry surface is vital for a good sear.
Heat a skillet or cast iron pan over high heat with a little oil or butter until it is smoking hot.
Carefully place the chicken in the hot pan and sear it for only 60 to 90 seconds per side. This is solely to create a golden-brown crust and should not affect the internal temperature significantly.
Remove, slice, and serve immediately. No resting is required because the sous vide process already allows the juices to stabilize.
8. The Probiotic Plump: Yogurt Marinade
How to Cook Juicy Chicken
Relevant Name: Creamy Spice Yogurt Marinade
Marinating chicken in yogurt is a time-tested secret for delivering unbelievable tenderness, especially common in Middle Eastern and Indian cooking. Unlike acidic marinades (like those using citrus or vinegar) which can sometimes cook the exterior of the chicken and make it tough, the mild acidity of yogurt works gently to break down the proteins. This process results in meat that is incredibly tender and moist.
The key component here is lactic acid, which is found in abundance in yogurt. Lactic acid slowly tenderizes the muscle fibers without causing them to seize up. Furthermore, the thick consistency of the yogurt creates a protective coating around the meat. This layer helps to insulate the chicken from high heat during cooking, actively preventing moisture loss and guaranteeing a juicier final product.
Additionally, the creamy base holds spices and flavorings much better than an oil-based marinade, allowing the seasoning to truly penetrate the chicken. Notice the visible cumin seeds and paprika in this image; these spices will infuse deeply into the meat over time. This technique is an easy, flavorful path to succulent chicken on the grill, in the oven, or even pan-fried.
🧂 Ingredients
2 pounds Chicken Pieces (thighs, drums, or cubes)
1 cup Plain Full-Fat Yogurt (Greek yogurt is a great choice)
1 tablespoon Ginger-Garlic Paste (or 1 tsp each of ground ginger and garlic powder)
1 teaspoon Cumin Seeds (or ground cumin)
1 teaspoon Smoked Paprika (or regular paprika)
1/2 teaspoon Turmeric Powder
1 teaspoon Kosher Salt
1/2 teaspoon Black Pepper
🥄 Equipment
Large Mixing Bowl
Whisk or Spoon
Plastic Wrap
🧑🍳 DIY Instruction
Step 1: Mix the Marinade
In the large mixing bowl, combine the plain yogurt, ginger-garlic paste, cumin, paprika, turmeric powder, salt, and pepper.
Use a spoon or whisk to thoroughly mix all the ingredients until you have a smooth, uniform, creamy marinade.
Step 2: Marinate the Chicken
Pat the chicken pieces dry with paper towels. Scoring the thicker pieces with two or three shallow cuts can help the marinade penetrate more deeply.
Add the chicken pieces to the mixing bowl with the yogurt marinade.
Use your hands or a spoon to thoroughly coat every piece of chicken with the creamy mixture. Ensure the chicken is completely covered.
Step 3: Chill and Wait
Cover the bowl tightly with plastic wrap or transfer the marinated chicken to a large, sealable bag.
Place the chicken in the refrigerator. Marinate for at least 3 hours, but the results are even better if left for 6 to 12 hours. Do not marinate for more than 24 hours, as the acidity can eventually break down the meat too much.
Step 4: Cook
When ready to cook, remove the chicken from the refrigerator about 30 minutes prior to cooking.
Remove the pieces from the marinade, allowing any excess yogurt to drip off, but do not wipe or rinse the yogurt coating away.
Grill, roast, or pan-fry the chicken as instructed by your recipe. The yogurt creates a lovely char and crust, keeping the interior juicy.
9. The Velveting Trick: Baking Soda Tenderizer
How to Cook Juicy Chicken
Relevant Name: Velveting for Silky Smooth Texture
If you have ever had wonderfully tender and silky stir-fry chicken at an Asian restaurant, you have likely encountered the technique known as velveting. While traditionally done with cornstarch and egg whites, a simple and highly effective shortcut involves using baking soda. Just a tiny amount of baking soda can dramatically alter the pH of the chicken’s surface, which leads to immediate and noticeable tenderization.
The alkalinity of the baking soda helps raise the pH on the surface of the meat. This elevated pH makes it much harder for the proteins to contract tightly and expel moisture when they are exposed to high heat. As a result, the chicken stays incredibly plump and moist, taking on that signature velvety smooth mouthfeel. This technique is particularly valuable for thinly sliced pieces destined for fast-cooking applications like stir-fries.
You only need a very small amount of this common pantry staple to achieve remarkable results. However, using too much baking soda can give the chicken an unpleasant soapy taste, so precision is important here. Remember to always rinse the chicken thoroughly after the treatment to wash away any residual alkaline flavor before cooking.
🧂 Ingredients
1 pound Boneless, Skinless Chicken (sliced into stir-fry strips or cubes)
1 teaspoon Baking Soda
1 tablespoon Water or other liquid marinade (like soy sauce or oil)
🥄 Equipment
Medium Mixing Bowl
Measuring Spoon
Colander or Fine Mesh Sieve
🧑🍳 DIY Instruction
Step 1: Prep and Mix
Place your sliced or cubed chicken pieces into the medium mixing bowl.
In a separate small dish, dissolve the teaspoon of baking soda in the tablespoon of water. A paste will form.
Pour the dissolved baking soda mixture over the chicken pieces in the bowl.
Use your hands or a spoon to toss the chicken thoroughly, ensuring every piece is lightly coated in the mixture.
Step 2: Rest and Rinse
Allow the chicken to rest in the baking soda solution for only 15 to 20 minutes. Do not leave it for longer, or the texture can become unpleasant.
After the resting period, transfer the chicken pieces to a colander or fine mesh sieve.
Rinse the chicken very thoroughly under cold running water for at least a minute. This is essential to remove any trace of the baking soda flavor.
Step 3: Pat Dry and Cook
Place the rinsed chicken on a plate lined with paper towels. Pat the chicken completely dry.
The chicken is now ready to be seasoned, tossed with cornstarch (if desired for a traditional coating), and cooked quickly in your stir-fry or skillet.
10. The Moisture Shield: Mid-Cook Basting
How to Cook Juicy Chicken
Relevant Name: Glazing for Moisture and Color
Basting is a simple yet powerful technique that serves a dual purpose: it keeps the exterior of the chicken moist and develops a rich, glossy, caramelized crust. Applying a sauce, glaze, or simple butter-and-herb mixture (as shown here) to the chicken’s surface during the final stages of cooking adds a layer of fat and moisture that works against the drying effects of oven heat. It is a proactive step to ensure the surface does not turn into a dry crust.
While basting can involve the chicken’s own rendered juices, using an external sauce, especially one containing sugar or fat, is more effective. The sugar in the glaze caramelizes beautifully as it cooks, enhancing the color and forming a protective barrier that seals in the meat’s natural moisture. This layer stops the evaporation that leads to dry skin and meat underneath.
It is important to time your basting correctly, though. If you apply a sugary glaze too early, the sugars will burn long before the chicken is done cooking. For this reason, baste during the last 10 to 15 minutes of the cooking time. The final result is a chicken with an enticing, flavorful crust and a juicy interior.
🧂 Ingredients
Any cut of chicken (roasted or grilled)
Simple Basting Glaze:
2 tablespoons Melted Unsalted Butter or Olive Oil
2 tablespoons Honey, Maple Syrup, or Brown Sugar (for caramelization)
1 teaspoon Dried Herbs (thyme, rosemary, or oregano)
1/2 teaspoon Garlic Powder
🥄 Equipment
Small Bowl or Ramekin
Whisk
Silicone or Natural Fiber Basting Brush
🧑🍳 DIY Instruction
Step 1: Prepare the Glaze
In the small bowl, combine the melted butter or oil, the sweetener of your choice (honey, maple syrup, or brown sugar), dried herbs, and garlic powder.
Whisk the mixture until the ingredients are fully incorporated.
Step 2: Time the Application
Place your chicken in the oven or on the grill to cook. Do not baste yet!
Determine the total cooking time for your chicken. You want to start basting only when the chicken is about 80% finished—typically during the final 10 to 15 minutes. For instance, if your chicken takes 45 minutes to roast, start basting around the 30-minute mark.
Step 3: Baste and Repeat
Use the basting brush to generously apply a layer of the glaze mixture evenly over the entire exposed surface of the chicken.
Return the chicken to the oven or grill.
Allow the glaze to set for about 5 minutes, then apply a second, thinner layer of the glaze. This creates a deeper color and a more robust flavor.
Step 4: Finish
Continue cooking until the internal temperature reaches 165°F (74°C).
Remove the chicken, let it rest, and enjoy the beautifully caramelized, juicy meat.
11. Choose Wisely: Selecting the Right Cut
How to Cook Juicy Chicken
Relevant Name: Prioritizing Fatty Cuts for Moisture
The type of chicken you choose is the first and most fundamental decision you make in the quest for juicy poultry. Cuts like the skin-on, bone-in thighs and drumsticks, clearly visible alongside leaner options in the butcher’s display, naturally contain significantly more fat and connective tissue. This higher fat content acts as a safeguard against drying out during cooking.
Fat adds flavor and, more importantly, keeps the meat lubricated while it cooks. Cuts with bones and skin offer further protection, slowing the transfer of heat and ensuring a gentler cooking process. Choosing these fattier options provides a much larger margin for error, meaning they stay wonderfully moist even if you slightly misjudge the cooking time.
If you insist on using breast meat, make sure you choose a piece that looks plump and fresh, with good color, as seen here in the selection. However, for a truly foolproof outcome, especially for slow-cooking methods or grilling, always opt for the cuts with more inherent moisture, such as the darker, richer meat from the leg.
🧂 Ingredients
Bone-in, skin-on Chicken Thighs or Drumsticks
🥄 Equipment
None specific to selection, but a reliable butcher/market helps
🧑🍳 DIY Instruction
Step 1: Assess Your Recipe
Before shopping, determine the cooking method you will use:
High Heat/Fast Cooking (Grilling, Stir-fry): Choose fatty cuts (thighs) or thin, even cuts (pounded breast, see Hack 4).
Low Heat/Slow Cooking (Braising, Stews): Fatty, tough cuts like thighs, drums, or wings are strongly preferred, as they become unbelievably tender.
Roasting: Whole chicken or bone-in, skin-on pieces.
Step 2: Examine the Meat
Look closely at the available chicken pieces. Prioritize cuts that have a visible layer of fat, especially on the skin.
The meat should look vibrant, not dull or gray. Avoid any packages that show excessive liquid pooling inside.
If selecting a whole chicken, choose one that feels heavy for its size, indicating good meat-to-bone ratio and moisture content.
Step 3: Purchase and Store
Ask your butcher about the freshness and handling of the chicken.
Store the chicken in the coldest part of your refrigerator until you are ready to prepare it. If freezing, make sure it is wrapped tightly to prevent freezer burn, which causes dryness.
12. Acid Infusion: The Citrus Marinade
How to Cook Juicy Chicken
Relevant Name: Rosemary and Lemon Quick Marinade
A flavorful liquid marinade is one of the simplest ways to add both flavor and moisture to chicken before it even starts cooking. Marinating involves soaking the meat in a mixture, often containing an acid like the lemon slices shown here, combined with oil, herbs, and spices. The acid helps to slightly break down the outer surface of the chicken.
When the proteins on the surface are slightly broken down by the acid, they become more open to absorbing the liquid around them. This infusion of external moisture helps counteract the inevitable drying that happens once the heat is applied. Additionally, the oil in the marinade contributes a layer of fat, further protecting the meat during cooking.
It is crucial to limit the marinating time when using strong acids like lemon juice or vinegar. If the chicken sits in a highly acidic bath for too long, the exterior can actually turn tough and rubbery. For chicken breasts, aim for a maximum of four hours, but even thirty minutes provides a worthwhile flavor boost and moisture benefit.
🧂 Ingredients
2 Boneless, Skinless Chicken Breasts
1/4 cup Olive Oil
1/4 cup Fresh Lemon Juice
4 cloves Garlic, sliced
3 sprigs Fresh Rosemary
1 teaspoon Salt
1/2 teaspoon Black Pepper
🥄 Equipment
Small Bowl (for mixing)
Whisk
Non-Reactive Container or Sealable Plastic Bag
🧑🍳 DIY Instruction
Step 1: Mix the Marinade
In the small bowl, whisk together the olive oil and fresh lemon juice until they are well combined.
Add the sliced garlic, fresh rosemary sprigs, salt, and pepper to the oil and juice mixture. Stir well to integrate the seasonings.
Step 2: Coat the Chicken
Place the chicken breasts into the non-reactive container or the sealable plastic bag.
Pour the entire marinade mixture over the chicken, ensuring the liquid covers the meat completely. Use your hands to gently massage the marinade into the chicken.
Step 3: Chill and Time
Seal the container or bag and place the marinating chicken in the refrigerator.
Marinate for a minimum of 30 minutes for flavor enhancement. For deeper flavor and moisture retention, you can go up to 4 hours, but absolutely no longer than that with strong citrus acid. The short time frame is key.
Step 4: Cook
Remove the chicken from the marinade. Do not wipe off all the herbs and oil; a small amount will help during cooking. Discard the remaining marinade.
Cook the chicken immediately using your preferred method (grill, oven, or pan-fry).
13. Internal Basting: Compound Butter Injection
How to Cook Juicy Chicken
Relevant Name: Herb Butter Injection for Maximum Juiciness
One innovative way to defeat dryness in lean cuts is to inject fat and flavor directly into the center of the meat. This technique uses a compound butter—butter mixed with fresh herbs and seasoning, like the one being inserted here—which melts during cooking and actively bastes the chicken from the inside out. This approach bypasses the skin and goes straight to the meat fibers that need moisture the most.
Butter is roughly 80% fat, making it an excellent medium for internal moisture delivery. As the butter melts under the heat of the oven or grill, it distributes its fat and the flavor of the herbs directly into the muscle tissue. This creates pockets of moisture that prevent the fibers from contracting too tightly and expelling all their natural juices.
This method works especially well for large, thick cuts like a whole chicken breast or turkey breast, where the center is most likely to dry out before the exterior browns. Using a specialized meat injector ensures the flavor and fat are distributed evenly throughout the poultry, guaranteeing a rich, succulent bite every single time.
🧂 Ingredients
1/2 cup Unsalted Butter, softened to room temperature
2 tablespoons Fresh Herbs, finely chopped (rosemary, thyme, or parsley)
1 clove Garlic, minced
1/2 teaspoon Salt
1/4 teaspoon Black Pepper
2 large Boneless, Skinless Chicken Breasts or a Whole Chicken
🥄 Equipment
Small Bowl
Fork or Spoon
Meat Injector (syringe)
🧑🍳 DIY Instruction
Step 1: Make the Compound Butter
Place the softened butter in the small bowl. If the butter is too cold, it will clog the injector.
Add the chopped fresh herbs, minced garlic, salt, and pepper to the butter.
Use a fork or spoon to mash and thoroughly mix the ingredients until everything is fully combined and the mixture is uniform.
Step 2: Load the Injector
Scoop the compound butter into the chamber of the meat injector. The injector should have a wide needle opening to accommodate the herbs.
If the butter is too thick to draw up, you can gently warm it slightly more, but ensure it remains mostly solid.
Step 3: Inject the Chicken
Take the chicken breast or whole chicken. Slowly and carefully insert the needle of the injector deep into the thickest parts of the meat.
Slowly push the plunger to release a small amount of the butter mixture, forming pockets of flavor inside the meat.
Withdraw the needle slightly and inject in several different spots across the breast, making sure to distribute the butter evenly. You want to avoid injecting too much in one spot, which would cause the butter to leak out.
Wipe away any butter that leaks onto the exterior. The chicken is now ready to cook.
14. Vertical Cooking: The Beer Can Method
How to Cook Juicy Chicken
Relevant Name: Upright Roasting for Even Heat
Cooking a whole chicken vertically is a smart strategy to promote extremely even heat distribution, resulting in thoroughly cooked and exceptionally juicy poultry. In the classic beer can method, the chicken is propped upright on a rack or can, allowing the air to circulate around all sides, including the cavity. This circulation helps the darker leg and thigh meat cook simultaneously with the leaner breast meat.
When the chicken is roasted in this position, the fat from the top (the breast) drips down over the legs and thighs. This action naturally bastes the meat below, enhancing the flavor and keeping the lower parts moist. Furthermore, because the breast is sitting higher, it is further away from the most intense heat, preventing it from drying out before the dark meat is finished.
The unique appearance of the chicken standing tall often surprises guests, but the true benefit is the wonderfully succulent result. While a specific stand is pictured here, many people successfully use a partially filled beer or soda can, which adds steam from the internal liquid to the cooking process, further enhancing the internal moisture.
🧂 Ingredients
1 Whole Chicken (about 4–5 pounds)
1 teaspoon Salt
1/2 teaspoon Pepper
1 tablespoon Oil
Optional: 1 can of Beer or Soda (standard 12 oz can)
🥄 Equipment
Vertical Roasting Rack or Chicken Roaster Stand (or one aluminum can)
Baking Sheet (to catch drippings)
🧑🍳 DIY Instruction
Step 1: Prep the Chicken
Remove any giblets from the chicken cavity and pat the entire chicken dry with paper towels.
Rub the chicken all over with a light coating of oil. Season the exterior generously with salt and pepper.
Step 2: Prepare the Roaster (Optional Beer Can)
Using a Vertical Rack: Place the rack on a sturdy baking sheet. The chicken will fit over the center pin.
Using a Can: Open the can of beer or soda and pour out or drink about half of the liquid. The remaining liquid will steam and moisten the bird. Place the half-full can on the baking sheet.
Step 3: Position the Chicken
Carefully insert the rack pin or the open can into the main cavity of the chicken. The chicken should sit upright and stable on the baking sheet. The legs and can act like a tripod for balance.
If roasting in the oven, preheat the oven to 425°F (220°C).
Step 4: Cook and Monitor
Place the baking sheet with the upright chicken into the preheated oven or on a hot grill.
Cook for approximately 1 hour and 15 minutes to 1 hour and 30 minutes. The skin should turn a deep, appealing golden brown.
Check the temperature using a thermometer in the thickest part of the thigh; it should read 165°F (74°C).
Carefully remove the chicken, being cautious of the hot can or rack. Allow it to rest for 15 minutes before carving.
When pan-frying chicken, a technique often employed by restaurant chefs is to aggressively baste the chicken with hot fat during the final moments of cooking. Once the chicken thigh or breast is nearly cooked, a large amount of butter, along with aromatics like the garlic cloves and thyme sprigs shown, is added to the skillet. The butter foams up and is repeatedly spooned over the chicken.
This method serves to rapidly raise the temperature of the chicken’s surface while simultaneously bathing it in flavorful, melted fat. This action helps to create an incredibly crispy, golden-brown skin while the hot fat penetrates the meat, actively forcing moisture back into the surface layers. The constant application of fat prevents the outer layer from drying out and becoming tough.
The addition of fresh herbs and garlic infuses the meat with a fantastic aromatic depth that a simple dry seasoning cannot achieve. The residual foaming butter, known as beurre noisette (brown butter), adds a beautiful, nutty complexity to the final sauce. This is a quick and effective way to ensure bone-in cuts finish their cooking with exceptional juiciness.
🧂 Ingredients
2 Chicken Thighs (bone-in, skin-on)
1 tablespoon Olive Oil
1/2 stick Unsalted Butter (4 tablespoons)
4 cloves Garlic, smashed
4 sprigs Fresh Thyme or Rosemary
Salt and Pepper to taste
🥄 Equipment
Oven-Safe Skillet (preferably cast iron or stainless steel)
Large Spoon (for basting)
Tongs
🧑🍳 DIY Instruction
Step 1: Sear the Chicken
Season the chicken thighs heavily with salt and pepper, particularly on the skin side.
Heat the olive oil in your skillet over medium-high heat.
Once the oil is hot, place the chicken thighs skin-side down in the skillet. Reduce the heat slightly to medium.
Sear without moving for 8 to 10 minutes, until the skin is deep golden brown and rendered crisp. Flip the chicken using tongs.
Step 2: Add Aromatics and Butter
Continue cooking the chicken on the flesh side for 5 minutes.
Add the butter, smashed garlic cloves, and fresh thyme sprigs to the skillet. The butter should melt and foam around the chicken.
Step 3: Baste Generously
Tilt the skillet slightly toward you so the foaming butter pools at one edge.
Use the large spoon to scoop up the hot, foaming butter mixture and continuously pour it over the top of the chicken thigh. Baste for 1 to 2 minutes. This process finishes the cooking while imparting incredible flavor and moisture.
Step 4: Finish and Serve
Check the internal temperature; the thigh should reach 165°F (74°C).
Remove the chicken and let it rest for 5 minutes before serving. Drizzle with any remaining butter from the skillet.
16. Steam Assistance: Air Fryer Hydration
How to Cook Juicy Chicken
Relevant Name: Water Pan Hack for Moist Air-Fried Chicken
The air fryer is fantastic for achieving crispy chicken skin quickly, but its ultra-hot, dry circulating air can strip the meat of internal moisture, often leading to a dry result. A brilliant way to combat this intense dryness is to introduce a small amount of steam into the cooking chamber. This is achieved by placing a small, heat-safe dish of water into the air fryer basket or drawer, as shown here.
The water turns into steam as the machine heats up, adding humidity to the typically arid environment. The presence of steam helps slow down the rate at which the chicken’s internal moisture evaporates. Instead of the surface drying out instantly, the steam-enriched air keeps the exterior moist longer, ensuring the inside remains beautifully succulent.
This hack is especially useful when cooking lean cuts, like chicken breasts or nuggets, which require high heat for browning but are highly susceptible to drying. The steam helps the meat cook gently while still allowing the crisping process to occur. Adding just a little water makes a noticeable difference in the final texture of air-fried poultry.
🧂 Ingredients
Any chicken cut suitable for air frying (wings, tenders, nuggets)
1/2 cup Water (for steaming)
🥄 Equipment
Air Fryer
Small, Oven-Safe Ramekin or Dish (must fit in the air fryer drawer)
Tongs
🧑🍳 DIY Instruction
Step 1: Prep the Chicken
Prepare your chicken as usual: pat it dry, season it, or coat it in a light layer of oil and breading if desired.
Preheat your air fryer to the temperature specified in your recipe (e.g., 375°F or 190°C).
Step 2: Add the Steam
Pour about half a cup of water into the small, oven-safe ramekin.
Carefully place the ramekin directly into the air fryer drawer or on the very bottom layer beneath the main cooking basket. Ensure it is stable and will not tip over.
Step 3: Cook the Chicken
Place the chicken into the air fryer basket, making sure it is not directly sitting in the water and that the chicken is in a single layer for proper air circulation.
Close the drawer and cook the chicken according to your recipe’s time and temperature. The added humidity will slightly extend the cooking time, so rely on a thermometer.
Step 4: Finish
Remove the chicken once it reaches 165°F (74°C).
Allow the chicken to rest briefly before serving, and discard the hot water.
17. The Steam Pouch: Cooking En Papillote
How to Cook Juicy Chicken
Relevant Name: Parchment Pouch Steam Cooking
Cooking “en papillote” is a French method that translates to “in parchment.” This elegant technique involves wrapping chicken and vegetables in a sealed pouch of parchment paper, creating a self-contained steamer. This is arguably the most effective way to cook very lean chicken breasts, as the moisture released by the chicken and the vegetables has nowhere to escape.
The pouch effectively traps all the internal steam and juices as the package heats up in the oven. The chicken is cooked by the gentle, moist heat created by the steam, rather than being blasted by dry heat. This ensures that the protein fibers do not lose their essential water content, guaranteeing the meat remains wonderfully tender and juicy.
Placing the chicken and fresh vegetables like asparagus, onions, and tomatoes—as seen in the image—inside the pouch means you get a complete, flavorful, and incredibly moist meal that requires almost no cleanup. The parchment package keeps everything moist and infused with the aromas of the herbs and vegetables.
2 large Rectangles of Parchment Paper (approx. 15 inches by 12 inches)
🧑🍳 DIY Instruction
Step 1: Prep Ingredients
Preheat your oven to 400°F (200°C).
Toss the chopped vegetables with a drizzle of olive oil, salt, and pepper in a bowl.
Lightly season the chicken breasts with salt and pepper.
Step 2: Create the Pouches
Lay a sheet of parchment paper flat on the counter. Fold it in half to create a crease, then unfold it.
On one half of the paper, arrange half of the seasoned vegetables, forming a bed for the chicken.
Place one chicken breast on top of the vegetables. Pour 1 tablespoon of chicken broth or wine over the chicken and vegetables.
Step 3: Seal the Pouch
Fold the other half of the parchment paper over the chicken and vegetables to meet the first half.
Starting at one end of the folded edge, begin making small, tight, overlapping pleats to seal the two halves together. The pleats should curve to create a crescent or half-moon shape, trapping the ingredients inside.
Continue pleating until the pouch is completely sealed and ballooned slightly. Repeat with the second piece of chicken.
Step 4: Cook
Place the sealed pouches onto the baking sheet.
Bake for 15 to 20 minutes, or until the pouches are puffed up and lightly browned. The internal steam should be visible through the paper.
Serve the pouches immediately, allowing guests to carefully cut the paper open to release the flavorful steam.
18. Temperature Compensation: Icing the Breasts
How to Cook Juicy Chicken
Relevant Name: Ice Pack Breast Equalization
A primary challenge when roasting a whole chicken is the difference in cooking requirements between the lean breast meat and the fatty leg meat. The breasts cook faster and are prone to drying out, while the legs and thighs take longer to reach the proper temperature. Applying ice packs or ice cubes to the breast area before roasting is an ingenious way to compensate for this difference.
The cold application temporarily lowers the temperature of the breast meat, effectively giving the legs and thighs a crucial head start when the chicken enters the hot oven. By the time the breast meat warms up to the oven temperature, the darker meat is already well on its way to being fully cooked. This ensures that both parts of the bird finish cooking simultaneously.
This simple preparation significantly increases the chances of achieving a moist roast throughout. Once the chicken goes into the oven, the ice should be removed. This technique, combined with proper trussing, results in a consistently juicy whole roasted bird every time.
🧂 Ingredients
1 Whole Chicken (trussed)
Ice Cubes or a small Flexible Ice Pack
🥄 Equipment
Large Baking Sheet or Roasting Pan
Meat Thermometer
Paper Towels
🧑🍳 DIY Instruction
Step 1: Prep and Truss
Remove the chicken from the packaging, take out the giblets, and pat the skin completely dry with paper towels.
Truss the chicken using kitchen twine to secure the legs and wings close to the body. This helps the chicken cook into a more compact, even shape.
Step 2: Chill the Breast
Place a small, flexible ice pack or a row of ice cubes across the breast meat of the chicken.
Allow the chicken to sit with the cold application for approximately 30 minutes on the counter or in the refrigerator. This period is long enough to cool the surface temperature of the breast meat without causing significant temperature changes in the rest of the chicken.
Step 3: Cook
Preheat your oven to the desired roasting temperature (e.g., 425°F or 220°C).
Remove the ice packs or ice cubes and quickly pat the breast area dry again if any moisture remains.
Season the chicken and place it immediately into the hot oven.
Roast until the thigh reads 165°F (74°C). The initial chill ensures the breast will not overshoot this temperature before the dark meat is done.
Remove and rest before carving.
19. Flavor Lock: Deglazing a Pan Sauce
How to Cook Juicy Chicken
Relevant Name: Skillet Deglazing for Rich Pan Sauce
A wonderful way to rescue and reuse the rich flavors left at the bottom of a pan after cooking chicken is by deglazing. Deglazing involves pouring liquid, such as chicken stock or wine, into a hot pan and scraping up all those browned, sticky bits—known as the fond—that contain concentrated flavor. This action creates a quick, deeply flavorful pan sauce.
This technique is essential because the fond represents all the moisture and proteins that initially escaped the chicken’s surface during searing. Instead of discarding this flavorful residue, you re-incorporate it into a liquid, creating a sauce that you can then serve with the chicken. This effectively serves the chicken with its own lost moisture and flavor, preventing the final dish from tasting dry.
The simple process takes only a couple of minutes and turns ordinary skillet chicken into an elevated meal. You can enhance the sauce with aromatics like the rosemary sprig shown here, a pat of butter for richness, or a spoonful of mustard for complexity before serving. It is a necessary step to maximize both flavor and perceived juiciness.
Once your chicken is cooked and removed from the skillet to rest, leave the heat source on medium-high. Do not drain the fat or drippings from the pan.
Step 2: Deglaze the Pan
Immediately pour the chicken stock or wine into the hot skillet. It should bubble up quickly.
Use a wooden spoon or spatula to vigorously scrape the bottom of the pan, lifting up all the browned, sticky bits (the fond) into the liquid. These bits will dissolve quickly into the stock, concentrating the flavor.
Step 3: Thicken and Flavor
Allow the liquid to simmer rapidly for 1 to 2 minutes, stirring occasionally, until it has reduced by about one-third and has thickened slightly.
Remove the pan from the heat and swirl in the tablespoon of butter and any optional additions like mustard or herbs. The butter will melt, making the sauce glossy and rich.
Step 4: Serve
Slice the rested chicken and arrange it on a plate.
Spoon the prepared pan sauce generously over the chicken slices and serve immediately.
20. The Ultimate Tool: Using a Thermometer
How to Cook Juicy Chicken
Relevant Name: Precise Temperature Control for Doneness
Using a reliable meat thermometer is the single most important action you can take to prevent dry chicken. The reason chicken often dries out is simple: it is cooked based on time, rather than temperature. Since ovens vary and chicken pieces differ wildly in size, relying on a timer is inherently risky. A thermometer provides objective proof of doneness.
By inserting the probe into the thickest part of the meat—as demonstrated in the image—you can track the internal temperature precisely. You must remove chicken from the heat when it hits 160°F (71°C), allowing for the carryover cooking (Hack 6) to raise the temperature to the safe and juicy 165°F (74°C) during the resting period. Hitting this target exactly ensures maximum moisture retention.
A thermometer takes all the guesswork out of cooking poultry. Cutting into the chicken to check the color, an outdated method, only causes all the internal juices to escape. Simply monitor the temperature until it is just right, and you will achieve wonderfully succulent chicken every single time. This is the difference between guessing and cooking with true confidence.
🧂 Ingredients
Any cooked chicken (whole roast shown)
🥄 Equipment
Instant-Read Meat Thermometer (Digital is preferred for speed and accuracy)
🧑🍳 DIY Instruction
Step 1: Know Where to Measure
For a whole chicken, insert the probe into the thickest part of the thigh, making sure the tip does not touch any bone, which can give a false, high reading.
For chicken breasts, insert the probe horizontally into the thickest part of the breast.
Step 2: Monitor During Cooking
Start checking the temperature about halfway through your estimated cooking time and continue checking every 5 to 10 minutes thereafter.
For a whole roast, you may need to check both the thigh and the breast to ensure even cooking.
Step 3: Remove at the Right Time
Remove the chicken from the oven or grill when the thermometer reads 160°F (71°C) in the thickest part. This is the correct temperature to allow for carryover.
If the breast is already at 165°F (74°C) but the thigh is still below 160°F (71°C), remove the chicken and let it rest. The thigh temperature will continue to climb.
Step 4: Rest and Verify
Allow the chicken to rest for the required time (15–20 minutes for a whole chicken).
You can recheck the temperature at the end of the rest period to ensure it reached the safe 165°F (74°C). Slice and enjoy!
21. The Salt Wrap: Prosciutto Protection
How to Cook Juicy Chicken
Relevant Name: Salted Cured Meat Wrap for Lean Cuts
Wrapping chicken in thin slices of cured, salted meat, such as prosciutto or parma ham (like the meat pictured here), is a wonderful way to achieve a double benefit: guaranteed flavor and a powerful moisture barrier. This hack works similarly to the bacon wrap (Hack 3) but often involves a thinner, more intensely flavored meat that creates a delicate, crispy layer around the poultry.
Prosciutto is predominantly fat and salt, and when cooked, it renders slowly, continuously basting the chicken underneath. This essential fat prevents the rapid moisture loss that often plagues lean cuts like chicken breasts. Furthermore, the inherent saltiness deeply seasons the exterior of the meat without requiring excessive initial seasoning.
This method transforms simple chicken into an elevated, savory dish with an amazing texture contrast. The crispy, chewy cured meat outside perfectly complements the tender, juicy interior. This is a simple, straightforward step to introduce external fat and flavor to any cut that is prone to drying out.
🧂 Ingredients
2 Boneless, Skinless Chicken Breasts
8–10 thin Slices of Prosciutto or Cured Ham
Optional: Fresh Sage Leaves
🥄 Equipment
Baking Sheet
Parchment Paper or Aluminum Foil
Tongs
🧑🍳 DIY Instruction
Step 1: Prep the Chicken
Pat the chicken breasts very dry with paper towels. You do not need to add salt since the prosciutto is intensely salty.
If desired, place a fresh sage leaf on top of the chicken where you plan to start wrapping.
Step 2: Wrap the Prosciutto
Lay the prosciutto slices flat on your workspace, slightly overlapping them to create a sheet.
Place one chicken breast at one end of the prosciutto sheet.
Carefully roll the chicken breast tightly in the cured meat, ensuring the entire surface of the chicken is covered. The prosciutto should adhere naturally to the poultry.
Repeat with the second chicken breast.
Step 3: Cook
Preheat your oven to 400°F (200°C). Line a baking sheet with parchment paper.
Place the wrapped chicken breasts onto the prepared baking sheet.
Bake for approximately 20 to 25 minutes, turning once halfway through if necessary to ensure even browning on all sides.
The prosciutto should be crisp and the internal temperature of the chicken must reach 165°F (74°C).
Step 4: Rest
Remove the chicken from the oven and transfer it to a cutting board.
Allow the chicken to rest for 5 to 10 minutes before slicing to lock in the released juices.
22. Slow Soak: Braising in Liquid
How to Cook Juicy Chicken
Relevant Name: Herb and Citrus Liquid Braise
Braising is a fantastic slow-cooking method that guarantees juicy chicken, particularly for tougher, dark meat cuts like thighs and drumsticks. The technique involves browning the chicken first, then finishing it by simmering it slowly in a substantial amount of flavorful liquid, such as the white wine and chicken stock mixture visible here, combined with aromatic additions like rosemary and orange slices.
Because the chicken is fully submerged or partially covered and cooked gently at a lower temperature, it cannot possibly dry out; it is actively being hydrated by the cooking liquid. This moist environment allows the tough connective tissue in the dark meat to slowly break down into gelatin. The presence of gelatin adds a remarkable richness and silky texture to the meat, making it unbelievably tender.
The flavorful liquid, often enriched with wine, citrus, and herbs, infuses the meat completely over the extended cooking time. Braising creates a satisfying, falling-off-the-bone texture that cannot be achieved through roasting or grilling, making it a reliable method for ensuring maximum succulence every time.
🧂 Ingredients
4 Bone-in, Skin-on Chicken Thighs
1 tablespoon Olive Oil
1/2 cup Dry White Wine (or additional chicken stock)
1 1/2 cups Chicken Stock
1 large Orange, sliced
4 sprigs Fresh Rosemary and Thyme
Salt and Pepper to taste
🥄 Equipment
Large Oven-Safe Skillet or Dutch Oven with a Lid
Tongs
🧑🍳 DIY Instruction
Step 1: Sear the Chicken
Preheat your oven to 350°F (175°C).
Season the chicken thighs heavily with salt and pepper.
Heat the olive oil in the skillet or Dutch oven over medium-high heat.
Sear the chicken thighs skin-side down for about 5 minutes until the skin is golden brown and crispy. Remove the chicken and set it aside.
Step 2: Build the Braising Liquid
Reduce the heat to medium. Pour the white wine into the skillet and scrape up any browned bits from the bottom of the pan with a wooden spoon (deglaizing, Hack 19). Simmer for 1 minute.
Add the chicken stock, orange slices, and fresh herbs to the liquid. Bring the liquid to a gentle simmer.
Step 3: Braise the Chicken
Return the chicken thighs to the pot, nestling them into the liquid skin-side up. The liquid should cover about halfway up the sides of the chicken.
Cover the skillet tightly with a lid or aluminum foil.
Transfer the covered pot to the preheated oven and braise for 45 minutes to 1 hour. The chicken is done when it is very tender and easily pulls away from the bone (internal temperature should be well over 165°F, 74°C).
Step 4: Finish
Remove the chicken from the oven. Discard the citrus rinds and herbs.
Let the chicken rest briefly, then serve with the flavorful braising liquid spooned over the top.
23. Temperature Holding: The Warming Cabinet
How to Cook Juicy Chicken
Relevant Name: Controlled Heat Holding for Moisture
After successfully cooking chicken to the precise temperature of 165°F (74°C), the next challenge is holding it without letting it dry out before serving. The environment of a warming cabinet, like the one shown here, is designed to keep food hot without continuing to cook it, making it an excellent hack for juicy chicken, especially when feeding a crowd.
Warming cabinets maintain a controlled temperature that is typically just above the safe serving temperature (around 140°F to 160°F or 60°C to 71°C). This gentle heat ensures that the internal moisture and juices, which have already stabilized during the crucial resting period, are not driven out by residual high heat. It holds the chicken in a comfortable state.
For home cooks, covering the chicken loosely with foil and placing it in a turned-off oven that was preheated to the lowest setting (around 170°F or 77°C) mimics this professional technique. This gentle holding temperature preserves the meat’s succulence until the moment it reaches the table.
🧂 Ingredients
Any cooked chicken pieces (fried, roasted, etc.)
🥄 Equipment
Warming Cabinet (professional) or an Oven Set to its Lowest Temperature (home)
Aluminum Foil
Meat Thermometer
🧑🍳 DIY Instruction
Step 1: Cook and Rest
Cook your chicken using any method until it reaches the safe internal temperature of 165°F (74°C).
Allow the chicken to complete its required resting time (Hack 5), ensuring the juices have fully redistributed.
Step 2: Prepare the Holding Area
If using a home oven, preheat it to its very lowest setting, usually 170°F (77°C) or 200°F (93°C).
If your oven can hold 170°F (77°C), turn the oven off once the temperature is reached. If the lowest setting is 200°F (93°C), you can leave it on, but be aware that it may dry the chicken slightly over long periods.
Step 3: Hold the Chicken
Transfer the rested chicken pieces to a baking tray.
Cover the chicken loosely with aluminum foil to trap moisture without steaming the exterior excessively.
Place the tray into the warmed holding area. The chicken will remain safely hot and juicy for up to an hour, provided the holding temperature is maintained below 170°F (77°C).
Step 4: Serve
Remove the chicken just before serving. It will be hot, ready, and perfectly moist.
24. The Brine Re-use: Pickle Juice Marinade
How to Cook Juicy Chicken
Relevant Name: Dill Pickle Juice Tenderizer
The leftover liquid from a jar of dill pickles is essentially a premixed, powerfully flavored brine that is an astonishingly effective chicken marinade. As shown in the image, soaking chicken in pickle juice introduces a balanced combination of salt, acid (from vinegar), and concentrated flavor (from dill and spices). This three-part approach is incredibly beneficial for fighting dryness.
The vinegar’s mild acidity works to gently tenderize the outer surface of the chicken, opening up the muscle fibers, similar to a traditional marinade. Concurrently, the salt in the brine acts just like a wet brine (Hack 1), forcing moisture into the meat’s structure, which helps the chicken retain more water during cooking. This dual action is a simple, no-waste way to guarantee juicy results.
This hack is widely known as the secret behind exceptionally moist fried chicken sandwiches in some fast-food establishments. Use it for pan-frying, air frying, or grilling. The chicken should be marinated for a relatively short period, as the acid is quite strong.
🧂 Ingredients
4 Boneless, Skinless Chicken Breasts or Thighs
1 1/2 cups Dill Pickle Juice (from a jar of pickles)
Optional: 1 teaspoon Hot Sauce (for a little kick)
🥄 Equipment
Non-Reactive Bowl or Sealable Plastic Bag
Tongs
🧑🍳 DIY Instruction
Step 1: Prepare the Marinade
Pour the pickle juice into the non-reactive bowl or the sealable plastic bag. If you like a little heat, whisk in the optional hot sauce.
Taste the pickle juice. If it seems excessively salty, you can dilute it with a splash of water, but usually, it is ready to use as is.
Step 2: Marinate the Chicken
Add the chicken pieces to the pickle juice, ensuring they are fully submerged in the liquid.
Seal the container or bag and place the chicken in the refrigerator.
Marinate the chicken for at least 2 hours, but no more than 8 hours. Due to the high acidity, longer soaking can cause the chicken to break down too much.
Step 3: Prep for Cooking
Remove the chicken from the pickle juice and discard the marinade.
Pat the chicken pieces thoroughly dry with paper towels. A dry surface is essential if you plan to bread and fry the chicken.
Cook using your preferred method.
25. The Final Sizzle: High Heat Sear
How to Cook Juicy Chicken
Relevant Name: The Reverse Sear Technique
Although the image shows a steak, the principle of using a high-heat sear applies powerfully to chicken, ensuring a beautiful exterior crust and maximum internal juiciness. This method, often paired with the reverse sear technique, involves cooking the chicken gently at a low temperature first, followed by a final, rapid blast of high heat.
The low and slow phase ensures the entire piece of chicken cooks evenly to just below the target temperature without drying out the exterior. The final, incredibly hot sear—either in a skillet or under a broiler—creates a savory, brown crust quickly, a process known as the Maillard reaction. This quick action develops flavor and texture without raising the internal temperature enough to dry out the meat.
This method is especially effective for thick cuts like bone-in chicken breasts or whole chickens. By delaying the searing until the end, you manage to achieve both a crispy exterior and a consistently moist interior. This is a deliberate, two-stage process that contrasts sharply with traditional cooking and yields vastly improved results.
🧂 Ingredients
Any cut of chicken (especially thick pieces)
1 tablespoon High-Smoke-Point Oil (e.g., canola or grapeseed)
1 tablespoon Butter (for flavor and color)
🥄 Equipment
Oven
Baking Sheet and Wire Rack
Cast Iron Skillet or Heavy-Bottomed Pan
Instant-Read Thermometer
🧑🍳 DIY Instruction
Step 1: Slow Cook (The Reverse)
Preheat your oven to a low temperature, such as 250°F (120°C).
Place the seasoned chicken on a wire rack set over a baking sheet.
Slow roast the chicken until its internal temperature reaches 150°F (66°C). This slow process can take anywhere from 20 minutes to over an hour, depending on the cut.
Step 2: Prepare the Sear
Once the chicken hits 150°F (66°C), remove it from the oven.
Heat a cast iron skillet over high heat on your stovetop. Add the oil to the pan. When the oil is shimmering or just starting to smoke, it is ready.
Step 3: Sear the Chicken
Carefully place the chicken, skin-side down, into the smoking hot pan.
Sear aggressively for only 60 to 90 seconds to develop a deep brown crust.
Add the butter and quickly flip the chicken. Sear the second side for 30 to 60 seconds. You are looking for color, not internal cooking.
Step 4: Rest
Remove the chicken immediately. The internal temperature should be around 160°F (71°C) now.
Allow the chicken to rest for 5 to 10 minutes, letting the internal temperature rise to the safe 165°F (74°C), resulting in incredibly juicy meat.
26. The Natural Fat Pocket: Rendered Juices
How to Cook Juicy Chicken
Relevant Name: Utilizing Subcutaneous Fat for Self-Basting
This close-up diagram illustrates exactly how fat contributes to a juicy result. As chicken cooks, the layer of fat just beneath the skin—the subcutaneous fat—begins to melt, or render, under the heat. This rendered fat naturally collects in the pocket between the skin and the meat, actively lubricating and basting the muscle fibers below, as the visible droplets demonstrate.
This internal basting is the primary reason that bone-in, skin-on cuts are so much more forgiving than lean, skinless breasts. The presence of the fat pocket acts as an internal moisture delivery system and a thermal shield. The fatty layer slows down the rate at which the dry heat reaches the delicate muscle fibers.
To make the most of this natural system, you should score the skin (without cutting into the meat) before cooking. Scoring helps the fat render out more quickly and evenly, creating a crispy skin while maximizing the self-basting action. It is a smart way to let the chicken’s own biology enhance its juiciness.
🧂 Ingredients
Bone-in, Skin-on Chicken Thighs or Breasts
Salt and Pepper
🥄 Equipment
Sharp Knife (for scoring)
Roasting Pan or Skillet
🧑🍳 DIY Instruction
Step 1: Prep the Skin
Remove the chicken pieces from the packaging and pat the skin completely dry with paper towels.
Take a very sharp knife and gently score the skin in a few parallel lines across the fatty part, being careful to cut through only the skin and fat, and not into the meat itself.
Step 2: Season and Start Cold
Season the chicken generously with salt and pepper, making sure some seasoning gets under the skin and into the scores.
Optional Cold Start: If using a pan, place the chicken skin-side down in a cold pan and then turn the heat to medium. This slow introduction of heat helps the fat render more gradually and completely.
Step 3: Cook and Render
Cook the chicken until the fat has fully rendered and the skin is golden brown and crisp. This can take 8 to 10 minutes in a pan or longer in an oven.
The resulting golden liquid in the pan is the rendered chicken fat, which has done its work to keep the meat incredibly moist.
Step 4: Finish
Finish cooking the chicken until the internal temperature reaches 165°F (74°C).
Remove and rest before slicing.
27. Zest Infusion: Surface Aromatics
How to Cook Juicy Chicken
Relevant Name: Fresh Lemon Zest Surface Rub
While marinating requires time, rubbing chicken with fine aromatics like fresh lemon zest is a fast hack that delivers bright flavor and contributes to a perceived juiciness. Zest contains concentrated, fragrant essential oils, which are volatile. Rubbing these oils directly onto the raw chicken skin or meat ensures the flavor is infused immediately.
The volatile oils in the zest melt and bloom when exposed to heat, coating the chicken and creating a vibrant, appealing scent that enhances the eating experience. Because zest adds flavor without adding moisture or harsh acidity, it can be applied generously right before cooking. The bright flavor of citrus naturally complements chicken and provides a lift that makes the overall dish taste fresher and more appealing.
This technique works best when applied directly to the skin or mixed with a bit of fat, like olive oil, to help it adhere to the surface of the meat. A microplane grater is the best tool for achieving the fine texture shown here, ensuring you get only the yellow part of the rind, avoiding the bitter white pith underneath.
🧂 Ingredients
2 Chicken Pieces (thighs or breasts)
Zest of 1 fresh Lemon
1 teaspoon Salt
1/2 teaspoon Black Pepper
1 tablespoon Olive Oil (optional)
🥄 Equipment
Microplane or fine grater
🧑🍳 DIY Instruction
Step 1: Prep the Zest
Wash the lemon thoroughly. Using a microplane, gently grate the bright yellow skin to obtain the zest. Avoid grating down to the white pith, which is bitter.
You should aim for about 1 to 2 teaspoons of fresh zest.
Step 2: Apply the Rub
Pat the chicken pieces dry.
In a small bowl, combine the lemon zest, salt, and pepper. If using, mix in the olive oil to create a paste.
Rub this mixture generously and thoroughly over the entire surface of the chicken, working the zest into the skin or muscle fibers.
Step 3: Cook
Cook the chicken immediately using your desired method. The heat will release the fragrant lemon oils.
The zest will slightly blacken during cooking, but the flavor will be locked into the surface.
Step 4: Serve
Serve the chicken immediately, perhaps with a final squeeze of lemon juice for extra brightness.
28. Injectable Boost: Quick Moisture Solution
How to Cook Juicy Chicken
Relevant Name: Quick Brine Injection for Breasts
For an almost instant moisture boost in large, lean chicken breasts, injection offers a rapid alternative to hours of brining. This hack involves using a meat injector (like the one shown here) to directly infuse the muscle fibers with a simple salt or broth solution. This bypasses the need for the liquid to slowly penetrate the meat from the exterior.
The injected liquid is a potent moisturizer and flavor enhancer. The salt helps the meat fibers hold onto the water, while the broth or melted butter adds flavor and fat directly to the center of the breast, which is typically the first part to dry out. It is a targeted, efficient method for ensuring that even the thickest parts of the poultry remain wonderfully succulent.
This technique is especially useful when you are short on time and cannot wait for a long brine or marinade. Just be careful not to inject too much liquid in one spot, which can cause the meat to tear or bulge. Distribute the solution evenly across the thickest areas for the best result.
🧂 Ingredients
2 large Boneless, Skinless Chicken Breasts
1/2 cup Chicken Broth (low sodium)
1/2 teaspoon Salt (or 1 tablespoon melted butter)
🥄 Equipment
Meat Injector (syringe)
Measuring Cup
🧑🍳 DIY Instruction
Step 1: Prepare the Solution
If using the brine solution: Warm the chicken broth slightly and dissolve the salt completely into the broth. Allow the solution to cool back to room temperature.
If using butter: Melt the butter and allow it to cool slightly so it remains liquid but is not scalding hot.
Step 2: Load and Inject
Draw the solution (broth or butter) into the meat injector.
Insert the needle deep into the thickest part of the chicken breast.
Slowly depress the plunger, injecting a small amount of liquid. Do this in several different spots across the breast, making sure the liquid is evenly distributed internally. You should use about 1/4 cup of liquid per large breast.
Step 3: Cook Immediately
Wipe away any solution that has leaked onto the exterior of the chicken.
Season the exterior and cook the chicken immediately. No resting is required before cooking.
29. Steam Roasting: Liquid Under the Rack
How to Cook Juicy Chicken
Relevant Name: Water Pan Roasting for Ambient Moisture
Adding moisture to the environment of a hot oven is an effective way to prevent the fierce, dry heat from sucking the life out of your chicken. Placing a pan of water, broth, or even wine underneath the roasting rack, as seen here, generates steam as the liquid heats up and evaporates. This steam elevates the humidity inside the oven.
The increase in moisture saturation helps the exterior of the chicken stay hydrated longer, slowing down the rate of moisture loss from the meat itself. For those who struggle with dry breasts, this method offers a simple buffer against the heat. The humid air ensures that the chicken’s surface remains slightly moist, allowing the internal temperature to rise slowly and gently.
Furthermore, if you are roasting a whole chicken, this water pan catches the flavorful drippings, preventing them from burning on the bottom of the oven. These drippings can then be used, often combined with the liquid in the pan, to make a richer, more flavorful gravy or sauce.
🧂 Ingredients
1 Whole Chicken (or other roasting cuts)
2 cups Water or Chicken Stock
Optional: Vegetables (carrots, onions) for flavor
🥄 Equipment
Roasting Pan
Wire Roasting Rack (to keep chicken above the liquid)
🧑🍳 DIY Instruction
Step 1: Prep the Chicken and Pan
Preheat your oven to your desired roasting temperature (e.g., 400°F or 200°C).
Place the roasting rack securely inside the roasting pan.
Pour the water or chicken stock into the roasting pan, ensuring the liquid is below the wire rack. Add any optional vegetables to the liquid for aroma.
Season and prepare the chicken, then place it directly on the wire rack.
Step 2: Cook with Steam
Carefully place the roasting pan and chicken into the preheated oven.
The liquid will begin to boil and create steam inside the oven environment.
Monitor the liquid level throughout the cooking process. If the liquid evaporates completely, carefully add more hot water or stock to maintain the steam.
Step 3: Finish and Serve
Roast until the internal temperature reaches 165°F (74°C).
Remove the chicken and allow it to rest. You can use the liquid left in the pan, combined with the drippings, to make a gravy or sauce.
30. Internal Barrier: Stuffed Chicken
How to Cook Juicy Chicken
Relevant Name: Mushroom and Rice Stuffed Chicken Roll
Stuffing chicken breasts is an ingenious way to incorporate moisture and fat directly into the center of the meat, creating an internal moisture barrier against dryness. As illustrated by the sliced roll shown here, the filling—often a mixture of breadcrumbs, rice, mushrooms, and cheese—insulates the delicate breast meat from the harsh external heat.
The stuffing itself usually contains fat and moisture from ingredients like butter, cheese, or stock. As the chicken cooks, the stuffing gently steams the surrounding meat from the inside. This gentle, moist heat prevents the lean breast meat from seizing up and drying out, keeping the entire roll succulent.
Furthermore, stuffing forces you to either butterfly the breast or pound it flat and roll it, which creates a more uniform thickness. This uniform thickness aids in even cooking. This hack elevates the plain chicken breast, turning it into a complete, flavorful, and predictably moist meal.
🧂 Ingredients
2 large Boneless, Skinless Chicken Breasts
Filling: 1 tablespoon Butter, 1/2 cup Mushrooms (finely chopped), 1/4 cup Cream Cheese, 1/4 cup Cooked Rice, Salt and Pepper
🥄 Equipment
Sharp Knife (for butterflying)
Small Skillet (for cooking filling)
Toothpicks or Butcher’s Twine
Baking Sheet
🧑🍳 DIY Instruction
Step 1: Prepare the Filling
Melt the butter in a small skillet over medium heat. Add the chopped mushrooms and cook until the moisture evaporates and they are soft.
Remove from heat and mix the cooked mushrooms with the cream cheese, cooked rice, salt, and pepper. Set aside.
Step 2: Prepare the Chicken
Take one chicken breast and use a sharp knife to carefully slice it horizontally almost all the way through, stopping about half an inch before the edge. Open the breast like a book (butterflying).
Place the butterflied breast between two sheets of plastic wrap and pound it gently until it is about 1/2 inch thick (Hack 4). Repeat with the second breast.
Step 3: Stuff and Roll
Place half of the filling mixture down the center of each flattened chicken breast.
Carefully roll the chicken up tightly around the filling to create a compact log.
Secure the seam with a few toothpicks or tie the roll with butcher’s twine.
Step 4: Cook
Preheat your oven to 400°F (200°C).
Sear the rolls quickly in a hot pan for 2 minutes per side to set the exterior (optional).
Place the rolls on a baking sheet and bake for 20 to 30 minutes, or until the internal temperature reaches 165°F (74°C) in the center of the meat.
Remove toothpicks/twine and allow the stuffed rolls to rest for 5 minutes before slicing.
31. Wok Finish: High-Heat Glazing
How to Cook Juicy Chicken
Relevant Name: Glazed Wok-Seared Chicken and Vegetables
Stir-frying in a wok is one of the fastest cooking methods, but the intense heat can easily strip chicken of moisture if done incorrectly. The key to maintaining juiciness is to add a glaze or sauce at the very end of the cooking process, as shown by the liquid being poured over the seared chicken and vegetables. This hack ensures the sauce is reduced and coats the chicken perfectly, locking in the final moisture.
The rapid application of liquid at high heat creates a quick steam and causes the sauce to thicken almost instantly. This thickened, flavorful coating acts as a shield, preventing any further evaporation from the chicken’s surface. Applying the sauce at the end also prevents any sugar in the glaze from burning, which would leave a bitter, unpleasant taste.
Using a high-quality wok, with its sloped sides and large surface area, allows for consistent heat and quick cooking. Pairing the chicken with moist, quick-cooking vegetables like broccoli and peppers ensures the entire dish finishes simultaneously, guaranteeing a tender, succulent outcome with a rich, glossy finish.
🧂 Ingredients
1 pound Chicken Pieces (sliced, and velveted if possible, see Hack 9)
1 tablespoon High-Smoke-Point Oil (peanut or canola)
2 cups Assorted Stir-Fry Vegetables
Simple Glaze: 1/4 cup Soy Sauce, 1 tablespoon Honey or Brown Sugar, 1 teaspoon Cornstarch, 1/4 cup Chicken Broth
🥄 Equipment
Wok or Large Skillet
Whisk (for mixing the glaze)
Tongs or Wok Spatula
🧑🍳 DIY Instruction
Step 1: Prepare the Glaze and Chicken
In a small bowl, whisk together the ingredients for the glaze until the cornstarch is completely dissolved. Set aside.
Pat the chicken slices very dry. If using the velveting technique (Hack 9), ensure the chicken is rinsed and dried.
Step 2: Cook the Chicken and Vegetables
Heat the wok over high heat until it is smoking. Add the oil, swirling to coat the sides.
Add the chicken pieces in a single layer (cook in batches if necessary to maintain high heat). Stir-fry for 2 to 3 minutes until the chicken is mostly cooked through and lightly browned. Remove the chicken and set aside.
Add the vegetables to the wok and stir-fry for 3 to 4 minutes until they are bright and tender-crisp.
Step 3: Glaze and Finish
Return the chicken to the wok with the vegetables.
Quickly give the glaze mixture a final whisk, then pour it over the chicken and vegetables.
Toss the ingredients rapidly using the tongs or spatula. The sauce should bubble and thicken immediately, coating the chicken in a glossy finish. This process should take less than 60 seconds.
Remove immediately from the heat and serve while the chicken is still hot and beautifully moist.
32. Moisture Spritz: Lemon Finish
How to Cook Juicy Chicken
Relevant Name: Post-Grill Citrus Spritz
While the image depicts a steak, the concept of finishing meat with a small burst of liquid immediately after cooking is a wonderful hack for keeping grilled or pan-fried chicken moist. Spritzing the hot poultry with a light, flavorful liquid, such as the lemon juice shown here, adds a final layer of moisture and a vibrant burst of flavor that enhances the chicken’s inherent succulence.
The sizzling sound you hear when the liquid hits the hot meat is the liquid being instantly converted to steam. This steam gently permeates the outer layer of the chicken. The slight acidity of the lemon juice also provides a counterpoint to the smoky or savory flavor of the seasoning, making the final bite more refreshing and brighter.
This quick spritz is done right after the chicken is removed from the heat source and just before it is transferred to the cutting board for resting. The moisture quickly cools the exterior slightly and ensures the final texture is not overly dry or chewy. It is a quick, easy way to introduce complex flavor and a bit of final hydration.
🧂 Ingredients
Any cut of cooked chicken (grilled or pan-fried)
1/2 fresh Lemon, cut
1 tablespoon Melted Butter (optional, for richness)
🥄 Equipment
Tongs
Cutting Board
🧑🍳 DIY Instruction
Step 1: Cook the Chicken
Cook your chicken to the precise internal temperature of 165°F (74°C) using your grill, broiler, or pan.
Step 2: The Sizzle Spritz
Immediately remove the chicken from the heat source and place it on a heat-resistant surface or cutting board.
Take the half lemon and quickly squeeze a generous drizzle of the fresh juice over the entire surface of the hot chicken. You should hear a satisfying sizzle as the acid hits the heat.
If desired, you can immediately follow the lemon juice with a drizzle of melted butter for a rich flavor boost.
Step 3: Rest and Serve
Allow the chicken to rest for the required time (5 to 10 minutes). The lemon juice and butter will mix with the resting juices, creating a simple, flavorful dressing.
Slice and serve, perhaps drizzling the accumulated juices over the top.
33. Fall-Apart Texture: Shredding in Sauce
How to Cook Juicy Chicken
Relevant Name: Sauce Shredding for Maximum Moisture Absorption
For leftover chicken or dark meat cuts that tend to be tough or dry, shredding the cooked meat and mixing it back into a warm, flavorful liquid is a remarkable way to resurrect its moisture. This hack is commonly used for dishes like pulled chicken sandwiches or shredded chicken tacos, where the meat is meant to be tender and coated in sauce.
When the chicken is shredded, the muscle fibers are pulled apart, exposing a huge surface area. Immediately tossing the shredded meat into a bubbling, flavorful liquid—like the rich, bubbly broth shown here—allows the fibers to quickly absorb the sauce. The meat actively soaks up the moisture, transforming dry or tough pieces into something incredibly succulent and tender.
The brief simmering period in the sauce also ensures the chicken is warmed through evenly while absorbing all the surrounding flavor. This guarantees that every strand of chicken is fully coated and saturated with moisture, making it truly satisfying to eat. This hack turns a potentially dry mistake into a delicious, flavor-packed meal component.
🧂 Ingredients
2 cups Cooked, Slightly Dry Chicken (breasts or thighs)
1 1/2 cups Favorite Sauce or Broth (BBQ sauce, taco seasoning mixed with stock, or simple chicken broth)
🥄 Equipment
Medium Saucepan or Pot
Slotted Spoon
Two Forks (for shredding)
🧑🍳 DIY Instruction
Step 1: Shred the Chicken
Place the cooked chicken on a cutting board.
Use two forks to pull the meat apart into strands. Alternatively, you can use a stand mixer with the paddle attachment for quick, efficient shredding.
Step 2: Warm the Sauce
Pour the sauce or broth into the medium saucepan and place it over medium heat. Bring the liquid to a gentle simmer.
Step 3: Combine and Soak
Add the shredded chicken to the simmering liquid.
Use the slotted spoon to toss the chicken, ensuring it is completely immersed and coated in the sauce.
Allow the chicken to gently simmer in the sauce for 5 to 10 minutes. This time is essential for the dry muscle fibers to absorb the moisture from the liquid.
Step 4: Serve
The chicken is ready when the liquid has slightly reduced and the meat looks fully saturated and shiny.
Serve the moist, flavorful shredded chicken immediately.
34. Vegetable Buffer: Skewering with Protection
How to Cook Juicy Chicken
Relevant Name: Chicken and Vegetable Grilling Skewers
Grilling is a favorite method for chicken, but the direct, fierce heat of the flames is notorious for drying out lean cubes of breast meat. Skewering the chicken alongside chunky, moisture-rich vegetables—like the peppers and red onions shown here—is a clever way to protect the meat from excessive heat exposure.
The vegetables, particularly the onions and peppers, act as a natural buffer between the chicken cubes and the direct flame. As the vegetables cook, they release small amounts of steam and moisture, which helps keep the immediate environment around the chicken humid. This protective layer slows down the rate at which the chicken dries out.
Furthermore, threading the cubes onto skewers prevents the chicken pieces from being scattered over the hottest parts of the grill. Make sure the chicken and vegetable pieces are roughly the same size to ensure even cooking, and avoid placing very dense vegetables (like large carrots) alongside the poultry. The result is attractively grilled chicken that retains its internal succulence.
🧂 Ingredients
1 pound Boneless, Skinless Chicken (cut into 1-inch cubes)
1 Red Onion, cut into 1-inch squares
1 Red Bell Pepper, cut into 1-inch squares
1 Yellow Bell Pepper, cut into 1-inch squares
1/4 cup Olive Oil
Salt and Pepper to taste
🥄 Equipment
Metal or Wooden Skewers (soaked for 30 minutes if wood)
Large Bowl
Grill (or broiler)
🧑🍳 DIY Instruction
Step 1: Prep and Season
Place the cubed chicken and cut vegetables into the large bowl.
Drizzle the olive oil over the mixture and season generously with salt and pepper. Toss everything together to ensure an even coating.
Step 2: Thread the Skewers
Take a skewer and begin threading the ingredients. Alternate the chicken cubes with the various vegetables (onion, pepper, chicken, pepper, etc.).
Do not pack the ingredients too tightly; leave a small amount of space between each piece to allow for even cooking and heat circulation.
Step 3: Grill
Preheat your grill to medium-high heat.
Place the skewers directly on the grill grates. Grill for a total of 8 to 12 minutes, turning the skewers every 2 to 3 minutes.
The chicken is done when the internal temperature of the thickest piece reaches 165°F (74°C).
Step 4: Rest
Remove the skewers from the grill and let them rest on a platter for 5 minutes before serving.
Rotisserie cooking, often seen in professional kitchens or specialty home ovens, is one of the best methods for guaranteeing an evenly cooked, moist whole chicken. As pictured here, the chicken is secured and slowly rotated over a heat source, ensuring all sides are continuously exposed to heat. This slow, steady rotation is the secret to preventing dryness.
The constant turning ensures that no single part of the chicken is overexposed to the direct heat, meaning the cooking is incredibly uniform. As the bird rotates, the rendered fat and internal juices constantly drip and roll around the surface of the chicken, essentially creating a continuous, natural self-basting action.
The result is a chicken with gloriously crisp skin and meat that remains wonderfully succulent from breast to thigh. Often, vegetables placed underneath, like those visible on the tray, catch the drippings and cook to savory perfection. This technique is hard to replicate without the specific equipment but is a major contributor to juicy chicken when available.
🧂 Ingredients
1 Whole Chicken (trussed)
1 tablespoon Oil or Melted Butter
1 teaspoon Salt
1/2 teaspoon Pepper
🥄 Equipment
Rotisserie Rod or Hanging Mechanism (shown)
Kitchen Twine (for trussing)
Drip Pan/Baking Sheet (for vegetables and drippings)
🧑🍳 DIY Instruction
Step 1: Truss the Chicken
Prepare the chicken by removing giblets and patting it dry.
Crucially, you must securely truss the chicken with kitchen twine. Tie the legs together and secure the wings close to the body. This creates a compact, uniform shape that rotates evenly and cooks consistently.
Step 2: Season and Secure
Rub the entire exterior of the chicken with oil or melted butter. Season generously with salt and pepper.
Secure the chicken onto the rotisserie rod or hook (as shown). Ensure the chicken is centered and balanced, which is vital for smooth rotation.
Step 3: Cook
Set the rotisserie to cook at a medium-high temperature (around 350°F to 400°F or 175°C to 200°C).
Place the drip pan underneath the chicken.
Allow the chicken to rotate slowly and cook for approximately 1 1/2 to 2 hours. The continuous motion ensures self-basting.
Step 4: Final Check and Rest
Check the internal temperature in the thickest part of the thigh; it must read 165°F (74°C).
Carefully remove the chicken from the rotisserie and allow it to rest for 15 minutes before carving.
36. Crunchy Coating: Flake Crumb Breading
How to Cook Juicy Chicken
Relevant Name: Corn Flake Crusted Chicken Tender
Applying a thick, crunchy breading to chicken tenders or breasts is more than just a flavor choice; it is an effective hack for locking in moisture. The outer coating, especially one made from large, textured flakes like the corn flake crumbs shown here, creates a hardened shell that significantly slows the rate of moisture evaporation during cooking.
When the chicken is fried or baked, the coating quickly crisps up and solidifies into a protective barrier. This shell prevents the internal juices from steaming out and drying the muscle fibers within. The use of a flaky, dry crumb ensures the crust remains incredibly crunchy, which adds to the overall enjoyment of the dish.
This method is especially beneficial for fried foods or oven-baked tenders that are exposed to high, dry heat. By enclosing the chicken entirely in a sealed coating, you are actively preserving its succulence. It is a simple step that transforms potentially dry meat into a tender, crunchy, and satisfying meal.
🧂 Ingredients
2 large Chicken Breasts (cut into tenders)
1 cup Corn Flakes, crushed
1/4 cup All-Purpose Flour
1 large Egg, beaten
Salt, Pepper, and desired Seasonings (garlic powder, paprika)
Cooking Oil (for frying or baking)
🥄 Equipment
3 Shallow Dishes (for the breading station)
Tongs
Baking Sheet or Deep Fryer
🧑🍳 DIY Instruction
Step 1: Prepare the Breading Station
Set up three shallow dishes in a row:
Dish 1 (Flour): Mix the flour with salt and pepper.
Dish 2 (Egg): Pour the beaten egg into the dish.
Dish 3 (Crumbs): Place the crushed corn flakes and any desired dry seasonings.
Preheat your cooking apparatus (oven to 400°F (200°C) or fryer oil to 350°F (175°C)).
Step 2: Coat the Chicken
Take one chicken tender and dredge it first in the flour (Dish 1), shaking off the excess.
Dip the floured tender entirely into the beaten egg (Dish 2), letting any excess drip off.
Finally, press the tender firmly into the corn flake crumbs (Dish 3), ensuring the entire surface is heavily coated with the flakes.
Place the fully coated tender onto a clean plate and repeat with the remaining pieces.
Step 3: Cook
Place the coated chicken onto a prepared baking sheet (or gently lower into hot oil).
Bake for 15 to 20 minutes, or fry for 5 to 7 minutes, until the crust is golden brown and the internal temperature reaches 165°F (74°C).
Step 4: Serve
Remove the chicken and allow it to rest for a minute or two before serving immediately.
37. Zone Cooking: Two-Heat Grilling
How to Cook Juicy Chicken
Relevant Name: Dual-Zone Grilling Technique
Grilling chicken over a consistent, high flame is a guaranteed path to a dry interior and burnt exterior. A sophisticated and highly effective technique is to use dual-zone cooking, which involves setting up your grill with one area designated as high heat and the adjacent area as low heat, or cool, as suggested by the setup in this image (a fire pit on one side, a finished chicken on the other).
The process requires you to start the chicken on the cool side of the grill. This indirect, low heat allows the chicken to cook gently and evenly all the way through to about 90% doneness without drying out. During this time, the internal juices stabilize and the meat remains succulent.
Once the chicken nears its final temperature (around 150°F to 155°F or 66°C to 68°C), you move it to the high-heat side for a quick, 60-second sear on each side. This blast of direct heat achieves a beautiful char and crisp skin without raising the internal temperature enough to cause dryness. This method is the ultimate control hack for grilling juicy poultry.
🧂 Ingredients
Any cut of chicken (whole chicken or bone-in pieces shown)
Oil, Salt, and Pepper
🥄 Equipment
Charcoal or Gas Grill
Charcoal (or grill burners set to two different levels)
Instant-Read Thermometer
🧑🍳 DIY Instruction
Step 1: Set Up the Grill Zones
Charcoal Grill: Push all the hot coals to one side of the grill grate to create a high-heat zone. The other side is the cool, indirect zone.
Gas Grill: Turn one burner to medium-high (direct heat) and leave the adjacent burner off or on very low (indirect heat).
Step 2: Cook Indirectly
Place the seasoned chicken pieces on the cool, indirect side of the grill. Close the lid.
Cook the chicken gently, monitoring the internal temperature. Do not let the internal temperature exceed 155°F (68°C) during this phase.
Step 3: The Final Sear
Once the chicken reaches 155°F (68°C), carefully move the pieces from the cool side to the hot, direct side of the grill.
Sear for only 60 seconds per side. This is simply to achieve color and crispness.
Step 4: Rest
Remove the chicken immediately after searing.
Allow the chicken to rest for 5 to 10 minutes, where the temperature will safely climb to 165°F (74°C).
38. Fat Seal: Mayonnaise Coating
How to Cook Juicy Chicken
Relevant Name: Mayonnaise-Sealed Crust
Using a thin, even coat of mayonnaise as a pre-cook rub is a surprisingly effective and simple hack for ensuring chicken remains juicy. Mayonnaise is essentially an emulsion made up of oil, egg yolks, and a hint of acid. This high-fat coating provides a superb seal against the oven’s dry heat.
The rich fat from the mayonnaise slowly renders during cooking, constantly basting the chicken’s surface. This continuous layer of fat protects the delicate exterior, preventing the muscle fibers from drying out quickly. Furthermore, the egg in the mayonnaise helps promote incredible browning and creates a beautifully savory, deep golden crust, as seen on the baked chicken piece here.
This technique works particularly well on oven-baked or grilled chicken breasts and thighs. The flavor of the mayonnaise itself is not noticeable after cooking; it simply provides a neutral, high-fat vehicle that guarantees a moist interior. Mix in a little seasoning before applying it for an even more flavorful crust.
🧂 Ingredients
2 Chicken Pieces (thighs or breasts)
2 tablespoons Full-Fat Mayonnaise
1/2 teaspoon Garlic Powder
Salt and Pepper to taste
🥄 Equipment
Small Bowl
Basting Brush or Spoon
Baking Sheet
🧑🍳 DIY Instruction
Step 1: Prep the Coating
Preheat your oven to 400°F (200°C).
In the small bowl, stir together the mayonnaise, garlic powder, salt, and pepper until the mixture is fully incorporated.
Step 2: Coat the Chicken
Pat the chicken pieces thoroughly dry.
Use the basting brush or a spoon to spread a thin, even layer of the seasoned mayonnaise mixture over the entire surface of the chicken, including the sides. You do not need a thick layer; a light coat is sufficient.
Step 3: Cook
Place the coated chicken onto a baking sheet lined with parchment paper.
Bake for approximately 20 to 30 minutes (depending on the cut). The exterior will turn a rich, golden brown thanks to the fat and egg in the coating.
Remove the chicken immediately when the internal temperature reaches 165°F (74°C).
Step 4: Rest
Transfer the chicken to a cutting board and allow it to rest for 5 to 10 minutes before slicing.
Key Takeaways
Temperature Control is Everything: Always use an instant-read meat thermometer to ensure your chicken reaches exactly 165°F (74°C) and is removed promptly. Cooking by sight or time is the primary cause of dryness.
Preparation Locks in Moisture: Techniques like brining (wet or dry), marinating (yogurt or acid-based), and injecting fat (compound butter) are essential steps that physically force moisture and flavor into the muscle fibers before cooking begins.
Don’t Skip the Rest: Allowing cooked chicken to rest for 5–20 minutes is critical. This pause lets the internal juices redistribute throughout the meat, guaranteeing maximum succulence when you slice it.
External Fat is a Shield: For lean cuts like chicken breasts, using an external fat layer, whether it is bacon, prosciutto, or a mayonnaise coating, creates a protective barrier against the oven’s harsh, drying heat.
Adjust to the Environment: Combat the dryness of high-heat cooking (like grilling or air frying) by adding steam, using two-zone heat, or wrapping the chicken in moist packets (en papillote) for gentle cooking.
Conquering dry chicken requires adopting a combination of smart techniques, starting well before the chicken hits the heat and ending with a patient rest. By implementing the 38 hacks detailed in this guide—from the simple act of pounding chicken thin to the precision of the sous vide method—you gain complete control over the final texture of your poultry.
The most important lesson remains consistency and precision. Equip yourself with a reliable thermometer, choose the preparation method best suited for your cut, and never rush the resting process. Once these practices become habits, you will consistently serve chicken that is juicy, tender, and flavor-packed. Your days of dry chicken are officially over!
Spread the loveThe temperature drops and the daylight fades fast during the winter months. You arrive home exhausted and crave something that warms you from the inside out. Spending hours over a hot stove is…
Spread the loveHoliday feasts bring joy and abundance, but they also leave us with a mountain of the same two proteins. Facing a fridge full of turkey and ham for the third day in a…
Spread the loveAre you stuck in a rut with your seafood routine? Most of us stick to basic seasoning because it is easy, but your dinner plate deserves more excitement. Salmon is incredibly versatile, yet…