Finding yourself with a frozen bird on the morning of a big feast is a nightmare many hosts share. The pressure to deliver a delicious meal can feel overwhelming when the clock is ticking toward your guests’ arrival. You might feel like throwing in the towel, but take a deep breath because help has arrived.
Last-Minute Holiday Dinner Tips
This guide provides a lifeline for every kitchen emergency you might encounter during the holiday rush. From thawing disasters to seasoning mishaps, we have gathered a collection of clever hacks to save your celebration. You do not need to be a professional chef to navigate these common culinary roadblocks with confidence.
Explore these thirty six essential tips designed to keep your kitchen running smoothly and your sanity intact. Whether you are dealing with a power outage or a surprise vegan guest, we have a plan for you. Let us turn those potential disasters into success stories that your family will talk about for years.
Holiday stress peaks when you realize the main course is still a block of ice. This humorous scene captures that panic as kitchen tools scramble to save a frozen turkey in a mock emergency room. Small spatulas and whisks act as doctors while a giant syringe looms nearby.
Panicked salt shakers and a pepper grinder watch the operation with wide eyes. A bright red sign reminds us that dinner tips are needed fast when the clock is ticking toward midnight. It represents the frantic energy every host feels when the centerpiece isn’t ready for the oven.
Thawing a bird safely requires patience and a specific technique to keep everyone healthy. You can bypass the frozen disaster by using a controlled water bath. This method speeds up the process without letting bacteria grow on the surface.
Equipment Needed
Large plastic bucket or a clean kitchen sink
Heavy plate or a weighted bowl
Digital meat thermometer
Leakproof plastic bag
Ingredients
One frozen turkey
Plenty of cold tap water
Fresh ice cubes if needed
DIY Instructions Step by Step
Keep the turkey in its original store wrapping to protect the meat from water exposure.
Place the wrapped bird into a sturdy leakproof plastic bag and squeeze out all the extra air before sealing it tightly.
Put the bagged turkey into your clean sink or a large bucket that fits the whole bird comfortably.
Fill the container with cold tap water until the turkey is completely underwater.
Set a heavy plate or a bowl on top of the bird to prevent it from floating to the surface.
Change the water every thirty minutes by draining the old liquid and refilling with fresh cold water.
Check the progress after several hours and ensure the water stays cool to the touch.
Use your meat thermometer to verify the internal temperature remains below forty degrees Fahrenheit during the thaw.
Remove the bird from the water once the legs and wings move freely and no ice crystals remain inside the cavity.
Cook the meat immediately after this process finishes to maintain food safety.
2. Clever Heavy Cream Substitutes
Last-Minute Holiday Dinner Tips
Running out of a key ingredient like heavy cream can feel like a disaster when the guest list is long. This image shows a person holding an empty carton over a beautifully roasted turkey, highlighting that classic moment of kitchen panic. A smartphone in the foreground offers a digital lifeline with tips for quick ingredient swaps.
Visualizing the empty container against a backdrop of stuffing, mashed potatoes, and green bean casserole emphasizes the urgency of the situation. It captures the modern reality of using technology to solve traditional holiday mishaps. You can still achieve a rich texture in your sauces or soups by looking at what remains in your pantry.
Finding a replacement does not require a trip to the store during peak holiday hours. Simple combinations of milk and fats often mimic the mouthfeel of expensive creams. These quick fixes allow you to continue cooking without missing a beat or losing your holiday spirit.
Equipment Needed
Small mixing bowl
Balloon whisk
Measuring cups
Liquid measuring glass
Ingredients
Three quarters cup whole milk
One quarter cup unsalted butter
One tablespoon all purpose flour (optional for thickness)
DIY Instructions Step by Step
Take the unsalted butter out of the refrigerator and let it sit at room temperature until it feels soft.
Place the butter in a small microwave safe bowl and heat it in ten second intervals until it melts completely.
Pour the cold whole milk into a separate mixing bowl slowly.
Add the melted butter to the milk while whisking constantly to combine the two liquids.
Continue stirring for two minutes until the mixture looks uniform and slightly thickened.
Sprinkle in a small amount of flour if you need the substitute to have a heavier consistency for sauces.
Whisk the flour thoroughly to ensure no small white lumps remain in the liquid.
Use this mixture immediately in any recipe that calls for heavy cream in a one to one ratio.
Store any leftover liquid in a sealed jar inside the refrigerator for up to two days.
Shake the jar well before using it again as the fat might separate from the milk over time.
3. Small Space Cooking Success
Last-Minute Holiday Dinner Tips
Hosting a large group in a tiny kitchen requires a strategic approach to movement and counter space. This lively photo shows a diverse group of friends squeezed into a narrow cooking area, sharing laughs and plates of cookies. A small chalkboard on the wall reminds everyone that success is possible even when the room feels crowded.
Warm lighting and festive decorations create an inviting atmosphere despite the lack of elbow room. It proves that the joy of a holiday meal comes from the company rather than the size of the stove. Managing a crowd involves clear communication and designated zones for appetizers and main courses.
Optimizing your workflow helps prevent guests from tripping over each other while you finish the gravy. Utilizing every inch of available surface allows for a smooth transition from prep work to serving. This setup encourages a communal feeling where everyone contributes to the final feast.
Equipment Needed
Multi tier cooling rack
Over the sink cutting board
Magnetic knife strip
Rolling kitchen cart
Ingredients
Variety of pre sliced cheeses
Assorted holiday crackers
Fresh rosemary sprigs for garnish
Small bowls of mixed nuts
DIY Instructions Step by Step
Clear every non essential item from your countertops to create as much flat workspace as possible.
Set up a tiered cooling rack in one corner to hold multiple plates of food vertically rather than spread out.
Place an over the sink cutting board across your basin to gain extra room for chopping vegetables.
Organize your tools on a magnetic strip or in a tall jar to keep the drawers free for storage.
Use a rolling cart to hold heavy items like bags of potatoes or extra beverages that don’t fit in the pantry.
Designate a specific area away from the stove for guests to stand and snack while they talk to you.
Fill small bowls with crackers and cheese so people can help themselves without entering the main cooking zone.
Garnish each plate with rosemary to add a festive touch without taking up valuable plate space.
Clean as you go by washing individual dishes immediately to keep the sink clear for the next task.
Keep the floor clear of rugs or bags to ensure no one trips while carrying hot pots of food.
4. The Social Anxiety Host Guide
Last-Minute Holiday Dinner Tips
Stepping out to face a room full of hungry guests can be intimidating for even the most seasoned host. This illustration depicts a woman peeking nervously from behind a door at a group of people sitting at a dinner table. It perfectly illustrates the internal struggle of wanting to be a good provider while feeling overwhelmed by the social pressure.
The contrast between the calm diners and the anxious face in the doorway highlights a very common holiday experience. Everyone at the table looks ready to enjoy the meal, unaware of the stress happening behind the scenes. Managing your expectations for the evening is just as important as managing the oven temperature.
Creating a comfortable environment for yourself allows you to enjoy the fruits of your labor. Simple strategies can help you transition from the kitchen to the dining room with more confidence. Remember that your friends and family are there to see you, not just to critique the seasoning of the bird.
Equipment Needed
Printed guest list
Prepared conversation starter cards
Timer for social breaks
Small notepad and pen
Ingredients
Calming herbal tea bags
Fresh lemon slices
Honey for sweetening
Sparkling water
DIY Instructions Step by Step
Write down a simple schedule for the evening so you know exactly when each dish needs to come out.
Prepare a few light topics of conversation on small cards to help break the ice during lulls in the meal.
Brew a hot cup of herbal tea with lemon and honey ten minutes before the guests arrive to soothe your nerves.
Set a timer on your phone to remind yourself to take a five minute breather in a quiet room every hour.
Keep a notepad in the kitchen to jot down any last minute tasks so you don’t have to hold them in your head.
Arrange the seating chart so you are sitting next to a person who makes you feel relaxed and happy.
Fill glasses with sparkling water and lemon to keep yourself hydrated and refreshed throughout the long evening.
Take three deep breaths behind the kitchen door before you carry the first platter out to the dining table.
Focus on one guest at a time when speaking to avoid feeling overwhelmed by the entire group at once.
Remind yourself that a minor mistake in the kitchen is not a reflection of your worth as a host or a friend.
5. Holiday Food Safety Kit
Last-Minute Holiday Dinner Tips
Keeping your kitchen sanitary is the best gift you can give your guests this year. This image features a clear plastic container labeled as a food safety kit, filled with essential tools like thermometers and sanitizing sprays. It sits on a table with a turkey in the background, serving as a vital reminder to avoid holiday food poisoning.
Inside the box, you can see tongs, wipes, and a scrolling list of tips to ensure the meal is safe to eat. This visual guide emphasizes that preparation involves more than just following a recipe for flavor. Proper temperature control and surface cleaning prevent the spread of harmful bacteria during the chaotic cooking process.
A well organized safety station keeps these items within reach when things get busy. You can significantly reduce risks by checking the internal heat of the meat at regular intervals. Making health a priority ensures that everyone remembers the dinner for the right reasons.
Equipment Needed
Clear plastic storage bin
Digital instant read thermometer
Pair of long handled metal tongs
Small green cutting board
Ingredients
Bottle of food grade sanitizing spray
Pack of antibacterial wet wipes
Alcohol swabs for cleaning the thermometer probe
Roll of paper towels
DIY Instructions Step by Step
Select a clear plastic bin that fits easily on a shelf or under your prep table.
Label the outside of the box with large letters so everyone in the kitchen knows where to find the supplies.
Place your digital thermometer inside alongside a small pack of alcohol swabs for quick sanitizing after every use.
Add a bottle of sanitizing spray and a fresh roll of paper towels for wiping down counters after handling raw poultry.
Put a pair of clean tongs in the kit to move meat without using your hands directly.
Include a dedicated small green cutting board to be used only for vegetables to prevent cross contamination.
Tuck a pack of antibacterial wipes into the corner for guests to use before they sit down at the table.
Set the kit in a visible spot on the counter at least one hour before you start preparing the main course.
Use the thermometer to check that the thickest part of the bird reaches one hundred and sixty five degrees Fahrenheit.
Replace any used items in the kit immediately so it stays ready for the next holiday gathering.
6. The Showstopping Bow Turkey
Last-Minute Holiday Dinner Tips
Presentation can turn a simple meal into a memorable event for everyone at the table. This photograph shows a perfectly browned turkey sitting on a dark platter, decorated with a large red ribbon. The shiny skin and festive bow make the bird look like a centerpiece gift waiting to be unwrapped.
The background features blurred wine glasses and candlelight, which adds to the elegant and warm holiday mood. Using a simple accessory like a ribbon provides a professional touch without requiring advanced culinary skills. It draws the eye and makes the main course feel extra special for your guests.
Adding a decorative element is a quick way to hide any minor skin tears or uneven browning. This visual trick ensures that the first impression of the meal is one of beauty and care. Your family will appreciate the extra effort you put into the aesthetic of the holiday feast.
Equipment Needed
Extra wide red satin ribbon
Sharp fabric scissors
Large oval serving platter
Meat carving set
Ingredients
One fully roasted whole turkey
Fresh sprigs of parsley
Handful of fresh cranberries
Small orange slices
DIY Instructions Step by Step
Remove the turkey from the oven and let it rest on a cutting board for at least thirty minutes.
Transfer the bird carefully to the center of a clean, large oval serving platter.
Cut a long piece of red satin ribbon that is long enough to wrap around the entire breast of the bird.
Loop the ribbon under the wings and bring the ends together at the top of the chest.
Tie a large, floppy bow with the ribbon and trim the ends at an angle to prevent fraying.
Arrange fresh parsley sprigs around the base of the bird to create a vibrant green border.
Scatter fresh red cranberries over the parsley to add pops of festive color to the tray.
Place small orange slices between the greens to provide a bright contrast to the dark platter.
Ensure the bow is centered and not touching any hot juices that might stain the fabric.
Present the bird to your guests as a completed work of art before you take it back to carve.
7. The Clock Watcher’s Cheat Sheet
Last-Minute Holiday Dinner Tips
Time management is the most difficult ingredient to master when cooking a large holiday feast. This image shows a silver kitchen clock pointing to five o’clock while a detailed cheat sheet is taped to the refrigerator. The paper contains a complex flowchart designed to help a host speed up the bird when guests are already arriving.
In the background, you can see a blurred dining room where people are gathered and ready to eat. A dog waits patiently on the floor, adding a sense of domestic reality to the high stakes kitchen environment. Having a visual plan helps you stay focused when the pressure of the ticking clock starts to build.
A written guide reduces the mental load of remembering every single side dish and its cooking time. You can easily track your progress by checking off tasks as you complete them during the final hour. This level of organization is the secret to serving a hot meal on time.
Equipment Needed
Roll of masking tape
Black permanent marker
Sheet of white paper
Kitchen timer or stopwatch
Ingredients
Pre made holiday menu
List of cooking temperatures
Estimated resting times for meat
Quick snack for the cook
DIY Instructions Step by Step
Draw a vertical line down the center of your paper to separate the main course from the side dishes.
Write the final serving time at the bottom of the sheet in large, bold numbers.
Work backward from that time to determine when each item needs to go into the oven.
Use a permanent marker to create a flowchart that shows which tasks can happen at the same time.
Tape the paper to your refrigerator at eye level using a small piece of masking tape on each corner.
Set your kitchen timer for the next milestone on your list to keep yourself moving quickly.
Check the sheet every fifteen minutes to ensure you are not falling behind your established schedule.
Adjust the plan if one dish finishes early by moving it to a warm spot on the stove.
Mark a big “X” through each completed task to give yourself a sense of accomplishment.
Leave a small space at the bottom for notes on what worked well for next year’s dinner.
8. The Leftover Pivot Plan
Last-Minute Holiday Dinner Tips
Cooking too much food is a common holiday tradition that leads to a refrigerator full of containers. This overhead shot shows a table overflowing with turkey, mashed potatoes, green beans, and pie. The title on the image suggests a pivot plan for handling the abundance of food after the main event.
Bright colors from the cranberry sauce and roasted vegetables make the spread look incredibly appetizing. It captures the moment of plenty just before the carving begins and the plates are filled. Having a plan for these items prevents waste and provides easy meals for the rest of the week.
Transforming your remains into new dishes keeps the flavors interesting for your family. You can turn a simple turkey into a hearty soup or a creative sandwich in just a few steps. This approach ensures that the hard work you did in the kitchen continues to provide value.
Equipment Needed
Set of glass storage containers
Large stock pot
Sharp chef’s knife
Permanent labels for dating
Ingredients
Leftover roasted turkey meat
Remaining mashed potatoes
Extra cranberry sauce
Leftover gravy
DIY Instructions Step by Step
Clear a large space on your counter to organize all the remaining food once the meal is over.
Carve all the remaining meat off the turkey carcass using a sharp chef’s knife.
Place the meat into glass storage containers and seal them with airtight lids immediately.
Put the turkey bones into a large stock pot and cover them with water to start a base for soup.
Scoop the mashed potatoes into a separate container and flatten the top to save space in the fridge.
Transfer the cranberry sauce into a small jar and label it with the current date using a marker.
Store the gravy in a leakproof container so it can be easily reheated for future sandwiches.
Group all holiday containers in one section of the refrigerator so they are easy to find tomorrow.
Freeze any meat that you do not plan to eat within the next three days to keep it fresh.
Use the labeled dates to ensure you eat the oldest items first and avoid any food waste.
9. Surprise Guest Dietary Needs
Last-Minute Holiday Dinner Tips
Discovering a guest has new dietary restrictions at the very last minute can cause a wave of panic. This photo captures a woman in a red sweater looking shocked at her phone while holding a large turkey. The screen reveals a message that “Cousin Lily is vegan now,” creating an immediate culinary challenge.
The kitchen is filled with other people and dishes, emphasizing the chaos of a busy holiday gathering. An open book on the counter offers tips for sudden dietary needs, providing a glimmer of hope. It highlights the importance of being flexible and prepared for unexpected changes in your guest list.
You can often adapt your existing side dishes to accommodate various lifestyles without starting over. Knowing a few quick swaps allows you to make every guest feel welcome and included. This situation is an opportunity to show your skills as a versatile and thoughtful host.
Equipment Needed
Separate small saucepan
Clean wooden spoon
Small serving bowl
Measuring spoons
Ingredients
One can of chickpeas
Olive oil
Salt and black pepper
Fresh garlic cloves
DIY Instructions Step by Step
Take a deep breath and look through your pantry for plant based protein sources like beans or nuts.
Open a can of chickpeas and rinse them thoroughly under cold water in a colander.
Heat a small amount of olive oil in a separate saucepan over medium heat.
Mince two cloves of garlic and add them to the oil until they smell fragrant and turn slightly brown.
Pour the rinsed chickpeas into the pan and stir them with a clean wooden spoon.
Season the mixture with salt and black pepper to enhance the natural flavors of the beans.
Sauté the chickpeas for five minutes until they are warm through and slightly crispy on the outside.
Check your vegetable sides to see if you can serve a portion before adding butter or cream.
Place the seasoned chickpeas in a small serving bowl and garnish with a bit of fresh parsley.
Serve this dish to your vegan guest as a protein rich alternative to the main turkey course.
10. The Peace Treaty Dinner
Last-Minute Holiday Dinner Tips
Getting children to sit still and eat during a formal holiday meal is a victory in itself. This image shows a young boy in a suit and tie holding up a “Peace Treaty” sign at a crowded dinner table. The other children around him point and react, while an adult watches from the background with a hopeful expression.
The table is packed with kid friendly options like green beans, potatoes, and even a few cookies. It represents the negotiation that often happens between parents and picky eaters during festive celebrations. Creating a family friendly environment helps reduce stress and encourages everyone to try new things.
A structured plan for the kids’ table can lead to a much quieter and more enjoyable evening for the adults. Small incentives and familiar foods make the experience feel like a fun game rather than a chore. This approach fosters a sense of unity and shared joy across all generations of the family.
Equipment Needed
Large sheet of parchment paper
Red and black markers
Small stickers or stamps
Kid sized plates and utensils
Ingredients
Plain buttered noodles
Sliced apples
Small pieces of white meat turkey
Carrot sticks with ranch dip
DIY Instructions Step by Step
Create a “Peace Treaty” document on a large sheet of parchment paper using your markers.
Write down three simple rules for the meal, such as “try one bite” and “stay in your seat.”
Place a small kid sized plate at each child’s station to make the portions look manageable.
Serve a small amount of plain buttered noodles alongside the traditional holiday dishes.
Cut the turkey into very small cubes that are easy for little hands to pick up with a fork.
Arrange carrot sticks and apple slices in a fun pattern to make the vegetables look more attractive.
Give each child a sticker to place on the treaty after they try a new vegetable or piece of meat.
Encourage the oldest child to lead the group in a simple game of “I Spy” while they eat.
Keep a small bowl of ranch dip in the center for the kids to use with their vegetables.
Praise the children for their good behavior and reward them with a holiday cookie once the treaty is fulfilled.
11. Flavor Fortification Strategy
Last-Minute Holiday Dinner Tips
A bland gravy can make even the most succulent bird feel like a disappointment during the big meal. This image highlights a chef pouring a rich, dark liquid into a white gravy boat to enhance its depth and color. Small bowls containing bouillon cubes and dried mushrooms sit nearby as secret weapons for an instant flavor boost.
The steam rising from the boat suggests a fresh, hot sauce ready to be served over a holiday plate. Using a wire whisk ensures that every addition blends smoothly without leaving behind any gritty texture or lumps. It demonstrates that you can always rescue a weak sauce with a few clever additions from your spice cabinet.
Richness often comes from concentrated umami sources that build a savory profile quickly. You do not need hours of simmering to achieve a gourmet result when you use these high impact ingredients. This approach allows you to fix seasoning errors just moments before the guests take their seats at the table.
Equipment Needed
Ceramic gravy boat
Fine wire whisk
Small condiment bowls
Liquid measuring spoons
Ingredients
Two cups of existing turkey gravy
One tablespoon Worcestershire sauce
One beef or poultry bouillon cube
Half teaspoon dried mushroom powder
DIY Instructions Step by Step
Pour your prepared gravy into a small saucepan and set the heat to low on your stovetop.
Crumble one bouillon cube into a tiny bowl and add a teaspoon of hot water to dissolve it into a thick paste.
Stir the bouillon paste into the gravy using a whisk to distribute the salt and savory notes evenly.
Add the Worcestershire sauce one teaspoon at a time while tasting the mixture after each addition.
Sprinkle the dried mushroom powder over the surface of the liquid to introduce a deep earthy flavor.
Whisk the gravy vigorously for two minutes to ensure the powder does not clump together in the heat.
Increase the temperature slightly until the sauce begins to simmer gently but do not let it boil rapidly.
Check the color and add a drop of browning sauce if you prefer a darker, more traditional appearance.
Transfer the fortified sauce into a warmed ceramic gravy boat to keep it hot during the service.
Serve the rich gravy immediately over sliced turkey or mashed potatoes to delight your hungry guests.
12. The Master Carving Presentation
Last-Minute Holiday Dinner Tips
The moment the main course hits the table is the true highlight of any festive gathering. This overhead view shows a beautifully roasted bird surrounded by an abundance of rolls, cranberry sauce, and fresh greens. Hands reach in with a carving knife to start the process of sharing the feast with everyone.
Flickering candles and colorful side dishes create an atmosphere of warmth and shared abundance. The circular arrangement of food suggests a communal spirit where every guest can reach their favorite holiday staple easily. A well decorated platter makes the centerpiece look like a professional work of culinary art.
Learning to slice the meat correctly ensures that everyone receives a tender and juicy portion. Proper carving also allows you to arrange the plate neatly for a stunning visual impact before the eating begins. This final step is the culmination of all your hard work and preparation in the kitchen.
Equipment Needed
Large oval porcelain platter
Sharp carving knife
Long pronged meat fork
Decorative garnish greens
Ingredients
One whole roasted turkey
Two cups fresh parsley or bay leaves
One cup fresh cherry tomatoes
Assorted dinner rolls
DIY Instructions Step by Step
Let the roasted bird rest for thirty minutes on a stable surface before you attempt any cutting.
Move the turkey to the center of a large porcelain platter that has plenty of room for garnishes.
Tuck fresh parsley or bay leaves around the base of the bird to hide the juices and add a pop of green.
Place cherry tomatoes at equal intervals among the greens to create a bright and festive border.
Insert the long pronged fork into the breastbone to hold the bird steady while you work.
Position your carving knife at a slight angle and make long, smooth strokes to remove the legs and wings first.
Slice the breast meat against the grain in thin, even pieces to keep the texture soft and easy to chew.
Arrange the sliced meat back on the platter next to the main body to maintain the beautiful shape of the bird.
Surround the platter with small bowls of cranberry sauce and plates of warm dinner rolls for easy access.
Invite your guests to the table and begin serving the sliced portions while the meat is still warm and fragrant.
13. The Burnt Bottom Recovery
Last-Minute Holiday Dinner Tips
Accidents happen in a busy kitchen, especially when multiple dishes are competing for space in the oven. This photo shows a cook carefully slicing into a bird that has developed a dark, charred exterior on the bottom. Wisps of smoke rise from a nearby pot of potatoes, emphasizing the high pressure of a holiday dinner rescue.
The scene includes various metal bowls and measuring cups scattered across the counter, reflecting the frantic energy of a recovery mission. A guidebook in the foreground offers tips on how to save burnt food and eliminate a smoky aroma from the room. It proves that a charred surface does not have to mean a ruined meal if you know the right tricks.
Removing the damaged parts allows you to serve the moist and flavorful meat hidden underneath the skin. You can quickly pivot by focusing on presentation and bold sauces to mask any lingering hints of overcooking. This strategy keeps the dinner on track despite a few minutes of distraction near the stove.
Equipment Needed
Heavy duty chef knife
Pair of disposable food safety gloves
Clean wooden cutting board
Large stainless steel pot
Ingredients
One overcooked or charred turkey
One cup of high quality chicken stock
Fresh sprigs of rosemary
Extra butter for basting
DIY Instructions Step by Step
Put on a pair of food safety gloves to protect your hands from the hot grease and charred bits.
Remove the bird from the roasting pan immediately to stop the cooking process from the residual heat.
Place the turkey on a clean wooden board with the burnt side facing up for easy access.
Use a sharp knife to gently peel away the blackened skin without tearing the tender meat below.
Slice off any thin layers of meat that have absorbed a bitter or smoky flavor from the char.
Transfer the cleaned meat to a fresh baking dish and drizzle it with warm chicken stock to restore moisture.
Add a few dots of butter and fresh rosemary on top to introduce a pleasant and aromatic scent.
Cover the dish tightly with foil and place it in a warm oven at a very low temperature.
Open the windows or use a kitchen fan to clear the smoky air from the room before guests enter.
Serve the salvaged meat with an extra helping of gravy to ensure every bite is rich and delicious.
14. Silky Potato Perfection
Last-Minute Holiday Dinner Tips
Mashed potatoes are often the unsung hero that brings the entire holiday plate together into a cohesive meal. This close up shot features a bowl of creamy, whipped potatoes with a melting square of butter right in the center. The golden swirl of melted fat creates a mouthwatering visual that promises comfort and rich flavor.
The smooth texture of the mash indicates that the vegetables were processed with care to avoid any lumps. A silver spoon rests on the side, ready to scoop up a generous portion for a waiting guest. This dish serves as a simple yet effective way to satisfy everyone at the table regardless of their main course preference.
Achieving this level of creaminess requires a balance of temperature and the right ratio of dairy. You can transform basic tubers into a luxury side dish by incorporating fats at the very last moment. This technique ensures the potatoes stay light and fluffy rather than becoming heavy or gluey during the feast.
Equipment Needed
Large mixing bowl
Stainless steel potato masher or ricer
Silicone spatula
Large serving spoon
Ingredients
Five pounds of Yukon Gold potatoes
Half cup heavy cream
Four tablespoons unsalted butter
Pinch of sea salt
DIY Instructions Step by Step
Peel the potatoes and cut them into equal sized cubes to ensure they all cook at the same rate.
Boil the cubes in a large pot of salted water until they feel soft when pierced with a fork.
Drain the water completely and let the potatoes sit in the hot pot for two minutes to evaporate extra moisture.
Pass the hot potatoes through a ricer or use a hand masher to break them down into a fine consistency.
Heat the heavy cream and two tablespoons of butter in a small pan until the liquid is warm.
Pour the warm dairy into the bowl of potatoes slowly while stirring with a spatula.
Fold the mixture gently to combine the ingredients without overworking the starch in the vegetables.
Taste the mash and add a pinch of sea salt to enhance the natural buttery flavor of the dish.
Transfer the potatoes to a serving bowl and create a small well in the center with the back of a spoon.
Drop the remaining two tablespoons of butter into the well and serve while the golden pool is still melting.
15. The Skillet Roasting Hack
Last-Minute Holiday Dinner Tips
Holiday cooking often requires more oven space than a standard kitchen provides. This illustration shows a beautifully browned bird resting in a large black skillet filled with aromatic broth and tomato slices. Steam rises from the pan, suggesting a juicy and tender result that rivals traditional roasting methods.
Using a skillet allows the heat to circulate differently, often resulting in crispier skin on the legs and wings. This method is an excellent solution for smaller gatherings or when the main roasting pan is already occupied by side dishes. It proves that you can achieve a high quality meal with basic everyday cookware.
Adding liquid to the bottom of the pan keeps the meat from drying out during the intense heat of the oven. You can enhance the aroma by tucking fresh herbs like rosemary and sage into the corners of the skillet. This visual setup makes the centerpiece look rustic and inviting for a casual holiday dinner.
Equipment Needed
Large cast iron or oven safe skillet
Sturdy metal spatula
Aluminum foil
Meat thermometer
Ingredients
One small whole turkey or large chicken
Two cups chicken broth
Three thick slices of fresh tomato
Fresh rosemary sprigs
DIY Instructions Step by Step
Preheat your oven to three hundred and fifty degrees Fahrenheit while you prepare the meat.
Pat the skin of the bird completely dry with paper towels to ensure it browns properly in the pan.
Place the bird in the center of the skillet with the breast side facing up.
Pour the chicken broth into the bottom of the skillet carefully to avoid splashing the skin.
Arrange the tomato slices in the liquid around the meat to add acidity and flavor to the drippings.
Tuck fresh rosemary sprigs under the wings and legs for a boost of herbal fragrance.
Slide the skillet into the oven on the middle rack for even heat distribution.
Check the internal temperature after one hour using a digital thermometer in the thickest part of the thigh.
Tent the bird with aluminum foil if the skin begins to look too dark before the meat is finished.
Remove the skillet from the oven once the thermometer reads one hundred and sixty five degrees Fahrenheit.
16. Multi Tier Kitchen Management
Last-Minute Holiday Dinner Tips
Efficiency is the secret to a stress free holiday when you have a long list of recipes to complete. This photo captures a busy countertop filled with multiple trays of roasted vegetables, a steaming turkey, and fresh pie crusts. It represents the height of meal preparation where every minute and every inch of space matters.
Using cooling racks to stack baking sheets allows you to manage several side dishes at the same time. This vertical strategy keeps the workspace organized and prevents the “countertop clutter” that causes kitchen accidents. You can see how having the gravy, cranberry sauce, and dessert ready at once ensures a smooth transition to the table.
Managing different cooking times requires a clear plan and the right tools like colanders and hand mixers. Keeping your equipment within reach allows you to move from one task to another without losing focus. This organized chaos is where the magic of a holiday feast truly happens.
Equipment Needed
Set of stackable cooling racks
Large colander
Handheld electric mixer
Assorted rimmed baking sheets
Ingredients
Two pounds of Brussels sprouts
Three large carrots, sliced
One pre made pie crust
One quart of turkey gravy
DIY Instructions Step by Step
Start by roasting your heartiest vegetables like carrots and sprouts on separate rimmed baking sheets.
Set up a stackable cooling rack in a corner of your counter to hold finished trays while they wait to be served.
Use a colander to drain any steamed items quickly over the sink to keep the pot available for the next dish.
Prepare your gravy in a small saucepan and keep it on a low simmer to maintain the right temperature.
Roll out your pie crust on a clean, floured surface while the main course is in the final stages of roasting.
Use an electric mixer to whip your potatoes or cream in a deep bowl to prevent splatters on your other dishes.
Rotate the trays on your cooling rack every ten minutes to ensure nothing stays in a “cold zone” for too long.
Place the most colorful dishes, like cranberry sauce, in the front to remind yourself of the final presentation.
Keep a damp cloth nearby to wipe up small spills immediately before they become sticky or hard to clean.
Move all completed items to the dining area once the bird has finished resting for thirty minutes.
17. The Mustard Binder Secret
Last-Minute Holiday Dinner Tips
Achieving a uniform golden crust on your holiday roast is easier than it looks with a simple kitchen hack. This image shows a chef whisking a bright yellow mixture in a glass bowl, with a spoonful of thick mustard being added. This technique creates a “binder” that helps seasonings stick to the meat while adding a subtle tang.
The workspace is clean and organized with small bowls of dry rub and fresh herbs like sage and rosemary ready for use. Using a binder ensures that your spices do not fall off during the long roasting process in the hot oven. It provides a professional finish that will impress your guests the moment you carve the bird.
Mustard is an excellent choice because the strong vinegar flavor mellows out as it cooks, leaving behind a savory depth. You can customize the mixture with different herbs to match the theme of your dinner. This small step makes a huge difference in the final appearance and taste of the centerpiece.
Equipment Needed
Large glass mixing bowl
Balloon whisk
Small condiment bowls
Basting brush
Ingredients
Half cup yellow or Dijon mustard
Two tablespoons dried poultry seasoning
One tablespoon garlic powder
Fresh sage and rosemary for garnish
DIY Instructions Step by Step
Scoop the mustard into a glass mixing bowl and whisk it until the texture is smooth and light.
Add the dried poultry seasoning and garlic powder to the bowl one tablespoon at a time.
Stir the mixture vigorously until the spices are completely incorporated into the yellow paste.
Pat the turkey skin dry with a clean cloth to help the binder adhere more effectively.
Use a basting brush or your gloved hands to apply a thin, even layer of the mustard mixture over the entire bird.
Ensure you cover the areas under the wings and around the legs for a consistent look.
Sprinkle extra salt or pepper over the wet binder if you prefer a more seasoned crust.
Place the bird in your roasting pan and let it sit for ten minutes before putting it in the oven.
Roast as usual, noting how the mustard creates a beautiful and dark golden brown finish.
Garnish the final platter with fresh sage and rosemary to contrast with the rich color of the skin.
18. Too Salty Triage
Last-Minute Holiday Dinner Tips
A heavy hand with the salt shaker can happen to the best of us when we are rushing to finish the meal. This photo features several bowls of colorful spices and a “Too Salty” triage note taped to the table. It illustrates the moment you realize a dish needs a quick flavor correction to be edible for your guests.
Having a digital timer and various balancing ingredients like sugar or lemon juice nearby is essential for this rescue mission. You can often save a dish by introducing a contrasting flavor that neutralizes the perception of saltiness. It is a common kitchen emergency that has several easy and effective solutions.
Understanding how flavors interact allows you to stay calm when a mistake occurs in the final hour. You do not have to throw away a whole pot of soup or gravy if you act quickly with the right ingredients. This triage approach ensures that every dish on your table tastes balanced and delicious.
Equipment Needed
Set of small tasting spoons
Digital kitchen timer
Small ceramic bowls
Stirring spatula
Ingredients
One cup raw potato chunks
One tablespoon granulated sugar
One teaspoon lemon juice or white vinegar
Extra unsalted broth
DIY Instructions Step by Step
Taste the dish carefully to determine exactly how much extra salt is present in the mixture.
Drop several large chunks of raw, peeled potato into your salty soup or gravy immediately.
Simmer the potatoes in the liquid for ten minutes, as they will naturally absorb some of the excess salt.
Remove the potato chunks with a spoon and discard them before they begin to fall apart.
Add a very small pinch of sugar to the pot to help mask the saltiness without making the food taste sweet.
Squeeze a few drops of fresh lemon juice into the dish to provide a bright acidity that balances the salt.
Pour in a half cup of unsalted broth to dilute the seasoning if the liquid is too thick.
Set your timer for five minutes to let the new flavors meld together over a low heat.
Taste the dish again with a clean spoon to check if the balance has improved.
Repeat the steps with more broth or acidity if the salt level still feels too high for your palate.
19. The Festive Batch Cocktail Bar
Last-Minute Holiday Dinner Tips
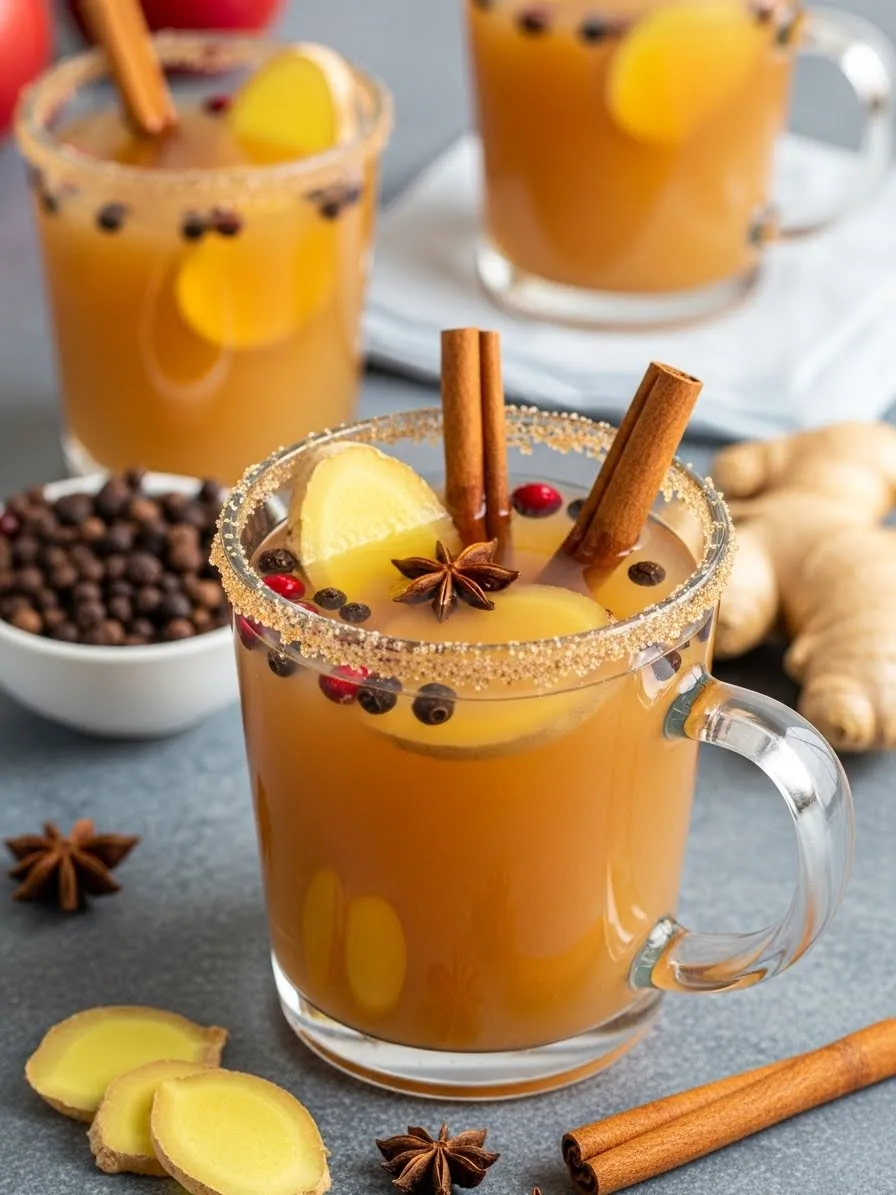
Providing drinks for a large crowd is much easier when you set up a dedicated self service station. This image shows a beautiful wooden cabinet filled with jars of spices, glassware, and a silver cocktail shaker. A sign in the center offers tips for festive batch cocktails, encouraging guests to help themselves.
Organizing your bar with pre measured ingredients in clear jars makes the setup look professional and inviting. Using warming spices like cinnamon, star anise, and cloves adds a seasonal aroma to the room that guests will love. This arrangement allows the host to spend more time at the table instead of mixing individual drinks all night.
A batch cocktail approach ensures that the flavors stay consistent for every person at the party. You can offer a variety of garnishes like dried fruits and herbs to let people customize their own glass. This stylish setup turns a simple beverage service into a highlight of the holiday evening.
Equipment Needed
Large glass jars with lids
Silver cocktail shaker
Assorted martini and coupe glasses
Long handled bar spoon
Ingredients
Two bottles of base spirit (like gin or vodka)
One quart of cranberry juice
Whole cinnamon sticks and star anise
Selection of fruit preserves or jams
DIY Instructions Step by Step
Choose a sturdy shelf or a separate table to serve as your designated holiday bar area.
Fill large glass jars with dry spices like cinnamon and star anise for guests to use as aromatic garnishes.
Mix your base spirit and juice in a large pitcher or clean jar several hours before the guests arrive.
Chill the mixture in the refrigerator so it is ready to serve without needing too much ice.
Place a variety of clean glassware on the shelves so people can choose the style they prefer.
Set out the silver shaker and a bowl of ice for those who want their drink extra cold and frothy.
Arrange small jars of fruit preserves to act as a natural sweetener and colorful addition to the cocktails.
Put a long handled bar spoon in a glass of water nearby for easy stirring between drinks.
Post a small menu card that explains the ingredients so guests know what they are drinking.
Refill the ice and garnish jars halfway through the evening to keep the station looking fresh.
20. The Power Outage Protocol
Last-Minute Holiday Dinner Tips
Nothing tests a holiday host like a sudden loss of electricity just as the cooking begins. This cozy scene shows a group of friends wearing headlamps and gathered around a wood burning fireplace to finish their meal. A large white cooler sits on the table, serving as a makeshift oven or warming box for the prepared dishes.
The warm glow from lanterns and the fire creates a surprisingly festive and intimate atmosphere despite the lack of modern lights. It proves that a successful dinner is about the people and the food, even if the circumstances are not what you planned. Using portable light sources allows the conversation and the cooking to continue without a pause.
A high quality cooler is a vital tool for keeping hot food at a safe temperature when the stove stops working. You can still serve a delicious meal of grilled vegetables and hearty stews by utilizing alternative heat sources. This “Power Outage Protocol” turns a potential disaster into a unique and memorable holiday story.
Equipment Needed
Large insulated cooler
Battery powered LED lanterns
Headlamps for every cook
Cast iron Dutch oven
Ingredients
Pre roasted vegetables
Warm hearty stew or soup
Thermos of hot coffee or tea
Assorted crusty bread rolls
DIY Instructions Step by Step
Put on your headlamp immediately to ensure you can see your tools and ingredients clearly in the dark.
Place several battery powered lanterns around the kitchen and dining area to provide a steady wash of light.
Transfer any hot dishes into a clean, insulated cooler to trap the heat and keep the food safe to eat.
Line the bottom of the cooler with a thick towel to prevent the hot containers from damaging the plastic.
Move your cast iron Dutch oven to the edge of the fireplace to keep a stew or soup at a low simmer.
Use a long handled ladle to serve the food directly from the hearth to avoid moving heavy pots in the dark.
Wrap bread rolls in foil and place them near the heat source to warm them up before serving.
Keep the refrigerator and freezer doors closed tightly to preserve the cold for as long as possible.
Pour hot drinks from a pre filled thermos to keep everyone warm while the power is out.
Focus on simple, handheld foods that do not require complex cutting or a lot of light to enjoy.
21. Professional Plating Precision
Last-Minute Holiday Dinner Tips
Presentation transforms a simple meal into a high end dining experience for your loved ones. This image showcases a chef in a crisp white uniform carefully arranging food on a plate with metal tongs. She focuses intently on the balance of colors and textures to ensure every serving looks like a work of art.
Small sliders and vibrant vegetable sides sit ready on the counter, proving that even casual items can look elegant with the right touch. Neatness in the kitchen reflects a calm mind, which is essential when the holiday rush begins. You can elevate your own table by taking an extra moment to wipe the rims of your serving dishes.
Achieving a restaurant quality look does not require a culinary degree or expensive tools. Simple techniques like stacking ingredients or using fresh garnishes make a massive visual impact. This approach makes your guests feel special and shows the care you put into every detail of the dinner.
Equipment Needed
Long stainless steel plating tongs
Clean white porcelain plates
Small offset spatula
Damp lint free cloth
Ingredients
Mini burger buns or sliders
Sliced cooked vegetables (carrots and greens)
Creamy risotto or mashed potato base
Fresh microgreens for garnish
DIY Instructions Step by Step
Place your clean white plates on a flat surface in a well lit area of the kitchen.
Use a small offset spatula to spread a neat circle of potatoes or risotto in the center of the plate.
Pick up your slider or main protein using the metal tongs to keep your fingers clean and the food intact.
Set the protein gently on top of the base layer so it sits slightly off center for a modern look.
Arrange the sliced vegetables around the main item in a curved pattern to add height and vibrant color.
Use the tongs to place small sprigs of microgreens on top of the slider as a final decorative touch.
Inspect the rim of the plate for any stray drops of sauce or crumbs that might have fallen.
Wipe the edges of the porcelain with a damp lint free cloth to ensure a spotless and professional finish.
Repeat these steps for each guest to ensure every plate looks consistent and appetizing.
Serve the dishes immediately while the food is hot and the presentation is at its peak.
22. The Clean As You Go Method
Last-Minute Holiday Dinner Tips
Kitchen chaos often stems from a mountain of dirty dishes and cluttered countertops during meal prep. This bright photo features an organized kitchen station with a stand mixer, various bowls of prepped ingredients, and a drying rack full of clean tools. A guidebook on the counter offers tips for clearing the chaos using a systematic cleaning approach.
Keeping your workspace tidy allows you to move quickly between tasks without searching for a clean whisk or spoon. Small white bowls hold chopped greens and spices, showing that “mise en place” is the foundation of a successful holiday. It visualizes the peace that comes when you stay ahead of the mess instead of letting it overwhelm you.
Washing a few items while the turkey roasts saves you hours of work once the dinner ends. This strategy keeps the sink clear for important tasks like draining pasta or rinsing fresh produce. Your future self will thank you for maintaining a neat environment throughout the long day of cooking.
Equipment Needed
Wire dish drying rack
Large ceramic mixing bowl
Electric stand mixer
Small ingredient prep bowls
Ingredients
Pre chopped green peas
Minced herbs (parsley or chives)
Dry spices and seasonings
Warm soapy water
DIY Instructions Step by Step
Start by clearing every non essential item from your main countertop to create a blank workspace.
Fill one side of your sink with warm soapy water before you begin any food preparation.
Organize your ingredients into small white bowls so everything is measured and ready to use.
Place your stand mixer in a corner where it has plenty of room to operate without blocking your path.
Wash each tool or bowl immediately after you finish using it for a specific task.
Set the wet items in a wire drying rack so they can air dry quickly without taking up counter space.
Wipe down the surface of your cutting board with a damp cloth after finishing each vegetable.
Empty your trash bin before the main cooking window starts to prevent it from overflowing.
Keep a dedicated “bowl for scraps” on the counter to collect peels and wrappers in one spot.
Take a final look at your tidy kitchen once the bird is in the oven and enjoy the organized atmosphere.
23. The Ultimate Harvest Spread
Last-Minute Holiday Dinner Tips
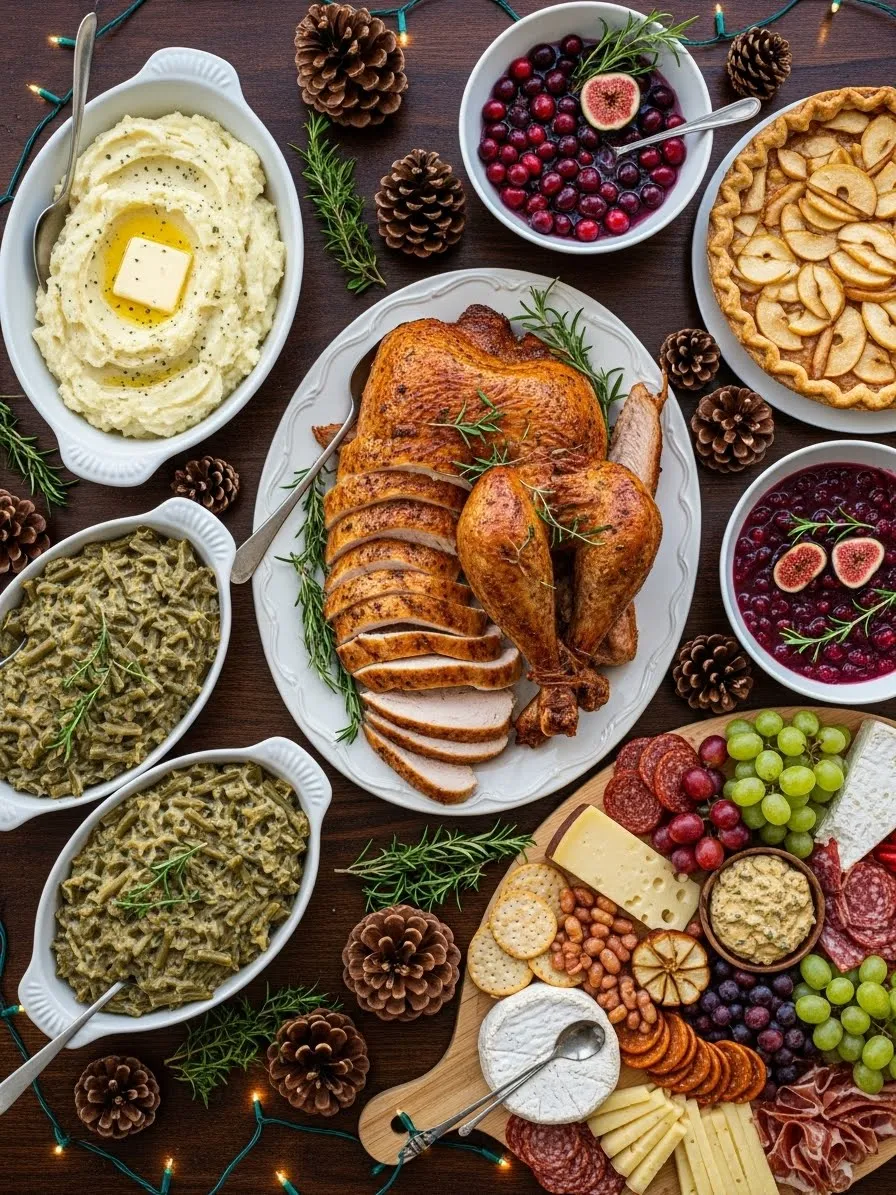
Abundance is the theme of this stunning overhead shot of a completed holiday feast. A perfectly sliced turkey takes center stage, surrounded by green bean casserole, mashed potatoes, and a colorful charcuterie board. Pinecones and festive greenery are scattered across the dark wood table, adding a rustic and natural touch to the celebration.
The variety of dishes ensures that every guest finds something they love, from savory meats to sweet apple pies. Deep red cranberry sauce with fresh fig slices provides a beautiful contrast to the golden brown rolls and creamy sides. It captures the essence of a traditional meal where everyone gathers to share in the results of the harvest.
Organizing a large spread requires careful placement to ensure people can reach everything without a struggle. Grouping similar items together, like cheeses and crackers, helps the flow of the buffet or family style service. This visual representation of a successful dinner is the goal for every holiday host.
Equipment Needed
Large wooden serving board
Oval white turkey platter
Assorted ceramic side dish bowls
Small glass condiment dishes
Ingredients
Roasted sliced turkey breast
Creamy mashed potatoes with a butter pat
Green bean casserole with fried onions
Selection of cured meats, cheeses, and grapes
DIY Instructions Step by Step
Place the large turkey platter in the very center of the table as the primary focal point.
Arrange your warm side dishes like potatoes and beans on opposite sides of the bird to balance the weight.
Set the charcuterie board at one end of the table to serve as an easy appetizer zone for early arrivals.
Fill small glass dishes with cranberry sauce and garnishes like fresh figs to tuck into empty spaces.
Scatter clean pinecones and sprigs of rosemary between the bowls to create a festive and organic look.
Ensure every dish has its own serving spoon or fork so guests do not have to share utensils.
Place the desserts, like the apple pie, on the periphery of the main spread to save for later.
Slice the turkey breast into even pieces and fan them out on the platter for a professional appearance.
Light small candles or string lights nearby to enhance the warm colors of the roasted food.
Step back and check that there is enough room for guests to place their own plates as they serve themselves.
24. The Appetizer Overload Strategy
Last-Minute Holiday Dinner Tips
Hungry guests can become a distraction in the kitchen while you are trying to finish the main course. This lively image shows a group of friends gathered around a coffee table stacked high with snacks and dips. A “Peace Treaty” or strategy sign reminds the host that appetizers are the best way to keep people happy and out of the cooking zone.
Men are shown competing to build the tallest cracker stack while others enjoy small quiches and fresh vegetables. This relaxed environment allows the conversation to flow while the turkey finishes its final minutes in the oven. It proves that a well timed snack can buy you the extra time you need for kitchen success.
Providing a wide variety of finger foods caters to different tastes and prevents anyone from getting “hangry.” Using a large wooden board for the display creates an impressive visual that acts as a secondary centerpiece. This strategy turns the wait for dinner into an enjoyable part of the holiday experience.
Equipment Needed
Oversized wooden charcuterie board
Small white ceramic bowls
Tiered serving tray
Toothpicks or cocktail forks
Ingredients
Mini quiches or savory tarts
Assorted crackers and tortilla chips
Hummus and vegetable dip
Fresh carrots, celery, and olives
DIY Instructions Step by Step
Select a large coffee table or sideboard away from the kitchen to serve as the appetizer station.
Cover the surface with a clean cloth or a large wooden board to protect the furniture.
Place bowls of dips like hummus and salsa in the center of the board as anchors for the snacks.
Arrange stacks of crackers and chips in swirling patterns around the bowls to create visual interest.
Fill the gaps with colorful vegetables like carrot sticks and celery to provide a healthy option.
Set out a tray of warm mini quiches that guests can easily pick up with their hands.
Provide a small bowl for discarded olive pits or toothpicks to keep the area tidy.
Scatter handfuls of nuts and grapes across the board to add different textures and flavors.
Encourage your guests to help themselves as soon as they arrive to keep their energy high.
Refill the most popular items quickly so the board always looks full and inviting.
25. Zesty Cranberry Enhancement
Last-Minute Holiday Dinner Tips
Store bought sauces can sometimes lack the bright and complex flavors needed to complement a rich turkey. This close up shot features a bowl of vibrant red cranberry sauce being topped with fresh frozen berries for texture. Small side bowls contain orange zest, pecans, and rosemary, showing how simple additions can transform a basic condiment.
The deep crimson color of the sauce adds a beautiful pop of visual interest to any holiday table setting. Adding citrus zest provides a fragrant aroma and a sharp acidity that cuts through the heaviness of the gravy. It represents the “secret ingredient” philosophy where small changes yield big results in flavor.
Texture is just as important as taste when it comes to a perfect side dish. Mixing whole berries with a smooth jam creates a more interesting mouthfeel for your guests to enjoy. This easy hack allows you to serve a custom feeling sauce without spending hours over a hot stove.
Equipment Needed
Medium white ceramic bowl
Fine microplane or zester
Silver serving spoon
Small garnish bowls
Ingredients
Two cans of whole berry cranberry sauce
One fresh orange for zesting
Half cup halved pecans
Fresh rosemary sprigs
DIY Instructions Step by Step
Empty the contents of your cranberry sauce into a medium ceramic bowl and stir it until smooth.
Use a microplane to zest the outer skin of a fresh orange directly over the sauce.
Stir half of the orange zest into the mixture to distribute the citrus flavor evenly throughout.
Sprinkle the remaining zest on top of the sauce to create a bright and aromatic garnish.
Fold in the halved pecans if you want to add a crunchy element to the dish.
Top the sauce with a handful of fresh or frozen whole cranberries to improve the visual texture.
Tuck a small sprig of rosemary into the side of the bowl for a festive and herbal scent.
Let the sauce sit in the refrigerator for at least one hour to allow the flavors to meld together.
Place the bowl on a small plate with a silver spoon for a clean and elegant presentation.
Serve the enhanced sauce alongside the turkey and stuffing to provide a refreshing flavor contrast.
26. The Broken Thermometer Backup
Last-Minute Holiday Dinner Tips
Technical failures often happen at the worst possible time, like when you need to check the turkey’s doneness. This image shows a cook’s hand holding a knife to slice into a bird while a broken glass thermometer lies on the table. A yellow sticky note with “Broken Thermometer?” serves as a reminder to stay calm and use traditional methods.
The turkey sits on a wooden board surrounded by butter and herbs, looking nearly ready for the table. When your digital tools fail, you must rely on visual cues and physical touch to ensure the meat is safe. It captures the resourcefulness required to finish a meal when things do not go according to plan.
Checking the juices is a time honored way to verify that a bird is fully cooked through. Clear liquid indicates a finished roast, while any pink tint means it needs more time in the heat. This situation teaches every host the value of having a backup plan for their most essential kitchen gadgets.
Equipment Needed
Sharp chef’s knife
Wooden carving board
Metal meat fork
Clean paper towels
Ingredients
One roasted whole turkey
Small bowl of melted butter
Fresh thyme and rosemary
Extra salt for seasoning
DIY Instructions Step by Step
Remove the turkey from the oven and place it on a stable wooden carving board.
Locate the thickest part of the thigh near the joint where it meets the body of the bird.
Insert a sharp knife or a metal fork deep into the thigh meat with a steady hand.
Pull the tool out and observe the color of the juices that run out of the small hole.
Ensure the juices are completely clear and free of any red or pink coloration before serving.
Wiggle the drumstick gently to see if the joint moves easily and feels loose in the socket.
Check that the skin is a deep golden brown and sounds crisp when tapped with the back of a spoon.
Slice a small piece from the underside of the breast to verify the meat is opaque and white.
Cover the bird with foil and let it rest for thirty minutes to allow the temperature to even out.
Proceed with carving once you are confident the bird has reached a safe internal heat.
27. Vertical Storage Solutions
Last-Minute Holiday Dinner Tips
Maximizing every inch of a small kitchen requires looking up instead of out. This image shows a clever use of wall space with magnetic knife strips and tiered shelving for spices. A separate white folding table provides a temporary prep station for mixing salads or holding prepped ingredients.
Strings of festive lights wrap around the shelves, turning a functional storage area into a beautiful holiday display. This setup keeps your most used tools like whisks and ladles within arm’s reach while you stand at the stove. It proves that you do not need a massive island to prepare a complex meal with ease.
Adding a folding table is a game changer when you run out of flat surfaces for your mixing bowls. You can easily stow the furniture away once the guests arrive and the dinner service begins. This strategic layout ensures that you spend less time searching for tools and more time perfecting your recipes.
Equipment Needed
Magnetic knife strip
Tiered metal spice rack
White folding prep table
Stainless steel mixing bowls
Ingredients
Chopped celery and onions
Fresh leafy greens
Various dried spices in jars
Olive oil and vinegar for dressing
DIY Instructions Step by Step
Install a magnetic strip on a clear section of your wall to hold your carving knives safely.
Mount a tiered rack near your stove to organize all the herbs and spices you will need for the bird.
Set up a white folding table in a corner of the kitchen to act as a dedicated salad prep zone.
Place your stainless steel mixing bowls on the new table along with your chopped vegetables.
Hang your whisks and spatulas from hooks on the spice rack to keep your drawers from getting cluttered.
Use the shelves to hold heavy glass jars of flour or sugar so they do not take up counter space.
Wrap a string of battery powered lights around the unit to brighten your workspace during the evening.
Keep your most frequently used oils and vinegars on the top shelf for quick access during cooking.
Chop your greens and place them in a bowl on the folding table until you are ready to toss the salad.
Fold the table and lean it against a wall once the prep work is finished to clear the floor for guests.
28. The Trifle Pivot
Last-Minute Holiday Dinner Tips
Dessert disasters often happen when a pie crust fails or a cake does not rise as expected. This photo features a beautiful glass trifle bowl layered with cream, cookies, and fruit. A festive tag labeled “The Trifle Pivot” suggests that turning a broken dessert into a layered masterpiece is a smart move.
The background shows a warm holiday table with candles and pinecones, making the trifle look like an intentional centerpiece. Using whipped cream and crumbled cookies creates a decadent treat that hides any original baking mishaps. This approach saves time and reduces stress by utilizing what you already have in your pantry.
Presentation in a clear glass bowl allows the different colors and textures to shine through for your guests. You can customize the layers with different flavors of pudding or seasonal fruits to match your menu. This clever recovery ensures that your holiday meal ends on a high and sweet note.
Equipment Needed
Large glass trifle bowl or pedestal dish
Metal wire whisk
Silicone spatula
Small dessert plates
Ingredients
One failed or broken pie or cake
Two cups heavy whipping cream
One package of ginger snap cookies
Whole star anise for garnish
DIY Instructions Step by Step
Take your broken cake or pie and crumble it into small bite sized pieces using your hands.
Place a thick layer of the cake crumbles at the very bottom of your glass trifle bowl.
Whisk the heavy cream in a chilled bowl until it forms stiff, white peaks.
Spread a generous layer of the whipped cream over the cake crumbles using a spatula.
Crush several ginger snap cookies and sprinkle them over the cream to add a spicy crunch.
Repeat these layers until the bowl is full, ending with a smooth mound of whipped cream on top.
Break a few whole cookies in half and tuck them into the cream for a decorative finish.
Place a single star anise in the center to provide a festive and aromatic touch.
Refrigerate the trifle for at least two hours to let the layers settle and soften slightly.
Scoop deep into the bowl when serving to ensure every guest gets a bit of every delicious layer.
29. Fresh Herb Infusion Guide
Last-Minute Holiday Dinner Tips
Herbs are the secret to adding professional depth and aroma to a traditional holiday bird. This overhead shot shows bundles of fresh parsley, sage, rosemary, and thyme tied with twine on top of a printed guide. Small bowls of colorful spices like turmeric and paprika surround the greens, offering a palette of flavors.
Using fresh herbs instead of dried versions provides a more vibrant scent that fills the whole house while the turkey roasts. Tying them into bundles makes it easy to remove them from the cavity or the roasting pan before serving. This visual guide reminds us that nature provides the best tools for seasoning a memorable feast.
Understanding which herbs pair together allows you to create a custom flavor profile for your dinner. Sage and thyme are classic choices that enhance the savory notes of the poultry and the stuffing. This simple preparation step elevates your cooking and makes the meal feel truly special for your family.
Equipment Needed
Natural kitchen twine
Sharp kitchen shears
Small ceramic spice bowls
Clean wooden workspace
Ingredients
Fresh bunches of parsley and sage
Large sprigs of rosemary and thyme
Ground turmeric and paprika
Chives and mint for garnish
DIY Instructions Step by Step
Wash all your fresh herbs under cool water and pat them completely dry with a paper towel.
Group one sprig of each herb together to create a balanced aromatic bundle.
Cut a six inch piece of kitchen twine using your sharp shears.
Wrap the twine tightly around the stems of the herb bundle and tie a secure knot.
Trim the ends of the string so they do not hang loose or burn in the oven.
Place one bundle inside the cavity of the turkey before you begin the roasting process.
Scatter extra individual sprigs of rosemary and thyme in the bottom of the roasting pan.
Sprinkle a small amount of paprika or turmeric over the skin for a boost of golden color.
Use the fresh parsley and chives as a final garnish on the serving platter to add a pop of green.
Remove the tied bundles from the bird once it finishes cooking to keep the presentation neat.
30. The Slow Cooker Support Crew
Last-Minute Holiday Dinner Tips
Running out of stove burners is a common problem when you are managing multiple side dishes at once. This playful image features three slow cookers with faces and hats, acting as a “Support Crew” for the busy host. One unit warms the rolls, another mashes the potatoes, and a “Stuffing Sergeant” handles the bread mixture.
A whiteboard in the background lists tips for using your crock pot to save space and time during the rush. This creative approach keeps your food at the perfect temperature without taking up valuable oven real estate. It turns a functional kitchen appliance into a helpful member of your holiday team.
Using a slow cooker allows you to prepare certain dishes hours in advance and keep them warm until service. This reduces the last minute scramble and ensures that every item on your menu stays hot. Your guests will appreciate the consistent quality of the meal provided by your electronic assistants.
Equipment Needed
Three standard slow cookers
Large whiteboard and markers
Chef’s hat and small props (optional)
Wooden mixing spoons
Ingredients
Five pounds of peeled potatoes
Two dozen pre baked dinner rolls
Six cups of prepared herb stuffing
Plenty of melted butter
DIY Instructions Step by Step
Set up your slow cookers on a side counter away from the main stove area.
Label each unit so you know exactly which dish belongs in which pot.
Place your cooked, mashed potatoes into the first slow cooker and set it to the “warm” setting.
Stir in a bit of milk and butter every hour to keep the potatoes creamy and moist.
Fill the second slow cooker with your prepared stuffing and cover it tightly to lock in the steam.
Line the third slow cooker with a clean kitchen towel before adding your pre baked rolls.
Place the rolls inside and cover them with the ends of the towel to prevent them from getting soggy.
Use your whiteboard to track the start and finish times for each supporting dish.
Check the temperature of each pot periodically to ensure the food stays above one hundred and forty degrees.
Scoop the food directly from the slow cookers into serving bowls just as you sit down to eat.
31. Effortless Holiday Breakfasts
Last-Minute Holiday Dinner Tips
Morning energy often fades when the focus remains solely on the upcoming evening feast. This photo captures a kitchen counter filled with the making of a large breakfast bake alongside cartons of eggs, sliced ham, and chopped bell peppers. A guide in the foreground offers tips for easy morning meals, ensuring everyone stays fed without adding to your workload.
Warm light from the window illuminates the prep area, highlighting the simplicity of using a single glass baking dish for a crowd. Preparing a hearty meal before the main cooking marathon begins helps keep everyone in a good mood. It demonstrates that you can manage a full house by choosing recipes that require minimal oversight while they bake in the oven.
Setting a digital timer allows you to step away from the kitchen to enjoy a cup of coffee with your guests. You can easily assemble these ingredients the night before to save time during the busy holiday morning. This strategy ensures a smooth transition from a relaxed breakfast to the focused preparation required for the big dinner.
Equipment Needed
Glass rectangular baking dish
Large stainless steel mixing bowl
Balloon whisk
Digital kitchen timer
Ingredients
One dozen large eggs
Two cups diced ham
One cup chopped bell peppers
Half cup whole milk
DIY Instructions Step by Step
Preheat your oven to three hundred and fifty degrees Fahrenheit before you begin any food prep.
Crack one dozen eggs into a large mixing bowl and add a half cup of whole milk.
Whisk the eggs and milk vigorously until the mixture looks uniform and slightly frothy.
Grease the bottom and sides of a rectangular glass baking dish with a small amount of butter or oil.
Scatter the diced ham and chopped bell peppers evenly across the bottom of the prepared dish.
Pour the egg mixture over the ham and peppers carefully to avoid splashing the sides of the pan.
Place the dish on the center rack of your oven and set your digital timer for thirty minutes.
Check the breakfast bake periodically to ensure the edges are golden brown and the center is firm.
Remove the pan from the oven once the eggs are fully set and no longer jiggly in the middle.
Let the meal cool for five minutes before slicing it into squares and serving it to your hungry guests.
32. Post-Dinner Cleanup Efficiency
Last-Minute Holiday Dinner Tips
Cleaning up after a massive celebration can feel like an impossible task without a systematic plan. This image shows two people wearing protective gloves while scraping food scraps into a bin and sorting plastic bottles for recycling. A bucket filled with soapy sponges and a stack of clean storage containers sit ready to handle the remaining mess.
Managing waste as you go prevents the kitchen from becoming a source of stress after the guests leave. Using separate bins for food and recyclables makes the process faster and more environmentally friendly. It visualizes the final stage of a successful evening where every item is returned to its proper place.
Having a set of clear containers allows you to see exactly what leftovers you have for the following day. Tidying the surfaces with warm soapy water ensures that your kitchen stays sanitary for future meal prep. This organized approach brings the holiday event to a satisfying and clean conclusion.
Equipment Needed
Two large grey recycling bins
Set of clear plastic storage containers
Galvanized metal cleaning bucket
Rubber food safety gloves
Ingredients
Warm soapy water
Two large yellow and green sponges
Black heavy duty trash liners
Food grade surface sanitizer
DIY Instructions Step by Step
Put on your rubber food safety gloves to protect your skin from hot water and food debris.
Clear the table of all dishes and bring them to the counter near your recycling and trash bins.
Use a silicone spatula to scrape all solid food scraps into the bin lined with a heavy duty bag.
Sort empty plastic beverage bottles into the designated recycling container to save space in the main trash.
Fill your metal bucket with hot water and a generous amount of liquid dish soap.
Submerge your sponges in the soapy water and wipe down all the countertops to remove grease and spills.
Transfer any remaining large portions of food into the stack of clear plastic storage containers.
Seal each lid tightly to ensure the food stays fresh and does not absorb other smells in the fridge.
Load the dishwasher with plates and utensils, starting with the heaviest items on the bottom rack.
Take out the full trash bags immediately to keep your kitchen smelling fresh for the rest of the night.
33. The Kitchen Stress Reliever
Last-Minute Holiday Dinner Tips
High stakes cooking often leads to moments of intense pressure when multiple people are in the kitchen. This humorous photo depicts a group of friends reacting with exaggerated shock as a woman holds up a single carrot over a steaming pot. The chaotic energy and expressive faces highlight the emotional rollercoaster that often accompanies holiday hosting.
Festive decorations like red bows and greenery frame the scene, reminding us of the seasonal joy despite the frantic pace. Sharing these moments with friends turns the hard work of cooking into a series of funny memories. It captures the reality that even a small ingredient can feel like a major challenge when time is running out.
Finding ways to laugh through the mishaps is essential for a successful and happy celebration. Assigning simple tasks to your helpers can reduce the burden on the main cook and keep everyone involved. This lively atmosphere proves that the journey of making the meal is just as important as the final result on the table.
Equipment Needed
Large stainless steel stock pot
Long handled metal stirring spoon
Gas stovetop with multiple burners
Kitchen counter with festive garland
Ingredients
One large whole carrot with greens
Pot of simmering vegetable or meat soup
Fresh paper towels for quick spills
Bottle of cooking oil or vinegar
DIY Instructions Step by Step
Gather your friends in the kitchen and assign one person to handle all the vegetable prep.
Place a large stock pot on the front burner of your gas stove and fill it with your liquid base.
Turn the heat to medium and wait for the liquid to reach a gentle simmer before adding ingredients.
Hold up each major ingredient like a carrot to let your “team” know what is going into the pot next.
Chop the vegetables into equal pieces to ensure they cook at the same rate in the hot liquid.
Stir the mixture frequently with a long handled spoon to prevent anything from sticking to the bottom.
Keep a roll of paper towels nearby so your helpers can quickly wipe up any splashes or drips.
Taste the broth every fifteen minutes and adjust the seasoning with oil or vinegar as needed.
Encourage everyone to stay lighthearted by sharing stories or jokes while you work together.
Lower the heat once the vegetables are tender and let the flavors meld until you are ready to serve.
34. The Rapid Beverage Chill
Last-Minute Holiday Dinner Tips
Serving a warm bottle of wine is a common mistake that can be fixed in just a few minutes with a simple trick. This close up image shows a bottle of Chardonnay nestled in a silver ice bucket while salt is being poured over the ice cubes. The condensation on the glass and the sparkling ice create a refreshing and elegant visual for your bar station.
Adding salt to ice lowers the freezing point of the water, allowing the bottle to reach the desired temperature much faster. This technique is a lifesaver when guests arrive early or when you forget to put the beverages in the fridge. It demonstrates that a little bit of science can solve many common hosting dilemmas.
A chilled bottle not only tastes better but also looks more professional when presented at the dinner table. You can use this method for any bottled beverage that needs a quick drop in temperature before the first toast. This small detail ensures that every part of your holiday service is handled with care.
Equipment Needed
Polished silver ice bucket
Large supply of ice cubes
Small packet of coarse salt
Clean white cloth for wiping the bottle
Ingredients
One bottle of Chardonnay or white wine
Plenty of fresh ice
Two tablespoons of table or sea salt
Cold tap water
DIY Instructions Step by Step
Fill your silver ice bucket halfway with fresh ice cubes from your freezer.
Place the bottle of wine into the center of the bucket and push it down into the ice firmly.
Add more ice around the sides of the bottle until the bucket is nearly three quarters full.
Pour enough cold tap water into the bucket to cover most of the ice but not overflow.
Tear open a packet of salt and sprinkle it evenly over the top of the ice and water.
Stir the ice and salt mixture gently with your hand or a spoon to distribute the salt throughout the water.
Let the bottle sit in the bucket for ten to fifteen minutes while you finish other tasks.
Rotate the bottle every few minutes to ensure the liquid inside reaches the cold surface of the glass.
Pull the bottle out of the bucket and use a clean cloth to wipe away the salt water and condensation.
Serve the perfectly chilled drink to your guests and enjoy the immediate results of your quick work.
35. Natural Table Centerpiece Beauty
Last-Minute Holiday Dinner Tips
Creating a stunning table does not require expensive floral arrangements or complicated decorations. This serene image features a wooden table set with white plates, candles, and jars of fresh rosemary and apples. The snowy background outside the window adds a touch of winter magic to the warm and inviting indoor setting.
Using edible elements like fruit and herbs provides a beautiful fragrance that complements the holiday meal perfectly. The green sprigs of rosemary look like miniature evergreen trees, bringing a bit of nature to each place setting. This simple aesthetic is easy to achieve and works for both casual and formal gatherings.
Candlelight provides a soft glow that makes the food and the company look their best throughout the evening. You can easily adapt this look by using whatever seasonal fruits or greens you have available in your kitchen. This approach creates a cohesive and thoughtful environment for your holiday feast.
Equipment Needed
Long wooden dining table
Set of white porcelain plates and bowls
Small glass jars or vases
Tealight candles in glass holders
Ingredients
Large bunches of fresh rosemary
Several bright red apples
Sprigs of evergreen or fir branches
Natural linen napkins
DIY Instructions Step by Step
Lay a clean linen runner or napkins across your wooden table to create a neutral base for the decor.
Place small glass jars at equal intervals down the center of the table.
Fill each jar with fresh water and insert several large sprigs of rosemary to act as fragrant greenery.
Arrange red apples among the jars to add vibrant pops of color and different heights to the display.
Scatter small fir branches or evergreen needles between the apples and jars for a lush, natural look.
Set out your white porcelain plates and place a neatly folded napkin on top of each one.
Tuck a small piece of cardstock with a festive message or a name into each napkin fold.
Position tealight candles in glass holders around the centerpiece to provide a warm and flickering light.
Ensure there is enough room for your guests to see each other across the table without obstructions.
Light the candles just as the guests sit down to create an immediate sense of holiday warmth and magic.
36. The Over-Seasoning Rescue
Last-Minute Holiday Dinner Tips
A slip of the hand with the salt or spice can happen to anyone, but it does not have to ruin the entire dish. This photo shows a woman looking concerned while holding a potato over a platter of turkey that has been heavily coated in red sauce. A baking sheet of chocolate chip cookies and a curious dog add to the domestic reality of a busy kitchen.
Adding a raw potato to an over-seasoned liquid is a classic trick to absorb excess salt and balance the flavor. The image captures the moment of realization when a host must act quickly to save the main course. It serves as a final reminder that every culinary mistake has a simple and effective solution.
Focusing on the task at hand while keeping an eye on your pets and other dishes is part of the holiday challenge. You can always recover from a minor seasoning error by using common pantry items to neutralize the taste. This resourcefulness is what leads to a successful and delicious dinner for everyone at the table.
Equipment Needed
Large oval serving platter
Stainless steel tasting spoon
Wooden cutting board
Baking sheet with parchment paper
Ingredients
One large whole raw potato
Over-seasoned turkey or meat dish
Small jar of sweet cranberry sauce
Batch of fresh chocolate chip cookies
DIY Instructions Step by Step
Taste the sauce or gravy with a clean spoon to identify if the flavor is too salty or too spicy.
Wash a large raw potato thoroughly and peel away the skin with a kitchen tool.
Slice the potato into thick rounds or chunks and place them directly into the pot with the sauce.
Let the potato simmer in the liquid for ten minutes to absorb the extra seasoning or salt.
Remove the potato pieces with a spoon and discard them once they have finished their work.
Add a tablespoon of cranberry sauce to the mixture to provide a sweetness that can balance high heat.
Arrange your sliced turkey on a large platter and drizzle the rescued sauce over the top carefully.
Keep your dog away from the prep area by placing a tray of cookies on a high counter as a distraction.
Check the flavor one final time before bringing the platter to your waiting guests in the dining room.
Smile and serve your meal with confidence, knowing you successfully navigated the final challenge of the night.
Key Takeaways
Safety First: Always use a meat thermometer to ensure your turkey reaches a safe internal temperature of one hundred and sixty five degrees Fahrenheit.
Speedy Thawing: Utilize the cold water bath method to safely defrost a frozen bird in hours rather than days.
Smart Swaps: Keep simple pantry staples like milk and butter on hand to create quick substitutes for missing ingredients.
Mise en Place: Organize your ingredients and tools before you start cooking to reduce stress and maintain a clean workspace.
Flexible Hosting: Be prepared for dietary changes or power issues by having a backup protocol and alternative protein options.
Flavor Fixes: Use raw potatoes to absorb excess salt and acidic citrus to brighten up heavy sauces or gravies.
Hosting a holiday dinner is a labor of love that often comes with its fair share of surprises. While perfection is never the goal, being prepared for the unexpected allows you to enjoy the process much more. These tips are your secret weapons for managing the chaos that inevitably happens when the house is full.
Remember that the most important part of any gathering is the connection shared across the dinner table. A slightly charred turkey or a missing side dish will not ruin the joy of spending time with your loved ones. Your resourcefulness and calm attitude will set the tone for a warm and memorable evening.
We hope these strategies give you the boost you need to handle your kitchen with grace and humor. Go ahead and put on your apron, start your timers, and get ready for a successful feast. You have the tools to make this holiday your best one yet.
Spread the loveThe colder months arrive, bringing with them a craving for deep, satisfying warmth. A steaming mug held in your hands is the very definition of winter comfort. This year, move beyond the usual…
Spread the loveDo you ever feel like your favorite cozy meals are a bit too heavy for a regular Tuesday night? Many of us crave the warmth of a bowl of pasta or a crispy…
Spread the loveThe final countdown is almost here. Shaking up the perfect beverage is the best way to welcome a brand new year with your favorite people. You do not need a professional bar setup…