The turkey is carved, the sides are devoured, and the conversation is flowing—but then panic sets in. You realize, amidst the flurry of roasting and mashing, you completely forgot to plan the dessert. It happens to the best of us!
Last-Minute Thanksgiving Desserts
Don’t let the thought of a naked dessert table stress you out this Thanksgiving. Baking a complicated pie or layered cake is simply not an option when time is scarce. What you need are quick, easy, and impressive solutions that use ingredients you likely already have on hand.
This comprehensive guide brings you 38 incredible, last minute dessert ideas. Every single one is fast to assemble and delivers maximum holiday flavor with minimal effort.
From no bake shooters and creamy dips to speedy baked goods and elegant fruit creations, these recipes ensure your holiday meal ends on a high, sweet note. Get ready to save the day and wow your guests with minimal stress.
When time is short, these individual layered desserts come to the rescue, delivering all the classic Thanksgiving flavors without the hassle of baking a whole pie. The base features crunchy, spiced cookie crumbs, offering a buttery, ginger-kissed foundation. A light, airy layer of vanilla cream follows, providing a cool contrast to the richness of the pumpkin.
Next comes a smooth, velvety pumpkin mousse, which tastes just like a slice of pie filling. This dessert is essentially a deconstructed pumpkin cheesecake, requiring zero oven time. Each serving is topped with a generous swirl of whipped cream, dusted with cinnamon, and finished with a whole cookie for a beautiful presentation. They are simple to assemble and look incredibly impressive sitting on the dessert table. Guests will certainly appreciate these festive, easy to enjoy treats.
🥣 Required Ingredients
For the Cookie Crust:
1 cup (about 12 cookies) Biscoff or ginger snap cookies
3 tablespoons unsalted butter, melted
For the Cream Layers:
8 ounces cream cheese, softened
$1/2$ cup powdered sugar
1 teaspoon vanilla extract
1 cup heavy whipping cream, divided (use $1/2$ cup for the cream cheese layer and $1/2$ cup for the topping)
$1/4$ cup granulated sugar (for the topping)
For the Pumpkin Mousse:
1 cup canned pumpkin puree (not pumpkin pie filling)
$1/4$ cup powdered sugar
1 teaspoon pumpkin pie spice
🛠️ Equipment List
Food processor or a zip-top bag and rolling pin
Medium mixing bowl
Electric hand mixer or stand mixer
Rubber spatula
4 small serving glasses or jars (about 6-8 ounces each)
Piping bag and star tip (optional, for a decorative whipped cream topping)
🧑🍳 DIY Instructions: No Bake Parfait Assembly
Here is how to create these wonderful layered treats quickly and easily.
Step 1: Prepare the Cookie Crumb Base
Crush the Cookies: Place your Biscoff or ginger snap cookies into a food processor and pulse until fine crumbs form. If you don’t have a food processor, put the cookies in a sturdy zip-top bag and smash them with a rolling pin.
Mix in Butter: Transfer the crumbs to a bowl. Pour the 3 tablespoons of melted butter over the crumbs and stir everything together until the mixture is evenly moistened, resembling wet sand.
Create the Base: Divide the cookie mixture evenly among your four serving glasses. Use the back of a spoon to gently press the crumbs down, forming a firm layer at the bottom of each glass. Set these aside.
Step 2: Make the Vanilla Cream Layer
Whip the Cream Cheese: In your medium mixing bowl, beat the softened cream cheese, $1/2$ cup of powdered sugar, and vanilla extract using your electric mixer until the mixture is light and completely smooth. Scrape down the sides of the bowl as needed.
Fold in Whipped Cream: In a separate, small bowl, whip $1/2$ cup of the heavy cream until soft peaks form. Gently fold this whipped cream into the cream cheese mixture using a rubber spatula. This keeps the layer light and fluffy.
Layer the Cream: Spoon this vanilla cream mixture evenly over the cookie crumb layer in all four glasses.
Step 3: Mix the Pumpkin Mousse
Combine Ingredients: Take the remaining cream cheese mixture from the bowl (or, if you used a separate bowl, combine the ingredients there). Add the 1 cup of pumpkin puree, $1/4$ cup of powdered sugar, and the pumpkin pie spice.
Mix Until Smooth: Beat this mixture with your electric mixer until the pumpkin is fully incorporated and the mixture is smooth and velvety.
Layer the Mousse: Carefully spoon this pumpkin mousse layer on top of the vanilla cream layer in each glass.
Step 4: Chill and Finish
Chill: Place the parfaits in the refrigerator to chill for at least 30 minutes. This helps the layers set up nicely. If you’re really short on time, 15 minutes is fine, but longer is better.
Make Whipped Topping: Just before serving, whip the remaining $1/2$ cup of heavy whipping cream with the $1/4$ cup of granulated sugar until stiff peaks form.
Garnish: Pipe or spoon the whipped cream on top of each parfait. Finish with a dusting of cinnamon or pumpkin pie spice, and press a whole cookie into the whipped cream for a beautiful holiday flourish. Serve immediately.
2. Salty Sweet Pecan Caramel Corn
Last-Minute Thanksgiving Desserts
📸 Dessert Description
This crunchy, sticky treat is a guaranteed crowd-pleaser and requires minimal hands-on effort. The combination of fluffy popcorn and rich, buttery caramel creates an addictive snack mix that disappears fast. Whole pecans are folded into the mix, adding a deep, earthy flavor and satisfying crunch that feels distinctly autumnal.
Making this caramel corn fills the kitchen with a warm, inviting aroma, contributing to the holiday atmosphere. Serving it in small paper cones is a clever, easy way for guests to enjoy it casually after the main meal. This simple dessert provides a much needed salty counterpoint to the traditional sweet Thanksgiving spread. It’s an effortless dessert that also works beautifully as a party favor or a late night munchie.
🥣 Required Ingredients
For the Popcorn Mix:
12 cups popped popcorn (approximately $1/2$ cup unpopped kernels)
1 cup whole pecan halves
1 teaspoon salt
For the Caramel Coating:
$1/2$ cup (1 stick) unsalted butter
1 cup light brown sugar, packed
$1/4$ cup light corn syrup
$1/2$ teaspoon baking soda
1 teaspoon vanilla extract
🛠️ Equipment List
Large stockpot or bowl (for mixing popcorn)
Heavy-bottomed saucepan
Large, shallow baking sheet
Parchment paper or silicone baking mat
Wooden spoon or heat-proof spatula
🧑🍳 DIY Instructions: Fast & Festive Caramel Corn
This recipe is simple, but requires attention when handling the hot caramel.
Step 1: Prep the Popcorn
Pop and Combine: Pop your popcorn using your preferred method (air popper, stovetop, or microwave). Make sure there are no unpopped kernels. Place the popped corn and the whole pecan halves into your large stockpot or very large mixing bowl.
Season: Sprinkle the 1 teaspoon of salt over the popcorn and nuts, and gently toss to distribute it. Set this mixture aside.
Prepare Pan: Line your large, shallow baking sheet with parchment paper or a silicone mat. This step is crucial for easy cleanup.
Step 2: Cook the Caramel
Melt Butter: In the heavy-bottomed saucepan, melt the $1/2$ cup of butter over medium heat.
Add Sugars: Stir in the brown sugar and the corn syrup. Bring this mixture to a rolling boil, stirring constantly to ensure the sugar fully dissolves.
Boil: Let the mixture boil, without stirring, for exactly 4 minutes. This timing is important to get the right chewy texture.
Remove and Stir: Remove the saucepan from the heat immediately. Quickly stir in the vanilla extract and the baking soda. The mixture will foam up significantly; this is what makes the caramel light and crunchy later.
Step 3: Coat and Bake
Coat the Popcorn: Pour the hot caramel mixture over the popcorn and pecans in the large bowl. Using a wooden spoon or spatula, quickly and gently stir the mixture until all the popcorn and nuts are evenly coated. Work swiftly before the caramel starts to set.
Spread on Pan: Spread the coated popcorn mixture onto the prepared baking sheet in a single, even layer.
Cool: Allow the caramel corn to cool completely at room temperature, which will take about 30 minutes. As it cools, the caramel will harden and become brittle.
Break and Serve: Once cooled, break the caramel corn into smaller clusters. Serve it immediately in a large bowl or portioned out into small paper cones for a fun presentation.
3. Cranberry Apple Crumble Jars
Last-Minute Thanksgiving Desserts
📸 Dessert Description
Serving desserts in individual jars is an excellent way to simplify the Thanksgiving cleanup and add a rustic charm to your presentation. These cute crumbles feature tender, spiced apples layered beneath a buttery, oat-filled streusel topping. A few dried cranberries are sprinkled on top, providing chewy texture and a tart contrast to the sweet fruit.
The combination of warm spices like cinnamon and cloves makes this taste just like a classic deep dish pie. Since they bake and are served right in the jars, there’s no messy slicing required. Furthermore, this dessert is much quicker to assemble than a traditional double crust pie, saving valuable time. Guests can simply grab their jar and a spoon for a cozy, heartwarming holiday treat.
🥣 Required Ingredients
For the Apple Filling:
3 medium apples (like Honeycrisp or Granny Smith), peeled and diced
$1/4$ cup brown sugar
1 tablespoon all-purpose flour
1 teaspoon lemon juice
$1/2$ teaspoon ground cinnamon
$1/4$ cup dried cranberries
For the Crumble Topping:
$1/2$ cup all-purpose flour
$1/4$ cup rolled oats (not instant)
$1/4$ cup light brown sugar, packed
$1/4$ teaspoon ground cinnamon
Pinch of salt
4 tablespoons (1/2 stick) cold unsalted butter, cut into small cubes
🛠️ Equipment List
4 small oven-safe jars (like 8 oz Mason jars)
Medium mixing bowl
Small mixing bowl
Baking sheet
Pastry blender or fork
🧑🍳 DIY Instructions: Speedy Crumble Jars
Follow these steps to bake these easy individual crumbles.
Step 1: Prepare the Apple Filling
Mix Ingredients: In the medium mixing bowl, combine the diced apples, brown sugar, flour, lemon juice, and cinnamon. Toss gently until the apples are coated completely. The flour helps the filling thicken while baking.
Fill the Jars: Divide the apple mixture evenly among your four oven-safe jars. Spoon the mixture, making sure to push it down slightly, leaving about an inch of space at the top of the jar for the crumble. Stir the dried cranberries into the top of the filling in each jar.
Step 2: Make the Crumble Topping
Combine Dry Ingredients: In the small mixing bowl, whisk together the $1/2$ cup of flour, rolled oats, brown sugar, cinnamon, and salt.
Cut in Butter: Add the cold, cubed butter to the dry ingredients. Use a pastry blender, two knives, or your fingertips to “cut” the butter into the flour mixture. Mix until the mixture resembles coarse crumbs, like small peas. Do not overmix; the topping should be crumbly, not smooth.
Step 3: Bake the Crumbles
Top the Filling: Sprinkle the crumble topping evenly over the apple filling in each of the four jars. Gently press the topping down slightly, but keep it loose.
Preheat and Bake: Preheat your oven to 375°F (190°C). Place the jars on a baking sheet (this catches any drips and makes them easier to move). Bake for 25 to 30 minutes.
Check for Doneness: The crumble is ready when the topping is golden brown and the apple mixture is bubbling around the edges.
Cool and Serve: Carefully remove the baking sheet from the oven. Let the jars cool slightly before serving, as the filling is extremely hot. Serve warm with a dollop of whipped cream or vanilla ice cream.
4. Creamy Lemon Cookie Dip
Last-Minute Thanksgiving Desserts
📸 Dessert Description
Sometimes, the simplest things bring the most delight, and this sweet, zesty dip is a prime example. The base is an incredibly light and creamy mixture of whipped cream and cream cheese, creating a fluffy texture. Fresh lemon zest provides a bright, invigorating citrus flavor, which is a welcome surprise after a rich holiday meal.
A generous drizzle of honey or maple syrup is swirled on top before serving, enhancing the sweetness and adding a beautiful sheen. This dessert requires no baking whatsoever, making it an excellent time saver on a busy day. Arrange it attractively on a platter surrounded by your favorite dipping items, such as vanilla wafers, shortbread, or graham crackers. This dessert is easy to eat while standing and mingling, offering a fresh, appealing alternative to pie.
🥣 Required Ingredients
8 ounces cream cheese, softened
$1/2$ cup powdered sugar
1 teaspoon vanilla extract
1 cup heavy whipping cream
1 large lemon, zested and juiced (you’ll need 1 tablespoon of juice)
2 tablespoons honey or maple syrup (for drizzling)
Assorted cookies or crackers for dipping (e.g., Ritz crackers, vanilla wafers, shortbread)
🛠️ Equipment List
Medium mixing bowl
Electric hand mixer or stand mixer
Rubber spatula
Zester or fine grater
Serving bowl and platter
🧑🍳 DIY Instructions: Quick Lemon Dip
This dessert comes together in mere minutes using your mixer.
Step 1: Cream the Base
Soften: Ensure your cream cheese is thoroughly softened. If you forgot, you can microwave it for 15-20 seconds.
Combine: In the medium mixing bowl, beat the softened cream cheese, $1/2$ cup of powdered sugar, vanilla extract, lemon zest, and lemon juice using your electric mixer until the mixture is light and completely smooth. Scrape down the sides of the bowl as needed.
Step 2: Add the Cream
Whip the Cream: Pour the heavy whipping cream directly into the cream cheese mixture.
Mix Until Fluffy: Start the mixer on low speed, then gradually increase to high. Beat the entire mixture until it becomes thick, creamy, and holds stiff peaks. This usually takes 2-3 minutes. Stop mixing as soon as the dip is thick enough to hold its shape.
Step 3: Chill and Serve
Chill: Transfer the dip to your serving bowl. Cover it and place it in the refrigerator to chill for at least 15 minutes. This allows the flavors to meld and the dip to firm up slightly.
Garnish: Just before serving, drizzle the honey or maple syrup generously over the top of the dip. You can also add a few extra curls of lemon zest for visual appeal.
Arrange: Place the serving bowl on a platter and surround it with a wide array of your favorite dipping cookies and crackers.
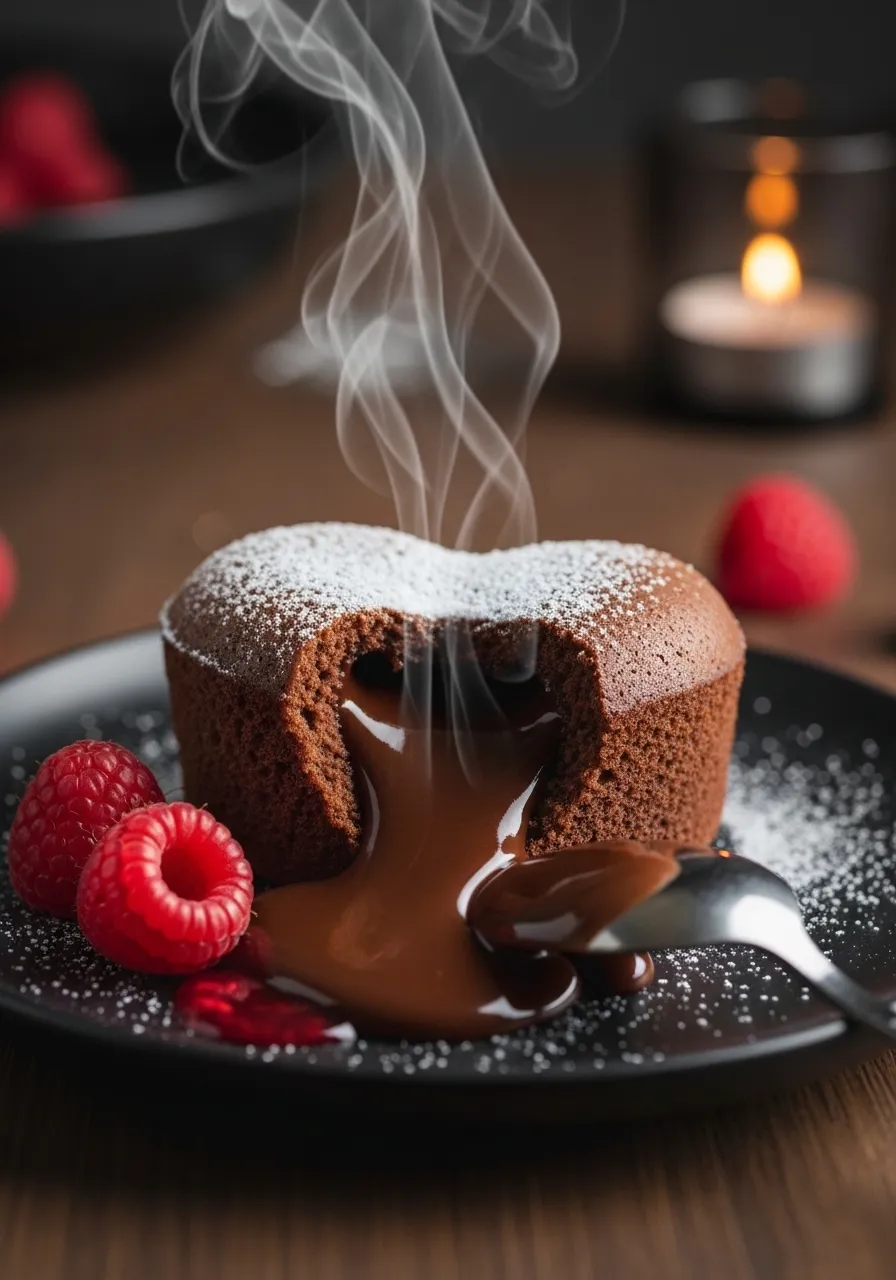
5. Fudge Brownie Squares
Last-Minute Thanksgiving Desserts
📸 Dessert Description
For the dedicated chocolate lover, these unbelievably rich, fudgy squares are an absolute must have. These are not cakey brownies; rather, they are dense, chewy, and intensely chocolatey, almost like a piece of decadent fudge. The deep cocoa flavor is the undisputed star, and a dusting of cocoa powder on top provides an elegant, matte finish.
The beauty of this recipe is its versatility and speed; you can often mix up a batch with pantry staples you already have. They bake quickly and are easy to cut into uniform, bite sized squares, making them easy for guests to grab and enjoy. Since they are served at room temperature, there is no worry about heating them up last minute. Guests will certainly appreciate the simple, powerful hit of chocolate satisfaction these small squares provide.
Follow these steps for a quick and deeply chocolatey batch of brownies.
Step 1: Prep and Melt
Preheat and Line: Preheat your oven to 350°F (175°C). Line your 8×8 inch metal baking pan with parchment paper, leaving an overhang on two sides to act as handles. This makes removing the brownies much easier.
Melt Chocolate and Butter: In the medium saucepan, melt the butter and the chopped unsweetened chocolate together over low heat, stirring frequently. Once melted and smooth, remove the pan from the heat.
Step 2: Mix the Batter
Add Sugar: Stir the 1 cup of granulated sugar into the warm chocolate mixture until fully incorporated.
Add Wet Ingredients: Whisk in the eggs one at a time, making sure each one is completely combined before adding the next. Stir in the vanilla extract.
Fold in Dry Ingredients: In the small mixing bowl, whisk together the flour and salt. Add this flour mixture to the chocolate mixture. Using your rubber spatula, fold the ingredients together gently until just combined. Don’t overmix.
Step 3: Bake and Finish
Bake: Pour the batter into the prepared 8×8 pan and spread it into an even layer. If using the optional chocolate chips, sprinkle them on top now.
Time: Bake for 25 to 30 minutes. The brownies are done when a toothpick inserted into the center comes out with moist crumbs attached, but not raw batter. You want them slightly underbaked for that signature fudgy texture.
Cool Completely: Place the pan on a wire rack and let the brownies cool completely, about 1-2 hours. Do not slice them while warm.
Slice and Dust: Once cooled, lift the brownies out of the pan using the parchment paper overhangs. Use a sharp knife to cut them into small squares. Dust the top generously with cocoa powder before serving.
6. Black Forest Chocolate Cherry Trifle
Last-Minute Thanksgiving Desserts
📸 Dessert Description
A majestic trifle provides a stunning centerpiece that requires absolutely no complicated baking. This dessert features layers of rich, moist chocolate cake cubes, offering a deep cocoa flavor and satisfying texture. These dense cake pieces are interspersed with generous layers of whipped vanilla cream, providing a light, airy contrast.
The beautiful red layers come from sweet, slightly tart cherry pie filling, which cuts through the richness of the chocolate and cream. Garnishing the whole thing with a massive swirl of cream, a dusting of cocoa powder, and a fresh cherry on top makes it look quite dramatic. The assembly takes very little time, and its transparency beautifully showcases the vibrant layers. This impressive, yet quick, dessert is a wonderful way to end the holiday meal.
Large glass trifle dish (about 10-12 cup capacity)
Whisk
Sharp knife
🧑🍳 DIY Instructions: Layered Trifle Assembly
You can use a store-bought chocolate pound cake if you need to save even more time.
Step 1: Bake and Cool the Cake
Prepare Cake: Follow the instructions on the chocolate cake mix box to prepare the batter.
Bake: Pour the batter into a greased and floured 9×13 inch pan. Bake according to the package directions.
Cool and Cube: Once baked, allow the cake to cool completely on a wire rack. Once cool, use a sharp knife to cut the entire cake into bite sized cubes (about 1 inch squares).
Step 2: Make the Whipped Cream
Whip: In a large, chilled mixing bowl, combine the 3 cups of heavy whipping cream, $1/2$ cup of powdered sugar, and vanilla extract.
Beat: Use an electric mixer to beat the mixture until stiff peaks form. The cream should hold its shape firmly.
Step 3: Assemble the Trifle
First Cake Layer: Place about one-third of the chocolate cake cubes into the bottom of your large glass trifle dish. Spread them out evenly.
First Cream Layer: Gently spoon about one-third of the whipped cream mixture over the cake cubes, spreading it to cover the layer.
First Cherry Layer: Spread about one-third of the cherry pie filling over the cream layer. Try to keep the filling away from the glass sides if you want the cream layers to show clearly.
Repeat Layers: Repeat the process: a second layer of cake cubes, a second layer of cream, and a second layer of cherry filling.
Final Layers: Add the remaining cake cubes. Top with the remaining whipped cream, swirling it dramatically on top.
Garnish and Chill: Dust the top of the trifle with cocoa powder and place a fresh cherry or chocolate shavings in the center. Chill for at least 2 hours before serving to allow the moisture from the cream and cherries to soak into the cake, creating a tender, flavorful texture.
7. Salted White Chocolate Blondies
Last-Minute Thanksgiving Desserts
📸 Dessert Description
These chewy, moist bars offer a comforting, spiced alternative to classic chocolate chip cookies. They feature the deep, molasses flavor of brown sugar, which gives them a rich, butterscotch-like taste. Studded throughout the dense batter are generous chunks of creamy white chocolate, adding sweetness and a textural contrast.
The secret to their elevated taste lies in the finish: a light dusting of powdered sugar and a sprinkle of flaky sea salt. This salt brightens the sweetness and makes every bite more complex and savory. Blondies are incredibly quick to mix up and bake in one pan, making them a wonderful, simple dessert solution. Cutting them into squares makes them easy to plate and serve casually.
🥣 Required Ingredients
$1/2$ cup (1 stick) unsalted butter, melted
1 cup light brown sugar, packed
1 large egg
1 teaspoon vanilla extract
1 cup all-purpose flour
$1/2$ teaspoon salt
$1/2$ teaspoon baking powder
3/4 cup white chocolate chips or chunks
Powdered sugar and flaky sea salt (for garnish)
🛠️ Equipment List
8×8 inch metal baking pan
Parchment paper
Medium mixing bowl
Whisk or rubber spatula
🧑🍳 DIY Instructions: Quick Brown Sugar Blondies
Achieving that chewy texture is all about the right mixing and baking time.
Step 1: Prep the Pan and Wet Ingredients
Preheat and Line: Preheat your oven to 350°F (175°C). Line an 8×8 inch metal baking pan with parchment paper, allowing the edges to hang over slightly for easy removal.
Mix Sugars: In the medium mixing bowl, whisk together the melted butter and brown sugar until smooth. This helps create that chewy texture.
Add Egg and Vanilla: Whisk in the egg and the vanilla extract until everything is fully combined.
Step 2: Combine Dry Ingredients
Whisk Together: In a separate, small bowl, whisk together the flour, salt, and baking powder.
Combine Batter: Gently fold the dry ingredients into the wet ingredients using a rubber spatula. Mix only until you see no streaks of dry flour remaining. Do not overmix.
Fold in Chocolate: Fold in the white chocolate chips.
Step 3: Bake and Finish
Spread: Pour the batter into the prepared baking pan and spread it into an even layer.
Bake: Bake for 22 to 25 minutes. The edges should look set and slightly golden, but the center should still look soft or slightly underbaked. This ensures a moist, fudgy center.
Cool: Let the blondies cool completely in the pan on a wire rack before attempting to slice them. Cooling is critical for texture.
Garnish and Serve: Once cool, use the parchment handles to lift the blondies out. Cut them into squares. Just before serving, dust lightly with powdered sugar and sprinkle a very small pinch of flaky sea salt over the top of each piece.
8. Speedy Spiced Peach Cobbler Ramekins
Last-Minute Thanksgiving Desserts
📸 Dessert Description
Individual cobblers are charming, comforting, and incredibly fast to put together using canned or frozen fruit. The base features tender, spiced peaches layered beneath a buttery, oat-filled streusel topping. A dollop of biscuit dough is placed on top, which bakes up into a tender, slightly crisp topping.
Serving these in small ramekins provides built in portion control and adds a cute, rustic charm to the table. Using pre-sliced fruit dramatically reduces the prep time, making this a true last minute hero. The combination of warm fruit and fluffy topping is wonderfully satisfying and delivers the comforting feeling of home baking with minimal effort. A light dusting of powdered sugar makes them look extra special.
🥣 Required Ingredients
For the Peach Filling:
1 (29 ounce) can sliced peaches in heavy syrup, drained (reserve $1/4$ cup of the syrup)
$1/2$ teaspoon vanilla extract
$1/4$ teaspoon ground cinnamon or cardamom
For the Biscuit Topping:
1 cup all-purpose flour
2 tablespoons granulated sugar
1 teaspoon baking powder
$1/4$ teaspoon salt
4 tablespoons (1/2 stick) cold unsalted butter, cut into small cubes
$1/2$ cup heavy cream or milk
🛠️ Equipment List
4 small oven-safe jars (like 8 oz Mason jars)
Medium mixing bowl
Small mixing bowl
Baking sheet
Pastry blender or fork
🧑🍳 DIY Instructions: Ramekin Cobbler
Follow these steps to bake these easy individual crumbles.
Step 1: Prepare the Peach Filling
Mix Ingredients: In the small mixing bowl, combine the diced apples, brown sugar, flour, lemon juice, and cinnamon. Toss gently until the apples are coated completely. The flour helps the filling thicken while baking.
Fill the Jars: Divide the apple mixture evenly among your four oven-safe jars. Spoon the mixture, making sure to push it down slightly, leaving about an inch of space at the top of the jar for the crumble. Stir the dried cranberries into the top of the filling in each jar.
Step 2: Make the Crumble Topping
Combine Dry Ingredients: In the small mixing bowl, whisk together the $1/2$ cup of flour, rolled oats, brown sugar, cinnamon, and salt.
Cut in Butter: Add the cold, cubed butter to the dry ingredients. Use a pastry blender, two knives, or your fingertips to “cut” the butter into the flour mixture. Mix until the mixture resembles coarse crumbs, like small peas. Do not overmix; the topping should be crumbly, not smooth.
Step 3: Bake the Crumbles
Top the Filling: Sprinkle the crumble topping evenly over the apple filling in each of the four jars. Gently press the topping down slightly, but keep it loose.
Preheat and Bake: Preheat your oven to 375°F (190°C). Place the jars on a baking sheet (this catches any drips and makes them easier to move). Bake for 25 to 30 minutes.
Check for Doneness: The crumble is ready when the topping is golden brown and the apple mixture is bubbling around the edges.
Cool and Serve: Carefully remove the baking sheet from the oven. Let the jars cool slightly before serving, as the filling is extremely hot. Serve warm with a dollop of whipped cream or vanilla ice cream.
9. Skillet Peanut Butter Cookie Sundae
Last-Minute Thanksgiving Desserts
📸 Dessert Description
For a fun, interactive, and comforting end to the meal, this dessert is a winner. The base is a large, chewy peanut butter cookie baked right in a cast iron skillet. Baking it this way ensures a warm, gooey center and slightly crisp edges.
It is served dramatically right out of the skillet, making it feel like a truly communal dessert. The hot cookie is crowned with scoops of cold vanilla ice cream, creating a delightful temperature contrast. A beautiful garnish of caramel sauce, jam, or even chocolate syrup is drizzled over the top, along with a sprinkle of festive colors. This rustic, simple, yet decadent presentation is guaranteed to earn smiles from guests who love digging in with a spoon.
🥣 Required Ingredients
$1/2$ cup (1 stick) unsalted butter, softened
$1/2$ cup granulated sugar
$1/2$ cup packed light brown sugar
$1/2$ cup creamy peanut butter
1 large egg
1 teaspoon vanilla extract
$1/2$ teaspoon baking soda
$1/4$ teaspoon salt
1 $1/2$ cups all-purpose flour
Vanilla ice cream
Caramel sauce, raspberry jam, or chocolate syrup (for topping)
The cast iron skillet helps create a wonderful crust and keeps the dessert hot for serving.
Step 1: Mix the Cookie Dough
Cream Ingredients: In the large mixing bowl, beat the softened butter, granulated sugar, and brown sugar until light and fluffy using an electric mixer.
Add Wet Ingredients: Beat in the peanut butter, then the egg, followed by the vanilla extract, scraping down the sides of the bowl as needed.
Combine Dry: In a separate small bowl, whisk together the flour, baking soda, and salt.
Mix Batter: Gradually add the flour mixture to the wet ingredients, mixing on low speed until just combined. Don’t overmix.
Press Dough: Press the cookie dough evenly into the bottom of the prepared skillet.
Step 2: Press and Bake
Prepare Skillet: Lightly grease the 8-inch cast iron skillet.
Press Dough: Press the cookie dough evenly into the bottom of the prepared skillet.
Bake: Preheat your oven to 350°F (175°C). Bake for 25 to 30 minutes. The cookie is done when the edges are golden brown and the center still looks slightly soft.
Step 3: Serve Hot
Top: Remove the skillet from the oven. Let it cool for only 5 minutes—you want it hot!
Garnish: Place 2-3 scoops of vanilla ice cream right in the center of the warm cookie.
Drizzle: Generously drizzle with caramel sauce, jam, or syrup, and add a sprinkle of festive colors if desired.
Serve: Place a few spoons around the skillet and serve immediately for guests to enjoy family style.
10. Sweet Potato Orange Panna Cotta
Last-Minute Thanksgiving Desserts
📸 Dessert Description
This visually appealing dessert combines classic fall flavors with an elegant, smooth texture. The bottom layer is a delicate, silky panna cotta, offering a gentle vanilla flavor that melts in the mouth. On top of this smooth base rests a beautiful mound of spiced sweet potato puree, providing the signature autumnal taste.
The surprise element is the bright citrus note, coming from fresh orange zest mixed into the sweet potato and used as a garnish. This acidity cuts through the heaviness of the cream and sweet potato. Individual servings in small glasses look refined and are incredibly simple to assemble since the panna cotta layer sets up right in the glass. Capping it all off with whipped cream and a toasted marshmallow makes it a fun, sophisticated nod to the traditional sweet potato casserole.
1 cup smooth sweet potato puree (canned or freshly steamed/mashed)
$1/4$ cup powdered sugar
$1/2$ teaspoon pumpkin pie spice
1 tablespoon orange juice and 1 teaspoon orange zest
Garnish:
Whipped cream
Small marshmallows (to toast)
Extra orange zest
🛠️ Equipment List
6 small serving glasses or short jars
Small saucepan
Whisk
Medium mixing bowl
Rubber spatula
Kitchen torch (optional, for toasting marshmallows)
🧑🍳 DIY Instructions: No Bake Holiday Layers
The key to this recipe is allowing adequate chilling time for the panna cotta to set.
Step 1: Set the Panna Cotta
Bloom Gelatin: Pour the $1/4$ cup of cold water into the small saucepan. Sprinkle the unflavored gelatin powder evenly over the water and let it sit for 5 minutes. This process is called “blooming” and is essential.
Heat Cream: In the same saucepan, add the 1 $1/2$ cups of heavy cream and $1/4$ cup of granulated sugar. Heat over medium-low heat, whisking until the sugar dissolves and the cream is warm, but do not let it boil.
Dissolve Gelatin: Remove the cream mixture from the heat. Whisk in the bloomed gelatin until it is completely dissolved. Stir in the vanilla extract.
Pour and Chill: Pour the liquid evenly into the bottom of your six serving glasses. Place them in the refrigerator and chill for at least 3 hours, or until the panna cotta is fully set and firm to the touch.
Step 2: Prepare the Sweet Potato Topping
Combine: In the medium mixing bowl, combine the sweet potato puree, powdered sugar, pumpkin pie spice, orange juice, and orange zest. Stir well until the mixture is smooth and fully blended.
Add to Panna Cotta: Once the panna cotta is set, spoon the sweet potato mixture evenly over the top of the chilled layers.
Step 3: Garnish and Serve
Top: Just before serving, top each glass with a generous swirl of fresh whipped cream.
Toast Marshmallows (Optional): If desired, place a small marshmallow on top of the cream and use a kitchen torch to quickly toast it until golden brown. If you don’t have a torch, you can skip this step or toast the marshmallows on a foil-lined sheet pan in the oven for 1-2 minutes.
Finish: Garnish with a light sprinkle of fresh orange zest. Serve immediately.
11. Caramel Apple Spice Skillet Dip
Last-Minute Thanksgiving Desserts
📸 Dessert Description
This comforting, rustic dessert captures the essence of classic baked apples, prepared right on the stovetop. Large, tender chunks of sweet and tart apples are simmered in a rich, buttery caramel sauce. The whole mixture is heavily seasoned with warming spices like cinnamon sticks, cloves, and star anise, filling your kitchen with a welcoming holiday fragrance.
Serving this directly from a decorative saucepan or cast iron skillet emphasizes its homey charm. It is traditionally garnished with a dollop of whipped cream and served alongside crispy graham crackers or cinnamon chips for dipping. The beauty of this recipe lies in its speed; it’s ready in about 15 minutes, offering all the satisfaction of apple pie filling without the crust or long bake time. This dessert makes for a wonderfully casual, warming centerpiece.
🥣 Required Ingredients
4 medium apples (half Granny Smith, half Gala), peeled, cored, and diced
$1/2$ cup brown sugar
$1/4$ cup water or apple cider
2 tablespoons unsalted butter
1 tablespoon cornstarch
1 teaspoon vanilla extract
$1/2$ teaspoon ground cinnamon
2 cinnamon sticks, 3-4 whole cloves, and 2 whole star anise (optional, for simmering)
Graham crackers, cinnamon pita chips, or ginger snaps (for serving)
🛠️ Equipment List
Medium saucepan or skillet (preferably white enamel or cast iron for presentation)
Wooden spoon or rubber spatula
Small bowl (for cornstarch slurry)
🧑🍳 DIY Instructions: Quick Stovetop Apples
This recipe creates a thick, syrupy apple filling ready to be scooped or dipped.
Step 1: Cook the Apples
Melt Butter: Melt the 2 tablespoons of butter in your medium saucepan over medium heat.
Add Apples: Add the diced apples and $1/2$ teaspoon of ground cinnamon to the pan. Sauté for about 5 minutes, stirring occasionally, until the apples begin to soften slightly.
Add Flavor: Stir in the brown sugar, water or apple cider, and the whole spices (cinnamon sticks, cloves, star anise, if using). Bring the mixture to a gentle simmer.
Step 2: Thicken the Sauce
Make Slurry: In the small bowl, combine the 1 tablespoon of cornstarch with 2 tablespoons of cold water, stirring until a smooth liquid (slurry) forms.
Thicken: Pour the cornstarch slurry into the simmering apples. Stir constantly until the sauce thickens and becomes glossy, which should take about 1 minute.
Finish: Remove the pan from the heat. Stir in the vanilla extract and remove the whole spices before serving.
Step 3: Serve Warm
Present: Transfer the apple dip to a serving bowl or leave it right in the saucepan if using a nice one.
Garnish: Top with a dollop of whipped cream or vanilla ice cream. Serve immediately while warm, surrounded by dipping items like graham crackers or cinnamon chips.
12. Individual Salted Caramel and Pecan Shooters
Last-Minute Thanksgiving Desserts
📸 Dessert Description
These little layered desserts are remarkably sophisticated, yet they come together without any baking. The base layer features crushed vanilla cookies or graham crackers, offering a satisfying, buttery crunch. Above that sits a thick, luxurious layer of salted caramel, providing a deep, complex sweetness.
This dessert alternates the caramel with layers of light, airy vanilla mousse, which provides a welcome fluffy texture. The contrast between the salty caramel, the smooth cream, and the crunchy cookie crumbs is absolutely delightful. A beautiful finish is achieved by topping each shooter with a candied chestnut or a whole pecan and a spun sugar garnish. Serving these in shot glasses makes for elegant, effortless single servings.
🥣 Required Ingredients
For the Layers:
1 cup vanilla wafer or shortbread cookies, crushed
4 tablespoons unsalted butter, melted
1 $1/2$ cups store-bought salted caramel sauce
1 cup heavy whipping cream
2 tablespoons powdered sugar
1 teaspoon vanilla extract
Candied chestnuts or whole pecans (for garnish)
🛠️ Equipment List
Small mixing bowl
Large mixing bowl
Electric hand mixer or stand mixer
Rubber spatula
6-8 shot glasses or small serving glasses (about 2 ounces each)
Piping bag and star tip (optional, for cream)
🧑🍳 DIY Instructions: Layered Caramel Shooters
These beautiful desserts rely on layering pre-made ingredients for speed.
Step 1: Prepare the Cookie Base
Mix Crumbs: In the small mixing bowl, combine the crushed cookies with the melted butter. Stir until the crumbs are evenly moistened.
Layer: Spoon a small amount of the crumb mixture into the bottom of each serving glass, pressing gently to form a thin base.
Step 2: Make the Mousse
Whip Cream: In the large, chilled mixing bowl, whip the heavy cream, powdered sugar, and vanilla extract until stiff peaks form. The resulting mixture is a quick, light mousse.
Step 3: Assemble the Shooters
Layer 1 (Caramel): Spoon or pipe a layer of salted caramel sauce over the cookie base in each glass.
Layer 2 (Mousse): Follow the caramel with a layer of the prepared vanilla mousse. A piping bag helps create a neat, defined layer.
Layer 3 (Caramel): Add a second layer of caramel sauce.
Layer 4 (Mousse): Finish the layers with a final decorative swirl of the remaining mousse on top.
Step 4: Chill and Garnish
Chill: Place the shooters in the refrigerator for at least 30 minutes to firm up slightly.
Garnish: Just before serving, top each mousse swirl with a drizzle of caramel, a pecan, or a candied chestnut.
13. Festive Chocolate Dipped Pretzel Rods
Last-Minute Thanksgiving Desserts
📸 Dessert Description
These cheerful, colorful pretzel rods are an excellent option for a party dessert table. The salty crunch of the pretzel provides a wonderful contrast to the sweet, smooth coating of melted chocolate. They are remarkably versatile, easily customized with different colors of chocolate, various sprinkles, or chopped nuts.
Dipping the pretzels is a straightforward process that anyone can do, making this a fun, simple project. Arranging them upright in a glass makes for an eye-catching presentation that’s easy for guests to grab and enjoy. The varying colors add a vibrant touch to the autumnal Thanksgiving palette. These simple treats are a lovely combination of sweet, salty, and crunchy.
🥣 Required Ingredients
1 bag (about 12-15) large pretzel rods
1 cup white chocolate melting wafers
1 cup milk or semi-sweet chocolate melting wafers
Vegetable shortening or coconut oil (optional, to thin chocolate)
Assorted festive sprinkles, finely chopped nuts, or crushed toffee pieces
🛠️ Equipment List
2 small, deep microwave-safe bowls (tall enough for dipping)
Keeping the chocolate melted but cool enough to handle is the key to success here.
Step 1: Melt the Chocolate
Melt: Place the white chocolate melting wafers in one bowl and the milk chocolate wafers in the second. Microwave them separately in 30-second intervals, stirring well between each, until they are completely smooth.
Thin (Optional): If the chocolate seems too thick, stir in about $1/2$ teaspoon of shortening or coconut oil until it reaches a smooth, liquid consistency suitable for dipping.
Step 2: Dip and Decorate
Dip: Hold a pretzel rod by the dry end and dip it straight down into the melted chocolate. Leave about 2-3 inches of the pretzel uncoated at the bottom.
Remove Excess: Lift the pretzel out and gently scrape the bottom edge against the side of the bowl to remove excess chocolate.
Decorate: Immediately hold the dipped rod over a piece of wax paper. Sprinkle the decorations of your choice over the wet chocolate, or drizzle a different color of melted chocolate back and forth over the main coating.
Dry: Lay the decorated pretzel rods on a sheet of wax or parchment paper to set.
Step 3: Chill and Serve
Set: Allow the chocolate to set completely at room temperature, which takes about 30 minutes, or speed up the process by placing them in the refrigerator for 10 minutes.
Present: Once hardened, arrange the pretzel rods in a tall glass to display them upright for an easy grab and go dessert.
14. Sweet Fig and Goat Cheese Cracker Bites
Last-Minute Thanksgiving Desserts
📸 Dessert Description
For those seeking a dessert that is savory sweet, these elegant little bites are a wonderful option. They are assembled on simple crackers, which provide a neutral, crisp foundation. The creamy layer comes from whipped goat cheese or a mild cream cheese mixture, offering a subtle tanginess that complements the fruit.
A spoonful of fig jam is layered on top, providing a dense, sticky sweetness that tastes sophisticated and complex. The entire bite is finished with a drizzle of rich balsamic glaze and a tiny sprig of fresh thyme for an aromatic flourish. This no bake treat comes together almost instantly, delivering a high-end gourmet presentation with minimal effort. This choice is especially appealing for guests who prefer lighter, more complex flavor combinations after a heavy holiday meal.
🥣 Required Ingredients
1 box butter crackers (like Ritz) or water crackers
4 ounces soft goat cheese or cream cheese, softened
2 tablespoons honey or maple syrup
$1/2$ teaspoon lemon zest
$1/2$ cup fig jam or preserves
2-3 fresh figs, sliced (optional, for added garnish)
Balsamic glaze (for drizzling)
Fresh thyme or rosemary sprigs (for garnish)
🛠️ Equipment List
Small mixing bowl
Rubber spatula or whisk
Serving board or platter
🧑🍳 DIY Instructions: Quick Sweet and Savory Bites
The trick here is to soften the cheese fully for easy whipping and spreading.
Step 1: Prepare the Cheese Spread
Whip Cheese: Place the softened goat cheese or cream cheese in the small mixing bowl. Stir in the honey or maple syrup and the lemon zest until the mixture is light, fluffy, and completely smooth.
Step 2: Assemble the Bites
Spread Base: Arrange your crackers on the serving board or platter. Use a small offset spatula or the back of a spoon to spread a generous dollop of the whipped cheese mixture onto each cracker.
Add Fig: Spoon a small amount of fig jam or preserves on top of the cheese layer. If using fresh figs, add a slice or two to the jam.
Step 3: Garnish and Serve
Drizzle: Just before serving, drizzle a ribbon of thick balsamic glaze over the fig layer on each cracker.
Garnish: Finish each bite with a tiny sprig of fresh thyme or rosemary. The herbs add a beautiful aroma and visual contrast. Serve immediately.
15. Thanksgiving “Acorn” Peanut Butter Bites
Last-Minute Thanksgiving Desserts
📸 Dessert Description
These little “acorns” are adorable, bite sized treats that require absolutely no oven time. The body is made from a simple, sweet peanut butter mixture, which provides a dense, chewy texture reminiscent of a truffle. A mini pretzel stick is inserted into one side to simulate the acorn stem, adding a crucial salty element and crunch.
One end of the peanut butter ball is dipped in melted chocolate, forming the acorn cap. The cap is often decorated with tiny sprinkles or chopped nuts for added texture. Adding a small chip of chocolate or white chocolate creates the illusion of a small button on the cap. These are incredibly easy to make in large batches and their cute, festive look makes them a big hit, especially with younger guests.
🥣 Required Ingredients
1 cup creamy peanut butter
4 tablespoons unsalted butter, softened
1 $1/2$ cups powdered sugar
$1/2$ teaspoon vanilla extract
1 cup chocolate chips (milk or semi-sweet)
40 mini pretzel sticks
Mini chocolate chips and mini white chocolate chips (for garnish)
Sprinkles or chopped nuts (for cap texture)
🛠️ Equipment List
Medium mixing bowl
Rubber spatula
Baking sheet
Parchment paper
Small microwave-safe bowl (for melting chocolate)
🧑🍳 DIY Instructions: No Bake Acorn Bites
The key to this recipe is chilling the dough to make it easy to shape.
Step 1: Make the Peanut Butter Dough
Cream: In the medium mixing bowl, combine the peanut butter, softened butter, powdered sugar, and vanilla extract. Use a spatula to mix until a stiff, uniform dough forms.
Shape: Scoop out small amounts of the dough (about 1 tablespoon) and roll them into small oval or acorn shapes. The shape should be slightly tapered.
Chill: Place the shaped dough onto the parchment lined baking sheet and chill in the refrigerator for at least 30 minutes to firm up.
Step 2: Decorate and Finish
Melt Chocolate: Melt the 1 cup of chocolate chips in the small microwave-safe bowl in 30-second intervals until completely smooth.
Dip Caps: Take the chilled peanut butter shapes. Dip the wider, rounded end of each shape into the melted chocolate, creating the “acorn cap.”
Add Details: Immediately press the dipped end into a small dish of sprinkles or chopped nuts for texture. Press a mini chocolate chip onto the side of the chocolate cap. Press a mini white chocolate chip onto the face of the acorn for an “eye.”
Add Stem: Stick a mini pretzel stick gently into the undipped, pointed end of the peanut butter body.
Set: Return the finished acorns to the parchment lined pan and chill until the chocolate is fully set.
16. Microwave Carrot Cake Mug Cake
Last-Minute Thanksgiving Desserts
📸 Dessert Description
When you need an ultra quick, single serving dessert, a mug cake is the ultimate solution. This particular cake brings the warm, spicy flavors of a classic carrot cake, but it cooks in under two minutes. The small size makes it an easily managed sweet treat after a large meal.
The cake is moist, tender, and infused with autumn spices like cinnamon and nutmeg. It rises right out of the mug, creating a wonderful, comforting display. A generous swirl of homemade or store-bought cream cheese frosting is piped on top, providing the essential tangy creaminess. Finishing it with a sprinkle of chopped pecans or walnuts adds a delightful crunch. It is the fastest way to get a rich, seasonal baked dessert on the table.
🥣 Required Ingredients
For the Mug Cake:
4 tablespoons all-purpose flour
4 tablespoons granulated sugar
$1/4$ teaspoon baking powder
$1/2$ teaspoon ground cinnamon
Pinch of salt
1 large egg yolk (or half an egg white/yolk mixture)
3 tablespoons milk
1 tablespoon oil (vegetable or canola)
2 tablespoons finely shredded carrot
For the Cream Cheese Frosting (Quick):
2 tablespoons cream cheese, softened
2 tablespoons powdered sugar
$1/2$ teaspoon milk
Chopped pecans (for garnish)
🛠️ Equipment List
2 standard size (12 ounce) microwave-safe mugs
Small bowl
Fork or whisk
Measuring spoons and cups
🧑🍳 DIY Instructions: Super Fast Carrot Mug Cake
Microwaving times vary, so watch your cake closely on the final cooking stage.
Step 1: Mix the Cake Batter
Combine Dry: In the small bowl, whisk together the flour, sugar, baking powder, cinnamon, and salt.
Add Wet: Add the egg yolk, milk, and oil to the dry ingredients. Mix with a fork or whisk until the batter is just smooth. Do not overmix.
Fold In: Gently fold in the shredded carrot.
Step 2: Cook the Cake
Divide and Fill: Pour half the batter into one mug and the rest into a second mug. Wipe down the sides of the mug if any batter splashed up.
Microwave: Microwave each mug individually on high power for 60 to 90 seconds. The top of the cake should look set and slightly spring back when lightly touched. It’s better to undercook slightly than overcook.
Step 3: Frost and Garnish
Make Frosting: While the cake cools, combine the softened cream cheese, powdered sugar, and $1/2$ teaspoon of milk in the small bowl. Stir vigorously until the mixture is light, smooth, and easily spreadable.
Top: Allow the mug cakes to cool for 2 minutes. Spoon or pipe the cream cheese frosting directly onto the top of the warm cake in the mug.
Finish: Garnish each with a sprinkle of chopped pecans. Serve immediately with a small spoon.
17. Cool Cranberry Citrus Granita
Last-Minute Thanksgiving Desserts
📸 Dessert Description
A granita offers a wonderful palate cleanser after a rich, heavy Thanksgiving dinner. This refreshing frozen dessert, often flavored with cranberries and citrus, features a light, icy texture that is scraped into delicate, crunchy flakes. The bright, tart flavor of the cranberries is beautifully balanced by the acidity of fresh lime and orange zest.
Granita is incredibly simple to make, requiring minimal active prep time; the freezer does most of the work. Serving it in small martini or coupe glasses elevates the look, making it feel like a sophisticated after dinner treat. Garnishing the glasses with a sprig of fresh mint and a curl of orange peel adds a lovely pop of color. This is an excellent choice for offering a light, invigorating finish to the holiday meal.
🥣 Required Ingredients
2 cups cranberry juice (100% juice, not cocktail)
$1/2$ cup granulated sugar
$1/4$ cup fresh lime juice
Zest of 1 orange
1 cup cold water
Fresh mint leaves and orange peels (for garnish)
🛠️ Equipment List
Small saucepan
Whisk
Shallow glass or metal baking dish (9×13 inch is great)
Fork
🧑🍳 DIY Instructions: Easy Icy Granita
The secret to a good granita is the continuous scraping process to create the ice crystals.
Step 1: Make the Syrup Base
Heat: In the small saucepan, combine the $1/2$ cup of granulated sugar and 1 cup of cold water. Heat over medium heat, stirring constantly, until the sugar is completely dissolved. Remove from the heat.
Mix Juices: Whisk in the cranberry juice, lime juice, and orange zest.
Step 2: Freeze and Scrape
Pour: Pour the liquid mixture into the shallow glass or metal baking dish.
First Freeze: Place the dish in the freezer. After 45 minutes, the edges should start to freeze solid.
Scrape: Use a fork to scrape the frozen edges and pull them toward the center, forming icy flakes.
Repeat: Return the dish to the freezer. Continue to repeat this scraping process every 30 to 45 minutes for about 3-4 hours, until the entire mixture is frozen and scraped into light, loose ice crystals.
Step 3: Serve
Fluff: Before serving, use the fork to give the granita a final fluff.
Serve: Scoop the icy mixture into small serving glasses or chilled martini glasses. Garnish with a small sprig of fresh mint and a curl of orange zest.
18. Creamy Chocolate Marshmallow Dip
Last-Minute Thanksgiving Desserts
📸 Dessert Description
This rich, velvety chocolate dip is a fun, highly customizable dessert that caters to all ages. It features a dense, smooth chocolate base, often made with cream cheese or sweetened cocoa, creating a very luxurious, decadent texture. Mini marshmallows and pecans are often stirred in or sprinkled generously on top, adding texture and a slight chewiness.
This dessert is served at room temperature or slightly chilled, making it easy to manage amidst all the other holiday cooking. The best part is the wide array of dipping options you can provide. Offer salty things like pretzels and graham crackers alongside sweet options like apple slices and vanilla wafers. This simple platter presentation encourages interaction and provides a hearty chocolate end to the meal.
🥣 Required Ingredients
8 ounces cream cheese, softened
$1/2$ cup butter, softened
1 cup powdered sugar
$1/2$ cup unsweetened cocoa powder
1 teaspoon vanilla extract
3-4 tablespoons milk (as needed)
$1/2$ cup mini marshmallows (plus extra for topping)
$1/2$ cup chopped pecans (plus extra for topping)
Dipping items: pretzels, graham crackers, apple slices, vanilla wafers
🛠️ Equipment List
Medium mixing bowl
Electric hand mixer or stand mixer
Rubber spatula
Serving bowl
🧑🍳 DIY Instructions: No Bake Dessert Dip
Achieving the perfect, smooth texture is easy with fully softened ingredients.
Step 1: Make the Dip Base
Cream Butter and Cheese: In the medium mixing bowl, beat the softened cream cheese and softened butter together using an electric mixer until the mixture is light and smooth.
Add Chocolate: Gradually beat in the powdered sugar and the cocoa powder until fully incorporated. Start on low speed to prevent the powder from flying out.
Adjust Consistency: Beat in the vanilla extract. If the dip seems too stiff, add the milk, one tablespoon at a time, until it reaches a smooth, scoopable consistency.
Step 2: Mix and Garnish
Fold In: Use a rubber spatula to fold in $1/2$ cup of the mini marshmallows and $1/2$ cup of the chopped pecans.
Transfer: Spoon the dip into your serving bowl.
Garnish: Top the center of the dip generously with extra mini marshmallows and whole pecan halves for visual appeal.
Step 3: Serve
Chill (Optional): You can chill the dip for about 15 minutes to firm it up slightly, but it can be served immediately.
Arrange: Place the dip bowl on a large platter and surround it with a variety of dipping items like pretzels, graham crackers, and sliced fruit.
19. Individual Ginger Pecan Cream Shooters
Last-Minute Thanksgiving Desserts
📸 Dessert Description
These are similar to the pumpkin parfaits, but feature a classic, complex gingersnap and nut flavor profile. This no bake dessert is built on layers of crushed gingersnap cookies, offering a zesty, autumnal warmth. The cookies are interspersed with crunchy chopped pecans, lending a deep, buttery nuttiness.
The creamy layers are made with a simple vanilla cream or light cream cheese mousse, which provides a cool, tangy contrast to the bold spices. Serving the dessert in small shooter glasses keeps the portions reasonable after a large holiday meal. The presentation is elegant and tidy, making them a simple, grab and go treat. A dusting of grated chocolate finishes the top beautifully.
🥣 Required Ingredients
1 cup gingersnap or Biscoff cookies, crushed
3 tablespoons unsalted butter, melted
8 ounces cream cheese, softened
$1/2$ cup powdered sugar
1 teaspoon vanilla extract
1 cup heavy whipping cream
$1/2$ cup chopped pecans
Grated chocolate or cocoa powder (for dusting)
🛠️ Equipment List
Medium mixing bowl
Electric hand mixer or stand mixer
Rubber spatula
6-8 shot glasses or small serving glasses (about 2 ounces each)
🧑🍳 DIY Instructions: Spiced Cookie and Nut Layers
This recipe is quick and requires just one cream mixture, simplifying the process.
Step 1: Prepare the Cookie Layers
Mix Crumbs: In the medium mixing bowl, combine the crushed cookies with the melted butter. Stir until the crumbs are evenly moistened.
Add Nuts: Gently stir in the chopped pecans.
Step 2: Prepare the Cream Mousse
Whip Base: In a separate, large mixing bowl, beat the softened cream cheese, powdered sugar, and vanilla extract until smooth.
Whip Cream: In a chilled bowl, whip the heavy cream until stiff peaks form.
Fold: Gently fold the whipped cream into the cream cheese mixture until the mousse is light and uniform.
Step 3: Layer and Chill
Layer 1 (Cookie): Spoon a small amount of the cookie and pecan mixture into the bottom of each glass.
Layer 2 (Mousse): Spoon or pipe a layer of the vanilla mousse over the cookie base.
Layer 3 (Cookie): Add a second, smaller layer of the cookie and pecan mixture.
Layer 4 (Mousse): Top with a final, generous layer of the mousse.
Chill: Refrigerate for at least 30 minutes to ensure all the layers are firm and chilled.
Step 4: Garnish
Finish: Just before serving, dust the top of each mousse layer with a light sprinkle of cocoa powder or grated chocolate.
20. Simple Pan Fried Pineapple with Yogurt
Last-Minute Thanksgiving Desserts
📸 Dessert Description
For a surprisingly light and tropical finish, this quick dessert uses caramelized pineapple and yogurt. Slices of pineapple are quickly pan fried in butter and brown sugar, caramelizing the natural sugars and bringing out a deep, sweet flavor. A blend of spices like star anise or cinnamon often permeates the syrup, adding a festive warmth.
The warm pineapple is served immediately over a cooling base of plain or vanilla yogurt, creating a satisfying hot and cold contrast. This dessert is very fast to prepare since the cooking time for the pineapple is minimal. A sprinkle of sea salt or toasted coconut flakes is added as a final touch. It provides a bright, unexpected flavor that acts as a delightful counterpoint to the traditional heavy Thanksgiving fare.
🥣 Required Ingredients
1 (20 ounce) can pineapple slices, drained
2 tablespoons unsalted butter
2 tablespoons brown sugar
$1/2$ teaspoon ground cinnamon (optional)
2 cups plain Greek yogurt or vanilla yogurt
Flaky sea salt or toasted coconut flakes (for topping)
Thinly sliced banana (optional, for garnish)
🛠️ Equipment List
Medium nonstick skillet
Small bowl (for serving)
Spatula
🧑🍳 DIY Instructions: Quick Tropical Treat
Caramelizing the pineapple is very fast, so be ready to serve immediately.
Step 1: Prepare the Pineapple
Heat Skillet: Melt the 2 tablespoons of butter in the medium nonstick skillet over medium-high heat.
Caramelize: Add the brown sugar and stir until it dissolves into the butter. Lay the drained pineapple slices in the skillet in a single layer. Sprinkle with cinnamon if using.
Cook: Cook the pineapple slices for 2 to 3 minutes per side, until they are golden brown and caramelized. Remove the slices from the skillet, but keep the hot syrup in the pan.
Step 2: Assemble and Serve
Yogurt Base: Scoop a generous amount of plain or vanilla yogurt into the bottom of each small serving bowl.
Add Pineapple: Place one warm, caramelized pineapple ring right on top of the yogurt base.
Drizzle: Spoon a drizzle of the remaining hot caramel syrup from the skillet over the pineapple and yogurt.
Garnish: Finish with a light sprinkle of flaky sea salt or toasted coconut flakes. Serve immediately while the pineapple is warm.
21. Cinnamon Cereal Snack Bars
Last-Minute Thanksgiving Desserts
📸 Dessert Description
These no bake bars are a fantastic quick treat, reminiscent of a classic rice crispy square but with a more sophisticated, spicy flavor. They feature crunchy cinnamon flavored cereal, bound together with melted marshmallows, creating a chewy yet crisp texture. The warm aroma of cinnamon fills the air as they are made, adding to the festive feeling.
Once set, these bars are drizzled with melted white chocolate, which adds a touch of creamy sweetness and a pretty decorative element. They are incredibly simple to make, requiring minimal ingredients and no baking. These are easily cut into squares, making them convenient for guests to grab. They are especially popular with children and those who appreciate a nostalgic, comforting snack.
The key to these bars is working quickly once the marshmallows are melted.
Step 1: Prep the Pan and Melt Marshmallows
Line Pan: Line a 9×13 inch baking pan with parchment paper or foil, allowing some overhang on the sides. Lightly grease the paper or foil.
Melt Butter: In the large microwave-safe bowl, melt the 4 tablespoons of butter in the microwave.
Add Marshmallows: Add the entire bag of mini marshmallows to the melted butter. Microwave for 1 minute, then stir. Continue microwaving in 30-second intervals, stirring between each, until the marshmallows are completely melted and smooth.
Add Vanilla: Stir in the vanilla extract.
Step 2: Combine and Press
Add Cereal: Quickly add the 6 cups of cinnamon flavored cereal to the melted marshmallow mixture. Use a rubber spatula to stir until the cereal is evenly coated. Work fast before the mixture sets.
Press into Pan: Transfer the mixture to the prepared baking pan. Using the greased spatula or greased hands, gently and evenly press the mixture into the pan. Do not press too hard, as this can make the bars tough.
Step 3: Decorate and Chill
Melt White Chocolate: In the small microwave-safe bowl, melt the white chocolate chips or melting wafers in 30-second intervals until smooth.
Drizzle: Use a spoon to drizzle the melted white chocolate over the top of the cereal bars in a decorative pattern.
Chill and Cut: Allow the bars to cool completely at room temperature for at least 30 minutes, or chill in the refrigerator for 15 minutes to speed setting. Once firm, use the parchment overhangs to lift the slab out of the pan. Cut into squares using a sharp knife.
22. Easy Pumpkin Cheesecake Bars
Last-Minute Thanksgiving Desserts
📸 Dessert Description
These layered bars capture all the beloved flavors of pumpkin pie and cheesecake in an easy to serve format. The base is a simple graham cracker crust, providing a buttery, crunchy foundation. A smooth, creamy pumpkin cheesecake layer follows, delivering classic autumn spices and a velvety texture.
The crowning glory is a thick, fluffy layer of no bake vanilla cream cheese frosting, adding a tangy sweetness and a beautiful white contrast. This dessert needs no oven for the creamy layers, making it a much faster alternative to a traditional cheesecake. Slicing into neat squares makes for elegant, effortless serving. They are a wonderful choice for offering a taste of Thanksgiving tradition without the complexity.
🥣 Required Ingredients
For the Graham Cracker Crust:
1 $1/2$ cups graham cracker crumbs (about 10-12 full sheets)
$1/4$ cup granulated sugar
6 tablespoons unsalted butter, melted
For the Pumpkin Cheesecake Layer:
8 ounces cream cheese, softened
$1/2$ cup canned pumpkin puree (not pie filling)
$1/2$ cup powdered sugar
1 teaspoon pumpkin pie spice
1 teaspoon vanilla extract
1 cup heavy whipping cream
For the Cream Cheese Topping:
4 ounces cream cheese, softened
$1/4$ cup powdered sugar
1 tablespoon milk
$1/2$ teaspoon vanilla extract
🛠️ Equipment List
8×8 inch baking pan
Parchment paper
Medium mixing bowl
Large mixing bowl
Electric hand mixer or stand mixer
Rubber spatula
🧑🍳 DIY Instructions: No Bake Pumpkin Squares
Allow ample chilling time for each layer to set for the best presentation.
Step 1: Prepare the Crust
Mix Crumbs: In the medium mixing bowl, combine the graham cracker crumbs, granulated sugar, and melted butter. Stir until the crumbs are evenly moistened.
Press: Line an 8×8 inch baking pan with parchment paper, leaving an overhang on two sides. Press the crumb mixture firmly and evenly into the bottom of the pan. Chill in the refrigerator for at least 15 minutes.
Step 2: Make the Pumpkin Cheesecake Layer
Whip Cream Cheese: In the large mixing bowl, beat the softened cream cheese until smooth using an electric mixer.
Add Pumpkin: Beat in the pumpkin puree, $1/2$ cup powdered sugar, pumpkin pie spice, and 1 teaspoon vanilla extract until well combined and smooth.
Whip Cream: In a separate, chilled bowl, whip the heavy cream until stiff peaks form.
Fold Together: Gently fold the whipped cream into the pumpkin cream cheese mixture until fully incorporated.
Layer: Pour this pumpkin cheesecake mixture over the chilled crust and spread evenly. Return to the refrigerator to chill for at least 1 hour, or until firm.
Step 3: Make the Cream Cheese Topping
Combine: In a clean medium mixing bowl, beat the softened cream cheese, $1/4$ cup powdered sugar, 1 tablespoon milk, and $1/2$ teaspoon vanilla extract until light and smooth.
Spread: Once the pumpkin layer is firm, spread the cream cheese topping evenly over it.
Final Chill: Chill the bars for at least 2 more hours, or preferably overnight, to allow all layers to set completely.
Step 4: Slice and Serve
Remove: Use the parchment paper overhangs to lift the chilled bars out of the pan.
Slice: Use a sharp knife to cut into squares. Serve chilled.
23. Sweet Potato and Ginger Cookie Dip
Last-Minute Thanksgiving Desserts
📸 Dessert Description
This creamy, spiced dip is an inventive way to present a classic Thanksgiving flavor, requiring zero baking. It features a rich, smooth sweet potato base, blended with cream cheese for a luxurious, spreadable texture. The dip is generously flavored with warm spices like ginger, cinnamon, and nutmeg, evoking a comforting autumnal taste.
It is traditionally served in a wide bowl, often set right into a food processor if you want to keep the process super simple. The dip is garnished with small ginger snap cookies and a dusting of cinnamon, which provides a lovely visual and textural contrast. Surrounding the dip with crisp apple slices, vanilla wafers, and more ginger snaps makes for an inviting spread. This effortless dip is great for casual grazing and offers a lighter alternative to heavier baked goods.
🥣 Required Ingredients
8 ounces cream cheese, softened
1 cup sweet potato puree (canned or freshly cooked and mashed)
$1/2$ cup powdered sugar
1 teaspoon vanilla extract
$1/2$ teaspoon ground cinnamon
$1/4$ teaspoon ground ginger
Pinch of nutmeg
Ginger snap cookies, vanilla wafers, and apple slices (for dipping)
🛠️ Equipment List
Food processor or medium mixing bowl
Electric hand mixer or stand mixer (if not using food processor)
Rubber spatula
Serving platter
🧑🍳 DIY Instructions: No Bake Sweet Potato Dip
For the smoothest dip, ensure your cream cheese and sweet potato puree are at room temperature.
Step 1: Blend the Dip
Combine: If using a food processor, add the softened cream cheese, sweet potato puree, powdered sugar, vanilla extract, cinnamon, ginger, and nutmeg to the bowl. Process until the mixture is completely smooth and creamy, scraping down the sides as needed.
Mix (Alternative): If using a mixer, combine all ingredients in a medium mixing bowl and beat with an electric mixer until light, fluffy, and smooth.
Step 2: Chill and Garnish
Chill: Transfer the dip to your serving bowl or leave it in the food processor bowl if you like that rustic look. Cover and chill in the refrigerator for at least 30 minutes to allow the flavors to meld and the dip to firm up slightly.
Garnish: Just before serving, arrange some ginger snap cookies on top of the dip and dust lightly with extra cinnamon.
Step 3: Serve
Arrange: Place the serving bowl on a large platter and surround it with a variety of dipping options like ginger snap cookies, vanilla wafers, and fresh apple slices.
24. Elegant Poached Pears with Blue Cheese and Nuts
Last-Minute Thanksgiving Desserts
📸 Dessert Description
For a truly sophisticated and surprisingly simple dessert, consider elegant poached pears. Whole pears are gently simmered in a spiced red wine syrup, which infuses them with flavor and turns them a stunning ruby color. This method makes the pears incredibly tender and juicy.
The magic happens with the topping: crumbled blue cheese, toasted walnuts, and pistachios. The pungent, salty blue cheese creates a dynamic contrast with the sweet pear, while the nuts add a satisfying crunch. This dessert provides a refreshing, light finish to a rich holiday meal. Garnishing with vanilla bean, orange peel, and star anise makes it feel truly special and gourmet.
🥣 Required Ingredients
4 firm but ripe pears (like Bosc or Anjou), peeled
3 cups red wine (such as Pinot Noir or Cabernet Sauvignon)
1 cup granulated sugar
1 cup water
1 cinnamon stick, 3-4 star anise, 1 vanilla bean (split), and strips of orange peel (for poaching)
2 ounces good quality blue cheese, crumbled
2 tablespoons chopped walnuts or pistachios
Honey or maple syrup (optional, for drizzling)
🛠️ Equipment List
Medium saucepan (large enough for pears to fit snugly)
Sharp knife
Serving plates
🧑🍳 DIY Instructions: Simple Poached Pears
Keeping the pears submerged in the liquid is key to even cooking and coloring.
Step 1: Poach the Pears
Prep Pears: Carefully peel the pears, leaving the stems intact. If desired, you can use a melon baller to remove the core from the bottom of the pear, but this is optional.
Combine Liquid: In the medium saucepan, combine the red wine, granulated sugar, water, cinnamon stick, star anise, vanilla bean, and orange peel. Bring to a gentle simmer over medium heat, stirring until the sugar dissolves.
Poach: Carefully place the peeled pears into the simmering liquid. Ensure they are mostly submerged. If not, use a piece of parchment paper cut to fit inside the pan (a “cartouche”) to keep them down. Reduce heat to low, cover, and simmer for 20-30 minutes, or until the pears are tender when pierced with a knife but still hold their shape. The cooking time depends on the ripeness of your pears.
Cool: Remove the saucepan from the heat and allow the pears to cool completely in the poaching liquid. This helps them absorb more flavor and deepen their color. Once cool, you can chill them in the refrigerator, still in the liquid, until ready to serve.
Step 2: Serve and Garnish
Slice (Optional): When ready to serve, carefully remove the pears from the liquid. You can serve them whole or slice them in half lengthwise. If slicing, carefully remove the core.
Plate: Place one whole or half pear on each serving plate. Drizzle a little of the poaching liquid over the pear.
Top: Garnish each pear with crumbled blue cheese and a sprinkle of chopped walnuts or pistachios. A tiny drizzle of honey or maple syrup is also a lovely addition.
25. Individual Key Lime Cheesecakes
Last-Minute Thanksgiving Desserts
📸 Dessert Description
These bright, zesty shooters bring a refreshing, tropical note to the Thanksgiving dessert table. Each glass features a crunchy graham cracker crust base, providing a sweet, buttery foundation. On top of this sits a vibrant, creamy key lime cheesecake filling, offering a delightful balance of tart and sweet.
These individual desserts are no bake, making them incredibly quick to assemble and freeing up oven space. They are topped with a generous swirl of whipped cream and a sprinkle of fresh lime zest, adding a beautiful finish and an extra burst of citrus aroma. The small portions are appealing after a big meal, offering a light, invigorating option that stands out from traditional heavy holiday fare.
🥣 Required Ingredients
For the Graham Cracker Crust:
1 cup graham cracker crumbs
3 tablespoons unsalted butter, melted
1 tablespoon granulated sugar
For the Key Lime Filling:
8 ounces cream cheese, softened
1 (14 ounce) can sweetened condensed milk
$1/2$ cup key lime juice (or regular lime juice)
1 teaspoon vanilla extract
Green food coloring (optional, a few drops)
For Garnish:
1 cup heavy whipping cream
2 tablespoons powdered sugar
Lime zest (for topping)
🛠️ Equipment List
Small mixing bowl
Medium mixing bowl
Electric hand mixer or stand mixer
Rubber spatula
8-10 small shot glasses or dessert shooters (about 2-3 ounces each)
🧑🍳 DIY Instructions: No Bake Lime Shooters
Ensuring the cream cheese is soft is crucial for a smooth, lump free filling.
Step 1: Prepare the Crust
Mix Crumbs: In the small mixing bowl, combine the graham cracker crumbs, melted butter, and granulated sugar. Stir until evenly moistened.
Layer: Divide the crumb mixture evenly among the shot glasses, pressing gently to form a thin crust at the bottom of each glass.
Step 2: Make the Key Lime Filling
Whip Cream Cheese: In the medium mixing bowl, beat the softened cream cheese with an electric mixer until it is completely smooth and fluffy.
Combine: Gradually beat in the sweetened condensed milk until well combined.
Add Lime: Beat in the key lime juice and vanilla extract until the mixture is smooth. If desired, add a few drops of green food coloring to achieve a more vibrant lime color.
Fill Glasses: Spoon or pipe the key lime filling evenly over the graham cracker crust in each glass.
Step 3: Chill and Garnish
Chill: Place the glasses in the refrigerator for at least 1 hour, or until the filling is firm and set.
Make Whipped Cream: Just before serving, whip the heavy whipping cream with the powdered sugar in a clean, chilled bowl until stiff peaks form.
Garnish: Pipe or spoon a swirl of whipped cream on top of each key lime shooter. Finish with a sprinkle of fresh lime zest. Serve chilled.
26. Classic Raspberry Panna Cotta Shooters
Last-Minute Thanksgiving Desserts
📸 Dessert Description
These elegant, individual desserts are incredibly impressive, yet surprisingly simple to make. Each shooter features a smooth, creamy vanilla panna cotta base, which is delicate and melts in the mouth. Panna cotta has a subtle sweetness and a wonderfully silky texture.
A vibrant layer of sweet raspberry sauce or preserves tops the panna cotta, providing a beautiful color contrast and a tart, fruity burst of flavor. These desserts are no bake, and the panna cotta sets directly in the serving glasses, making for easy assembly. The striking red and white layers make them visually appealing. They are a light, refreshing option, offering a refined, fruit forward conclusion to the holiday meal.
1 cup raspberry preserves or seedless raspberry jam
1 tablespoon water (optional, to thin)
🛠️ Equipment List
Small saucepan
Whisk
Small mixing bowl
Rubber spatula
8-10 small shot glasses or dessert shooters (about 2-3 ounces each)
🧑🍳 DIY Instructions: Elegant Layered Panna Cotta
For the cleanest layers, ensure the panna cotta is fully set before adding the topping.
Step 1: Set the Panna Cotta
Bloom Gelatin: Pour the $1/4$ cup of cold water into the small mixing bowl. Sprinkle the unflavored gelatin powder evenly over the water and let it sit for 5 minutes. This softens the gelatin.
Heat Cream: In the small saucepan, combine the 1 $1/2$ cups of heavy cream and $1/4$ cup of granulated sugar. Heat over medium-low heat, stirring constantly, until the sugar dissolves and the cream is warm, but do not let it boil.
Dissolve Gelatin: Remove the cream mixture from the heat. Whisk in the bloomed gelatin until it is completely dissolved. Stir in the vanilla extract.
Pour and Chill: Pour the liquid evenly into the bottom of your 8-10 serving glasses. Place them in the refrigerator and chill for at least 3 hours, or until the panna cotta is fully set and firm to the touch.
Step 2: Prepare the Raspberry Topping
Warm Jam: In a separate small saucepan, gently warm the raspberry preserves or jam over low heat until it is pourable. If it’s too thick, stir in 1 tablespoon of water to thin it slightly.
Cool: Let the raspberry topping cool to room temperature before adding it to the panna cotta.
Step 3: Layer and Serve
Top Panna Cotta: Once the panna cotta layers are completely set, spoon the cooled raspberry topping evenly over them.
Chill Again: Return the glasses to the refrigerator for at least 30 minutes to allow the raspberry layer to set slightly.
Serve: Serve chilled.
27. Individual Caramel Apple Biscuit Shortcakes
Last-Minute Thanksgiving Desserts
📸 Dessert Description
These charming shortcakes offer a delicious take on classic apple pie, but with a unique, flaky biscuit topping instead of a crust. The base features warm, tender apple slices, often mixed with bananas for extra sweetness, all coated in a rich, buttery caramel sauce. This filling is flavorful and comforting.
Small, golden brown biscuits are baked, then split and filled with this delightful fruit and caramel mixture. A decorative pastry leaf often graces the top of the biscuit, adding a simple, festive touch. Served with a scoop of vanilla ice cream, these individual shortcakes provide a rustic, homey feel and a delightful combination of warm, gooey fruit and cool, creamy ice cream. They are a much faster way to serve an “apple pie” inspired dessert.
🥣 Required Ingredients
For the Caramel Apple Filling:
3 medium apples (like Honeycrisp or Gala), peeled, cored, and diced
1 ripe banana, sliced (optional)
$1/2$ cup store-bought caramel sauce, plus extra for drizzling
$1/2$ teaspoon ground cinnamon
For the Biscuit Shortcakes:
2 cups all-purpose flour
2 tablespoons granulated sugar
1 tablespoon baking powder
$1/2$ teaspoon salt
6 tablespoons cold unsalted butter, cut into small cubes
$3/4$ cup buttermilk (or regular milk with 1 teaspoon lemon juice/vinegar)
Vanilla ice cream (for serving)
🛠️ Equipment List
Medium saucepan
Medium mixing bowl
Pastry blender or fork
Baking sheet
Round cookie cutter (about 2 $1/2$ inch)
Small leaf cookie cutter (optional, for garnish)
🧑🍳 DIY Instructions: Quick Shortcake Assembly
Making the biscuits from scratch adds freshness, but you can use store bought biscuit dough for extra speed.
Step 1: Make the Caramel Apple Filling
Cook Apples: In the medium saucepan, combine the diced apples, $1/2$ cup caramel sauce, and cinnamon. Cook over medium heat for 8-10 minutes, stirring occasionally, until the apples are tender but still hold their shape.
Add Banana: If using, stir in the sliced banana during the last 2 minutes of cooking. Remove from heat and set aside.
Step 2: Prepare and Bake Biscuits
Dry Ingredients: In the medium mixing bowl, whisk together the flour, sugar, baking powder, and salt.
Cut in Butter: Add the cold, cubed butter to the dry ingredients. Use a pastry blender or your fingertips to cut the butter into the flour until the mixture resembles coarse crumbs.
Add Buttermilk: Pour in the buttermilk and mix with a fork until just combined. The dough will be slightly sticky. Do not overmix.
Shape: Turn the dough out onto a lightly floured surface. Gently pat or roll the dough to about $1/2$ inch thickness. Use the round cookie cutter to cut out about 8-10 biscuits. If desired, cut out small leaf shapes from the dough scraps and place on top of half of the biscuits.
Bake: Place the biscuits on a baking sheet. Bake in a preheated 425°F (220°C) oven for 12-15 minutes, or until golden brown and risen.
Step 3: Assemble and Serve
Split Biscuits: Once the biscuits are out of the oven, immediately slice each one horizontally to create two halves.
Layer: Place the bottom half of a biscuit on a plate. Spoon a generous amount of the warm caramel apple filling over it. Top with the other biscuit half.
Garnish: Drizzle extra caramel sauce over the top. Serve immediately with a scoop of vanilla ice cream.
28. Rich Cinnamon Chocolate Pudding Mugs
Last-Minute Thanksgiving Desserts
📸 Dessert Description
These warm, comforting mugs of chocolate pudding are a simple, quick way to end a meal, especially for chocolate lovers. The pudding is rich and intensely chocolatey, with a smooth, velvety texture. A hint of cinnamon often infuses the pudding, adding a warm, subtle spice that makes it feel seasonal.
Serving the pudding in individual mugs makes it a cozy, easy to handle dessert. Each mug is generously topped with a dollop of whipped cream and a sprinkle of cinnamon or mini chocolate chips. For added fun, small churros or waffle cookies can be added for dipping. This dessert is quick to prepare from scratch or even faster with a good quality store-bought pudding mix. It provides a hearty, classic dessert in a convenient, charming package.
🥣 Required Ingredients
$1/2$ cup granulated sugar
$1/4$ cup unsweetened cocoa powder
3 tablespoons cornstarch
2 cups milk (whole or 2%)
$1/2$ teaspoon ground cinnamon
1 teaspoon vanilla extract
2 tablespoons unsalted butter
Whipped cream (for topping)
Mini chocolate chips or more cinnamon (for garnish)
Mini churros or vanilla wafers (for dipping)
🛠️ Equipment List
Medium saucepan
Whisk
4 microwave-safe mugs (about 8-10 ounce capacity)
🧑🍳 DIY Instructions: Speedy Stovetop Pudding
Whisking constantly is important to prevent lumps and scorching with this recipe.
Step 1: Make the Pudding
Combine Dry: In the medium saucepan, whisk together the granulated sugar, cocoa powder, and cornstarch. This helps prevent lumps.
Add Milk: Gradually whisk in the milk until the mixture is smooth.
Cook: Place the saucepan over medium heat. Cook, whisking constantly, until the pudding thickens and comes to a gentle boil. This typically takes about 5-7 minutes. Once boiling, continue to cook and whisk for 1 minute more to ensure the cornstarch is fully cooked.
Finish: Remove the pudding from the heat. Stir in the ground cinnamon, vanilla extract, and butter until the butter is completely melted and incorporated.
Step 2: Serve and Garnish
Fill Mugs: Pour or scoop the warm pudding evenly into the four mugs.
Top: Allow the pudding to cool for a few minutes. Then, top each mug with a generous dollop of whipped cream.
Garnish: Sprinkle with mini chocolate chips or an extra dusting of cinnamon. Serve warm with mini churros or vanilla wafers for dipping.
29. No Bake Dark Chocolate Bark with Fruit & Nuts
Last-Minute Thanksgiving Desserts
📸 Dessert Description
This beautiful chocolate bark is an incredibly fast, customizable, and impressive dessert. It begins with a layer of rich, melted dark chocolate, spread thinly on parchment paper. The real artistry comes with the toppings, which can be anything you desire.
This version features a festive array of dried cranberries, toasted pecans, and bright green pistachios, creating a wonderful blend of chewy, crunchy, and nutty textures. A sprinkle of sea salt and vibrant orange zest provides a pop of flavor and color. This dessert requires no baking; the chocolate simply needs to cool and harden. It breaks easily into irregular, shard like pieces, which feel rustic and elegant. It makes a beautiful gift or a simple, sophisticated after dinner treat.
🥣 Required Ingredients
10 ounces good quality dark chocolate (chips or chopped bar)
$1/2$ cup dried cranberries
$1/2$ cup pecans, lightly toasted and roughly chopped
$1/4$ cup pistachios, shelled and roughly chopped
Zest of 1 orange
Flaky sea salt (for sprinkling)
🛠️ Equipment List
Baking sheet
Parchment paper
Microwave-safe bowl or double boiler
Rubber spatula
🧑🍳 DIY Instructions: Speedy Chocolate Bark
Working quickly once the chocolate is melted is key to getting the toppings to stick.
Step 1: Melt the Chocolate
Prepare Pan: Line a baking sheet with parchment paper.
Melt: Place the dark chocolate chips or chopped chocolate in a microwave-safe bowl. Microwave in 30-second intervals, stirring well between each, until the chocolate is completely melted and smooth. Alternatively, use a double boiler on the stovetop.
Step 2: Spread and Top
Spread: Pour the melted chocolate onto the prepared parchment paper. Use a rubber spatula to quickly spread the chocolate into a thin, even layer (about $1/4$ inch thick). You can make it a rectangle or an irregular shape.
Add Toppings: Immediately sprinkle the dried cranberries, chopped pecans, and pistachios evenly over the wet chocolate.
Flavor and Finish: Gently press the orange zest over the toppings. Sprinkle flaky sea salt over the entire bark.
Step 3: Chill and Break
Set: Place the baking sheet with the chocolate bark in the refrigerator for at least 30 minutes, or until the chocolate is completely firm and snaps easily.
Break: Once hardened, break the chocolate bark into irregular pieces or use a sharp knife to cut it into desired shapes. Store in an airtight container at room temperature for up to 2 weeks, or in the refrigerator for longer.
30. Creamy Coffee Mousse Bowls
Last-Minute Thanksgiving Desserts
📸 Dessert Description
For coffee lovers, these light, airy mousse bowls are an incredibly quick and satisfying dessert. They feature a smooth, creamy coffee flavored mousse, which is rich in taste but light in texture. The coffee provides a gentle pick me up, a welcome addition after a filling holiday meal.
These individual servings are charmingly presented in small bowls and topped with a generous swirl of whipped cream. A dusting of cocoa powder or finely grated chocolate, along with a few coffee beans, adds an elegant finish. This dessert requires no baking and can be prepared ahead of time, simply needing a quick garnish before serving. It is a sophisticated yet easy option that provides a memorable coffee infused end to the feast.
🥣 Required Ingredients
1 $1/2$ cups heavy whipping cream, divided
$1/2$ cup powdered sugar
1 tablespoon instant espresso powder or instant coffee granules
1 teaspoon vanilla extract
Chocolate shavings or cocoa powder (for garnish)
Chocolate wafer rolls (optional, for serving)
🛠️ Equipment List
Medium mixing bowl (chilled)
Electric hand mixer or stand mixer
Rubber spatula
4-6 small serving bowls or ramekins
🧑🍳 DIY Instructions: No Bake Coffee Dream
Chilling your bowl and beaters will help the cream whip faster and hold its shape better.
Step 1: Make the Coffee Cream Base
Dissolve Coffee: In a very small bowl, mix the instant espresso powder with 1 tablespoon of hot water to dissolve it completely. Let it cool slightly.
Whip Cream: In a chilled medium mixing bowl, combine 1 cup of the heavy whipping cream, $1/4$ cup of the powdered sugar, and the vanilla extract. Beat with an electric mixer until medium-stiff peaks form.
Fold in Coffee: Gently fold the cooled dissolved coffee into the whipped cream until evenly combined. Be careful not to deflate the cream.
Step 2: Assemble and Chill
Fill Bowls: Divide the coffee mousse mixture evenly among your 4-6 small serving bowls.
Chill: Cover the bowls and refrigerate for at least 1 hour to allow the mousse to set and flavors to meld.
Step 3: Garnish and Serve
Whip Topping: Just before serving, whip the remaining $1/2$ cup of heavy whipping cream with the remaining $1/4$ cup of powdered sugar in a clean, chilled bowl until stiff peaks form.
Top: Spoon or pipe a swirl of this whipped cream on top of each coffee mousse.
Finish: Garnish with a sprinkle of chocolate shavings or cocoa powder. Add a chocolate wafer roll to each bowl if desired. Serve chilled.
31. No Bake Chocolate Pistachio Truffles
Last-Minute Thanksgiving Desserts
📸 Dessert Description
These decadent, bite sized truffles are a simple yet impressive no bake dessert, offering intense chocolate flavor. The base is a rich, fudgy chocolate ganache or dough, which is rolled into small, smooth balls. The simplicity of their preparation makes them an excellent last minute option.
Each truffle is then beautifully coated in a variety of toppings, adding both texture and visual appeal. Some are rolled in finely chopped pistachios, providing a vibrant green color and nutty crunch. Others are finished with toasted sesame seeds, offering a unique, earthy flavor and elegant appearance. A touch of edible gold leaf adds a sophisticated shimmer. These luxurious truffles are satisfying and easy for guests to enjoy with coffee.
🥣 Required Ingredients
1 cup semi-sweet chocolate chips (or finely chopped chocolate)
$1/2$ cup heavy cream
2 tablespoons unsalted butter
$1/2$ teaspoon vanilla extract
$1/4$ cup finely chopped pistachios (for coating)
$1/4$ cup toasted sesame seeds (for coating)
Unsweetened cocoa powder (for dusting)
Edible gold leaf (optional, for garnish)
🛠️ Equipment List
Small saucepan
Whisk
Medium mixing bowl
Rubber spatula
Baking sheet
Parchment paper
Small bowls (for coatings)
🧑🍳 DIY Instructions: Fast Fudge Truffles
The key to these truffles is chilling the ganache thoroughly for easy rolling.
Step 1: Make the Ganache
Heat Cream & Butter: In the small saucepan, heat the heavy cream and butter over medium-low heat until it just begins to simmer around the edges. Do not boil.
Melt Chocolate: Remove the saucepan from the heat and immediately add the chocolate chips. Let stand for 5 minutes without stirring.
Whisk: After 5 minutes, whisk the mixture gently until the chocolate is completely melted and smooth, forming a glossy ganache. Stir in the vanilla extract.
Chill: Pour the ganache into the medium mixing bowl. Cover with plastic wrap, pressing the wrap directly onto the surface of the ganache to prevent a skin from forming. Chill in the refrigerator for at least 2 hours, or until firm enough to roll.
Step 2: Roll and Coat
Prep Coatings: Place the chopped pistachios, toasted sesame seeds, and cocoa powder in separate small bowls.
Roll Truffles: Scoop out small portions of the chilled ganache (about 1 tablespoon each). Quickly roll them between your palms to form smooth balls.
Coat: Immediately roll each truffle in your desired coating: pistachios, sesame seeds, or cocoa powder.
Garnish: For an extra touch, gently press a tiny piece of edible gold leaf onto some of the finished truffles.
Step 3: Serve
Chill: Place the coated truffles in mini paper liners on a baking sheet and chill until ready to serve. They are best served chilled.
32. Quick Apple Butter & Pumpkin Tartlets
Last-Minute Thanksgiving Desserts
📸 Dessert Description
These charming, individual tartlets are a fast and customizable take on classic pie flavors. They begin with pre-made wonton wrappers or mini phyllo cups, which bake up into crisp, flaky shells without the effort of making a full pie crust. Each little cup is filled with a different autumnal delight.
Some are filled with sweet, spiced apple butter, offering a concentrated apple flavor. Others hold a smooth, creamy pumpkin puree, reminiscent of pumpkin pie filling. A few are even dusted with cinnamon sugar for a simple yet satisfying taste. Topped with a scoop of vanilla ice cream, these tartlets provide a delightful variety of flavors and textures in small, easy to manage portions. They are an effortless way to offer multiple pie options without the complexity.
🥣 Required Ingredients
1 package wonton wrappers or frozen mini phyllo shells
1 (12 ounce) jar apple butter
1 cup canned pumpkin puree (not pie filling)
2 tablespoons brown sugar (for pumpkin filling)
1 teaspoon pumpkin pie spice (for pumpkin filling)
Using ready made shells or wrappers is the secret to the speed of this dessert.
Step 1: Prepare the Shells
Shape Wontons: If using wonton wrappers, gently press one wrapper into each cup of a mini muffin tin, letting the corners stick up to form a cup shape. If using frozen phyllo shells, follow package directions to bake them until golden brown.
Bake Wontons: Bake the wonton wrappers in a preheated 350°F (175°C) oven for 8-10 minutes, or until golden and crisp. Remove from the oven and let cool in the pan.
Step 2: Prepare Fillings
Apple Butter: The apple butter is ready to use as is.
Pumpkin Filling: In a small bowl, combine the pumpkin puree, brown sugar, and pumpkin pie spice. Stir well until smooth.
Cinnamon Sugar: In another small bowl, mix the granulated sugar and ground cinnamon.
Step 3: Fill and Serve
Fill Shells: Once the baked shells are cool, spoon the various fillings into them. You can fill some with apple butter, some with pumpkin mixture, and some with just cinnamon sugar.
Garnish: For the pumpkin-filled cups, you can add a small swirl of whipped cream or white frosting. For the cinnamon sugar ones, no further garnish is needed.
Serve: Serve the tartlets at room temperature or slightly warmed, with a small scoop of vanilla ice cream on the side or directly on top.
33. Layered Raspberry Yogurt Parfaits
Last-Minute Thanksgiving Desserts
📸 Dessert Description
These vibrant, fruity parfaits are a light, refreshing, and incredibly quick dessert. Each glass features creamy vanilla yogurt, providing a cool, tangy base. Layers of bright raspberry compote or crushed fresh raspberries are swirled throughout, creating beautiful patterns and a burst of tart flavor.
The combination of the smooth yogurt and the sweet-tart fruit is wonderfully balanced. These individual servings are easily assembled in clear glasses, making their layered presentation visually appealing. Garnishing with fresh raspberries and a small sprig of lavender adds a touch of sophistication. This no bake dessert is ideal for those seeking a lighter option after a heavy holiday meal, offering a fresh, fruit forward conclusion.
🥣 Required Ingredients
2 cups vanilla Greek yogurt or plain Greek yogurt, sweetened with 2 tablespoons honey
1 cup fresh or frozen raspberries
2 tablespoons granulated sugar (if using plain raspberries)
Small vanilla wafer cookies (for serving, optional)
Fresh raspberries and lavender sprigs (for garnish)
🛠️ Equipment List
Small saucepan (if making compote)
Small mixing bowl
Whisk or fork
4-6 small serving glasses (about 6-8 ounce capacity)
🧑🍳 DIY Instructions: Fast Yogurt & Fruit Parfaits
For best results, use a thick, creamy yogurt to prevent the layers from mixing too much.
Step 1: Prepare Raspberry Compote
Cook Raspberries: If using frozen raspberries or fresh raspberries and sugar, combine the raspberries and 2 tablespoons of sugar in a small saucepan. Cook over medium-low heat for 5-7 minutes, stirring occasionally, until the raspberries break down and form a thick sauce. Let cool completely. If using fresh raspberries, you can simply crush them slightly.
Step 2: Layer the Parfaits
First Yogurt Layer: Spoon about $1/4$ cup of the vanilla yogurt into the bottom of each serving glass.
Raspberry Layer: Top the yogurt with a layer of the cooled raspberry compote or crushed raspberries.
Second Yogurt Layer: Add another layer of vanilla yogurt.
Repeat: Continue layering, ending with a final layer of yogurt on top.
Step 3: Swirl and Garnish
Swirl (Optional): If you like a marbled look, use a thin knife or skewer to gently swirl through the layers a couple of times.
Garnish: Top each parfait with a fresh raspberry and a small sprig of lavender. Serve immediately or chill for up to 30 minutes. Serve with small cookies if desired.
34. Individual Chocolate Pretzel Pudding Cups
Last-Minute Thanksgiving Desserts
📸 Dessert Description
This dessert is a delightful combination of sweet and salty, delivering intense chocolate flavor with a satisfying crunch. Each cup starts with a layer of crushed pretzels, providing a unique salty base that contrasts beautifully with the sweetness of the pudding. The pretzels also add a wonderful texture.
A rich, dark chocolate pudding layer sits on top, which can be made quickly from scratch or with a high quality instant mix. The pudding is thick, creamy, and deeply chocolatey. The individual servings in clear glasses are visually appealing, showcasing the distinct layers. The final touch is a sprinkle of mini pretzels and a dash of flaky sea salt, enhancing the sweet and salty dynamic. This no bake dessert is quick to assemble and always a crowd pleaser.
🥣 Required Ingredients
For the Pretzel Crust:
1 $1/2$ cups crushed pretzels
4 tablespoons unsalted butter, melted
2 tablespoons granulated sugar
For the Chocolate Pudding:
1 (5.1 ounce) box instant chocolate pudding mix
3 cups cold milk (whole or 2%)
1 teaspoon vanilla extract
Garnish:
Mini pretzels (for topping)
Flaky sea salt (for sprinkling)
🛠️ Equipment List
Small mixing bowl
Medium mixing bowl
Whisk
6-8 small serving glasses (about 6-8 ounce capacity)
🧑🍳 DIY Instructions: Salty Sweet Pudding
Allowing the pudding to chill completely is key for a firm set.
Step 1: Prepare the Pretzel Crust
Crush Pretzels: Place the pretzels in a zip-top bag and crush them with a rolling pin, or pulse in a food processor, until fine crumbs form.
Mix: In the small mixing bowl, combine the crushed pretzels, melted butter, and granulated sugar. Stir until evenly moistened.
Layer: Divide the pretzel mixture evenly among the 6-8 serving glasses, pressing gently to form a firm crust at the bottom of each.
Step 2: Make the Chocolate Pudding
Whisk: In the medium mixing bowl, whisk together the instant chocolate pudding mix, cold milk, and vanilla extract for 2 minutes, or until the mixture begins to thicken. Do not overmix.
Chill: Let the pudding stand for 5 minutes to thicken further.
Step 3: Assemble and Chill
Fill Glasses: Spoon or pipe the thickened chocolate pudding evenly over the pretzel crusts in each glass.
Chill: Place the glasses in the refrigerator for at least 1 hour, or until the pudding is completely set and firm.
Step 4: Garnish and Serve
Top: Just before serving, sprinkle mini pretzels over the top of each pudding cup.
Finish: Add a tiny pinch of flaky sea salt to each. Serve chilled.
35. Quick Baked Cinnamon Sugar Donuts
Last-Minute Thanksgiving Desserts
📸 Dessert Description
These fluffy, warm donuts are a fast, comforting dessert that brings a homemade touch to the table without the mess of deep frying. Made from a simple biscuit dough, they bake up quickly to a golden brown. The true charm comes from their coating: a generous roll in cinnamon sugar immediately after baking.
Some versions feature a surprise chocolate center, made by inserting a small chocolate square into the dough before baking. This creates a gooey, melted core. The donuts are served warm, often in a basket, making them a casual and inviting dessert. They are much faster to make than traditional donuts and taste just as satisfying, providing a delightful, comforting sweetness.
🥣 Required Ingredients
1 (16.3 ounce) can refrigerated biscuit dough (like Pillsbury Grands)
$1/2$ cup granulated sugar
1 tablespoon ground cinnamon
4 tablespoons unsalted butter, melted
Small chocolate squares or chips (optional, for filling)
🛠️ Equipment List
Baking sheet
Parchment paper
Small round cookie cutter (about 1 inch, for donut holes) or sharp knife
Small shallow bowl (for cinnamon sugar)
Pastry brush (optional)
🧑🍳 DIY Instructions: Speedy Biscuit Donuts
Working quickly while the donuts are warm is essential for the cinnamon sugar to stick.
Step 1: Prep and Cut Dough
Preheat & Prep Pan: Preheat your oven to 375°F (190°C). Line a baking sheet with parchment paper.
Shape Donuts: Open the can of biscuit dough. If making full donuts, use a small round cookie cutter (or even a bottle cap) to cut a hole in the center of each biscuit. If making filled donuts, leave them whole and create a small indentation in the center of each.
Fill (Optional): If filling, place a small chocolate square or a few chocolate chips into the indentation of each biscuit, then gently pinch the dough around the chocolate to seal it.
Step 2: Bake
Bake: Place the biscuits (donuts) and any cut out holes (donut holes) on the prepared baking sheet. Bake for 10-12 minutes, or until golden brown and cooked through.
Step 3: Coat and Serve
Melt Butter: While the donuts are baking, melt the 4 tablespoons of butter in a small microwave-safe bowl.
Mix Cinnamon Sugar: In the small shallow bowl, combine the $1/2$ cup of granulated sugar and 1 tablespoon of ground cinnamon.
Coat: As soon as the donuts come out of the oven, brush them with the melted butter (or dip them quickly). Immediately roll them in the cinnamon sugar mixture until completely coated.
Serve: Serve the cinnamon sugar donuts warm, arranged in a festive basket.
36. Giant Caramel Apple Nachos
Last-Minute Thanksgiving Desserts
📸 Dessert Description
This deconstructed caramel apple dessert is a fun, shareable, and impressively quick platter. Crisp green and red apple slices are fanned out on a large platter, forming the “nacho” base. These fresh slices provide a healthy, refreshing crunch.
A generous drizzle of rich, gooey caramel sauce covers the apples, adding a deep, buttery sweetness. The entire platter is then showered with an assortment of sweet and savory toppings: mini chocolate chips, crunchy peanuts, and chopped pecans. A few swirls of whipped cream add a light, airy contrast. This no bake dessert is incredibly fast to assemble and perfect for a casual, interactive dessert experience. It provides all the joy of a caramel apple without the mess.
🥣 Required Ingredients
3-4 medium apples (half Granny Smith, half Gala), cored and thinly sliced
$1/2$ cup store-bought caramel sauce
$1/4$ cup mini chocolate chips
$1/4$ cup chopped peanuts
$1/4$ cup chopped pecans
Whipped cream or cool whip (for topping)
Ground cinnamon (optional, for dusting)
🛠️ Equipment List
Large serving platter or sheet pan
Small microwave-safe bowl (for caramel)
Spoon or squeeze bottle (for drizzling)
🧑🍳 DIY Instructions: Fast Fruit & Caramel Treat
Working quickly ensures the apples stay crisp before serving.
Step 1: Arrange Apples
Slice: Core and thinly slice your apples. For the best presentation, aim for uniform slices.
Arrange: Arrange the apple slices in an overlapping pattern on your large serving platter, spreading them out to create a wide base. You can make rows or a circular design.
Step 2: Drizzle and Top
Warm Caramel: Warm the caramel sauce slightly in a microwave-safe bowl for about 15-30 seconds, until it’s easily drizzled. If it’s too thin, let it cool a moment.
Drizzle: Generously drizzle the warm caramel sauce over all the apple slices.
Sprinkle: Sprinkle the mini chocolate chips, chopped peanuts, and chopped pecans evenly over the caramel covered apples. Dust lightly with cinnamon if desired.
Step 3: Garnish and Serve
Add Cream: Pipe or dollop small swirls of whipped cream or cool whip onto the platter, spaced out evenly.
Serve: Serve immediately, allowing guests to pick up slices with their hands or a small fork.
37. Quick Spiced Phyllo Rolls with Honey
Last-Minute Thanksgiving Desserts
📸 Dessert Description
These delightful, crispy phyllo rolls offer a taste of baklava without the extensive layering or baking time. Thin sheets of phyllo dough are quickly rolled around a sweet, spiced nut filling, often including pistachios or walnuts. The pastry bakes to a beautiful golden crispness.
Once baked, the warm rolls are immediately drenched in a sweet honey syrup, which soaks into the flaky layers and infuses them with rich flavor. A sprinkle of chopped pistachios or colorful sprinkles adds a festive garnish. These individual rolls are much faster to prepare than a traditional baklava and are easy to serve. They provide a delightful crunchy, sweet, and nutty dessert with a lovely syrupy finish.
🥣 Required Ingredients
1 package (1 pound) frozen phyllo dough, thawed
$1/2$ cup (1 stick) unsalted butter, melted
1 cup finely chopped pistachios or walnuts
$1/4$ cup granulated sugar
1 teaspoon ground cinnamon
$1/2$ cup honey
2 tablespoons water
$1/4$ teaspoon vanilla extract
Extra pistachios or sprinkles (for garnish)
🛠️ Equipment List
Baking sheet
Parchment paper
Pastry brush
Small mixing bowl
Small saucepan
Sharp knife
🧑🍳 DIY Instructions: Fast Baklava Inspired Rolls
Working with phyllo requires speed, so have all your ingredients ready.
Step 1: Prep Filling and Phyllo
Mix Filling: In the small mixing bowl, combine the chopped pistachios or walnuts, granulated sugar, and ground cinnamon.
Thaw Phyllo: Thaw the phyllo dough according to package directions, usually overnight in the refrigerator. Unroll carefully and keep the unused sheets covered with a damp towel to prevent them from drying out.
Step 2: Assemble and Bake Rolls
Layer Phyllo: Take one sheet of phyllo dough. Brush lightly with melted butter. Place another phyllo sheet directly on top and brush with more butter. Repeat with a third sheet (so you have 3 buttered layers).
Fill and Roll: Sprinkle a thin line of the nut mixture along one long edge of the layered phyllo. Carefully roll the phyllo tightly into a log shape.
Cut: Using a sharp knife, cut the log into 1-inch thick pinwheel slices.
Repeat: Repeat with the remaining phyllo sheets and nut mixture. Arrange the pinwheels cut side up on a parchment lined baking sheet.
Bake: Bake in a preheated 350°F (175°C) oven for 15-20 minutes, or until golden brown and crispy.
Step 3: Make Syrup and Serve
Make Syrup: While the rolls are baking, combine the honey, water, and vanilla extract in the small saucepan. Bring to a simmer over low heat for 2 minutes, then remove from heat.
Pour Syrup: As soon as the rolls come out of the oven, immediately pour the warm honey syrup evenly over them. The hot phyllo will absorb the syrup.
Garnish: Sprinkle with extra chopped pistachios or sprinkles. Let cool completely for at least 30 minutes to allow the syrup to soak in.
38. Easy Chocolate Espresso Pudding Shots
Last-Minute Thanksgiving Desserts
📸 Dessert Description
These decadent little shots are a dream for chocolate and coffee enthusiasts, providing a rich, intense flavor in a small, satisfying portion. Each glass features a base of crushed pretzels, offering a salty crunch that beautifully complements the sweet chocolate.
On top of this crust sits a thick, smooth chocolate pudding infused with a robust espresso flavor, which deepens the cocoa and provides a subtle pick me up. The individual serving size makes them easy to enjoy after a heavy meal. Topped with a sprinkle of mini pretzels and a dash of flaky sea salt, these no bake desserts are quick to assemble and always a crowd pleaser.
🥣 Required Ingredients
For the Pretzel Crust:
1 cup crushed pretzels
3 tablespoons unsalted butter, melted
1 tablespoon granulated sugar
For the Chocolate Espresso Pudding:
1 (5.1 ounce) box instant chocolate pudding mix
3 cups cold milk (whole or 2%)
1 tablespoon instant espresso powder or instant coffee granules
1 teaspoon vanilla extract
Garnish:
Mini pretzels (for topping)
Flaky sea salt (for sprinkling)
🛠️ Equipment List
Small mixing bowl
Medium mixing bowl
Whisk
8-10 small shot glasses or dessert shooters (about 2-3 ounces each)
🧑🍳 DIY Instructions: Fast Coffee Chocolate Dessert
Making sure the milk is very cold helps the instant pudding set quickly and firmly.
Step 1: Prepare the Pretzel Crust
Crush Pretzels: Place the pretzels in a zip-top bag and crush them with a rolling pin, or pulse in a food processor, until fine crumbs form.
Mix: In the small mixing bowl, combine the crushed pretzels, melted butter, and granulated sugar. Stir until evenly moistened.
Layer: Divide the pretzel mixture evenly among the 8-10 serving glasses, pressing gently to form a firm crust at the bottom of each.
Step 2: Make the Chocolate Espresso Pudding
Whisk Pudding: In the medium mixing bowl, whisk together the instant chocolate pudding mix, cold milk, instant espresso powder, and vanilla extract for 2 minutes, or until the mixture begins to thicken. Do not overmix.
Chill: Let the pudding stand for 5 minutes to thicken further.
Step 3: Assemble and Chill
Fill Glasses: Spoon or pipe the thickened chocolate espresso pudding evenly over the pretzel crusts in each glass.
Chill: Place the glasses in the refrigerator for at least 1 hour, or until the pudding is completely set and firm.
Step 4: Garnish and Serve
Top: Just before serving, sprinkle mini pretzels over the top of each pudding shot.
Finish: Add a tiny pinch of flaky sea salt to each. Serve chilled.
Key Takeaways
Speed and Simplicity is Everything
Focus on no bake recipes like layered parfaits, chilled dips, and chocolate truffles. These require zero oven time and utilize simple pantry staples.
Embrace pre made ingredients. Using store bought cookie dough, ready made graham cracker crumbs, or instant pudding dramatically reduces prep work.
Individual serving desserts, such as shooters and ramekin cobblers, are faster to assemble and eliminate the need for difficult slicing and plating.
Flavor and Presentation Don’t Need Time
Maximize classic Thanksgiving flavors like pumpkin, apple, cinnamon, and caramel using concentrated sources like canned puree or apple butter.
Use spices creatively. A simple addition of cinnamon, nutmeg, or cardamom can make any quick treat taste instantly seasonal and homemade.
Presentation is simplified with clear glasses or rustic platters. Layering a dessert in a transparent glass elevates its look effortlessly.
Savory Sweet Balance
Incorporate contrasting textures and flavors. Salted caramel, pretzels, and flaky sea salt offer a much needed break from heavy, uniform sweetness.
Offer light options. Desserts like granitas or yogurt parfaits provide a refreshing palate cleanser after a rich holiday feast.
Running out of time doesn’t mean you have to skip the sweet finale. As you’ve seen, creating a memorable Thanksgiving dessert can be simple, stress free, and incredibly fast. These 38 recipes prove that thoughtful presentation and vibrant flavors can be achieved with minimal effort and no complicated techniques.
Whether you chose the elegant no bake chocolate bark or the cozy spiced apple skillet dip, you now have a treasury of quick fixes ready for any holiday emergency. No more panic attacks about the dessert table!
Enjoy the rest of your Thanksgiving knowing you have the last course perfectly covered. Relax, celebrate, and savor the moment with a delicious, last minute sweet treat.
Spread the loveThe holiday season is here, bringing with it the cherished tradition of Christmas baking. While scrolling through social media, it is easy to feel intimidated by those complicated, multi-layered cookie designs. Many people…
Spread the loveValentine’s Day often feels like a high pressure search for the right gift. You want to show him how much you care without spending all day in the kitchen. These sweet treats offer…
Spread the loveThe holidays bring a special kind of joy—the lights, the music, and, of course, the parade of seasonal sweets. Baking can be wonderfully therapeutic, yet sometimes the thought of flour dust, sticky counters,…