Thanksgiving is about gathering, gratitude, and great food. Nobody wants to spend the entire holiday stressing over a hot oven while missing out on time with family. This year, show your in-laws you’re a culinary genius and a relaxed host by presenting a feast where almost everything is done ahead of time.

Forget the last minute chaos and reclaim your holiday peace. These 40 “wow-factor” recipes are specifically designed to be prepped, assembled, or cooked days in advance. They feature stunning presentations and flavor profiles guaranteed to impress even the toughest critic at your table.
From a glistening Bourbon Glazed Ham to elegant Individual Cranberry Parfaits, this guide gives you the detailed, step by step plan you need. Get ready to enjoy a stress free holiday where every dish looks and tastes like a masterpiece.
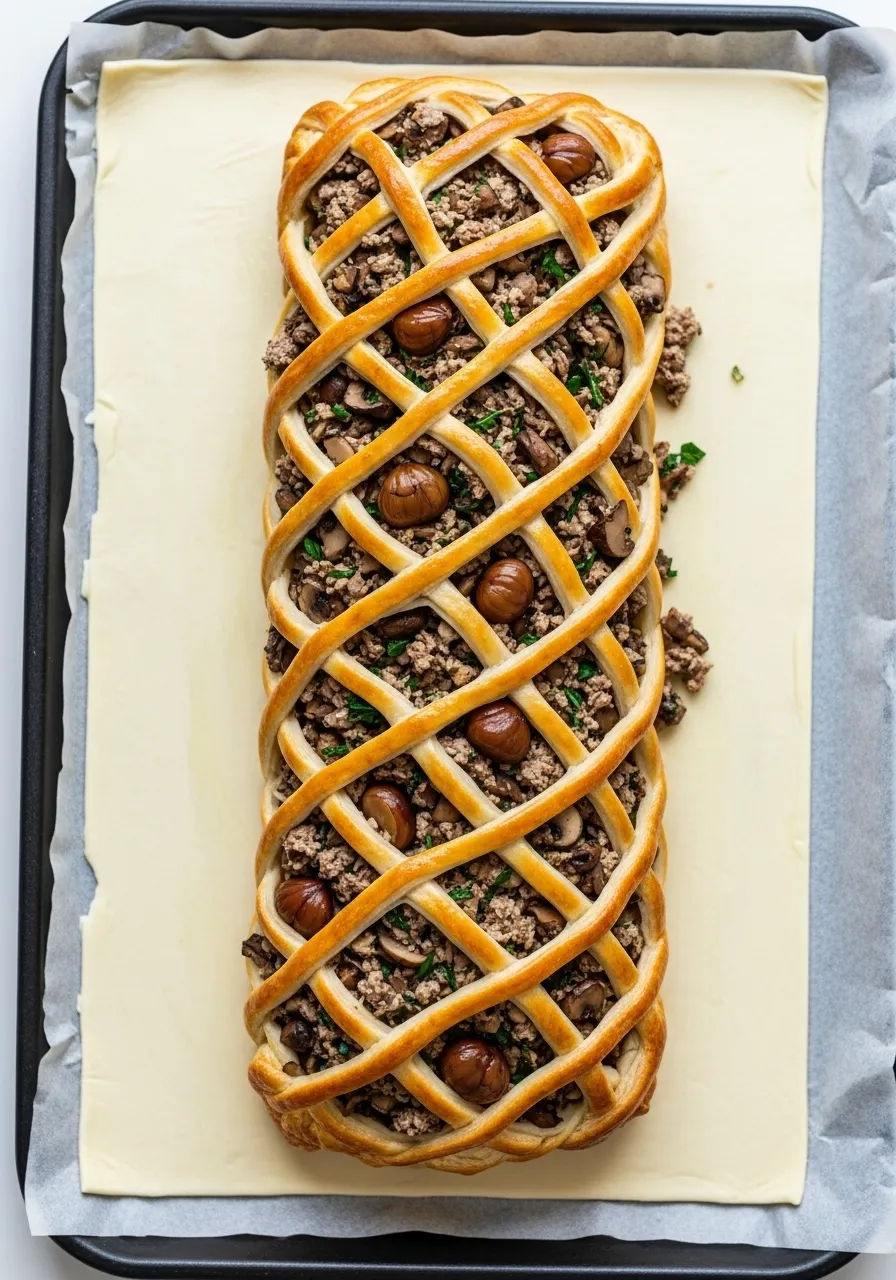
1. Elevated Sausage & Chestnut Holiday Braid

Image Description
This stunning dish is your secret weapon for a memorable Thanksgiving. Imagine the look on your in-laws’ faces when this golden beauty emerges from the oven. The flaky puff pastry braid encases a rich, savory filling that looks utterly professional. It combines seasoned ground meat—perhaps Italian sausage or a beef mixture—earthy mushrooms, and sweet, tender whole chestnuts.
Preparing this savory loaf ahead of time lets you bypass kitchen stress on the big day. You can assemble it entirely the day before, simply brushing it with egg wash and baking it right before guests arrive. It serves beautifully as an appetizer or a standout side dish. This impressive centerpiece adds instant elegance to your holiday table without adding last minute chaos.
Required Ingredients
- 1 package (14 to 17 ounces) all butter puff pastry, thawed according to package directions
- 1 pound sweet Italian sausage, casings removed (or ground pork/beef mix)
- 1 cup cremini mushrooms, finely chopped
- 1 medium shallot, finely minced
- 2 cloves garlic, minced
- 1/2 cup pre cooked, peeled chestnuts, whole or roughly chopped
- 1/4 cup fresh parsley, chopped
- 1 teaspoon dried sage
- 1/2 teaspoon kosher salt
- 1/4 teaspoon black pepper
- 1 large egg, beaten with 1 teaspoon water (for egg wash)
Equipment List
- Large skillet or frying pan
- Medium mixing bowl
- Baking sheet
- Parchment paper
- Sharp knife or pizza cutter
- Pastry brush
- Measuring cups and spoons
DIY Instruction Steps
Step 1: Prepare the Filling
- Place your large skillet over medium high heat on the stovetop. Once the pan is warm, add the ground sausage or meat mixture. Use a wooden spoon to break the meat into small pieces as it cooks.
- Cook the sausage until it is fully browned and no pink remains. This usually takes about six to eight minutes.
- Carefully drain any excess grease from the skillet and return the meat to the pan.
- Add the minced shallots and chopped mushrooms to the sausage. Cook this mixture for five minutes, stirring occasionally until the vegetables have softened.
- Stir in the minced garlic, dried sage, salt, and pepper. Cook for one more minute until the garlic becomes fragrant.
- Remove the skillet from the heat. Transfer the entire filling mixture to your mixing bowl. Stir in the chopped fresh parsley and the chestnuts. Allow this filling to cool completely before moving to the next step—using warm filling will melt the puff pastry.
Step 2: Roll and Cut the Puff Pastry
- Preheat your oven to 400°F (200°C). Line your baking sheet with parchment paper.
- Unroll the thawed puff pastry sheet onto the prepared parchment paper. If your puff pastry came as a block, roll it into a rectangle approximately 10 by 14 inches.
- Mentally (or lightly with a ruler) divide the pastry into three equal vertical sections. The center section will hold the filling, and the two outer sections will become the braided strips.
- Using a sharp knife or pizza cutter, cut diagonal strips one inch wide into the two outer sections. Stop cutting when you reach the center third of the dough. The cuts should be diagonal, running from the center line outward, similar to the shape of a fishbone. You should have eight to ten strips on each side.
Step 3: Assemble the Braid
- Take your cooled filling and spoon it down the center third of the pastry sheet, spreading it evenly but making sure it does not spill into the cut strips.
- To start the braid, fold the top and bottom edges of the center dough over the filling to seal the ends.
- Begin weaving the strips by alternating sides: take the topmost strip from the right and lay it diagonally over the filling. Press it gently onto the dough on the opposite side (the left).
- Next, take the topmost strip from the left and lay it diagonally over the filling, overlapping the first strip. Press it onto the dough on the opposite side (the right).
- Continue this alternating pattern until all the strips are woven, creating a beautiful lattice pattern over the filling. Gently seal the end strips.
Step 4: Bake and Serve
- This is the make ahead step: You can cover the assembled braid loosely with plastic wrap and refrigerate it for up to 24 hours at this point.
- When ready to bake, use the pastry brush to lightly coat the entire surface of the braid (pastry strips and sealed ends) with the egg wash (beaten egg and water). This step gives the braid its appealing, golden shine.
- Bake for 25 to 30 minutes, or until the pastry is puffed and deeply golden brown.
- Let the braid rest on the baking sheet for five minutes before transferring it to a cutting board. Slice into thick portions and serve warm.
2. Updated Creamy Green Bean Casserole

Image Description
This updated take on a holiday classic instantly upgrades your side dish game. Forget the canned soup; this version uses fresh, bright green beans and plenty of whole mushrooms simmered in a rich, velvety sauce. It looks far more appealing than the traditional, homogenous casserole. The entire dish is beautifully crowned with a generous layer of crispy fried shallots or onions, providing that essential crunch.
The sheer green of the beans contrasts beautifully with the deep brown mushrooms and the golden-brown topping. You can assemble this decadent casserole entirely, cover it, and refrigerate it the day before your dinner. All you need to do on Thanksgiving is bake it until bubbly and top it with the fried onions right before serving. This side dish will impress the purists and modern food lovers alike.
Required Ingredients
- 1.5 pounds fresh green beans, trimmed
- 1 tablespoon butter or olive oil
- 1 pound mixed mushrooms (cremini, shiitake), sliced
- 1 medium onion, finely chopped
- 3 cloves garlic, minced
- 1/4 cup flour (all-purpose)
- 2 cups low-sodium vegetable or chicken broth
- 1 cup heavy cream or half-and-half
- 1 teaspoon dried thyme
- 1/2 teaspoon kosher salt
- 1/4 teaspoon black pepper
- 1 cup store-bought fried onions (for topping)
Equipment List
- Large pot or Dutch oven
- Large skillet
- 9×13 inch baking dish
- Whisk
- Measuring cups and spoons
DIY Instruction Steps
Step 1: Blanch the Green Beans
- Bring a large pot of salted water to a rolling boil.
- Carefully add the trimmed green beans to the boiling water. Cook them for only three to four minutes—they should turn bright green and still be slightly crisp (al dente).
- Immediately drain the beans and plunge them into a large bowl of ice water to stop the cooking process. This step locks in the bright color. Drain them well once cooled.
Step 2: Make the Creamy Sauce
- In your large skillet, melt the butter or heat the olive oil over medium heat.
- Add the sliced mushrooms and cook them without stirring for two minutes to let them brown slightly. Then, stir and cook for another three to five minutes until the mushrooms have released their liquid and are tender. Remove the mushrooms from the pan and set them aside.
- Add the chopped onion to the same skillet and cook until softened, about five minutes. Stir in the minced garlic and cook for one minute until fragrant.
- Sprinkle the flour over the onions and garlic, then whisk for one minute until a paste (roux) forms. This step helps thicken the sauce.
- Slowly pour in the broth while continually whisking to ensure a smooth sauce without lumps. Bring the mixture to a simmer.
- Stir in the heavy cream, thyme, salt, and pepper. Let the sauce gently simmer for five minutes until it thickens slightly.
Step 3: Assemble and Chill
- Gently combine the blanched green beans and the cooked mushrooms with the creamy sauce in the skillet or a large bowl. Mix everything until the beans and mushrooms are fully coated.
- Pour the mixture into your prepared 9×13 inch baking dish. Make sure to spread it out into an even layer.
- Cover the baking dish tightly with aluminum foil or plastic wrap. Place the casserole in the refrigerator. You can make this up to 48 hours in advance. Keep the fried onions separate at room temperature.
Step 4: Bake and Finish
- About an hour before you plan to serve, remove the casserole from the refrigerator and take off the covering. Let it sit on the counter for 15 minutes to take off the chill.
- Preheat your oven to 375°F (190°C).
- Bake the casserole for 20 to 25 minutes, or until the sauce is hot and bubbling around the edges.
- Remove the dish from the oven. Sprinkle the fried onions evenly over the top just before bringing it to the table for serving.
3. Whole Roasted Maple Sage Turkey Breast

Image Description
Focusing on a turkey breast is a smart move for an intimate gathering or when you want less fuss than a whole bird. This photo captures the preparation stage beautifully, showcasing the generous spread of an herby compound butter. Fresh rosemary and sage leaves are visibly worked into softened butter, which is then liberally applied to the skin of the turkey breast.
The seasoning—likely salt and pepper—is already applied, promising a crisp, deeply flavored crust once roasted. Roasting a turkey breast is faster and more forgiving than roasting a whole turkey, guaranteeing moist results every time. Making the herbed butter in advance and simply spreading it on the meat the morning of ensures a moist, flavorful entrée with minimal day-of effort.
Required Ingredients
- 1 boneless, skin on turkey breast (about 3 to 4 pounds)
- 1/2 cup (1 stick) unsalted butter, softened to room temperature
- 2 tablespoons chopped fresh sage
- 1 tablespoon fresh rosemary leaves, chopped
- 1 tablespoon fresh thyme leaves
- 2 cloves garlic, minced
- 1 tablespoon pure maple syrup
- 1 teaspoon kosher salt, plus more for seasoning
- 1/2 teaspoon black pepper, plus more for seasoning
Equipment List
- Small mixing bowl
- Plastic wrap or parchment paper (for rolling butter)
- Roasting pan with a rack
- Meat thermometer
- Pastry brush (optional)
DIY Instruction Steps
Step 1: Prepare the Compound Butter
- Place the softened butter into your small mixing bowl.
- Add the chopped sage, rosemary, thyme leaves, minced garlic, and maple syrup to the butter. Add the 1 teaspoon of salt and 1/2 teaspoon of pepper as well.
- Use a fork or spatula to thoroughly mix all the ingredients into the butter until the herbs are evenly distributed.
- Make Ahead Option: Spoon the butter onto a sheet of plastic wrap or parchment paper. Roll it tightly into a log shape and twist the ends closed. Refrigerate until firm. This can be made up to a week in advance.
Step 2: Prepare the Turkey
- Remove the turkey breast from its packaging. Pat the turkey breast completely dry using paper towels. A dry surface helps achieve crispy skin.
- Place the turkey breast on the rack in your roasting pan. Season the entire surface lightly with extra salt and pepper.
- If you prepared a butter log, simply slice off discs of butter. If the butter is still soft, use your hands or a spatula to scoop up the herbed butter.
- Spread the compound butter evenly over the skin of the turkey breast. Ensure the butter mixture is applied to the top surface. You can also gently loosen the skin with your fingers and push some butter underneath it for extra moisture.
Step 3: Refrigerate and Roast
- This is your crucial make ahead step: Cover the turkey breast loosely with plastic wrap or foil. Place it in the refrigerator overnight. This allows the herb flavors to fully absorb into the meat.
- On Thanksgiving day, remove the turkey from the refrigerator one hour before cooking. This ensures it cooks more evenly.
- Preheat your oven to 350°F (175°C).
- Place the roasting pan in the preheated oven. Estimate a cooking time of about 15 to 20 minutes per pound, but always rely on the thermometer.
- Roast until a meat thermometer inserted into the thickest part registers 165°F (74°C). If the skin starts getting too dark, loosely tent the turkey breast with aluminum foil.
- Once cooked, remove the turkey from the oven and let it rest on the cutting board for 15 minutes before slicing. Resting is essential for juicy meat.
4. Savory Sausage, Apple, and Sage Stuffing

Image Description
This is the ultimate, crowd-pleasing stuffing (or dressing, if cooked outside the bird). It looks rustic, deeply flavorful, and far removed from anything boxed. The casserole dish is generously filled with crunchy croutons made from cubed bread, savory browned sausage, and aromatic chopped celery and onions. The little cubes of sweet apple add a bright, unexpected contrast.
Sprigs of fresh sage garnish the top, hinting at the key herb that defines Thanksgiving flavor. Because the best stuffing is made ahead, this dish is a true time saver. You can mix all the components and soak them in the broth the night before. This preparation ensures the bread cubes fully absorb the liquids for a rich, moist interior when baked.
Required Ingredients
- 1 loaf (about 12 cups) crusty day-old bread, cubed and dried/toasted
- 1 pound bulk pork sausage (sweet or mild)
- 1/2 cup (1 stick) unsalted butter
- 1 large yellow onion, chopped
- 2 cups chopped celery
- 1 large sweet apple (e.g., Honeycrisp or Fuji), cored and diced
- 4 cloves garlic, minced
- 1 tablespoon chopped fresh sage
- 1 teaspoon dried thyme
- 2 cups low-sodium chicken or vegetable broth
- 2 large eggs, lightly beaten
- 1 teaspoon kosher salt
- 1/2 teaspoon black pepper
Equipment List
- Large skillet or frying pan
- Extra large mixing bowl
- 9×13 inch baking dish
DIY Instruction Steps
Step 1: Prep the Aromatics and Sausage
- In your large skillet, brown the pork sausage over medium high heat, breaking it up as you go, until it is fully browned. Remove the cooked sausage using a slotted spoon and transfer it to the extra large mixing bowl, leaving the rendered fat in the skillet.
- Add the butter to the skillet with the sausage fat. Melt the butter over medium heat.
- Add the chopped onion and celery to the pan. Sauté for about eight minutes until the vegetables have softened nicely.
- Add the diced apple, minced garlic, fresh sage, and dried thyme to the skillet. Cook for another three minutes until the apples soften slightly.
- Pour the entire vegetable mixture, including the cooking liquid, over the cooked sausage in the mixing bowl.
Step 2: Assemble and Soak the Stuffing
- Add the dried bread cubes to the mixing bowl with the sausage and vegetable mixture. Toss gently to combine.
- In a separate bowl, whisk together the two large eggs, the broth, salt, and pepper.
- Pour the broth mixture over the bread and sausage mixture in the large bowl. Gently fold everything together until all the bread cubes are moistened. Be careful not to mash the bread.
Step 3: Make Ahead and Chill
- Transfer the fully mixed stuffing into the 9×13 inch baking dish. Spread it out into an even layer.
- Cover the dish tightly with plastic wrap. Place it in the refrigerator overnight. Allowing the mixture to sit overnight helps the bread fully absorb the rich liquids, leading to a moist final product. You can make this up to 24 hours ahead.
Step 4: Bake and Serve
- On the day of serving, remove the covered dish from the refrigerator and let it sit at room temperature for at least 30 minutes.
- Preheat your oven to 375°F (190°C).
- Remove the plastic wrap. Bake the stuffing, uncovered, for 35 to 45 minutes, or until the edges are nicely browned, and the internal temperature is piping hot (165°F or 74°C).
- If you want a moister stuffing, cover it with foil for the first 25 minutes of baking, then uncover it for the last 15 minutes to brown the top. Serve hot.
5. Roasted Whole Cauliflower with Cashew Cream Sauce

Image Description
This showstopping vegetable course offers a sophisticated, plant-forward centerpiece that feels worthy of a holiday meal. It’s a gorgeous whole cauliflower that has been roasted until the edges of the florets are deeply golden and slightly caramelized. The natural shape of the cauliflower head is preserved, making it highly dramatic when placed on the serving platter.
The image also shows a rich, savory cashew cream sauce served alongside, suggesting a dairy-free, creamy accompaniment. Roasting the cauliflower is effortless, and the cashew cream sauce can be blended entirely ahead of time. This simple yet elegant approach to vegetables is sure to please your guests, proving that a Thanksgiving side doesn’t need to be complicated to look luxurious.
Required Ingredients
- 1 large head of cauliflower, with leaves trimmed but base intact
- 2 tablespoons olive oil
- 1 teaspoon smoked paprika
- 1/2 teaspoon kosher salt
- 1/4 teaspoon black pepper
For the Cashew Cream Sauce:
- 1 cup raw cashews
- 1.5 cups hot vegetable broth
- 2 tablespoons nutritional yeast (for cheesy flavor)
- 1 tablespoon lemon juice
- 1/2 teaspoon kosher salt
- Chives or parsley, finely chopped (for garnish)
Equipment List
- Small saucepan (for broth)
- High-speed blender
- Baking sheet or small roasting pan
- Large pot (optional, for pre-boiling)
DIY Instruction Steps
Step 1: Prep the Cauliflower
- Remove any large, outer green leaves from the cauliflower head. Leave the core intact so the head holds its shape. Rinse the cauliflower well.
- Optional Pre-boil (for extra tenderness): Bring a large pot of salted water to a boil. Place the cauliflower in the boiling water for five to seven minutes. Remove carefully and pat dry. This step ensures an extra tender interior after roasting.
- Preheat your oven to 400°F (200°C).
Step 2: Season and Roast
- In a small bowl, mix the olive oil, smoked paprika, salt, and pepper.
- Place the cauliflower head onto the baking sheet. Use your hands to rub the oil mixture all over the entire surface of the cauliflower, pushing it slightly into the crevices of the florets.
- Place the cauliflower in the preheated oven. Roast for 45 to 60 minutes, depending on its size. The cauliflower is done when a knife easily pierces the core and the florets are deeply browned and caramelized on the surface.
Step 3: Make the Cashew Cream Sauce
- Place the raw cashews into a bowl. Pour the hot vegetable broth over them and let them soak for at least 30 minutes, or until the cashews are soft. Soaking is key for a truly smooth sauce.
- Drain the soaking liquid and transfer the softened cashews to a high-speed blender.
- Add the fresh vegetable broth, nutritional yeast, lemon juice, and salt to the blender.
- Blend on high speed for one to two minutes. Stop and scrape down the sides as needed until the sauce is completely smooth and velvety.
Step 4: Assemble and Finish
- This is the make ahead step: Pour the cashew cream sauce into an airtight container and store it in the refrigerator for up to four days. If it thickens too much, whisk in a tablespoon of warm water or broth before serving.
- Once the roasted cauliflower is out of the oven, transfer it gently to a serving platter.
- Serve the cashew cream sauce on the side or spoon a generous amount over the top of the whole roasted cauliflower. Garnish with a sprinkle of fresh chives or parsley for a pop of color.
6. Spicy Chorizo and Cheddar Cornbread Dressing

Image Description
This isn’t your grandma’s dressing; this savory side offers a fantastic kick and bold flavor, guaranteed to be a conversation starter. The base is a crumbly, golden cornbread dressing, beautifully studded with rich, smoky slices of chorizo sausage. You can clearly see the melted cheddar cheese adding gooey richness throughout the dish. The dish gets a fresh, spicy contrast from halved jalapeño peppers baked right into the top layer.
Baking this dressing ahead and warming it up on the day saves valuable oven space. The flavor actually improves overnight as the cornbread absorbs all the savory broth and spice. This Southern inspired dish, garnished with fresh cilantro, proves that Thanksgiving classics can successfully handle a flavor upgrade.
Required Ingredients
- 1 batch (about 6 cups) day-old cornbread, crumbled
- 1 tablespoon butter or olive oil
- 1 pound bulk chorizo sausage, casing removed, or pre-sliced chorizo medallions
- 1 large yellow onion, chopped
- 3 stalks celery, chopped
- 4 cloves garlic, minced
- 1 teaspoon dried sage
- 1/2 teaspoon cayenne pepper (optional, for extra heat)
- 1.5 cups low-sodium chicken broth
- 1 cup shredded sharp cheddar cheese
- 2 large jalapeño peppers, sliced lengthwise for topping
- Fresh cilantro, for garnish
Equipment List
- Large skillet or frying pan
- Extra large mixing bowl
- 9×13 inch baking dish
DIY Instruction Steps
Step 1: Prep the Aromatics and Meat
- Preheat your oven to 350°F (175°C) if you are baking the cornbread now, or make sure your day-old cornbread is crumbled into the extra large mixing bowl.
- In your large skillet, melt the butter or heat the olive oil over medium heat.
- Add the chorizo sausage and cook, breaking it up as you go, until it is fully browned. If using pre-sliced chorizo, cook until crispy. Remove the cooked chorizo using a slotted spoon and place it in a separate bowl. Leave about 2 tablespoons of the flavorful rendered fat in the skillet.
- Add the chopped onion and celery to the skillet. Cook these for about six to eight minutes, stirring often, until they are soft.
- Stir in the minced garlic, dried sage, and cayenne pepper (if using). Cook for one minute until fragrant.
Step 2: Assemble the Dressing
- Add the cooked vegetables, along with their cooking liquid, back into the mixing bowl with the crumbled cornbread.
- Pour the chicken broth over the cornbread mixture. Toss everything gently to combine, ensuring the cornbread is evenly moistened but not mushy.
- Stir in half of the cooked chorizo and half of the shredded cheddar cheese. Spread the mixture evenly into the 9×13 inch baking dish.
Step 3: Top and Chill
- Sprinkle the remaining chorizo and cheddar cheese over the top of the dressing.
- Place the halved jalapeño peppers directly on top of the dressing for decoration and flavor.
- Cover the dish tightly with plastic wrap. Place it in the refrigerator for at least eight hours or up to 24 hours. This chilling step allows the flavors to truly meld and deepen.
Step 4: Bake and Finish
- On Thanksgiving day, remove the dish from the refrigerator and let it sit at room temperature for 30 minutes.
- Preheat your oven to 375°F (190°C).
- Remove the plastic wrap. Bake the dressing for 30 to 35 minutes, or until the top is beautifully golden brown and the cheese is melted and bubbly.
- Remove from the oven. Garnish generously with fresh cilantro leaves right before serving for a pop of freshness.
7. Crustless Apple Cranberry Oat Crumble Pie

Image Description
This comforting dessert is all the taste of apple pie with none of the hassle of rolling a top crust. The deep-dish pie shell is generously filled with sliced fresh apples and studded with bright red whole cranberries. A thick layer of rustic oat crumble is piled high over the fruit, ready for baking. The crimped edge of the bottom crust is visible, adding a classic touch.
This dessert is rich, flavorful, and wonderfully seasonal, perfectly balancing the sweetness of the apples with the tartness of the cranberries. You can assemble this whole pie, up to the point of baking, and freeze it. This lets you pull it out of the freezer and pop it straight into the oven on Thanksgiving day for an easy, warm dessert. The oat topping bakes up golden and crunchy, creating a delightful texture contrast.
Required Ingredients
- 1 store-bought or homemade deep dish pie crust (9 inch), unbaked
For the Filling:
- 6 medium apples (mixed varieties like Granny Smith and Gala), peeled, cored, and sliced
- 1/2 cup fresh or frozen cranberries
- 1/2 cup granulated sugar
- 1/4 cup flour (all-purpose)
- 1 teaspoon ground cinnamon
- 1/4 teaspoon ground nutmeg
- 1 tablespoon fresh lemon juice
For the Oat Crumble Topping:
- 1 cup oats (old fashioned rolled oats)
- 1/2 cup packed light brown sugar
- 1/2 cup flour (all-purpose)
- 1/2 cup (1 stick) cold unsalted butter, cubed
Equipment List
- 9-inch pie plate
- Large mixing bowl
- Medium mixing bowl
- Baking sheet (optional, for catching drips)
DIY Instruction Steps
Step 1: Prepare the Pie Filling
- Place the sliced apples and cranberries into the large mixing bowl.
- In a small bowl, whisk together the granulated sugar, 1/4 cup flour, cinnamon, and nutmeg.
- Sprinkle the sugar mixture over the apples and cranberries. Add the lemon juice. Toss gently until all the fruit is evenly coated.
- Pour the fruit mixture into the unbaked pie shell. Make sure to mound the fruit slightly in the center.
Step 2: Create the Crumble Topping
- In the medium mixing bowl, combine the rolled oats, brown sugar, and 1/2 cup flour. Stir these dry ingredients together.
- Add the cold, cubed butter to the dry ingredients.
- Use a pastry blender, two knives, or your fingers to cut the butter into the dry ingredients. Continue until the mixture resembles coarse crumbs. Some larger clumps are desirable.
- Sprinkle the crumble topping evenly over the fruit filling in the pie crust.
Step 3: Assemble and Freeze
- This is your make ahead step: Wrap the entire assembled, unbaked pie tightly in two layers of plastic wrap, followed by a layer of aluminum foil.
- Place the wrapped pie in the freezer. It can be frozen for up to one month.
Step 4: Bake from Frozen
- When ready to bake, remove the pie from the freezer. Do not thaw it. Remove the foil and plastic wrap.
- Preheat your oven to 425°F (220°C).
- Place the frozen pie on a baking sheet to catch any drips. Place the baking sheet with the pie into the preheated oven.
- Bake at 425°F (220°C) for 15 minutes. Then, reduce the oven temperature to 375°F (190°C) and continue baking for 45 to 60 minutes, or until the topping is golden brown and the filling is bubbling thickly.
- Let the pie cool on a wire rack for at least two hours before slicing and serving.
8. Acorn Squash with Cranberry Quinoa Pilaf

Image Description
Here is a stunning, naturally beautiful dish that works wonderfully as a vegetarian main or an elegant side. Four vibrant orange acorn squash halves, roasted until tender, are filled with a hearty and colorful quinoa pilaf. The quinoa is mixed with festive ingredients like ruby-red dried cranberries and crunchy pecans. Fresh celery adds a nice texture and green color.
This dish is visually exciting thanks to the contrast between the dark green skin, the bright orange flesh, and the multi colored pilaf. You can cook both the squash and the pilaf entirely the day before. You simply warm them together before adding a final garnish of fresh sage leaves. This dish feels light yet satisfying and offers a welcome balance to the rich Thanksgiving menu.
Required Ingredients
- 2 medium acorn squash
- 2 tablespoons olive oil
- 1/2 teaspoon kosher salt
- 1/4 teaspoon black pepper
For the Quinoa Pilaf:
- 1 cup tri-color or white quinoa, rinsed
- 2 cups vegetable or chicken broth
- 1/2 cup finely diced celery
- 1/4 cup finely minced shallots
- 1/2 cup dried cranberries
- 1/2 cup pecans, toasted and coarsely chopped
- 2 tablespoons chopped fresh sage
- 1 tablespoon maple syrup (optional)
Equipment List
- Baking sheet
- Medium saucepan with lid
- Large skillet
- Sharp knife
DIY Instruction Steps
Step 1: Roast the Acorn Squash
- Preheat your oven to 400°F (200°C).
- Wash the acorn squash well. Carefully slice each squash in half lengthwise from stem to tip. Use a spoon to scoop out the seeds and stringy bits.
- Brush the cut surfaces and the insides of the squash halves with olive oil. Sprinkle them with salt and pepper.
- Place the squash halves cut side down on the baking sheet.
- Roast for 30 to 40 minutes, or until the squash flesh is easily pierced with a fork and the edges are slightly caramelized. Set them aside to cool.
Step 2: Prepare the Quinoa Pilaf
- Combine the rinsed quinoa and the broth in the saucepan. Bring the mixture to a boil.
- Reduce the heat to low, cover the pan tightly with the lid, and simmer for 15 minutes, or until all the liquid is absorbed. Turn off the heat and let the quinoa steam, still covered, for 10 minutes. Fluff it gently with a fork.
- In the large skillet, heat a drizzle of olive oil. Add the diced celery and minced shallots. Sauté for five minutes until the vegetables soften.
- In a large bowl, combine the cooked quinoa, the sautéed vegetables, dried cranberries, chopped pecans, chopped fresh sage, and maple syrup (if using). Stir well to distribute all the ingredients. Taste and adjust salt and pepper if needed.
Step 3: Assemble and Chill
- Once the roasted squash halves are cool enough to handle, use a spoon to fill each cavity generously with the prepared quinoa pilaf.
- Place the assembled, filled squash halves back onto the baking sheet.
- Cover the baking sheet tightly with plastic wrap. Place it in the refrigerator. This can be made up to 24 hours ahead.
Step 4: Reheat and Garnish
- Preheat your oven to 350°F (175°C).
- Remove the plastic wrap and bake the stuffed squash for 15 to 20 minutes, or until the filling is heated all the way through and the squash is steaming hot.
- Garnish each squash with a few extra pecan halves and a small, fresh sage leaf just before serving.
9. Sparkling Cranberry, Pear, and Ginger Relish

Image Description
This vibrant, fresh take on cranberry sauce completely elevates the necessary side dish. Moving far beyond the canned gelatin, this relish is made fresh with whole, bright red cranberries and chunks of pale pear and spicy fresh ginger. The ingredients are shown ready for processing in a food chopper, promising a textured, zesty final product.
The beautiful color of the cranberries, accented by the sweetness of the pear and the warmth of the ginger, makes this side irresistible. Since this relish is served cold or at room temperature, it is the definition of a make-ahead masterpiece. It needs at least a day in the refrigerator for the flavors to fully bloom, making it a stress free item to cross off your prep list early.
Required Ingredients
- 1 bag (12 ounces) fresh or frozen cranberries
- 1 large firm pear (e.g., Anjou or Bosc), peeled, cored, and roughly chopped
- 1/4 cup finely chopped fresh ginger
- 3/4 cup granulated sugar (adjust to taste)
- 1/4 cup fresh orange juice or water
- Pinch of kosher salt
Equipment List
- Food processor or small blender
- Small saucepan
- Airtight container for storage
DIY Instruction Steps
Step 1: Process the Fruit and Ginger
- Wash the cranberries thoroughly and discard any soft or bruised ones.
- Place the washed cranberries, chopped pear, and chopped fresh ginger into the bowl of your food processor.
- Pulse the mixture several times until the ingredients are coarsely chopped and well combined. Do not over-process; you want a rustic texture, not a paste.
Step 2: Cook the Relish
- Transfer the processed fruit mixture to the small saucepan.
- Add the sugar, orange juice (or water), and the pinch of salt to the saucepan.
- Place the pan over medium heat. Bring the mixture to a gentle simmer, stirring frequently.
- Once the mixture starts simmering, cook for only five to ten minutes. The cranberries will begin to burst, and the relish will thicken slightly. Do not overcook; the goal is a fresh, bright flavor and texture.
Step 3: Cool and Chill (Make Ahead)
- Remove the saucepan from the heat. Pour the hot relish into your clean, airtight container.
- Let the relish cool completely to room temperature on the counter before covering it.
- Cover the container and refrigerate the relish. You must make this at least one day ahead, but it keeps beautifully for up to one week. The flavors deepen significantly overnight.
- Serve the relish chilled or at room temperature.
10. Marinated Mozzarella & Sun Dried Tomato Skewers

Image Description
Offer guests something elegant and stress free immediately upon arrival with these lovely marinated skewers. The presentation is simple yet striking, with small bamboo skewers holding glossy, dark Kalamata olives and smooth, white balls of mozzarella cheese. The rich red color comes from pieces of sun dried tomatoes, which are also swimming in the flavorful marinade at the bottom of the jar.
The entire arrangement is soaked in a marinade of olive oil and dried herbs, ready to serve as a quick appetizer. This is truly a make-ahead wonder; the antipasto flavors must marinate overnight to reach their full potential. They look beautiful served straight from a glass jar, ensuring a quick setup and a sophisticated start to your Thanksgiving meal.
Required Ingredients
- 1 pound small fresh mozzarella balls (pearls or ciliegine), drained
- 1 cup pitted Kalamata or Castelvetrano olives
- 1 cup oil-packed sun dried tomatoes, drained and halved
- 1/2 cup drained marinated artichoke hearts, halved
- 2 cups high-quality extra virgin olive oil
- 2 tablespoons red wine vinegar
- 2 teaspoons dried oregano
- 1 teaspoon red pepper flakes
- 1/2 teaspoon kosher salt
- 2 sprigs fresh rosemary
- 25-30 small decorative bamboo skewers
Equipment List
- Large mixing jar or container with a tight lid
- Small bowl (for making marinade)
- Bamboo skewers
DIY Instruction Steps
Step 1: Make the Marinade
- In a small bowl, whisk together the 2 cups of olive oil, red wine vinegar, dried oregano, red pepper flakes, and salt. Add a few grinds of black pepper if you like.
- Taste the marinade mixture to check the seasoning, then set it aside.
Step 2: Layer the Ingredients
- Place the drained mozzarella balls, olives, sun dried tomatoes, and artichoke hearts into the large mixing jar or container.
- Tuck the two sprigs of fresh rosemary into the jar alongside the other ingredients.
- Pour the prepared olive oil marinade over the ingredients in the jar. Make sure all the cheese and vegetables are fully submerged in the oil. You may need to gently push them down.
Step 3: Marinate (Make Ahead Step)
- Seal the jar or container tightly with the lid.
- Refrigerate the mixture for at least 12 hours, and preferably 24 hours. The mozzarella needs time to fully absorb the herb and tomato flavors.
- You can keep the jar refrigerated for up to four days.
Step 4: Skewer and Serve
- About 30 minutes before serving, take the jar out of the refrigerator to allow the olive oil to liquefy slightly and the ingredients to reach room temperature.
- Thread the ingredients onto the small bamboo skewers. A good combination is one olive, one sun dried tomato half, and one mozzarella ball per skewer.
- Arrange the finished skewers standing upright in a clean glass jar or lay them on a shallow serving platter. Drizzle a little extra marinade over the skewers before presenting them.
11. Scalloped Hasselback Potato Gratin

Image Description
This elegant potato dish delivers the creamy, comforting flavor of a classic gratin with the stunning presentation of Hasselback potatoes. Thinly sliced potatoes are arranged in neat, vertical rows, creating a visually appealing fan effect in the baking dish. The top is generously scattered with shredded cheese and whole cloves of garlic, promising a rich, savory aroma when baked. Fresh thyme sprigs are tucked into the slices, adding a beautiful, herbaceous garnish.
The beauty of this side is that you can slice and arrange the potatoes entirely ahead of time. You simply cover the dish and pour the cream sauce over it right before baking on the big day. The thinly sliced potatoes guarantee a tender texture while the cheese and herb topping provides a deeply satisfying, golden crust.
Required Ingredients
- 6 medium Russet or Yukon Gold potatoes, peeled (about 3 pounds)
- 1.5 cups heavy cream or half-and-half
- 1 cup low sodium vegetable or chicken broth
- 3 cloves garlic, minced, plus 5-6 whole cloves for garnish
- 1 teaspoon fresh thyme leaves, plus sprigs for garnish
- 1 teaspoon kosher salt
- 1/2 teaspoon black pepper
- 1 cup shredded Gruyère or white cheddar cheese
Equipment List
- Mandoline slicer (highly recommended) or sharp knife
- 9×13 inch baking dish
- Small saucepan
- Measuring cups and spoons
DIY Instruction Steps
Step 1: Slice and Arrange the Potatoes
- Preheat your oven to 375°F (190°C).
- Carefully slice the potatoes very thinly—about 1/8 inch thick. Using a mandoline slicer ensures even thickness, which is important for even cooking.
- Arrange the potato slices vertically in your baking dish, overlapping them slightly to create tight rows. Push them tightly together to fit as many as possible into the dish.
Step 2: Prepare the Cream Mixture
- In the small saucepan, combine the heavy cream, broth, minced garlic, thyme leaves, salt, and pepper.
- Heat this mixture over medium heat until it just begins to simmer, then immediately remove it from the heat. This step infuses the cream with garlic and herbs.
- Pour the warm cream mixture evenly over the arranged potatoes, making sure the liquid penetrates the gaps between the slices.
Step 3: Cheese and Chill
- Sprinkle the shredded cheese over the top of the potatoes.
- Tuck the whole garlic cloves and a few sprigs of fresh thyme between the slices for visual appeal.
- This is your make ahead step: Cover the dish tightly with foil and refrigerate it for up to 24 hours. Allowing the potatoes to soak in the cream overnight makes them wonderfully tender when baked.
Step 4: Bake and Finish
- On the day of serving, remove the covered dish from the refrigerator and let it sit for 30 minutes.
- Bake the gratin, covered with foil, for 40 minutes.
- Remove the foil and continue baking for another 20 to 30 minutes, or until the top is golden brown and bubbling, and the potatoes are completely tender when poked with a fork.
- Let the gratin rest for 10 minutes before serving hot.
12. Spiced Cranberry and Dried Cherry Sauce

Image Description
This deep, rich cranberry sauce goes beyond simple sweetness, incorporating complex holiday spices and dried fruit. The saucepan is filled with a glossy, dark red mixture of whole and partially burst cranberries and dried cherries. Whole star anise pods and a cinnamon stick are visibly simmering in the sauce, infusing it with warm, aromatic notes. Slices of fresh orange add a bright, citrusy element.
The deep burgundy color and visible spices make this sauce look homemade and far more sophisticated than anything store bought. Because this side is meant to be served chilled, you can make it days ahead of time. The longer it sits, the more the spices mellow, allowing the flavor to truly shine on Thanksgiving Day.
Required Ingredients
- 1 bag (12 ounces) fresh or frozen whole cranberries
- 1 cup dried cherries or dark raisins
- 1 cup granulated sugar
- 1/2 cup water or red wine
- 1/4 cup fresh orange juice
- 3 whole star anise pods
- 1 cinnamon stick
- 1 tablespoon fresh orange zest
- Pinch of kosher salt
Equipment List
- Medium saucepan
- Wooden spoon
- Measuring cups and spoons
- Zester
DIY Instruction Steps
Step 1: Combine Ingredients and Simmer
- In the medium saucepan, combine the fresh cranberries, dried cherries, sugar, water (or wine), and orange juice.
- Add the star anise pods and the cinnamon stick directly to the mixture. Stir in the orange zest and the pinch of salt.
- Place the saucepan over medium heat. Bring the mixture to a slow, steady simmer, stirring occasionally.
Step 2: Cook and Thicken
- Continue simmering for 10 to 15 minutes. As the sauce cooks, the cranberries will begin to burst, and the sauce will naturally thicken. Stir gently to prevent sticking.
- Remove the saucepan from the heat. Carefully pick out and discard the star anise pods and the cinnamon stick.
Step 3: Cool and Chill (Make Ahead)
- Pour the hot cranberry sauce into a clean, airtight container.
- Allow the sauce to cool completely to room temperature before covering.
- Cover the container tightly and place the sauce in the refrigerator. This sauce is best when made at least 24 hours in advance, but it keeps well for up to 10 days.
- Serve chilled or at room temperature alongside your turkey.
13. Cheesy Creamed Sweet Potato Gratin

Image Description
Moving away from the marshmallow topped sweet potato casserole, this rich sweet potato gratin offers a savory alternative that feels sophisticated and deeply comforting. The thinly sliced, bright orange sweet potatoes are arranged in attractive, overlapping rows. They are bathed in a creamy white sauce and generously topped with finely grated Parmesan cheese. Large, fresh sage leaves garnish the top, signaling the autumnal flavor profile.
The vibrant orange of the potatoes contrasted with the creamy sauce and white cheese topping makes this dish visually gorgeous. The beauty of this recipe is that you can slice the potatoes and assemble the gratin the day before. This reduces the number of tasks you have on Thanksgiving, leaving only the baking time.
Required Ingredients
- 4 large sweet potatoes, peeled and thinly sliced (about 3 pounds)
- 1.5 cups heavy cream or half-and-half
- 1/2 cup low sodium vegetable broth
- 2 tablespoons unsalted butter
- 2 shallots, finely minced
- 1/2 teaspoon ground nutmeg
- 1 teaspoon kosher salt
- 1/2 teaspoon black pepper
- 1 cup freshly grated Parmesan cheese, divided
- 6-8 fresh sage leaves, for garnish
Equipment List
- Mandoline slicer (recommended)
- 9×13 inch baking dish (or 8×8 for thicker layers)
- Small skillet
- Measuring cups and spoons
DIY Instruction Steps
Step 1: Slice and Arrange the Potatoes
- Preheat your oven to 375°F (190°C).
- Slice the peeled sweet potatoes very thinly, aiming for uniform thickness.
- Arrange the slices in the baking dish, standing them up vertically in tight, neat rows across the width of the dish.
Step 2: Prepare the Cream Sauce
- In the small skillet, melt the butter over medium heat.
- Add the minced shallots and sauté for about five minutes until they are softened and translucent.
- Pour in the heavy cream and broth. Stir in the nutmeg, salt, and pepper. Heat this mixture until it just begins to steam, but do not boil it.
- Remove the skillet from the heat. Stir in 1/2 cup of the grated Parmesan cheese until it is melted and fully incorporated into the sauce.
Step 3: Assemble and Chill
- Pour the warm cream sauce slowly and evenly over the arranged sweet potatoes. Gently shake the dish to ensure the sauce settles down between the slices.
- Sprinkle the remaining 1/2 cup of Parmesan cheese over the top of the potatoes. Place the whole fresh sage leaves on top for garnish.
- Cover the dish tightly with aluminum foil and refrigerate it for up to 24 hours. The potatoes will absorb some of the liquid, which keeps them from drying out during baking.
Step 4: Bake and Serve
- On the day of serving, remove the covered dish from the refrigerator and let it sit for 30 minutes.
- Bake the gratin, covered with foil, for 45 minutes.
- Remove the foil and continue baking for another 15 to 20 minutes, or until the sweet potatoes are tender, and the top is golden and caramelized.
- Allow the gratin to rest for 10 minutes before slicing and serving hot.
14. Maple Dijon Brussels Sprouts with Bacon

Image Description
This vibrant dish takes a simple green vegetable and turns it into a holiday favorite. Bright green Brussels sprouts are roasted until their edges are caramelized and slightly charred, promising a delightful crunch. The sprouts are tossed with savory, crumbled bacon pieces and glistening red pomegranate seeds. This combination of sweet, salty, and tart flavors is visually stunning.
You can blanch the sprouts and cook the bacon ahead of time. Then, on Thanksgiving, you simply toss them together with the dressing and roast them quickly. This ensures a hot, fresh, and deeply flavored vegetable side without needing lots of last-minute attention.
Required Ingredients
- 2 pounds Brussels sprouts, trimmed and halved
- 4 slices thick-cut bacon, cooked and crumbled
- 1/4 cup olive oil
- 2 tablespoons pure maple syrup
- 1 tablespoon grainy Dijon mustard
- 1 tablespoon apple cider vinegar
- 1/2 teaspoon kosher salt
- 1/4 teaspoon black pepper
- 1/4 cup pomegranate seeds (arils), for garnish
Equipment List
- Large baking sheet
- Large skillet (for bacon)
- Large mixing bowl
- Small whisk
DIY Instruction Steps
Step 1: Prep the Sprouts and Bacon
- Cook the bacon in the large skillet until crispy. Remove the bacon and set it aside, reserving the bacon grease. Crumble the bacon once cooled.
- Optional Make Ahead Step: You can blanch the Brussels sprouts by boiling them for two minutes, then immediately plunging them into ice water. Drain them well and store them in the refrigerator for up to 24 hours.
Step 2: Prepare the Maple Dressing
- In the small mixing bowl, whisk together the olive oil, maple syrup, Dijon mustard, and apple cider vinegar until fully emulsified.
- Stir in the salt and pepper. Set the dressing aside. This dressing can be made up to three days in advance and stored in the refrigerator.
Step 3: Roast the Sprouts
- Preheat your oven to 400°F (200°C).
- Toss the halved Brussels sprouts (blanched or raw) with a drizzle of olive oil and a sprinkle of salt. Spread them out in a single layer on the large baking sheet.
- Roast for 15 to 25 minutes, stirring halfway, until they are tender on the inside and nicely browned and crispy on the outside.
Step 4: Combine and Garnish
- Remove the roasted sprouts from the oven and transfer them to the large mixing bowl.
- Pour the prepared maple Dijon dressing over the warm sprouts. Toss to coat thoroughly.
- Gently stir in the crumbled bacon.
- Transfer the mixture to a serving dish. Generously scatter the bright red pomegranate seeds over the top right before serving. Serve warm.
15. Bourbon Glazed Holiday Ham with Spice

Image Description
This savory pork loin or ham is a fantastic alternative or complement to turkey, offering a deep, spicy, and sweet flavor profile. The roast is beautifully seared and coated in a glistening, dark bourbon glaze. Whole star anise pods and black peppercorns are pressed onto the surface for visual appeal and an aromatic punch. Fresh rosemary sprigs and roasted potatoes garnish the platter, making it a cohesive and complete dish.
The glossy glaze, shown prepared in the background, can be made several days ahead of time. This leaves you with only the final glazing and baking step on Thanksgiving. This roast looks incredibly impressive and is much easier to manage than a large turkey, ensuring you serve a flavorful, moist main course.
Required Ingredients
- 1 pork loin roast (3-4 pounds) or boneless smoked ham
- 1 tablespoon whole black peppercorns, crushed
- 1 teaspoon kosher salt
- 1 tablespoon olive oil
For the Bourbon Glaze:
- 1/2 cup good quality bourbon
- 1/2 cup light brown sugar
- 1/4 cup honey or maple syrup
- 1 tablespoon Dijon mustard
- 1 teaspoon ground ginger
- 4 whole star anise pods, for simmering and garnish
- 1 cinnamon stick
Equipment List
- Small saucepan
- Medium cast iron skillet or small roasting pan
- Meat thermometer
- Pastry brush
DIY Instruction Steps
Step 1: Prepare the Bourbon Glaze (Make Ahead)
- In the small saucepan, combine the bourbon, brown sugar, honey, Dijon mustard, ground ginger, star anise, and cinnamon stick.
- Bring the mixture to a simmer over medium heat, stirring until the sugar is dissolved.
- Reduce the heat to low and let it simmer gently for five to ten minutes, or until the glaze thickens enough to coat the back of a spoon.
- Remove the saucepan from the heat. Discard the star anise and cinnamon stick (or reserve a few anise pods for garnish). This glaze can be made up to one week ahead and stored in the refrigerator.
Step 2: Prep and Sear the Roast
- Preheat your oven to 375°F (190°C).
- Pat the pork roast or ham dry. Rub the entire surface with olive oil, then sprinkle with the crushed black peppercorns and salt.
- Place a large cast iron skillet (if using) over medium high heat. Sear the roast on all sides until a deep brown crust forms. This takes about eight to ten minutes total. Transfer the roast to the roasting pan.
Step 3: Glaze and Bake
- Brush a generous layer of the bourbon glaze all over the seared roast.
- Bake, brushing with the remaining glaze every 15 minutes.
- Bake until a meat thermometer registers 145°F (63°C) for pork loin or 140°F (60°C) for pre cooked ham. This usually takes about 20 minutes per pound for pork.
- Let the roast rest for 10 minutes before slicing and serving. Drizzle with any extra glaze and garnish with the reserved star anise.
16. Garlic Herb Smashed Potatoes with Parmesan

Image Description
These smashed potatoes are the ultimate marriage of creamy texture and crispy edges. Small, boiled potatoes are gently pressed flat, then roasted until the exposed surfaces are golden and crunchy. The potatoes are generously sprinkled with grated Parmesan cheese and fresh parsley, creating a beautiful speckled crust. The bright green parsley against the yellow potato flesh makes this side pop.
You can boil and smash the potatoes entirely the day before. On Thanksgiving, you only need to drizzle them with oil and roast them until crispy. This two part process is much more manageable than traditional mashed potatoes and yields a far more impressive texture.
Required Ingredients
- 2 pounds small Yukon Gold or baby potatoes (about 1-1.5 inches wide)
- 3 tablespoons olive oil
- 2 cloves garlic, minced
- 1/2 cup grated Parmesan cheese
- 2 tablespoons chopped fresh parsley
- 1 teaspoon kosher salt
- 1/2 teaspoon black pepper
Equipment List
- Large pot
- Baking sheet
- Potato masher or large fork
- Small bowl
DIY Instruction Steps
Step 1: Boil the Potatoes (Make Ahead)
- Place the potatoes in the large pot and cover them with cold, salted water.
- Bring the water to a boil, then reduce the heat and simmer for 15 to 20 minutes, or until the potatoes are tender when pierced with a fork but still hold their shape.
- Drain the potatoes thoroughly and let them cool completely. You can store the boiled potatoes in the refrigerator overnight.
Step 2: Smash and Prepare
- Preheat your oven to 425°F (220°C). Line the baking sheet with parchment paper.
- Place the cooled, boiled potatoes on the prepared baking sheet.
- Use the bottom of a glass or a potato masher to gently press each potato until it is flattened into a disc shape, about 1/2 inch thick. Do not smash them apart.
- In the small bowl, mix the olive oil and minced garlic. Drizzle this mixture over the smashed potatoes. Sprinkle them with salt and pepper.
Step 3: Roast to Crispy
- Roast the potatoes for 20 minutes.
- Carefully flip each potato and roast for another 15 to 20 minutes, or until both sides are deeply golden brown and very crispy.
Step 4: Garnish and Serve
- Remove the baking sheet from the oven.
- Immediately sprinkle the hot potatoes with the grated Parmesan cheese and chopped fresh parsley. The residual heat will melt the cheese slightly.
- Serve immediately for maximum crispiness.
17. Sausage and Cranberry Stuffed Mushrooms

Image Description
These festive stuffed mushrooms make an elegant, warm appetizer that is always appreciated. They feature tender button or cremini mushroom caps holding a hearty, savory filling. The filling is visibly rich with ground sausage, herbs, and dried cranberries, giving them a classic Thanksgiving flavor. Each mushroom is topped with a single, glossy cranberry, adding a beautiful, festive accent.
These appetizers are totally customizable and look polished and put together. The entire filling and stuffing process can be done the day before. On Thanksgiving, you simply pop them into the oven to bake, minimizing kitchen chaos right before dinner. They are easy for guests to eat and a flavorful start to the meal.
Required Ingredients
- 24 medium cremini or white button mushrooms, stems removed
- 1 tablespoon olive oil
- 1/2 pound ground Italian sausage, casing removed
- 1/2 cup finely chopped onion
- 2 cloves garlic, minced
- 1/4 cup dried cranberries, plus extra for topping
- 1/4 cup grated Parmesan cheese
- 2 tablespoons chopped fresh parsley
- 1 teaspoon dried sage
- 1/4 cup fine dry breadcrumbs (or panko)
- 1/4 teaspoon kosher salt
- 1/4 teaspoon black pepper
Equipment List
- Small skillet
- Medium mixing bowl
- Baking sheet
DIY Instruction Steps
Step 1: Prepare the Mushroom Caps
- Gently wipe the mushroom caps clean with a damp paper towel. Twist off the stems. Finely chop the stems and set them aside.
- Arrange the mushroom caps, cavity side up, on the baking sheet.
Step 2: Cook the Filling
- Heat the olive oil in the small skillet over medium heat. Add the ground sausage and cook until it is fully browned. Drain any excess grease.
- Add the chopped mushroom stems and chopped onion to the skillet. Cook for five minutes until they soften.
- Stir in the minced garlic and dried sage. Cook for one minute until fragrant.
- Transfer the cooked sausage mixture to the medium mixing bowl.
Step 3: Mix the Stuffing (Make Ahead)
- To the sausage mixture, add the dried cranberries, Parmesan cheese, chopped parsley, breadcrumbs, salt, and pepper. Stir well until everything is evenly combined. The mixture should hold together loosely.
- Use a small spoon or your fingers to generously fill each mushroom cap with the stuffing mixture, pressing it gently to form a dome shape.
Step 4: Chill and Bake
- This is your make ahead step: Place the baking sheet with the stuffed mushrooms in the refrigerator. They can be covered loosely and chilled for up to 24 hours.
- Preheat your oven to 375°F (190°C).
- Place a single dried cranberry on top of each stuffed mushroom for garnish.
- Bake for 18 to 20 minutes, or until the mushrooms are tender and the stuffing is heated through and lightly golden brown on top. Serve warm.
18. Honey Roasted Carrots with Feta and Pistachios

Image Description
This vibrant, colorful side dish is visually striking and features beautiful whole carrots—a mix of orange and purple varieties—roasted until caramelized. The roasted carrots are drizzled with a light honey glaze and tossed with salty, crumbled Feta cheese and bright green, chopped pistachios. Fresh mint leaves are scattered over the top, adding a fresh, green garnish.
The contrast of the deep, earthy carrots with the white cheese and green nuts makes this dish truly memorable. You can prep the carrots and make the honey glaze ahead of time. On the holiday, simply roast the carrots and add the fresh toppings right before serving. This is a flavorful vegetable side that avoids heaviness.
Required Ingredients
- 2 pounds whole carrots (rainbow if available), scrubbed and trimmed
- 2 tablespoons olive oil
- 1/2 teaspoon kosher salt
- 1/4 teaspoon black pepper
- 2 tablespoons honey
- 1/2 cup crumbled Feta cheese
- 1/4 cup chopped roasted pistachios
- 1 tablespoon chopped fresh mint or parsley, for garnish
Equipment List
- Large baking sheet
- Small saucepan (optional, for warming honey)
- Small mixing bowl
DIY Instruction Steps
Step 1: Prep and Roast the Carrots
- Preheat your oven to 400°F (200°C).
- If the carrots are very thick, slice them in half lengthwise; otherwise, leave them whole.
- In the large mixing bowl, toss the carrots with the olive oil, salt, and pepper until evenly coated.
- Spread the carrots in a single layer on the large baking sheet.
- Roast for 20 to 30 minutes, turning once halfway through. They should be tender-crisp and nicely caramelized.
Step 2: Glaze and Chill
- While the carrots are still hot from the oven, drizzle the honey over them. Toss gently to coat them evenly.
- This is your make ahead step: Let the carrots cool completely on the baking sheet. Cover the sheet loosely and refrigerate for up to 24 hours.
Step 3: Reheat and Garnish
- On the day of serving, reheat the carrots in a 350°F (175°C) oven for about 10 minutes until warmed through.
- Transfer the warm carrots to a large serving platter.
- Sprinkle the crumbled Feta cheese and chopped pistachios evenly over the carrots.
- Garnish with the fresh mint leaves right before serving for a vibrant aroma and appearance.
19. Fluffy Chive and Buttermilk Biscuits

Image Description
No Thanksgiving meal is complete without warm bread, and these layered, flaky biscuits are far superior to rolls. These rounds of dough are visibly light and puffy, with beautiful separation between the layers. The surface is golden brown, and bits of chopped green chives are dotted throughout the dough, providing a mild onion flavor and lovely color.
The greatest advantage of biscuits is that the entire cutting and shaping process can be completed ahead of time. You simply freeze the unbaked biscuits and bake them directly from frozen on the holiday. This ensures you have hot, incredibly fresh, and impressive bread ready right on time.
Required Ingredients
- 2 cups flour (all-purpose), plus more for dusting
- 1 tablespoon baking powder
- 1 teaspoon kosher salt
- 1/2 teaspoon baking soda
- 1/2 cup (1 stick) cold unsalted butter, cut into small cubes
- 1 cup cold buttermilk
- 1/4 cup fresh chives, finely chopped
- 2 tablespoons melted butter, for brushing
Equipment List
- Large mixing bowl
- Pastry blender or fork
- Biscuit cutter (or glass rim)
- Baking sheet
- Parchment paper
DIY Instruction Steps
Step 1: Mix Dry Ingredients and Cut in Butter
- In the large mixing bowl, whisk together the flour, baking powder, salt, and baking soda.
- Add the cold, cubed butter to the dry ingredients.
- Use a pastry blender or your fingers to cut the butter into the flour until the mixture resembles coarse crumbs with some pea-sized pieces of butter remaining. The pieces of cold butter are essential for flaky layers.
- Stir in the chopped fresh chives.
Step 2: Add Buttermilk and Form Dough
- Pour the cold buttermilk into the dry ingredients. Stir just until the dough comes together and no dry flour pockets remain. Do not overmix, which leads to tough biscuits.
- Turn the shaggy dough out onto a lightly floured surface. Gently pat the dough into a rectangular shape, about one inch thick.
- Fold the dough in thirds, like a letter. Pat it out again to about 3/4 inch thick. This process creates the flaky layers.
Step 3: Cut and Freeze (Make Ahead)
- Use the biscuit cutter (or glass rim) to cut out the biscuits. Push straight down and do not twist the cutter, which seals the edges and prevents rising.
- Place the cut biscuits on a parchment paper lined baking sheet.
- This is your crucial make ahead step: Place the entire baking sheet into the freezer for at least one hour until the biscuits are solid. Once frozen, transfer the biscuits to a freezer safe bag or container. They can be stored for up to three months.
Step 4: Bake from Frozen
- Preheat your oven to 425°F (220°C). Place the frozen biscuits back on a parchment lined baking sheet, spacing them slightly apart.
- Bake for 18 to 20 minutes, or until the tops are golden brown.
- Brush the hot biscuits with the melted butter immediately upon removing them from the oven. Serve warm.
20. Chocolate Bourbon Pecan Pie

Image Description
This decadent pecan pie is a Southern classic elevated with the richness of bourbon and chocolate. The pie has a beautiful, golden brown crust holding a deep, mahogany filling. The top is a stunning mosaic of whole pecans and semi sweet chocolate chips, offering a perfect balance of crunch, gooey sweetness, and deep, smoky flavor. Whipped cream is suggested as an accompaniment in the background, making this dessert look truly celebratory.
This pie tastes even better the day after it’s baked, allowing you to bake it entirely two days before the holiday. It’s a wonderful, gooey, sophisticated dessert that guarantees a memorable last course.
Required Ingredients
- 1 unbaked deep dish pie crust (9 inch)
- 1 cup light or dark corn syrup
- 3 large eggs, lightly beaten
- 1/2 cup granulated sugar
- 1/2 cup packed light brown sugar
- 4 tablespoons (1/2 stick) unsalted butter, melted
- 2 tablespoons good quality bourbon
- 1 teaspoon vanilla extract
- 1/2 teaspoon kosher salt
- 1.5 cups chopped and whole pecans, divided
- 1/2 cup semi sweet chocolate chips, divided
Equipment List
- 9-inch pie plate
- Large mixing bowl
- Whisk
- Measuring cups and spoons
DIY Instruction Steps
Step 1: Prep the Filling
- Preheat your oven to 350°F (175°C).
- In the large mixing bowl, whisk together the corn syrup, beaten eggs, granulated sugar, and brown sugar until the sugars are mostly dissolved.
- Whisk in the melted butter, bourbon, vanilla extract, and salt until the mixture is uniform.
- Stir in 1 cup of chopped pecans and 1/4 cup of the chocolate chips.
Step 2: Assemble and Bake
- Pour the filling mixture into the unbaked pie crust.
- Arrange the remaining whole pecans and chocolate chips attractively over the top of the filling.
- Carefully place the pie in the center of the preheated oven. Bake for 50 to 60 minutes. The pie is done when the edges are set, but the center still jiggles slightly.
- Tip: If the crust edges begin to brown too quickly, cover them loosely with aluminum foil for the last 15 minutes of baking.
Step 3: Cool and Serve (Make Ahead)
- Remove the pie from the oven. Place it on a wire rack and allow it to cool completely to room temperature, which takes about three to four hours. The pie will continue to set as it cools.
- This is your make ahead step: Once completely cooled, the pie can be covered loosely with foil or plastic wrap and left at room temperature for up to two days. Do not refrigerate the pie, as it can make the filling less smooth.
- Serve at room temperature, perhaps with a dollop of fresh whipped cream or vanilla ice cream.
21. Rich Homemade Turkey Gravy

Image Description
A perfectly smooth, deeply flavorful gravy is the undisputed king of Thanksgiving condiments. This image shows a gleaming saucepan filled with a rich, brown gravy, hinting at hours of simmering and flavor building. A wooden spoon rests inside, ready to serve this essential topping. Bundles of fresh thyme and large sage leaves are artfully arranged nearby, showcasing the key herbs that infuse this classic.
The true beauty of this gravy is that it can be made entirely ahead of time, ensuring a stress-free Thanksgiving Day. No last minute scrambling for pan drippings; this rich sauce is ready to be gently reheated, allowing you to focus on carving the turkey and enjoying your guests. This is a crucial “wow-factor” component for any holiday meal.
Required Ingredients
- 6 cups low-sodium chicken or turkey broth
- 1/2 cup finely chopped onion
- 1/2 cup finely chopped celery
- 1/2 cup finely chopped carrots
- 1/2 cup (1 stick) unsalted butter
- 1/2 cup flour (all-purpose)
- 1 teaspoon fresh thyme leaves
- 1 teaspoon fresh sage leaves, chopped
- 1/2 teaspoon kosher salt
- 1/4 teaspoon black pepper
- 1 tablespoon Worcestershire sauce (optional, for depth)
Equipment List
- Large saucepan or Dutch oven
- Fine-mesh sieve
- Whisk
- Measuring cups and spoons
DIY Instruction Steps
Step 1: Sauté Aromatics
- In your large saucepan, melt the butter over medium heat.
- Add the chopped onion, celery, and carrots to the pan. Sauté for eight to ten minutes, stirring occasionally, until the vegetables are softened and lightly golden.
Step 2: Create a Roux
- Sprinkle the flour over the softened vegetables. Cook, stirring constantly with a whisk or wooden spoon, for two to three minutes. This creates a roux, which will thicken your gravy and add a nutty flavor. The mixture should turn a light golden brown.
Step 3: Simmer and Infuse
- Slowly pour in the chicken or turkey broth while whisking constantly to prevent lumps. Continue whisking until the gravy is smooth.
- Add the fresh thyme, chopped sage, salt, pepper, and Worcestershire sauce (if using).
- Bring the gravy to a gentle simmer, then reduce the heat to low. Let it simmer, uncovered, for 15 to 20 minutes, stirring occasionally, until the gravy has thickened to your desired consistency.
Step 4: Strain and Chill (Make Ahead)
- Remove the saucepan from the heat. Carefully pour the gravy through a fine-mesh sieve into a clean bowl or container. Press on the solids in the sieve with the back of a spoon to extract all the liquid and flavor. Discard the solids.
- Allow the strained gravy to cool completely to room temperature.
- This is your crucial make ahead step: Transfer the cooled gravy to an airtight container. Refrigerate for up to three to four days.
Step 5: Reheat and Serve
- On Thanksgiving Day, gently reheat the gravy in a saucepan over low heat, stirring frequently. If it’s too thick, whisk in a tablespoon or two of extra broth or water until it reaches the desired consistency.
- Taste and adjust seasoning if needed. Serve hot.
22. Tangy Quick Pickled Red Onions

Image Description
These vibrant, thinly sliced pickled red onions offer a fantastic pop of color and tangy flavor to any holiday plate. A tall glass jar is filled to the brim with rings of bright magenta onion, suspended in a clear, briny liquid. Black peppercorns are visible, hinting at the subtle spice in the pickling mixture. A small bowl holds a forkful of these zesty onions, showcasing their delicate texture.
These tangy onions add a refreshing counterpoint to rich Thanksgiving foods like turkey or dressing. Making them ahead of time is not just a convenience; it’s essential for their flavor development. The longer they sit, the better they taste, making them a zero-stress addition that elevates any plate.
Required Ingredients
- 1 large red onion, very thinly sliced
- 1 cup hot water
- 1 cup white vinegar or apple cider vinegar
- 1 tablespoon granulated sugar
- 1 teaspoon kosher salt
- 1/2 teaspoon whole black peppercorns (optional)
- 1 bay leaf (optional)
Equipment List
- 1-pint canning jar with a tight-fitting lid
- Small saucepan
- Measuring cups and spoons
- Mandoline slicer (recommended)
DIY Instruction Steps
Step 1: Prepare the Onions
- Peel the red onion and slice it very thinly. A mandoline slicer works wonders for achieving uniform, delicate rings.
- Place the sliced red onion into the clean pint canning jar. If using, add the black peppercorns and bay leaf to the jar.
Step 2: Make the Brine
- In the small saucepan, combine the hot water, white vinegar, sugar, and salt.
- Heat over medium heat, stirring constantly, until the sugar and salt are fully dissolved. Do not boil the mixture, just warm it until dissolved.
Step 3: Pour and Chill (Make Ahead)
- Carefully pour the warm brine over the sliced red onions in the jar. Make sure the onions are completely submerged in the liquid.
- Tap the jar gently on the counter to release any air bubbles.
- Let the jar sit on the counter for 15 minutes to cool slightly.
- Seal the jar tightly with its lid. Refrigerate for at least two hours before serving.
- This is your make ahead step: These pickled red onions are even better after sitting overnight and can be stored in the refrigerator for up to two weeks. The longer they sit, the more vibrant their color and tangy their flavor.
Step 4: Serve
- Serve the pickled red onions as a vibrant condiment with roasted turkey, on a cheese board, or alongside any savory Thanksgiving dish for a bright, tangy contrast.
23. Classic Fluffy Dinner Rolls

Image Description
There’s nothing quite like warm, homemade dinner rolls fresh from the oven, and these look incredibly inviting. The square pan is filled with perfectly golden brown, individual rolls that are soft and pillowy. Their tops are lightly brushed, giving them a subtle sheen and indicating a tender crust. A jar of what appears to be melted butter or a light glaze, along with a bowl of whipped butter, sits in the background, ready for spreading.
Homemade rolls are a true “wow-factor” item, showing effort and care. The dough for these can be made and shaped the day before, then refrigerated. On Thanksgiving, simply let them rise at room temperature and bake them just before guests arrive. This ensures hot, fresh bread without adding stress to your busy schedule.
Required Ingredients
- 1 cup warm milk (105-115°F)
- 2.25 teaspoons active dry yeast (one packet)
- 2 tablespoons granulated sugar
- 1/2 cup (1 stick) unsalted butter, melted and cooled, plus more for brushing
- 1 large egg, beaten
- 1 teaspoon kosher salt
- 3 to 3.5 cups flour (all-purpose), divided
Equipment List
- Large mixing bowl
- Stand mixer with dough hook (optional, but recommended)
- 9×13 inch baking pan
- Plastic wrap
- Pastry brush
DIY Instruction Steps
Step 1: Activate Yeast and Combine Wet Ingredients
- In the large mixing bowl, combine the warm milk and sugar. Sprinkle the active dry yeast over the top and let it sit for five to ten minutes until foamy. This confirms the yeast is active.
- Stir in the melted and cooled butter, beaten egg, and salt.
Step 2: Form and Knead the Dough
- Add two cups of flour to the wet ingredients. Mix on low speed (if using a stand mixer) or with a wooden spoon until just combined.
- Gradually add the remaining flour, about 1/2 cup at a time, until a soft, slightly sticky dough forms. The dough should pull away from the sides of the bowl.
- Knead the dough for five to seven minutes (in a stand mixer) or eight to ten minutes by hand on a lightly floured surface, until it is smooth and elastic.
Step 3: First Rise and Shape (Make Ahead)
- Lightly grease the mixing bowl. Place the dough in the bowl, turning it once to coat. Cover the bowl with plastic wrap. Let it rise in a warm place for one to one and a half hours, or until doubled in size.
- Gently punch down the risen dough. Divide it into 15 equal pieces. Shape each piece into a smooth ball.
- Arrange the dough balls in the lightly greased 9×13 inch baking pan, touching each other slightly.
- This is your crucial make ahead step: Cover the pan tightly with plastic wrap and refrigerate for eight to 24 hours. The slow, cold rise develops flavor.
Step 4: Second Rise and Bake
- On Thanksgiving Day, remove the pan from the refrigerator. Let the rolls rise at room temperature for one to one and a half hours, or until they have nearly doubled in size again. They should look puffy.
- Preheat your oven to 375°F (190°C).
- Bake for 18 to 22 minutes, or until the tops are golden brown.
- Brush the hot rolls with a little extra melted butter immediately after removing them from the oven. Serve warm.
24. Prosciutto Wrapped Asparagus Bundles

Image Description
These elegant asparagus bundles wrapped in savory prosciutto are the epitome of an effortless yet sophisticated appetizer. Neat bunches of vibrant green asparagus spears are snugly wrapped in thin slices of rosy pink prosciutto, creating a visually appealing contrast. The spears are arranged artfully on a white surface, hinting at their readiness for a quick roast or pan-sear.
This appetizer is simple, delicious, and incredibly easy to prepare in advance. You can assemble all the bundles the day before and simply bake or sear them right before guests arrive. They offer a refined, low-carb option that feels special without adding any last-minute stress.
Required Ingredients
- 1.5 pounds fresh asparagus spears, tough ends trimmed
- 12 slices thin prosciutto
- 1 tablespoon olive oil
- 1/4 teaspoon black pepper
Equipment List
- Baking sheet
- Parchment paper
- Small bowl (for olive oil)
DIY Instruction Steps
Step 1: Prepare the Asparagus
- Wash the asparagus spears thoroughly. Snap off the tough, woody ends.
- Blanch the asparagus: Bring a pot of salted water to a boil. Drop the asparagus into the boiling water for one to two minutes, just until bright green and slightly tender-crisp.
- Immediately drain the asparagus and plunge it into a bowl of ice water to stop the cooking. This step locks in the vibrant color and slight crispness. Drain very well and pat dry.
Step 2: Assemble the Bundles (Make Ahead)
- Divide the blanched asparagus into 12 equal bunches, typically three to four spears per bundle, depending on their thickness.
- Take one slice of prosciutto and wrap it tightly around the center of each asparagus bundle.
- Arrange the assembled bundles on the parchment lined baking sheet.
- This is your make ahead step: Cover the baking sheet loosely with plastic wrap. Refrigerate the bundles for up to 24 hours.
Step 3: Roast and Serve
- Preheat your oven to 400°F (200°C).
- Drizzle the bundles lightly with olive oil and sprinkle with black pepper.
- Bake for eight to ten minutes, or until the prosciutto is slightly crispy and the asparagus is heated through.
- Alternatively, you can pan-sear them in a hot skillet for two to three minutes per side until the prosciutto crisps up.
- Serve warm or at room temperature.
25. Individual Cranberry Cheesecake Parfaits

Image Description
These delightful individual cranberry cheesecake parfaits offer a stunning, portion controlled dessert that is both elegant and easy. Clear glass jars or cups are layered with a golden graham cracker crumb base, followed by a thick, creamy white cheesecake filling. A vibrant ruby red layer of cranberry sauce is nestled between more cheesecake filling. The top is generously crowned with fresh, whole cranberries, making it extra festive.
These parfaits are a dream for make-ahead holiday entertaining. You can assemble them entirely two days before Thanksgiving. The individual portions mean no slicing or serving fuss on the big day, leaving you to simply pull them from the fridge and present a beautiful dessert.
Required Ingredients
- 1.5 cups crushed graham crackers
- 1/4 cup granulated sugar
- 1/2 cup (1 stick) unsalted butter, melted
For the Cheesecake Filling:
- 2 (8 ounce) packages full-fat cream cheese, softened
- 1 cup powdered sugar
- 1 teaspoon vanilla extract
- 1.5 cups heavy cream, chilled
For the Cranberry Layer:
- 1 batch of your favorite homemade cranberry sauce (or store-bought, ideally with whole berries)
- 1/2 cup fresh cranberries, for garnish
Equipment List
- 6-8 small glass jars or clear cups (4-6 ounces)
- Large mixing bowl
- Hand mixer or stand mixer
- Small mixing bowl
- Rubber spatula
DIY Instruction Steps
Step 1: Prepare the Graham Cracker Crust
- In the small mixing bowl, combine the crushed graham crackers and granulated sugar.
- Pour in the melted butter and stir until the crumbs are thoroughly moistened and resemble wet sand.
- Divide the graham cracker mixture evenly among your glass jars. Press the crumbs down firmly with the back of a spoon to create an even base.
- Place the jars in the refrigerator while you prepare the filling.
Step 2: Make the Cheesecake Filling
- In the large mixing bowl, beat the softened cream cheese with a hand mixer or stand mixer on medium speed until it is completely smooth and fluffy, with no lumps.
- Gradually beat in the powdered sugar until fully combined.
- Beat in the vanilla extract.
- In a separate clean bowl, whip the chilled heavy cream until stiff peaks form.
- Gently fold the whipped cream into the cream cheese mixture using a rubber spatula until just combined. Do not overmix, which can deflate the whipped cream.
Step 3: Layer the Parfaits (Make Ahead)
- Spoon or pipe about one third of the cheesecake filling over the graham cracker crust in each jar.
- Next, spoon a layer of cranberry sauce over the cheesecake filling.
- Top with another layer of cheesecake filling.
- Repeat the layers with cranberry sauce and finish with a final layer of cheesecake filling.
- This is your crucial make ahead step: Cover the individual jars tightly with plastic wrap. Refrigerate for at least four hours, or preferably overnight. The parfaits can be made up to two days in advance.
Step 4: Garnish and Serve
- Just before serving, remove the plastic wrap.
- Garnish the top of each parfait with a few fresh, whole cranberries for a festive touch. Serve chilled.
26. Easy Gingerbread Pumpkin Pie

Image Description
This isn’t just a pumpkin pie; it’s a festive holiday showstopper with a delightful twist. The pie features a rich, smooth, and perfectly spiced pumpkin filling swirled into an artistic pattern. It rests in a sturdy, golden brown gingerbread cookie crust, which is visibly crumbly and thick. The crust is made from crushed gingerbread cookies, giving the pie an extra layer of warm, aromatic flavor. Small gingerbread cookie cutouts are scattered around the pie, enhancing the theme.
This pie is a fantastic make-ahead dessert; it needs to chill overnight to set properly and tastes even better the next day. The spiced crust adds so much more flavor and texture than a traditional pastry crust, making it a truly “wow-factor” dessert that’s still incredibly easy to prepare.
Required Ingredients
- 1 (9 inch) store-bought or homemade gingerbread cookie crust (about 2 cups crushed gingerbread cookies mixed with 1/4 cup melted butter, pressed into a pie plate and baked for 10 min)
For the Filling:
- 1 (15 ounce) can pure pumpkin puree (not pie filling)
- 1 (14 ounce) can sweetened condensed milk
- 2 large eggs
- 1 teaspoon ground cinnamon
- 1/2 teaspoon ground ginger
- 1/4 teaspoon ground nutmeg
- 1/8 teaspoon ground cloves
- 1/2 teaspoon kosher salt
Equipment List
- 9-inch pie plate
- Large mixing bowl
- Whisk
- Rubber spatula
DIY Instruction Steps
Step 1: Prepare the Gingerbread Crust
- If making from scratch: Crush about 2 cups of gingerbread cookies into fine crumbs. Mix with 1/4 cup of melted butter. Press firmly into a 9 inch pie plate. Bake at 350°F (175°C) for 10 minutes, then let cool completely.
Step 2: Mix the Pumpkin Filling
- In the large mixing bowl, whisk together the pumpkin puree, sweetened condensed milk, and eggs until smooth and fully combined.
- Add the cinnamon, ginger, nutmeg, cloves, and salt. Whisk again until the spices are evenly distributed throughout the pumpkin mixture.
Step 3: Assemble and Bake
- Pour the pumpkin filling into the cooled gingerbread cookie crust.
- If desired, use the back of a spoon to create an artistic swirl pattern on the top of the pie.
- Carefully place the pie in the center of the preheated oven. Bake for 50 to 60 minutes, or until a knife inserted one inch from the edge comes out clean. The center might still be slightly jiggly, which is normal.
- Remove the pie from the oven.
Step 4: Chill and Serve (Make Ahead)
- Let the baked pie cool completely on a wire rack to room temperature, which takes about two to three hours.
- This is your crucial make ahead step: Once completely cooled, cover the pie loosely with plastic wrap. Refrigerate for at least four hours, or preferably overnight. The pie tastes best when allowed to chill and set thoroughly. It can be made up to two days in advance.
- Serve chilled, perhaps with a dollop of whipped cream and an extra sprinkle of gingerbread crumbs.
27. Elegant Coq au Vin (Chicken in Wine Sauce)

Image Description
For those who want a show stopping main course that isn’t turkey, this rich Coq au Vin is an exceptional choice. The deep pan is filled with beautifully browned chicken pieces, glistening from a dark, luxurious red wine sauce. Whole pearl onions, button mushrooms, and aromatic herbs like rosemary and garlic are nestled alongside the chicken, simmering in the flavorful liquid.
Coq au Vin is an absolutely ideal make-ahead dish. It tastes even better the day after it’s cooked, as the flavors have more time to meld and deepen. This allows you to prepare the entire stew a day or two before Thanksgiving, leaving you with only a gentle reheat on the holiday. This deeply comforting, sophisticated dish guarantees raves from your guests.
Required Ingredients
- 8 bone-in, skin-on chicken thighs and drumsticks (about 3.5 pounds total)
- 4 slices thick-cut bacon, cut into 1/2-inch pieces
- 1 tablespoon olive oil
- 1 large yellow onion, chopped
- 3 cloves garlic, minced
- 8 ounces small button mushrooms, halved
- 1 cup frozen pearl onions, thawed
- 1 (750ml) bottle dry red wine (Burgundy, Pinot Noir, or Cabernet Sauvignon)
- 1 cup low-sodium chicken broth
- 1 tablespoon tomato paste
- 1 teaspoon fresh thyme leaves
- 1 teaspoon fresh rosemary leaves
- 1 bay leaf
- 1 teaspoon kosher salt
- 1/2 teaspoon black pepper
- Fresh parsley, chopped, for garnish
Equipment List
- Large Dutch oven or oven-safe pot with lid
- Large plate
- Measuring cups and spoons
DIY Instruction Steps
Step 1: Brown Bacon and Chicken
- Pat the chicken pieces very dry with paper towels. Season them generously with salt and pepper.
- In the large Dutch oven, cook the bacon over medium heat until crispy. Use a slotted spoon to remove the bacon and set it aside. Leave the rendered bacon fat in the pot.
- Increase the heat to medium-high. Add the olive oil if needed. Sear the chicken pieces in batches, skin side down first, for five to seven minutes per side, until deep golden brown. Remove the chicken and set it aside on the plate.
Step 2: Sauté Vegetables and Deglaze
- Add the chopped yellow onion to the pot with the remaining fat. Cook for five minutes until softened.
- Add the minced garlic, halved mushrooms, and thawed pearl onions. Cook for another five to seven minutes until the mushrooms have released their liquid and browned slightly.
- Stir in the tomato paste and cook for one minute, stirring constantly.
- Pour in the entire bottle of red wine. Bring it to a simmer, scraping up any browned bits from the bottom of the pot with a wooden spoon. Let it simmer for five minutes to reduce slightly.
Step 3: Simmer the Stew (Make Ahead)
- Return the seared chicken pieces to the pot. Pour in the chicken broth. Add the fresh thyme, rosemary, and bay leaf.
- Bring the liquid to a gentle simmer. Cover the Dutch oven with its lid.
- Reduce the heat to low and let it simmer for 45 to 60 minutes, or until the chicken is very tender and cooked through.
- Remove the bay leaf. Stir in the reserved crispy bacon.
Step 4: Chill and Reheat
- This is your crucial make ahead step: Let the Coq au Vin cool completely. Once cool, cover the Dutch oven tightly or transfer to an airtight container. Refrigerate for one to two days.
- On Thanksgiving Day, gently reheat the Coq au Vin on the stovetop over low heat, or in a 325°F (160°C) oven, until it is steaming hot and bubbly.
- Garnish generously with fresh chopped parsley just before serving. Serve with mashed potatoes or crusty bread.
28. Butternut Squash Casserole with Pecan Topping

Image Description
This vibrant butternut squash casserole is a delicious and colorful side dish that balances sweet and savory notes. A smooth, creamy layer of mashed butternut squash forms the base in the baking dish. It’s generously topped with a crunchy mixture of finely chopped pecans and a lighter colored crumb topping, likely brown sugar and butter.
The bright orange of the squash provides a stunning visual. This casserole is an excellent make-ahead option; you can cook and mash the squash, then prepare the topping the day before. On Thanksgiving, you simply assemble and bake, ensuring a warm, comforting side with minimal last minute fuss.
Required Ingredients
- 2 large butternut squash (about 4 pounds total)
- 1/4 cup (1/2 stick) unsalted butter, melted
- 1/4 cup heavy cream or milk
- 2 tablespoons pure maple syrup
- 1/2 teaspoon ground cinnamon
- 1/4 teaspoon ground nutmeg
- 1 teaspoon kosher salt
- 1/2 teaspoon black pepper
For the Pecan Topping:
- 1 cup chopped pecans
- 1/2 cup light brown sugar
- 1/4 cup flour (all-purpose)
- 1/4 cup (1/2 stick) cold unsalted butter, cut into small pieces
Equipment List
- Large baking sheet
- Large saucepan or Dutch oven
- Potato masher or immersion blender
- 9×13 inch baking dish
- Medium mixing bowl
DIY Instruction Steps
Step 1: Roast the Butternut Squash
- Preheat your oven to 400°F (200°C).
- Carefully cut the butternut squash in half lengthwise. Scoop out the seeds and stringy bits.
- Place the squash halves cut side down on the large baking sheet. Roast for 45 to 60 minutes, or until the squash is very tender when pierced with a fork.
- Once cool enough to handle, scoop the roasted flesh into the large saucepan or Dutch oven.
Step 2: Prepare the Squash Base (Make Ahead)
- To the roasted squash flesh, add the melted butter, heavy cream, maple syrup, cinnamon, nutmeg, salt, and pepper.
- Mash with a potato masher or use an immersion blender to create a smooth puree.
- Pour the squash mixture into the 9×13 inch baking dish, spreading it evenly.
Step 3: Make the Pecan Topping (Make Ahead)
- In the medium mixing bowl, combine the chopped pecans, brown sugar, and flour.
- Add the cold, cubed butter. Use a pastry blender or your fingers to cut the butter into the dry ingredients until a crumbly mixture forms.
- This is your make ahead step for both the squash base and the topping: Cover the squash base tightly with plastic wrap and refrigerate. Store the pecan topping in an airtight container at room temperature. Both can be prepared up to 24 hours in advance.
Step 4: Bake and Serve
- Preheat your oven to 375°F (190°C).
- Remove the squash base from the refrigerator and uncover it.
- Sprinkle the pecan topping evenly over the butternut squash base.
- Bake for 30 to 35 minutes, or until the casserole is heated through and the topping is golden brown and bubbly.
- Serve warm.
29. Artisan Rosemary Focaccia Bread

Image Description
This rustic yet refined focaccia bread offers a sophisticated alternative to traditional rolls, boasting a beautiful, golden crust and a tender, airy interior. The image shows the risen dough in a round shape, ready for its final proofing or baking. Its surface is dimpled with characteristic indentations, filled with fresh rosemary sprigs, flaky sea salt, and glistening olive oil.
Focaccia is a fantastic make-ahead bread because much of the dough preparation and even the first rise can happen the day before. It’s incredibly forgiving and impresses guests with its gourmet appearance and rich flavor. This delicious, herby bread promises to be a standout addition to your Thanksgiving table.
Required Ingredients
- 3 cups flour (all-purpose), plus more for dusting
- 1 teaspoon active dry yeast
- 1 teaspoon granulated sugar
- 1 teaspoon kosher salt (for dough)
- 1.5 cups warm water (105-115°F)
- 1/4 cup extra virgin olive oil, divided
- 2 tablespoons fresh rosemary leaves, divided
- Flaky sea salt, for sprinkling
Equipment List
- Large mixing bowl
- Plastic wrap
- 9×13 inch baking pan (or a round 9-inch cake pan)
- Pastry brush
DIY Instruction Steps
Step 1: Activate Yeast and Mix Dough
- In the large mixing bowl, combine the warm water, sugar, and yeast. Let it sit for five to ten minutes until foamy.
- Stir in two tablespoons of olive oil, the kosher salt, and the flour. Mix with a wooden spoon or a stand mixer with a dough hook until a shaggy, sticky dough forms. Do not knead excessively; focaccia dough is quite wet.
- Cover the bowl tightly with plastic wrap and let the dough rise in a warm place for one to one and a half hours, or until doubled in size.
Step 2: First Chill and Shape (Make Ahead)
- Lightly oil your 9×13 inch baking pan (or round pan) with one tablespoon of olive oil.
- Gently turn the risen dough out into the prepared pan. Use your fingertips to gently press the dough to the edges of the pan. Avoid tearing or deflating it.
- Cover the pan loosely with plastic wrap. This is your make ahead step: Refrigerate the dough overnight (8-24 hours). The slow cold ferment develops deep flavor.
Step 3: Final Proof and Dimple
- On Thanksgiving Day, remove the pan from the refrigerator. Let the dough come to room temperature and proof for about one hour. It should look puffy and a bit bubbly.
- Preheat your oven to 400°F (200°C).
- Drizzle the dough with the remaining one tablespoon of olive oil. Use your fingertips to gently dimple the surface of the dough all over, creating little pockets.
- Scatter half of the fresh rosemary leaves over the surface and sprinkle generously with flaky sea salt.
Step 4: Bake and Serve
- Bake the focaccia for 20 to 25 minutes, or until the top is golden brown and the edges are crispy.
- Remove from the oven. If desired, scatter the remaining fresh rosemary leaves over the hot focaccia.
- Let it cool slightly in the pan before transferring to a cutting board. Slice into squares or wedges and serve warm.
30. Slow Cooker Creamy Mashed Potatoes

Image Description
Creamy, smooth mashed potatoes are non negotiable on Thanksgiving, and these look utterly luscious. The image shows two vessels of mashed potatoes: one in a black cast iron skillet, and the other in a convenient slow cooker, both adorned with pats of melting butter and fresh sage leaves. The texture appears incredibly fluffy and rich.
The biggest “wow-factor” of this dish is its ingenious make-ahead method: the slow cooker. You can prepare and mash the potatoes entirely ahead of time, then keep them warm and moist in the slow cooker for hours. This frees up precious stovetop space and ensures perfectly hot mashed potatoes are ready whenever your guests are.
Required Ingredients
- 5 pounds Yukon Gold potatoes, peeled and quartered
- 1 cup heavy cream or half-and-half, warmed
- 1/2 cup (1 stick) unsalted butter, melted, plus extra for serving
- 4 ounces cream cheese, softened
- 1 teaspoon kosher salt, plus more for seasoning
- 1/2 teaspoon black pepper, plus more for seasoning
- Fresh sage leaves, for garnish
Equipment List
- Large pot
- Potato masher or stand mixer with paddle attachment
- Slow cooker (3-quart or larger)
- Measuring cups and spoons
DIY Instruction Steps
Step 1: Boil the Potatoes
- Place the peeled and quartered potatoes in the large pot. Cover them with cold, salted water (add about 1 tablespoon of salt to the water).
- Bring the water to a boil, then reduce the heat and simmer for 15 to 20 minutes, or until the potatoes are very tender when pierced with a fork.
- Drain the potatoes thoroughly. Return the hot potatoes to the empty pot.
Step 2: Mash and Mix (Make Ahead)
- Add the warmed heavy cream, melted butter, softened cream cheese, 1 teaspoon salt, and 1/2 teaspoon pepper to the drained potatoes.
- Using a potato masher, mash the potatoes until smooth, or use a stand mixer with the paddle attachment on low speed for two to three minutes until creamy. Be careful not to overmix, which can make them gummy.
- Taste and adjust seasoning with more salt and pepper if needed.
Step 3: Keep Warm in Slow Cooker
- This is your crucial make ahead step: Transfer the mashed potatoes to your slow cooker.
- Set the slow cooker to the “warm” setting. The mashed potatoes can be kept warm for up to four hours, stirring occasionally and adding a splash more warm cream or broth if they seem too dry.
- If preparing longer than four hours ahead, you can make the mashed potatoes the day before, cool them completely, and store them in the refrigerator. On Thanksgiving, reheat them gently in the slow cooker on low for two to three hours, stirring often and adding liquid as needed, then switch to “warm.”
Step 4: Garnish and Serve
- Just before serving, stir the mashed potatoes once more.
- Garnish with a few pats of butter and fresh sage leaves. Serve hot directly from the slow cooker or transfer to a serving bowl.
31. Creamy Spinach and Artichoke Casserole

Image Description
This richly textured spinach and artichoke casserole is a savory side dish that is far more elegant than a traditional green vegetable. The dish features dark, rich green spinach swimming in a velvety white cream sauce. Chunks of tender, pale green artichoke hearts are studded throughout, along with dollops of baked goat cheese or ricotta that have lightly browned on top. Shredded Parmesan cheese is scattered over the surface, promising a crispy, cheesy crust.
This savory casserole is perfect for making ahead. You can mix and assemble the entire dish, then bake it right before serving on Thanksgiving. It offers a sophisticated, comforting, and deeply satisfying vegetable component that contrasts beautifully with the turkey.
Required Ingredients
- 1 (10 ounce) package frozen chopped spinach, thawed and squeezed very dry
- 1 (14 ounce) can marinated artichoke hearts, drained and chopped
- 1 cup full-fat ricotta cheese or small mozzarella balls, divided
- 1/2 cup heavy cream
- 1/4 cup chicken or vegetable broth
- 2 cloves garlic, minced
- 1/2 cup shredded Parmesan cheese, divided
- 1/2 teaspoon ground nutmeg
- 1/2 teaspoon kosher salt
- 1/4 teaspoon black pepper
Equipment List
- Medium mixing bowl
- 8×8 inch baking dish
- Small skillet
- Wooden spoon
DIY Instruction Steps
Step 1: Prep the Base
- Preheat your oven to 375°F (190°C). Lightly grease your 8×8 inch baking dish.
- In the small skillet, sauté the minced garlic in a drizzle of olive oil for one minute until fragrant.
- In the medium mixing bowl, combine the thoroughly drained spinach, chopped artichoke hearts, heavy cream, broth, nutmeg, salt, and pepper. Stir well.
Step 2: Assemble the Casserole (Make Ahead)
- Stir half of the shredded Parmesan cheese into the spinach mixture.
- Pour the mixture into the prepared baking dish, spreading it evenly.
- Dot the surface of the casserole evenly with spoonfuls of ricotta cheese (or the small mozzarella balls).
- Sprinkle the remaining half of the Parmesan cheese over the top.
- This is your make ahead step: Cover the dish tightly with foil or plastic wrap. Refrigerate for up to 24 hours.
Step 3: Bake and Serve
- Remove the dish from the refrigerator and let it sit for 30 minutes.
- Bake, covered with foil, for 25 minutes.
- Remove the foil and bake for another 10 to 15 minutes, or until the top is bubbly, the cheese is golden brown, and the casserole is heated all the way through.
- Serve warm.
32. Creamy Spiced Ginger Butternut Squash Soup

Image Description
A warm bowl of butternut squash soup is the perfect starter for a cool weather feast. This soup has a creamy, vibrant orange hue, suggesting a smooth, silky texture. It is elegantly garnished with a swirl of heavy cream, cubes of roasted butternut squash, and crunchy pumpkin seeds. Pieces of fresh ginger and a whole nutmeg are visible in the background, hinting at the warm, aromatic spices that flavor the soup.
Soup is the ultimate make-ahead appetizer, as it can be cooked entirely days in advance. The flavors deepen overnight, allowing you to focus on the main dishes. Simply gently reheat it right before serving for an elegant and comforting start to the meal.
Required Ingredients
- 3 cups cubed fresh butternut squash (about 1 medium squash)
- 1 medium yellow onion, chopped
- 3 cloves garlic, minced
- 2 tablespoons fresh ginger, peeled and grated
- 4 cups low-sodium vegetable broth
- 1/2 cup heavy cream or coconut milk
- 1 teaspoon ground cinnamon
- 1/2 teaspoon ground nutmeg
- 1 teaspoon kosher salt
- 1/2 teaspoon black pepper
- Pumpkin seeds and cream, for garnish
Equipment List
- Large pot or Dutch oven
- Immersion blender or standard blender
- Baking sheet
DIY Instruction Steps
Step 1: Roast the Squash
- Preheat your oven to 400°F (200°C). Toss the cubed butternut squash with a drizzle of olive oil, salt, and pepper.
- Spread the squash on the baking sheet. Roast for 20 to 25 minutes, or until the squash is tender and slightly caramelized. Set aside.
Step 2: Sauté Aromatics and Simmer
- In the large pot or Dutch oven, sauté the chopped onion in a drizzle of olive oil over medium heat until softened, about five minutes.
- Add the minced garlic and grated ginger. Cook for one minute until fragrant.
- Add the roasted butternut squash, vegetable broth, cinnamon, and nutmeg to the pot. Bring the mixture to a boil, then reduce the heat to low and simmer for ten minutes.
Step 3: Blend and Finish (Make Ahead)
- Remove the pot from the heat. Use an immersion blender to blend the soup until it is completely smooth and creamy. If using a standard blender, work in batches, venting the lid for steam.
- Stir in the heavy cream, salt, and pepper. Taste and adjust seasoning.
- This is your make ahead step: Let the soup cool completely, then transfer it to an airtight container. Refrigerate for up to three days.
Step 4: Reheat and Garnish
- Gently reheat the soup in a pot on the stovetop over low heat, stirring occasionally. Do not boil it.
- Serve hot. Garnish each bowl with a swirl of heavy cream, a sprinkle of pumpkin seeds, and a dusting of nutmeg.
33. Harvest Farro Salad with Butternut and Feta

Image Description
This vibrant grain salad offers a light, refreshing, and texture rich counterpoint to the heavy dishes on the Thanksgiving table. It showcases hearty farro, a nutty grain, mixed with cubes of bright orange roasted butternut squash. Salty cubes of Feta cheese and crunchy green pumpkin seeds are scattered throughout the bowl. Fresh sage leaves garnish the top, adding a lovely herbal aroma. A jar of dressing is visible in the background.
This salad is an exceptional make-ahead choice because the grain, squash, and dressing can all be prepared two days in advance. You simply assemble and toss the ingredients right before serving. This sophisticated salad introduces fresh flavor and texture to your holiday meal.
Required Ingredients
- 1 cup whole farro, rinsed
- 3 cups vegetable or chicken broth (or water)
- 1.5 cups roasted butternut squash cubes
- 1/2 cup crumbled Feta cheese
- 1/4 cup toasted pumpkin seeds (pepitas)
- 1 tablespoon fresh sage leaves, for garnish
For the Maple Vinaigrette:
- 1/4 cup extra virgin olive oil
- 2 tablespoons apple cider vinegar
- 1 tablespoon pure maple syrup
- 1 teaspoon Dijon mustard
- 1/2 teaspoon kosher salt
Equipment List
- Medium saucepan with lid
- Large mixing bowl
- Whisk
- Airtight container (for dressing)
DIY Instruction Steps
Step 1: Cook the Farro (Make Ahead)
- In the medium saucepan, combine the rinsed farro and the broth (or water). Bring the liquid to a boil.
- Reduce the heat to low, cover the pan tightly, and simmer for 25 to 30 minutes, or until the farro is tender but still chewy.
- Drain any remaining liquid. Let the farro cool completely.
Step 2: Make the Vinaigrette (Make Ahead)
- In a separate small bowl, whisk together all the vinaigrette ingredients: olive oil, apple cider vinegar, maple syrup, Dijon mustard, and salt.
- Transfer the vinaigrette to an airtight container and store it in the refrigerator.
Step 3: Assemble the Salad
- In the large mixing bowl, combine the cooled farro, the roasted butternut squash cubes, crumbled Feta cheese, and toasted pumpkin seeds.
- This is your crucial make ahead step: You can leave the salad assembled (without dressing) overnight in the refrigerator.
Step 4: Dress and Serve
- Just before serving, drizzle the prepared maple vinaigrette over the salad. Toss gently to coat all the ingredients.
- Transfer the salad to a serving bowl. Garnish with the fresh sage leaves. Serve at room temperature.
34. All Butter Press-in Pie Dough

Image Description
A great Thanksgiving starts with a reliable, flaky pie crust, and this image shows a beautiful, unbaked all butter pie dough pressed into a clear glass pie plate. The edges are neatly crimped and fluted, indicating a light and tender texture once baked. The crust looks wonderfully smooth and rich, with slight traces of butter visible.
Mastering your crust is the first step to making any pie ahead of time. This particular press-in dough is wonderfully forgiving. You can prepare and shape the crust entirely days in advance, storing it in the freezer or refrigerator. This lets you skip the crust work entirely on the holiday morning, focusing only on the filling.
Required Ingredients
- 2.5 cups flour (all-purpose)
- 1 teaspoon kosher salt
- 1 cup (2 sticks) very cold unsalted butter, cut into small cubes
- 1/2 cup ice cold water
Equipment List
- Large mixing bowl
- Pastry blender or food processor
- 9-inch pie plate
- Plastic wrap
DIY Instruction Steps
Step 1: Combine Dry Ingredients and Butter
- In the large mixing bowl, whisk together the flour and salt.
- Add the very cold, cubed butter to the flour mixture.
- Use a pastry blender or your fingertips to quickly cut the butter into the flour until the mixture resembles coarse crumbs with some pea sized pieces of butter still visible. The cold butter creates the flaky layers.
Step 2: Add Water and Form Dough
- Gradually drizzle the ice cold water over the flour and butter mixture, starting with 1/4 cup. Toss the mixture lightly with a fork until the dough just begins to come together.
- Add more water, one teaspoon at a time, until the dough can be gently pressed together without being overly sticky.
- Gather the dough into a single ball. Flatten it slightly into a thick disk.
Step 3: Press into Plate (Make Ahead)
- Lightly flour your work surface and the pie dough disk. Roll the dough into a 12 inch circle.
- Carefully transfer the dough to the 9 inch pie plate. Gently press it into the bottom and sides. Trim the excess dough and then crimp or flute the edges as desired.
- This is your make ahead step: Cover the pie plate tightly with plastic wrap. Refrigerate for at least 30 minutes before filling or baking. For longer storage, freeze the wrapped crust for up to three months.
Step 4: Blind Bake or Fill
- When ready to bake, follow your pie recipe instructions. For a pre-baked (blind baked) crust, line the dough with parchment paper and pie weights, then bake according to the recipe.
- Fill and bake the crust immediately if the recipe calls for an unbaked shell.
35. Pumpkin Spice No-Bake Icebox Cake

Image Description
This striking no bake dessert layers festive pumpkin flavor with creamy whipped topping in a tower of crunchy cookies. The presentation is stunning, featuring alternating layers of thin, round gingersnap cookies, light whipped cream, and a smooth, orange pumpkin cream filling. The entire cake is crowned with a final layer of whipped cream and scattered gingersnap crumbs.
The beauty of this icebox cake is that it must be made ahead. The cookies soften overnight as they absorb the pumpkin cream, transforming into a moist, cake like texture. This is a stress free, make ahead dessert that tastes delicious and looks professionally layered.
Required Ingredients
- 1 (15 ounce) can pure pumpkin puree (not pie filling)
- 1 (8 ounce) package full-fat cream cheese, softened
- 1/2 cup powdered sugar
- 1 teaspoon ground cinnamon
- 1/2 teaspoon ground ginger
- 1/4 teaspoon ground nutmeg
- 1 teaspoon vanilla extract
- 3 cups heavy cream, chilled
- 1/4 cup granulated sugar
- 1 box gingersnap cookies (about 50 cookies)
Equipment List
- 8×4 inch loaf pan
- Large mixing bowl
- Hand mixer or stand mixer
- Rubber spatula
DIY Instruction Steps
Step 1: Make the Pumpkin Cream Filling
- In the large mixing bowl, beat the softened cream cheese until smooth. Beat in the pumpkin puree, powdered sugar, cinnamon, ginger, nutmeg, and vanilla extract until the mixture is uniform. Set the bowl aside.
Step 2: Whip the Heavy Cream
- In a separate clean bowl, whip the chilled heavy cream and granulated sugar until stiff peaks form.
- Gently fold about one third of the whipped cream into the pumpkin mixture to lighten it. This is your pumpkin cream layer.
- Keep the remaining two thirds of the plain whipped cream separate; this is your white layer.
Step 3: Assemble the Cake (Make Ahead)
- Line the 8×4 inch loaf pan with parchment paper, leaving an overhang on the sides for easy lifting.
- Spread a thin layer of the plain whipped cream on the bottom of the pan.
- Arrange a single layer of gingersnap cookies tightly over the cream. You may need to break a few to fit.
- Top the cookie layer with a layer of the pumpkin cream filling, spread evenly.
- Continue layering: plain whipped cream, then cookies, then pumpkin cream, ending with a final layer of plain whipped cream.
- This is your crucial make ahead step: Cover the pan tightly with plastic wrap and refrigerate for at least 12 hours, or up to 24 hours. The chilling time allows the cookies to soften.
Step 4: Unmold and Garnish
- Remove the cake from the refrigerator. Use the parchment paper overhang to gently lift the cake out of the loaf pan and onto a serving platter.
- Garnish the top with crumbled gingersnap cookies just before serving. Slice and serve chilled.
36. Spiced Cranberry and Rosemary Sangria

Image Description
A gorgeous holiday sangria is the ultimate way to greet your guests and instantly set a festive tone. This pitcher is brimming with a light, amber colored liquid, likely white wine or cider, infused with seasonal fruit. Thick slices of red apple and bright red cranberries are suspended throughout the pitcher. Sprigs of fresh green rosemary are tucked in, adding a beautiful color contrast and an aromatic, savory note.
The beauty of sangria is that it absolutely needs to be made ahead to allow the fruit and herbs to fully infuse the liquid. You can prepare the base entirely the day before, simply adding ice right before serving. This is a zero effort, high impact drink that looks beautiful on your bar cart.
Required Ingredients
- 1 bottle (750ml) crisp white wine (e.g., Pinot Grigio or Sauvignon Blanc)
- 2 cups pure apple cider or cranberry juice
- 1/2 cup brandy or spiced rum (optional)
- 1/4 cup orange flavored liqueur (e.g., Triple Sec)
- 1 medium apple, thinly sliced
- 1/2 cup fresh or frozen cranberries
- 2 sprigs fresh rosemary, plus more for garnish
- Ice, for serving
Equipment List
- Large pitcher (64 ounces or larger)
- Wooden spoon
- Measuring cups
DIY Instruction Steps
Step 1: Combine Liquids and Fruit (Make Ahead)
- In the large pitcher, combine the white wine, apple cider, brandy, and orange liqueur (if using).
- Add the thinly sliced apple and fresh or frozen cranberries to the pitcher.
- Gently bruise the rosemary sprigs with your fingers to release their aroma, then add them to the pitcher.
Step 2: Infuse
- Stir everything gently with a wooden spoon.
- This is your crucial make ahead step: Cover the pitcher and refrigerate for at least four hours, and up to 24 hours. This allows the fruit and rosemary flavors to fully infuse the liquid.
Step 3: Serve
- Just before serving, remove the rosemary sprigs.
- Add plenty of ice to the pitcher. Stir briefly.
- Pour the sangria into individual glasses. Garnish each glass with a few extra cranberries and a small sprig of fresh rosemary. Serve cold.
37. Homemade Garlic and Herb Infused Oil

Image Description
A beautiful bottle of herb infused olive oil is a simple yet elegant detail that shows thoughtfulness on your holiday table. The bottle is filled with golden-hued olive oil, showcasing vibrant green sprigs of fresh rosemary and thyme submerged inside. Slices of pale garlic clove are visible through the glass, infusing the oil with their pungent aroma. Slices of crusty bread are nearby, suggesting a quick dip for guests.
Infused oil is the ultimate zero-stress make-ahead condiment. It must be prepared several days in advance for the flavors to fully develop. This provides a stunning presentation and a wonderfully flavorful drizzle for mashed potatoes, focaccia, or even roasted vegetables.
Required Ingredients
- 2 cups high quality extra virgin olive oil
- 4 sprigs fresh rosemary
- 4 sprigs fresh thyme
- 6 cloves whole garlic, lightly smashed
Equipment List
- Clean, airtight glass bottle (with a tight stopper)
- Small saucepan
- Funnel (optional)
DIY Instruction Steps
Step 1: Prepare the Herbs and Garlic
- Wash the rosemary and thyme sprigs. Pat them completely dry, which is essential to prevent mold. Peel and lightly smash the garlic cloves with the flat side of a knife to help them release their flavor.
- Place the herb sprigs and garlic cloves into the clean glass bottle.
Step 2: Warm the Oil
- Pour the olive oil into the small saucepan. Warm the oil over very low heat for about five minutes. Do not let the oil simmer or smoke; you just want to warm it gently. Warming helps the oil absorb the flavors.
- Remove the saucepan from the heat. Let the oil cool slightly.
Step 3: Infuse (Make Ahead)
- Carefully pour the warmed olive oil over the herbs and garlic in the bottle. Use a funnel if necessary.
- Seal the bottle tightly with its stopper.
- This is your crucial make ahead step: Let the oil infuse at cool room temperature (not refrigerated) for at least three days, or up to one week, before serving.
Step 4: Serve
- Serve the oil with crusty bread for dipping or use it to finish roasted side dishes. Remember to use the oil within two weeks for best quality.
38. Stovetop Simmering Spices for Aroma

Image Description
While not a food item, a festive aroma is a key part of setting the holiday mood, and this image shows a wonderful solution. A black saucepan on the stovetop is filled with water, whole oranges, cut apples, fresh cranberries, cinnamon sticks, and star anise pods, all simmering gently. Bags of dried citrus and spice mixes are visible in the background, ready for future use.
Creating this stovetop potpourri is a zero-effort way to make your house smell welcoming and cozy before guests walk in. The beauty is that you can prepare the spice bags ahead of time. On Thanksgiving, simply fill a pot with water and the pre-mixed ingredients. This sets a gorgeous atmosphere without using oven space or requiring any work on the day of the party.
Required Ingredients
- 2 whole oranges, halved
- 1 apple, cored and roughly sliced
- 1 cup fresh or frozen cranberries
- 4 cinnamon sticks
- 6 whole star anise pods
- 1 tablespoon whole cloves
- 2 sprigs fresh rosemary
- Water, for simmering
Equipment List
- Medium saucepan
- Measuring cups
- Ziploc bags or small airtight containers (for make-ahead bags)
DIY Instruction Steps
Step 1: Create the Simmering Mixes (Make Ahead)
- This is your make ahead step: You can prep several bags of the dry ingredients (cinnamon, star anise, cloves, and rosemary) ahead of time. Store them in airtight bags or containers at room temperature.
- Alternatively, you can slice the citrus and apple a day ahead and store them in the refrigerator, ready to add to the pot.
Step 2: Prepare the Pot
- On Thanksgiving Day, place the saucepan on the stovetop.
- Fill the pot about halfway with water.
- Add the halved oranges, apple slices, cranberries, cinnamon sticks, star anise, cloves, and rosemary to the water.
Step 3: Simmer
- Bring the water to a boil over high heat, then immediately reduce the heat to the lowest setting possible. The goal is a gentle simmer, not a rapid boil.
- Allow the mixture to simmer for as long as needed—up to several hours—to keep your house smelling wonderful.
- Check the water level every hour and add more water as necessary to keep the pot from boiling dry.
Step 4: Enjoy
- Let the spices and fruit cool completely before discarding them or placing the remaining mixture back in the refrigerator for one more use.
39. Kale Salad with Persimmon and Pecan Vinaigrette

Image Description
A fresh, massaged kale salad offers a delightful, earthy crunch that stands up well against rich holiday food. The bowl is filled with dark green, curly kale leaves, tossed lightly with toasted pecans and light green pumpkin seeds. Slices of bright orange persimmon add a stunning, sweet pop of color. A jar of Champagne vinaigrette is visible in the background, hinting at a light, bright dressing.
This salad is an excellent make-ahead dish because kale actually benefits from being massaged and dressed ahead of time. This softens the leaves and intensifies the flavor, making it more palatable. You can prep all the components and toss the salad right before serving, ensuring a fresh, impressive side dish.
Required Ingredients
- 1 large bunch fresh kale, stems removed, chopped
- 1 tablespoon olive oil
- 1 Fuyu persimmon, thinly sliced
- 1/2 cup toasted pecans
- 1/4 cup toasted pumpkin seeds
For the Champagne Vinaigrette:
- 1/4 cup extra virgin olive oil
- 2 tablespoons Champagne vinegar or white wine vinegar
- 1 teaspoon Dijon mustard
- 1 tablespoon pure maple syrup
- 1/2 teaspoon kosher salt
Equipment List
- Large mixing bowl
- Small mixing bowl
- Whisk
DIY Instruction Steps
Step 1: Massage the Kale (Make Ahead)
- Place the chopped kale leaves in the large mixing bowl. Drizzle with the 1 tablespoon of olive oil.
- Use your hands to gently massage the kale for two to three minutes until the leaves soften and turn a deeper shade of green. This removes the bitterness and tenderizes the leaves.
- This is your make ahead step: You can store the massaged kale in the refrigerator for up to 24 hours.
Step 2: Make the Vinaigrette (Make Ahead)
- In the small mixing bowl, whisk together all the vinaigrette ingredients until they are fully emulsified.
- Store the dressing in an airtight container at room temperature.
Step 3: Assemble and Serve
- When ready to serve, add the sliced persimmon, toasted pecans, and toasted pumpkin seeds to the massaged kale in the large mixing bowl.
- Drizzle the prepared Champagne vinaigrette over the salad. Toss gently to combine.
- Transfer the salad to a serving bowl. Garnish with the fresh sage leaves. Serve at room temperature.
40. Sweet and Savory Whipped Feta Dip

Image Description
This vibrant whipped Feta dip is an incredibly impressive appetizer that requires minimal effort and no cooking on the day of your event. A thick, creamy layer of white, whipped feta is spread artistically on a round platter. A glistening drizzle of honey forms a delicate spiral across the surface. Bright red pomegranate seeds are scattered across the honey, adding a sweet and tart pop of flavor and crunch. Mint leaves provide a fresh, green garnish. Toasted baguette slices or crackers are served alongside.
This dip is designed for making ahead; the feta needs time to chill and firm up after whipping. You can prepare the base entirely the day before, simply adding the elegant honey and pomegranate toppings right before guests arrive. This ensures an easy, beautiful, and utterly delicious appetizer.
Required Ingredients
- 8 ounces high quality Feta cheese, block style (not crumbled)
- 4 ounces full-fat cream cheese, softened
- 2 tablespoons heavy cream or whole milk
- 1 teaspoon fresh lemon zest
- 2 tablespoons liquid honey, plus extra for drizzling
- 1/2 cup pomegranate seeds (arils), for topping
- Fresh mint leaves, for garnish
- Toasted baguette slices or crackers, for serving
Equipment List
- Food processor or stand mixer with paddle attachment
- Rubber spatula
- Serving platter
DIY Instruction Steps
Step 1: Whip the Feta Base (Make Ahead)
- Break the Feta block into chunks and place them in the food processor. Add the softened cream cheese and heavy cream.
- Process or beat on high speed for three to five minutes, scraping down the sides as necessary, until the mixture is completely smooth, light, and airy. This is the key step to getting a truly velvety texture.
- Stir in the fresh lemon zest and the two tablespoons of honey.
Step 2: Chill and Set
- Use the rubber spatula to spread the whipped feta mixture onto your serving platter, creating a rustic swirl pattern or a smooth layer.
- This is your crucial make ahead step: Cover the platter tightly with plastic wrap (or transfer the dip to an airtight container). Refrigerate for at least four hours, or up to 24 hours. Chilling allows the texture to set.
Step 3: Garnish and Serve
- Remove the dip from the refrigerator 15 minutes before serving.
- Just before guests arrive, drizzle the top generously with extra liquid honey in a spiral pattern.
- Scatter the bright red pomegranate seeds over the honey. Garnish with the fresh mint leaves.
- Serve chilled or at room temperature alongside toasted baguette slices, crackers, or vegetables.
Creating a magnificent Thanksgiving feast truly does not require a last minute kitchen sprint. By strategically planning and preparing these 40 “wow-factor” dishes ahead of time, you transform the holiday experience from exhausting labor to relaxed enjoyment. Imagine the feeling of simply warming a creamy Sweet Potato Gratin or pulling golden Chive Biscuits from the freezer without touching a mixing bowl that day.
Your family will be impressed by the elevated flavors and beautiful presentation, and your in-laws will surely recognize the care and effort you put into the meal. Most importantly, you get to sit down, truly relax, and enjoy the moments that matter. You deserve to be a guest at your own table this Thanksgiving.
Key Takeaways
- Prep, Assemble, and Chill: Focus on recipes that gain flavor overnight, like the Coq au Vin or Cranberry Relish. Assemble casseroles like the Spinach and Artichoke Casserole entirely ahead of time.
- Utilize the Freezer: Freeze items that bake well from cold, such as the Focaccia Bread dough and Fluffy Biscuits. This ensures warm, fresh bread without any day-of prep work.
- Master the Sides: Free up oven space by using the slow cooker for Mashed Potatoes or serving dips and salads like the Whipped Feta and Kale Salad at room temperature.
- Elevated Presentation: Simple garnishes like Pomegranate Seeds, fresh Sage leaves, or a drizzle of Infused Olive Oil instantly turn a prepared dish into a showstopper.