Managing a busy schedule often leaves little room for healthy eating. You might find yourself reaching for takeout when the day feels out of control. This collection of meal prep recipes helps you take back your time and energy. You can enjoy delicious food without the nightly stress of starting from scratch.
Meal Prep Recipes
Organizing your kitchen and planning ahead is the secret to a calm week. These 48 ideas cover everything from breakfast to dinner to keep you satisfied. Every recipe is designed for clarity and ease of preparation. You will find that saving hours in the kitchen is simpler than you think.
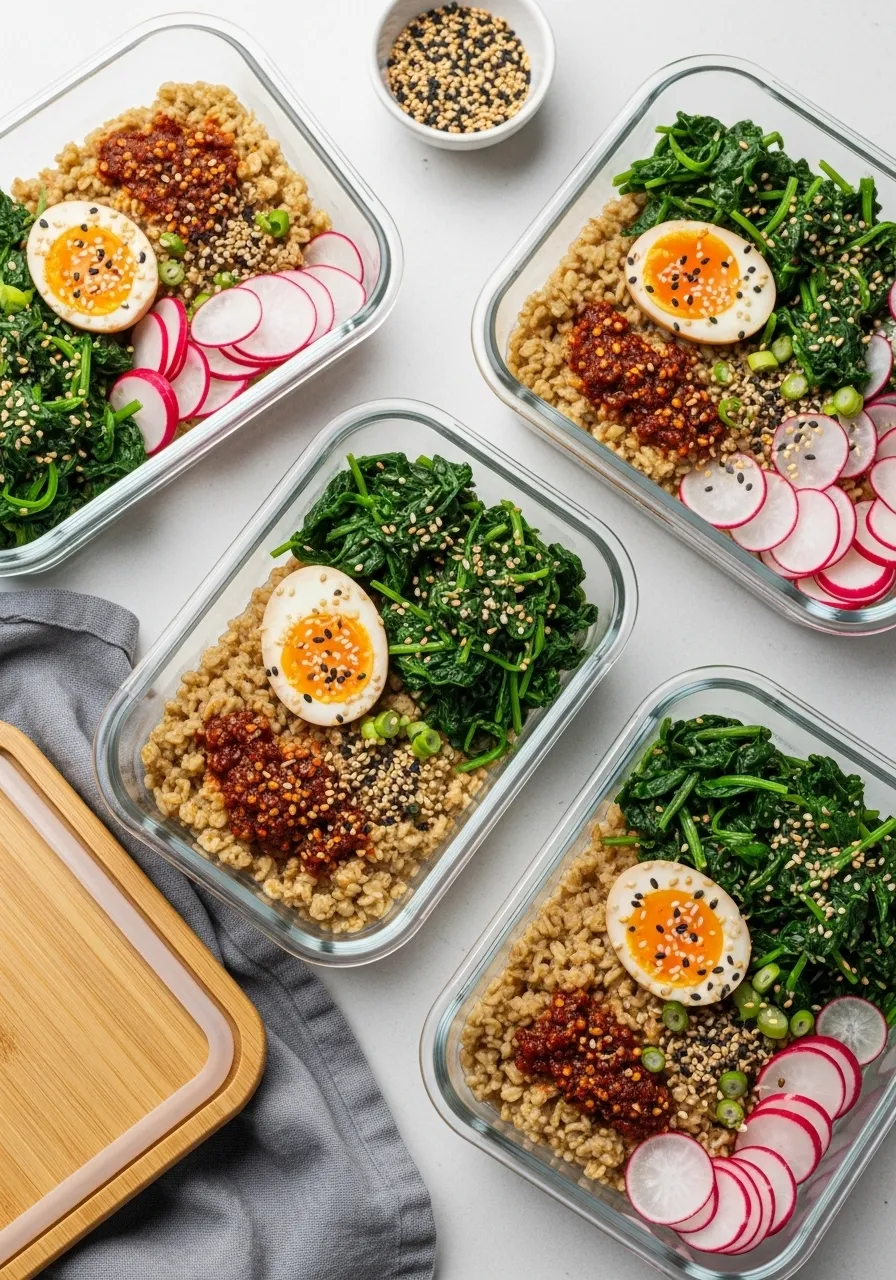
These colorful meal prep containers hold a balanced mix of flavors and textures. Hearty brown rice or grains provide a solid base for the meal. Bright green sautéed spinach and crisp radish slices add freshness to every bite. Each bowl features a jammy soft boiled egg sprinkled with toasted sesame seeds.
A dollop of savory chili oil provides a spicy kick that wakes up the palate. Chopped green onions offer a mild onion crunch. Glass storage containers help keep the ingredients vibrant and fresh throughout your work week. Preparing these meals in advance removes the stress of daily cooking. You can enjoy a nutritious lunch without spending hours in the kitchen every afternoon.
Ingredients
2 cups brown rice or quinoa
4 large eggs
2 bunches fresh spinach
4 radishes
Chili oil or spicy paste
Sesame seeds
2 green onions
Olive oil
Salt and pepper
Equipment
Large pot for grains
Medium saucepan for eggs
Large skillet for spinach
Chef’s knife
Cutting board
4 glass meal prep containers with lids
DIY Instructions
Cook the grains according to the package directions until they are tender. Let them cool slightly before portioning them into your containers.
Boil a pot of water and carefully lower the eggs into it. Cook them for exactly seven minutes for a soft yolk. Place them in a bowl of ice water immediately after cooking to stop the heat.
Heat a small amount of olive oil in a skillet over medium heat. Add the spinach and cook it until it just starts to wilt. Season with a small pinch of salt and pepper.
Slice the radishes into thin circles using a sharp knife. Chop the green onions into small pieces for the garnish.
Peel the cooled eggs carefully and cut them in half lengthways.
Divide the grains, spinach, and radish slices equally among the four containers. Top each bowl with an egg half, a scoop of chili oil, sesame seeds, and green onions.
2. Roasted Vegetable and Quinoa Harvest Bowls
Meal Prep Recipes
Colorful roasted vegetables fill these sturdy meal prep containers. Charred broccoli florets sit next to tender sweet potato cubes and bright red pepper strips. A generous portion of fluffy tri color quinoa adds texture and protein to the base. Savory roasted chickpeas provide a satisfying crunch that lasts all week long.
A small cup of creamy tahini dressing waits in the corner for lunchtime. This plant based meal keeps you full and energized throughout a busy workday. Preparing these bowls on Sunday saves you from making poor food choices when you feel tired. Everything stays fresh and delicious for several days in the fridge.
Ingredients
1 cup tri color quinoa
2 large sweet potatoes
2 heads of broccoli
2 red bell peppers
1 can chickpeas
1 cup tahini sauce
2 tablespoons olive oil
1 teaspoon salt
1 teaspoon garlic powder
Equipment
2 large baking sheets
1 medium saucepan with lid
1 large mixing bowl
Chef knife
Cutting board
4 meal prep containers
4 small dressing cups
DIY Instructions
Preheat your oven to 400 degrees Fahrenheit so it is hot when you finish chopping.
Peel the sweet potatoes and cut them into small cubes about the size of a dice.
Cut the broccoli into small bite sized pieces and slice the red peppers into long strips.
Rinse the chickpeas in a colander under cold water and pat them dry with a paper towel.
Toss all the vegetables and chickpeas in a large bowl with olive oil, salt, and garlic powder until they are coated.
Spread the mixture onto two baking sheets in a single layer and roast for 25 minutes or until the edges are brown.
Boil two cups of water in a saucepan and add the quinoa. Cover the pot and simmer on low heat for 15 minutes.
Let the quinoa and vegetables cool completely before you put them into the containers.
Divide the quinoa and roasted mix into four containers and place a dressing cup in each one.
3. No Boil Freezer Friendly Penne Pasta
Meal Prep Recipes
These foil pans hold a comforting pasta dish that is ready for the freezer. Al dente penne noodles rest under a thick layer of rich tomato sauce. Fresh green spinach leaves are tucked between the pasta for extra nutrition. Small mounds of creamy ricotta cheese sit on top like soft white clouds.
Shredded mozzarella and dried herbs finish the dish with a savory touch. You can stack these containers easily to save space in your kitchen. This meal is great for nights when you lack the energy to cook from scratch. Just pop one into the oven to enjoy a hot dinner in minutes. It simplifies your evening routine significantly.
Ingredients
1 box penne pasta
1 jar marinara sauce
2 cups fresh spinach
1 cup ricotta cheese
2 cups shredded mozzarella cheese
1 tablespoon dried oregano
1 cup water
Equipment
4 small aluminum foil pans
4 plastic lids or aluminum foil sheets
1 large mixing bowl
1 large spoon
DIY Instructions
Pour the dry pasta and the jar of marinara sauce into a large mixing bowl.
Add one cup of water to the bowl to help the pasta cook later.
Stir in the fresh spinach leaves until they are mixed well with the sauce.
Divide the pasta mixture equally into the four aluminum foil pans.
Use a spoon to place small dollops of ricotta cheese on top of the pasta in each pan.
Sprinkle a thick layer of mozzarella cheese and a dash of oregano over the top.
Cover each pan tightly with a lid or a piece of foil to prevent freezer burn.
Label the pans with the date and cooking instructions.
Bake the frozen pasta at 375 degrees Fahrenheit for 45 minutes when you are ready to eat.
4. Rainbow Soba Noodle Mason Jar Salads
Meal Prep Recipes
Glass mason jars showcase beautiful layers of fresh vegetables and noodles. Creamy peanut dressing sits at the bottom to keep the other ingredients crisp. Bright green edamame beans and orange shredded carrots add a pop of color. Brown soba noodles provide a hearty middle layer for this healthy lunch option.
Purple cabbage and sliced radishes sit at the very top for maximum crunch. Chopped green onions give a mild bite to every single forkful. These jars are easy to grab as you head out the door in the morning. Shaking the jar right before you eat coats everything in the savory sauce. It is a smart way to enjoy a restaurant style salad at your desk.
Ingredients
1 package soba noodles
2 cups shelled edamame
2 cups shredded carrots
1 cup sliced purple cabbage
4 radishes
2 green onions
1 cup peanut dressing
1 tablespoon sesame seeds
Equipment
4 large wide mouth mason jars
1 large pot
1 colander
Chef knife
Cutting board
DIY Instructions
Cook the soba noodles in a pot of boiling water for about 6 minutes.
Drain the noodles in a colander and rinse them with cold water so they do not stick together.
Slice the radishes into thin rounds and chop the green onions into small bits.
Pour two tablespoons of peanut dressing into the bottom of each mason jar.
Add a layer of edamame beans on top of the dressing followed by the shredded carrots.
Place a portion of the cooked soba noodles into each jar.
Add the purple cabbage and radishes on top of the noodles.
Garnish the very top with green onions and a sprinkle of sesame seeds.
Seal the jars with their lids and keep them upright in the refrigerator until lunch.
5. Slow Cooker Shredded Beef for Tacos
Meal Prep Recipes
A deep black slow cooker holds a large portion of juicy shredded beef. The meat is cooked until it falls apart easily with the touch of a fork. Savory juices and spices surround the beef to keep it moist and flavorful. Fresh cilantro rests in small bowls nearby to add a bright finish to your meal.
This recipe is excellent for creating multiple dishes throughout the week. You can use the beef for tacos, salads, or hearty grain bowls. Cooking a large roast at once saves you from standing over the stove every evening. Your kitchen will smell wonderful as the meat simmers slowly all day long. It is a simple way to prepare a high protein base for many recipes.
Ingredients
3 pounds beef chuck roast
1 cup beef broth
1 tablespoon chili powder
1 teaspoon cumin
1 teaspoon salt
1 teaspoon onion powder
1 bunch fresh cilantro
Equipment
1 slow cooker
2 large dinner forks
1 small bowl
DIY Instructions
Place the whole beef roast into the bottom of your slow cooker.
Pour the beef broth over the meat to provide moisture during the long cooking process.
Sprinkle the chili powder, cumin, salt, and onion powder over the top of the beef.
Put the lid on the slow cooker and set it to low for 8 hours.
Remove the lid carefully once the time is up and the meat is tender.
Use two forks to pull the meat apart into small shreds while it is still in the pot.
Let the meat sit in the juices for 10 minutes to soak up all the extra flavor.
Chop the fresh cilantro and place it in a small bowl for serving.
Store the shredded beef in a sealed container in the fridge for up to four days.
6. Mediterranean Protein Power Snack Boxes
Meal Prep Recipes
These black snack boxes are filled with a variety of bite sized treats. Crunchy whole almonds provide a healthy dose of fats and energy. Cool cucumber slices and salty kalamata olives offer a refreshing Mediterranean flair. Cubes of white feta cheese are seasoned with black pepper for a savory kick.
Soft boiled eggs and rolled deli turkey slices add plenty of protein to keep you satisfied. A large scoop of smooth hummus sits in the corner for dipping. These boxes are great for a quick lunch or a post workout snack. Everything is prepped and ready to eat without any further cooking. They help you stay on track with your health goals even on your busiest days.
Ingredients
4 large eggs
8 slices deli turkey
1 cup whole almonds
1 large cucumber
1 cup kalamata olives
1 cup feta cheese cubes
1 cup hummus
Black pepper
Equipment
4 compartment meal prep boxes
1 small saucepan
Chef knife
Cutting board
DIY Instructions
Place the eggs in a saucepan and cover them with water.
Bring the water to a boil and then turn off the heat. Let the eggs sit for 9 minutes for a firm yolk.
Move the eggs to a bowl of cold water to cool before peeling them.
Slice the cucumber into thick rounds using your knife and cutting board.
Roll up the turkey slices into tight cylinders so they fit neatly in the box.
Place a scoop of hummus into one section of each snack box.
Divide the almonds, cucumber slices, olives, and feta cheese into the other sections.
Peel the eggs and cut them in half before adding them to the protein section.
Sprinkle a little bit of black pepper over the feta cheese and eggs for extra flavor.
7. Overnight Chocolate Raspberry Chia Pudding
Meal Prep Recipes
A clear glass jar holds a thick and creamy chocolate chia seed pudding. Tiny chia seeds have soaked up the liquid to create a satisfying texture. Three bright red raspberries sit on top to provide a burst of fruity sweetness. A spoonful of smooth nut butter and crunchy cacao nibs add layers of flavor.
This breakfast is ready to eat the moment you wake up in the morning. You can prepare several jars at once to last for the entire work week. Chia seeds are full of fiber and nutrients that give you a great start to the day. The chocolate flavor makes it feel like you are eating a treat for breakfast. It is a convenient option for anyone with a chaotic morning schedule.
Ingredients
1 cup almond milk
3 tablespoons chia seeds
1 tablespoon cocoa powder
1 tablespoon maple syrup
5 fresh raspberries
1 tablespoon almond butter
1 teaspoon cacao nibs
Equipment
1 small mason jar with lid
1 spoon
1 small whisk or fork
DIY Instructions
Pour the almond milk into the mason jar.
Add the chia seeds, cocoa powder, and maple syrup to the milk.
Stir the mixture vigorously with a whisk or a fork until the cocoa powder is fully blended.
Let the jar sit for 5 minutes and then stir it one more time to prevent clumps.
Place the lid on the jar and put it in the refrigerator for at least 4 hours or overnight.
Remove the jar from the fridge when you are ready to eat.
Top the pudding with the fresh raspberries and a dollop of almond butter.
Sprinkle the cacao nibs over the top for a little bit of crunch.
Enjoy your cold and creamy breakfast straight from the jar.
8. Sheet Pan Steak Fajitas with Lime
Meal Prep Recipes
Colorful bell peppers and red onions cover a large baking sheet next to strips of steak. The beef is seasoned with savory spices and roasted until it is perfectly tender. Slices of purple onion add a sweet and tangy flavor to the mix. Fresh lime wedges are ready to be squeezed over the hot ingredients.
This meal is portioned into clear containers for easy dinners later in the week. You can serve the fajita mix over rice or inside warm tortillas. Roasting everything on a single pan makes the cleanup process very fast and simple. The vibrant colors make this a visually appealing meal that tastes as good as it looks. It is a fantastic way to enjoy a restaurant favorite at home.
Ingredients
1 pound flank steak
3 bell peppers in different colors
1 large red onion
2 tablespoons olive oil
1 tablespoon cumin
1 tablespoon chili powder
2 fresh limes
1 teaspoon salt
Equipment
1 large baking sheet
1 wire cooling rack
Chef knife
Cutting board
4 meal prep containers
DIY Instructions
Set your oven to 425 degrees Fahrenheit and let it heat up.
Slice the flank steak into thin strips against the grain of the meat.
Cut the bell peppers and the red onion into long slices of the same size.
Place the meat and vegetables onto the baking sheet.
Drizzle olive oil over everything and sprinkle on the cumin, chili powder, and salt.
Use your hands to toss the ingredients until they are evenly coated with oil and spices.
Spread everything out in a single layer so it roasts evenly.
Bake for 15 to 20 minutes until the steak is cooked and the vegetables are soft.
Squeeze fresh lime juice over the pan and divide the mixture into your containers.
9. Zesty Thai Green Curry with Tofu and Veggies
Meal Prep Recipes
A deep black bowl holds a fragrant Thai green curry filled with fresh ingredients. Cubes of firm tofu soak up the creamy coconut milk sauce. Bright green snap peas and broccoli florets add a healthy crunch to the dish. Thin strips of red pepper and bamboo shoots provide extra texture and flavor.
A single sprig of cilantro and a lime wedge sit on top for a fresh finish. This meal is both hearty and light enough for a midday lunch. You can easily reheat this curry in the microwave without losing any flavor. Preparing a big batch of curry ensures you have a warm meal ready in minutes. It is a wonderful way to bring exotic flavors into your weekly routine.
Ingredients
1 block firm tofu
1 can coconut milk
2 tablespoons green curry paste
1 cup broccoli florets
1 cup snap peas
1 red bell pepper
1 can bamboo shoots
1 tablespoon soy sauce
Fresh cilantro and lime
Equipment
1 large pot
1 wooden spoon
Chef knife
Cutting board
DIY Instructions
Open the tofu package and drain the water. Press the tofu with a paper towel to remove extra moisture.
Cut the tofu into small cubes and slice the red pepper into thin strips.
Heat a large pot over medium heat and add the green curry paste.
Cook the paste for one minute until it smells very strong.
Pour in the coconut milk and stir until the paste is completely dissolved.
Add the tofu cubes, broccoli, snap peas, and bamboo shoots to the liquid.
Simmer the mixture for 10 minutes until the vegetables are tender but still green.
Stir in the soy sauce for a salty finish and turn off the heat.
Ladle the curry into bowls and garnish with cilantro and a squeeze of lime.
10. Zesty Greek Chickpea Mason Jar Salads
Meal Prep Recipes
Bright yellow lemon dressing pools at the bottom of these tall glass jars. A layer of hearty chickpeas and salty kalamata olives sits just above the liquid. Fluffy quinoa and halved cherry tomatoes add weight and freshness to the salad. Crisp cucumber slices and red onion bits provide a sharp and clean taste.
Fresh spinach leaves and crumbled feta cheese fill the top of the jar to keep them dry. These salads stay fresh for several days because the dressing does not touch the greens. You can tip the jar into a bowl for a beautiful presentation at lunchtime. This recipe is a great way to eat more vegetables without much effort. It makes your healthy eating habits much easier to maintain.
Ingredients
2 cans chickpeas
1 cup cooked quinoa
1 cup cherry tomatoes
1 cup kalamata olives
1 large cucumber
2 cups fresh spinach
1 cup crumbled feta cheese
1 cup lemon vinaigrette
Equipment
4 large mason jars with lids
1 small bowl
Chef knife
Cutting board
DIY Instructions
Rinse the chickpeas in a colander and slice the cherry tomatoes in half.
Chop the cucumber into small cubes and finely dice the red onion.
Pour three tablespoons of lemon vinaigrette into each mason jar.
Add a layer of chickpeas followed by a layer of olives into the jars.
Spoon the cooked quinoa on top of the olives to create a solid barrier.
Place the cherry tomatoes, cucumbers, and onions on top of the quinoa.
Stuff a handful of fresh spinach into the top of each jar.
Sprinkle the crumbled feta cheese over the spinach.
Close the lids tightly and store the jars in the fridge until you are ready to eat.
11. Freezer Friendly Egg and Black Bean Burritos
Meal Prep Recipes
These hand held breakfast burritos offer a colorful and filling start to your morning routine. Soft flour tortillas wrap around fluffy scrambled eggs and hearty black beans. Bright red and green bell peppers add a fresh crunch to every single bite. You can see the layers of protein and vegetables clearly in the cross section of the wrap.
Each burrito comes individually wrapped in silver foil to keep it fresh in the freezer. This method allows you to grab a healthy meal as you rush out the door. Reheating them takes only a few minutes in the microwave or oven. Preparing a large batch on the weekend ensures you have a nutritious breakfast all week long. It is a simple way to manage a busy schedule without skipping the most important meal.
Ingredients
8 large eggs
1 can black beans
1 red bell pepper
1 green bell pepper
8 large flour tortillas
1 cup shredded cheddar cheese
1 tablespoon olive oil
Salt and pepper
Equipment
Large nonstick skillet
Chef knife
Cutting board
Large mixing bowl
Aluminum foil sheets
DIY Instructions
Crack the eggs into a large bowl and whisk them until the yolks and whites are combined.
Dice the red and green bell peppers into small pieces using your knife and cutting board.
Rinse the black beans in a colander and let them drain completely.
Heat the olive oil in a skillet over medium heat and add the diced peppers.
Cook the peppers for five minutes until they are soft and then pour in the whisked eggs.
Stir the eggs gently until they are cooked through and then season with salt and pepper.
Lay a tortilla flat and place a scoop of eggs, a spoonful of beans, and some cheese in the center.
Fold the sides of the tortilla inward and roll it up tightly to create a burrito shape.
Wrap each finished burrito in a sheet of aluminum foil and store them in a freezer bag.
12. Honey Garlic Salmon Cubes with Broccoli
Meal Prep Recipes
Glass meal prep containers hold a delicious mix of glazed salmon and fresh greens. Small cubes of salmon are roasted until they have a golden brown finish. A sprinkle of white and black sesame seeds adds a light crunch and visual appeal. Bright green broccoli florets provide a healthy side that stays crisp for days.
Hearty brown rice fills the rest of the container to create a balanced meal. Sliced green onions offer a mild bite that complements the sweet glaze. These bowls are easy to stack and keep your fridge organized. You can enjoy a high quality seafood dinner at work without any extra effort. This recipe helps you eat more healthy fats during your busiest work days.
Ingredients
1 pound salmon fillet
2 cups brown rice
2 large heads of broccoli
3 tablespoons soy sauce
2 tablespoons honey
1 tablespoon sesame oil
2 green onions
Sesame seeds
Equipment
Baking sheet
Medium saucepan with lid
Chef knife
Cutting board
4 glass meal prep containers
DIY Instructions
Cook the brown rice in a saucepan with four cups of water until the liquid is gone.
Remove the skin from the salmon and cut the fish into small squares.
Mix the soy sauce, honey, and sesame oil in a small bowl to make the glaze.
Toss the salmon cubes in the glaze until every piece is covered.
Cut the broccoli into small bite sized pieces and place them on a baking sheet.
Add the salmon cubes to the baking sheet and roast at 400 degrees for 12 minutes.
Slice the green onions into thin rings while the food is in the oven.
Divide the cooked rice, roasted broccoli, and salmon into your four glass containers.
Garnish the salmon with sesame seeds and green onions before closing the lids.
13. Creamy Lemon Chicken and Spinach Orzo
Meal Prep Recipes
A large cream colored pot holds a comforting and fragrant chicken dish. Golden brown chicken thighs rest on a bed of tender orzo pasta. Fresh spinach leaves are stirred into the mixture for a boost of greens. Bright yellow lemon slices and zest provide a citrus flavor that cuts through the creaminess.
This one pot meal is excellent for saving time on cleaning up the kitchen. You can serve the chicken and pasta directly from the pot or portion it out for later. The sauce stays silky and rich even after being stored in the refrigerator. It provides a gourmet feel to your weekly lunch or dinner. Preparing this dish in bulk is a smart move for anyone with a full calendar.
Ingredients
4 bone in chicken thighs
1 cup orzo pasta
2 cups chicken broth
2 cups fresh spinach
1 large lemon
1/2 cup heavy cream
2 tablespoons olive oil
Salt and garlic powder
Equipment
Large dutch oven or deep pot
Wooden spoon
Tongs
Citrus zester or grater
DIY Instructions
Season the chicken thighs with salt and garlic powder on both sides.
Heat the olive oil in your pot over medium heat and sear the chicken until the skin is brown.
Remove the chicken from the pot and set it aside on a clean plate.
Pour the dry orzo into the same pot and stir it for one minute to toast the pasta.
Add the chicken broth and the juice from half of the lemon to the pot.
Place the chicken thighs back into the liquid and cover the pot with a lid.
Simmer the mixture for 15 minutes until the pasta is soft and the chicken is cooked.
Stir in the heavy cream and fresh spinach until the leaves wilt from the heat.
Top the dish with thin lemon slices and extra zest before serving or storing.
14. Roasted Sweet Potato and Black Bean Power Bowls
Meal Prep Recipes
These round glass bowls are packed with nutrient dense ingredients for a healthy lunch. Cubes of roasted sweet potato provide a natural sweetness and soft texture. Dark black beans and fluffy couscous make the meal very filling and satisfying. Bright pink pickled onions add a sharp tang that balances the earthy flavors.
A generous sprinkle of green pumpkin seeds adds a delightful crunch to the bowl. You can pour a zesty cilantro lime dressing over the top right before eating. These bowls look beautiful and stay fresh for up to four days in the fridge. They are a fantastic vegetarian option for your weekly meal prep routine. Eating a rainbow of vegetables has never been this simple or delicious.
Ingredients
3 large sweet potatoes
2 cans black beans
1 cup dry couscous
1/2 cup pickled red onions
1/4 cup pumpkin seeds
2 fresh limes
1/4 cup olive oil
1 teaspoon cumin
Equipment
Large baking sheet
Medium heat proof bowl
4 round meal prep containers
Small jars for dressing
DIY Instructions
Peel the sweet potatoes and cut them into small cubes for roasting.
Toss the potato cubes with olive oil and cumin on a baking sheet.
Roast the potatoes at 400 degrees for 25 minutes or until they are soft.
Place the dry couscous in a bowl and pour one cup of boiling water over it.
Cover the bowl with a plate and let it sit for five minutes before fluffing with a fork.
Drain and rinse the black beans under cold water in a sink.
Divide the couscous, black beans, and roasted potatoes into four containers.
Add a scoop of pickled onions and a sprinkle of pumpkin seeds to each bowl.
Mix lime juice and oil in small jars to use as a dressing when you are ready to eat.
15. Spinach and Cheddar Baked Egg Muffins
Meal Prep Recipes
A white plate holds a stack of fluffy and savory egg muffins. These small breakfast bites are filled with chopped green spinach and melted cheese. You can see the light and airy texture in the muffin that has a bite taken out. The golden tops indicate they were baked to a light and delicious finish.
Preparing these muffins is a great way to use up extra vegetables in your fridge. They are easy to grab and eat with one hand during a busy commute. You can store them in a container and reheat them in seconds for a hot meal. They provide a high protein start to the day without any sugar. This recipe is a favorite for kids and adults who need a quick breakfast.
Ingredients
10 large eggs
2 cups chopped fresh spinach
1 cup shredded cheddar cheese
1/4 cup milk
1/2 teaspoon salt
1/4 teaspoon black pepper
Nonstick cooking spray
Equipment
12 cup muffin tin
Large mixing bowl
Whisk
Measuring cups
DIY Instructions
Turn your oven on to 350 degrees so it can get hot while you prep.
Spray the inside of each muffin cup with nonstick spray to prevent sticking.
Crack all the eggs into a large bowl and add the milk, salt, and pepper.
Whisk the eggs until they are smooth and no streaks of yolk remain.
Stir the chopped spinach and shredded cheese into the egg mixture.
Pour the mixture into the muffin tin until each cup is about three quarters full.
Bake the muffins for 20 minutes or until the centers are firm to the touch.
Let the muffins cool in the pan for five minutes before removing them.
Store the cooled muffins in a sealed bag in the fridge for up to five days.
16. Herb Turkey Meatballs with Crisp Green Beans
Meal Prep Recipes
A wooden cutting board holds a pile of savory herb seasoned meatballs. Small green flecks of parsley and herbs are visible throughout the meat. A metal cookie scoop rests nearby to show how to get a uniform shape. Glass containers in the background are filled with fresh green beans for a complete meal.
A small bowl of creamy white dipping sauce adds a refreshing element to the dish. Turkey meatballs are a leaner alternative to beef and stay moist when reheated. This meal is simple to portion out for a week of healthy dinners. The green beans provide a snap that pairs well with the tender meat. You can save hours by baking a large batch of these at once.
Ingredients
2 pounds ground turkey
1/2 cup breadcrumbs
1 large egg
2 tablespoons chopped parsley
1 teaspoon garlic powder
1 pound fresh green beans
1 cup greek yogurt
1 tablespoon lemon juice
Equipment
Large baking sheet
Parchment paper
Medium cookie scoop
Large mixing bowl
DIY Instructions
Line a baking sheet with parchment paper to keep the meatballs from sticking.
Combine the ground turkey, breadcrumbs, egg, parsley, and garlic powder in a bowl.
Use your hands to mix the ingredients together until they are just combined.
Scoop out the meat using the cookie scoop and roll it into a round ball.
Place the meatballs on the baking sheet with a little space between each one.
Bake the meatballs at 375 degrees for 18 to 20 minutes.
Steam or blanch the green beans in boiling water for three minutes until they are bright green.
Mix the yogurt and lemon juice in a small bowl to create a dipping sauce.
Divide the meatballs and green beans into containers and add a dollop of sauce.
17. Rainbow Tofu and Veggie Thai Wraps
Meal Prep Recipes
Two thick wraps are stacked on top of each other against a bright orange and blue background. The interior of the wrap shows beautiful layers of purple cabbage and orange carrots. Firm cubes of tofu and green snap peas provide a satisfying and healthy filling. A thick layer of savory orange spread holds all the vegetables in place.
A small bowl of creamy peanut sauce sits nearby for dipping each bite. These wraps are a fresh and crunchy option for a midday lunch at your desk. They are easy to pack in a lunch box and do not require any reheating. Using a variety of colors makes the meal feel special and full of nutrients. This is a smart way to enjoy a plant based meal that feels very indulgent.
Ingredients
2 large whole wheat tortillas
1 block extra firm tofu
1 cup shredded purple cabbage
1 cup matchstick carrots
1/2 cup snap peas
1/2 cup hummus or red pepper spread
1/2 cup peanut dressing
1 tablespoon soy sauce
Equipment
Chef knife
Cutting board
Small skillet
Clean kitchen towel
DIY Instructions
Wrap the tofu in a clean towel and place a heavy book on top for ten minutes.
Slice the pressed tofu into long strips and cook them in a skillet with soy sauce.
Lay a tortilla flat on your cutting board and spread the hummus over the entire surface.
Place a handful of purple cabbage and carrots in a line across the center.
Add the cooked tofu strips and snap peas on top of the vegetables.
Fold the bottom of the tortilla up and roll it tightly to enclose the filling.
Use a sharp knife to cut the wrap in half at a diagonal angle.
Serve the wraps with a side of peanut sauce for dipping.
Store the wraps in a tight container to keep the tortilla soft.
18. Sheet Pan Sausage with Brussels Sprouts and Squash
Meal Prep Recipes
A large copper baking sheet is filled with a hearty mix of roasted autumn vegetables. Sliced smoked sausages are nestled between charred Brussels sprouts and orange butternut squash. Red onion wedges add a sweet and savory flavor to the entire pan. Tongs are shown moving a piece of sausage into a glass storage container.
This meal is a great example of efficient cooking with very little cleanup. Everything cooks at the same temperature and time for a stress free evening. The roasted flavors develop a deep richness that tastes even better the next day. You can serve this over a bed of grains or eat it just as it is. It is a warm and comforting option for chilly nights during a busy week.
Ingredients
1 package smoked sausage
1 pound Brussels sprouts
2 cups cubed butternut squash
1 large red onion
3 tablespoons olive oil
1 teaspoon dried thyme
1/2 teaspoon salt
Equipment
1 large rimmed baking sheet
Chef knife
Cutting board
Metal tongs
4 glass containers
DIY Instructions
Slice the sausage into thick rounds using your knife and cutting board.
Cut the Brussels sprouts in half and slice the red onion into thick wedges.
Spread the sausage, sprouts, squash, and onions out on the baking sheet.
Drizzle the olive oil over the top and sprinkle with thyme and salt.
Use your hands or tongs to toss everything until the oil covers every piece.
Bake the mixture at 400 degrees for 25 to 30 minutes until the squash is tender.
Stir the ingredients halfway through the cooking time to ensure even browning.
Let the pan cool slightly before dividing the food into four meal prep containers.
Seal the containers and keep them in the fridge for a quick reheat later.
19. Slow Simmered Chickpea and Apricot Stew
Meal Prep Recipes
A deep black pot holds a steaming red stew filled with hearty chickpeas. Bright orange dried apricots are scattered throughout the sauce for a touch of sweetness. The rich tomato base is seasoned with fragrant spices that fill the kitchen with warmth. Glass containers nearby show the stew paired with fluffy yellow couscous.
Slices of crusty bread sit on small plates ready for dipping into the savory liquid. This Moroccan inspired meal is both filling and full of unique flavors. Cooking the stew in a large batch allows you to have several healthy lunches ready. The sweetness of the fruit balances the savory spices for a complex taste. It is a wonderful vegetarian dish that feels very substantial.
Ingredients
2 cans chickpeas
1 can crushed tomatoes
1 cup dried apricots
1 large yellow onion
2 cups vegetable broth
2 cups dry couscous
1 tablespoon cumin
1 tablespoon cinnamon
Equipment
Large heavy pot with lid
Wooden spoon
Measuring cups
4 glass meal prep containers
DIY Instructions
Dice the yellow onion and cook it in the pot with a little oil until it is soft.
Add the chickpeas, tomatoes, apricots, and vegetable broth to the pot.
Stir in the cumin and cinnamon to give the stew its signature flavor.
Bring the liquid to a boil and then lower the heat to a simmer.
Cover the pot and let it cook for 30 minutes so the flavors can blend.
Prepare the couscous by soaking it in two cups of boiling water for five minutes.
Fluff the couscous with a fork and portion it into the glass containers.
Ladle the hot stew over the couscous until the containers are full.
Serve with a slice of bread or store in the fridge for a healthy meal later.
20. Crunchy Tuna Salad Mason Jar Salads
Meal Prep Recipes
Tall glass jars showcase a smart way to store tuna salad without it getting soggy. A layer of grainy mustard and dressing sits at the very bottom of the jar. Diced green celery and red onions provide a crisp and flavorful barrier. Flaky tuna is layered in the middle to keep it away from the dressing until you are ready.
Fresh green parsley and sunflower seeds fill the top of the jar for maximum freshness. You can see a fork lifting a bite of the salad from the center jar. These jars are easy to transport and fit neatly into a bag for work. Shaking the jar before you eat mixes all the layers into a delicious salad. It is a clever way to keep your seafood lunch fresh and appetizing.
Ingredients
2 cans tuna in water
1 cup diced celery
1/2 cup diced red onion
1/2 cup fresh parsley
1/4 cup sunflower seeds
4 tablespoons grainy mustard
2 tablespoons olive oil
1 tablespoon lemon juice
Equipment
4 pint sized mason jars with lids
1 small mixing bowl
Chef knife
Cutting board
DIY Instructions
Drain the water from the tuna cans and place the fish in a small bowl.
Mix the mustard, olive oil, and lemon juice in the bottom of each mason jar.
Chop the celery and red onion into small uniform pieces.
Add a layer of diced celery and onion on top of the dressing in the jars.
Place a portion of the tuna on top of the vegetables in each jar.
Finely chop the fresh parsley and add it to the jar as the next layer.
Sprinkle the sunflower seeds on the very top for a final crunch.
Close the lids tightly and store the jars upright in your refrigerator.
Shake the jar vigorously right before you want to eat to coat everything in dressing.
21. Savory Red Lentil Pasta Bolognese
Meal Prep Recipes
A hearty plant based sauce covers these twisted pasta noodles. The thick red sauce features tender lentils that provide a satisfying texture and plenty of protein. A wooden spoon rests in a white bowl showing off the rich consistency of the meal. You can see several containers stacked in the background ready for a week of easy lunches.
This recipe is a fantastic way to enjoy a classic comfort dish without much effort. The sauce holds its flavor well when stored in the fridge or freezer. Using rotini pasta helps catch every bit of the savory sauce in its spirals. You will appreciate having a nutritious meal waiting for you after a long day at work. It simplifies your evening routine while keeping you full and happy.
Ingredients
1 box red lentil or whole wheat rotini pasta
2 cans crushed tomatoes
1 cup dry red lentils
1 large yellow onion
2 cloves garlic
1 tablespoon olive oil
1 teaspoon dried basil
1 teaspoon salt
1/2 teaspoon black pepper
Equipment
1 large pot for pasta
1 medium saucepan for sauce
1 wooden spoon
1 chef knife
1 cutting board
4 plastic or glass storage containers
DIY Instructions
Fill a large pot with water and add a pinch of salt. Bring the water to a rolling boil on your stove.
Add the pasta to the boiling water and cook it until it is soft but still firm. Drain the water out using a colander in the sink.
Peel the onion and garlic skin away. Chop the onion into very small pieces and mince the garlic finely.
Heat the olive oil in a saucepan over medium heat. Add the onions and cook them until they look clear.
Stir in the garlic, crushed tomatoes, and dry lentils. Add one cup of water to help the lentils soften.
Cover the pan and let the sauce simmer for 20 minutes. Stir it occasionally so it does not stick to the bottom.
Season the sauce with basil, salt, and pepper once the lentils are tender.
Place a portion of pasta into each of your four containers.
Pour a generous amount of the lentil sauce over the noodles and seal the lids tightly.
22. Vibrant Black Rice and Beet Poke Bowls
Meal Prep Recipes
This wooden bowl is filled with a stunning array of colorful and fresh ingredients. Deep purple black rice serves as a nutritious base for the meal. Cubes of roasted beets and bright green edamame beans create a beautiful visual contrast. Thinly sliced radishes and pickled ginger add a sharp and refreshing bite to the bowl.
A small side of soy sauce and a pair of chopsticks sit ready for use. These bowls look like they came from a high end restaurant but are simple to make at home. Glass containers keep the different elements fresh and crisp for several days. Preparing these in advance ensures you have a healthy and light lunch option. The variety of textures makes every mouthful interesting and delicious.
Ingredients
2 cups black rice
3 medium beets
2 cups shelled edamame
4 radishes
1/2 cup pickled ginger
1 sheet dried seaweed
1/4 cup soy sauce
2 tablespoons rice vinegar
1 teaspoon sesame seeds
Equipment
1 medium pot with lid
1 baking sheet
1 chef knife
1 cutting board
4 glass meal prep containers
4 small sauce cups
DIY Instructions
Rinse the black rice under cold water until the water runs clear. Put the rice in a pot with four cups of water and bring it to a boil.
Lower the heat to a simmer and cover the pot. Cook the rice for 30 minutes or until all the liquid is absorbed.
Preheat your oven to 400 degrees. Peel the beets and cut them into small even cubes.
Place the beet cubes on a baking sheet and roast them for 25 minutes. Let them cool before adding them to the bowls.
Slice the radishes into paper thin circles and cut the seaweed sheet into tiny strips.
Boil the edamame beans in water for three minutes and then drain them.
Divide the cooked black rice among your four containers.
Arrange the beets, edamame, radishes, and pickled ginger on top of the rice in neat sections.
Top the bowls with seaweed strips and sesame seeds. Pour the soy sauce into small cups to keep on the side.
23. Quick Beef and Broccoli Stir Fry with Jasmine Rice
Meal Prep Recipes
A steaming black wok holds a classic combination of tender beef and bright broccoli. The meat is sliced into thin strips and coated in a glossy savory sauce. Large broccoli florets stay crisp and green during the quick cooking process. You can see a wooden spatula tossing the ingredients over a hot blue flame.
One black container is already filled with a portion of fluffy white jasmine rice and the stir fry. This meal is a reliable choice for busy weeknights when you need something fast. It reheats beautifully and keeps its flavor for several days. Making your own stir fry allows you to control the amount of salt and oil. It is a smart way to enjoy a favorite takeout dish while staying on a budget.
Ingredients
1 pound flank steak
2 large heads of broccoli
2 cups jasmine rice
1/2 cup soy sauce
2 tablespoons brown sugar
1 tablespoon minced ginger
2 tablespoons cornstarch
2 tablespoons vegetable oil
Sesame seeds
Equipment
1 large wok or deep skillet
1 medium pot for rice
1 wooden spatula
1 small mixing bowl
4 black meal prep containers
DIY Instructions
Put the jasmine rice in a pot with three cups of water. Bring it to a boil and then simmer with a lid for 15 minutes.
Slice the beef into thin strips across the grain of the meat. This makes the beef much easier to chew.
Cut the broccoli into small bite sized florets. Discard the thick bottom stems.
Mix the soy sauce, brown sugar, ginger, and cornstarch in a small bowl. Stir it until the sugar dissolves.
Heat the oil in your wok over high heat until it starts to shimmer.
Add the beef strips to the wok and cook them until they are brown on all sides. Remove the meat and set it aside.
Toss the broccoli into the hot wok and add two tablespoons of water. Cover the wok for two minutes to steam the greens.
Pour the beef and the sauce mixture back into the wok. Stir everything together until the sauce becomes thick and shiny.
Spoon the rice into your containers and top them with the beef and broccoli. Sprinkle sesame seeds over the top for a final touch.
24. High Protein Bistro Breakfast Boxes
Meal Prep Recipes
These glass bento boxes offer a balanced and fresh start to your morning. Each container holds two soft boiled eggs with bright orange yolks. A mix of fresh blackberries and raspberries adds a burst of sweetness and antioxidants. Cubes of white feta cheese and sliced green kiwi provide a unique flavor combination.
A handful of crunchy walnuts and almonds adds healthy fats to keep you full longer. These boxes require no cooking once the eggs are prepared. You can assemble them in minutes on a Sunday evening for the whole week. They are easy to grab as you head out the door for work or school. This variety of food groups ensures you get the energy you need for a chaotic day.
Ingredients
8 large eggs
1 pint blackberries
1 pint raspberries
2 ripe kiwi fruits
1 cup feta cheese cubes
1/2 cup walnuts
1/2 cup whole almonds
Black pepper
Equipment
1 small saucepan
1 chef knife
1 cutting board
4 glass bento style containers with dividers
DIY Instructions
Place the eggs in a saucepan and cover them with two inches of cold water.
Bring the water to a boil and then immediately turn off the heat. Let the eggs sit in the hot water for seven minutes.
Move the eggs to a bowl filled with ice and cold water to stop the cooking.
Peel the kiwi skin away and slice the fruit into round circles.
Rinse the berries under cold water and pat them dry with a paper towel.
Peel the cooled eggs and cut them in half lengthways to show the yolks.
Place the egg halves into one section of your storage containers.
Divide the kiwi slices, blackberries, and raspberries into the second section.
Fill the remaining sections with the cheese cubes, walnuts, and almonds.
Sprinkle a tiny bit of black pepper over the eggs if you like a little spice.
25. Zesty Pesto Chicken and Zoodle Mason Jars
Meal Prep Recipes
A tall glass jar displays beautiful layers of a fresh and healthy salad. A thick base of creamy green pesto dressing sits at the bottom of the jar. Slices of grilled chicken and juicy cherry tomatoes create a hearty middle layer. Fresh spinach leaves and a tall pile of zucchini noodles fill the rest of the space.
Bright yellow lemon zest is sprinkled on the very top for a citrus aroma. These jars keep the zucchini noodles crisp because they stay far away from the dressing. You can shake the jar before eating to coat every ingredient in the pesto sauce. This low carb meal is light yet satisfying for a warm afternoon lunch. It is an excellent way to use fresh summer vegetables in your meal prep.
Ingredients
2 large zucchinis
2 grilled chicken breasts
1 cup cherry tomatoes
2 cups fresh spinach
1 cup basil pesto
1 large lemon
1/2 cup grated parmesan cheese
Equipment
1 spiralizer for zucchini
4 large mason jars with lids
1 chef knife
1 cutting board
1 citrus zester
DIY Instructions
Use a spiralizer tool to turn the zucchinis into long thin noodles. If you do not have one you can buy them pre made at the store.
Slice the grilled chicken into small strips and cut the cherry tomatoes in half.
Pour three tablespoons of pesto sauce into the bottom of each mason jar.
Add a layer of chicken strips followed by the tomato halves on top of the sauce.
Pack a handful of spinach leaves into the jar to act as a barrier.
Place a large portion of zucchini noodles on top of the spinach.
Use a zester to grate the yellow part of the lemon peel over the noodles.
Sprinkle some parmesan cheese on the very top and close the lid tightly.
Store the jars upright in the fridge and shake them well just before you serve the salad.
26. Sheet Pan Roasted Gnocchi and Peppers
Meal Prep Recipes
Golden brown gnocchi cover this large baking sheet along with colorful vegetables. Slices of yellow and red bell peppers roast until they are sweet and tender. Large wedges of red onion add a savory depth to the entire pan. The gnocchi become crispy on the outside while remaining soft and pillowy on the inside.
This one pan method is a clever way to cook pasta without boiling any water. Everything finishes at the same time which makes the process very efficient. You can easily divide the mixture into containers for a quick vegetarian dinner. The charred edges of the vegetables provide a wonderful smoky flavor. It is a simple recipe that requires very little active work in the kitchen.
Ingredients
1 package shelf stable gnocchi
2 bell peppers
1 large red onion
3 tablespoons olive oil
1 teaspoon garlic powder
1 teaspoon dried oregano
1/2 teaspoon salt
Equipment
1 large rimmed baking sheet
1 chef knife
1 cutting board
1 large mixing bowl
4 meal prep containers
DIY Instructions
Set your oven to 400 degrees and let it get hot while you prepare the food.
Cut the bell peppers into long strips and slice the red onion into thick wedges.
Open the package of gnocchi and put the pieces into a large mixing bowl.
Add the peppers and onions to the bowl with the gnocchi.
Drizzle the olive oil over the ingredients and sprinkle in the garlic powder, oregano, and salt.
Toss everything with your hands or a spoon until the oil and spices cover every piece.
Spread the mixture onto the baking sheet in a single layer. Make sure nothing is piled up too high.
Roast the pan for 20 to 25 minutes. Stir the ingredients halfway through to ensure they brown evenly.
Let the meal cool slightly before you put it into your storage containers.
27. Creamy Curry Chicken Lettuce Wraps with Cashews
Meal Prep Recipes
A large metal bowl holds a mountain of savory and creamy chicken salad. Shredded chicken is mixed with a bright yellow curry sauce that smells amazing. Crunchy cashews and sweet dark raisins are folded into the mixture for extra texture. You can see fresh green celery bits and lettuce leaves ready for filling.
This recipe is a light and refreshing way to enjoy a protein rich lunch. The lettuce wraps keep the meal low in carbs while providing a satisfying crunch. You can store the chicken salad in a container and pack the lettuce separately. Assembly takes only a few seconds when you are ready to eat at your desk. It is a classic dish that feels special thanks to the warm spices and nuts.
Ingredients
3 cups shredded cooked chicken
1 cup mayonnaise or greek yogurt
2 tablespoons curry powder
1/2 cup roasted cashews
1/2 cup raisins
2 stalks celery
1 head of romaine or butter lettuce
1 tablespoon honey
Equipment
1 large mixing bowl
1 wooden spoon
1 chef knife
1 cutting board
4 meal prep containers
DIY Instructions
Chop the celery into very tiny pieces and roughly chop the cashews so they are easier to eat.
Put the mayonnaise, curry powder, and honey into a large mixing bowl. Stir them until the sauce is a solid yellow color.
Add the shredded chicken, celery, cashews, and raisins to the bowl.
Mix everything together with a large spoon until the chicken is fully coated in the sauce.
Wash the lettuce head and pull away the large outer leaves. Pat them dry with a clean towel.
Spoon the chicken salad into your storage containers.
Place the dry lettuce leaves in a separate bag or a small container so they stay crisp.
When you are ready for lunch simply scoop the chicken salad into a lettuce leaf and wrap it up.
You can also add some crackers on the side for an extra crunch.
28. Seeded Salmon Fillet with Roasted Asparagus
Meal Prep Recipes
A black container holds a beautiful piece of salmon covered in toasted seeds. The fish is seasoned with a blend of white and black sesame seeds for a savory crust. A large bundle of bright green asparagus spears sits next to the salmon. A fresh lemon wedge is tucked into the corner to brighten the flavors of the dish.
This meal is a great choice for anyone looking for a high protein and healthy dinner. The salmon stays juicy and flaky when it is roasted in the oven. Asparagus is a quick cooking vegetable that pairs naturally with seafood. You can prepare several of these containers at once to save time during the week. It looks elegant and tastes like a gourmet meal from a professional kitchen.
Ingredients
4 salmon fillets
1 bunch fresh asparagus
1/4 cup everything bagel seasoning or mixed sesame seeds
2 tablespoons olive oil
1 large lemon
1/2 teaspoon salt
Equipment
1 baking sheet
1 sheet of parchment paper
1 chef knife
4 meal prep containers
DIY Instructions
Line your baking sheet with parchment paper to make cleaning up much easier.
Trim the tough woody ends off the bottom of the asparagus stalks.
Place the salmon fillets on one side of the baking sheet and the asparagus on the other side.
Drizzle olive oil over the fish and the vegetables.
Press the seeds firmly into the top of each salmon fillet to create a thick coating.
Sprinkle a little salt over the asparagus and place the pan in a 400 degree oven.
Bake for 12 to 15 minutes until the salmon is cooked through and the asparagus is tender.
Cut the lemon into four wedges and place one in each of your containers.
Move the cooked fish and greens into the containers and seal them once they have cooled.
29. Golden Red Lentil Soup with Fresh Herbs
Meal Prep Recipes
A steaming bowl of orange lentil soup sits on a light gray surface. The texture is smooth and creamy with small whole lentils visible in the liquid. A wooden spoon dips into the soup showing how thick and satisfying the meal is. You can see a stack of containers in the background filled with extra portions for later.
This soup is a warm and comforting option for cold or busy days. It is made with simple ingredients that are easy to find and very affordable. Red lentils break down quickly which makes the cooking time quite short. You can reheat this soup in a microwave for a fast and healthy lunch. The fresh green herbs on top add a touch of color and a clean finish.
Ingredients
2 cups dry red lentils
1 quart vegetable broth
1 large carrot
1 yellow onion
2 cloves garlic
1 tablespoon olive oil
1 teaspoon cumin
1 teaspoon turmeric
Fresh parsley
Equipment
1 large soup pot
1 wooden spoon
1 chef knife
1 cutting board
4 meal prep containers
DIY Instructions
Peel the onion, carrot, and garlic. Dice them into small pieces using your knife.
Heat the olive oil in your large pot and add the vegetables. Cook them until they are soft.
Stir in the cumin and turmeric to toast the spices for one minute.
Add the dry red lentils and the vegetable broth to the pot.
Bring the liquid to a boil and then lower the heat to a simmer.
Cover the pot and let it cook for 20 minutes. The lentils will turn soft and the soup will thicken.
Season the soup with salt and pepper to your taste.
Ladle the hot soup into your four containers and let them cool down.
Chop some fresh parsley and sprinkle it over each portion before you close the lids.
30. Grilled Chicken Fiesta Bowls with Charred Corn
Meal Prep Recipes
Four round black bowls are arranged in a perfect square on a white table. Each bowl is packed with a variety of colorful and fresh ingredients. Strips of grilled chicken rest on a bed of brown rice and black beans. Bright yellow charred corn and sliced radishes add a beautiful pop of color to the meal.
A small cup of red salsa sits in the center for dipping or pouring. Fresh cilantro and lime wedges provide a zesty finish to every bowl. These meals are great for staying on track with your health goals. They provide a massive amount of fiber and protein to keep you energized. Preparing these bowls takes the guesswork out of your daily nutrition.
Ingredients
2 pounds chicken breast
2 cups brown rice
2 cans black beans
2 cups frozen or canned corn
4 radishes
2 fresh limes
1 bunch cilantro
1 cup salsa
Taco seasoning
Equipment
1 large skillet or grill pan
1 medium pot for rice
4 round meal prep containers
4 small sauce cups
DIY Instructions
Cook the brown rice in a pot with four cups of water until it is fluffy.
Season the chicken breasts with taco seasoning and grill them in a skillet until they are done.
Slice the cooked chicken into long thin strips.
Place the corn in a dry skillet over high heat for five minutes until the edges turn black.
Rinse the black beans and slice the radishes into thin circles.
Scoop a portion of rice and beans into each of the four bowls.
Add the chicken strips, charred corn, and radish slices on top of the base.
Place a handful of cilantro and a lime wedge into each container.
Fill the small cups with salsa and place one in the middle of each bowl.
31. Smoked Salmon and Herb Cream Cheese Pinwheels
Meal Prep Recipes
These elegant wraps feature vibrant layers of pink smoked salmon and fresh green herbs. Creamy white spread holds everything together inside a soft flour tortilla. Salty capers add a sharp bite to the middle of each roll.
Fresh dill and lemon zest provide a bright aroma that makes this lunch feel light. You can slice these into small circles for easy snacking or a quick desk lunch. Glass plates showcase the beautiful spiral pattern of the ingredients. Preparing these in advance keeps your morning routine simple and fast.
Ingredients
4 large flour tortillas
8 ounces smoked salmon
1 container herb cream cheese
1 bunch fresh dill
2 tablespoons capers
1 lemon for zest
1 cup fresh spinach
Equipment
Large cutting board
Sharp chef knife
Small spatula or spoon
Plastic wrap
DIY Instructions
Lay one flour tortilla flat on a clean cutting board or countertop.
Use a small spatula to spread a thick layer of herb cream cheese over the entire surface.
Place a single layer of smoked salmon over the cheese until it is mostly covered.
Sprinkle the fresh dill, lemon zest, and capers evenly across the fish.
Add a thin layer of spinach leaves on top for extra crunch and color.
Roll the tortilla up as tightly as possible to create a long log shape.
Wrap the log in plastic wrap and let it sit in the fridge for thirty minutes.
Remove the plastic and use a sharp knife to cut the log into one inch circles.
Arrange the pinwheels in your meal prep container and keep them cold until you eat.
32. Slow Cooker Beef Stew with Parsnips
Meal Prep Recipes
A large black slow cooker holds a rich and savory beef stew. Thick chunks of tender meat simmer with orange carrots and golden potatoes in a dark gravy. Long white parsnips with fresh rosemary sprigs sit on top of the individual portions.
This hearty meal is great for cold evenings when you need a warm hug in a bowl. Each glass container is filled to the brim with high protein ingredients. Cooking a big batch at once saves you from prepping every single night. The flavors only get better as the stew sits in your fridge.
Ingredients
2 pounds beef stew meat
4 large carrots
4 yellow potatoes
2 large parsnips
1 yellow onion
4 cups beef broth
2 tablespoons tomato paste
3 sprigs fresh rosemary
2 tablespoons cornstarch
Equipment
6 quart slow cooker
Large cutting board
Chef knife
Small mixing bowl
4 glass meal prep containers
DIY Instructions
Cut the beef into small cubes and dice the onion into fine pieces.
Peel the carrots, potatoes, and parsnips with a vegetable peeler or knife.
Slice the carrots and parsnips into rounds and cut the potatoes into chunks.
Place the meat, onions, carrots, and potatoes into the bottom of the slow cooker.
Mix the beef broth and tomato paste in a bowl before pouring it over the ingredients.
Set the machine to cook on low for eight hours or until the beef is very soft.
Stir the cornstarch with a little water and add it to the pot during the last thirty minutes.
Ladle the hot stew into your containers and place a parsnip and rosemary sprig on top.
Let the meals cool down before you put the lids on and store them in the fridge.
33. Rainbow Veggie Wraps with Hummus
Meal Prep Recipes
These thick tortillas are stuffed with a colorful variety of garden fresh vegetables. Deep purple beets and bright yellow peppers create a stunning rainbow effect. Crisp green spinach and crunchy sprouts add a lot of volume without the extra calories.
A savory orange hummus spread acts as a delicious glue for all the layers. These wraps stay firm and do not get soggy during the day. You can wrap them in parchment paper for a portable lunch on the go. This recipe is a fantastic way to eat more plants throughout your week.
Ingredients
4 large whole wheat tortillas
1 cup red pepper hummus
2 cups fresh spinach
1 cup shredded beets
1 yellow bell pepper
1 cup alfalfa sprouts
1 large cucumber
Salt and pepper
Equipment
Large cutting board
Chef knife
Spreading knife
Parchment paper or foil
DIY Instructions
Place one tortilla flat on the cutting board so you have space to work.
Spread two large spoonfuls of hummus over the center of the wrap.
Layer a handful of spinach leaves over the hummus to cover the surface.
Add the shredded beets and yellow pepper strips in neat rows.
Top the vegetables with a bunch of alfalfa sprouts and thin cucumber slices.
Sprinkle a tiny bit of salt and pepper over the greens for extra flavor.
Fold the left and right sides of the tortilla toward the middle.
Roll the wrap from the bottom up while keeping the filling tucked inside.
Slice the wrap in half and secure it with parchment paper for your lunch box.
34. Bistro Snack Boxes with Salami and Cheese
Meal Prep Recipes
Glass containers are filled with a variety of bite sized treats for an easy lunch. Salty salami rosettes and creamy white cheese cubes offer a satisfying protein boost. Crunchy crackers and fresh cucumber slices provide a nice texture contrast.
Sweet dried apricots and briny green olives fill the small compartments. These boxes are great for people who enjoy grazing throughout the afternoon. You can assemble four boxes at once to keep your fridge stocked. It feels like having a personal charcuterie board at your desk every day.
Ingredients
1 package sliced salami
8 ounces white cheddar cheese
1 box whole grain crackers
1 large cucumber
1 cup green olives
1 cup dried apricots
1/2 cup almonds
Equipment
3 compartment glass meal prep containers
Chef knife
Cutting board
DIY Instructions
Slice the white cheddar cheese into small cubes using your chef knife.
Cut the cucumber into thick rounds and then slice those rounds in half.
Take a slice of salami and fold it in half and then half again to make a rosette.
Place the meat rosettes and cheese cubes into the largest section of the container.
Put a stack of crackers and a few cucumber slices into the second section.
Fill the smallest section with green olives, dried apricots, and a few almonds.
Repeat this process until all four of your snack boxes are full.
Check that the lids are sealed tightly so the crackers stay crunchy.
Store the boxes in the refrigerator for up to five days of easy snacking.
35. Instant Pot Shredded Salsa Chicken
Meal Prep Recipes
Tongs lift a portion of juicy shredded chicken from a stainless steel pressure cooker. The meat is coated in a zesty red salsa that looks incredibly appetizing. Containers in the background hold fluffy white rice and steamed green broccoli.
This recipe is one of the fastest ways to prep a large amount of protein. You can use the chicken for bowls, tacos, or even over a salad. The high pressure cooking method keeps the meat very tender and moist. It helps you avoid the dry chicken blues often found in meal prep.
Ingredients
2 pounds chicken breasts
2 cups red salsa
1 tablespoon taco seasoning
1/2 cup chicken broth
4 cups cooked white rice
4 cups broccoli florets
Equipment
Instant Pot or pressure cooker
2 large forks for shredding
4 meal prep containers
Tongs
DIY Instructions
Place the raw chicken breasts into the bottom of the Instant Pot inner pot.
Pour the red salsa, chicken broth, and taco seasoning over the meat.
Close the lid and set the valve to the sealing position.
Cook the chicken on high pressure for twelve minutes and then let the pressure release.
Use tongs to move the cooked chicken to a large bowl or plate.
Shred the meat into small pieces using two forks while it is still hot.
Pour a little bit of the leftover sauce from the pot over the shredded meat.
Portion the white rice and steamed broccoli into your containers.
Add a large scoop of the salsa chicken to each bowl and seal the lids.
36. Mediterranean Roasted Vegetables with Hummus
Meal Prep Recipes
A large baking sheet is covered in a mix of charred Mediterranean vegetables. Cubes of eggplant, zucchini, and peppers are roasted until they are sweet and soft. A glass container nearby holds a portion of the veggies next to a scoop of smooth hummus.
Fresh thyme sprigs add an earthy fragrance to the entire pan. This dish is naturally vegan and full of fiber to keep you feeling full. Roasting everything at once is a very efficient way to handle your grocery haul. You can enjoy these warm or cold depending on your preference.
Ingredients
1 large eggplant
2 medium zucchinis
2 red bell peppers
1 large red onion
1/4 cup olive oil
1 tablespoon dried oregano
4 sprigs fresh thyme
1 cup hummus
Equipment
1 large rimmed baking sheet
Chef knife
Cutting board
Large mixing bowl
4 glass containers
DIY Instructions
Turn your oven on to 400 degrees so it is ready for roasting.
Cut the eggplant, zucchini, and peppers into one inch cubes.
Slice the red onion into thick wedges and place all the veggies in a bowl.
Drizzle olive oil over the vegetables and sprinkle on the oregano and salt.
Toss the mixture until every piece is coated and then spread it on the baking sheet.
Place the fresh thyme sprigs on top and roast for twenty five minutes.
Stir the vegetables halfway through to make sure they brown on all sides.
Divide the roasted vegetables into four glass meal prep containers.
Add a large dollop of hummus to the side of each container once the food cools.
37. Garlic Butter Shrimp and Asparagus
Meal Prep Recipes
Pink grilled shrimp are lined up neatly next to a bundle of green asparagus spears. Two bright yellow lemon slices rest on top to provide a fresh citrus finish. The shrimp are seasoned with red pepper flakes for a tiny bit of heat.
This meal is very light and cooks in less than fifteen minutes. It is a smart choice for a healthy dinner that does not feel heavy. Glass containers keep the seafood fresh and prevent any odors from leaking out. You can add a side of quinoa if you want a more filling meal.
Ingredients
1 pound large shrimp, peeled and deveined
2 bunches fresh asparagus
3 tablespoons butter or olive oil
3 cloves minced garlic
1 teaspoon red pepper flakes
1 large lemon
Salt and pepper
Equipment
Large skillet
Chef knife
Cutting board
4 glass storage containers
DIY Instructions
Wash the asparagus and snap off the woody bottom ends of the stalks.
Mince the garlic into very small pieces and slice the lemon into rounds.
Heat the butter or oil in your skillet over medium high heat.
Add the asparagus to the pan and cook for five minutes until it is tender.
Move the asparagus to one side of the pan and add the shrimp and garlic.
Season the shrimp with red pepper flakes, salt, and pepper as they cook.
Flip the shrimp after two minutes and cook until they are pink and opaque.
Remove the pan from the heat and squeeze a little lemon juice over everything.
Divide the shrimp and asparagus into your containers and top with a lemon slice.
38. Taco Stuffed Sweet Potatoes with Black Beans
Meal Prep Recipes
Roasted sweet potato skins are filled with a savory mix of black beans and corn. Melted yellow cheese and fresh green cilantro garnish the top of each boat. A black plate holds a stack of these filling and nutritious meals.
This plant based dinner is full of complex carbohydrates and healthy fiber. The sweetness of the potato balances the salty taco seasonings perfectly. You can reheat these easily in the microwave for a fast weeknight dinner. They are a fun twist on traditional taco night that your family will love.
Ingredients
4 medium sweet potatoes
1 can black beans
1 cup frozen corn
1 tablespoon taco seasoning
1 cup shredded cheddar cheese
1 bunch fresh cilantro
1/2 cup sour cream
Equipment
Baking sheet
Large spoon
Medium mixing bowl
4 meal prep containers
DIY Instructions
Poke holes in the sweet potatoes with a fork and bake them at 400 degrees for forty five minutes.
Rinse the black beans in a colander and mix them with the corn in a bowl.
Stir the taco seasoning into the bean and corn mixture until it is coated.
Slice the hot potatoes in half lengthways and gently scoop out some of the flesh.
Mix the potato flesh with the beans and corn and then spoon the filling back into the skins.
Sprinkle a generous amount of cheese over each potato and put them back in the oven for five minutes.
Remove the potatoes once the cheese is bubbly and let them cool slightly.
Place each stuffed potato into a container and garnish with fresh cilantro.
Pack a small side of sour cream to use when you reheat the meal.
39. Pesto Chicken and Grain Bowls with Greens
Meal Prep Recipes
Glass containers hold a balanced mix of sliced chicken and green vegetables. The chicken is coated in a vibrant basil pesto that adds a lot of flavor. Hearty grains and crisp cucumbers provide a solid and refreshing base.
A small jar of creamy herb dressing sits in the corner for a final touch. This meal stays fresh for days and provides a lot of energy for your afternoon. Bright green peas and kale add extra nutrients to every single forkful. Preparing these bowls ensures you never have a boring lunch at work again.
Ingredients
2 large chicken breasts
1 cup basil pesto
2 cups cooked farro or barley
1 large cucumber
1 cup sugar snap peas
2 cups chopped kale
1/2 cup creamy ranch or herb dressing
Equipment
Large skillet or grill pan
4 glass meal prep containers
4 small dressing jars
Chef knife
DIY Instructions
Season the chicken with salt and cook it in a skillet until the center is no longer pink.
Let the meat rest for five minutes before you slice it into thin strips.
Toss the chicken strips in a bowl with the pesto until they are fully covered.
Slice the cucumber into rounds and remove the strings from the snap peas.
Place a scoop of cooked grains into the bottom of each glass container.
Add a layer of chopped kale and then arrange the cucumber and peas on top.
Place the pesto chicken strips over the vegetables in a neat row.
Fill the small jars with dressing and tuck them into the corner of the container.
Close the lids and keep the bowls cold until you are ready for lunch.
40. Slow Cooker White Chicken Chili with Jalapeños
Meal Prep Recipes
A ladle scoops a thick portion of white chicken chili from a silver pot. Creamy white beans and shredded chicken are surrounded by a savory broth. Small bowls of sliced jalapeños and fresh cilantro are ready to be added as toppings.
This soup is a lighter version of the classic red chili but just as filling. It stores beautifully in glass jars for a quick grab and go lunch. The flavors meld together over time to create a rich and comforting meal. You will love having a warm soup waiting for you in the fridge.
Ingredients
1 pound chicken breasts
2 cans white northern beans
1 small can diced green chilies
1 quart chicken broth
1 yellow onion
2 fresh jalapeños
1 bunch cilantro
1 teaspoon cumin
Equipment
Slow cooker or large stock pot
Ladle
2 forks
4 large mason jars or containers
DIY Instructions
Dice the onion and place it in the slow cooker with the raw chicken breasts.
Add the beans, green chilies, chicken broth, and cumin to the pot.
Cook on low for six hours until the chicken is tender enough to shred.
Take the chicken out and use two forks to pull it into small pieces.
Put the shredded meat back into the soup and stir everything together.
Slice the jalapeños into thin rings and chop the fresh cilantro.
Ladle the hot chili into your mason jars or storage containers.
Top each portion with a few jalapeño slices and a sprinkle of cilantro.
Let the jars cool before sealing them and placing them in your refrigerator.
41. Saucy Marinara Meatballs with Veggie Pasta
Meal Prep Recipes
A heavy cast iron skillet holds round meatballs in a bubbling red sauce. A wooden spoon lifts one savory piece to show the rich texture of the marinara. Several glass containers in the back wait to be filled with this high protein meal. They contain a mix of spiralized zucchini and tender pasta shells for a balanced base.
This meal prep strategy keeps your week organized and stress free. You can cook a large batch of meat once and enjoy it for several days. The sauce keeps the ingredients moist even after reheating in a microwave. Fresh herbs and cheese on top add a professional touch to your homemade lunch. It feels satisfying to see your fridge stocked with healthy options.
Ingredients
1 pound ground turkey or beef
1 cup breadcrumbs
1 large egg
2 cups marinara sauce
2 cups rotini pasta
2 large zucchinis
1/4 cup grated parmesan cheese
Salt and garlic powder
Equipment
Large skillet
Medium pot
Vegetable spiralizer
Wooden spoon
4 glass meal prep containers
DIY Instructions
Put the ground meat, breadcrumbs, egg, salt, and garlic powder into a large bowl.
Use your hands to mix the ingredients together and roll them into small balls about the size of a golf ball.
Place the meatballs in a skillet over medium heat and cook until the outsides are brown.
Pour the marinara sauce over the meatballs and lower the heat to a simmer for fifteen minutes.
Fill a pot with water and boil the rotini pasta until it is soft and then drain it.
Use your spiralizer to turn the zucchinis into long thin noodles that look like spaghetti.
Divide the cooked pasta and the raw zucchini noodles into your four containers.
Spoon the hot meatballs and extra sauce over the noodles in each box.
Sprinkle some parmesan cheese on top and close the lids once the food is cool.
42. No Bake Oat and Nut Butter Energy Bites
Meal Prep Recipes
Round energy bites sit in a high stack on a clean white plate. These snacks feature a chewy blend of oats and rich nut butter. You can see tiny seeds and dark chocolate chips mixed throughout each piece. One bite shows the soft and dense interior that promises a quick energy boost.
This no cook recipe is a great way to handle mid afternoon hunger. Store these treats in a jar on your counter or in the fridge. Making them in bulk saves you from reaching for processed snacks during a busy day. They stay fresh for a long time and require zero heating before eating. Every ball is packed with fiber and healthy fats to keep you moving.
Ingredients
2 cups rolled oats
1 cup peanut or almond butter
1/2 cup honey or maple syrup
1/4 cup flax seeds
1/2 cup mini chocolate chips
1 teaspoon vanilla extract
Equipment
Large mixing bowl
Large spoon
Flat baking tray
Wax paper
DIY Instructions
Pour the oats, nut butter, honey, seeds, chocolate chips, and vanilla into a large bowl.
Stir the mixture with a large spoon until it becomes a thick and sticky dough.
Place the bowl in the refrigerator for thirty minutes to make the dough easier to handle.
Take a small scoop of the mixture and roll it between your palms to form a round ball.
Line a baking tray with wax paper so the bites do not stick to the surface.
Place each finished ball on the tray until you have used all the dough.
Put the tray back in the fridge for another hour to help the balls stay firm.
Move the energy bites into a glass jar or a sealed bag for easy snacking.
Keep them in a cool place so the chocolate chips do not melt.
43. Refreshing Cold Soba Noodle Salad
Meal Prep Recipes
Thin brown soba noodles are lifted with wooden chopsticks from a dark bowl. Ice cubes sit among the noodles to keep the dish refreshing and cold. Bright green edamame beans and purple cabbage add a crunch to this light meal. Several plastic containers in the back hold extra portions for your upcoming work days.
This chilled salad is a smart choice for warm afternoons when you want something light. A savory soy dressing coats every strand for a deep flavor profile. You can assemble these bowls in minutes once the noodles are cooked and cooled. Using ice helps maintain the firm texture of the buckwheat pasta. It looks beautiful and tastes like a gourmet lunch from a restaurant.
Ingredients
1 package soba noodles
1 cup frozen shelled edamame
1 cup shredded purple cabbage
1 cup shredded carrots
1/4 cup soy sauce
1 tablespoon sesame oil
1 tablespoon rice vinegar
Ice cubes
Equipment
Medium pot
Large bowl
Colander
4 meal prep containers
DIY Instructions
Boil a pot of water and cook the soba noodles for six minutes or until they are tender.
Drain the noodles in a colander and rinse them with very cold water to stop the cooking.
Put the frozen edamame in a bowl of warm water for five minutes to thaw them out.
Mix the soy sauce, sesame oil, and rice vinegar in a small cup to make your dressing.
Place the cooled noodles into a large bowl and toss them with the dressing.
Add the purple cabbage, carrots, and thawed edamame to the noodles and stir well.
Divide the mixture into your four containers for the week.
Place a few ice cubes into each bowl right before you eat to keep the meal very cold.
Use chopsticks or a fork to mix the ice through the noodles as you enjoy your lunch.
44. Pan Seared Chicken with Balsamic Peaches
Meal Prep Recipes
Golden brown chicken breasts simmer in a dark cast iron pan. Slices of fresh yellow peaches sit in the bubbling sauce to add a natural sweetness. A sprinkle of green herbs finishes the dish with a pop of color. Three glass containers stand ready to hold the chicken alongside a bed of arugula.
This fruity and savory combination is a unique way to spice up your routine. You can cook the fruit and meat together to save time and effort. The sauce glazes the chicken as it cools for a rich and juicy bite. Fresh greens provide a sharp contrast to the warm and sweet ingredients. It is a sophisticated meal that requires very little active work.
Ingredients
2 large chicken breasts
3 fresh peaches
1/4 cup balsamic vinegar
2 tablespoons honey
4 cups fresh arugula
2 tablespoons olive oil
Salt and black pepper
Equipment
Cast iron skillet
Chef knife
Tongs
4 glass meal prep containers
DIY Instructions
Use a sharp knife to cut the chicken breasts in half so they are thinner and cook faster.
Slice the fresh peaches into thick wedges and remove the hard pits from the center.
Heat the olive oil in your skillet over medium heat on the stove.
Place the chicken in the pan and cook for six minutes on each side until the meat is white inside.
Add the peach wedges to the pan around the chicken and cook for three minutes.
Pour the balsamic vinegar and honey over the top of the food in the skillet.
Let the liquid bubble and thicken for two minutes until it looks like a shiny syrup.
Place a handful of fresh arugula into each of your containers.
Put a piece of chicken and a few peach slices on top of the greens and drizzle with extra sauce.
45. Sheet Pan Steak Fajitas with Peppers
Meal Prep Recipes
Slices of grilled steak lay across a large baking sheet lined with white paper. Yellow and red bell pepper strips are roasted until they are soft and charred. A small bowl of fresh lime wedges sits in the corner for a citrus finish. Soft flour tortillas wait nearby to be filled with the savory meat and veggies.
Preparing your fajitas this way ensures all the flavors meld together very well. You can portion the steak and peppers into containers for quick evening tacos. This sheet pan method is a favorite for people who hate cleaning many pots. Fresh lime juice keeps the beef tasting bright and exciting every single day. It makes a high protein dinner feel like a festive occasion.
Ingredients
1 pound flank steak or skirt steak
3 bell peppers in different colors
1 large yellow onion
2 tablespoons vegetable oil
1 tablespoon chili powder
1 teaspoon cumin
8 small flour tortillas
2 fresh limes
Equipment
Large baking sheet
Chef knife
Cutting board
Large mixing bowl
DIY Instructions
Set your oven to 400 degrees so it is hot when you finish your prep.
Cut the steak into long thin strips and slice the peppers and onions into similar shapes.
Put the meat and vegetables into a large bowl and add the oil and spices.
Use your hands or a big spoon to coat everything evenly in the oil and seasoning.
Spread the mixture onto your baking sheet in one flat layer.
Bake the pan for fifteen minutes or until the steak is cooked to your liking.
Cut the limes into wedges while you wait for the oven to finish.
Divide the meat and peppers into your containers and add a couple of tortillas to each one.
Squeeze the fresh lime juice over the steak right before you eat your fajitas.
46. Slow Roasted Pork Carnitas and Rice
Meal Prep Recipes
Two silver forks pull apart a large roast of tender pork on a wooden board. A dark crust covers the outside of the meat while the inside remains pink and juicy. Large citrus halves sit nearby to provide a tangy juice for the carnitas. Three meal prep bowls are filled with white rice, black beans, and chopped cilantro.
This slow cooked meat is a versatile base for many different meals. You can use the pork for burritos, bowls, or even over a salad. The long roasting time develops a deep flavor that beats any quick cooking method. Shredding the meat while it is hot allows it to soak up its own juices. It is a budget friendly way to feed yourself for an entire week.
Ingredients
3 pounds pork shoulder roast
2 cups white rice
1 can black beans
1 orange
1 lime
1 tablespoon dried oregano
1 tablespoon salt
1 bunch fresh cilantro
Equipment
Slow cooker or deep oven pot
2 large forks
Wooden cutting board
4 meal prep containers
DIY Instructions
Place the whole pork roast into your slow cooker or a heavy pot.
Squeeze the juice from the orange and the lime over the meat and add the salt and oregano.
Cook the pork on low for eight hours until the meat is soft enough to fall apart.
Move the roast to a wooden board and use two forks to pull it into small shreds.
Boil the white rice in a pot of water until it is fluffy and drain the beans.
Place a scoop of rice and a spoonful of beans into each container.
Add a large portion of the shredded pork on top of the rice and beans.
Chop the fresh cilantro and sprinkle it over the meat for a fresh taste.
Seal the containers and store them in the fridge for a quick and filling dinner.
47. Roasted Cauliflower and Chickpea Salad
Meal Prep Recipes
Roasted cauliflower florets and chickpeas fill a large wooden bowl on a white table. A thick slice of lemon sits on top to offer a fresh and zesty aroma. Tiny bits of green parsley are scattered throughout the healthy grain mixture. Five glass jars with clip lids are packed with portions for a busy schedule.
This plant based salad is full of fiber and stays fresh in the fridge. You can enjoy the dish cold or at room temperature for a quick snack. The lemon juice prevents the greens from wilting too quickly during storage. Using jars makes the meals portable so you can take them anywhere. It provides a satisfying crunch that keeps you full until your next meal.
Ingredients
1 head of cauliflower
2 cans of chickpeas
1 cup dry couscous or quinoa
1/2 cup fresh parsley
1 large lemon
3 tablespoons olive oil
1 teaspoon salt
1 teaspoon cumin
Equipment
Large baking sheet
Large wooden bowl
5 glass jars with lids
Chef knife
DIY Instructions
Cut the cauliflower into small florets and rinse the chickpeas in a sink.
Toss the cauliflower and chickpeas with olive oil, salt, and cumin on a baking sheet.
Roast the vegetables at 400 degrees for twenty minutes until they are brown.
Prepare the couscous by adding one cup of boiling water to the grains and covering the bowl.
Let the grains sit for five minutes and then fluff them up with a fork.
Combine the roasted vegetables, cooked grains, and chopped parsley in a big wooden bowl.
Squeeze the juice from the lemon over the whole salad and toss it together.
Spoon the mixture into your five glass jars and press it down gently.
Keep the jars in the refrigerator for a healthy and ready to eat lunch.
48. Freezer Ready Smoothie Prep Packs
Meal Prep Recipes
Colorful silicone bags are filled with layers of frozen fruit and fresh greens. A clear glass jar has tipped over to show a mix of berries and mango. Tiny flax seeds and spinach leaves provide a hidden boost of nutrition for your morning. Bright reusable bags help keep your freezer organized and easy to navigate.
This method is the fastest way to get a healthy breakfast into your routine. You can simply pour the contents of one bag into a blender with milk. The fruit stays frozen and ready for a thick and creamy texture. Preparing these packs on a Sunday takes the stress out of your daily commute. It is a smart way to ensure you eat enough fruit every single day.
Ingredients
4 cups fresh spinach
2 cups frozen mixed berries
2 cups frozen mango cubes
1/2 cup ground flax seeds
4 cups almond milk or water
4 tablespoons honey
Equipment
4 reusable silicone bags or jars
High speed blender
Measuring cups
DIY Instructions
Open your four reusable bags and stand them up on your kitchen counter.
Place one cup of fresh spinach into the bottom of each bag.
Add a half cup of frozen berries and a half cup of mango cubes on top of the greens.
Sprinkle two tablespoons of flax seeds into each bag for extra fiber.
Squeeze the air out of the bags and seal them tightly before placing them in the freezer.
Take one bag out of the freezer when you are ready for breakfast.
Pour the contents of the bag into your blender and add one cup of milk and a bit of honey.
Blend the mixture on high speed until it is smooth and there are no chunks of fruit.
Pour the smoothie into a tall glass and enjoy a fast and healthy start to your day.
Key Takeaways
1 Batch cooking reduces daily decision fatigue
You spend less time wondering what to eat when the fridge is already stocked. This habit prevents you from making impulsive food choices. It allows you to focus on your work or family instead of a stove.
2 Quality ingredients stay fresh longer in proper storage
Using glass jars or airtight containers protects the flavor of your meals. It ensures your food remains safe and appetizing for several days. Proper packing keeps textures crisp and prevents wilting.
3 Preparing meals at home saves a significant amount of money
You avoid the hidden costs of restaurant delivery and expensive convenience snacks. Small efforts on the weekend lead to big rewards for your wallet. Controlling your own ingredients also leads to a much healthier lifestyle.
Taking a few hours on Sunday to prep your food changes the entire flow of your week. You deserve to eat well even when life feels overwhelming. These recipes prove that nutrition and convenience can go hand in hand. Your future self will thank you for the extra effort today.
Start with one or two dishes that fit your current routine. Build your confidence as you learn which flavors you enjoy most. This guide provides a solid foundation for a more organized and healthy lifestyle. Enjoy the peace of mind that comes with a well prepared kitchen.
Spread the loveFew kitchen disappointments are worse than slicing into what you hoped would be a juicy chicken breast, only to find it dry, tough, and lacking in flavor. This common frustration plagues home cooks…
Spread the loveThanksgiving dinner feels incomplete without potatoes, but that heavy, sometimes gluey mashed dish can weigh down the whole meal. This year, trade the standard bowl for something exciting, crispy, and full of flavor.…
Spread the loveOpening a bare refrigerator on a Tuesday afternoon feels quite stressful. You want to eat something nutritious but the energy to cook from scratch simply isn’t there. This common struggle leads many of…