The holiday season brings a wonderful opportunity to indulge in treats that are as visually stunning as they are delicious. When gathering friends and family, having a dessert that feels festive and yet requires minimal fuss is key to stress-free hosting. We all seek those special recipes that truly capture the spirit of cheer and celebration.
Peppermint Dessert Recipes
Nothing evokes the sights and smells of winter and Christmas quite like the cool, refreshing snap of peppermint. It pairs beautifully with rich dark chocolate, creamy white chocolate, and everything from soft cookies to towering layered cakes. This iconic flavor is versatile enough to star in both baked goods and no-bake confections.
This collection provides 39 delectable recipes that celebrate the perfect marriage of mint and sweet goodness. Whether you need a quick, elegant centerpiece or a simple handheld treat for a cookie exchange, you will find inspiration here. Prepare your kitchen for the most wonderful, minty time of the year!
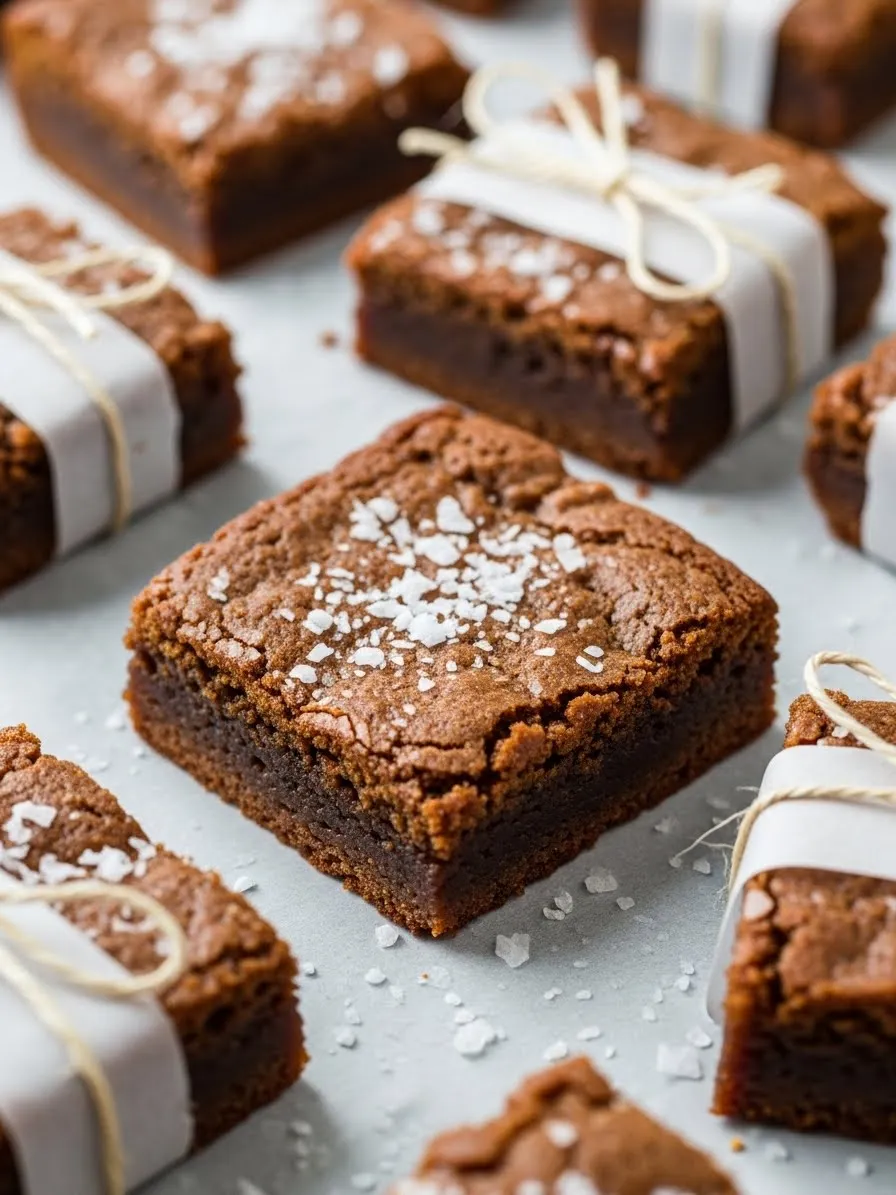
These layered treats are the ultimate chocolate and mint combination, presenting beautifully on any holiday platter. The deep, rich brownie base creates a satisfying foundation for the creamy topping. They deliver a wonderful contrast of textures that everyone at your party will appreciate.
You’ll notice the middle layer adds an extra element of surprise, giving the bite a fudgy, complex center. A thick, sweet blanket of white chocolate covers the top, making this dessert feel truly luxurious. Each square is consistently moist and chewy from the first bite to the last.
Sprinkling crushed peppermint candies and bright holiday sprinkles over the top provides a joyful, crunchy finish. The red, white, and green flecks truly capture the spirit of the season. These brownies are a simple way to elevate a classic dessert and bring some yuletide cheer to your table.
Required Ingredients
For the Brownies:
1 cup (2 sticks) unsalted butter
1 1/2 cups granulated sugar
4 large eggs
1 teaspoon vanilla extract
3/4 cup unsweetened cocoa powder
3/4 cup all-purpose flour
1/2 teaspoon salt
1/2 teaspoon baking powder
For the Filling and Topping:
1 1/2 cups (about 9 ounces) white chocolate chips, divided
1/2 cup (1 stick) unsalted butter, softened
2 cups powdered sugar, sifted
1 teaspoon peppermint extract, divided
3 tablespoons milk or heavy cream
1/2 cup crushed peppermint candies (or candy canes), plus more for sprinkling
Holiday sprinkles (optional)
Equipment List
9×13 inch baking pan
Parchment paper
Large mixing bowl
Saucepan or microwave-safe bowl (for melting chocolate)
Electric mixer (handheld or stand mixer)
Measuring cups and spoons
Wire rack
DIY Instruction: Step-by-Step
Step 1: Prepare the Brownie Base
Preheat and Prepare: Set your oven to 350 F. Grease your 9×13 inch baking pan, then line it with parchment paper, leaving an overhang on the sides. This will help you lift the cooled brownies out easily.
Melt the Butter and Sugar: In a large, microwave-safe bowl or a saucepan over low heat, melt the 1 cup of butter. Once melted, remove it from the heat and stir in the granulated sugar until well combined.
Add Wet Ingredients: Beat in the four large eggs one at a time, making sure each one is fully incorporated before adding the next. Stir in the vanilla extract.
Combine Dry Ingredients: In a separate medium bowl, whisk together the cocoa powder, flour, salt, and baking powder.
Mix Batter: Gradually add the dry mixture to the wet mixture, mixing only until just combined. Be careful not to overmix, as this can make your brownies tough.
Bake: Pour the batter into the prepared pan, spreading it evenly. Bake for 25–30 minutes. A toothpick inserted into the center should come out with moist crumbs attached, not wet batter.
Cool Completely: Place the pan on a wire rack and let the brownies cool completely. This is very important before adding the layers.
Step 2: Make the Peppermint Filling
Cream Butter: In a large bowl, use an electric mixer to beat the 1/2 cup of softened butter until it’s light and fluffy.
Make Frosting: Slowly add the sifted powdered sugar, alternating with the milk or cream, beating until smooth and spreadable.
Flavor: Stir in 1/2 teaspoon of the peppermint extract.
Add Crumbles: Gently fold in the 1/2 cup of crushed peppermint candies.
Layer: Once the brownies are fully cool, carefully spread this peppermint filling evenly over the top of the brownie layer. Place the pan in the refrigerator for at least 30 minutes to let the filling firm up.
Step 3: Create the White Chocolate Bark Topping
Melt Chocolate: In a microwave-safe bowl, melt the 1 1/2 cups of white chocolate chips. Heat it in 30-second intervals, stirring well after each one, until the chocolate is smooth. Alternatively, melt it over a double boiler.
Add Flavor: Stir in the remaining 1/2 teaspoon of peppermint extract into the melted white chocolate.
Pour Topping: Remove the chilled pan from the refrigerator. Pour the melted peppermint white chocolate over the filling layer, carefully spreading it right to the edges using an offset spatula.
Decorate: Immediately sprinkle the top with the extra crushed peppermint candies and holiday sprinkles, if using. Press them lightly into the warm chocolate so they stick.
Chill and Cut: Return the pan to the refrigerator for about 1–2 hours, or until the white chocolate layer is completely set and hard like bark. Once set, lift the slab out of the pan using the parchment paper overhang. Use a large, sharp knife to cut the brownies into neat squares.
2. No-Bake Peppermint Mousse Shooters
Peppermint Dessert Recipes
These charming dessert shots offer beautiful layers of holiday flavor and color. They combine a crunchy, buttery graham cracker crust with a light, airy mousse. The bright pink center immediately signals the refreshing peppermint taste within.
You will appreciate the simplicity of these treats since they require absolutely no oven time. The rich, creamy texture of the mousse contrasts beautifully with the crispy crust below. Serving them in small glasses makes them an elegant and convenient option for any large gathering.
Each shooter is crowned with a generous swirl of fresh whipped cream, dusted with tiny pieces of crushed candy cane. The red and white flecks add a delightful splash of seasonal color and a satisfying, subtle crunch. This dessert is a lovely way to end a heavy meal on a refreshingly sweet note.
Required Ingredients
For the Graham Cracker Crust:
1 1/2 cups graham cracker crumbs
1/4 cup granulated sugar
6 tablespoons unsalted butter, melted
For the Peppermint Mousse:
1 (8 ounce) package cream cheese, softened
1 cup powdered sugar
1 teaspoon vanilla extract
1 teaspoon peppermint extract
Red food coloring (optional, but recommended for color)
Electric mixer (optional, but helpful for the mousse)
Measuring cups and spoons
DIY Instruction: Step-by-Step
Step 1: Make the Crust Layer
Combine Dry Ingredients: In a medium mixing bowl, measure out the graham cracker crumbs and the granulated sugar. Stir these together until they are well mixed.
Add Butter: Pour in the six tablespoons of melted butter. Stir thoroughly with a spoon or fork until the crumbs are evenly moistened and resemble wet sand.
Layer the Glasses: Distribute the crumb mixture evenly among your 8 to 10 serving glasses. Use the back of a small spoon or your fingertip to press the crumbs firmly into the bottom of each glass. Set these aside.
Step 2: Prepare the Peppermint Mousse
Beat Cream Cheese: In a large mixing bowl, use an electric mixer to beat the softened cream cheese until it is smooth and light. Ensure no lumps remain.
Add Sweetener and Flavor: Gradually add the powdered sugar to the cream cheese mixture and continue beating until everything is incorporated. Stir in the vanilla extract and the peppermint extract.
Color the Mousse (Optional): If you desire the signature pink color, add a few drops of red food coloring now. Mix it in until you reach the festive shade you like.
Fold in Whipped Topping: Gently fold the thawed whipped topping into the cream cheese mixture using a rubber spatula. Use large, slow motions, cutting down the center of the bowl and bringing the mixture up and over. Stop folding as soon as the mixture is uniform and airy. Do not overmix, or the mousse will lose its lightness.
Step 3: Assemble and Chill
Fill the Glasses: Carefully spoon or pipe the prepared peppermint mousse mixture over the graham cracker crust in each glass. Smooth the top of the mousse layer gently with the back of a spoon.
Chill: Place all the assembled shooters into the refrigerator. Let them chill for at least two hours, or until the mousse is completely set and firm.
Garnish and Serve: Just before you plan to serve, top each glass with a generous swirl of fresh whipped cream. Sprinkle a pinch of crushed peppermint candies over the whipped cream for a final crunch and visual appeal.
3. Dark Chocolate Peppermint Crinkle Cookies
Peppermint Dessert Recipes
These cookies feature a striking appearance, making them a beautiful addition to any holiday cookie swap. Their rich, dark chocolate base creates a deep, satisfying cocoa flavor. As they bake, the sugar coating naturally cracks, exposing the dark interior and creating a stunning contrast.
The texture is delightfully fudgy and chewy inside, while the outside offers a subtle crispness. Rolling the dough deeply in powdered sugar ensures a thick, snow-dusted exterior. Every bite delivers a wonderful blend of intense chocolate and a hint of holiday spice.
This recipe uses a simple dough that is easy to prepare ahead of time. The dramatic “crinkle” effect happens naturally in the oven, meaning they look impressive without requiring fancy decorating techniques. They are a genuinely cozy and deeply flavorful cookie that celebrates the chocolate-mint pairing.
Required Ingredients
1 cup all-purpose flour
1/2 cup unsweetened cocoa powder
1/2 teaspoon baking powder
1/4 teaspoon salt
1/4 cup unsalted butter, softened
1 cup granulated sugar
2 large eggs
1 teaspoon vanilla extract
1/2 teaspoon peppermint extract
1/2 cup powdered sugar (for rolling)
Equipment List
Baking sheets
Parchment paper
Medium and large mixing bowls
Whisk
Electric mixer (handheld or stand mixer)
Plastic wrap
Measuring cups and spoons
Small scoop (optional, for uniform cookies)
DIY Instruction: Step-by-Step
Step 1: Prepare the Dough
Whisk Dry Ingredients: In a medium bowl, whisk together the flour, cocoa powder, baking powder, and salt. Set this mixture aside.
Cream Wet Ingredients: In a large bowl, use an electric mixer to beat the softened butter and granulated sugar together until the mixture is light and fluffy. This typically takes about 2 minutes.
Add Eggs and Extracts: Beat in the eggs one at a time, making sure each one is fully mixed before adding the next. Stir in the vanilla extract and the peppermint extract.
Combine: Gradually add the dry ingredients to the wet mixture, mixing only until just combined. The finished dough will be quite soft and sticky.
Chill Dough: Cover the bowl tightly with plastic wrap. Place the dough in the refrigerator to chill for at least 2 hours, or until it is firm enough to roll. This step is essential for the crinkle effect.
Step 2: Roll and Coat
Preheat Oven: Set your oven to 350 F. Line a couple of baking sheets with parchment paper. Place the 1/2 cup of powdered sugar in a small, shallow bowl.
Scoop Dough: Remove the chilled dough from the refrigerator. Roll the dough into balls, about 1-inch in diameter (roughly 1 heaping tablespoon of dough).
Coat Thoroughly: Take each dough ball and roll it generously in the bowl of powdered sugar. The sugar should completely cover the dough ball in a thick layer. Do not tap off the excess; a heavy coating is what creates the dramatic crinkle effect.
Place on Sheet: Arrange the sugar-coated dough balls on the prepared baking sheets, leaving about 2 inches between them, as they will spread.
Step 3: Bake and Cool
Bake: Bake the cookies for 9 to 11 minutes. The cookies are done when the edges look set and the characteristic cracks have appeared all over the surface. The center should still look slightly soft.
Cool: Let the cookies cool on the baking sheet for a few minutes before carefully transferring them to a wire rack to cool completely.
4. White Chocolate Peppermint Pretzel Bark
Peppermint Dessert Recipes
This candy bark is a wonderfully simple recipe that delivers a complex mix of textures and tastes. It balances the sweetness of white chocolate with a salty crunch, making it endlessly craveable. The combination of sweet, salty, and minty flavors creates a truly unique holiday snack.
Small pretzels pressed into the melted chocolate provide the necessary savory counterpoint. These crunchy elements are not only delicious but also add an interesting visual pattern to the finished product. The contrast between the creamy white chocolate and the dark pretzel is quite appealing.
Finished with red and white candy sprinkles and bits of crushed peppermint, this bark looks undeniably festive. It breaks easily into irregular shards, which is part of its rustic charm. This sweet and savory treat makes an excellent homemade gift or a quick addition to your dessert platter.
Required Ingredients
24 ounces white chocolate melting wafers or high-quality white chocolate chips
1 teaspoon peppermint extract
1 cup mini twist pretzels
1/4 cup crushed peppermint candies
Holiday sprinkles (optional)
Mini round peppermint candies (optional, for whole placement)
Equipment List
Baking sheet (10×15 inches or similar)
Parchment paper
Microwave-safe bowls or a double boiler setup
Rubber spatula
Measuring cups and spoons
DIY Instruction: Step-by-Step
Step 1: Prepare and Melt the Chocolate
Prepare Pan: Line a large baking sheet (about 10×15 inches) with parchment paper. Ensure the paper extends slightly over the edges, which will help with removal later.
Melt Chocolate: Place the white chocolate melting wafers or chips in a microwave-safe bowl. Heat in 30-second intervals, stirring thoroughly after each one, until the chocolate is smooth. You can also use a double boiler over simmering water for a gentler melt.
Add Flavor: Stir in the 1 teaspoon of peppermint extract until it is fully incorporated into the melted white chocolate.
Step 2: Assemble the Bark
Pour: Pour the melted peppermint white chocolate onto the prepared parchment-lined baking sheet. Use the back of a rubber spatula to quickly spread the chocolate into an even layer, about 1/4 inch thick. Work quickly, as the white chocolate starts to set relatively fast.
Add Pretzels: Immediately arrange the mini pretzels across the surface of the wet chocolate. Press them gently into the chocolate layer so they stick securely.
Garnish: Sprinkle the crushed peppermint candies and the holiday sprinkles, if using, evenly over the entire surface of the bark. You can also place a few of the whole, round mini peppermint candies in between the pretzels for extra color.
Step 3: Set and Break
Chill: Place the baking sheet into the refrigerator and chill for at least 1 hour, or until the chocolate is completely set and firm to the touch.
Break into Shards: Once the bark is fully set, lift it off the baking sheet using the parchment paper edges. Peel the paper away. Break the large piece of bark into smaller, rustic pieces or shards using your hands or a large, sharp knife.
Store: Store the finished bark in an airtight container at room temperature or in the refrigerator until ready to serve.
5. Rich Peppermint Hot Fudge Sauce
Peppermint Dessert Recipes
This luxuriously thick, glossy sauce is the ultimate addition to your winter desserts. Its deep, dark color promises an intensely chocolatey experience. Drizzled over ice cream or spooned directly from the jar, it adds a festive flair to anything it touches.
The addition of peppermint extract gives this classic hot fudge a wonderful, seasonal twist. The smooth, velvety texture is achieved by melting the chocolate and butter carefully. You will notice how nicely it thickens as it cools, making it highly spreadable.
Serving this sauce warm truly maximizes its decadent aroma and flavor profile. Presented in small glass jars tied with festive ribbon, this fudge sauce makes a thoughtful homemade gift. This recipe is simple to execute, but the results taste rich and incredibly gourmet.
Required Ingredients
1 cup heavy cream
1/2 cup granulated sugar
1/4 cup unsweetened cocoa powder (high quality)
4 tablespoons unsalted butter
4 ounces semi-sweet or bittersweet chocolate, chopped
1 teaspoon vanilla extract
1/2 teaspoon peppermint extract
Pinch of salt
Equipment List
Medium saucepan
Whisk
Measuring cups and spoons
Airtight jars (for storage)
DIY Instruction: Step-by-Step
Step 1: Combine and Heat
Whisk Dry Ingredients: In a medium saucepan, whisk together the granulated sugar and cocoa powder until there are no lumps.
Add Cream: Pour in the heavy cream. Whisk the mixture until the cocoa and sugar are fully dissolved and the liquid is smooth.
Bring to a Simmer: Place the saucepan over medium heat. Bring the mixture to a gentle simmer, stirring occasionally to prevent sticking or scorching the bottom. Once it begins to bubble slightly around the edges, reduce the heat to low.
Step 2: Finish the Fudge
Add Chocolate and Butter: Turn the heat off or remove the pan from the heat. Immediately add the chopped chocolate, the four tablespoons of butter, and the small pinch of salt.
Melt and Stir: Let the mixture stand for a few minutes to allow the residual heat to melt the chocolate and butter. Then, whisk until everything is smooth, glossy, and completely combined. Do not return it to the heat once the chocolate is added.
Flavor: Stir in the vanilla extract and the peppermint extract. Taste and add another tiny drop of peppermint extract if you prefer a stronger mint flavor, but be cautious not to overdo it.
Step 3: Cool and Store
Cool: Allow the hot fudge to cool slightly before transferring it to jars. It will thicken considerably as it cools.
Serve and Store: Serve the hot fudge warm over ice cream, cake, or anything else you choose. Store leftover fudge in an airtight container or jar in the refrigerator for up to two weeks. To reheat, microwave small portions for 15-30 seconds, or gently warm it in a saucepan.
6. Swirled Peppermint Pinwheel Cookies
Peppermint Dessert Recipes
These spiraled cookies look just like giant peppermint candies and offer a wonderful buttery, crisp texture. The striking red and white pattern makes them one of the most visually appealing cookies on the holiday tray. They feature a straightforward sugar cookie base infused with refreshing mint flavor.
Making these cookies requires rolling and chilling, resulting in neat, uniform slices. The dough itself is easy to handle once properly chilled, giving you clean, defined swirls. You will enjoy the satisfying slight crunch they provide with every single bite.
Rolling the edges in crushed candy cane before baking adds a sparkly exterior and an extra layer of crunch. This simple addition elevates the texture and reinforces the festive theme. These pinwheels are a genuinely charming, classic cookie that is worth the small amount of effort.
Required Ingredients
2 1/2 cups all-purpose flour
1 teaspoon baking powder
1/2 teaspoon salt
1 cup (2 sticks) unsalted butter, softened
1 cup granulated sugar
1 large egg
1 teaspoon vanilla extract
1 teaspoon peppermint extract
Red food coloring (gel preferred)
1/4 cup crushed peppermint candies (for rolling)
Equipment List
Baking sheets
Parchment paper
Medium and large mixing bowls
Whisk
Electric mixer (handheld or stand mixer)
Plastic wrap
Rolling pin
Sharp knife
Measuring cups and spoons
DIY Instruction: Step-by-Step
Step 1: Prepare the Dough
Whisk Dry Ingredients: In a medium bowl, whisk together the flour, baking powder, and salt. Set this mixture aside.
Cream Wet Ingredients: In a large mixing bowl, beat the softened butter and granulated sugar together until they are light and fluffy.
Add Egg and Extracts: Beat in the egg, vanilla extract, and peppermint extract until everything is smooth and fully combined.
Combine: Gradually add the flour mixture to the wet ingredients, mixing on low speed until the dough just comes together. Do not overmix.
Divide Dough: Divide the cookie dough in half. Place one half back into the mixing bowl.
Step 2: Color and Chill
Color the Dough: Add a few drops of red gel food coloring to the half of the dough remaining in the bowl. Mix on low speed until the color is evenly distributed and fully saturated.
Shape: Shape both the plain (white) dough and the red dough into rectangles, about 1-inch thick. Wrap each piece separately in plastic wrap.
Chill: Place both rectangles of dough in the refrigerator to chill for at least 3 hours. This makes the dough firm enough to roll and handle without sticking.
Step 3: Assemble the Pinwheel
Roll Dough: Lightly flour a piece of parchment paper. Remove the white dough from the refrigerator and roll it out into a rectangle about 1/8 inch thick. The size should be roughly 8 inches x 10 inches. Repeat this process with the red dough, ensuring it is rolled to the exact same size.
Layer: Gently brush the surface of the white dough with a tiny bit of water. Carefully flip the red dough on top of the white dough, aligning the edges perfectly. Press down gently to adhere the layers.
Roll Up: Starting with the long edge, tightly roll the layered dough into a long log. Peel the parchment paper away as you roll.
Step 4: Finish and Bake
Coat (Optional): Sprinkle the crushed peppermint candies onto a clean piece of parchment paper. Roll the log of dough in the crushed candies, pressing lightly to ensure they stick to the entire outside surface.
Final Chill: Wrap the log tightly in plastic wrap and return it to the refrigerator for at least 1 hour (or up to 3 days). This is vital for clean cuts.
Slice and Bake: Preheat your oven to 350 F. Use a sharp knife to slice the chilled log into 1/4-inch thick rounds. Place the slices on a parchment-lined baking sheet.
Bake: Bake for 10 to 12 minutes, or until the edges are very lightly golden. Transfer the cookies to a wire rack to cool completely.
7. No-Bake Peppermint Rice Cereal Treats
Peppermint Dessert Recipes
These chewy, festive bars are a delightful twist on a childhood favorite, infused with bright peppermint flavor. They feature the classic marshmallow-cereal base but add a playful, holiday look with red coloring and swirls. Their texture is perfectly soft, sticky, and wonderfully crunchy.
The recipe is extremely simple, making it a fantastic activity for beginner bakers or families. Melting the marshmallows with a touch of butter creates the signature gooey binder. A drizzle of contrasting white chocolate and red melted marshmallow creates a fun, swirly pattern on top.
You can easily customize these bars with fun additions like peppermint stars or extra crushed candy cane mixed right into the cereal. These treats are easy to slice into neat squares, offering a manageable, handheld dessert. They capture the nostalgic spirit of the holidays in a straightforward, fun-to-eat format.
Required Ingredients
6 tablespoons unsalted butter
1 (10 ounce) package mini marshmallows, divided
1 teaspoon peppermint extract
Red food coloring (gel preferred)
6 cups crisp rice cereal
1/2 cup white chocolate chips (for drizzling, optional)
Equipment List
9×13 inch baking pan
Parchment paper or non-stick cooking spray
Large saucepan or stockpot
Rubber spatula
Microwave-safe bowl (for white chocolate drizzle)
Measuring cups and spoons
DIY Instruction: Step-by-Step
Step 1: Prepare the Base
Prepare Pan: Lightly grease a 9×13 inch baking pan with non-stick cooking spray, or line it with parchment paper for easy removal. Set this aside.
Melt Butter and Marshmallows: In a large saucepan, melt the 6 tablespoons of butter over low heat. Once the butter is melted, add 8 cups of the mini marshmallows (reserve about 1 cup for later) and stir constantly until the marshmallows are completely melted and smooth. Remove the pan from the heat.
Add Flavor: Stir in 3/4 teaspoon of the peppermint extract.
Step 2: Incorporate Cereal and Color
Mix Cereal: Pour the 6 cups of crisp rice cereal into the marshmallow mixture. Stir quickly and gently until the cereal is evenly coated.
Layer Dough: Press about two-thirds of the warm cereal mixture evenly into the prepared pan using a buttered spatula or wax paper. Press firmly but not too tightly.
Step 3: Create the Swirl Topping
Melt Remaining Marshmallows: In a separate, small, microwave-safe bowl, combine the reserved 1 cup of mini marshmallows with a small drizzle of water (about 1/2 teaspoon). Microwave on high for 30 seconds, then stir until melted.
Color: Stir a few drops of red gel food coloring and the remaining 1/4 teaspoon of peppermint extract into the melted red marshmallow mixture.
Add White Cereal: Quickly fold the remaining one-third of the plain (white) cereal mixture into the red marshmallow mixture.
Swirl: Drop spoonfuls of the red cereal mixture unevenly over the white layer in the pan. Gently press it into the bottom layer. You can use a knife to swirl the two layers together a bit for a marbled look.
Step 4: Finish and Slice
Drizzle (Optional): Melt the white chocolate chips in a microwave-safe bowl, stirring every 30 seconds until smooth. Drizzle the melted white chocolate over the bars in a decorative pattern.
Set: Allow the bars to cool completely and set up for at least 1 hour at room temperature.
Slice: Once set, cut the bars into squares or use a holiday cookie cutter to create festive shapes.
8. Decadent Peppermint Silk Pie
Peppermint Dessert Recipes
This deep, dark chocolate pie offers a rich, velvety texture that feels incredibly luxurious. Resting in a crunchy Oreo cookie crust, the dense chocolate filling is intensely satisfying. It is a stunning, sophisticated dessert that requires no baking time for the filling.
The smooth, bittersweet filling is subtly infused with a hint of peppermint, elevating the classic chocolate flavor. Its elegant, glossy surface makes a beautiful centerpiece for a holiday dinner table. This pie is a fantastic make-ahead option, as it needs ample time to chill and set.
The pie is beautifully finished with a generous border of fresh whipped cream rosettes. Each rosette is crowned with a single, festive mini peppermint candy, adding a touch of color and a slight crunch. This dessert delivers a wonderful balance of creamy smoothness and refreshing mint.
Required Ingredients
For the Oreo Crust:
1 1/2 cups finely crushed Oreo cookies (about 20 cookies)
4 tablespoons unsalted butter, melted
For the Peppermint Chocolate Filling:
1 cup (2 sticks) unsalted butter, softened
1 1/2 cups powdered sugar, sifted
1 teaspoon vanilla extract
1 teaspoon peppermint extract
4 ounces unsweetened baking chocolate, melted and cooled
2 large eggs (pasteurized eggs are recommended since they are not cooked)
Pinch of salt
For Garnish:
1 cup heavy cream
2 tablespoons powdered sugar
1 teaspoon vanilla extract
Mini round peppermint candies (for decoration)
Equipment List
9-inch pie plate
Electric mixer (stand mixer is best for the filling)
Measuring cups and spoons
Rubber spatula
Piping bag and star tip (for the whipped cream border)
DIY Instruction: Step-by-Step
Step 1: Prepare and Bake the Crust
Make Crumbs: In a medium bowl, combine the finely crushed Oreo crumbs and the melted butter. Stir until the mixture is uniformly moistened.
Press into Pan: Press the crumb mixture firmly and evenly into the bottom and up the sides of a 9-inch pie plate. You can use the bottom of a measuring cup to help press it down.
Chill (or Bake): For a no-bake crust, place it in the freezer for 30 minutes. For a sturdier crust, bake at 350 F for 8 minutes, then let it cool completely.
Step 2: Make the Peppermint Chocolate Filling
Cream Butter: In a large bowl, use a stand mixer with the paddle attachment (or a hand mixer) to beat the softened butter until it is light and creamy.
Add Sugar: Gradually add the sifted powdered sugar and the pinch of salt, beating until the mixture is smooth and fully incorporated.
Add Eggs (One at a Time): Add the eggs, one at a time, beating for a full 5 minutes after each egg addition. This step incorporates air and lightens the filling. Since the eggs are raw, use pasteurized eggs for safety.
Add Flavor and Chocolate: Beat in the vanilla extract and the peppermint extract. Finally, beat in the cooled, melted unsweetened chocolate until the mixture is uniform in color and texture.
Step 3: Assemble and Chill
Fill the Crust: Spoon the rich chocolate filling into the prepared crust. Spread it out evenly with a rubber spatula, creating a smooth surface.
Chill: Cover the pie loosely with plastic wrap. Place it in the refrigerator to chill for at least 4 hours, or until the pie is firm and completely set. Overnight chilling is best.
Step 4: Garnish and Serve
Make Whipped Cream: In a chilled bowl, beat the heavy cream until soft peaks form. Add the 2 tablespoons of powdered sugar and the 1 teaspoon of vanilla extract and continue beating until stiff peaks form.
Decorate: Transfer the whipped cream to a piping bag fitted with a large star tip. Pipe rosettes around the entire edge of the pie.
Final Touch: Place a single mini round peppermint candy on top of each whipped cream rosette. Slice the pie and serve chilled.
9. Glazed Peppermint Baked Doughnuts
Peppermint Dessert Recipes
These light, fluffy doughnuts are baked, not fried, making them an approachable treat for the holidays. They offer a simple, cake-like texture that serves as a beautiful base for the festive topping. The light golden color indicates their tender crumb.
The delicate peppermint flavor is infused right into the doughnut batter, providing a subtle minty note throughout. They are finished with a sweet, flowing white glaze that drips attractively down the sides. This glaze sets into a soft, slightly crackled shell.
A generous sprinkling of crushed candy cane tops off each ring, adding a vibrant color and satisfying crunch. The red and white flecks make them instantly recognizable as a holiday confection. These baked rings are a simple yet impressive sweet treat to enjoy with coffee or cocoa.
Required Ingredients
For the Doughnuts:
1 1/2 cups all-purpose flour
1/2 cup granulated sugar
2 teaspoons baking powder
1/4 teaspoon salt
1/2 cup milk (dairy or non-dairy)
1 large egg
2 tablespoons unsalted butter, melted
1/2 teaspoon peppermint extract
For the Peppermint Glaze:
1 1/2 cups powdered sugar, sifted
3 tablespoons milk or heavy cream
1/4 teaspoon peppermint extract
1/4 cup crushed peppermint candies, for topping
Equipment List
Doughnut pan (6-cavity standard size)
Mixing bowls (medium and large)
Whisk
Piping bag or zip-top bag (optional, for filling the pan)
Wire rack
Measuring cups and spoons
DIY Instruction: Step-by-Step
Step 1: Prepare the Doughnuts
Preheat and Prepare: Set your oven to 350 F. Lightly grease a 6-cavity doughnut pan.
Whisk Dry Ingredients: In a large bowl, whisk together the flour, granulated sugar, baking powder, and salt.
Combine Wet Ingredients: In a separate medium bowl, whisk together the milk, egg, melted butter, and 1/2 teaspoon of peppermint extract until fully combined.
Mix Batter: Pour the wet ingredients into the dry ingredients. Stir just until the batter comes together and is smooth. Be careful not to overmix.
Fill Pan: Transfer the batter to a large piping bag or a zip-top bag with the corner snipped off. Pipe the batter evenly into the prepared doughnut cavities, filling them about two-thirds full.
Step 2: Bake and Cool
Bake: Bake for 10 to 12 minutes, or until the doughnuts spring back lightly when touched.
Cool: Let the doughnuts cool in the pan for 5 minutes. Then, invert them onto a wire rack to cool completely before glazing.
Step 3: Glaze and Garnish
Make Glaze: While the doughnuts cool, prepare the glaze. In a medium bowl, whisk together the sifted powdered sugar, milk (or cream), and 1/4 teaspoon of peppermint extract until the mixture is smooth and runny but thick enough to coat a spoon. Add more milk, 1/2 teaspoon at a time, if the glaze is too thick.
Dip and Drip: Once the doughnuts are completely cool, dip the top of each one into the glaze, letting the excess drip back into the bowl. Place the glazed doughnut back on the wire rack.
Garnish: Immediately sprinkle the crushed peppermint candies over the wet glaze. The glaze will set quickly, so sprinkle immediately after dipping.
Set: Let the glazed doughnuts sit for about 15 minutes, or until the glaze is set.
10. Chocolate-Dipped Peppermint Fluff Truffles
Peppermint Dessert Recipes
These elegant little spheres feature a fluffy, creamy white center encased in a hard chocolate shell. They are a genuinely bite-sized treat that delivers a refreshing burst of minty sweetness. The smooth, melt-in-your-mouth filling contrasts beautifully with the snap of the chocolate coating.
The interior is a simple, no-bake mixture, making the preparation surprisingly easy. They look incredibly professional, especially when drizzled with a contrasting chocolate pattern. Serving them in small candy cups highlights their rounded, uniform shape.
With their rich, dark coating and light, airy filling, these truffles perfectly balance texture and flavor. The peppermint flavor is infused directly into the fluffy center, giving it a cool, clean finish. They are a wonderful addition to any dessert platter or a thoughtful, handcrafted gift.
Required Ingredients
For the Peppermint Fluff Filling:
4 ounces cream cheese, softened
1/2 cup (1 stick) unsalted butter, softened
3 cups powdered sugar, sifted
1 teaspoon peppermint extract
1/4 teaspoon salt
For the Chocolate Coating:
16 ounces semi-sweet or bittersweet chocolate, finely chopped
1 tablespoon coconut oil or shortening
Equipment List
Baking sheet
Parchment paper
Small scoop (1 tablespoon size)
Electric mixer (handheld or stand mixer)
Medium and large mixing bowls
Double boiler or microwave-safe bowl (for melting chocolate)
Dipping tools (forks or specialized dipping tools)
DIY Instruction: Step-by-Step
Step 1: Make the Peppermint Fluff Filling
Cream Butter and Cheese: In a large bowl, use an electric mixer to beat the softened cream cheese and the softened butter together until the mixture is completely smooth and creamy.
Add Sweetener and Flavor: Gradually add the sifted powdered sugar and the salt, beating on low speed until combined. Increase the speed and beat until the filling is light and fluffy.
Add Extract: Mix in the peppermint extract until evenly distributed.
Chill: Cover the bowl and refrigerate the filling for at least 1 hour, or until it is firm enough to roll into balls.
Step 2: Shape and Freeze
Scoop: Line a baking sheet with parchment paper. Use a small scoop (about 1 tablespoon) to scoop the chilled filling onto the prepared sheet.
Roll: Quickly roll the scoops into smooth, uniform balls using your hands.
Freeze: Place the tray of rolled balls in the freezer for at least 30 minutes. This step is crucial, as the firm center makes dipping much easier and prevents melting.
Step 3: Dip the Truffles
Melt Chocolate: Place the chopped chocolate and coconut oil (or shortening) in a heatproof bowl set over a saucepan of simmering water (a double boiler). Stir occasionally until the chocolate is fully melted and smooth. Alternatively, melt it in the microwave in 30-second intervals.
Dip: Remove the truffle balls from the freezer. Drop one ball into the melted chocolate. Use a fork or dipping tool to gently roll the truffle until it is completely coated.
Transfer: Lift the truffle out with the fork, tapping the side of the bowl to allow excess chocolate to drip off. Place the dipped truffle onto the parchment-lined baking sheet. Repeat with the remaining balls, working quickly.
Step 4: Finish and Set
Decorate (Optional): If you wish to drizzle the tops, reserve a small amount of the melted chocolate. Once the first chocolate layer is set, drizzle the reserved chocolate over the truffles using a fork or a small spoon for a decorative finish.
Set: Allow the chocolate to set completely at room temperature or chill them in the refrigerator for a few minutes.
Serve: Serve the finished truffles chilled or at room temperature. They store beautifully in an airtight container in the refrigerator.
11. Skillet Chocolate Chip Peppermint Cookie
Peppermint Dessert Recipes
This deep-dish cookie is served warm straight from the pan, providing a truly comforting dessert experience. The large format ensures a crispy, golden-brown edge and a gooey, soft center. It combines the familiar taste of a classic chocolate chip cookie with a refreshing holiday twist.
Scattered chocolate chips dot the surface, melting into pockets of bittersweet goodness as it bakes. The addition of small peppermint pieces throughout the dough gives a cool, minty contrast to the buttery sweetness. Serving it in the skillet maintains the warmth and rustic charm.
A generous scoop of vanilla ice cream placed right in the center slowly melts into the warm cookie, creating a luxurious puddle. The ice cream itself is dusted with extra crushed peppermint, tying the flavors together beautifully. This dessert is designed for sharing and creates an instantly impressive presentation.
Required Ingredients
1 cup (2 sticks) unsalted butter, softened
3/4 cup granulated sugar
3/4 cup packed light brown sugar
2 large eggs
1 teaspoon vanilla extract
1/2 teaspoon peppermint extract
2 1/4 cups all-purpose flour
1 teaspoon baking soda
1/2 teaspoon salt
1 cup semi-sweet chocolate chips, divided
1/2 cup crushed peppermint candies, divided
Vanilla ice cream (for serving)
Equipment List
10-inch cast iron skillet
Large mixing bowl
Electric mixer (handheld or stand mixer)
Measuring cups and spoons
Spatula
DIY Instruction: Step-by-Step
Step 1: Prepare the Cookie Dough
Preheat Oven: Set your oven to 350 F. Lightly grease the 10-inch cast iron skillet.
Cream Butter and Sugars: In a large mixing bowl, use an electric mixer to beat the softened butter, granulated sugar, and brown sugar until the mixture is light and fluffy.
Add Wet Ingredients: Beat in the two large eggs one at a time, making sure each is fully incorporated. Stir in the vanilla extract and the peppermint extract.
Combine Dry Ingredients: In a separate medium bowl, whisk together the flour, baking soda, and salt.
Mix Dough: Gradually add the dry ingredients to the wet ingredients, mixing on low speed until the dough just comes together. Do not overmix.
Fold In: Gently fold in 3/4 cup of the chocolate chips and 1/4 cup of the crushed peppermint candies.
Step 2: Bake and Serve
Press into Skillet: Press the cookie dough evenly into the prepared cast iron skillet.
Top: Sprinkle the remaining 1/4 cup of chocolate chips and remaining 1/4 cup of crushed peppermint candies over the top of the dough.
Bake: Bake for 25–30 minutes, or until the edges are golden brown and the center is set but still looks soft.
Serve: Remove the skillet from the oven. Let it cool for 5 minutes. Place a generous scoop of vanilla ice cream right in the center of the warm cookie. Serve immediately with a spoon for everyone to enjoy directly from the pan.
12. Strawberry Swirl Peppermint Meringues
Peppermint Dessert Recipes
These delicate, cloud-like kisses feature a stunning pink and white spiral pattern, making them truly eye-catching. Their texture is wonderfully light and airy, dissolving pleasantly on the tongue. The crisp meringue shell hides a delightful, chewy marshmallow center.
The vibrant pink swirls are achieved by painting food coloring inside the piping bag before adding the meringue mixture. This simple technique creates a striking, festive visual that suggests a gentle fruit-and-mint flavor. You will find the slight chewiness of the interior a welcome surprise.
Their towering, peaked shape makes them look professionally made, yet they rely on basic ingredients and a specific drying process. These sweets are naturally gluten-free and very low-fat, offering a lighter option for your holiday platter. They deliver a lovely, understated sweetness with a refreshing mint finish.
Required Ingredients
4 large egg whites, at room temperature
1 cup granulated sugar
1/2 teaspoon cream of tartar
1/4 teaspoon salt
1/2 teaspoon peppermint extract
Red gel food coloring
Optional: Small white chocolate chips (to stuff the center)
Equipment List
Baking sheets
Parchment paper
Stand mixer with whisk attachment (recommended) or electric hand mixer
Piping bag
Large star tip (like Wilton 1M)
Small, clean paintbrush or skewer
Measuring cups and spoons
DIY Instruction: Step-by-Step
Step 1: Prepare the Meringue
Preheat and Prepare: Set your oven to 200 F. Line two large baking sheets with parchment paper.
Whip Egg Whites: Place the room-temperature egg whites in the clean, grease-free bowl of a stand mixer. Beat them on medium speed until they become foamy.
Add Tartar and Salt: Add the cream of tartar and salt. Increase the speed to high and beat until the egg whites form soft peaks.
Add Sugar: Slowly add the granulated sugar, one tablespoon at a time, while the mixer is running on high speed. Continue beating until the mixture is thick, glossy, and forms very stiff, shiny peaks. This should take about 7–10 minutes total. The sugar should be completely dissolved.
Flavor: Beat in the peppermint extract briefly until just combined.
Step 2: Color and Pipe
Color the Bag: Take a small, clean paintbrush or skewer and dip it into the red gel food coloring. Paint 3–4 vertical stripes up the inside walls of your piping bag.
Fill Bag: Carefully spoon the white meringue mixture into the prepared piping bag fitted with the star tip, trying not to smudge the red stripes.
Pipe Kisses: Hold the bag vertically and pipe tall, swirled “kisses” onto the prepared baking sheets. If you wish to stuff the center, pipe a small base, gently press a white chocolate chip into the center, and then pipe the meringue up and over it.
Step 3: Bake and Dry
Bake: Place the baking sheets in the oven. Bake for 1–1.5 hours. The meringues should feel completely dry and lift easily from the parchment paper.
Cool/Dry: Once the baking time is complete, turn the oven off. Do not open the oven door. Leave the meringues inside the oven for at least 1–2 hours, or until the oven is completely cool. This crucial step dries them out fully and prevents cracking.
Store: Store the cooled meringues in an airtight container at room temperature. Moisture is their enemy, so avoid the refrigerator.
13. Peppermint Swirl Brioche Pull-Apart Bread
Peppermint Dessert Recipes
This golden, buttery bread features a rich, sweet dough with a festive, hidden filling. The light, fluffy interior is characteristic of brioche, making it incredibly tender. This beautiful loaf is designed to be pulled apart, encouraging interactive sharing.
Inside the pillowy pockets of bread, you’ll find layers of creamy, sweet filling swirled with bright red peppermint flavor. The combination of warm, rich dough and cool mint is a delightful contrast. The top is brushed with a sweet egg wash, giving it a beautiful, shiny crust.
White chocolate chips scattered over the top and a sweet drizzle add extra elements of texture and sweetness. This bread is substantial enough for a holiday breakfast or a sweet addition to a brunch spread. Every piece offers a perfectly soft, decadent bite of sweet holiday flavor.
Required Ingredients
For the Brioche Dough:
1 cup lukewarm milk
2 1/4 teaspoons active dry yeast (1 standard packet)
1/2 cup granulated sugar, divided
3 1/2 cups all-purpose flour, plus more for dusting
1 teaspoon salt
3 large eggs
1/2 cup (1 stick) unsalted butter, softened and cut into pieces
For the Filling and Glaze:
1/4 cup (1/2 stick) unsalted butter, softened
1/2 cup powdered sugar
1/2 teaspoon peppermint extract
1/4 cup crushed peppermint candies
Red food coloring (gel preferred)
1 egg (for egg wash)
1/4 cup white chocolate chips (for topping)
Equipment List
9×5 inch loaf pan
Parchment paper
Stand mixer with dough hook (recommended)
Rolling pin
Small bowls
Plastic wrap
Pastry brush
DIY Instruction: Step-by-Step
Step 1: Make the Brioche Dough
Activate Yeast: In the bowl of your stand mixer, dissolve the yeast and 1 tablespoon of the sugar into the lukewarm milk. Let it sit for 5–10 minutes until foamy.
Mix Dough: Add the remaining sugar, flour, salt, and 3 large eggs to the yeast mixture. Mix with the dough hook on low speed until combined.
Knead and Add Butter: Increase the speed to medium-low and knead for 5 minutes. Start adding the softened butter pieces, one piece at a time, allowing each to incorporate before adding the next. Knead for another 5–10 minutes until the dough is smooth, elastic, and pulls away from the sides of the bowl.
First Rise: Cover the bowl with plastic wrap and let the dough rise in a warm place for 1.5–2 hours, or until doubled in size.
Step 2: Assemble the Pull-Apart Loaf
Prepare Filling: While the dough rises, combine the softened butter, powdered sugar, peppermint extract, and a few drops of red food coloring in a small bowl. Stir until smooth and vibrantly colored. Stir in the crushed peppermint candies.
Shape Dough: Punch down the risen dough and turn it out onto a lightly floured surface. Roll it into a large rectangle, about 12 inches x 16 inches.
Spread Filling: Spread the prepared peppermint butter mixture evenly over the entire surface of the dough rectangle.
Cut and Layer: Cut the dough into six equal strips horizontally. Stack the strips directly on top of each other. Cut the stacked strips into six equal squares.
Place in Pan: Stand the stacked squares upright in the prepared loaf pan, arranging them snugly next to each other.
Step 3: Second Rise and Bake
Second Rise: Cover the loaf pan loosely with plastic wrap. Let it rise again in a warm place for about 30–45 minutes, or until the loaf looks puffy.
Egg Wash: Preheat your oven to 375 F. Whisk the remaining egg with a teaspoon of water for an egg wash. Gently brush the top of the risen loaf with the egg wash.
Bake: Bake for 30–35 minutes, or until the top is deeply golden brown. If the top begins to brown too quickly, loosely tent the loaf with foil.
Cool and Glaze: Let the bread cool in the pan for 10 minutes before carefully transferring it to a wire rack. Drizzle with a thin, sweet glaze (made from powdered sugar and a touch of milk) and sprinkle with the white chocolate chips before serving warm.
14. Chocolate Peppermint Whoopie Pies
Peppermint Dessert Recipes
These classic sandwich cookies feature two soft, dark chocolate cake rounds embracing a fluffy, pink filling. They offer a substantial, satisfying dessert that is easy to hold and eat. The exterior is incredibly moist, contrasting with the creamy center.
The rich cocoa flavor of the cake complements the bright, cool flavor of the peppermint filling perfectly. The filling, which is essentially a thick marshmallow or buttercream, holds its shape well. This makes them a durable and easy treat to transport.
Crushed candy cane is pressed all around the circumference of the creamy filling, adding a final festive flourish. This coating gives a wonderful textural crunch and a pop of red and white color. These whoopie pies are a charming, traditional holiday treat that everyone will reach for.
Required Ingredients
For the Cakes:
2 cups all-purpose flour
1/2 cup unsweetened cocoa powder
1 teaspoon baking soda
1/2 teaspoon salt
1/2 cup (1 stick) unsalted butter, softened
1 cup granulated sugar
1 large egg
1 teaspoon vanilla extract
1/2 cup buttermilk
For the Peppermint Filling:
1 cup (2 sticks) unsalted butter, softened
3 cups powdered sugar, sifted
1 teaspoon peppermint extract
2 tablespoons milk or heavy cream
Red food coloring (optional)
1/2 cup crushed peppermint candies (for rolling edges)
Equipment List
Baking sheets
Parchment paper
Medium and large mixing bowls
Electric mixer (handheld or stand mixer)
Piping bag or spoon
Measuring cups and spoons
DIY Instruction: Step-by-Step
Step 1: Bake the Chocolate Cakes
Preheat Oven: Set your oven to 350 F. Line two baking sheets with parchment paper.
Combine Dry: Whisk together the flour, cocoa powder, baking soda, and salt in a medium bowl.
Cream Wet: In a large bowl, cream the butter and sugar until light and fluffy. Beat in the egg and vanilla extract.
Mix Batter: Alternately add the dry mixture and the buttermilk to the wet mixture, beginning and ending with the dry ingredients. Mix until just combined.
Pipe/Spoon: Spoon or pipe the batter onto the prepared baking sheets in rounded mounds, about 1.5–2 inches wide, leaving space between them.
Bake: Bake for 10–12 minutes. The cakes should spring back when lightly touched. Let them cool on the sheets for a few minutes before moving them to a wire rack to cool completely.
Step 2: Make the Peppermint Filling
Cream Butter: In a clean large bowl, beat the softened butter until it is smooth and creamy.
Make Frosting: Gradually add the sifted powdered sugar and beat until combined. Beat in the peppermint extract and milk (or cream) until the filling is light, fluffy, and spreadable.
Color: Add a drop of red food coloring, if using, and beat until the color is evenly distributed throughout the filling.
Step 3: Assemble the Pies
Pair: Match the cooled cakes into pairs of similar sizes.
Fill: Pipe or spread a generous layer of the peppermint filling onto the flat side of one cake. Top with the second cake to create a sandwich.
Coat Edges: Place the 1/2 cup of crushed peppermint candies on a shallow plate. Gently roll the edge of the filled whoopie pie through the crushed candies so they stick to the exposed filling around the circumference.
15. Frozen Peppermint Hot Cocoa Smoothie
Peppermint Dessert Recipes
This chilled, frosty beverage is a rich and decadent take on a classic winter drink. It has the deep, comforting flavor of hot cocoa but is served cold and thick like a shake. This drink is a wonderful way to enjoy holiday flavors in a cooling format.
The drink features a smooth, chocolate base, blended to a slushy consistency that is refreshing on the palate. A thick layer of freshly whipped cream crowns the top, providing a beautiful textural contrast. It makes a beautiful dessert presentation in a tall glass.
A red and white striped straw and a sprinkle of cocoa powder complete the festive look. The subtle flavor of peppermint is infused throughout the cold chocolate blend. This is a genuinely luxurious treat that feels celebratory and indulgent.
Required Ingredients
1 cup milk (dairy or non-dairy)
1/2 cup strong brewed coffee, cooled (optional, for flavor depth)
1/2 cup chocolate syrup or high-quality cocoa powder
1/2 teaspoon peppermint extract
1-2 cups ice cubes
1/4 cup sugar (or to taste, depending on syrup sweetness)
Whipped cream and cocoa powder (for topping)
Equipment List
High-speed blender
Tall glasses
Measuring cups and spoons
Festive straws (optional)
DIY Instruction: Step-by-Step
Step 1: Combine the Base Ingredients
Combine Liquids: Pour the milk, cooled coffee (if using), chocolate syrup or cocoa powder, and peppermint extract into the blender jar.
Sweeten: Add the sugar (adjusting the amount based on the sweetness of your chocolate syrup) and a small pinch of salt to enhance the chocolate flavor.
Step 2: Blend the Smoothie
Add Ice: Fill the blender with 1 to 2 cups of ice cubes. Start with less and add more if you want a thicker consistency.
Blend: Secure the lid and blend the mixture on high speed. You may need to stop and scrape down the sides a few times. Continue blending until the mixture is smooth, thick, and slushy, with no large pieces of ice remaining.
Step 3: Serve and Garnish
Pour: Pour the thick, frosty smoothie immediately into tall serving glasses.
Top: Top each glass generously with a swirl of fresh whipped cream.
Garnish: Sprinkle a small amount of cocoa powder or a few chocolate shavings over the whipped cream for a final touch. Add a festive straw and serve at once.
16. White Chocolate Peppermint Shortbread Bars
Peppermint Dessert Recipes
These layered bars begin with a dense, buttery shortbread base that melts in your mouth. The cookie base offers a simple, salty counterpoint to the sweet topping. The two distinct layers make them easy to slice into neat, impressive squares.
A thick layer of creamy white chocolate fudge sets atop the shortbread. The fudge is studded with bits of crushed candy cane, creating appealing specks of red and white. This addition infuses the fudge with a cool, refreshing mint flavor.
The white chocolate is further embellished with a scattering of chocolate chips, adding a visual pop and a slight variation in sweetness. The shortbread layer ensures the bars hold their shape well, making them an excellent candidate for gifting. These are a beautifully balanced dessert that is both crisp and creamy.
Required Ingredients
For the Shortbread Crust:
1 cup (2 sticks) unsalted butter, softened
1/2 cup powdered sugar
2 cups all-purpose flour
1/2 teaspoon salt
For the Peppermint Fudge Topping:
1 (14 ounce) can sweetened condensed milk
1 cup white chocolate chips
1/2 teaspoon peppermint extract
1/2 cup crushed peppermint candies, plus more for garnish
1/4 cup dark chocolate chips and white chocolate chips (for garnish)
Equipment List
9×13 inch baking pan
Parchment paper
Mixing bowls
Electric mixer (optional)
Small saucepan
Measuring cups and spoons
DIY Instruction: Step-by-Step
Step 1: Make the Shortbread Crust
Preheat and Prepare: Set your oven to 350 F. Line a 9×13 inch baking pan with parchment paper, allowing some overhang on the sides.
Mix Dough: In a large bowl, cream the softened butter and powdered sugar until light and fluffy.
Add Dry: Gradually mix in the flour and salt until a soft, crumbly dough forms.
Press and Bake: Press the dough evenly into the bottom of the prepared pan. Bake for 18–20 minutes, or until the edges are lightly golden. Let the crust cool completely on a wire rack.
Step 2: Prepare the Fudge Topping
Melt Ingredients: In a small saucepan over low heat, combine the sweetened condensed milk and the white chocolate chips. Stir constantly until the chocolate is fully melted and the mixture is smooth and thick.
Flavor and Mix: Remove the pan from the heat. Stir in the 1/2 teaspoon of peppermint extract and the 1/2 cup of crushed peppermint candies.
Step 3: Assemble and Chill
Pour Topping: Pour the warm white chocolate fudge mixture evenly over the cooled shortbread crust. Spread it quickly with a spatula.
Garnish: Immediately sprinkle the remaining crushed peppermint candies and the mixed dark and white chocolate chips over the top of the wet fudge.
Chill and Cut: Refrigerate the bars for at least 2 hours, or until the fudge topping is completely set and firm. Use the parchment paper overhang to lift the bars out of the pan. Cut into neat squares using a sharp, warm knife.
17. Stuffed White Chocolate Peppermint Blondies
Peppermint Dessert Recipes
These chewy blondies feature a sweet, molasses-forward brown sugar base, giving them a rich, butterscotch-like flavor. They are exceptionally soft and moist, maintaining a delicate chewiness in the center. The warm, comforting spice of the blondie complements the cool mint inside.
The surprise is a molten, creamy white chocolate peppermint layer baked right into the center. When pulled apart, this white chocolate filling stretches and drips attractively. This middle layer adds a wonderful textural element and a boost of mint.
Additional white chocolate chips are scattered throughout the dough and over the top, reinforcing the sweet, vanilla flavor. These bars are easy to make and slice, presenting as a beautiful, tall dessert. They are a wonderful mash-up of a classic blonde brownie and festive holiday flavor.
Required Ingredients
1 cup (2 sticks) unsalted butter, melted
1 1/2 cups packed light brown sugar
2 large eggs
1 teaspoon vanilla extract
1/2 teaspoon peppermint extract
2 cups all-purpose flour
1 teaspoon baking powder
1/2 teaspoon salt
1 cup white chocolate chips, divided
1/2 cup white chocolate peppermint filling or frosting (store-bought or homemade)
Equipment List
8×8 inch baking pan
Parchment paper
Medium and large mixing bowls
Whisk
Spatula
Measuring cups and spoons
DIY Instruction: Step-by-Step
Step 1: Prepare the Blondie Batter
Preheat and Prepare: Set your oven to 350 F. Line an 8×8 inch baking pan with parchment paper, leaving overhang for easy removal.
Combine Wet: In a large bowl, whisk the melted butter and brown sugar until smooth. Whisk in the eggs one at a time, followed by the vanilla and peppermint extracts.
Combine Dry: In a separate medium bowl, whisk together the flour, baking powder, and salt.
Mix Batter: Gradually add the dry mixture to the wet mixture, stirring until just combined.
Fold In: Gently fold in 3/4 cup of the white chocolate chips.
Step 2: Layer and Bake
Base Layer: Press half of the blondie batter evenly into the bottom of the prepared pan.
Filling Layer: Carefully spread the white chocolate peppermint filling or frosting over the base layer.
Top Layer: Drop spoonfuls of the remaining batter over the filling layer. Gently spread the top layer as best as you can to cover the filling.
Garnish: Sprinkle the remaining 1/4 cup of white chocolate chips over the top of the batter.
Bake: Bake for 30–35 minutes, or until the edges are set and lightly browned. The center should still look soft.
Step 3: Cool and Slice
Cool Completely: Remove the pan from the oven and let the blondies cool completely on a wire rack before attempting to cut them. Cutting them warm will result in a messy filling.
Slice: Use the parchment paper overhang to lift the blondies out of the pan. Cut into squares using a sharp knife.
18. Creamy Pink Peppermint Dip
Peppermint Dessert Recipes
This fluffy, vibrant pink dip is incredibly light and creamy, offering a delightful twist on a sweet appetizer. It is airy, almost like a whipped frosting, making it easy to scoop. The sweet, cooling peppermint flavor is immediately recognizable.
The dip’s beautiful color comes from a touch of food coloring, giving it an undeniable festive appeal. It is served in a bowl surrounded by various items suitable for dipping, like vanilla cookies and fruit slices. This versatility makes it an excellent choice for a party spread.
A large swirl of the dip is topped with a generous sprinkle of crushed candy cane, providing a slight crunch. The contrast between the smooth, sweet dip and the crunchy mint pieces is very satisfying. This simple dessert spread is a fun, easy, and engaging addition to any gathering.
Required Ingredients
8 ounces cream cheese, softened
1/2 cup (1 stick) unsalted butter, softened
2 cups powdered sugar, sifted
1 teaspoon vanilla extract
1 teaspoon peppermint extract
Red food coloring (gel preferred)
1/4 cup crushed peppermint candies (for mixing and topping)
Assorted dippers: Vanilla wafers, shortbread cookies, graham crackers, fruit (strawberries, apple slices)
Equipment List
Medium mixing bowl
Electric mixer (handheld or stand mixer)
Serving bowl
Rubber spatula
Measuring cups and spoons
DIY Instruction: Step-by-Step
Step 1: Prepare the Base
Cream Ingredients: In a medium mixing bowl, use an electric mixer to beat the softened cream cheese and the softened butter together until the mixture is completely smooth and fluffy. Scrape down the sides of the bowl often.
Add Sweetener: Gradually add the sifted powdered sugar, beating until the dip is light and lump-free.
Step 2: Flavor and Color
Add Extracts: Beat in the vanilla extract and the peppermint extract.
Color: Add a few drops of red food coloring. Mix until you achieve a light, uniform pink color.
Fold in Crumbles: Gently fold in 2 tablespoons of the crushed peppermint candies using a rubber spatula.
Step 3: Serve and Garnish
Transfer: Spoon the prepared dip into a serving bowl. Use the back of the spoon or spatula to create a decorative swirl on the top.
Garnish: Sprinkle the remaining crushed peppermint candies generously over the top of the dip.
Arrange Dippers: Arrange the cookies, crackers, and fruit slices around the bowl of dip on a platter. Serve immediately, or chill for up to 30 minutes before serving.
19. Peppermint Chip Ice Cream
Peppermint Dessert Recipes
This homemade ice cream is rich, creamy, and wonderfully refreshing, offering a cooling contrast to heavy holiday meals. Its light pink color is achieved by incorporating crushed candy cane into the creamy base. The texture is velvety smooth, interspersed with satisfying chunks of chocolate.
Dark chocolate chips or shavings are folded into the churned ice cream, providing a bittersweet crunch in every spoonful. The cool, clean flavor of the peppermint is perfectly balanced by the rich cream base. This dessert is a welcome change from the typical baked goods of the season.
Served in a glass bowl, the scoops look inviting, especially when topped with extra chocolate chips. It is a fantastic option for those who enjoy the classic mint-chocolate pairing. This frozen treat can be prepared ahead of time, minimizing stress on the day of your event.
Required Ingredients
2 cups heavy cream
1 cup whole milk
3/4 cup granulated sugar
1/4 teaspoon salt
1 teaspoon vanilla extract
1 teaspoon peppermint extract
Red food coloring (optional, for color)
1/2 cup crushed peppermint candies
1/2 cup mini chocolate chips or finely chopped dark chocolate
Equipment List
Ice cream maker
Large saucepan
Large bowl
Whisk
Airtight freezer container
Measuring cups and spoons
DIY Instruction: Step-by-Step
Step 1: Prepare the Ice Cream Base
Warm Cream Base: In a large saucepan, combine the heavy cream, whole milk, granulated sugar, and salt. Heat the mixture over medium heat, stirring until the sugar is completely dissolved. Do not boil.
Cool: Remove the pan from the heat. Stir in the vanilla extract and the peppermint extract. Add a few drops of red food coloring now if you wish for a light pink tint.
Chill: Pour the mixture into a large bowl, cover it, and place it in the refrigerator to chill thoroughly for at least 4 hours, or preferably overnight. The base must be very cold before churning.
Step 2: Churn and Mix-Ins
Churn: Pour the chilled ice cream base into your ice cream maker bowl and churn according to the manufacturer’s instructions. This usually takes 20–30 minutes, until the ice cream is the consistency of soft serve.
Add Mix-Ins: During the last few minutes of churning, or immediately after it stops, quickly fold in the crushed peppermint candies and the mini chocolate chips (or chopped chocolate) using a spatula.
Step 3: Freeze and Serve
Transfer: Transfer the soft ice cream mixture to an airtight, freezer-safe container.
Harden: Place the container in the freezer for at least 2–4 hours to allow the ice cream to fully harden (this is called “curing”).
Serve: Let the ice cream sit out at room temperature for a few minutes before scooping. Serve with extra chocolate chips or crushed peppermint on top.
20. Festive Peppermint Profiterole Tower
Peppermint Dessert Recipes
This stunning, architectural dessert is composed of small, light choux pastry puffs stacked high into a visually impressive tower. The crisp pastry shells create a wonderful contrast with the creamy filling inside. The tower structure instantly elevates this treat to a holiday centerpiece.
Each puff is generously filled with a fluffy, pale blue or mint green peppermint cream. This vibrant, cool-toned filling is a delightful surprise against the golden pastry. A sweet, light caramel drizzle is often used to hold the puffs together and add a touch of glaze.
The finished tower is lightly dusted with powdered sugar, mimicking a gentle snowfall. This croquembouche-style dessert is both elegant and fun, allowing guests to pull apart individual pieces. It is a complex but rewarding project that screams holiday celebration.
Required Ingredients
For the Choux Pastry Puffs:
1/2 cup water
1/2 cup milk
1/2 cup (1 stick) unsalted butter, cubed
1/2 teaspoon salt
1 cup all-purpose flour
4 large eggs
For the Peppermint Cream Filling:
1 cup heavy cream, chilled
1/2 cup powdered sugar
1 teaspoon vanilla extract
1 teaspoon peppermint extract
Blue or green food coloring (gel preferred)
For Assembly and Garnish:
1 cup granulated sugar (for caramel, optional)
Powdered sugar (for dusting)
Equipment List
Baking sheets
Parchment paper
Medium saucepan
Large mixing bowl
Electric mixer (handheld or stand mixer)
Piping bag and small round tip
Skewer or toothpick (for piercing)
Large plate or cake stand (for assembly)
DIY Instruction: Step-by-Step
Step 1: Make and Bake the Choux Puffs
Preheat and Prep: Set your oven to 400 F. Line two large baking sheets with parchment paper.
Make Paste: In a saucepan, bring the water, milk, butter, and salt to a rolling boil over medium-high heat. Remove from heat and quickly dump in the flour all at once. Stir vigorously with a wooden spoon until the mixture forms a ball and pulls away from the sides of the pan.
Add Eggs: Transfer the dough to a mixing bowl. Beat in the eggs one at a time, ensuring each is fully incorporated before adding the next. The dough should be smooth and glossy.
Pipe and Bake: Spoon the dough into a piping bag fitted with a round tip. Pipe small mounds (about 1.5 inches wide) onto the prepared sheets. Bake for 20–25 minutes, or until golden brown and puffed.
Cool: Immediately remove the puffs from the oven. Use a skewer or toothpick to poke a small hole in the side of each puff to release steam. Cool completely on a wire rack.
Step 2: Prepare the Peppermint Cream
Whip Cream: In a chilled bowl, beat the heavy cream until soft peaks form.
Add Flavor and Color: Beat in the powdered sugar, vanilla extract, and peppermint extract. Add a small drop of blue or green gel food coloring and beat until the cream is light and evenly colored and forms stiff peaks.
Fill Puffs: Spoon the peppermint cream into a clean piping bag fitted with a small tip. Pipe the cream into each cooled choux puff through the small hole you made earlier.
Step 3: Assemble the Tower
Make Caramel (Optional for Bonding): If using caramel to bond, melt 1 cup of granulated sugar in a clean saucepan over medium heat without stirring. Swirl the pan occasionally until the sugar melts into a clear, amber liquid. Remove from heat immediately.
Assemble: Working quickly, dip the top of a filled puff into the warm caramel (if using) and gently press it onto your serving platter or cake stand to form the base ring. Continue dipping and pressing subsequent puffs together to form layers, stacking them into a cone shape. (Alternatively, use melted chocolate or a stiff royal icing to bond the puffs for stability.)
Garnish: Dust the finished tower generously with powdered sugar just before serving.
21. Peppermint Hot Cocoa Mug Cakes
Peppermint Dessert Recipes
This single-serving chocolate cake bakes quickly right inside a mug, creating a warm, cozy treat. The cake has a rich, deep cocoa flavor, making it intensely satisfying. The simplicity of preparation makes this an outstanding option for a last-minute dessert craving.
A generous pile of small, fluffy marshmallows tops the baked cake, slowly melting down into the warm center. A drizzle of sweet milk or glaze runs down the sides of the mug, suggesting an overflowing cup of cocoa. A festive candy cane stick serves as a colorful stirrer and a source of extra mint flavor.
You will enjoy the moist, cake-like texture achieved in mere minutes using a microwave. Serving them immediately in the mug adds to the comforting, homey feel of the dessert. This is a genuinely easy, personalized way to enjoy the classic combination of mint and chocolate.
Combine Dry: In a small mixing bowl, whisk together the flour, granulated sugar, cocoa powder, baking powder, and salt. Make sure the cocoa powder is fully broken up and combined with the other dry ingredients.
Transfer to Mug: Pour the dry mixture into your large, microwave-safe mug.
Step 2: Add Wet Ingredients
Add Liquids: Pour the milk, melted butter, vanilla extract, and peppermint extract into the mug with the dry ingredients.
Mix Batter: Use a fork or small whisk to stir the mixture vigorously until all the ingredients are just combined and no streaks of dry flour remain. Be careful not to overmix, as this can make the cake tough. Scrape down the sides to ensure everything is mixed.
Step 3: Cook and Garnish
Cook: Place the mug in the microwave. Cook on high power for 60–90 seconds. Cooking time varies widely based on the microwave wattage; the cake is done when the top looks set and spongy. It may rise slightly above the rim of the mug.
Add Toppings: Remove the mug carefully, as it will be hot. Immediately place the mini marshmallows on top of the warm cake. Let them sit for a minute to melt slightly.
Drizzle and Serve: Drizzle the top with the sweetened condensed milk (if using) so it runs attractively down the sides. Stick the small candy cane into the cake. Serve immediately with a spoon while the cake is warm and gooey.
22. Chocolate Swirl Peppermint Rolls
Peppermint Dessert Recipes
These sweet, tender rolls offer a beautiful swirl of dark chocolate and mint nestled in a soft, yeasted dough. The bread itself is light and incredibly fluffy, characteristic of a brioche-style bun. This is a satisfying dessert or a wonderful addition to a holiday brunch.
The rich, deep brown filling peeks out of the cut sides, showcasing the tight spiral pattern. This filling is infused with a refreshing peppermint flavor that cuts through the richness of the cocoa. Each roll is baked until golden brown, ensuring a delicate crust.
A simple white glaze is drizzled haphazardly over the top, along with a sprinkle of chocolate shavings for extra texture. The glaze melts slightly into the warm bread, adding an element of sweetness and moisture. These rolls are a delightful way to enjoy the classic combination of mint and chocolate in a soft, handheld format.
Required Ingredients
For the Sweet Rolls Dough:
1 cup lukewarm milk
2 1/4 teaspoons active dry yeast (1 standard packet)
1/4 cup granulated sugar, divided
3 cups all-purpose flour, plus more for dusting
1 teaspoon salt
1 large egg, plus 1 yolk
1/4 cup unsalted butter, softened and cubed
For the Peppermint Chocolate Filling:
1/2 cup (1 stick) unsalted butter, softened
1/2 cup granulated sugar
1/4 cup unsweetened cocoa powder
1 teaspoon peppermint extract
1/4 cup mini chocolate chips
For the Glaze:
1 cup powdered sugar
2-3 tablespoons milk
1/4 teaspoon peppermint extract (optional)
Chocolate shavings or sprinkles (for topping)
Equipment List
9×13 inch baking pan (or round cake pan)
Stand mixer with dough hook (recommended)
Rolling pin
Plastic wrap
Small bowls
Whisk
Measuring cups and spoons
DIY Instruction: Step-by-Step
Step 1: Make and Rise the Dough
Activate Yeast: In the bowl of a stand mixer, combine the lukewarm milk, yeast, and 1 tablespoon of the sugar. Let it stand for 5–10 minutes until foamy.
Mix Dough: Add the remaining sugar, flour, salt, egg, and egg yolk to the yeast mixture. Mix with the dough hook on low speed until combined.
Add Butter and Knead: Add the softened butter, one piece at a time, allowing each to incorporate before adding the next. Knead on medium-low speed for 8–10 minutes until the dough is smooth and elastic.
First Rise: Place the dough in a lightly greased bowl, cover with plastic wrap, and let it rise in a warm place for 1–1.5 hours, or until doubled in size.
Step 2: Assemble the Rolls
Prepare Filling: In a small bowl, mix the softened butter, granulated sugar, cocoa powder, and peppermint extract until it forms a creamy, spreadable paste.
Roll Dough: Punch down the risen dough and turn it out onto a lightly floured surface. Roll it into a large rectangle, about 12 inches x 18 inches.
Spread and Roll: Spread the prepared chocolate peppermint filling evenly over the dough rectangle, leaving a small border on one long edge. Sprinkle the mini chocolate chips over the filling. Starting from the long edge opposite the border, tightly roll the dough into a log.
Slice and Place: Use a sharp knife or unscented dental floss to slice the log into 12 equal pieces, about 1 inch thick. Place the rolls cut-side up into a lightly greased baking pan.
Step 3: Second Rise and Bake
Second Rise: Cover the pan loosely with plastic wrap and let the rolls rise again in a warm place for 30–45 minutes, or until they look puffy.
Bake: Preheat your oven to 375 F. Bake the rolls for 20–25 minutes, or until they are golden brown on top.
Glaze: While the rolls cool slightly, whisk together the powdered sugar, milk, and optional peppermint extract until a smooth, thin glaze forms. Drizzle the warm rolls generously with the glaze and sprinkle with chocolate shavings before serving warm.
23. Holiday Peppermint Sugar Cookies
Peppermint Dessert Recipes
These beautifully decorated sugar cookies are cut into festive shapes like snowflakes and trees, making them a cornerstone of holiday baking. The cookie base is crisp yet tender, with a buttery vanilla flavor. The vibrant icing colors make them immediately eye-catching.
Each cookie is topped with a smooth layer of royal icing in bright holiday hues like teal, white, and red. The icing sets to a firm, shiny finish, ensuring they are easy to stack and transport. You will enjoy the precise, cheerful designs on the surface.
A delicate dusting of crushed peppermint candy is sprinkled over the wet icing, adding a subtle minty crunch and sparkle. These cookies are a fun, engaging project for bakers of all skill levels. They capture the spirit of the season in a perfectly designed, edible form.
Required Ingredients
For the Cookies:
3 cups all-purpose flour
1 teaspoon baking powder
1/2 teaspoon salt
1 cup (2 sticks) unsalted butter, softened
1 cup granulated sugar
2 large eggs
1 teaspoon vanilla extract
1/2 teaspoon peppermint extract
For the Icing and Decoration:
3 cups powdered sugar, sifted
4-6 tablespoons milk or water
1/2 teaspoon almond or vanilla extract
Red and teal food coloring (gel preferred)
1/4 cup crushed peppermint candies
Equipment List
Baking sheets
Parchment paper
Rolling pin
Holiday cookie cutters (tree, snowflake, round)
Electric mixer
Mixing bowls
Piping bags or squeeze bottles (for icing)
DIY Instruction: Step-by-Step
Step 1: Make and Chill the Dough
Combine Dry: In a medium bowl, whisk together the flour, baking powder, and salt.
Cream Wet: In a large bowl, cream the softened butter and granulated sugar until light and fluffy. Beat in the eggs, vanilla, and peppermint extract.
Mix Dough: Gradually add the dry mixture to the wet mixture, mixing until the dough comes together. Do not overmix.
Chill: Divide the dough in half. Wrap each half tightly in plastic wrap and chill for at least 1 hour, or until firm enough to roll.
Step 2: Cut and Bake
Preheat and Roll: Set your oven to 350 F. On a lightly floured surface, roll out one disc of dough to about 1/4 inch thickness.
Cut Shapes: Use your holiday cookie cutters to cut out various shapes. Reroll and cut any scraps. Place the cutouts on parchment-lined baking sheets.
Bake: Bake for 8–10 minutes, or until the edges are very lightly golden. The centers should still be soft. Transfer the cookies to a wire rack to cool completely before decorating.
Step 3: Prepare the Icing
Make Glaze Base: In a medium bowl, whisk the sifted powdered sugar with the milk or water and the almond or vanilla extract until smooth. You are looking for a thick but pourable consistency.
Divide and Color: Divide the glaze into separate bowls for each color (red, white, and teal). Mix in a small amount of gel food coloring until you achieve your desired vibrant shades.
Step 4: Decorate
Flood Cookies: Use a spoon or a squeeze bottle to outline the edge of each cooled cookie with the colored icing, then fill in (flood) the center. Let the icing smooth out.
Add Peppermint: Immediately after flooding a section or an entire cookie, sprinkle a small amount of crushed peppermint candies over the wet icing.
Set: Let the iced cookies dry completely at room temperature for several hours or overnight until the icing is hard and set.
24. White Chocolate Peppermint Puppy Chow
Peppermint Dessert Recipes
This classic snack mix is coated in a sweet, light dusting that resembles powdered snow. The cereal squares provide a great crunch and are easy to scoop and enjoy. This treat is incredibly easy to make in large batches, making it a wonderful party snack.
Instead of the usual peanut butter and chocolate, this version features a creamy white chocolate coating, giving it a rich vanilla flavor. The peppermint flavor is infused right into the coating, giving it a cool, refreshing quality. A generous coating of powdered sugar provides the signature fuzzy, powdery finish.
The finished mix is light, crunchy, and irresistibly addictive. Served in large decorative bowls, this snack is visually appealing and fun for all ages. It offers a straightforward way to incorporate seasonal mint flavors into a beloved snack mix.
Required Ingredients
9 cups square corn or rice cereal (like Chex)
1 cup white chocolate chips
1/4 cup unsalted butter
1/2 teaspoon peppermint extract
1/2 cup crushed peppermint candies
1 1/2 cups powdered sugar
Equipment List
Extra-large mixing bowl (or large paper bag)
Microwave-safe bowl
Rubber spatula
Measuring cups and spoons
DIY Instruction: Step-by-Step
Step 1: Melt the Coating
Set Up: Place the 9 cups of cereal into an extra-large mixing bowl or a large, sturdy zip-top bag.
Melt Chocolate: In a microwave-safe bowl, combine the white chocolate chips and the butter. Microwave in 30-second intervals, stirring after each, until the mixture is completely melted and smooth.
Add Flavor: Stir the peppermint extract into the melted white chocolate mixture until combined.
Step 2: Coat and Shake
Pour Over Cereal: Pour the melted white chocolate mixture over the cereal in the large bowl. Use a rubber spatula to gently fold and stir the cereal until it is evenly coated with the white chocolate.
Add Crumbles: Stir in the 1/2 cup of crushed peppermint candies.
Add Powdered Sugar: Add the 1 1/2 cups of powdered sugar to the coated cereal (or pour it into the large zip-top bag if using).
Shake: Seal the bowl (or bag) tightly and gently shake, tossing the cereal until every piece is completely coated with the powdered sugar.
Step 3: Cool and Serve
Cool: Spread the finished puppy chow mixture onto a baking sheet lined with parchment paper. Let it cool completely at room temperature for about 15–20 minutes to allow the coating to set fully.
Serve: Transfer the mixture to a serving bowl. Store leftovers in an airtight container at room temperature.
25. Red Velvet Peppermint Bundt Cake
Peppermint Dessert Recipes
This gorgeous cake boasts a striking, deep red color and a dense, moist crumb, making it a visually stunning centerpiece. The classic red velvet flavor offers a subtle cocoa tang that pairs beautifully with mint. Its fluted bundt shape allows the white glaze to cascade attractively down the sides.
A thick, white glaze is generously poured over the cooled cake, creating beautiful white drips and rivulets. This glaze is typically a cream cheese or vanilla confection, offering a slightly tangy sweetness. The contrast between the vibrant red cake and the snowy white glaze is genuinely festive.
Though not visible, a hint of peppermint can be infused into the cake batter or the glaze itself, giving it a cool holiday aroma. The rich color and dramatic presentation make this an undeniably memorable dessert. Serving this cake requires only a simple slice and provides a substantial treat.
Required Ingredients
For the Red Velvet Cake:
2 1/2 cups all-purpose flour
1 teaspoon baking soda
1 teaspoon cocoa powder
1/2 teaspoon salt
1/2 cup (1 stick) unsalted butter, softened
1 1/2 cups granulated sugar
2 large eggs
1 teaspoon vanilla extract
1/2 teaspoon peppermint extract (optional, for mint flavor)
1 cup buttermilk
1 tablespoon red food coloring (gel preferred)
1 teaspoon white vinegar
For the Cream Cheese Glaze:
4 ounces cream cheese, softened
1/4 cup unsalted butter, softened
2 cups powdered sugar, sifted
1 teaspoon vanilla extract
1 tablespoon milk or heavy cream
Equipment List
10–12 cup bundt pan
Large mixing bowls
Electric mixer (handheld or stand mixer)
Whisk
Small bowl (for glaze)
Wire rack
DIY Instruction: Step-by-Step
Step 1: Prepare and Bake the Cake
Preheat and Prep: Set your oven to 350 F. Grease and flour your bundt pan very thoroughly. This is crucial for easy release.
Combine Dry: In a medium bowl, whisk together the flour, baking soda, cocoa powder, and salt.
Cream Wet: In a large bowl, cream the butter and sugar until light and fluffy. Beat in the eggs one at a time, followed by the vanilla and optional peppermint extracts.
Color: In a small bowl, whisk the red food coloring into the buttermilk.
Mix Batter: Alternately add the dry mixture and the buttermilk mixture to the wet ingredients, beginning and ending with the dry. Mix on low speed until just combined. Stir in the white vinegar last.
Bake: Pour the batter evenly into the prepared bundt pan. Bake for 30–40 minutes, or until a wooden skewer inserted into the cake comes out clean.
Cool: Let the cake cool in the pan for 10–15 minutes before inverting it onto a wire rack to cool completely.
Step 2: Glaze the Cake
Make Glaze Base: In a small bowl, use an electric mixer to beat the softened cream cheese and butter until smooth and creamy.
Mix Glaze: Beat in the sifted powdered sugar and vanilla extract. Add the milk or cream, 1 tablespoon at a time, beating until the glaze is thick but still runny enough to drip down the cake sides beautifully.
Glaze: Place the completely cooled cake on a serving plate. Spoon the glaze slowly and evenly over the top of the bundt cake, allowing it to drip down the fluted sides. Let the glaze set slightly before serving.
26. Salted Peppermint Caramel Candies
Peppermint Dessert Recipes
These individually wrapped candies feature a deeply rich, chewy caramel center coated in dark chocolate. The simple, elegant wrapping emphasizes the homemade, handcrafted nature of the confection. A cross-section reveals the soft, glossy, golden caramel inside.
The caramel itself can be subtly flavored with peppermint extract, offering a cool, refreshing contrast to the sweet, buttery interior. Each piece is dipped in a thick layer of smooth, dark chocolate, providing a satisfying snap upon biting. This layer of dark chocolate balances the intense sweetness of the caramel.
A sprinkle of coarse sea salt flakes over the chocolate coating adds a final savory touch. This saltiness enhances all the flavors, making the chocolate richer and the caramel more intense. These candies are an impressive, sophisticated gift or a delightful personal indulgence.
Required Ingredients
For the Caramel:
1 cup (2 sticks) unsalted butter
2 cups granulated sugar
1 cup light corn syrup
1 (14 ounce) can sweetened condensed milk
1 teaspoon vanilla extract
1/2 teaspoon peppermint extract
1 teaspoon sea salt (fine grain)
For the Coating and Topping:
12 ounces dark chocolate, finely chopped
1 tablespoon coconut oil or shortening
Flaky sea salt (coarse grain, for sprinkling)
Equipment List
8×8 inch baking pan
Parchment paper
Heavy-bottomed saucepan
Candy thermometer
Wooden spoon or heat-proof spatula
Dipping tools or fork
DIY Instruction: Step-by-Step
Step 1: Cook the Caramel
Prepare Pan: Line an 8×8 inch baking pan with parchment paper, leaving overhang on the sides.
Combine Ingredients: In the heavy-bottomed saucepan, combine the butter, granulated sugar, corn syrup, and sweetened condensed milk.
Cook: Cook over medium heat, stirring constantly until the butter melts and the sugar dissolves. Attach the candy thermometer to the side of the pan.
Boil and Stir: Bring the mixture to a boil and stop stirring. Allow the mixture to cook until the temperature reaches 248 F (firm ball stage). This takes patience.
Finish: Remove the pan from the heat. Stir in the vanilla extract, peppermint extract, and the fine-grain sea salt.
Pour and Cool: Pour the caramel immediately into the prepared pan. Let it cool completely at room temperature for at least 2 hours, or until firm. Do not refrigerate.
Step 2: Cut and Dip
Cut Caramel: Use the parchment overhang to lift the caramel out of the pan. Use a sharp, lightly oiled knife to cut the caramel into small squares or rectangles.
Melt Chocolate: Place the chopped dark chocolate and coconut oil in a microwave-safe bowl. Melt in 30-second intervals, stirring after each, until the chocolate is smooth.
Dip Candies: Dip each caramel piece completely into the melted chocolate. Use a fork to lift the candy out, allowing the excess chocolate to drip off. Place the dipped caramel onto a fresh sheet of parchment paper.
Salt: Immediately sprinkle each dipped piece with a few flakes of coarse sea salt while the chocolate is still wet.
Set and Wrap: Let the chocolate set fully. Once hardened, you can optionally wrap the pieces in small squares of wax paper or cellophane candy wrappers.
27. Oreo Peppermint Cheesecake Shooters
Peppermint Dessert Recipes
These stunning individual desserts feature distinct, beautiful layers, making them visually sophisticated. They start with a dark, rich layer of crushed chocolate sandwich cookie crust. The alternating pink and white layers suggest a light, airy filling.
The creamy filling is structured in layers, providing a wonderful textural shift from the firm crust. The bright pink layer is infused with refreshing peppermint, while the white layer offers a contrasting vanilla or cream cheese base. Serving them in small glasses makes them convenient and elegant.
A final, top layer features a delicate swirl pattern, garnished with a piece of chocolate cookie and a fresh mint leaf. The clean edges of the layers make these shooters look professional and highly appealing. They are a genuinely fun way to present a classic flavor combination.
Required Ingredients
For the Crust:
1 1/2 cups finely crushed chocolate sandwich cookies (Oreo)
4 tablespoons unsalted butter, melted
For the Peppermint Cheesecake Filling:
1 (8 ounce) package cream cheese, softened
1 cup powdered sugar, sifted
1 teaspoon vanilla extract
1 teaspoon peppermint extract
1 cup heavy cream, whipped to stiff peaks
Red food coloring (gel preferred)
Optional: Whole or halved chocolate sandwich cookies (for garnish)
Fresh mint leaves (for garnish)
Equipment List
8-10 small shot glasses or clear dessert glasses
Medium and large mixing bowls
Electric mixer
Rubber spatula
Piping bag or spoon
DIY Instruction: Step-by-Step
Step 1: Prepare the Crust
Mix Crumbs: In a medium bowl, combine the crushed chocolate cookies and the melted butter. Stir until the crumbs are thoroughly moistened.
Layer Glasses: Distribute the crumb mixture evenly among your 8 to 10 serving glasses. Press the crumbs firmly into the bottom of each glass to create a solid base. Set aside.
Step 2: Make the Cheesecake Layers
Make Cheesecake Base: In a large bowl, beat the softened cream cheese until smooth. Beat in the powdered sugar, vanilla extract, and peppermint extract until the mixture is completely smooth.
Fold in Whipped Cream: Gently fold in the prepared whipped heavy cream using a rubber spatula until the mixture is light and fluffy.
Divide and Color: Divide the cheesecake mixture into two separate bowls. Leave one bowl white. Add a few drops of red food coloring to the second bowl and stir gently until you achieve a light pink color.
Step 3: Assemble and Chill
Layer: Spoon or pipe the white cheesecake mixture evenly over the crust layer in all the glasses. Next, carefully spoon or pipe the pink peppermint mixture over the white layer. Smooth the tops gently.
Swirl Topping (Optional): Reserve a small amount of the pink mixture. Drizzle it over the top white layer of each glass, then use a toothpick to gently swirl the colors together.
Chill: Place the shooters in the refrigerator for at least 3 hours, or until the filling is firm and completely set.
Garnish: Just before serving, top each glass with a piece of chocolate sandwich cookie and a fresh mint leaf.
28. White Chocolate Peppermint Marshmallow Cookies
Peppermint Dessert Recipes
These cookies are chewy and buttery, with a golden-brown edge and a soft, inviting center. They are wonderfully textural, featuring chunks of melted chocolate and soft marshmallow pieces. The dough itself has a subtle richness that serves as a beautiful backdrop for the mint.
Bits of white chocolate chips dot the dough, providing sweet bursts of vanilla flavor throughout the cookie. Mini marshmallows are placed on top before baking, melting slightly to create a gooey, puffy appearance. The combined texture of chewiness and meltiness is delightful.
A delicate white chocolate drizzle is applied after cooling, adding a final elegant touch. These cookies have a lovely homemade aesthetic that suggests warmth and comfort. They are an easy way to incorporate fun, varied textures into a classic holiday cookie recipe.
Required Ingredients
1 cup (2 sticks) unsalted butter, softened
3/4 cup granulated sugar
3/4 cup packed light brown sugar
2 large eggs
1 teaspoon vanilla extract
1/2 teaspoon peppermint extract
2 1/4 cups all-purpose flour
1 teaspoon baking soda
1/2 teaspoon salt
1 cup white chocolate chips, divided
1/2 cup mini marshmallows
Equipment List
Baking sheets
Parchment paper
Electric mixer
Medium and large mixing bowls
Small bowl (for melting drizzle)
Wire rack
DIY Instruction: Step-by-Step
Step 1: Prepare the Cookie Dough
Preheat and Prep: Set your oven to 375 F. Line baking sheets with parchment paper.
Cream Butter and Sugars: In a large bowl, use an electric mixer to beat the softened butter, granulated sugar, and brown sugar until light and fluffy.
Add Wet Ingredients: Beat in the eggs one at a time, followed by the vanilla extract and the peppermint extract.
Combine Dry: In a separate medium bowl, whisk together the flour, baking soda, and salt.
Mix Dough: Gradually add the dry ingredients to the wet ingredients, mixing on low speed until the dough just comes together.
Fold In: Fold in 3/4 cup of the white chocolate chips.
Step 2: Bake and Decorate
Scoop: Scoop the dough onto the prepared baking sheets, leaving 2 inches between cookies.
Bake: Bake for 8 minutes. Remove the sheet from the oven. Gently press 3–4 mini marshmallows and the remaining 1/4 cup of white chocolate chips onto the top of each partially baked cookie.
Finish Bake: Return the cookies to the oven and bake for another 2–4 minutes, or until the edges are golden brown and the marshmallows are slightly softened.
Cool: Let the cookies cool on the baking sheet for 5 minutes before transferring them to a wire rack to cool completely.
Step 3: Drizzle
Melt Drizzle: Melt 2 tablespoons of extra white chocolate chips in a small microwave-safe bowl.
Drizzle: Use a fork to drizzle the melted white chocolate over the cooled cookies in a back-and-forth pattern. Let the drizzle set before serving.
29. No-Bake Peppermint Icebox Cake
Peppermint Dessert Recipes
This towering, multi-layered dessert is an incredibly easy, no-bake option for the holidays. It alternates dark chocolate wafer cookies with thick layers of creamy filling. The stacked construction makes it a dramatic, impressive presentation piece.
The creamy white filling is infused with a cool, refreshing peppermint flavor, contrasting beautifully with the bittersweet chocolate wafers. As the cake chills, the filling softens the wafers, transforming them into a moist, cake-like texture. This process is what gives the icebox cake its unique quality.
The top is crowned with a thick layer of the white filling, completely covered in a generous shower of crushed peppermint and chocolate shavings. This colorful topping reinforces the holiday theme. This cake is easy to make ahead of time, ensuring a stress-free dessert.
Required Ingredients
2 (7 ounce) packages thin chocolate wafer cookies (like Nabisco Famous Wafers)
2 cups heavy cream, chilled
1/2 cup powdered sugar
1 teaspoon vanilla extract
1 teaspoon peppermint extract
1/4 cup finely crushed peppermint candies, plus more for topping
1/4 cup chocolate shavings (for topping)
Equipment List
8×8 or 9×5 inch pan (depending on desired height and shape)
Electric mixer (handheld or stand mixer)
Medium and large mixing bowls
Rubber spatula
Measuring cups and spoons
DIY Instruction: Step-by-Step
Step 1: Prepare the Peppermint Cream
Whip Cream: In a chilled large mixing bowl, beat the heavy cream on high speed until soft peaks form.
Add Sweetener and Flavor: Gradually add the powdered sugar, vanilla extract, and peppermint extract. Continue beating until stiff peaks form.
Fold in Crumbles: Gently fold in the 1/4 cup of crushed peppermint candies using a rubber spatula.
Step 2: Assemble the Layers
First Layer: Spread a small amount of the whipped cream mixture on the bottom of your serving platter or pan to anchor the first layer.
Layer Cookies: Arrange a layer of chocolate wafer cookies over the cream. You may need to break some cookies to fill in gaps, depending on your pan shape.
Layer Cream: Spread an even layer of the peppermint whipped cream over the cookies.
Repeat: Continue alternating layers of cookies and cream until you run out of ingredients, ensuring the final layer is cream.
Step 3: Chill and Garnish
Chill: Cover the cake loosely with plastic wrap. Place it in the refrigerator to chill for at least 8 hours, or preferably overnight. This resting time is essential to soften the cookies and create the cake-like texture.
Garnish: Just before serving, sprinkle the top generously with the remaining crushed peppermint candies and the chocolate shavings. Use a large, sharp knife to slice the cake vertically for a dramatic presentation of the layers.
30. Holiday Peppermint Macarons
Peppermint Dessert Recipes
These delicate almond meringue cookies are bright and festive, showcasing a variety of vibrant holiday colors. Their signature feet are clearly visible, indicating a technically well-executed treat. The small size makes them genuinely appealing and elegant.
The crunchy meringue shells sandwich a thick layer of creamy, sweet filling, offering a contrast of textures. The filling is typically a white chocolate or buttercream base, subtly flavored with peppermint extract. The bright red and green colors of the shells are highly thematic.
Many of the finished macarons are dipped in dark chocolate and drizzled with white chocolate for extra visual interest and flavor complexity. They are finished with a dusting of crushed candy cane, reinforcing the holiday theme. These refined, beautiful cookies are a truly impressive addition to any dessert table.
Required Ingredients
For the Macaron Shells:
1 1/2 cups powdered sugar, sifted
1 cup almond flour, sifted
3 large egg whites, aged at room temperature
1/4 cup granulated sugar
Red and green gel food coloring
For the Peppermint Buttercream Filling:
1/2 cup (1 stick) unsalted butter, softened
2 cups powdered sugar, sifted
1/2 teaspoon vanilla extract
1/2 teaspoon peppermint extract
1-2 tablespoons milk or heavy cream
For Decoration:
1/2 cup dark chocolate, melted (for dipping)
2 tablespoons white chocolate, melted (for drizzling)
1/4 cup finely crushed peppermint candies
Equipment List
Baking sheets
Parchment paper or silicone mat (recommended)
Stand mixer with whisk attachment
Piping bag with a round tip (Wilton 1A or similar)
Rubber spatula
Food scale (essential for macaron accuracy)
Small bowls
DIY Instruction: Step-by-Step
Step 1: Make the Macaron Shells
Measure and Sift: Use a food scale to weigh out your powdered sugar and almond flour. Sift them together into a bowl.
Whip Egg Whites: Beat the room-temperature egg whites on medium speed until foamy. Gradually add the granulated sugar while beating. Continue beating until stiff, glossy peaks form (the meringue).
Color: Divide the meringue into two bowls. Gently fold red gel coloring into one bowl and green gel coloring into the other until the desired color is reached.
Macaronage: Gently fold the dry ingredients (almond flour/powdered sugar) into the colored meringues, using a rubber spatula. Fold until the batter flows like slow-moving lava (the “ribbon stage”).
Pipe: Transfer each color batter to a separate piping bag fitted with a round tip. Pipe 1.5-inch circles onto the prepared baking sheets.
Rest and Bake: Tap the sheets firmly on the counter a few times to release air bubbles. Let the shells rest at room temperature for 30–60 minutes until a dry skin forms (you can touch them without the batter sticking). Bake at 300 F for 12–15 minutes. Cool completely.
Step 2: Make the Peppermint Filling
Cream Butter: In a medium bowl, beat the softened butter until smooth.
Make Buttercream: Gradually add the sifted powdered sugar, alternating with the milk (or cream), beating until the frosting is light and fluffy.
Flavor: Beat in the vanilla and peppermint extracts until smooth.
Fill: Transfer the buttercream to a piping bag.
Step 3: Assemble and Decorate
Pair and Fill: Match the cooled macaron shells by size. Pipe a generous dollop of the peppermint buttercream onto the flat side of one shell and gently sandwich it with a matching shell.
Dip and Drizzle: Melt the dark chocolate and white chocolate separately. Dip one half of the assembled macaron into the dark chocolate. Place it on parchment paper and immediately drizzle the dark chocolate portion with the melted white chocolate.
Garnish: Sprinkle the crushed peppermint candies over the wet chocolate before it sets. Let the chocolate fully set before serving or storing.
31. Peppermint Spiced Tiramisu Cups
Peppermint Dessert Recipes
These individual servings offer a festive twist on the classic Italian dessert, featuring beautifully stacked layers. The contrast between the rich cocoa powder dusting and the creamy white filling is striking. Serving them in clear cups makes the delicate layering visible and elegant.
The creamy layers are a light mascarpone mixture, subtly infused with a hint of cooling peppermint extract. This addition transforms the traditional flavor profile into something distinctly holiday-appropriate. Ladyfingers soaked in coffee provide the necessary soft, sweet texture.
A dusting of cocoa powder covers the top of each cup, creating a rich, velvety finish. A single, round peppermint candy crowns the top of each dessert, adding a cheerful splash of color and a minty flourish. This sophisticated dessert is a fantastic make-ahead option that only improves as it chills.
Required Ingredients
1 (8 ounce) package mascarpone cheese, softened
1/2 cup heavy cream, chilled
1/4 cup powdered sugar, sifted
1 teaspoon vanilla extract
1/2 teaspoon peppermint extract
1 cup strong brewed coffee, cooled
2 tablespoons coffee liqueur (optional)
1 (7 ounce) package ladyfinger cookies
Unsweetened cocoa powder (for dusting)
Round peppermint candies (for garnish)
Equipment List
6-8 small clear serving glasses or cups
Medium mixing bowl
Whisk or electric mixer
Small shallow bowl (for coffee)
Sifter or fine-mesh strainer
DIY Instruction: Step-by-Step
Step 1: Prepare the Mascarpone Cream
Whip Cream: In a chilled medium bowl, beat the heavy cream until soft peaks form. Set aside.
Make Mascarpone Base: In a separate medium bowl, combine the softened mascarpone cheese, powdered sugar, vanilla extract, and peppermint extract. Beat until the mixture is smooth and creamy.
Fold Cream: Gently fold the whipped cream into the mascarpone mixture using a rubber spatula. Use large, slow motions to keep the mixture light and airy.
Step 2: Prepare Ladyfingers
Mix Coffee: Pour the cooled strong coffee into a shallow bowl. Stir in the coffee liqueur, if using.
Soak: Quickly dip one side of each ladyfinger into the coffee mixture. You want them moistened but not soggy. Cut the ladyfingers into pieces that fit neatly into your serving cups.
Step 3: Assemble the Tiramisu Cups
Layer 1 (Ladyfingers): Place a layer of the cut, soaked ladyfingers on the bottom of each serving glass, creating an even base.
Layer 2 (Cream): Spoon or pipe a generous layer of the peppermint mascarpone cream over the ladyfingers.
Repeat: Repeat the process with another layer of coffee-soaked ladyfingers and finish with a final, thick layer of the mascarpone cream. Smooth the top of the cream layer gently.
Step 4: Chill and Garnish
Chill: Cover the cups loosely and refrigerate for at least 6 hours, or preferably overnight. Chilling allows the flavors to meld and the ladyfingers to soften completely.
Garnish: Just before serving, dust the top of each cup with a layer of unsweetened cocoa powder using a sifter. Place a single round peppermint candy in the center of the cocoa layer for a festive finish.
32. Peppermint Gooey Butter Cake Squares
Peppermint Dessert Recipes
This dense, two-layered cake offers a delightfully soft, rich crumb on the bottom and a sweet, creamy topping. The yellow cake base provides a comforting, buttery flavor foundation. It is a wonderfully moist and substantial holiday dessert.
The top layer is a sweet, almost custard-like blend of cream cheese and powdered sugar, creating a distinct creamy texture. A hint of peppermint extract can be added to the creamy layer to give it a refreshing seasonal lift. This dense filling contrasts nicely with the light, cakey base.
A heavy dusting of powdered sugar covers the entire top, giving it a beautiful, snowy appearance. Scattered red and green sprinkles add a playful pop of color to the surface. These squares are easy to cut and serve, making them a great option for a casual holiday gathering.
Required Ingredients
For the Cake Base:
1 (18.25 ounce) package yellow cake mix
1 large egg
1/2 cup (1 stick) unsalted butter, melted
For the Cream Cheese Topping:
1 (8 ounce) package cream cheese, softened
2 large eggs
1 teaspoon vanilla extract
1/2 teaspoon peppermint extract
3 cups powdered sugar, sifted
Powdered sugar (for dusting)
Red and green sprinkles (for garnish)
Equipment List
9×13 inch baking pan
Aluminum foil or parchment paper
Large and medium mixing bowls
Electric mixer
Rubber spatula
Sifter
DIY Instruction: Step-by-Step
Step 1: Prepare and Bake the Cake Base
Preheat and Prep: Set your oven to 350 F. Line a 9×13 inch baking pan with aluminum foil or parchment paper, leaving overhang on the sides.
Mix Base: In a large bowl, combine the yellow cake mix, 1 large egg, and the melted butter. Stir until a thick dough forms.
Press: Press the dough evenly into the bottom of the prepared baking pan. This will be the cake’s base layer.
Step 2: Make the Gooey Layer
Cream Cheese Mixture: In a medium bowl, beat the softened cream cheese until it is smooth and lump-free.
Add Wet Ingredients: Beat in the 2 large eggs, vanilla extract, and peppermint extract.
Add Sweetener: Gradually add the sifted powdered sugar, beating until the mixture is completely smooth and creamy. The mixture will be thick and pourable.
Layer: Pour the cream cheese mixture evenly over the cake base in the pan.
Step 3: Bake and Finish
Bake: Bake for 35–40 minutes, or until the top should be lightly golden brown and set around the edges, but the center will still have a slight wiggle.
Cool: Remove the pan from the oven and let the cake cool completely on a wire rack. Cooling is important before dusting and cutting.
Dust and Garnish: Just before serving, use a sifter to dust the entire top of the cake with a thick layer of powdered sugar. Sprinkle red and green sprinkles over the top.
Slice: Use the foil or paper overhang to lift the cake out of the pan. Cut into neat squares.
33. Classic Lattice Cherry Peppermint Tart
Peppermint Dessert Recipes
This beautiful round tart features a short, buttery crust holding a vibrant red filling. The lattice top woven from pastry strips creates a stunning, decorative appearance. This dessert suggests a warm, comforting filling with a bright, sweet flavor.
The red filling is typically a sweet cherry blend, offering a slight tartness that is great for the holidays. A hint of peppermint extract can be added to the cherry filling to give it a unique seasonal lift without overpowering the fruit. The pastry is baked to a lovely golden brown.
A single star anise is placed at the center of the lattice, adding an aromatic, spicy touch and a focal point. This classic tart is substantial and slices cleanly, making it an elegant end to a celebratory meal. The firm, fluted crust holds the filling securely and provides a delightful snap.
Required Ingredients
For the Pastry Crust:
2 1/2 cups all-purpose flour
1 teaspoon salt
1 cup (2 sticks) unsalted butter, chilled and cubed
1/2 cup ice water (or less)
1 large egg (for egg wash)
For the Cherry Peppermint Filling:
4 cups frozen or fresh pitted cherries
1/2 cup granulated sugar
1/4 cup cornstarch
1 teaspoon lemon juice
1/2 teaspoon peppermint extract
1 star anise (for garnish, optional)
Equipment List
9-inch tart pan with a removable bottom
Rolling pin
Large bowl
Whisk
Pastry brush
Baking sheet
DIY Instruction: Step-by-Step
Step 1: Make and Chill the Pastry
Make Dough: In a large bowl, whisk together the flour and salt. Cut in the cold, cubed butter using a pastry blender or your fingertips until the mixture resembles coarse crumbs.
Add Water: Gradually sprinkle in the ice water, 1 tablespoon at a time, mixing until the dough just comes together. Do not overmix.
Chill: Divide the dough into two discs, one slightly larger than the other. Wrap each disc in plastic wrap and chill for at least 1 hour.
Step 2: Fill and Form the Lattice
Roll Crust: Roll out the larger dough disc and gently press it into the bottom and up the sides of the tart pan. Trim the edges. Place the lined pan in the freezer for 15 minutes.
Make Filling: In a large bowl, mix the cherries, granulated sugar, cornstarch, lemon juice, and peppermint extract until evenly coated.
Fill: Pour the cherry filling into the chilled crust.
Make Lattice: Roll out the smaller dough disc. Cut it into even strips about 1/2 to 1 inch wide. Lay half the strips diagonally over the filling. Weave the remaining strips through the first set, lifting alternating strips, to create a lattice pattern. Crimp the edges.
Step 3: Bake and Garnish
Egg Wash: Preheat your oven to 375 F. Whisk the egg with a tablespoon of water for an egg wash. Brush the lattice top generously with the egg wash.
Bake: Place the tart on a baking sheet. Bake for 50–60 minutes, or until the crust is golden brown and the filling is bubbly. If the crust browns too quickly, cover the edges with foil.
Cool: Let the tart cool completely on a wire rack before slicing and serving. Cooling allows the filling to set. Place the star anise in the center of the tart before serving.
34. Chocolate-Dipped Peppermint Shortbread
Peppermint Dessert Recipes
These round shortbread cookies are wonderfully buttery and crumbly, offering a delicate texture that melts in the mouth. The simple, classic shortbread provides a neutral, comforting base flavor. Dipping them in dark chocolate gives them an elegant, professional finish.
Each cookie is partially submerged in smooth, dark chocolate, creating a striking half-dipped pattern. This layer of dark chocolate delivers a rich, slightly bittersweet contrast to the buttery cookie. A light sprinkling of crushed peppermint candy is added immediately to the chocolate.
The crushed mint pieces provide a necessary visual appeal and a refreshing flavor component. These cookies are simple to mass-produce, making them an excellent choice for a holiday cookie box or platter. They combine two traditional flavors—shortbread and chocolate—with a festive mint twist.
Required Ingredients
1 cup (2 sticks) unsalted butter, softened
1/2 cup granulated sugar
1 teaspoon vanilla extract
1/2 teaspoon peppermint extract
2 cups all-purpose flour
1/4 teaspoon salt
10 ounces dark chocolate or semi-sweet chocolate, finely chopped
1/4 cup crushed peppermint candies
Equipment List
Baking sheets
Parchment paper
Rolling pin
Round cookie cutter (about 2.5 inches)
Electric mixer
Medium and large mixing bowls
Microwave-safe bowl or double boiler
DIY Instruction: Step-by-Step
Step 1: Make and Chill the Shortbread Dough
Cream Ingredients: In a large bowl, use an electric mixer to cream the softened butter and granulated sugar until light and fluffy. Beat in the vanilla and peppermint extracts.
Combine Dry: In a separate medium bowl, whisk together the flour and salt.
Mix Dough: Gradually add the flour mixture to the wet ingredients, mixing on low speed until the dough just comes together. Do not overmix.
Chill: Shape the dough into a disc. Wrap it tightly in plastic wrap and chill for at least 30 minutes, or until firm enough to roll.
Step 2: Bake the Cookies
Preheat and Roll: Set your oven to 350 F. On a lightly floured surface, roll out the dough to about 1/4 inch thickness.
Cut: Use a round cookie cutter to cut out the shapes. Place the cutouts on parchment-lined baking sheets. You can lightly score a pattern on the top of the cookies before baking, if desired.
Bake: Bake for 10–12 minutes, or until the edges are very lightly golden. The cookies should still look pale. Transfer the cookies to a wire rack to cool completely.
Step 3: Dip and Garnish
Melt Chocolate: Melt the dark chocolate in a microwave-safe bowl, stirring every 30 seconds until smooth. You can also use a double boiler.
Dip: Take one cooled cookie at a time. Dip half of the cookie into the melted dark chocolate, letting the excess drip back into the bowl.
Garnish: Immediately place the dipped cookie on a fresh sheet of parchment paper. Sprinkle a small pinch of crushed peppermint candies over the wet chocolate before it sets.
Set: Let the chocolate set completely at room temperature or chill them in the refrigerator for about 15 minutes before stacking or serving.
35. Peppermint Cream Eclairs
Peppermint Dessert Recipes
These elongated pastries feature a light, airy choux shell that holds a generous filling of cream. The golden-brown shell provides a crisp exterior that contrasts with the softness inside. They are a genuinely sophisticated French dessert with a seasonal twist.
The pastry is sliced horizontally and filled with beautiful mounds of white, fluffy cream. This cream filling is infused with a refreshing peppermint flavor. The top half is coated with a glossy, mint-green glaze, which adds a striking visual element.
The glaze is finished with a scattering of white crystalized sugar or fine crushed peppermint pieces, enhancing the holiday look. These eclairs are impressive to serve and offer a satisfying combination of crispy pastry and cool, creamy filling. They are a delicate and refined way to serve peppermint.
Required Ingredients
For the Choux Pastry:
1/2 cup water
1/2 cup milk
1/2 cup (1 stick) unsalted butter, cubed
1/2 teaspoon salt
1 cup all-purpose flour
4 large eggs
For the Peppermint Cream Filling:
2 cups heavy cream, chilled
1/2 cup powdered sugar
1 teaspoon vanilla extract
1 teaspoon peppermint extract
For the Mint Glaze:
1 1/2 cups powdered sugar, sifted
2-3 tablespoons milk
1/4 teaspoon peppermint extract
Green food coloring (gel preferred)
Crushed peppermint or sanding sugar (for topping)
Equipment List
Baking sheets
Parchment paper
Medium saucepan
Piping bag with a star tip (for cream) and a plain tip (for dough)
Electric mixer
Small bowl (for glaze)
DIY Instruction: Step-by-Step
Step 1: Make and Bake the Eclairs
Preheat and Prep: Set your oven to 400 F. Line a baking sheet with parchment paper.
Make Paste: In a saucepan, bring the water, milk, butter, and salt to a rolling boil. Remove from heat and quickly dump in the flour all at once. Stir vigorously until the mixture forms a ball.
Add Eggs: Transfer the dough to a mixing bowl. Beat in the eggs one at a time until the dough is smooth and glossy.
Pipe: Spoon the dough into a piping bag fitted with a large round tip. Pipe 4-inch long strips onto the prepared sheet, leaving space between them.
Bake: Bake for 15 minutes at 400 F. Reduce the oven temperature to 375 F and bake for another 10–15 minutes, or until the eclairs are deeply golden brown, hollow, and light. Let them cool completely.
Step 2: Make the Peppermint Cream
Whip Cream: In a chilled large mixing bowl, beat the heavy cream until soft peaks form.
Add Flavor and Sweetener: Gradually add the powdered sugar, vanilla extract, and peppermint extract. Continue beating until stiff peaks form.
Fill: Slice the cooled eclairs horizontally and spoon or pipe the peppermint cream into the bottom half of each shell.
Step 3: Glaze and Garnish
Make Glaze: In a small bowl, whisk together the sifted powdered sugar, milk, and 1/4 teaspoon of peppermint extract. Add a small amount of green food coloring until you achieve a light mint color. The glaze should be thick but pourable.
Dip: Dip the top half of each cream-filled eclair into the glaze, allowing the excess to drip off. Place the glazed eclair back on the wire rack.
Garnish: Immediately sprinkle the crushed peppermint or sanding sugar over the wet glaze. Let the glaze set before serving.
36. Swirled Peppermint Cheesecake Brownie Bites
Peppermint Dessert Recipes
These miniature desserts are rich, fudgy brownie cups topped with a decorative cream cheese swirl. The bite-sized format makes them simple to serve and enjoy at a party. The dark, dense brownie base provides a wonderful contrast to the light topping.
The topping is a thick layer of creamy white cheesecake frosting, baked onto the brownie. Swirls of red, mint-flavored cream are artfully piped over the white frosting, creating a festive, circular pattern. The combination of rich chocolate and tangy, cool mint is genuinely appealing.
A small cluster of chocolate chips sits in the center of the swirl, adding a final chocolate element and visual focus. These are a fun, easy-to-handle dessert that combines three beloved treats: brownie, cheesecake, and peppermint. They look beautiful arranged on a tiered serving tray.
Required Ingredients
1 box brownie mix (plus ingredients required on the box) or your favorite brownie recipe
1 (8 ounce) package cream cheese, softened
1 large egg
1/4 cup granulated sugar
1/2 teaspoon vanilla extract
1/2 teaspoon peppermint extract
1 tablespoon milk or heavy cream
Red food coloring (gel preferred)
Mini chocolate chips (for garnish)
Equipment List
Mini muffin pan (24-cup)
Paper mini muffin liners
Medium mixing bowls
Electric mixer
Piping bag or zip-top bag (optional, for swirling)
Toothpick or skewer
DIY Instruction: Step-by-Step
Step 1: Prepare Brownie Base
Preheat and Prep: Set your oven to 350 F. Line a 24-cup mini muffin pan with paper liners.
Make Batter: Prepare the brownie batter according to the package directions or your chosen recipe.
Fill Cups: Spoon the brownie batter into the prepared mini muffin liners, filling each about two-thirds full.
Step 2: Make and Swirl Topping
Make Cheesecake Mixture: In a medium bowl, beat the softened cream cheese, egg, granulated sugar, vanilla extract, and 1/4 teaspoon of the peppermint extract until smooth. This is your white base topping.
Divide and Color: Remove 1/4 cup of the white cheesecake mixture into a very small bowl. Stir in the milk, the remaining 1/4 teaspoon of peppermint extract, and a few drops of red food coloring to create a thin, vibrant red swirl mixture.
Top Brownies: Drop a spoonful of the white cheesecake mixture onto the center of each brownie batter cup. It should spread almost to the edges.
Swirl: Spoon the red mixture into a piping bag (or a zip-top bag with the corner snipped off). Pipe a small red dot or spiral onto the center of the white cheesecake topping. Use a toothpick or skewer to gently pull the red color outward, creating a star or swirl pattern.
Step 3: Bake and Garnish
Bake: Bake for 18–20 minutes, or until the brownie edges are set and the cheesecake topping is mostly set but still soft.
Garnish: Immediately press 3-4 mini chocolate chips into the center of the warm cheesecake swirl of each bite.
Cool: Let the bites cool completely in the pan on a wire rack before serving.
37. White Chocolate Peppermint Popcorn
Peppermint Dessert Recipes
This light, airy snack mix is perfect for movie night or casual grazing at a party. The fluffy popcorn kernels are uniformly coated in a sweet, white shell. It offers a wonderful combination of crunchy texture and sweet, cool flavor.
The popcorn is coated in melted white chocolate, giving it a rich, vanilla-flavored sweetness. The peppermint flavor is infused right into this white chocolate coating. The white coating also creates a visual contrast with the crushed candy pieces.
Generous bits of crushed peppermint candy are sprinkled over the warm coating, sticking beautifully to the kernels. The festive red and white flecks make this snack incredibly inviting. This popcorn is easy to make in large quantities and serves as a delightful sweet-and-crunchy treat.
Required Ingredients
10-12 cups plain popped popcorn (air-popped is best)
12 ounces white chocolate melting wafers or high-quality chips
1 teaspoon vegetable oil or coconut oil
1 teaspoon peppermint extract
1/2 cup crushed peppermint candies, plus more for garnish
Equipment List
Two large baking sheets
Parchment paper
Large mixing bowl
Microwave-safe bowl or double boiler
Rubber spatula
DIY Instruction: Step-by-Step
Step 1: Prepare and Coat Popcorn
Prepare Pan: Line two large baking sheets with parchment paper. Place the popped popcorn in a very large mixing bowl. Remove any unpopped kernels.
Melt Chocolate: In a microwave-safe bowl, combine the white chocolate and the vegetable or coconut oil. Microwave in 30-second intervals, stirring after each, until the chocolate is fully melted and smooth.
Add Flavor: Stir the peppermint extract into the melted white chocolate mixture.
Step 2: Mix and Spread
Coat Popcorn: Pour the melted peppermint white chocolate over the popcorn in the large mixing bowl. Use a rubber spatula to gently fold and stir the popcorn until the kernels are evenly coated. Work quickly before the chocolate sets.
Add Crumbles: Gently fold in the 1/2 cup of crushed peppermint candies.
Spread: Immediately spread the coated popcorn mixture onto the prepared parchment-lined baking sheets in a single, thin layer.
Step 3: Set and Serve
Garnish: Sprinkle the tops with a final layer of crushed peppermint candies.
Set: Allow the popcorn to cool completely at room temperature for about 30–60 minutes, or until the white chocolate is fully set and hardened. You can place it in the refrigerator briefly (10 minutes) if needed.
Break Up: Once set, break the popcorn into smaller pieces. Store in an airtight container at room temperature.
38. Toasted Marshmallow Peppermint Cookies
Peppermint Dessert Recipes
These dark chocolate cookies have a soft, rich, fudgy interior and a slightly crackled edge. The intense cocoa flavor provides a deep, slightly bittersweet base. Breaking one open reveals the soft, melted center and chewy texture.
A large, gooey marshmallow is placed on top of the cookie before the end of baking, then briefly toasted to a golden-brown finish. This creates a wonderfully sticky, chewy center that is irresistibly appealing. Bits of colorful garnish sit atop the melted marshmallow, adding a festive mint touch.
The rich, deep brown of the cookie base contrasts dramatically with the white, puffy topping. These are a cozy, comforting dessert that combines the richness of chocolate with the airy sweetness of marshmallow. Serving them warm is highly recommended for the best gooey texture.
Required Ingredients
1 1/4 cups all-purpose flour
1/2 cup unsweetened cocoa powder
1 teaspoon baking soda
1/4 teaspoon salt
1/2 cup (1 stick) unsalted butter, softened
3/4 cup granulated sugar
1/2 cup packed light brown sugar
2 large eggs
1 teaspoon vanilla extract
1/2 teaspoon peppermint extract
12 large marshmallows
Holiday sprinkle mix or edible décor (for garnish)
Equipment List
Baking sheets
Parchment paper
Medium and large mixing bowls
Electric mixer
Small scoop or tablespoon
Kitchen torch or oven broiler
DIY Instruction: Step-by-Step
Step 1: Make the Chocolate Cookie Dough
Preheat and Prep: Set your oven to 350 F. Line a baking sheet with parchment paper.
Combine Dry: Whisk together the flour, cocoa powder, baking soda, and salt in a medium bowl.
Cream Wet: In a large bowl, cream the butter, granulated sugar, and brown sugar until light and fluffy. Beat in the eggs one at a time, followed by the vanilla and peppermint extracts.
Mix Dough: Gradually add the dry mixture to the wet mixture, mixing until the dough just comes together.
Step 2: Bake and Top
Scoop: Scoop the dough onto the prepared baking sheet, leaving at least 2 inches between cookies.
Bake: Bake for 8 minutes. Remove the cookies from the oven.
Add Marshmallow: Carefully place one large marshmallow on the top center of each partially baked cookie.
Finish Bake: Return the cookies to the oven and bake for another 2–4 minutes, or until the edges are set and the marshmallows are softened and slightly puffy.
Step 3: Toast and Garnish
Toast: Remove the sheet from the oven. Use a kitchen torch to quickly toast the tops of the marshmallows until they are golden brown and slightly caramelized. Alternatively, place the cookies under a preheated broiler for 15–30 seconds, watching them constantly to prevent burning.
Garnish: Immediately sprinkle the tops of the warm, toasted marshmallows with the holiday sprinkle mix or edible décor, pressing gently to make them stick.
Cool: Let the cookies cool on the baking sheet for 5 minutes before transferring them to a wire rack. Serve warm for the best gooey texture.
39. Spiced Pear and Peppermint Crumble Cake
Peppermint Dessert Recipes
This substantial square of cake features beautiful layers of moist, spiced cake, tender fruit, and a crunchy topping. The rich, golden-brown layers suggest a warming, comforting flavor profile. It is a wonderfully rustic dessert that is perfect for a chilly evening.
Tender slices of pear are nestled throughout the cake layer, providing a sweet, slightly yielding fruitiness. The cake batter is typically spiced with cinnamon or ginger, adding warmth. A subtle hint of peppermint can be infused into the spice blend or the crumble topping.
A thick layer of crisp, oat-based streusel crumble tops the cake, adding a necessary contrasting texture. Served warm with a large scoop of vanilla ice cream, the textures and temperatures create a delightful contrast. This cake is a beautiful fusion of fruit, spice, and a hint of mint.
Required Ingredients
For the Cake:
1 cup (2 sticks) unsalted butter, softened
1 cup granulated sugar
1 cup packed light brown sugar
3 large eggs
2 1/2 cups all-purpose flour
1 teaspoon baking soda
1 teaspoon cinnamon
1/2 teaspoon peppermint extract (optional)
1 cup buttermilk or sour cream
2-3 medium pears, peeled, cored, and sliced
For the Crumble Topping:
1 cup all-purpose flour
1/2 cup rolled oats
1/2 cup packed light brown sugar
1/4 teaspoon cinnamon
1/2 cup (1 stick) unsalted butter, chilled and cubed
Equipment List
9×13 inch baking pan
Parchment paper
Medium and large mixing bowls
Electric mixer
Small scoop or tablespoon
Wire rack
DIY Instruction: Step-by-Step
Step 1: Prepare the Crumble Topping
Combine Dry: In a medium bowl, whisk together the flour, rolled oats, brown sugar, and cinnamon.
Cut in Butter: Use a pastry blender or your fingertips to cut the cold, cubed butter into the dry mixture until large, coarse crumbs form. Place the mixture in the refrigerator while you make the cake batter.
Step 2: Prepare the Cake Batter
Preheat and Prep: Set your oven to 350 F. Line a 9×13 inch baking pan with parchment paper, leaving overhang on the sides.
Cream Ingredients: In a large bowl, cream the softened butter, granulated sugar, and brown sugar until light and fluffy. Beat in the eggs one at a time. Stir in the vanilla and optional peppermint extracts.
Combine Dry: In a separate medium bowl, whisk together the flour, baking soda, and cinnamon.
Mix Batter: Alternately add the dry mixture and the buttermilk (or sour cream) to the wet mixture, beginning and ending with the dry. Mix until the batter is just combined.
Step 3: Layer and Bake
Pour Batter: Pour the cake batter into the prepared pan, spreading it evenly.
Add Pears: Arrange the sliced pears evenly over the top of the cake batter.
Top with Crumble: Retrieve the chilled crumble mixture and sprinkle it evenly over the layer of pears.
Bake: Bake for 45–55 minutes, or until a wooden skewer inserted into the center of the cake (avoiding the pears) comes out clean.
Step 4: Cool and Serve
Cool: Let the cake cool in the pan on a wire rack for at least 30 minutes.
Serve: Use the parchment paper overhang to lift the cake out of the pan. Cut into large squares. Serve warm with a scoop of vanilla ice cream or a dollop of whipped cream.
Key Takeaways
Versatility of Mint: Peppermint is highly adaptable, pairing perfectly with dark chocolate, white chocolate, creamy fillings, and buttery pastries alike.
Easy Holiday Hosting: Many recipes are no-bake or require minimal hands-on time, making them excellent choices for busy holiday preparation.
Textural Variety: The collection includes desserts that offer satisfying contrasts, such as the gooey center of a skillet cookie, the snap of chocolate bark, and the fluffy airiness of mousse.
Festive Presentation: Recipes feature striking color combinations (red, white, and green) and layers that naturally make for beautiful, eye-catching holiday presentations.
Great for Gifting: Handheld treats like shortbread, truffles, and puppy chow are simple to portion and pack for thoughtful, homemade holiday gifts.
We have explored a festive array of desserts, proving that the classic peppermint flavor can transform any treat into a holiday favorite. From the soft chew of a Peppermint Blondie to the sophistication of a layered Tiramisu Cup, these recipes offer something for every palate and occasion. You no longer need to search far and wide for a unique holiday dessert.
These delicious creations range from no-bake wonders that save you oven space to impressive bakes that will stun guests. Each recipe is designed to be approachable and rewarding, ensuring your holiday baking is full of joy, not stress. We hope you feel ready to embrace the cool, crisp flavor of mint this season.
Serving a homemade peppermint dessert is a wonderful tradition to start or continue. Choose your favorite, gather your ingredients, and enjoy creating these sweet moments with your loved ones. Happy baking, chilling, and celebrating!
Spread the loveGetting a party started for kids often feels like a puzzle with too many pieces. You want something that looks exciting but does not take all day to prepare. These colorful candy drinks…
Spread the loveIs your holiday baking done? Sharing homemade food is a beautiful way to show you care during the busy winter season. These 40 simple recipes help you create thoughtful gifts without spending days…
Spread the loveFinding the right centerpiece for your holiday table often feels like a daunting task. You want something that captures the magic of the season without spending your entire vacation in the kitchen. This…