Holiday feasts bring joy and abundance, but they also leave us with a mountain of the same two proteins. Facing a fridge full of turkey and ham for the third day in a row can feel like a culinary chore. You do not have to settle for the same repetitive sandwiches or cold slices over the kitchen sink.

Transforming these seasonal staples into vibrant, exciting meals is easier than you might think. By raiding your pantry and using a few fresh vegetables, you can create dishes that taste nothing like your holiday dinner. These recipes help you clear out the fridge while keeping your taste buds entertained with global spices and varied textures.
This collection offers forty creative ways to give your leftovers a second life. From zesty tacos and spicy stir-fries to comforting soups and crispy snacks, there is a dish here for every craving. Let us turn those heavy holiday remains into light, modern, and effortless weeknight victories.
1. Zesty Turkey Strip Sheet Pan Fajitas

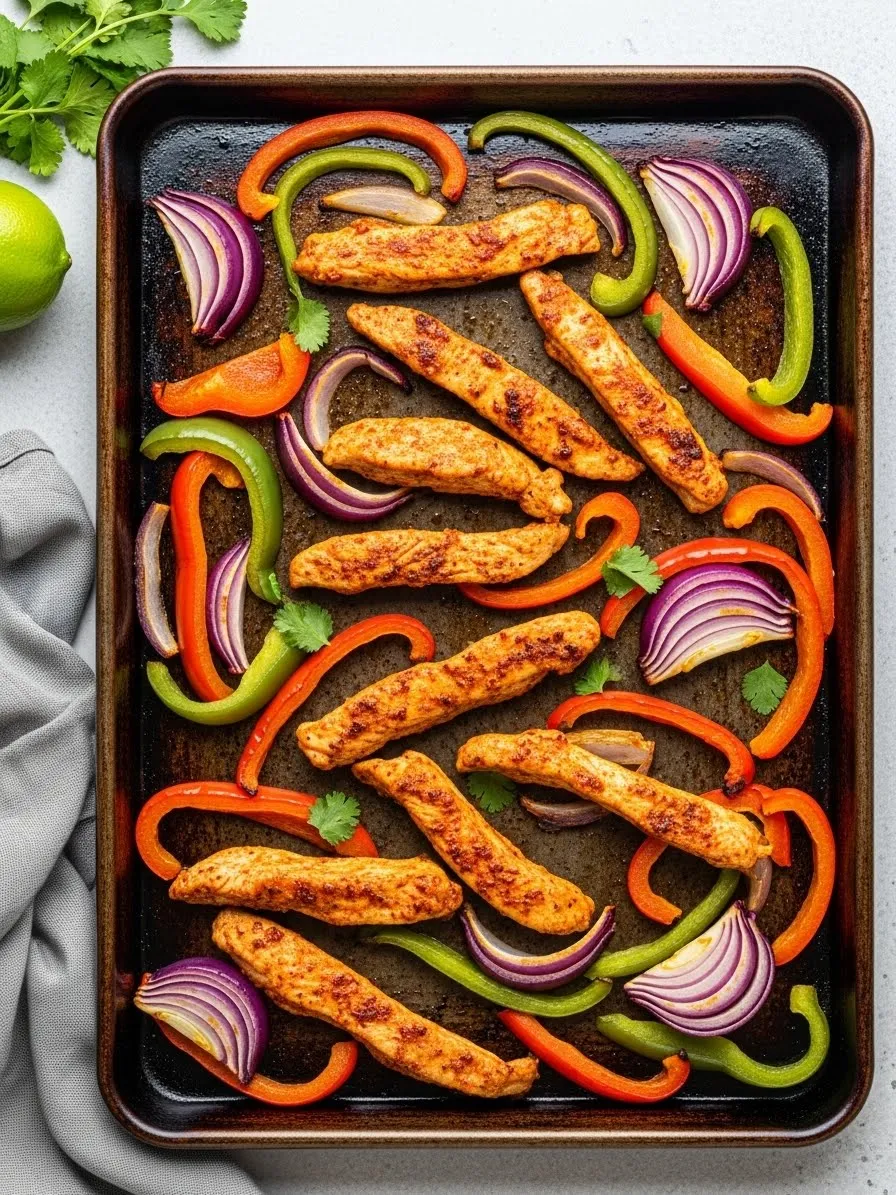
This image showcases a vibrant sheet pan filled with seasoned turkey strips and a colorful array of sliced vegetables. Bright orange, green, and red bell peppers mix with thick wedges of red onion across the dark baking surface. The poultry pieces appear coated in a savory, reddish spice blend, ready for a quick roast.
A fresh lime and a sprig of cilantro sit to the side, suggesting a bright finish for this healthy meal. The arrangement looks organized yet rustic, highlighting a simple way to transform holiday leftovers into a fresh dinner. Every ingredient remains distinct, ensuring the textures stay crisp and the flavors bold.
Ingredients
- 2 cups leftover cooked turkey, sliced into long strips
- 2 large bell peppers (any color), deseeded and sliced into strips
- 1 large red onion, cut into thick wedges
- 2 tablespoons olive oil
- 1 tablespoon taco seasoning or fajita spice mix
- 1 fresh lime, cut into halves
- Fresh cilantro for garnish
Equipment
- Large rimmed baking sheet
- Sharp chef’s knife
- Cutting board
- Large mixing bowl
- Tongs
DIY Instructions
- Preheat your oven to 400°F so the vegetables sear quickly without becoming mushy.
- Prepare the vegetables by slicing the bell peppers and red onion into uniform pieces so they cook at the same rate.
- Slice the turkey into strips that match the size of your pepper slices for a consistent look and feel.
- Toss the ingredients in a large bowl with olive oil and the spice blend until every piece is well coated.
- Spread the mixture across the baking sheet in a single layer, ensuring no pieces are piled on top of each other.
- Roast the tray for about 15 to 20 minutes, or until the vegetables are tender and the edges start to brown slightly.
- Remove from the oven and immediately squeeze fresh lime juice over the hot ingredients to brighten the flavor.
- Garnish with cilantro and serve directly from the pan with warm tortillas or over a bed of rice.
2. Crispy Leftover Mashed Potato Cakes

This photo features a stack of three golden-brown potato cakes resting on a clean white plate. Each patty has a beautifully seared exterior that suggests a satisfying crunch. A dollop of cool sour cream sits on the very top, crowned with a generous sprinkle of fresh green chives.
The middle cake shows a small bite taken out, revealing a fluffy and light interior filled with tiny flecks of herbs. Small bits of chopped chives are scattered around the base on the plate, adding a touch of color to the scene. This dish offers a clever way to repurpose extra holiday mash into a savory side or breakfast.
Ingredients
- 3 cups chilled leftover mashed potatoes
- 1 large egg, lightly beaten
- 1/2 cup shredded cheddar cheese
- 1/4 cup all-purpose flour (plus more for dusting)
- 3 tablespoons chopped fresh chives
- 2 tablespoons vegetable oil or butter for frying
- Sour cream for serving
Equipment
- Large mixing bowl
- Non-stick skillet or frying pan
- Spatula
- Measuring cups and spoons
DIY Instructions
- Combine the base by placing your cold mashed potatoes in a large bowl and breaking up any large clumps with a fork.
- Mix in the binders by adding the beaten egg, shredded cheese, and chopped chives to the potatoes until the mixture is uniform.
- Form the patties by scooping about a half-cup of the mixture and shaping it into a round disc about one inch thick.
- Coat lightly by dusting each side of the potato cake with a tiny bit of flour to help create a crust and prevent sticking.
- Heat the pan over medium heat and add your oil or butter, letting it melt until it shimmers.
- Fry the cakes in batches for about 3 to 4 minutes per side, moving them carefully with a spatula until they are deep golden brown.
- Drain any excess oil by placing the finished cakes on a paper towel-lined plate for just a moment.
- Serve while hot with a cold spoonful of sour cream and extra chives on top for a fresh flavor contrast.
3. Gooey Brie and Cranberry Ham Sliders

The image captures a close-up view of a decadent sandwich sliced in half to show off its rich fillings. Thick ribbons of melted Brie cheese stretch between the toasted bread slices, creating an inviting and creamy texture. Deep red cranberry sauce drips down the side, adding a pop of festive color against the pale cheese.
Folded layers of savory ham sit at the bottom, providing a hearty foundation for the sweet and salty combination. Tiny green thyme leaves are sprinkled over the plate and the sandwich, hinting at an earthy herbal note. The bread is toasted to a light tan, suggesting a warm and crisp bite.
Ingredients
- 4 thick slices of sourdough or brioche bread
- 6 ounces leftover holiday ham, thinly sliced
- 4 ounces Brie cheese, sliced with the rind on or off
- 1/4 cup leftover cranberry sauce
- 2 tablespoons butter, softened
- 1 teaspoon fresh thyme leaves
Equipment
- Bread knife
- Small butter knife or offset spatula
- Medium skillet
- Serving plate
DIY Instructions
- Prep the bread by spreading a thin, even layer of softened butter on one side of each bread slice.
- Layer the bottom by placing two slices of bread, butter-side down, in a cold skillet.
- Add the meat by folding your leftover ham slices and piling them high on the bread in the skillet.
- Spread the sauce by adding a thick layer of cranberry sauce directly over the ham for a sweet kick.
- Top with cheese by placing the Brie slices over the cranberry sauce so they can melt into the other ingredients.
- Close the sandwich by putting the remaining bread slices on top with the buttered side facing up.
- Toast slowly over medium-low heat for about 3 to 5 minutes per side until the bread is brown and the cheese is runny.
- Slice and garnish by cutting the sandwiches in half and tossing a few fresh thyme leaves over the top before serving.
4. Savory Stuffing Crust Leftover Quiche

This overhead shot displays a rustic quiche with a unique crust made entirely from leftover holiday stuffing. The golden-brown edges of the stuffing cubes create a textured border around a smooth, yellow egg filling. A slice has been removed and placed on a white plate nearby, showing the dense and flavorful interior layers.
Melted orange cheddar cheese covers the top, accented by dark, crisp sage leaves that add a gourmet touch. Light dustings of flour remain on the wooden table surface, giving the scene a cozy, homemade feel. This recipe serves as a brilliant solution for using up every last bit of stuffing and herbs.
Ingredients
- 4 cups leftover prepared stuffing
- 1 tablespoon melted butter
- 6 large eggs
- 1 cup heavy cream or whole milk
- 1 cup leftover cooked sausage or ham, chopped
- 1 cup shredded cheddar cheese
- 1/2 cup sliced leeks or green onions
- 5-6 fresh sage leaves
Equipment
- 9-inch pie dish
- Large mixing bowl
- Whisk
- Measuring cups
DIY Instructions
- Create the crust by mixing your leftover stuffing with melted butter and pressing it firmly into the bottom and sides of a pie dish.
- Pre-bake the base at 375°F for about 10 minutes to help the stuffing set and become crispy.
- Whisk the filling by combining the eggs and cream in a bowl until the mixture is completely smooth.
- Add the mix-ins by stirring your chopped meat and sliced leeks into the egg liquid.
- Assemble the quiche by pouring the egg mixture carefully into the warm stuffing crust.
- Top it off by sprinkling the shredded cheddar cheese and placing the fresh sage leaves on the surface.
- Bake the dish for 30 to 35 minutes, or until the center is set and no longer jiggles when moved.
- Let it rest for at least 10 minutes before slicing to ensure the pieces hold their shape perfectly.
5. Creamy Turkey and Wild Rice Soup

A black bowl filled with a hearty, steaming soup takes center stage in this warm and inviting photograph. A silver spoon lifts a generous portion of shredded turkey, bright orange carrots, and dark wild rice from the broth. A swirl of white cream decorates the surface of the liquid, adding a touch of elegance to the meal.
Tiny black pepper flakes and fresh herbs are scattered across the top, promising a well-seasoned experience. In the background, a soft candle flame flickers, enhancing the cozy, post-holiday atmosphere of the setting. This soup looks like the ultimate comfort food for a chilly winter evening after the celebrations end.
Ingredients
- 2 cups leftover turkey, shredded or cubed
- 1 cup cooked wild rice
- 4 cups chicken or turkey broth
- 2 large carrots, peeled and sliced into rounds
- 2 stalks celery, sliced
- 1 small yellow onion, diced
- 1/2 cup heavy cream
- 1 tablespoon olive oil
- Salt and black pepper to taste
Equipment
- Large soup pot or Dutch oven
- Wooden spoon
- Ladle
- Chef’s knife
DIY Instructions
- Sauté the aromatics by heating oil in your pot and adding the onions, carrots, and celery until they soften slightly.
- Simmer the base by pouring in the broth and bringing the liquid to a gentle boil over medium-high heat.
- Cook the vegetables by reducing the heat to low and letting the pot simmer for about 10 minutes until the carrots are tender.
- Add the leftovers by stirring in the shredded turkey and the pre-cooked wild rice.
- Warm through for another 5 minutes to ensure the meat and rice are heated all the way to the center.
- Incorporate the cream by slowly pouring it into the pot while stirring constantly to create a velvety texture.
- Season the soup with a generous amount of salt and cracked black pepper according to your preference.
- Serve in bowls and garnish with a tiny bit of extra cream or fresh herbs for a professional look.
6. Roasted Sweet Potato and Black Bean Tacos

This image features three vibrant tacos lined up in a metal holder against a dark, moody background. Each charred corn tortilla is stuffed with cubes of roasted orange sweet potatoes and hearty black beans. A smooth, pale yellow puree sits at the base, providing a creamy layer of flavor.
Bright pink pickled onions are piled on top, adding a sharp tang and a beautiful contrast to the warm colors. A zig-zag of white lime crema and a few fresh cilantro leaves finish the presentation with a fresh touch. These tacos offer a healthy and colorful break from the traditional heavy holiday flavors.
Ingredients
- 2 cups leftover roasted sweet potatoes, cubed
- 1 can (15 oz) black beans, rinsed and drained
- 8 small corn tortillas
- 1/2 cup pickled red onions
- 1/4 cup sour cream mixed with lime juice (crema)
- 1/2 cup mashed chickpeas or hummus (for the base)
- Fresh cilantro and scallions for garnish
Equipment
- Small skillet or microwave-safe bowl
- Taco holders (optional)
- Spoons for layering
DIY Instructions
- Warm the fillings by heating your leftover sweet potatoes and black beans in a skillet until they are hot.
- Char the tortillas by placing them directly over a low gas flame for a few seconds or in a dry pan until they soften.
- Spread the base by taking a spoonful of mashed chickpeas or hummus and smearing it across the center of each tortilla.
- Add the heart of the taco by piling a mix of sweet potatoes and beans over the base layer.
- Top with acid by placing several strands of pickled red onions on top of the beans to cut through the sweetness.
- Drizzle the sauce by using a spoon or a small squeeze bottle to apply the lime crema in a zig-zag pattern.
- Garnish the meal with fresh cilantro leaves and chopped green onions for extra crunch and color.
- Serve immediately while the tortillas are still warm and flexible for the best eating experience.
7. Pineapple and Ham Fried Rice

A large black wok is the focus of this action shot, where a wooden spatula lifts a big portion of steaming fried rice. Cubes of savory ham and bright yellow pineapple chunks are scattered throughout the grains of rice. Vibrant green peas and orange carrot bits add a rainbow of colors to the dish.
The rice looks perfectly toasted and coated in a light, savory sauce with tiny sesame seeds sprinkled over the top. Thinly sliced green onions are piled in the center, adding a final layer of freshness to the hot meal. This quick stir-fry is a fantastic way to give leftover ham a completely different flavor profile.
Ingredients
- 3 cups leftover cooked white rice (cold rice works best)
- 1.5 cups leftover ham, cut into small cubes
- 1 cup fresh or canned pineapple chunks
- 1/2 cup frozen peas and carrots
- 2 large eggs, lightly beaten
- 3 tablespoons soy sauce
- 1 tablespoon sesame oil
- 2 green onions, thinly sliced
Equipment
- Large wok or deep skillet
- Wooden spatula
- Small bowl for eggs
DIY Instructions
- Heat the pan over high heat and add a splash of oil, swirling it around to coat the entire surface.
- Sear the ham by tossing the cubes into the hot pan for 2 minutes until the edges become slightly crispy.
- Scramble the eggs by pushing the ham to one side and pouring the beaten eggs into the empty space, stirring until set.
- Incorporate the rice by adding the cold grains to the pan and breaking up any big lumps with your spatula.
- Add the produce by stirring in the pineapple chunks, peas, and carrots, then cook for another 3 minutes.
- Season the dish by drizzling the soy sauce and sesame oil over the rice, tossing everything together to coat evenly.
- Fry until hot by continuing to stir for a final 2 minutes so the rice absorbs the flavors and gets a bit of a crust.
- Finish with greens by removing the pan from the heat and folding in the sliced green onions before serving.
8. Cranberry Glazed Turkey Breasts

This photo shows two juicy turkey breasts resting on a bed of vibrant green beans. A thick, glossy cranberry glaze is spooned over the meat, featuring whole berries and cracked black peppercorns. Fresh sprigs of rosemary sit on top, adding a woody aroma and a professional look to the plate.
The turkey has clear grill marks, suggesting a smoky and charred exterior that contrasts with the sweet sauce. The green beans underneath are bright and look crisp-tender, providing a simple and healthy base for the meal. This presentation turns simple leftovers into a dish that looks like it belongs in a high-end restaurant.
Ingredients
- 2 large slices of leftover turkey breast
- 1/2 cup leftover cranberry sauce
- 1 tablespoon balsamic vinegar
- 1 teaspoon honey
- 1/2 pound fresh green beans, trimmed
- 1 tablespoon olive oil
- 2 sprigs fresh rosemary
- Salt and black pepper
Equipment
- Small saucepan
- Medium skillet
- Tongs
DIY Instructions
- Make the glaze by combining cranberry sauce, balsamic vinegar, and honey in a small saucepan over low heat.
- Simmer the sauce for about 5 minutes, stirring occasionally until it becomes thin enough to pour but remains glossy.
- Prepare the beans by heating olive oil in a skillet and sautéing the green beans with salt and pepper for 6 minutes.
- Warm the turkey by placing the slices in the same skillet with the beans for the last 2 minutes just to heat them through.
- Plate the base by arranging the cooked green beans in a neat pile on the center of a clean white plate.
- Add the meat by leaning the turkey breasts against the beans so they stay elevated and visible.
- Drizzle the finish by pouring a generous amount of the warm cranberry glaze over each piece of turkey.
- Garnish and serve by placing a rosemary sprig on each breast and adding an extra crack of black pepper over the whole plate.
9. Leftover Veggie Cast Iron Frittata

The image features a beautiful, round frittata served directly in a black cast iron skillet. Slices of roasted carrots and charred Brussels sprouts are arranged in a starburst pattern across the golden egg surface. Dark purple olives and crumbles of white feta cheese are scattered throughout, adding salty pops of flavor.
A single wedge has been cut and pulled forward, showing the thickness and the fluffy texture of the baked eggs. Fresh parsley is sprinkled over the top, and a small bowl of extra feta sits in the background. This dish is a colorful and easy way to use up various roasted vegetables from a holiday feast.
Ingredients
- 8 large eggs
- 1/4 cup whole milk or heavy cream
- 2 cups leftover roasted vegetables (like carrots and Brussels sprouts)
- 1/4 cup pitted kalamata olives
- 1/2 cup crumbled feta cheese
- 1 tablespoon olive oil
- Fresh parsley for garnish
Equipment
- 10-inch cast iron skillet
- Large bowl
- Whisk
- Spatula
DIY Instructions
- Prep the oven by preheating it to 375°F so it is ready as soon as you finish the stovetop portion.
- Whisk the eggs and milk together in a bowl with a pinch of salt until the mixture is light and frothy.
- Warm the skillet over medium heat with olive oil, then add your leftover vegetables to the pan to take the chill off.
- Pour the eggs over the vegetables, ensuring they flow into all the gaps and cover the bottom of the pan evenly.
- Add the toppings by dropping the olives and feta cheese crumbles onto the wet egg surface in a random pattern.
- Cook on the stove for about 2 to 3 minutes without stirring, just until the edges of the frittata start to turn pale and set.
- Transfer to bake by placing the whole skillet into the oven for 8 to 12 minutes until the center is firm to the touch.
- Garnish and slice by topping with fresh parsley and cutting into wedges directly in the pan for a rustic presentation.
10. Loaded Holiday Cobb Salad

This top-down view shows a large wooden bowl filled with a massive, colorful Cobb salad. Neat rows of ingredients create a rainbow effect, including diced turkey, hard-boiled eggs, and bright red cherry tomatoes. Sliced avocado and crispy bacon bits add richness and a variety of textures to the dish.
In the center, a small glass pitcher holds a tangy balsamic vinaigrette ready to be poured. Crisp green beans and vibrant purple radicchio leaves poke out from the bottom, providing a fresh and crunchy base. This salad is a light and nutritious way to enjoy leftover holiday proteins and vegetables.
Ingredients
- 3 cups chopped romaine lettuce or mixed greens
- 2 cups leftover turkey, diced into small cubes
- 3 hard-boiled eggs, sliced
- 1 cup cherry tomatoes, halved
- 1 avocado, thinly sliced
- 1/2 cup cooked bacon, crumbled
- 1 cup leftover steamed green beans
- 1/4 cup radicchio or red cabbage, shredded
- 1/2 cup balsamic vinaigrette
Equipment
- Large wooden salad bowl
- Small jar or pitcher for dressing
- Knife and cutting board
DIY Instructions
- Build the base by filling your large wooden bowl with a thick layer of chopped lettuce and radicchio leaves.
- Prepare the turkey by cutting your leftovers into uniform cubes so they are easy to pick up with a fork.
- Boil the eggs by placing them in water for 9 minutes, then cooling them in ice before peeling and slicing.
- Arrange the rows by placing the turkey, eggs, tomatoes, and green beans in neat lines across the top of the greens.
- Add the fats by nestling the avocado slices and bacon crumbles into the remaining spaces for a full look.
- Prep the dressing by whisking balsamic vinegar, oil, and a little mustard in a separate jar until well combined.
- Place the pitcher right in the middle of the salad for a beautiful presentation if you are serving guests.
- Toss and enjoy by pouring the dressing over the bowl just before eating to keep all the vegetables crisp and fresh.
11. Hawaiian Style Leftover Ham French Bread Pizza

This photo highlights two long slices of French bread transformed into a tropical feast using holiday leftovers. Cubes of savory ham and bright yellow pineapple chunks are scattered generously across a thick layer of melted mozzarella cheese. Thin rings of red onion add a sharp bite and a beautiful purple contrast to the golden crust.
A rich red tomato sauce peaks through the toppings, suggesting a tangy base for the salty and sweet combination. The bread is toasted to a light brown on the edges, ensuring every bite remains crisp and sturdy. This simple meal provides a fun and casual way to enjoy extra ham in a completely different format.
Ingredients
- 1 large loaf of French bread, sliced in half lengthwise
- 1.5 cups leftover holiday ham, diced
- 1 cup pineapple chunks, fresh or canned
- 1/2 small red onion, thinly sliced into rings
- 1 cup pizza sauce or marinara
- 2 cups shredded mozzarella cheese
- Dried oregano for seasoning
Equipment
- Large baking sheet
- Serrated bread knife
- Spoon for spreading sauce
- Cutting board
DIY Instructions
- Set the temperature of your oven to 400°F so the bread toasts quickly while the cheese melts.
- Slice the bread carefully down the middle using a serrated knife to create two long, flat bases.
- Spread the sauce evenly over the cut side of each bread half, leaving a small border for the crust.
- Layer the cheese by sprinkling a thick coating of mozzarella over the sauce to act as a glue for the toppings.
- Distribute the toppings by scattering your ham cubes, pineapple pieces, and onion rings across both halves.
- Bake the pizzas for about 10 to 12 minutes until the cheese is bubbly and starting to brown on top.
- Season the surface with a pinch of dried oregano immediately after removing the tray from the oven.
- Slice into sections about two inches wide and serve while the cheese is still hot and stretchy.
12. Creamy Turkey and Biscuit Pot Pie

A large white ceramic baking dish holds a comforting turkey pot pie topped with fluffy, golden-brown biscuits. The image captures a silver spoon lifting a single biscuit to reveal a thick, creamy filling packed with shredded turkey, bright green peas, and orange carrots. The sauce looks rich and velvety, clinging to the tender vegetables and meat.
Each biscuit is topped with a light sprinkle of fresh green herbs, adding a touch of color to the warm, tan surface. The steam rising from the dish suggests a hot and satisfying meal for a cold winter day. This recipe offers a clever shortcut by using biscuits as a crust for a hearty leftover centerpiece.
Ingredients
- 3 cups leftover turkey, shredded
- 1 bag (12 oz) frozen peas and carrots
- 1 can (10.5 oz) condensed cream of chicken soup
- 1/2 cup milk
- 1 tube refrigerated biscuit dough (8-10 count)
- 1/2 teaspoon garlic powder
- 1 tablespoon fresh parsley, chopped
Equipment
- 9×13 inch baking dish
- Medium mixing bowl
- Whisk or large spoon
DIY Instructions
- Heat the oven to 375°F to ensure the biscuits rise properly and turn a deep golden color.
- Mix the filling in a large bowl by combining the shredded turkey, frozen vegetables, soup, milk, and garlic powder.
- Pour the mixture into your baking dish and spread it out into an even layer using the back of your spoon.
- Bake the base for about 15 minutes on its own to make sure the center of the pot pie is hot.
- Arrange the biscuits by placing the raw dough rounds in neat rows on top of the hot turkey mixture.
- Finish baking for another 12 to 15 minutes until the biscuits are fully cooked and the filling is bubbling.
- Garnish the top with chopped parsley to add a fresh aroma and a professional look to the dish.
- Scoop carefully to ensure each serving gets a whole biscuit and plenty of the creamy turkey filling underneath.
13. Brown Butter and Sage Turkey Gnocchi

The photo showcases a grey bowl filled with plump, ridged gnocchi tossed in a shimmering brown butter sauce. Crisp, dark green sage leaves are nestled among the pasta, providing a sophisticated herbal contrast to the pale yellow dumplings. Tiny flecks of black pepper and a dusting of white parmesan cheese coat every piece.
A light drizzle of golden oil sits at the bottom of the bowl, highlighting the richness of this simple yet elegant meal. The gnocchi appear soft and pillowy, promising a melt-in-the-mouth texture with a savory finish. This dish is a refined way to use up the last bits of holiday herbs and butter.
Ingredients
- 1 package (16 oz) potato gnocchi
- 4 tablespoons unsalted butter
- 1/2 cup leftover turkey, finely shredded (optional)
- 10-12 fresh sage leaves
- 1/4 cup grated parmesan cheese
- Salt and cracked black pepper to taste
Equipment
- Large pot for boiling water
- Medium skillet
- Slotted spoon or strainer
DIY Instructions
- Boil the water in a large pot with a generous pinch of salt to season the pasta as it cooks.
- Cook the gnocchi by dropping them into the water and waiting until they float to the surface, which takes about 3 minutes.
- Melt the butter in a skillet over medium heat, swirling it constantly until it starts to foam and turn a nutty brown color.
- Crisp the sage by tossing the fresh leaves into the hot brown butter for about 30 seconds until they become translucent and stiff.
- Transfer the pasta directly from the water into the skillet using a slotted spoon, letting a little starchy water follow along.
- Toss everything together over the heat for 1 minute so the butter emulsifies and coats the gnocchi and turkey pieces.
- Plate the dish by scooping the pasta into a warm bowl and ensuring the crispy sage leaves are visible on top.
- Finish with cheese by adding a heavy sprinkle of parmesan and a final turn of the pepper mill for extra heat.
14. Zesty Lemon and Almond Green Bean Pasta

This top-down shot displays a white bowl filled with spiral pasta and a mountain of vibrant green beans. Thin curls of yellow lemon zest are twined across the center, adding a bright and citrusy pop of color. Toasted almond slivers and red pepper flakes are scattered throughout, providing a satisfying crunch and a hint of spice.
A silver fork rests on the side of the bowl, ready to dive into the light and healthy meal. The background is clean and bright, emphasizing the fresh ingredients used to revive tired holiday side dishes. This pasta is an excellent choice for a quick lunch that feels light but remains filling.
Ingredients
- 8 ounces rotini or fusilli pasta
- 2 cups leftover steamed green beans
- 3 tablespoons olive oil
- 2 cloves garlic, thinly sliced
- 1 large lemon, zested and juiced
- 1/4 cup toasted almond slivers
- 1/2 teaspoon red pepper flakes
Equipment
- Large pasta pot
- Small skillet
- Microplane or zester
- Colander
DIY Instructions
- Cook the pasta in boiling salted water according to the package directions until it reaches an al dente texture.
- Sauté the garlic in a small skillet with olive oil over low heat until the slices are fragrant and just barely golden.
- Drain the pasta but save about a half-cup of the cooking water to help create the light lemon sauce.
- Combine the ingredients by putting the pasta back in the pot and adding the green beans, garlic oil, and lemon juice.
- Mix thoroughly while adding a splash of the saved pasta water to help the oil and juice coat the noodles evenly.
- Add the crunch by tossing in the toasted almond slivers and red pepper flakes for texture and a bit of a kick.
- Zest the lemon directly over the bowl to release the aromatic oils and add a beautiful yellow garnish.
- Serve at room temperature or warm, making it a versatile option for any time of day after the holidays.
15. Savory Stuffing Waffles with Gravy and Egg

This close-up image captures a creative breakfast tower made from leftover holiday stuffing pressed into a waffle iron. Two thick, herb-flecked waffles are stacked on a white plate, topped with a perfectly fried sunny-side-up egg. A stream of smooth, golden gravy is being poured from a small white pitcher, cascading over the yolk and down the sides.
The egg yolk is bright and runny, suggesting a rich sauce when broken into the crisp waffle grooves. Tiny bits of green chives are sprinkled over the top to add a fresh finish to the heavy components. This dish is a show-stopping way to turn traditional dinner leftovers into a decadent morning treat.
Ingredients
- 3 cups leftover prepared stuffing
- 1 large egg (for the waffle batter)
- 2 tablespoons chicken broth (if the stuffing is dry)
- 2 large eggs (for frying on top)
- 1/2 cup leftover gravy, warmed
- 1 teaspoon chopped chives
- Non-stick cooking spray
Equipment
- Waffle maker
- Medium mixing bowl
- Small skillet
- Small pitcher for gravy
DIY Instructions
- Prep the stuffing by mixing it in a bowl with one beaten egg and a splash of broth until it holds together when pressed.
- Heat your waffle maker and coat both the top and bottom plates with a generous spray of non-stick oil.
- Scoop the mixture into the center of the waffle iron and spread it out slightly, then close the lid firmly.
- Cook the waffles for about 5 to 7 minutes until the outside is very crispy and they no longer stick to the iron.
- Fry the eggs in a separate skillet over medium heat, keeping the yolks soft and the whites fully set.
- Stack the meal by placing two stuffing waffles on a plate and carefully sliding a fried egg onto the very top.
- Warm the gravy in the microwave or on the stove until it is thin enough to pour easily from a pitcher.
- Pour and garnish by drizzling the gravy over the entire stack and adding a pinch of fresh chives for color.
16. Baked Turkey Tetrazzini Casserole

This image features a steaming scoop of creamy turkey pasta being lifted out of a clear glass baking dish. Long strands of spaghetti are coated in a thick white sauce, mixed with tender turkey pieces, earthy mushroom slices, and bright green peas. A crunchy, golden-brown breadcrumb topping covers the entire surface, providing a necessary texture contrast.
The steam is visible in the background, lit by a soft candle to create a cozy and inviting dinner scene. The edges of the casserole are bubbly and slightly charred, indicating a deep, baked-in flavor. This classic comfort dish is a reliable crowd-pleaser for feeding a full house after the holidays.
Ingredients
- 12 ounces spaghetti, broken in half
- 3 cups leftover turkey, shredded
- 1 cup sliced mushrooms
- 1 cup frozen peas
- 2 cups alfredo sauce or heavy cream
- 1/2 cup chicken broth
- 1 cup shredded mozzarella cheese
- 1/2 cup panko breadcrumbs
Equipment
- Large pot for pasta
- 9×13 inch glass baking dish
- Large mixing spoon
DIY Instructions
- Boil the spaghetti for two minutes less than the package suggests so the noodles don’t get mushy during the baking process.
- Mix the base by combining the cooked pasta, turkey, mushrooms, and peas in your large baking dish.
- Add the liquids by pouring the alfredo sauce and chicken broth over the ingredients, stirring until everything is wet.
- Cover with cheese by spreading an even layer of mozzarella over the top to create a gooey middle layer.
- Apply the crunch by sprinkling the panko breadcrumbs over the cheese for a professional, crispy finish.
- Bake the casserole at 375°F for 20 to 25 minutes until the sauce is bubbling and the breadcrumbs are dark tan.
- Let it set for 5 minutes after taking it out of the oven to allow the sauce to thicken slightly before serving.
- Serve in wide bowls to catch all the extra creamy sauce and ensure every bite has a bit of the crunchy topping.
17. Hearty Ham and Corn Chowder

The photo features a deep blue Dutch oven filled with a thick, pale yellow corn chowder. Large cubes of savory pink ham and chunks of tender potato are piled in the center, surrounded by sweet yellow corn kernels. A large wooden spoon rests in the pot, suggesting a rustic and home-cooked meal.
In the background, two thick slices of charred, toasted bread sit in a bowl, ready to be dipped into the rich soup. Fresh green parsley is scattered over the surface, adding a pop of life to the warm, creamy colors. This soup is a fantastic one-pot meal that uses up multiple holiday staples in a single step.
Ingredients
- 2 cups leftover ham, cubed
- 3 cups potatoes, peeled and diced
- 2 cups corn kernels (fresh, frozen, or canned)
- 4 cups chicken or vegetable broth
- 1 small yellow onion, diced
- 1 cup heavy cream or whole milk
- 2 tablespoons butter
- Fresh parsley for garnish
Equipment
- Large Dutch oven or heavy-bottomed pot
- Wooden spoon
- Ladle
- Knife and cutting board
DIY Instructions
- Sauté the onions in the Dutch oven with melted butter over medium heat until they become clear and soft.
- Boil the potatoes by adding them to the pot with the broth and bringing the liquid to a steady simmer for 12 minutes.
- Check for tenderness by poking a potato with a fork; it should break apart easily when it is ready.
- Add the protein by stirring in the leftover ham cubes and the corn kernels to the simmering liquid.
- Incorporate the cream by pouring it slowly into the pot and stirring to combine everything into a velvety soup.
- Simmer gently for another 5 minutes on low heat, making sure the soup does not come to a full boil again.
- Season the chowder with plenty of black pepper and a little salt, though the ham often provides enough saltiness.
- Serve with toast by ladling big portions into bowls and placing a piece of charred bread on the side for dipping.
18. Creamy Turkey and Cranberry Walnut Salad

This top-down view shows a bright white bowl filled with a chunky turkey salad. Cubes of pale turkey are mixed with crisp green celery and bright red dried cranberries for a festive look. Large walnut halves are scattered throughout, promising a hearty crunch in every bite.
A sprig of fresh dill sits on top, suggesting a light and herbaceous flavor profile for the creamy dressing. In the background, a halved avocado is visible, hinting at a healthy and fat-rich accompaniment to this protein-packed meal. This salad is a refreshing way to enjoy leftovers as a cold sandwich filling or a light wrap.
Ingredients
- 3 cups leftover turkey, diced into small cubes
- 1/2 cup dried cranberries
- 1/2 cup walnut halves or pieces
- 3 stalks celery, finely chopped
- 1/2 cup mayonnaise or Greek yogurt
- 1 tablespoon fresh dill, chopped
- 1 teaspoon honey or maple syrup
- Salt and pepper to taste
Equipment
- Large mixing bowl
- Rubber spatula
- Chef’s knife
DIY Instructions
- Prepare the turkey by cutting your leftovers into small, uniform cubes that will hold the dressing well.
- Chop the celery into tiny pieces to ensure you get a bit of crunch in every single spoonful of the salad.
- Whisk the dressing in the bottom of your large bowl by mixing the mayo, honey, and chopped dill until smooth.
- Combine the ingredients by adding the turkey, cranberries, walnuts, and celery to the bowl with the dressing.
- Fold gently using a spatula to coat all the pieces without breaking the delicate walnuts or mashing the turkey.
- Season to taste with a pinch of salt and a generous amount of black pepper to balance the sweet cranberries.
- Chill the salad in the refrigerator for at least 30 minutes to allow the flavors to meld together perfectly.
- Serve it up on top of a bed of lettuce, inside a hollowed-out avocado, or between two thick slices of toasted bread.
19. Roasted Vegetable and Quinoa Buddha Bowl

The image captures a nutritious Buddha bowl filled with a variety of colorful roasted leftovers. Charred Brussels sprouts, honey-glazed carrots, and cubes of roasted squash are arranged over a fluffy bed of white quinoa. A pile of cooked chickpeas adds a boost of plant-based protein to the center of the dish.
A creamy tahini dressing is being drizzled over the top from a spoon, creating beautiful white streaks across the dark vegetables. Fresh kale leaves sit at the bottom, providing a raw and crunchy base for the warm toppings. This bowl is an excellent way to reset your diet with a fiber-rich and vibrant meal after a heavy holiday.
Ingredients
- 2 cups leftover roasted vegetables (Brussels sprouts, carrots, squash)
- 1 cup cooked quinoa
- 1/2 cup canned chickpeas, drained and rinsed
- 1 cup chopped raw kale or spinach
- 2 tablespoons tahini
- 1 tablespoon lemon juice
- 1 tablespoon warm water (to thin the dressing)
Equipment
- Large shallow bowl
- Small jar for dressing
- Spoon for drizzling
DIY Instructions
- Prepare the greens by placing a thick layer of chopped kale in the bottom of your shallow serving bowl.
- Scoop the base by adding the fluffy quinoa to one side of the bowl, leaving room for the other ingredients.
- Reheat the veggies quickly in a skillet or microwave just until they are warm to the touch.
- Arrange the bowl by placing the roasted carrots, sprouts, and squash in separate piles on top of the greens and quinoa.
- Add the beans by nestling the chickpeas into the center of the arrangement to fill any gaps.
- Mix the dressing in a small jar by whisking the tahini, lemon juice, and water until it reaches a pourable consistency.
- Drizzle the sauce slowly over the entire bowl, making sure to hit the roasted vegetables and the quinoa.
- Enjoy the balance of textures by mixing a little bit of everything onto your fork for a perfect, healthy bite.
20. Creamy Cauliflower and Turkey Curry

A black pot filled with a golden, steaming curry takes center stage in this vibrant photograph. Shredded turkey and bright yellow cauliflower florets are submerged in a rich, spiced coconut milk broth. A swirl of white cream and a fresh cilantro leaf decorate the center, adding a gourmet touch to the rustic dish.
Thin slices of red chili pepper are scattered across the surface, hinting at a mild and warming heat. In the background, a bowl of fluffy white rice is ready to soak up the aromatic and savory sauce. This recipe is a brilliant way to transform traditional holiday bird into a completely different international flavor experience.
Ingredients
- 2 cups leftover turkey, shredded
- 1 small head cauliflower, cut into bite-sized florets
- 1 can (14 oz) coconut milk
- 2 tablespoons yellow curry powder
- 1/2 cup frozen peas
- 1 tablespoon ginger-garlic paste
- 1 small red chili, sliced (optional)
- Fresh cilantro for garnish
Equipment
- Large deep skillet or pot
- Wooden spoon
- Measuring spoons
DIY Instructions
- Sauté the aromatics by heating a little oil in your pot and adding the ginger-garlic paste for 1 minute until fragrant.
- Bloom the spices by stirring in the yellow curry powder, letting it cook for 30 seconds to release the oils and flavor.
- Simmer the base by pouring in the coconut milk and bringing the liquid to a very gentle bubble over medium heat.
- Cook the veggies by adding the cauliflower florets to the sauce and letting them simmer for 8 to 10 minutes until tender.
- Add the leftovers by folding in the shredded turkey and the frozen peas, cooking for another 3 minutes to heat through.
- Swirl the cream by adding a small dollop of coconut cream or heavy cream to the center and moving it gently with a spoon.
- Adjust the heat by scattering the fresh red chili slices over the top according to how much spice you enjoy.
- Serve over rice while the curry is hot, making sure to ladle plenty of the golden sauce over the grains for maximum flavor.
21. Savory Ham and Potato Breakfast Hash

The image captures a black cast iron skillet filled with a rustic breakfast hash. Perfectly cubed potatoes are fried to a deep golden brown, mixed with savory bits of chopped ham and softened onions. Two soft poached eggs sit right in the center, with one yolk broken to reveal a rich, flowing center that coats the crispy base.
Steam seems to rise from the hot pan, highlighting the fresh cracks of black pepper and coarse salt. The dark surface of the skillet provides a bold contrast to the bright whites and yellows of the eggs. This one-pan meal offers a hearty way to refuel using common holiday leftovers from the night before.
Ingredients
- 2 cups leftover ham, diced
- 3 cups leftover roasted potatoes, cubed (or par-boiled potatoes)
- 1 small yellow onion, finely chopped
- 2 large eggs
- 2 tablespoons olive oil or butter
- Salt and black pepper to taste
- Fresh parsley for garnish
Equipment
- 10-inch cast iron skillet
- Spatula
- Small bowl (for cracking eggs)
DIY Instructions
- Heat the skillet over medium-high heat and add the oil or butter until it begins to shimmer.
- Sauté the onions for about 3 minutes until they become translucent and start to smell sweet.
- Crisp the potatoes by adding them to the pan in a single layer, letting them fry undisturbed for several minutes to get a brown crust.
- Add the ham and toss it with the potatoes, cooking for another 5 minutes so the meat edges get slightly charred.
- Create two wells in the hash mixture using the back of a large spoon to make space for your eggs.
- Crack the eggs into the wells carefully, then cover the skillet with a lid for 2 to 3 minutes to steam the whites.
- Check the yolks to ensure the whites are set but the centers remain soft and jiggly.
- Season and serve immediately with a sprinkle of fresh parsley and extra black pepper directly from the skillet.
22. Turkey and Corn Enchiladas Verdes

This photo features a ceramic baking dish filled with neatly rolled enchiladas smothered in a vibrant green salsa verde. A metal spatula lifts one roll, showing a glimpse of shredded turkey and sweet corn kernels tucked inside a soft tortilla. Thick ribbons of melted white cheese and swirls of cool lime crema decorate the top.
Bright red radish slices and fresh cilantro leaves add a crisp, peppery finish and a pop of color to the tray. A lime wedge sits on the side, ready to provide a final burst of acidity to the rich dish. This recipe is a refreshing, tangy departure from traditional holiday flavor profiles.
Ingredients
- 3 cups leftover turkey, shredded
- 1 cup corn kernels (canned or frozen)
- 8 to 10 corn tortillas
- 2 cups green enchilada sauce (salsa verde)
- 1.5 cups shredded Monterey Jack cheese
- 1/4 cup sour cream or Mexican crema
- 3 radishes, thinly sliced
- Fresh cilantro for garnish
Equipment
- 9×13 inch baking dish
- Small skillet (to soften tortillas)
- Tongs
DIY Instructions
- Prepare the oven by preheating it to 350°F and lightly greasing the bottom of your baking dish.
- Mix the filling by combining the shredded turkey and corn in a bowl with a small splash of the green sauce to keep it moist.
- Soften the tortillas by heating them in a dry skillet for 10 seconds per side so they do not crack when rolled.
- Assemble each roll by placing a generous scoop of the turkey mixture in the center of a tortilla and rolling it up tightly.
- Arrange the rolls seam-side down in the baking dish, packing them closely together to keep the moisture in.
- Drown in sauce by pouring the remaining green salsa verde over the top, followed by a thick layer of shredded cheese.
- Bake the dish for 20 minutes until the cheese is bubbly and the sauce is simmering at the edges.
- Top and serve by drizzling with crema and scattering the radish slices and cilantro over the hot tray.
23. Creamy Potato Soup with Crispy Ham

The image displays a smooth, velvety bowl of potato soup served in a dark ceramic dish. A mountain of fluffy mashed potatoes sits in the very center, topped with a pile of small, crispy ham cubes. A delicate swirl of white cream and a circle of golden herb oil surround the center island.
Finely chopped green chives are scattered over the top, adding a fresh, sharp note to the mild soup. The presentation is elegant and minimalist, turning simple pantry staples into a gourmet starter. This dish is a comforting way to transform extra mashed potatoes into a completely new texture.
Ingredients
- 4 cups chicken or vegetable broth
- 2 cups leftover mashed potatoes
- 1 cup leftover ham, finely diced
- 1/2 cup heavy cream
- 2 tablespoons butter
- 2 tablespoons fresh chives, chopped
- 1 tablespoon olive oil (for drizzling)
Equipment
- Medium saucepan
- Whisk
- Small skillet (for the ham)
DIY Instructions
- Crisp the ham by frying the small cubes in a dry skillet over medium heat until they are crunchy and dark pink.
- Simmer the broth in a saucepan until it reaches a gentle boil, then reduce the heat to low.
- Whisk the potatoes into the broth one scoop at a time, stirring constantly to avoid lumps and create a smooth base.
- Stir in the cream and butter, continuing to whisk until the soup is thick enough to coat the back of a spoon.
- Reserve some mash to place a solid scoop in the center of each serving bowl for a textured presentation.
- Ladle the soup carefully around the central potato mound to keep the island effect.
- Garnish the top by piling the crispy ham on the center mound and sprinkling chives across the surface.
- Add the finish by drizzling a tiny bit of olive oil or extra cream in a circle before serving warm.
24. Crunchy Turkey Banh Mi Sandwich

This close-up shot features a crusty baguette sliced open and stuffed with thick layers of roasted turkey. Bright orange pickled carrots and white daikon radish strips provide a sharp, vinegary crunch. Slices of fresh green jalapeño and sprigs of cilantro add a spicy and herbal kick to every bite.
A dark, savory sauce is drizzled over the meat, soaking into the soft interior of the bread. The sandwich is wrapped in plain white paper, giving it a fresh, street-food aesthetic. This meal is a fast and light way to repurpose turkey with bold, Southeast Asian inspired flavors.
Ingredients
- 1 large French baguette or 2 hoagie rolls
- 2 cups leftover turkey, sliced
- 1/2 cup pickled carrots and daikon
- 1 jalapeño, thinly sliced
- 1/2 cup fresh cilantro sprigs
- 2 tablespoons mayonnaise
- 1 tablespoon hoisin sauce or soy sauce
- Squeeze of lime juice
Equipment
- Serrated bread knife
- Small bowl
- Cutting board
DIY Instructions
- Prep the bread by slicing the baguette lengthwise and pulling out a little of the soft middle to make room for fillings.
- Toast the roll in the oven for 3 minutes at 350°F to make the exterior extra crunchy.
- Mix the spread by combining the mayonnaise with a tiny splash of lime juice for a bright base layer.
- Layer the meat by spreading the mayo on both sides of the bread and piling the turkey slices on the bottom half.
- Add the pickles by draining your carrots and daikon and spreading them generously over the turkey.
- Introduce the heat by placing jalapeño slices along the length of the sandwich according to your spice preference.
- Finish with herbs by tucking large sprigs of fresh cilantro into the top of the sandwich.
- Drizzle the sauce with hoisin or soy sauce before closing the bread and slicing it at an angle to serve.
25. Cheesy Ham and Poppy Seed Sliders

The image shows a tray of warm, buttery sliders with a hand lifting one to reveal a long stretch of melted cheese. Thin slices of pink ham are layered between the soft rolls, which are topped with a glossy glaze. Tiny black poppy seeds and a savory sauce are baked right into the golden crust.
The cheese is perfectly gooey, connecting the lifted bun to the rest of the batch in the baking dish. These bite-sized sandwiches look rich and indulgent, making them a crowd favorite for post-holiday snacking. Using leftover ham this way makes for an effortless meal that feeds a whole family.
Ingredients
- 12 pack of sweet Hawaiian rolls
- 1 pound leftover ham, thinly sliced
- 8 slices Swiss or Provolone cheese
- 1/2 cup butter, melted
- 1 tablespoon Dijon mustard
- 1 tablespoon poppy seeds
- 1/2 teaspoon garlic powder
Equipment
- 9×13 inch baking pan
- Large serrated knife
- Small bowl and pastry brush
DIY Instructions
- Slice the rolls in one large piece horizontally so you have a top half and a bottom half.
- Layer the base by placing the bottom half of the rolls into your baking pan.
- Add the meat by overlapping the ham slices until the entire surface of the bread is covered.
- Cover with cheese by placing the slices over the ham, ensuring they reach all the way to the edges.
- Close the sliders by putting the top half of the rolls back on and pressing down slightly.
- Whisk the glaze by mixing the melted butter, mustard, poppy seeds, and garlic powder in a small bowl.
- Brush the tops of the rolls generously with the butter mixture, letting some of it drip down the sides.
- Bake the tray at 350°F for 15 minutes or until the cheese is melted and the tops are dark golden brown.
26. Roasted Pear and Blue Cheese Salad

This overhead shot captures a sophisticated salad served on a clear glass plate. Four halves of roasted, honey-glazed pears sit atop a bed of fresh green arugula and purple radicchio. Crumbles of white blue cheese and halves of earthy walnuts are scattered across the greens.
Bright red pomegranate seeds provide a festive sparkle and bursts of tart juice. A silver honey dipper rests on the side, suggesting a sweet finish to this elegant and light dish. This recipe is a graceful way to use up leftover fruit and nuts from a holiday cheeseboard.
Ingredients
- 2 large pears, halved and cored
- 4 cups arugula or mixed salad greens
- 1/2 cup blue cheese crumbles
- 1/2 cup walnut halves
- 1/4 cup pomegranate seeds
- 2 tablespoons honey
- 2 tablespoons balsamic glaze
Equipment
- Baking sheet
- Large salad bowl
- Small paring knife
DIY Instructions
- Roast the pears by placing them cut-side up on a baking sheet, drizzling with honey, and baking at 400°F for 15 minutes.
- Cool the fruit for a few minutes so the hot pears do not wilt the delicate salad greens immediately.
- Prepare the base by tossing the arugula and radicchio in a large bowl with a tiny bit of olive oil.
- Arrange the plate by placing the greens down first and nestling the warm pear halves into the center.
- Add the crunch by scattering the walnut halves and pomegranate seeds over the entire salad.
- Distribute the cheese by crumbling the blue cheese over the top so it starts to soften from the warmth of the pears.
- Drizzle the glaze by using a spoon to apply thin lines of balsamic glaze across the fruit and greens.
- Serve as a starter to provide a light, refreshing break between heavier post-holiday meals.
27. Leftover Turkey Shepherd’s Pie

The photo shows a deep red ceramic casserole dish filled with a classic shepherd’s pie. A large spoon lifts a portion to reveal a savory filling of shredded turkey, green peas, orange carrots, and corn. The top is a thick layer of mashed potatoes, textured with beautiful golden ridges from being broiled.
Small flecks of herbs are visible in the creamy potato topping, adding an aromatic touch to the dish. The steam rising from the serving suggests a hot, rib-sticking meal that is ready for the table. This is a brilliant way to combine several different holiday leftovers into one cohesive, comforting bake.
Ingredients
- 3 cups leftover turkey, chopped
- 3 cups leftover mashed potatoes
- 2 cups mixed vegetables (peas, carrots, corn)
- 1.5 cups leftover gravy
- 1/2 cup shredded cheese (optional)
- 1 tablespoon butter, melted
Equipment
- Medium casserole dish
- Large mixing bowl
- Fork (for texturing potatoes)
DIY Instructions
- Create the base by mixing your chopped turkey and vegetables in a bowl with the leftover gravy until well coated.
- Transfer the mix into the bottom of your casserole dish and spread it out into an even layer.
- Prep the topping by warming your mashed potatoes slightly so they are easy to spread without tearing the meat layer.
- Apply the potatoes by dropping large scoops over the turkey and using a spatula to smooth them to the edges.
- Add texture by dragging a fork across the top of the potatoes to create peaks and valleys that will brown in the oven.
- Brush with butter to help the potato ridges become extra crispy and golden during the baking process.
- Bake the pie at 375°F for 25 minutes, then turn on the broiler for 2 minutes to brown the top.
- Let it rest for 5 minutes before serving so the gravy thickens and the layers stay together on the plate.
28. Asparagus and Ham Carbonara

This image features a swirling nest of spaghetti served on a slate-colored plate. Bright green asparagus tips and crispy cubes of browned ham are tangled within the pasta strands. A generous dusting of grated parmesan cheese and cracks of black pepper cover the dish, promising a savory bite.
The sauce looks light and glossy, clinging to the noodles without appearing heavy or oily. A silver fork rests at the top, ready to twirl the pasta into a perfect mouthful. This quick Italian-style meal is a sophisticated way to use up the last bits of a holiday ham.
Ingredients
- 8 ounces spaghetti
- 1 cup leftover ham, cubed
- 1 bunch thin asparagus, cut into 2-inch pieces
- 2 large eggs
- 1/2 cup grated parmesan cheese
- 1 teaspoon black pepper
- 1 tablespoon olive oil
Equipment
- Large pasta pot
- Medium skillet
- Small mixing bowl
- Whisk
DIY Instructions
- Boil the pasta in salted water, adding the asparagus pieces to the pot during the last 3 minutes of cooking.
- Sauté the ham in a skillet with olive oil over medium heat until the cubes are browned and crispy.
- Whisk the sauce by combining the eggs and parmesan cheese in a small bowl until they form a thick paste.
- Save the water by scooping out a half-cup of the starchy pasta liquid before draining the spaghetti and asparagus.
- Combine while hot by adding the drained pasta and asparagus into the skillet with the ham, then removing the pan from the heat.
- Temper the eggs by whisking a little hot pasta water into the egg mixture so they do not scramble when added.
- Create the sauce by pouring the egg mix over the pasta and tossing rapidly until a creamy coating forms.
- Season heavily with black pepper and serve immediately while the sauce is at its creamiest.
29. Vibrant Dragon Fruit Smoothie Bowl

This top-down view features a stunning, deep pink smoothie bowl served in a natural coconut shell. The surface is decorated with neat rows of sliced bananas, crunchy walnut halves, and bright red pomegranate seeds. A thick stripe of tiny grey chia seeds adds a modern, healthy texture to the arrangement.
A sprig of fresh mint and a lime wedge sit on the side, emphasizing the refreshing and tropical nature of the breakfast. The bright white marble background makes the intense pink color of the dragon fruit pop. This bowl is a light and detoxifying choice for the morning after a large holiday feast.
Ingredients
- 1 frozen pitaya (dragon fruit) packet or 1 cup fresh cubes
- 1 frozen banner
- 1/2 cup almond milk or coconut water
- 1/2 banana, sliced (for topping)
- 2 tablespoons walnuts
- 1 tablespoon chia seeds
- 1 tablespoon pomegranate seeds
Equipment
- High-speed blender
- Serving bowl (coconut bowl optional)
- Spoon
DIY Instructions
- Blend the base by combining the dragon fruit, frozen banana, and milk in a blender until the texture is like thick soft-serve.
- Adjust the liquid by adding only a teaspoon of milk at a time if the blender gets stuck; you want the bowl to be thick.
- Pour the mixture into your serving bowl and smooth the top with the back of a spoon.
- Create the rows by carefully placing the banana slices in a straight line down one side of the bowl.
- Add the crunch by lining up the walnuts and pomegranate seeds next to the bananas for a striped look.
- Sprinkle the seeds by adding a final row of chia seeds to provide a contrast against the bright pink base.
- Garnish the dish with a fresh mint leaf and a squeeze of lime to brighten the tropical flavors.
- Eat immediately with a spoon before the frozen base begins to melt for the best refreshing experience.
30. White Bean and Turkey Chili

A rustic brown bowl is filled with a thick, hearty white chili made from shredded turkey and creamy white beans. A large scoop of cool sour cream and a fan of sliced avocado sit on top, garnished with a few cilantro leaves. Slices of fresh green jalapeño add a bright look and a spicy kick to the dish.
In the background, thick wedges of buttery cornbread are ready for dipping into the savory broth. The warm, earthy tones of the bowl and the food create a cozy and inviting atmosphere. This chili is a wonderful way to stretch a small amount of leftover turkey into a large, filling meal.
Ingredients
- 2 cups leftover turkey, shredded
- 2 cans (15 oz) cannellini or great northern beans, rinsed
- 4 cups chicken broth
- 1 small onion, diced
- 1 can (4 oz) diced green chilis
- 1 teaspoon cumin
- 1/2 cup sour cream
- 1 avocado, sliced
Equipment
- Large pot or Dutch oven
- Wooden spoon
- Ladle
DIY Instructions
- Sauté the onion in the bottom of your pot with a little oil until it is soft and translucent.
- Add the aromatics by stirring in the diced green chilis and cumin, cooking for 1 minute until fragrant.
- Pour the base by adding the beans and the chicken broth, then bringing the mixture to a simmer.
- Mash some beans against the side of the pot with your spoon to release their starch and thicken the soup naturally.
- Incorporate the turkey by folding the shredded meat into the pot and letting it heat through for 10 minutes.
- Adjust the texture by simmering longer if you prefer a thicker chili or adding a splash of water for a thinner soup.
- Ladle into bowls and add a generous dollop of sour cream and several slices of avocado to each serving.
- Finish the plate with jalapeño slices and serve alongside warm cornbread for the ultimate post-holiday comfort meal.
31. Crispy Ham and Potato Croquettes

The photo captures a plate of golden brown, breaded croquettes with a satisfyingly crunchy texture. One sphere is broken open in the foreground, revealing a fluffy mashed potato center studded with savory bits of pink ham. A small bowl of creamy dipping sauce with a red swirl sits nearby, ready for a quick dip.
Fresh green parsley flakes are scattered over the crispy shells and the white parchment paper base. The round shapes look uniform and sturdy, making them a great finger food option for a casual post-holiday lunch. Every bite promises a mix of a salty meat filling and a smooth, buttery potato interior.
Ingredients
- 2 cups leftover mashed potatoes, chilled
- 1 cup leftover ham, very finely diced
- 1/2 cup shredded white cheddar cheese
- 2 large eggs, beaten
- 1 cup panko breadcrumbs
- 1/2 cup all-purpose flour
- Vegetable oil for frying
- Fresh parsley for garnish
Equipment
- Large mixing bowl
- Three small shallow bowls (for breading station)
- Deep skillet or heavy pot
- Slotted spoon
- Paper towels
DIY Instructions
- Mix the base by combining your cold mashed potatoes, finely diced ham, and shredded cheese in a large bowl.
- Form the balls by scooping a tablespoon of the mixture and rolling it between your palms into a smooth sphere.
- Setup the station by placing flour in the first bowl, beaten eggs in the second, and panko crumbs in the third.
- Coat the croquettes by rolling each ball in flour, dipping it into the egg, and finally rolling it in the breadcrumbs until fully covered.
- Heat the oil in your skillet to about 350°F, ensuring there is enough liquid to submerge the potato balls halfway.
- Fry in batches for 3 to 4 minutes, turning them occasionally until the entire surface is a deep, even golden color.
- Drain the oil by moving the hot croquettes to a plate lined with paper towels to keep the crusts from getting soggy.
- Serve while warm with your favorite creamy mustard sauce or a spicy aioli for a flavorful snack.
32. Stuffed Peppers with Turkey and Stuffing

This image features two vibrant bell peppers, one red and one yellow, standing upright in a white baking dish. They are stuffed to the brim with a savory mixture of shredded turkey and herb-filled holiday stuffing. Each pepper is topped with a thick layer of melted mozzarella and a dollop of bright red tomato sauce.
Fresh basil leaves are torn and scattered over the cheese, adding a touch of green to the warm presentation. The peppers look tender and slightly charred at the edges, suggesting they have been roasted to bring out their natural sweetness. This dish is a clever way to repackage several different holiday leftovers into a single, healthy container.
Ingredients
- 2 large bell peppers (any color), tops removed and seeds cleared
- 1.5 cups leftover turkey, chopped
- 1.5 cups leftover prepared stuffing
- 1/2 cup marinara sauce
- 1 cup shredded mozzarella cheese
- 1 tablespoon olive oil
- Fresh basil for garnish
Equipment
- Medium baking dish
- Small mixing bowl
- Spoon for stuffing
DIY Instructions
- Prep the peppers by cutting off the tops and removing the white ribs and seeds from the inside.
- Soften the shells by placing the peppers in a microwave-safe dish with a splash of water and heating for 3 minutes.
- Create the filling by mixing the chopped turkey and leftover stuffing in a bowl until they are well combined.
- Stuff the peppers by spooning the turkey mixture into the cavities, pressing down gently to pack them tightly.
- Add the sauce by pouring a spoonful of marinara over the top of the filling in each pepper.
- Top with cheese by piling a generous amount of mozzarella over the sauce to create a cap.
- Bake the dish at 375°F for about 20 minutes until the peppers are soft and the cheese is bubbly and brown.
- Finish the plate with torn basil leaves and a drizzle of the remaining sauce around the base of the peppers.
33. Pesto Turkey and Red Pepper Panini

The photograph shows a thick, grilled panini sliced in half to reveal its colorful interior layers. Ribbons of bright green pesto are spread against the toasted, grill-marked bread. Layers of sliced turkey, melted provolone cheese, and roasted red pepper strips create a hearty and balanced sandwich.
The bread is pressed thin and looks incredibly crunchy, with clear char lines from the panini press. Steam appears to rise from the melted cheese, highlighting the freshness of the ingredients. This sandwich is a sophisticated and fast way to enjoy leftover holiday poultry with a Mediterranean twist.
Ingredients
- 2 thick slices of sourdough or ciabatta bread
- 4 ounces leftover turkey, thinly sliced
- 2 slices provolone cheese
- 2 tablespoons basil pesto
- 1/4 cup roasted red peppers, sliced
- 1 tablespoon butter, softened
Equipment
- Panini press or heavy skillet
- Butter knife
- Cutting board
DIY Instructions
- Spread the flavor by applying a thick layer of basil pesto to the inside of both slices of bread.
- Build the layers by placing one slice of cheese on the bottom, followed by the turkey and the roasted red peppers.
- Seal the sandwich by adding the second slice of cheese and the top piece of bread, pesto-side down.
- Butter the exterior by spreading a thin layer of softened butter on the outside of both bread slices.
- Heat your press or skillet over medium heat until it is hot enough to sizzle when touched with water.
- Grill the panini for about 3 to 5 minutes until the bread is golden and the cheese has completely melted.
- Apply pressure if using a skillet by placing a heavy pot on top of the sandwich to get those classic flat edges.
- Slice at an angle and serve immediately while the bread is at its maximum crunch level.
34. Creamy Ham and Pea Risotto

This top-down shot displays a shallow white bowl filled with a luxurious and creamy risotto. Small cubes of savory ham and bright green peas are folded into the starch-rich rice. A mound of bright yellow lemon zest and a delicate pea shoot garnish the center, adding a fresh and citrusy aroma.
A silver fork and a glass of white wine sit on the periphery, suggesting a light and elegant dinner setting. The rice looks perfectly cooked, with a glossy sheen that indicates a rich, buttery finish. This recipe transforms humble leftovers into a high-end Italian meal that feels brand new.
Ingredients
- 1 cup Arborio rice
- 3 cups warm chicken or vegetable broth
- 1/2 cup leftover ham, finely cubed
- 1/2 cup frozen peas
- 1/4 cup dry white wine (optional)
- 2 tablespoons butter
- 1/4 cup grated parmesan cheese
- 1 tablespoon lemon zest
Equipment
- Medium heavy-bottomed pot
- Ladle
- Wooden spoon
- Microplane for zesting
DIY Instructions
- Toast the rice by melting one tablespoon of butter in your pot and stirring the Arborio rice for 2 minutes.
- Deglaze the pan by pouring in the white wine and stirring until the liquid is completely absorbed by the grains.
- Add the broth one ladle at a time, waiting for the rice to soak up the liquid before adding the next scoop.
- Stir constantly to release the starch from the rice, which creates the signature creamy texture of a good risotto.
- Fold in the extras by adding the ham cubes and peas when the rice is almost tender, about 15 minutes in.
- Finish the sauce by stirring in the remaining butter and the parmesan cheese once the rice is fully cooked.
- Brighten the dish by folding in half of the lemon zest just before removing the pot from the heat.
- Garnish and serve by topping each bowl with the remaining zest and a fresh pea shoot for a professional look.
35. Sweet Potato and Ham Breakfast Frittata

The image features a colorful frittata served in a light blue cast iron skillet. Bright orange cubes of roasted sweet potato and savory bits of ham are distributed evenly through the yellow baked eggs. Large dollops of white goat cheese are melted into the surface, creating a creamy contrast to the firm eggs.
A sprig of fresh herbs and a wooden table background give the scene a cozy, brunch-like feel. The edges of the frittata are slightly pulled away from the pan, showing it is cooked through but remains moist. This one-pan meal is a fantastic way to utilize leftover roasted root vegetables from a holiday dinner.
Ingredients
- 6 large eggs
- 1/4 cup milk
- 1.5 cups leftover roasted sweet potatoes, cubed
- 1/2 cup leftover ham, diced
- 4 ounces goat cheese or feta, crumbled
- 1 tablespoon olive oil
- Salt and pepper to taste
Equipment
- 10-inch oven-safe skillet (cast iron)
- Large mixing bowl
- Whisk
DIY Instructions
- Preheat your oven to 375°F to ensure a quick and even bake for the egg mixture.
- Whisk the liquid by combining the eggs, milk, salt, and pepper in a bowl until no streaks of yolk remain.
- Warm the skillet over medium heat with the olive oil and add the sweet potatoes and ham to take the chill off.
- Pour the eggs carefully over the warm ingredients in the pan, ensuring they reach all the edges.
- Add the cheese by dropping large crumbles of goat cheese onto the top of the wet egg mixture.
- Start on the stove by letting the frittata cook for 2 minutes without stirring until the bottom is set.
- Transfer to the oven and bake for 10 to 12 minutes until the center no longer jiggles and the top is firm.
- Cool slightly before slicing into wedges to ensure the cheese stays in place and the eggs hold their shape.
36. Clear Broth Turkey and Spinach Ramen

This photo shows a deep black bowl filled with a steaming, clear ramen broth and springy noodles. Slices of tender leftover turkey breast are fanned out across the top, decorated with small drops of red chili oil. Two halves of a soft-boiled egg with bright orange, runny yolks sit in the center of the bowl.
Freshly shredded cabbage and vibrant green spinach leaves are tucked into the side, adding a healthy crunch. Steam rises from the hot soup, while a bowl of red pepper flakes sits in the background for extra heat. This light and savory noodle dish is a great way to enjoy turkey in a completely fresh, non-traditional way.
Ingredients
- 2 packs of dried ramen noodles (seasoning discarded)
- 4 cups chicken or turkey broth
- 1 cup leftover turkey, sliced into thin rounds
- 2 soft-boiled eggs, halved
- 1 cup fresh spinach leaves
- 1/2 cup shredded cabbage
- Chili oil and green onions for garnish
Equipment
- Large soup pot
- Small pot (for eggs)
- Tongs or chopsticks
- Ladle
DIY Instructions
- Prepare the eggs by boiling them for 6.5 minutes, then immediately placing them in ice water before peeling.
- Simmer the broth in a large pot until it reaches a rolling boil, then reduce the heat to keep it hot.
- Cook the noodles directly in the broth for about 2 to 3 minutes or according to the package directions.
- Wilt the greens by adding the spinach to the hot broth for the last 30 seconds of the noodle cooking time.
- Assemble the bowl by ladling the noodles and broth into a large bowl and placing the turkey slices on top.
- Add the texture by nestling the shredded cabbage and the soft-boiled egg halves into the side of the bowl.
- Season the surface with a few drops of chili oil to create the red spots seen in the photo.
- Finish with greens by sprinkling chopped green onions over the top and serving while the broth is steaming hot.
37. Rosemary and Ham Potato Pizza

The image captures a rustic, thin-crust pizza topped with a creamy white base and savory toppings. Small, crisp cubes of ham and thin rings of red onion are scattered over a layer of smooth mashed potatoes used as a sauce. Large rounds of melted fresh mozzarella cheese are dotted across the surface, each topped with a sprig of fresh rosemary.
A single slice is being lifted from the wooden board, showing a long, gooey cheese pull. The crust is a beautiful golden brown with a light dusting of flour on the edges. This recipe is an inventive way to combine leftover mashed potatoes and ham into a fun, shareable meal.
Ingredients
- 1 pre-made pizza dough ball
- 1 cup leftover mashed potatoes
- 1/2 cup leftover ham, diced small
- 1/2 small red onion, sliced into rings
- 6 ounces fresh mozzarella cheese, sliced
- 2 tablespoons olive oil
- 3 sprigs fresh rosemary
Equipment
- Pizza stone or large baking sheet
- Rolling pin
- Pizza cutter
- Pastry brush
DIY Instructions
- Preheat your oven to its highest setting, usually around 475°F or 500°F, with the baking sheet inside.
- Roll the dough out on a floured surface until it is thin and reaches your desired shape.
- Spread the base by using a spoon to apply a thin, even layer of leftover mashed potatoes across the dough.
- Add the toppings by scattering the ham cubes and red onion rings over the potato layer.
- Layer the cheese by placing the mozzarella rounds on top, leaving space between them for the other ingredients to show.
- Season the crust by brushing the edges of the dough with olive oil and sprinkling rosemary leaves over the whole pizza.
- Bake the pizza for 8 to 10 minutes until the edges are dark golden and the cheese is bubbling.
- Slice and serve immediately while the cheese is stretchy and the potato base is warm and creamy.
38. Cranberry Glazed Meatball Bites

This close-up features a stack of juicy, browned meatballs covered in a thick, glossy red glaze. A single meatball is held up by a toothpick, showing a drop of the sweet and tangy cranberry sauce about to fall. Each ball is topped with a tiny ring of fresh green onion for a sharp flavor contrast.
A bowl filled with fresh whole cranberries sits in the background, emphasizing the festive flavor of the sauce. The meatballs appear to have a rustic, homemade texture with a slightly charred exterior. This dish is a great way to repurpose leftover cranberry sauce into a savory party appetizer.
Ingredients
- 1 pound ground turkey or beef (or leftover meatloaf rolled into balls)
- 1/2 cup leftover cranberry sauce
- 2 tablespoons chili sauce or ketchup
- 1 tablespoon brown sugar
- 1 tablespoon soy sauce
- 2 green onions, sliced into rings
- Toothpicks for serving
Equipment
- Large skillet
- Small saucepan
- Tongs
DIY Instructions
- Form the balls by rolling your meat into 1-inch spheres if you are starting with fresh ground poultry or beef.
- Brown the meat in a large skillet over medium heat, turning them frequently until the outside is dark and crispy.
- Create the glaze in a small saucepan by whisking together the cranberry sauce, chili sauce, brown sugar, and soy sauce.
- Simmer the sauce for 5 minutes until it thickens and becomes shiny and pourable.
- Coat the meatballs by adding them into the saucepan with the glaze and tossing gently to cover every surface.
- Arrange the stack by piling the glazed meatballs on a white plate in a pyramid shape.
- Add the finish by sliding a green onion ring onto a toothpick and piercing the top meatball of the stack.
- Serve as snacks while the glaze is still warm and tacky for the best flavor and presentation.
39. Spicy Kung Pao Turkey Stir-Fry

The image shows a dark wok filled with a steaming stir-fry featuring cubes of savory turkey. The meat is coated in a dark, glossy sauce and mixed with whole dried red chilis, toasted peanuts, and bright green onion slices. A pair of wooden chopsticks lifts a single piece of turkey, highlighting the tender texture of the meat.
Steam rises from the pan, suggesting a hot and fast cooking process that keeps the ingredients fresh. The peanuts add a necessary crunch to the soft turkey, while the chilis hint at a bold, spicy flavor profile. This dish is an excellent way to give leftover holiday turkey a completely different international identity.
Ingredients
- 2 cups leftover turkey, cut into 1-inch cubes
- 1/2 cup roasted unsalted peanuts
- 6-8 dried red chili peppers
- 2 green onions, sliced on a bias
- 3 tablespoons soy sauce
- 1 tablespoon rice vinegar
- 1 tablespoon hoisin sauce
- 1 teaspoon grated ginger
Equipment
- Large wok or deep skillet
- Wooden spatula
- Small bowl for sauce
DIY Instructions
- Whisk the sauce in a small bowl by combining the soy sauce, vinegar, hoisin, and grated ginger until smooth.
- Heat the wok over high heat with a splash of oil until it starts to smoke slightly.
- Toast the chilis by tossing the dried peppers into the oil for 30 seconds until they turn dark and fragrant.
- Add the turkey cubes to the pan and stir-fry for 2 minutes just to get the edges crispy and hot.
- Pour the sauce over the meat and continue to stir rapidly so the liquid thickens and coats the turkey evenly.
- Add the crunch by tossing in the peanuts and half of the green onions for the last minute of cooking.
- Garnish the meal with the remaining green onions once the wok is removed from the heat.
- Serve over white rice to balance the heat of the chilis and soak up the extra savory sauce.
40. Crispy Thanksgiving Leftover Egg Rolls

The final image shows a golden, deep-fried egg roll sliced open to reveal a colorful and dense filling. Layers of shredded turkey, herb stuffing, and a streak of bright red cranberry sauce are visible inside the thin, bubbly pastry shell. A small white bowl of warm, savory gravy sits in the center for dipping.
Steam rises from the hot filling, and a piece of crispy herb-flecked stuffing sits on the side as a garnish. The exterior of the egg roll looks incredibly light and crunchy, providing a unique way to eat a full holiday meal in one bite. These rolls are the ultimate creative solution for the very last of your holiday leftovers.
Ingredients
- 10-12 egg roll wrappers
- 1.5 cups leftover turkey, finely shredded
- 1.5 cups leftover stuffing
- 1/2 cup leftover cranberry sauce
- 1 cup leftover gravy (for dipping)
- 1 egg, beaten (to seal wrappers)
- Vegetable oil for frying
Equipment
- Deep pot for frying
- Tongs
- Small bowl for egg wash
- Paper towels
DIY Instructions
- Heat the oil in a deep pot to 350°F, making sure you have at least 2 inches of liquid for a deep fry.
- Lay out a wrapper on a clean surface with one corner pointing toward you like a diamond.
- Layer the filling by placing a small amount of stuffing, turkey, and a dot of cranberry sauce in the center.
- Fold the roll by bringing the bottom corner over the filling, tucking in the sides, and rolling upward tightly.
- Seal the edge by dipping your finger in the beaten egg and smearing it on the top corner before finishing the roll.
- Fry the rolls in batches for 2 to 3 minutes until the shells are golden brown and covered in tiny bubbles.
- Drain the grease by placing the hot egg rolls on paper towels to keep them from becoming oily.
- Serve with gravy by heating your leftover sauce in a small bowl and dipping the crispy rolls while they are still hot.
Key Takeaways
- Embrace Global Spices: Use taco seasonings, curry powders, or pesto to mask traditional holiday flavors and keep meals interesting.
- Master the Textures: Turn soft leftovers like mashed potatoes or stuffing into crispy cakes, waffles, or croquettes for a better mouthfeel.
- Focus on Freshness: Add raw greens, citrus juices, and pickled vegetables to heavy meats to brighten the dish and reduce “holiday fatigue.”
- Reduce Food Waste: These recipes utilize every bit of the feast, including gravy, cranberry sauce, and vegetable side dishes.
The days following a big celebration should be for resting, not stressing over complicated meal prep. By choosing any of these forty recipes, you turn a cluttered refrigerator into a source of inspiration. You have already done the hard work of cooking the meat; now you get to enjoy the convenience of quick assembly.
Whether you prefer a light salad after a week of indulgence or a hearty casserole to feed visiting family, these options cover every base. These meals prove that turkey and ham are versatile ingredients that belong in more than just a roasting pan. You can finally enjoy your post-holiday week without ever feeling like you are eating the same meal twice.
Now that your kitchen is stocked with ideas, grab that container of turkey and start cooking. Your family will appreciate the variety, and you will appreciate the empty fridge. Happy cooking and enjoy the simplified path to delicious, resourceful dining.