Starting a detox does not mean you have to stop snacking or settle for bland food. Many people find that their kitchen cupboards are hidden traps for processed sugars and salty cravings. You can easily flip the script by replacing those heavy bags of chips with vibrant, whole food alternatives.
Quick Healthy Snack Recipes
These thirty six recipes are designed to help you reset your body while keeping your taste buds happy. You will find that preparing these bites takes very little time and provides much more energy than store bought options. Taking control of your pantry is the first step toward feeling lighter and more focused every day.
Each snack in this guide focuses on clean ingredients like fresh fruit, crunchy vegetables, and healthy fats. You do not need to be a professional chef to master these simple steps. Clear out the clutter in your kitchen and prepare to discover how delicious a detox can truly be.
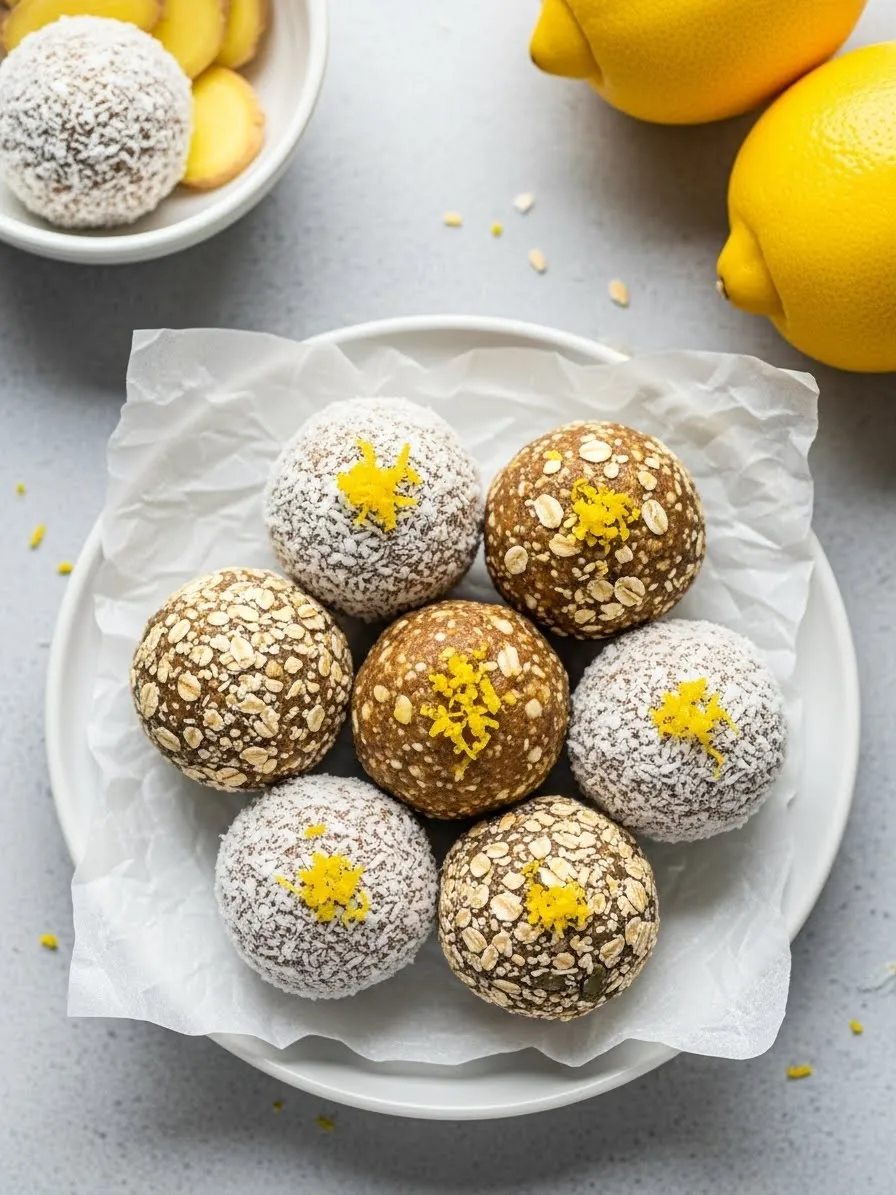
Bright citrus flavors meet the warm spice of ginger in these refreshing snack bites. These small rounds offer a burst of natural energy without any refined sugars. You can see how the lemon zest adds a beautiful pop of yellow against the snowy coconut flakes and rustic oats.
Choosing whole ingredients makes these treats a great addition to your detox plan. They stay firm in the fridge and travel easily in a small container. You will love how the tangy lemon cuts through the sweetness of the dates.
Every bite provides a satisfying texture that keeps hunger away between meals. Using fresh lemon juice ensures a vibrant taste that store bought snacks cannot match. This recipe helps you stay on track while satisfying your craving for something sweet.
Required Ingredients
1 cup rolled oats
10 large medjool dates, pitted
1/2 cup shredded unsweetened coconut
1 tablespoon fresh lemon zest
2 tablespoons fresh lemon juice
1 teaspoon ground ginger
1 pinch sea salt
Extra coconut for rolling
Equipment List
Food processor
Measuring cups and spoons
Large mixing bowl
Small plate
Airtender container for storage
DIY Instructions Step by Step
Place your pitted dates into the food processor first and pulse until they form a sticky paste.
Add the rolled oats, ground ginger, and sea salt to the processor and blend until the mixture looks like coarse crumbs.
Pour in the fresh lemon juice and add the lemon zest before pulsing again to distribute the moisture evenly.
Check the consistency by pinching a bit of the dough between your fingers to see if it holds together.
Scoop out one tablespoon of the mixture at a time and roll it firmly between your palms to create a smooth ball.
Put some extra shredded coconut onto a small plate and roll each ball through the flakes until they are fully coated.
Line a container with parchment paper and place the finished energy balls inside.
Chill the snacks in your refrigerator for at least thirty minutes so they firm up before you eat them.
2. Matcha Cashew Energy Bites
Quick Healthy Snack Recipes
These vibrant green treats offer a sophisticated way to enjoy a boost of antioxidants during your afternoon slump. You can see the beautiful contrast between the earthy matcha coating and the creamy cashew pieces tucked inside each bite.
Choosing high quality green tea powder provides a gentle lift without the jitters associated with coffee. These bites are firm and satisfying, making them a smart choice for those seeking a nutritious alternative to sugary snacks.
Required Ingredients
1 cup raw cashews
1/2 cup almond flour
2 tablespoons matcha green tea powder
3 tablespoons maple syrup
1 teaspoon vanilla extract
1 pinch sea salt
Extra matcha for dusting
Equipment List
Food processor
Small mixing bowl
Measuring spoons
Airtight storage container
DIY Instructions Step by Step
Place the raw cashews into your food processor and pulse until they are broken into small, pebbly pieces.
Add the almond flour, sea salt, and half of the matcha powder to the bowl with the nuts.
Pour in the maple syrup and vanilla extract while the processor is running on a low setting.
Stop the machine once the mixture forms a thick dough that pulls away from the sides.
Scoop a small portion of the dough and roll it between your hands to form a round ball about one inch wide.
Sift the remaining matcha powder into a small bowl and roll each finished bite in the powder for a bright finish.
Arrange the bites on a plate and let them set in the freezer for ten minutes to improve the texture.
Keep these in a sealed container in your refrigerator to maintain their fresh flavor and vibrant color.
3. Pomegranate Apple Sandwiches
Quick Healthy Snack Recipes
Stacking crisp apple rings creates a fun and crunchy snack that feels much more indulgent than it actually is. Nut butter flows over the edges of the fruit, acting as a delicious glue for the heart healthy toppings.
Juicy pomegranate seeds provide a tart snap that balances the richness of the creamy spread. This snack is wonderful because it combines fiber, healthy fats, and vitamin C in every single bite.
Required Ingredients
2 large red apples
1/2 cup almond butter or cashew butter
1/4 cup fresh pomegranate seeds
2 tablespoons hemp hearts
1 teaspoon ground cinnamon
Equipment List
Sharp knife
Apple corer
Butter knife or small spatula
Cutting board
DIY Instructions Step by Step
Wash your apples thoroughly and use a corer to remove the center seeds and tough inner parts.
Slice the fruit horizontally into thick rings so they look like flat donuts.
Spread a generous layer of nut butter onto the top surface of each apple ring using your spatula.
Sprinkle a pinch of ground cinnamon over the nut butter to add a warm aroma.
Press fresh pomegranate seeds into the nut butter so they stay in place when you take a bite.
Finish the snack by dusting a spoonful of hemp hearts over the top for extra protein.
Stack two or three rings on top of each other to create a tower or eat them individually as small tartlets.
Serve these immediately after assembly to ensure the apples remain crisp and the toppings stay fresh.
4. Raspberry Chia Seed Pudding
Quick Healthy Snack Recipes
This creamy pudding highlights how simple ingredients can transform into a decadent treat. The tiny seeds swell overnight to create a thick texture that feels like a classic dessert while remaining completely healthy.
Fresh raspberries add a bright tanginess that cuts through the rich coconut milk base. You will notice the dark cocoa nibs on top, which provide a necessary crunch to complement the smooth pudding.
Required Ingredients
1/4 cup chia seeds
1 cup unsweetened almond or coconut milk
1/2 cup fresh raspberries
1 tablespoon cocoa nibs
1 teaspoon honey or maple syrup
Equipment List
Glass jar with a lid
Measuring cups
Long spoon for stirring
DIY Instructions Step by Step
Pour the chia seeds into your glass jar and add the plant based milk of your choice.
Whisk the mixture vigorously for one minute to ensure no clumps of seeds remain at the bottom.
Let the jar sit for five minutes on your counter before giving it one final stir.
Seal the lid tightly and place the jar in your refrigerator for at least four hours or overnight.
Remove the thickened pudding from the fridge and stir in a small amount of sweetener if you prefer.
Wash your raspberries and place them gently on top of the pudding layer.
Scatter the cocoa nibs over the fruit to add a deep chocolate flavor and a crunchy texture.
Enjoy this snack directly from the jar for a quick and mess free detox treat.
5. Walnut Stuffed Medjool Dates
Quick Healthy Snack Recipes
These dates act as nature’s candy bars, providing a deep caramel flavor that satisfies any sweet tooth. The visual contrast between the dark fruit and the pale, craggy walnut halves makes them a beautiful addition to any snack plate.
Adding a dusting of cocoa powder and a sprinkle of sea salt elevates the simple ingredients. This combination offers a steady release of energy thanks to the fiber in the fruit and the healthy fats in the nuts.
Required Ingredients
12 large Medjool dates
12 walnut halves
1 tablespoon unsweetened cocoa powder
1/2 teaspoon flaky sea salt
Equipment List
Small paring knife
Small sifter or spoon
Serving plate
DIY Instructions Step by Step
Take a small knife and slice lengthwise through each date to create an opening, making sure not to cut all the way through.
Remove the hard pit from the center of each fruit and discard it.
Place one whole walnut half into the cavity of the date where the pit used to be.
Press the sides of the date gently to secure the nut inside the fruit.
Arrange the stuffed dates on a plate with the walnut side facing upward.
Hold a small sifter over the dates and lightly dust them with cocoa powder for a rich finish.
Sprinkle a few grains of flaky sea salt over each piece to enhance the natural sweetness of the fruit.
Serve these at room temperature for the softest texture or keep them chilled for a chewier bite.
6. Spicy Chili Lime Pineapple
Quick Healthy Snack Recipes
Sweet pineapple chunks take on a bold personality when paired with a hint of spice. The golden fruit looks stunning against a bright blue background, and the visible grains of chili powder promise a wake up call for your taste buds.
Fresh lime juice adds a zesty finish that makes the tropical flavors sing. This snack is incredibly refreshing on a warm day and helps curb cravings for processed salty snacks.
Required Ingredients
1 fresh pineapple, peeled and sliced
1 lime, juiced
1 teaspoon chili powder or Tajin seasoning
1/2 teaspoon sea salt
Equipment List
Sharp chef’s knife
Large bowl
Cutting board
DIY Instructions Step by Step
Cut the top and bottom off your pineapple and slice away the tough outer skin with your knife.
Quarter the fruit lengthwise and remove the hard core from the center of each section.
Slice the remaining fruit into thick wedges or bite sized chunks depending on your preference.
Arrange the pineapple pieces in a single layer on a large plate or inside a bowl.
Squeeze the juice of one fresh lime over all the fruit pieces to coat them evenly.
Sprinkle the chili powder or spice blend over the top of the wet fruit so it sticks well.
Add a light dusting of sea salt to help the flavors pop against the natural sugars.
Eat these immediately while the fruit is cold and juicy for the best experience.
7. Lemon Herb Edamame
Quick Healthy Snack Recipes
Steamed edamame pods are a powerhouse of plant protein and fiber. The bright green color is enhanced by fresh lemon zest and a blend of dried herbs that make this snack savory and addictive.
Popping the beans out of the pods adds a mindful element to your snacking routine. This simple preparation keeps you full for longer while supporting your body’s natural detox process.
Required Ingredients
2 cups frozen edamame in pods
1 tablespoon olive oil
1 teaspoon lemon zest
1/2 teaspoon dried parsley or dill
1/2 teaspoon sea salt
Equipment List
Large pot or steamer basket
Medium mixing bowl
Colander
DIY Instructions Step by Step
Bring a pot of water to a boil and add the frozen edamame pods.
Cook the pods for about five minutes until they turn a bright green and feel tender.
Drain the hot water using a colander and rinse the pods briefly with cool water.
Pat the pods dry with a clean towel and place them into a mixing bowl.
Drizzle the olive oil over the warm pods and toss them to ensure even coverage.
Grate fresh lemon zest over the bowl and add your dried herbs and sea salt.
Stir the mixture well so the seasoning sticks to the slightly fuzzy skin of the pods.
Serve the edamame in a small bowl and provide a second empty bowl for the discarded shells.
8. Everything Bagel Avocado Egg
Quick Healthy Snack Recipes
This snack combines the creamy texture of ripe avocado with the richness of a soft boiled egg. The colorful seasoning blend adds a salty and garlicky crunch that makes every bite interesting.
Placing the egg directly onto an avocado slice creates a low carb treat that feels like a meal. It is a fantastic way to get healthy fats and high quality protein in one quick sitting.
Required Ingredients
1 large egg
1/2 ripe avocado
1 tablespoon everything bagel seasoning
1 squeeze of lemon juice
Equipment List
Small saucepan
Slotted spoon
Knife
DIY Instructions Step by Step
Fill a small saucepan with water and bring it to a gentle boil on your stove.
Lower the egg into the water using a slotted spoon and let it simmer for seven minutes for a jammy yolk.
Prepare a bowl of ice water and move the egg into it immediately after the timer goes off.
Peel the cooled egg carefully and slice it in half vertically to reveal the bright orange center.
Cut your avocado in half and slice a thick piece to act as the base for your egg.
Place the egg half onto the avocado slice and squeeze a bit of lemon juice over the top.
Sprinkle the bagel seasoning generously over the egg so the seeds and salt cover the surface.
Eat this snack with a fork or as a handheld bite for a satisfying and nutritious boost.
9. Crispy Roasted Chickpeas
Quick Healthy Snack Recipes
These golden nuggets are a fantastic alternative to greasy potato chips. They offer a satisfying crunch and a savory flavor that comes from roasting them until all the moisture disappears.
You can see the light coating of spices that makes these beans so flavorful. They are easy to pack in a bag and stay fresh for several days, making them a great staple for your pantry.
Required Ingredients
1 can (15 oz) chickpeas
1 tablespoon olive oil
1/2 teaspoon smoked paprika
1/2 teaspoon garlic powder
1/4 teaspoon sea salt
Equipment List
Baking sheet
Parchment paper
Clean kitchen towel
Small bowl
DIY Instructions Step by Step
Drain the chickpeas in a colander and rinse them thoroughly under cold running water.
Spread the beans onto a clean kitchen towel and roll them around until they are completely dry.
Remove any loose skins that fall off during the drying process to ensure a better crunch.
Toss the dry chickpeas in a bowl with the olive oil and all of your dry spices.
Line a baking sheet with parchment paper and spread the beans out in a single layer.
Roast them in an oven at 400 degrees Fahrenheit for about twenty five to thirty minutes.
Shake the pan halfway through the cooking time to make sure they brown evenly on all sides.
Allow the chickpeas to cool completely on the pan before eating them to reach maximum crunchiness.
10. Berry Flaxseed Yogurt Bowl
Quick Healthy Snack Recipes
This bowl is a masterpiece of textures, featuring a hypnotic swirl of ground flaxseeds and vibrant purple berry juice. The creamy yogurt base provides a cooling contrast to the tartness of the fresh blueberries.
Each spoonful offers a mix of probiotics and omega 3 fatty acids to support your digestion. It is a visually stunning snack that looks like a work of art on your table while being very easy to assemble.
Required Ingredients
1 cup plain Greek yogurt
1/4 cup fresh blueberries
2 tablespoons ground flaxseed
1 tablespoon whole flaxseeds
1 teaspoon honey
Equipment List
Small bowl
Spoon
Measuring spoons
DIY Instructions Step by Step
Scoop the Greek yogurt into a clean bowl and smooth out the top surface with the back of a spoon.
Place a spoonful of ground flaxseed in the center and use a toothpick to swirl it into the yogurt.
Arrange the fresh blueberries around one side of the bowl to create a colorful border.
Sprinkle the whole flaxseeds over the top to add a nutty texture to the soft yogurt.
Drizzle a small amount of honey over the entire bowl if you want a touch of natural sweetness.
Stir the mixture gently as you eat to combine the grainy seeds with the smooth dairy.
Add a few halved grapes or sliced strawberries if you want to increase the fruit variety.
Serve this chilled for a refreshing snack that keeps you satisfied until your next full meal.
11. Smoked Salmon Cucumber Rolls
Quick Healthy Snack Recipes
Elegant and refreshing, these rolls showcase thin cucumber ribbons wrapped around delicate swirls of smoked salmon. Each bite looks like a miniature piece of art with a single green caper perched on top as a briny crown. You can see the vibrant orange fish peeking through the translucent green vegetable layers.
A wooden toothpick holds each roll together, making them a mess free option for your next gathering. Fresh sprigs of dill add a touch of feathery green and a cooling aroma to the plate. This snack feels incredibly light while providing a healthy dose of protein and healthy fats.
Required Ingredients
2 long English cucumbers
4 ounces smoked salmon, sliced into thin strips
1 tablespoon capers
Fresh dill sprigs for garnish
1 teaspoon lemon juice
Equipment List
Vegetable peeler or mandoline
Cutting board
Wooden toothpicks
Small serving tray
DIY Instructions Step by Step
Wash your cucumbers and use a vegetable peeler to shave long, thin ribbons along the entire length of the vegetable.
Lay one cucumber ribbon flat on your cutting board and pat it dry with a paper towel to remove excess moisture.
Place a small strip of smoked salmon at one end of the cucumber ribbon.
Squeeze a tiny drop of lemon juice over the salmon to brighten the flavor.
Roll the cucumber tightly around the salmon until you reach the end of the strip.
Push a toothpick through the center of the roll to secure the layers in place.
Top each roll with one caper and a small piece of fresh dill.
Arrange the finished rolls on a slate board or tray and serve them chilled.
12. Turkey Spinach Bell Pepper Wraps
Quick Healthy Snack Recipes
These colorful wraps swap out flour tortillas for lean turkey breast slices to keep things light and detox friendly. Inside, you will find layers of fresh spinach leaves surrounding bright orange bell pepper matchsticks. The cross section reveals a beautiful spiral pattern that makes these snacks look professionally made.
Providing a satisfying crunch, the raw peppers balance the softness of the turkey and greens. This snack is easy to assemble in minutes and packs well for a midday boost at work. You will enjoy the clean flavors that don’t leave you feeling heavy or sluggish.
Required Ingredients
4 large slices of deli turkey breast
1 cup fresh baby spinach leaves
1 orange bell pepper, sliced into thin strips
1 tablespoon hummus or Greek yogurt spread
Equipment List
Sharp knife
Cutting board
Serving plate
DIY Instructions Step by Step
Place a slice of turkey flat on a clean cutting board.
Spread a very thin layer of hummus or yogurt across the surface of the turkey to help the vegetables stick.
Layer several baby spinach leaves over the turkey, leaving a small gap at the edges.
Stack three or four bell pepper strips at one end of the turkey slice.
Fold the edge of the turkey over the peppers and roll it forward as tightly as you can.
Use a sharp knife to trim the uneven ends of the roll for a cleaner look.
Slice the roll in half at a slight angle to show off the colorful interior.
Repeat this process with the remaining turkey slices and serve immediately.
13. Watermelon Radish Guacamole Bites
Quick Healthy Snack Recipes
Vibrant pink watermelon radishes serve as the base for these eye catching appetizers. A generous scoop of chunky guacamole sits atop each radish round, topped with a single cilantro leaf. The contrast between the bright green avocado and the neon pink radish makes this a showstopper on any table.
Each bite offers a peppery snap followed by the creamy richness of the avocado dip. This snack is naturally gluten free and provides a wonderful way to enjoy more raw vegetables in your daily routine.
Required Ingredients
2 large watermelon radishes
2 ripe avocados
1/4 cup red onion, finely diced
1 tablespoon fresh lime juice
Fresh cilantro leaves for garnish
1 pinch sea salt
Equipment List
Sharp knife or mandoline
Small mixing bowl
Fork
Spoon
DIY Instructions Step by Step
Slice your watermelon radishes into thin, circular rounds using a knife or a mandoline.
Place the radish slices in a bowl of ice water for ten minutes to make them extra crunchy.
In a separate bowl, mash the ripe avocados with a fork until they are mostly smooth but still have some chunks.
Stir in the diced red onion, lime juice, and a pinch of sea salt.
Pat the radish rounds dry with a towel and arrange them on a large platter.
Use a small spoon to place a mound of guacamole in the center of each radish slice.
Press a single cilantro leaf into the top of the green dip for a finished look.
Serve these as a fresh snack or a light party appetizer.
14. Nut Butter Celery Boats
Quick Healthy Snack Recipes
Crisp celery stalks get a flavorful upgrade with a filling of creamy nut butter and a zigzag of savory sauce. You can see how the black sesame seeds and tiny spice grains add a sophisticated texture to this classic childhood snack. The alternating patterns on the plate make this simple dish look gourmet.
Eating these provides a steady flow of energy thanks to the combination of fiber and protein. The slight bitterness of the celery pairs beautifully with the rich, nutty center. This is a mess free way to satisfy a craving for something salty and crunchy.
Required Ingredients
4 long celery stalks
1/2 cup natural almond or peanut butter
1 tablespoon tahini or savory yogurt sauce
1 teaspoon black sesame seeds
1/2 teaspoon mustard seeds
Equipment List
Chef’s knife
Small spatula or spoon
Squeeze bottle (optional)
DIY Instructions Step by Step
Wash the celery stalks and trim away the leaves and the tough white ends.
Cut each long stalk into two or three shorter pieces of equal length.
Fill the hollow center of each celery piece with your favorite nut butter using a small spatula.
Smooth the top of the nut butter so it sits flush with the edges of the celery.
Use a squeeze bottle or a spoon to drizzle a zigzag pattern of tahini or sauce over the filling.
Sprinkle black sesame seeds and mustard seeds along the length of each boat.
Arrange the stalks on a dark plate to make the green colors stand out.
Enjoy these immediately while the celery is at its crispiest.
15. Golden Roasted Garlic Cauliflower
Quick Healthy Snack Recipes
Tender cauliflower florets are roasted until they reach a beautiful golden brown color with charred edges. Nestled among the vegetables are whole cloves of roasted garlic that become soft and buttery in the oven. A sprig of fresh parsley in the center adds a pop of life to the rustic, warm tones of the dish.
Cooking the cauliflower this way brings out its natural sweetness and creates a satisfying texture. You can see how the garlic bulbs have been sliced to reveal the perfectly cooked interiors. This savory snack is a great way to enjoy a warm treat that still fits within your detox goals.
Required Ingredients
head of cauliflower, cut into florets
1 whole head of garlic
2 tablespoons olive oil
1 teaspoon dried oregano
1/2 teaspoon sea salt
Fresh parsley for garnish
Equipment List
Cast iron skillet or baking sheet
Sharp knife
Large bowl
DIY Instructions Step by Step
Cut your cauliflower into bite sized florets and place them in a large mixing bowl.
Slice the top off the whole garlic head to expose the tops of the individual cloves.
Drizzle olive oil over the cauliflower and toss it well with salt and dried oregano.
Place the cauliflower florets into a cast iron skillet or onto a baking sheet.
Nestle the garlic head and a few loose cloves in the middle of the vegetables.
Roast in an oven at 400 degrees Fahrenheit for twenty five minutes.
Turn the florets halfway through the cooking time to ensure they brown on all sides.
Garnish with fresh parsley and squeeze the soft garlic out of the skins to eat with the cauliflower.
16. Avocado Carrot Nori Cones
Quick Healthy Snack Recipes
These hand rolls offer a brilliant way to enjoy the flavors of sushi without the heavy rice base. You can see the crisp orange carrot and white radish matchsticks bundled tightly within a dark, mineral rich nori sheet. A smooth slice of avocado sits on top, adding a creamy finish to the crunchy vegetable filling.
Using seaweed wraps provides a unique savory taste that pairs beautifully with the fresh produce. These cones are light enough for a quick snack yet substantial enough to keep you focused. You will enjoy the simplicity of these rolls as they bring a touch of Japanese inspiration to your detox journey.
Required Ingredients
2 large sheets of roasted nori
1 ripe avocado, sliced into wedges
1 large carrot, julienned
1 white daikon radish, julienned
1 teaspoon sesame seeds
1 tablespoon rice vinegar for dipping
Equipment List
Sharp knife
Cutting board
Small dipping bowl
DIY Instructions Step by Step
Lay a sheet of nori on a dry cutting board and cut it in half to create two long rectangles.
Place a few sticks of carrot and white radish at a diagonal angle across one corner of the seaweed.
Add a wedge of avocado on top of the vegetable sticks so it peeks out of the top.
Lift the corner of the nori with the vegetables and begin rolling it into a cone shape toward the opposite side.
Dab a tiny drop of water on the final edge of the nori to seal the cone shut.
Sprinkle a few sesame seeds over the exposed avocado and vegetables for a nutty flavor.
Repeat this process until you have used all your vegetable matchsticks and seaweed strips.
Serve the cones immediately with a side of rice vinegar to keep the seaweed from becoming soft.
17. Pesto Stuffed Cherry Tomatoes
Quick Healthy Snack Recipes
Bright red cherry tomatoes act as tiny edible bowls for a rich and aromatic green filling. Each tomato is topped with a fresh basil leaf and a single pine nut, creating a classic Mediterranean look. You can see how the thick pesto texture contrasts with the smooth, shiny skin of the fruit.
These bites are exploding with herbal notes and a hint of garlic. They make a wonderful addition to a snack platter when you want something juicy and savory. Choosing small tomatoes ensures that each piece is a manageable, mess free bite.
Required Ingredients
20 large cherry tomatoes
1/2 cup vegan basil pesto
20 fresh basil leaves
20 toasted pine nuts
1 tablespoon hemp seeds
Equipment List
Small paring knife
Small spoon or piping bag
Serving platter
DIY Instructions Step by Step
Wash the cherry tomatoes and pat them dry before slicing a tiny bit off the bottom so they stand upright.
Cut the top quarter off each tomato and use a small spoon to gently scoop out the seeds and pulp.
Turn the hollowed tomatoes upside down on a paper towel for a few minutes to drain any excess juice.
Fill each tomato cavity with a teaspoon of basil pesto using a small spoon or a piping bag.
Place a small, fresh basil leaf on top of the pesto filling in each tomato.
Press one toasted pine nut into the center of the basil leaf to secure it.
Dust the entire platter with a sprinkle of hemp seeds for an extra boost of nutrition.
Chill the stuffed tomatoes in the refrigerator for fifteen minutes before serving to let the flavors meld.
18. Herb Crusted Olive and Walnut Medley
Quick Healthy Snack Recipes
This snack bowl transports your senses to a sunny garden with its mix of buttery green and deep purple olives. Whole walnut halves are scattered throughout, providing a satisfying crunch that complements the soft fruit. You will notice a fine coating of dried herbs that clings to every piece, promising a savory experience.
The combination of healthy fats from the olives and nuts makes this an excellent choice for brain health. This medley is easy to prepare in large batches and keeps well for several days. It serves as a sophisticated alternative to processed nut mixes.
Required Ingredients
1 cup pitted Kalamata olives
1 cup pitted green Castelvetrano olives
1/2 cup raw walnut halves
1 tablespoon extra virgin olive oil
1 teaspoon dried thyme
1 teaspoon dried rosemary
1/2 teaspoon red pepper flakes
Equipment List
Medium mixing bowl
Wooden spoon
Small serving bowl
DIY Instructions Step by Step
Drain the olives from their brine and rinse them under cold water to remove excess salt.
Spread the olives on a towel and pat them until they are completely dry to help the oil stick.
Place the dry olives and raw walnut halves into a medium mixing bowl.
Drizzle the extra virgin olive oil over the mixture and toss with a spoon until everything is coated.
Add the dried thyme, rosemary, and red pepper flakes to the bowl.
Stir the mixture thoroughly so the herbs are distributed evenly across the olives and nuts.
Transfer the medley to a wooden serving bowl for an attractive, rustic presentation.
Serve at room temperature or slightly warmed in a pan to release the aroma of the herbs.
19. Cinnamon Almond Sweet Potato Toasts
Quick Healthy Snack Recipes
Slices of roasted sweet potato provide a naturally sweet and sturdy base for a variety of toppings. You can see a thick layer of almond butter spread across the orange rounds, topped with a dusting of cinnamon and hemp hearts. These stacks look warm and inviting, offering a healthy twist on traditional toast.
Every bite delivers a blend of complex carbohydrates and healthy fats to keep your energy levels stable. The cinnamon adds a comforting spice that makes this snack feel like a treat. This recipe is a great way to use up leftover baked sweet potatoes from your dinner prep.
Required Ingredients
1 large sweet potato, sliced into 1/2 inch rounds
1/2 cup smooth almond butter
1 teaspoon ground cinnamon
2 tablespoons hemp hearts
1 drizzle of maple syrup (optional)
Equipment List
Baking sheet
Parchment paper
Toaster or oven
Butter knife
DIY Instructions Step by Step
Preheat your oven to 400 degrees Fahrenheit and line a baking sheet with parchment paper.
Arrange the sweet potato slices in a single layer on the sheet and bake for twenty minutes.
Flip the slices and bake for another ten minutes until they are tender but still firm enough to hold.
Allow the slices to cool slightly so the nut butter does not melt off immediately.
Spread a generous tablespoon of almond butter onto each sweet potato round.
Sprinkle a pinch of ground cinnamon over the top of the almond butter.
Finish each toast with a dusting of hemp hearts to add a bit of nutty texture.
Serve these warm as a cozy afternoon snack or a quick morning bite.
20. Rainbow Veggie Skewers with Hummus
Quick Healthy Snack Recipes
Eating the rainbow becomes easy with these playful skewers that feature a variety of colorful vegetables. You can see bright red peppers, yellow peppers, orange carrots, and green cucumbers stacked high on wooden sticks. A single broccoli floret sits at the end of one skewer, while a bowl of creamy hummus waits in the center for dipping.
This snack is visually appealing and makes eating raw vegetables much more fun for everyone. The hummus provides a smooth, savory element that ties all the different flavors together. It is a fantastic way to ensure you are getting a wide range of vitamins in a single sitting.
Required Ingredients
1 red bell pepper, cut into chunks
1 yellow bell pepper, cut into chunks
1 large carrot, sliced into thick rounds
1 cucumber, sliced into thick half moons
1 cup broccoli florets
1 cup classic hummus
1 pinch paprika for garnish
Equipment List
Wooden skewers
Sharp knife
Small dipping bowl
Large plate
DIY Instructions Step by Step
Wash all your vegetables and cut them into bite sized pieces that are roughly the same size.
Slide a piece of red pepper onto the wooden skewer followed by a yellow pepper chunk.
Add a thick carrot round and a cucumber slice to continue the color pattern.
Finish the skewer with a small broccoli floret at the very tip.
Repeat this process until you have created several colorful veggie wands.
Scoop the hummus into a small bowl and place it in the center of a large plate.
Dust the top of the hummus with a little bit of paprika to add color and flavor.
Arrange the skewers around the bowl like the rays of a sun and serve immediately.
21. Frozen Mint Grapes
Quick Healthy Snack Recipes
These frosty globes offer a refreshing burst of sweetness that feels like eating a mini fruit sorbet. You can see the delicate ice crystals clinging to the deep purple and red skins, while flecks of bright green mint add a cooling aroma. They look like sparkling jewels piled high in a silver bowl, promising a crisp and icy treat.
Snacking on frozen fruit helps slow down your eating pace, making you more mindful of every bite. The natural sugars provide a clean energy lift, while the mint aids in soothing your digestive system. It is a fantastic way to satisfy a dessert craving without reaching for processed sweets.
Required Ingredients
2 cups red or black seedless grapes
1/4 cup fresh mint leaves, finely chopped
1 teaspoon lime zest
Equipment List
Large bowl
Baking sheet
Parchment paper
Small storage container
DIY Instructions Step by Step
Remove the grapes from their stems and wash them thoroughly in a colander under cold water.
Pat the fruit completely dry with a clean kitchen towel so ice doesn’t clump them together.
Place the dry grapes in a large bowl and toss them with the finely chopped mint and lime zest.
Line a baking sheet with parchment paper and spread the grapes out in a single layer.
Slide the tray into your freezer for at least four hours until the fruit is rock solid.
Transfer the frozen grapes into a storage container or bag and keep them in the freezer.
Grab a handful whenever you need a cooling snack that tastes like a natural candy.
Enjoy them quickly before they thaw to maintain that unique sorbet-like texture.
22. Avocado Lime Rice Cakes
Quick Healthy Snack Recipes
Creamy mashed avocado creates a rich and velvety topping for these light, crunchy rice cakes. You can see the vibrant green spread topped with a flurry of hemp seeds and a thin slice of fresh lemon. A sprinkle of red pepper flakes adds a tiny kick of heat that balances the cooling citrus notes.
This snack is a powerhouse of healthy fats and fiber to keep you full for hours. It works well as a quick breakfast or a post-workout recovery bite. The combination of textures from the soft avocado to the airy rice base makes every mouthful interesting.
Required Ingredients
2 brown rice cakes
1/2 ripe avocado
1 tablespoon hemp seeds
1/2 lemon, sliced into thin wedges
1 pinch red pepper flakes
1 pinch sea salt
Equipment List
Small bowl
Fork
Butter knife
Cutting board
DIY Instructions Step by Step
Slice the avocado in half and scoop the flesh into a small bowl, discarding the pit.
Mash the avocado with a fork until it is mostly smooth but still has a few small chunks.
Squeeze a little lemon juice into the mash and add a pinch of sea salt to enhance the flavor.
Place two rice cakes on a flat surface and spread the avocado mixture evenly over the tops.
Scatter a generous spoonful of hemp seeds over the green spread for extra protein.
Add a few red pepper flakes to the center if you enjoy a subtle spicy finish.
Garnish each cake with a thin lemon slice to make the presentation look beautiful.
Eat these immediately so the rice cakes stay crisp and the avocado remains bright green.
23. Cardamom Cashew Stuffed Dates
Quick Healthy Snack Recipes
Medjool dates serve as a natural caramel base for these nutty and aromatic treats. You can see the pale, crescent-shaped cashews nestled inside the dark, glossy fruit. A dusting of ground cardamom provides a sophisticated floral scent that elevates the simple ingredients.
These bites are wonderful for a mid-afternoon pick-me-up when your focus starts to wander. They offer a steady release of natural sugar paired with the satisfying crunch of raw nuts. You will appreciate how the spicy cardamom cuts through the deep sweetness of the date.
Required Ingredients
10 Medjool dates
20 raw cashew halves
1/2 teaspoon ground cardamom
1/2 teaspoon honey (optional)
Equipment List
Paring knife
Small tray or plate
Small sifter
DIY Instructions Step by Step
Use a small knife to make a vertical slit in each date and remove the hard inner pit.
Open the date slightly to create a pocket for the nuts without tearing the fruit apart.
Place two cashew halves inside each date, pressing them firmly into the sticky interior.
Arrange the stuffed dates on a wooden tray or a decorative plate.
Dust the tops of the fruit with ground cardamom using a small sifter or your fingers.
Drizzle a tiny amount of honey over the cashews if you want a glossy and extra sweet finish.
Press the sides of the date back together slightly to secure the nuts in place.
Store them in a cool spot or the fridge to keep the fruit chewy and the nuts fresh.
24. Balsamic Beet and Arugula Salad
Quick Healthy Snack Recipes
Deep crimson beet cubes stand out against the peppery green arugula leaves in this vibrant snack bowl. A glossy drizzle of balsamic reduction coats every piece, adding a sweet and tangy glaze. You can see the beautiful contrast between the earthy root vegetable and the delicate, jagged edges of the greens.
Beets are excellent for supporting your body’s natural detoxification pathways and improving blood flow. This light salad feels incredibly fresh and serves as a great palate cleanser between larger meals. It is a simple way to add more antioxidants to your daily routine.
Required Ingredients
2 medium beets, cooked and cubed
2 cups fresh arugula
1 tablespoon balsamic glaze
1 teaspoon extra virgin olive oil
1 pinch cracked black pepper
Equipment List
Medium mixing bowl
Salad tongs or large spoons
Small serving bowl
DIY Instructions Step by Step
Peel your cooked beets and cut them into uniform cubes about half an inch wide.
Place a handful of fresh arugula into a mixing bowl and add the beet cubes on top.
Drizzle the olive oil over the greens first to help the other flavors stick.
Toss the mixture gently with tongs so you do not bruise the delicate arugula leaves.
Transfer the salad to a clean serving bowl for a better presentation.
Pour the balsamic glaze in a zigzag pattern over the top of the beets and greens.
Finish with a generous crack of black pepper to add a bit of warmth.
Serve this cold for the best flavor experience and a refreshing crunch.
25. Goji Berry and Coconut Trail Mix
Quick Healthy Snack Recipes
This trail mix is a colorful explosion of nutrients that looks as good as it tastes. You can see the bright red goji berries mixed with creamy almond slivers and ivory coconut ribbons. Pumpkin seeds add a pop of forest green to the jar, creating a visually stunning snack.
Packing this mix into a glass jar makes it easy to take on hikes or to the office. It provides a balanced blend of healthy fats, protein, and antioxidants to keep your energy levels steady. You will love the tropical flair the coconut adds to the earthy nuts and seeds.
Required Ingredients
1/2 cup raw almonds
1/4 cup dried goji berries
1/4 cup unsweetened coconut flakes
1/4 cup raw pumpkin seeds (pepitas)
Equipment List
Glass mason jar
Measuring cups
Large spoon
DIY Instructions Step by Step
Measure out your raw almonds and pumpkin seeds and place them into a clean bowl.
Add the dried goji berries to the mix, ensuring they are not clumped together.
Gently stir in the coconut flakes so they do not break into tiny pieces.
Pour the entire mixture into a glass mason jar for easy storage and visibility.
Give the jar a good shake to distribute the smaller seeds and berries among the larger nuts.
Store the jar in a cool, dark pantry to keep the oils in the nuts from going stale.
Portion out a small handful whenever you feel a hunger pang during the day.
Enjoy this snack dry or sprinkle it over a bowl of yogurt for a crunchy topping.
26. Sea Salt Kale Chips
Quick Healthy Snack Recipes
These delicate, ruffled greens are transformed into a light and crispy snack that melts in your mouth. You can see the visible grains of flaky sea salt scattered across the dark green, curly edges of the kale leaf. They look like brittle forest treasures, offering a savory crunch that rivals any potato chip.
Kale chips are an easy way to get a massive dose of leafy greens while satisfying a salty craving. They are very low in calories but high in vitamins A and K. Making them at home ensures they are not swimming in unnecessary oils or preservatives.
Required Ingredients
1 large bunch of curly kale
1 tablespoon olive oil
1 teaspoon flaky sea salt
1/2 teaspoon garlic powder (optional)
Equipment List
Large baking sheet
Parchment paper
Large mixing bowl
Salad spinner
DIY Instructions Step by Step
Wash the kale leaves thoroughly and use a salad spinner to get them as dry as possible.
Tear the leaves into bite-sized pieces, making sure to remove and discard the tough inner ribs.
Place the dry kale into a large bowl and drizzle the olive oil over the top.
Massage the oil into every nook and cranny of the leaves with your hands until they look glossy.
Line a baking sheet with parchment paper and spread the kale out in a single layer.
Sprinkle the sea salt and garlic powder evenly over the leaves before putting them in the oven.
Bake at 300 degrees Fahrenheit for about fifteen to twenty minutes until they are crisp but still green.
Let the chips cool on the pan for a few minutes to reach their maximum crunch before eating.
27. Raspberry Chia Squeeze Pouch
Quick Healthy Snack Recipes
This vibrant purple gel is a portable powerhouse of hydration and long-lasting energy. You can see the tiny chia seeds suspended in the thick raspberry puree, creating a textured and fun snack. The handheld pouch makes it a great choice for busy people who need a quick boost on the move.
Chia seeds soak up many times their weight in liquid, helping you stay hydrated throughout the day. The raspberries provide a natural tartness and a high dose of vitamin C. It is a much healthier alternative to store-bought energy gels that are often full of corn syrup.
Required Ingredients
1 cup fresh raspberries
3 tablespoons chia seeds
1/2 cup water
1 teaspoon honey
Equipment List
Blender
Reusable food pouch or small jar
Funnel
DIY Instructions Step by Step
Place the fresh raspberries and water into a blender and pulse until you have a smooth liquid.
Pour the juice into a bowl and stir in the chia seeds and honey with a spoon.
Let the mixture sit on your counter for at least thirty minutes so the seeds can expand and thicken.
Stir the gel one more time to break up any clumps of seeds that might have formed.
Use a funnel to pour the thickened raspberry mixture into a reusable squeeze pouch.
Seal the pouch tightly and keep it in the refrigerator until you are ready to head out.
Give the pouch a little massage before opening to ensure the texture is consistent.
Squeeze the contents directly into your mouth for a fast and mess-free detox snack.
28. Chili Spiced Pumpkin Seeds
Quick Healthy Snack Recipes
These toasted seeds are coated in a fine layer of red spice that promises a warm and savory flavor profile. You can see how the flat, green seeds are cradled in a hand, showcasing their rustic and natural look. The dusting of chili powder adds a beautiful color and a mild heat that lingers on the tongue.
Pumpkin seeds are a fantastic source of magnesium and zinc, which support your immune system during a detox. Roasting them brings out a nutty aroma that makes them incredibly addictive. They are a great snack to keep in your car or bag for emergencies.
Required Ingredients
1 cup raw pumpkin seeds (pepitas)
1 teaspoon olive oil
1/2 teaspoon chili powder
1/4 teaspoon cumin
1 pinch sea salt
Equipment List
Small skillet or baking sheet
Wooden spoon
Small bowl
DIY Instructions Step by Step
Place a small skillet over medium heat and add the olive oil to coat the bottom.
Pour the raw pumpkin seeds into the pan and stir them constantly to prevent burning.
Toast the seeds for about five minutes until they start to pop and smell slightly nutty.
Turn off the heat and immediately sprinkle the chili powder, cumin, and salt over the warm seeds.
Toss the mixture well so the spices stick to the oil-coated surface of the pepitas.
Transfer the seasoned seeds to a bowl and let them cool down completely.
Store the finished snack in a small jar or a zip-top bag for easy access.
Enjoy a small handful whenever you need a crunchy and savory boost to get through the day.
29. Granola Apple Slices
Quick Healthy Snack Recipes
These apple wedges act as a fresh and crunchy base for a layer of creamy nut butter and toasted oats. You can see the golden granola and white coconut flakes piled on top of the caramel-colored spread. They look like tiny fruit tacos, offering a satisfying mix of textures in every bite.
Choosing a crisp apple variety like Honeycrisp provides the best structural support for the heavy toppings. This snack is high in fiber and keeps your blood sugar stable thanks to the healthy fats in the nut butter. It is a fun recipe to make with kids or as a quick afternoon treat.
Required Ingredients
1 large crisp apple
1/4 cup peanut or almond butter
2 tablespoons low-sugar granola
1 tablespoon coconut flakes
Equipment List
Sharp knife
Cutting board
Small spatula or butter knife
DIY Instructions Step by Step
Wash the apple and cut it into thick wedges, removing the core and seeds from each piece.
Lay the wedges flat on a cutting board or a serving plate.
Use a small spatula to spread a thick layer of nut butter onto the top of each apple slice.
Sprinkle the granola over the nut butter, pressing it down slightly so it stays in place.
Top the granola with a few flakes of unsweetened coconut for extra flavor and flair.
Arrange the finished slices in a row on a clean plate for a beautiful presentation.
Serve these immediately while the apple is cold and the granola is still crunchy.
Add a dusting of cinnamon if you want to give the snack a warmer, dessert-like feel.
30. Tuna Avocado Cucumber Rounds
Quick Healthy Snack Recipes
These low-carb bites swap out crackers for thick, hydrating slices of fresh cucumber. You can see a mound of savory tuna salad sitting on a bed of creamy guacamole, topped with a single caper and a sprig of dill. A thin half-moon of lemon adds a bright yellow accent to the cool green and gray tones of the dish.
This snack is incredibly refreshing and provides a high-protein option that fits perfectly into a detox plan. The cucumber adds a satisfying snap that complements the soft and rich toppings. It is an elegant appetizer that looks much more complicated to make than it actually is.
Required Ingredients
1 large English cucumber
1 can tuna in water, drained
1/2 cup pre-made or fresh guacamole
1 tablespoon capers
Fresh dill for garnish
1 lemon, sliced into small half-moons
Equipment List
Sharp knife
Cutting board
Small spoon
Serving platter
DIY Instructions Step by Step
Wash the English cucumber and peel away strips of skin to create a decorative striped pattern.
Slice the vegetable into thick rounds about one inch wide and arrange them on a platter.
Place a small spoonful of guacamole in the center of each cucumber slice.
Flake the drained tuna with a fork and put a neat pile on top of the green base.
Nestle a small half-moon of lemon into the side of the tuna pile for a citrusy touch.
Top each bite with one caper to add a salty and briny burst of flavor.
Garnish the rounds with a small sprig of fresh dill for a professional finish.
Keep the platter in the fridge until the very moment you are ready to serve your guests.
31. Golden Turmeric Latte
Quick Healthy Snack Recipes
Warmth and spice flow through this soothing beverage, creating a calming ritual for your detox journey. You can see the intricate leafy pattern swirled into the frothy white foam on top of the vibrant yellow liquid. The deep wooden background and a hint of cinnamon bark add to the cozy, rustic feel of this healthy drink.
Sipping on turmeric provides powerful anti-inflammatory benefits that support your body’s natural healing. This latte uses creamy plant-based milk to carry the bold flavors of ginger and black pepper. It is a wonderful alternative to afternoon coffee when you need a gentle, caffeine-free hug in a mug.
Required Ingredients
1 cup unsweetened almond or coconut milk
1 teaspoon ground turmeric
1/2 teaspoon ground ginger
1/4 teaspoon ground cinnamon
1 pinch black pepper
1 teaspoon maple syrup or honey
Equipment List
Small saucepan
Milk frother or small whisk
Measuring spoons
Your favorite ceramic mug
DIY Instructions Step by Step
Pour your choice of plant-based milk into a small saucepan and set it over medium-low heat.
Add the ground turmeric, ginger, cinnamon, and black pepper to the milk while it is still cool.
Whisk the mixture constantly as it warms up to ensure all the spices dissolve and no clumps remain.
Stir in a small spoonful of maple syrup or honey once the liquid begins to steam gently.
Remove the pan from the heat just before the milk reaches a rolling boil to keep the flavor delicate.
Use a milk frother directly in the pan for thirty seconds to create a thick, velvety foam on the surface.
Pour the golden liquid carefully into a mug and scoop the remaining foam onto the top.
Sprinkle a tiny bit of extra cinnamon over the foam for a professional and aromatic finish.
32. Zesty Green Detox Smoothie
Quick Healthy Snack Recipes
This vibrant green elixir looks like a glass full of liquid sunshine and garden freshness. You can see the thick, smooth texture of the blended greens garnished with a crisp cucumber slice and a tart apple wedge. A sprig of fresh mint stands tall at the top, promising a cooling finish to every refreshing sip.
Drinking your greens is an efficient way to flood your system with essential vitamins and minerals. The addition of cucumber and lime keeps the flavor bright rather than bitter or earthy. This smoothie is a fantastic way to start your morning or reset your palate after a weekend of heavy treats.
Required Ingredients
1 cup fresh spinach leaves
1/2 green apple, sliced
1/2 cucumber, chopped
1 tablespoon fresh lime juice
1 teaspoon fresh ginger, grated
1 cup coconut water or plain water
Equipment List
High speed blender
Measuring cups
Glass for serving
Sharp knife
DIY Instructions Step by Step
Wash your spinach, apple, and cucumber thoroughly under cold running water to remove any debris.
Chop the apple and cucumber into small chunks so they blend easily without straining the motor.
Place the spinach leaves into the blender first to ensure they sit closest to the blades.
Add the fruit chunks, grated ginger, and lime juice on top of the leafy greens.
Pour in the coconut water or plain water to provide the liquid base needed for a smooth blend.
Secure the lid tightly and blend on high speed for about one minute until no visible bits remain.
Check the thickness and add a splash more water if you prefer a thinner, more juice-like consistency.
Pour the smoothie into a tall glass and add a slice of cucumber to the rim for a beautiful presentation.
33. Savory Herb Bone Broth
Quick Healthy Snack Recipes
Steam rises from a dark stone bowl filled with a clear, golden broth that looks incredibly nourishing. You can see small droplets of healthy fats shimmering on the surface alongside a few bright green parsley leaves. This simple preparation highlights the beauty of slow-cooked ingredients and the comfort of a warm, savory snack.
Collagen-rich broth is excellent for supporting gut health and keeping you satisfied during a detox. It offers a deep, complex flavor that feels much more like a meal than a simple drink. Sipping this from a heavy bowl encourages you to slow down and enjoy the quiet moments of your day.
Required Ingredients
2 cups high-quality bone broth or vegetable broth
1 tablespoon fresh parsley, chopped
1/2 teaspoon sea salt
1/4 teaspoon cracked black pepper
1 teaspoon apple cider vinegar
Equipment List
Small pot
Ladle
Soup bowl
Spoon
DIY Instructions Step by Step
Pour the broth into a small pot and place it on the stove over medium heat.
Stir in a splash of apple cider vinegar, which helps bring out the minerals in the broth.
Add the sea salt and black pepper to the liquid and stir gently as it begins to simmer.
Allow the broth to heat until it is steaming hot but not vigorously boiling.
Taste the liquid and adjust the salt if you feel it needs a bit more savory depth.
Ladle the hot broth into a deep stone or ceramic bowl carefully to avoid splashes.
Sprinkle the fresh parsley leaves over the top so they wilt slightly in the heat.
Enjoy the broth slowly with a spoon while it is warm for the most comforting experience.
34. Frozen Watermelon Mint Cubes
Quick Healthy Snack Recipes
These frosty red squares look like a pile of refreshing fruit candies served in a clear glass bowl. You can see the fine coating of ice crystals on the watermelon flesh, punctuated by dark green bits of frozen mint. They are a playful and hydrating treat that offers a satisfying crunch before melting into a sweet juice.
Watermelon is naturally high in water content, making these cubes a great way to stay hydrated. Freezing the fruit intensifies the sweetness and creates a unique texture that feels very indulgent. These are a great hit at summer gatherings or as a quick post-workout cool down.
Required Ingredients
4 cups fresh watermelon, cubed
2 tablespoons fresh mint, finely minced
1 pinch flaky sea salt
Equipment List
Baking sheet
Parchment paper
Large mixing bowl
Serving bowl
DIY Instructions Step by Step
Cut the rind off a fresh watermelon and slice the red fruit into uniform one inch cubes.
Place the watermelon pieces into a large bowl and toss them gently with the minced mint.
Line a flat baking sheet with parchment paper to prevent the fruit from sticking to the metal.
Arrange the cubes in a single layer on the tray, making sure they do not touch each other.
Sprinkle a tiny bit of flaky sea salt over the fruit to make the natural sugars stand out.
Place the tray in your freezer for at least three to four hours until the cubes are completely hard.
Peel the frozen fruit off the paper and pile them into a chilled glass bowl for serving.
Eat these immediately while they are still icy for the best flavor and a fun, crunchy texture.
35. Cucumber Lemon Infused Water
Quick Healthy Snack Recipes
A tall glass pitcher holds a clear, sparkling liquid filled with elegant swirls of cucumber and bright yellow lemon rounds. You can see how the thin vegetable ribbons wrap around the citrus slices, creating a beautiful botanical display. This simple drink turns basic hydration into a spa-like experience that you can enjoy right at home.
Infusing your water with fresh produce adds a hint of flavor without any added sugars or chemicals. The lemon provides a boost of vitamin C while the cucumber offers a subtle, cooling freshness. Keeping a pitcher like this in your fridge makes it much easier to reach your daily water goals.
Required Ingredients
1 large English cucumber
2 fresh lemons
2 liters filtered water
1 handful fresh mint leaves (optional)
Equipment List
Large glass pitcher
Vegetable peeler
Sharp knife
Long stirring spoon
DIY Instructions Step by Step
Wash your lemons and cucumber thoroughly to ensure the skins are clean before they enter the water.
Use a vegetable peeler to shave long, thin ribbons from the cucumber, stopping when you reach the seeds.
Slice the lemons into thin, circular rounds and remove any visible seeds with the tip of your knife.
Place the cucumber ribbons and lemon slices into the bottom of your large glass pitcher.
Fill the pitcher to the top with cold, filtered water and use a long spoon to push the fruit down.
Add a few slapped mint leaves to the top if you want an extra layer of herbal aroma.
Place the pitcher in the refrigerator for at least two hours to allow the flavors to seep into the water.
Pour the chilled water into a glass and refill the pitcher with more water as you drink it throughout the day.
36. Hibiscus Cinnamon Iced Tea
Quick Healthy Snack Recipes
This deep ruby red beverage looks strikingly bold against a dark background, served in a tall glass filled with clear ice cubes. A lime wheel sits on the rim, and a long cinnamon stick acts as a natural stirrer in the center. You can see the condensation on the glass, promising a cold and tart refreshment that is completely natural.
Hibiscus tea is famous for its tart flavor and high level of antioxidants that support a healthy heart. Adding a cinnamon stick provides a warm undertone that balances the acidity of the flower petals. This tea is a sophisticated and colorful way to end your snack list on a high note.
Required Ingredients
4 dried hibiscus flowers or 2 tea bags
1 whole cinnamon stick
4 cups boiling water
1 fresh lime, sliced
1 teaspoon honey (optional)
Equipment List
Heat proof pitcher or pot
Fine mesh strainer
Tall glasses
Ice cube tray
DIY Instructions Step by Step
Place the dried hibiscus flowers and the whole cinnamon stick into a heat proof pitcher or pot.
Pour the boiling water over the ingredients and let them steep for about ten minutes.
Watch as the water turns a deep, beautiful red color and the cinnamon releases its spicy scent.
Strain the liquid through a fine mesh sieve to remove the flowers and any small cinnamon bits.
Stir in a small amount of honey while the tea is still warm if you prefer a bit of sweetness.
Allow the tea to cool down to room temperature before placing it in the refrigerator to chill completely.
Fill a tall glass with large ice cubes and pour the cold hibiscus tea over the top.
Garnish the glass with a fresh lime wheel and the original cinnamon stick for a beautiful, detox-friendly drink.
Key Takeaways
Whole Ingredients Rule: Every recipe relies on natural, unprocessed foods to ensure your body gets the best nutrients without hidden additives.
Prep for Success: Most of these snacks can be made in advance, helping you avoid the temptation of reaching for unhealthy treats when you are busy.
Balance is Vital: By combining fiber, protein, and healthy fats, these recipes keep you full longer and prevent energy crashes.
Hydration Matters: Liquid snacks like infused water and herbal teas play a huge role in flushing out toxins and keeping your skin glowing.
Transitioning to a healthier lifestyle is often about the small choices you make throughout the afternoon. While it might feel hard to ignore the sweets in your pantry at first, these nutrient dense recipes make the change effortless. You are not just eating less junk; you are fueling your cells with the power of nature.
Consistency is the secret to a successful detox journey. As you explore these different textures and flavors, you will likely find a few new favorites that become staples in your routine. Remember that your body deserves high quality fuel to perform its best every single day.
Take a moment to celebrate the fact that you are prioritizing your well-being. These thirty six snacks prove that eating for health can be just as exciting and colorful as any traditional treat. Enjoy the crunch, savor the sweetness, and feel the difference that real food makes in your life.
Spread the loveThe holiday season brings immense joy, but planning the food can often feel like a monumental task. When hosting a party, the sheer thought of an overwhelming menu can quickly steal your festive…
Spread the loveHosting a massive sports viewing party brings a lot of excitement and a bit of pressure. You want your guests to feel fed and happy without spending your entire Sunday stuck in the…
Spread the loveValentine’s Day deserves a special touch this year. You can skip the crowded bars and long wait times easily. These recipes help you create a cozy lounge right in your own living room.…