Working from home offers fantastic flexibility, yet somehow, the midday lunch hour often becomes the most chaotic part of the day. You might find yourself frantically scrolling through delivery apps or worse, grabbing a handful of chips because sitting down for a proper meal feels like too much effort.
Quick Lunch Ideas
This pattern can wreck your focus and energy levels, leading to that inevitable 3 PM slump. Eating a nourishing, satisfying lunch is vital for maintaining productivity and health when your kitchen is only steps away.
We understand the challenge of needing speed without sacrificing flavor or nutrition. We gathered 40 ridiculously easy and quick lunch ideas designed specifically for the at-home worker. These meals require minimal effort, often rely on smart shortcuts, and deliver maximum satisfaction. Say goodbye to the messy lunch routine and hello to sustained energy!
This beautiful, protein-packed salad is the answer to your midday meal slump. The centerpiece is a generous serving of plump white beans, tossed with flaked, savory tuna, creating a satisfying texture. Adding a vibrant pop of color and flavor are thinly sliced red onions, which contribute a delightful, sharp crunch.
Fresh basil leaves are scattered throughout the bowl, lending a wonderful aromatic quality to every forkful. Bright lemon wedges are tucked into the mix, promising a refreshing, zesty dressing that cuts through the richness of the fish and beans. A light drizzle of olive oil, visible on the tuna, seals the deal, making this quick lunch look gourmet without any fuss.
This is a fantastic option for remote workers looking for something nourishing that requires zero cooking. It keeps you feeling energized and focused through your afternoon tasks.
Required Ingredients
1 (15-ounce) can cannellini beans (white kidney beans), rinsed and drained
1 (5-ounce) can tuna in olive oil or water, drained
1/4 cup thinly sliced red onion
2 tablespoons fresh lemon juice
1 tablespoon extra virgin olive oil (plus more for garnish)
1/4 teaspoon salt
1/4 teaspoon black pepper
1/4 cup fresh basil leaves, roughly torn or left whole for garnish
1 small lemon, cut into wedges (for serving)
Required Equipment
1 medium mixing bowl
1 can opener
1 measuring spoon set
1 spoon or rubber spatula for mixing
DIY Instruction
Step 1: Prepare the Base
Get your medium mixing bowl ready. Take the cannellini beans and use a strainer to rinse them thoroughly under cold running water. You want to wash off any of the canning liquid. Once they are cleaned, drain them well and place the beans into the mixing bowl.
Step 2: Add the Protein
Carefully open your can of tuna. If your tuna is packed in water, drain it completely. If it is packed in olive oil, you can choose to drain off most of the oil or leave a little for extra flavor; this is up to you. Once drained, add the tuna to the bowl with the white beans. You can gently flake the tuna with a fork as you add it.
Step 3: Introduce the Crunch and Flavor
Take your thinly sliced red onion and add it to the bowl with the tuna and beans. Next, drizzle the measured 1 tablespoon of extra virgin olive oil and the 2 tablespoons of fresh lemon juice over the ingredients.
Step 4: Season and Combine
Sprinkle the $1/4$ teaspoon of salt and the $1/4$ teaspoon of black pepper over the mixture. Use your spoon or rubber spatula to gently fold and combine all the ingredients. Stir carefully so you do not mash the beans, ensuring everything is evenly coated in the dressing.
Step 5: Garnish and Serve
Transfer the salad to your serving bowl. Scatter the fresh basil leaves over the top. If you like, you can add a tiny extra drizzle of olive oil and a final grind of black pepper, just as shown in the picture. Place a lemon wedge or two on the side of the bowl. Enjoy your fresh, satisfying lunch immediately!
Chocolate Peanut Butter Snack Dip Board
Quick Lunch Ideas
2. Image Description
This visually stunning platter transforms a simple snack into a truly exciting midday break. Central to the board is a creamy, swirled chocolate peanut butter dip, generously speckled with mini chocolate chips and a smooth peanut butter drizzle. The dip looks wonderfully rich, ready to scoop up with assorted fresh fruit.
Surrounding the bowl is a rainbow of refreshing dippers, offering both sweetness and tang. You see vibrant sliced kiwis, whole strawberries, and juicy blueberries creating a colorful border. Sliced bananas and bright mandarin orange segments complete the arrangement, making the entire setup appealing and highly nutritious.
This quick preparation is excellent for satisfying that afternoon sweet craving in a healthy way. It’s a fun, no-cook option that provides sustained energy to power through the rest of your workday.
In your medium mixing bowl, measure and add the creamy peanut butter and the Greek yogurt. Using a whisk or spatula, mix these two ingredients together until they are well combined and smooth.
Step 2: Add the Flavoring
Next, introduce the sweetness and chocolate element. Add the unsweetened cocoa powder, maple syrup (or honey), and the vanilla extract to the bowl. Ensure your measurements are accurate for the best flavor balance.
Step 3: Mix Until Uniform
Continue to mix all the ingredients thoroughly. You need to scrape down the sides of the bowl to make sure no dry cocoa powder is left behind. Keep mixing until the dip is a uniform, creamy brown color and the texture is smooth and thick.
Step 4: Arrange the Serving Platter
Transfer the finished dip into a small serving bowl and place it in the center of your large platter. Now, prepare your fruit dippers. Wash the berries and kiwis. Peel and segment the mandarins and slice the bananas. Arrange all the fruits neatly around the bowl of dip, creating an attractive and colorful border.
Step 5: Garnish and Enjoy
For a final flourish, you can drizzle a small amount of extra peanut butter over the dip and sprinkle it with a few mini chocolate chips, if you wish. This delightful snack is ready for you to enjoy right at your desk!
Shredded Chicken and Noodle Asian Bowl
Quick Lunch Ideas
3. Image Description
What a hearty and flavorful lunch! This bowl offers a fantastic mix of textures and tastes, promising quick satisfaction. A generous pile of fluffy, shredded chicken sits alongside perfectly cooked ramen or egg noodles, providing the satisfying protein and carbohydrate base. The bowl is bursting with healthy additions.
Bright green shelled edamame and firm chickpeas fill one quadrant, adding fiber and wonderful color. A separate mound of thinly sliced, sautéed or steamed carrots and broccoli florets brings a colorful vegetable crunch. A dollop of creamy peanut sauce, visible in a jar nearby, suggests a rich, nutty dressing will tie all the elements together.
Toppings of fresh cilantro and thinly sliced red chili peppers give this meal a beautiful, restaurant-quality presentation. This lunch is simple, warming, and a brilliant way to use leftover cooked chicken for a quick midday assembly.
Required Ingredients
1 package (3 oz) instant ramen noodles (discard seasoning packet, or save for another use)
1 cup pre-cooked, shredded chicken breast
1/2 cup frozen shelled edamame
1/2 cup canned chickpeas, rinsed and drained
1 cup frozen stir-fry vegetables (carrots, broccoli, snow peas)
For the Sauce: 3 tablespoons peanut butter, 1 tablespoon soy sauce, 1 tablespoon rice vinegar, 1 teaspoon maple syrup or honey, 1-2 tablespoons hot water to thin
Required Equipment
1 small saucepan or kettle
1 microwave-safe bowl (for vegetables)
1 medium mixing bowl (for sauce)
1 serving bowl
Chopsticks or fork
DIY Instruction
Step 1: Cook the Noodles
Bring about 3 cups of water to a boil in your small saucepan or kettle. Once the water is boiling, add the instant ramen noodles (without the seasoning packet) and cook according to the package directions, usually about 3 minutes, until they are tender. Drain the noodles well and place them into your large serving bowl.
Step 2: Prepare the Vegetables
Place the frozen shelled edamame and the frozen stir-fry vegetables into a microwave-safe bowl. Add about 1 tablespoon of water and cover the bowl loosely with a plate or plastic wrap. Microwave for 1-2 minutes, or until the vegetables are heated through and slightly tender-crisp. Drain off any excess water and add them to the serving bowl next to the noodles.
Step 3: Assemble the Sauce
In your small mixing bowl, whisk together the peanut butter, soy sauce, rice vinegar, and maple syrup (or honey). Slowly add the hot water, one tablespoon at a time, whisking constantly until the sauce reaches a pourable consistency. It should be thick, but able to drizzle.
Step 4: Layer the Bowl
Add the pre-cooked shredded chicken and the rinsed chickpeas to the serving bowl, arranging them over and next to the noodles and vegetables, similar to the picture.
Step 5: Finish and Serve
Drizzle the prepared peanut sauce over the ingredients. Garnish the top with fresh cilantro, a sprinkle of sesame seeds, and a few slices of chili pepper if you like a little heat. Your robust Asian bowl is ready to eat!
Greek Chickpea and Feta Cheese Wrap
Quick Lunch Ideas
4. Image Description
This Mediterranean-inspired wrap is a refreshing and crunchy option, bursting with vibrant colors and fresh ingredients. The large, soft tortilla is tightly filled with a generous mixture of creamy feta cheese and hearty chickpeas, forming a satisfying, textured filling. Everything is enveloped in plenty of crisp green lettuce leaves, visible around the edges, which help keep the wrap together and add freshness.
Inside, you can see thick slices of crunchy cucumber, providing a cool contrast, alongside bold purple slices of red onion and briny kalamata olives. The ingredients look perfectly balanced, promising a delightful combination of salty, savory, and tangy flavors. The exterior is lightly drizzled with oil, giving the wrap an appetizing sheen.
Served alongside a lemon wedge and a creamy dip, this simple lunch requires no heat and delivers substantial, fiber-rich energy, making it an excellent brain-boosting meal for busy afternoons.
Required Ingredients
1 large, soft whole-wheat or spinach tortilla
1/2 cup canned chickpeas, rinsed, drained, and lightly mashed
1/4 cup crumbled feta cheese
1/4 cup thinly sliced cucumber
2 tablespoons chopped Kalamata olives
1 tablespoon finely chopped red onion
1 tablespoon fresh parsley, chopped
1 teaspoon olive oil
A few large leaves of romaine or green leaf lettuce
Required Equipment
1 small mixing bowl
1 fork (for mashing)
1 knife and cutting board (for chopping vegetables)
DIY Instruction
Step 1: Prepare the Chickpea Base
Take the rinsed and drained chickpeas and place them in your small mixing bowl. Use a fork to gently mash about half of the chickpeas. Mashing some of them helps create a creamy base that holds the filling together inside the wrap.
Step 2: Create the Filling
To the mashed and whole chickpeas, add the crumbled feta cheese, chopped Kalamata olives, finely chopped red onion, and chopped fresh parsley. Drizzle the 1 teaspoon of olive oil over the mixture. Gently stir everything together until the filling is evenly combined.
Step 3: Build the Wrap
Lay the tortilla flat on a clean cutting board. Arrange the large lettuce leaves down the center of the tortilla, leaving a margin of about one inch on all sides. The lettuce will serve as a moisture barrier.
Step 4: Spoon and Roll
Spoon the chickpea and feta mixture evenly down the center of the lettuce-lined tortilla. Place the cucumber slices on top of the filling. Now, roll the wrap tightly. Fold in the two sides of the tortilla first, over the filling. Then, starting from the edge closest to you, roll it up firmly away from you.
Step 5: Slice and Serve
Use a sharp knife to slice the rolled wrap in half diagonally. This beautiful presentation highlights all the fresh layers inside. Enjoy this satisfying, crunchy lunch immediately!
Creamy Feta and Fried Egg Plate
Quick Lunch Ideas
5. Image Description
This quick lunch elevates simple eggs into a savory, substantial midday meal. The dish features a golden-centered, beautifully fried egg resting atop a mound of creamy, yellow scrambled eggs. The dual preparation of the egg offers a wonderful contrast in texture—a runny yolk over soft, pillowy curds.
Scattered generously around the eggs are small dollops of creamy white cheese, likely ricotta or soft cottage cheese, adding a fresh, tangy flavor. The entire dish is beautifully dusted with a robust amount of freshly cracked black pepper and a pinch of salt. The deep black plate provides a striking contrast, making the bright yellow and white components truly stand out.
This is a fantastic “breakfast for lunch” option, especially when you need a quick protein boost. The entire plate can be cooked and assembled in just a few minutes, making it a truly fast and nourishing choice for home workers.
Required Ingredients
2 large eggs
1 tablespoon milk or cream (for scrambling)
1 teaspoon butter or olive oil
2 tablespoons ricotta cheese or soft crumbled feta cheese
Salt and freshly ground black pepper to taste
Required Equipment
1 small non-stick frying pan
1 spatula
1 small bowl
1 fork or whisk
DIY Instruction
Step 1: Scramble One Egg
Crack one of your eggs into a small bowl. Add the tablespoon of milk or cream and a small pinch of salt and pepper. Use a fork or whisk to beat the egg mixture until it is pale yellow and slightly frothy.
Step 2: Cook the Scramble
Melt about half a teaspoon of butter or olive oil in your small non-stick frying pan over medium-low heat. Pour the scrambled egg mixture into the pan. Stir the egg gently and continuously with a spatula until soft, fluffy curds form, taking care not to overcook them. Remove the scrambled egg from the pan and place it in the center of your serving plate.
Step 3: Fry the Second Egg
Add the remaining half teaspoon of butter or oil to the same pan. Crack the second egg directly into the pan. Cook over medium heat until the whites are set and the yolk is cooked to your preference (runny is recommended for this dish).
Step 4: Assemble and Season
Gently slide the fried egg on top of the mound of scrambled eggs on the plate. Now, take your ricotta or soft feta cheese and place small dollops around the edges of the eggs.
Step 5: Finish with Pepper
This step is crucial for flavor and appearance. Generously sprinkle the entire dish with freshly cracked black pepper and a final pinch of salt. Serve immediately while the eggs are steaming hot.
Caprese Balsamic Glaze Toast
Quick Lunch Ideas
6. Image Description
This open-faced sandwich is an absolute masterpiece of simplicity and fresh flavor, reminiscent of summer gardens. A thick slice of toasted bread serves as a sturdy foundation for the layered ingredients. Alternating slices of creamy white mozzarella cheese and bright red cherry tomatoes create a beautiful, repetitive pattern.
Tiny, vivid green basil leaves are tucked in between the slices, lending a beautiful aromatic quality to the lunch. The entire creation is liberally drizzled with a thick, dark balsamic glaze that crisscrosses over the ingredients, providing a wonderful, sweet and tangy contrast to the rich cheese and fresh vegetables.
This lunch is ready in minutes and requires minimal cooking—just the toast! It is a fresh, flavorful, and satisfying option that feels light yet substantial enough to carry you through the afternoon.
Required Ingredients
1 thick slice of rustic bread (like sourdough or artisan white)
1-2 tablespoons balsamic glaze (found near vinegars or in the produce section)
Pinch of salt and black pepper
Required Equipment
Toaster or small non-stick pan
Knife and cutting board
Small plate for serving
DIY Instruction
Step 1: Toast the Bread
Take your thick slice of bread. You can either place it in a toaster until lightly golden, or for a richer flavor, lightly brush both sides with the olive oil and toast it in a small non-stick pan over medium heat for about 1-2 minutes per side until it is golden brown and crisp. Place the finished toast on your serving plate.
Step 2: Layer the Cheese
Arrange the fresh mozzarella slices evenly over the toasted bread. If you are using mini mozzarella balls, cut them in half and lay them down first.
Step 3: Add the Tomatoes and Basil
Take your sliced tomatoes and layer them between the mozzarella slices, or place one tomato slice atop each piece of mozzarella. Now, tear or chiffonade the basil leaves and scatter them over the top of the tomatoes and cheese.
Step 4: Season and Glaze
Sprinkle a small pinch of salt and a grind of black pepper over the fresh ingredients. Finally, take your balsamic glaze and drizzle it generously over the entire open-faced sandwich, letting it fall beautifully over the sides.
Step 5: Serve Immediately
This quick Caprese toast is best enjoyed right away while the bread is still slightly warm and the mozzarella is cool and creamy.
Speedy Lemon-Herb Jar Salad
Quick Lunch Ideas
7. Image Description
This jar salad is the ultimate example of quick, pre-prepped efficiency for the remote worker. The ingredients are perfectly layered in a tall glass jar, which is a fantastic technique for keeping them fresh until lunchtime. At the bottom, a vibrant green layer of lemon-herb dressing rests, keeping the top ingredients dry.
Above the dressing, a sturdy layer of protein and vegetables acts as a barrier, including creamy white beans and plump artichoke hearts. Sliced cucumbers and bright red cherry tomatoes stack above that, adding wonderful crunch and color. Finally, the jar is topped with a beautiful, fluffy mixture of mixed leafy greens, which look fresh and un-wilted.
This layered approach guarantees a crisp, non-soggy salad, making it a sensational grab-and-go option from the refrigerator. Simply give it a good shake before eating to coat everything in the zesty dressing!
Required Ingredients
Dressing Layer: 3 tablespoons olive oil, 1 tablespoon fresh lemon juice, 1/2 teaspoon dried Italian herbs (or 1 teaspoon fresh), salt and pepper
Bottom Layers: 1/2 cup canned white beans (cannellini or great northern), rinsed and drained; 1/4 cup marinated artichoke hearts, quartered
Middle Layers: 1/4 cup sliced cucumber; 1/4 cup halved cherry tomatoes
Top Layer: 1 cup mixed spring greens or baby spinach
Required Equipment
1 clean, wide-mouth mason jar (at least 16-ounce) with a lid
1 small bowl or measuring cup (for dressing)
1 spoon for mixing
DIY Instruction
Step 1: Mix the Dressing
In a small bowl or measuring cup, whisk together the olive oil, fresh lemon juice, dried Italian herbs, salt, and pepper until well combined. Pour this dressing into the very bottom of the clean mason jar. This is your first layer.
Step 2: Add Sturdy Ingredients
Next, you need to create the barrier layer directly on top of the dressing. Carefully spoon the rinsed white beans into the jar, followed by the quartered artichoke hearts. These dense ingredients will prevent the dressing from soaking into the upper layers.
Step 3: Layer the Vegetables
Continue to stack the remaining vegetables. Gently add the sliced cucumber, pressing them lightly against the sides of the jar. Follow this with the halved cherry tomatoes, making sure to layer them neatly.
Step 4: Top with Greens
Finally, lightly pack the mixed spring greens or baby spinach into the top of the jar. You want the greens to be slightly compressed so they fit, but not so much that they are crushed.
Step 5: Seal and Prep for Serving
Screw the lid tightly onto the jar. When lunchtime arrives, give the jar a vigorous shake to distribute the dressing throughout all the layers. You can eat it directly out of the jar or pour it into a bowl.
Spicy Korean Tuna and Kimchi Bowl
Quick Lunch Ideas
8. Image Description
Steaming gently, this Korean-inspired rice bowl is a bold and flavor-rich lunch that comes together quickly. At the base is a bed of fluffy white rice, ready to absorb the rich flavors layered above it. Piled high is a generous portion of flaked tuna, providing lean protein and a substantial texture to the meal.
The tuna is mixed with vibrant red kimchi, adding an essential fermented tang and delightful spice that stimulates the appetite. Crowned in the center is a glossy, dark red dollop of Gochujang (Korean chili paste), promising a serious kick of savory heat. The bowl is beautifully finished with a sprinkling of toasted sesame seeds and bright green sliced scallions, which add freshness and a pleasant oniony note.
This quick preparation is easy to customize to your spice preference and is a comforting, warm meal that uses pantry staples and offers exciting, complex flavors. It’s an energizing departure from a standard sandwich.
Required Ingredients
1 cup cooked white rice (prepared ahead of time or microwaved)
1 (5-ounce) can tuna, drained
1/2 cup chopped kimchi
1-2 teaspoons Gochujang (Korean chili paste), adjusted to your taste
1 teaspoon sesame oil
1 tablespoon sliced scallions (green onion), for garnish
1/2 teaspoon toasted sesame seeds, for garnish
Required Equipment
1 serving bowl
1 fork or spoon
1 measuring spoon set
DIY Instruction
Step 1: Prepare the Base
Spoon the warm or room temperature cooked rice into your serving bowl, spreading it out to create an even base.
Step 2: Combine Tuna and Kimchi
In a separate small bowl, gently mix the drained tuna with the chopped kimchi and the sesame oil. Toss the mixture just until everything is lightly coated. You are incorporating the flavors without making it mushy.
Step 3: Top the Rice
Spoon the tuna and kimchi mixture over the bed of rice. Distribute it evenly over the top, making a nice, high mound in the center of the bowl.
Step 4: Add the Spicy Centerpiece
Take your Gochujang and place a neat dollop of the paste directly in the center of the tuna and kimchi mixture. Start with just 1 teaspoon if you are unsure of the spice level, and increase it if you prefer more heat.
Step 5: Garnish and Serve
Finish the bowl with the sliced scallions, scattering the bright green rings over the ingredients. Sprinkle the entire bowl with toasted sesame seeds for texture and a nutty aroma. Mix everything well before eating to combine the rice, spicy paste, and tuna mixture.
Cheddar and Apple Sweet-Savory Flatbread
Quick Lunch Ideas
9. Image Description
This unique flatbread offers a sensational balance of sweet, savory, and tangy flavors, making for a truly memorable lunch. The base is a crispy, lightly baked flatbread or pizza dough. Scattered across the surface is a light layer of melted white cheese, acting as the creamy foundation.
The star of the show is the beautiful layering of thin apple slices—both tart green and sweet red varieties—creating a gorgeous, alternating pattern. Drizzles of golden-yellow honey or apricot preserve are visible across the fruit, adding a comforting sweetness. The entire surface is speckled with fresh thyme leaves, which lend a wonderful, unexpected herbal aroma.
A scattering of melted, bright orange cheddar cheese adds a sharp, savory counterpoint to the apples. This flatbread is an incredibly simple, warm, and sophisticated meal that takes advantage of pantry shortcuts for a fast finish.
Required Ingredients
1 pre-made flatbread or naan bread
1/4 cup shredded white cheddar or mozzarella cheese
1/4 cup shredded sharp orange cheddar cheese
1 small apple (preferably half green, half red), cored and thinly sliced
1-2 tablespoons honey
1/2 teaspoon fresh thyme leaves (or a pinch of dried thyme)
Freshly ground black pepper
Required Equipment
Baking sheet
Oven or toaster oven
Knife and cutting board
DIY Instruction
Step 1: Preheat and Prep
Preheat your oven or toaster oven to 400°F (about 200°C). Place the flatbread or naan on a baking sheet.
Step 2: Lay the Cheese Base
Sprinkle the shredded white cheddar or mozzarella cheese evenly over the flatbread, leaving a small border around the edges. This cheese will melt and act as the “glue” for the toppings.
Step 3: Arrange the Apple Slices
Take your thinly sliced apples and arrange them neatly over the cheese. You can create the beautiful, fan-like pattern shown in the image by slightly overlapping the slices.
Step 4: Add Flavor and Color
Scatter the shredded sharp orange cheddar cheese in small clusters over and between the apple slices. Drizzle the honey evenly over the entire flatbread.
Step 5: Bake and Finish
Bake the flatbread for 5-8 minutes, or until the cheese is melted and bubbly and the crust is warm and lightly golden. Remove it from the oven and immediately sprinkle the fresh thyme leaves and a grind of black pepper over the top. Slice and enjoy your warm, sweet-savory lunch!
Southwest Black Bean and Quinoa Bowl
Quick Lunch Ideas
10. Image Description
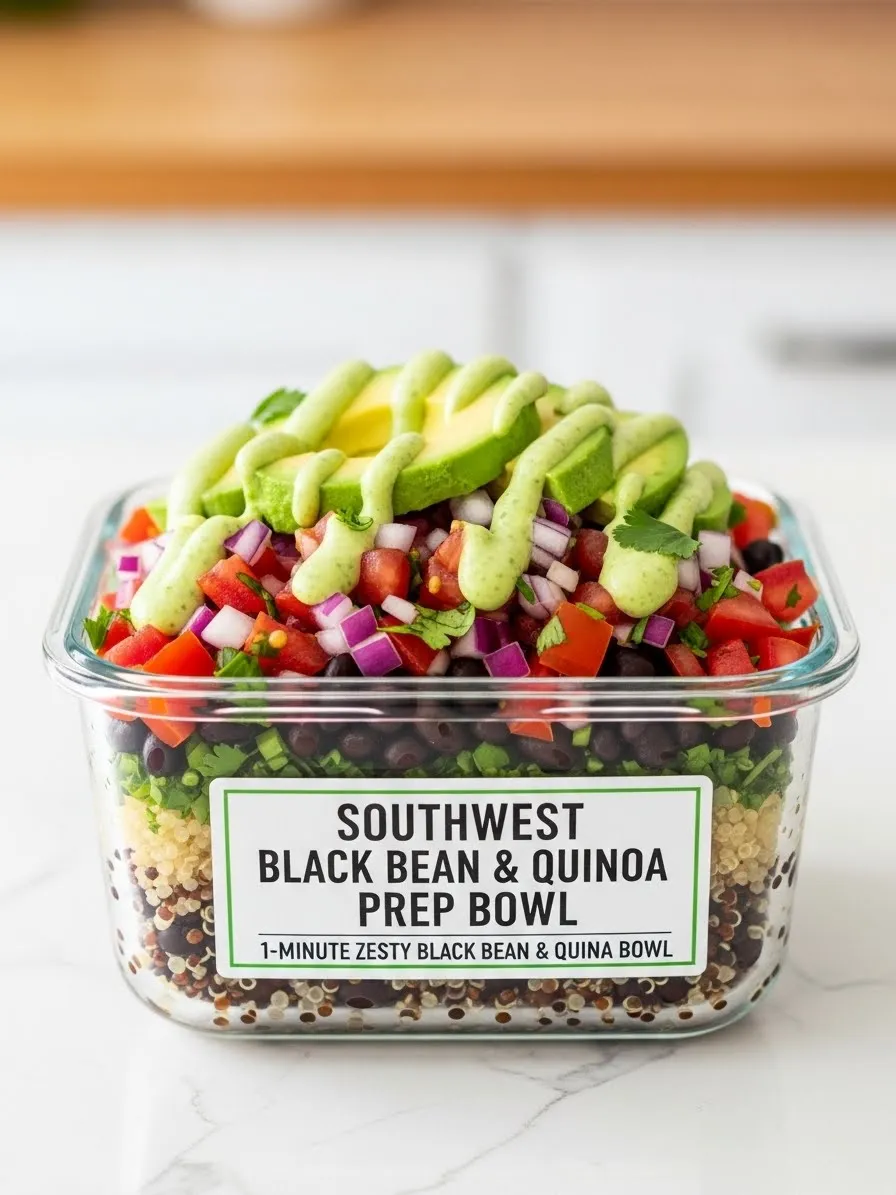
This colorful, vibrant layered bowl is a fantastic example of meal prep made easy, keeping every ingredient fresh and distinct. The base of the bowl is a mix of fluffy quinoa, providing a light, protein-rich foundation. Visible layers build upward, starting with hearty black beans, which offer a substantial texture and excellent fiber.
Next, you see a scattering of fresh green cilantro, followed by a mound of brightly diced red onion and juicy chopped tomatoes. The bowl is finished with slices of creamy avocado, creating a healthy fat layer, and a beautiful drizzle of zesty, green cilantro-lime dressing.
Because this lunch is designed to be prepped ahead and layered, it is a truly speedy, grab-and-go option, requiring absolutely no cooking during your workday. It’s a flavorful, satisfying, and balanced meal that is far superior to a messy, rushed desk snack.
1 clear glass container (for layering, or just a regular bowl)
1 knife and cutting board
1 spoon for mixing
DIY Instruction
Step 1: Prepare the Base
If you did not pre-cook the quinoa, prepare 1 cup according to the package directions or use a microwavable pouch. Spoon the cooked quinoa into the bottom of your serving bowl or container.
Step 2: Layer the Beans and Cilantro
Next, spoon the rinsed and drained black beans directly over the quinoa. You can lightly mix the beans and quinoa if you like, but keep them separated for a neater look. Follow this with a layer of the chopped fresh cilantro.
Step 3: Add the Toppings
Now, sprinkle the diced red onion and the diced tomato evenly over the black bean layer. You are creating a fresh, colorful topping.
Step 4: Dress and Add Avocado
If you are eating immediately, pour the pre-made creamy cilantro-lime dressing over the vegetables. If you are prepping ahead, keep the dressing separate until lunchtime. Arrange the fresh slices or cubes of avocado on top of the bowl.
Step 5: Mix and Enjoy
If the dressing was kept separate, drizzle it over the avocado and vegetables now. Use a spoon to gently mix all the ingredients together before eating. Enjoy your fresh, wholesome Southwest-inspired lunch!
Classic Quick Egg Salad Sandwich
Quick Lunch Ideas
11. Image Description
This classic egg salad sandwich looks incredibly satisfying and comforting, making it a wonderful midday treat. The filling is generously piled between two slices of lightly toasted bread, visible through the careful cut. The chunky salad mix features plenty of coarsely chopped hard-boiled egg whites and bright, crumbled yolks, giving it that signature yellow color.
Small pieces of celery and red onion are visible within the salad, suggesting a welcome crunch and a sharp, savory flavor contrast. The filling is creamy but not overly wet, indicating a delightful texture that holds its shape well. A final garnish of fresh, bright green sliced scallions tops the sandwich, adding a final hint of fresh onion flavor.
This lunch is easily prepped the night before or assembled in minutes if you have hard-boiled eggs ready. It’s a hearty, protein-rich option that provides lasting energy for your remote workday.
Required Ingredients
2 slices of your favorite bread, lightly toasted
3 hard-boiled eggs, peeled and roughly chopped
1/4 cup mayonnaise (or Greek yogurt for a lighter option)
1 tablespoon finely chopped red onion
1 tablespoon finely chopped celery
1/2 teaspoon Dijon mustard
Salt and black pepper to taste
1 tablespoon sliced scallions, for garnish
Required Equipment
1 small mixing bowl
1 fork
1 knife and cutting board
Toaster (optional, for bread)
DIY Instruction
Step 1: Prep the Eggs
Take your peeled hard-boiled eggs and place them on the cutting board. Roughly chop them into small, bite-sized pieces. Transfer the chopped eggs to your small mixing bowl.
Step 2: Add Flavor and Binder
Add the mayonnaise (or Greek yogurt), finely chopped red onion, finely chopped celery, and the Dijon mustard to the bowl with the eggs. Use the fork to gently mix all the ingredients. You want to combine everything thoroughly, but avoid mashing the mixture too much; keep some of those lovely chunky textures.
Step 3: Season the Salad
Sprinkle a pinch of salt and a grind of fresh black pepper into the egg salad. Stir again to distribute the seasoning evenly. Taste a small amount and adjust the seasoning if necessary.
Step 4: Assemble the Sandwich
Take your two slices of lightly toasted bread. Spoon a generous amount of the egg salad mixture onto one slice. Spread it gently to the edges. Place the second slice of toast on top, pressing down lightly.
Step 5: Finish and Serve
Use a sharp knife to slice the sandwich diagonally in half, revealing the hearty filling inside. Garnish the top with the sliced green scallions. This delicious, quick lunch is ready to power your afternoon!
Mediterranean Sun-Dried Tomato Pasta Salad
Quick Lunch Ideas
12. Image Description
This pasta salad is a bright, beautiful dish, showcasing the vibrant colors and bold flavors of the Mediterranean. The base is spiral pasta, which is coated in a light dressing that makes it look glistening and inviting. The bowl is absolutely loaded with stunning toppings.
Juicy, intensely flavored sun-dried tomato halves are scattered throughout, adding a chewy texture and sweet-tart element. Dark Kalamata olives and rings of sharp red onion are nestled among the pasta spirals, providing essential salty and tangy contrasts. Crumbles of creamy white feta cheese are generously sprinkled over the top, adding a rich, savory finish.
The entire dish is seasoned beautifully with a scattering of dried herbs, suggesting a zesty Italian or Greek dressing is present. This is a cold, quick lunch that is easy to make in a large batch and enjoy throughout the week.
Required Ingredients
1 cup cooked rotini (spiral) pasta, cooled
1/2 cup sun-dried tomatoes in oil, drained and halved
1/4 cup crumbled feta cheese
1/4 cup Kalamata olives, halved
2 tablespoons thinly sliced red onion
2 tablespoons olive oil
1 tablespoon red wine vinegar
1/2 teaspoon dried oregano
Salt and black pepper to taste
1 tablespoon fresh parsley, chopped (optional)
Required Equipment
1 medium mixing bowl
1 spoon or rubber spatula
1 measuring cup and spoon set
DIY Instruction
Step 1: Combine the Base
Ensure your rotini pasta is fully cooked and cooled. Place the cooled pasta into your medium mixing bowl. Add the halved sun-dried tomatoes, the halved Kalamata olives, and the thinly sliced red onion.
Step 2: Prepare the Dressing
In a separate small cup, whisk together the olive oil and the red wine vinegar. Sprinkle in the $1/2$ teaspoon of dried oregano, a pinch of salt, and a grind of black pepper. Mix this vigorously until the dressing is emulsified.
Step 3: Dress the Salad
Pour the prepared dressing over the pasta and vegetable mixture in the mixing bowl. Use a large spoon or spatula to toss everything gently until the pasta and all the ingredients are evenly coated.
Step 4: Add the Cheese
Carefully sprinkle the crumbled feta cheese over the top of the salad. If you like, you can add the chopped fresh parsley now as well. Give the salad one last very gentle toss, or simply leave the cheese on top for a beautiful presentation.
Step 5: Chill (Optional) and Serve
This pasta salad tastes best when the flavors have had a moment to blend. If you have time, chill it in the refrigerator for about 15 minutes. This satisfying lunch is ready to eat whenever you need a boost.
Thai Peanut Chicken Crunch Bowl
Quick Lunch Ideas
13. Image Description
This colorful, cold salad bowl is an exciting, texture-rich meal that looks incredibly flavorful. The base is a beautiful blend of shredded cabbage—both pale green and vibrant purple—mixed with slender carrot strips, offering plenty of fiber and crunch. Piled high in the center is a generous scoop of what appears to be ground chicken or tofu, mixed with a rich, reddish-brown peanut sauce.
The protein mixture looks savory and lightly spiced, sitting in dramatic contrast to the cool vegetables underneath. Streaks of the creamy peanut sauce drizzle down the sides of the bowl and over the shredded salad base. Toasted peanuts are scattered over the top, promising a delightful finishing crunch.
This lunch is easy to customize with leftover protein and comes together quickly. It’s a wonderful, vibrant dish that keeps you energized without feeling heavy during your busy workday.
Required Ingredients
2 cups pre-shredded coleslaw mix (green and purple cabbage and carrots)
1/2 cup cooked, crumbled ground chicken or ground turkey (or crumbled tofu)
Sauce: 2 tablespoons peanut butter, 1 tablespoon soy sauce, 1 teaspoon rice vinegar, 1 teaspoon honey or maple syrup, 1/2 teaspoon grated fresh ginger (optional), 1-2 tablespoons hot water to thin
1 tablespoon chopped peanuts, for topping
Fresh cilantro leaves, for garnish
Required Equipment
1 medium mixing bowl
1 small bowl and whisk (for sauce)
1 serving bowl
DIY Instruction
Step 1: Make the Peanut Sauce
In your small bowl, combine the peanut butter, soy sauce, rice vinegar, and honey (or maple syrup). Whisk these ingredients together until they are smooth. Slowly add the hot water, a teaspoon at a time, continuing to whisk until the sauce is thin enough to drizzle easily but still maintains some thickness. Stir in the grated ginger if you are using it.
Step 2: Dress the Protein
Take the pre-cooked ground chicken or tofu and put it into the medium mixing bowl. Pour about half of the prepared peanut sauce over the protein and stir gently until it is fully coated and glossy. Set this aside.
Step 3: Assemble the Salad Base
Place the pre-shredded coleslaw mix into your serving bowl. You can add a tablespoon or two of the remaining sauce to the vegetables and toss gently, or leave them plain for maximum crunch.
Step 4: Layer and Garnish
Spoon the peanut-coated chicken mixture directly into the center of the shredded cabbage and carrot base, creating a mound. Drizzle the remaining peanut sauce over the entire bowl.
Step 5: Finish with Crunch
Sprinkle the chopped peanuts and a few fresh cilantro leaves over the top of the bowl for flavor and visual appeal. This vibrant and satisfying lunch is ready for you to enjoy.
90-Second Mushroom and Swiss Mug Omelet
Quick Lunch Ideas
14. Image Description
This mug omelet is the definition of speed and convenience, perfect for a lightning-fast hot lunch. The fluffy, bright yellow egg mixture has risen beautifully inside the white ceramic mug, indicating a light and airy texture. Melted Swiss cheese bubbles gently over the surface, creating a gooey, savory topping.
Thinly sliced, golden-brown sautéed mushrooms are arranged artfully across the cheese, adding an earthy depth of flavor. A sprinkle of fresh green chives provides a final, appetizing pop of color. Wisps of steam are clearly rising from the mug, emphasizing how quickly this dish moves from microwave to desk.
This meal is a marvelous solution for getting a hot, protein-rich lunch when you only have ninety seconds to spare. It’s warming, simple, and far more substantial than a grab-and-go snack.
Required Ingredients
2 large eggs
1 tablespoon milk or cream
1/4 cup sliced mushrooms (pre-cooked or sautéed briefly)
2 tablespoons shredded Swiss cheese
1 tablespoon chopped chives (or sliced scallions)
Salt and black pepper to taste
Required Equipment
1 standard ceramic coffee mug (microwave-safe)
1 fork or whisk
DIY Instruction
Step 1: Prepare the Egg Mixture
Crack the two eggs directly into the microwave-safe ceramic mug. Add the tablespoon of milk or cream and a small pinch of salt and pepper. Use a fork or whisk to vigorously whisk the egg mixture until the yolks and whites are fully combined and slightly frothy.
Step 2: Add Fillings (Except Cheese)
Stir in most of the pre-cooked sliced mushrooms and half of the chopped chives into the egg mixture in the mug. Make sure the ingredients are distributed throughout the liquid.
Step 3: Cook the Omelet
Place the mug in the microwave. Cook on high for 45-60 seconds. The eggs should be mostly set around the edges but still a little liquid in the center.
Step 4: Melt the Cheese
Remove the mug from the microwave. Sprinkle the shredded Swiss cheese over the top of the partially cooked eggs. Place the remaining sliced mushrooms on the cheese. Return the mug to the microwave and cook for another 20-30 seconds, or until the cheese is melted and the eggs are fully set.
Step 5: Garnish and Serve
Carefully remove the hot mug from the microwave. Sprinkle the remaining fresh chopped chives over the melted cheese and mushrooms. Grab a spoon and enjoy your piping hot, custom mug omelet!
Creamy Herb Cottage Cheese Dip Platter
Quick Lunch Ideas
15. Image Description
This beautiful platter transforms a simple protein into a satisfying and colorful grazing lunch. Central to the board is a generous bowl of creamy cottage cheese dip, which has been artfully drizzled with golden olive oil and lightly dusted with cracked black pepper. Fresh dill sprigs are used for garnish, hinting at a bright, herbal flavor profile.
Surrounding the bowl is an appealing array of fresh dippers, offering crunch and vitamins. You see vibrant strips of red, yellow, and orange bell peppers, crisp cucumber sticks, and whole radishes and cherry tomatoes. Triangles of soft pita bread and savory crackers complete the spread, ensuring both dipping options are covered.
This is a fantastic “snack lunch” that requires no cooking and is high in protein, keeping you full and focused. It is easy to customize with whatever fresh vegetables you have on hand.
Required Ingredients
1 cup cottage cheese (full fat or low fat)
1 tablespoon fresh dill, chopped
1 teaspoon lemon juice
1/4 teaspoon garlic powder
Salt and black pepper to taste
1 tablespoon extra virgin olive oil (for drizzling)
Assorted dippers: sliced cucumber, bell pepper strips, carrot sticks, pita wedges, and whole-wheat crackers
Required Equipment
1 small food processor or blender (optional, for smoother dip)
1 small mixing bowl (if not using a processor)
1 serving plate or platter
DIY Instruction
Step 1: Prepare the Cottage Cheese Base
If you prefer a smoother dip, place the cottage cheese into a small food processor or blender and process until it is mostly smooth, about 30 seconds. If you like the curds intact, simply place the cottage cheese into the small mixing bowl.
Step 2: Flavor the Dip
Add the chopped fresh dill, the lemon juice, garlic powder, salt, and pepper to the cottage cheese. Mix thoroughly with a spoon until all the flavors are evenly distributed throughout the dip.
Step 3: Arrange the Platter
Spoon the seasoned cottage cheese dip into a nice, small serving bowl and place it in the center of your large platter.
Step 4: Cut and Arrange Dippers
Wash and slice your vegetables (cucumber, bell peppers, carrots, etc.) into easy-to-grab sticks. Arrange the vegetable strips, pita wedges, and crackers neatly around the bowl of dip on the platter, creating an attractive and colorful border.
Step 5: Garnish and Serve
Just before serving, drizzle the tablespoon of extra virgin olive oil over the top of the dip. You can use the back of a spoon to create a little swirl pattern, as shown in the picture. Garnish with a small sprig of fresh dill. This delightful, crunchy lunch is ready!
Dill and Lemon Sheet Pan Salmon
Quick Lunch Ideas
16. Image Description
This is an exceptionally quick and healthy baked meal, representing effortless cooking for busy days. A beautiful, thick fillet of salmon is the star, coated in a generous layer of fresh green dill and lightly seasoned. The salmon sits on a bed of fresh, dark green baby spinach leaves that will wilt beautifully as the fish cooks.
Circular slices of bright yellow lemon are placed both on top of the salmon and scattered around the bed of spinach, hinting at the zesty, fresh flavor infused into the fish. The entire arrangement is laid out on a simple metal baking sheet, emphasizing the easy, one-pan cleanup.
This option is fantastic because it requires only a few minutes of prep and about 15 minutes in the oven, giving you a warm, high-protein lunch with minimal mess. It is simple, elegant, and highly nourishing.
Required Ingredients
1 (5-6 ounce) salmon fillet, skin on or off
1 cup baby spinach leaves
1 tablespoon olive oil (for spinach)
1/2 teaspoon salt
1/4 teaspoon black pepper
1 tablespoon fresh dill, chopped
1 small lemon, thinly sliced
Required Equipment
Small baking sheet
Small mixing bowl
Oven or toaster oven
DIY Instruction
Step 1: Prep the Spinach Base
Preheat your oven or toaster oven to 400°F (about 200°C). Place the baby spinach leaves directly onto the baking sheet. Drizzle the spinach with a tiny bit of olive oil and a pinch of salt. Gently toss the spinach right on the pan to coat.
Step 2: Season the Salmon
Take the salmon fillet and place it in the center of the spinach bed. Brush or drizzle a little olive oil over the fish. Sprinkle the $1/2$ teaspoon of salt and the $1/4$ teaspoon of black pepper evenly over the top of the salmon.
Step 3: Add the Flavoring
Sprinkle the chopped fresh dill generously over the entire top surface of the salmon. Place a thin lemon slice or two directly on the salmon. Scatter the remaining lemon slices around the salmon fillet on the bed of spinach.
Step 4: Bake and Finish
Place the baking sheet into the preheated oven. Bake for 12-15 minutes, depending on the thickness of the fillet, until the salmon flakes easily with a fork and is cooked through. The spinach should be wilted but not burned.
Step 5: Serve Directly
Carefully slide the salmon and wilted spinach from the sheet pan onto your serving plate. This warm, fresh lunch is ready for you in minutes with almost no cleanup!
Everything Bagel Spiced Tofu Scramble
Quick Lunch Ideas
17. Image Description
This savory tofu scramble is a vibrant, plant-based power lunch that requires quick stovetop cooking. The scramble has a beautiful yellow hue, achieved with turmeric, and features firm, crumbled tofu pieces. The texture looks wonderfully varied, similar to scrambled eggs.
The dish is generously seasoned with a bold mix of “Everything Bagel” spices, including noticeable sesame seeds, poppy seeds, and dried garlic pieces, which give the meal a rich, savory aroma. Sautéed elements like sliced garlic cloves, chopped onions, and small, vibrant red bell pepper pieces are mixed throughout, adding both crunch and color. A garnish of fresh parsley provides a bright finish.
This is a hearty, protein-packed vegan option that is highly flavorful and requires just a few minutes of attention in a skillet. It’s an exciting way to get sustained energy without relying on meat or dairy.
Required Ingredients
1/2 block (7 ounces) extra-firm tofu, pressed and crumbled
Heat the teaspoon of olive oil in your medium non-stick skillet over medium heat. Add the diced white onion and diced red bell pepper to the hot pan. Sauté for about 2-3 minutes until the vegetables start to soften.
Step 2: Add Tofu and Color
Add the crumbled tofu to the pan. Sprinkle the $1/2$ teaspoon of turmeric powder and the tablespoon of nutritional yeast over the tofu and vegetables. Stir well with a spatula to distribute the color and flavor evenly across all the tofu pieces.
Step 3: Season and Scramble
Cook the tofu for about 3-5 minutes, stirring occasionally, until it is heated through and slightly dry. Now, sprinkle the tablespoon of Everything Bagel seasoning, a pinch of salt, and a grind of black pepper over the scramble. Stir again to fully incorporate the spices.
Step 4: Plate and Garnish
Spoon the finished tofu scramble into your serving bowl. If you like, you can quickly sauté the thinly sliced garlic in the same pan for 30 seconds until golden and crispy, then scatter them over the scramble as a garnish.
Step 5: Serve Hot
Garnish with a sprig of fresh parsley and enjoy this hot, savory, and satisfying lunch immediately!
Quick Pesto and Broccoli Flatbread Pizza
Quick Lunch Ideas
18. Image Description
This mini flatbread pizza is a wonderful, savory option that comes together in a flash using pre-made components. The crust is a golden, bubbly flatbread that looks perfectly warmed and slightly chewy. Instead of traditional tomato sauce, a vibrant, thick layer of green pesto is spread across the surface, giving the meal a rich, herbal base.
Large pieces of fresh mozzarella cheese are placed strategically over the pesto, melting beautifully into soft white pools with slightly golden edges. Scattered generously across the pizza are tender, slightly charred broccoli florets, adding a healthy vegetable crunch and earthiness. A scattering of pine nuts adds a final, delicate texture.
This warm lunch is easy to customize and takes minimal time in a toaster oven. It’s a great way to satisfy that pizza craving without ordering delivery or spending time making dough.
Required Ingredients
1 pre-made mini flatbread or large naan
2-3 tablespoons prepared basil pesto
1/2 cup cooked broccoli florets (steamed or roasted)
1/2 cup fresh mozzarella cheese, sliced or shredded
1 teaspoon pine nuts
A few fresh basil leaves, torn (optional)
Required Equipment
Baking sheet or pizza pan
Oven or toaster oven
Spoon or small spatula (for spreading pesto)
DIY Instruction
Step 1: Preheat and Prep
Preheat your oven or toaster oven to 425°F (about 220°C). Place the flatbread on a baking sheet or pizza pan.
Step 2: Spread the Base
Spoon the prepared basil pesto onto the flatbread. Use the back of a spoon or a small spatula to spread the pesto evenly across the surface, leaving a small, crust-like border around the edges.
Step 3: Add Cheese and Broccoli
Scatter the sliced or shredded fresh mozzarella cheese evenly over the layer of pesto. Distribute the pre-cooked broccoli florets across the top of the cheese.
Step 4: Bake the Pizza
Place the baking sheet into the preheated oven. Bake for 6-8 minutes, or until the mozzarella cheese is fully melted, bubbling, and the edges of the flatbread are golden brown and crisp.
Step 5: Finish and Serve
Carefully remove the flatbread pizza from the oven. Immediately sprinkle the pine nuts over the melted cheese and broccoli. If you have them, scatter a few torn fresh basil leaves over the top. Slice and enjoy your warm, zesty pesto pizza!
Whipped Ricotta Fig and Honey Toast
Quick Lunch Ideas
19. Image Description
This open-faced sandwich is a sophisticated, quick lunch that feels indulgent yet light. It features a thick slice of rustic toast as its base. The toast is generously slathered with a thick, cloud-like layer of creamy, whipped white cheese, likely ricotta or goat cheese, creating a beautiful contrast against the golden bread.
Layered across the cheese are stunning quartered fresh figs, showing off their deep magenta flesh and tiny, crunchy seeds. Parallel lines of dark, preserved fig jam are piped artistically over the cheese, adding a concentrated burst of sweetness. A generous drizzle of golden honey covers the entire creation.
Sprigs of fresh mint add a beautiful green contrast and a refreshing aromatic lift. This elegant, no-cook assembly is a perfect balance of sweet, creamy, and crunchy textures, making for a truly memorable midday meal.
Required Ingredients
1 thick slice of sourdough or artisan bread, toasted
1/2 cup whipped ricotta cheese (or plain whipped cream cheese)
1-2 fresh figs, sliced into quarters
1 tablespoon fig jam or blackberry jam
1 tablespoon honey
Pinch of coarse salt (like sea salt)
2-3 small mint leaves, for garnish
Required Equipment
Toaster or small pan (for toast)
Knife and cutting board
Spatula or spoon (for spreading)
DIY Instruction
Step 1: Prepare the Toast
Toast your thick slice of bread to a beautiful golden color. Place the warm toast on your serving plate.
Step 2: Spread the Creamy Base
Take the whipped ricotta cheese (or cream cheese) and use a spatula or spoon to spread a thick, even layer of the cheese over the entire surface of the toast. You want the layer to be generous and cloud-like, as shown in the picture.
Step 3: Arrange the Fruit and Jam
Gently arrange the quartered fresh fig slices across the top of the ricotta. Next, use a small spoon or a piping bag (if you want to be extra neat) to place small lines of the fig jam between the fig slices.
Step 4: Drizzle and Season
Generously drizzle the tablespoon of honey over the entire open-faced sandwich, letting it coat the jam and the figs. Finish the assembly with a very tiny pinch of coarse salt sprinkled over the top—this helps intensify the sweetness of the fruit.
Step 5: Garnish
Tuck the small, fresh mint leaves in between the fig slices for a beautiful, fresh garnish. Enjoy this surprisingly easy gourmet treat immediately!
Layered Turmeric Ginger Carrot Smoothie
Quick Lunch Ideas
20. Image Description
This vibrant layered smoothie is a refreshing and immune-boosting lunch option that drinks like a meal. Presented in a tall glass, it features distinct, gorgeous horizontal layers of color. The bottom is a deep, rich orange, suggesting carrot and fresh ginger. The middle is a creamy, lighter yellow, likely incorporating yogurt or banana.
The very top layer is a thick, white, frothy cream or foam, completing the tri-color effect. Visible slices of fresh ginger and a generous dusting of bright orange turmeric powder on top highlight the powerful, warming flavors within. Whole carrots and pieces of fresh ginger root displayed around the glass emphasize the healthy ingredients.
This drinkable lunch is ready in minutes if you have a powerful blender. It is a fantastic, nutrient-dense way to replace a heavy meal, leaving you feeling light and energized.
Required Ingredients
Bottom Layer (Orange): 1/2 cup chopped carrots (steamed/softened is best), 1/2 inch fresh ginger root, 1/4 cup orange juice, 1/2 cup ice
Middle Layer (Yellow): 1/2 cup frozen banana slices, 1/2 cup frozen mango chunks, 1/4 teaspoon turmeric powder, 1/4 cup water or almond milk
Top Layer (Cream/Garnish): 2 tablespoons vanilla Greek yogurt or coconut cream, pinch of ground turmeric
Required Equipment
Blender (a powerful one is best for smooth texture)
2 small bowls
1 tall serving glass
DIY Instruction
Step 1: Make the Orange Base Layer
Place the chopped carrots, fresh ginger, orange juice, and $1/2$ cup of ice into the blender. Blend on high until the mixture is completely smooth. Pour this orange layer into the bottom of your tall serving glass, filling it about one-third of the way. Place the glass in the freezer while you prepare the next layer.
Step 2: Create the Yellow Middle Layer
Rinse the blender container briefly. Add the frozen banana slices, frozen mango chunks, $1/4$ teaspoon of turmeric powder, and water or almond milk. Blend until this mixture is perfectly smooth and thick.
Step 3: Layer the Smoothie
Carefully pour the thick yellow mixture over the back of a spoon onto the orange layer in the glass. Pour slowly to ensure the layers remain distinct. The glass should now be filled about two-thirds of the way.
Step 4: Top and Finish
Gently spoon the vanilla Greek yogurt or coconut cream onto the very top of the yellow layer to create the white frothy cap. Dust the top with a final pinch of ground turmeric powder.
Step 5: Serve Immediately
This beautiful, layered smoothie is ready to drink and enjoy!
5-Minute Layered Chicken Taco Salad Bowl
Quick Lunch Ideas
21. Image Description
This visually dynamic salad bowl is a testament to quick assembly and fresh flavor, making it a fantastic express lunch. The meal is beautifully layered in a clear glass bowl, allowing you to appreciate the contrasting ingredients. At the bottom, a generous bed of shredded green lettuce provides a crisp base.
Above the lettuce, a hearty layer of dark black beans and bright yellow corn kernels creates a substantial, fiber-rich foundation. Next, tender pieces of shredded, seasoned chicken breast are layered on, adding satisfying protein. The bowl is topped with a thick, savory red salsa, followed by a large dollop of freshly mashed guacamole.
A vibrant lime wedge placed on the guacamole promises a zesty finishing squeeze. This dish is designed for speed, needing only 5 minutes to assemble if you have the chicken pre-cooked, offering a flavorful and balanced midday meal.
Required Ingredients
2 cups shredded romaine lettuce
1/2 cup pre-cooked, shredded seasoned chicken breast
1/2 cup canned black beans, rinsed and drained
1/2 cup canned corn, rinsed and drained (or frozen/thawed)
1/4 cup finely chopped red onion
1/2 cup chunky salsa
1/2 cup prepared guacamole
1 lime wedge, for garnish
Required Equipment
1 medium clear serving bowl
1 measuring cup
1 spoon
DIY Instruction
Step 1: Set the Base
Place the shredded romaine lettuce into the bottom of your clear serving bowl. Press it down gently to create an even, crisp foundation.
Step 2: Layer the Beans and Corn
Spoon the rinsed black beans evenly over the lettuce base. Next, spoon the corn kernels over the black beans, creating a distinct yellow and black layer.
Step 3: Add the Protein
Carefully layer the shredded, seasoned chicken breast over the corn and beans. Try to keep the layer flat for a cleaner look. Sprinkle the finely chopped red onion over the chicken.
Step 4: Top with Salsa and Guacamole
Spoon the chunky salsa over the layer of red onion and chicken. Now, place the prepared guacamole on top of the salsa layer, forming a neat mound in the center.
Step 5: Garnish and Serve
Place the lime wedge on the side of the guacamole or right on top. When ready to eat, squeeze the lime over the dish and mix everything vigorously to combine all the delicious layers and dressing.
High-Protein PB&J Power Wrap
Quick Lunch Ideas
22. Image Description
This fun, easy-to-handle wrap is a modern take on a classic comfort food, perfect for a high-energy lunch. The soft flour tortilla is tightly rolled, revealing the colorful filling in a visually appealing swirl. Inside, the deep red of the jelly or jam contrasts beautifully with the pale yellow of peanut butter, which is generously applied.
Whole peanuts or peanut pieces are visible nestled inside the roll, adding a fantastic textural crunch. The wraps are sliced diagonally, showcasing the clean, concentric layers of the ingredients. A sticky drizzle of honey or melted peanut butter is visible at the bottom, suggesting a rich, sweet flavor profile.
This no-cook wrap is incredibly fast to assemble and is an excellent way to get sustained carbohydrates and protein, making it an energetic and simple choice for a busy at-home worker.
Required Ingredients
1 large, soft whole-wheat or plain tortilla
2 tablespoons peanut butter (creamy or chunky)
1 tablespoon Greek yogurt (or cottage cheese, for extra protein)
2 tablespoons fruit jelly or jam (strawberry, grape, or raspberry)
1 tablespoon whole peanuts or chopped nuts (optional, for crunch)
Required Equipment
1 small mixing bowl
1 spoon or rubber spatula
1 knife and cutting board
DIY Instruction
Step 1: Make the Protein Spread
In your small mixing bowl, combine the peanut butter and the Greek yogurt (or cottage cheese). Use a spoon or spatula to mix them together until you have a smoother, high-protein peanut butter spread.
Step 2: Spread the Base
Lay the large tortilla flat on your cutting board. Spread the peanut butter mixture evenly over the entire surface of the tortilla, leaving a small, half-inch border around the edges.
Step 3: Add Jelly and Crunch
Spoon the fruit jelly or jam onto the spread. You can leave it in a line down the center or spread it lightly over the entire surface. Sprinkle the whole peanuts or chopped nuts over the jelly layer.
Step 4: Roll the Wrap
Starting at the edge closest to you, fold in the two sides of the tortilla first, over the filling. Then, tightly roll the wrap away from you. Ensure it is rolled firmly so it holds its shape.
Step 5: Slice and Serve
Use a sharp knife to slice the rolled wrap in half diagonally. This reveals the beautiful swirl of the PB&J filling. Serve immediately for a quick, sweet energy boost!
Speedy Chili Cheese Tofu Nachos
Quick Lunch Ideas
23. Image Description
This plate of nachos is a vibrant, messy, and satisfying lunch that comes together quickly in the microwave or oven. A crunchy base of golden tortilla chips is absolutely smothered in a rich, reddish-brown chili made from crumbled tofu or ground meat, indicating a warm, savory flavor. Cubes of seasoned, baked tofu are visible within the chili mixture, adding a great texture.
The dish is generously drizzled with a rich, melted cheese sauce or cheddar cheese strips. A dollop of creamy white sour cream or Greek yogurt crowns the center. The nachos are brightened with scattered cubes of sharp red onion and slices of vibrant green jalapeño, which promise a nice kick of heat.
Garnished with fresh cilantro, this is a comforting and highly flavorful meal that is far more fun and substantial than a standard sandwich. It’s a great way to use up chili leftovers for a fast lunch.
Required Ingredients
1 large handful of tortilla chips (about 1.5 cups)
1 cup pre-made chili (with ground meat or crumbled tofu)
1/4 cup shredded cheddar cheese or cheese sauce
2 tablespoons finely diced red onion
1/4 cup sliced jalapeño peppers (fresh or pickled)
1 tablespoon sour cream or plain Greek yogurt
Pinch of chili powder and fresh cilantro, for garnish
Required Equipment
1 microwave-safe plate or oven-safe plate/pan
1 spoon
DIY Instruction
Step 1: Prepare the Chip Base
Spread the tortilla chips evenly across your microwave-safe plate or small oven-safe pan. This creates the crunchy base for your nachos.
Step 2: Add the Warm Chili
Spoon the pre-made chili evenly over the chips. Try to cover as many of the chips as possible so every bite gets some flavor.
Step 3: Add the Cheese
Sprinkle the shredded cheddar cheese evenly over the chili. Alternatively, you can drizzle a ready-made cheese sauce over the top.
Step 4: Melt the Cheese
Place the plate in the microwave and heat for 60-90 seconds, or until the chili is piping hot and the cheese is completely melted. If using an oven, bake at 350°F (175°C) for about 5 minutes.
Step 5: Garnish and Serve
Remove the plate carefully. Immediately sprinkle the finely diced red onion and the sliced jalapeño peppers over the hot nachos. Top the center with a dollop of sour cream or Greek yogurt. Finish with a light dusting of chili powder and fresh cilantro leaves. Enjoy these cheesy, spicy nachos right away!
Cinnamon Apple and Granola Yogurt Bowl
Quick Lunch Ideas
24. Image Description
This beautiful fruit and yogurt bowl is a refreshing, crunchy, and wholesome quick lunch, perfect for a midday energy boost. The base is a mix of crisp apple slices—both green and red varieties—which look beautifully seasoned. The slices are generously dusted with cinnamon, giving the dish a warm, inviting aroma.
A large, creamy scoop of Greek yogurt sits right in the center, providing a fantastic boost of protein and coolness. The yogurt is crowned with a crunchy mix of whole pecans and golden granola clusters, offering a delightful texture contrast to the soft fruit. The surrounding apples and pecans reinforce the fresh, whole ingredients used.
This is a no-cook meal that is effortless to assemble. It’s a wonderful alternative to a savory lunch, providing complex carbohydrates and protein for sustained energy.
Required Ingredients
1 medium apple (any variety), cored and sliced
1 teaspoon lemon juice
1/2 teaspoon ground cinnamon
1/2 cup plain or vanilla Greek yogurt
1/4 cup granola clusters
1 tablespoon pecan halves (or walnuts)
Required Equipment
1 small mixing bowl (for apples)
1 serving bowl
1 spoon
DIY Instruction
Step 1: Season the Apples
Place the cored and sliced apples into a small mixing bowl. Drizzle the teaspoon of lemon juice over the slices and toss gently; this prevents browning. Now, sprinkle the $1/2$ teaspoon of ground cinnamon over the apples and toss again until they are evenly coated.
Step 2: Create the Base
Arrange the cinnamon-coated apple slices neatly in the bottom of your serving bowl. You can create a fan shape or just layer them evenly.
Step 3: Add the Creamy Protein
Spoon a generous amount of the Greek yogurt right into the center of the apples. You want the yogurt to sit on top of the fruit rather than mixing in.
Step 4: Add the Crunch
Sprinkle the granola clusters and the pecan halves over the yogurt. Ensure the pecans and granola are visible on the top for that appealing, crunchy look.
Step 5: Serve Chilled
This crunchy, cool, and satisfying lunch is best enjoyed immediately!
Pepperoni Pizza Stuffed Peppers
Quick Lunch Ideas
25. Image Description
This inventive dish is a fun, low-carb take on pizza, perfect for a quick, hot lunch. The “crust” is a halved red bell pepper, which holds its shape beautifully and looks slightly charred, suggesting a sweet, warm flavor. The pepper boats are generously filled with a rich, thick layer of tomato sauce, creating a savory base.
The stuffing is covered with a thick blanket of melted mozzarella cheese, which is golden and bubbly around the edges. Scattered across the top are numerous slices of pepperoni, which have curled slightly and crisped up beautifully. Cubes of green bell pepper are mixed in for extra vegetable goodness.
This is a hot, hearty lunch that requires minimal cooking effort. It is a much healthier way to enjoy pizza flavors, offering a satisfying blend of savory ingredients and a tender vegetable base.
Required Ingredients
1 large red or yellow bell pepper
2 tablespoons tomato sauce or marinara sauce
1/4 cup shredded mozzarella cheese
8-10 slices mini pepperoni
1 tablespoon diced green bell pepper (optional, for texture)
1/4 teaspoon dried oregano or Italian seasoning
Required Equipment
Small baking sheet
Knife and cutting board
Oven or toaster oven
DIY Instruction
Step 1: Prep the Peppers
Preheat your oven or toaster oven to 375°F (about 190°C). Take the large bell pepper and slice it in half lengthwise. Scoop out and discard the seeds and the white membrane inside. Place the two pepper halves cut-side up on a small baking sheet.
Step 2: Add the Sauce Base
Spoon the tomato or marinara sauce into the center of each pepper half, spreading it gently to cover the bottom surface.
Step 3: Layer the Toppings
Sprinkle about half of the shredded mozzarella cheese over the sauce in both pepper halves. Then, scatter the optional diced green bell pepper over the cheese. Place the pepperoni slices neatly over the top, covering the surface.
Step 4: Melt the Cheese
Sprinkle the remaining mozzarella cheese over the top of the pepperoni. Place the baking sheet into the preheated oven. Bake for 10-15 minutes, or until the pepper halves are tender-crisp and the cheese is fully melted, golden brown, and bubbly.
Step 5: Season and Serve
Carefully remove the sheet pan. Sprinkle the dried oregano or Italian seasoning over the melted cheese. Let the peppers cool for just a minute before serving this quick, warm pizza lunch!
3-Minute Ginger Soy Edamame Steam Bag
Quick Lunch Ideas
26. Image Description
This picture highlights the ultimate in speed and convenience—a pre-packaged steam bag of seasoned edamame, ready in minutes. The clear bag shows a generous quantity of bright green shelled edamame, suggesting freshness and a satisfying crunch. The legumes are tossed with thin slices of light-colored root vegetable, which appear to be matchsticks of ginger.
A glossy, clear sauce coats the edamame, hinting at the savory-sweet flavor of soy and ginger. The packaging prominently displays the “3-Minute” cooking time, emphasizing its efficiency. Wisps of steam rising from the bag suggest it has just been microwaved, making it an incredibly fast, hot side dish or a light, nutritious lunch.
This is a fantastic option for a high-protein, high-fiber midday meal that requires zero preparation and delivers complex Asian flavors effortlessly.
Required Ingredients
1 (12-ounce) bag of frozen shelled edamame (microwavable steam bag is quickest)
1 tablespoon soy sauce or tamari
1 teaspoon sesame oil
1/2 inch fresh ginger root, finely grated or sliced into matchsticks
Required Equipment
Microwave
Small mixing bowl (if not using a steam bag)
Spoon
DIY Instruction
Step 1: Steam the Edamame
If you are using a steam bag, follow the package directions and place the bag in the microwave. Typically, this takes about 3-4 minutes on high. If you are using a regular bag of frozen edamame, place the beans in a microwave-safe bowl with 2 tablespoons of water, cover, and microwave for 4-5 minutes until tender.
Step 2: Prepare the Flavoring
While the edamame is cooking, in a small bowl, whisk together the soy sauce (or tamari) and the sesame oil. Add the finely grated or matchstick-sliced fresh ginger to this sauce.
Step 3: Dress the Beans
Once the edamame is cooked, carefully cut open the steam bag and drain off any excess water. Transfer the warm edamame to your serving bowl.
Step 4: Toss and Serve
Pour the prepared ginger-soy sauce mixture over the warm edamame. Use a spoon to toss everything gently until the beans are fully coated in the glossy, fragrant sauce. This savory, hot lunch is ready to eat!
Roasted Red Pepper and Hummus Pinwheels
Quick Lunch Ideas
27. Image Description
These colorful pinwheels are an outstanding example of a fresh, no-cook wrap that is both visually appealing and satisfying. The large, light-colored tortilla is tightly rolled and sliced diagonally, revealing beautiful, concentric layers of filling. The base spread is a thick, creamy layer of pale yellow hummus, generously covering the tortilla.
Vivid green spinach leaves are layered on top of the hummus, acting as a fresh wrap for the inner ingredients. The centerpiece is bright red strips of roasted bell pepper, which spiral tightly through the center, adding a sweet and smoky flavor. Crumbles of white feta cheese are scattered throughout, providing a sharp, salty contrast.
Served alongside a bowl of extra hummus and olive oil, this lunch is packed with protein and vegetables, making it a fast, healthy, and highly enjoyable meal for a remote worker.
Required Ingredients
1 large, soft whole-wheat or plain tortilla
3 tablespoons prepared plain or roasted red pepper hummus
1/2 cup fresh baby spinach leaves
1/4 cup sliced roasted red peppers (from a jar, drained)
2 tablespoons crumbled feta cheese
Pinch of black pepper
Required Equipment
1 knife and cutting board
1 spoon or rubber spatula
DIY Instruction
Step 1: Spread the Hummus Base
Lay the large tortilla flat on your cutting board. Use a spoon or spatula to spread the prepared hummus evenly across the entire surface of the tortilla, leaving a small, half-inch border around the edges.
Step 2: Layer the Greens
Layer the fresh baby spinach leaves over the top of the hummus. Make sure the spinach covers the entire spread surface completely.
Step 3: Add the Key Fillings
Lay the sliced roasted red peppers in a line or scatter them evenly over the spinach. Sprinkle the crumbled feta cheese and a pinch of black pepper over the peppers.
Step 4: Roll and Chill (Optional)
Starting at the edge closest to you, roll the tortilla up as tightly as possible, creating a firm cylinder. If you have time, wrap the cylinder tightly in plastic wrap and chill it in the refrigerator for 10 minutes; this makes slicing much cleaner.
Step 5: Slice and Serve
Use a sharp knife to slice the rolled wrap into $3/4$-inch thick pinwheels. Arrange the pinwheels cut-side up on your plate to show off the beautiful spiral layers. Serve with extra hummus on the side for dipping!
4-Minute Spicy Tom Yum Broth Bowl
Quick Lunch Ideas
28. Image Description
This steaming bowl of Tom Yum soup is an incredibly fast, hot, and intensely flavorful lunch, perfect for cold days or when you need a powerful burst of flavor. The broth is a vibrant reddish-orange, indicating the essential Tom Yum paste and a creamy coconut milk base. Wisps of steam rising from the surface confirm its piping hot status.
The bowl is filled with chunks of visible mushrooms, and small, curled shrimp (or another protein) suggesting a substantial filling. Garnished beautifully with fresh cilantro leaves, sliced red chili peppers, and a crucial lime wedge, the soup promises a delicious blend of sour, spicy, and savory notes.
With ingredients like canned coconut milk and pre-made paste, this soup is a fantastic pantry shortcut that delivers complex, restaurant-quality flavor in under five minutes. It’s an easy, warming meal for the remote worker.
Required Ingredients
2 cups hot water or vegetable broth
1-2 tablespoons Tom Yum paste (adjust to taste)
1/4 cup canned coconut milk (full-fat or light)
1/4 cup pre-cooked shrimp (or shredded chicken, or cubed tofu)
1/4 cup sliced mushrooms
1/2 lime, cut into a wedge, for serving
Fresh cilantro and sliced chili peppers, for garnish
Required Equipment
Kettle or small saucepan (for heating water/broth)
1 serving bowl
1 spoon or whisk
DIY Instruction
Step 1: Prepare the Hot Broth
In a kettle or small saucepan, bring 2 cups of water or vegetable broth to a rapid boil. Pour the hot liquid into your serving bowl.
Step 2: Dissolve the Paste
Spoon the Tom Yum paste into the hot broth. Use a spoon or whisk to stir the paste until it is completely dissolved and the broth is a uniform reddish-orange color. Start with 1 tablespoon and add more if you prefer a stronger, spicier flavor.
Step 3: Add Creaminess and Protein
Stir the coconut milk into the broth until it is fully incorporated, giving the soup a creamy texture and slightly lightening the color. Add the pre-cooked shrimp and the sliced mushrooms to the hot broth. The heat of the broth will warm the protein and tenderize the mushrooms slightly.
Step 4: Garnish and Serve
Place the lime wedge on the rim of the bowl. Sprinkle the soup generously with fresh cilantro leaves and a few slices of red chili pepper for color and heat. Serve immediately while it is still steaming hot!
Air Fryer Steak and Pepper Skewers
Quick Lunch Ideas
29. Image Description
These skewers offer a high-protein, flavor-packed lunch that looks restaurant-quality despite being incredibly fast to cook. Three wooden skewers are loaded with tender, thinly sliced beef that has been curled into attractive shapes. Alternating with the meat are thick chunks of bright red and vibrant green bell peppers.
The skewers are coated in a beautiful, dark, glossy sauce that looks like a rich barbecue or teriyaki glaze, suggesting a savory, slightly sweet flavor. A small bowl of extra dipping sauce sits beside the skewers. The dark, woven metal basket in the background suggests these were cooked quickly in an air fryer or broiler, highlighting their speedy preparation.
This warm, satisfying meal is a simple way to elevate lunch using small cuts of steak and easy-to-manage cooking equipment, providing robust energy for the second half of the day.
Required Ingredients
4 ounces thinly sliced beef (like flank steak or sirloin tips), sliced into 1-inch strips
1/2 red bell pepper, cut into 1-inch squares
1/2 green bell pepper, cut into 1-inch squares
2 tablespoons ready-made stir-fry or BBQ sauce
1/2 teaspoon garlic powder
Salt and black pepper to taste
Required Equipment
3-4 wooden or metal skewers
1 small bowl
Air fryer or oven broiler
Baking pan (if using oven)
DIY Instruction
Step 1: Prep and Marinade
If using wooden skewers, soak them in water for 10 minutes to prevent burning. Place the sliced beef strips in a small bowl. Toss the beef with the garlic powder, salt, and pepper. Add 1 tablespoon of the stir-fry or BBQ sauce and toss until the meat is coated.
Step 2: Assemble the Skewers
Thread the beef strips onto the skewers, alternating with the red and green bell pepper squares. You can thread the beef in a wavy or curled pattern, as shown in the picture.
Step 3: Cook the Skewers
Place the skewers in the basket of your air fryer. Cook at 400°F (200°C) for 6-8 minutes, flipping halfway through, until the beef is cooked to your preference and the peppers are slightly tender. If using a broiler, place the skewers on a baking pan and broil 4 inches from the heat for 3-4 minutes per side.
Step 4: Glaze and Serve
Once cooked, brush or drizzle the remaining 1 tablespoon of sauce over the hot skewers. Serve immediately with the extra sauce in a small bowl for dipping. This warm, savory meal is ready to be devoured!
Warming Tomato and Basil Soup with Croutons
Quick Lunch Ideas
30. Image Description
This simple, comforting bowl of tomato soup is an exceptionally quick warm lunch, perfect for a cozy at-home break. The soup itself is a rich, creamy orange-red color, indicating a smooth, velvety texture. Wisps of steam rising from the bowl give it a wonderfully inviting, hot appearance.
The soup is beautifully garnished with a swirl of light-colored cream or sour cream, which pools delicately into the red base. Piled high in the center is a generous mound of golden, crisp croutons, promising a delightful crunch in every bite. A small sprig of fresh basil sits atop the croutons, adding a pop of green and a fresh, herbal aroma.
This lunch option uses pantry staples and warms you from the inside out. It’s an easy, classic choice that is ready in minutes using canned or boxed soup as a base.
Required Ingredients
1 cup pre-made canned or boxed tomato soup
1 tablespoon cream (heavy cream or half-and-half)
1/4 cup store-bought or home-made croutons
1 small sprig of fresh basil
Pinch of dried oregano and black pepper
Required Equipment
Microwave-safe bowl or small saucepan
Spoon or whisk
DIY Instruction
Step 1: Heat the Soup
Pour the tomato soup into a microwave-safe bowl. Heat the soup in the microwave for 60-90 seconds, stirring halfway through, until it is steaming hot. Alternatively, you can heat it in a small saucepan on the stovetop.
Step 2: Prepare the Cream Garnish
Take the cream and pour it into a tiny cup. You will use this to create the signature swirl.
Step 3: Plate and Swirl
Pour the hot soup into your final serving bowl. Now, carefully pour the cream in a circular motion around the center of the soup to create the contrasting white swirl.
Step 4: Top with Croutons
Gently spoon the croutons into the center of the cream swirl, creating a nice mound. Try to keep them mostly dry on the surface for maximum crunch.
Step 5: Finish with Herbs
Place the small sprig of fresh basil right on top of the croutons. Sprinkle a tiny pinch of dried oregano and black pepper over the soup. Enjoy this warm, simple, and comforting lunch!
2-Minute Green Goddess Cottage Bowl
Quick Lunch Ideas
31. Image Description
This stunning bowl is the ultimate power lunch, requiring just two minutes of assembly time. The base is a thick, creamy mixture of cottage cheese, blended beautifully with fresh herbs, giving it a vibrant light green color. The texture looks rich and soft, perfect for scooping.
A generous drizzle of golden olive oil creates a stunning swirl on the surface, complemented by a final dusting of black pepper and chopped scallions. The creamy dip is bordered by an array of fresh, colorful vegetables. Crisp cucumber slices and bright pink radish rounds provide fantastic crunch and freshness.
Whole green olives and a lemon wedge sit on the rim, promising a zesty, briny counterpoint to the creamy cheese. This high-protein, no-cook meal is a flavorful and simple option that feels light yet highly satisfying for the remote worker.
Required Ingredients
1 cup cottage cheese (blended slightly for smoother texture, optional)
1/4 cup fresh herbs (dill, parsley, chives), finely chopped
1 tablespoon fresh lemon juice
1 teaspoon garlic powder
Salt and black pepper to taste
1 tablespoon extra virgin olive oil (for drizzling)
Place the cottage cheese into your small mixing bowl. If you prefer a smoother dip, you can briefly blend it now. Add the finely chopped fresh herbs, the tablespoon of fresh lemon juice, and the teaspoon of garlic powder.
Step 2: Season and Mix
Sprinkle a pinch of salt and a grind of black pepper over the mixture. Use a spoon or whisk to thoroughly mix everything until the herbs are evenly distributed and the cheese turns a light green color.
Step 3: Arrange the Toppings
Spoon the herbed cottage cheese into your serving bowl. Now, arrange the sliced cucumber and sliced radishes neatly around one side of the dip. Place the green olives and the lemon wedge near the edge.
Step 4: Drizzle and Finish
Pour the tablespoon of extra virgin olive oil over the top of the dip. You can use the back of a spoon to gently swirl the oil into the cheese, creating a pretty pattern. Finish with a final dusting of black pepper. This beautifully fresh lunch is ready immediately!
Warming Chorizo and Corn Skillet Scramble
Quick Lunch Ideas
32. Image Description
This hot, savory skillet meal is a hearty, all-in-one lunch that looks intensely flavorful and comforting. It features rich, dark red, crumbled chorizo sausage mixed vigorously with bright yellow scrambled eggs, suggesting a delightful mix of spice and creaminess. The vibrant yellow curds of the eggs absorb the seasoning beautifully.
Thick slices of sharp red onion and pieces of bright green bell pepper are scattered throughout the mixture, adding both sweetness and a tender crunch. A generous amount of dark black beans and yellow corn kernels are nestled in the mix, providing fiber and texture. A final flourish of fresh cilantro leaves gives the dish a bright, clean finish.
Served straight from the skillet with wisps of steam rising, this is a quick, hot, and satisfying protein-packed option that is far better than a cold meal.
Required Ingredients
1 teaspoon olive oil
1/2 cup crumbled cooked chorizo sausage (or seasoned ground beef)
2 large eggs, whisked
1/4 cup canned black beans, rinsed and drained
1/4 cup canned or frozen corn kernels
2 tablespoons sliced red onion
2 tablespoons chopped green bell pepper
Salt and black pepper to taste
Fresh cilantro, for garnish
Required Equipment
1 small non-stick skillet
1 spatula or wooden spoon
1 small bowl (for whisking eggs)
DIY Instruction
Step 1: Sauté the Vegetables and Meat
Heat the teaspoon of olive oil in your small non-stick skillet over medium heat. Add the sliced red onion and chopped green bell pepper. Sauté for about 2 minutes until they begin to soften. Add the crumbled cooked chorizo sausage (or seasoned ground beef) and stir, heating it through for about 1 minute.
Step 2: Add Beans and Corn
Stir the rinsed black beans and the corn kernels into the mixture in the skillet. Continue to heat, stirring constantly, for about 1 minute until everything is warm.
Step 3: Introduce the Eggs
Pour the whisked eggs over the mixture in the skillet. Reduce the heat to medium-low. Use your spatula to gently push the cooked eggs from the edges toward the center, allowing the uncooked egg to flow underneath.
Step 4: Scramble and Season
Continue to cook for about 2 minutes, stirring gently until the eggs are cooked through and form soft curds. Sprinkle with salt and black pepper to taste.
Step 5: Garnish and Serve
Remove the skillet from the heat. Top the mixture with a handful of fresh cilantro leaves. You can eat this meal straight from the skillet for minimal cleanup, using your wooden spoon!
Tropical Mango Coconut Tapioca Pudding
Quick Lunch Ideas
33. Image Description
This gorgeous glass of tapioca pudding is a refreshing, light, and sweet option, perfect when you need a gentle, cooling lunch. The base is a creamy, white, translucent pudding studded with tiny tapioca pearls, giving it a delightful, subtle texture. Visible small cubes of light yellow mango are mixed throughout the pudding, adding pockets of sweet, tropical flavor.
The top of the glass is generously crowned with a heap of bright yellow, perfectly ripe mango chunks. A scattering of golden, toasted coconut flakes adds a fantastic crunch and an extra layer of tropical richness. A sprig of fresh mint garnish provides a beautiful, clean finish.
Easily made ahead of time and served cold, this pudding is a smooth, sweet, and satisfying treat that feels like a dessert but offers a lighter, fruit-based midday meal.
Required Ingredients
1 cup pre-made tapioca pudding (or rice pudding)
1/2 cup diced fresh or frozen mango (thawed)
2 tablespoons canned coconut milk (optional, for creaminess)
1 tablespoon toasted coconut flakes, for topping
1 sprig of fresh mint, for garnish
Required Equipment
1 medium bowl (if mixing in milk)
1 spoon
1 clear serving glass
DIY Instruction
Step 1: Prep the Pudding Base
Spoon the pre-made tapioca pudding into a medium bowl. If using, stir in the coconut milk until it is fully incorporated, making the pudding extra creamy.
Step 2: Add the Mango
Take about half of the diced mango and gently stir it into the pudding mixture. You want to distribute the fruit without mashing the pudding.
Step 3: Layer the Glass
Spoon the mango and tapioca mixture into your clear serving glass. Fill the glass almost to the rim, smoothing the top surface gently with the back of the spoon.
Step 4: Crown with Toppings
Arrange the remaining half of the diced mango chunks neatly over the top of the pudding. Sprinkle the toasted coconut flakes generously over the mango.
Step 5: Garnish and Serve
Place the sprig of fresh mint on the edge of the glass. This cool, sweet, and tropical lunch is ready to be enjoyed!
Quick Smoked Salmon and Dill Bagel
Quick Lunch Ideas
34. Image Description
This open-faced bagel sandwich is an exceptionally quick, elegant, and protein-rich lunch, resembling a classic deli favorite. The base is a golden, soft bagel half, which is thickly spread with a rich, white cream cheese mixture. The spread is visibly studded with finely chopped chives and specks of dill, suggesting a fresh, savory herbal flavor.
Generous, rosy-orange slices of smoked salmon are draped beautifully over the cream cheese, covering the entire surface. A sprinkle of bright yellow lemon zest and thin slices of fresh green dill fronds garnish the salmon, adding an essential layer of zesty aroma and flavor.
This no-cook meal is fast, luxurious, and highly satisfying. It is an excellent source of healthy fats and protein, providing a refreshing midday break.
Required Ingredients
1 plain bagel, sliced in half
2 tablespoons cream cheese, softened
1 tablespoon chopped fresh chives
1 teaspoon chopped fresh dill (plus a sprig for garnish)
2 ounces smoked salmon (lox)
1/2 teaspoon lemon zest
Pinch of black pepper
Required Equipment
Toaster (optional, for bagel)
1 small mixing bowl
1 spoon or spatula
DIY Instruction
Step 1: Prep the Bagel
Lightly toast the bagel halves if you like a little crunch, then place the bottom half on your serving plate.
Step 2: Make the Herbed Cream Cheese
In your small mixing bowl, combine the softened cream cheese with the chopped fresh chives and the chopped fresh dill. Stir vigorously until the herbs are evenly mixed throughout the cheese.
Step 3: Spread the Base
Use a spoon or spatula to spread a thick, even layer of the herbed cream cheese mixture over the toasted bagel half.
Step 4: Layer the Salmon
Gently arrange the slices of smoked salmon on top of the cream cheese. You can roll or fold the salmon to give it a neat, attractive look as shown in the picture.
Step 5: Finish with Zest and Herbs
Sprinkle the lemon zest and a pinch of black pepper over the salmon. Garnish the top with the sprig of fresh dill. Your flavorful, quick lunch is ready to enjoy!
Curry Chicken Salad Lettuce Cups
Quick Lunch Ideas
35. Image Description
These vibrant lettuce cups are a light, crunchy, and refreshing take on classic chicken salad, perfect for a low-carb lunch. The base is made of crisp, bright green Romaine or butter lettuce leaves, which serve as edible, natural cups. Each cup is generously filled with a creamy, rich-looking chicken salad.
The salad has a beautiful golden-yellow hue, achieved with curry powder, and features chunks of cooked chicken and diced red onion. Plump, amber-colored golden raisins and chopped celery pieces are mixed throughout, adding bursts of sweetness and crunch. A dusting of paprika or curry powder tops the filling.
Displayed alongside small bowls of curry powder and golden raisins, this dish emphasizes its quick assembly using pre-cooked chicken. It’s a flavorful, satisfying, and very fast option that keeps you feeling light.
Required Ingredients
1 cup cooked, cubed chicken breast
2 tablespoons mayonnaise (or plain Greek yogurt)
1 teaspoon curry powder
1/4 cup finely chopped red onion
2 tablespoons chopped celery
2 tablespoons golden raisins
Salt and black pepper to taste
4-6 large, crisp romaine or butter lettuce leaves
Required Equipment
1 medium mixing bowl
1 spoon or rubber spatula
Knife and cutting board
DIY Instruction
Step 1: Combine Wet Ingredients
In the medium mixing bowl, combine the mayonnaise (or Greek yogurt) and the curry powder. Stir well until the curry powder is fully incorporated and the mixture is a uniform yellow color.
Step 2: Add Fillings
Add the cubed cooked chicken, finely chopped red onion, chopped celery, and golden raisins to the bowl. Sprinkle a pinch of salt and black pepper over the ingredients.
Step 3: Mix the Salad
Use a spoon or spatula to gently fold and mix all the ingredients until the chicken and vegetables are evenly coated in the creamy curry dressing.
Step 4: Prep the Lettuce Cups
Wash and pat dry your large lettuce leaves. Place them on your cutting board or serving platter, arranging them into “cups.”
Step 5: Fill and Serve
Spoon a generous amount of the curry chicken salad mixture into the center of each lettuce cup. You can dust the top with a tiny bit of extra curry powder for color. Serve this crisp, flavorful lunch immediately!
French Onion and Melted Gruyère Toast
Quick Lunch Ideas
36. Image Description
This warm, luxurious open-faced sandwich is a comforting, savory lunch that looks incredibly indulgent. The base is a thick, toasted slice of baguette or rustic bread. Piled high on the bread is a mound of deeply caramelized brown onions, which appear soft, sweet, and rich.
The entire surface is blanketed by a thick layer of melted Gruyère or Swiss cheese, which is golden and bubbly, dripping down the sides, emphasizing its gooey texture. A scattering of fresh thyme leaves provides an aromatic, herbal finish that cuts through the richness of the cheese and onions.
This simple preparation takes advantage of pre-caramelized onions for speed, offering a hot, satisfying, and sophisticated lunch experience with minimal effort.
Required Ingredients
1 thick slice of baguette or artisan bread
1 tablespoon olive oil (for toast)
1/2 cup pre-made caramelized onions (or quickly sautéed onions)
1/4 cup shredded Gruyère or Swiss cheese
Fresh thyme leaves, for garnish
Salt and black pepper to taste
Required Equipment
Toaster or small non-stick pan
Small baking sheet
Oven or toaster oven
DIY Instruction
Step 1: Prep and Toast the Bread
Preheat your oven or toaster oven to 350°F (175°C). Brush both sides of your thick slice of bread with a little olive oil. Toast it lightly in a pan or toaster until golden. Place the toast on a small baking sheet.
Step 2: Layer the Onions
Spoon the pre-made caramelized onions evenly over the surface of the toasted bread. If your onions are cold, you can warm them briefly in a microwave first.
Step 3: Add the Cheese
Sprinkle the shredded Gruyère or Swiss cheese generously and evenly over the caramelized onions, ensuring the cheese covers the entire surface.
Step 4: Melt the Cheese
Place the baking sheet into the preheated oven. Bake for 3-5 minutes, or until the cheese is completely melted, bubbly, and slightly browned on the edges. Alternatively, you can briefly use the broiler setting for 1-2 minutes, watching constantly to prevent burning.
Step 5: Garnish and Serve
Carefully remove the sheet pan. Immediately sprinkle the fresh thyme leaves over the hot, melted cheese. Finish with a grind of black pepper. Enjoy this warm, savory, and comforting lunch right away!
5-Minute Guacamole and Pico de Gallo Dip
Quick Lunch Ideas
37. Image Description
This vibrant, colorful bowl is the definition of fresh, quick preparation, making it a fantastic dipping lunch. The bowl is clearly divided into two distinct, tantalizing halves. On the left is a chunky, bright green guacamole, showing off large cubes of avocado, diced red onion, and chopped cilantro. Coarse sea salt sprinkled over the surface glistens and highlights the richness of the avocado.
On the right is a lively red pico de gallo, featuring finely diced red tomatoes, red onion, and green bell peppers. Slices of bright green jalapeño sit atop the salsa, promising a kick of heat. Golden tortilla chips are tucked into the back of the bowl, ready for scooping up the fresh dips.
This no-cook, fast-assembly lunch is high in healthy fats and vitamins, providing a satisfying and crunchy midday experience.
Required Ingredients
Guacamole: 1 ripe avocado, mashed or cubed; 1 tablespoon finely chopped red onion; 1 tablespoon lime juice; 1 tablespoon chopped cilantro; salt
Pico de Gallo: 1 medium tomato, diced; 1 tablespoon finely chopped red onion; 1 tablespoon chopped cilantro; 1/2 jalapeño, thinly sliced (optional)
Tortilla chips, for dipping
1 lime wedge, for garnish
Required Equipment
1 medium bowl (or two small bowls)
1 fork or spoon
Knife and cutting board
DIY Instruction
Step 1: Prepare the Guacamole
In one side of the medium bowl (or one small bowl), mash or cube the ripe avocado. Stir in the chopped red onion, lime juice, and chopped cilantro. Season generously with salt and stir gently to combine.
Step 2: Prepare the Pico de Gallo
In the other side of the medium bowl (or the second small bowl), combine the diced tomato, the remaining chopped red onion, and the remaining chopped cilantro. If using, mix in the sliced jalapeño. Season this mixture with a small pinch of salt.
Step 3: Arrange the Bowl
If using one bowl, gently push the guacamole and pico de gallo together to create the clean dividing line shown in the picture. If using two bowls, place them side-by-side.
Step 4: Garnish and Serve
Garnish the top of the guacamole with a few extra pieces of red onion and a sprinkle of coarse salt. Place a lime wedge on the edge of the guacamole. Tuck the tortilla chips into the back of the bowl. Dip and enjoy this incredibly fresh, fast lunch!
Sweet Potato Toast with Nut Butter and Berry
Quick Lunch Ideas
38. Image Description
This creative open-faced lunch replaces bread with a thick slice of roasted sweet potato, offering a highly nutritious, gluten-free base. The vibrant orange sweet potato slice is topped with a thick layer of creamy nut butter, spread generously across the surface. This provides protein and a rich, nutty flavor.
The toast is decorated with neat, circular slices of banana, which are then dusted with tiny chia seeds for added texture and omega fats. A cluster of dark blue blueberries and large, toasted coconut flakes sit on the opposite side, providing a delightful burst of freshness and crunch. Golden honey or maple syrup is visibly drizzled over the entire assembly.
This is a warming, nutrient-dense lunch that requires minimal hands-on time, making it a wonderful, sweet, and energy-sustaining option.
Required Ingredients
1 medium sweet potato, sliced lengthwise into 1/4-inch thick “toast”
1 tablespoon olive oil (for roasting)
2 tablespoons peanut butter or almond butter
1/2 small banana, sliced
1 tablespoon fresh blueberries
1/2 teaspoon chia seeds
1/2 teaspoon toasted coconut flakes
1 teaspoon honey or maple syrup
Required Equipment
Baking sheet
Oven or toaster oven
Knife and cutting board
Spatula or spoon
DIY Instruction
Step 1: Prep and Roast the Sweet Potato
Preheat your oven or toaster oven to 400°F (200°C). Slice the sweet potato lengthwise into $1/4$-inch thick pieces. Lightly brush the slice with olive oil. Place the slice on the baking sheet and roast for 10-15 minutes, flipping once, until the potato is tender and lightly golden. Let it cool slightly.
Step 2: Spread the Nut Butter
Place the warm sweet potato slice on your serving plate. Use a spatula or spoon to spread the peanut butter or almond butter evenly over the surface of the potato.
Step 3: Arrange the Toppings
Arrangement the banana slices neatly down one side of the toast. Sprinkle the chia seeds over the banana slices. Place the fresh blueberries and the toasted coconut flakes on the opposite side.
Step 4: Drizzle and Serve
Drizzle the teaspoon of honey or maple syrup over the entire sweet potato toast. You can sprinkle chopped nuts around the plate for extra crunch. Enjoy this warm, fulfilling, and sweet lunch immediately!
Tuna and White Bean Basil Salad
Quick Lunch Ideas
39. Image Description
This light, zesty salad is a fantastic no-cook meal, demonstrating how simple ingredients can look both fresh and gourmet. The bowl is filled with plump, creamy white beans, providing a hearty, fiber-rich base. Large, flaky chunks of savory tuna are nestled among the beans, offering lean, satisfying protein.
Thinly sliced rings of vibrant purple red onion are scattered throughout, adding a sharp, appealing color contrast and a delicious crunch. The salad is generously garnished with large, fresh green basil leaves, which look glossy and aromatic. Bright yellow lemon slices are tucked into the mix, indicating a zesty, refreshing dressing.
The entire dish is visible with a light sheen, suggesting a simple olive oil and lemon dressing has been used. This is an easy-to-assemble, protein-rich lunch that requires almost no effort.
Required Ingredients
1 (15-ounce) can cannellini beans (white kidney beans), rinsed and drained
1 (5-ounce) can tuna in olive oil or water, drained
1/4 cup thinly sliced red onion
2 tablespoons olive oil
1 tablespoon fresh lemon juice
1/2 teaspoon dried oregano (or a small handful of fresh basil leaves)
Salt and black pepper to taste
Lemon slices and fresh basil leaves, for garnish
Required Equipment
1 medium mixing bowl
1 spoon or rubber spatula
DIY Instruction
Step 1: Combine the Base
Rinse and drain the cannellini beans thoroughly and place them into your medium mixing bowl. Add the drained tuna (flaking it gently with a fork as you add it) and the thinly sliced red onion.
Step 2: Dress the Salad
In a separate small cup, whisk together the olive oil and the fresh lemon juice. Sprinkle in the dried oregano (or add the fresh basil leaves now), salt, and black pepper.
Step 3: Toss Gently
Pour the dressing over the tuna, beans, and onion mixture. Use a spoon or rubber spatula to gently fold and toss the salad. You want the ingredients to be evenly coated without mashing the white beans.
Step 4: Garnish and Serve
Transfer the salad to your serving bowl. Arrange the fresh basil leaves and the thin lemon slices over the top, just as pictured. A final grind of black pepper adds an appealing finish. This fresh, protein-packed lunch is ready!
Chocolate Peanut Butter Snack Dip Board
Quick Lunch Ideas
40. Image Description
This is an incredibly appealing and colorful snack board that easily serves as a satisfying sweet lunch. A large, shallow bowl in the center holds a thick, creamy chocolate peanut butter dip, which has been artfully swirled and drizzled with a rich peanut butter topping. Mini chocolate chips are scattered across the surface, enhancing its indulgent look.
The dip is surrounded by a beautiful rainbow of fresh, vibrant fruit dippers. There are large, juicy red strawberries, clusters of deep blue blueberries, and bright orange mandarin orange segments. Slices of kiwi and circular slices of yellow banana complete the colorful ring.
This appealing, no-cook preparation is an excellent way to turn a sweet craving into a balanced meal, providing protein from the dip and plenty of vitamins from the fruit. It’s a fun, effortless option for a quick midday break.
In your medium mixing bowl, measure and add the creamy peanut butter and the Greek yogurt. Using a whisk or spatula, mix these two ingredients together until they are well combined and smooth.
Step 2: Add the Flavoring
Add the unsweetened cocoa powder and the maple syrup (or honey) to the bowl. Ensure your measurements are accurate for the best flavor balance.
Step 3: Mix Until Uniform
Continue to mix all the ingredients thoroughly. Keep mixing until the dip is a uniform, creamy brown color and the texture is smooth and thick.
Step 4: Arrange the Serving Platter
Transfer the finished dip into a small serving bowl and place it in the center of your large platter. Now, prepare your fruit dippers. Wash and slice all the fruits, arranging them neatly around the bowl of dip, creating an attractive and colorful border.
Step 5: Garnish and Enjoy
For a final flourish, you can drizzle a small amount of extra peanut butter over the dip and sprinkle it with a few mini chocolate chips. This delightful, nourishing lunch is ready for you to enjoy!
Key Takeaways
Speed is Essential: Over half of these ideas require 15 minutes or less, often using pre-cooked ingredients or simple assembly. This eliminates the frantic midday cook session.
Balance Your Plate: Focus on high-protein options like tuna, chicken, eggs, or tofu to ensure sustained energy that lasts through the afternoon.
Embrace No-Cook Options: Utilize recipes like layered jar salads, cottage cheese platters, and quick wraps that require zero heat, perfect for hot weather or intense work deadlines.
Utilize Your Pantry: Clever use of canned beans, pre-shredded vegetables, and quick-heating grains like microwavable quinoa transforms simple ingredients into complex, satisfying meals.
Prep for Success: Many ideas, such as pasta salads and high-protein dips, are excellent for batch preparation on Sunday, giving you grab-and-go options all week long.
Taking a moment to fuel your body with a quality lunch is not a luxury; it is a necessity for anyone working from home. We have seen that banishing a non-existent lunch routine does not require gourmet cooking skills or hours of effort. Instead, it demands a strategy of speed, smart assembly, and simple ingredients.
The 40 ideas shared here prove that you can enjoy flavorful, energy-boosting meals in the time it takes to brew a cup of tea. Whether you crave a warm, comforting chili bowl, a fresh, crunchy salad, or a simple savory toast, your midday meal should be a break you look forward to. Start small, try one of these recipes this week, and reclaim your lunch hour for focused, productive well-being.
Spread the loveWe all appreciate the simple elegance of a traditional fudgy brownie. That rich, dark square represents pure comfort and chocolate bliss. Yet, the world of baking is vast, demanding creativity and unexpected flavor…
Spread the loveHoliday feasts bring joy and abundance, but they also leave us with a mountain of the same two proteins. Facing a fridge full of turkey and ham for the third day in a…
Spread the loveWeeknight dinner fatigue is a real problem plaguing modern kitchens. We often fall back on the same three recipes, turning mealtime into a predictable and, frankly, boring chore. But the cure for this…