Finding the time to cook a nutritious meal often feels like a second job. You likely come home after a tiring day only to face a kitchen that requires hours of your energy. Long ingredient lists and complex techniques usually lead to the frustration of ordering expensive takeout instead.
Simple 20-Minute Meals
You deserve a solution that fits your busy lifestyle without sacrificing flavor. This collection of meals focuses on speed and simplicity to help you reclaim your evening. Every recipe here moves from the cutting board to the table in just twenty minutes.
Stop letting the clock dictate what your family eats for dinner. These dishes use smart shortcuts and fresh ingredients to provide a high-quality experience in record time. You can now enjoy a home-cooked feast even on your most hectic weeknights.
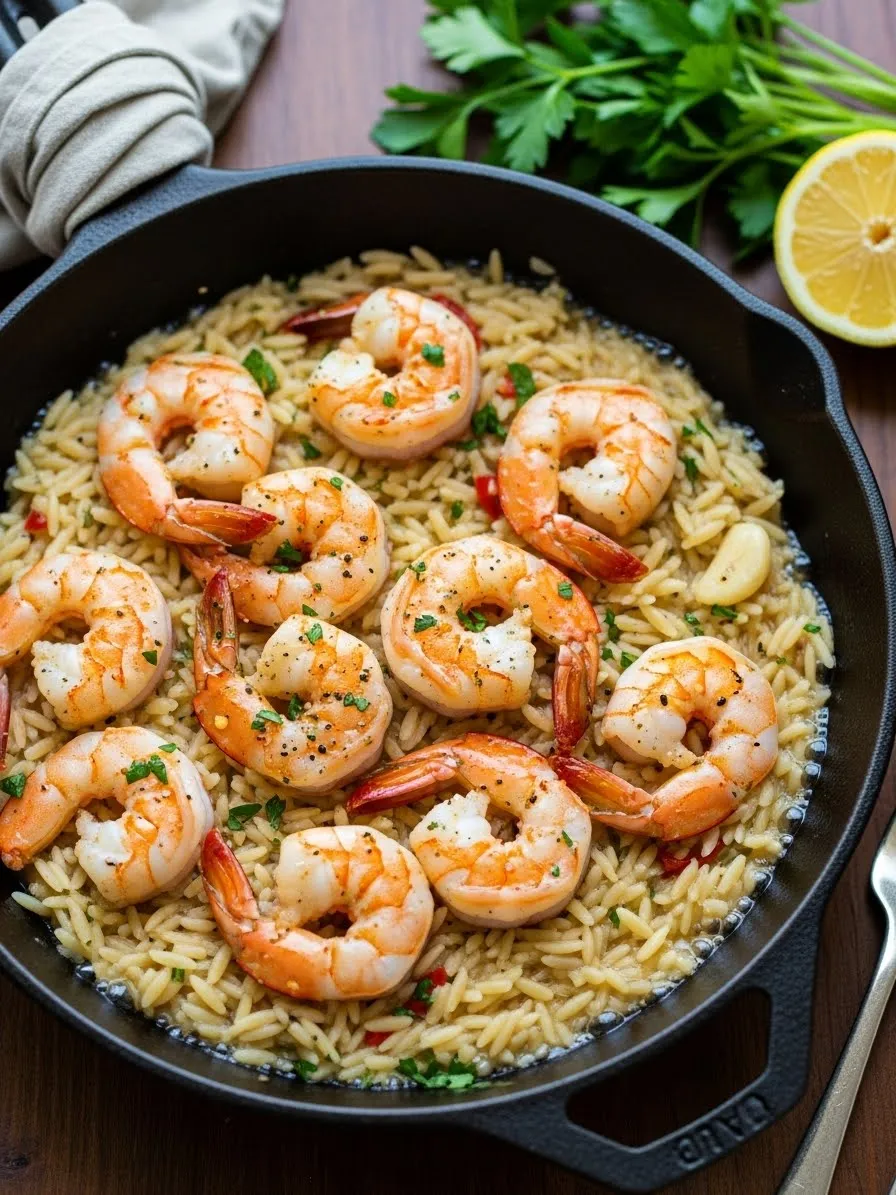
Succulent pink shrimp rest atop a bed of tender orzo pasta in a heavy cast iron skillet. The grains of pasta soak up a rich, golden broth infused with garlic and herbs. You can see tiny flecks of red chili and green parsley scattered throughout the dish, hinting at a bright and savory flavor profile.
Fresh lemon wedges sit nearby, ready to provide a sharp zing to the buttery sauce. This meal looks hearty yet light enough for a quick weeknight dinner. The steam rising from the pan suggests a comforting warmth that fills the kitchen.
Every bite offers a mix of firm shrimp and soft pasta. This recipe brings restaurant quality results to your table without the long wait. It is a wonderful way to feed your family when time feels short.
Ingredients
1 pound large shrimp, peeled and deveined
1 cup orzo pasta
2 cups chicken or vegetable broth
3 tablespoons unsalted butter
4 cloves garlic, minced
1 tablespoon olive oil
1/2 teaspoon red pepper flakes
1 fresh lemon (half juiced, half sliced)
2 tablespoons fresh parsley, chopped
Salt and black pepper to taste
Equipment
Large cast iron skillet or heavy frying pan
Wooden spoon or spatula
Measuring cups and spoons
Chef’s knife
DIY Instructions
Place your skillet over medium heat and add the olive oil along with one tablespoon of butter.
Season the shrimp with a pinch of salt and pepper, then toss them into the hot pan.
Cook the shrimp for about two minutes per side until they turn pink and opaque, then move them to a plate.
Add the remaining butter to the same skillet and stir in the minced garlic and red pepper flakes.
Pour the dry orzo pasta into the pan and stir it for one minute to let it toast slightly.
Pour the broth into the skillet and bring the liquid to a gentle simmer.
Lower the heat and cover the pan, allowing the orzo to cook for about 8 to 10 minutes until the liquid is mostly absorbed.
Squeeze the lemon juice over the pasta and stir in the chopped parsley.
Nestle the cooked shrimp back into the orzo to warm them through for one minute.
Serve immediately with extra lemon slices on the side for a fresh finish.
2. Roasted Sausage and Veggie Sheet Pan
Simple 20-Minute Meals
Vibrant colors pop from a seasoned baking sheet filled with a balanced mix of proteins and greens. Thick, juicy sausages with deep sear marks nestle between stalks of bright green broccolini and slices of yellow bell pepper. Toasted zucchini rounds add another layer of texture to this simple one-pan meal.
Every component glistens with a light coating of oil and savory spices. This dish highlights how a few fresh ingredients can create a hearty dinner with very little cleanup. The layout shows a rustic charm that appeals to anyone craving a home-cooked feel.
Golden hues on the peppers and charred edges on the broccoli promise a smoky sweetness in every bite. This setup is a smart choice for busy evenings when you need a nutritious meal fast. It offers a straightforward way to get dinner on the table without stress.
Ingredients
1 package of smoked sausages or bratwursts
1 bunch of fresh broccolini
1 large yellow bell pepper, sliced
1 large red bell pepper, sliced
1 medium zucchini, sliced into rounds
2 tablespoons olive oil
1 teaspoon dried oregano
1/2 teaspoon garlic powder
Salt and black pepper to taste
Equipment
Large rimmed baking sheet
Sharp chef’s knife
Cutting board
Large mixing bowl
DIY Instructions
Start by preheating your oven to 400 degrees Fahrenheit so it is hot when you are ready to roast.
Wash all your vegetables under cool water and pat them dry with a clean towel.
Slice the zucchini into rounds and cut the bell peppers into long, thin strips.
Use a knife to make small, shallow slits across the top of each sausage to help them cook evenly.
Place the sausages and all the chopped vegetables into a large bowl.
Drizzle the olive oil over everything and sprinkle on your oregano, garlic powder, salt, and pepper.
Toss the mixture with your hands or a large spoon until every piece has a light coating of oil and spices.
Spread the ingredients out in a single layer on your baking sheet, making sure not to crowd them.
Slide the tray into the oven and roast for about 15 to 20 minutes.
Remove the pan once the sausages are browned and the vegetables feel tender when poked with a fork.
3. Cheesy Black Bean Quesadillas
Simple 20-Minute Meals
Golden brown tortillas are sliced into neat triangles, revealing a rich filling of melted cheddar cheese and hearty black beans. Strings of gooey cheese stretch between the pieces, creating an inviting look for a quick snack or light dinner. Each wedge is topped with a single fresh cilantro leaf for a touch of green.
Two small white bowls sit at the bottom of the frame, offering cooling guacamole and zesty red salsa. The contrast between the creamy green dip and the chunky red sauce adds a festive feel to the plate. This meal provides a simple balance of textures and classic flavors.
Crispy edges on the flour tortillas offer a satisfying crunch with every bite. This dish serves as a reliable go-to for anyone who needs a filling meal in minutes. It is a kid-friendly option that adults will enjoy just as much.
Ingredients
4 large flour tortillas
1 can (15 ounces) black beans, rinsed and drained
2 cups shredded sharp cheddar or Mexican blend cheese
1 tablespoon butter or vegetable oil
1/2 teaspoon ground cumin
Fresh cilantro for garnish
1/2 cup salsa
1/2 cup guacamole
Equipment
Large non-stick skillet or griddle
Spatula
Pizza cutter or sharp knife
Small serving bowls
DIY Instructions
Rinse your black beans in a colander under cold water and let them drain completely.
Place the beans in a small bowl and stir in the cumin for a bit of extra flavor.
Set your skillet on the stove over medium heat and add a tiny bit of butter or oil.
Lay one tortilla flat in the pan and sprinkle a generous layer of cheese over one half.
Spoon a layer of black beans over the cheese, then add a little more cheese on top of the beans to act as glue.
Fold the empty half of the tortilla over the filling to create a half-moon shape.
Press down gently with your spatula and cook for about two minutes until the bottom is golden brown.
Flip the quesadilla carefully and cook the other side for another two minutes or until the cheese is fully melted.
Slide the quesadilla onto a cutting board and use a pizza cutter to slice it into three even triangles.
Serve hot with bowls of salsa and guacamole on the side for dipping.
4. Pesto Tortellini with Spinach and Peas
Simple 20-Minute Meals
Soft pillows of tortellini are coated in a vibrant green basil pesto, creating a fresh and aromatic dish. Bright green peas and tender leaves of wilted spinach are tucked between the pasta shapes, adding extra nutrients and color. A dusting of grated parmesan cheese and a handful of toasted pine nuts provide a sophisticated finish.
Steam curls upward from the white bowl, suggesting a meal that is both warm and comforting. The combination of textures—from the soft pasta to the pop of the peas—makes every spoonful interesting. This dish looks like a high-end bistro meal but takes very little effort to assemble.
Earthly tones and bright greens make this plate look exceptionally healthy and inviting. It is a fantastic way to brighten up a rainy evening or a busy Monday. This recipe proves that fast food can still be fresh and wholesome.
Fill a large pot with water, add a pinch of salt, and bring it to a rolling boil on your stove.
Drop the refrigerated tortellini into the boiling water and cook according to the package directions (usually 3 to 5 minutes).
Add the frozen peas to the boiling water during the last minute of the pasta’s cooking time.
Place the fresh spinach leaves into your colander in the sink.
Pour the hot pasta and peas directly over the spinach into the colander; the hot water will wilt the spinach perfectly.
Shake the colander well to remove all excess water, then transfer everything into a large mixing bowl.
Add the basil pesto to the bowl while the pasta is still steaming hot.
Toss gently with a large spoon until the pesto covers every piece of tortellini and every leaf of spinach.
Divide the mixture into bowls and sprinkle the top with grated parmesan and toasted pine nuts.
Serve immediately while warm for the best flavor and texture.
5. BBQ Chicken Pizza with Red Onions
Simple 20-Minute Meals
A rustic, golden pizza crust holds a layer of tangy barbecue sauce and melted mozzarella cheese. Chunks of seasoned grilled chicken are scattered across the surface, paired with thin rings of red onion and fresh arugula. White pearls of fresh mozzarella add a creamy contrast to the savory toppings.
A wooden pizza cutter rests on the edge of the board, ready to slice through the bubbly crust. The scattered red pepper flakes and basil leaves on the wooden board suggest a meal with a bit of a kick. This dish is a fun twist on a classic favorite that brings a smoky flavor to your kitchen.
Crispy edges and melted cheese make this pizza look incredibly satisfying. It provides a great balance of sweet sauce and sharp onions. This meal is a crowd-pleaser that works for a quick family dinner or a casual get-together.
Ingredients
1 pre-baked pizza crust or flatbread
1/2 cup of your favorite BBQ sauce
1 1/2 cups shredded mozzarella cheese
1 cup cooked chicken breast, chopped or shredded
1/4 small red onion, thinly sliced
4-5 small balls of fresh mozzarella (bocconcini)
1 cup fresh arugula
1/2 teaspoon red pepper flakes (optional)
Equipment
Baking sheet or pizza stone
Cutting board
Pizza cutter or sharp knife
Measuring cups
DIY Instructions
Preheat your oven to 425 degrees Fahrenheit so it reaches the right temperature for a crispy crust.
Place your pre-baked pizza crust onto a flat baking sheet or a pizza stone.
Spread the BBQ sauce evenly across the crust, leaving about a half-inch of space around the edges.
Sprinkle a thick layer of shredded mozzarella cheese over the sauce.
Distribute the cooked chicken pieces and the thin red onion slices evenly across the top.
Place the fresh mozzarella balls in different spots on the pizza for extra creaminess.
Slide the tray into the oven and bake for 10 to 12 minutes, or until the cheese is bubbly and the edges are brown.
Take the pizza out of the oven and let it sit for two minutes before adding the fresh arugula on top.
Sprinkle with red pepper flakes if you like a little heat.
Slice into wedges and serve while the cheese is still hot and stretchy.
6. Savory Sesame Beef Stir Fry
Simple 20-Minute Meals
Thin strips of tender beef are tossed with long, glossy noodles in a dark, savory sauce. The dish is heavily garnished with white sesame seeds and chopped green onions, adding a fresh crunch to the rich flavors. Bean sprouts and thin slivers of orange carrots are woven through the noodles, providing a nice variety of vegetables.
A pair of dark wooden chopsticks lifts a bundle of noodles and a piece of beef, showing off the silky texture of the sauce. The black skillet serves as a bold background that makes the colors of the food stand out. This meal looks like it came straight from a professional kitchen.
Deep umami scents likely rise from the pan, promising a very satisfying experience. This recipe is a fantastic way to enjoy a classic take-out style meal at home. It is a quick and effective way to satisfy a craving for something salty and savory.
Ingredients
1 pound flank steak or stir-fry beef strips
1 package (8 ounces) stir-fry noodles or spaghetti
2 tablespoons vegetable oil
1/2 cup stir-fry sauce (soy sauce, ginger, and garlic blend)
1 cup fresh bean sprouts
1/2 cup matchstick carrots
2 tablespoons sesame seeds
2 whole green onions, sliced
1 tablespoon sesame oil
Equipment
Large wok or deep non-stick skillet
Large pot for noodles
Tongs or a large spatula
Small bowl
DIY Instructions
Boil a pot of water and cook your noodles according to the box instructions, then drain them.
Pat the beef strips dry with a paper towel so they sear well in the pan.
Heat the vegetable oil in your wok over high heat until it starts to shimmer.
Add the beef strips in a single layer and cook for about 2 minutes until they are browned and no longer pink.
Remove the beef from the pan and set it aside on a clean plate.
Throw the carrots and bean sprouts into the hot wok and stir them quickly for 1 to 2 minutes.
Add the cooked noodles and the browned beef back into the wok with the vegetables.
Pour the stir-fry sauce and sesame oil over everything and toss well to coat.
Keep stirring for another minute until the sauce thickens slightly and everything is hot.
Turn off the heat and garnish heavily with sesame seeds and green onions before serving in bowls.
7. Mediterranean Chickpea and Feta Bowl
Simple 20-Minute Meals
A light blue bowl is filled with a colorful arrangement of fresh Mediterranean ingredients. Neat piles of diced cucumbers, halved cherry tomatoes, and dark Kalamata olives surround a center of protein-rich chickpeas. Cubes of feta cheese, dusted with dried herbs, sit alongside warm triangles of pita bread.
The variety of colors makes this dish look as healthy as it is beautiful. This is a no-cook meal that focuses on assembly and fresh produce, making it an excellent choice for a fast lunch or dinner. It offers a refreshing mix of salty, tangy, and earthy flavors.
Crisp vegetables and creamy cheese provide a wonderful contrast in every mouthful. This bowl is a great option for those who want a filling meal that feels light on the stomach. It is a simple way to enjoy the flavors of the coast at home.
Ingredients
1 can (15 ounces) chickpeas, rinsed and drained
1 cup cherry tomatoes, sliced in half
1 large cucumber, diced
1/2 cup Kalamata olives, pitted
1/2 cup feta cheese, cubed or crumbled
2 pieces of pita bread, cut into triangles
2 tablespoons olive oil
1 tablespoon dried oregano
Juice of half a lemon
Equipment
Large salad bowl
Knife and cutting board
Small jar or bowl for dressing
Serving fork
DIY Instructions
Open your can of chickpeas and pour them into a strainer to rinse under cold water.
Cut your cucumber into small bite-sized cubes and slice the cherry tomatoes in half.
Arrange the chickpeas, cucumbers, tomatoes, and olives in separate sections of a large bowl.
Add the cubed feta cheese to one side and nestle the pita triangles into the edge of the bowl.
In a small jar or bowl, whisk together the olive oil, lemon juice, and dried oregano.
Drizzle the dressing over the entire bowl right before you are ready to eat.
Toss the ingredients together if you like a mixed salad, or keep them separate for a prettier look.
Use the pita bread to scoop up the chickpeas and cheese for a satisfying bite.
Add a pinch of salt or pepper if you feel the vegetables need a little extra seasoning.
Serve immediately while the vegetables are crisp and the bread is soft.
8. Seared Salmon with Lemon and Asparagus
Simple 20-Minute Meals
A beautiful fillet of pink salmon is perfectly seared and served on a slate-gray plate. A charred lemon slice sits on top, adding a bright citrus note to the rich fish. A bundle of tender green asparagus spears rests alongside the salmon, drizzled with oil and sprinkled with capers.
Specks of black pepper and sea salt are visible across the plate, highlighting the simple seasoning used to bring out the natural flavors. This meal looks elegant and professional, yet it is easy to prepare in a single pan. It is a great choice for a healthy, low-carb dinner.
The flaky texture of the salmon and the snap of the asparagus make for a classic pairing. This dish is full of healthy fats and vitamins, making it a smart fuel for your body. It is an impressive meal that takes less than twenty minutes to create.
Ingredients
2 salmon fillets (about 6 ounces each)
1 bunch of fresh asparagus, woody ends trimmed off
2 tablespoons olive oil
1 lemon, sliced into rounds
1 tablespoon capers
1/2 teaspoon garlic powder
Salt and black pepper to taste
Equipment
Large non-stick skillet
Tongs or a fish spatula
Cutting board
Paper towels
DIY Instructions
Pat the salmon fillets dry with a paper towel to ensure the skin gets crispy in the pan.
Season both sides of the fish with salt, pepper, and a little garlic powder.
Heat the olive oil in a large skillet over medium-high heat until it is hot but not smoking.
Place the salmon fillets in the pan, skin-side down, and press gently with a spatula.
Cook the fish for about 4 to 5 minutes without moving it so the skin becomes golden.
Flip the salmon carefully and add the asparagus spears to the empty spaces in the pan.
Toss the lemon slices and capers into the pan as well to let them warm through.
Cook for another 3 to 4 minutes until the salmon is opaque and the asparagus is tender.
Squeeze any remaining lemon juice over the fish and vegetables for a fresh finish.
Serve immediately on a warm plate for the best dining experience.
9. Peanut Noodle Stir Fry with Edamame
Simple 20-Minute Meals
A dark bowl overflows with long, steaming noodles coated in a creamy, savory peanut sauce. Bright green edamame beans and orange carrot curls provide a fresh pop of color against the tan noodles. Red bell pepper strips and fresh cilantro leaves add even more texture and flavor to the dish.
Chopsticks lift a heavy serving of noodles, showing off the thick and glossy coating of the sauce. Crushed peanuts are sprinkled on top for an extra layer of crunch. This meal looks like a comforting bowl of warmth that is perfect for a cozy night in.
The combination of sweet, salty, and nutty flavors is deeply satisfying. This recipe is a great vegetarian option that still feels very filling thanks to the protein in the beans and peanuts. It is a fast way to enjoy complex Asian-inspired flavors at home.
Ingredients
1 package (8 ounces) rice noodles or linguine
1/2 cup shelled edamame, thawed
1 small red bell pepper, thinly sliced
1 cup matchstick carrots
1/4 cup creamy peanut butter
2 tablespoons soy sauce
1 tablespoon honey or maple syrup
1/2 teaspoon chili flakes (optional)
1/4 cup crushed peanuts and fresh cilantro for garnish
Equipment
Large pot for noodles
Small mixing bowl or whisk
Large skillet or wok
Tongs
DIY Instructions
Cook your noodles in a pot of boiling water according to the package, then drain them.
In a small bowl, whisk together the peanut butter, soy sauce, and honey until smooth.
If the sauce is too thick, add a spoonful of the hot noodle water to thin it out.
Heat a tiny bit of oil in a large skillet and add the red peppers and carrots.
Stir-fry the vegetables for about 3 minutes until they start to soften.
Add the thawed edamame to the pan and cook for one more minute.
Toss the drained noodles into the skillet with the vegetables.
Pour the peanut sauce over the top and use tongs to mix everything until the noodles are well-coated.
Cook for just one minute to heat the sauce through, then turn off the stove.
Serve in bowls topped with plenty of crushed peanuts and fresh cilantro.
10. Tuna Melt Sliders with Melted Cheddar
Simple 20-Minute Meals
Three golden, toasted sliders are stacked neatly on a wire cooling rack. Each bun is filled with a creamy tuna salad mixture featuring bits of red onion and celery for crunch. A thick, melted slice of cheddar cheese and a dollop of white sauce complete the filling.
The soft, shiny tops of the brioche buns catch the light, making them look incredibly appetizing. A few ruffled potato chips and a green pickle slice sit on the side, creating a classic deli-style presentation. These sliders are a fun and fast way to upgrade a simple tuna sandwich.
Warm cheese and cool tuna salad offer a classic contrast that many people find comforting. This meal is easy to scale up for a larger group or keep small for a quick solo dinner. It is a smart way to use pantry staples for a tasty result.
Ingredients
1 package of slider buns (6-8 count)
2 cans (5 ounces each) tuna, drained
1/2 cup mayonnaise
1/4 cup finely diced celery
2 tablespoons diced red onion
1 teaspoon Dijon mustard
6-8 slices of sharp cheddar cheese
1 tablespoon butter, melted
Equipment
Small mixing bowl
Baking sheet
Knife for spreading
Pastry brush (optional)
DIY Instructions
Preheat your oven to 375 degrees Fahrenheit so it is ready for toasting.
Drain the liquid from your tuna cans and place the fish into a small mixing bowl.
Add the mayonnaise, celery, red onion, and mustard to the tuna and stir until well combined.
Slice your slider buns in half and place the bottom pieces on a baking sheet.
Spoon a generous amount of the tuna mixture onto each bun bottom.
Place a square of cheddar cheese on top of the tuna.
Put the top half of the buns back on to close the sandwiches.
Brush the tops of the buns with a little melted butter for a golden finish.
Slide the tray into the oven for 5 to 7 minutes, or until the cheese is melted and the buns are toasted.
Serve warm with chips and a pickle for a complete meal.
11. Brown Butter Sage Gnocchi
Simple 20-Minute Meals
Golden potato gnocchi sizzle in a shallow pan filled with aromatic brown butter. Each small dumpling features a deep, toasted crust on both the top and bottom. Fresh sage leaves are fried right in the butter until they become crisp and delicate.
A large flake of aged parmesan cheese sits atop the center dumpling, slowly softening from the heat. This dish highlights how a few high quality ingredients can create a sophisticated meal in very little time. Small bubbles in the butter suggest a rich and nutty flavor profile that coats every piece of pasta.
Warm tones and simple textures make this plate look incredibly inviting for a quiet evening. This recipe offers a fast way to enjoy gourmet comfort food at home. It is an excellent choice for anyone who loves the combination of savory herbs and rich dairy.
Ingredients
1 package (16 ounces) shelf stable or refrigerated potato gnocchi
4 tablespoons unsalted butter
10 to 12 fresh sage leaves
1/4 cup shaved or grated parmesan cheese
1/4 teaspoon sea salt
1/8 teaspoon cracked black pepper
Equipment
Large nonstick skillet
Metal spatula or tongs
Measuring spoons
Small serving bowl
DIY Instructions
Place your large skillet on the stove over medium heat and add the butter.
Allow the butter to melt and begin to bubble gently until it starts to turn a light golden brown.
Add the gnocchi to the pan in a single layer so each piece touches the bottom.
Toss in the fresh sage leaves so they can fry in the butter alongside the pasta.
Cook the gnocchi for about 3 to 4 minutes without moving them to develop a dark, crispy crust.
Flip each dumpling over using your spatula or tongs to brown the other side.
Continue cooking for another 3 minutes until the gnocchi are tender on the inside and crunchy on the outside.
Watch the sage leaves closely and remove them if they start to turn dark brown too quickly.
Transfer the hot gnocchi to a bowl and pour the remaining brown butter from the pan over the top.
Garnish with the large flakes of parmesan cheese and a pinch of sea salt before eating.
12. Honey Garlic Crispy Tofu Bowl
Simple 20-Minute Meals
Dark, glazed cubes of crispy tofu are piled into a grey ceramic bowl next to a mound of fluffy white rice. The tofu is coated in a sticky honey garlic sauce that glistens under the light. Bright green edamame beans and thin, vibrant radish slices provide a fresh and crunchy balance to the meal.
A sprinkle of white sesame seeds and fresh green onions adds a final layer of texture and color. This bowl shows a beautiful organization of ingredients that makes it look as good as it tastes. Wooden chopsticks rest across the top of the bowl, ready for the first bite.
Sweet and savory scents likely fill the air when this dish is served. It is a fantastic vegetarian option that provides plenty of protein and variety. This setup is a smart way to enjoy a balanced and colorful dinner on a busy schedule.
Ingredients
1 block (14 ounces) extra firm tofu, pressed and cubed
2 cups cooked white rice
1/2 cup shelled edamame, steamed
4 small radishes, thinly sliced
2 tablespoons cornstarch
1/4 cup honey garlic sauce (soy sauce, honey, and minced garlic)
2 green onions, sliced
1 tablespoon sesame seeds
2 tablespoons vegetable oil
Equipment
Nonstick skillet
Mixing bowl
Chef’s knife
Cutting board
DIY Instructions
Press your tofu between paper towels for 10 minutes to remove as much water as possible.
Cut the tofu into small, even cubes and place them in a bowl with the cornstarch.
Toss the cubes gently until they have a light, even white coating on all sides.
Heat the oil in your skillet over medium-high heat until it is very hot.
Add the tofu cubes to the pan and fry them for about 2 minutes on each side until they are golden and crispy.
Pour the honey garlic sauce over the tofu in the pan and stir quickly to coat every piece.
Let the sauce simmer for 1 minute until it becomes thick and sticky, then remove the pan from the heat.
Scoop the warm rice into one side of your serving bowl.
Arrange the glazed tofu, steamed edamame, and sliced radishes in their own sections on top of the rice.
Finish the dish by sprinkling sesame seeds and sliced green onions over the tofu before serving.
13. Spicy Buffalo Chicken Wrap
Simple 20-Minute Meals
A large flour tortilla is tightly rolled and sliced in half, revealing a colorful and organized interior. Pieces of crispy breaded chicken are drizzled with bright orange buffalo sauce. Layers of fresh green lettuce, matchstick carrots, and red onions provide a refreshing crunch.
The wrap is served in a red and white checkered paper basket, giving it a fun restaurant feel. This meal is a great way to enjoy the bold flavors of chicken wings in a handheld form. It looks filling and satisfying without being too heavy for a quick dinner.
Every bite offers a mix of spicy sauce and cool, crisp vegetables. This recipe is a reliable choice for anyone who loves a bit of heat in their food. It is a very simple meal to assemble using pre-cooked chicken or leftovers.
Ingredients
2 large flour tortillas
2 cups breaded chicken strips, cooked and sliced
1/4 cup buffalo hot sauce
2 cups shredded romaine lettuce
1/2 cup matchstick carrots
1/4 small red onion, diced
2 tablespoons ranch or blue cheese dressing
Equipment
Small bowl
Large plate
Sharp knife
Cutting board
DIY Instructions
Place your sliced, cooked chicken strips into a small bowl and pour the buffalo sauce over them.
Toss the chicken gently with a spoon until every piece is covered in the orange sauce.
Lay your flour tortillas flat on a clean surface or a large plate.
Spread a spoonful of ranch or blue cheese dressing down the center of each tortilla.
Pile a large handful of shredded lettuce on top of the dressing.
Add the buffalo chicken pieces in a neat row over the bed of lettuce.
Sprinkle the matchstick carrots and diced red onions over the chicken.
Fold the bottom of the tortilla up, then tuck in the sides as you roll it tightly toward the top.
Place the wrap seam-side down on a cutting board and slice it in half at an angle.
Serve immediately while the chicken is warm and the vegetables are still cold and crisp.
14. Creamy Taco Shells with Fresh Garnish
Simple 20-Minute Meals
Large pasta shells are smothered in a thick, creamy taco-inspired sauce that fills a red Dutch oven. The sauce is a rich orange color, suggesting a blend of melted cheese and savory spices. A wooden spoon lifts a serving of the pasta, showing the gooey and comforting texture of the meal.
Freshly diced tomatoes, sliced jalapeños, and green onions are scattered on top as a bright garnish. This dish combines the heartiness of pasta with the zesty flavors of a classic taco night. It is a one-pot meal that looks beautiful and is easy to clean up afterward.
Steam rises from the pot, indicating a meal that is ready to serve and enjoy. This recipe is a great family-style dinner that appeals to both kids and adults. It provides a fun way to change up your standard pasta routine with bold new flavors.
Ingredients
1 box (12 ounces) large pasta shells
1 pound ground turkey or beef
1 packet (1 ounce) taco seasoning
1 cup heavy cream
2 cups shredded cheddar cheese
1/2 cup water
1 large tomato, diced
1 jalapeño, sliced
2 green onions, chopped
Equipment
Large pot or Dutch oven
Wooden spoon
Colander
Measuring cups
DIY Instructions
Boil a large pot of salted water and cook your pasta shells for 8 to 10 minutes until tender.
Drain the pasta in a colander and set it aside while you prepare the sauce in the same pot.
Brown the ground meat in the pot over medium heat until no pink remains, then drain off any excess fat.
Stir in the taco seasoning and half a cup of water, letting it simmer for 2 minutes.
Lower the heat and pour in the heavy cream, stirring constantly to combine it with the meat.
Add the shredded cheddar cheese one handful at a time, stirring until the sauce is smooth and bubbly.
Add the cooked pasta shells back into the pot and toss them gently to coat every piece in the sauce.
Let the mixture sit for 1 minute so the pasta can soak up some of the creamy liquid.
Turn off the heat and sprinkle the diced tomatoes, jalapeño slices, and green onions over the top.
Serve the pasta directly from the pot while it is hot and the cheese is still melted.
15. Chili Oil Fried Egg and Avocado Rice
Simple 20-Minute Meals
A perfectly fried egg sits atop a bed of white rice and creamy avocado slices. The yolk is bright and runny, with a few large flakes of sea salt scattered over the surface. A spoonful of dark red chili oil is drizzled over the white of the egg, adding a spicy and savory kick.
A silver spoon enters the frame, ready to break the yolk and mix the rich flavors together. This meal looks like a simple yet luxurious way to enjoy a quick breakfast or lunch. The contrast between the cool avocado and the warm, spicy egg is visually stunning.
Crispy edges on the egg white suggest a great texture that pairs well with the soft rice. This dish is a fantastic example of how a few pantry staples can make a gourmet-style meal. It is an excellent choice for anyone who enjoys a bit of heat with their protein.
Ingredients
1 large egg
1 cup cooked white rice
1/2 ripe avocado, sliced
1 tablespoon crunchy chili oil (chili crisp)
1/2 teaspoon flaky sea salt
1 tablespoon vegetable oil
Equipment
Small nonstick skillet
Serving bowl
Spoon
Knife
DIY Instructions
Scoop your warm, cooked rice into a small serving bowl and flatten it out slightly.
Cut your avocado in half, remove the pit, and slice it into thin wedges while it is still in the skin.
Use a spoon to scoop the avocado slices out and lay them across one side of the rice.
Place your skillet on the stove over medium-high heat and add the vegetable oil.
Wait for the oil to get very hot and start to shimmer before cracking the egg into the pan.
Let the egg cook for about 2 minutes without moving it so the edges become brown and crispy.
Use a spoon to splash a little bit of the hot oil over the white parts of the egg to help them set.
Carefully slide the egg out of the pan and place it right on top of the rice and avocado.
Drizzle a large spoonful of chili oil over the egg white and the rice.
Sprinkle the flaky sea salt over the yolk and serve immediately while the egg is still hot.
16. Sun-Dried Tomato and Spinach Gnocchi
Simple 20-Minute Meals
Soft potato gnocchi pillows mingle with vibrant green spinach and deep red sun-dried tomatoes in a clean white bowl. This dish features a light dusting of grated parmesan that settles into the ridges of the pasta. White cannellini beans are scattered throughout, adding a boost of plant-based protein and a creamy texture.
A glass jar of sun-dried tomatoes in oil sits in the background, showing the source of the rich, savory flavor. Fresh walnut halves and pine nuts rest on the dark tabletop, suggesting a nutty crunch in every bite. This meal looks like a fresh Mediterranean escape served in a single bowl.
The contrast of colors makes this plate look incredibly appetizing and healthy. This recipe is an excellent way to use pantry staples to create something that feels special. It is a fast option for those who want a meatless dinner that still feels very filling.
Ingredients
1 package (16 ounces) potato gnocchi
1/2 cup sun-dried tomatoes in oil, chopped
2 cups fresh baby spinach
1 can (15 ounces) white cannellini beans, rinsed
2 tablespoons olive oil
2 cloves garlic, minced
1/4 cup grated parmesan cheese
1/4 cup walnuts or pine nuts
Salt and black pepper to taste
Equipment
Large skillet or frying pan
Large pot for boiling water
Colander
Chef’s knife
DIY Instructions
Bring a large pot of salted water to a boil and cook the gnocchi according to the package directions.
Drain the gnocchi in a colander as soon as they float to the surface of the water.
Heat the olive oil in your skillet over medium heat and add the minced garlic.
Stir the garlic for about one minute until it smells fragrant but does not turn brown.
Add the chopped sun-dried tomatoes and the rinsed white beans to the skillet.
Toss in the fresh spinach leaves and stir them until they just begin to wilt.
Add the cooked gnocchi into the pan and toss everything together so the oil coats the pasta.
Season the mixture with a bit of salt and plenty of cracked black pepper.
Transfer the meal to a serving bowl and sprinkle the top with parmesan cheese.
Finish by adding the walnuts or pine nuts for a satisfying crunch before serving.
17. Crispy Chicken Sub with Melted Provolone
Simple 20-Minute Meals
A hearty sub sandwich is sliced in half to show off layers of golden breaded chicken and melted provolone cheese. Strings of warm, gooey cheese stretch between the two halves of the toasted baguette. Tangy barbecue sauce and creamy mayonnaise provide a rich base for the savory chicken.
Bright purple red onion rings and thick green pickle slices add a sharp, refreshing bite to the sandwich. The crusty bread features dark char marks from being toasted to a perfect crunch. This meal looks like a classic comfort food favorite that you would find at a high-end deli.
Salty potato chips are piled in the background, completing this classic dinner combo. This recipe is a fantastic way to turn simple ingredients into a very satisfying handheld meal. It is a great choice for a casual Friday night dinner at home.
Ingredients
1 large baguette or 2 sub rolls
2 breaded chicken cutlets, cooked and sliced
4 slices provolone cheese
2 tablespoons mayonnaise
2 tablespoons BBQ sauce
4 slices red onion
4-6 dill pickle slices
1 tablespoon butter
Equipment
Baking sheet or toaster oven
Bread knife
Small spatula
Cutting board
DIY Instructions
Slice your baguette or sub rolls in half lengthwise using a serrated bread knife.
Spread a thin layer of butter on the inside of the bread and place it on a baking sheet.
Toast the bread under a broiler for about 2 minutes until the edges are golden brown.
Remove the bread and spread mayonnaise on the bottom half and BBQ sauce on the top half.
Lay the sliced, cooked chicken cutlets along the bottom half of the toasted bread.
Place the provolone cheese slices over the warm chicken so they can start to soften.
Slide the bottom half back under the broiler for 1 minute to fully melt the cheese.
Add the red onion rings and pickle slices on top of the melted cheese.
Close the sandwich with the top half of the bread and press down gently.
Slice the sub in half at an angle and serve immediately with a side of potato chips.
18. Spicy Garlic Shrimp and Creamy Grits
Simple 20-Minute Meals
A stack of jumbo shrimp, perfectly seared and seasoned with dark spices, sits atop a bowl of smooth, buttery grits. A vibrant orange sauce is drizzled in a circle around the base, hinting at a spicy and savory flavor. Tiny bits of fresh green chives are scattered over the top for a pop of color.
A lemon wedge rests in the background, ready to brighten the rich and creamy dish with a splash of acidity. The texture of the grits looks velvety and warm, providing a soft bed for the firm, juicy shrimp. This plate brings a touch of Southern-style comfort to your dinner table in minutes.
Deep, smoky aromas likely rise from the seasoned shrimp as they hit the plate. This dish is a wonderful way to enjoy a restaurant-style meal with very little prep work. It offers a sophisticated balance of heat and creaminess that is hard to resist.
Ingredients
1 pound large shrimp, peeled and deveined
1 cup quick-cooking grits
4 cups water or chicken broth
4 tablespoons butter
2 cloves garlic, minced
1 tablespoon Cajun seasoning
1/2 cup shredded cheddar cheese (optional)
2 tablespoons chopped fresh chives
1 lemon, cut into wedges
Equipment
Medium saucepan for grits
Large skillet for shrimp
Whisk
Tongs
DIY Instructions
Bring the water or broth to a boil in a medium saucepan over high heat.
Slowly whisk in the grits and a pinch of salt, then lower the heat to a simmer.
Cover the pan and cook for about 5 to 7 minutes, stirring occasionally so they stay smooth.
Stir in two tablespoons of butter and the shredded cheese once the grits are thick and tender.
Pat your shrimp dry with a paper towel and toss them in a bowl with the Cajun seasoning.
Melt the remaining butter in a large skillet over medium-high heat.
Add the minced garlic and the seasoned shrimp to the hot pan in a single layer.
Cook the shrimp for 2 minutes per side until they are pink and have a nice dark sear.
Scoop a large portion of creamy grits into a bowl and pile the spicy shrimp on top.
Garnish with fresh chives and serve with a lemon wedge for squeezing over the shrimp.
19. Beef and Broccoli Ramen Bowl
Simple 20-Minute Meals
Twirly, golden ramen noodles are piled high in a deep blue bowl, mixed with savory ground beef and bright green broccoli. A pair of wooden chopsticks lifts a bundle of noodles, showing off the glossy sauce that coats every strand. Steam rises in thin curls, suggesting a hot and comforting meal.
Fresh green onions are scattered throughout the dish, adding a touch of brightness to the savory beef. This meal is a fast and effective way to upgrade a simple pack of noodles into a complete dinner. It looks like a cozy bowl of warmth that is perfect for a fast weeknight fix.
The combination of textures—from the soft noodles to the crunchy broccoli—is very satisfying. This recipe proves that you can make a hearty meal using simple ingredients you likely already have. It is a smart choice for anyone craving a salty and savory stir-fry flavor.
Ingredients
2 packs of instant ramen noodles (discard the flavor packets)
1/2 pound ground beef
2 cups fresh broccoli florets
1/4 cup soy sauce
1 tablespoon brown sugar
1 teaspoon minced ginger
2 green onions, sliced
1 tablespoon vegetable oil
Equipment
Large pot for pasta
Large skillet or wok
Small bowl for sauce
Tongs
DIY Instructions
Fill a pot with water and bring it to a boil to cook the ramen noodles.
Add the noodles and the broccoli florets to the boiling water at the same time.
Cook for about 3 minutes until the noodles are soft and the broccoli is bright green.
Drain the noodles and broccoli in a colander and set them aside.
In a small bowl, whisk together the soy sauce, brown sugar, and ginger.
Heat the oil in your skillet over medium-high heat and add the ground beef.
Cook the beef until it is fully browned, breaking it into small crumbles with a spoon.
Add the drained noodles and broccoli into the skillet with the cooked beef.
Pour the sauce over everything and toss with tongs for 1 to 2 minutes until hot and coated.
Divide the mixture into bowls and top with plenty of sliced green onions before eating.
20. Caprese Flatbread Bites
Simple 20-Minute Meals
Four round flatbreads are topped with thick slices of red tomato and creamy white mozzarella cheese. Each bite is finished with a generous drizzle of dark, sweet balsamic glaze that creates a beautiful striped pattern. Fresh green basil leaves are tucked under the glaze, adding an aromatic touch.
The flatbreads rest on a rustic wooden board, showing off their golden, toasted edges. Two of the pieces have small bites taken out of them, suggesting they are a delicious and easy-to-eat snack. This dish is a fresh and light way to enjoy the classic flavors of a Caprese salad.
Bright colors and simple ingredients make this plate look very inviting for a summer evening. This recipe is an excellent choice for a fast appetizer or a light dinner. It takes only minutes to assemble and requires very little cooking time.
Ingredients
4 small round flatbreads or pita rounds
2 large tomatoes, sliced into rounds
8 ounces fresh mozzarella cheese, sliced
1/4 cup balsamic glaze
1/2 cup fresh basil leaves
1 tablespoon olive oil
Salt and black pepper to taste
Equipment
Baking sheet
Toaster oven or regular oven
Cutting board
Knife
DIY Instructions
Preheat your oven or toaster oven to 400 degrees Fahrenheit.
Place the flatbread rounds onto a baking sheet and brush them with a tiny bit of olive oil.
Toast the flatbreads for about 3 minutes until they feel slightly firm and warm.
Place two slices of fresh tomato on each piece of warm bread.
Top the tomatoes with a slice of fresh mozzarella cheese.
Slide the tray back into the oven for just 1 or 2 minutes to let the cheese soften.
Take the flatbreads out and tuck a few fresh basil leaves between the tomato and cheese.
Season each bite with a tiny pinch of salt and a bit of cracked black pepper.
Drizzle the balsamic glaze back and forth over the top of each flatbread.
Serve immediately while the bread is crunchy and the cheese is creamy.
21. Pan-Seared Sausage and Peppers
Simple 20-Minute Meals
Three thick, juicy sausages rest in a dark cast iron skillet, showing off deep, caramelized sear marks. They are nestled among a colorful tangle of sliced red, yellow, and green bell peppers. Thin slivers of sautéed white onion are mixed in, softened and sweet from the high heat of the pan.
A fresh lemon half and a small bowl of cracked black pepper sit in the background on a rustic wooden surface. The steam rising from the skillet suggests a savory and smoky aroma that fills the air. This meal looks like a classic, hearty comfort dish that requires very little effort to pull together.
Vibrant vegetable colors contrast beautifully against the dark iron of the pan. This setup is a great way to enjoy a protein-heavy meal with plenty of fresh produce. It is a reliable choice for a fast dinner that still feels special and home-cooked.
Ingredients
1 pound Italian sausages (sweet or spicy)
2 large bell peppers (red and yellow), sliced into strips
1 large green bell pepper, sliced into strips
1 medium white onion, thinly sliced
2 tablespoons olive oil
1 teaspoon dried basil
1/2 teaspoon garlic powder
Salt and black pepper to taste
Equipment
Large cast iron skillet
Tongs
Chef’s knife
Cutting board
DIY Instructions
Place your cast iron skillet over medium-high heat and add one tablespoon of olive oil.
Lay the sausages in the hot pan and cook them for about 5 minutes per side.
Use your tongs to turn them frequently until they are browned on all sides and cooked through.
Remove the sausages from the skillet and set them aside on a clean plate.
Add the remaining tablespoon of oil to the same pan without cleaning it out.
Toss in the sliced bell peppers and onions, stirring them to coat in the leftover sausage juices.
Sprinkle the dried basil, garlic powder, salt, and pepper over the vegetables.
Sauté the peppers and onions for 5 to 7 minutes until they are soft and slightly charred.
Place the cooked sausages back into the skillet on top of the vegetables to warm them up.
Serve hot directly from the skillet for an easy and impressive presentation.
22. White Bean and Kale Soup
Simple 20-Minute Meals
A deep blue ceramic bowl holds a clear, steaming broth filled with tender white cannellini beans and vibrant green kale leaves. A single golden brown crouton floats in the center, topped with a pinch of red chili flakes for a subtle heat. The kale is wilted perfectly, maintaining its bright color against the pale beans.
A silver spoon rests in the bowl, ready to scoop up a heart-warming mouthful of this nutritious soup. Tiny droplets of olive oil and flecks of black pepper glisten on the surface of the liquid. This dish looks like the definition of healthy comfort food, offering a light but satisfying meal.
Simple ingredients come together here to create a very clean and professional appearance. This recipe is a fantastic way to get your greens in while enjoying a warm, savory broth. it is an excellent option for a quick lunch or a light evening meal.
Ingredients
2 cans (15 ounces each) cannellini beans, rinsed and drained
1 large bunch of curly kale, stems removed and leaves chopped
4 cups vegetable or chicken broth
1 medium onion, diced
2 cloves garlic, minced
1 tablespoon olive oil
1 teaspoon lemon juice
1/4 teaspoon red pepper flakes
Salt and black pepper to taste
Large croutons for garnish
Equipment
Large soup pot or Dutch oven
Wooden spoon
Ladle
Knife and cutting board
DIY Instructions
Heat the olive oil in your large soup pot over medium heat.
Add the diced onion and cook for about 3 minutes until it becomes translucent.
Stir in the minced garlic and red pepper flakes, cooking for just one more minute.
Pour in the vegetable or chicken broth and bring the liquid to a gentle boil.
Add the rinsed white beans to the pot and lower the heat to a simmer.
Let the soup cook for 5 minutes to allow the flavors to blend together.
Stir in the chopped kale leaves and cook for 2 to 3 minutes until they are wilted and soft.
Add the lemon juice, salt, and black pepper to taste.
Ladle the hot soup into bowls and place a large crouton in the center of each.
Serve immediately while hot for a refreshing and healthy dining experience.
23. Pecan-Crusted Chicken Salad
Simple 20-Minute Meals
A clear glass container is packed with a creamy, shredded chicken salad that looks rich and flavorful. Large, toasted pecan halves are scattered across the top, providing a dark and crunchy contrast to the pale chicken. Bright green onions and a dusting of red paprika add a pop of color to the dish.
In the background, a small head of butter lettuce is shaped like a rose, suggesting a fresh way to serve the salad. A few yellow cherry tomatoes sit nearby, adding to the garden-fresh feel of the meal. This looks like a gourmet take on a classic deli staple, perfect for meal prepping.
The mixture appears thick and satisfying, with plenty of visible texture from the nuts and herbs. This recipe is a smart way to use leftover chicken for a fast and delicious lunch. It offers a wonderful balance of creamy dressing and earthy, crunchy pecans.
Ingredients
3 cups cooked chicken breast, shredded
1/2 cup mayonnaise
1/4 cup Greek yogurt (plain)
1/2 cup toasted pecan halves
2 green onions, thinly sliced
1 tablespoon Dijon mustard
1/2 teaspoon paprika
1/4 teaspoon garlic powder
Salt and black pepper to taste
Butter lettuce leaves for serving
Equipment
Large mixing bowl
Rubber spatula or large spoon
Airtight storage container
Knife and cutting board
DIY Instructions
Place your shredded, cooked chicken into a large mixing bowl.
Add the mayonnaise, Greek yogurt, and Dijon mustard to the bowl.
Stir the mixture thoroughly until all the chicken is evenly coated in the creamy dressing.
Fold in the sliced green onions, garlic powder, salt, and black pepper.
Sprinkle the paprika over the top and stir one last time to distribute the color.
Transfer the chicken salad into a glass container or serving bowl.
Top the salad with a generous handful of toasted pecan halves just before serving.
Wash and dry several large butter lettuce leaves to use as “wraps” or cups.
Spoon a large portion of the chicken salad into the center of a lettuce leaf.
Serve cold for a refreshing meal that is full of different textures and flavors.
24. Korean Beef Power Bowl
Simple 20-Minute Meals
A wide ceramic bowl is filled with a beautiful arrangement of colorful Korean-inspired ingredients. A mound of savory, crumbled ground beef sits at the bottom, topped with a perfectly fried egg with a runny yolk. A swirl of red gochujang sauce and a sprinkle of black sesame seeds decorate the egg.
Sections of matchstick carrots, fresh baby spinach, and spicy pickled cucumbers surround the central protein. Fluffy white rice peeks out from underneath the toppings, ready to soak up the sauce and egg yolk. This meal is a visual feast that promises a complex mix of sweet, spicy, and salty flavors.
The organization of the bowl makes it look incredibly professional and appetizing. This is a fantastic way to enjoy a balanced meal with plenty of vegetables and lean protein. It is a quick and effective way to bring international flavors to your dinner table.
Ingredients
1 pound ground beef
2 cups cooked white rice
1 large egg
1 cup matchstick carrots
2 cups fresh baby spinach
1 cucumber, sliced and tossed with chili flakes
2 tablespoons soy sauce
1 tablespoon brown sugar
1 tablespoon sesame oil
1 tablespoon gochujang (Korean chili paste)
1 teaspoon sesame seeds
Equipment
Large skillet
Small non-stick pan (for the egg)
Serving bowl
Measuring spoons
DIY Instructions
Cook your white rice according to the package directions and set it aside in a warm place.
Brown the ground beef in a large skillet over medium heat until it is fully cooked.
Stir in the soy sauce, brown sugar, and sesame oil, letting it simmer with the beef for 2 minutes.
Remove the beef from the skillet and place a portion into your serving bowl over a bed of rice.
Quickly sauté the spinach in the same skillet for 1 minute until it just begins to wilt.
Arrange the spinach, carrots, and spicy cucumbers in neat sections around the beef.
Fry the egg in a small non-stick pan until the white is set but the yolk is still runny.
Place the fried egg carefully in the center of the bowl on top of the beef.
Add a small dollop of gochujang sauce directly onto the egg yolk.
Sprinkle sesame seeds over the entire bowl and serve immediately while everything is hot.
25. Pesto Chicken Pasta with Roasted Tomatoes
Simple 20-Minute Meals
A bright blue plate is piled high with spiral rotini pasta tossed in a rich, nutty green pesto. Slices of seasoned grilled chicken are mixed in, topped with a cluster of roasted cherry tomatoes still on the vine. Fresh basil leaves and a dusting of grated parmesan cheese provide a final touch of elegance.
A small wooden bowl filled with toasted pine nuts sits to the side, suggesting an extra layer of crunch. The pasta looks perfectly coated in the sauce, with the red tomatoes providing a beautiful contrast to the green pesto. This dish looks like a fresh, summery meal that belongs at an outdoor dinner party.
The aroma of fresh basil and garlic likely fills the room when this plate is served. This recipe is a wonderful way to enjoy a classic Italian flavor profile with minimal cooking time. It is a very satisfying and visually stunning dinner option.
Ingredients
12 ounces rotini or fusilli pasta
2 cooked chicken breasts, sliced
1/2 cup prepared basil pesto
1 cup cherry tomatoes
2 tablespoons olive oil
1/4 cup grated parmesan cheese
2 tablespoons toasted pine nuts
Fresh basil leaves for garnish
Salt and black pepper to taste
Equipment
Large pot for pasta
Baking sheet (for tomatoes)
Large mixing bowl
Tongs
DIY Instructions
Preheat your oven to 400 degrees Fahrenheit to roast the cherry tomatoes.
Place the tomatoes on a baking sheet, drizzle with olive oil, and roast for 10 minutes until the skins burst.
Bring a large pot of salted water to a boil and cook the pasta according to the package instructions.
Drain the pasta well and transfer it into a large mixing bowl.
Add the prepared pesto to the warm pasta and toss with tongs until every spiral is green.
Gently fold in the sliced chicken and the roasted cherry tomatoes.
Season the dish with a bit of salt and plenty of cracked black pepper.
Divide the pasta into bowls or plates for serving.
Sprinkle a generous amount of parmesan cheese and toasted pine nuts over the top.
Garnish with a few fresh basil leaves and serve while the pasta is still warm.
26. Shrimp and Fish Soft Tacos
Simple 20-Minute Meals
Three soft flour tortillas rest on a dark, rustic baking sheet, each filled with a generous portion of flaky white fish. Plump, pink shrimp are tucked into the centers, adding a second layer of delicious seafood protein. A vibrant salsa made of diced tomatoes, green peppers, and onions provides a fresh and crunchy topping.
Thin rings of red onion and sprigs of fresh cilantro are scattered over the tacos, offering a sharp and aromatic finish. The tortillas appear light and soft, ready to be folded and enjoyed by hand. This meal looks like a festive and healthy choice for a quick dinner that brings a taste of the coast to your kitchen.
Lime wedges sit in the background, promising a bright burst of citrus to cut through the savory seasonings. This recipe is a fantastic way to enjoy a variety of seafood in one sitting. It offers a colorful and satisfying meal that takes very little time to prepare.
Ingredients
1/2 pound white fish fillets (like tilapia or cod)
1/2 pound medium shrimp, peeled and deveined
6 small flour tortillas
1 cup fresh salsa (tomatoes, onions, and peppers)
1/4 small red onion, thinly sliced
1/2 cup fresh cilantro leaves
2 tablespoons olive oil
1 teaspoon cumin
1/2 teaspoon chili powder
2 fresh limes
Equipment
Large non-stick skillet
Baking sheet (for serving)
Small bowl
Tongs
DIY Instructions
Pat the fish and shrimp dry with a paper towel to help them sear better in the pan.
Mix the cumin, chili powder, salt, and pepper in a small bowl.
Sprinkle the seasoning mix evenly over both sides of the fish and shrimp.
Heat the olive oil in your skillet over medium-high heat until it is hot.
Place the fish fillets in the pan and cook for 3 to 4 minutes per side until they flake easily.
Add the shrimp to the same pan and cook for 2 minutes per side until they are pink and firm.
Warm the flour tortillas in a separate dry pan or the microwave for a few seconds.
Break the cooked fish into large chunks and distribute it among the six tortillas.
Place two or three shrimp on top of the fish in each taco.
Finish by adding a spoonful of salsa, sliced red onions, and fresh cilantro before serving with lime wedges.
27. Hearty Red Lentil Dal with Spinach
Simple 20-Minute Meals
A dark cast iron skillet is filled to the brim with a thick, aromatic red lentil stew. The dal features a rich, orange hue from turmeric and tomatoes, with tender leaves of green spinach swirled throughout. A large dollop of cool white yogurt sits in the center, drizzled with a touch of golden oil.
Fragrant cumin seeds are scattered over the surface, promising a warm and earthy flavor in every bite. A wooden spoon rests in the skillet, suggesting a meal that is ready to be shared family-style. This dish looks like a comforting and nutrient-dense option for a cold evening.
Steam rises gently from the pan, carrying the scent of ginger, garlic, and spices. This recipe is a wonderful vegetarian choice that provides a high amount of protein and fiber. It is a simple one-pan meal that is both filling and deeply satisfying.
Ingredients
1 cup dry red lentils, rinsed
3 cups vegetable broth
1 can (14 ounces) crushed tomatoes
2 cups fresh baby spinach
1 medium onion, finely diced
3 cloves garlic, minced
1 tablespoon fresh ginger, grated
1 tablespoon olive oil
1 teaspoon turmeric powder
1/2 cup plain Greek yogurt
Fresh cilantro for garnish
Equipment
Large deep skillet or pot
Wooden spoon
Ladle
Fine-mesh strainer
DIY Instructions
Rinse your red lentils in a strainer under cold water until the water runs clear.
Heat the olive oil in your skillet over medium heat and add the diced onion.
Sauté the onion for about 5 minutes until it is soft and slightly golden.
Stir in the minced garlic, grated ginger, and turmeric, cooking for just one minute until fragrant.
Add the rinsed lentils, crushed tomatoes, and vegetable broth to the skillet.
Bring the mixture to a boil, then turn the heat down to low and cover the pan.
Simmer for about 15 minutes or until the lentils are soft and have absorbed most of the liquid.
Remove the lid and stir in the fresh spinach leaves until they are wilted and soft.
Season the dal with salt and pepper to taste, then turn off the heat.
Top the skillet with a large scoop of yogurt and fresh cilantro before serving in deep bowls.
28. Ham and Swiss Savory Crepes
Simple 20-Minute Meals
Two golden, lacy crepes are folded over a rich filling of thin-sliced ham and melted Swiss cheese. Stringy cheese pulls away from the center, showing off the warm and gooey texture of the meal. A sprinkle of fresh chives on top adds a delicate onion flavor and a touch of green color.
The crepes have a beautiful toasted pattern on the outside, suggesting a light and slightly crisp finish. A small bowl of whole grain mustard and a fresh green salad sit in the background, offering sharp and bright side pairings. This dish looks like a sophisticated brunch-style dinner that can be made in minutes.
Soft textures and savory flavors make this plate feel very indulgent yet light. This recipe is a great way to use standard deli ingredients in a new and elegant way. It provides a simple balance of salty ham and creamy cheese that is hard to beat.
Ingredients
4 large ready-made savory crepes (or thin tortillas)
8 slices of deli ham
1 cup shredded Swiss or Gruyère cheese
2 tablespoons unsalted butter
2 tablespoons fresh chives, chopped
1/4 cup whole grain mustard (for serving)
2 cups mixed greens (for serving)
Equipment
Large non-stick skillet
Spatula
Serving board or plate
Knife
DIY Instructions
Place your large skillet over medium-low heat and melt a tiny bit of butter.
Lay one ready-made crepe flat in the pan to warm it through for 30 seconds.
Place two slices of ham over one half of the crepe.
Sprinkle a generous quarter-cup of shredded Swiss cheese over the ham.
Fold the empty half of the crepe over the filling to create a half-moon shape.
Cook for about 2 minutes until the cheese starts to melt and the bottom of the crepe is golden.
Flip the crepe carefully and cook for another minute to finish melting the cheese.
Slide the warm crepe onto a serving board and sprinkle it with chopped chives.
Repeat the process for the remaining crepes until all the ingredients are used.
Serve immediately with a side of whole grain mustard and a fresh green salad.
29. Mediterranean Tuna-Stuffed Peppers
Simple 20-Minute Meals
Six vibrant bell pepper halves, in shades of red, orange, and green, serve as edible bowls for a Mediterranean tuna salad. The tuna is mixed with dark Kalamata olives, red onions, and fresh parsley for a burst of flavor. A thin slice of lemon and a single olive sit on top of each pepper as a garnish.
The peppers are arranged on a wooden board, looking like a fresh and healthy appetizer or a light meal. Tiny capers and a drizzle of olive oil add a salty and rich finish to the dish. This meal is a fantastic no-cook option that focuses on assembly and fresh produce.
Bright colors and crisp textures make this plate look very appetizing for a warm evening. This recipe is a smart way to enjoy a low-carb dinner that is full of healthy fats and protein. It offers a refreshing and tangy taste that is perfect for a fast fix.
Ingredients
3 large bell peppers (different colors), halved and deseeded
2 cans (5 ounces each) tuna in water, drained
1/4 cup Kalamata olives, chopped
1/4 small red onion, finely diced
2 tablespoons capers
2 tablespoons fresh parsley, chopped
1 tablespoon olive oil
1 tablespoon lemon juice
Salt and black pepper to taste
Equipment
Medium mixing bowl
Chef’s knife
Cutting board
Wooden serving tray
DIY Instructions
Wash your bell peppers and cut them in half from top to bottom, removing the seeds and white ribs.
Drain the water from the tuna cans and place the fish into a medium mixing bowl.
Use a fork to flake the tuna into smaller pieces so it is easy to mix.
Add the chopped olives, diced red onion, capers, and fresh parsley to the bowl.
Pour the olive oil and lemon juice over the mixture and stir until everything is combined.
Season the tuna salad with a pinch of salt and a generous amount of black pepper.
Place the bell pepper halves on a clean serving board or tray.
Spoon a large amount of the tuna mixture into each pepper half, pressing down slightly to pack it in.
Top each portion with an extra olive or a small lemon wedge for decoration.
Serve immediately while the peppers are crisp and the tuna is fresh.
30. Cheesy Sloppy Joe Sliders
Simple 20-Minute Meals
Twelve soft, golden slider buns are nestled in a black skillet, filled with a saucy ground beef mixture and melted cheddar cheese. The meat is thick and rich, bubbling out from the sides of the buns. A generous sprinkle of fresh green onions on top adds a bright finish to the savory dish.
A red and white checkered napkin sits underneath the skillet, giving the meal a fun and casual picnic feel. The buns have a shiny, buttery top that looks incredibly inviting for a family-style dinner. This dish is a crowd-pleasing twist on a classic comfort food that is easy to share.
Warm scents of toasted bread and savory beef likely fill the kitchen when this pan comes out of the oven. This recipe is a great way to feed a group of people quickly and with very little mess. It offers a satisfying mix of sweet sauce and salty cheese.
Ingredients
1 package (12 count) slider rolls
1 pound ground beef
1 cup sloppy joe sauce (canned or homemade)
2 cups shredded cheddar cheese
2 tablespoons butter, melted
2 green onions, sliced
1/2 teaspoon garlic powder
Equipment
Large skillet (oven-safe)
Wooden spoon
Pastry brush
Bread knife
DIY Instructions
Preheat your oven to 350 degrees Fahrenheit so it is ready for toasting the sliders.
Brown the ground beef in a skillet over medium heat until it is no longer pink.
Drain the excess fat from the pan and stir in the sloppy joe sauce.
Let the meat mixture simmer for about 5 minutes until it is thick and hot.
Slice the entire block of slider rolls in half horizontally without separating the individual buns.
Place the bottom half of the rolls into a large oven-safe skillet or a baking dish.
Spread the warm meat mixture evenly over the bottom buns.
Sprinkle the shredded cheddar cheese in a thick layer over the meat.
Place the top half of the rolls back on and brush the tops with melted butter and garlic powder.
Bake for 10 minutes until the cheese is melted, then garnish with green onions and serve.
31. Lemon Broccoli Chicken Penne
Simple 20-Minute Meals
Golden brown slices of seasoned chicken breast rest against a vibrant backdrop of al dente penne pasta. Bright green broccoli florets are nestled between the ridges of the noodles, adding a fresh and healthy crunch to the bowl. A light dusting of parmesan cheese coats the surface, melting slightly from the heat of the meal.
Tiny flecks of fresh parsley and black pepper provide a subtle hint of seasoning that enhances the bright citrus notes. This dish sits in a sky blue bowl, making the colors of the fresh vegetables and savory protein stand out. It looks like a balanced and refreshing dinner that satisfies without feeling too heavy.
Steam rises from the bowl, indicating a freshly prepared meal that is ready to be enjoyed. This recipe is a fantastic way to combine lean protein with nutritious greens for a fast family dinner. It offers a classic flavor combination that almost everyone loves.
Ingredients
1 pound chicken breast, sliced and seasoned
12 ounces penne pasta
2 cups fresh broccoli florets
3 tablespoons olive oil
2 tablespoons fresh lemon juice
1/4 cup grated parmesan cheese
2 tablespoons fresh parsley, chopped
Salt and black pepper to taste
Equipment
Large pot for pasta
Medium skillet for chicken
Tongs or a large spoon
Colander
DIY Instructions
Bring a large pot of salted water to a rolling boil on your stove.
Add the penne pasta to the boiling water and cook for 8 to 10 minutes until tender.
Toss the broccoli florets into the same pot during the last three minutes of pasta cooking time.
Drain the pasta and broccoli together in a colander and set them aside.
Heat two tablespoons of olive oil in a skillet over medium-high heat.
Place the sliced chicken in the pan and cook for about 5 to 6 minutes until browned and fully cooked.
Transfer the drained pasta and broccoli back into the large pot or a mixing bowl.
Add the cooked chicken, remaining olive oil, lemon juice, and parsley to the pasta.
Toss everything together gently so the lemon and oil coat every piece of food.
Serve immediately in bowls with a generous sprinkle of parmesan cheese on top.
32. Savory Black Bean Tostada
Simple 20-Minute Meals
A crispy, golden corn tortilla serves as a sturdy base for a thick layer of seasoned black beans. Thin rings of bright red onion and slices of fresh green jalapeño create a vibrant pattern on top of the dark beans. A drizzle of cool white crema and a sprinkle of crumbly white cheese add a rich finish to the dish.
Fresh cilantro leaves are tucked into the toppings, providing a burst of aromatic flavor and green color. This meal sits on a clean white plate, looking like a fresh and healthy take on a classic Mexican favorite. It offers a wonderful contrast of textures, from the crunchy base to the creamy bean filling.
Lime wedges and a bowl of salsa sit nearby, ready to add a zesty kick to every bite. This recipe is an excellent choice for a meatless dinner that is still very filling and full of protein. It is a fast way to enjoy bold, savory flavors with very little prep.
Ingredients
4 crispy corn tostada shells
1 can (15 ounces) black beans, warmed and seasoned
1/2 cup crumbled cotija or feta cheese
1/4 small red onion, thinly sliced
1 fresh jalapeño, sliced into thin rings
1/4 cup Mexican crema or sour cream
Fresh cilantro for garnish
1 lime, cut into wedges
Equipment
Small saucepan (for beans)
Spoons for spreading and drizzling
Cutting board
Knife
DIY Instructions
Empty the can of black beans into a small saucepan and warm them over medium heat.
Use a fork or a masher to lightly crush some of the beans so they become a bit spreadable.
Lay your crispy tostada shells flat on a clean plate or cutting board.
Spread a thick, even layer of the warm black beans across each shell.
Arrange the thin red onion rings in a circle on top of the beans.
Place several jalapeño slices across the surface, depending on how much heat you enjoy.
Sprinkle a handful of the crumbled white cheese over the vegetables.
Use a spoon to drizzle the white crema back and forth in a decorative pattern.
Finish the dish with a few fresh cilantro leaves for a touch of brightness.
Serve immediately with a lime wedge on the side to squeeze over the top.
33. Seared Scallops over Pearl Couscous
Simple 20-Minute Meals
Plump, jumbo scallops are perfectly seared to a deep golden brown and rest on a bed of soft pearl couscous. The scallops have a beautiful crust that suggests a buttery and savory flavor profile. Fresh green herbs and bright yellow lemon zest are scattered throughout the small grains of pasta.
A charred lemon half sits in the corner of the black cast iron skillet, ready to provide a warm, citrusy juice. Steam rises from the pan, highlighting the freshness of this elegant seafood dish. This meal looks like a high-end restaurant entree but is simple enough to make at home.
The contrast between the firm scallops and the tender, chewy couscous makes for an interesting dining experience. This recipe is a fantastic way to enjoy seafood when you want something light yet sophisticated. It is a smart choice for a special evening or a quick gourmet fix.
Ingredients
1/2 pound jumbo sea scallops, patted dry
1 cup dry pearl (Israeli) couscous
1 1/4 cups chicken or vegetable broth
3 tablespoons unsalted butter
1 tablespoon olive oil
1 teaspoon lemon zest
2 tablespoons fresh parsley, chopped
Salt and black pepper to taste
Equipment
Large cast iron skillet
Small saucepan (for couscous)
Tongs
Paper towels
DIY Instructions
Cook the pearl couscous in a saucepan with the broth according to the package directions until tender.
Remove the couscous from the heat and stir in the lemon zest and half of the parsley.
Remove the small, tough muscle from the side of each scallop if it is still attached.
Pat the scallops very dry with paper towels; this is the secret to a great golden sear.
Season both sides of the scallops with a tiny bit of salt and black pepper.
Heat the olive oil and one tablespoon of butter in your skillet over medium-high heat.
Place the scallops in the hot pan, making sure they do not touch each other.
Sear them for about 2 minutes on one side without moving them until a brown crust forms.
Flip the scallops and add the remaining butter to the pan, cooking for another 90 seconds.
Spoon the warm couscous into bowls, top with the seared scallops, and garnish with remaining parsley.
34. Pineapple Teriyaki Chicken Boat
Simple 20-Minute Meals
A hollowed-out pineapple half serves as a tropical bowl for a mound of fluffy white rice and shredded teriyaki chicken. The chicken is glazed in a dark, glossy sauce and topped with toasted sesame seeds and fresh green onions. Large chunks of bright yellow pineapple are tucked into the mixture for a sweet and juicy contrast.
Wooden chopsticks rest against the side of the pineapple, ready for the first bite of this festive meal. A small bowl of extra teriyaki sauce sits nearby on a rustic wooden table. This dish looks like a vacation in a bowl, offering a beautiful balance of sweet and savory flavors.
The presentation is incredibly striking and turns a simple chicken dinner into a special event. This recipe is a wonderful way to use fresh fruit to enhance a standard stir-fry meal. It provides a fun and creative way to serve dinner to your family or guests.
Ingredients
1 fresh pineapple, halved and hollowed out
2 cups cooked white rice
1 pound chicken breast, cooked and shredded
1/2 cup teriyaki sauce
2 green onions, thinly sliced
1 tablespoon sesame seeds
Fresh cilantro for garnish
Equipment
Sharp chef’s knife
Large spoon
Small saucepan
Mixing bowl
DIY Instructions
Cut a fresh pineapple in half lengthwise, keeping the green leaves on for a better look.
Use a knife to cut around the inside edge of the pineapple and scoop out the fruit with a spoon.
Chop some of the removed pineapple into bite-sized cubes and set them aside.
Warm your teriyaki sauce in a small saucepan over low heat until it starts to bubble.
Place your shredded, cooked chicken into a mixing bowl and pour the warm sauce over it.
Toss the chicken with a spoon until every piece has a thick coating of teriyaki glaze.
Fill the empty pineapple half with a large portion of warm, cooked white rice.
Pile the saucy teriyaki chicken on top of the rice, letting some of the glaze soak in.
Add the fresh pineapple cubes around the chicken to add sweetness and color.
Garnish the top with sliced green onions, sesame seeds, and a few cilantro leaves before serving.
35. Creamy Mushroom Stroganoff
Simple 20-Minute Meals
Broad, ribbon-like egg noodles are swirled in a rich, velvety brown gravy filled with sliced mushrooms. A large dollop of cool white sour cream sits in the center, topped with a pinch of fresh green herbs. The mushrooms appear tender and savory, having soaked up the deep flavors of the sauce.
Steam curls upward from the white ceramic bowl, suggesting a meal that is both warm and deeply comforting. This dish looks like a classic home-cooked favorite that is perfect for a chilly evening. It offers a hearty and satisfying texture that feels indulgent without being over-complicated.
The earthy tones of the sauce and mushrooms make the white sour cream pop in the center of the frame. This recipe is a fantastic vegetarian alternative to the traditional beef version. It is a fast way to get a lot of flavor onto the table with minimal ingredients.
Ingredients
12 ounces wide egg noodles
1 pound cremini or button mushrooms, sliced
1 medium onion, diced
2 cloves garlic, minced
2 cups beef or vegetable broth
1/2 cup sour cream
2 tablespoons butter
2 tablespoons all-purpose flour
Fresh parsley for garnish
Equipment
Large pot for noodles
Large deep skillet
Whisk
Wooden spoon
DIY Instructions
Boil a large pot of salted water and cook your egg noodles according to the package directions.
Melt the butter in a large skillet over medium heat and add the diced onions.
Sauté the onions for 3 minutes, then add the sliced mushrooms to the pan.
Cook the mushrooms for about 7 minutes until they are brown and have released their liquid.
Stir in the minced garlic and cook for just one minute until you can smell it.
Sprinkle the flour over the mushrooms and stir constantly for one minute to make a thick paste.
Slowly pour in the broth while whisking to prevent any lumps from forming in the sauce.
Let the gravy simmer for 5 minutes until it thickens enough to coat the back of a spoon.
Add the cooked egg noodles to the skillet and toss them gently with the mushroom gravy.
Serve in bowls with a large spoonful of sour cream and a sprinkle of parsley on top.
36. Pesto Turkey and Spinach Wrap
Simple 20-Minute Meals
A large, toasted flour tortilla is rolled tightly around layers of deli turkey, melted cheese, and fresh green spinach. A thick layer of bright green pesto is visible inside the roll, adding a burst of herbal flavor. The wrap is sliced in half to show the neat, concentric circles of the various ingredients.
The outside of the tortilla features dark brown grill marks, suggesting a light and crispy texture. A few fresh arugula leaves are scattered around the wrap on a wooden cutting board. This meal looks like a fresh and smart lunch or a very fast dinner for a busy day.
The contrast between the warm, toasted bread and the fresh green interior is very inviting. This recipe is a great way to use standard deli meat for a more sophisticated and flavorful meal. It is a reliable choice for anyone who wants a portable and healthy dinner.
Ingredients
2 large flour tortillas
1/2 pound thin-sliced deli turkey
4 slices provolone or mozzarella cheese
1/4 cup prepared basil pesto
2 cups fresh baby spinach
1 tablespoon butter or olive oil
Equipment
Non-stick skillet or panini press
Spatula
Knife
Cutting board
DIY Instructions
Lay your flour tortillas flat on a clean cutting board or a large plate.
Spread a generous layer of basil pesto across the entire surface of each tortilla.
Place the deli turkey slices in an even layer over the pesto.
Add the cheese slices on top of the turkey so they are in the center of the wrap.
Pile a large handful of fresh spinach over the cheese and turkey.
Fold the sides of the tortilla in and roll it up tightly from bottom to top.
Heat a skillet over medium heat with a tiny bit of butter or olive oil.
Place the wrap seam-side down in the hot pan to seal it and toast the bottom.
Cook for about 2 minutes per side until the tortilla is golden and the cheese inside has melted.
Remove the wrap from the pan and slice it in half at an angle before serving.
37. Sheet Pan Sausage and Cabbage
Simple 20-Minute Meals
Thick rounds of savory sausage are roasted alongside large wedges of tender, charred green cabbage. Small cubes of golden potatoes are scattered across the baking sheet, seasoned with aromatic caraway seeds and black pepper. The edges of the cabbage are dark and crispy, offering a smoky sweetness to the dish.
Thin slices of red onion are woven through the mixture, having softened and caramelized in the oven. This meal is served directly on a rimmed baking tray, showcasing a rustic and straightforward style of cooking. It looks like a hearty, old-fashioned dinner that is very easy to prepare and clean up.
Warm scents of roasted vegetables and seasoned meat likely fill the kitchen when this tray is removed. This recipe is an excellent way to turn humble ingredients into a very satisfying and filling meal. It is a smart choice for anyone who loves a one-pan dinner with lots of texture.
Ingredients
1 pound smoked sausage or kielbasa, sliced into rounds
1 medium head of green cabbage, cut into wedges
2 large potatoes, cut into small cubes
1/2 red onion, sliced
3 tablespoons olive oil
1 teaspoon caraway seeds (optional)
Salt and black pepper to taste
Equipment
Large rimmed baking sheet
Large mixing bowl
Chef’s knife
Cutting board
DIY Instructions
Preheat your oven to 400 degrees Fahrenheit so it is hot when you are ready to roast.
Cut the cabbage into thick wedges, making sure to leave a bit of the core so they stay together.
Place the sausage rounds, cabbage wedges, potato cubes, and onions into a large mixing bowl.
Drizzle the olive oil over everything and sprinkle on the caraway seeds, salt, and pepper.
Toss the ingredients gently with your hands until every piece has a light coating of oil.
Spread the mixture out in a single layer on your large baking sheet.
Arrange the cabbage wedges so they have enough space to roast without being covered by other food.
Slide the tray into the oven and roast for about 20 to 25 minutes.
Remove the tray halfway through to flip the sausage and stir the potatoes for even browning.
Serve hot directly from the tray for a simple and comforting family-style dinner.
38. Dumpling Egg Drop Soup
Simple 20-Minute Meals
Golden, pan-seared dumplings float in a clear, savory broth filled with swirls of whisked egg. The dumplings have a dark brown bottom that suggests a nice crunch, contrasting with the soft, silky texture of the soup. Thinly sliced green onions and a sprinkle of sesame seeds are scattered over the surface.
Steam rises in delicate wisps from the black skillet, indicating a hot and soothing meal. This dish is a creative way to combine two favorite take-out items into one fast and comforting bowl. It looks like a light yet satisfying dinner that is perfect for when you feel a bit under the weather.
Tiny droplets of toasted sesame oil glisten on the surface of the broth, adding a rich aroma. This recipe is an incredibly fast way to get a lot of flavor out of frozen staples. It offers a warm and savory experience that takes less than fifteen minutes to assemble.
Ingredients
10 to 12 frozen potstickers or dumplings
4 cups chicken or vegetable broth
2 large eggs, lightly whisked
1 tablespoon soy sauce
1 teaspoon sesame oil
2 green onions, thinly sliced
1 tablespoon vegetable oil
Equipment
Large deep skillet or pot
Small bowl (for eggs)
Fork or whisk
Ladle
DIY Instructions
Heat the vegetable oil in your skillet over medium-high heat.
Place the frozen dumplings in the pan and sear them for 2 minutes until the bottoms are golden.
Carefully pour the broth into the skillet with the dumplings and bring it to a boil.
Lower the heat and let the dumplings simmer in the broth for about 5 minutes until they are cooked through.
Stir in the soy sauce and sesame oil to season the broth.
Whisk your eggs in a small bowl until the yolks and whites are fully combined.
Stir the soup in a circular motion to create a slow whirlpool in the center.
Slowly drizzle the whisked eggs into the moving broth to create thin, silky “ribbons.”
Turn off the heat immediately so the eggs stay soft and do not overcook.
Ladle the soup and dumplings into bowls and top with plenty of fresh green onions.
39. Zucchini Ribbon and Chickpea Salad
Simple 20-Minute Meals
Long, elegant ribbons of fresh green zucchini are tangled together in a bright white bowl. Piles of protein-rich chickpeas and crumbles of white feta cheese are scattered throughout the greens. Fresh mint leaves and a dusting of black pepper add a refreshing and aromatic finish to the dish.
A lemon half sits at the top of the bowl, ready to provide a sharp and bright dressing. This meal looks exceptionally light and healthy, focusing on fresh produce and simple textures. It is a fantastic choice for a quick summer dinner or a side dish for grilled protein.
Bright green colors of the zucchini and mint make the bowl look very appetizing and fresh. This recipe is a great way to use seasonal vegetables in a new and visually interesting way. It offers a cool and crunchy experience that is very satisfying on a warm day.
Ingredients
2 medium zucchini
1 can (15 ounces) chickpeas, rinsed and drained
1/2 cup crumbled feta cheese
1/4 cup fresh mint leaves, torn
2 tablespoons olive oil
Juice of half a lemon
Salt and black pepper to taste
Equipment
Vegetable peeler
Large salad bowl
Small jar for dressing
Colander
DIY Instructions
Wash your zucchini and use a vegetable peeler to shave them into long, thin ribbons.
Stop peeling once you reach the seedy center of the zucchini to keep the ribbons firm.
Place the zucchini ribbons into a large salad bowl and add the rinsed chickpeas.
Toss in the crumbled feta cheese and the torn fresh mint leaves.
In a small jar or bowl, whisk together the olive oil and lemon juice.
Season the dressing with a pinch of salt and a good amount of black pepper.
Drizzle the dressing over the zucchini mixture right before you are ready to eat.
Toss the salad gently with your hands or a large spoon so the ribbons do not break.
Let the salad sit for two minutes to allow the lemon juice to soften the zucchini slightly.
Serve immediately while the vegetables are crisp and the flavors are bright.
40. Crispy Chicken Caesar Salad
Simple 20-Minute Meals
Large slices of breaded, golden chicken are arranged over a bed of crisp green romaine lettuce. A thick, creamy dressing is drizzled back and forth over the chicken, creating an inviting and indulgent look. Bright red cherry tomato halves and thin rings of red onion add pops of color and extra flavor to the bowl.
Small kernels of yellow corn are scattered throughout, adding a touch of sweetness to the savory salad. This meal is served in a wide wooden bowl, giving it a fresh and wholesome feel. It looks like a very satisfying way to enjoy a classic salad with a bit of extra protein and crunch.
The variety of textures—from the crunchy chicken to the juicy tomatoes—makes every bite interesting. This recipe is a fast way to turn pre-cooked or frozen chicken into a complete and healthy dinner. It offers a classic flavor profile that is familiar and comforting.
Ingredients
2 breaded chicken cutlets, cooked and sliced
1 large head of romaine lettuce, chopped
1/2 cup cherry tomatoes, halved
1/4 cup canned corn, drained
1/4 small red onion, thinly sliced
1/2 cup Caesar dressing
1/4 cup grated parmesan cheese
Equipment
Large salad bowl
Chef’s knife
Cutting board
Tongs for tossing
DIY Instructions
Wash the romaine lettuce and chop it into bite-sized pieces, then place it in a large bowl.
Slice your cooked, crispy chicken cutlets into thin strips about half an inch wide.
Add the cherry tomato halves, corn, and sliced red onions to the bed of lettuce.
Place the sliced chicken in a neat row across the top of the other ingredients.
Use a spoon to drizzle the Caesar dressing over the chicken and the greens.
Sprinkle a generous amount of grated parmesan cheese over the entire bowl.
Toss the salad gently if you prefer the dressing to be mixed in completely.
Add a bit of extra black pepper to the top for a little more seasoning.
Serve immediately while the chicken is still warm and the lettuce is crisp.
Enjoy this filling and easy meal that brings a restaurant favorite to your own table.
41. Pan-Seared Salmon with Lemon Glaze
Simple 20-Minute Meals
A thick, succulent salmon fillet sits in a seasoned cast iron skillet, featuring a beautifully browned and crispy surface. The fish is bathed in a shallow pool of golden lemon butter sauce that glistens under the kitchen lights. Three thin lemon wheels are layered across the top, garnished with a light dusting of fresh green parsley.
Bright citrus notes pair with the savory aroma of the seared fish to create a truly inviting meal. This dish looks elegant enough for a restaurant but uses simple techniques that anyone can master in minutes. The dark skillet provides a rustic background that makes the vibrant orange and yellow colors pop.
Healthy fats and bright flavors make this a top choice for a quick, nutritious dinner. This recipe proves you do not need much time to prepare a high-quality protein dish. It is a wonderful way to finish a busy day with a light and refreshing meal.
Ingredients
1 large salmon fillet (approx. 8 ounces)
2 tablespoons unsalted butter
1 tablespoon olive oil
1/2 fresh lemon, sliced into rounds
1 tablespoon fresh parsley, finely chopped
1/2 teaspoon garlic powder
Salt and black pepper to taste
Equipment
Small cast iron skillet or non-stick frying pan
Fish spatula or tongs
Measuring spoons
Chef’s knife
DIY Instructions
Use a paper towel to pat the salmon fillet completely dry on both sides so it sears properly.
Sprinkle the garlic powder, salt, and black pepper evenly over the top of the fish.
Place your skillet over medium-high heat and add the olive oil.
Lay the salmon in the hot pan, skin-side up first, once the oil begins to shimmer.
Cook the fish for 4 minutes without moving it to develop a dark, crispy crust.
Flip the fillet carefully using a spatula and drop the butter into the pan.
Arrange the lemon slices on top of the salmon as the butter melts and starts to bubble.
Spoon the melted lemon butter over the fish repeatedly for another 3 minutes of cooking.
Turn off the heat once the salmon is opaque and flakes easily with a fork.
Garnish with fresh parsley and serve directly from the skillet for a beautiful presentation.
42. Smoked Salmon and Avocado Toast
Simple 20-Minute Meals
A thick slice of artisanal sourdough bread is toasted to a deep golden brown and topped with a mountain of smashed avocado. Delicate ribbons of bright pink smoked salmon are folded over the creamy green base, creating a beautiful textured look. Thin rings of red onion, briny capers, and fresh dill sprigs add layers of sharp flavor and color.
The toast is finished with a heavy sprinkle of everything bagel seasoning, adding a satisfying crunch to every bite. This meal looks like a professional brunch dish that is surprisingly easy to assemble at home. It offers a fresh and vibrant way to end the day with plenty of healthy ingredients.
Creamy avocado and salty salmon provide a classic flavor combination that is both filling and light. This recipe is an excellent no-cook option for those evenings when you want zero stress. It is a visually stunning meal that feels like a special treat.
Ingredients
1 thick slice of sourdough or multigrain bread
1/2 ripe avocado
3 ounces smoked salmon slices
1 tablespoon capers
3-4 thin rings of red onion
1 teaspoon everything bagel seasoning
Fresh dill sprigs for garnish
Squeeze of fresh lemon juice
Equipment
Toaster or skillet (for bread)
Small bowl
Fork
Butter knife
DIY Instructions
Place your slice of bread in a toaster or on a dry skillet until it is crunchy and golden brown.
Cut the avocado in half, remove the pit, and scoop the green fruit into a small bowl.
Mash the avocado with a fork until it is mostly smooth but still has a few small chunks for texture.
Spread the mashed avocado in a thick, even layer over the warm piece of toast.
Drape the smoked salmon slices over the avocado in a decorative, folded pattern.
Tuck the thin red onion rings between the folds of the salmon.
Sprinkle the capers and the everything bagel seasoning evenly across the top.
Add a few small pieces of fresh dill to give the toast an aromatic finish.
Squeeze a tiny bit of lemon juice over the fish to brighten all the flavors.
Slice the toast in half at an angle and serve immediately while the bread is still crisp.
Key Takeaways
Speed is Priority: Every dish listed is specifically designed to be completed in twenty minutes or less.
Minimal Cleanup: Many recipes utilize one-pan or one-pot methods to save you time at the sink.
Pantry Staples: We focus on ingredients you likely already have or can find easily at any local market.
Versatile Flavors: This list covers everything from fresh seafood and hearty pasta to vibrant vegetarian bowls.
Creating a delicious dinner does not have to be a marathon event in your kitchen. You have seen how simple techniques and the right ingredients can transform your weeknight routine. These forty-two options provide enough variety to keep your meal plan exciting for weeks to come.
Take the stress out of your evening by choosing recipes that respect your time. Cooking at home is now an achievable goal rather than a distant dream. Pick a recipe from this list tonight and notice how much more relaxed your dinner hour becomes.
Spread the loveSticking to a healthy routine often feels impossible when your evening meals lack variety. Many home cooks fall into the “chicken and broccoli” trap, leading to burnout and expensive takeout orders. Breaking that…
Spread the loveDealing with fussy appetites at dinnertime can be one of the biggest challenges for any parent. Finding meals that both appeal to children and satisfy the flavor preferences of adults often feels like…
Spread the loveBurgers are a solid choice for dinner, but sometimes your taste buds crave something more exciting. Repeating the same heavy meals can feel like a chore. You deserve a kitchen that smells like…