Thanksgiving dinner often revolves around the centerpiece roast, but the heart of the feast truly lies in the side dishes. These accompanying courses provide the textures, colors, and contrasting flavors that make the meal memorable. A collection of delicious vegetable recipes is crucial for balancing the richness of the turkey and stuffing.

Many holiday hosts struggle with finding sides that are both simple to execute and genuinely exciting. We’ve compiled 45 effortless recipes to solve that dilemma. This list focuses on simple, elegant preparations that highlight seasonal vegetables without demanding hours of complicated prep time.
You will discover everything from creamy mashes and vibrant salads to deeply roasted, caramelized delights. Each recipe is designed to be approachable for the home cook, ensuring you can spend more time enjoying your guests and less time stressed in the kitchen. Prepare to wow everyone at your holiday table with these easy and flavorful vegetable creations.
1. Sesame-Glazed Charred Broccoli with Ginger

The holidays call for dishes that feel both comforting and a little unexpected. This stunning broccoli recipe delivers flavor that elevates a simple vegetable to something truly special.
Notice how the edges of the florets are beautifully caramelized, achieving a deep, smoky sweetness. A glistening, savory glaze coats each piece, promising a wonderful contrast to the satisfying crunch of the toasted sesame seeds. Slivers of fresh ginger scattered across the top add a bright, spicy lift. This side dish is incredibly easy to prepare but brings a restaurant-quality wow factor to your Thanksgiving table. It provides a welcome pop of vibrant green and a delightful texture against richer main courses.
Required Ingredients
- For the Broccoli:
- 1 large head of broccoli, cut into medium florets
- 2 tablespoons olive oil
- $1/4$ teaspoon salt
- $1/8$ teaspoon black pepper
- For the Sesame Glaze:
- 2 tablespoons soy sauce (or tamari for gluten-free)
- 1 tablespoon honey or maple syrup
- 1 tablespoon toasted sesame oil
- 1 teaspoon rice vinegar
- 1 clove garlic, minced
- $1/2$ teaspoon fresh ginger, grated
- For Garnish:
- 1 tablespoon toasted sesame seeds
- 1 teaspoon fresh ginger, cut into thin matchsticks
Equipment List
- Large cutting board
- Sharp chef’s knife
- Large mixing bowl
- Baking sheet
- Small saucepan or microwave-safe bowl
- Whisk
- Microplane or small grater
DIY Instruction (Step-by-Step)
Step 1: Prep the Broccoli and Oven
- Start by preheating your oven to $400^{\circ}\text{F}$ ($200^{\circ}\text{C}$). Line a large baking sheet with parchment paper for easy cleanup.
- Wash the head of broccoli thoroughly. Use a sharp knife to cut it into evenly sized, medium florets. Try to keep the stems about $1/2$ inch long.
- Place all the cut broccoli florets into a large mixing bowl.
Step 2: Season and Roast
- Drizzle the olive oil over the broccoli in the bowl. Sprinkle the salt and pepper over the florets.
- Use your hands or a large spoon to toss the broccoli. Make sure every piece is lightly coated with oil and seasoning. This helps the broccoli achieve that wonderful char.
- Spread the seasoned broccoli out onto the prepared baking sheet in a single layer. Do not overcrowd the pan; this is essential for crisping.
- Place the baking sheet in the preheated oven. Roast for 15 to 20 minutes. The broccoli should be fork-tender and the edges should look deeply caramelized and brown.
Step 3: Prepare the Sesame Glaze
- While the broccoli roasts, prepare the glaze. In a small saucepan, combine the soy sauce, honey (or maple syrup), toasted sesame oil, and rice vinegar.
- Mince the garlic and grate the $1/2$ teaspoon of ginger into the mixture.
- Place the saucepan over medium-low heat. Whisk the mixture constantly until it just begins to simmer and thickens slightly, about 3 to 5 minutes. If you do not want to use the stove, you can microwave the mixture in a small bowl for about 30 seconds until warm and combined.
Step 4: Glaze and Garnish
- Once the broccoli is finished roasting, carefully remove the baking sheet from the oven.
- Pour the prepared sesame glaze directly over the hot broccoli on the baking sheet.
- Toss the broccoli gently with a spatula, ensuring all the florets are coated in the glossy sauce.
- Transfer the glazed broccoli immediately to your serving dish.
- Garnish the top generously with the toasted sesame seeds and the thin matchsticks of fresh ginger before serving.
2. Creamy Parsnip and Sage Mash

This side dish redefines comfort, offering a sophisticated twist on traditional mashed vegetables. It’s wonderfully smooth, with a rich texture that simply melts in your mouth.
Golden fried sage leaves are scattered across the top, providing a beautiful aroma and a delicate crispness. Thin, roasted parsnip ribbons also adorn the mash, adding a subtle sweetness and earthy undertone. A generous drizzle of golden olive oil finishes the presentation, enhancing both the flavor and the visual appeal. This dish promises a hearty, warming addition to any festive meal, proving that root vegetables can be both elegant and incredibly delicious. It’s a comforting option that still feels fresh and exciting for your holiday spread.
Required Ingredients
- For the Mash:
- 2 lbs parsnips, peeled and cut into 1-inch pieces
- 1 lb russet potatoes, peeled and cut into 1-inch pieces (optional, for extra creaminess)
- 4 tablespoons unsalted butter
- $1/2$ cup warm milk (whole milk or a plant-based alternative)
- $1/4$ cup heavy cream (optional, for richer texture)
- $1/2$ teaspoon salt, or to taste
- $1/4$ teaspoon black pepper, or to taste
- For the Garnish:
- 10-12 fresh sage leaves
- 2 tablespoons olive oil (for frying sage and drizzle)
- 1 medium parsnip, thinly shaved into ribbons (using a vegetable peeler)
Equipment List
- Large pot
- Vegetable peeler
- Sharp knife
- Colander
- Potato masher or immersion blender
- Small skillet
- Serving bowl
DIY Instruction (Step-by-Step)
Step 1: Cook the Parsnips (and Potatoes)
- Begin by peeling both the parsnips and potatoes (if using). Cut them into roughly 1-inch pieces to ensure even cooking.
- Place the cut parsnips and potatoes into a large pot. Cover them with cold water by about 1 inch.
- Add a pinch of salt to the water. Bring the water to a boil over high heat, then reduce the heat to medium and simmer for 15-20 minutes, or until the vegetables are very tender when pierced with a fork.
Step 2: Mash the Vegetables
- Once tender, carefully drain the parsnips and potatoes thoroughly using a colander. Return the drained vegetables to the empty hot pot.
- Add the butter, warm milk, and heavy cream (if using) to the pot.
- Using a potato masher, begin to mash the vegetables until they reach your desired consistency. For an extra smooth mash, you can use an immersion blender or pass them through a food mill.
- Stir in the salt and pepper. Taste and adjust seasoning as needed. Keep the mash warm.
Step 3: Prepare the Garnish
- Heat 1 tablespoon of olive oil in a small skillet over medium heat.
- Once the oil is shimmering, carefully add the fresh sage leaves to the skillet in a single layer. Fry them for about 30 seconds to 1 minute on each side, until they are crisp and a deeper green color. Remove them from the skillet and place them on a paper towel-lined plate to drain.
- Using the same skillet, or adding a touch more olive oil if needed, quickly sauté the thinly shaved parsnip ribbons for 1-2 minutes until they are slightly softened and lightly browned at the edges. Remove and set aside.
Step 4: Assemble and Serve
- Transfer the warm parsnip and sage mash to your serving bowl.
- Arrange the crispy fried sage leaves and the sautéed parsnip ribbons artfully over the top of the mash.
- Finish with a generous drizzle of your best olive oil just before serving.
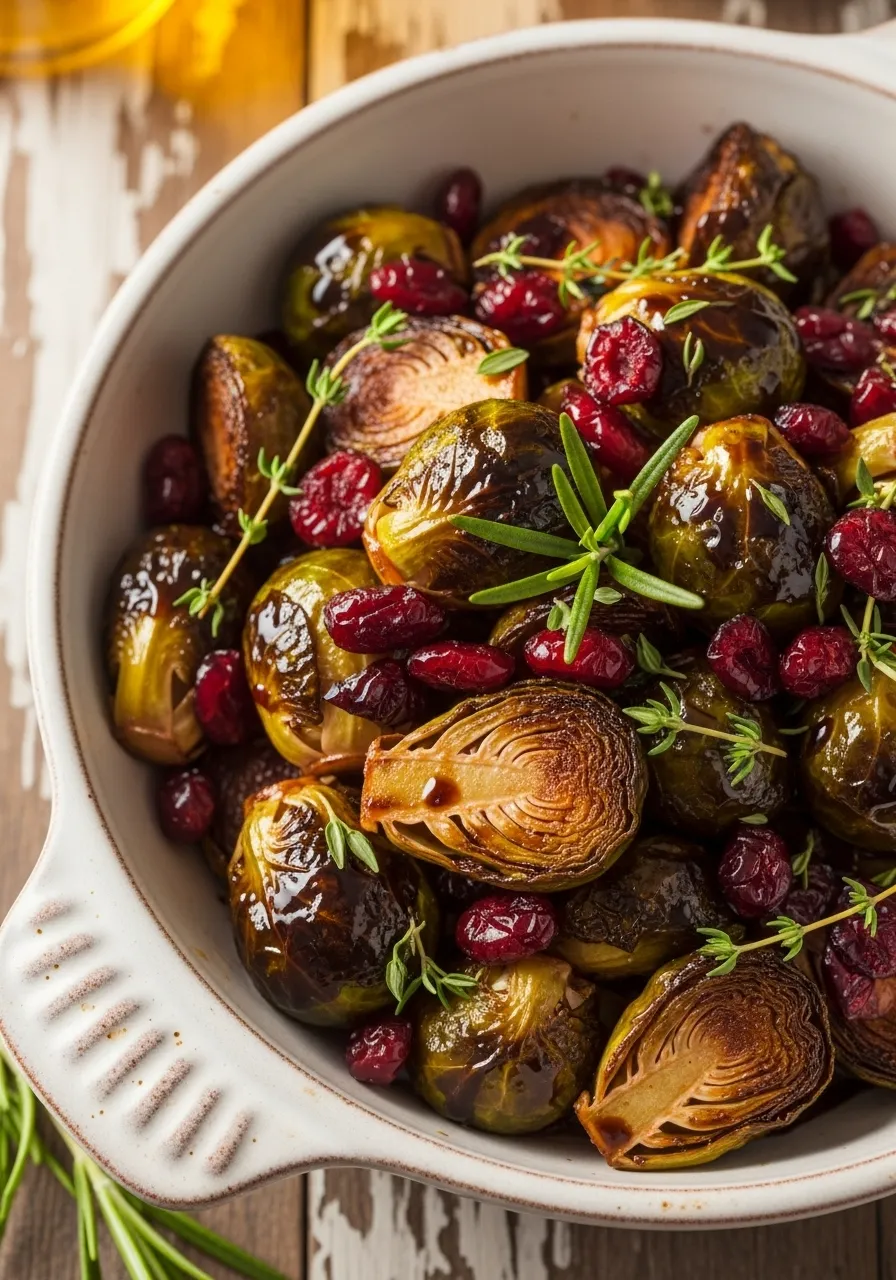
3. Balsamic Glazed Brussels Sprouts with Cranberries

This visually appealing dish showcases roasted Brussels sprouts with a glossy, inviting sheen. It’s a side that truly pops with color and festive spirit.
Each Brussels sprout boasts beautifully caramelized edges, indicating a tender interior and rich, savory flavor. Bright, ruby-red dried cranberries are generously mixed throughout, adding a delightful chewiness and a touch of tart sweetness. Sprigs of fresh rosemary and thyme are nestled among the sprouts, releasing their fragrant, earthy aromas. This combination of textures and tastes creates a complex yet approachable side that will surely be a highlight on your Thanksgiving table, balancing the richness of the holiday meal.
Required Ingredients
- 2 lbs Brussels sprouts, trimmed and halved
- 2 tablespoons olive oil
- $1/4$ teaspoon salt
- $1/8$ teaspoon black pepper
- For the Balsamic Glaze:
- $1/2$ cup balsamic vinegar
- 1 tablespoon maple syrup or brown sugar
- $1/2$ cup dried cranberries
- 2 sprigs fresh rosemary, roughly chopped
- 2 sprigs fresh thyme, roughly chopped
Equipment List
- Large cutting board
- Sharp knife
- Large mixing bowl
- Baking sheet
- Small saucepan
- Whisk
DIY Instruction (Step-by-Step)
Step 1: Prep the Brussels Sprouts and Oven
- Preheat your oven to $400^{\circ}\text{F}$ ($200^{\circ}\text{C}$).
- Trim the tough ends off the Brussels sprouts and remove any loose outer leaves. Cut each sprout in half lengthwise.
- Place the halved Brussels sprouts into a large mixing bowl.
- Drizzle the olive oil over the sprouts. Sprinkle with salt and black pepper.
- Toss everything together until the sprouts are evenly coated.
Step 2: Roast the Brussels Sprouts
- Spread the seasoned Brussels sprouts in a single layer on a large baking sheet. Ensure they have some space to breathe; this helps them roast rather than steam.
- Roast in the preheated oven for 20-25 minutes, or until the sprouts are tender and their edges are nicely browned and caramelized.
Step 3: Prepare the Balsamic Glaze
- While the Brussels sprouts are roasting, prepare the glaze. In a small saucepan, combine the balsamic vinegar and maple syrup (or brown sugar).
- Bring the mixture to a gentle simmer over medium heat.
- Reduce the heat to low and continue to simmer, stirring occasionally, for 5-7 minutes. The glaze should thicken enough to coat the back of a spoon. Be careful not to let it get too thick, as it will thicken further as it cools.
Step 4: Combine, Glaze, and Serve
- Once the roasted Brussels sprouts are done, remove them from the oven.
- Add the roasted sprouts to a clean serving bowl.
- Pour the warm balsamic glaze over the Brussels sprouts.
- Add the dried cranberries, chopped rosemary, and chopped thyme to the bowl.
- Gently toss everything together until the sprouts and cranberries are evenly coated with the glaze and herbs.
- Serve warm as a flavorful and festive side dish.
4. Golden Roasted Baby Potatoes

These charming baby potatoes are a simple yet incredibly satisfying side, boasting a beautiful golden-brown exterior. They are a timeless addition to any meal.
Each potato half is generously seasoned, showing off a delightful crispness on the cut surface. The skin is slightly wrinkled and perfectly cooked, indicating a fluffy, tender interior. A sprinkle of fresh, vibrant green parsley adds a touch of color and fresh herbaceousness, contrasting beautifully with the rich, roasted tones. This dish proves that sometimes the most straightforward preparations yield the most delicious results. These potatoes are easy to make, comforting, and a crowd-pleaser for any holiday gathering.
Required Ingredients
- 1.5 lbs baby potatoes (such as creamer or new potatoes), halved
- 2 tablespoons olive oil
- 1 teaspoon garlic powder
- $1/2$ teaspoon paprika (sweet or smoked)
- $1/2$ teaspoon salt, or to taste
- $1/4$ teaspoon black pepper, or to taste
- 2 tablespoons fresh parsley, chopped, for garnish
Equipment List
- Large cutting board
- Sharp knife
- Large mixing bowl
- Baking sheet
DIY Instruction (Step-by-Step)
Step 1: Prep the Potatoes and Oven
- Preheat your oven to $425^{\circ}\text{F}$ ($220^{\circ}\text{C}$).
- Thoroughly wash the baby potatoes. Pat them dry with a clean towel.
- Using a sharp knife, cut each baby potato in half. Try to make the halves as uniform in size as possible for even cooking.
- Place all the halved potatoes into a large mixing bowl.
Step 2: Season the Potatoes
- Drizzle the olive oil over the potatoes in the bowl.
- Sprinkle the garlic powder, paprika, salt, and black pepper over the potatoes.
- Use your hands or a large spoon to toss the potatoes vigorously. Make sure every cut surface and skin is well coated with the oil and seasonings.
Step 3: Roast to Golden Perfection
- Spread the seasoned potatoes in a single layer on a large baking sheet. Give them plenty of space; crowding the pan can lead to steaming instead of roasting.
- Place the baking sheet in the preheated oven. Roast for 25-35 minutes, or until the potatoes are fork-tender on the inside and beautifully golden brown and crispy on the outside.
- After about 15 minutes, use a spatula to flip the potatoes to ensure all sides get a chance to brown. Continue roasting until they are fork-tender on the inside and beautifully golden brown and crispy on the outside.
Step 4: Garnish and Serve
- Once roasted, carefully remove the baking sheet from the oven.
- Transfer the golden roasted potatoes to a serving dish.
- Immediately sprinkle the freshly chopped parsley over the hot potatoes. The heat will bring out the herb’s aroma.
- Serve warm as a delightful and crispy side dish.
5. Vibrant Kale Salad with Toasted Walnuts

This simple yet sophisticated kale salad offers a refreshing and nutritious counterpoint to heavier holiday fare. Its deep green hues are invigorating.
The kale leaves are expertly massaged, giving them a tender texture while retaining a pleasant chewiness. Each leaf glistens with a light, flavorful dressing that coats it beautifully. Generous clusters of golden-brown walnuts are scattered throughout, providing a satisfying crunch and a rich, nutty flavor. This salad is a vibrant and wholesome addition to any Thanksgiving spread. It is easy to prepare and contributes a lovely brightness, making it a welcome, lighter option at the table.
Required Ingredients
- 1 large bunch curly kale (about 8-10 ounces)
- $1/4$ cup olive oil
- 2 tablespoons fresh lemon juice
- 1 tablespoon maple syrup or honey
- 1 teaspoon Dijon mustard
- $1/2$ clove garlic, minced (optional)
- $1/4$ teaspoon salt, or to taste
- $1/8$ teaspoon black pepper, or to taste
- $1/2$ cup walnuts, roughly chopped
Equipment List
- Large cutting board
- Sharp knife
- Large mixing bowl
- Small bowl or jar with lid
- Whisk
DIY Instruction (Step-by-Step)
Step 1: Prep the Kale
- Thoroughly wash the kale leaves.
- Remove the tough stems from the kale. You can do this by holding the bottom of the stem with one hand and stripping the leafy greens off with the other. Alternatively, fold the leaf in half along the stem and cut the stem out.
- Roughly chop the kale leaves into bite-sized pieces. Place the chopped kale into a large mixing bowl.
Step 2: Massage the Kale
- Drizzle about 1 tablespoon of olive oil over the chopped kale.
- Using your clean hands, gently but firmly massage the kale for 2-3 minutes. Squeeze and rub the leaves until they begin to soften and become a darker green. This step is crucial for making the kale more tender and easier to digest.
Step 3: Prepare the Dressing
- In a small bowl or a jar with a lid, combine the remaining olive oil, fresh lemon juice, maple syrup (or honey), toasted sesame oil, and rice vinegar.
- Mince the garlic and grate the $1/2$ teaspoon of ginger into the mixture.
- Place the saucepan over medium-low heat. Whisk the mixture constantly until it just begins to simmer and thickens slightly, about 3 to 5 minutes. If you do not want to use the stove, you can microwave the mixture in a small bowl for about 30 seconds until warm and combined.
Step 4: Toast the Walnuts
- While the dressing is prepared, heat a small dry skillet over medium-low heat.
- Add the chopped walnuts to the skillet.
- Toast the walnuts for 3-5 minutes, stirring frequently, until they are fragrant and lightly golden brown. Be careful not to burn them. Remove from heat and let them cool slightly.
Step 5: Assemble and Serve
- Pour the prepared dressing over the massaged kale in the large mixing bowl.
- Add the toasted walnuts to the bowl.
- Toss everything together until the kale is evenly coated with the dressing and the walnuts are distributed throughout.
- Transfer the vibrant kale salad to your serving dish.
- Garnish the top generously with the toasted sesame seeds and the thin matchsticks of fresh ginger before serving.
6. Charred Broccoli with Lemon-Tahini Drizzle

Here is a vegetable dish that combines satisfying roastiness with bright, creamy flavor. The deep green broccoli florets are beautifully charred, proving that roasting brings out the best in vegetables.
A rich, pale drizzle of lemon-tahini sauce flows generously over the top, adding a smooth, nutty contrast. Little bursts of crispy, roasted chickpeas are nestled around the florets, introducing a welcome textural component. The dish is finished with a sprinkle of fresh green herbs and bright yellow lemon zest, enhancing the visual appeal and adding a fresh aroma. This healthy, flavorful side is guaranteed to disappear quickly, offering a delightful mix of savory, charred, and tangy tastes to your holiday meal.
Required Ingredients
- For the Broccoli and Chickpeas:
- 2 heads of broccoli, cut into large florets
- 1 (15-ounce) can chickpeas, rinsed, drained, and patted dry
- 2 tablespoons olive oil
- $1/2$ teaspoon salt
- $1/4$ teaspoon black pepper
- For the Lemon-Tahini Sauce:
- $1/4$ cup tahini
- 2 tablespoons fresh lemon juice
- 1 clove garlic, minced
- 2-4 tablespoons cold water (to thin)
- Pinch of salt
- For Garnish:
- 1 teaspoon lemon zest
- 1 tablespoon fresh parsley, chopped
Equipment List
- Large cutting board
- Sharp knife
- Large mixing bowl
- Baking sheet
- Small bowl
- Whisk or fork
DIY Instruction (Step-by-Step)
Step 1: Prep the Oven and Roasting Items
- Preheat your oven to $425^{\circ}\text{F}$ ($220^{\circ}\text{C}$). Line a large baking sheet with parchment paper.
- In a large mixing bowl, combine the broccoli florets and the dried chickpeas.
- Drizzle the olive oil over the mixture. Sprinkle generously with salt and pepper.
- Toss everything until the broccoli and chickpeas are well coated. Spread them out onto the prepared baking sheet in a single layer, ensuring the chickpeas don’t clump together.
Step 2: Roast to Perfection
- Place the baking sheet in the preheated oven. Roast for 18 to 25 minutes.
- Halfway through the cooking time (around 10-12 minutes), gently flip the broccoli and chickpeas with a spatula to ensure they char evenly on all sides.
- The broccoli should have dark, crispy edges, and the chickpeas should be slightly crunchy.
Step 3: Mix the Tahini Sauce
- While the vegetables roast, prepare the sauce. In a small bowl, whisk together the tahini, lemon juice, minced garlic, and a pinch of salt.
- The mixture will become very thick. Slowly add 1 tablespoon of cold water at a time, whisking continuously, until the sauce reaches a smooth, drizzly consistency. You will likely use 2 to 4 tablespoons total.
Step 4: Assemble and Serve
- Transfer the hot roasted broccoli and chickpeas to a serving bowl.
- Generously drizzle the lemon-tahini sauce over the top of the vegetables. You can drizzle it in an attractive pattern across the surface.
- Finish the dish by grating the lemon zest and sprinkling the chopped fresh parsley over the sauced broccoli before serving.
7. Homestyle Southern-Style Greens

This is a deep-seated favorite, bringing an authentic, comforting presence to the table. The dark green leaves are nestled around succulent-looking ham hocks, creating a rustic, hearty presentation.
The greens are tender and submerged in a savory, smoky pot liquor, showcasing the richness absorbed from the cooking process. Slices of red pepper and bits of sweet white onion are mixed throughout, adding subtle bursts of color and flavor. A small sprig of fresh thyme garnishes the top, suggesting the fragrant herbs used in preparation. This traditional side offers a wonderful, earthy counterpoint to any Thanksgiving centerpiece, truly embodying the spirit of a warming holiday feast.
Required Ingredients
- 2 lbs collard greens (or turnip greens), washed well and roughly chopped
- 2 smoked ham hocks (or turkey wings for lighter flavor)
- 6 cups low-sodium chicken or vegetable broth (or water)
- 1 medium white onion, chopped
- 2 cloves garlic, minced
- 1 teaspoon apple cider vinegar (adds necessary tang)
- $1/2$ teaspoon smoked paprika
- Salt and black pepper to taste
- 1 pinch crushed red pepper flakes (optional)
Equipment List
- Very large pot or Dutch oven
- Sharp knife
- Cutting board
- Colander
DIY Instruction (Step-by-Step)
Step 1: Prep the Greens
- Collard greens can be sandy, so ensure they are meticulously washed. Fill a sink or very large bowl with cold water and soak the greens, then rinse them several times.
- Stack the leaves, roll them up like a cigar, and slice them into $1/2$-inch ribbons. Set the greens aside.
- Chop the onion and mince the garlic.
Step 2: Build the Flavor Base
- In your large pot or Dutch oven, place the ham hocks (or turkey wings). Cover them with the broth or water.
- Add the chopped onion, minced garlic, apple cider vinegar, and smoked paprika.
- Bring the liquid to a boil over medium-high heat. Once boiling, reduce the heat to low, cover the pot partially, and let it simmer for about 1 hour. This extracts the deep, smoky flavor from the meat.
Step 3: Cook the Greens
- After the initial simmering, carefully add the chopped greens to the pot. It may look like too many, but they will cook down considerably.
- Stir the greens into the broth mixture, ensuring they are mostly submerged. Add the crushed red pepper flakes now if you like a little heat.
- Continue to simmer, covered, for another 1 to 2 hours, or until the greens are very tender and soft. The longer they cook, the better the flavor.
Step 4: Season and Serve
- Carefully remove the ham hocks or meat from the pot. Pull the meat from the bones, chop it, and return it to the greens (optional).
- Taste the “pot liquor” (the cooking liquid) and the greens. Adjust the salt and pepper as needed. The seasoning should be robust.
- Serve the greens and the savory liquid in a deep bowl alongside your holiday meal.
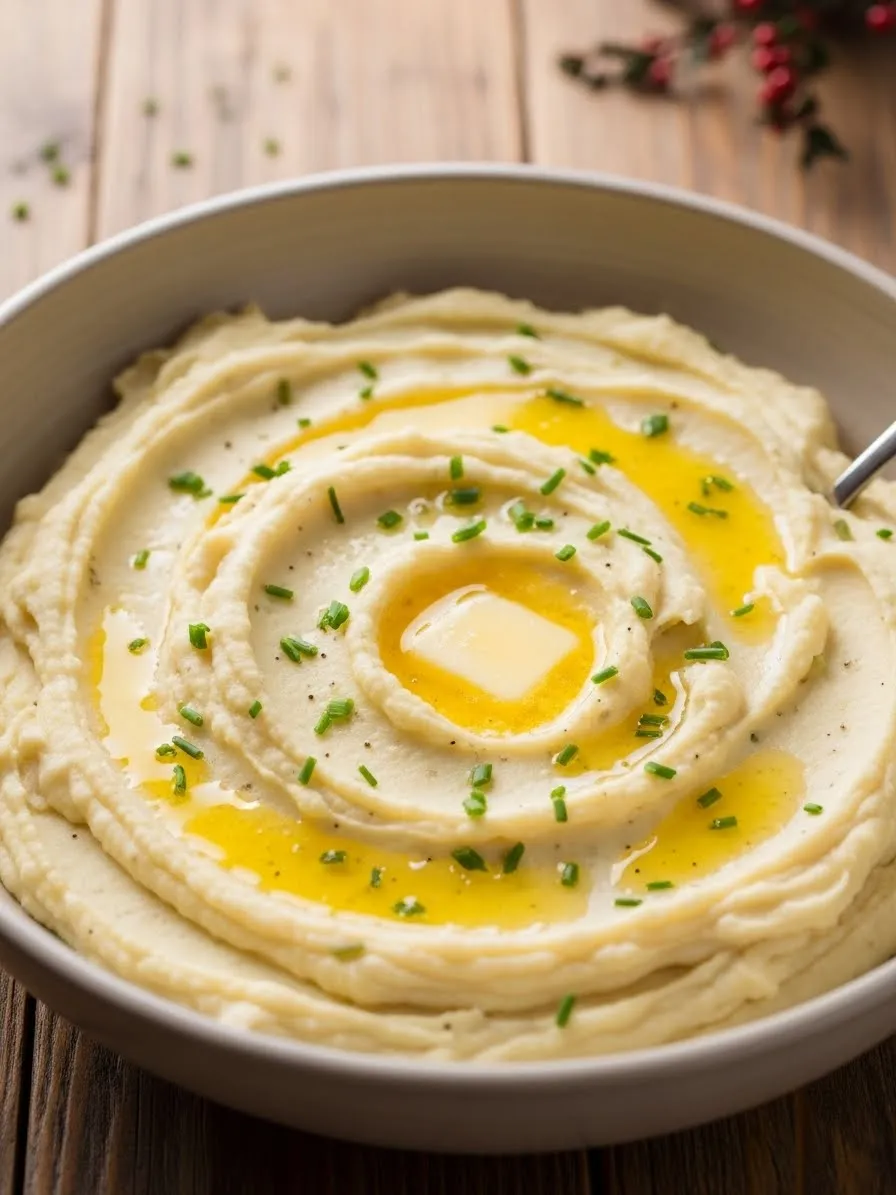
8. Silky Cauliflower Puree with Thyme

This elegant side dish is luxuriously creamy, presenting a lighter yet equally satisfying alternative to traditional potato mash. Its smooth, cloud-like texture is truly enticing.
The surface of the puree is gently swirled, creating a welcoming texture, and topped with a glistening drizzle of high-quality olive oil. A small knob of butter melting in the center adds richness, and a light dusting of cracked black pepper suggests a subtle warmth. Fresh sprigs of thyme are placed delicately on top, providing an herbal aroma and a contrasting visual element. This beautiful puree is both simple in flavor and sophisticated in presentation, making it a wonderful addition to your holiday menu.
Required Ingredients
- 1 large head of cauliflower, cut into florets
- 2 tablespoons unsalted butter, plus extra for serving
- $1/4$ cup heavy cream or half-and-half
- 2 cloves garlic, peeled (optional, for deeper flavor)
- $1/2$ teaspoon salt, or to taste
- $1/4$ teaspoon black pepper, or to taste
- Fresh thyme sprigs, for garnish
- High-quality olive oil, for drizzling
Equipment List
- Large pot
- Colander
- Food processor, high-powered blender, or immersion blender
- Serving bowl
DIY Instruction (Step-by-Step)
Step 1: Cook the Cauliflower
- Cut the cauliflower into evenly sized florets. If using, leave the two cloves of garlic whole and unpeeled.
- Place the cauliflower florets and garlic into a large pot. Cover them with cold water.
- Bring the water to a boil over high heat, then reduce the heat to medium. Simmer the cauliflower for 15-20 minutes, or until the florets are very tender and easily pierced with a fork.
Step 2: Drain and Blend
- Carefully drain the cauliflower and garlic completely using a colander. Return the drained, hot vegetables to the empty hot pot or transfer them to a food processor or blender. If you used whole garlic, squeeze the soft pulp out of the peel and discard the skin.
- Add the butter, warm milk, and heavy cream (if using) to the pot.
- Using a potato masher, begin to mash the vegetables until they reach your desired consistency. For an extra smooth mash, you can use an immersion blender or pass them through a food mill.
- Stir in the salt and pepper. Taste and adjust seasoning as needed. Keep the mash warm.
Step 3: Prepare the Garnish
- Heat 1 tablespoon of olive oil in a small skillet over medium heat.
- Once the oil is shimmering, carefully add the fresh sage leaves to the skillet in a single layer. Fry them for about 30 seconds to 1 minute on each side, until they are crisp and a deeper green color. Remove them from the skillet and place them on a paper towel-lined plate to drain.
- Using the same skillet, or adding a touch more olive oil if needed, quickly sauté the thinly shaved parsnip ribbons for 1-2 minutes until they are slightly softened and lightly browned at the edges. Remove and set aside.
Step 4: Assemble and Serve
- Transfer the warm parsnip and sage mash to your serving bowl.
- Arrange the crispy fried sage leaves and the sautéed parsnip ribbons artfully over the top of the mash.
- Finish with a generous drizzle of your best olive oil just before serving.
9. Roasted Carrots and Red Onion with Glaze

This beautiful collection of roasted root vegetables offers a comforting mix of sweet and savory flavors. The vibrant mix of orange, yellow, and purple carrots creates a striking, appealing presentation.
The carrots and deep purple red onion wedges are beautifully caramelized, showing off their rich, roasted edges. A glossy, savory-sweet glaze clings to the vegetables, hinting at a depth of flavor. A rich sauce is lightly spooned over the top, adding moisture and sheen. A small scattering of fresh cilantro or parsley brightens the overall look. This dish is hearty, flavorful, and incredibly easy to prepare, making it a rustic and delicious addition to the holiday table.
Required Ingredients
- 2 lbs mixed carrots (rainbow or standard), peeled and halved lengthwise
- 2 medium red onions, cut into 8 wedges each
- 3 tablespoons olive oil
- $1/4$ teaspoon salt
- $1/8$ teaspoon black pepper
- For the Glaze/Sauce:
- 2 tablespoons balsamic vinegar or maple syrup (for a pure glaze)
- 1 tablespoon melted butter or olive oil
Equipment List
- Large cutting board
- Sharp knife
- Large mixing bowl
- Baking sheet
DIY Instruction (Step-by-Step)
Step 1: Prep the Vegetables and Oven
- Preheat your oven to $400^{\circ}\text{F}$ ($200^{\circ}\text{C}$).
- Peel the carrots and cut any thick ones in half lengthwise. Cut the red onions into 8 wedges each, keeping the root end intact to hold the wedges together.
- Place the carrots and onion wedges into a large mixing bowl.
Step 2: Season and Roast
- Drizzle the 3 tablespoons of olive oil over the vegetables. Sprinkle with salt and pepper.
- Toss everything thoroughly until the pieces are well coated.
- Spread the seasoned carrots and onions in a single layer on a large baking sheet. Give them plenty of space; crowding the pan can lead to steaming instead of roasting.
- Roast for 25-35 minutes, or until the vegetables are tender when pierced with a fork and their edges are nicely caramelized and browned.
Step 3: Apply the Glaze
- While the vegetables are still warm, you can apply the glaze. In a small bowl, whisk together the balsamic vinegar (or maple syrup) and the melted butter (or olive oil).
- Remove the roasted vegetables from the oven. Pour the glaze mixture directly over the hot vegetables on the baking sheet.
- Gently toss to coat all the pieces in the glossy glaze.
Step 4: Serve
- Transfer the glazed carrots and onions to a serving platter.
- If desired, drizzle a little extra glaze or a touch of your favorite savory sauce over the top before serving. Garnish with a sprig of fresh herbs if available.
10. Warm Roasted Pear and Parsnip Wedges

This unique side offers an elegant blend of sweetness and earthiness, beautifully presented for a special occasion. The roasted parsnip wedges provide a hearty base.
Golden-brown parsnip spears are scattered alongside halved Bosc pears, showing off a delightful caramelization on the edges. The pears are dusted with black pepper, suggesting a delightful balance of sweet fruit and savory seasoning. Two dark vanilla beans are placed across the dish, adding an aromatic hint of warm fragrance. This dish is truly a sophisticated upgrade, showcasing how fruits and vegetables can combine to create a deeply flavorful, warm, and inviting holiday side.
Required Ingredients
- 4 medium parsnips, peeled and cut into $1/2$-inch thick wedges
- 2 Bosc or Anjou pears, halved lengthwise and cored
- 2 tablespoons olive oil (or melted butter)
- 1 tablespoon maple syrup or honey
- $1/4$ teaspoon salt
- $1/4$ teaspoon black pepper, plus extra for dusting
- $1/2$ teaspoon cinnamon or nutmeg (optional)
- 1 vanilla bean (optional, for aroma)
Equipment List
- Large cutting board
- Sharp knife
- Vegetable peeler
- Small mixing bowl
- Baking sheet
DIY Instruction (Step-by-Step)
Step 1: Prep the Oven and Ingredients
- Preheat your oven to $400^{\circ}\text{F}$ ($200^{\circ}\text{C}$).
- Peel the parsnips and cut them into evenly sized wedges. Halve the pears lengthwise and use a melon baller or spoon to remove the core.
- In a small mixing bowl, whisk together the olive oil (or melted butter), maple syrup (or honey), salt, and cinnamon/nutmeg (if using).
Step 2: Toss and Roast
- Place both the parsnip wedges and pear halves onto a large baking sheet.
- Drizzle the prepared maple mixture over the parsnips and pears. Gently toss to coat everything lightly.
- Arrange the parsnips and pears in a single layer on the baking sheet, ensuring the cut side of the pears is facing up.
- Roast for 20-30 minutes, or until the parsnips are tender and the pears are softened and slightly caramelized around the edges.
Step 3: Finish and Serve
- Remove the roasted pears and parsnips from the oven.
- Transfer them artfully to a serving platter.
- Dust the entire dish lightly with an extra grind of black pepper, which helps balance the sweetness of the fruit and maple.
- If you are using a vanilla bean for presentation, place it on the platter. Serve the warm roasted dish immediately.
11. Sautéed Green Beans with Crispy Bacon and Garlic

This is a vibrant and flavorful side dish, starring bright green beans sautéed to a tender-crisp texture. The dish brings a wonderful pop of color and freshness to any meal.
Scattered throughout are generous pieces of savory, crispy bacon, which lend a delightful smoky richness. Thin slices of fresh garlic are also visible, infusing the beans with an aromatic warmth. A light sprinkle of coarse sea salt and freshly ground black pepper adorns the vegetables, enhancing their natural flavors. Steaming gently in a cast-iron skillet, this dish promises a comforting and easy-to-love addition to your holiday spread. It’s a classic combination that always satisfies.
Required Ingredients
- 1 lb fresh green beans, trimmed
- 4 slices bacon, cut into $1/2$-inch pieces
- 2 cloves garlic, thinly sliced
- $1/2$ teaspoon salt, or to taste
- $1/4$ teaspoon black pepper, or to taste
Equipment List
- Large skillet (cast iron works beautifully)
- Slotted spoon
- Paper towels
- Cutting board
- Sharp knife
DIY Instruction (Step-by-Step)
Step 1: Cook the Bacon
- Place the bacon pieces in a large skillet (preferably cast iron) over medium heat.
- Cook the bacon, stirring occasionally, until it is crispy and golden brown. This usually takes about 5-8 minutes.
- Once crispy, use a slotted spoon to remove the bacon from the skillet, transferring it to a plate lined with paper towels to drain. Leave the rendered bacon fat in the skillet.
Step 2: Sauté the Green Beans and Garlic
- Add the trimmed green beans to the hot skillet with the bacon fat. If there is an excessive amount of fat, you can drain some, leaving about 1 tablespoon.
- Sauté the green beans over medium-high heat for 5-7 minutes, stirring frequently, until they are tender-crisp and have a bright green color.
- Add the thinly sliced garlic to the skillet with the green beans during the last 2-3 minutes of cooking. Continue to sauté until the garlic is fragrant but not browned.
Step 3: Combine and Season
- Return the crispy bacon pieces to the skillet with the green beans and garlic.
- Toss everything together to combine.
- Season with salt and black pepper to taste.
- Serve the green beans immediately, straight from the skillet or transferred to a warm serving dish.
12. Creamy Butternut Squash Puree with Roasted Garlic

This warm and inviting puree offers a rich, autumnal flavor, presenting a beautiful golden-orange hue. It’s a smooth and comforting side that complements any festive meal.
The surface of the puree is artfully swirled, and a small pat of butter melts invitingly in the center, adding to its luxurious texture. Sprigs of fresh thyme are scattered over the top, contributing a fragrant, earthy aroma. Cloves of roasted garlic are nestled around the edges, hinting at the deep, savory notes infused throughout the dish. This vibrant puree is a wholesome and flavorful choice, offering both beauty and a gentle sweetness to your holiday spread.
Required Ingredients
- 2 lbs butternut squash, peeled, seeded, and cut into 1-inch cubes
- 1 head of garlic, top sliced off to expose cloves
- 2 tablespoons olive oil
- 2 tablespoons unsalted butter, plus extra for serving
- $1/2$ cup warm vegetable broth or milk
- 2 tablespoons heavy cream (optional, for richness)
- $1/2$ teaspoon salt, or to taste
- $1/4$ teaspoon black pepper, or to taste
- Fresh thyme sprigs, for garnish
Equipment List
- Sharp knife
- Cutting board
- Baking sheet
- Aluminum foil
- Large pot
- Food processor, high-powered blender, or immersion blender
- Small bowl (for roasted garlic)
- Serving bowl
DIY Instruction (Step-by-Step)
Step 1: Roast Garlic and Butternut Squash
- Preheat your oven to $400^{\circ}\text{F}$ ($200^{\circ}\text{C}$).
- Place the head of garlic (with the top sliced off) on a small piece of aluminum foil. Drizzle about 1 teaspoon of olive oil over the exposed cloves, then wrap the foil tightly around the garlic.
- Spread the cubed butternut squash on a baking sheet. Drizzle with 1 tablespoon of olive oil, season with a pinch of salt and pepper, and toss to coat.
- Place both the foil-wrapped garlic and the squash on the baking sheet. Roast for 30-40 minutes, or until the squash is very tender and the garlic cloves are soft and golden brown.
Step 2: Prepare the Puree
- Once roasted, carefully remove the squash and garlic from the oven.
- Allow the garlic to cool slightly, then squeeze the soft, roasted garlic pulp from the cloves into a large pot or the bowl of a food processor/blender.
- Add the roasted butternut squash to the pot or blender along with the butter, warm broth (or milk), and heavy cream (if using).
- Process or blend until the mixture is completely smooth and creamy, scraping down the sides as needed. If it’s too thick, add a little more broth or milk, 1 tablespoon at a time.
Step 3: Season and Serve
- Stir in the remaining salt and pepper. Taste the puree and adjust seasoning as necessary.
- Transfer the warm butternut squash puree to a serving bowl. Create a gentle swirl pattern on the surface with the back of a spoon.
- Place a small pat of butter in the center, and garnish generously with fresh thyme sprigs and a few of the whole roasted garlic cloves (if desired for presentation).
13. Cheesy Butternut Squash and Sage Gratin

This appealing gratin emerges from the oven steaming and golden, promising a hearty and flavorful experience. It’s a comforting dish, rich with seasonal tastes.
Thinly sliced butternut squash is layered beneath a golden, crispy topping of breadcrumbs and grated cheese. The edges of the gratin are bubbling with a creamy sauce, hinting at the deliciousness within. Fresh sage leaves are tucked into the topping, adding an aromatic, earthy fragrance. This savory gratin is a satisfying and luxurious side, offering a wonderful blend of textures and warmth, truly embodying the spirit of a holiday feast.
Required Ingredients
- 1 large butternut squash (about 3 lbs), peeled, seeded, and thinly sliced into $1/4$-inch rounds
- 2 tablespoons unsalted butter, plus more for greasing
- 2 tablespoons all-purpose flour
- 2 cups milk (whole milk or 2%)
- 1 cup grated Gruyere or sharp cheddar cheese, plus $1/4$ cup for topping
- $1/2$ teaspoon salt
- $1/4$ teaspoon black pepper
- $1/4$ teaspoon nutmeg
- 10-12 fresh sage leaves, roughly chopped, plus a few whole for garnish
- $1/2$ cup panko breadcrumbs
Equipment List
- Large cutting board
- Sharp knife or mandoline (for thin slices)
- 9×13 inch baking dish
- Medium saucepan
- Whisk
- Small bowl
DIY Instruction (Step-by-Step)
Step 1: Prepare the Baking Dish and Cheese Sauce
- Preheat your oven to $375^{\circ}\text{F}$ ($190^{\circ}\text{C}$). Lightly grease a 9×13 inch baking dish with butter.
- In a medium saucepan, melt 2 tablespoons of butter over medium heat.
- Whisk in the flour and cook for 1 minute, stirring constantly, to create a roux.
- Gradually whisk in the milk until the sauce is smooth and thickened, about 3-5 minutes.
- Remove the saucepan from the heat. Stir in 1 cup of grated cheese, salt, pepper, and nutmeg until the cheese is melted and the sauce is smooth. Stir in the chopped fresh sage.
Step 2: Layer the Gratin
- Peel the butternut squash and carefully slice it into thin, $1/4$-inch rounds. A mandoline can help achieve even slices, but a sharp knife works too.
- Arrange a single layer of sliced butternut squash in the bottom of the prepared baking dish.
- Pour about one-third of the cheese sauce evenly over the squash layer.
- Repeat the layering: another layer of squash, then another third of the cheese sauce.
- Finish with a final layer of squash.
Step 3: Add Topping and Bake
- In a small bowl, combine the remaining $1/4$ cup of grated cheese and the panko breadcrumbs. Sprinkle this mixture evenly over the top of the gratin.
- If desired, place a few whole sage leaves on top for garnish.
- Bake for 45-55 minutes, or until the squash is tender when pierced with a knife and the topping is golden brown and bubbly.
- Let the gratin rest for 5-10 minutes before serving to allow the sauce to set slightly.
14. Bright Lemony Garlic Asparagus

This visually striking dish presents long, slender asparagus spears, cooked to a vibrant green. It’s a refreshing and healthy choice that is both simple and elegant.
A generous sprinkle of finely minced garlic adorns the top of the spears, promising a fragrant, savory punch. A light drizzle of olive oil enhances the sheen and flavor of the asparagus. Bright yellow lemon wedges are arranged alongside, ready to be squeezed for a zesty, fresh finish. This dish is crisp, clean, and full of flavor. It provides a light, zesty contrast to richer holiday foods, proving that sometimes simplicity is the most delicious option.
Required Ingredients
- 1 lb fresh asparagus, tough ends trimmed
- 2 tablespoons olive oil
- 3 cloves garlic, minced
- $1/2$ teaspoon salt, or to taste
- $1/4$ teaspoon black pepper, or to taste
- 1 large lemon, cut into wedges for serving
Equipment List
- Large skillet or baking sheet
- Cutting board
- Sharp knife
- Small bowl
DIY Instruction (Step-by-Step)
Step 1: Prep the Asparagus and Garlic
- Wash the asparagus spears. Snap or cut off the tough, woody ends.
- Mince the garlic cloves finely.
- Place the trimmed asparagus in a large bowl.
Step 2: Cook the Asparagus (Choose Your Method)
- Skillet Method:
- Heat 2 tablespoons of olive oil in a large skillet over medium-high heat.
- Add the asparagus to the hot skillet in a single layer. Sauté for 5-7 minutes, flipping occasionally, until the asparagus is bright green, tender-crisp, and slightly charred in spots.
- During the last 1-2 minutes of cooking, add the minced garlic to the skillet and sauté until fragrant.
- Roasting Method:
- Preheat your oven to $400^{\circ}\text{F}$ ($200^{\circ}\text{C}$).
- Toss the asparagus with 2 tablespoons of olive oil, salt, and pepper directly on a baking sheet.
- Roast for 10-15 minutes, or until tender-crisp. During the last 5 minutes of roasting, sprinkle the minced garlic over the asparagus.
Step 3: Season and Serve
- Transfer the cooked asparagus to a serving platter.
- Season with salt and black pepper to taste.
- Arrange the lemon wedges alongside the asparagus. Encourage guests to squeeze fresh lemon juice over their portions for a bright finish.
15. Braised Fennel with Orange and Saffron

This sophisticated side dish presents tender, pale fennel wedges gently cooked in a rich, aromatic broth. It offers an unexpected yet delightful flavor profile.
Vibrant orange segments are nestled among the fennel, providing a burst of citrusy color and sweetness. Delicate threads of saffron are scattered across the dish, hinting at its exotic, warm fragrance. A light scattering of fresh green herbs, possibly parsley or chervil, adds a final fresh touch. This unique preparation elevates fennel, transforming it into an elegant and flavorful addition that will surprise and delight your guests with its harmonious blend of flavors.
Required Ingredients
- 2 large fennel bulbs, trimmed and cut into 1-inch wedges
- 2 tablespoons olive oil
- 1 medium shallot, thinly sliced
- 1 cup vegetable broth
- $1/2$ cup fresh orange juice
- 1 pinch saffron threads, steeped in 1 tablespoon hot water
- $1/2$ teaspoon salt, or to taste
- $1/4$ teaspoon black pepper, or to taste
- 1 large orange, segmented (pith and membrane removed)
- 1 tablespoon fresh parsley or chervil, chopped, for garnish
Equipment List
- Large cutting board
- Sharp knife
- Large skillet with a lid or Dutch oven
- Small bowl (for saffron)
DIY Instruction (Step-by-Step)
Step 1: Prep the Fennel and Aromatics
- Trim the feathery fronds from the fennel bulbs (you can reserve some for garnish). Slice the bulbs into 1-inch thick wedges, keeping some of the core intact to hold the layers together.
- Thinly slice the shallot.
- In a small bowl, steep the saffron threads in 1 tablespoon of hot water and set aside.
- Segment the orange: using a sharp knife, slice off the top and bottom of the orange. Stand the orange upright and carefully cut away the peel and white pith in strips. Then, carefully cut between the membranes to release the individual orange segments.
Step 2: Sauté the Fennel
- Heat the olive oil in a large skillet with a lid or a Dutch oven over medium heat.
- Add the fennel wedges to the hot skillet. Sauté for 5-7 minutes, turning occasionally, until the fennel begins to soften and lightly brown.
- Add the sliced shallot to the skillet and sauté for another 2-3 minutes until softened and fragrant.
Step 3: Braise the Fennel
- Pour in the vegetable broth, fresh orange juice, and the steeped saffron (including the water).
- Season with salt and black pepper.
- Bring the liquid to a gentle simmer, then reduce the heat to low. Cover the skillet and braise for 15-20 minutes, or until the fennel is very tender.
Step 4: Finish and Serve
- Remove the lid and gently stir in the prepared orange segments during the last 2-3 minutes of cooking to warm them through.
- Taste the braising liquid and adjust seasoning if needed.
- Transfer the braised fennel and orange to a serving dish. Garnish with chopped fresh parsley or chervil and a few extra saffron threads if desired. Serve warm.
16. Creamy Garlic and Chive Mashed Potatoes

This classic mashed potato dish offers a comforting and exceptionally creamy texture. Its inviting warmth makes it a staple for any festive meal.
The potatoes are whipped to a smooth consistency, with visible flecks of fresh green chives adding a touch of color and a mild oniony flavor. A golden pat of butter melts in the center, creating a rich pool that signals indulgence. Around the edges, whole roasted garlic cloves and a beautifully roasted garlic head are nestled, promising a deep, sweet garlic essence infused throughout. This is a truly satisfying and flavorful side, loved by all and a must-have for your holiday table.
Required Ingredients
- 2 lbs russet or Yukon Gold potatoes, peeled and cut into 1-inch chunks
- 1 head of garlic, top sliced off
- 2 tablespoons olive oil (for roasting garlic)
- $1/2$ cup warm milk (whole milk or a plant-based alternative)
- $1/4$ cup heavy cream (optional, for extra richness)
- 4 tablespoons unsalted butter, plus more for serving
- 2 tablespoons fresh chives, chopped, plus extra for garnish
- $1/2$ teaspoon salt, or to taste
- $1/4$ teaspoon black pepper, or to taste
Equipment List
- Large pot
- Colander
- Potato masher or electric mixer
- Small piece of aluminum foil
- Small bowl
- Sharp knife
- Cutting board
- Serving bowl
DIY Instruction (Step-by-Step)
Step 1: Roast the Garlic
- Preheat your oven to $400^{\circ}\text{F}$ ($200^{\circ}\text{C}$).
- Place the head of garlic (with the top sliced off) on a small piece of aluminum foil. Drizzle about 1 tablespoon of olive oil over the exposed cloves. Wrap the foil tightly around the garlic.
- Place the foil-wrapped garlic directly on an oven rack or a small baking sheet. Roast for 30-40 minutes, or until the cloves are very soft and golden brown.
- Once roasted, remove from the oven and allow to cool slightly. Squeeze the soft, sweet garlic pulp from the cloves into a small bowl. Mash it into a paste.
Step 2: Cook the Potatoes
- While the garlic roasts, place the peeled and cubed potatoes into a large pot. Cover them with cold water by about 1 inch.
- Add a generous pinch of salt to the water. Bring the water to a boil over high heat, then reduce the heat to medium and simmer for 15-20 minutes, or until the potatoes are very tender when pierced with a fork.
Step 3: Mash and Combine
- Carefully drain the cooked potatoes thoroughly using a colander. Return the drained, hot potatoes to the empty hot pot.
- Add the warm milk, heavy cream (if using), 4 tablespoons of butter, and the mashed roasted garlic to the pot.
- Using a potato masher, mash the potatoes until they are smooth and creamy. For an extra light and fluffy texture, you can use an electric mixer on low speed. Be careful not to overmix.
- Stir in the chopped chives, salt, and black pepper. Taste and adjust seasoning as needed.
Step 4: Serve
- Transfer the creamy mashed potatoes to your serving bowl. Create a gentle swirl on the surface with the back of a spoon.
- Make a small indentation in the center and place an extra pat of butter on top to melt.
- Garnish with extra chopped chives and a few of the whole roasted garlic cloves for visual appeal and an extra garlic punch. Serve warm.
17. Grilled Eggplant with Pomegranate and Mint

This vibrant dish showcases grilled eggplant slices, boasting beautiful char marks. It’s a fresh and exotic side, offering a delightful blend of flavors and textures.
Each tender slice of eggplant is generously topped with glistening, ruby-red pomegranate seeds, which add a burst of juicy, tart sweetness. Fresh green mint leaves are scattered over the top, providing an invigorating, aromatic contrast. A rich, dark sauce is artfully swirled beside the eggplant, hinting at a deep, savory accompaniment. This dish is a colorful and sophisticated option, providing a lighter yet flavorful addition to any Thanksgiving meal.
Required Ingredients
- 2 medium eggplants, cut into $1/2$-inch thick rounds
- 3 tablespoons olive oil
- $1/2$ teaspoon salt
- $1/4$ teaspoon black pepper
- $1/2$ cup pomegranate seeds
- $1/4$ cup fresh mint leaves, roughly chopped
- For optional drizzle: 2 tablespoons balsamic glaze or pomegranate molasses
Equipment List
- Cutting board
- Sharp knife
- Grill or grill pan
- Pastry brush (optional, for oiling grill)
- Small bowl
DIY Instruction (Step-by-Step)
Step 1: Prep and Season the Eggplant
- Wash the eggplants thoroughly. Cut them into $1/2$-inch thick rounds.
- Lightly sprinkle both sides of the eggplant slices with salt. Let them sit on a wire rack over a baking sheet for 15-20 minutes. This draws out excess moisture and bitterness.
- After 15-20 minutes, use paper towels to gently blot dry each eggplant slice, removing any accumulated moisture.
- Brush both sides of the eggplant slices with olive oil and season with black pepper.
Step 2: Grill the Eggplant
- Preheat your grill or grill pan to medium-high heat.
- Place the eggplant slices on the hot grill. Grill for 3-5 minutes per side, or until tender and deeply browned with distinct grill marks. Adjust cooking time based on your grill and desired tenderness.
- Remove the grilled eggplant from the heat and arrange it on a serving platter.
Step 3: Assemble and Serve
- Transfer the hot grilled eggplant to a serving platter.
- Generously scatter the fresh pomegranate seeds over the grilled eggplant slices.
- Sprinkle the chopped fresh mint leaves generously over the top.
- If using, artfully drizzle balsamic glaze or pomegranate molasses over the eggplant and around the platter.
- Serve this vibrant dish warm or at room temperature.
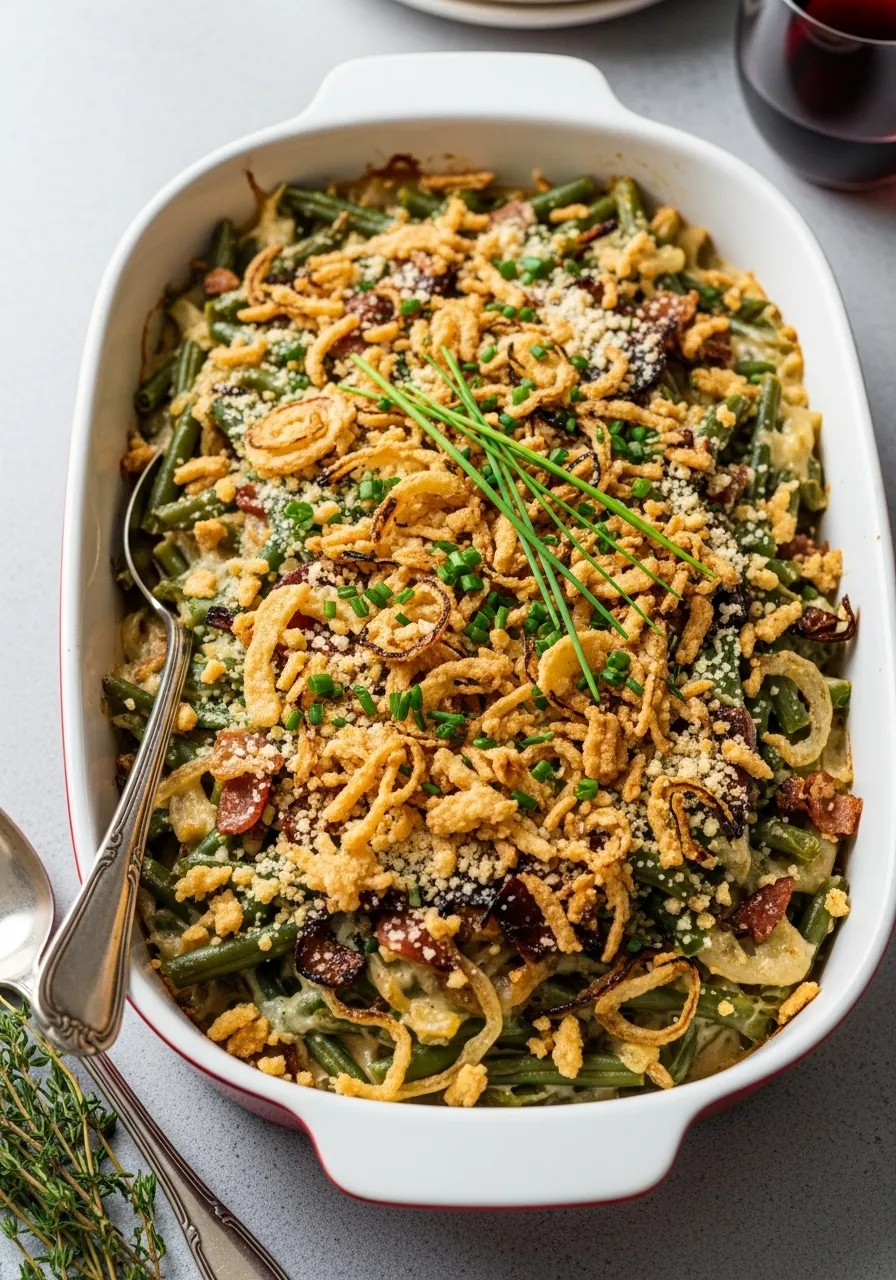
18. Creamy Green Bean Casserole with Crispy Onions

This classic Thanksgiving side dish is wonderfully warm and comforting, featuring tender green beans baked in a creamy sauce. It’s a familiar and beloved presence on the holiday table.
The casserole is topped generously with a golden crown of crispy fried onions, which add an irresistible crunch and savory flavor. Beneath the topping, glimpses of creamy sauce and tender green beans are visible, alongside sautéed mushrooms and onions. Steaming gently from the baking dish, this casserole embodies traditional holiday flavors, offering a hearty and satisfying addition that is always a crowd-pleaser and brings a touch of nostalgic warmth.
Required Ingredients
- 2 (14.5 ounce) cans cut green beans, drained, or 1.5 lbs fresh green beans, trimmed and blanched
- 1 (10.5 ounce) can condensed cream of mushroom soup
- $1/2$ cup milk (whole milk or 2%)
- 1 teaspoon soy sauce or Worcestershire sauce
- $1/4$ teaspoon black pepper
- 1 cup fresh mushrooms, sliced (optional)
- $1/2$ small onion, chopped (optional)
- 1 (6 ounce) can crispy fried onions, divided
Equipment List
- 1.5-quart casserole dish
- Large bowl
- Medium skillet (if using fresh mushrooms/onions)
DIY Instruction (Step-by-Step)
Step 1: Prepare the Green Beans
- If using canned green beans, simply drain them well.
- If using fresh green beans, trim the ends. You can blanch them by boiling in salted water for 3-5 minutes until tender-crisp, then immediately draining and plunging into ice water to stop cooking. Drain again.
- If using fresh mushrooms and onions, sauté them in a skillet with a little butter or oil until softened, about 5-7 minutes.
Step 2: Mix the Casserole Base
- Preheat your oven to $350^{\circ}\text{F}$ ($175^{\circ}\text{C}$).
- In a large bowl, combine the drained green beans, condensed cream of mushroom soup, milk, soy sauce (or Worcestershire), and black pepper.
- If you sautéed mushrooms and onions, add them to the bowl now.
- Stir everything together until the ingredients are well combined and the green beans are coated in the creamy sauce.
Step 3: Assemble and Bake
- Pour the green bean mixture into the prepared 1.5-quart casserole dish.
- Spread half of the crispy fried onions evenly over the top of the casserole. Gently press them down slightly into the mixture.
- Bake for 20-25 minutes, or until the casserole is hot and bubbly.
- Remove the casserole from the oven. Sprinkle the remaining half of the crispy fried onions over the top.
- Return to the oven and bake for another 5 minutes, or until the topping is golden brown and extra crispy. Let rest for a few minutes before serving.
19. Creamed Spinach Gratin

This richly decadent creamed spinach gratin is served warm and bubbling, offering a comforting and satisfying side. It’s a truly indulgent addition to any holiday table.
The vibrant green spinach is smothered in a luscious, creamy sauce, with visible hints of melted cheese creating a golden crust on top. A light dusting of black pepper adds a subtle warmth and visual appeal. The dish is presented in a charming white ramekin, suggesting individual portions or a cozy serving. This creamy gratin provides a wonderful balance of fresh vegetable goodness with an utterly comforting, rich texture, making it an irresistible part of your Thanksgiving meal.
Required Ingredients
- 2 (10-ounce) packages frozen chopped spinach, thawed and squeezed very dry
- 2 tablespoons unsalted butter
- 1 small shallot, finely minced (or $1/4$ small onion)
- 2 cloves garlic, minced
- 2 tablespoons all-purpose flour
- 1 cup milk (whole milk or half-and-half)
- $1/2$ cup heavy cream
- $1/4$ cup grated Parmesan cheese, plus extra for topping
- $1/4$ teaspoon nutmeg
- $1/2$ teaspoon salt, or to taste
- $1/4$ teaspoon black pepper, plus extra for topping
Equipment List
- Large colander
- Clean kitchen towel or cheesecloth
- Medium saucepan
- Whisk
- Oven-safe ramekins or small casserole dish
DIY Instruction (Step-by-Step)
Step 1: Prepare the Spinach
- Thaw the frozen chopped spinach completely. This can be done in the refrigerator overnight or by running it under cold water.
- This step is crucial: Place the thawed spinach in a colander and press out as much excess water as possible. For even drier spinach, wrap it in a clean kitchen towel or cheesecloth and wring out the liquid until it’s almost dry. This prevents a watery gratin.
Step 2: Make the Cream Sauce
- Preheat your oven to $375^{\circ}\text{F}$ ($190^{\circ}\text{C}$). Lightly grease your ramekins or small casserole dish.
- In a medium saucepan, melt the butter over medium heat.
- Add the minced shallot (or onion) and cook for 2-3 minutes until softened and translucent.
- Add the minced garlic and cook for another minute until fragrant.
- Whisk in the flour and cook for 1 minute, stirring constantly, to create a roux.
- Gradually whisk in the milk and heavy cream until the sauce is smooth and thickened, about 3-5 minutes.
Step 3: Combine and Bake
- Remove the saucepan from the heat. Stir in the $1/4$ cup of Parmesan cheese, nutmeg, salt, and black pepper until the cheese is melted and combined.
- Add the squeezed-dry spinach to the cream sauce. Stir thoroughly to ensure all the spinach is coated.
- Pour the creamed spinach mixture into the prepared ramekins or casserole dish.
- Sprinkle a little extra Parmesan cheese and black pepper over the top of each serving.
- Bake for 15-20 minutes, or until the gratin is bubbly and the cheese on top is golden brown and melted.
- Let rest for a few minutes before serving to allow the sauce to set slightly.
20. Roasted Delicata Squash with Cilantro Pesto

This vibrant dish features beautifully roasted delicata squash rings, offering a naturally sweet and savory combination. It’s a delightful and colorful addition to any meal.
Each golden-orange squash ring is charred with distinct grill marks, indicating a tender, caramelized texture. A generous dollop of bright green cilantro pesto crowns each ring, adding a fresh, herbaceous burst of flavor. Scattered green pumpkin seeds (pepitas) are sprinkled over the top, providing a pleasant crunch and earthy undertone. This visually appealing and flavorful dish is both healthy and satisfying, offering a lighter yet festive option for your Thanksgiving table.
Required Ingredients
- 1 medium delicata squash, washed and cut into $1/2$-inch thick rings (seeds removed)
- 1 tablespoon olive oil
- $1/4$ teaspoon salt
- $1/8$ teaspoon black pepper
- For the Cilantro Pesto:
- 1 cup fresh cilantro leaves and tender stems
- $1/4$ cup pumpkin seeds (pepitas), plus 1 tablespoon for garnish
- 1 small clove garlic
- 2 tablespoons fresh lime juice
- $1/4$ cup olive oil
- $1/4$ teaspoon salt, or to taste
- Pinch of crushed red pepper flakes (optional)
Equipment List
- Large cutting board
- Sharp knife
- Spoon (for removing seeds)
- Baking sheet
- Food processor or small blender
DIY Instruction (Step-by-Step)
Step 1: Prepare and Roast the Delicata Squash
- Preheat your oven to $400^{\circ}\text{F}$ ($200^{\circ}\text{C}$).
- Wash the delicata squash thoroughly. Since the skin is edible, no need to peel. Cut the squash into $1/2$-inch thick rings. Use a spoon to scrape out and discard the seeds and stringy bits from the center of each ring.
- Place the squash rings on a baking sheet. Drizzle with 1 tablespoon of olive oil. Sprinkle with salt and black pepper.
- Toss gently to ensure all rings are coated. Spread them in a single layer.
- Roast for 20-25 minutes, flipping halfway through, until the squash is tender and lightly caramelized with some browned edges.
Step 2: Make the Cilantro Pesto
- While the squash roasts, prepare the pesto. In a food processor or small blender, combine the fresh cilantro, $1/4$ cup of pumpkin seeds, garlic clove, and fresh lime juice.
- Pulse a few times until roughly chopped.
- With the food processor running on low, slowly drizzle in the $1/4$ cup of olive oil until the pesto is smooth but still has some texture.
- Stir in the salt and a pinch of red pepper flakes (if using). Taste and adjust seasoning as needed.
Step 3: Assemble and Serve
- Arrange the roasted delicata squash rings on a serving platter.
- Spoon a generous amount of the cilantro pesto onto the center of each squash ring.
- Garnish the dish with the remaining 1 tablespoon of pumpkin seeds and a few fresh cilantro leaves.
- Serve warm or at room temperature.
21. Balsamic Glazed Roasted Brussels Sprouts

This inviting dish features beautifully roasted Brussels sprouts, each boasting a lovely char and a glistening, deep balsamic glaze. It’s a sophisticated and flavorful vegetable side.
The sprouts display caramelized edges, indicating a tender interior and a rich, savory taste. A thick, dark balsamic reduction is generously drizzled over them, adding a tangy sweetness that complements the slight bitterness of the sprouts. Fresh green herbs, possibly parsley, are lightly scattered for a touch of vibrant color and freshness. This elegant and easy-to-make dish is a wonderful addition to any festive meal, offering a depth of flavor that everyone will appreciate.
Required Ingredients
- 1.5 lbs Brussels sprouts, trimmed and halved
- 2 tablespoons olive oil
- $1/2$ teaspoon salt
- $1/4$ teaspoon black pepper
- $1/4$ cup balsamic vinegar
- 1 tablespoon maple syrup or brown sugar (optional, for extra sweetness)
- 1 teaspoon fresh parsley, chopped, for garnish (optional)
Equipment List
- Large cutting board
- Sharp knife
- Large mixing bowl
- Baking sheet
- Small saucepan
- Whisk
DIY Instruction (Step-by-Step)
Step 1: Prep the Brussels Sprouts and Oven
- Preheat your oven to $400^{\circ}\text{F}$ ($200^{\circ}\text{C}$).
- Trim the tough ends off the Brussels sprouts and remove any loose outer leaves. Cut each sprout in half lengthwise.
- Place the halved Brussels sprouts into a large mixing bowl.
- Drizzle the olive oil over the sprouts. Sprinkle with salt and black pepper.
- Toss everything together until the sprouts are evenly coated.
Step 2: Roast the Brussels Sprouts
- Spread the seasoned Brussels sprouts in a single layer on a large baking sheet. Ensure they have some space to roast rather than steam.
- Roast in the preheated oven for 20-25 minutes, or until the sprouts are tender and their edges are nicely browned and caramelized.
Step 3: Prepare the Balsamic Glaze
- While the Brussels sprouts are roasting, prepare the glaze. In a small saucepan, combine the balsamic vinegar and maple syrup (if using).
- Bring the mixture to a gentle simmer over medium heat.
- Reduce the heat to low and continue to simmer, stirring occasionally, for 5-7 minutes. The glaze should thicken enough to coat the back of a spoon. Be careful not to let it get too thick, as it will thicken further as it cools.
Step 4: Combine and Serve
- Once the roasted Brussels sprouts are done, remove them from the oven.
- Transfer the roasted sprouts to a serving dish.
- Pour the warm balsamic glaze over the Brussels sprouts.
- Gently toss to coat all the sprouts with the glaze.
- Garnish with chopped fresh parsley, if desired, before serving warm.
22. Herb-Roasted Parsnip Fries with Sage

This dish transforms simple parsnips into delightful, crispy “fries” seasoned with aromatic herbs. It’s a hearty and flavorful alternative to traditional potato sides.
Long, golden-brown parsnip wedges are stacked in a bowl, showing off their tender yet slightly crispy texture. A generous dusting of dried herbs, likely rosemary and thyme, coats each piece, filling the air with a rustic fragrance. Fresh sage leaves are tucked among the parsnips, adding a burst of green color and a distinct, earthy aroma. This flavorful side is both comforting and a touch unexpected, providing a wonderful, wholesome addition to your Thanksgiving table.
Required Ingredients
- 2 lbs parsnips, peeled and cut into $1/2$-inch thick fries or wedges
- 2 tablespoons olive oil
- 1 teaspoon dried rosemary
- 1 teaspoon dried thyme
- $1/2$ teaspoon salt, or to taste
- $1/4$ teaspoon black pepper, or to taste
- 6-8 fresh sage leaves, for garnish (optional)
Equipment List
- Large cutting board
- Sharp knife
- Vegetable peeler
- Large mixing bowl
- Baking sheet
DIY Instruction (Step-by-Step)
Step 1: Prep the Parsnips and Oven
- Preheat your oven to $400^{\circ}\text{F}$ ($200^{\circ}\text{C}$).
- Peel the parsnips and cut them into $1/2$-inch thick, fry-like wedges. Try to make them as uniform in size as possible for even cooking.
- Place the parsnip wedges into a large mixing bowl.
Step 2: Season and Roast
- Drizzle the olive oil over the parsnips.
- Sprinkle the dried rosemary, dried thyme, salt, and black pepper over the parsnips.
- Toss everything together until the parsnips are well coated with the oil and seasonings.
- Spread the seasoned parsnips in a single layer on a large baking sheet. Do not overcrowd the pan, as this helps them crisp up.
- Roast for 25-35 minutes, flipping halfway through. The parsnips should be tender on the inside and nicely browned and slightly crispy on the outside.
Step 3: Serve
- Transfer the herb-roasted parsnip fries to a serving bowl.
- Garnish with fresh sage leaves, if desired, by tucking them among the hot parsnips for added aroma and visual appeal.
- Serve warm as a delicious and earthy side dish.
23. Roasted Beet and Goat Cheese Arugula Salad

This vibrant salad is a feast for the eyes, bursting with color and fresh ingredients. It offers a refreshing and tangy counterpoint to richer holiday dishes.
Bright green arugula forms the bed of the salad, offering a peppery bite. Slices of jewel-toned red and golden beets are artfully arranged, showcasing their earthy sweetness. Crumbly white goat cheese is dotted generously throughout, adding a creamy texture and a delightful tang. A sprinkle of microgreens and chopped walnuts adds a touch of freshness and crunch. This elegant salad is both light and flavorful, making it a beautiful and invigorating addition to your Thanksgiving spread.
Required Ingredients
- 5 ounces arugula
- 2 medium red beets, roasted or steamed, peeled and thinly sliced
- 2 medium golden beets, roasted or steamed, peeled and thinly sliced
- 4 ounces goat cheese, crumbled
- $1/4$ cup chopped walnuts, toasted (optional)
- For the Dressing:
- 3 tablespoons olive oil
- 1 tablespoon balsamic vinegar
- 1 teaspoon Dijon mustard
- $1/2$ teaspoon honey or maple syrup
- Salt and black pepper to taste
Equipment List
- Large mixing bowl
- Small bowl or jar (for dressing)
- Whisk or fork
- Sharp knife
- Cutting board
DIY Instruction (Step-by-Step)
Step 1: Prepare the Beets
- You can either roast or steam your beets.
- To Roast: Preheat oven to $400^{\circ}\text{F}$ ($200^{\circ}\text{C}$). Wrap individual beets in foil and roast for 45-60 minutes, or until tender. Let cool, then peel and slice thinly.
- To Steam: Place whole, unpeeled beets in a steamer basket over boiling water. Cover and steam for 30-40 minutes, or until tender. Let cool, then peel and slice thinly.
- Once cooled, peel the beets (the skin should rub off easily) and slice them into thin rounds, about $1/8$ inch thick. Keep the red and golden beets separate to maintain their colors.
Step 2: Make the Dressing
- In a small bowl or a jar with a lid, combine the olive oil, balsamic vinegar, Dijon mustard, and honey (or maple syrup).
- Whisk vigorously until the dressing is well combined and emulsified. Season with salt and black pepper to taste. If using a jar, simply shake well.
Step 3: Assemble the Salad
- In a large mixing bowl, gently toss the arugula with about half of the prepared dressing. You want the leaves lightly coated, not drenched.
- Arrange the dressed arugula on a large serving platter or individual plates.
- Artfully scatter the sliced red and golden beets over the arugula.
- Crumble the goat cheese generously over the beets and arugula.
- If using, sprinkle the toasted chopped walnuts over the salad.
Step 4: Serve
- Drizzle the remaining dressing lightly over the salad just before serving.
- Serve immediately as a vibrant and refreshing side dish.
24. Sweet Potato Casserole with Pecans and Dried Fruit

This rich and comforting casserole presents a warm, inviting spectacle, brimming with autumnal flavors. It’s a classic sweet side, cherished for holiday gatherings.
A thick, glossy glaze coats the tender sweet potato cubes, suggesting a wonderful sweetness. Whole pecans are scattered generously across the top, adding a satisfying crunch and nutty aroma. Dark, plump dried prunes and golden raisins are mixed throughout, providing bursts of chewy fruitiness. This casserole is both hearty and indulgent, offering a delightful blend of textures and tastes. It is a traditional and much-loved addition to any Thanksgiving meal, bringing warmth and sweet satisfaction.
Required Ingredients
- 3 lbs sweet potatoes, peeled and cut into 1-inch cubes
- $1/2$ cup brown sugar, packed
- $1/4$ cup unsalted butter, melted
- $1/4$ cup orange juice or milk
- 1 teaspoon vanilla extract
- $1/2$ teaspoon ground cinnamon
- $1/4$ teaspoon ground nutmeg
- $1/2$ teaspoon salt
- $1/2$ cup chopped pecans, plus extra whole pecans for topping
- $1/2$ cup mixed dried fruit (such as prunes, raisins, or dried cranberries)
Equipment List
- Large pot
- Colander
- Potato masher or electric mixer
- 9×13 inch baking dish
- Small bowl (for glaze)
DIY Instruction (Step-by-Step)
Step 1: Cook the Sweet Potatoes
- Preheat your oven to $375^{\circ}\text{F}$ ($190^{\circ}\text{C}$). Lightly grease a 9×13 inch baking dish.
- Peel the sweet potatoes and cut them into 1-inch cubes.
- Place the cubed sweet potatoes in a large pot and cover with cold water. Bring to a boil over high heat, then reduce heat to medium and simmer for 15-20 minutes, or until very tender.
- Drain the sweet potatoes thoroughly in a colander.
Step 2: Mash and Mix
- Return the drained hot sweet potatoes to the empty pot.
- Add the brown sugar, melted butter, orange juice (or milk), vanilla extract, cinnamon, nutmeg, and salt.
- Mash the sweet potatoes with a potato masher until smooth. For a creamier texture, you can use an electric mixer on low speed.
- Stir in the chopped pecans and the mixed dried fruit until evenly distributed.
Step 3: Bake the Casserole
- Spoon the sweet potato mixture into the prepared baking dish, spreading it evenly.
- Arrange extra whole pecans decoratively over the top of the casserole.
- Bake for 25-30 minutes, or until the casserole is heated through and the top is lightly golden brown.
- If you want a more caramelized topping, you can turn on the broiler for the last 2-3 minutes, watching carefully to prevent burning.
- Let it rest for a few minutes before serving warm.
25. Caramelized Shallots with Fresh Rosemary

This inviting dish features beautifully caramelized shallots, each glowing with a rich, deep color. It’s a wonderfully aromatic and subtly sweet side.
The shallots are tender and infused with a savory liquid, suggesting a gentle braising or roasting process. Some are halved, showcasing their delicate layers and a slight char on the cut surfaces. Fresh sprigs of rosemary are nestled among the shallots, releasing their fragrant, piney aroma. This dish is both elegant and simple, offering a refined addition to your holiday table. It provides a sweet and savory depth that pairs well with many main courses.
Required Ingredients
- 1.5 lbs small shallots (or pearl onions), peeled
- 2 tablespoons olive oil
- 1 tablespoon balsamic vinegar (optional, for extra glaze)
- 1 tablespoon maple syrup or brown sugar (optional, for sweetness)
- 1 cup vegetable broth or chicken broth
- 2 sprigs fresh rosemary, plus extra for garnish
- $1/2$ teaspoon salt, or to taste
- $1/4$ teaspoon black pepper, or to taste
Equipment List
- Large oven-safe skillet (cast iron or oven-safe pan) or baking sheet
- Sharp knife
- Cutting board
DIY Instruction (Step-by-Step)
Step 1: Prep the Shallots
- Preheat your oven to $400^{\circ}\text{F}$ ($200^{\circ}\text{C}$).
- Carefully peel the shallots. For larger shallots, you may want to cut them in half lengthwise. Leave smaller ones whole.
- Place the peeled shallots in a large oven-safe skillet or on a baking sheet.
Step 2: Season and Roast/Sauté
- Drizzle the olive oil over the shallots. Sprinkle with salt and black pepper.
- Add the rosemary sprigs to the pan.
- If using an oven-safe skillet, place it on the stovetop over medium-high heat for 5-7 minutes, stirring occasionally, until the shallots begin to brown.
- Then, add the vegetable broth to the skillet. If using a baking sheet, simply add the broth directly to the pan with the shallots now.
- If using balsamic vinegar or maple syrup, add them now for extra glaze and sweetness.
Step 3: Braise/Roast to Tenderness
- Transfer the skillet or baking sheet to the preheated oven.
- Roast or braise for 25-35 minutes, or until the shallots are very tender and caramelized. The liquid should have reduced and become a glossy sauce. If the liquid reduces too quickly, add a splash more broth.
- Stir occasionally during roasting to ensure even caramelization.
Step 4: Serve
- Remove from the oven. Discard the woody rosemary sprigs (if desired) or leave them for garnish.
- Transfer the caramelized shallots and their rich sauce to a serving bowl.
- Garnish with fresh rosemary sprigs just before serving warm.
26. Lemon-Garlic Green Beans with Crispy Onions

This dish offers bright and crisp green beans, beautifully accented with fresh lemon and garlic. It’s a vibrant and refreshing take on a classic side.
The tender-crisp green beans are coated in a light, savory dressing. Rings of golden-brown crispy onions are scattered throughout, adding a delightful crunch and a hint of sweet onion flavor. Zesty lemon peel curls are generously sprinkled over the top, providing a burst of citrus aroma and a lovely yellow contrast. This dish is both fresh and satisfying, offering a lighter option that still brings comforting flavors to your holiday table.
Required Ingredients
- 1.5 lbs fresh green beans, trimmed
- 2 tablespoons olive oil
- 2 cloves garlic, minced
- Zest of 1 large lemon
- 2 tablespoons fresh lemon juice
- $1/2$ small red onion, thinly sliced into rings (optional, for crispy rings)
- $1/4$ cup store-bought crispy fried onions (for garnish)
- $1/2$ teaspoon salt, or to taste
- $1/4$ teaspoon black pepper, or to taste
Equipment List
- Large pot (for blanching) or large skillet (for sautéing)
- Colander
- Large mixing bowl
- Small bowl (for lemon zest)
- Sharp knife
- Cutting board
DIY Instruction (Step-by-Step)
Step 1: Prep Green Beans and Aromatics
- Trim the tough ends off the fresh green beans.
- Mince the garlic. Zest the lemon, then set aside the zest. Halve the lemon and reserve for juicing.
- If making your own crispy onion rings: thinly slice $1/2$ small red onion into rings. Toss with a drizzle of oil and a pinch of flour, then pan-fry until crispy or roast until golden.
Step 2: Cook the Green Beans (Choose Your Method)
- Blanching Method (for tender-crisp):
- Bring a large pot of salted water to a rolling boil. Add the trimmed green beans and cook for 3-5 minutes, until bright green and tender-crisp.
- Immediately drain the beans and plunge them into an ice bath to stop cooking and preserve color. Drain thoroughly again.
- Sautéing Method (for tender-charred):
- Heat 2 tablespoons of olive oil in a large skillet over medium-high heat. Add the green beans.
- Sauté for 5-8 minutes, stirring occasionally, until the beans are tender and have some lightly charred spots.
Step 3: Combine with Flavorings
- Return the cooked green beans to a large bowl.
- Add the minced garlic, fresh lemon juice, salt, and black pepper.
- Toss everything together gently to combine.
Step 4: Garnish and Serve
- Transfer the lemon-garlic green beans to a serving platter.
- Generously sprinkle the lemon zest and the crispy fried onions (either store-bought or homemade) over the top.
- Serve warm or at room temperature as a bright and zesty side.
27. Glazed Baby Carrots with Fresh Thyme

These charming baby carrots are glistening with a savory glaze, boasting a beautiful orange hue and tender texture. It’s a simple yet elegant side, full of natural sweetness.
The petite carrots are perfectly cooked, with a few showing light caramelization on their surfaces. A sprinkle of fresh, vibrant green thyme leaves is scattered over them, adding an aromatic, earthy fragrance. A few extra sprigs of thyme are tucked in for a rustic, appealing presentation. This dish is both wholesome and comforting, offering a lovely balance of natural sweetness and herbaceous notes, making it a delightful and easy addition to any holiday meal.
Required Ingredients
- 1.5 lbs baby carrots (pre-peeled, or regular carrots peeled and cut into baby-sized pieces)
- 2 tablespoons unsalted butter
- 1 tablespoon maple syrup or honey
- $1/2$ teaspoon salt, or to taste
- $1/4$ teaspoon black pepper, or to taste
- 1 tablespoon fresh thyme leaves, chopped, plus extra sprigs for garnish
- $1/4$ cup water or vegetable broth
Equipment List
- Large skillet with a lid
- Small bowl
- Sharp knife
- Cutting board
DIY Instruction (Step-by-Step)
Step 1: Prep Carrots
- If using regular carrots, peel them and cut them into smaller, baby-carrot-sized pieces (about 2-3 inches long). If using pre-peeled baby carrots, simply rinse them.
- Finely chop the fresh thyme leaves.
Step 2: Sauté and Glaze
- Melt the butter in a large skillet with a lid over medium heat.
- Add the baby carrots to the skillet. Sauté for 5 minutes, stirring occasionally, until they start to turn a brighter orange.
- Pour in the water (or vegetable broth) and maple syrup (or honey). Add the chopped thyme, salt, and black pepper.
- Stir to combine, ensuring the carrots are coated.
Step 3: Simmer to Tenderness
- Bring the liquid to a gentle simmer.
- Reduce the heat to low, cover the skillet, and simmer for 10-15 minutes, or until the carrots are tender when pierced with a fork.
- Remove the lid and increase the heat to medium-high. Cook for another 3-5 minutes, stirring occasionally, allowing the liquid to reduce and create a light, glossy glaze around the carrots.
Step 4: Serve
- Transfer the glazed baby carrots to a serving bowl.
- Garnish with fresh thyme sprigs for an extra touch of aroma and visual appeal.
- Serve warm.
28. Rosemary Roasted Sweet Potatoes with Feta

This colorful dish presents chunky roasted sweet potatoes, offering a delightful balance of sweet and savory flavors. It’s a vibrant and satisfying side that brightens any table.
The sweet potato cubes are beautifully roasted, with caramelized edges and a tender interior. Generous crumbles of bright white feta cheese are scattered over them, adding a creamy texture and a salty tang. Fresh sprigs of rosemary are tucked among the potatoes, infusing the dish with an earthy, aromatic fragrance. This combination of robust flavors and textures makes for a surprisingly complex yet easy-to-love side dish that’s both comforting and fresh for your holiday spread.
Required Ingredients
- 3 lbs sweet potatoes, peeled and cut into 1-inch cubes
- 2 tablespoons olive oil
- 2 sprigs fresh rosemary, leaves removed and chopped, plus extra sprigs for garnish
- $1/2$ teaspoon salt, or to taste
- $1/4$ teaspoon black pepper, or to taste
- 4 ounces feta cheese, crumbled
Equipment List
- Large cutting board
- Sharp knife
- Large mixing bowl
- Baking sheet
DIY Instruction (Step-by-Step)
Step 1: Prep the Sweet Potatoes and Oven
- Preheat your oven to $400^{\circ}\text{F}$ ($200^{\circ}\text{C}$).
- Peel the sweet potatoes and cut them into evenly sized 1-inch cubes.
- Remove the leaves from the rosemary sprigs and finely chop them.
Step 2: Season and Roast
- Place the cubed sweet potatoes in a large mixing bowl.
- Drizzle the olive oil over the sweet potatoes.
- Add the chopped rosemary, salt, and black pepper.
- Toss everything together until the sweet potatoes are well coated with the oil and seasonings.
- Spread the seasoned sweet potatoes in a single layer on a large baking sheet. Do not overcrowd the pan, as this helps them roast and caramelize rather than steam.
- Roast for 25-35 minutes, flipping halfway through. The sweet potatoes should be tender on the inside and beautifully caramelized and slightly crispy on the outside.
Step 3: Assemble and Serve
- Transfer the hot roasted sweet potatoes to a serving dish.
- Generously crumble the feta cheese over the top of the warm potatoes. The heat will slightly soften the feta.
- Tuck in a few fresh rosemary sprigs for garnish and extra aroma.
- Serve warm as a delicious sweet and savory side.
29. Cinnamon Sweet Potato Mash with Whipped Topping

This inviting mash presents a beautiful, sunny orange hue, offering a warm and spice-infused sweetness. It’s a truly comforting and classic holiday side.
The smooth, creamy sweet potato mash is artfully swirled, and topped with a generous dollop of fluffy whipped cream or marshmallow creme. A delicate dusting of cinnamon adds a warm aroma and a touch of visual appeal. Cinnamon sticks are artfully arranged nearby, emphasizing the comforting spice blend. This dish is both easy to love and deeply satisfying, offering a wonderful blend of creamy texture and aromatic sweetness that epitomizes holiday indulgence.
Required Ingredients
- 3 lbs sweet potatoes, peeled and cut into 1-inch chunks
- 4 tablespoons unsalted butter, melted
- $1/4$ cup warm milk or heavy cream
- 2 tablespoons maple syrup or brown sugar
- 1 teaspoon ground cinnamon, plus extra for dusting
- $1/2$ teaspoon ground nutmeg (optional)
- $1/4$ teaspoon salt
- For Topping:
- 1 cup heavy whipping cream, whipped (or marshmallow fluff/creme)
- (If whipping cream: 1-2 tablespoons powdered sugar, $1/2$ teaspoon vanilla extract)
Equipment List
- Large pot
- Colander
- Potato masher or electric mixer
- Large serving bowl
- Whisk or electric mixer (for whipped cream)
DIY Instruction (Step-by-Step)
Step 1: Cook the Sweet Potatoes
- Peel the sweet potatoes and cut them into evenly sized 1-inch chunks.
- Place the sweet potato chunks in a large pot and cover with cold water.
- Bring the water to a boil over high heat, then reduce the heat to medium and simmer for 15-20 minutes, or until the sweet potatoes are very tender when pierced with a fork.
- Drain the sweet potatoes thoroughly in a colander.
Step 2: Mash and Season
- Return the drained hot sweet potatoes to the empty pot.
- Add the melted butter, warm milk (or heavy cream), maple syrup (or brown sugar), cinnamon, nutmeg (if using), and salt.
- Using a potato masher, mash the sweet potatoes until smooth and creamy. For an extra fluffy texture, you can use an electric mixer on low speed. Be careful not to overmix.
- Taste the mash and adjust seasonings as desired.
Step 3: Prepare the Topping (if using homemade whipped cream)
- In a clean, chilled bowl, combine the heavy whipping cream, powdered sugar, and vanilla extract.
- Using an electric mixer or a whisk, beat until soft or medium peaks form.
Step 4: Assemble and Serve
- Transfer the warm cinnamon sweet potato mash to a large serving bowl.
- Create an attractive swirl pattern on the surface with the back of a spoon.
- Pipe or spoon a generous dollop of whipped cream (or marshmallow creme) into the center of the mash.
- Lightly dust the whipped topping and the surrounding mash with extra ground cinnamon.
- Serve warm, perhaps with cinnamon sticks on the side for decoration.
30. Braised Leeks with Tarragon

This elegant dish presents tender, pale leeks gently cooked in a savory broth, showcasing their subtle, sweet onion flavor. It’s a refined and delicate vegetable side.
The leeks are cut into uniform pieces, ranging from the white to light green sections, all tender and glistening with a rich liquid. Fresh tarragon leaves, both whole and chopped, are scattered generously over the top, releasing their distinctive anise-like aroma. Steaming gently in a shallow bowl, this dish offers a sophisticated and aromatic addition to your holiday spread. It’s a comforting yet light option that brings a touch of gourmet flair to the table.
Required Ingredients
- 4 medium leeks, white and light green parts only
- 2 tablespoons unsalted butter or olive oil
- 1 clove garlic, minced (optional)
- 1 cup vegetable broth or chicken broth
- 2 tablespoons dry white wine (optional, for flavor depth)
- 1 tablespoon fresh tarragon, chopped, plus extra sprigs for garnish
- $1/2$ teaspoon salt, or to taste
- $1/4$ teaspoon black pepper, or to taste
Equipment List
- Large cutting board
- Sharp knife
- Large skillet with a lid or Dutch oven
- Colander or bowl (for cleaning leeks)
DIY Instruction (Step-by-Step)
Step 1: Prepare and Clean the Leeks
- Trim the dark green tops and the root ends off the leeks. Cut the leeks into 2-3 inch sections.
- Leeks can hold a lot of dirt between their layers. Slice each section lengthwise in half, but keep the root end intact so the layers hold together. Rinse thoroughly under cold running water, fanning out the layers to ensure all grit is removed. Pat dry.
- Finely chop the fresh tarragon.
Step 2: Sauté the Leeks
- Melt the butter (or heat olive oil) in a large skillet with a lid or a Dutch oven over medium heat.
- Add the leek sections to the hot skillet, cut-side down if possible. Sauté for 5-7 minutes, turning occasionally, until they are lightly softened and just starting to brown around the edges.
- If using, add the minced garlic and sauté for another minute until fragrant.
Step 3: Braise the Leeks
- Pour in the vegetable broth and white wine (if using). Add the chopped tarragon, salt, and black pepper.
- Bring the liquid to a gentle simmer.
- Reduce the heat to low, cover the skillet, and braise for 15-20 minutes, or until the leeks are very tender. The liquid should reduce slightly, creating a flavorful sauce.
Step 4: Serve
- Carefully transfer the braised leeks and their cooking liquid to a serving dish.
- Garnish with fresh tarragon sprigs and a sprinkle of chopped chives (if desired) for extra aroma and visual appeal.
- Serve warm as an elegant and tender vegetable side.
31. Spiced Roasted Cauliflower with Cucumber Raita

This vibrant dish features beautifully charred cauliflower florets, coated in a rich, golden spice blend. It’s an aromatic and savory side, offering a delightful twist on a familiar vegetable.
Each piece of cauliflower boasts caramelized edges and a tender interior, promising a satisfying texture. Fresh green cilantro leaves are scattered among the florets, adding a pop of color and herbaceous freshness. In the background, a creamy cucumber raita, garnished with fresh mint and diced cucumber, waits to provide a cooling counterpoint. This flavorful and refreshing combination is both healthy and deeply satisfying, offering a welcome balance to your holiday table.
Required Ingredients
- For the Roasted Cauliflower:
- 1 large head of cauliflower, cut into medium florets
- 2 tablespoons olive oil
- 1 teaspoon ground cumin
- 1 teaspoon ground coriander
- $1/2$ teaspoon turmeric powder
- $1/2$ teaspoon salt, or to taste
- $1/4$ teaspoon black pepper, or to taste
- 2 tablespoons fresh cilantro, chopped, for garnish
- For the Cucumber Raita:
- 1 cup plain Greek yogurt
- $1/2$ cucumber, peeled, seeded, and finely diced
- 1 tablespoon fresh mint, chopped
- $1/4$ teaspoon salt, or to taste
- Pinch of black pepper
Equipment List
- Large cutting board
- Sharp knife
- Large mixing bowl
- Baking sheet
- Small bowl (for raita)
- Whisk or spoon
DIY Instruction (Step-by-Step)
Step 1: Prep Cauliflower and Oven
- Preheat your oven to $400^{\circ}\text{F}$ ($200^{\circ}\text{C}$).
- Wash the cauliflower and cut it into evenly sized, medium florets.
- In a large mixing bowl, combine the cauliflower florets, olive oil, ground cumin, ground coriander, turmeric powder, salt, and black pepper.
- Toss everything thoroughly until the cauliflower is evenly coated with the oil and spices.
Step 2: Roast the Cauliflower
- Spread the seasoned cauliflower in a single layer on a large baking sheet. Do not overcrowd the pan; this helps the cauliflower achieve a good char.
- Roast for 20-25 minutes, flipping halfway through. The cauliflower should be tender and have beautifully caramelized and slightly crispy edges.
Step 3: Make the Cucumber Raita
- While the cauliflower roasts, prepare the raita. In a small bowl, combine the Greek yogurt, finely diced cucumber, chopped fresh mint, salt, and black pepper.
- Stir everything together until well combined. Taste and adjust seasoning as needed.
Step 4: Assemble and Serve
- Transfer the hot roasted cauliflower to a serving dish.
- Garnish the cauliflower with fresh chopped cilantro.
- Serve the spiced roasted cauliflower warm, with the cool cucumber raita on the side for dipping.
32. Lemon-Garlic Sautéed Kale

This vibrant dish features a generous pile of bright green kale, lightly sautéed and steaming gently. It’s a healthy and flavorful side, offering a refreshing contrast to richer fare.
The tender kale leaves are infused with aromatic garlic slices, which are subtly browned and fragrant. A generous sprinkle of bright yellow lemon zest adds a zesty, fresh aroma and a pop of color. Lemon wedges are arranged on the side, ready to be squeezed over the greens for an extra burst of citrus. This simple yet flavorful preparation highlights the natural goodness of kale, making it a wonderful, nutrient-rich addition to your holiday spread.
Required Ingredients
- 1 large bunch curly kale (about 8-10 ounces)
- 2 tablespoons olive oil
- 3-4 cloves garlic, thinly sliced
- Zest of 1 large lemon, plus wedges for serving
- $1/2$ teaspoon salt, or to taste
- $1/4$ teaspoon black pepper, or to taste
- 1 tablespoon water or vegetable broth (optional, to help wilt)
Equipment List
- Large cutting board
- Sharp knife
- Large skillet with a lid or Dutch oven
- Colander or large bowl (for cleaning kale)
DIY Instruction (Step-by-Step)
Step 1: Prep the Kale and Aromatics
- Thoroughly wash the kale leaves. Remove the tough stems by stripping the leafy greens off. Roughly chop the kale leaves into bite-sized pieces.
- Thinly slice the garlic cloves. Zest the lemon, then cut the lemon into wedges for serving.
- If desired, you can massage the kale with a tiny bit of olive oil and a pinch of salt for 1-2 minutes to help tenderize it before cooking.
Step 2: Sauté the Garlic and Kale
- Heat the olive oil in a large skillet (or Dutch oven) over medium heat.
- Add the thinly sliced garlic and sauté for 1-2 minutes until fragrant and just beginning to turn golden. Be careful not to burn it.
- Add the chopped kale to the skillet. It will seem like a lot, but it will wilt down. Add a tablespoon of water or broth if needed to help it steam and wilt.
- Sauté the kale for 5-7 minutes, stirring frequently, until it is tender but still has a slight bite.
Step 3: Season and Serve
- Remove the skillet from the heat.
- Stir in the lemon zest, salt, and black pepper.
- Transfer the sautéed kale to a serving dish.
- Serve immediately with fresh lemon wedges on the side for squeezing, allowing guests to add extra citrus brightness.
33. Glazed Turnips with Fresh Dill

This intriguing side dish features tender turnip halves, glistening with a savory glaze. It offers an earthy flavor with a refreshing herbal twist.
The turnips are beautifully cooked, showcasing a tender texture and a slight translucence. A light, glossy glaze coats each piece, suggesting a subtle sweetness and savory depth. Generous amounts of fresh green dill are scattered over the top, adding a bright, herbaceous aroma and a lovely contrasting color. This dish is both comforting and unique, providing an unexpected yet delightful addition to your holiday table, particularly for those seeking something beyond common root vegetables.
Required Ingredients
- 1.5 lbs small turnips, peeled and halved (or quartered if large)
- 2 tablespoons unsalted butter
- 1 tablespoon maple syrup or honey
- $1/2$ cup vegetable broth or water
- 1 tablespoon fresh dill, chopped, plus extra sprigs for garnish
- $1/2$ teaspoon salt, or to taste
- $1/4$ teaspoon black pepper, or to taste
Equipment List
- Large cutting board
- Sharp knife
- Vegetable peeler
- Large skillet with a lid
DIY Instruction (Step-by-Step)
Step 1: Prep the Turnips
- Peel the turnips thoroughly. Halve smaller turnips or quarter larger ones to ensure they cook evenly.
- Finely chop the fresh dill.
Step 2: Sauté and Simmer
- Melt the butter in a large skillet with a lid over medium heat.
- Add the turnip pieces to the hot skillet. Sauté for 5-7 minutes, stirring occasionally, until they begin to brown lightly.
- Pour in the vegetable broth (or water) and maple syrup (or honey). Add the chopped dill, salt, and black pepper.
- Stir to combine, ensuring the turnips are coated.
Step 3: Glaze to Tenderness
- Bring the liquid to a gentle simmer.
- Reduce the heat to low, cover the skillet, and simmer for 15-20 minutes, or until the turnips are very tender when pierced with a fork.
- Remove the lid and increase the heat to medium-high. Cook for another 3-5 minutes, stirring occasionally, allowing the liquid to reduce and create a light, glossy glaze around the turnips.
Step 4: Serve
- Transfer the glazed turnips to a serving bowl.
- Garnish with fresh dill sprigs for an extra touch of aroma and visual appeal.
- Serve warm.
34. Roasted Cauliflower Steaks with Romesco Sauce

This impressive dish features thick “steaks” of roasted cauliflower, boasting beautiful char marks and a tender interior. It’s a hearty and flavorful vegetarian option for your holiday table.
Each golden-brown cauliflower steak is topped with a generous dollop of vibrant red romesco sauce, which is rich with roasted peppers and nuts. Whole blanched almonds are scattered over the sauce, adding a satisfying crunch. Fresh green cilantro leaves provide a final touch of color and freshness. This dish is both visually appealing and deeply flavorful, offering a substantial and exciting side that will satisfy both vegetarians and meat-eaters alike.
Required Ingredients
- 1 large head of cauliflower, cut into 1-inch thick “steaks”
- 2 tablespoons olive oil, plus more for drizzling
- $1/2$ teaspoon salt
- $1/4$ teaspoon black pepper
- For the Romesco Sauce:
- 1 red bell pepper, roasted (or from a jar)
- $1/2$ cup roasted red peppers (from a jar), drained
- $1/4$ cup blanched almonds (plus 1 tablespoon for garnish)
- 1 clove garlic
- 2 tablespoons red wine vinegar
- $1/4$ cup olive oil
- $1/4$ teaspoon smoked paprika
- $1/4$ teaspoon salt, or to taste
- Pinch of crushed red pepper flakes (optional)
- 1 tablespoon fresh cilantro, chopped, for garnish
Equipment List
- Large cutting board
- Sharp knife
- Baking sheet
- Food processor or blender
- Small bowl
DIY Instruction (Step-by-Step)
Step 1: Prepare and Roast the Cauliflower Steaks
- Preheat your oven to $400^{\circ}\text{F}$ ($200^{\circ}\text{C}$).
- Remove the outer leaves of the cauliflower. Using a large, sharp knife, cut the entire head of cauliflower into 1-inch thick “steaks” from the center outwards. Smaller florets that break off can still be roasted.
- Place the cauliflower steaks and florets on a baking sheet. Drizzle with 2 tablespoons of olive oil. Sprinkle with salt and black pepper.
- Roast for 20-30 minutes, flipping halfway through, until the cauliflower is tender and deeply golden brown with some charred spots.
Step 2: Make the Romesco Sauce
- If roasting your own red bell pepper: cut in half, remove seeds, place cut-side down on a baking sheet, and roast with the cauliflower until skin is blackened (about 20-25 mins). Place in a bowl and cover with plastic wrap for 10 minutes, then peel.
- In a food processor, combine the roasted red bell pepper (fresh or jarred), jarred roasted red peppers, $1/4$ cup blanched almonds, garlic, red wine vinegar, smoked paprika, salt, and crushed red pepper flakes (if using).
- With the food processor running, slowly drizzle in the $1/4$ cup of olive oil until the sauce is smooth. Taste and adjust seasoning as needed.
Step 3: Assemble and Serve
- Arrange the roasted cauliflower steaks on a serving platter.
- Spoon a generous amount of romesco sauce over each cauliflower steak.
- Garnish with extra blanched almonds and fresh chopped cilantro.
- Serve warm with any remaining sauce on the side.
35. Crispy Spiced Okra with Herbs

This intriguing dish features crispy, golden-brown okra pods, some whole and some sliced to reveal their distinctive star-shaped cross-section. It’s a flavorful and unique side.
Each piece of okra is coated in a savory, spiced crust, suggesting a delightful crunch. A light dusting of dried herbs, possibly rosemary and thyme, adds an aromatic layer. A few fresh herb sprigs are nestled among the okra, providing a vibrant green contrast. This dish is a wonderful way to enjoy okra, offering a crunchy texture and rich flavor that’s a refreshing change from typical preparations. It makes for an exciting and flavorful addition to any holiday meal.
Required Ingredients
- 1 lb fresh okra, trimmed and some sliced into $1/2$-inch rounds (some left whole)
- 2 tablespoons olive oil
- 2 tablespoons cornmeal or fine semolina (for crispness)
- 1 teaspoon smoked paprika
- $1/2$ teaspoon ground cumin
- $1/4$ teaspoon cayenne pepper (optional, for heat)
- $1/2$ teaspoon salt, or to taste
- $1/4$ teaspoon black pepper, or to taste
- Fresh rosemary or thyme sprigs, for garnish (optional)
Equipment List
- Large cutting board
- Sharp knife
- Large mixing bowl
- Baking sheet
DIY Instruction (Step-by-Step)
Step 1: Prep the Okra
- Wash the fresh okra thoroughly. Pat dry completely.
- Trim the very tips of the stem ends, but avoid cutting into the pod, as this can release the “slime.”
- For a mix of textures, leave about half of the pods whole and slice the other half into $1/2$-inch thick rounds.
- Place the okra (whole and sliced) in a large mixing bowl.
Step 2: Season and Coat
- Drizzle the olive oil over the okra.
- In a separate small bowl, mix together the cornmeal (or semolina), smoked paprika, ground cumin, cayenne pepper (if using), salt, and black pepper.
- Sprinkle this spice and cornmeal mixture over the okra.
- Toss everything thoroughly until the okra is evenly coated. The cornmeal helps create a crispy crust.
Step 3: Roast or Fry
- Roasting Method (recommended for crispness):
- Preheat your oven to $425^{\circ}\text{F}$ ($220^{\circ}\text{C}$).
- Spread the seasoned okra in a single layer on a large baking sheet. Do not overcrowd the pan.
- Roast for 15-25 minutes, flipping halfway through, until the okra is tender-crisp and nicely browned.
- Pan-Frying Method:
- Heat 2 tablespoons of oil in a large skillet over medium-high heat.
- Add the okra in a single layer (work in batches if necessary). Fry for 5-8 minutes, turning occasionally, until golden brown and crispy.
Step 4: Serve
- Transfer the crispy spiced okra to a serving bowl.
- Garnish with fresh rosemary or thyme sprigs, if desired.
- Serve warm as a unique and flavorful side dish.
36. Mexican Street Corn Salad (Esquites)

This vibrant salad is a lively and colorful side dish, bursting with the fresh, zesty flavors of Mexican street corn. It’s a fun and festive addition to any meal.
Sweet golden corn kernels are mixed with bright red diced bell peppers, creating an inviting medley of colors and textures. Crumbled white cotija cheese is scattered over the top, adding a salty tang and creamy texture. Fresh green cilantro leaves and a dusting of chili powder provide an aromatic finish. Lime wedges are presented alongside, ready to be squeezed for a burst of citrusy brightness. This flavorful salad is both refreshing and satisfying, bringing a lively, zesty character to your holiday table.
Required Ingredients
- 4 cups corn kernels (from 4-5 ears of corn, or 2 (15-ounce) cans, drained, or frozen, thawed)
- 1 red bell pepper, finely diced
- $1/2$ small red onion, finely diced (optional)
- $1/4$ cup fresh cilantro, chopped, plus extra for garnish
- 2 tablespoons mayonnaise (or Greek yogurt for lighter)
- 1 tablespoon fresh lime juice, plus wedges for serving
- $1/4$ cup crumbled cotija cheese (or feta)
- $1/2$ teaspoon chili powder, plus extra for dusting
- $1/4$ teaspoon salt, or to taste
- Pinch of cayenne pepper (optional, for heat)
Equipment List
- Large mixing bowl
- Small bowl or jar
- Whisk or spoon
- Cutting board
- Sharp knife
- Skillet (if charring corn)
DIY Instruction (Step-by-Step)
Step 1: Cook the Corn
- If using fresh corn: Cut the kernels from the cobs. You can optionally char the corn for extra flavor: heat a large dry skillet over medium-high heat. Add the corn and cook for 5-7 minutes, stirring occasionally, until some kernels are lightly browned and charred.
- If using canned or frozen corn: Drain canned corn well. Thaw frozen corn. You can still char these in a skillet if desired.
Step 2: Prep Other Vegetables
- Finely dice the red bell pepper and red onion (if using).
- Chop the fresh cilantro.
- Cut the lime into wedges for serving.
Step 3: Mix the Salad
- In a large mixing bowl, combine the cooked corn kernels, diced red bell pepper, and diced red onion (if using).
- Add the mayonnaise (or Greek yogurt), fresh lime juice, chopped cilantro, chili powder, salt, and cayenne pepper (if using).
- Stir everything together until all the ingredients are well combined and coated.
Step 4: Assemble and Serve
- Transfer the Mexican street corn salad to a serving bowl.
- Generously crumble the cotija cheese (or feta) over the top of the salad.
- Lightly dust with extra chili powder and garnish with fresh cilantro leaves.
- Serve with lime wedges on the side for squeezing, allowing guests to add extra citrus brightness. Serve warm or at room temperature.
37. Spicy Maple Roasted Butternut Squash

This appealing dish features perfectly roasted butternut squash cubes, glowing with a rich, caramelized sheen. It’s a sweet and spicy side, perfect for warming up a holiday meal.
Each tender cube of squash is beautifully browned, with some charred edges that add depth of flavor. A glossy, deep-amber glaze clings to the squash, suggesting a wonderful blend of sweetness and heat. Bright red chili slices and fresh green cilantro leaves are scattered over the top, providing a vibrant contrast and a gentle spicy kick. This dish is both comforting and exciting, offering a flavorful and easy-to-make addition to your Thanksgiving table.
Required Ingredients
- 1 large butternut squash (about 3 lbs), peeled, seeded, and cut into 1-inch cubes
- 2 tablespoons olive oil
- 2 tablespoons maple syrup
- $1/2$ teaspoon smoked paprika
- $1/4$ teaspoon cayenne pepper (or more, to taste)
- $1/2$ teaspoon salt, or to taste
- $1/4$ teaspoon black pepper, or to taste
- 1 small red chili, thinly sliced (optional, for garnish)
- 2 tablespoons fresh cilantro or parsley, chopped, for garnish
Equipment List
- Large cutting board
- Sharp knife
- Vegetable peeler
- Large mixing bowl
- Baking sheet
DIY Instruction (Step-by-Step)
Step 1: Prep the Squash and Oven
- Preheat your oven to $400^{\circ}\text{F}$ ($200^{\circ}\text{C}$).
- Peel the butternut squash, scoop out the seeds, and cut it into evenly sized 1-inch cubes.
- Thinly slice the red chili if using for garnish.
Step 2: Season and Roast
- Place the cubed butternut squash in a large mixing bowl.
- Drizzle with olive oil and maple syrup.
- Add the smoked paprika, cayenne pepper, salt, and black pepper.
- Toss everything thoroughly until the squash is evenly coated with the oil, syrup, and spices.
- Spread the seasoned butternut squash in a single layer on a large baking sheet. Do not overcrowd the pan, as this helps it roast and caramelize.
- Roast for 25-35 minutes, flipping halfway through, until the squash is tender and beautifully caramelized with some dark, crispy edges.
Step 3: Serve
- Transfer the hot roasted butternut squash to a serving bowl.
- Garnish with thinly sliced fresh red chili (if using) and chopped fresh cilantro or parsley for color and a fresh finish.
- Serve warm as a sweet and spicy side dish.
38. Glazed Delicata Squash Rings with Thyme

This elegant side dish features beautifully roasted delicata squash rings, showcasing their natural sweetness and appealing scalloped edges. It’s a delicate and sophisticated vegetable.
Each golden-orange squash ring is tender and glistening with a light glaze, which hints at a touch of sweetness. A sprinkle of coarse sea salt sparkles over the surface, enhancing the flavor, while tiny fresh thyme leaves are scattered throughout, adding an aromatic, earthy touch. A shallow pool of liquid at the bottom suggests a savory glaze. This dish is both visually appealing and flavorful, offering a unique and wholesome addition to your holiday table.
Required Ingredients
- 1 large delicata squash, washed and cut into $1/2$-inch thick rings (seeds removed)
- 1 tablespoon olive oil
- 1 tablespoon maple syrup or brown sugar
- $1/2$ teaspoon salt, plus extra flaky sea salt for garnish
- $1/4$ teaspoon black pepper
- 1 tablespoon fresh thyme leaves, plus extra sprigs for garnish
- 2 tablespoons water or vegetable broth (for glazing)
Equipment List
- Large cutting board
- Sharp knife
- Spoon (for removing seeds)
- Baking sheet
- Small bowl
DIY Instruction (Step-by-Step)
Step 1: Prep the Squash and Oven
- Preheat your oven to $400^{\circ}\text{F}$ ($200^{\circ}\text{C}$).
- Wash the delicata squash thoroughly. Since the skin is edible, no need to peel. Cut the squash into $1/2$-inch thick rings. Use a spoon to scrape out and discard the seeds and stringy bits from the center of each ring.
- Finely chop the fresh thyme leaves.
Step 2: Season and Roast
- Place the squash rings on a baking sheet. Drizzle with olive oil and maple syrup (or brown sugar).
- Sprinkle with salt, black pepper, and the chopped fresh thyme leaves.
- Toss gently to ensure all rings are coated. Spread them in a single layer.
- Roast for 20-25 minutes, flipping halfway through, until the squash is tender and lightly caramelized with some browned edges.
Step 3: Glaze and Serve
- In a small bowl, mix the 2 tablespoons of water or vegetable broth with a tiny pinch of salt and a small dash of maple syrup (if desired).
- Remove the roasted squash from the oven. If a more pronounced glaze is desired, you can add the liquid mixture to the pan during the last 5 minutes of roasting, letting it reduce and coat the squash.
- Arrange the roasted delicata squash rings on a serving platter.
- Sprinkle with flaky sea salt and garnish with fresh thyme sprigs.
- Serve warm.
39. Garlic Herb Sautéed Mixed Mushrooms

This enticing dish features a beautiful medley of sautéed mushrooms, showcasing various textures and earthy flavors. It’s a wonderful savory addition to any holiday table.
A vibrant mix of shiitake, oyster, enoki, and cremini mushrooms are visible, glistening with a savory sauce. Finely chopped fresh parsley is scattered over the top, adding a bright green pop of color and an herbaceous aroma. A light dusting of black pepper suggests a gentle seasoning. A small pool of olive oil at the bottom hints at the rich flavor base. This dish is both simple and sophisticated, offering a delightful umami-rich experience that complements any festive spread.
Required Ingredients
- 2 lbs mixed mushrooms (shiitake, cremini, oyster, enoki, etc.), cleaned and sliced/separated
- 3 tablespoons olive oil
- 3 cloves garlic, minced
- 2 tablespoons fresh parsley, chopped, plus extra for garnish
- 1 tablespoon fresh thyme or rosemary, chopped (optional)
- $1/2$ teaspoon salt, or to taste
- $1/4$ teaspoon black pepper, or to taste
- 2 tablespoons dry white wine or vegetable broth (for deglazing)
Equipment List
- Large cutting board
- Sharp knife
- Large skillet (preferably cast iron)
- Paper towels
DIY Instruction (Step-by-Step)
Step 1: Prep the Mushrooms
- Gently wipe any dirt from the mushrooms with a damp paper towel. Do not rinse them, as they absorb water.
- For larger mushrooms (like shiitake or cremini), slice them. For smaller clusters (like enoki or oyster), separate them.
- Mince the garlic and chop the fresh parsley and other herbs (if using).
Step 2: Sauté the Mushrooms
- Heat 2 tablespoons of olive oil in a very large skillet (or work in batches) over medium-high heat. Mushrooms need space to brown, so do not overcrowd the pan.
- Add the mushrooms to the hot skillet in a single layer. Let them cook undisturbed for 3-5 minutes to allow them to brown before stirring.
- Continue to sauté, stirring occasionally, for another 5-7 minutes, until the mushrooms have released their liquid and are nicely browned and tender.
Step 3: Add Aromatics and Deglaze
- Add the minced garlic and chopped fresh herbs (thyme/rosemary if using) to the skillet with the mushrooms. Sauté for 1-2 minutes until fragrant.
- Pour in the dry white wine (or vegetable broth) to deglaze the pan, scraping up any browned bits from the bottom. Let the liquid simmer and reduce for about 1-2 minutes.
Step 4: Season and Serve
- Stir in the chopped fresh parsley, salt, and black pepper. Taste and adjust seasoning as needed.
- Transfer the sautéed mixed mushrooms to a serving bowl.
- Garnish with extra fresh parsley and a grind of black pepper.
- Serve warm as an earthy and savory side dish.
40. Garlic Sautéed Cabbage with Herbs

This simple yet satisfying dish features thinly sliced cabbage, lightly sautéed to a tender-crisp texture. It’s a wholesome and flavorful side that is easy to prepare.
The pale green cabbage leaves are glistening with a light dressing, showing off a delicate char on some edges. Finely minced garlic and fresh green herbs, likely parsley or chives, are scattered over the top, adding an aromatic freshness. A subtle drizzle of golden liquid pools at the bottom, enhancing the overall sheen. This dish is both light and comforting, offering a refreshing and healthy vegetable option that balances richer flavors on your holiday table.
Required Ingredients
- 1 medium head of green cabbage (about 2 lbs), thinly sliced or shredded
- 2 tablespoons olive oil or butter
- 3 cloves garlic, minced
- 2 tablespoons fresh parsley, chopped, plus extra for garnish
- 1 tablespoon apple cider vinegar (optional, for brightness)
- $1/2$ teaspoon salt, or to taste
- $1/4$ teaspoon black pepper, or to taste
- $1/4$ cup water or vegetable broth (to help steam)
Equipment List
- Large cutting board
- Sharp knife
- Very large skillet or Dutch oven
DIY Instruction (Step-by-Step)
Step 1: Prep the Cabbage and Aromatics
- Remove any tough outer leaves from the cabbage. Cut the cabbage in half, remove the core, and then thinly slice or shred the cabbage.
- Mince the garlic. Chop the fresh parsley.
Step 2: Sauté the Cabbage
- Heat the olive oil (or melt butter) in a very large skillet or Dutch oven over medium-high heat.
- Add the minced garlic and sauté for 30 seconds until fragrant.
- Add the sliced cabbage to the skillet. It will seem like a lot, but it will quickly wilt down.
- Sauté the cabbage for 5-7 minutes, stirring frequently, until it is tender-crisp and has a slight char on some edges. If it starts to stick, add the $1/4$ cup of water or vegetable broth to help it steam.
Step 3: Season and Finish
- Remove the skillet from the heat.
- Stir in the chopped fresh parsley, apple cider vinegar (if using), salt, and black pepper.
- Toss everything together until the cabbage is well combined and coated.
- Taste and adjust seasoning as needed.
Step 4: Serve
- Transfer the garlic sautéed cabbage to a serving platter.
- Garnish with extra fresh parsley.
- Serve warm immediately as a simple yet flavorful side dish.
41. Orange Glazed Carrots with Garlic and Parsley

This vibrant dish features tender whole carrots, glistening with a bright orange glaze. It’s a beautifully simple yet flavorful side that brings a touch of sweetness to your table.
Each carrot is perfectly cooked, showcasing its natural color and a subtle sheen from the glaze. Finely minced garlic and delicate orange zest are scattered over the top, adding aromatic and zesty notes. Fresh green parsley provides a final touch of color and a fresh herbaceous counterpoint. A small pool of the golden glaze at the bottom highlights the dish’s richness. This elegant and easy-to-make side offers a wonderful blend of sweet, savory, and citrusy flavors, making it a delightful addition to any festive meal.
Required Ingredients
- 1.5 lbs medium carrots, peeled
- 2 tablespoons unsalted butter
- 2 tablespoons orange juice
- 1 tablespoon maple syrup or honey
- 1 clove garlic, minced
- Zest of $1/2$ an orange, plus extra for garnish
- 1 tablespoon fresh parsley, chopped, plus extra for garnish
- $1/2$ teaspoon salt, or to taste
- $1/4$ teaspoon black pepper, or to taste
- $1/4$ cup water or vegetable broth
Equipment List
- Large cutting board
- Sharp knife
- Vegetable peeler
- Large skillet with a lid
DIY Instruction (Step-by-Step)
Step 1: Prep Carrots and Aromatics
- Peel the carrots. If they are very thick, you can halve them lengthwise. For presentation, you can leave a small piece of the green top intact.
- Mince the garlic. Zest $1/2$ an orange, reserving a bit for garnish. Chop the fresh parsley, reserving some for garnish.
Step 2: Sauté and Glaze
- Melt the butter in a large skillet with a lid over medium heat.
- Add the carrots to the hot skillet. Sauté for 5 minutes, stirring occasionally, until they start to turn a brighter orange.
- Add the minced garlic and sauté for 1 minute until fragrant.
- Pour in the orange juice, maple syrup (or honey), water (or vegetable broth), orange zest, salt, and black pepper.
- Stir to combine, ensuring the carrots are coated.
Step 3: Simmer to Tenderness
- Bring the liquid to a gentle simmer.
- Reduce the heat to low, cover the skillet, and simmer for 15-20 minutes, or until the carrots are tender when pierced with a fork.
- Remove the lid and increase the heat to medium-high. Cook for another 3-5 minutes, stirring occasionally, allowing the liquid to reduce and create a light, glossy glaze around the carrots.
Step 4: Serve
- Transfer the orange glazed carrots to a serving platter.
- Garnish generously with fresh chopped parsley and extra orange zest.
- Serve warm.
42. Rosemary Garlic Smashed Potatoes

This rustic dish features beautifully golden-brown smashed potatoes, each boasting a wonderfully crispy exterior and a fluffy interior. It’s a hearty and flavorful side, perfect for any comforting meal.
Each small potato is boiled until tender, then gently “smashed” to create a craggy surface, which then crisps up in the oven. Generous amounts of finely minced garlic and fragrant rosemary needles are scattered over the potatoes, infusing them with savory, earthy notes. A few fresh rosemary sprigs are tucked in for a touch of vibrant green and aromatic appeal. This dish is both satisfying and incredibly flavorful, offering a delightful texture contrast that makes it a crowd-pleaser for your holiday table.
Required Ingredients
- 2 lbs baby gold potatoes or new potatoes
- 3 tablespoons olive oil
- 4 cloves garlic, minced
- 2 tablespoons fresh rosemary, chopped, plus extra sprigs for garnish
- $1/2$ teaspoon salt, or to taste
- $1/4$ teaspoon black pepper, or to taste
Equipment List
- Large pot
- Colander
- Baking sheet
- Potato masher or fork
- Small bowl
DIY Instruction (Step-by-Step)
Step 1: Boil the Potatoes
- Preheat your oven to $425^{\circ}\text{F}$ ($220^{\circ}\text{C}$).
- Wash the baby potatoes thoroughly.
- Place the potatoes in a large pot and cover with cold, salted water. Bring to a boil over high heat, then reduce the heat to medium and simmer for 15-20 minutes, or until the potatoes are very tender when pierced with a fork.
- Drain the potatoes thoroughly in a colander.
Step 2: Smash and Season
- Arrange the drained, hot potatoes on a baking sheet, leaving some space between them.
- Using a potato masher, the bottom of a glass, or a fork, gently “smashed” each potato until it’s flattened but still holds together. The goal is to create a craggy surface for maximum crispiness.
- In a small bowl, combine the olive oil, minced garlic, chopped fresh rosemary, salt, and black pepper.
- Spoon or brush this oil and herb mixture evenly over each smashed potato, ensuring the garlic and rosemary are distributed well.
Step 3: Roast to Crispy Perfection
- Place the baking sheet in the preheated oven.
- Roast for 25-35 minutes, or until the smashed potatoes are beautifully golden brown and crispy on the outside.
- Remove from the oven.
Step 4: Serve
- Transfer the crispy rosemary garlic smashed potatoes to a serving platter.
- Garnish with fresh rosemary sprigs for extra aroma and visual appeal.
- Serve immediately.
43. Roasted Artichoke Hearts with Lemon Aioli

This elegant dish presents beautifully roasted artichoke hearts, showcasing their tender, earthy flavor. It’s a sophisticated and delightful side, perfect for a special meal.
The golden-brown artichoke hearts are arranged artfully on a wooden board, some displaying a light char from roasting. They are lightly seasoned and tender, promising a delicious bite. In the center, a creamy, pale yellow lemon aioli awaits, garnished with fresh parsley and a lemon slice, offering a bright and zesty dipping experience. Fresh rosemary sprigs and lemon wedges are scattered around, adding to the rustic charm. This dish is both impressive and easy to love, making it a unique and flavorful addition to your holiday spread.
Required Ingredients
- 2 (14-ounce) cans or jars of artichoke hearts, drained and halved
- 2 tablespoons olive oil
- $1/2$ teaspoon salt
- $1/4$ teaspoon black pepper
- 1 tablespoon fresh parsley, chopped, for garnish
- Lemon wedges and fresh rosemary sprigs, for garnish
- For the Lemon Aioli:
- $1/2$ cup mayonnaise
- 1 clove garlic, minced
- 1 tablespoon fresh lemon juice
- $1/2$ teaspoon lemon zest
- $1/4$ teaspoon salt
- Pinch of cayenne pepper (optional)
Equipment List
- Large cutting board
- Sharp knife
- Baking sheet
- Small bowl (for aioli)
- Whisk or spoon
DIY Instruction (Step-by-Step)
Step 1: Prep Artichoke Hearts and Oven
- Preheat your oven to $400^{\circ}\text{F}$ ($200^{\circ}\text{C}$).
- Drain the canned or jarred artichoke hearts very well. If they are whole, halve them. If they come in quarters, you can leave them as is. Pat them dry with paper towels.
- Place the artichoke hearts on a baking sheet. Drizzle with olive oil. Sprinkle with salt and black pepper.
- Toss gently to ensure they are evenly coated.
Step 2: Roast the Artichoke Hearts
- Roast the artichoke hearts for 20-25 minutes, flipping halfway through, until they are tender and have some nicely browned and slightly crispy edges.
- Remove from the oven and set aside.
Step 3: Make the Lemon Aioli
- While the artichokes roast, prepare the aioli. In a small bowl, combine the mayonnaise, minced garlic, fresh lemon juice, lemon zest, salt, and cayenne pepper (if using).
- Whisk everything together until smooth and well combined. Taste and adjust seasoning as needed.
Step 4: Assemble and Serve
- Transfer the roasted artichoke hearts to a serving board or platter.
- Pour the lemon aioli into a small serving bowl and place it in the center of the platter.
- Garnish the aioli with a sprinkle of fresh chopped parsley and a thin lemon slice.
- Arrange lemon wedges and fresh rosemary sprigs around the roasted artichokes for garnish.
- Serve warm or at room temperature as an elegant appetizer or side dish.
44. Green Beans Almondine with Thyme

This classic dish features vibrant green beans tossed with toasted almonds, offering a delightful combination of fresh and nutty flavors. It’s an elegant and timeless side.
The tender-crisp green beans are beautifully cooked, maintaining their bright green color. A generous sprinkle of golden-brown sliced almonds is scattered throughout, providing a wonderful crunch and a rich, toasted flavor. Fresh sprigs of thyme are nestled among the beans, releasing their aromatic, earthy scent and adding a delicate visual touch. This dish is both simple and sophisticated, offering a satisfying blend of textures and a comforting taste that makes it a beloved addition to any holiday table.
Required Ingredients
- 1.5 lbs fresh green beans, trimmed
- 2 tablespoons unsalted butter
- $1/4$ cup sliced almonds
- 1 clove garlic, minced (optional)
- 1 tablespoon fresh thyme leaves, plus sprigs for garnish
- $1/2$ teaspoon salt, or to taste
- $1/4$ teaspoon black pepper, or to taste
Equipment List
- Large pot (for blanching) or large skillet (for sautéing)
- Colander
- Small skillet (for almonds)
- Large serving bowl or platter
DIY Instruction (Step-by-Step)
Step 1: Prepare the Green Beans
- Trim the tough ends off the fresh green beans.
- You can either blanch or sauté the green beans:
- Blanching Method: Bring a large pot of salted water to a rolling boil. Add the trimmed green beans and cook for 3-5 minutes, until bright green and tender-crisp. Immediately drain and plunge into an ice bath to stop cooking and preserve color. Drain thoroughly again.
- Sautéing Method: Heat 1 tablespoon of butter or olive oil in a large skillet over medium-high heat. Add the green beans and sauté for 5-8 minutes, stirring occasionally, until tender-crisp and lightly charred.
Step 2: Toast the Almonds
- In a separate small skillet, melt the remaining 1 tablespoon of butter over medium heat.
- Add the sliced almonds and toast, stirring frequently, for 3-5 minutes, until they are golden brown and fragrant. Be careful not to burn them.
- If using, add the minced garlic to the almonds during the last minute of toasting.
Step 3: Combine and Season
- Transfer the cooked green beans to a large serving bowl or platter.
- Pour the toasted almonds (and garlic, if used) over the green beans.
- Add the fresh thyme leaves, salt, and black pepper.
- Gently toss everything together until the green beans are coated and the almonds are evenly distributed.
Step 4: Serve
- Garnish with fresh thyme sprigs for an elegant touch.
- Serve warm as a classic and flavorful side dish.
45. Roasted Red Cabbage and Apple Wedges with Caraway

This visually striking dish features vibrant red cabbage and crisp apple wedges, beautifully roasted and seasoned. It’s a wonderfully balanced side with a hint of earthy spice.
Thick wedges of deep purple-red cabbage are artfully arranged on a white platter, revealing their layered texture. Bright red and green apple slices are nestled among the cabbage, offering a sweet and tangy contrast. A light drizzle of dressing or glaze coats the vegetables, hinting at a delicate flavor. Scattered caraway seeds add an aromatic, slightly pungent note, while fresh parsley provides a final touch of color. This dish is both hearty and refreshing, making it a unique and flavorful addition to your holiday table, providing a delightful mix of sweet, savory, and earthy elements.
Required Ingredients
- 1 medium red cabbage (about 2 lbs), cut into 8-10 wedges
- 2 medium apples (such as Honeycrisp, Gala, or Granny Smith), cored and cut into 8-10 wedges
- 2 tablespoons olive oil
- 1 tablespoon apple cider vinegar
- 1 tablespoon maple syrup or brown sugar
- 1 teaspoon caraway seeds
- $1/2$ teaspoon salt, or to taste
- $1/4$ teaspoon black pepper, or to taste
- 1 tablespoon fresh parsley, chopped, for garnish (optional)
Equipment List
- Large cutting board
- Sharp knife
- Baking sheet
DIY Instruction (Step-by-Step)
Step 1: Prep Cabbage and Apples
- Preheat your oven to $400^{\circ}\text{F}$ ($200^{\circ}\text{C}$).
- Remove any loose outer leaves from the red cabbage. Cut the cabbage in half through the core, then cut each half into 4-5 wedges, ensuring a piece of the core remains attached to hold the leaves together.
- Core the apples and cut them into similar-sized wedges.
Step 2: Season and Roast
- On a large baking sheet, arrange the red cabbage and apple wedges in a single layer.
- Drizzle with olive oil, apple cider vinegar, and maple syrup (or brown sugar).
- Sprinkle with caraway seeds, salt, and black pepper.
- Toss everything gently with your hands to ensure the cabbage and apples are evenly coated.
- Roast for 25-35 minutes, flipping halfway through, until the cabbage is tender and slightly caramelized, and the apples are soft.
Step 3: Serve
- Transfer the roasted red cabbage and apple wedges to a serving platter.
- If desired, garnish with fresh chopped parsley.
- Serve warm as a flavorful and colorful side dish.
Key Takeaways
- Embrace Variety: Thanksgiving side dishes don’t need to be heavy; bright salads, charred vegetables, and creamy purees offer essential balance to the meal.
- Roasting is Your Friend: Many recipes utilize roasting, which is the easiest way to enhance natural sweetness and achieve beautiful caramelization without constant stovetop attention.
- Fresh Herbs Matter: Simple additions like rosemary, thyme, sage, and fresh parsley instantly elevate basic vegetables, providing necessary aroma and visual appeal.
- Savory-Sweet Balance: Dishes that blend savory notes with a hint of sweetness (like maple or balsamic glaze) create complex, craveable flavors that feel inherently festive.
- Focus on Texture: Ensure your menu includes a mix of textures—think crispy smashed potatoes, tender mashes, crunchy nuts, and al dente green beans—to keep the dining experience interesting.
Preparing a Thanksgiving meal should be a joyous occasion, not a source of exhaustion. We hope this collection of 45 simple and elegant vegetable recipes gives you the tools to create a stunning spread with confidence.
These dishes prove that holiday food does not have to be overly complicated to be deeply delicious. By focusing on fresh, seasonal produce and minimal but impactful flavorings, you can deliver sophistication without stress.
Select a few favorites, utilize your oven space wisely, and enjoy the praise from your grateful guests. Cheers to a beautiful, balanced, and deliciously easy holiday dinner!