The holiday season often feels like a parade of the same gingerbread men and sugar rounds. While those classics hold a special place in our hearts, your dessert table might be craving a fresh spark. Bringing something unexpected to a cookie exchange is a great way to celebrate the spirit of the season.
Unique Christmas Cookies
This collection moves beyond the standard sprinkles and frosting. We have gathered 45 distinct recipes that play with floral notes, savory herbs, and bold fruit pairings. Each treat is designed to be a conversation starter that looks just as good as it tastes.
Whether you are a seasoned baker or picking up a rolling pin for the first time, these instructions are for you. You will find clear steps and simple ingredient lists for every single creation. Prepare to transform your holiday baking into a gallery of edible art.
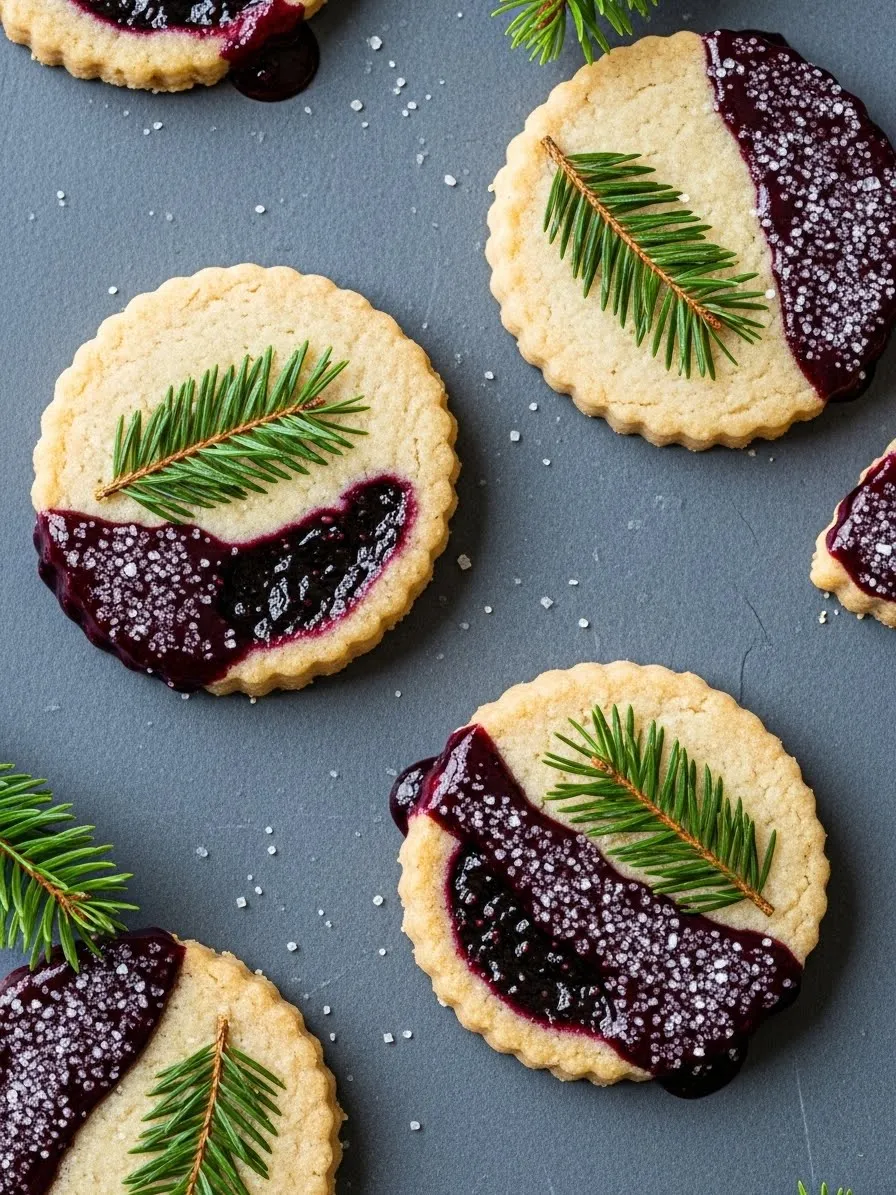
These buttery biscuits feature a scalloped edge and a golden bake. A rich purple berry glaze coats one side of each round treat. Glistening sugar crystals sit atop the dark fruit spread to add a bit of crunch.
A single green spruce sprig rests on the plain half of the cookie. This touch of nature brings a rustic feel to your holiday dessert table. The contrast between the deep jam and the bright evergreen needle creates a striking visual.
Coarse salt flakes are scattered across the gray background to enhance the colors. Each piece looks like a small work of art. These treats will certainly stand out among standard holiday sweets.
Ingredients
2 cups all purpose flour
3/4 cup softened salted butter
1/2 cup granulated sugar
1 teaspoon vanilla extract
1/2 cup blackberry or blueberry jam
1/4 cup coarse sparkling sugar
Small fresh spruce or rosemary sprigs for garnish
Equipment
Large mixing bowl
Electric hand mixer
Rolling pin
Scalloped round cookie cutter
Baking sheet
Parchment paper
Small spoon or offset spatula
DIY Instructions
Turn your oven on and set it to 350 degrees Fahrenheit.
Line a flat baking sheet with a piece of parchment paper so the dough does not stick.
Place the softened butter and granulated sugar into your large mixing bowl.
Use the electric mixer to blend the butter and sugar until the mixture looks fluffy and light.
Pour in the vanilla extract and mix again for a few seconds.
Slowly add the flour to the bowl while mixing on a low speed until a soft dough forms.
Place the dough on a clean counter and use your rolling pin to flatten it until it is about half an inch thick.
Press the scalloped cutter into the dough to create your round shapes.
Move the circles to the baking sheet and bake them for 10 to 12 minutes until the edges are just barely brown.
Let the cookies cool completely on a wire rack before you start decorating.
Stir the jam in a small bowl to make it smooth.
Use a small spoon to spread a layer of jam over one half of each cooled cookie.
Sprinkle the sparkling sugar over the wet jam immediately.
Place one clean spruce sprig on the plain side of the cookie to finish the look.
2. Salted Caramel Chocolate Dipped Cookies
Unique Christmas Cookies
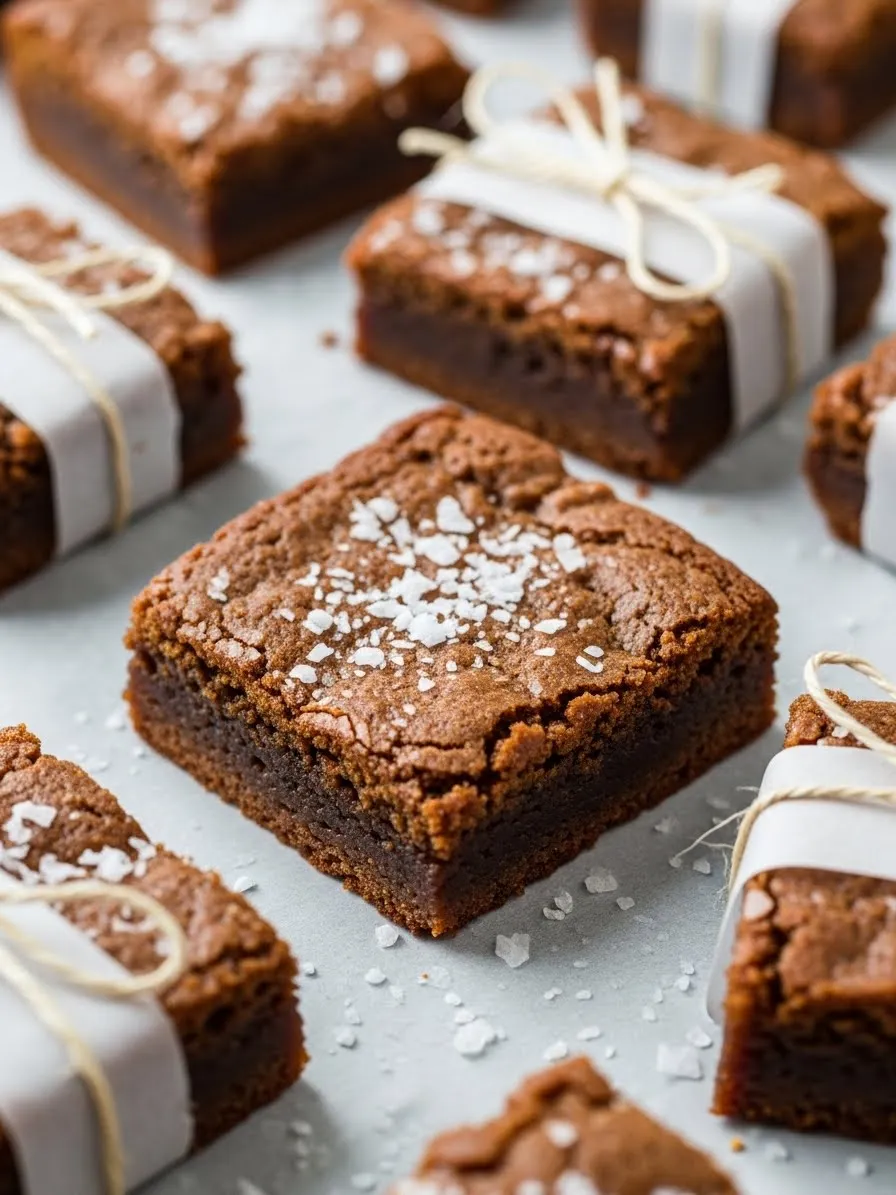
These thick, chewy cookies feature a deep golden brown color and a soft texture. Several large chunks of gooey caramel are pressed into the top of each round treat. A smooth layer of dark melted chocolate covers exactly one half of the biscuit.
Large flakes of sea salt are scattered generously over the glossy chocolate coating. These white crystals also sit on the exposed caramel pieces to provide a sharp flavor contrast. The background is a clean white surface that makes the warm tones of the dough pop.
Small cracks on the surface suggest a moist and tender center for every bite. The rich brown chocolate appears thick and velvety as it clings to the edge of the cookie. This combination of salt and sugar offers a sophisticated twist on a classic holiday favorite.
Ingredients
1 cup softened salted butter
1 cup brown sugar
1/2 cup white granulated sugar
2 large eggs
2 teaspoons vanilla extract
3 cups all purpose flour
1 teaspoon baking soda
1 cup caramel baking bits
1 cup dark chocolate melting wafers
2 tablespoons flaky sea salt
Equipment
Stand mixer or hand mixer
Two large baking sheets
Parchment paper
Medium cookie scoop
Heat safe glass bowl
Small saucepan
Wire cooling rack
DIY Instructions
Preheat your oven to 350 degrees Fahrenheit before you begin mixing.
Line your baking sheets with parchment paper to prevent the caramel from sticking to the metal.
Place the butter, brown sugar, and white sugar into a large bowl.
Beat these ingredients together until the mixture is smooth and pale in color.
Add the eggs one at a time and pour in the vanilla extract while continuing to mix.
Stir in the flour and baking soda slowly until you no longer see white streaks of powder.
Use your hands or a spoon to fold in most of the caramel bits.
Scoop balls of dough onto the baking sheet, leaving two inches of space between them.
Press a few extra caramel bits into the top of each dough ball.
Bake for 10 to 12 minutes until the edges look firm but the centers are still soft.
Let the cookies cool on the pan for five minutes before moving them to a wire rack.
Melt the dark chocolate wafers in a glass bowl over a pot of simmering water.
Dip half of each cooled cookie into the melted chocolate.
Sprinkle the flaky salt over the wet chocolate and the caramel bits immediately.
3. Powdered Apricot Snowballs
Unique Christmas Cookies
These delicate round cookies are shaped like small spheres and covered in a thick layer of white powdered sugar. One cookie is sliced open to reveal a bright orange apricot center. The fruit filling sits nestled inside a light, buttery crumb that looks soft and airy.
The texture of the sugar coating resembles fresh fallen snow on a winter morning. Small golden specks are visible on the surface of some cookies to add a hint of shimmer. A pile of these treats sits on a light gray surface that keeps the focus on the bright white sugar.
The internal fruit filling is dense and slightly translucent against the pale dough. This hidden surprise makes the simple exterior much more interesting for guests. These bite-sized sweets bring a clean and elegant look to any dessert platter.
Ingredients
1 cup softened salted butter
1/2 cup powdered sugar (plus extra for rolling)
1 teaspoon almond extract
2 cups all purpose flour
1/4 teaspoon salt
1/2 cup dried apricots, chopped into small pieces
1 tablespoon edible gold leaf flakes (optional)
Equipment
Large mixing bowl
Baking sheet
Parchment paper
Sharp knife
Sifter or fine mesh strainer
Wire cooling rack
DIY Instructions
Set your oven temperature to 325 degrees Fahrenheit and line a pan with parchment paper.
Cream the softened butter and the half cup of powdered sugar in a bowl until smooth.
Mix in the almond extract to give the dough a sweet nutty scent.
Add the flour and salt to the bowl and stir until a firm dough forms.
Take a small piece of dough and flatten it in the palm of your hand.
Place one small piece of dried apricot in the center of the dough circle.
Fold the edges of the dough over the fruit and roll it into a smooth ball.
Place the balls on your baking sheet and bake for 15 to 18 minutes.
Ensure the cookies do not brown; they should remain pale and firm.
Let the cookies cool for only three minutes so they are still warm to the touch.
Fill a small bowl with extra powdered sugar and roll each warm cookie in it.
Place the coated cookies on a wire rack to cool completely.
Roll them in the sugar a second time once they are cold for a thicker white coating.
Sprinkle a few gold flakes on top if you want a little extra holiday shine.
4. Cocoa Star Sandwich Cookies
Unique Christmas Cookies
These square biscuits feature a warm golden hue and perfectly straight edges. A star shaped cutout in the center of the top layer reveals a thick filling of dark chocolate ganache. Fine cocoa powder is dusted lightly over the surface of each cookie to create a rustic, earthy look.
The dark brown filling has a glossy sheen that catches the light beautifully. Small grains of the cocoa dust settle into the corners of the star shapes and onto the dark surface below. These treats are stacked neatly, showing off the generous layer of cream sandwiched between the two crisp layers.
The background is dark and textured, which emphasizes the clean lines of the square shapes. This simple design feels modern yet traditional for the winter season. Each bite offers a balance between the crunchy outer shell and the velvety center.
Ingredients
1 cup softened salted butter
3/4 cup granulated sugar
1 large egg
1 teaspoon vanilla extract
2 1/2 cups all purpose flour
1/2 cup dark chocolate chips
1/4 cup heavy cream
2 tablespoons unsweetened cocoa powder for dusting
Equipment
Rolling pin
Square cookie cutter
Small star shaped cookie cutter
Baking sheets
Parchment paper
Small saucepan
Sieve or sifter
DIY Instructions
Preheat your oven to 350 degrees Fahrenheit and line two pans with parchment paper.
Mix the butter and sugar in a large bowl until the texture is light and smooth.
Add the egg and vanilla extract to the bowl and beat them into the butter mixture.
Stir in the flour slowly until you have a firm dough that does not stick to your fingers.
Roll the dough out on a floured surface until it is about a quarter of an inch thick.
Cut the dough into squares using your square cutter.
Take half of the squares and use the small star cutter to remove the center of each one.
Place all the pieces on the baking sheets and bake for 10 minutes until the edges are firm.
Let the cookies cool completely on a wire rack.
Heat the heavy cream in a small pan until it starts to simmer, then pour it over the chocolate chips in a bowl.
Let the chocolate sit for a minute, then stir it until it becomes a smooth, thick ganache.
Spread a spoonful of the chocolate ganache onto the solid square cookies.
Place a star cutout cookie on top of the chocolate and press down gently.
Put the cocoa powder into a sieve and shake it over the finished cookies for a light coating.
5. Rose Pistachio Petal Rings
Unique Christmas Cookies
These elegant ring shaped cookies are topped with a vibrant pink glaze that flows smoothly over the edges. Crushed green pistachios are sprinkled heavily around the circle to provide a bright color and salty crunch. Small pieces of deep red dried rose petals are tucked between the nuts for a floral touch.
The cookie base has a delicate scalloped texture along the inner and outer rings. This gives the treat a sophisticated appearance that looks like a piece of jewelry. The light gray background keeps the focus on the striking pink and green color palette.
Each cookie is uniform in size and sits gracefully on a flat surface. The combination of the soft icing and the crunchy toppings creates an interesting variety of textures. These sweets bring a fresh and unique flavor profile to a traditional holiday spread.
Ingredients
1 cup softened salted butter
1/2 cup powdered sugar
2 cups all purpose flour
1/2 teaspoon rose water
1 cup pink candy melts or white chocolate with pink food coloring
1/2 cup shelled pistachios, finely chopped
2 tablespoons culinary grade dried rose petals
Equipment
Large mixing bowl
Dough rolling pin
Large round scalloped cutter
Small round cutter for the center hole
Baking sheet
Cooling rack
Microwave safe bowl
DIY Instructions
Set your oven to 325 degrees Fahrenheit and prepare a baking sheet with parchment paper.
Beat the butter and powdered sugar together until the mixture is very creamy.
Add the rose water and flour to the bowl and mix until a soft dough forms.
Roll the dough out on a flat surface to a thickness of about half an inch.
Cut out large circles with your scalloped cutter.
Use the smaller round cutter to remove the center of each circle to create a ring.
Bake the rings for 12 to 15 minutes or until they are set but still pale.
Allow the cookies to cool entirely before you begin the icing process.
Melt the pink candy wafers in the microwave in 30 second intervals until smooth.
Dip the top of each cookie ring into the melted pink icing.
Place the cookies on a rack and immediately sprinkle the chopped pistachios over the wet glaze.
Add a few fragments of the dried rose petals on top of the pistachios.
Let the icing sit for 20 minutes until it is hard to the touch.
6. Hot Cocoa Marshmallow Melts
Unique Christmas Cookies
These deep brown cookies have a rich chocolate flavor and a soft, crackled surface. A large, white marshmallow is tucked into the center of each round treat. When pulled apart, the marshmallow stretches into long, gooey strands that look incredibly tempting.
The top of each marshmallow is toasted to a golden brown and sprinkled with a dash of cinnamon or cocoa. Small grains of sugar are scattered across the dark dough to add a subtle sparkle. The cookies sit on a plain white surface that highlights the contrast between the dark chocolate and the white center.
A cinnamon stick and a star anise pod rest in the background to suggest warm winter spices. The thick, fudgy texture of the cookie appears moist and heavy. This recipe turns a classic winter beverage into a handheld dessert.
Ingredients
1/2 cup softened salted butter
1 cup granulated sugar
1 large egg
1 teaspoon vanilla extract
1 1/2 cups all purpose flour
1/2 cup unsweetened cocoa powder
1 teaspoon baking soda
12 large marshmallows
1 teaspoon ground cinnamon for dusting
Equipment
Mixing bowl
Hand mixer
Baking sheet
Parchment paper
Wire cooling rack
DIY Instructions
Preheat your oven to 350 degrees Fahrenheit and line your baking sheet.
Cream the butter and sugar in a bowl until the mixture is fluffy.
Mix in the egg and vanilla extract until well combined.
Sift the flour, cocoa powder, and baking soda into the wet ingredients and stir until a dark dough forms.
Scoop a tablespoon of dough and flatten it in your hand.
Place a whole marshmallow in the middle and wrap the dough around it, leaving the very top of the marshmallow exposed.
Arrange the balls on the baking sheet with plenty of space between them as they will spread.
Bake for 8 to 10 minutes; the marshmallow should puff up and the cookie should set.
Remove the pan from the oven and immediately sprinkle a little cinnamon on the warm marshmallows.
Use a kitchen torch for a few seconds if you want the marshmallows to look extra toasted.
Let them cool on the pan for at least five minutes so the marshmallow firms up slightly.
Serve these while they are still slightly warm for the best “cheese pull” effect.
7. Cranberry Peppercorn Shortbread Bars
Unique Christmas Cookies
These rectangular shortbread bars offer a vibrant yellow hue that suggests a rich, buttery base. A creamy white glaze is drizzled in messy zig-zag patterns across the top of each piece. Deep red dried cranberries are pressed into the surface to provide a chewy texture and tart flavor.
Small pink peppercorns are scattered over the icing to add a surprising pop of color. These tiny berries bring a mild heat that balances the sweet glaze and rich dough. The bright red ornaments in the background emphasize the festive holiday theme of this unique dessert.
Green rosemary sprigs sit near the cookies to add a fresh, earthy scent to the presentation. The crumb of the shortbread looks dense and sandy, which is a hallmark of a well-baked biscuit. These bars are a sophisticated choice for those who enjoy a mix of sweet, tart, and spicy notes.
Ingredients
1 cup softened salted butter
3/4 cup granulated sugar
2 cups all-purpose flour
1/2 teaspoon lemon zest
1/2 cup dried cranberries
1 tablespoon pink peppercorns, lightly crushed
1/2 cup powdered sugar
2 teaspoons milk
Equipment
8×8 inch square baking pan
Parchment paper
Large mixing bowl
Electric hand mixer
Small bowl for glaze
Sharp knife
DIY Instructions
Preheat your oven to 325 degrees Fahrenheit and line your square pan with parchment paper.
Beat the softened butter and granulated sugar together in a large bowl until the mixture is light.
Add the lemon zest and flour to the bowl and mix on low speed until the dough starts to clump together.
Stir in half of the dried cranberries using a large spoon.
Press the dough firmly into the bottom of your prepared baking pan in an even layer.
Bake for 25 to 30 minutes or until the top looks dry and the edges are a very pale gold.
Let the shortbread cool in the pan for ten minutes, then lift it out using the parchment paper.
Slice the warm shortbread into long rectangles while it is still soft.
Whisk the powdered sugar and milk in a small bowl until you have a thick, pourable glaze.
Drizzle the white glaze over the bars in a back and forth motion.
Press the remaining cranberries and the crushed pink peppercorns into the wet glaze.
Allow the bars to cool completely so the icing becomes firm before serving.
8. Lavender Cornflower Thumbprints
Unique Christmas Cookies
These round, golden cookies feature a deep well in the center filled with a smooth white icing. A single, bright blue cornflower sits perfectly in the middle of the stack, creating a stunning focal point. Other cookies are topped with dried lavender buds that add a purple tint and a floral aroma.
The base of the cookie is speckled with tiny black seeds or ground lavender, giving it a rustic and natural look. The edges are slightly cracked, which shows the tender and crumbly nature of the dough. The clean white background ensures that the vibrant blue and purple colors stand out.
These treats feel like something found in a high-end garden cafe. The contrast between the creamy icing and the dry floral petals provides a unique eating experience. This recipe is a wonderful way to bring a touch of spring to your winter holiday celebrations.
1/2 cup white chocolate ganache or thick royal icing
Fresh or dried edible cornflowers for garnish
Equipment
Mixing bowl
Baking sheet
Parchment paper
Measuring spoons
Wire cooling rack
DIY Instructions
Set your oven to 350 degrees Fahrenheit and line a baking sheet with parchment paper.
Mix the butter and sugar in your bowl until the texture is creamy and light.
Stir in the egg yolk and vanilla extract until the liquid is fully absorbed.
Fold in the flour and the ground lavender until a stiff dough forms.
Roll the dough into small balls about the size of a walnut.
Place the balls on the baking sheet and use your thumb to press a deep hole into the center of each one.
Bake the cookies for 10 to 12 minutes until they are firm but not dark brown.
If the center holes puffed up during baking, press them down again with a spoon while they are hot.
Let the cookies cool completely on a wire rack.
Fill the center of each cookie with a spoonful of melted white chocolate or thick icing.
Place a few lavender buds or a single cornflower petal onto the wet icing.
Let the centers set for about 30 minutes before you move them to a plate.
9. Cinnamon Swirl Rugelach
Unique Christmas Cookies
These golden-brown pastries are rolled into a tight spiral shape that shows off a dark cinnamon and nut filling. A heavy dusting of coarse white sugar covers the top of each roll to add a sweet crunch. The flaky layers of the dough look light and airy, similar to a croissant or a pie crust.
The dark filling seeps out slightly at the ends, creating a caramelized look on the bottom of each treat. Every swirl is uniform in size and sits neatly on a white surface. The sugar crystals catch the light and give the cookies a frosted appearance.
These treats are a wonderful blend of a cookie and a pastry. The warm scent of cinnamon is almost visible in the rich, brown tones of the center. Serving these alongside a hot cup of coffee makes for a classic and comforting holiday pairing.
Ingredients
1 cup softened cream cheese
1 cup softened salted butter
2 cups all-purpose flour
1/4 cup granulated sugar
1/2 cup brown sugar
2 teaspoons ground cinnamon
1/2 cup finely chopped walnuts or pecans
1 egg (for egg wash)
2 tablespoons coarse sparkling sugar
Equipment
Food processor or mixing bowl
Plastic wrap
Rolling pin
Pizza cutter or sharp knife
Baking sheet
Parchment paper
Pastry brush
DIY Instructions
Blend the cream cheese and butter in a bowl until the mixture is completely smooth.
Add the flour and stir until a soft, sticky dough forms.
Divide the dough into three equal balls, wrap them in plastic, and chill them in the fridge for two hours.
Preheat your oven to 375 degrees Fahrenheit when you are ready to bake.
Mix the brown sugar, cinnamon, and chopped nuts in a small bowl to make the filling.
Roll one ball of dough out on a floured surface into a large, thin circle.
Spread a thin layer of the cinnamon mixture over the entire circle of dough.
Use a pizza cutter to slice the circle into 12 wedges, like you are cutting a pizza.
Start at the wide end of a wedge and roll the dough up toward the point.
Place the rolls on a baking sheet lined with parchment paper.
Brush the top of each roll with a beaten egg and sprinkle the coarse sugar over them.
Bake for 15 to 20 minutes until the pastries are a deep golden brown.
10. Matcha Green Tea Tree Tarts
Unique Christmas Cookies
These miniature tarts feature a crisp, golden crust filled with a tall swirl of vibrant green frosting. The filling is piped into a ridged, conical shape that looks exactly like a small evergreen tree. A single silver sugar pearl sits at the very top of each peak to represent a star.
The matcha powder gives the cream a natural, earthy green color without the need for artificial dyes. Several of these tarts are arranged together, creating a tiny forest of edible trees. The background is a soft white, which makes the bold green color of the tea frosting stand out.
The crust appears buttery and short, providing a sturdy base for the rich cream. This dessert is a great way to introduce unique flavors like green tea to your holiday guests. These tarts are as beautiful to look at as they are to eat.
Ingredients
24 pre-baked mini tart shells (or shortbread cookie cups)
1 cup softened unsalted butter
2 cups powdered sugar
2 tablespoons high-quality matcha green tea powder
1 teaspoon vanilla extract
1 tablespoon heavy cream
24 silver sugar pearls (dragees)
Equipment
Large mixing bowl
Electric hand mixer
Piping bag
Large star-shaped piping tip
Small spoon
DIY Instructions
Place the pre-baked tart shells on a large tray so they are ready to be filled.
Put the softened butter in a mixing bowl and beat it until it is very smooth and white.
Sift the powdered sugar and the matcha powder into the bowl to remove any lumps.
Mix on low speed at first so the powder does not fly out of the bowl.
Add the vanilla extract and the heavy cream, then beat on high for two minutes until the frosting is stiff.
Fit your piping bag with the star-shaped tip and fill it with the green matcha frosting.
Hold the bag straight up over a tart shell.
Squeeze the bag while moving your hand in a small circle to build a wide base.
Gradually lift the bag as you continue to swirl the frosting to create a pointed tree shape.
Stop squeezing and pull the bag away quickly to leave a sharp peak at the top.
Carefully place one silver sugar pearl on the very tip of each green tree.
Store these in a cool place so the “trees” keep their shape until you are ready to serve them.
11. Honeyed Amber Lace Wafers
Unique Christmas Cookies
These delicate, golden wafers feature a complex lace-like pattern with dozens of tiny holes. Two of these thin, crispy layers sandwich a bright orange apricot filling that glows through the gaps. A single star anise pod sits atop the stack to provide a bold, spicy aroma and a beautiful natural garnish.
The cookies rest on a rich, dark chocolate base that has an elegant swirl pattern pressed into it. This chocolate foundation adds a sturdy structure and a deep cocoa flavor to the light honey biscuits. The background is a clean white, which helps the amber tones of the caramel and fruit shine.
Each wafer looks incredibly fragile and thin, suggesting a satisfying snap with every bite. The star anise adds a rustic touch that feels right for a winter gathering. These treats offer a sophisticated mix of textures, from the brittle lace to the soft, chewy fruit center.
Ingredients
1/2 cup salted butter
1/2 cup granulated sugar
1/2 cup honey
1 cup all-purpose flour
1/2 teaspoon ground ginger
1/2 cup apricot jam
1 cup dark chocolate melting wafers
Whole star anise for garnish
Equipment
Small saucepan
Baking sheet
Parchment paper
Small spoon
Heat-safe bowl
Wire cooling rack
DIY Instructions
Warm your oven to 350 degrees Fahrenheit and line a flat pan with parchment paper.
Put the butter, sugar, and honey into a small saucepan over medium heat.
Stir the mixture until the butter melts and the sugar dissolves completely.
Remove the pan from the heat and stir in the flour and ginger until the batter is smooth.
Drop small teaspoons of batter onto the baking sheet, leaving three inches between them.
Bake for 5 to 7 minutes until the cookies spread out and turn a deep golden brown.
Let the wafers cool on the pan for a few minutes until they are firm enough to move to a rack.
Melt the dark chocolate in a bowl over simmering water or in the microwave.
Dip the bottom of half the cookies into the chocolate and let them harden on parchment paper.
Spread a thin layer of apricot jam onto the chocolate side of the hardened cookies.
Press a plain wafer on top of the jam to create a sandwich.
Place a star anise pod on the very top of each cookie to finish the presentation.
12. Savory Sage Shortbread Rectangles
Unique Christmas Cookies
These thick, rectangular biscuits have a coarse and rustic texture that looks like traditional shortbread. A single, deep green sage leaf is pressed firmly into the center of each golden treat. The leaf remains intact after baking, showing off its natural veins and velvety surface.
Small dark flecks of ground black pepper are visible throughout the dough to hint at a savory flavor profile. The edges of the rectangles are slightly uneven, giving them a charming homemade feel. These biscuits sit on a bright white surface that makes the earthy tones pop.
The contrast between the pale yellow dough and the dark evergreen leaf is very striking. This recipe moves away from heavy sugar to offer something herbal and aromatic. These are a great choice for a holiday cheese board or as a light snack with tea.
Ingredients
1 cup softened salted butter
1/2 cup powdered sugar
2 cups all-purpose flour
1 tablespoon finely chopped fresh sage
1/2 teaspoon cracked black pepper
12 to 15 whole fresh sage leaves for garnish
Equipment
Large mixing bowl
Rolling pin
Sharp knife or rectangular cutter
Baking sheet
Parchment paper
Cooling rack
DIY Instructions
Preheat your oven to 325 degrees Fahrenheit and line a baking sheet with paper.
Mix the softened butter and powdered sugar in a bowl until the mixture is creamy.
Add the flour, chopped sage, and black pepper to the bowl.
Stir the ingredients until a thick, crumbly dough begins to form.
Press the dough into a flat disk and roll it out until it is about half an inch thick.
Use a sharp knife to cut the dough into equal-sized rectangles.
Place one whole sage leaf in the middle of each rectangle.
Use your rolling pin to gently press the leaf into the dough so it stays flat.
Move the rectangles to the baking sheet and bake for 20 minutes.
Ensure the cookies remain pale and only turn lightly golden on the bottom.
Let the shortbread cool completely on the pan to prevent the rectangles from breaking.
13. Pomegranate Pistachio Jewel Bars
Unique Christmas Cookies
These thick dessert bars feature a light golden crust and a creamy white chocolate top layer. Vibrant red pomegranate seeds are scattered across the surface like small, edible rubies. Bright green pistachio halves are nestled between the fruit to provide a beautiful color contrast.
The internal texture of the bar shows a dense, buttery crumb filled with more nuts and fruit. Each slice is uniform and shows off a clean cross-section of the colorful ingredients. A stack of two bars sits in the center, highlighting the generous amount of toppings used.
The background remains white to let the festive red and green colors stand out. These bars feel fresh and bright compared to heavier chocolate holiday treats. Every bite promises a mix of tart fruit, salty nuts, and sweet cream.
Ingredients
1 cup softened salted butter
1/2 cup granulated sugar
2 cups all-purpose flour
1 cup white chocolate chips
1/2 cup fresh pomegranate seeds
1/2 cup shelled pistachios
Equipment
8-inch square baking pan
Parchment paper
Large bowl
Small microwave-safe bowl
Offset spatula
Sharp knife
DIY Instructions
Turn your oven to 350 degrees Fahrenheit and line your square pan with parchment paper.
Mix the butter and sugar in a large bowl until the mixture is smooth.
Stir in the flour until you have a sandy dough that holds together when squeezed.
Press the dough firmly into the bottom of the pan to create an even base.
Bake the crust for 15 to 18 minutes until the edges are a light gold.
Melt the white chocolate chips in the microwave in short bursts until liquid.
Pour the melted chocolate over the warm crust and spread it out with a spatula.
Sprinkle the pomegranate seeds and pistachios over the wet chocolate immediately.
Press down gently on the toppings so they stick to the chocolate layer.
Place the pan in the refrigerator for at least one hour until the chocolate is hard.
Lift the block out of the pan and cut it into clean squares with a sharp knife.
14. Golden Peach Thyme Thumbprints
Unique Christmas Cookies
These round, soft cookies have a beautiful golden hue and a deep center well. A glossy, amber-colored peach preserve fills the middle of each treat. Thin orange stripes of glaze are drizzled over the sides to add an extra layer of sweetness.
A tiny sprig of fresh thyme sits in the center of the jam to add a herbal touch. The edges of the cookies are slightly indented, giving them a sunburst appearance. These treats are clustered together on a dark gray surface that emphasizes their warm colors.
The texture of the cookie looks tender and slightly moist rather than crunchy. This combination of stone fruit and fresh herbs offers a sophisticated flavor for the holidays. These sweets are a bright addition to any dessert table.
Ingredients
1 cup softened salted butter
2/3 cup granulated sugar
2 cups all-purpose flour
1/2 cup peach preserves
1/2 cup powdered sugar
1 tablespoon orange juice
Fresh thyme sprigs for garnish
Equipment
Large mixing bowl
Baking sheet
Parchment paper
Small spoon
Wire cooling rack
DIY Instructions
Preheat the oven to 350 degrees Fahrenheit and line a pan with parchment paper.
Beat the butter and sugar together until the mixture is light and airy.
Gradually stir in the flour until a soft dough forms.
Roll the dough into balls about one inch wide and place them on the pan.
Use your thumb to press a deep hole into the center of each ball.
Bake the cookies for 10 to 12 minutes until they are set but not brown.
Remove the pan and let the cookies cool for a few minutes.
Fill each center hole with a small spoonful of peach preserves.
Whisk the powdered sugar and orange juice in a bowl to make a thick glaze.
Use a fork to drizzle the orange glaze over the cookies in a messy pattern.
Place a tiny piece of fresh thyme on top of the jam in each cookie center.
15. Brûlée Sugar Rounds
Unique Christmas Cookies
These thick, pale cookies feature a perfectly flat top with a hard, caramelized sugar crust. The sugar has been torched to a deep amber color with a few dark spots, much like a classic custard dessert. A kitchen torch is shown in the frame, highlighting the finishing process of this treat.
The base of the cookie appears soft and buttery, providing a great contrast to the brittle top. Small cracks along the sides suggest a tender texture that will melt in your mouth. These rounds are spread across a light surface, catching the light on their glossy surfaces.
Every cookie has a unique pattern of caramelization from the heat of the flame. This simple look is very elegant and focuses on the beauty of burnt sugar. These treats bring a bit of restaurant-style flair to your home baking.
Ingredients
1 cup softened salted butter
1 cup granulated sugar (plus extra for the topping)
1 large egg
2 teaspoons vanilla extract
2 1/2 cups all-purpose flour
1/2 teaspoon baking powder
Equipment
Large mixing bowl
Hand mixer
Baking sheet
Parchment paper
Kitchen blowtorch
Metal spoon
DIY Instructions
Set your oven to 350 degrees Fahrenheit and line your baking sheet.
Cream the butter and the cup of sugar together until very smooth.
Mix in the egg and vanilla extract until the dough is well combined.
Stir in the flour and baking powder until you have a thick cookie dough.
Roll the dough into balls and place them on the sheet, pressing them flat with a spoon.
Bake for 10 to 12 minutes until the edges are firm but the tops are still pale.
Let the cookies cool completely before you move on to the topping.
Sprinkle a thick, even layer of granulated sugar over the top of each cookie.
Hold your kitchen torch about three inches away from the sugar.
Move the flame in small circles until the sugar melts and turns a dark golden brown.
Let the sugar crust harden for five minutes before you touch or serve the cookies.
16. Midnight White Chocolate Diamonds
Unique Christmas Cookies
These striking cookies feature a deep black cocoa base that is as dark as a winter night. A single, white chocolate piece shaped like a faceted diamond sits in the center of a sliced cookie. The stark contrast between the charcoal dough and the bright white candy creates a high-fashion look.
Large, red dried cherries are pressed into the sides of the round treats to add a burst of color. Fine sugar crystals are dusted over the top to resemble a light frost on dark soil. The texture of the cookie appears dense and fudgy, like a rich brownie.
The background is a soft white, making the dark silhouettes of the cookies stand out. These treats offer a sophisticated flavor profile that is not too sweet. They are an excellent choice for a modern holiday party where you want to impress your guests.
Ingredients
1 cup softened salted butter
3/4 cup granulated sugar
1 large egg
1 teaspoon vanilla extract
1 1/2 cups all purpose flour
3/4 cup black cocoa powder
1/2 cup dried tart cherries
12 white chocolate diamond or gem shaped candies
2 tablespoons granulated sugar for dusting
Equipment
Large mixing bowl
Electric hand mixer
Baking sheet
Parchment paper
Cooling rack
DIY Instructions
Preheat your oven to 325 degrees Fahrenheit and line a baking sheet with parchment paper.
Mix the softened butter and sugar in a large bowl until the mixture is smooth and creamy.
Add the egg and vanilla extract and beat the ingredients until they are fully combined.
Sift the black cocoa powder and flour into the bowl to ensure there are no lumps.
Stir the dry ingredients into the butter mixture until a very dark, thick dough forms.
Fold in the dried cherries using a large spoon or your hands.
Roll the dough into balls about the size of a golf ball and place them on the pan.
Press down gently on each ball to flatten it slightly into a thick disk.
Bake for 12 to 14 minutes until the edges are firm to the touch.
Remove the cookies from the oven and immediately press one white chocolate diamond into the center of each warm cookie.
Sprinkle the extra granulated sugar over the tops while they are still hot so it sticks.
Allow the cookies to cool completely on the pan so the chocolate gem sets firmly into the dough.
17. Frosted Cinnamon Twists
Unique Christmas Cookies
These golden pastries are shaped into intricate, knotted circles that show off many flaky layers. A thick, clear syrup glaze coats the top to give the treats a glossy and inviting sheen. Small, white pearl sugar crystals are scattered over the surface for a sweet and crunchy finish.
The dough is swirled with a dark cinnamon filling that peeks through the folds of the twist. Drops of golden honey or syrup are visible on the gray background to suggest a sticky and rich texture. These twists look like a cross between a traditional cookie and a gourmet breakfast pastry.
Each piece is baked until the edges are a deep brown while the centers remain soft and tender. The circular shape and white sugar toppings give them a festive, wreath-like appearance. These are a hearty option that pairs wonderfully with a warm mug of cider.
Set your oven to 400 degrees Fahrenheit and line a baking sheet with parchment paper.
Lay the thawed puff pastry sheets out flat on a lightly floured surface.
Mix the brown sugar and cinnamon in a small bowl until they are well blended.
Brush the melted butter over the entire surface of the pastry sheets.
Sprinkle the cinnamon sugar mixture evenly over the buttered dough.
Use a pizza cutter to slice the dough into long strips about one inch wide.
Take one strip and twist it several times like a rope.
Roll the twisted strip into a circle and tuck the ends under to create a knot shape.
Place the twists on the baking sheet and bake for 15 to 18 minutes until they are puffed and golden.
Remove the pan from the oven and brush the warm pastries with honey or maple syrup.
Sprinkle the pearl sugar over the sticky glaze immediately.
Let the twists cool for at least ten minutes before serving so the glaze can set.
18. Peppermint Cocoa Macarons
Unique Christmas Cookies
These elegant sandwich cookies feature a dark, smooth chocolate shell and a bright white cream filling. The edges of the white filling are coated in crushed red and white peppermint candies. A stack of three macarons shows off the uniform shape and the festive “crunch” layer.
The chocolate shells have a slight sheen and a perfectly circular shape. Small bits of peppermint are scattered around the base of the stack to add to the holiday atmosphere. The background is a neutral gray that helps the red candy and white cream pop.
The contrast between the soft, airy shells and the brittle candy bits offers a great variety of textures. These treats look like professional bakery items but carry a classic home-style flavor. They are a colorful and sophisticated addition to any cookie exchange.
Ingredients
1 1/2 cups powdered sugar
1 cup almond flour
3 large egg whites, at room temperature
1/4 cup granulated sugar
2 tablespoons unsweetened cocoa powder
1/2 cup white chocolate ganache or peppermint buttercream
1/2 cup crushed peppermint candy canes
Equipment
Food processor
Sifter
Stand mixer with a whisk attachment
Piping bag with a round tip
Baking sheet
Parchment paper
DIY Instructions
Preheat your oven to 300 degrees Fahrenheit and line your baking sheet with parchment paper.
Pulse the almond flour, powdered sugar, and cocoa powder in a food processor until fine.
Sift the mixture into a bowl to remove any large lumps of almond or cocoa.
Beat the egg whites in a clean bowl until they become foamy.
Slowly add the granulated sugar while continuing to beat the eggs until stiff, glossy peaks form.
Gently fold the dry ingredients into the egg whites using a spatula until the batter is smooth.
Fill your piping bag and squeeze small circles of batter onto the baking sheet.
Tap the pan firmly on the counter a few times to release any trapped air bubbles.
Let the cookies sit at room temperature for 30 minutes until a dry “skin” forms on top.
Bake for 15 to 18 minutes, then let them cool completely before peeling them off the paper.
Pipe a circle of filling onto the flat side of one chocolate shell.
Press another shell on top to create a sandwich.
Roll the edges of the macaron in the crushed peppermint so the candy sticks to the filling.
19. Starry Spiced Jam Cookies
Unique Christmas Cookies
These star-shaped biscuits feature a pale, buttery dough and a deep red jam center. A whole star anise pod is placed in the middle of the jam, adding a beautiful and fragrant garnish. The jam has a slight shimmer, making it look like a glowing ruby against the light cookie.
Small brown flecks of cinnamon or nutmeg are visible in the dough, suggesting a warm and spicy flavor. The background includes orange slices and cinnamon sticks, which emphasize the winter spice theme. These cookies are thick and sturdy, with clean edges that hold their shape perfectly.
The star-within-a-star design is a clever way to dress up a traditional jam-filled cookie. Each bite offers a mix of crisp shortbread and chewy fruit preserve. These treats look wonderful when arranged on a dark platter for a holiday gathering.
Ingredients
1 cup softened salted butter
3/4 cup granulated sugar
1 large egg
1 teaspoon vanilla extract
2 1/2 cups all purpose flour
1/2 teaspoon ground cloves
1/2 cup raspberry or strawberry jam
12 whole star anise pods for garnish
Equipment
Large star-shaped cookie cutter
Small star-shaped cookie cutter
Baking sheet
Parchment paper
Rolling pin
Small spoon
DIY Instructions
Turn your oven on to 350 degrees Fahrenheit and line two pans with parchment paper.
Cream the butter and sugar in a large bowl until the mixture is light and fluffy.
Mix in the egg and vanilla extract until the dough is smooth.
Stir in the flour and ground cloves until a firm dough forms.
Roll the dough out on a floured surface to about a quarter-inch thickness.
Cut out large stars using your large cutter and place them on the baking sheet.
Use the small star cutter to press an indentation into the center of each cookie, but do not cut all the way through.
Bake the cookies for 10 to 12 minutes until the edges are a very light gold.
Remove the pan and use a small spoon to fill the star indentation with jam.
Place one whole star anise pod on top of the jam in each cookie.
Return the cookies to the oven for just two more minutes to set the jam.
Let the cookies cool completely so the jam firms up and the star anise stays in place.
20. Chocolate Reindeer Truffles
Unique Christmas Cookies
These adorable treats are shaped like small reindeer heads and coated in a smooth chocolate glaze. Two crunchy pretzel loops are attached to the top of each ball to serve as antlers. A single red chocolate candy is placed in the center to create a bright “Rudolph” nose.
The base of the treat is a rich mixture of crushed cookies and cream, which gives it a bumpy and rustic look. The bottom half is dipped in dark chocolate, creating a clean line around the “face.” These treats are clustered together on a white surface, making the red noses stand out.
Small white salt crystals on the pretzels add a bit of sparkle and a salty contrast to the sweet chocolate. These are a fun and playful addition to any holiday dessert spread. Kids and adults alike will enjoy the whimsical design of these bite-sized sweets.
Ingredients
1 package (14 oz) chocolate sandwich cookies
1 package (8 oz) softened cream cheese
2 cups milk chocolate melting wafers
24 mini pretzel twists
12 red M&M’s or red chocolate candies
1/4 cup crushed peanuts (optional for texture)
Equipment
Food processor
Large bowl
Baking sheet
Parchment paper
Microwave-safe bowl
Toothpicks
DIY Instructions
Place the chocolate sandwich cookies in a food processor and blend them until they are fine crumbs.
Put the crumbs into a large bowl and add the softened cream cheese.
Mix the crumbs and cheese together with your hands or a spoon until a thick, dark dough forms.
Stir in the crushed peanuts if you want your reindeer to have a little extra crunch.
Scoop out the dough and roll it into balls about one inch in diameter.
Place the balls on a baking sheet lined with parchment paper and freeze them for 15 minutes.
Melt the chocolate wafers in the microwave in 30-second bursts until the chocolate is smooth.
Dip each chilled ball into the melted chocolate to coat it halfway.
Place the ball back on the parchment paper.
Quickly press two mini pretzels into the top of the ball to make the antlers before the chocolate hardens.
Stick one red candy onto the front of the ball to create the nose.
Let the reindeer sit at room temperature for 30 minutes until the chocolate is completely firm.
21. Sesame Spice Snowflakes
Unique Christmas Cookies
These intricately stamped cookies take the shape of classic six-pointed snowflakes with a warm, toasted brown color. Tiny white sesame seeds are scattered across the surface, clinging to the ridges of the geometric design. The seeds resemble a light dusting of winter snow against the spiced dough.
Each cookie features deep grooves that highlight the symmetrical beauty of the snowflake pattern. They are arranged neatly on a flat white surface, which makes the earthy tones of the biscuit very clear. The texture appears crisp and firm, suggesting a satisfying snap when broken.
These treats offer a savory twist on a sweet tradition by using nutty sesame notes. They provide a sophisticated look without the need for messy icing or bright dyes. Serving these at a holiday gathering adds a touch of understated elegance to your dessert display.
Ingredients
1 cup softened salted butter
3/4 cup brown sugar
1 large egg
2 1/2 cups all-purpose flour
1 tablespoon ground ginger
1 teaspoon ground cinnamon
1/4 cup white sesame seeds
1/4 cup honey for brushing
Equipment
Large mixing bowl
Rolling pin
Snowflake shaped cookie stamp or cutter
Baking sheet
Parchment paper
Pastry brush
DIY Instructions
Preheat your oven to 350 degrees Fahrenheit and line your baking sheet with parchment paper.
Beat the softened butter and brown sugar in a bowl until the mixture is light and fluffy.
Add the egg and mix well until the liquid is fully incorporated into the butter.
Stir in the flour, ginger, and cinnamon until a stiff, fragrant dough forms.
Roll the dough out on a floured surface to about a quarter-inch thickness.
Press your snowflake stamp firmly into the dough to create the design and cut the shape.
Place the snowflakes on the baking sheet and bake for 10 to 12 minutes until the edges are firm.
Let the cookies cool on a wire rack for at least fifteen minutes.
Lightly brush the top of each cookie with a tiny amount of honey.
Sprinkle the white sesame seeds over the honey so they stick to the design.
22. Golden Poppy Seed Shards
Unique Christmas Cookies
These stunning treats look like fragments of amber glass suspended in mid-air. The transparent yellow candy is filled with thousands of tiny black poppy seeds that create a beautiful speckled pattern. Each shard has sharp, jagged edges that give the dessert a modern and artistic appearance.
The light passes through the clear sugar, making the golden honey color glow against the neutral background. Some pieces are stacked while others lay flat, showing off the varying thickness of the brittle. This is a unique alternative to traditional heavy cookies that adds a bright spark to a dessert tray.
The texture is thin and glass-like, promising a loud crunch and a sweet, nutty flavor. Small bubbles trapped inside the sugar add to the rustic, handmade feel of the candy. These shards are a conversation starter that looks as much like art as it does a snack.
Ingredients
2 cups granulated sugar
1/2 cup light corn syrup
1/4 cup water
1 tablespoon honey
2 tablespoons poppy seeds
1/2 teaspoon lemon extract
Equipment
Heavy-bottomed saucepan
Candy thermometer
Large baking sheet
Silicone baking mat or parchment paper
Metal spatula
DIY Instructions
Line a large baking sheet with a silicone mat or parchment paper and set it aside.
Combine the sugar, corn syrup, honey, and water in a heavy saucepan over medium heat.
Stir the mixture until the sugar dissolves, then stop stirring.
Attach a candy thermometer to the side of the pan, making sure it does not touch the bottom.
Boil the syrup until it reaches 300 degrees Fahrenheit, which is known as the hard-crack stage.
Remove the pan from the heat immediately so the sugar does not burn.
Stir in the poppy seeds and the lemon extract quickly.
Pour the hot mixture onto your prepared baking sheet and spread it thin with a metal spatula.
Let the candy cool completely at room temperature until it is hard and brittle.
Use the back of a spoon or your hands to crack the sheet into large, irregular shards.
23. Frosted Chai Sandwich Rounds
Unique Christmas Cookies
These thick, circular cookies feature the word “CHAI” stamped clearly into the top of each biscuit. A generous layer of smooth white cream is sandwiched between two spiced brown layers. Coarse sugar crystals are encrusted along the sides of the cookies to add a brilliant sparkle.
The dough has a soft, matte texture that contrasts with the glossy, white filling peeking out from the center. The warm tan color of the biscuit suggests a blend of cozy winter spices like cardamom and cloves. These treats are stacked on a dark gray surface that emphasizes their clean, professional look.
Every bite offers a balance of crunchy sugar and soft, spiced dough. The stamped lettering gives them a high-end bakery feel that is sure to impress. These are the ultimate companions for a hot cup of tea on a cold December afternoon.
Preheat your oven to 350 degrees Fahrenheit and prepare your pan with parchment paper.
Cream the butter and granulated sugar together in a bowl until the texture is smooth.
Mix in the flour and chai spices until a soft, workable dough forms.
Roll the dough out and cut into circles using your round cutter.
Use the alphabet stamps to press the word “CHAI” into half of the dough circles.
Bake all the circles for 10 minutes until the bottoms are lightly browned.
Let the cookies cool completely on a flat surface.
Beat the cream cheese and powdered sugar together in a small bowl to make the filling.
Spread a thick layer of the cream cheese frosting onto the bottom of a plain cookie.
Press a stamped cookie on top of the frosting to create the sandwich.
Roll the edges of the sandwich in the coarse sparkling sugar so it sticks to the cream.
24. Mini Plum Pudding Bites
Unique Christmas Cookies
These festive treats are shaped like tiny, dark chocolate domes that mimic a classic Christmas pudding. A thick drip of white icing sits on top of each ball to represent a layer of cream. Small green fondant leaves and bright red berries finish the look with a traditional holiday touch.
The base of the treat is dense and filled with dark fruit pieces, giving it a rich and heavy appearance. The bottom half shows a textured crumb that looks moist and flavorful. These bites are arranged on a clean white surface, making the deep brown and bright white colors pop.
A few cloves are scattered in the background to hint at the aromatic spices hidden inside. These are a great way to serve a traditional flavor in a fun, handheld format. They bring a sense of nostalgia and elegance to any holiday party.
Ingredients
2 cups crushed chocolate cake or brownie crumbs
1/2 cup dark raisins or chopped prunes
1/4 cup orange juice
1/4 teaspoon ground cloves
1 cup dark chocolate melting wafers
1/2 cup white chocolate melting wafers
Red and green sprinkles or fondant for decoration
Equipment
Large bowl
Microwave-safe bowl
Baking sheet
Parchment paper
Small spoon or piping bag
DIY Instructions
Mix the cake crumbs, dried fruit, orange juice, and cloves in a large bowl.
Use your hands to press and roll the mixture into small, firm domes about one inch wide.
Place the domes on a tray and put them in the fridge for 20 minutes to firm up.
Melt the dark chocolate in the microwave and dip each dome to coat it completely.
Set the chocolate-covered balls back on the parchment paper until they harden.
Melt the white chocolate and use a spoon to pour a small amount over the top of each dome.
Allow the white chocolate to run down the sides slightly to look like dripping cream.
Before the white chocolate dries, place two green leaves and three red berries on top.
Let the treats sit for 30 minutes until all the chocolate layers are completely solid.
25. Matcha White Chocolate Crinkles
Unique Christmas Cookies
These vibrant green cookies feature a beautiful “crackle” pattern created by rolling the dough in powdered sugar before baking. Large chunks of white chocolate are nestled into the deep crevices of the bright matcha base. The contrast between the lime green dough and the snowy white sugar is visually stunning.
The cookies have a soft, rounded shape that looks tender and chewy on the inside. Every piece is unique, with different patterns of green peeking through the white coating. These are piled together on a neutral surface, showcasing their bold and natural color.
Matcha brings a fresh, slightly bitter flavor that pairs excellently with the sweet white chocolate gems. These are a modern choice for those who want a break from standard vanilla and cinnamon. They add a splash of color that feels both festive and sophisticated.
Ingredients
2 cups all-purpose flour
1 tablespoon matcha green tea powder
1 teaspoon baking powder
1/2 cup softened salted butter
3/4 cup granulated sugar
2 large eggs
1/2 cup powdered sugar (for rolling)
1/2 cup white chocolate chunks
Equipment
Sifter
Mixing bowl
Hand mixer
Small bowl for sugar
Baking sheet
Parchment paper
DIY Instructions
Preheat your oven to 325 degrees Fahrenheit and line a baking sheet.
Sifter the flour, matcha powder, and baking powder together in a bowl until the color is even.
In a separate bowl, beat the butter and granulated sugar until the mixture is light.
Add the eggs to the butter mixture one at a time, mixing well after each addition.
Slowly add the green flour mixture until a thick, bright green dough forms.
Fold in most of the white chocolate chunks using a large spoon.
Scoop out small portions of dough and roll them into smooth balls.
Roll each ball in the bowl of powdered sugar until it is heavily coated.
Place the balls on the baking sheet and press a few extra chocolate chunks into the tops.
Bake for 10 to 12 minutes; the cookies will spread and create the crinkle design.
Let them cool completely on the pan so they stay soft and chewy.
26. Glazed Citrus Sage Muffins
Unique Christmas Cookies
These petite, golden muffins feature a soft and airy crumb that suggests a light citrus flavor. A thick, ivory glaze drips down the sides of each treat, creating a beautiful contrast against the warm cake. A single, sugar-dusted sage leaf sits atop each muffin to provide a rustic and herbal finish.
The deep green of the sage leaf pops against the pale white icing. Small orange zest flecks are visible within the batter, hinting at a bright and tangy interior. These sweets are arranged neatly on a white surface, giving them a clean and elegant appearance.
The combination of sweet glaze and savory herbs offers a unique twist on a holiday classic. Each muffin is uniform in size, making them a great choice for a brunch gathering. These treats feel sophisticated yet comforting for a cold winter morning.
Ingredients
1 1/2 cups all-purpose flour
1/2 cup granulated sugar
1 tablespoon baking powder
1/2 cup whole milk
1/4 cup melted salted butter
1 large egg
1 tablespoon orange zest
1 cup powdered sugar
2 tablespoons orange juice
Fresh sage leaves and granulated sugar for garnish
Equipment
Mini muffin tin
Paper liners
Large mixing bowl
Whisk
Small bowl for glaze
Cooling rack
DIY Instructions
Heat your oven to 375 degrees Fahrenheit and place paper liners into the mini muffin tin.
Whisk the flour, granulated sugar, and baking powder together in a large bowl.
Combine the milk, melted butter, egg, and orange zest in a separate container.
Pour the wet ingredients into the dry ingredients and stir until just combined.
Fill each muffin cup about two-thirds full with the batter.
Bake for 12 to 15 minutes or until a toothpick comes out clean.
Let the muffins cool completely on a wire rack before you start the icing.
Mix the powdered sugar and orange juice in a small bowl to create a thick, pourable glaze.
Spoon a generous amount of glaze over each muffin and let it run down the sides.
Dampen the fresh sage leaves with a tiny bit of water and roll them in granulated sugar.
Place one sparkly sage leaf on top of each glazed muffin before the icing sets.
27. Tropical Coconut Macaroons
Unique Christmas Cookies
These towering coconut treats are shaped into craggy peaks with a beautifully toasted, golden-brown exterior. The base of each macaroon is dipped in a smooth layer of white chocolate, creating a clean and crisp bottom edge. A tiny, colorful paper umbrella is tucked into the top of each mound for a whimsical touch.
A small piece of dried pineapple sits just below the umbrella to add a burst of chewy sweetness. The white chocolate coating has a slight sheen that highlights the texture of the shredded coconut. These treats sit on a light marble surface, evoking the feeling of a winter beach getaway.
The contrast between the warm toasted coconut and the cool white chocolate is very inviting. These are a great way to bring some sunshine to a traditional holiday cookie spread. Every bite promises a mix of crunchy edges and a soft, moist center.
Ingredients
1 bag (14 oz) sweetened shredded coconut
1 can (14 oz) sweetened condensed milk
1 teaspoon vanilla extract
2 large egg whites
1/4 teaspoon salt
1 cup white chocolate melting wafers
1/2 cup dried pineapple chunks
Mini cocktail umbrellas for decoration
Equipment
Large mixing bowl
Stand mixer or hand mixer
Baking sheet
Parchment paper
Ice cream scoop
Small microwave-safe bowl
DIY Instructions
Preheat your oven to 325 degrees Fahrenheit and line a baking sheet with parchment paper.
Mix the shredded coconut, condensed milk, and vanilla extract in a large bowl.
Beat the egg whites and salt in a separate bowl until stiff peaks form.
Gently fold the egg whites into the coconut mixture using a spatula.
Use an ice cream scoop to drop rounded mounds of the mixture onto the baking sheet.
Use your fingers to dampen the tops slightly and pull them into a pointed peak.
Bake for 20 to 25 minutes until the coconut is golden brown on the edges.
Let the macaroons cool completely on the pan so they do not fall apart.
Melt the white chocolate in the microwave in 30-second intervals until smooth.
Dip the bottom of each cooled macaroon into the chocolate and place it back on the paper.
Press a piece of dried pineapple onto the side of the peak while the chocolate is still wet.
Stick a mini umbrella into the top of each macaroon once the chocolate has hardened.
28. Spiced Red Velvet Rounds
Unique Christmas Cookies
These striking cookies feature a deep, velvety red color and a slightly pebbled surface texture. A fine dusting of bright orange spice or zest is concentrated in the center of each round. The vibrant red dough stands out beautifully against the cool gray background.
The edges of the cookies are scalloped, giving them a decorative and traditional feel. Small cracks on the surface suggest a soft, melt-in-your-mouth consistency similar to shortbread. These are stacked and scattered, showing off the rich color from every angle.
The contrast between the red base and the orange topping creates a warm and festive look. These cookies offer a sophisticated alternative to standard chocolate or vanilla holiday treats. They look modern and elegant, making them a great choice for a stylish cookie gift box.
Ingredients
1 cup softened salted butter
3/4 cup granulated sugar
1 large egg
2 cups all-purpose flour
1/4 cup unsweetened cocoa powder
1 tablespoon red food coloring
1 teaspoon vanilla extract
1/4 cup orange zest mixed with a pinch of cinnamon for dusting
Equipment
Large mixing bowl
Electric mixer
Scalloped round cookie cutter
Rolling pin
Baking sheet
Parchment paper
DIY Instructions
Set your oven to 350 degrees Fahrenheit and line a flat pan with parchment paper.
Beat the butter and sugar in a large bowl until the mixture is pale and creamy.
Add the egg, red food coloring, and vanilla extract and mix until the color is even.
Sift the flour and cocoa powder into the wet ingredients to prevent lumps.
Stir until a firm, bright red dough forms that does not stick to the bowl.
Roll the dough out on a floured surface to about a quarter-inch thickness.
Use the scalloped cutter to create your round cookie shapes.
Place the rounds on the baking sheet and bake for 10 to 12 minutes.
Ensure the cookies are firm but do not let the red color turn brown.
Remove the pan from the oven and immediately sprinkle the orange spice mixture into the center of each warm cookie.
Let them cool completely on the pan to help the spice stick to the surface.
29. Nutty Chocolate Swirl Logs
Unique Christmas Cookies
These elegant cookies are sliced from a long roll to reveal a beautiful spiral of dark chocolate and light sponge. The outer edge of each slice is coated in a thick layer of crushed hazelnuts for a salty crunch. Small white meringue mushrooms sit in the background to create a whimsical forest theme.
The dark chocolate filling is rich and fudgy, contrasting with the soft and pale cake layers. Every slice shows a perfect, uniform swirl that highlights the skill of the baker. These are arranged on a long white platter, making them a central focus of any dessert table.
The texture looks moist and dense, promising a decadent experience in every bite. The addition of the nuts brings an earthy flavor that balances the sweet chocolate. These treats are a classic holiday choice that feels both festive and high-end.
Ingredients
3 large eggs
1/2 cup granulated sugar
1/2 cup all-purpose flour
1/2 cup dark chocolate ganache or chocolate hazelnut spread
1 cup finely chopped hazelnuts
1/4 cup melted chocolate (for sticking the nuts)
Equipment
9×13 inch jelly roll pan
Parchment paper
Clean kitchen towel
Off-set spatula
Sharp knife
DIY Instructions
Preheat your oven to 350 degrees Fahrenheit and line your jelly roll pan with parchment paper.
Beat the eggs and sugar for about five minutes until the mixture is thick and pale.
Gently fold in the flour with a spatula so you do not deflate the eggs.
Pour the batter into the pan and spread it evenly into the corners.
Bake for 10 to 12 minutes until the cake springs back when touched.
Turn the hot cake out onto a clean kitchen towel dusted with a little sugar.
Roll the cake and the towel together starting from the short end and let it cool.
Unroll the cooled cake and spread a thick layer of chocolate ganache over the surface.
Roll the cake back up tightly without the towel this time.
Brush the outside of the log with a thin layer of melted chocolate.
Press the chopped hazelnuts into the melted chocolate until the log is fully coated.
Use a sharp knife to slice the log into rounds that are about one inch thick.
30. Honeycomb Lavender Bars
Unique Christmas Cookies
These luxurious bars feature a golden, buttery crust topped with a thick layer of amber honey filling. A piece of real honeycomb sits atop a stack of bars, with liquid honey dripping down the sides. Fresh sprigs of purple lavender are tucked into the treats to add a floral scent and a pop of color.
The surface of the bars is speckled with dried lavender buds and tiny white salt flakes. The golden filling has a glossy, translucent look that catches the light beautifully. These are presented on a clean white surface with loose lavender flowers scattered around the base.
The combination of the crunchy honeycomb and the soft, chewy bar offers a wonderful variety of textures. These sweets feel very artisanal and would be a standout item at any holiday market. They bring a touch of summer garden flavors to the winter season.
Ingredients
1/2 cup softened salted butter
1/4 cup granulated sugar
1 1/2 cups all-purpose flour
1/2 cup honey
1/4 cup heavy cream
1 tablespoon dried culinary lavender
1 small piece of fresh honeycomb (for garnish)
Flaky sea salt for sprinkling
Equipment
8-inch square baking pan
Parchment paper
Small saucepan
Large bowl
Sharp knife
DIY Instructions
Heat your oven to 350 degrees Fahrenheit and line your baking pan.
Mix the butter, sugar, and flour in a bowl until a crumbly dough forms.
Press the dough into the bottom of the pan and bake for 15 minutes.
Combine the honey, heavy cream, and half of the lavender in a saucepan over medium heat.
Bring the mixture to a simmer for two minutes, then pour it over the baked crust.
Return the pan to the oven and bake for another 10 to 12 minutes until the honey layer bubbles.
Sprinkle the remaining lavender and a pinch of flaky salt over the top while it is hot.
Let the bars cool completely in the pan until the honey layer is firm.
Slice into squares and top each one with a tiny piece of fresh honeycomb.
Drizzle a little extra honey over the top just before you serve them to your guests.
31. Maple Bacon Bourbon Bites
Unique Christmas Cookies
These rustic, textured cookies feature a warm golden-brown dough mixed with crunchy nut pieces. A thick pool of amber maple glaze rests in the center of each treat, glistening under the light. A savory piece of thick-cut, candied bacon sits right on top of the sticky syrup for a bold finish.
Small droplets of glaze run down the sides of the crinkled dough to suggest a moist and soft center. The background is a clean white, which helps the rich, smoky colors of the bacon and maple pop. This combination of salty and sweet flavors offers a complex experience for adventurous holiday eaters.
Each cookie looks substantial and heavy, promising a filling snack during a cold winter day. The contrast between the brittle bacon and the soft glaze creates an interesting variety of textures. These treats will definitely spark a conversation at any festive dessert table or gift exchange.
Ingredients
1 cup softened salted butter
1 cup brown sugar
1 large egg
2 tablespoons bourbon
2 1/2 cups all-purpose flour
1/2 cup chopped pecans
1/2 cup maple syrup
6 slices of thick-cut bacon
1/2 cup powdered sugar (for the glaze)
Equipment
Large mixing bowl
Electric hand mixer
Baking sheet
Parchment paper
Frying pan or oven rack (for bacon)
Small whisk
DIY Instructions
Heat your oven to 400 degrees Fahrenheit and cook the bacon slices until they are very crispy.
Let the bacon cool, then chop it into small, uniform squares.
Lower the oven temperature to 350 degrees Fahrenheit and line a baking sheet with parchment paper.
Beat the softened butter and brown sugar together in a large bowl until the mixture is light.
Add the egg and the bourbon to the bowl and mix until the liquid is fully absorbed.
Stir in the flour and the chopped pecans slowly until a thick, nutty dough forms.
Roll the dough into balls about the size of a golf ball and place them on the baking sheet.
Use your thumb or a small spoon to press a deep indentation into the center of each ball.
Bake the cookies for 10 to 12 minutes until the edges are firm and lightly browned.
Whisk the maple syrup and powdered sugar in a small bowl to create a thick, pourable glaze.
Spoon a small amount of the maple glaze into the center of each warm cookie.
Place one square of crispy bacon on top of the wet glaze immediately so it sticks.
Allow the cookies to cool completely so the glaze can set into a firm, sticky center.
32. Frozen Blueberry Crinkle Gems
Unique Christmas Cookies
These vibrant, deep blue cookies feature a striking crackled surface that reveals a bright turquoise interior. Large chunks of creamy white chocolate are nestled into the deep crevices of the round treats. A fine coating of powdered sugar covers the surface to resemble a light dusting of winter frost.
The intense blue color is natural and rich, making each cookie look like a small piece of jewelry. A few tiny silver star sprinkles are scattered in the background to emphasize the magical, wintry theme. The texture appears soft and pillowy, promising a melt-in-your-mouth experience with every bite.
One cookie is sliced in half to show off the dense, moist crumb and the generous amount of white chocolate inside. The contrast between the snowy white sugar and the bold blue dough is visually stunning. These treats bring a cool and refreshing look to a traditional holiday spread.
Ingredients
2 cups all-purpose flour
1 teaspoon baking powder
1/2 cup softened salted butter
3/4 cup granulated sugar
2 large eggs
1/4 cup concentrated blueberry puree (for natural color)
1 tablespoon blue food coloring (optional for deeper hue)
1/2 cup powdered sugar (for rolling)
1/2 cup white chocolate chunks
Equipment
Large mixing bowl
Sifter or fine mesh strainer
Hand mixer
Small bowl for powdered sugar
Baking sheet
Parchment paper
DIY Instructions
Preheat your oven to 325 degrees Fahrenheit and line a baking sheet with parchment paper.
Sifter the flour and baking powder together in a medium bowl to remove any lumps.
In a large bowl, cream the butter and granulated sugar together until the mixture is fluffy.
Add the eggs one at a time, followed by the blueberry puree and food coloring.
Mix the wet ingredients until the color is vibrant and even throughout the bowl.
Gradually stir in the flour mixture until a soft, sticky blue dough forms.
Fold in the white chocolate chunks using a large spoon or spatula.
Scoop a tablespoon of dough and roll it into a ball, then roll the ball heavily in the powdered sugar.
Place the sugar-coated balls on the baking sheet, leaving space for them to spread.
Bake for 10 to 12 minutes; the cookies will expand and create the beautiful crinkle pattern.
Let the cookies cool on the pan for five minutes before moving them to a wire rack.
Ensure they are completely cold before stacking to keep the powdered sugar looking fresh.
33. Almond Apricot Crowns
Unique Christmas Cookies
These elegant, dome-shaped cookies are covered in a layer of sliced, toasted almonds that resemble a textured shell. A single, bright orange dried apricot sits perfectly on top like a small golden jewel. The base of each treat is dipped in a smooth, dark chocolate coating that adds a clean and professional finish.
The light brown color of the dough peeks through the gaps in the almond slices. These treats are arranged on a white surface, which makes the contrast between the dark chocolate and bright fruit very clear. The texture looks crunchy on the outside but suggests a soft, almond-flavored center.
Small grains of sugar or salt are visible on the chocolate base to add a bit of shimmer. These cookies feel very artisanal and would look beautiful in a holiday gift box. They offer a sophisticated mix of nutty, fruity, and cocoa flavors in every bite.
Ingredients
1 cup almond flour
1/2 cup all-purpose flour
1/2 cup granulated sugar
1 large egg white
1 teaspoon almond extract
1/2 cup sliced almonds
12 dried apricots
1 cup dark chocolate melting wafers
Equipment
Mixing bowl
Baking sheet
Parchment paper
Small microwave-safe bowl
Wire cooling rack
DIY Instructions
Turn your oven on to 325 degrees Fahrenheit and prepare a baking sheet with parchment paper.
Mix the almond flour, all-purpose flour, and sugar in a large bowl.
Add the egg white and almond extract to the dry ingredients and stir until a stiff paste forms.
Roll the dough into balls about the size of a walnut and flatten the bottoms slightly.
Press the sliced almonds into the surface of each ball until the top and sides are covered.
Place one dried apricot in the center of the top and press down gently to secure it.
Bake the cookies for 15 to 18 minutes until the almonds look lightly toasted and golden.
Let the cookies cool completely on a wire rack before you start the chocolate step.
Melt the dark chocolate wafers in the microwave in 30-second intervals until smooth.
Dip the bottom of each cooled cookie into the melted chocolate.
Place the cookies back on the parchment paper and let them sit for 20 minutes until the chocolate is hard.
34. Champagne & Midnight Toast Hearts
Unique Christmas Cookies
These romantic, heart-shaped cookies feature a smooth layer of dusty rose-colored royal icing. The phrase “CHAMPAGNE & MIDNIGHT TOAST” is stamped neatly into the center of the main cookie in deep red letters. Small fragments of edible gold leaf are scattered across the icing to add a touch of luxury and shine.
Dried strawberry slices are placed on the other heart cookies to provide a pop of bright red color and a tart flavor. The cookies are stacked and scattered on a white background, creating a clean and modern aesthetic. The icing has a matte finish that looks soft and elegant.
Thin drizzles of pink icing criss-cross over the strawberry hearts to tie the design together. These treats are a wonderful choice for a New Year’s Eve party or a winter wedding. They combine classic holiday sentiments with a trendy and sophisticated color palette.
Ingredients
1 cup softened salted butter
1 cup granulated sugar
1 large egg
1 teaspoon vanilla extract
2 1/2 cups all-purpose flour
2 cups powdered sugar
2 tablespoons milk
Pink and red food coloring
1/2 cup dried strawberry slices
Edible gold leaf flakes
Equipment
Heart-shaped cookie cutter
Alphabet cookie stamps
Rolling pin
Baking sheet
Parchment paper
Piping bag with a small tip
DIY Instructions
Preheat your oven to 350 degrees Fahrenheit and line your baking sheet with paper.
Cream the butter and sugar, then mix in the egg and vanilla until smooth.
Add the flour and stir until a firm dough forms, then roll it out to a quarter-inch thickness.
Cut the dough into heart shapes and bake for 10 minutes until the edges are set.
Let the cookies cool completely on a wire rack before you begin decorating.
Whisk the powdered sugar and milk together, then add pink food coloring to make the base icing.
Spread a smooth layer of pink icing over the surface of each heart cookie.
Use the alphabet stamps to press your message into the wet icing of one cookie.
Place dried strawberry slices on the other cookies and drizzle extra pink icing over them.
Use a toothpick to carefully place small bits of gold leaf on the corners of the cookies.
Allow the icing to dry for at least four hours until it is hard to the touch.
35. Poached Pear Spiced Tarts
Unique Christmas Cookies
These exquisite miniature tarts feature a golden, buttery crust filled with a light, spiced cream. A whole, small poached pear sits upright in the center of each tart, looking elegant and sophisticated. The pear has a soft, translucent appearance and is dusted lightly with ground cinnamon.
Small star anise pods and cinnamon sticks are scattered on the dark slate background to emphasize the warm spice flavors. The crust has a rustic, slightly crumbly texture that suggests a homemade feel. These treats are arranged neatly, showing off the uniform height and shape of the pears.
A fine dusting of powdered sugar over the edges of the tart base resembles a light winter snowfall. This dessert is a great way to serve fruit in a formal and beautiful way during the holidays. Every bite promises a mix of tender fruit, rich cream, and crunchy pastry.
Ingredients
12 pre-baked mini tart shells
12 small pears (like Seckel pears)
2 cups water
1 cup granulated sugar
1 cinnamon stick
1 cup heavy whipping cream
1/2 teaspoon ground cardamom
2 tablespoons powdered sugar
Equipment
Small saucepan
Slotted spoon
Large mixing bowl
Electric whisk
Piping bag
DIY Instructions
Peel the pears carefully, leaving the stems attached, and slice a tiny bit off the bottom so they stand up.
Combine the water, sugar, and cinnamon stick in a saucepan and bring the liquid to a simmer.
Place the pears in the liquid and cook them for 15 minutes until they are soft but not mushy.
Remove the pears with a slotted spoon and let them cool completely on a plate.
Beat the heavy cream, cardamom, and powdered sugar in a bowl until stiff peaks form.
Fill your piping bag with the spiced cream and squeeze a generous amount into each tart shell.
Place one cooled, poached pear in the center of the cream in each tart.
Sprinkle a tiny bit of extra cinnamon or powdered sugar over the top of the pear for decoration.
Serve these immediately or keep them in the fridge until your guests are ready for dessert.
36. Pistachio Lemon Clouds
Unique Christmas Cookies
These soft, pale yellow cookies feature a delicate, crinkled surface that suggests a light and airy texture. A thick dollop of white lemon glaze sits in the center of each round treat. A small pile of finely crushed pistachios is sprinkled over the wet icing to add a salty crunch and a pop of green color.
The cookies are spread across a white surface, making the bright yellow and green tones stand out beautifully. Small cracks on the surface show the tender nature of the dough, which likely melts in the mouth. The look is clean and refreshing, offering a break from heavier holiday flavors.
The combination of citrus and nuts brings a sophisticated and modern feel to the dessert table. Each cookie is uniform in size and shape, creating a professional and inviting presentation. These are an excellent choice for a holiday tea or a light afternoon snack.
Ingredients
1 cup softened salted butter
1/2 cup granulated sugar
1 large egg
2 tablespoons lemon zest
2 cups all-purpose flour
1/2 teaspoon baking powder
1 cup powdered sugar
2 tablespoons lemon juice
1/4 cup shelled pistachios, finely chopped
Equipment
Large mixing bowl
Hand mixer
Baking sheet
Parchment paper
Small spoon for glaze
DIY Instructions
Set your oven to 350 degrees Fahrenheit and line a baking sheet with parchment paper.
Beat the butter and sugar in a large bowl until the mixture is very pale and smooth.
Add the egg and the lemon zest and mix until the ingredients are fully combined.
Stir in the flour and baking powder slowly until a soft, lemon-scented dough forms.
Roll the dough into small balls and place them on the pan, pressing them down slightly.
Bake for 10 to 12 minutes; the cookies should be set but still very pale in color.
Let the cookies cool completely on a wire rack before you start the icing.
Whisk the powdered sugar and lemon juice in a small bowl to create a thick white glaze.
Spoon a small amount of glaze into the center of each cookie and let it spread slightly.
Sprinkle the chopped pistachios over the wet glaze before it has a chance to harden.
37. Peppermint Bark Sugar Rounds
Unique Christmas Cookies
These large, golden sugar cookies feature a soft and chewy texture with slightly crisp edges. A generous pool of melted white chocolate sits in the center of each round treat. Large, jagged shards of homemade peppermint bark are pressed into the wet chocolate to create a festive mountain of candy.
The red and white candy cane bits provide a bright pop of color against the pale cookie base. Small crumbs of peppermint are scattered across the surface to ensure every bite has a minty crunch. These treats are stacked neatly, showing off the thick layer of toppings and the rich dough.
The background is a neutral gray that helps the vibrant red and snowy white colors stand out. This recipe combines a classic cookie with a favorite holiday confection for a double dose of cheer. These are a great choice for anyone who loves the refreshing taste of winter peppermint.
Ingredients
1 cup softened salted butter
1 cup granulated sugar
1 large egg
1 teaspoon vanilla extract
2 1/2 cups all-purpose flour
1/2 cup white chocolate melting wafers
1 cup peppermint bark, broken into large shards
1/4 cup crushed candy canes
Equipment
Large mixing bowl
Electric hand mixer
Baking sheet
Parchment paper
Microwave-safe bowl
Wire cooling rack
DIY Instructions
Preheat your oven to 350 degrees Fahrenheit and line a baking sheet with parchment paper.
Beat the softened butter and granulated sugar in a bowl until the mixture is light and fluffy.
Add the egg and vanilla extract, then mix until the liquid is fully incorporated.
Stir in the flour slowly until a soft dough forms that does not stick to your hands.
Roll the dough into balls about the size of a golf ball and place them on the pan.
Press the balls down with the palm of your hand to create thick, flat disks.
Bake for 10 to 12 minutes until the edges are just beginning to turn a pale gold.
Let the cookies cool completely on a wire rack before you add the chocolate.
Melt the white chocolate wafers in a bowl using 30-second bursts in the microwave.
Spoon a tablespoon of melted chocolate into the center of each cookie.
Press a large shard of peppermint bark into the center of the wet chocolate.
Sprinkle some crushed candy cane bits around the bark before the chocolate hardens.
38. Blackberry Walnut Crumble Bars
Unique Christmas Cookies
These thick dessert bars feature a buttery shortbread base and a deep purple layer of blackberry jam. A heavy coating of walnut crumble and powdered sugar sits on top to add a rustic and cozy appearance. The dark fruit filling peeks through the golden nuggets of the topping.
The texture of the bars looks dense and satisfying, with a clear distinction between the layers. Large pieces of walnuts are visible in the crumble, promising a nutty flavor and a firm crunch. These are sliced into long rectangles and arranged in a row to show off the colorful fruit center.
The white surface background makes the dark berry colors and the snowy sugar dusting look very sharp. This treat is a wonderful way to use winter preserves in a handheld format. Every bite offers a balance between the tart fruit and the rich, sweet pastry.
Ingredients
1 cup softened salted butter
1/2 cup granulated sugar
2 1/2 cups all-purpose flour
1 cup blackberry jam or preserves
1/2 cup chopped walnuts
1/4 cup brown sugar
2 tablespoons powdered sugar for dusting
Equipment
8×8 inch square baking pan
Parchment paper
Large mixing bowl
Pastry cutter or fork
Sharp knife
Fine mesh sifter
DIY Instructions
Turn your oven on to 350 degrees Fahrenheit and line your square pan with parchment paper.
Mix the softened butter and granulated sugar in a bowl until smooth.
Stir in 2 cups of the flour until a soft, crumbly dough begins to form.
Press two-thirds of this dough firmly into the bottom of the pan to make the crust.
Bake the crust for 12 minutes, then remove it from the oven.
Spread the blackberry jam evenly over the warm crust using a spoon.
Take the remaining dough and mix it with the last half-cup of flour, the brown sugar, and the walnuts.
Use your fingers to crumble this mixture over the top of the jam layer.
Return the pan to the oven and bake for 20 more minutes until the top is golden brown.
Let the bars cool completely in the pan so the jam can firm up.
Lift the parchment paper to remove the block and slice it into rectangles.
Dust the tops with a light coating of powdered sugar before serving.
39. Sweet Potato Pecan Marshmallow Rounds
Unique Christmas Cookies
These unique cookies feature a vibrant orange dough made with real sweet potato for a soft, cake-like texture. A large, toasted marshmallow sits in the center of each round, looking puffed and golden. A single, dark pecan half is pressed into the top of the marshmallow to finish the look.
The edges of the cookies are slightly crinkled, showing the moist and tender nature of the spiced dough. Small cracks on the surface suggest a flavor profile similar to a classic autumn pie. These are arranged on a white background, making the warm orange and brown tones look very inviting.
This recipe turns a traditional holiday side dish into a fun and portable dessert. The combination of gooey marshmallow and crunchy nut provides a great variety of textures. These treats are a comforting and creative addition to a winter holiday menu.
Ingredients
1 cup cooked and mashed sweet potato
1/2 cup softened salted butter
3/4 cup brown sugar
1 large egg
2 cups all-purpose flour
1 teaspoon ground cinnamon
1/2 teaspoon ground nutmeg
12 large marshmallows
12 pecan halves
Equipment
Large mixing bowl
Electric mixer
Baking sheet
Parchment paper
Kitchen torch (optional)
Wire cooling rack
DIY Instructions
Preheat your oven to 350 degrees Fahrenheit and prepare your baking sheet with paper.
Beat the butter and brown sugar together in a large bowl until the mixture is creamy.
Add the egg and the mashed sweet potato, then mix until the color is a bright, even orange.
Stir in the flour, cinnamon, and nutmeg slowly until a soft, thick dough forms.
Scoop the dough into balls and place them on the baking sheet, leaving space between them.
Bake the cookies for 10 minutes, then remove the pan from the oven.
Place one large marshmallow in the center of each warm cookie and press it down slightly.
Return the pan to the oven for 2 minutes until the marshmallows puff up and start to melt.
Remove the cookies again and immediately press a pecan half into the center of each marshmallow.
Use a kitchen torch for a few seconds if you want the marshmallows to look more toasted.
Let the cookies cool on the pan for ten minutes so the marshmallow can set.
40. Chocolate Cranberry Spiral Slices
Unique Christmas Cookies
These stunning cookies feature a complex spiral pattern of dark chocolate and light vanilla dough. A thin layer of bright red cranberry jam is rolled into the swirl to add a pop of color and a tart flavor. The edges of each slice are dipped in white chocolate and covered in dark chocolate shavings.
The intricate design makes each cookie look like a professional bakery item. The contrast between the charcoal-colored dough and the snowy white coating is very modern and stylish. These are arranged in a stack, showing off the uniform swirls and the generous amount of toppings.
Small bits of dried cranberry are visible within the dark layers, hinting at the chewy texture inside. The background is neutral, keeping the focus on the striking circular patterns. These treats offer a sophisticated blend of cocoa and fruit for a gourmet holiday experience.
Ingredients
1/2 cup softened salted butter
1/2 cup granulated sugar
1 large egg
1 1/2 cups all-purpose flour
1/4 cup dark cocoa powder
1/4 cup cranberry jam, strained of large lumps
1/2 cup white chocolate melting wafers
1/4 cup dark chocolate sprinkles or shavings
Equipment
Two mixing bowls
Rolling pin
Plastic wrap
Baking sheet
Parchment paper
Sharp knife
DIY Instructions
Mix the butter, sugar, and egg in a bowl, then divide the mixture into two equal parts in separate bowls.
Add 3/4 cup of flour to the first bowl to make the vanilla dough.
Add the remaining flour and the cocoa powder to the second bowl to make the dark dough.
Roll the vanilla dough into a large rectangle between two sheets of parchment paper.
Roll the dark dough into a rectangle of the same size.
Place the dark dough on top of the vanilla dough and spread a very thin layer of cranberry jam over it.
Roll the two layers together tightly into a long log and wrap it in plastic.
Chill the log in the fridge for at least two hours so it becomes firm enough to slice.
Preheat your oven to 350 degrees Fahrenheit and slice the log into half-inch rounds.
Bake the rounds for 10 to 12 minutes and let them cool completely.
Dip one half of each cooled cookie into melted white chocolate.
Sprinkle the dark chocolate shavings over the wet icing immediately.
41. Matcha and Strawberry Fir Trees
Unique Christmas Cookies
These festive cookies take the shape of small evergreen trees with a vibrant, earthy green color. Pieces of bright red dried strawberries are embedded into the dough to look like colorful holiday ornaments. The rough, pebbled texture of the biscuit gives the trees a natural and rustic appearance.
A second set of trees features a warm, reddish-pink dough that offers a beautiful color contrast on a dessert platter. These treats are scattered across a clean white surface, highlighting their sharp geometric lines and bold holiday colors. The dough appears thick and sturdy, suggesting a crisp and satisfying crunch.
Each tree is uniform in size, making them a great choice for a structured cookie display. The natural tartness of the strawberries balances the mild, grassy notes of the green tea. These unique biscuits bring a modern and artistic flair to traditional Christmas baking.
Ingredients
1 cup softened salted butter
3/4 cup granulated sugar
1 large egg
2 1/4 cups all-purpose flour
2 tablespoons matcha green tea powder
1/2 cup freeze-dried strawberries, chopped
1 teaspoon vanilla extract
Equipment
Large mixing bowl
Electric hand mixer
Christmas tree cookie cutter
Rolling pin
Baking sheet
Parchment paper
DIY Instructions
Preheat your oven to 350 degrees Fahrenheit and line a baking sheet with parchment paper.
Mix the softened butter and granulated sugar in a large bowl until the mixture is fluffy.
Add the egg and vanilla extract and beat until the liquid is fully incorporated.
Stir in the flour and matcha powder slowly until a stiff, green dough forms.
Gently fold in the chopped dried strawberry pieces using a large spoon.
Roll the dough out on a floured surface until it is about a quarter-inch thickness.
Press the tree-shaped cutter into the dough to create your festive shapes.
Place the trees on the baking sheet and bake for 10 to 12 minutes until the edges are firm.
Let the cookies cool completely on the pan so they do not break when moved.
42. Salted Caramel Charcoal Spirals
Unique Christmas Cookies
These striking dark cookies feature a deep cocoa base that is almost black in color. A glossy, amber-colored caramel is piped in a perfect spiral on the top of each round treat. Small grains of black lava salt are scattered over the caramel to enhance the rich flavors.
The contrast between the dark, matte cookie and the shiny, golden caramel is visually stunning. These treats are arranged in a pile on a gray surface, emphasizing their sophisticated and modern look. The texture of the cookie appears dense and fudgy, like a piece of dark chocolate cake.
Every spiral is uniform, giving the cookies a very professional and polished finish. The addition of salt brings a savory edge that cuts through the sweetness of the caramel. These are a bold and elegant addition to any contemporary holiday party.
Ingredients
1 cup softened salted butter
3/4 cup granulated sugar
1 large egg
1 1/2 cups all-purpose flour
3/4 cup black cocoa powder
1/2 cup thick salted caramel sauce
1 tablespoon black lava salt or flaky sea salt
Equipment
Mixing bowl
Hand mixer
Baking sheet
Parchment paper
Piping bag with a small round tip
Wire cooling rack
DIY Instructions
Set your oven to 325 degrees Fahrenheit and line a baking sheet with parchment paper.
Beat the butter and sugar together until the mixture is smooth and light.
Add the egg and mix well until the dough is creamy.
Sifter the flour and black cocoa powder into the bowl and stir until a dark dough forms.
Roll the dough into small balls and place them on the baking sheet, flattening them slightly.
Bake for 12 minutes until the edges are firm, then let them cool completely.
Fill a piping bag with the thick caramel sauce.
Starting from the center of a cooled cookie, pipe the caramel in a continuous spiral moving outward.
Sprinkle a few grains of salt over the wet caramel immediately.
Allow the caramel to set for at least one hour before serving or stacking.
43. White Chocolate Cranberry Clouds
Unique Christmas Cookies
These soft, pillowy cookies feature a pale golden color and a rounded, domed shape. A thick layer of white chocolate glaze is drizzled over the top in a zig-zag pattern. Bright red dried cranberries and tiny white sugar pearls are nestled into the icing for a festive touch.
The texture of the cookie appears moist and cake-like, suggesting a tender bite. These treats are spread across a light surface, making the snowy white icing and red berries stand out beautifully. The overall look is clean, bright, and very inviting for a winter gathering.
Each cookie is decorated individually, giving them a handcrafted and artisanal feel. The tartness of the cranberries provides a sharp contrast to the sweet white chocolate cream. These are a light and cheerful option for a standard holiday dessert tray.
Ingredients
1/2 cup softened salted butter
1 cup granulated sugar
1 large egg
1/2 cup sour cream
2 cups all-purpose flour
1/2 cup dried cranberries
1 cup white chocolate melting wafers
2 tablespoons white nonpareil sprinkles
Equipment
Large mixing bowl
Baking sheet
Parchment paper
Small spoon or piping bag
Wire cooling rack
DIY Instructions
Preheat your oven to 350 degrees Fahrenheit and line a pan with parchment paper.
Mix the butter and sugar in a bowl, then add the egg and sour cream.
Stir in the flour slowly until you have a soft, sticky dough.
Fold in the dried cranberries using a spatula.
Drop rounded tablespoons of dough onto the baking sheet.
Bake for 10 to 12 minutes until the tops spring back when touched.
Let the cookies cool completely on a wire rack.
Melt the white chocolate wafers in the microwave in 30-second intervals.
Drizzle the melted chocolate over the cooled cookies in a back-and-forth motion.
Top with more cranberries and the white sugar pearls before the chocolate hardens.
44. Cinnamon Sugar Doughnut Rounds
Unique Christmas Cookies
These golden, ring-shaped cookies are designed to look like classic miniature doughnuts. A heavy coating of fine cinnamon sugar covers the entire surface, giving them a sparkly and textured finish. The dough has a light and airy appearance with a soft, pale interior visible through the center hole.
The cookies are piled together on a neutral background, highlighting their uniform shape and warm color. Small grains of sugar are scattered around the base, suggesting a fresh and crunchy coating. These treats feel nostalgic and comforting, perfect for a cozy winter morning.
Each round is baked to a light golden brown, ensuring a balance between a crisp exterior and a soft center. They offer a simple yet delightful flavor that pairs wonderfully with hot cocoa or coffee. These are a fun and playful twist on a standard holiday biscuit.
Ingredients
1/2 cup softened salted butter
1/2 cup granulated sugar
1 large egg
1 1/2 cups all-purpose flour
1 teaspoon baking powder
1/4 cup granulated sugar mixed with 1 tablespoon cinnamon (for coating)
Equipment
Mixing bowl
Round cookie cutter
Small round cutter (for the center)
Baking sheet
Parchment paper
Small bowl for sugar coating
DIY Instructions
Heat your oven to 350 degrees Fahrenheit and line a baking sheet.
Cream the butter and sugar together until the mixture is light and fluffy.
Mix in the egg, then slowly stir in the flour and baking powder.
Roll the dough out on a floured surface to about a half-inch thickness.
Cut out large circles and then use the smaller cutter to remove the centers.
Place the rings on the baking sheet and bake for 8 to 10 minutes.
Let the cookies cool for just two minutes so they are still warm.
Toss each warm cookie in the bowl of cinnamon sugar until fully coated.
Place them on a rack to finish cooling completely.
45. Pistachio Apricot Jewel Squares
Unique Christmas Cookies
These dense dessert bars feature a rich, buttery crust and a visible layer of bright orange apricot pieces. A smooth, pale cream layer sits on top, acting as a base for a heavy coating of crushed green pistachios. Deep purple flower petals are scattered across the top to add a final touch of elegance.
The side view of the bars shows a beautiful layering of colors and textures from the fruit and nuts. Each square is cut with clean, sharp edges, making them look like professional patisserie items. They are stacked on a white surface, which emphasizes the vibrant natural colors of the ingredients.
The combination of salty nuts, tart fruit, and sweet cream provides a complex and satisfying flavor profile. These treats look like precious jewels and are sure to be the centerpiece of a holiday display. They offer a sophisticated and high-end finish to your Christmas cookie collection.
Ingredients
1 cup softened salted butter
1/2 cup brown sugar
2 cups all-purpose flour
1 cup apricot preserves or chopped dried apricots
1/2 cup white chocolate ganache or thick cream filling
1/2 cup shelled pistachios, finely crushed
1 tablespoon edible dried flower petals
Equipment
8-inch square baking pan
Parchment paper
Large bowl
Offset spatula
Sharp knife
DIY Instructions
Preheat your oven to 350 degrees Fahrenheit and line your square pan.
Mix the butter, brown sugar, and flour until a crumbly dough forms.
Press the dough into the pan and bake for 15 minutes until lightly golden.
Spread the apricot layer evenly over the warm crust.
Return to the oven for 5 minutes, then let the pan cool completely.
Spread a smooth layer of white chocolate ganache over the apricot base.
Sprinkle the crushed pistachios and flower petals heavily over the wet cream.
Chill the pan in the refrigerator for at least two hours.
Use a sharp knife to cut the block into small, uniform squares.
Key Takeaways for Festive Success
Balance Your Flavors: Move beyond pure sugar by adding sea salt, citrus zest, or fresh herbs like sage and thyme to cut through the richness.
Texture is Essential: Aim for a variety of bites on your platter, ranging from brittle honey wafers to pillowy sweet potato rounds.
Focus on Visual Contrast: Use natural colors like green matcha, deep red pomegranate, and dark cocoa to create a striking display without artificial dyes.
Temperature Matters: Always let your shortbread and butter-based cookies cool completely before applying glazes to ensure the designs stay sharp.
Make it Interactive: Use tools like kitchen torches for brûlée finishes or alphabet stamps to personalize your treats for guests.
Baking during the holidays is about more than just satisfying a sweet tooth. It is a chance to slow down and create something memorable for the people you love. By stepping away from the “same old” recipes, you turn your kitchen into a space of discovery and joy.
Each of these 45 ideas offers a way to make this year’s celebrations feel a bit more special. You do not need professional training to produce these “jewel” bars or “snowflake” biscuits. With the right equipment and a bit of patience, your home-baked gifts will be the highlight of the season.
We hope these recipes inspire you to experiment with new scents and shapes. Grab your apron, put on your favorite carols, and start a new tradition today. Your most creative holiday season is just one batch of dough away.
Spread the loveIs your holiday baking done? Sharing homemade food is a beautiful way to show you care during the busy winter season. These 40 simple recipes help you create thoughtful gifts without spending days…
Spread the loveBuilding a gingerbread house is a beloved holiday tradition, but nothing ruins the festive mood like a roof sliding off or walls buckling. You spend hours on detail only to watch your masterpiece…
Spread the loveValentine Day offers a wonderful chance to get messy in the kitchen with your little ones. These bite sized treats bring smiles to every face and fill your home with sweetness. You do…