Valentine’s Day often brings a lot of pressure to create something beautiful. Many bakers worry about their icing skills failing them at the last minute. This guide helps you move past those fears with ease.
Valentine Cookies Decorated
You will find 45 unique ways to decorate your holiday treats. These designs range from simple floral patterns to detailed artist palettes. Every suggestion aims to make your baking session enjoyable and stress free.
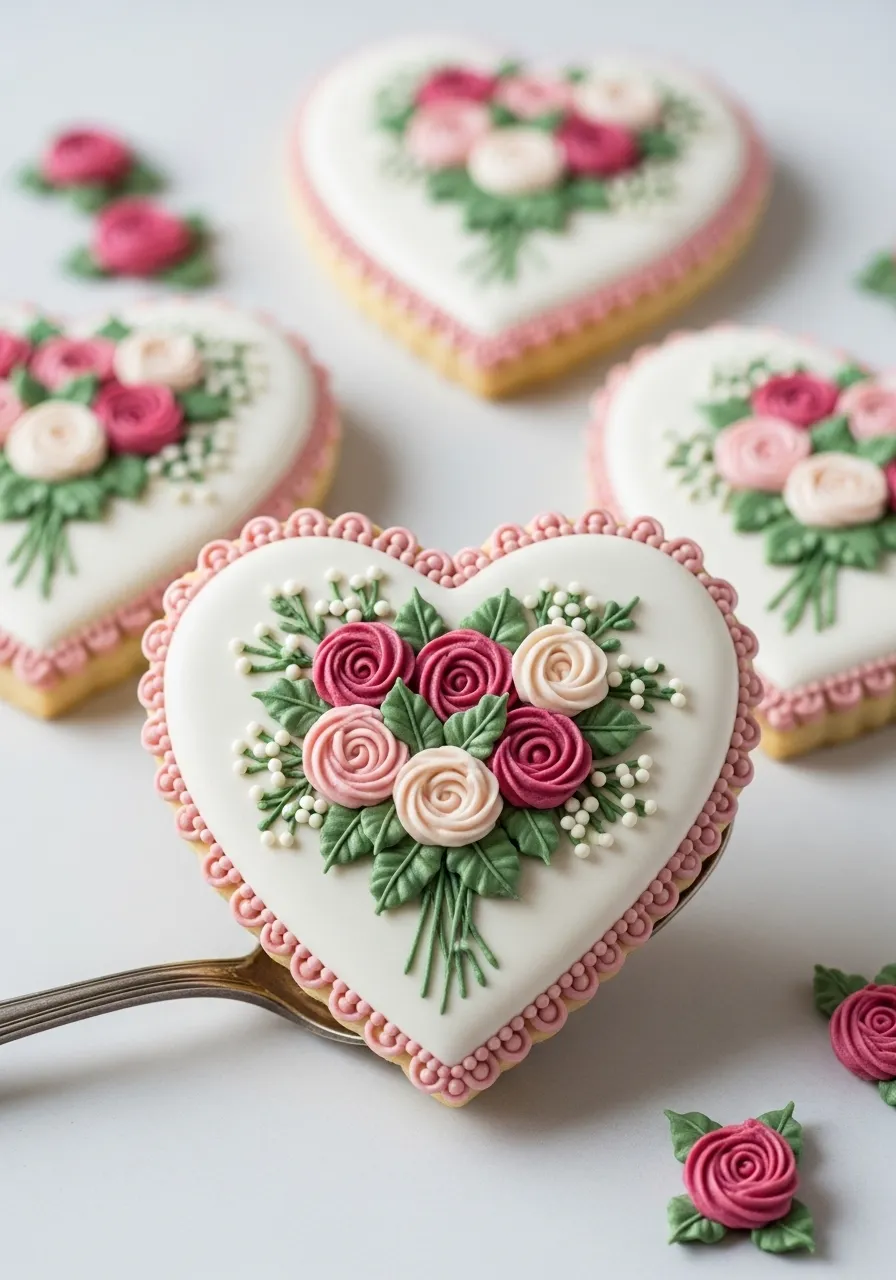
These heart shaped treats showcase a beautiful floral design that captures the spirit of romance. A smooth white royal icing background sets the stage for a vibrant bouquet of roses. Tiny burgundy and soft pink blossoms cluster together in the center. Delicate green leaves and small white dots surround the flowers to create a realistic look.
An intricate pink beaded border wraps around the entire edge of the cookie. This adds a lovely texture and frame to the central artwork. Every detail looks professional yet remains achievable for home bakers who want to impress their loved ones. Such treats from The Recipe Fork will certainly be the star of any Valentine party table.
Required Ingredients
Heart shaped sugar cookies
White royal icing
Pink royal icing
Burgundy royal icing
Green royal icing
Stiff white icing or white pearl sprinkles
Equipment Needed
Piping bags
Small round piping tips
Leaf piping tip
Small star piping tip
Scribe tool or a clean toothpick
DIY Instructions
Bake your favorite heart shaped sugar cookies and allow them to cool completely.
Outline and flood the top of each cookie with white royal icing using a medium consistency.
Let the base icing dry for at least six hours or until the surface is completely hard.
Fit a piping bag with a small star tip and fill it with pink or burgundy icing to create the roses.
Squeeze a small amount of icing in a circular motion starting from the center to form each tiny rose.
Use a leaf tip with green icing to pipe small leaves tucked around the flower clusters.
Add small dots of white icing between the leaves to mimic the look of baby’s breath flowers.
Apply a series of small pink icing dots side by side around the edge of the heart to create the beaded border.
Allow the finished decorations to set for several hours before moving or packaging the cookies.
2. Gothic Anatomical Heart Cookies
Valentine Cookies Decorated
Deep red tones and black highlights bring this scientific design to life. Gold leaf accents add a touch of luxury to the realistic veins. Dark heart cookies with intricate textures surround the main piece. These treats offer a unique take on classic Valentine themes.
Lighting creates a moody atmosphere for this edible art. The contrast between the bright red muscle and dark background is striking. Every small detail makes these look like something from a vintage medical journal. Your guests will find these designs both bold and memorable.
Required Ingredients
Black cocoa sugar cookies
Red royal icing
Black royal icing
Edible gold leaf
Clear almond extract or vodka for painting
Equipment Needed
Fine detail food safe brush
Piping bags with small round tips
Scribe tool
Small mixing palette
DIY Instructions
Bake your cookies in a heart shape and let them cool.
Use black icing to outline the top sections where the arteries sit.
Fill the lower part of the heart with bright red royal icing.
Add darker red or black shading while the icing is still wet to create depth.
Pipe thin red lines across the surface to mimic small blood vessels.
Let the base layer dry for several hours until it is firm.
Paint small areas with a tiny bit of clear extract and apply gold leaf carefully.
Use a brush to add black shadows around the edges of the arteries.
Place the finished cookies on a dark tray to match the aesthetic.
3. Botanical Bloom Shortbread
Valentine Cookies Decorated
Natural beauty takes center stage with these pressed flower treats. Real purple and yellow pansies sit atop a clear glaze. Small sprigs of green thyme add a fresh herbal touch to each round cookie. These look like they came straight from a spring garden.
Each flower remains vibrant against the light golden cookie base. The simple round and square shapes keep the focus on the organic patterns. Powdered sugar dusted in the background adds a soft texture to the scene. These are a great choice for a sophisticated afternoon tea.
Required Ingredients
Round and square shortbread cookies
Edible pansies or violas
Fresh thyme sprigs
Light corn syrup or clear glaze
Powdered sugar for dusting
Equipment Needed
Small food safe paintbrush
Paper towels
Flat tray
Sifter
DIY Instructions
Prepare your shortbread dough and cut it into circles and squares.
Bake the cookies until they are barely golden on the edges.
Wash your edible flowers and pat them very dry with paper towels.
Press the flowers between two heavy books for an hour to flatten them.
Brush a thin layer of clear glaze or corn syrup on the cooled cookie.
Lay one flattened pansy in the center of the glazed surface.
Place a small sprig of thyme next to the flower.
Paint another light layer of glaze over the top to seal the botanicals.
Dust the edges of your serving plate with powdered sugar before serving.
4. Retro Groovy Swirl Hearts
Valentine Cookies Decorated
Bright orange and pink colors create a fun 1970s vibe for these cookies. The swirling patterns look like liquid movement captured on a heart. Tiny white stars scattered across the surface add a whimsical touch. This style brings high energy to your Valentine celebration.
Each layer of color blends into the next with a smooth finish. The bold palette stands out against the pale pink background. These designs feel nostalgic and modern at the same time. You can find more colorful inspiration like this at The Recipe Fork.
Required Ingredients
Heart and flower shaped sugar cookies
Orange royal icing
Hot pink royal icing
Yellow royal icing
White star sprinkles or stiff white icing
Equipment Needed
Piping bags
Scribe tool or toothpick
Tweezers for sprinkles
DIY Instructions
Outline your heart cookie with a thin line of orange icing.
Pipe concentric lines of orange, pink, and yellow inside the heart.
Drag a scribe tool from the center outward to create a sunburst effect.
Swirl the tool in circular motions if you prefer a marble look.
Work quickly so the colors blend while the icing is still wet.
Drop small white star sprinkles into the wet icing at random spots.
Tap the cookie gently on the table to help the icing settle flat.
Repeat the process with flower shapes using the same color scheme.
Let the cookies dry overnight before you stack them.
5. Modern Terrazzo Stone Hearts
Valentine Cookies Decorated
Earthy tones like sage green and terracotta give these cookies a stony appearance. The irregular shapes of the “chips” mimic real terrazzo flooring. A crisp white background makes the muted colors pop. This design is excellent for someone who loves modern interior design.
Each heart features a unique arrangement of colorful pieces. Dark charcoal and soft blush pink balance the warm orange tones. The flat matte finish looks very professional and clean. These treats prove that Valentine designs do not always need to be red.
Required Ingredients
Sugar cookies
White royal icing for the base
Small amounts of colored icing in sage, terracotta, blush, and charcoal
Equipment Needed
Piping bags
Scribe tool
Flat cookie sheet
DIY Instructions
Flood your heart cookie with a smooth layer of white royal icing.
Immediately drop small irregular dots of colored icing onto the white base.
Use a scribe tool to pull the edges of the dots into jagged shapes.
Ensure the colored “stones” stay flush with the white icing surface.
Add various sizes of chips to make the pattern look natural.
Avoid overcrowding the cookie so the white background stays visible.
Shake the cookie slightly to make sure all colors level out.
Let the icing dry completely for at least eight hours.
Store them in a single layer to protect the smooth finish.
6. Celestial Always Galaxy Stars
Valentine Cookies Decorated
Deep space themes meet romantic messages in this cosmic cookie set. A gradient of teal and purple mimics the look of a distant nebula. White constellations connect small dots across the star and moon shapes. The word “Always” is written in elegant cursive on the central star.
Glittery dust over the icing makes the cookies shimmer like real stars. The dark chocolate cookie base adds to the midnight sky effect. Each shape feels like a piece of a larger universe. These are a thoughtful gift for someone who is your whole world.
Required Ingredients
Star and crescent moon chocolate cookies
Teal, purple, and blue royal icing
Stiff white royal icing
Edible silver glitter or luster dust
Equipment Needed
Small sponge or brush for blending
Fine tip piping bag
Large dry brush for glitter
DIY Instructions
Cover your cookies with a dark blue base layer of icing.
Dab purple and teal icing onto the wet base with a sponge.
Swirl the colors gently to create a cloudy galaxy appearance.
Sprinkle a tiny bit of edible glitter over the wet surface.
Allow this base layer to dry for several hours.
Pipe small white dots to represent stars in specific patterns.
Connect the dots with very thin white lines to form constellations.
Write the word “Always” in the center of your largest star.
Use a dry brush to wipe away any excess glitter from the edges.
7. Minimalist Love Line Art
Valentine Cookies Decorated
Simple black lines on a white background create a striking visual impact. These cookies feature drawings of faces sharing a kiss and interlocking hands. The style is clean and focuses on the emotion of the moment. It resembles a sketch from an artist’s notebook.
Round and square shapes provide a gallery feel to the collection. Small white roses placed nearby add a classic touch to the presentation. This look is sophisticated and stays far away from traditional clutter. These cookies are a great way to celebrate love through modern art.
Required Ingredients
Round and square sugar cookies
White royal icing
Black edible ink marker or very stiff black icing
Equipment Needed
Piping bags with a size 0 or 1 tip
Projector or stencil if you are not confident drawing freehand
Steady work surface
DIY Instructions
Flood your cookies with a thick layer of white royal icing.
Let the icing dry for a full 24 hours until it is rock hard.
Draw your design lightly with an edible marker if you are a beginner.
Trace over your lines with a very fine tip and black icing.
Keep your hand steady and apply even pressure for smooth lines.
Create the profile of two faces leaning in for a kiss.
Use continuous lines where possible to keep the minimalist style.
Draw a second design featuring two hands with fingers intertwined.
Allow the black lines to dry completely before touching the surface.
8. Sealed With Love Letters
Valentine Cookies Decorated
This creative design looks like a classic envelope holding a secret note. A tiny “Be Always” message peeks out from the top of the cookie. A bright red wax seal with a heart center holds the flap closed. The white icing features small dots that look like stitched edges.
Warm sunlight hits the cookie to show off the raised textures. The golden brown edges of the cookie dough frame the white “paper” beautifully. This treat tells a story of old fashioned romance and handwritten letters. It is a nostalgic addition to any Valentine dessert box.
Required Ingredients
Envelope shaped cookies
White royal icing
Red royal icing
Black edible marker
Equipment Needed
Piping bags
Round tips in various sizes
Small heart mold for the seal
DIY Instructions
Bake a large square cookie and a smaller rectangle for the “letter”.
Flood the larger cookie with white icing to look like an envelope.
Use a scribe tool to mark diagonal lines for the envelope folds.
Pipe small white dots along those lines to look like stitching.
Flood the small rectangle with white icing and let it dry.
Write “Be Always” on the small piece with a black edible marker.
Attach the small piece to the top of the envelope with a dab of icing.
Pipe a thick circle of red icing in the center of the envelope.
Press a small heart shape into the red icing while it is still soft.
9. Gilded Marble Heart Delights
Valentine Cookies Decorated
Pink and white swirls create a soft marble effect on these heart treats. Each cookie has a different pattern of colors for a natural look. Large flakes of gold leaf are pressed into the edges for a high end finish. The shiny surface reflects light beautifully on a marble platter.
A mix of hexagons and hearts adds variety to the set. The gold accents look like raw mineral veins found in expensive stone. This design is both feminine and luxurious at the same time. These are the best choice for a glamorous Valentine party.
Required Ingredients
Heart and hexagon sugar cookies
White royal icing
Soft pink royal icing
Edible gold leaf
Equipment Needed
Wide shallow bowl for dipping
Toothpick
Tweezers
DIY Instructions
Fill a wide bowl with white royal icing of a dipping consistency.
Drop several dots of pink icing onto the white surface.
Swirl the pink icing slightly with a toothpick to create a marble pattern.
Take a cookie and press the top face down into the icing.
Lift the cookie straight up and twist it slightly to break the seal.
Shake the cookie gently to help the icing level out and cover the edges.
Use tweezers to place small pieces of gold leaf onto the wet icing.
Let the cookies sit on a flat tray to dry for at least six hours.
Wipe the edges of the cookie to remove any drips before the icing sets.
10. Zesty Citrus Heart Slices
Valentine Cookies Decorated
Bright grapefruit and lemon designs offer a refreshing twist on holiday sweets. These cookies look like real fruit slices with detailed segments and rinds. A few of the slices are shaped like hearts to fit the Valentine theme. The vibrant red and yellow colors bring a cheerful mood to the plate.
White icing outlines the sections to create a realistic citrus texture. Tiny white seeds in the center add to the authentic appearance. The glossy finish makes the “fruit” look juicy and fresh. These treats from The Recipe Fork provide a lovely pop of color.
Required Ingredients
Heart and semi circle sugar cookies
Red or deep pink royal icing
Yellow royal icing
White royal icing
Equipment Needed
Piping bags
Small round tips
Scribe tool
DIY Instructions
Flood your heart or semi circle cookie with white royal icing.
Allow this base layer to dry for about 30 minutes.
Pipe a border of red or yellow icing around the edge to create the rind.
Fill the center with the same color to create the fruit segments.
Use white icing to pipe thin lines from the center to the rind.
Draw small teardrop shapes within each segment to mimic fruit pulp.
Place three tiny white dots in the very center to look like seeds.
Use a scribe tool to refine the shapes of the segments while wet.
Let the finished cookies dry overnight until the surface is firm.
11. Rustic Wood Grain Scrabble Tiles
Valentine Cookies Decorated
Warm wood grain patterns cover these square chocolate cookies. They look like real game tiles with letters spelling out romantic words. The black letters contrast sharply against the tan and brown swirls.
Every tile features a small number to represent its value in a game. Dark chocolate dough provides a sturdy base for the detailed icing work. These treats offer a cozy and nostalgic feel for a quiet Valentine night at home. You can find more creative baking ideas like this on The Recipe Fork.
Required Ingredients
Square chocolate sugar cookies
Tan royal icing
Light brown royal icing
Stiff black royal icing
Equipment Needed
Piping bags
Small round piping tips
Scribe tool or toothpick
Small paintbrush
DIY Instructions
Bake your square chocolate cookies and let them cool until they are room temperature.
Outline the top of the cookie with tan icing and fill the center completely.
Drop small lines of light brown icing onto the wet tan base immediately.
Drag a scribe tool through the brown lines in a wavy motion to create wood grain.
Let this base layer dry for at least eight hours until the surface is hard.
Use a small round tip to pipe a large black letter in the center of the tile.
Pipe a small number in the bottom right corner of the cookie to match a game tile.
Use a tiny bit of brown icing and a paintbrush to add small knots to the wood if you want more detail.
Allow the black lettering to dry for two hours before you move the cookies.
12. The Best Matchbox Valentines
Valentine Cookies Decorated
Bright red and blue colors make this matchbox design stand out. The box features a large red heart with the words “The Best Match” written across it. Edible matches with sugary red tips lay scattered around the main cookie. This playful theme is a fun way to tell someone they light up your life.
The matchbox has a brown side to represent the striking surface. Each match stick is thin and looks very realistic with its burnt chocolate end. This set combines clever construction with classic holiday colors. It is a unique gift for a partner who enjoys a good pun.
Required Ingredients
Large rectangular sugar cookies
Thin rectangular stick cookies
White royal icing
Red royal icing
Light blue royal icing
Brown royal icing
Red sanding sugar
Equipment Needed
Piping bags
Small round tips
Food safe marker for lettering
Small bowl for sugar
DIY Instructions
Bake one large rectangle for the box and several thin sticks for the matches.
Cover the matchbox cookie with a white base layer of icing.
Pipe a blue border around the edge once the white layer is dry.
Draw a large red heart in the center of the white area.
Write the words “The Best Match” over the heart using a food safe marker or thin icing.
Paint one long edge of the matchbox cookie with brown icing to look like a striker.
Dip the ends of your stick cookies into red icing and then into red sanding sugar.
Pipe a tiny bit of brown icing just below the red tip to look like a burnt match.
Arrange the matches around the box on your serving platter for the best look.
13. Intricate Heart Puzzle Pieces
Valentine Cookies Decorated
A large heart is broken into interlocking puzzle pieces with different pink and red patterns. One piece is separated from the main group to show how they fit together. Each section features a unique design like white lace or geometric zigzags. This style represents how two people fit together to make a whole.
Soft pink and deep red colors create a beautiful variety across the shapes. The white details are very fine and look like delicate embroidery. This cookie set is a great choice for a meaningful Valentine gift. Every piece is a small work of art on its own.
Required Ingredients
Large heart sugar cookies
Light pink royal icing
Deep red royal icing
Stiff white royal icing
Equipment Needed
Puzzle shaped cookie cutters
Fine tip piping bags
Scribe tool
DIY Instructions
Use puzzle cutters to slice your large heart dough into pieces before you bake them.
Bake the pieces and keep them in their groups so they still fit together.
Flood each puzzle piece with a different shade of pink or red icing.
Let the base colors dry for at least four hours.
Pipe thin white lines to create a lace pattern on one of the pink pieces.
Draw a chevron or zigzag pattern on a red piece using a fine tip.
Add small white dots or flower shapes to the remaining pieces for variety.
Place the pieces back together on a plate but leave one piece slightly out of place.
Ensure all icing is completely dry before you package the set in a box.
14. Classic Blue Toile Porcelain Cookies
Valentine Cookies Decorated
These cookies resemble fine china with detailed blue illustrations on white icing. Scenic country landscapes and cupids decorate the center of each scalloped frame. The raised white borders add a touch of elegance to the set. This design is inspired by traditional French fabric patterns.
The blue ink looks like it was painted by a master artist. Intricate bows and floral garlands surround the central scenes. These treats feel very sophisticated and are great for a fancy tea party. They bring a vintage charm to your holiday dessert table.
Required Ingredients
Scalloped round sugar cookies
White royal icing
Blue food coloring
Clear vanilla extract
Equipment Needed
Small food safe paintbrushes
Fine tip piping bag
Small mixing palette
DIY Instructions
Flood your scalloped cookies with a smooth layer of white royal icing.
Let the icing dry for a full day so the surface is very firm.
Mix a drop of blue food coloring with a little vanilla extract on a palette.
Paint a small scene in the center of the cookie using a very thin brush.
Focus on simple shapes like trees, small people, or a winged cupid.
Use different amounts of extract to create light and dark blue tones for depth.
Pipe a thick white border around the edge of the cookie using a star tip.
Add tiny blue dots or bows to the border to tie the design together.
Allow the painted details to dry for an hour before serving.
15. Magical Love Potion Elixirs
Valentine Cookies Decorated
Glowing potion bottles in various colors line a shelf like a wizard’s apothecary. Labels like “Eternal Crush” and “Lovesick” identify the magical contents. Each bottle has a sparkly silver cork and tiny bubbles inside. This whimsical design is great for fans of fantasy and magic.
The icing looks like translucent glass with liquid shimmering inside. Bright green, deep purple, and ruby red colors fill the different shapes. Each bottle sits on a dark chocolate cookie base that looks like a stand. These treats add a sense of mystery to your Valentine celebration.
Required Ingredients
Bottle shaped sugar cookies
Colorful royal icing in red, purple, and green
Black royal icing
Edible silver glitter
Clear corn syrup
Equipment Needed
Piping bags
Small round tips
Food safe marker
DIY Instructions
Bake your cookies in different bottle and flask shapes.
Outline the bottle and fill it with your choice of bright colored icing.
Mix a little clear corn syrup into the icing to give it a glossy look.
Use black or tan icing to pipe a label shape in the middle of the bottle.
Let the label dry and then write a fun name like “Potion No. 9” on it.
Pipe a thick gray or brown square at the top of the bottle for the cork.
Sprinkle silver glitter onto the wet cork icing to make it shine.
Add a few tiny white dots in the liquid area to look like bubbles.
Stand the cookies up on a flat tray to show off the bottle shapes.
16. Delicate White Bridal Lace Hearts
Valentine Cookies Decorated
Pure white icing creates an intricate lace pattern on these heart cookies. The design features tiny nets, swirls, and floral shapes that look like real fabric. A beaded border completes the dainty and timeless look. These are a great choice for a wedding or a very romantic Valentine gift.
The texture of the icing is raised and feels very professional. Every small loop and dot is placed with care to mimic embroidery. The simple color palette lets the detail of the craftsmanship shine. These cookies from The Recipe Fork look almost too beautiful to eat.
Required Ingredients
Heart shaped sugar cookies
White royal icing in flood consistency
Stiff white royal icing for details
Equipment Needed
Piping bags
Size 0 or 1 round piping tips
Scribe tool
DIY Instructions
Cover your heart cookies with a smooth layer of white flood icing.
Allow this base layer to dry completely for about twelve hours.
Use a very fine tip to pipe a grid of thin lines on one section of the heart.
Add tiny dots at the intersections of the grid to create a net look.
Pipe swirling lines and small leaf shapes over the other parts of the cookie.
Fill in some of the small circles to create solid floral petals.
Pipe a row of medium sized white dots around the very edge of the heart.
Ensure all your lines are thin and consistent for the most realistic lace effect.
Let the finished lace dry for several hours before you move the treats.
17. Romantic Road Trip Pink Beetles
Valentine Cookies Decorated
Cute pink cars carry big red hearts on their roof racks for a romantic getaway. Small white daisies decorate the sides of the vehicles. The bright blue windows and black wheels make the colors stand out beautifully. This design is excellent for someone who loves travel or vintage cars.
The cars look like they are moving through a field of flowers. Each vehicle has tiny silver bumpers and headlights for a realistic touch. This cheerful theme brings a smile to everyone who sees it. It is a creative way to celebrate a journey of love.
Required Ingredients
Car shaped sugar cookies
Pink royal icing
Light blue royal icing
Red royal icing
White and yellow icing for flowers
Equipment Needed
Piping bags
Small round tips
Scribe tool
DIY Instructions
Flood the body of the car with bright pink royal icing.
Use blue icing to fill in the window sections while the pink is still wet.
Let the body dry for an hour so the colors do not bleed.
Pipe a large red heart on top of the car roof.
Add two small brown lines across the heart to look like ropes holding it down.
Pipe black circles at the bottom for the wheels and add a white dot in the center.
Use white icing to make five small dots in a circle on the car door for a daisy.
Place a tiny yellow dot in the center of each white daisy.
Let the entire cookie dry for eight hours until the icing is firm.
18. Sparkling Amethyst Geode Hearts
Valentine Cookies Decorated
Gray marble cookies open up to reveal a treasure of purple crystals inside. Edible gold leaf frames the jagged edges of the gemstone center. These look like real rocks split in half to show their inner beauty. This design is a stunning choice for people who love nature and crystals.
The contrast between the rough gray stone and the shiny purple sugar is amazing. Tiny fragments of rock sugar create a realistic jagged texture. The gold accents add a touch of luxury to the earthy theme. These are the best treats for a unique and modern Valentine gift.
Required Ingredients
Heart shaped sugar cookies
Gray royal icing
Black royal icing
Purple rock sugar or large sanding sugar
Edible gold leaf
Equipment Needed
Piping bags
Scribe tool
Small tweezers
Food safe brush
DIY Instructions
Flood your heart cookie with gray icing and add a few drops of black.
Swirl the colors with a scribe tool to create a marble stone look.
Use a spoon to cut out a small jagged hole in the center of the wet icing.
Pour purple rock sugar into the hole until it is completely filled.
Press the sugar down gently so it sticks to the cookie base.
Let the icing dry for several hours until it is hard.
Apply a thin line of clear syrup around the edge of the purple sugar.
Use tweezers to place small pieces of gold leaf onto the syrup.
Brush away any loose gold flakes with a dry paintbrush.
19. Vintage Typewriter Key Letters
Valentine Cookies Decorated
Circular cookies mimic the look of old fashioned typewriter keys. Each black key features a crisp white letter and a silver metallic rim. They sit on chocolate stems that look like the mechanical parts of a writing machine. This theme is a great way to spell out a special message for your loved one.
The dark colors look very classic and masculine. Every letter is centered and easy to read against the black background. These treats are a thoughtful gift for a writer or someone who loves history. You can arrange them to spell out names or romantic phrases.
Required Ingredients
Small round sugar cookies
Chocolate stick cookies or pretzels
Black royal icing
White royal icing
Silver luster dust
Equipment Needed
Piping bags
Round tips
Small brush
Clear extract
DIY Instructions
Flood your round cookies with a thick layer of black royal icing.
Let the black icing dry completely for at least six hours.
Mix silver luster dust with a drop of extract to make a metallic paint.
Paint a thin silver ring around the very edge of each black cookie.
Pipe a single white letter in the center of each cookie using a steady hand.
Attach a chocolate stick to the back of the cookie with a dab of icing.
Let the cookies dry while lying flat on a tray.
Stand the cookies up in a bowl of sugar or a cake to look like a keyboard.
Ensure the letters are upright so your message is easy to read.
20. Adorable Milk and Cookie Pair
Valentine Cookies Decorated
A smiling milk carton and a chocolate chip cookie hold hands in this cute set. The milk carton has a pink heart and a blue straw. Tiny heart shaped chocolate chips decorate the cookie’s cheerful face. This design is a sweet way to show that you and your partner are a great duo.
The bright colors and happy expressions create a very friendly mood. Small pink blushes on their cheeks add to the cute character style. This set is a favorite for kids and adults who enjoy whimsical treats. It reminds everyone that some things are simply better together.
Required Ingredients
Milk carton and round sugar cookies
Light blue royal icing
White royal icing
Light brown royal icing
Dark brown icing for chips
Pink icing for details
Equipment Needed
Piping bags
Small round tips
Scribe tool
DIY Instructions
Flood the milk carton cookie with white and light blue icing.
Pipe a small pink heart in the center of the blue section.
Add two black dots for eyes and a small curved line for the mouth.
Flood the round cookie with light brown icing to look like dough.
Pipe several small dark brown hearts onto the wet icing for chips.
Add a face to the cookie character using black and pink icing.
Pipe a small blue straw sticking out of the top of the milk carton.
Use a tiny bit of icing to connect their “hands” if they are close together.
Let the characters dry overnight before you move them to a platter.
21. Cozy Cafe Latte Hearts
Valentine Cookies Decorated
Wake up your morning with these adorable caffeinated treats. A bright teal cup holds a creamy tan surface with a beautiful white heart swirl. This design captures the warmth of a coffee date shared with a special person. Small pink donuts with colorful sprinkles sit in the background to complete the cozy bakery scene.
The smooth finish on the cup looks like polished ceramic. Every line on the latte art is crisp and clean against the light brown base. These cookies are a wonderful choice for a brunch celebration or a quiet morning gift. You can find more warm inspiration like this on The Recipe Fork.
Required Ingredients
Round sugar cookies
Teal royal icing
Light tan royal icing
White royal icing
Pink royal icing for donuts
Equipment Needed
Piping bags
Scribe tool or toothpick
Round piping tips
Small offset spatula
DIY Instructions
Bake your round cookies and let them cool until they are room temperature.
Outline a cup and handle shape using the teal icing.
Fill the body of the cup with teal icing and let it sit for ten minutes.
Pour light tan icing into the center of the cup area to represent the coffee.
Drop three small circles of white icing onto the wet tan surface.
Drag your scribe tool through the centers of the white dots in a single motion to create hearts.
Pipe a pink circle on a separate cookie to create a donut base.
Add a smaller white circle in the center and top with tiny colorful icing dots for sprinkles.
Allow all pieces to dry for eight hours before you serve them.
22. Wild at Heart Leopard Prints
Valentine Cookies Decorated
Bold pink icing meets a fierce animal print in this stylish collection. Dark cocoa cookies provide a deep base for the vibrant fuchsia background. Each black spot features a shimmering gold center that catches the light. One heart even has a jagged crack filled with gold leaf to show a resilient spirit.
The contrast between the matte black and the shiny gold is striking. Irregular patterns make each cookie look like a unique piece of fashion art. These treats are excellent for a Galentine party with your best friends. They prove that romance can be both sweet and a little bit wild.
Required Ingredients
Chocolate heart sugar cookies
Bright pink royal icing
Black royal icing
Edible gold leaf or gold luster dust
Equipment Needed
Piping bags
Fine tip piping bag
Tweezers for gold leaf
Small paintbrush
DIY Instructions
Cover your chocolate heart cookie with a smooth layer of bright pink icing.
Let the pink base dry for about two hours so it is no longer sticky.
Use black icing to pipe small irregular circles across the pink surface.
Leave the centers of the black circles empty for the gold accents.
Paint a small amount of gold luster dust mixed with water into the center of each spot.
Use tweezers to carefully place a small piece of gold leaf on one corner of the heart.
Tap the gold leaf down gently with a dry brush so it sticks to the icing.
Add a few small black dots between the larger leopard spots to fill in gaps.
Let the cookies dry completely overnight before you stack them.
23. Written in the Stars Constellations
Valentine Cookies Decorated
Gaze into the night sky with these dark and moody celestial shapes. A midnight black background provides a canvas for white constellations and shimmering star dust. Thin white lines connect the dots to form hearts and stars within the galaxy. The white icing stands out against the matte black surface for a very modern look.
Silver glitter scattered across the cookies looks like a distant nebula. Large plaque shapes and small stars provide variety to the set. This theme is a thoughtful way to tell someone your love was destined by the universe. Each cookie feels like a tiny map of the heavens.
Required Ingredients
Plaque and star shaped sugar cookies
Black royal icing
Stiff white royal icing
Edible silver glitter
Equipment Needed
Piping bags with very fine tips
Scribe tool
Large dry brush for glitter
DIY Instructions
Flood your cookies with a thick layer of black royal icing.
Sprinkle a tiny bit of silver glitter over the wet icing to create a galaxy effect.
Allow the black base to dry for at least six hours until it is hard.
Pipe small white dots at random spots to represent individual stars.
Use a very thin tip to draw straight lines connecting specific dots.
Form the shape of a heart or a star constellation with your lines.
Add tiny white stars by piping a small dot and pulling the corners out with a scribe tool.
Wipe away any extra glitter from the edges with a clean brush.
Let the white details set for two hours before moving the cookies.
24. Taco Bout True Love Set
Valentine Cookies Decorated
Celebrate a spicy romance with this fun Mexican food theme. A large heart shaped avocado features a smooth brown pit and shades of green. Taco cookies are filled with ruffled green lettuce and yellow cheese. Tiny hot sauce bottles and red hearts add extra flavor to this unique Valentine gift.
The text Taco Bout Love is written in bold black letters on the shell. Every detail looks like a realistic miniature version of your favorite meal. This set is a great choice for a casual date night or a food lover. It brings a playful sense of humor to the holiday.
Required Ingredients
Heart and taco shaped sugar cookies
Green, yellow, and red royal icing
Light brown and dark brown royal icing
Black edible marker
Equipment Needed
Piping bags
Leaf tip for lettuce
Small round tips
Scribe tool
DIY Instructions
Flood your taco shell cookies with light brown icing and let them dry.
Use a leaf tip to pipe ruffled green icing along the top edge for lettuce.
Add small red dots for tomatoes and thin yellow lines for shredded cheese.
Write your message on the taco shell using a black edible marker.
Cover a heart cookie with light green icing for the avocado body.
Pipe a dark green border around the edge for the avocado skin.
Place a large circle of dark brown icing in the center for the pit.
Use red icing to pipe small heart shapes on a separate cookie for the sauce bottle.
Let all the food pieces dry for eight hours to ensure the colors stay bright.
25. Love is a Journey Maps
Valentine Cookies Decorated
Map out your future together with these vintage parchment scrolls. The tan icing looks like old paper with burned edges and intricate compass designs. A small island in the shape of a heart marked with an X shows the way to hidden treasure. These cookies tell a story of adventure and discovery in every bite.
Faded grid lines and small mountain drawings add to the antique look. The script lettering is elegant and easy to read against the warm background. This design is excellent for couples who love to travel or explore new places. It turns a simple treat into a romantic treasure map.
Required Ingredients
Square or scroll shaped sugar cookies
Tan royal icing
Brown food coloring for painting
Black edible marker
Red royal icing
Equipment Needed
Small food safe paintbrushes
Fine tip piping bag
Scribe tool
DIY Instructions
Flood your cookies with tan icing and let them dry for 24 hours.
Mix a little brown food coloring with water to create a thin wash.
Paint the edges of the cookie with the brown wash to look like burnt paper.
Draw a faint grid of lines across the surface with a ruler and marker.
Sketch a small heart shaped island in the center of the map.
Add tiny triangles to represent mountains and wavy lines for water.
Write Love is a Journey across the top in your best cursive.
Pipe a small red heart and the words X Marks the Spot on the island.
Allow the ink and paint to dry completely before you touch the surface.
26. Sealed With a Kiss Lip Stamps
Valentine Cookies Decorated
Send a sweet message with these glossy lip and envelope treats. Bright red and soft pink lips feature detailed lines for a realistic puckered look. Clean white envelopes are stamped with a tiny red lip seal in the center. This set is a playful way to deliver a Valentine kiss to someone special.
A subtle shimmer on the icing makes the lips look like they have lip gloss. The envelopes feature simple white lines to show the folds of the paper. This design is very clean and focuses on the iconic symbols of romance. You can find more classic ideas like this at The Recipe Fork.
Required Ingredients
Lip and rectangular sugar cookies
Red royal icing
Pink royal icing
White royal icing
Edible luster dust for shine
Equipment Needed
Piping bags
Scribe tool
Small brush
DIY Instructions
Flood your lip shaped cookies with red or pink royal icing.
Use a scribe tool to pull vertical lines through the wet icing for texture.
Let the lips dry for several hours until they are firm.
Cover your rectangular cookies with a smooth layer of white icing.
Use a scribe tool to lightly mark an X shape for the envelope folds.
Pipe thin white lines over those marks to create a raised effect.
Add a small red lip shape in the center of the envelope where a seal would go.
Brush a little luster dust onto the red lips to give them a shiny finish.
Allow all the cookies to dry in a single layer for the best results.
27. You Are a Catch Fishing Lures
Valentine Cookies Decorated
Reel in your favorite person with this creative fishing collection. Wooden lures and a colorful rainbow trout look like they belong on a tackle box. Heart shaped bobbers with red and white sections add a romantic touch to the theme. These designs are a clever catch for anyone who loves spending time on the water.
The trout features realistic pink and green scales made with tiny dots. Copper colored icing on the lures looks like real metal hardware. Every piece is full of detail and tells a story of a shared hobby. This set is a fun and unexpected way to say I love you.
Required Ingredients
Fish, lure, and heart sugar cookies
Green, pink, and white royal icing
Copper or bronze luster dust
Black icing for details
Equipment Needed
Piping bags
Scribe tool
Small paintbrush
Fine round tips
DIY Instructions
Flood the top half of a heart cookie with white icing and the bottom with red.
Pipe a thick black line across the center to create a fishing bobber.
Use tan icing on the lure cookies and drag a scribe tool to make wood grain.
Paint the ends of the lures with copper luster dust mixed with extract.
Outline the fish shape and fill it with light green icing.
Drop small dots of pink and dark green onto the wet fish body.
Use a scribe tool to blend the dots slightly to look like scales.
Pipe a tiny black eye and a small mouth on the front of the fish.
Let the entire set dry for eight hours until the surface is hard.
28. Time for Tea Toile Set
Valentine Cookies Decorated
Enjoy an elegant afternoon tea with these classic blue and white patterns. Intricate floral designs and birds cover the surface of tiny teapots and teacups. Real strings attach to cookie tea bags that carry sweet messages like Be Mine. This porcelain style looks very expensive and sophisticated on any dessert table.
The blue details are very fine and mimic traditional French fabric. A small splash of liquid is captured mid air above one of the cups. This set is a beautiful way to celebrate a refined and romantic holiday. These cookies from The Recipe Fork will impress anyone who loves vintage style.
Required Ingredients
Teapot, teacup, and tag sugar cookies
White royal icing
Blue food coloring
Clear vanilla extract
Clean white string
Equipment Needed
Fine tip piping bag
Small food safe paintbrushes
Scribe tool
DIY Instructions
Flood all your cookies with a smooth base of white royal icing.
Let the white icing dry for at least twelve hours until it is very firm.
Mix blue food coloring with vanilla extract to create a watercolor paint.
Paint small flowers and birds on the teapots using a very thin brush.
Use different amounts of extract to make some blue areas lighter than others.
Pipe a gold or blue border around the rim of the teacups for extra detail.
Write short messages like Heart or Be Mine on the small tag cookies.
Attach a piece of white string to the back of the tag with a dab of icing.
Tape the other end of the string to the teacup cookie to complete the look.
29. Movie Night Ticket and Popcorn
Valentine Cookies Decorated
Plan a cozy evening with these cinema inspired snacks. A tall red and white striped bucket overflows with buttery popcorn pieces made of icing. Red tickets announce a Valentine date night and admit one special guest. These treats are a fun way to ask someone to share a movie and a snack.
The popcorn kernels look crunchy and realistic with yellow butter highlights. Bold black text on the tickets gives them an authentic theater feel. This set is a creative alternative to traditional flowers and candy. It sets the stage for a relaxed and memorable Valentine celebration.
Required Ingredients
Bucket and rectangular sugar cookies
Red royal icing
White royal icing
Yellow royal icing
Black edible marker
Equipment Needed
Piping bags
Small round tips
Scribe tool
DIY Instructions
Flood your bucket cookies with alternating red and white vertical stripes.
Use a scribe tool to keep the lines straight while the icing is wet.
Pipe a large pile of white icing “blobs” at the top of the bucket for popcorn.
Add small dots of yellow icing over the white blobs to look like melted butter.
Cover your rectangular cookies with bright red icing for the tickets.
Use a black edible marker to write Admit One and Valentine’s Date Night.
Pipe small black dots along the edges to look like perforated paper.
Add a few loose popcorn pieces on the plate around the main cookies.
Let the cookies dry for ten hours so the colors do not smudge.
30. Gothic Stained Glass Windows
Valentine Cookies Decorated
Cast a colorful glow with these edible stained glass window panes. Dark black frames hold brilliant shards of jewel toned sugar crystals. Red, green, and blue light seems to shine through the intricate gothic patterns. These cookies provide a dramatic and artistic flair to your holiday baking projects.
The black icing creates a strong contrast against the glowing centers. Each shape looks like a piece of history from an old cathedral. These treats are a stunning choice for someone who appreciates architectural beauty. They turn a simple cookie into a window of colorful light.
Required Ingredients
Arched and circular sugar cookies
Black royal icing
Colorful rock sugar or crushed hard candy
Clear corn syrup
Equipment Needed
Piping bags
Medium round tips
Scribe tool
Baking parchment
DIY Instructions
Use a knife to cut out the center shapes of your cookies before baking.
Place the cookies on parchment paper and fill the holes with crushed candy.
Bake the cookies until the candy melts and fills the empty spaces.
Let the cookies cool completely until the candy centers are hard and clear.
Pipe thick black icing borders around the edges of the cookie.
Add thin black lines across the candy center to create a window frame.
Follow the shapes of the melted candy to make the design look natural.
Use a scribe tool to smooth out any bumps in the black icing.
Allow the cookies to sit for several hours until the frames are set.
31. Sweet Succulent Terracotta Pots
Valentine Cookies Decorated
These cookies look like tiny clay pots filled with green plants. Soft orange icing covers the base to mimic terracotta. Dark chocolate crumbs on top look just like real soil. Every little leaf is shaped with care to look like a thick succulent plant.
Pink tips on the leaves add a nice touch of color. Round cookies show a top down view of the garden. Square cookies look like they are sitting on a wooden shelf. These treats are a great choice for a plant lover on Valentine’s Day.
Required Ingredients
Sugar cookies in pot and round shapes
Orange royal icing
Green royal icing
Pink royal icing
Chocolate cookie crumbs
Thick white royal icing
Equipment Needed
Piping bags
Small round piping tips
Leaf piping tips
Small spatula
Scribe tool
DIY Instructions
Bake your cookies and let them cool until they are room temperature.
Outline the pot shape with orange icing and fill it in completely.
Spread a layer of thick white icing on the top part of the cookie where the soil goes.
Press the wet white icing into a bowl of chocolate cookie crumbs to create the dirt.
Use a leaf tip with green icing to pipe thick petals in a circle over the crumbs.
Start from the outside and move toward the center to build a succulent shape.
Add a tiny dot of pink icing to the very tip of each green leaf.
Repeat this process for the round cookies to look like a full pot from above.
Let the cookies dry for ten hours so the heavy leaves do not slump.
32. Glistening Diamond Engagement Ring
Valentine Cookies Decorated
A large gold ring cookie holds a sparkling silver diamond on top. The words You’re A Gem are written in neat black letters in the center. Shiny gold icing makes the band look like real jewelry. Subtle gray shading on the diamond adds depth and shine.
The white background helps the metallic colors stand out. Every edge is crisp and clean for a high end look. This design is a fun way to propose a sweet treat to your partner. You can find more sparkling ideas at The Recipe Fork.
Required Ingredients
Ring shaped sugar cookies
White royal icing
Gray royal icing
Stiff black royal icing
Edible gold luster dust
Edible silver luster dust
Clear vanilla extract
Equipment Needed
Piping bags
Fine tip round tips
Small food safe paintbrushes
Mixing palette
DIY Instructions
Flood the circular band of the cookie with white royal icing.
Flood the diamond section at the top with light gray icing.
Allow these base layers to dry for at least twelve hours until very hard.
Mix gold luster dust with a few drops of vanilla extract to make paint.
Paint the entire circular band with the gold mixture using a soft brush.
Mix silver luster dust with extract and paint the diamond section.
Use a fine tip to pipe the words You’re A Gem in the middle of the diamond.
Pipe thin silver lines on the diamond to show the different facets of the stone.
Wait one hour for the metallic paint to dry before you package the cookies.
33. Prickly Pear Cactus Hearts
Valentine Cookies Decorated
Green cactus cookies feature small pink hearts growing on top. White icing dots create the look of sharp needles along the edges. The deep green color looks very vibrant against the white surface. These treats show that even something prickly can be full of love.
Different shapes like tall cacti and round prickly pears add variety. The chocolate cookie base provides a dark frame for the green icing. These are a cheerful and unique option for a desert themed party. Your guests will love the clever heart accents on each plant.
Required Ingredients
Cactus shaped chocolate cookies
Green royal icing
Bright pink royal icing
Stiff white royal icing
Equipment Needed
Piping bags
Small round tips
Scribe tool
DIY Instructions
Outline your cactus shapes with a border of green royal icing.
Fill the inside of the border with more green icing and use a scribe tool to smooth it.
Let the green base dry for about two hours so the surface sets.
Pipe a small pink heart at the very top of each cactus arm or head.
Use stiff white icing to pipe tiny V shapes all over the green area for needles.
Space the white needles out evenly so the green color still shows through.
Add a few extra white dots along the edges for a more realistic look.
Allow the cookies to sit on a flat tray overnight to dry completely.
Check that the pink hearts are firm before you stack the cookies together.
34. Creative Love Watercolor Palette
Valentine Cookies Decorated
White icing cookies look like an artist’s palette with colorful paint splatters. A small paintbrush rests on a square cookie that says Love Is Art. Red and purple hearts look like they are dripping with fresh watercolor paint. This design is excellent for anyone who enjoys painting or drawing.
Tiny dots of color surround the main hearts to add a messy artistic feel. The white base remains very clean to look like a fresh canvas. These treats celebrate the beauty of being creative with your partner. Every cookie is a small masterpiece that tastes as good as it looks.
Required Ingredients
Palette and square sugar cookies
White royal icing
Red, purple, and blue food coloring
Pink royal icing
Clear almond extract
Equipment Needed
Food safe paintbrushes
Small mixing bowls
Piping bags
Fine round tips
DIY Instructions
Flood your cookies with a smooth layer of white royal icing and let them dry for a day.
Mix a drop of food coloring with almond extract to create thin watercolor paint.
Paint a large heart in the center of the square cookie with red or purple.
Add more extract to your brush and pull the paint downward to create drips.
Flick the brush over the cookie to make small splatters of color.
Use pink icing to pipe the words Love Is Art on a separate clean cookie.
Dab small circles of different colors around the edge of the palette cookie.
Paint a small tan handle and black bristles to look like a paintbrush.
Let the painted designs dry for two hours before you serve them.
35. Nautical Anchor of My Soul
Valentine Cookies Decorated
Deep blue and white stripes decorate these nautical themed treats. A large bronze anchor has a thick rope wrapped around its frame. The words You’re My Anchor are written clearly on the metallic surface. Small sailboats with heart accents float nearby to complete the ocean scene.
Round life preserver cookies feature sweet messages for your special person. The bronze icing has a subtle shimmer that looks like aged metal. This set is a great choice for a beach lover or a sailor. These designs from The Recipe Fork bring a sea breeze to your holiday.
Required Ingredients
Anchor, boat, and circle sugar cookies
Dark blue royal icing
White royal icing
Bronze luster dust
Tan royal icing
Clear extract
Equipment Needed
Piping bags
Small round tips
Scribe tool
Paintbrush
DIY Instructions
Flood the anchor cookie with tan icing and let it dry for twelve hours.
Paint the dry tan anchor with bronze luster dust mixed with extract.
Pipe thin blue and white stripes across the boat and circle cookies.
Use white icing to pipe a small heart on the sail of the boat.
Write You’re My Anchor on the bronze surface with a very thin blue tip.
Pipe a wavy tan line around the anchor to look like a thick rope.
Add small blue dots to the white stripes for extra detail.
Ensure the metallic paint is fully dry before you handle the anchor.
Arrange the set on a wooden board to match the ocean theme.
36. Miniature Red Velvet Cake Bites
Valentine Cookies Decorated
These cookies are shaped like slices of rich red velvet cake. Thick white frosting swirls are piped in a wavy pattern along the edges. A bright red cherry with a stem sits right on top of each piece. Small silver pearls add a touch of elegance to the sweet design.
A layer of pink cream is visible in the middle of the cake slice. Round bite sized versions sit nearby for a variety of treats. The deep red color looks very traditional and romantic for the holiday. These are a decadent way to share a classic dessert in cookie form.
Required Ingredients
Triangle and round sugar cookies
Deep red royal icing
Stiff white royal icing
Pink royal icing
Red ball sprinkles or cherries
Silver edible pearls
Equipment Needed
Piping bags
Star piping tips
Scribe tool
Tweezers
DIY Instructions
Flood the triangle cookies with deep red icing and let them dry for two hours.
Pipe a thin pink line across the middle of the red triangle to look like filling.
Use a star tip and white icing to pipe a large wavy border on the top edge.
Pipe small stars of white icing along the bottom of the cake slice.
Place a red sprinkle or cherry on the highest point of the white icing.
Use tweezers to add silver pearls into the white frosting swirls.
Repeat the star piping on the round cookies to make them look like cupcakes.
Let the heavy frosting dry for at least six hours before moving the cookies.
Store them in a tall box so the frosting decorations stay beautiful.
37. Sweet Symphony Sheet Music
Valentine Cookies Decorated
Rectangular cookies look like aged parchment paper with musical notes. The title Aria Of Love is written in beautiful black script at the top. Small heart shapes take the place of some notes on the staff. These treats are a wonderful gift for a musician or a singer.
Brown shading around the edges makes the “paper” look old and worn. Large eighth note cookies sit next to the main sheet music. Every line and dot is placed with precision for a realistic look. This design captures the rhythm and melody of a romantic relationship.
Required Ingredients
Rectangular and musical note cookies
Tan royal icing
Stiff black royal icing
Brown food coloring or cocoa powder
Red royal icing
Equipment Needed
Piping bags with size 0 or 1 tips
Dry food safe brush
Small round tips
Scribe tool
DIY Instructions
Flood your rectangular cookies with tan icing and let them dry for a day.
Use a dry brush to rub a little brown coloring or cocoa on the edges.
Pipe five thin black lines across the cookie to create the musical staff.
Write Aria Of Love in the top center with a very fine black tip.
Pipe small black ovals on the lines and add vertical stems for notes.
Replace one or two note heads with a tiny red heart for a romantic touch.
Pipe a large G clef symbol on the left side of the staff lines.
Add small swirls in the corners of the parchment to look like fancy paper.
Allow the black ink to dry for three hours before you touch the surface.
38. Heartfelt Coffee Bean Blend
Valentine Cookies Decorated
Square cookies look like burlap coffee sacks with a stamped design. The message The Best Blend is written in bold black block letters. A small red heart sits above the words to show your passion for coffee. Realistic dark chocolate coffee beans are scattered around the sacks.
The texture of the icing looks just like a woven fabric bag. Each coffee bean has a small groove to look like a real roasted bean. This theme is a cozy way to celebrate a morning routine together. These treats are an excellent choice for a dedicated coffee drinker.
Required Ingredients
Square sugar cookies
Tan royal icing
Stiff black royal icing
Red royal icing
Chocolate coffee beans or dark brown icing
Equipment Needed
Piping bags
Small round tips
Stencil or mesh for burlap texture
Scribe tool
DIY Instructions
Flood your square cookies with tan icing and let them sit for five minutes.
Press a clean piece of mesh onto the wet icing to create a burlap texture.
Let the textured base dry completely for at least eight hours.
Pipe a black square border in the center of the cookie to frame the text.
Write The Best Blend inside the square using bold black block letters.
Add a small red heart just above the text for a pop of color.
Pipe a round black stamp in the corner that says Heart in the middle.
Glue a few real chocolate coffee beans to the plate around your cookies.
Wait for the black letters to dry before you stack the sacks.
39. Colorful Love Puzzle Cube
Valentine Cookies Decorated
A 3D cube cookie features bright red, pink, and purple squares. The words Love Is A Puzzle are written on a white section in the middle. Black outlines separate each colored tile for a very graphic look. This design is a fun challenge for anyone who loves games or brain teasers.
The stacked cookies create a sense of depth and movement. Every color is vibrant and sits flush with the black frame. This style is very modern and stands out on a dessert tray. It is a clever way to show that love is worth figuring out together.
Required Ingredients
Square sugar cookies
Black royal icing
Red, pink, and purple royal icing
White royal icing
Equipment Needed
Piping bags
Small round tips
Scribe tool
Straight edge or ruler
DIY Instructions
Bake three square cookies and stack them with icing to make a cube.
Cover the sides of the cube with a thick layer of black royal icing.
Let the black icing dry for about four hours until it is firm.
Pipe a grid of black lines on each face of the cube to create tiles.
Fill the small squares with alternating colors of red, pink, and purple.
Flood one middle section with white icing and let it dry.
Write Love Is A Puzzle on the white section using a fine black tip.
Ensure each colored square is smooth and does not spill over the lines.
Let the entire cube dry for a full day before you move it.
40. Spooky Sweet Valentine Ghosts
Valentine Cookies Decorated
Friendly white ghosts hold bright red hearts in their small hands. Every ghost features a happy smiling face with tiny pink cheeks. The soft wavy edges of the ghosts make them look like they are floating. This whimsical theme is a great choice for kids or anyone who likes cute characters.
The white icing is smooth and clean against the gray fabric background. Every red heart provides a bold pop of color in the center of the ghost. These treats show that love is nothing to be afraid of this year. They are a charming and simple addition to your holiday baking.
Required Ingredients
Ghost shaped sugar cookies
White royal icing
Red royal icing
Stiff black royal icing
Soft pink royal icing
Equipment Needed
Piping bags
Small round tips
Scribe tool
DIY Instructions
Outline your ghost cookies with white icing and fill them in completely.
Use a scribe tool to pop any bubbles and make the surface very smooth.
Let the white base dry for at least six hours until it is hard.
Pipe a medium sized red heart in the middle of the ghost body.
Add two small white dots on the sides of the heart to look like hands.
Pipe two tiny black dots for eyes and a small curved line for a smile.
Place two small pink dots next to the smile to create rosy cheeks.
Pipe thin white lines at the bottom of the ghost to show folds in the sheet.
Allow the faces to dry for two hours before you serve the cookies.
41. Radiant Sunflower Bouquet
Valentine Cookies Decorated
Bright yellow petals fan out from a chocolate center. Tiny brown dots fill the middle to look like real seeds. A white oval cookie sits on top with a cheerful message. “You brighten my day” appears in bold yellow letters. Green leaves and stems connect the flowers to create a full bouquet look.
The vibrant colors bring a warm feeling to your holiday. These treats from The Recipe Fork make a great gift for anyone who brings light into your life. Every petal looks sculpted and three dimensional. This design stands out because it uses sunny colors instead of traditional red.
Required Ingredients
Sugar cookies in flower, leaf, and oval shapes
Yellow royal icing (stiff consistency)
Dark brown royal icing (flood and stiff consistency)
White royal icing (flood consistency)
Bright yellow royal icing (stiff consistency for text)
Green royal icing (stiff consistency)
Small brown nonpareil sprinkles
Equipment Needed
Piping bags
Leaf piping tip
Small round piping tips
Scribe tool
Cookie sticks (optional)
DIY Instructions
Bake your cookies and let them cool until they are room temperature.
Flood the center of the flower cookies with a circle of dark brown icing.
Drop small brown sprinkles into the wet icing to create a seed texture.
Use a leaf tip and yellow icing to pipe petals starting from the center and moving outward.
Squeeze the bag firmly and then pull away quickly to make the petal points.
Flood the oval cookie with white icing and let it dry for eight hours.
Write your message on the white cookie using a very thin tip and yellow icing.
Pipe long green lines on a flat surface to act as stems and attach the leaves.
Place the flower heads at the top of the stems once everything is dry.
42. Intricate Macrame Rope Hearts
Valentine Cookies Decorated
White icing mimics the look of woven macrame cords. Thick lines and small knots create a beautiful textured pattern. The central heart features long fringe hanging from a wooden dowel look. A fun phrase at the top reads “Knot Yours” in tan icing.
This style is sophisticated and very modern. It looks like a real piece of wall art made from sugar. The creamy white color on a light background feels very calm. You can easily adapt this design for bohemian themed celebrations.
Required Ingredients
Large heart and rectangular sugar cookies
White royal icing (very stiff consistency)
Tan royal icing (stiff consistency)
Light gray or off white icing for the base
Equipment Needed
Piping bags
Size 1 and size 2 round piping tips
Scribe tool
Small paintbrush
DIY Instructions
Cover your cookies with a thin layer of off white icing and let it dry.
Pipe a horizontal tan line across the top of the heart to look like a wooden stick.
Use a size 2 tip and white icing to pipe vertical lines hanging from the stick.
Make small loops at the top of each line to represent a hitch knot.
Pipe diagonal lines that cross over each other in a diamond pattern.
Add tiny dots of icing where the lines cross to look like tight knots.
Pipe many thin, straight lines at the bottom of the heart to create the fringe.
Write “Knot Yours” at the top of the scene using a fine tip and tan icing.
Allow the raised texture to dry for at least twelve hours before touching it.
43. Sweet Watermelon Heart Slices
Valentine Cookies Decorated
Red fruit segments with a bright green rind look very fresh. Black teardrop seeds scatter across the red surface. A central heart cookie carries a clever pun. “You’re one in a melon” is written in black script.
The colors are bold and energetic. Swirling white lines on one heart show off a different texture. This set is a refreshing way to share a sweet message. It feels like a summer picnic in the middle of winter.
Required Ingredients
Heart and triangle sugar cookies
Red royal icing (flood consistency)
Green royal icing (stiff and flood consistency)
White royal icing (flood consistency)
Stiff black royal icing
Equipment Needed
Piping bags
Small round tips
Scribe tool
Toothpick
DIY Instructions
Flood the center of your heart and triangle cookies with red icing.
Leave a small gap around the edge for the rind.
Pipe a thin white line around the red section while it is still wet.
Add a thick green border around the white line to complete the rind.
Use a scribe tool to swirl the red and white icing on one heart for a marbled look.
Pipe small black teardrop shapes onto the red area to represent seeds.
Let the base icing dry for at least six hours.
Write your pun on the largest heart using a very thin black piping tip.
Allow the text to set for two hours before you move the cookies.
44. High Fashion Tweed Hearts
Valentine Cookies Decorated
Intricate pink and black tweed patterns cover large heart shapes. Gold chain borders and white pearls add a luxurious feel. Small pink quilted handbag cookies sit nearby. These treats look like they belong in a designer boutique window.
The level of detail on the fabric pattern is amazing. Every cross stitch of icing creates a realistic textile look. These are a great choice for someone with a love for fashion. They bring a touch of class to any Valentine box.
Required Ingredients
Heart and handbag sugar cookies
Pink royal icing (stiff and flood consistency)
Black royal icing (stiff consistency)
White royal icing (stiff consistency)
Gold luster dust
Edible white pearls
Clear extract
Equipment Needed
Piping bags with size 0 tips
Small food safe paintbrush
Tweezers
DIY Instructions
Flood your heart cookies with light pink icing and let them dry completely.
Pipe many thin horizontal lines across the heart with dark pink icing.
Add vertical lines over the top to create a grid pattern.
Pipe tiny black and white “stiches” at the intersections of the grid.
Use a medium round tip to pipe a bumpy border around the heart.
Paint this border with gold luster dust mixed with extract once it is dry.
Use tweezers to press a single white pearl into the center of the heart.
Pipe a diamond grid on the handbag cookies to look like quilted leather.
Add a small gold “C” shape or buckle to the front of the bags.
45. Timeless Ink and Quill Scroll
Valentine Cookies Decorated
An old parchment scroll features a deep blue ink splatter. A sleek black fountain pen rests on the paper. The words “Written in Ink I am yours” appear in elegant cursive. This design tells a story of classic letters and timeless love.
The silver details on the pen nib look very realistic. Dark blue ink flows into a beautiful pool on the parchment. This cookie set from The Recipe Fork is a poetic way to express your feelings. It looks like an artifact from a romantic history book.
Required Ingredients
Rectangular and pen shaped sugar cookies
Tan royal icing (flood consistency)
Deep blue royal icing (flood consistency)
Black royal icing (stiff and flood consistency)
Silver luster dust
Clear vanilla extract
Equipment Needed
Piping bags
Small round tips
Scribe tool
Small paintbrush
DIY Instructions
Flood the rectangular cookie with tan icing and let it dry for twelve hours.
Use a brush with a little brown food coloring to shade the edges of the scroll.
Flood the pen cookie with black icing and a silver section for the nib.
Paint the nib with silver luster dust mixed with extract once it is dry.
Pipe a large irregular shape of blue icing in the center of the scroll.
Pull the edges of the blue icing out with a scribe tool to look like a splash.
Write “Written in Ink” above the splash and “I am yours” below it.
Use a very fine tip and black icing for the cursive lettering.
Place the pen cookie diagonally across the scroll for a realistic scene.
Key Takeaways
Variation is the secret to a great cookie box. Mix different shapes and textures to keep things interesting.
Royal icing requires patience for the best results. Let your base layers dry fully before adding fine details.
Basic tools can produce professional looks. A simple scribe tool helps you fix small mistakes and smooth your icing.
Baking for someone you love is a wonderful way to celebrate the season. These 45 designs provide plenty of room for your own creative touch. You can choose a style that fits your skill level and your partner’s taste.
Take your time with the piping bag and enjoy the process. Every batch of cookies tells a story of care and effort. We hope these ideas help you create a memorable Valentine’s Day.
Spread the loveThe Thanksgiving countdown creates stress. Main courses like turkey and stuffing take up all the oven time. Dessert often becomes an afterthought. It does not have to be that way. This year, skip…
Spread the loveThe holidays bring a special kind of warmth, and giving a thoughtful present is part of the joy. Finding gifts that truly resonate with loved ones can sometimes feel challenging. Fortunately, there is…
Spread the loveFinding the right centerpiece for your holiday table often feels like a daunting task. You want something that captures the magic of the season without spending your entire vacation in the kitchen. This…