Nothing ruins a holiday baking session faster than a heart shaped cookie that looks like a blob. You spend hours chilling the dough only to watch it melt into a puddle in the oven. It feels frustrating when your hard work loses its sharp edges before the first bite.

Your kitchen should be a place of joy rather than a source of stress. This collection focuses on designs that stay crisp and defined while they bake. We gathered several creative ideas to help you master the art of the holiday biscuit. Get ready to impress your favorite people with beautiful treats that actually hold their shape.
1. Elegant Rose Heart Sugar Cookie

A stunning heart shape sets the foundation for this edible piece of art. Smooth white royal icing creates a clean canvas that allows the floral details to shine. Three dusty pink roses sit at the center, surrounded by delicate green leaves and tiny white blossoms. This color palette brings a soft and romantic feel to your holiday dessert table.
Achieving this look requires a dough that refuses to spread in the oven. You want crisp edges that stay sharp after baking. This specific design proves that simple cookies can look high end with the right piping techniques. Every petal and leaf adds texture and depth to the sweet treat. Your guests will admire the intricate details before they take their first bite.
Ingredients
- Chilled sugar cookie dough
- White royal icing
- Pink stiff peak buttercream
- Green stiff peak buttercream
- White stiff peak buttercream
Equipment
- Heart shaped cookie cutter with scalloped edges
- Piping bags
- Small rose petal tip
- Leaf tip
- Small round tip for dots
- Offset spatula
DIY Instructions
- Roll your chilled dough to a consistent thickness of about one quarter inch.
- Cut out shapes using the scalloped heart cutter and place them on a lined baking sheet.
- Bake until the edges just start to turn golden and let them cool completely on a wire rack.
- Spread a smooth layer of white royal icing over the top of the cookie using an offset spatula.
- Let the base icing dry until it feels firm to the touch.
- Fit a piping bag with a rose petal tip and fill it with pink buttercream.
- Pipe three roses in the center by spinning the bag in a tight spiral while keeping the wide end of the tip down.
- Use green buttercream and a leaf tip to add small leaves around the base of the roses.
- Finish the design by piping tiny white dots with a small round tip to mimic small filler flowers.
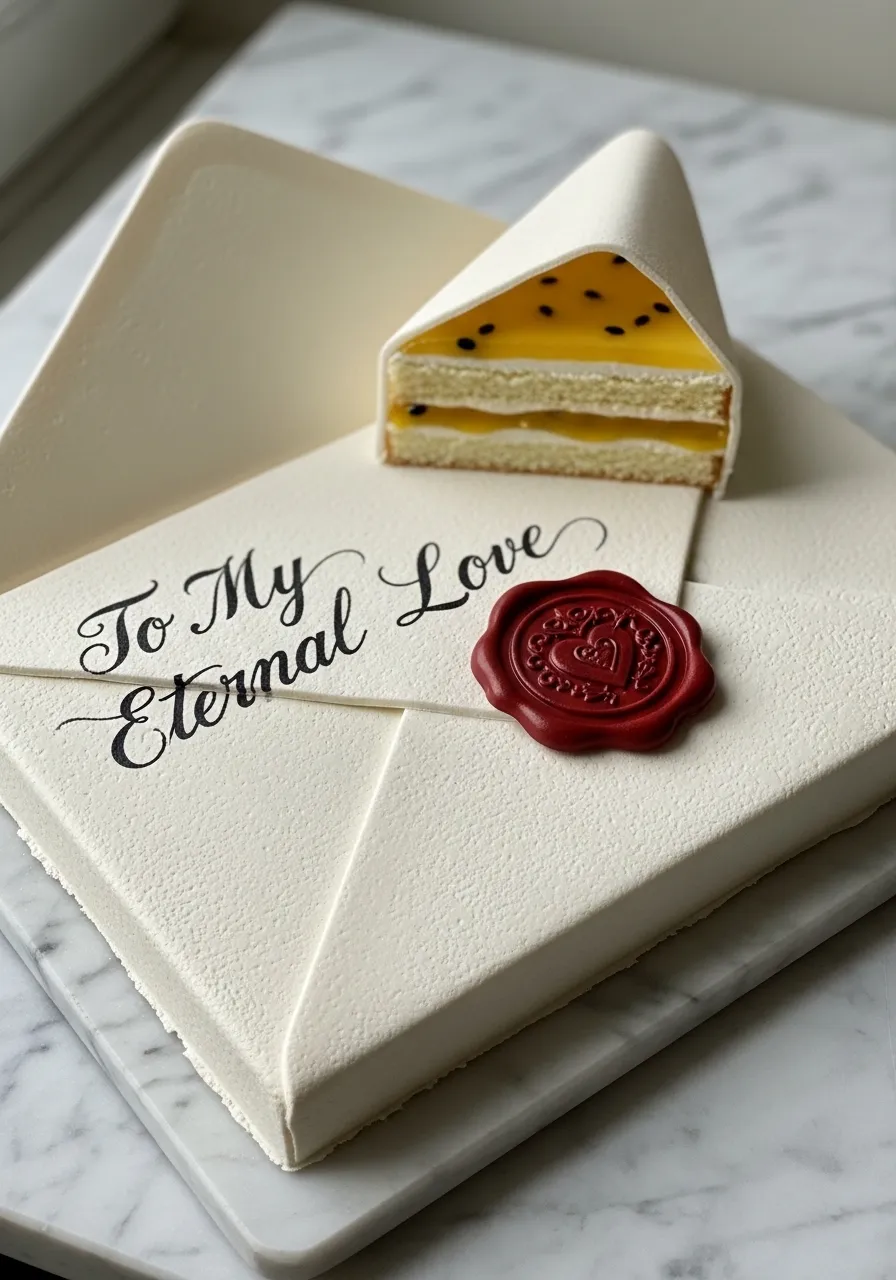
2. Sealed With Love Envelope Cookie

These rectangular treats mimic the look of classic love letters. Crisp white icing covers the surface while thin grey lines define the envelope flaps. A bright red wax seal sits at the center, featuring a tiny embossed heart. This design feels timeless and sophisticated for any romantic occasion.
Using a sturdy dough keeps these sharp corners intact during the baking process. You need a flat surface to ensure the delicate lines remain straight. Your friends will appreciate the thoughtful detail of a handwritten note turned into a delicious snack.
Ingredients
- Chilled sugar cookie dough
- White royal icing
- Grey royal icing
- Bright red royal icing
Equipment
- Rectangle cookie cutter
- Piping bags
- Fine round piping tips
- Small scribe tool
DIY Instructions
- Roll your dough to a consistent thickness and cut out rectangles.
- Bake the shapes and let them cool completely on a flat surface.
- Outline the edge of the rectangle with white icing and fill the center.
- Allow the white base to dry for at least four hours until it is hard.
- Pipe four thin grey lines from the corners toward the center to look like paper folds.
- Squeeze a medium circle of red icing in the very middle of the lines.
- Use a scribe tool or toothpick to swirl the red icing into a messy wax seal shape.
- Drop a tiny bit of red icing in the center of the seal and shape it into a heart while wet.
3. Modern Terrazzo Heart Cookie

Abstract patterns take center stage on these contemporary heart treats. A soft mauve base provides a warm background for the scattered stone shapes. Dark grey, cream, and blush pink dots create a textured terrazzo effect across the entire surface. This style offers a trendy alternative to traditional holiday decor.
Small clusters of icing add visual weight and interest to the design. Each cookie becomes unique depending on where you place the colorful shards. These snacks look great on a modern dessert platter or as individual gifts.
Ingredients
- Chilled sugar cookie dough
- Mauve royal icing
- Dark grey royal icing
- Cream royal icing
- Blush pink royal icing
Equipment
- Heart shaped cookie cutter
- Piping bags
- Small round tips
- Scribe tool
DIY Instructions
- Cut your dough into hearts and bake them until the edges are firm.
- Fill a piping bag with the mauve icing and cover the heart completely.
- While the mauve icing is still wet, grab your other colors.
- Drop random spots of grey, cream, and blush onto the wet mauve base.
- Vary the size of the dots so some are large and some are tiny.
- Use a scribe tool to gently tug the edges of the dots into irregular stone shapes.
- Let the icing dry flat so the surface stays smooth and level.
4. Nostalgic Conversation Heart Treats

Bright pastel colors bring back memories of childhood candy boxes. These small heart shapes feature classic phrases like HUG ME and TRUE LOVE in bold purple lettering. Smooth matte icing gives them a clean look that mimics the real chalky sweets. You can mix and match yellow, mint green, and lavender to create a vibrant bowl.
Clear lettering remains the most important part of this specific design. You must wait for the base icing to dry completely before adding the words. These little bites work wonderfully for classroom parties or casual get-togethers.
Ingredients
- Chilled sugar cookie dough
- Yellow royal icing
- Mint green royal icing
- Lavender royal icing
- Stiff purple royal icing
Equipment
- Small heart cookie cutter
- Piping bags
- Extra fine round piping tip
DIY Instructions
- Bake several small heart cookies and ensure they are totally cool.
- Ice one third of the batch in yellow, one third in green, and the rest in lavender.
- Let the cookies sit out overnight so the icing becomes very hard.
- Fit a piping bag with your smallest fine tip and fill it with purple icing.
- Squeeze with steady pressure to write short words in the center of each heart.
- Keep the letters blocky and simple to make them easy to read.
5. White Embossed Botanical Round

Nature inspired textures transform a simple round biscuit into something extraordinary. Pure white icing depicts intricate ferns, leaves, and tiny wildflowers in a raised pattern. The monochromatic look emphasizes the delicate shapes without needing bright colors. This elegant approach fits a winter wedding or an upscale tea party.
A chilled dough helps the stamped details remain visible after the heat of the oven. Heavy pressure ensures every vein in the leaves shows up clearly on the finished product. These cookies prove that simplicity often carries the most impact in baking.
Ingredients
- Chilled sugar cookie dough
- White royal icing
- Extra powdered sugar for dusting
Equipment
- Round cookie cutter
- Botanical texture stamp or embossed rolling pin
DIY Instructions
- Roll your dough out on a piece of parchment paper.
- Dust your botanical stamp with a little powdered sugar to prevent sticking.
- Press the stamp firmly into the dough until the pattern is deep.
- Cut circles out of the patterned area with your round cutter.
- Chill the cut shapes in the freezer for ten minutes before baking.
- Bake as usual and let them cool.
- Pipe a very thin layer of white icing over the top if you want a glossy finish.
- Alternatively, leave them plain to show off the natural dough texture.
6. Golden Watercolor Heart Design

Soft washes of pink and grey create a dreamy watercolor effect on these hearts. Splashes of gold leaf add a touch of luxury to the artistic background. No two cookies look exactly alike due to the fluid nature of the painting technique. This style feels high fashion and incredibly romantic for February.
Working with food coloring and spirits allows you to blend the shades seamlessly. You want the colors to bleed into each other slightly for a natural look. These treats serve as a beautiful centerpiece for a luxury dessert box.
Ingredients
- Chilled sugar cookie dough
- White royal icing
- Pink and grey gel food coloring
- Edible gold leaf
- Small amount of clear almond extract or vodka
Equipment
- Heart cookie cutter
- Small food safe paintbrushes
- Small mixing plate
DIY Instructions
- Cover your heart cookies with white icing and let them dry until hard.
- Put a drop of pink and grey gel on your mixing plate.
- Dip your brush in the extract and then into the color to make a watery paint.
- Dab the colors onto the white icing and let them spread naturally.
- Add more extract to the edges of the color to fade it into the white.
- Wait for the paint to dry completely.
- Use a dry brush to carefully press small flakes of gold leaf onto the center.
7. Velvet Burgundy Gold Rimmed Heart

Rich deep red tones provide a dramatic and moody aesthetic for your sweets. A matte finish gives the cookie a velvet-like texture that feels expensive. Shimmering gold leaf clings to the side, creating a striking contrast against the dark base. This bold choice stands out among traditional bright pink holiday treats.
Maintaining the deep color requires a high quality food gel. The sharp edge of the heart stays defined thanks to a reliable no-spread recipe. You only need a few supplies to make these look professional and sleek.
Ingredients
- Chilled sugar cookie dough
- Deep burgundy royal icing
- Edible gold leaf
Equipment
- Heart cookie cutter
- Small brush
- Tweezers
DIY Instructions
- Bake your hearts and let them cool.
- Fill the entire top of the cookie with the dark burgundy icing.
- Let the icing dry in front of a fan to get a smooth matte finish.
- Once the icing is dry, pick up a small piece of gold leaf with tweezers.
- Place the gold along the top right curve of the heart.
- Gently tap the gold with a dry brush so it sticks to the icing.
8. Classic Plaid Pattern Square

Crisp lines and geometric patterns define these cozy square biscuits. Red and navy blue icing create a traditional plaid look over a stark white base. Tiny dots and thin strokes add layers of detail that mimic real fabric. This design brings a warm and comforting feeling to your winter baking projects.
Steady hands are essential for piping the intersecting stripes correctly. You must pace yourself to ensure the lines remain consistent across the whole batch. These treats pair wonderfully with a hot cup of coffee on a chilly afternoon.
Ingredients
- Chilled sugar cookie dough
- White royal icing
- Red royal icing
- Navy blue royal icing
Equipment
- Square cookie cutter
- Piping bags
- Very fine round tips
DIY Instructions
- Ice your square cookies in white and let them dry fully.
- Pipe two thick blue vertical stripes on the left and right sides.
- Add two thick blue horizontal stripes across the top and bottom.
- Draw thin red lines through the center of the blue stripes.
- Fill the remaining white spaces with tiny red dots to create texture.
- Keep your lines as straight as possible by moving your whole arm while piping.
9. Ornate White Lace Heart

Sophisticated piping techniques create a look reminiscent of fine bridal lace. Spirals, dots, and teardrop shapes fill the heart from edge to edge with white royal icing. A scalloped border adds one last layer of texture to this bridal-style dessert. This monochromatic masterpiece celebrates the beauty of intricate craftsmanship.
Using a very fine piping tip allows for the high level of detail seen here. The thick icing holds its shape without merging into the neighboring lines. Your patience will be rewarded with a cookie that looks almost too beautiful to eat.
Ingredients
- Chilled sugar cookie dough
- Stiff white royal icing
Equipment
- Heart cookie cutter
- Piping bag
- The smallest fine round tip available
DIY Instructions
- Bake your heart cookie and make sure it is level.
- Pipe a scalloped line all the way around the outer edge.
- Start in the center by piping a small flower or star shape.
- Build outward by adding curved lines and small teardrops.
- Fill any large gaps with tiny dots of icing.
- Work slowly so you do not smudge the wet icing with your hand.
10. Retro Roller Skate Heart

Vibrant pinks and bright yellows bring a fun retro vibe to your kitchen. A classic roller skate sits prominently on a large heart base, featuring teal laces and black boots. This playful design captures the energy of an eighties roller rink. It makes a fantastic choice for a unique and energetic holiday celebration.
Layering the different colors requires waiting for each section to crust over. You start with the large shapes before adding the small details like the laces and wheels. Kids and adults alike will love the whimsical nature of these colorful snacks.
Ingredients
- Chilled sugar cookie dough
- Hot pink royal icing
- Black royal icing
- Teal royal icing
- Yellow royal icing
Equipment
- Large heart cookie cutter
- Piping bags
- Small round tips
DIY Instructions
- Ice the entire heart in hot pink and let it dry for one hour.
- Outline the shape of a boot in black icing on top of the pink.
- Fill the boot with black and add two yellow circles at the bottom for wheels.
- Wait thirty minutes for those shapes to set.
- Pipe a teal zig-zag line over the black boot to look like laces.
- Add a small white dot in the center of the wheels for a hubcap.
11. Minimalist Soulmate Line Art

Modern art meets sugar cookies in this striking monochromatic design. A smooth white base serves as the canvas for a single continuous black line. Two profiles face one another, capturing a quiet moment of connection. This style feels sophisticated and fits a contemporary holiday gathering or a gallery opening.
Achieving this look requires a very steady hand and thin icing. You must wait for the white background to dry completely before you begin the line work. Small variations in the thickness of the black line add a hand-drawn feel to the treat. Your guests will love the artistic flair of these unique biscuits.
Ingredients
- Chilled sugar cookie dough
- White royal icing
- Black stiff peak royal icing
- Small amount of water for thinning
Equipment
- Oval or pebble shaped cookie cutter
- Piping bags
- Extremely fine round tip (size 0 or 00)
- Scribe tool
DIY Instructions
- Bake your oval cookies and let them cool on a flat wire rack.
- Outline and fill the top of each cookie with smooth white icing.
- Place the cookies in front of a fan to help them dry quickly and stay shiny.
- Fill a piping bag with your black icing and use the smallest tip you own.
- Practice the face profile on a piece of parchment paper first to get the movement right.
- Start at the top of the cookie and draw the forehead, nose, and lips in one fluid motion.
- Finish the line at the chin or neck area.
- Use a scribe tool to gently move any small bumps in the black line while it is still wet.
12. Ombre Heart Stack

This tiered display showcases a beautiful range of pink shades from soft blush to deep berry. Three separate heart cookies sit atop one another to create a 3D effect. A single tiny teardrop shape on the top heart adds a delicate focal point. This project is a wonderful way to play with color gradients in your kitchen.
Consistency in the icing thickness ensures a professional finish on every level. You want the edges to be plump and rounded without spilling over the sides. These stacked treats make a bold statement on a dessert table or as a centerpiece for a gift box.
Ingredients
- Chilled sugar cookie dough
- Royal icing in four shades: light pink, medium pink, dark pink, and berry
- Pink stiff peak icing for the teardrop
Equipment
- Three heart cookie cutters in small, medium, and large sizes
- Piping bags
- Medium round tips
- Scribe tool
DIY Instructions
- Cut out an equal number of small, medium, and large hearts from your dough.
- Bake the shapes and ensure they are totally flat before decorating.
- Ice the large hearts with the darkest berry color and let them set.
- Cover the medium hearts with the dark pink and the small hearts with light pink.
- Let all the pieces dry for at least six hours so you can handle them.
- Place a small dot of wet icing in the center of the berry heart to act as glue.
- Press the dark pink heart onto the center of the berry heart.
- Repeat this step with the light pink heart on top.
- Finish by piping a small raised teardrop in the center of the smallest heart.
13. Cozy Cable Knit Heart

Bring the warmth of a winter sweater to your dessert tray with this textured design. White icing mimics the look of thick yarn woven into a classic cable pattern. The cream color of the cookie peeks through the gaps, adding to the rustic charm. This style is excellent for a cozy night in by the fireplace.
The key to this look is using icing that is thick enough to hold its shape. You want the ridges to stay high and distinct rather than melting together. It takes a bit of practice to get the braided look just right, but the result is worth the effort.
Ingredients
- Chilled sugar cookie dough
- Stiff white royal icing
- Extra powdered sugar
Equipment
- Heart shaped cookie cutter
- Piping bags
- Medium round piping tip
DIY Instructions
- Bake your heart cookies and let them cool completely.
- Fit your piping bag with a round tip and fill it with stiff white icing.
- Pipe a row of small diagonal lines down the center of the heart.
- Draw a second row of diagonal lines facing the opposite way to create a braid.
- Add straight vertical lines on either side of the center braid.
- Fill the remaining space with tiny zig zag lines to mimic knitted fabric.
- Keep your pressure steady so the yarn looks consistent across the surface.
- Let the icing dry in a cool area to prevent the peaks from falling.
14. Sweet Love Potion Bottle

Whimsical bottle shapes filled with a vibrant magenta liquid create a magical theme. Tiny pink hearts and silver pearls float inside the potion, adding sparkle and life. A tan colored cork at the top completes the look of an ancient apothecary jar. These cookies are a fun way to add a bit of fantasy to your holiday baking.
Layering is crucial here to give the appearance of a glass bottle. You start with the white background before adding the colorful liquid on top. These treats are sure to be a hit with anyone who loves a bit of storytelling with their snacks.
Ingredients
- Chilled sugar cookie dough
- White royal icing
- Magenta royal icing
- Tan royal icing
- Pink heart sprinkles
- Silver edible pearls
Equipment
- Bottle shaped cookie cutter
- Piping bags
- Small round tips
- Tweezers for sprinkles
DIY Instructions
- Cut your dough into bottle shapes and bake them until they are firm.
- Outline and fill the neck and edges of the bottle with white icing.
- Let the white part dry for thirty minutes.
- Fill the bottom bulb of the bottle with the bright magenta icing.
- While the magenta is wet, use tweezers to drop in pink hearts and silver pearls.
- Scatter the decorations so they look like they are floating in the liquid.
- Pipe a small tan rectangle at the very top of the neck to serve as the cork.
- Allow the entire cookie to dry flat overnight.
15. Abstract Geometric Heart

Bold colors and sharp lines transform this heart into a piece of modern stained glass. Dark green, bright red, and crisp white triangles fit together in a complex mosaic pattern. Thick white borders separate each color, giving the design structure and pop. This vibrant choice is a great way to use up leftover holiday icing colors.
A steady hand helps you keep the triangular sections clean and even. You want each segment to be filled to the same height for a flat surface. These cookies look very impressive when arranged together on a plain white platter.
Ingredients
- Chilled sugar cookie dough
- Red royal icing
- Dark green royal icing
- White royal icing
Equipment
- Heart shaped cookie cutter
- Piping bags
- Small round tips
- Scribe tool
DIY Instructions
- Bake your heart cookies and ensure they are cool to the touch.
- Draw a series of intersecting straight lines across the heart with white icing.
- This will create a grid of different sized triangles.
- Let these border lines dry for twenty minutes.
- Choose a few random triangles and fill them with the red icing.
- Fill another set of triangles with the dark green icing.
- Use the white icing to fill the remaining empty spots.
- Gently shake the cookie to help the icing settle smoothly within the borders.
16. Pressed Floral Pansy Round

Real edible flowers take these simple round cookies to a new level of natural beauty. Large purple and yellow pansies are pressed directly into the dough before baking. A light dusting of sugar crystals adds a bit of crunch and shimmer to the floral design. This organic approach is wonderful for a spring brunch or an outdoor garden party.
Selecting the right flowers is the most important part of this process. You need blooms that are safe to eat and thin enough to bake well. These treats feel incredibly special because nature provides the main decoration.
Ingredients
- Chilled sugar cookie dough
- Fresh edible pansies or violas
- One egg white for a wash
- Clear sanding sugar
Equipment
- Scalloped round cookie cutter
- Small pastry brush
- Parchment paper
DIY Instructions
- Roll your dough out and cut into rounds using the scalloped cutter.
- Lay the cookies on a baking sheet lined with parchment paper.
- Gently pull the stems off your edible flowers.
- Place one large flower in the center of each unbaked dough circle.
- Lightly press the petals into the dough with your fingertips.
- Brush a tiny amount of egg white over the petals to hold them in place.
- Sprinkle the edges of the cookie with clear sanding sugar.
- Bake the cookies at a slightly lower temperature to prevent the flowers from browning.
17. Celestial Galaxy Constellation Heart

Deep space comes alive on these dark and mysterious heart treats. A blend of navy blue, purple, and black icing creates a swirling nebula effect. Tiny white dots and stars form recognizable patterns across the glittering background. This design is a fantastic choice for anyone who loves astronomy or stargazing.
Sponging or swirling the colors while wet gives the background its depth. You want the transitions between the blues and purples to look soft and cloudy. These celestial snacks add a touch of magic to any dessert collection.
Ingredients
- Chilled sugar cookie dough
- Black, navy blue, and purple royal icing
- Stiff white royal icing
- Edible silver glitter
Equipment
- Heart shaped cookie cutter
- Piping bags
- Very fine round tips
- Small clean sponge
DIY Instructions
- Bake your heart cookies and let them cool on a flat surface.
- Apply random blobs of black, blue, and purple icing to the cookie.
- Use a small sponge or a scribe tool to swirl the colors together.
- Dust the wet icing with silver glitter to look like distant star dust.
- Let the background dry for at least four hours.
- Pipe small white dots for the main stars of a constellation.
- Draw very thin white lines between the dots to connect the shape.
- Add a few tiny four pointed stars to fill the empty spaces.
18. Rose Gold Beloved Script Heart

Simple elegance is the hallmark of this minimalist white heart design. The word “Beloved” is written in a beautiful flowing script across the center. A rose gold metallic finish gives the lettering a soft and luxurious glow. This cookie is a wonderful way to tell someone exactly how much they mean to you.
Choosing a high quality metallic dust ensures the words really stand out. You must be patient and wait for the base icing to be stone hard before you start painting. This refined look is excellent for wedding favors or a special anniversary gift.
Ingredients
- Chilled sugar cookie dough
- White royal icing
- Rose gold edible luster dust
- Small amount of clear extract or lemon juice
Equipment
- Heart shaped cookie cutter
- Piping bags
- Fine round tip
- Small food safe paintbrush
DIY Instructions
- Ice your heart cookies with a smooth layer of white icing.
- Let the cookies dry overnight so the surface is not fragile.
- Pipe the word of your choice in script using the white icing.
- Ensure the letters are slightly raised to catch the light.
- Allow the scripted letters to dry for another two hours.
- Mix a small amount of luster dust with a drop of extract to make paint.
- Carefully paint the metallic mixture onto the raised letters.
- Use a light touch so you do not get any gold on the white background.
19. Ruby Red Color Block Square

Modern squares featuring a grid of varying red and pink tones create a bold look. Each small rectangle is a slightly different shade, ranging from pale blush to deep crimson. Thin raised lines separate the colors and add a sense of order to the design. This style is a fun way to experiment with color theory and mixing.
Consistency in the size of each block is the secret to making this look professional. You want the lines to be straight and the colors to be vibrant. These cookies look great when served together as a set of colorful tiles.
Ingredients
- Chilled sugar cookie dough
- Royal icing in five shades of red and pink
- Stiff red icing for the grid lines
Equipment
- Square cookie cutter
- Piping bags
- Small round tips
- Ruler or straight edge
DIY Instructions
- Bake your square cookies and let them cool completely.
- Use a ruler to mark a three by three grid on the surface of the cookie.
- Fill each of the nine squares with a different shade of red or pink icing.
- Try to alternate the light and dark colors so they do not sit next to each other.
- Let the colored blocks dry for about an hour.
- Pipe thin red lines over the gaps between the blocks to form the final grid.
- Add a tiny dot of icing where the lines intersect for a finished look.
- Allow the entire treat to dry until the surface is matte.
20. Lavender Quilted Grid Heart

Soft purple tones and a classic quilted pattern give this heart a timeless feel. Small dots sit at each intersection of the grid, mimicking the look of an upholstered headboard. The matte finish of the icing adds to the soft and gentle aesthetic of the treat. This design is a lovely choice for a tea party or a relaxing weekend treat.
Creating a uniform grid is the most challenging part of this specific design. You want the lines to be evenly spaced to maintain the quilted illusion. This cookie proves that a single color can be very impactful when you add the right texture.
Ingredients
- Chilled sugar cookie dough
- Lavender royal icing
- Stiff lavender icing for the details
Equipment
- Heart shaped cookie cutter
- Piping bags
- Fine round tips
- Scribe tool
DIY Instructions
- Bake your heart cookies and let them cool on a rack.
- Outline and fill the cookie with the lavender icing and let it dry.
- Once the base is hard, pipe a series of diagonal lines across the heart.
- Pipe a second set of diagonal lines in the opposite direction to create diamonds.
- Make sure the lines are thin and straight for the best effect.
- Place a small raised dot of icing at every point where the lines cross.
- Work from one side to the other to avoid smudging your progress.
- Let the final details dry completely before serving.
21. Cupid’s Golden Arrows

These long biscuits take the form of love’s favorite weapon. A bright red heart sits at the tip of each white shaft. Shimmering gold fletching at the back adds a touch of elegance to the design. This slender shape proves that a good dough keeps its lines straight even after a long bake.
The white royal icing provides a smooth and flat surface for the golden details. You can see the precision in the feathered lines at the end of the arrow. Each piece feels like a tiny piece of treasure. Your guests will love the unique shape and the glimmering colors.
This style works well for gifts because of the sturdy design. The arrows stay intact even when you pack them in a box. You can pair them with heart shapes for a complete theme. Every bite offers a satisfying crunch and a sweet finish.
Ingredients
- Chilled sugar cookie dough
- White royal icing
- Bright red royal icing
- Gold edible luster dust
- Small amount of clear almond extract
Equipment
- Long rectangle cookie cutter
- Piping bags
- Small round tips
- Small food safe paintbrush
DIY Instructions
- Roll your dough to a thickness of one quarter inch.
- Cut out long rectangles and trim one end into a point and the other into a notch.
- Bake the shapes until they are firm and let them cool on a flat surface.
- Cover the middle section of the arrow with a smooth layer of white icing.
- Pipe a small red heart at the pointed tip of the arrow.
- Use white icing to pipe the feathered fletching at the notched end.
- Let the white icing dry until it is very hard to the touch.
- Mix the gold dust with a drop of extract to create a thick paint.
- Carefully paint the gold over the feathered white icing at the back.
22. Stained Glass Heart Window

A translucent ruby center captures the light in this unique heart biscuit. The pale dough acts as a frame for the bubbly red candy filling. A scalloped white border adds a finishing touch of texture. This technique creates a beautiful effect that looks like real glass.
The contrast between the crisp dough and the hard candy center is delightful. You can see tiny bubbles trapped inside the red section which adds character. This design looks professional but is surprisingly simple to achieve at home. It makes a stunning centerpiece for any holiday display.
These treats are best served on a clear plate to show off the transparency. The light passes through the center and casts a red glow on the table. It is a wonderful way to add a bit of magic to your dessert spread. Your friends will be curious about how you got the candy inside.
Ingredients
- Chilled sugar cookie dough
- Hard red candies like Jolly Ranchers
- White royal icing
Equipment
- Large heart shaped cookie cutter
- Small heart shaped cookie cutter
- Baking sheet
- Parchment paper
- Piping bag with a small round tip
DIY Instructions
- Roll out your dough and cut out several large hearts.
- Use the small heart cutter to remove the center of each large heart.
- Place the hollow hearts on a baking sheet lined with parchment paper.
- Crush your red candies into small bits using a heavy spoon or mallet.
- Fill the empty center of each heart with the candy bits.
- Bake the cookies until the dough is done and the candy has melted into a flat pool.
- Let the cookies cool completely on the pan so the candy hardens.
- Gently peel the cookies off the parchment paper.
- Pipe a scalloped white border around the edge of the candy center to hide the seam.
23. Sparkling Champagne Flutes

Two tall glasses clink together in a celebratory toast. Shimmering gold icing fills the cups while white bubbles float upward toward the rim. Tiny white pearls represent the carbonation of a fresh pour. This design brings a sense of joy and luxury to your holiday sweets.
The golden finish catches the light and mimics the look of a bubbly drink. You can see the detail in the stems and the base of the glasses. This pair of cookies is excellent for an anniversary or a fancy party. They look great when served next to a real bottle of sparkling wine.
Each bubble is a small dot of icing that adds a 3D effect. The white accents make the gold pop and give the design a clean look. These treats are a fun and edible way to say cheers to someone special. Everyone will enjoy the festive and creative appearance.
Ingredients
- Chilled sugar cookie dough
- White royal icing
- Gold edible luster dust
- Small white edible pearls
- Clear lemon extract
Equipment
- Champagne flute cookie cutter
- Piping bags
- Small round tips
- Small food safe paintbrush
DIY Instructions
- Cut out your dough using the flute cutter and bake until the edges are golden.
- Outline the glass shape with white icing and fill the top half with more white.
- Let the white icing dry for at least four hours.
- Paint the entire top section of the glass with a mixture of gold dust and extract.
- Pipe a thin white line around the rim of the glass for a crisp edge.
- Add several small dots of white icing rising from the gold area.
- Place a few white pearls onto the wet dots to look like large bubbles.
- Draw a thin white line down the stem and around the base to define the glass.
24. Cuddly Teddy Bear Hugs

A fuzzy brown bear holds a bright red heart close to its chest. The texture of the fur looks incredibly realistic thanks to clever piping techniques. Dark brown paws and a sweet smile give this character a friendly appearance. It serves as a warm and comforting treat for someone special.
The 3D heart looks like it is being squeezed in a tight embrace. You can see the tiny lines in the fur that make the bear look soft. This design is a favorite for children and those who love cute animals. It brings a playful and heart melting touch to your cookie box.
Each bear has a unique personality depending on the eyes and mouth. The neutral brown tones make the red heart stand out even more. These treats are almost too cute to eat but they are delicious nonetheless. They are sure to be the star of any gathering.
Ingredients
- Chilled sugar cookie dough
- Light brown royal icing
- Dark brown royal icing
- Bright red royal icing
- Tan royal icing for the muzzle
Equipment
- Teddy bear cookie cutter
- Piping bags
- Small grass tip for fur texture
- Small round tips
DIY Instructions
- Bake your bear cookies and let them cool on a rack.
- Pipe a large red heart in the center of the bear’s torso and let it dry.
- Fit a piping bag with a grass tip and fill it with light brown icing.
- Squeeze small bursts of icing all over the bear’s body to create a fur look.
- Work around the red heart so the fur appears to be overlapping it.
- Use tan icing to pipe a small oval for the muzzle on the face.
- Add two small dots of dark brown icing for the eyes and a small curve for the smile.
- Pipe dark brown circles on the hands and feet to look like paw pads.
25. Blooming Rose Bouquet

Several round cookies come together to form a stunning floral arrangement. Each piece features a thick swirl of frosting in shades of deep red and soft pink. Green leaves and a scalloped base tie the whole look together. This centerpiece looks just as beautiful as a real bundle of flowers.
The different heights of the frosting add a lot of depth to the bouquet. You can see the petals overlapping in a natural spiral pattern. This design is a great way to show off your piping skills with buttercream. It makes a grand statement on a bridal shower or brunch table.
The green leaves add a fresh pop of color against the red and pink. Each rose is a separate bite which makes it easy for guests to grab. This edible bouquet is a creative alternative to traditional holiday gifts. It is a sweet way to celebrate any romantic occasion.
Ingredients
- Chilled sugar cookie dough
- Stiff buttercream frosting in red, pink, and light pink
- Green buttercream frosting
- Small round cookie for the base
Equipment
- Round cookie cutters
- Piping bags
- Large star tip (like a 2D or 1M)
- Leaf tip
- Large flat platter
DIY Instructions
- Bake about a dozen small round cookies and one larger scalloped cookie.
- Arrange the small cookies in a circular bunch on a platter.
- Place the scalloped cookie at the bottom to act as the base of the bouquet.
- Fill three piping bags with the different shades of red and pink frosting.
- Start in the center of a cookie and pipe a spiral outward to create a rose.
- Alternate the colors of the roses until every cookie is covered.
- Use the green frosting and a leaf tip to fill the small gaps between the roses.
- Pipe straight green lines from the roses down to the scalloped base to look like stems.
26. Bold Pink XOXO Letters

Individual letters spell out a classic message of affection. Bright pink and crisp white icing cover the surface of these bold shapes. The clean edges of each character show off a dough that holds its form well. These treats are easy to share and look great on any platter.
The alternating colors create a rhythmic and modern look. You can see the smooth finish of the royal icing which looks like a hard shell. This style is excellent for a casual party or a classroom treat. The simple message is clear and festive for the holiday.
These letters can be arranged in different ways to fit your display. The thick icing makes them durable and easy to handle. They offer a great balance of sweetness and crunch in every bite. Your guests will enjoy the fun and graphic nature of these treats.
Ingredients
- Chilled sugar cookie dough
- Bright pink royal icing
- White royal icing
Equipment
- X and O letter cookie cutters
- Piping bags
- Medium round tips
- Scribe tool
DIY Instructions
- Cut your dough into X and O shapes and bake them until firm.
- Outline half of the letters with pink icing and the other half with white.
- Fill the centers with the same colors and use a scribe tool to smooth the surface.
- Let the cookies dry for two hours until the icing is set.
- Pipe a thin border around the edge of each letter in the opposite color.
- This will make the shapes pop and look more defined.
- Allow the cookies to dry completely overnight before stacking or packing.
27. Pastel Rainbow Heart Layers

Concentric rings of pastel colors radiate from the center of this heart. Shades of purple, teal, yellow, and orange create a cheerful rainbow effect. Each layer of icing is plump and rounded, giving the cookie a satisfying height. This design is sure to bring a smile to anyone who sees it.
The colors transition smoothly from one to the next. You can see how the different tones complement each other in a bright and airy way. This cookie is a fun departure from the usual red and pink holiday themes. It brings a sense of playfulness and joy to your baking.
The central teardrop shape acts as the heart of the design. Each ring adds a new layer of interest and texture. These treats are great for a spring party or a child’s celebration. They are as delicious as they are colorful.
Ingredients
- Chilled sugar cookie dough
- Royal icing in purple, teal, yellow, and orange
- Stiff white icing for the center
Equipment
- Heart shaped cookie cutter
- Piping bags
- Small round tips
DIY Instructions
- Bake your heart cookies and let them cool on a flat surface.
- Start at the very center of the heart and pipe a small purple teardrop.
- Outline the teardrop with a ring of teal icing.
- Continue adding rings of yellow and then orange moving toward the outer edge.
- Make sure each ring is touching the one before it so there are no gaps.
- Use a scribe tool to gently swirl the colors if you want a softer look.
- Finish with a final thick ring of pink or white around the very edge.
- Let the cookie dry in a warm spot to keep the colors vibrant and shiny.
28. Moody Black and Pink Marble

Swirls of dark charcoal and soft pink create a sophisticated marble finish. The patterns flow across the white base in a natural and artistic way. This moody aesthetic offers a modern twist on traditional holiday colors. Each cookie is a one of a kind masterpiece of color blending.
The fluid lines look like stone or expensive silk fabric. You can see the subtle grey tones that bridge the gap between black and pink. This design is excellent for a high fashion event or a sophisticated dinner party. It adds a touch of mystery and elegance to your dessert table.
No two cookies look the same due to the random nature of the swirl. The matte finish of the icing gives it a very clean and professional look. These treats are a great way to experiment with color mixing in your kitchen. They are sure to impress anyone with an eye for design.
Ingredients
- Chilled sugar cookie dough
- White royal icing
- Black royal icing
- Pink royal icing
Equipment
- Heart shaped cookie cutter
- Wide shallow bowl
- Scribe tool or toothpick
DIY Instructions
- Bake your heart cookies and let them cool completely.
- Fill a wide bowl with a thick layer of white royal icing.
- Drop a few dots of black and pink icing onto the surface of the white.
- Use a scribe tool to gently swirl the colors together in a random pattern.
- Hold a cookie by the edges and dip the top surface into the swirled icing.
- Lift the cookie straight up and give it a little shake to let the excess drip off.
- Turn the cookie over and place it on a flat surface to dry.
- Repeat the process for each cookie, adding more color to the bowl as needed.
29. Steaming Coffee Mug Heart

A cozy tan mug features a bright red heart on its side. Deep chocolate icing fills the cup to look like a fresh brew. White swirls of steam rise from the top, adding a sense of warmth. This treat captures the feeling of a quiet morning with a loved one.
The perspective of the mug makes it look like you are about to take a sip. You can see the detail in the handle and the white highlights that mimic a shiny ceramic surface. This design is a warm and comforting choice for a winter morning. It pairs beautifully with a real cup of cocoa or coffee.
The red heart is a simple but effective symbol of affection. The dark icing in the center provides a rich contrast to the pale mug. These cookies are a sweet way to show someone you care about their comfort. They bring a bit of hygge to your holiday baking.
Ingredients
- Chilled sugar cookie dough
- Tan royal icing
- Dark brown royal icing
- White royal icing
- Bright red royal icing
Equipment
- Mug shaped cookie cutter
- Piping bags
- Small round tips
DIY Instructions
- Cut out your mug shapes and bake them until they are firm.
- Outline and fill the body of the mug with the tan icing and let it dry.
- Use white icing to add a small curved highlight on the side and the handle.
- Fill the top oval of the mug with the dark brown icing for the coffee.
- Pipe three wiggly white lines rising from the brown area to look like steam.
- Add a small red heart in the center of the tan mug body.
- Ensure the steam lines are thin so they look light and airy.
- Allow the entire design to set for several hours before serving.
30. Whimsical Heart Air Balloon

A large heart shaped balloon floats high above the clouds. Vertical stripes of teal and red create a vibrant and playful look. A small woven basket hangs below, ready for a romantic journey. This imaginative design adds a touch of adventure to your dessert table.
The silver lines represent the ropes that hold the whole contraption together. You can see the texture of the basket which looks like real wicker. This cookie is a wonderful way to tell someone that your love takes you to new heights. It is a creative and uplifting choice for the holiday.
The bright colors make the balloon look like it is glowing in the sky. Each stripe is filled to a different height to add a bit of dimension. These treats are sure to be a conversation starter at any party. They offer a unique blend of fantasy and sweetness.
Ingredients
- Chilled sugar cookie dough
- Teal royal icing
- Red royal icing
- Tan royal icing for the basket
- Silver edible paint or icing
Equipment
- Large heart cookie cutter
- Small square cookie cutter
- Piping bags
- Fine round tips
DIY Instructions
- Bake several large hearts and an equal number of small squares.
- Place a heart above a square on your workspace to see the balloon shape.
- Pipe alternating vertical stripes of teal and red onto the heart.
- Use tan icing to pipe a grid pattern on the square to look like a basket.
- Let both pieces dry for at least two hours.
- Use a little bit of wet icing to glue the basket piece below the heart.
- Draw two thin silver lines connecting the bottom of the heart to the top of the basket.
- Add a few small silver dots on the balloon to look like shiny reflections.
31. Key to My Heart Padlock

A sturdy silver padlock serves as the base for this romantic design. Shimmering grey icing covers the square body while a curved handle arches over the top. A classic brass key rests across the front, featuring intricate swirls and a heart shaped handle. This duo represents the safety and security found in a deep connection.
Small white pearls frame the keyhole to add a touch of elegance. You can see how the gold luster dust makes the key stand out against the cool grey background. This project shows that mechanical shapes can look soft and sweet with the right colors. Your partner will appreciate the symbolism of holding the key to your soul.
Ingredients
- Chilled sugar cookie dough
- Grey royal icing
- Black royal icing
- White royal icing
- Gold edible luster dust
- Small white sugar pearls
- Clear vanilla extract
Equipment
- Padlock shaped cookie cutter
- Key shaped cookie cutter
- Piping bags
- Fine round tips
- Small food safe brush
DIY Instructions
- Bake your lock and key shapes and let them cool on a flat surface.
- Outline and fill the padlock body with grey icing and let it dry completely.
- Pipe the curved handle at the top using the same grey icing.
- Use black icing to pipe a small keyhole shape in the center of the lock.
- Place tiny white pearls around the edge of the keyhole while the black icing is wet.
- Cover the separate key cookie with white icing and allow it to harden.
- Mix your gold luster dust with a drop of vanilla extract to create a thick paint.
- Paint the entire key with the gold mixture and let it dry for one hour.
- Use a tiny bit of wet icing to stick the gold key diagonally across the padlock.
32. Formal Wedding Couple Hearts

Classic formal wear transforms these hearts into a celebration of a beautiful union. One heart depicts a sleek black tuxedo with a crisp white shirt and a tiny bow tie. The second heart shows a soft pink gown with a graceful white neckline and a pearl necklace. This set captures the magic of a wedding day or a fancy gala.
Smooth icing creates a professional look that mimics fine fabric. Each tiny button and pearl adds a layer of realism to the simple heart shapes. These treats make wonderful favors for a bridal shower or an engagement party. You can customize the colors to match any specific wedding theme.
Ingredients
- Chilled sugar cookie dough
- Black royal icing
- White royal icing
- Soft pink royal icing
- Small white edible pearls
Equipment
- Heart shaped cookie cutter
- Piping bags
- Medium and fine round tips
- Scribe tool
DIY Instructions
- Bake your hearts and ensure they are totally cool before you start.
- Draw a V shape on the tuxedo heart and fill the center with white icing.
- Fill the remaining outer sections of that heart with black icing to form the jacket.
- Pipe three small black dots down the white center for buttons and a small bow tie at the top.
- Cover the other heart with soft pink icing to represent the dress fabric.
- Use white icing to pipe a curvy shape over the pink for the top of the gown.
- Place a row of tiny white pearls along the edge of the white icing to look like a necklace.
- Let the cookies dry in a cool area until the surface is firm and matte.
33. Ruby Red Strawberry Rounds

Bright red berries take center stage on these cheerful circular biscuits. A large strawberry shape fills the center, complete with a green leafy top and yellow seeds. A white starburst pattern in the middle adds a graphic and modern touch. These treats bring a burst of summer energy to your February dessert table.
Using a round base makes these cookies easy to stack and pack for gifts. The vibrant red color pops against the neutral tone of the baked dough. You can see how the raised yellow dots create a fun texture that mimics real fruit. This design is simple enough for beginners but looks very polished.
Ingredients
- Chilled sugar cookie dough
- Bright red royal icing
- Grass green royal icing
- Yellow royal icing
- White royal icing
Equipment
- Round cookie cutter
- Piping bags
- Small round tips
- Scribe tool
DIY Instructions
- Cut out circles from your dough and bake them until the edges are firm.
- Outline a large circle on the cookie with red icing and fill it in completely.
- Use green icing to pipe a small crown of leaves at the top of the red circle.
- While the red icing is still wet, pipe several small yellow dots across the surface for seeds.
- Use a scribe tool to pull the yellow dots into a slight teardrop shape.
- Let the red base dry for at least two hours.
- Pipe a white dot in the very center of the strawberry.
- Draw thin white lines coming out from the center dot to create the starburst effect.
34. Elegant Mated Swan Pair

Two graceful swans curve toward each other to form a hidden heart shape between them. Pure white icing depicts their sleek bodies and long, slender necks. Intricate feathered details on the wings add a sense of movement and luxury. This design celebrates a lifelong bond and looks incredibly sophisticated.
Small orange beaks and black eyes give the birds a realistic and gentle expression. The monochromatic white palette keeps the look clean and high end. These cookies are a stunning choice for a romantic anniversary dinner or a winter wedding. Every guest will admire the delicate craftsmanship of the piped feathers.
Ingredients
- Chilled sugar cookie dough
- White royal icing
- Small amount of orange royal icing
- Small amount of black royal icing
Equipment
- Facing swan cookie cutters
- Piping bags
- Fine round tips
- Small star tip for feathers
DIY Instructions
- Bake your swan cookies and let them cool on a flat wire rack.
- Outline the entire swan body and neck with a thin line of white icing.
- Fill the neck and head area with smooth white icing and let it set for ten minutes.
- Use a star tip to pipe rows of overlapping white dollops on the wing area.
- Start at the back of the wing and work your way forward to create a layered feather look.
- Pipe a tiny orange triangle at the tip of the face for the beak.
- Add a single small black dot just above the beak for the eye.
- Allow the cookies to dry completely before placing them together to form the heart.
35. Berry Crumb Gold Leaf Hearts

Textured pink surfaces give these hearts a rustic yet glamorous appearance. One half of the heart features a smooth matte finish decorated with shimmering gold leaf. The other half is covered in a crunchy berry crumble that adds a delicious pop of color. This combination of textures makes every bite a unique experience.
The deep pink tones suggest a rich raspberry or strawberry flavor. You can see how the irregular flakes of gold catch the light and add a touch of wealth. These treats are excellent for a boutique bakery look or a fancy tea party. They prove that you do not need complex piping to create a stunning dessert.
Ingredients
- Chilled sugar cookie dough
- Deep pink royal icing
- Dried berry crumbles or pink sanding sugar
- Edible gold leaf
Equipment
- Heart shaped cookie cutter
- Small brush
- Tweezers for gold leaf
DIY Instructions
- Bake your hearts and let them cool completely on a flat surface.
- Outline and fill the entire heart with a layer of deep pink icing.
- Immediately sprinkle berry crumbles or sugar over one vertical half of the wet heart.
- Press the crumbles gently with your finger to make sure they stick.
- Let the cookie dry for at least six hours until the icing is hard.
- Use tweezers to pick up small, irregular pieces of edible gold leaf.
- Place the gold onto the smooth, non crumbled side of the heart.
- Gently tap the gold with a dry brush to flatten it against the icing.
36. Minty Berry Sandwich Stack

Three layers of deliciousness come together in this tall sandwich cookie. Soft mint green icing covers the top heart, which is finished with a tiny pink rose. Thick swirls of pink buttercream peek out from between the baked layers. This treat offers a refreshing flavor profile and a very satisfying crunch.
The bite taken out of the top shows off the tender crumb of the dough. You can see how the sturdy base holds the heavy frosting without collapsing. This design is fun and playful, making it a great choice for a casual holiday party. It invites everyone to dig in and enjoy the sweet layers.
Ingredients
- Chilled sugar cookie dough
- Mint green royal icing
- Pink stiff peak buttercream
- Tiny edible sugar rose and leaves
Equipment
- Heart shaped cookie cutter
- Piping bags
- Large open star tip
- Small round tip
DIY Instructions
- Cut out several hearts from your dough and bake them until they are golden.
- Ice one heart with a smooth layer of mint green icing and let it dry.
- Use a small round tip to pipe a tiny pink rose and green leaves in the corner of the mint heart.
- Fill a piping bag with pink buttercream and fit it with a star tip.
- Pipe large, vertical dollops of buttercream around the edge of a plain baked heart.
- Place a second plain heart on top of the frosting and repeat the piping.
- Top the stack with your decorated mint green heart.
- Press down very gently so the layers stick together without squishing the frosting.
37. Cherry Pie Lattice Hearts

Miniature heart pies bring a homey and traditional feel to your dessert spread. Deep red cherry jam fills the center, peeking through a woven lattice of golden dough. Tiny red heart candies are scattered across the top for an extra bit of holiday flair. This design mimics the look of a classic bakery window.
The crimped edges of the dough give the cookies a professional and finished look. You can see how the jam bubbles slightly, creating a rich and glossy texture. These treats are a wonderful way to combine the comfort of a pie with the portability of a cookie. They look beautiful on a rustic wooden serving board.
Ingredients
- Chilled sugar cookie dough
- Thick red cherry jam or fruit preserves
- Small red heart shaped candies
- One egg for an egg wash
Equipment
- Heart shaped cookie cutter
- Small knife or pastry wheel
- Fork for crimping
- Pastry brush
DIY Instructions
- Roll out your dough and cut out several large hearts.
- Place half of the hearts on a baking sheet and put a spoonful of jam in the center.
- Cut the remaining dough hearts into thin strips using a knife.
- Lay the strips over the jam in a criss cross pattern to create a lattice.
- Trim the edges of the strips so they match the shape of the heart base.
- Use a fork to press the edges of the dough together and create a crimped border.
- Brush the dough strips lightly with egg wash for a golden finish.
- Bake until the dough is golden brown and the jam is bubbly.
- Drop a few red heart candies onto the jam sections while the cookie is still hot.
38. Vintage Scroll Love Letter

An ancient scroll unfurls to reveal a handwritten message of love. The tan icing is shaded around the edges to look like aged parchment paper. Elegant black script flows across the surface, accented by a bright red wax seal at the bottom. This design feels like a romantic treasure from a bygone era.
Curled edges at the top and bottom add a wonderful sense of depth to the flat biscuit. You can see the fine details in the “I love you” lettering which requires a very steady hand. This cookie is a poetic and thoughtful way to express your feelings. It works beautifully as a centerpiece for a gift box filled with other treats.
Ingredients
- Chilled sugar cookie dough
- Tan royal icing
- White royal icing
- Black stiff peak royal icing
- Bright red royal icing
- Brown petal dust for shading
Equipment
- Rectangle or scroll shaped cookie cutter
- Piping bags
- Extra fine round tips
- Small dry brush
DIY Instructions
- Bake your rectangular cookies and let them cool on a flat surface.
- Outline and fill the center with tan icing and let it dry for one hour.
- Pipe two thick white cylinders at the top and bottom to represent the rolled paper.
- Allow the entire cookie to dry overnight so the surface is very hard.
- Use a dry brush and brown petal dust to lightly shade the edges of the tan area.
- Fit a piping bag with an extra fine tip and fill it with black icing.
- Carefully write your message in a flowing script in the center of the scroll.
- Squeeze a small circle of red icing at the bottom and swirl it into a wax seal shape.
- Let the message dry completely before moving the cookie.
39. Royal Purple Masquerade Mask

A mysterious and ornate mask adds a touch of drama to your holiday collection. Deep purple icing provides a royal background for the swirling gold patterns. Shimmering silver gems and golden feathers decorate the top edge for a high fashion look. This design captures the excitement of a secret ball or a fancy costume party.
The cutouts for the eyes give the mask a realistic and wearable appearance. You can see how the gold details are raised, adding a lot of texture to the piece. This cookie is a bold and creative choice for anyone who loves a bit of mystery. It stands out beautifully against more traditional heart designs.
Ingredients
- Chilled sugar cookie dough
- Deep purple royal icing
- Gold royal icing
- Small silver edible gems
- Gold edible luster dust
Equipment
- Mask shaped cookie cutter
- Piping bags
- Fine round tips
- Scribe tool
- Long wooden skewer
DIY Instructions
- Bake your mask cookies and ensure the eye holes remain clear.
- Outline and fill the entire mask with deep purple icing and let it set.
- Use gold icing to pipe three large feathers standing up from the top center.
- Draw thin, swirling lines of gold across the purple surface for an ornate look.
- Place silver gems at the corners of the eyes while the gold icing is wet.
- Use a scribe tool to tidy up any small bumps in the metallic lines.
- Let the mask dry for at least six hours.
- If you want a handheld look, use a little wet icing to attach a skewer to the back.
- Allow the attachment to dry fully before picking up the mask by the handle.
Key Takeaways
- Keep your dough cold at all times to prevent melting. Chilled butter is the secret to maintaining those sharp edges during the baking process.
- Measure the thickness of your dough with a ruler or guide. Consistent height ensures that every cookie in the oven finishes at the same moment.
- Allow the bottom layer of icing to set before you add fine lines. This step stops different colors from merging and keeps your designs looking clean.
- Use a high quality no spread recipe to ensure the shapes remain distinct. Proper ingredients provide the structure needed for complex decorating techniques.
Baking for someone you love is a wonderful way to celebrate any romantic occasion. These thirty nine designs offer something for every skill level and personal style. You can choose from simple watercolor hearts or intricate lace patterns.
Every cookie tells a unique story of effort and affection. Remember that steady practice makes your piping cleaner over time. Enjoy the process of creating these sweet gifts for your friends and neighbors. Your February celebration will feel much more special with a platter of beautiful sweets at The Recipe Fork.