Valentine’s Day deserves something more exciting than a box of store bought candy. Most people stick to simple chocolate coating when they dip fruit at home. You can transform a basic berry into a work of art with a few creative tricks. This list features forty unique designs that look professional and taste amazing.
Valentines Chocolate Covered Strawberry
Making these treats does not require a degree in pastry arts. You only need some fresh fruit and a bit of patience. Each idea below comes with a simple guide to help you succeed. Your partner or friends will be shocked by the beauty of these handmade gifts. Let us move past the plain berries and try something bold this year.
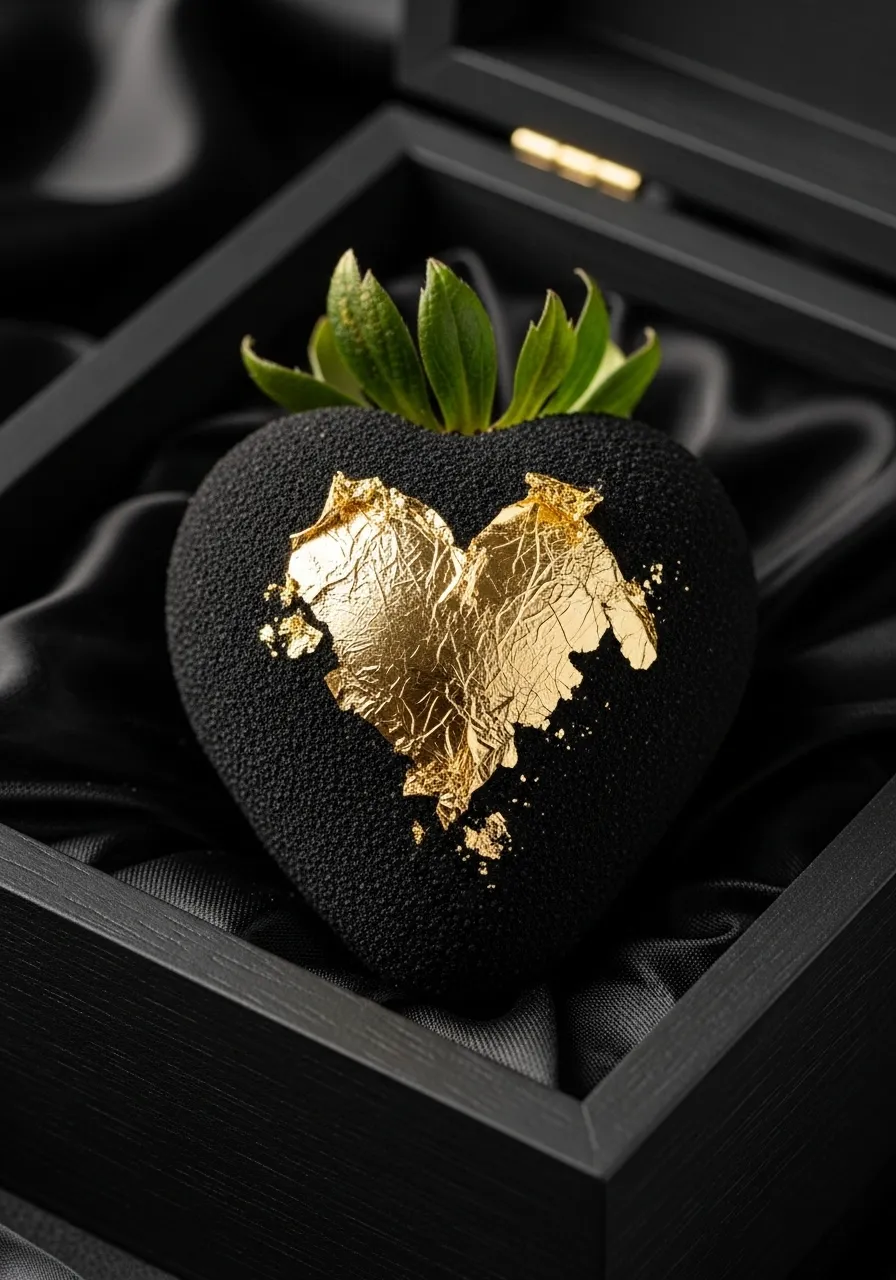
This design screams luxury and sophistication. The strawberry does not have a typical shiny finish. Instead, it boasts a deep, matte black coating that looks almost like velvet fabric. This dark backdrop makes the leaves look vibrant and fresh against the moody base.
Right in the center sits a stunning heart made from edible gold leaf. The golden shape isn’t cut cleanly. It has rough, distressed edges that give it a cool fractured appearance. The striking contrast between the dark noir coating and the bright metallic gold is absolutely beautiful.
Presenting this treat shows serious effort and taste. Your Valentine will be blown away by how elegant this looks. It is definitely far beyond the average grocery store dipped fruit.
Required Ingredients
Large, fresh strawberries (washed and completely dried)
Black candy melts (or dark chocolate with oil-based black food coloring)
Edible gold leaf sheets
Required Equipment
Microwave-safe bowl
Baking sheet lined with parchment paper
Tweezers (clean, for kitchen use)
Small, soft, dry food-safe paintbrush
DIY Instructions Step by Step
Prepare the Fruit: Ensure your strawberries are washed and absolutely dry. Any moisture on the berry skin will cause the chocolate coat to seize up and look lumpy.
Melt the Coating: Place your black candy melts in a microwave-safe bowl. Heat them in the microwave for 30 seconds at half power. Stir. Repeat in 15-second intervals, stirring vigorously in between, until the melts are completely smooth.
Dip the Berry: Hold the strawberry firmly by the green leaves. Dip it fully into the melted black coating. Lift it straight up and gently shake it to let excess coating drip back into the bowl.
Let it Set: Carefully place the dipped strawberry onto the parchment paper. Allow it to sit at room temperature until the black coating is completely hard to the touch.
Apply the Gold: This step requires patience because gold leaf is very delicate. Using tweezers, carefully tear off small pieces of the edible gold leaf sheet. Gently press the pieces onto the center of the hardened strawberry to form a rough heart shape.
Create the Texture: Use the dry paintbrush to gently tap the gold leaf down so it sticks. Brush outward lightly to break the edges of the gold, creating that distressed, fractured look. Blowing lightly on it can also help remove loose gold flakes.
2. Pink Crystal Geode Heart
Valentines Chocolate Covered Strawberry
This design features a soft pink and white marble finish. A striking heart shaped hollow sits in the center. It holds glowing pink sugar crystals that look like raw gemstones. A thin silver border frames the crystal center for a polished look.
Soft colors make this treat feel very romantic. The texture of the rock candy provides a satisfying crunch against the smooth chocolate. Each berry looks like a piece of jewelry found in a fancy boutique.
Anyone receiving this will appreciate the artistic effort. It stands out because of the three dimensional effect of the crystals. You can easily customize the colors to match any theme.
Required Ingredients
Large fresh strawberries
White candy melts
Pink oil based food coloring
Pink rock candy or coarse sugar crystals
Silver edible luster dust
Clear corn syrup
Required Equipment
Small microwave safe bowls
Parchment paper
Toothpicks
Small food safe paintbrush
Paring knife
DIY Instructions Step by Step
Melt the white candy melts in a bowl using 30 second intervals until smooth.
Pour a few drops of pink coloring into the white chocolate and swirl it gently with a toothpick.
Hold a strawberry by the stem and dip it into the marbled chocolate.
Place the berry on parchment paper and let it harden completely.
Use a small knife to carefully scrape out a heart shape from the front of the chocolate shell.
Brush a tiny amount of corn syrup inside the heart shaped hole.
Press the pink rock candy into the syrup until the heart is full.
Mix a drop of water with silver luster dust and paint a thin line around the edge of the crystal heart.
3. Vintage Lace and Pearl
Valentines Chocolate Covered Strawberry
Dusty rose chocolate creates a muted and classy base for this strawberry. Intricate white piping mimics the look of handmade lace. Tiny edible pearls sit at the center of the patterns to add a touch of luxury.
The details look very professional but require only a steady hand. This style reminds me of a vintage wedding or a high tea party. It feels delicate and thoughtful for a special Valentine gift.
Green leaves provide a natural contrast to the soft pink tones. This design works best on larger berries to give you enough room for the patterns. Your guests will think these came from a professional bakery.
Required Ingredients
Firm fresh strawberries
Pink or rose colored candy melts
White royal icing or white chocolate in a piping bag
Small edible sugar pearls
Required Equipment
Microwave safe bowl
Piping bag with a very fine round tip
Tweezers for placing pearls
Baking sheet with parchment paper
DIY Instructions Step by Step
Dry your strawberries thoroughly after washing so the chocolate sticks well.
Melt the pink candy melts and dip each berry until it is fully covered up to the leaves.
Set the berries on parchment paper to dry until the surface is firm.
Fill a piping bag with white icing or melted white chocolate.
Draw small semi circles around the top of the berry to start the lace look.
Add tiny dots and crisscross lines inside the semi circles to build the lace pattern.
Use tweezers to carefully place a sugar pearl in the center of the lace circles while the icing is still wet.
Let the decorations dry for at least twenty minutes before moving the fruit.
4. Crimson Drip Noir
Valentines Chocolate Covered Strawberry
Glossy black chocolate provides a bold and moody background for this design. Deep red chocolate drips down the sides like velvet. A single dark red rose sits on top to complete the gothic romance aesthetic.
This berry looks dramatic and very modern. The contrast between the dark base and the bright red drip is eye catching. It is a great choice for someone who prefers an edgy style over traditional pastels.
Candlelight makes the shiny surface of the chocolate sparkle. The rose adds a floral scent that pairs beautifully with the fruit. This design is simple to make but looks very expensive.
Required Ingredients
Large fresh strawberries
Black candy melts
Red candy melts
Small edible roses or food safe fresh roses
Required Equipment
Two microwave safe bowls
Spoons for drizzling
Parchment paper
Small plate for display
DIY Instructions Step by Step
Melt the black chocolate in a bowl until it is thin and runny.
Dip the strawberry into the black chocolate and tap off any extra liquid.
Place the berry on parchment paper and wait for it to dry completely.
Melt the red chocolate and let it cool slightly so it becomes a bit thick.
Use a spoon to pour a small amount of red chocolate onto the top of the black berry.
Gently push the red chocolate over the edges so it runs down in thick drips.
Press a small rose onto the top of the berry while the red chocolate is still sticky.
Set the berry in a cool place until the red drip is solid.
5. Iridescent Bubble Dream
Valentines Chocolate Covered Strawberry
This berry features a magical pearlescent finish that changes color in the light. Clear sugar bubbles and white pearls cluster around the bottom. Gold flakes add a final touch of glitter to the design.
The effect is bubbly and lighthearted. It looks like a strawberry dipped in a glass of sparkling champagne. This design is wonderful for a celebratory Valentine brunch.
Every angle reveals a different shimmer. The clear bubbles catch the light and create a beautiful glow. It is a sophisticated way to serve fruit in a fancy glass.
Required Ingredients
Fresh strawberries
White candy melts
Iridescent edible luster dust
Clear gelatin bubbles or round clear sprinkles
Edible gold leaf or gold flakes
White sugar pearls
Required Equipment
Small bowls
Soft food safe paintbrush
Tweezers
Champagne glass for serving
DIY Instructions Step by Step
Dip your strawberry in melted white chocolate and let it dry on parchment paper.
Dip a dry paintbrush into the iridescent luster dust.
Rub the dust all over the white chocolate shell until it shines like a pearl.
Melt a tiny bit more white chocolate to use as glue.
Apply small dots of chocolate to the bottom half of the berry.
Stick the clear bubbles and white pearls onto the dots using tweezers.
Use the tweezers to place tiny gold flakes between the bubbles for extra sparkle.
Place the finished berry inside a clean glass for a beautiful presentation.
6. Artistic Spring Drizzle
Valentines Chocolate Covered Strawberry
Bright colors and wild patterns make this berry look like a piece of modern art. Orange and pink chocolate drizzles crisscross over a white base. Dried blue flower petals and golden sprinkles add texture and life.
The design is messy in a very intentional and beautiful way. It feels energetic and fun for a Galentine party. You can use any colors you like to match your mood.
The dried petals provide a unique earthy flavor. This berry is not just a treat but a visual experience. It is very easy to create because you do not need to be precise.
Required Ingredients
Fresh strawberries
White, pink, and orange candy melts
Dried edible cornflower petals
Gold sugar sprinkles
Required Equipment
Three microwave safe bowls
Spoons or forks for drizzling
Parchment paper
DIY Instructions Step by Step
Cover the strawberry in a base layer of melted white chocolate and let it set.
Melt the pink and orange chocolate in separate bowls.
Dip a fork into the pink chocolate and swing it back and forth over the berry to create thin lines.
Repeat the same motion with the orange chocolate to layer the colors.
Toss the gold sprinkles over the wet drizzle immediately.
Sprinkle the dried blue petals over the top while the lines are still tacky.
Let the berry sit until all the layers of chocolate are hard.
7. Modern Mosaic Stone
Valentines Chocolate Covered Strawberry
This strawberry looks like a piece of polished terrazzo or mosaic stone. Small geometric shapes in brown and pink are pressed into a cream colored base. The smooth surface makes it look like it was carved from marble.
The earthy tones feel very calm and stylish. It is a great alternative to the usual bright red Valentine decorations. This design focuses on shape and pattern.
Every piece of chocolate is unique. Guests will be curious about how you achieved such a clean and flat pattern. It is a very impressive technique for a home cook.
Required Ingredients
Large strawberries
White, dark, and pink candy melts
Required Equipment
Flat baking sheet
Parchment paper
Small knife or kitchen scissors
Microwave safe bowls
DIY Instructions Step by Step
Melt small amounts of pink and dark chocolate.
Spread them very thinly onto a piece of parchment paper and let them harden.
Use a knife or scissors to break the thin chocolate sheets into small irregular triangles and squares.
Dip your strawberry into melted white chocolate.
While the white chocolate is still very wet, press the colored shards flat into the surface.
Try to leave small gaps between the pieces like a real mosaic.
Let the berry dry completely on a flat surface.
8. Enchanted Mossy Forest
Valentines Chocolate Covered Strawberry
A fuzzy green coating makes this berry look like it was plucked from a fairy tale. Tiny edible mushrooms and flowers grow out of the green surface. Clear gel drops mimic the look of morning dew.
The texture is very surprising and fun to touch. This whimsical design is great for a themed party or a nature lover. It brings a bit of outdoor magic to the dessert table.
Using different shades of green adds depth to the mossy look. The small details like the mushrooms make it feel very special. It is a creative departure from standard chocolate dipping.
Required Ingredients
Fresh strawberries
Milk chocolate
Green graham cracker crumbs or green sanding sugar
Small fondant mushrooms and flowers
Clear piping gel
Required Equipment
Bowls for dipping and coating
Small spoon
Toothpick
DIY Instructions Step by Step
Dip the strawberry in melted milk chocolate.
Roll the wet berry in a bowl of green crumbs or sugar until it is fully coated and looks fuzzy.
Let the chocolate set so the green layer stays in place.
Use a tiny dot of melted chocolate to stick the fondant mushrooms and flowers onto the berry.
Dip a toothpick into clear piping gel.
Place small round drops of the gel onto the green surface to look like water droplets.
Arrange the berries on a wooden board for a rustic forest look.
9. Molten Rose Gold Fault
Valentines Chocolate Covered Strawberry
This design features a rugged black texture that looks like volcanic rock. A bright rose gold heart seems to glow from a crack in the center. The metallic finish provides a high end and luxurious feel.
The contrast between the rough black and the smooth gold is stunning. This berry looks like a precious treasure found deep in the earth. It is a bold statement piece for a Valentine gift box.
Long drips of gold make the design feel dynamic. The matte black finish helps the metallic heart stand out even more. This is a very sophisticated look for a modern romance.
Required Ingredients
Large strawberries
Black candy melts
Rose gold edible paint or luster dust
Clear alcohol or lemon extract (for mixing dust)
Required Equipment
Microwave safe bowl
Small food safe paintbrush
Parchment paper
DIY Instructions Step by Step
Melt the black chocolate and dip the strawberry to get a thick coat.
Tap the berry with your finger while the chocolate is drying to create a rough and bumpy texture.
Let the black shell harden completely.
Pipe a thick heart shape onto the front of the berry using more black chocolate to create a raised edge.
Allow that new layer to dry.
Mix your rose gold luster dust with a few drops of lemon extract to make a thick paint.
Paint the inside of the raised heart and the surrounding “cracks” with the rose gold mixture.
Add a few vertical gold lines coming down from the heart to look like molten metal.
10. Golden Gala Tuxedo
Valentines Chocolate Covered Strawberry
This berry is dressed up in a classic black and white tuxedo. A tiny gold bow tie and buttons add a festive and formal touch. It is the ultimate treat for a fancy Valentine date night.
The clean lines make the strawberry look very sharp and professional. It is a fun way to represent a “dressed up” version of a classic snack. This design is always a huge hit at parties.
The gold accents provide a pop of color against the monochromatic base. You can make a matching “bride” berry using white lace patterns. It is a timeless and elegant design.
Required Ingredients
Fresh strawberries
White candy melts
Black candy melts
Gold star or round sprinkles for buttons
Gold bow tie sprinkle or fondant piece
Required Equipment
Two microwave safe bowls
Parchment paper
Tweezers
DIY Instructions Step by Step
Dip the entire strawberry into white chocolate first and let it dry.
Hold the berry and dip one side at an angle into the black chocolate.
Dip the other side at an angle to create a “V” shape in the white center.
Let the black chocolate dry on parchment paper.
Melt a tiny bit of chocolate to use as glue for the details.
Use tweezers to stick the gold bow tie at the top of the white “V” shape.
Place two or three gold sprinkles vertically below the bow tie to look like buttons.
Set the berry in a cool place until all the parts are firmly attached.
11. Himalayan Salt Dusk
Valentines Chocolate Covered Strawberry
This design blends sweet and salty flavors in a beautiful way. A smooth tan chocolate coating meets a rich dark base. One side of the berry is covered in chunky pink Himalayan salt crystals that catch the light.
The contrast between the earthy pink salt and the dark chocolate looks stunning. It feels high end and rustic at the same time. This treat offers a complex taste for someone who dislikes desserts that are too sugary.
Serve these on a stone platter to highlight the natural textures. The crunch of the salt paired with juicy fruit is a unique experience. Your Valentine will appreciate this sophisticated flavor profile.
Required Ingredients
Large fresh strawberries
Milk chocolate or caramel candy melts
Dark chocolate candy melts
Coarse pink Himalayan salt crystals
Required Equipment
Two microwave safe bowls
Baking sheet with parchment paper
Small spoon
DIY Instructions Step by Step
Wash your strawberries and make sure they are completely dry because water ruins melted chocolate.
Melt the milk chocolate or caramel in a bowl using short 20 second bursts in the microwave until it is smooth.
Melt the dark chocolate in a separate bowl using the same method.
Dip the strawberry halfway into the lighter chocolate and let it sit on the parchment paper until it is hard.
Dip the bottom half of the berry into the dark chocolate at an angle.
Press the pink salt crystals into the wet dark chocolate on only one side of the berry.
Place the berry back on the paper and let the whole thing set in a cool room.
12. Cosmic Galaxy Glow
Valentines Chocolate Covered Strawberry
This berry looks like a piece of the night sky. Deep blues and purples swirl together to create a vibrant nebula effect. Small silver stars and pearls are scattered across the surface to represent far away galaxies.
A silver crescent moon sits right at the top near the leaves. This design feels magical and out of this world. It is a great choice for a Valentine who loves space or astrology.
The glossy finish makes the colors pop against a dark background. Adding edible glitter provides a soft shimmer that looks like stardust. Each berry is a tiny edible universe.
Required Ingredients
Fresh strawberries
White candy melts
Navy blue, purple, and pink oil based food coloring
Silver star sprinkles and silver pearls
Edible silver luster dust
Silver fondant or a moon shaped sprinkle
Required Equipment
Several small bowls
Toothpicks
Soft food safe paintbrush
Parchment paper
DIY Instructions Step by Step
Melt a large bowl of white chocolate and divide it into three smaller bowls.
Color one bowl dark blue, one purple, and leave the last one light pink.
Pour small amounts of each color back into one main bowl but do not stir them.
Dip the strawberry and swirl it as you pull it out to get the marbled galaxy look.
Set the berry on parchment paper and immediately toss on the silver stars and pearls while it is wet.
Use a tiny bit of melted chocolate to stick the silver moon near the green leaves.
Mix a drop of water with silver luster dust and flick the brush over the berry to create tiny silver dots.
Let the design dry for thirty minutes before touching it.
13. Retro Heart Throb
Valentines Chocolate Covered Strawberry
Bright red glaze and crisp white chocolate create a fun vintage diner vibe. Small red glittery hearts line the edge where the colors meet. A playful white chocolate swirl stands up from the top like a straw in a milkshake.
A single red drop hangs from the swirl for a dramatic effect. This design feels energetic and nostalgic. It is a lighthearted way to show your love on Valentine Day.
The smooth shiny surface reflects light beautifully. It reminds me of classic candy apples but with a chocolatey twist. This design is a guaranteed conversation starter at any party.
Required Ingredients
Fresh strawberries
White candy melts
Red mirror glaze or red candy melts
Red heart shaped sprinkles
Red food coloring
Required Equipment
Microwave safe bowls
Small piping bag
Parchment paper
Toothpick
DIY Instructions Step by Step
Dip the bottom half of your strawberry into melted white chocolate and let it harden on paper.
Dip the top half of the berry into red glaze or melted red chocolate.
Place red heart sprinkles along the line where the white and red colors meet.
Pipe a thick curved line of white chocolate onto parchment paper and let it dry until it is a solid “straw” shape.
Use a dot of melted chocolate to stick the white straw into the top of the strawberry.
Use a toothpick to place a single drop of red glaze on the end of the straw.
Let the entire berry sit until the decorations are firm and steady.
14. Malachite Green Marble
Valentines Chocolate Covered Strawberry
Striking green and white swirls mimic the look of a malachite gemstone. This design feels very organic and luxurious. A jagged line of gold leaf runs down the side to add a metallic sparkle.
The pattern looks very complex but is easy to achieve with a few simple steps. It makes the fruit look like a carved piece of art. This style is great for someone who appreciates bold colors and unique textures.
Displaying these on a black marble tray makes them look even more expensive. The gold accents highlight the rich green tones. It is a very classy take on a dipped berry.
Required Ingredients
Large fresh strawberries
White candy melts
Dark green and light green oil based food coloring
Edible gold leaf
Required Equipment
Small bowls
Toothpicks
Tweezers
Parchment paper
DIY Instructions Step by Step
Melt the white chocolate and split it into two bowls.
Color one bowl dark green and the other light green.
Drop spoonfuls of both green colors into a fresh bowl of white chocolate.
Use a toothpick to swirl the colors together very slightly so you can still see the separate lines.
Dip your strawberry into the green mix and twist it as you lift it out.
Place the berry on parchment paper and let it harden completely.
Use tweezers to apply small torn pieces of gold leaf in a vertical line down the berry.
Gently press the gold leaf with a dry finger so it sticks to the surface.
15. Crushed Berry Velvet
Valentines Chocolate Covered Strawberry
This strawberry features a soft pink coating topped with tart crushed berries. A small window in the front reveals a fresh slice of the fruit inside. The texture looks like velvet and feels very rustic.
Using freeze dried raspberries gives the berry a natural and intense flavor. It is a great alternative to using artificial sprinkles. The deep red dust provides a beautiful contrast to the pale pink base.
This design smells as good as it looks. It feels very artisanal and homemade in the best way. It is a great option for a breakfast in bed surprise.
Required Ingredients
Fresh strawberries
Pink candy melts
Freeze dried raspberries or strawberries
Required Equipment
Microwave safe bowl
Plastic bag and a rolling pin
Parchment paper
Small knife
DIY Instructions Step by Step
Put your freeze dried berries in a plastic bag and crush them into a fine dust with a rolling pin.
Melt the pink chocolate in a bowl until it is very smooth.
Dip the strawberry into the pink chocolate to cover it completely.
Immediately roll the wet berry in the crushed fruit dust until it is fully coated.
Set the berry on parchment paper and let it dry.
Use a small sharp knife to carefully cut a heart shape out of the front of the coating.
Peel away the small piece of chocolate to show the bright red fruit underneath.
Clean the edges of the cut with the tip of the knife for a neat finish.
16. Cyber Circuit Noir
Valentines Chocolate Covered Strawberry
Neon pink and green lines create a futuristic circuit board pattern over a matte black base. Small silver pearls act as nodes at the end of each path. This design feels very modern and tech inspired.
A silver nut at the top adds a cool industrial touch. It is a fun choice for a Valentine who loves gaming or technology. The bright colors really stand out against the dark chocolate.
The matte finish gives it a sleek and professional look. It proves that chocolate strawberries can be edgy and cool. This design is unlike anything you would find in a store.
Required Ingredients
Firm fresh strawberries
Black candy melts
Neon green and neon pink candy melts
Silver sugar pearls
Silver edible paint
Required Equipment
Small bowls
Three piping bags with very tiny tips
Tweezers
DIY Instructions Step by Step
Dip your strawberry in black chocolate and let it dry until the surface is matte.
Melt the pink and green chocolate and put them into separate piping bags.
Pipe straight lines that turn at 90 degree angles all over the berry.
Use the green for one side and the pink for the other side of the berry.
Use tweezers to place a silver pearl at the ends of some of the lines.
Paint a small piece of chocolate or a nut with silver edible paint.
Stick the silver piece to the top of the berry using a dot of melted chocolate.
Let the lines dry completely so they do not smudge.
17. Iridescent Shell & Pearl
Valentines Chocolate Covered Strawberry
This berry looks like a treasure from the bottom of the sea. A large white chocolate shell covers the front with a pearly shimmer. A single large edible pearl sits at the base of the shell.
A tiny silver seahorse charm adds a whimsical nautical detail. The iridescent finish changes color as you move the berry. It feels very elegant and dreamlike.
Setting this on a bed of brown sugar sand completes the look. This design is wonderful for a beach themed Valentine celebration. It is a very delicate and beautiful treat.
Required Ingredients
Fresh strawberries
White candy melts
Iridescent edible luster dust
One large edible white pearl
Silver seahorse sprinkle or charm
Required Equipment
Microwave safe bowl
Soft food safe paintbrush
Seashell shaped silicone mold
Tweezers
DIY Instructions Step by Step
Press some melted white chocolate into a small seashell mold and let it freeze for ten minutes.
Pop the chocolate shell out of the mold and set it aside.
Dip your strawberry into white chocolate and let it dry.
Rub the iridescent dust all over the strawberry and the separate chocolate shell until they shine.
Put a small dab of melted chocolate on the back of the shell and press it onto the front of the berry.
Use another dot of chocolate to stick the large pearl at the bottom of the shell.
Use tweezers to place the silver seahorse charm at the top.
Keep the berry in a cool place so the heavy decorations stay attached.
18. Geometric Obsidian Slice
Valentines Chocolate Covered Strawberry
Tiny black nonpareils create a textured matte surface that looks like volcanic rock. A sharp silver geometric shard sticks out from the side for a bold look. The red fruit peeks through at the top for a pop of color.
This design is very minimalist and high fashion. It looks like a sculpture you might find in a modern art gallery. The contrast between the rough texture and the smooth silver is very striking.
It feels very sophisticated and masculine. This is a great choice for someone who likes clean lines and dark colors. It makes a very powerful visual statement.
Required Ingredients
Large strawberries
Dark chocolate candy melts
Black nonpareil sprinkles
Silver edible luster dust
White candy melts
Required Equipment
Small bowls
Flat baking sheet and parchment paper
Sharp knife
DIY Instructions Step by Step
Melt white chocolate and spread it thin on parchment paper.
Let it harden and then cut out a long sharp triangle shape with a knife.
Paint the triangle with silver luster dust until it looks like metal.
Dip your strawberry into melted dark chocolate.
Roll the wet berry in black sprinkles until the entire surface is covered.
Use a knife to poke a small slit into the side of the strawberry.
Slide the silver triangle into the slit so it stands up firmly.
Place the berry on a flat surface to set.
19. Sakura Blossom Red
Valentines Chocolate Covered Strawberry
A vibrant red base provides a bold background for delicate white cherry blossoms. Thin gold lines represent branches that wrap around the berry. Tiny pink petals look like they are floating in the breeze.
This design feels very peaceful and romantic. It is inspired by traditional Japanese art and spring mornings. The white flowers look very crisp against the deep red chocolate.
The 3D effect of the blossoms adds a lovely texture. It is a very thoughtful and artistic way to decorate a strawberry. Your Valentine will be impressed by the fine detail.
Required Ingredients
Fresh strawberries
Red candy melts
White fondant or thick white icing
Gold edible paint
Pink flower sprinkles
Required Equipment
Microwave safe bowl
Small food safe paintbrush
Small flower shaped plunger cutter
DIY Instructions Step by Step
Dip the strawberry into red chocolate and let it harden on parchment paper.
Roll out white fondant very thin and cut out tiny flowers with your cutter.
Use a tiny dot of water to stick the white flowers onto the red berry.
Dip your paintbrush into gold paint and draw thin wavy lines between the flowers.
Add tiny gold dots to the center of each white flower.
Stick a few pink petal sprinkles around the branches to show falling blossoms.
Let the paint and fondant dry for at least one hour.
20. Golden Honey Drip
Valentines Chocolate Covered Strawberry
Rich milk chocolate is covered in yellow sprinkles that look like pollen. A thick gold honey drip runs down the side and pools at the bottom. A small edible bee and a honeycomb piece sit at the top.
The warm colors make this design feel very cozy and sweet. It looks like a summer day in a garden. This is a great choice for someone who loves nature and natural treats.
A touch of gold leaf adds a bit of luxury to the rustic theme. The honey flavor pairs wonderfully with the fresh strawberry. It is a very cute and charming design.
Required Ingredients
Large fresh strawberries
Milk chocolate candy melts
Yellow nonpareil sprinkles
Thick caramel sauce or gold mirror glaze
Small edible bee decoration
Small piece of real honeycomb or yellow fondant
Required Equipment
Microwave safe bowl
Spoon for drizzling
Tweezers
DIY Instructions Step by Step
Dip the strawberry in melted milk chocolate.
Toss yellow sprinkles over the wet chocolate but leave a small space at the top clear.
Let the chocolate set until it is hard.
Use a spoon to pour thick caramel or gold glaze over the top so it drips slowly down one side.
Use tweezers to place the small piece of honeycomb on the top of the berry.
Stick the edible bee onto the honeycomb while the glaze is still sticky.
Let the berry sit on a plate until the drip stops moving.
21. Victorian Sapphire Cameo
Valentines Chocolate Covered Strawberry
This design features a striking sky blue base that looks like fine porcelain. A detailed white cameo of a lady sits in the center. Small white pearls encircle the portrait to create a classic jewelry look. A tiny cream bow at the top adds a soft touch.
Regal colors make this treat feel very special and calming. It is a wonderful choice for a Valentine who loves history or vintage fashion. Everyone will think these are expensive antiques rather than fruit.
Presenting these in a velvet box enhances the luxury feel. The intricate details of the cameo show immense care. You can easily create a set that looks like a royal collection.
Required Ingredients
Large fresh strawberries
Light blue candy melts
White fondant or white chocolate
Edible white sugar pearls
Small amount of cream frosting
Required Equipment
Microwave safe bowl
Cameo silicone mold
Tweezers for kitchen use
Parchment paper
Small piping bag
DIY Instructions Step by Step
Melt the blue chocolate in a bowl until it is thin and smooth.
Dip the strawberry into the blue chocolate and let it dry on parchment paper.
Press a small piece of white fondant into your cameo mold.
Pop the fondant shape out of the mold carefully.
Apply a tiny dot of melted chocolate to the back of the white cameo.
Press the cameo onto the front of the blue strawberry.
Use tweezers to place white sugar pearls in a circle around the cameo.
Pipe a tiny white bow at the top of the pearl circle to finish the look.
22. Arabian Nights Spice Blend
Valentines Chocolate Covered Strawberry
Warm colors and rich textures define this unique strawberry. Three distinct stripes of green, orange, and deep red cover the surface. Each section uses natural ingredients like crushed nuts and dried petals. A single star anise on top completes the look.
This berry smells like an exotic market in the best way. It is not just sweet but offers a savory and floral complexity. Using actual spices makes it feel very grounded and artisanal.
Health conscious friends will love the use of natural toppings. The colors pop against the dark chocolate base. It provides a unique taste experience that surprises the palate.
Required Ingredients
Fresh strawberries
Dark chocolate candy melts
Crushed pistachios
Dried orange zest or saffron threads
Dried edible rose petals
One whole star anise
Required Equipment
Microwave safe bowl
Three small plates
Parchment paper
DIY Instructions Step by Step
Put the pistachios, orange zest, and rose petals onto three separate plates.
Melt your dark chocolate in a bowl until it is runny.
Dip a strawberry into the chocolate and lift it out.
Roll the left side of the wet berry in the green pistachios.
Roll the middle section in the orange zest.
Press the right side of the berry into the red rose petals.
Place the berry on parchment paper and let it sit.
Stick a star anise to the top near the leaves using a drop of chocolate.
23. Satin Slipper Ballet Ribbon
Valentines Chocolate Covered Strawberry
A matte pink coating gives this strawberry a very soft and feminine appearance. Thin light pink ribbons crisscross over the front to mimic ballet slippers. Tiny silver gems sit where the ribbons meet. A large silk bow at the top adds a grand finish.
The design feels very delicate and graceful. It is a wonderful gift for a dancer or anyone who loves a soft aesthetic. The ribbons look like real fabric but are entirely edible.
Soft lighting makes the matte finish look like velvet. This treat is almost too pretty to eat. It works wonderfully for a pink themed Valentine party.
Required Ingredients
Large firm strawberries
Pink candy melts
Light pink fondant
Silver sugar pearls
Small pink ribbon for the stem
Required Equipment
Microwave safe bowl
Pizza cutter or sharp knife
Tweezers
Parchment paper
DIY Instructions Step by Step
Melt the pink chocolate and dip your strawberry to get a smooth coat.
Let the berry dry completely on a piece of parchment paper.
Roll out a small piece of pink fondant until it is paper thin.
Use a pizza cutter to slice the fondant into very narrow strips.
Wrap one strip diagonally across the berry.
Wrap a second strip in the opposite direction to create a cross shape.
Use tweezers to place a silver pearl where the two strips meet.
Tie a small physical ribbon around the green leaves of the strawberry.
24. Midnight Forest Cherry Delight
Valentines Chocolate Covered Strawberry
This treat looks like a miniature gourmet cake. Dark chocolate drips over a white cream layer and a rich brownie base. Thin chocolate curls pile high on top. A bright red sugared cherry sits right in the middle.
Layers provide a great mix of textures in every bite. It looks incredibly decadent and heavy. This is a great choice for a serious chocolate lover who wants more than just fruit.
The sugar on the cherry sparkles like fresh snow. It is a very filling dessert compared to a standard dipped berry. Your guests will feel like they are at a high end bakery.
Required Ingredients
Strawberries
Dark chocolate and white chocolate candy melts
Small pre made brownie circles
White frosting
Chocolate shavings
Maraschino cherries with stems
Required Equipment
Microwave safe bowls
Small spoons
Piping bag with a star tip
DIY Instructions Step by Step
Cut the pointed tip off the bottom of the strawberry so it can stand upright.
Place the flat bottom of the berry onto a small circle of brownie.
Melt the white chocolate and pour a small amount over the top of the berry.
Melt the dark chocolate and drizzle it over the white layer so it drips down.
Put some frosting into a piping bag and squeeze a small swirl on the very top.
Press a handful of chocolate shavings into the wet frosting.
Roll a cherry in some white sugar to make it look frosty.
Place the cherry on top of the frosting swirl to finish the dessert.
25. Monet Enchanted Lily Pond
Valentines Chocolate Covered Strawberry
Blue and purple strokes of chocolate create a moving water effect. Small green lily pads float across the surface. Tiny pink lotus flowers with clear dew drops sit on the leaves. The whole design looks like a classic oil painting.
Vivid colors make this strawberry look very artistic. It captures the beauty of a garden pond in a single bite. This design is very impressive because of its hand painted style.
Art lovers will recognize the inspiration immediately. Each berry is a tiny canvas. It is a peaceful and beautiful addition to any dessert tray.
Required Ingredients
Large strawberries
White candy melts
Blue, purple, pink, and green oil based food coloring
Clear piping gel
Required Equipment
Small bowls
Toothpicks or very thin food safe brushes
Parchment paper
DIY Instructions Step by Step
Melt white chocolate and divide it into several small bowls.
Color the bowls blue, purple, pink, and green.
Dip the berry in blue chocolate then quickly swirl in some purple with a toothpick.
Let the “water” layer dry completely on parchment paper.
Use a toothpick to paint small green circles on the berry to look like lily pads.
Use another toothpick to add tiny pink dots on top of the green circles for flowers.
Let the flowers dry for ten minutes.
Place a tiny drop of clear piping gel on the flowers to look like water droplets.
26. Sterling Silver Caviar
Valentines Chocolate Covered Strawberry
A sleek silver metallic top meets a textured black base. Hundreds of tiny black sugar pearls create a realistic caviar look. Small gold flakes are scattered across the silver section. A long silver pick makes it easy to serve.
This berry looks very high fashion and expensive. The shiny silver reflects the light like polished metal. It is a great choice for a fancy evening party or a gala event.
The crunch of the black pearls is very satisfying. It brings a touch of class to any Valentine celebration. You can serve these on a silver platter for maximum effect.
Required Ingredients
Fresh strawberries
White chocolate candy melts
Silver edible luster dust
Black nonpareil sprinkles
Edible gold leaf
Lemon extract
Required Equipment
Microwave safe bowl
Small food safe paintbrush
Silver cocktail picks
Parchment paper
DIY Instructions Step by Step
Dip the top half of your strawberry into melted white chocolate.
Let the chocolate harden completely on a flat surface.
Mix a few drops of lemon extract with silver luster dust to make a paint.
Paint the white chocolate section until it looks like solid silver.
Dip the bottom half of the berry into more melted chocolate.
Roll the wet bottom half in black sprinkles until it is fully covered.
Use a brush to stick a few tiny pieces of gold leaf onto the silver part.
Slide a silver cocktail pick through the green leaves for easy handling.
27. Secret Love Letter
Valentines Chocolate Covered Strawberry
A cream base holds a piece of edible parchment paper. Script writing in black ink covers the surface with romantic words. A deep red wax seal made of chocolate holds the letter in place. The edges of the paper look burnt and old.
Unique storytelling makes this design a standout choice. It feels very personal and classic. It is a wonderful way to send a message to your Valentine without using a card.
Every letter is different and special. The red seal adds a beautiful pop of color to the cream base. This berry is a work of art that tells a story of romance.
Required Ingredients
Strawberries
White candy melts
Edible wafer paper
Black edible ink pen
Red candy melts
Required Equipment
Microwave safe bowl
Wax seal stamp or a small round spoon
Small kitchen torch or lighter
Parchment paper
DIY Instructions Step by Step
Dip your strawberry into melted white chocolate and let it dry.
Write a short romantic message on a small piece of edible wafer paper.
Carefully tear the edges of the paper to make it look old.
Use a lighter to very quickly singe the edges of the paper for a burnt look.
Stick the paper to the front of the berry using a drop of melted chocolate.
Melt the red chocolate and pour a small circle onto a piece of parchment.
Press a wax seal stamp into the wet red chocolate and let it harden.
Peel the red seal off the paper and glue it to the top of your edible letter.
28. Sage Garden Pansy
Valentines Chocolate Covered Strawberry
A soft sage green coating provides a natural and earthy base. A large white and purple pansy flower sits front and center. A thick copper band frames the flower. Small copper sprinkles add a bit of sparkle to the side.
Organic colors feel very calm and stylish. Using real edible flowers makes the treat feel very fresh and high end. The copper accent adds a modern twist to the floral theme.
This design is great for a garden party. The purple of the flower stands out beautifully against the green. It feels like a bite of springtime in the middle of winter.
Required Ingredients
Fresh strawberries
Green candy melts
Fresh edible pansy flowers
Copper luster dust
Small copper sugar beads
Required Equipment
Microwave safe bowl
Tweezers
Small food safe brush
Parchment paper
DIY Instructions Step by Step
Melt the green chocolate and dip the strawberry until it is fully covered.
Let the berry dry on parchment paper until it is hard.
Use a tiny dot of melted chocolate to stick the edible pansy to the front.
Mix a little copper luster dust with a drop of oil or extract.
Paint a thick copper border around the edges of the flower.
While the copper paint is wet, press a few copper beads into the line.
Add a few more beads to the side of the berry for extra detail.
Keep the berry in a cool place so the flower stays fresh.
29. Pink Heart Disco
Valentines Chocolate Covered Strawberry
Hundreds of tiny silver mirror squares cover the entire strawberry. It looks exactly like a miniature disco ball. A single hot pink glitter heart sits on the side to break the silver pattern. The reflection from this berry is amazing.
Fun and loud vibes make this design a party favorite. It is great for a celebratory mood or a night of dancing. You can see your own reflection in the tiny silver tiles.
The pink heart provides a sweet focal point. This berry will catch every light in the room. It is the ultimate choice for a high energy Valentine bash.
Required Ingredients
Large strawberries
Milk chocolate candy melts
Edible silver mirror squares
Pink glitter heart sprinkle
Required Equipment
Microwave safe bowl
Tweezers
Parchment paper
DIY Instructions Step by Step
Dip your strawberry into melted milk chocolate and let it sit for one minute.
Use tweezers to pick up one silver mirror square at a time.
Press the squares into the chocolate starting from the bottom of the berry.
Create straight rows of silver squares as you move toward the top.
Cover the entire surface until no chocolate is visible.
Use a tiny bit of melted chocolate to glue the pink heart to the side.
Adjust any crooked squares while the chocolate is still slightly soft.
Let the berry set for at least twenty minutes until the tiles are firm.
30. Winter Frost Icicle
Valentines Chocolate Covered Strawberry
A red berry peeks through a thick layer of cracked white ice. Small silver beads are frozen inside the white shell. A clear glass icicle hangs nearby to show the cold theme. It looks like the fruit was caught in a snowstorm.
Interesting textures make this design look like real frozen ice. It feels very crisp and cool to the eye. This design is great for a winter wedding or a cold February night.
The silver beads add a subtle metallic shine. Using a translucent coating creates a deep 3D effect. It is a very sophisticated and seasonal treat.
Required Ingredients
Fresh strawberries
White candy melts
Silver sugar beads
Clear coarse sugar crystals
Required Equipment
Microwave safe bowl
Toothpick
Parchment paper
DIY Instructions Step by Step
Dip your strawberry into melted white chocolate to get a thick layer.
Let the chocolate start to set for about thirty seconds.
Use a toothpick to drag jagged lines through the chocolate to look like cracks.
Press silver beads into the deeper cracks while they are still wet.
Toss the clear sugar crystals over the berry to look like frost.
Tap the berry gently to remove any loose sugar.
Place the berry on parchment paper to finish drying.
Serve on a cold white plate to match the winter theme.
31. Abstract Primary Geometric
Valentines Chocolate Covered Strawberry
This design brings modern art directly to your dessert table. Bold red, yellow, and blue sections fill sharp geometric shapes across the surface. Thin black lines separate each color to create a very clean and professional appearance. It looks exactly like a famous abstract painting you might see in a museum gallery.
A striped black and white straw adds a fun and playful touch to the top. This berry is an excellent choice for anyone who loves bold style and bright colors. Every angle provides a new pattern to look at. The contrast makes it pop against a white plate. It proves that simple fruit can become a true masterpiece with a bit of creativity.
Required Ingredients
Large fresh strawberries
White candy melts
Red, yellow, and blue oil based food coloring
Dark chocolate or black candy melts
Required Equipment
Microwave safe bowls
Parchment paper
Piping bag with a very fine tip
Small striped paper straw
DIY Instructions Step by Step
Melt the white chocolate in a bowl until it is thin and smooth.
Divide the melted chocolate into four separate small bowls.
Add red coloring to one, blue to another, and yellow to the third.
Keep the fourth bowl white for the base sections.
Dip the strawberry into the white chocolate first and let it dry on parchment paper.
Use a small spoon to carefully drop patches of red, blue, and yellow onto the white shell.
Melt the black chocolate and put it into a piping bag with a tiny hole.
Draw straight black lines over the edges where the different colors meet to hide the seams.
Stick the paper straw into the top of the berry near the green leaves.
32. Spicy Obsidian Glow
Valentines Chocolate Covered Strawberry
Heat things up with this daring and dark treat. The strawberry features a rough black coating that looks like volcanic rock or obsidian. Bright red dust covers the top for a fiery and energetic appearance. A real dried chili pepper sits on top to hint at the bold flavor profile hidden inside.
Gold flakes add a touch of class to this moody and textured design. This is for the Valentine who loves a bit of heat with their sweet chocolate. It looks mysterious and very high end on a dark serving tray. The smokey vibe makes it a real showstopper for a romantic evening. Your partner will appreciate the unexpected twist on a classic dessert.
Required Ingredients
Firm fresh strawberries
Dark chocolate candy melts
Red sanding sugar or edible red glitter dust
One small dried red chili pepper
Edible gold leaf flakes
Required Equipment
Microwave safe bowl
Baking sheet with parchment paper
Small soft paintbrush
Tweezers
DIY Instructions Step by Step
Melt your dark chocolate in a bowl until there are no lumps left.
Dip the strawberry into the chocolate and wait a few seconds for it to start thickening.
Use the back of a spoon to tap the wet chocolate so it creates a bumpy and rough texture.
Set the berry on parchment paper to harden completely.
Dip the very top of the hardened berry back into a tiny bit of melted chocolate.
Sprinkle the red dust over the wet top section immediately.
Use tweezers to press a few gold flakes onto the sides of the black shell.
Apply a small dot of chocolate to the base of the dried chili and stick it to the top.
33. Blue Willow Kintsugi
Valentines Chocolate Covered Strawberry
This design mimics expensive blue and white porcelain found in fine homes. Intricate hummingbirds and flowers decorate the white chocolate shell in deep blue tones. A jagged gold line runs through the pattern like traditional Japanese repair art. This makes the berry look like a precious and delicate antique that has been mended with gold.
A small white rose sits near the leaves to add more floral charm. The contrast between the deep blue and bright white is classic and elegant. It feels very sophisticated and timeless for a special Valentine gift. Your partner will notice the artistic detail in this unique piece. It is a wonderful way to show deep appreciation for something beautiful.
Required Ingredients
Large fresh strawberries
White candy melts
Blue edible ink pen or blue food coloring
Gold luster dust
Lemon extract
Small white fondant rose
Required Equipment
Microwave safe bowl
Small food safe paintbrush
Parchment paper
DIY Instructions Step by Step
Dip the strawberry into melted white chocolate to get a very smooth base layer.
Allow the berry to dry on parchment paper until the shell is hard to the touch.
Use a blue edible pen to draw small birds and flower shapes all over the white surface.
Mix a tiny drop of lemon extract with the gold luster dust to create a thick gold paint.
Paint a thin and jagged line across the front of the berry to look like a gold crack.
Wait for the gold paint to dry for about five minutes.
Use a tiny bit of melted chocolate to glue the white fondant rose to the top.
34. Salted Caramel Popcorn Crunch
Valentines Chocolate Covered Strawberry
Everyone loves a great mix of sweet and salty flavors in one bite. This berry is covered in crunchy pieces of popcorn for a massive texture boost. A thick caramel drizzle flows over the top to hold everything together. It looks like a fun and fancy snack you would find at a high end fair.
Warm golden colors make this treat look very inviting and cozy. This design is a wonderful choice for a casual movie night date at home. Each bite gives you a juicy strawberry and a satisfying salty crunch. It is simple to make but looks very impressive when served on a wooden board. Your guests will reach for these first.
Required Ingredients
Fresh strawberries
White candy melts
Pre popped salted popcorn
Thick caramel sauce or melted caramel squares
Required Equipment
Microwave safe bowls
Spoon for drizzling
Parchment paper
DIY Instructions Step by Step
Melt the white chocolate and dip your strawberry to cover it completely.
Crush some of the popcorn into smaller bits so they stick better.
Press the popcorn pieces into the wet white chocolate before it hardens.
Set the berry on parchment paper and let the chocolate set firmly.
Warm up your caramel sauce until it is easy to pour.
Use a spoon to drizzle thick lines of caramel back and forth over the popcorn layer.
Add one whole piece of popcorn to the very top for a finished look.
Let the caramel cool down before serving so it does not slide off.
35. Royal Pomegranate Crown
Valentines Chocolate Covered Strawberry
Treat your Valentine like royalty with this majestic and grand design. The berry has a shimmering rose gold finish that looks like polished metal. A laurel wreath frames a heart made of bright red pomegranate seeds in the center. A tiny gold crown sits at the top to complete the regal look.
Deep red seeds look like precious rubies against the warm metallic base. This design feels very celebratory and high fashion. It is the best choice for someone who deserves a special reward. The mix of fruit textures is also very refreshing and juicy. This berry will stand out as the centerpiece of any dessert collection.
Required Ingredients
Large strawberries
White candy melts
Rose gold luster dust
Fresh pomegranate seeds
Small gold plastic or fondant crown
Lemon extract
Required Equipment
Microwave safe bowl
Food safe paintbrush
Tweezers
Leaf shaped fondant cutter or mold
DIY Instructions Step by Step
Dip the strawberry in melted white chocolate and let it dry completely.
Mix the rose gold dust with a few drops of lemon extract to make a shiny paint.
Coat the entire white shell with the rose gold paint using your brush.
Create small leaf shapes out of white chocolate or fondant and paint them gold.
Arrange the leaves in a circle on the front of the berry to form a wreath.
Apply a small amount of clear corn syrup inside the wreath to act as glue.
Use tweezers to carefully place pomegranate seeds inside the wreath to form a heart.
Stick the gold crown onto the top of the berry to finish the royal theme.
36. Espresso Martini Swirl
Valentines Chocolate Covered Strawberry
Coffee lovers will fall in love with this drink inspired and modern design. The bottom half is a sleek black chocolate that looks like a fresh cup of espresso. The top features a tan and white swirl that mimics the foam of a latte. Three dark coffee beans sit on the foam for a realistic and professional touch.
It looks just like a tiny cocktail served in a martini glass. This treat is sophisticated and works great as a dessert for a fancy dinner party. The rich coffee look is very tempting and stylish for an adult celebration. You can even add a silver pick for a more authentic bar vibe. It is a creative way to combine two favorite flavors.
Required Ingredients
Fresh strawberries
Black candy melts
White candy melts
Milk chocolate candy melts
Three whole coffee beans or chocolate covered beans
Required Equipment
Microwave safe bowls
Toothpick
Martini glass for serving
Silver cocktail pick
DIY Instructions Step by Step
Melt the black chocolate and dip the bottom half of the strawberry.
Let the black section dry on parchment paper until it is hard.
Melt the white and milk chocolate in separate bowls.
Pour the white chocolate over the top of the berry.
Add a few drops of the milk chocolate onto the wet white surface.
Use a toothpick to swirl the two colors together to look like coffee foam art.
Place three coffee beans in the center of the swirl while it is still wet.
Slide a silver pick through the side of the berry and place it in a glass.
37. Ethereal White Swan
Valentines Chocolate Covered Strawberry
This berry is transformed into a graceful and delicate white swan. Intricate white chocolate feathers cover the sides in soft and beautiful layers. A long elegant neck and head curve gracefully from the top of the fruit. Small silver beads add a tiny bit of sparkle to the tips of the wings.
The all white look is very clean and peaceful to the eye. It feels like something pulled straight out of a fairy tale or a classic ballet. This design requires a bit of patience but the result is absolutely stunning. Your Valentine will be amazed by the level of delicate handiwork involved. It is a very romantic and poetic way to show your love.
Required Ingredients
Large firm strawberries
White candy melts
Small silver sugar pearls
White fondant
Required Equipment
Microwave safe bowl
Small knife
Parchment paper
Tweezers
DIY Instructions Step by Step
Dip your strawberry into white chocolate and let it dry.
Roll out a small piece of white fondant into a long thin rope.
Curve the rope into an “S” shape to create the swan neck and head.
Attach the neck to the top of the strawberry using a drop of melted chocolate.
Melt more white chocolate and let it cool until it is slightly thick.
Use a small knife to spread thin petals of chocolate onto parchment paper to make feathers.
Once the feathers are hard, glue them to the sides of the berry in overlapping rows.
Use tweezers to stick a silver pearl on each side of the head for eyes.
38. Lavender Honey Bee
Valentines Chocolate Covered Strawberry
Bring the beauty of a quiet summer garden directly to your kitchen. A soft purple coating provides a calm and earthy base for this design. Thick golden honey drips down from the top where a small edible bee sits. Tiny yellow beads look like bits of pollen scattered across the purple surface.
Real lavender sprigs are tucked into the base to provide a lovely floral scent. This design is very sweet and charming for a nature lover. It feels very natural and fresh for a bright springtime gift. The purple and gold colors look beautiful together when they catch the light. This treat is as fragrant as it is delicious.
Required Ingredients
Fresh strawberries
Purple candy melts
Honey or thick yellow glaze
Small edible bee decoration
Yellow nonpareil sprinkles
Dried lavender sprigs
Required Equipment
Microwave safe bowl
Spoon
Tweezers
Parchment paper
DIY Instructions Step by Step
Melt the purple chocolate and dip your strawberry to get a smooth coat.
Let the berry dry completely on a piece of parchment paper.
Use a spoon to pour a small amount of honey or yellow glaze over the top.
Gently push the glaze so it creates one long drip down the front.
Sprinkle the yellow beads over the wet glaze to look like pollen.
Use tweezers to place the edible bee on top of the honey.
Stick two or three lavender sprigs into the bottom of the chocolate shell.
Serve on a white plate to let the purple color stand out.
39. Golden Award Winner
Valentines Chocolate Covered Strawberry
This strawberry looks like a top prize at a fancy event. It is wrapped in textured gold foil that glitters brightly from every angle. A small white tag is attached to show that this treat is a true winner. A red and gold tassel hangs from the side to give it a formal and celebratory look.
The design feels like a wonderful celebration of success and deep love. It is a fun and creative way to tell your partner they are your number one. The bright gold is very eye catching and makes the fruit look expensive. This is a simple way to make a big statement with very little effort. Your Valentine will feel like a champion.
Required Ingredients
Large fresh strawberries
Edible gold foil or gold candy melts
Small piece of white paper or fondant for the tag
Red and gold decorative tassel
Required Equipment
Microwave safe bowl (if using melts)
Tweezers
Clean scissors
DIY Instructions Step by Step
If you are using gold foil, wrap the strawberry carefully so the foil crinkles.
If you are using melts, dip the berry and let it dry then paint it with gold dust.
Write a small message like “Winner” on your white tag using a food safe pen.
Use a tiny dot of chocolate to stick the tag to the front of the berry.
Cut the edge of the tag to make it look like a vintage ticket.
Tie the red tassel around the green leaves at the top.
Ensure the tassel is secure so it does not fall into the chocolate.
Place the berry in a small gold cupcake liner for a fancy presentation.
40. Cosmic Nebula Orchid
Valentines Chocolate Covered Strawberry
This final design is truly out of this world and magical. Swirls of deep blue and pink create a galaxy pattern across the outer shell. A clear window in the center shows a purple nebula filled with tiny silver stars. A bright pink orchid and a silver moon decorate the top of the fruit.
It looks like a rare and beautiful specimen kept in a glass display case. This berry is a complete work of art for a very special night. The level of detail is incredible and shows a lot of creative thought. It is the ultimate way to end a Valentine dessert collection with a bang. Your partner will never forget such a unique and cosmic gift.
Required Ingredients
Large strawberries
White candy melts
Navy blue, pink, and purple oil based food coloring
Silver star sprinkles
Fresh edible orchid
Silver moon shaped sprinkle
Required Equipment
Small bowls
Toothpicks
Clear plastic box for display
Parchment paper
DIY Instructions Step by Step
Melt white chocolate and divide it into navy blue and pink bowls.
Dip the strawberry and swirl it to create the dark space background.
Let the berry dry on parchment paper.
Paint a large purple oval on the front using purple chocolate.
While the purple is wet, press several silver stars into the center.
Add tiny white dots around the stars to look like distant galaxies.
Use a dot of chocolate to stick the silver moon near the top leaves.
Place the edible orchid on the side of the berry and set the whole thing in a display box.
Key Takeaways
Dry your fruit completely before you start dipping so the coating sticks.
Melt your chocolate in short bursts to keep the texture smooth and runny.
Use toothpicks or fine brushes for tiny details and clean edges on every design.
Store your finished berries in a cool place but avoid the freezer to prevent sweating.
Experiment with different colors and toppings to match your specific party theme.
Creating these stunning strawberries is a great way to show someone you care. You do not need expensive tools to get these high end results. A steady hand and some colorful melts go a long way. This collection proves that even a simple snack can feel like a luxury gift.
Try out your favorite design from the list and see the reaction it gets. You might even find a new hobby in the process. These berries are meant to be shared and enjoyed with the people you love. Happy dipping and have a wonderful holiday.
Spread the loveThe holiday season is here, bringing with it the cherished tradition of Christmas baking. While scrolling through social media, it is easy to feel intimidated by those complicated, multi-layered cookie designs. Many people…
Spread the loveThe turkey is carved, the sides are devoured, and the conversation is flowing—but then panic sets in. You realize, amidst the flurry of roasting and mashing, you completely forgot to plan the dessert.…
Spread the loveGetting a party started for kids often feels like a puzzle with too many pieces. You want something that looks exciting but does not take all day to prepare. These colorful candy drinks…