Finding the right gift for February fourteenth can feel like a chore. Shops often fill with the same red boxes and tired flowers. You want to give something that shows real thought and effort.
Valentines Day Baking Ideas
Baking at home is one of the best ways to say you care. A tray of fresh cookies or a rich cake carries a warmth that money cannot buy. It transforms simple ingredients into a memory that your loved ones will cherish.
This list of fifty baking projects offers a way to escape the usual gift routine. You will find everything from simple treats to stunning showstoppers. There is something here for every skill level and every palate.
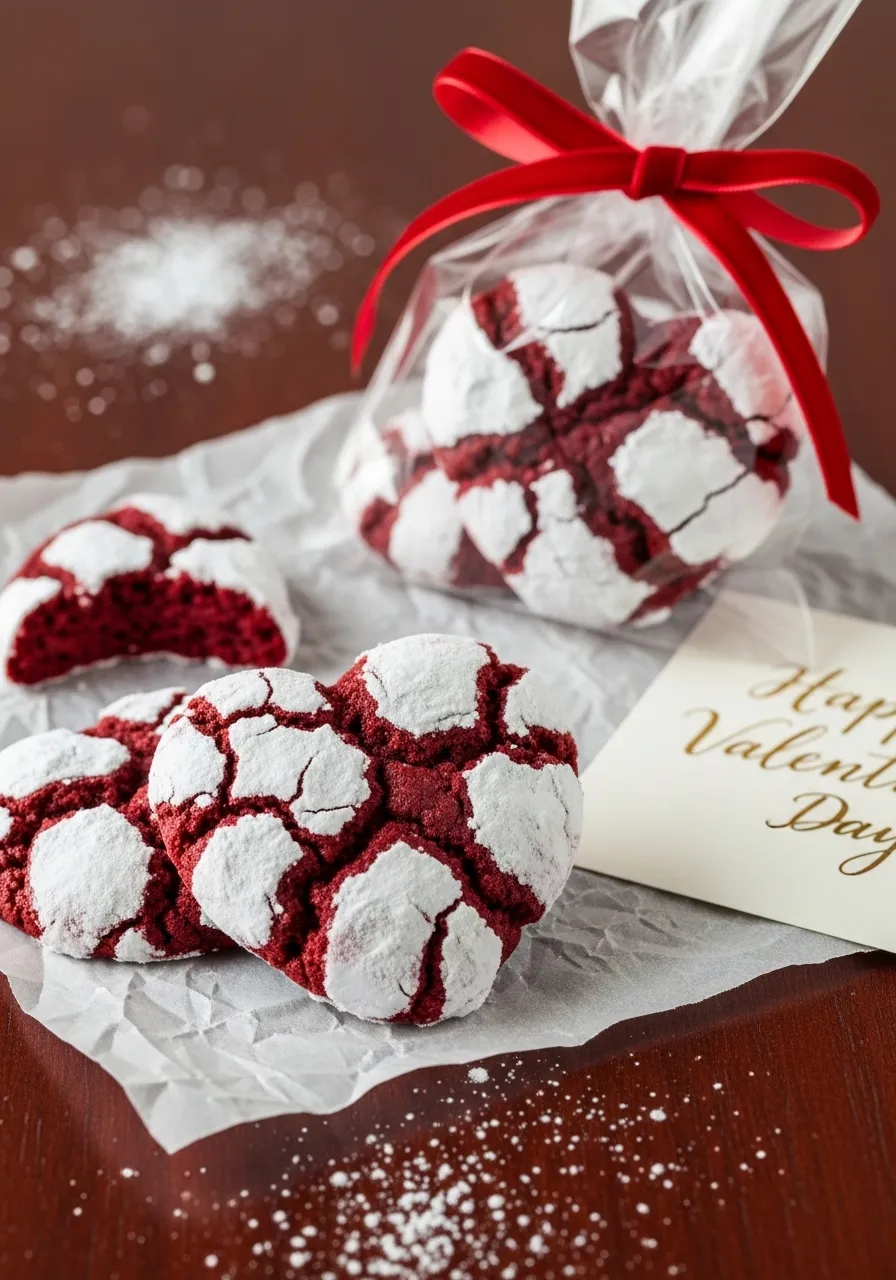
These vibrant red treats offer a striking contrast with their snowy powdered sugar coating. The deep crimson color makes them a standout choice for any February celebration. Each bite delivers a soft, cake like texture that feels indulgent and festive.
Packaging these cookies adds a personal touch to your gift giving. Sliding a few hearts into a clear bag tied with a silky ribbon creates a professional look without the high price tag. Your friends will appreciate the effort put into making something both visually striking and delicious.
Baking these at home allows you to control the ingredients and the shape. Using a heart shaped cutter ensures every piece looks consistent. They pair wonderfully with a hot cup of coffee or as a standalone dessert after a romantic dinner.
Ingredients
1 box Red Velvet Cake Mix
2 large eggs
1/2 cup vegetable oil
1 cup powdered sugar
1 tablespoon all purpose flour
Equipment
Large mixing bowl
Silicone spatula
Baking sheet
Parchment paper
Small shallow bowl
Cooling rack
DIY Instructions
Start by heating your oven to 350 degrees Fahrenheit. Line a large flat baking sheet with parchment paper so the dough does not stick to the metal.
Open the cake mix box and pour the dry powder into your large mixing bowl. Add the flour if the mix looks very fine.
Crack two eggs into the bowl and pour in the vegetable oil. Use your spatula to stir the mixture until all the powder disappears and a thick dough forms.
Pour the powdered sugar into a small shallow bowl. This will be your coating station.
Scoop a small amount of dough and roll it between your palms to make a ball about one inch wide. Drop the ball into the powdered sugar and roll it until it is completely white.
Place the balls on your prepared baking sheet. Leave at least two inches of space between each one because they will spread out as they bake.
Press down on each ball with your thumb and index finger to pinch the bottom into a point. Use your other hand to push the top down into two rounded humps to create a heart shape.
Slide the tray into the oven and bake for 10 to 12 minutes. The edges should feel firm while the center remains slightly soft.
Take the tray out and let the cookies rest for five minutes. Move them to a cooling rack to finish firming up before you put them in gift bags.
2. Heart Window Jam Sandwich Cookies
Valentines Day Baking Ideas
These classic treats feature a bright red center that looks like a glowing gemstone. A dusting of fine powdered sugar covers the top layer to give the cookies a soft and elegant finish. They look wonderful when stacked inside a white gift box for someone special.
Each bite offers a crisp texture from the shortbread paired with a sticky and sweet fruit filling. Using strawberry or raspberry jam provides that signature Valentine’s Day color. People love receiving these because they look like they came straight from a professional bakery.
The window design allows the filling to peek through and show off the heart shape. You can use different sized cutters to create various looks. These remain a favorite choice for holiday gifting because they stay fresh for several days.
Ingredients
2 cups all purpose flour
3/4 cup unsalted butter at room temperature
1/2 cup granulated sugar
1 large egg
1 teaspoon vanilla extract
1/2 cup strawberry jam
1/4 cup powdered sugar for dusting
Equipment
Large mixing bowl
Electric hand mixer
Rolling pin
Round fluted cookie cutter
Small heart shaped cookie cutter
Baking sheet
Parchment paper
Small sifter or mesh strainer
DIY Instructions
Put the soft butter and granulated sugar into your large bowl. Turn on your mixer and beat them together until the mixture looks pale and fluffy.
Add the egg and the vanilla extract to the bowl. Mix again until the liquid is fully blended into the butter.
Pour in the flour slowly while mixing on a low speed. Stop as soon as the white powder disappears to keep the dough tender.
Wrap the dough in plastic and put it in the fridge for thirty minutes. Cold dough is much easier to handle and will not stick to your tools.
Heat your oven to 350 degrees Fahrenheit. Roll the dough out on a flat surface until it is about one fourth of an inch thick.
Use the round fluted cutter to make many circles. Take the small heart cutter and poke a hole in the center of only half of those circles.
Place all the pieces on a baking sheet lined with parchment paper. Bake them for ten minutes or until the edges just start to turn a light golden brown.
Let the cookies cool completely on the tray. Spread a small spoonful of jam onto the solid circles.
Dust the circles with the heart holes with powdered sugar using your sifter. Place the sugared heart top onto the jam base to finish the sandwich.
3. Stamped XO Love Butter Cookies
Valentines Day Baking Ideas
Send a clear message this year with simple cookies that speak for themselves. These golden brown discs feature stamped words like Love and XO to add a unique texture to the surface. The tiny black specks of vanilla bean throughout the dough give them a high quality and gourmet appearance.
Packaging makes a huge difference for this specific gift idea. Wrapping each cookie in a translucent vellum envelope keeps them clean while showing off the design. Adding a dark wax seal on the top provides a vintage and romantic feel that feels very sophisticated.
The recipe uses a sturdy butter base so the stamped letters remain sharp after baking. You do not need messy frosting or bright colors to make these look impressive. They are a great choice for those who prefer a clean and minimalist aesthetic.
Ingredients
2 1/4 cups all purpose flour
1 cup cold unsalted butter cut into cubes
3/4 cup powdered sugar
1/2 teaspoon salt
1 tablespoon vanilla bean paste
1 large egg yolk
Equipment
Food processor or pastry cutter
Rolling pin
Round cookie cutter
Alphabet or message cookie stamps
Baking sheet
Vellum envelopes
Wax seal kit
DIY Instructions
Put the flour, powdered sugar, and salt into your food processor. Pulse the machine a few times to mix the dry ingredients together.
Drop the cold butter cubes into the flour. Pulse the machine until the mixture looks like coarse crumbs or small peas.
Add the egg yolk and the vanilla bean paste. Run the processor until the dough starts to clump together into a big ball.
Take the dough out and press it into a flat disc. Wrap it in plastic and let it rest in the fridge for at least one hour.
Turn your oven to 325 degrees Fahrenheit. Roll the chilled dough out until it is flat and even.
Cut out circles using your round cutter. Press your “XO” or “LOVE” stamps firmly into the center of each circle to leave a deep mark.
Move the cookies to a baking sheet. Bake them for twelve to fifteen minutes until they are firm but still pale in color.
Allow the cookies to cool completely on a flat surface so they do not warp.
Slide each finished cookie into a small paper envelope. Melt your wax and press a heart seal onto the flap to secure the package.
4. Gold Leaf Strawberry Macarons
Valentines Day Baking Ideas
Treat your Valentine to a taste of luxury with these delicate pink macarons. Each shell has a smooth top and a ruffled base that bakers call feet. The addition of real gold leaf flakes on top makes this gift feel incredibly expensive and thoughtful.
The filling consists of a thick and creamy white chocolate ganache that holds the two shells together. These cookies are famous for their light and airy crunch followed by a chewy center. They sit beautifully inside a dark navy gift box which makes the pink and gold colors pop.
Making macarons requires patience but the results are worth every second. You can customize the flavor by adding a drop of strawberry extract to the batter. They pair excellently with a glass of chilled champagne for a late night celebration.
Ingredients
1 3/4 cups powdered sugar
1 cup almond flour finely ground
3 large egg whites at room temperature
1/4 cup granulated sugar
2 drops pink gel food coloring
1/2 cup white chocolate chips
1/4 cup heavy cream
Edible gold leaf flakes
Equipment
Fine mesh sifter
Large glass bowl
Electric whisk
Rubber spatula
Piping bag with a round tip
Baking sheet with a silicone mat
Tweezers for gold leaf
DIY Instructions
Use your sifter to push the almond flour and powdered sugar into a bowl. Discard any large chunks that remain in the mesh so your shells stay smooth.
Put the egg whites in a clean glass bowl and whisk them until they look foamy. Slowly pour in the granulated sugar while you continue whisking.
Keep whisking until the whites stand up in stiff points when you lift the beaters. Fold in the pink food coloring at the very end.
Pour half of your dry flour mix into the egg whites. Use a spatula to gently turn the mixture over until it is combined.
Add the rest of the flour and keep folding until the batter flows like thick lava. Do not over mix or the cookies will be flat.
Fill your piping bag and squeeze small circles onto the silicone mat. Tap the tray hard on the counter five times to pop any bubbles.
Let the trays sit on the counter for forty minutes until the tops feel dry to the touch. Bake at 300 degrees Fahrenheit for fifteen minutes.
Melt the white chocolate and cream together to make the filling. Let it cool until it is thick enough to spread.
Pipe the cream onto one shell and press another on top. Use tweezers to carefully place tiny bits of gold leaf on the top shell.
5. Salted Caramel Brownie Bites
Valentines Day Baking Ideas
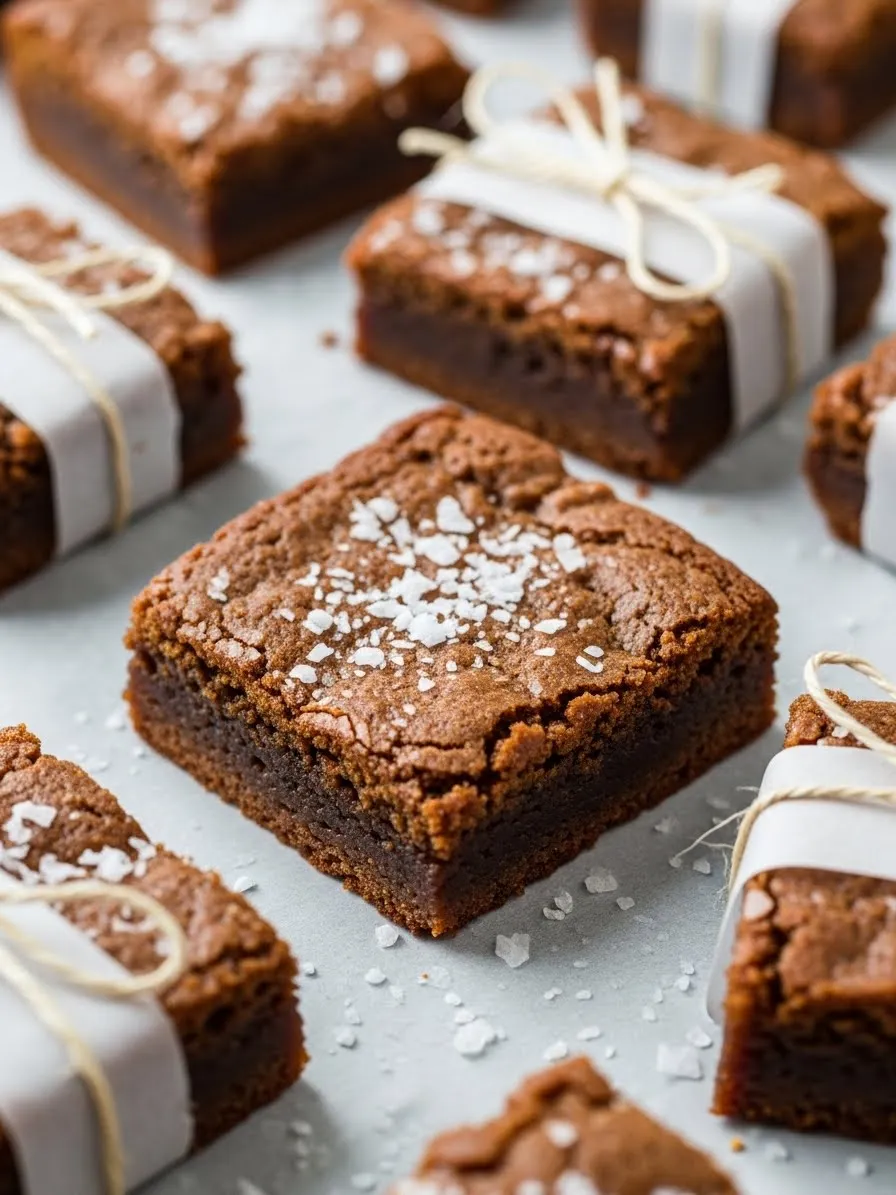
These rich and fudgy squares offer a wonderful balance of sweet and salty flavors. Each bite features a hidden pocket of gooey caramel tucked inside a dark chocolate base. Large flakes of sea salt on the surface provide a crunch that cuts through the sugar.
Presentation is key when giving these as a gift. Placing them inside a decorative vintage tin lined with parchment paper creates a charming look. The dark brown color of the brownies looks rustic and appetizing against the floral patterns of the container.
This recipe is great for beginners because the batter is very forgiving. You do not need to worry about flat cakes or sunken centers here. These treats are very dense and filling so a small box goes a long way.
Ingredients
1/2 cup melted unsalted butter
1 cup granulated sugar
2 large eggs
1 teaspoon vanilla
1/3 cup cocoa powder
1/2 cup all purpose flour
12 soft caramel candies
1 tablespoon flaky sea salt
Equipment
Square baking pan
Parchment paper
Medium mixing bowl
Whisk
Metal spoon
Vintage gift tin
DIY Instructions
Line your square baking pan with parchment paper. Leave some paper hanging over the sides so you can lift the brownies out easily later.
Whisk the melted butter and granulated sugar together in your bowl. Add the eggs and vanilla and stir until the yellow streaks disappear.
Stir in the cocoa powder and the flour using a metal spoon. Mix until you no longer see any white flour but do not beat the air into it.
Pour half of the chocolate batter into the pan and spread it out flat.
Unwrap your caramel candies and space them out evenly on top of the batter. Pour the remaining batter over the top to cover the caramels.
Heat your oven to 350 degrees Fahrenheit. Bake the pan for twenty five minutes or until a toothpick comes out with just a few crumbs.
Remove the pan from the oven and immediately sprinkle the flaky sea salt over the top while it is still hot.
Let the brownies cool completely in the pan before you try to cut them. This allows the caramel center to firm up so it does not leak.
Cut the block into small even squares. Layer them into your gift tin with pieces of parchment paper between each row.
6. Matcha White Chocolate Floral Hearts
Valentines Day Baking Ideas
These bright green cookies bring a fresh and earthy flavor to your Valentine’s Day spread. The vibrant color comes from high quality matcha green tea powder mixed into the dough. They look like tiny pieces of art when decorated with white chocolate dots and dried jasmine flowers.
The hearts provide a modern look that stands out from the usual red and pink themes. You can arrange them on a dark slate board for a striking visual contrast. This recipe is a fantastic choice for anyone who enjoys unique flavors and natural ingredients.
A simple brown gift box tied with green twine completes the organic look of this gift. The cookies have a light and buttery crunch that pairs well with hot tea. They are simple to decorate but look like they required hours of detailed work.
Ingredients
2 cups all purpose flour
2 tablespoons matcha powder
3/4 cup softened butter
3/4 cup powdered sugar
1 egg yolk
1/2 cup white chocolate chips
Dried edible flowers like jasmine or lavender
Equipment
Large bowl
Heart shaped cookie cutter
Baking sheet
Parchment paper
Small microwave safe bowl
Toothpick or small piping bag
DIY Instructions
Mix the flour and the green matcha powder together in a small bowl. Ensure the green powder is spread evenly through the white flour.
Cream the softened butter and powdered sugar in your large bowl until the mixture is smooth. Add the egg yolk and stir well.
Pour the green flour mixture into the butter. Stir until a stiff green dough forms and no dry spots remain.
Roll the dough out on a floured surface. Use your heart cutter to stamp out as many shapes as possible.
Place the green hearts on your baking sheet. Bake at 325 degrees Fahrenheit for twelve minutes so the edges do not turn brown.
Let the cookies cool until they are room temperature. Melt your white chocolate chips in the microwave using thirty second bursts.
Use a toothpick or a small bag to place tiny dots of white chocolate on the surface of each heart.
While the chocolate is still wet press a few dried flower petals or whole flowers into the dots.
Let the chocolate harden completely before you move the cookies. This will act as the glue to keep your floral decorations in place.
7. Double Chocolate Salted Crinkle Cookies
Valentines Day Baking Ideas
Chocolate lovers will fall for these deep and dark cocoa treats. Each cookie has a beautiful cracked surface that reveals a soft and fudgy interior. A large dollop of melted dark chocolate in the center makes them feel extra decadent for a romantic gift.
Using burlap or rustic fabric to wrap these cookies adds a cozy and homemade feel. You can attach a small hand written note with a wooden clothespin for a personal touch. The contrast between the white powdered sugar and the dark cookie base is very eye catching.
Adding a pinch of sea salt on top of the chocolate center enhances the cocoa flavor. These are best served slightly warm so the middle remains gooey. They are a reliable choice for gifting because the texture stays soft for several days.
Ingredients
1/2 cup unsweetened cocoa powder
1 cup white granulated sugar
1/4 cup vegetable oil
2 large eggs
1 teaspoon vanilla extract
1 cup all purpose flour
1/2 cup powdered sugar for coating
1/2 cup dark chocolate chips
Sea salt for sprinkling
Equipment
Medium mixing bowl
Small bowl for sugar
Baking sheet
Parchment paper
Burlap fabric for wrapping
Small wooden clips
DIY Instructions
Mix the cocoa powder, granulated sugar, and oil in your bowl. The mixture will look like wet sand.
Add the eggs one at a time and stir in the vanilla. Mix until the batter looks shiny and smooth.
Stir in the flour slowly until you have a thick and sticky dough. Put the bowl in the fridge for two hours so the dough becomes firm.
Heat your oven to 350 degrees Fahrenheit. Pour your powdered sugar into a small separate bowl.
Scoop a spoonful of dough and roll it into a ball. Roll the ball in the powdered sugar until it is completely white.
Place the balls on your baking sheet. Use your thumb to press a deep hole into the center of each ball.
Bake for ten minutes. While they bake melt your dark chocolate chips in a small bowl.
Take the cookies out and immediately fill the center holes with the melted dark chocolate. Sprinkle a little salt on the wet chocolate.
Let the cookies sit on the tray until they are cool. Wrap them in pieces of burlap and clip on a cute message to finish the gift.
8. Lemon Poppy Seed Heart Tarts
Valentines Day Baking Ideas
Bring some sunshine to a cold February day with these bright and citrusy tarts. The golden yellow lemon curd filling provides a sharp and refreshing flavor. Tiny black poppy seeds in the crust add a delightful crunch and a speckled look to the heart shapes.
These tarts look beautiful when arranged in a white wooden tray. You can add a few fresh daisies or lemon slices to the display for an extra pop of color. They are a wonderful alternative for people who do not want a heavy chocolate dessert.
The heart shaped crust gives these a festive look without needing any red dye. The filling is smooth and glossy which makes it look very professional. These are a great treat for a Valentine’s Day brunch or an afternoon tea party.
Ingredients
1 1/2 cups all purpose flour
1/2 cup cold butter cubes
2 tablespoons poppy seeds
1/4 cup powdered sugar
1 cup store bought or homemade lemon curd
1 fresh lemon for zest
Equipment
Heart shaped tart molds or muffin tin
Large bowl
Fork
Spoon
Grater for zesting
Cooling rack
DIY Instructions
Put the flour, powdered sugar, and poppy seeds into your bowl. Toss them together so the seeds are distributed.
Use your fingers to rub the cold butter into the flour. Keep doing this until the mixture looks like fine crumbs and no big butter chunks remain.
Press the crumbly dough into your heart shaped molds. Use your thumb to push the dough up the sides to create a wall.
Use a fork to poke a few small holes in the bottom of the crust. This prevents the dough from puffing up while it bakes.
Bake the crusts at 375 degrees Fahrenheit for ten minutes or until they look light brown. Let them cool completely before removing them from the molds.
Use a spoon to fill each heart crust with a generous amount of lemon curd. Smooth out the top so it is flat and shiny.
Take your grater and rub the yellow skin of a fresh lemon over the tarts. This adds a boost of fresh scent and flavor.
If you want a more solid filling you can put the tarts in the fridge for one hour.
Arrange the finished hearts in a gift box or on a tray. Keep them in a cool place until you are ready to give them away.
9. White Chocolate Raspberry Scones
Valentines Day Baking Ideas
Start the morning of Valentine’s Day with a basket of these fluffy and fruity scones. They are packed with tart red raspberries and sweet chunks of white chocolate. A drizzle of melted chocolate on top makes them look extra special for a holiday breakfast.
These treats have a crumbly exterior and a very soft and moist center. Serving them in a woven basket with a heart embroidered napkin creates a rustic and warm presentation. They are much easier to make than traditional cakes but feel just as indulgent.
The bright red berries provide a natural festive color that fits the theme perfectly. You can serve them with a small jar of clotted cream or extra jam on the side. They are best enjoyed fresh out of the oven while the chocolate is still soft.
Ingredients
2 cups all purpose flour
1/3 cup granulated sugar
1 tablespoon baking powder
1/2 cup cold unsalted butter
1/2 cup heavy cream
1 cup fresh raspberries
1/2 cup white chocolate chunks
Equipment
Large mixing bowl
Pastry cutter or fork
Baking sheet
Parchment paper
Small jar for cream
Woven basket
DIY Instructions
Mix the flour, sugar, and baking powder together in your large bowl.
Drop the cold butter into the flour. Use a pastry cutter or a fork to mash the butter until the pieces are the size of small peas.
Toss the white chocolate chunks and the fresh raspberries into the bowl. Be very gentle so you do not crush the berries.
Pour the heavy cream over the mixture. Use a spoon to stir it just until a shaggy dough starts to form.
Turn the dough out onto a floured surface. Use your hands to pat it into a circle that is about one inch thick.
Use a knife to cut the circle into eight even triangles like a pizza.
Place the triangles on a baking sheet lined with parchment paper. Leave space between them so they can rise and expand.
Bake at 400 degrees Fahrenheit for fifteen to eighteen minutes. The tops should look golden and the berries will be bubbly.
Let them cool slightly then drizzle with any extra melted white chocolate. Place them in a basket with a clean cloth for a beautiful gift.
10. Swirled Pink Meringue Kisses
Valentines Day Baking Ideas
These light and airy cookies are as sweet as a kiss and melt away on your tongue. The delicate pink and white swirls make them look like tiny whimsical clouds. They are naturally gluten free and use only a few simple ingredients to create a big impact.
Filling a tall glass jar with these meringues makes for a stunning visual gift. You can tie a pink satin ribbon around the neck of the jar to complete the look. They are very sturdy once dried out so they travel well in a gift bag or box.
The key to this recipe is baking them at a very low temperature for a long time. This ensures they stay crisp on the outside without turning brown. They are a wonderful low calorie option for those who want a light treat after dinner.
Ingredients
3 large egg whites at room temperature
3/4 cup granulated sugar
1/4 teaspoon cream of tartar
1 teaspoon vanilla extract
Pink gel food coloring
Equipment
Stand mixer or electric hand mixer
Large metal or glass bowl
Piping bag with a star tip
Baking sheet
Parchment paper
Tall glass jar with a lid
DIY Instructions
Ensure your bowl and whisk are completely clean and dry. Any oil or water will stop the eggs from fluffing up.
Put the egg whites and cream of tartar into the bowl. Whisk on a medium speed until the whites look like soft white foam.
Turn the mixer to high and add the sugar one tablespoon at a time. Do this slowly so the sugar has time to dissolve into the eggs.
Keep whisking until the mixture is very thick and shiny. It should stay in place if you turn the bowl upside down.
Stir in the vanilla extract gently with a spoon.
Take your piping bag and use a small brush to paint three stripes of pink food coloring down the inside of the bag.
Fill the bag with the white meringue mixture. When you squeeze it out the pink lines will create the beautiful swirl effect.
Pipe small star shapes onto a parchment lined baking sheet. Bake at 225 degrees Fahrenheit for one hour and fifteen minutes.
Turn the oven off and leave the cookies inside with the door closed for another hour. This dries them out so they become crunchy and light.
11. Molten Raspberry Chocolate Lava Cakes
Valentines Day Baking Ideas
These warm cakes offer a dramatic and romantic ending to any Valentine’s meal. The dark exterior hides a center of flowing liquid chocolate that spills out when you take the first spoonful. A bright red raspberry sauce on the plate adds a tart contrast to the rich cocoa flavor.
Serving these desserts while they remain hot ensures the center stays gooey and melted. You can dust the tops with a little cocoa powder or powdered sugar for a finished look. They look best on dark plates which make the red fruit colors really pop.
The individual portions make this an excellent choice for a quiet night at home. You only need a few high quality ingredients to achieve this restaurant style result. Your partner will feel truly special when they see the steam rising from their own personal cake.
Ingredients
4 ounces semi sweet chocolate baking bars
1/2 cup unsalted butter
2 large eggs plus 2 egg yolks
1/4 cup granulated sugar
2 tablespoons all purpose flour
1/2 cup fresh raspberries for sauce
1 tablespoon honey
Equipment
Two 6 ounce ceramic ramekins
Microwave safe glass bowl
Large mixing bowl
Whisk
Small blender
Baking sheet
DIY Instructions
Start by greasing the inside of your ceramic cups with a little butter. Dust them with a tiny bit of flour and shake out the extra so the cakes do not stick.
Break your chocolate bars into small pieces and put them in a glass bowl with the butter. Heat this in the microwave for thirty seconds and stir until the mixture is smooth.
Put the eggs, extra yolks, and sugar into your large mixing bowl. Whisk them together until the yellow color turns pale and the liquid looks slightly thick.
Pour the melted chocolate into the egg mixture slowly while you keep whisking. Add the flour and stir just until you no longer see white streaks.
Divide the chocolate batter between your two prepared cups. Place the cups on a flat baking sheet to make them easier to move.
Bake at 425 degrees Fahrenheit for exactly twelve minutes. The sides should look firm and baked while the very center remains soft to the touch.
While the cakes bake put the raspberries and honey into a blender. Blend until smooth and pour the red sauce onto your serving plates in a heart shape.
Take the cakes out of the oven and let them sit for one minute. Run a thin knife around the edge to loosen the cake.
Carefully flip the warm cake onto the plate right next to the red sauce. Top with a single fresh berry and serve immediately.
12. Honey Lavender Glazed Madeleines
Valentines Day Baking Ideas
These elegant French treats feature a distinctive shell shape and a delicate floral scent. The light golden color is enhanced by a clear honey glaze that makes the surface shine under the light. Sprinkling tiny purple lavender buds on top adds a touch of natural beauty to the gift.
The texture of a madeleine is unique because it feels like a cross between a cookie and a sponge cake. They are light and airy which makes them a great companion for afternoon tea. Placing them in a simple white tray highlights their classic and sophisticated shape.
This recipe is a wonderful way to show someone you put thought into the fine details. The lavender provides a calming aroma that fills the kitchen while they bake. They look very high end but only require a few steps to master.
Ingredients
1 cup all purpose flour
1/2 cup granulated sugar
2 large eggs
1/2 cup melted butter
1 tablespoon honey
1 teaspoon dried culinary lavender
1/2 cup powdered sugar for glaze
2 tablespoons milk
Equipment
Madeleine baking pan with shell shapes
Large mixing bowl
Electric hand mixer
Rubber spatula
Cooling rack
Honey dipper
DIY Instructions
Melt your butter in a small pan and let it cool down until it is just warm. Do not let it stay hot or it will cook the eggs too early.
Put the eggs and granulated sugar into your bowl. Use the mixer to beat them for five minutes until the mixture looks thick and has tiny bubbles.
Sift the flour into the egg mixture. Use a spatula to gently fold the flour in by turning the batter over from the bottom of the bowl.
Pour the melted butter and honey into the batter. Fold everything together until the batter looks shiny and smooth.
Cover the bowl and put it in the fridge for thirty minutes. Chilling the dough helps the cakes develop that signature hump on the back.
Grease your shell shaped pan with butter and a light coating of flour. Spoon the cold batter into the center of each shell.
Bake at 375 degrees Fahrenheit for eight to ten minutes. The edges should look golden brown and the centers should spring back when touched.
Mix the powdered sugar and milk in a small bowl to create a thin glaze.
Dip the warm shells into the glaze and place them on a rack. Sprinkle a few lavender buds over the wet glaze so they stick.
13. Surprise Heart Center Pound Cake
Valentines Day Baking Ideas
Cutting into this simple loaf reveals a beautiful pink heart hidden inside every slice. The contrast between the light buttery cake and the vibrant pink center creates an instant smile. It is a creative way to package a “message in a cake” for your favorite person.
A simple white icing drips down the sides to give it a clean and appetizing finish. Wrapping the loaf in brown parchment paper with a red and white string makes it look like a special delivery. It is a sturdy cake that travels well if you need to bring a gift to a party.
The secret to this design is baking the heart shape first and then placing it inside the second batch of batter. It looks like magic but only requires a heart shaped cutter and a little bit of planning. This treat is sure to be the talk of any Valentine’s gathering.
Ingredients
3 cups all purpose flour
1 1/2 cups granulated sugar
1 cup softened butter
4 large eggs
1 cup whole milk
1 tablespoon vanilla extract
Pink gel food coloring
1 cup powdered sugar for icing
Equipment
Two 9 inch loaf pans
Heart shaped cookie cutter
Large mixing bowl
Whisk
Parchment paper
Cooling rack
DIY Instructions
Start by making a simple cake batter. Cream the butter and sugar together until fluffy then stir in the eggs, milk, vanilla, and flour.
Take one third of that batter and put it in a small bowl. Stir in a few drops of pink gel coloring until the batter is a bright rose color.
Pour the pink batter into a loaf pan and bake at 350 degrees Fahrenheit for twenty minutes. Let it cool completely.
Slice the pink cake into thick pieces. Use your heart cutter to stamp out a pink heart from the center of every slice.
Line your second loaf pan with parchment paper. Spread a thin layer of the remaining white batter across the bottom of the pan.
Line up all your pink hearts in a tight row down the middle of the pan. They should be standing upright and touching each other.
Carefully pour the rest of the white batter over the pink hearts. Make sure the hearts are completely covered so they stay hidden.
Bake the whole loaf for forty five minutes. Let it cool before you lift it out of the pan using the parchment paper.
Mix powdered sugar with a splash of milk to make a thick icing. Pour it over the top and let it drip down before you slice and reveal the heart.
14. Ruby Grapefruit Pink Glaze Loaf
Valentines Day Baking Ideas
This citrus cake offers a refreshing and zesty twist on holiday baking. The batter contains fresh grapefruit juice and zest which gives it a light and tangy flavor profile. A thick pink glaze made from ruby grapefruit juice creates a stunning visual on top of the golden loaf.
Decorating the top with fresh grapefruit slices and tiny red peppercorns adds a sophisticated touch. The bright colors look cheerful and fit the Valentine’s theme without using heavy chocolate. It is an excellent choice for a morning treat or a light dessert after a big meal.
The pink glaze is completely natural as it gets its color from the fruit itself. This makes it a great option for those who prefer to avoid artificial dyes. Your friends will love the unique combination of sweet and tart in every bite.
Ingredients
1 1/2 cups all purpose flour
1 cup granulated sugar
1/2 cup vegetable oil
2 large eggs
1/2 cup plain Greek yogurt
1 large ruby grapefruit for zest and juice
1 1/2 cups powdered sugar
1 teaspoon baking powder
Equipment
9 inch loaf pan
Large mixing bowl
Small whisk
Grater for zesting
Citrus juicer
Cooling rack
DIY Instructions
Rub the grapefruit zest into the granulated sugar using your fingers. This releases the oils and makes the cake smell amazing.
Whisk the oil, eggs, and yogurt into the sugar until the mixture is smooth. Stir in two tablespoons of the fresh grapefruit juice.
Add the flour and baking powder to the bowl. Stir gently until the white powder disappears but do not over mix the batter.
Pour the mixture into your greased loaf pan. Smooth the top with a spoon so it bakes evenly.
Bake at 350 degrees Fahrenheit for about fifty minutes. A toothpick should come out clean when you poke the center.
Let the cake cool in the pan for ten minutes before you move it to a cooling rack. It must be completely cool before you add the glaze.
Put the powdered sugar in a small bowl. Add grapefruit juice one teaspoon at a time while stirring until you have a thick pink liquid.
Pour the glaze over the top of the loaf and let it run down the sides.
Slice a few thin pieces of grapefruit and place them on the wet glaze. Add a few dried berries or peppercorns for a professional look.
15. Salted Caramel Chocolate Jar Cakes
Valentines Day Baking Ideas
These portable treats are built in layers for a beautiful and rustic presentation. Each jar contains moist chocolate cake topped with a thick layer of creamy salted caramel and whipped cream. The clear glass lets your gift recipient see every delicious layer before they even open the lid.
Wrapping the jars in brown paper and tying them with twine gives them a charming handmade feel. You can even attach a small wooden spoon to the side so they are ready to eat on the go. These are fantastic for giving to coworkers or teachers as a mess free gift.
The layers stay fresh inside the jars which makes them easy to transport. You can customize the sweetness by adding more or less sea salt to the caramel. They look very cozy and inviting when placed on a dark blue knit blanket.
Ingredients
1 box chocolate cake mix
1 cup water
1/2 cup vegetable oil
3 large eggs
1 jar store bought salted caramel sauce
1 tub whipped topping or fresh whipped cream
1 tablespoon coarse sea salt
Equipment
4 small wide mouth glass jars
Baking pan
Small spoon
Brown craft paper
Twine
Small wooden spoons
DIY Instructions
Mix the cake batter according to the box directions using the water, oil, and eggs.
Pour the batter into a flat baking pan and bake it until it is firm. Let the cake cool completely on the counter.
Use your hands to crumble the cooled chocolate cake into small pieces.
Put a handful of cake crumbs into the bottom of each glass jar. Press them down slightly with your spoon.
Pour a thick layer of salted caramel sauce over the cake crumbs. Add a tiny pinch of sea salt on top of the sauce.
Spoon a layer of whipped cream over the caramel. Repeat the cake and caramel layers until the jar is almost full.
Finish with a large swirl of whipped cream on the very top. Drizzle a little extra caramel over the cream for a pretty look.
Cut a circle of brown paper and place it over the jar lid. Wrap the twine around the neck of the jar several times and tie a knot.
Tuck a wooden spoon under the twine. Keep the jars in the fridge until you are ready to deliver your sweet gifts.
16. Mini Velvet Chocolate Mousse Cakes
Valentines Day Baking Ideas
These small desserts offer an incredibly smooth and luxurious texture that melts instantly. Each round cake is coated in a fine cocoa dust that looks like soft brown velvet. A swirl of light tan cream and a geometric chocolate piece on top provide a modern and artistic finish.
Placing these on individual gold boards makes them feel like they came from a high end pastry shop. They are a great choice for a formal Valentine’s dinner where you want to impress your guests. The deep chocolate flavor is intense and satisfying for any cocoa fan.
The mousse is light yet rich which makes it a sophisticated alternative to heavy cakes. You can prepare these a day in advance to save time on the actual holiday. They look stunning when grouped together in a sleek black gift box.
Ingredients
2 cups heavy whipping cream
1 cup dark chocolate chips
1/2 cup granulated sugar
1/4 cup unsweetened cocoa powder
1 teaspoon vanilla extract
Chocolate squares for decoration
Equipment
Silicone cylinder molds
Large mixing bowl
Electric whisk
Small sifter
Gold cardboard cake circles
Piping bag
DIY Instructions
Put the dark chocolate chips in a bowl and melt them in the microwave. Stir until smooth and let the chocolate cool down but stay liquid.
Pour the heavy cream and sugar into a large cold bowl. Whisk on high speed until the cream is thick and holds its shape.
Fold the melted chocolate into the whipped cream very slowly. Use a spatula to keep the mixture light and airy.
Spoon the chocolate mousse into the cylinder molds. Smooth the tops with a flat knife so they are level.
Put the molds in the freezer for at least four hours. The mousse must be frozen solid so you can pop it out of the mold cleanly.
Take the frozen cakes out of the molds and place them on the gold circles. Let them sit in the fridge for one hour to thaw.
Use your small sifter to dust the tops and sides with cocoa powder. This creates the velvet look.
Pipe a small dollop of extra whipped cream onto the center of each cake.
Press a decorative chocolate square into the cream at an angle. Keep them cold until it is time to eat.
17. Red Wine Chocolate Cherry Bundt
Valentines Day Baking Ideas
This dark and moody cake combines the flavors of deep cocoa and rich red wine. The bundt shape creates beautiful ridges that hold onto the thick chocolate ganache as it drips down. Topping the cake with fresh cherries and rosemary sprigs provides a festive and natural decoration.
The wine adds a unique depth to the chocolate and keeps the cake very moist. It is a grown up version of a classic chocolate cake that feels very elegant for February. Serving it with a glass of the same red wine makes for a coordinated and thoughtful gift.
The glossy glaze reflects the light and makes the cake look very appetizing. It is a large dessert that is great for sharing with a group of friends. The contrast of the dark cake against a silver platter creates a timeless and romantic look.
Ingredients
2 cups all purpose flour
3/4 cup cocoa powder
2 cups granulated sugar
1 cup red wine (like Merlot or Cabernet)
1 cup melted butter
2 large eggs
1/2 cup dark chocolate chips for glaze
1/4 cup heavy cream for glaze
Fresh cherries for topping
Equipment
Bundt cake pan
Large mixing bowl
Whisk
Small saucepan
Silver serving platter
DIY Instructions
Whisk the flour, cocoa powder, and sugar together in your large bowl to remove any lumps.
Pour the red wine, melted butter, and eggs into the dry mix. Stir until you have a thick and dark batter.
Grease your bundt pan very well with butter and cocoa powder. This ensures all those pretty ridges come out of the pan easily.
Pour the batter into the pan and bake at 350 degrees Fahrenheit for forty five minutes.
Let the cake sit in the pan for fifteen minutes before you flip it onto your silver platter. It needs time to firm up so it does not break.
Put the chocolate chips and heavy cream in a small pan over low heat. Stir constantly until the chocolate melts into a shiny glaze.
Pour the warm glaze over the top of the cake. Let it naturally run down into the grooves of the bundt shape.
Place fresh cherries with the stems still on around the top of the cake while the glaze is wet.
Add a few tiny sprigs of rosemary for a pop of green color. Let the glaze set for thirty minutes before you serve it.
18. Marbled Pink Cherry Swirl Loaf
Valentines Day Baking Ideas
This cheerful loaf features a beautiful swirl of white and pink batter inside every slice. Hidden whole cherries throughout the cake provide a sweet surprise and an extra burst of flavor. A light white glaze and more cherries on top make this a very pretty gift for a friend.
The pattern inside looks complicated but is actually very easy to achieve with a simple knife swirl. It is a fun and whimsical take on a traditional pound cake. The bright colors look wonderful on a red and white checkered napkin.
Packaging this cake in a windowed gift box allows the colors to shine through. It is a sweet and fruity treat that is great for sharing over a glass of milk. This recipe is a fantastic way to brighten someone’s day during the winter months.
Ingredients
1 1/2 cups all purpose flour
1 cup granulated sugar
1/2 cup softened butter
2 large eggs
1/2 cup sour cream
Pink food coloring
1 cup jarred maraschino cherries (drained)
1 cup powdered sugar for glaze
Equipment
9 inch loaf pan
Two medium mixing bowls
Knife for swirling
Cooling rack
Red and white checkered napkins
DIY Instructions
Mix your basic cake batter by combining the butter, sugar, eggs, sour cream, and flour.
Divide the batter equally into two separate bowls. Add a few drops of pink coloring to one bowl and stir until it is bright.
Grease your loaf pan and line it with paper. Drop large spoonfuls of white and pink batter into the pan in a random pattern.
Push the drained cherries into the batter. Space them out so every slice will have at least one cherry inside.
Take a butter knife and drag it through the batter in a “figure eight” motion. Do not stir too much or the colors will just mix into one.
Bake at 350 degrees Fahrenheit for forty five minutes. Let the loaf cool completely on a rack.
Mix the powdered sugar with a little cherry juice to make a light pink glaze.
Pour the glaze over the top of the loaf. Place a few extra cherries on top while the icing is still sticky.
Serve with a cold glass of milk for a classic and sweet Valentine’s snack.
19. Mini Heart Victoria Sponge Cakes
Valentines Day Baking Ideas
These tiny cakes are a charming version of the classic British tea treat. Each heart consists of two layers of soft yellow sponge held together by sweet cream and strawberry jam. A dusting of powdered sugar on top gives them a clean and traditional appearance.
Serving these on a tiered floral stand creates a beautiful display for a Valentine’s brunch. They are small enough to be eaten in just a few bites which makes them perfect for a party. The combination of fruit and cream is a crowd favorite that never goes out of style.
A light blue gift box tied with a pink ribbon makes these look like a very special delivery. They are delicate and pretty and show off your baking skills in a simple way. Your guests will love the classic flavors and the cute heart shapes.
Ingredients
1 cup all purpose flour
1 cup granulated sugar
1 cup softened butter
2 large eggs
1/2 cup strawberry jam
1 cup whipped cream
Powdered sugar for dusting
Equipment
Flat baking sheet
Heart shaped cookie cutter
Piping bag
Tiered serving stand
Small sifter
DIY Instructions
Make a simple sponge batter by mixing the butter, sugar, eggs, and flour until smooth.
Spread the batter out onto a flat baking sheet lined with paper. You want the cake to be about one inch thick.
Bake at 350 degrees Fahrenheit for fifteen minutes. Let the large flat cake cool completely.
Use your heart cutter to stamp out many small heart shapes from the cake. You will need two hearts for every mini cake.
Spread a thin layer of strawberry jam onto the bottom of one heart piece.
Pipe a thick layer of whipped cream on top of the jam.
Place a second cake heart on top of the cream to make a sandwich. Press down very gently so the cream does not squeeze out.
Use your sifter to shake a little powdered sugar over the tops of all the hearts.
Arrange them on a pretty plate or a tiered stand. These are best served the same day they are made so the cream stays fresh.
20. Pistachio Honey Rose Hearts
Valentines Day Baking Ideas
These vibrant green hearts offer a unique and exotic flavor profile for your holiday baking. The base is a soft semolina cake enriched with finely ground pistachios and sweet honey. Topping each heart with whole pistachios and dried rose petals adds a touch of luxury and color.
The green and pink color combination is a fresh change from the usual red themes. These cakes have a slightly grainy and satisfying texture that pairs wonderfully with a drizzle of warm honey. They look beautiful arranged on a hammered copper tray for a rustic feel.
Wrapping these in a small wooden treasure box makes for a very memorable gift. The nutty flavor is balanced by the floral scent of the roses. This recipe is a great choice for anyone who enjoys adventurous and beautiful desserts.
Ingredients
1 cup semolina flour
1/2 cup ground pistachios
1/2 cup granulated sugar
1/2 cup melted butter
1/4 cup honey
1 teaspoon rose water
Dried edible rose petals
Whole pistachios for topping
Equipment
Heart shaped silicone mold
Large mixing bowl
Small glass jar for honey
Copper or bronze serving tray
Small wooden gift box
DIY Instructions
Mix the semolina, ground pistachios, and sugar together in your bowl.
Add the melted butter and stir until the dry ingredients are all wet and the mixture looks like green sand.
Stir in the rose water to give the batter a light floral scent. Be careful as rose water is very strong.
Press the green mixture firmly into the heart shaped molds. Use your fingers to pack it down so the cakes do not fall apart.
Bake at 350 degrees Fahrenheit for twenty minutes. The edges should look slightly golden.
While the cakes are still warm pour a tiny bit of honey over each one. The cake will soak up the honey as it cools.
Let the hearts cool completely in the mold before you try to pop them out.
Place a whole pistachio and a few pink rose petals on the center of each heart. The sticky honey will act as glue.
Arrange the hearts on a tray and serve with a small jar of extra honey on the side.
21. Raspberry Swirl Cheesecake Bars
Valentines Day Baking Ideas
Bright red swirls of fruit dance across a creamy white surface. These bars offer a tangy contrast to the sweet buttery crust. They look striking when placed in a clear box with a pink bow.
A smooth cheesecake filling provides a rich texture that melts in your mouth. Using fresh berries for the sauce gives the dessert a vibrant and natural flavor. Your friends will love the professional look of the marbled pattern on top.
This recipe is a great choice for those who want a fancy looking gift without spending all day in the kitchen. The bars are easy to slice and hold their shape well during travel. You can serve them cold for the best taste and texture.
Ingredients
2 cups graham cracker crumbs
1/2 cup melted butter
16 ounces cream cheese at room temperature
1/2 cup granulated sugar
2 large eggs
1 teaspoon vanilla extract
1/2 cup raspberry jam or seedless puree
Equipment
Square baking pan
Parchment paper
Large mixing bowl
Electric hand mixer
Small spoon
Knife or toothpick for swirling
DIY Instructions
Start by heating your oven to 325 degrees Fahrenheit. Line your square pan with parchment paper so you can lift the bars out easily later.
Mix the graham cracker crumbs and melted butter in a bowl until the mixture feels like wet sand. Press this firmly into the bottom of your pan to make an even layer.
Put the soft cream cheese and sugar into your large bowl. Use your mixer to beat them together until the lumps disappear and the mix looks smooth.
Add the eggs one at a time while mixing on a low speed. Stir in the vanilla extract last but do not over mix the batter.
Pour the white cheesecake mixture over the crust in your pan. Use a spoon to spread it out so the surface is flat.
Drop small dots of raspberry jam all over the top of the white cheesecake.
Take a toothpick or a knife and drag it through the red dots to create swirls and loops. Stop before the colors blend too much so the red stays distinct.
Bake the pan for thirty minutes or until the edges are set and the middle only jiggles slightly.
Let the pan cool on the counter for one hour then move it to the fridge for four hours. Cut into even squares only after the cheesecake is completely cold.
22. Gooey Pecan Caramel Brownies
Valentines Day Baking Ideas
Thick chocolate squares sit stacked high with golden caramel dripping down the sides. Crunchy pecans add a savory note to the rich cocoa base. These make a wonderful gift for anyone who loves deep and decadent flavors.
The brownies have a dense and fudgy center that feels very indulgent. Adding a sprinkle of sea salt on top helps to balance the sweetness of the caramel. You can wrap a stack of three in a brown gift box for a cozy presentation.
A heavy drizzle of warm caramel makes these treats look like they came from a gourmet bakery. They are very filling so a small portion goes a long way. This recipe is a reliable favorite for chocolate lovers during the holiday.
Ingredients
1 cup melted unsalted butter
2 cups granulated sugar
4 large eggs
1 cup cocoa powder
1 cup all purpose flour
1 cup chopped pecans
1/2 cup jarred caramel sauce
Equipment
8 inch square baking pan
Large mixing bowl
Silicone spatula
Whisk
Measuring cups
Brown gift box
DIY Instructions
Turn your oven to 350 degrees Fahrenheit. Rub a little butter inside your baking pan and line it with paper so the brownies do not stick.
Whisk the melted butter and sugar in your large bowl. The mixture will look a bit grainy but that is normal.
Crack the eggs into the bowl one by one and stir them in. Keep whisking until the batter looks shiny and smooth.
Sift the cocoa powder and flour into the bowl. Use your spatula to fold the dry powder into the wet mix until the white streaks are gone.
Stir half of the chopped pecans into the chocolate batter. Pour the batter into your prepared pan and smooth out the top.
Bake the brownies for twenty five minutes. They should be firm on the edges but still a little soft in the center.
Let the brownies cool completely in the pan. Once they are cold lift them out and cut them into large squares.
Warm your caramel sauce in the microwave for ten seconds so it is easy to pour. Stack the brownies and drizzle the caramel over the top.
Sprinkle the rest of the pecans over the wet caramel so they stay in place. Put them in your gift box once the caramel has set.
23. Pomegranate Dark Cocoa Tarts
Valentines Day Baking Ideas
Shining red seeds cover the top of these sleek dark treats like tiny edible rubies. The pomegranate adds a fresh pop that cuts through the intense chocolate ganache. They sit beautifully on a silver tray for a midnight snack or a fancy party.
The crust is made from a dark cocoa pastry that provides a satisfying crunch. Each tart is filled with a silky smooth chocolate cream that feels very luxurious. This dessert is a sophisticated choice for someone who appreciates unique fruit pairings.
A small silver leaf decoration on top adds an extra touch of elegance. These tarts are small but packed with flavor and look very high end. You can serve them with a dollop of whipped cream on the side for a complete dessert.
Ingredients
1 1/2 cups chocolate cookie crumbs
6 tablespoons melted butter
1 cup heavy cream
8 ounces dark chocolate chips
1 cup fresh pomegranate seeds
Edible silver flakes for decoration
Equipment
Mini tart pans with removable bottoms
Medium mixing bowl
Small saucepan
Metal spoon
Tweezers for silver flakes
DIY Instructions
Mix the chocolate cookie crumbs and melted butter in your bowl. Press the mixture into the bottom and up the sides of your mini tart pans.
Put the pans in the fridge for twenty minutes to let the crust firm up. You do not need to bake this type of crust.
Pour the heavy cream into a small saucepan and heat it over medium heat. Watch it closely and remove it from the stove as soon as tiny bubbles start to form.
Place your dark chocolate chips in a separate bowl. Pour the hot cream over the chocolate and let it sit for five minutes without stirring.
Use a metal spoon to slowly stir the cream and chocolate together. It will turn into a thick and glossy dark brown liquid.
Pour the chocolate liquid into your chilled tart crusts. Fill them almost to the top but leave a little room for the fruit.
Put the tarts back in the fridge for two hours so the chocolate center becomes solid.
Carefully place the pomegranate seeds onto the top of the chocolate in a neat pattern.
Use tweezers to add a tiny bit of silver leaf to each tart. Keep them in the fridge until you are ready to give them as a gift.
24. Hazelnut Lava Chocolate Chip Cookies
Valentines Day Baking Ideas
Molten chocolate centers ooze out from these thick and soft cookies when you pull them apart. Each bite combines the crunch of toasted nuts with the sweetness of brown sugar. You can wrap them in brown paper for a rustic and cozy feel.
Toasted hazelnuts are mixed into the dough to provide a deep and earthy flavor. These cookies are much larger than average which makes them feel like a substantial gift. They are best served warm so the middle remains liquid and gooey.
A sprinkle of sea salt on the surface enhances the taste of the chocolate chips. Your friends will be surprised by the hidden hazelnut cream tucked inside. This recipe takes a classic cookie to a whole new level of indulgence.
Ingredients
1 cup softened butter
1 cup brown sugar
1/2 cup granulated sugar
2 large eggs
2 1/2 cups all purpose flour
1 cup chocolate chips
1/2 cup chopped hazelnuts
1/2 cup hazelnut cocoa spread
Equipment
Large baking sheet
Parchment paper
Mixing bowl
Electric mixer
Tablespoon
Cooling rack
DIY Instructions
Place small spoonfuls of the hazelnut cocoa spread onto a plate covered with paper. Put the plate in the freezer for one hour so the spread becomes hard.
Heat your oven to 350 degrees Fahrenheit. Line your baking sheet with parchment paper to prevent sticking.
Cream the butter and both types of sugar in your bowl until the mixture looks fluffy. Add the eggs and mix well.
Stir in the flour slowly until a soft dough forms. Fold in the chocolate chips and the chopped hazelnuts using a spoon.
Take a large scoop of dough and flatten it in your hand like a pancake.
Place one of the frozen hazelnut spread balls in the center of the dough. Fold the edges of the dough over the top to hide the center.
Roll the dough into a ball and place it on the baking sheet. Leave plenty of space because these cookies are quite big.
Bake for twelve to fifteen minutes. The edges should be golden but the middle should still look a bit soft.
Let the cookies cool on the tray for ten minutes before moving them. This prevents the heavy cookies from breaking while the center is still hot.
25. Strawberry White Chocolate Heart Cookies
Valentines Day Baking Ideas
Pretty pink dough shapes are decorated with stripes of red icing and white chocolate bits. Dried fruit pieces provide a natural flavor and a lovely texture to every bite. A single rose next to these treats completes the romantic presentation.
The cookies are soft and chewy with a light strawberry scent. Packaging them in a clear plastic box with a pink ribbon shows off the beautiful heart shapes. They are a cheerful and sweet option for a Valentine’s Day exchange.
Using white chocolate chunks adds a creamy sweetness that pairs well with the tart berries. These cookies are easy to make in large batches for all your friends. They look very festive and professional with minimal effort.
Ingredients
2 1/4 cups all purpose flour
1/2 teaspoon baking soda
1 cup softened butter
1/2 cup granulated sugar
1/2 cup brown sugar
1 large egg
1/2 cup freeze dried strawberries crushed
1 cup white chocolate chips
Red decorating icing
Equipment
Heart shaped cookie cutter
Large mixing bowl
Rolling pin
Baking sheet
Parchment paper
Clear gift boxes
DIY Instructions
Mix the flour and baking soda in a small bowl and set it aside for later.
Beat the butter and both sugars in a large bowl until the mix is light and airy. Add the egg and stir until it is fully blended.
Pour in the flour mixture and the crushed strawberries. Stir until the dough turns a pretty pink color and no white spots remain.
Fold in the white chocolate chips using a spatula. Wrap the dough in plastic and let it chill in the fridge for thirty minutes.
Roll the cold dough out on a floured surface until it is about half an inch thick. Use your heart cutter to stamp out your shapes.
Place the hearts on a baking sheet lined with parchment paper. Bake at 350 degrees Fahrenheit for ten minutes.
Let the cookies cool completely on a flat surface so they stay crisp.
Use the red decorating icing to squeeze thin lines back and forth across each heart.
Place a few extra white chocolate bits on the wet icing to decorate. Let the icing dry before you put the cookies into boxes.
26. Blood Orange Curd Heart Tarts
Valentines Day Baking Ideas
Vibrant citrus filling glows within a crisp and buttery pastry shell like a setting sun. Fresh slices of blood orange and mint leaves add a gourmet touch to the final design. These tarts offer a light and zesty option for a morning gift or a brunch.
The curd has a unique deep pink color that is entirely natural from the fruit. Using a heart shaped crust makes them fit the holiday theme without any extra effort. They are a refreshing change from the usual heavy chocolate desserts of the season.
A white gift box with a clear window is the best way to show off these colorful treats. The combination of sweet pastry and tart orange is very sophisticated. Your recipient will appreciate the fresh and bright flavors in every bite.
Ingredients
1 1/2 cups all purpose flour
1/2 cup cold butter cubes
1/4 cup powdered sugar
1 cup fresh blood orange juice
3 large eggs
1/2 cup granulated sugar
Fresh mint leaves for garnish
Equipment
Heart shaped tart molds
Medium mixing bowl
Small saucepan
Whisk
Sifter
Clear window gift box
DIY Instructions
Make the crust by rubbing the cold butter into the flour and powdered sugar. Press the crumbs into your heart molds and bake at 375 degrees Fahrenheit for ten minutes.
Let the crusts cool while you prepare the orange filling.
Whisk the blood orange juice, eggs, and granulated sugar together in a small saucepan.
Cook the mixture over low heat while stirring constantly. Do not let it boil or the eggs will scramble.
Keep stirring until the liquid becomes thick like a heavy syrup or pudding. This usually takes about eight to ten minutes.
Pour the warm orange curd into your baked heart shells. Smooth the top with a spoon so it looks flat and shiny.
Put the tarts in the fridge for at least two hours to set. The filling will become firm and easy to eat.
Slice a blood orange into very thin triangles. Place one piece of fruit and a tiny mint leaf on top of each tart.
Carefully move the tarts into your windowed box. Keep them cool until you are ready to deliver your gift.
27. Layered Peanut Butter Chocolate Squares
Valentines Day Baking Ideas
Smooth tiers of salty peanut butter and dark chocolate create a bold visual contrast. A single whole nut sits on top of each piece to signal the flavor hidden inside. They look very professional when lined up in a sleek black box with a gold ribbon.
The base is a crunchy mixture of crushed nuts and biscuits that provides a great texture. This treat is very rich so cutting it into small bite sized pieces is best. It is a fantastic choice for anyone who loves the classic combination of salt and sugar.
You do not need an oven to make these impressive looking bars. They rely on the fridge to become firm and hold their shape. This makes them a great last minute gift idea for a busy holiday schedule.
Ingredients
2 cups graham cracker crumbs
1 cup creamy peanut butter
1/2 cup melted butter
2 cups powdered sugar
1 1/2 cups milk chocolate chips
1/2 cup whole roasted peanuts
Equipment
Square baking pan
Parchment paper
Medium mixing bowl
Small microwave safe bowl
Sharp knife for clean cuts
DIY Instructions
Line your square pan with parchment paper. Ensure the paper covers the bottom and the sides so you can lift the block out later.
Mix the cracker crumbs, melted butter, and half of the peanut butter in your bowl. Stir in the powdered sugar until the mix is thick and stiff.
Press this peanut butter mixture into the bottom of the pan. Use the back of a spoon to make it very flat and even.
Put the chocolate chips and the rest of the peanut butter into a small bowl. Heat them in the microwave for thirty seconds and stir until smooth.
Pour the melted chocolate over the peanut butter layer in the pan. Tilt the pan back and forth so the chocolate covers everything.
Press the whole peanuts into the top of the wet chocolate in neat rows. This makes it easier to cut them into even squares later.
Put the pan in the fridge for at least three hours. The layers need to be very cold and hard before you try to cut them.
Lift the whole block out of the pan using the paper.
Use a hot sharp knife to cut between the rows of peanuts. Wipe the knife after every cut to keep the layers looking clean and sharp.
28. Red Velvet Swirl Cheesecake Brownies
Valentines Day Baking Ideas
Crimson and cream colors blend together in a striking marble pattern on these thick bars. These treats combine the best parts of a soft cake and a fudgy chocolate brownie. Stacking them on a white pedestal makes the vibrant colors stand out even more.
The cheesecake layer adds a creamy tang that lightens the rich cocoa base. You can cut these into heart shapes for an extra festive look. They are a crowd favorite because they offer two different desserts in one single bite.
Packaging these in a box with a red and white striped ribbon fits the theme beautifully. They stay moist for several days which makes them a great make ahead gift. This recipe is sure to impress anyone who loves a bit of drama in their baking.
Ingredients
1/2 cup melted butter
1 cup granulated sugar
1/4 cup cocoa powder
1 teaspoon red food coloring
1 teaspoon vanilla extract
2 large eggs
3/4 cup all purpose flour
8 ounces cream cheese at room temperature
1/4 cup extra sugar for cheesecake
Equipment
Square baking pan
Two mixing bowls
Whisk
Knife for swirling
Heart shaped cookie cutter (optional)
DIY Instructions
Heat your oven to 350 degrees Fahrenheit and grease your square pan with a little oil or butter.
Mix the melted butter, one cup of sugar, cocoa powder, and red food coloring in a bowl. Stir in one egg and the vanilla extract.
Add the flour and stir until the batter is a deep red color. Save a small spoonful of this red batter for the very end.
Pour the rest of the red batter into your pan and spread it out flat.
In your second bowl beat the cream cheese, the extra sugar, and the remaining egg. Mix until it is smooth and white.
Spoon the white cheesecake mixture over the red batter in the pan.
Drop the small spoonful of red batter you saved onto the white layer. Use a knife to swirl the colors together in a pretty pattern.
Bake for twenty five minutes. The center should be set but still a little soft to the touch.
Let the brownies cool completely in the fridge before you cut them. Use your heart cutter to stamp out shapes for a special Valentine’s gift.
29. Vanilla Bean Crème Brûlée Tartlets
Valentines Day Baking Ideas
Hard burnt sugar tops these tiny custard filled shells for a satisfying and loud crunch. The smooth vanilla center feels like silk and pairs well with the crisp buttery crust. Using a small kitchen torch makes the topping look like beautiful stained glass.
These tartlets are a miniature version of the famous French restaurant dessert. They are a wonderful gift for someone who enjoys the finer details of high quality pastry. The tiny black vanilla seeds throughout the custard show that you used real ingredients.
Serving these on a silver tray with a handwritten note creates a very elegant presentation. You can even bring the torch with you to finish them right before they are eaten. It is a memorable and interactive way to share a sweet treat.
Ingredients
1 1/2 cups flour
1/2 cup cold butter
2 cups heavy cream
4 large egg yolks
1/2 cup granulated sugar
1 whole vanilla bean
Extra sugar for the burnt topping
Equipment
Mini tart pans
Small saucepan
Whisk
Kitchen torch
Sharp knife
DIY Instructions
Make a simple crust by mixing the flour and cold butter. Press it into the mini pans and bake at 350 degrees Fahrenheit for ten minutes.
Pour the heavy cream into a saucepan. Use a knife to scrape the seeds out of the vanilla bean and add them to the cream.
Heat the cream until it is hot but not boiling. In a bowl whisk the egg yolks and sugar until they turn pale yellow.
Pour a little bit of the hot cream into the eggs while whisking fast. Then pour the rest of the cream in slowly so the eggs do not cook too fast.
Pour the custard into your baked shells. Bake at 300 degrees Fahrenheit for twenty minutes until the middle is just set.
Put the tarts in the fridge for four hours to let them get cold and firm.
Just before you give them away sprinkle a thin layer of sugar over the top of the custard.
Use your kitchen torch to melt the sugar until it turns dark brown and bubbly.
Wait two minutes for the sugar to harden into a glass like layer before you serve or package them.
30. Toasted Marshmallow S’mores Heart Bars
Valentines Day Baking Ideas
Fluffy white marshmallow peaks are browned to a golden tan on top of a rich chocolate base. Pulling one bar away reveals a stretchy and gooey middle that everyone loves to eat. They bring the cozy feel of a campfire right into your living room.
The bottom layer is a thick graham cracker crust that provides a solid and crunchy base. These treats are very nostalgic and fun for people of all ages. You can wrap them in clear paper and tie them with a red string for a simple gift.
This recipe is great because it uses common pantry staples to create something special. The heart shape makes them perfect for the holiday while the flavors remain a classic favorite. They are best enjoyed while the marshmallow is still a bit soft.
Ingredients
2 cups graham cracker crumbs
1/2 cup melted butter
1 1/2 cups chocolate chips
1 can sweetened condensed milk
2 cups mini marshmallows
Equipment
Square baking pan
Parchment paper
Medium bowl
Small saucepan
Kitchen torch or oven broiler
DIY Instructions
Line your square pan with parchment paper and heat your oven to 350 degrees Fahrenheit.
Mix the graham cracker crumbs and melted butter in your bowl. Press this into the pan to make a sturdy bottom crust.
Bake the crust for ten minutes so it becomes crisp and golden.
While the crust bakes melt the chocolate chips and the condensed milk in a small pan over low heat. Stir until the chocolate is smooth and thick.
Pour the chocolate mixture over the hot crust and spread it out to the edges.
Put the pan back in the oven for five minutes to let the chocolate set slightly.
Take the pan out and cover the entire top with a thick layer of mini marshmallows.
Use a kitchen torch to brown the tops of the marshmallows until they look toasted. If you do not have a torch you can put the pan under the oven broiler for one minute.
Let the bars cool completely before you cut them. Use a large knife to cut out heart shapes while the marshmallow is still slightly sticky.
31. Dark Chocolate Gold Leaf Truffles
Valentines Day Baking Ideas
These rich dark chocolate truffles look like they belong in a royal collection. Each ball is coated in a fine layer of bitter cocoa powder that balances the sweet interior. A tiny speck of edible gold leaf sits on top to add a splash of luxury.
The box presentation feels very classic and high end. This gift works wonderfully for a partner who enjoys the finer things in life. You can pair these treats with a small glass of aged bourbon to enhance the deep cocoa notes.
Every bite provides a silky experience that lingers on the palate. Handmade truffles show a level of care that store bought boxes simply cannot match. Your Valentine will appreciate the sophisticated look and the intense flavor of these artisanal sweets.
Ingredients
8 ounces dark chocolate chips
1/2 cup heavy cream
1 tablespoon unsalted butter
1/4 cup cocoa powder
1 sheet edible gold leaf
Equipment
Small saucepan
Heat proof bowl
Metal spoon
Baking sheet
Parchment paper
Small tweezers
DIY Instructions
Put your dark chocolate chips into a heat proof bowl. Make sure the bowl is completely dry because even a drop of water can ruin the chocolate.
Pour the heavy cream into a small saucepan and set it over medium heat. Watch it closely and remove it from the stove once it starts to simmer.
Pour the hot cream over the chocolate chips. Let the mixture sit for five minutes without stirring so the heat can melt the chocolate.
Add the butter to the bowl and stir slowly with a metal spoon. Keep stirring until the mixture is glossy and all the lumps are gone.
Place the bowl in the fridge for at least two hours. The mixture needs to be firm enough to roll into balls.
Use a small spoon to scoop out a piece of the chilled chocolate. Roll it between your palms to make a smooth ball about one inch wide.
Drop the ball into a bowl of cocoa powder and roll it until it is fully covered. Place the finished truffle on a tray lined with parchment paper.
Use small tweezers to pick up a tiny piece of gold leaf. Gently press it onto the top of the truffle so it sticks to the cocoa.
Keep the truffles in a cool place until you are ready to put them in a gift box.
32. Pistachio and Rose White Chocolate Bark
Valentines Day Baking Ideas
This stunning white chocolate bark features a beautiful mix of colors and textures. Bright green pistachios and deep red dried rose petals are scattered across the creamy surface. It looks like a garden frozen in sugar and makes a very romantic gift.
The saltiness of the nuts provides a great contrast to the sweet white chocolate. You can break the bark into irregular shards to give it a rustic and artistic feel. Placing these pieces in a glass jar with a simple gift tag creates a lovely presentation.
This recipe is very simple to make but the results look like they came from a boutique candy shop. The floral scent from the roses adds a unique touch that is very popular for spring. It is a light and crunchy treat that anyone would love to receive.
Ingredients
12 ounces white chocolate melting wafers
1/4 cup shelled pistachios
2 tablespoons dried edible rose petals
1/4 cup dried cranberries
1 teaspoon sea salt
Equipment
Microwave safe bowl
Large baking sheet
Parchment paper
Rubber spatula
Glass jar for gifting
DIY Instructions
Line a large baking sheet with parchment paper so the chocolate does not stick to the tray.
Put the white chocolate wafers into a microwave safe bowl. Heat them for thirty seconds at a time and stir between each burst.
Stop heating once the chocolate is mostly melted. Stir it until the remaining small chunks disappear and the liquid is smooth.
Pour the melted chocolate onto the parchment paper. Use a rubber spatula to spread it into a flat layer about one fourth of an inch thick.
Scatter the pistachios and dried cranberries over the wet chocolate immediately. Make sure they are spread out evenly so every piece has some.
Sprinkle the dried rose petals over the top to add a pop of red color. Finish with a light dusting of sea salt to balance the sugar.
Let the tray sit on the counter for at least one hour until the chocolate is hard. You can put it in the fridge for twenty minutes to speed it up.
Lift the paper and use your hands to snap the chocolate into large and small pieces.
Stack the shards inside a clean glass jar. Tie a piece of twine around the neck of the jar to finish your gift.
33. Peppermint Pink Fudge Hearts
Valentines Day Baking Ideas
These bright pink hearts offer a cool and refreshing flavor that feels very festive. Each piece is topped with crushed peppermint candies for an extra crunch and a splash of red. They sit beautifully inside a striped tin which adds to the holiday cheer.
The fudge is incredibly creamy and has a soft texture that almost melts on your tongue. Using white chocolate as the base allows the pink color to look very vibrant and clean. This is a fantastic gift for friends who love traditional holiday treats with a romantic twist.
Making fudge at home is much easier than people think. You do not need a candy thermometer or special skills to get a great result. These hearts stay fresh for a long time which makes them a reliable choice for shipping to loved ones.
Ingredients
3 cups white chocolate chips
1 can sweetened condensed milk
1/2 cup crushed peppermint candies
2 drops pink gel food coloring
1 teaspoon peppermint extract
Equipment
Square baking pan
Parchment paper
Small saucepan
Metal spoon
Heart shaped cookie cutter
DIY Instructions
Line your square pan with parchment paper. Leave some extra paper hanging over the sides to help you lift the fudge out later.
Put the white chocolate chips and the sweetened condensed milk into a small saucepan.
Turn the heat to low and stir the mixture constantly with a metal spoon. Do not let the mixture boil or it will become grainy.
Remove the pan from the heat once all the chocolate has melted. Stir in the peppermint extract and the pink food coloring.
Mix until the color is even and the batter looks shiny. Pour the mixture into your prepared square pan.
Use a spoon to smooth the top so it is flat. Scatter the crushed peppermint candies over the surface while it is still wet.
Put the pan in the fridge for at least four hours. The fudge needs to be very cold and firm before you try to cut it.
Lift the fudge out of the pan using the paper. Use your heart shaped cutter to stamp out many small hearts.
Arrange the hearts in a decorative tin. You can use the extra scraps for snacking or as toppings for hot cocoa.
34. Sprinkled White Chocolate Dipped Cookies
Valentines Day Baking Ideas
Classic chocolate sandwich cookies get a major upgrade with a dip in sweet white chocolate. These treats are decorated with pink and gold sprinkles to give them a very festive look. They are arranged neatly in a white gift box which makes them feel like a premium gift.
The combination of crunchy dark cookie and smooth white chocolate is a winning choice for all ages. Half dipping the cookies allows the original design to show through while adding a touch of elegance. They are a great last minute gift because they require very little active work.
You can customize the sprinkles to match any color theme you like. These are very sturdy and hold up well during travel or party hosting. Your Valentine will love the extra effort you put into making a simple snack look so beautiful.
Ingredients
1 package chocolate sandwich cookies
1 cup white chocolate melting wafers
1 tablespoon pink heart sprinkles
1 tablespoon gold round sprinkles
Equipment
Small microwave safe bowl
Baking sheet
Parchment paper
Fork
Gift box with a clear lid
DIY Instructions
Line a flat baking sheet with parchment paper. This will be the place where your cookies dry without sticking.
Pour the white chocolate wafers into a small bowl. Heat them in the microwave for thirty seconds and stir until the liquid is smooth.
Hold a sandwich cookie by the edge. Dip only half of the cookie into the melted white chocolate.
Gently shake the cookie over the bowl to let the extra chocolate drip off. This keeps the decoration looking clean and professional.
Place the dipped cookie onto the parchment paper. While the chocolate is still wet scatter some pink and gold sprinkles over it.
Repeat this process for all the cookies in the package. Make sure you add the sprinkles before the chocolate hardens.
Let the cookies sit on the counter for thirty minutes. The white chocolate needs to be completely hard to the touch.
Once they are dry you can stack them into your gift box.
Tie a pink ribbon around the box to finish the presentation. These look wonderful and taste even better.
35. Toasted Marshmallow Chocolate Brownies
Valentines Day Baking Ideas
These thick chocolate squares feature a gooey layer of toasted marshmallow on the very top. Pulling a piece away creates a stretchy and sweet bridge that looks incredibly appetizing. The rich cocoa base and the light marshmallow peaks provide a wonderful balance of textures.
The brownies have a dense and fudgy interior that feels like a real indulgence. Toasting the top gives the marshmallows a campfire flavor that reminds everyone of cozy nights. These are a great gift for anyone who enjoys a messy and delicious dessert.
Packaging these can be a bit tricky because they are so soft and sticky. Placing them in a box lined with wax paper ensures they stay in one piece. They are best served warm when the marshmallow is at its most stretchy and sweet.
Ingredients
1 box brownie mix
2 large eggs
1/2 cup vegetable oil
1/4 cup water
2 cups large marshmallows
1/4 cup chocolate chips
Equipment
Square baking pan
Parchment paper
Large mixing bowl
Whisk
Kitchen torch or oven broiler
DIY Instructions
Heat your oven to 350 degrees Fahrenheit. Line your square pan with parchment paper so the brownies are easy to remove.
Mix the brownie powder, eggs, oil, and water in your large bowl. Stir until the batter is thick and dark.
Pour the batter into the pan and bake for twenty five minutes. The edges should be firm but the center should stay a little soft.
Remove the pan from the oven. Immediately place the large marshmallows in a single layer over the entire surface of the brownie.
Put the pan back in the oven for three minutes. This will make the marshmallows soft and puffy.
Use a kitchen torch to brown the tops of the marshmallows until they look toasted. If you do not have a torch you can use the oven broiler for one minute.
Drizzle some melted chocolate chips over the toasted marshmallows for a finished look.
Let the brownies cool for at least one hour before you try to cut them. Use a wet knife to make clean cuts through the sticky marshmallow.
Place the squares into a gift box with layers of wax paper between them.
36. Melting Heart Hot Cocoa Bombs
Valentines Day Baking Ideas
Watch the magic happen when you pour hot milk over these chocolate heart shapes. The shell melts away to reveal a hidden treasure of cocoa powder and tiny marshmallows inside. It is an interactive gift that turns a cold afternoon into a warm and sweet celebration.
The dark chocolate shell provides a rich base for the drink. Each heart is decorated with a drizzle of white chocolate and a few sprinkles for a festive appearance. They look very impressive when placed in a clear gift box with a gold ribbon.
This gift is a great choice for families or couples who want a cozy activity together. You can customize the interior with different flavors like peppermint or caramel. They are fun to make and even more fun to watch as they disappear into the mug.
Ingredients
2 cups dark chocolate melting wafers
1/2 cup hot cocoa mix
1/2 cup mini marshmallows
1/4 cup white chocolate for drizzling
1 cup hot milk for serving
Equipment
Heart shaped silicone mold
Small spoon
Small microwave safe bowl
Large mug
Clear gift box
DIY Instructions
Melt the dark chocolate wafers in your microwave using thirty second bursts. Stir until the chocolate is completely smooth and liquid.
Spoon a small amount of chocolate into each heart mold. Use the back of the spoon to spread the chocolate up the sides to the very top edge.
Put the mold in the freezer for ten minutes. Take it out and add a second thin layer of chocolate to the sides to make them strong.
Freeze the mold for another ten minutes. Carefully pop the hollow chocolate hearts out of the silicone mold.
Fill half of the hollow hearts with a spoonful of cocoa powder and some mini marshmallows.
Take an empty heart half and touch the edges to a warm plate for three seconds. This will melt the rim slightly.
Press the warm empty heart onto a filled heart to seal them together. Hold them for a few seconds until the chocolate hardens.
Drizzle melted white chocolate over the top and add a few sprinkles.
To serve place the heart in a mug and pour very hot milk over the top. The heart will burst open and create a delicious drink.
37. Zesty Lime Coconut Snowballs
Valentines Day Baking Ideas
These bright white truffles offer a refreshing tropical flavor that stands out from the crowd. Each ball is coated in shredded coconut which looks like a tiny dusting of fresh snow. A pinch of lime zest on the top provides a beautiful green color and a sharp citrus scent.
The center is made from a creamy white chocolate ganache that is infused with fresh lime juice. These treats are a wonderful alternative for those who prefer fruity and light desserts over heavy cocoa. They look very professional when arranged in a white box with a few lime slices.
This recipe is simple to follow and does not require any baking time. The combination of coconut and lime is a classic pairing that feels very sophisticated. Your Valentine will love the fresh and zesty surprise hidden inside each sweet ball.
Ingredients
12 ounces white chocolate chips
1/2 cup heavy cream
2 tablespoons fresh lime juice
1 tablespoon lime zest
1 cup sweetened shredded coconut
Equipment
Small saucepan
Medium bowl
Small spoon
Shallow dish for coconut
White gift box
DIY Instructions
Put the white chocolate chips into a medium bowl and set it aside.
Heat the heavy cream in a small pan until it just starts to bubble. Pour the hot cream over the white chocolate chips.
Let the mixture sit for five minutes. Stir it gently until all the chips are melted and the liquid is smooth.
Stir in the fresh lime juice and half of the lime zest. Put the bowl in the fridge for two hours so the mixture becomes firm.
Pour the shredded coconut into a shallow dish. This will be your coating station for the truffles.
Scoop out a small piece of the chilled lime mixture. Roll it between your palms to make a round ball about one inch wide.
Drop the ball into the coconut and roll it until it is completely white and fuzzy.
Place the truffles on a tray and sprinkle the rest of the green lime zest over the top.
Put them in your gift box and keep them in the fridge until you are ready to share them.
38. Ruby Chocolate Fruit and Nut Discs
Valentines Day Baking Ideas
These pink chocolate circles offer a naturally fruity flavor and a stunning rose color. Each disc is topped with green pistachios, red dried berries, and a tiny bit of edible gold leaf. They look very elegant when stacked inside a clear cylinder tied with a gold string.
Ruby chocolate is a unique type of cocoa that has a tart berry taste without any added fruit. This makes it a very special gift for someone who loves trying new things in the kitchen. The different colors of the toppings make these treats look like tiny pieces of jewelry.
This recipe is incredibly fast to put together because there is no baking involved. You simply melt the chocolate and place the decorations on top before it dries. It is a fantastic choice for a high end gift that feels very thoughtful and modern.
Ingredients
1 cup ruby chocolate melting wafers
1/4 cup shelled pistachios
1/4 cup dried cranberries or cherries
1 tablespoon ginger pieces
Gold leaf flakes for decoration
Equipment
Microwave safe bowl
Baking sheet
Parchment paper
Small spoon
Clear plastic cylinder
DIY Instructions
Line a flat baking sheet with parchment paper. This will ensure your chocolate discs come off easily once they are hard.
Melt the ruby chocolate wafers in the microwave. Use twenty second bursts and stir every time so the pink color stays bright.
Use a small spoon to drop a dollop of melted chocolate onto the parchment paper. The chocolate will naturally spread into a circle.
While the pink circle is still wet press one pistachio and a few dried berries into the surface.
Add a tiny bit of dried ginger for a spicy kick if you like. Place a small flake of gold leaf on the top for a luxurious look.
Repeat this process until you have used all your melted chocolate. Try to keep the circles the same size so they stack well.
Let the discs sit on the counter for at least forty minutes until they are solid.
Carefully peel the discs off the paper. Be gentle as the thin edges can break easily.
Stack them inside your clear cylinder and tie the gold string in a bow at the top.
39. Chocolate Dipped Strawberry Heart Bouquet
Valentines Day Baking Ideas
This stunning arrangement features fresh strawberries shaped like hearts and dipped in smooth chocolate. Each berry is placed on a wooden stick to look like a long stemmed rose in a dark vase. A red velvet ribbon and a small gift tag complete the romantic and professional look.
Using both milk and white chocolate for the stripes adds a lot of visual interest to the bouquet. The natural sweetness of the fruit pairs wonderfully with the rich coating. This is a great alternative to a real flower bouquet because it is beautiful and delicious.
The key to this gift is selecting the largest and freshest strawberries you can find. Cutting a small “V” shape in the top of the berry before dipping creates the perfect heart look. Your partner will be amazed by the creativity and the effort put into this sweet display.
Ingredients
12 large fresh strawberries
1 cup milk chocolate chips
1/4 cup white chocolate chips for drizzling
1 tablespoon coconut oil
Equipment
12 wooden skewers or cake pop sticks
Black vase or tall jar
Small microwave safe bowls
Parchment paper
Red velvet ribbon
DIY Instructions
Wash your strawberries and pat them completely dry with a paper towel. Chocolate will not stick to wet fruit.
Use a small knife to cut a tiny “V” shape into the top of each strawberry where the green stem used to be. This creates the humps of the heart.
Push a wooden skewer into the bottom of each strawberry. Make sure it goes in deep so the berry does not fall off later.
Melt the milk chocolate and the coconut oil in a small bowl until smooth. The oil helps the chocolate stay thin and glossy.
Dip each strawberry into the melted chocolate. Turn it slowly to make sure the entire fruit is covered up to the top.
Place the skewers in a tall glass so the berries are standing up while they dry. Do not let them touch each other.
Melt the white chocolate and drizzle it back and forth over the dry berries to create pretty stripes.
Once the chocolate is fully hard arrange the skewers inside your black vase.
Tie the red velvet ribbon around the vase and attach your gift tag with a sweet message.
40. Red Velvet Heart Cake Pops
Valentines Day Baking Ideas
These bright red cake balls are covered in a smooth white coating and decorated with tiny hearts. Each pop is a bite sized piece of moist red velvet cake that feels very indulgent. They look wonderful when arranged in a jar filled with pink sugar and tied with a red ribbon.
The contrast between the white shell and the deep red interior is a great surprise for your Valentine. These are a popular choice for parties because they are easy to eat without a plate or fork. They stay moist for several days which makes them an excellent make ahead gift.
Making cake pops is a fun way to use up any extra cake scraps you might have. You can add a little bit of cream cheese frosting to the mix to make the center extra rich. They look very professional and festive and will certainly brighten anyone’s day.
Ingredients
1 box red velvet cake mix
1/2 cup cream cheese frosting
2 cups white chocolate melting wafers
1/4 cup red heart shaped sprinkles
Pink sanding sugar for the jar
Equipment
Large bowl
Baking sheet
Parchment paper
Cake pop sticks
Glass jar
DIY Instructions
Bake your red velvet cake according to the box directions and let it cool completely.
Use your hands to crumble the entire cake into a large bowl. You want the crumbs to be very small and even.
Add the cream cheese frosting to the crumbs. Mix with your hands until the dough is moist and you can roll it into a ball without it breaking.
Roll the dough into balls about the size of a golf ball. Pinch the bottom to make a point and push the top down to create a heart shape.
Place the hearts on a tray and put them in the freezer for fifteen minutes. Cold pops are much easier to dip.
Melt your white chocolate wafers in the microwave until smooth. Dip the end of a stick into the chocolate and push it into the bottom of a heart.
Dip the entire heart into the white chocolate. Tap the stick gently on the side of the bowl to remove the extra liquid.
Sprinkle the tiny red hearts over the wet chocolate. Place the stick into a piece of foam or a tall glass to let it dry.
Fill your glass jar with pink sugar and stand the finished pops up inside for a beautiful presentation.
41. Golden Adventure Fortune Cookies
Valentines Day Baking Ideas
These crisp treats bring a sense of mystery to your holiday table. Each golden shell hides a secret message to make your partner smile. A dark chocolate dip and gold glitter give them a high end finish that feels truly special.
This gift provides a fun way to share your favorite memories or future plans. You can write your own notes to make the experience very personal. Your partner will love the extra effort you put into the tiny details inside the shells.
Putting these in a classic white takeout box adds a playful touch. The contrast between the simple paper and the shimmering gold cookies looks very professional. It is a creative choice for anyone who loves a bit of whimsy with their dessert.
Ingredients
3 large egg whites
3/4 cup granulated sugar
1/2 cup melted butter
1/4 teaspoon vanilla extract
1 cup all purpose flour
2 tablespoons water
1/2 cup dark chocolate chips
Edible gold glitter
Equipment
Large mixing bowl
Whisk
Baking sheet
Silicone mat
Small strips of paper
Muffin tin
Microwave safe bowl
DIY Instructions
Start by heating your oven to 350 degrees Fahrenheit. Place a silicone mat on your baking sheet so the cookies do not stick to the tray.
Whisk the egg whites and sugar in your bowl until the mixture looks foamy. Pour in the melted butter and vanilla and stir well.
Add the flour and water to the liquid. Mix until you have a smooth batter that looks like thin pancake mix.
Use a spoon to drop two small circles of batter onto the mat. Spread them out with the back of the spoon until they are very thin.
Bake for five minutes or until the edges turn a light golden brown. Work quickly while the cookies are still hot and soft.
Place a paper note in the center of a hot cookie. Fold the cookie in half over the paper to make a semi circle.
Pull the ends of the semi circle down over the edge of a mug to create the classic folded shape.
Put the folded cookie into a muffin tin hole so it keeps its shape while it cools and hardens.
Melt the chocolate in a bowl and dip one end of each cold cookie. Sprinkle the gold glitter over the wet chocolate and let it set.
42. Custom Heart Cookie Decorating Kit
Valentines Day Baking Ideas
Give the gift of a shared activity this year. This wooden box holds everything needed for a cozy night of creativity. Plain heart cookies act as the canvas for colorful icing and sparkling sprinkles.
Families love these kits because they provide hours of entertainment. You can include different colors of icing to allow for many unique designs. Your recipient will appreciate having all the supplies ready for a fun baking session.
A handwritten instruction card adds a nice touch to the package. Wrapping the wooden box with a red ribbon makes it look like a high end boutique item. It is a thoughtful gift that focuses on making memories together.
Ingredients
1 batch of plain sugar cookies cut into hearts
2 cups powdered sugar
4 tablespoons milk
1 tablespoon light corn syrup
Red and pink food coloring
Assorted heart sprinkles
Equipment
Wooden gift box
Small glass jars
Plastic piping bags
Red ribbon
Instruction card
DIY Instructions
Bake a batch of your favorite sugar cookies using a heart cutter. Let them cool completely so they are very firm.
Mix the powdered sugar, milk, and corn syrup in a bowl to make the icing. Stir until it is thick and shiny like honey.
Divide the icing into three smaller bowls. Add a drop of red coloring to one and pink to another while leaving the last one white.
Pour each color into a plastic piping bag and tie the ends tight. This keeps the icing from drying out inside the box.
Fill small glass jars with different types of heart sprinkles. Make sure the lids are on tight so nothing spills during travel.
Place a layer of tissue paper in the bottom of your wooden gift box. Arrange the plain cookies on one side of the box.
Tuck the icing bags and sprinkle jars into the other side of the box.
Place your instruction card on top and close the lid. Wrap the red ribbon around the outside and tie a large bow.
Store the kit in a cool place until you are ready to give it to your favorite baker.
43. Sweet Talk Pastel Cupcakes
Valentines Day Baking Ideas
Soft colors and vintage vibes make these cupcakes a beautiful choice for a February morning. Each one features a classic conversation heart on top to send a cute message. The swirls of frosting look elegant in a soft pink gift box.
These treats use a light vanilla base that feels airy and sweet. Using pastel shades of green, purple, and yellow for the icing creates a cheerful variety. People love seeing the different messages on top of each tiny cake.
Packaging them in a box with a clear window allows the colors to shine. A small gift note attached with a paperclip adds a personal touch. They are a great choice for school parties or sharing with office friends.
Ingredients
12 pre baked vanilla cupcakes
1 cup softened butter
3 cups powdered sugar
2 tablespoons heavy cream
Pink, green, and purple food coloring
1 box conversation heart candies
Equipment
Electric mixer
Piping bag
Large star tip
Cupcake gift box
Small paperclips
DIY Instructions
Make sure your cupcakes are completely cold before you start. Warm cakes will melt the butter in your frosting.
Beat the soft butter in a large bowl until it looks white and creamy.
Add the powdered sugar one cup at a time while the mixer is running on a low speed.
Pour in the heavy cream and turn the mixer to high. Beat the frosting for three minutes until it is very fluffy.
Separate the frosting into three bowls and add your pastel food colors. Use only a tiny drop of color so the shades stay soft.
Put a star tip into your piping bag and fill it with one color of frosting. Squeeze a large swirl onto the top of four cupcakes.
Wash the bag and repeat the process for the other two colors.
Press one conversation heart candy into the center of each frosting swirl. Pick different messages for each cake to make it fun.
Place the cupcakes into the holes of your gift box. Close the lid and clip your note to the side for the final look.
44. Sunshine Lemon Poppy Seed Bars
Valentines Day Baking Ideas
Bright citrus flavors provide a refreshing break from heavy chocolate treats. These bars feature a dense base with a zesty yellow glaze on top. They pair wonderfully with a warm cup of coffee during a slow brunch.
The tiny black poppy seeds add a nice crunch and a speckled look to the light dough. Serving them on a floral plate makes the yellow color pop. They feel sophisticated and light for a daytime celebration.
A gold tin is the best way to package these bars for a gift. The metal keeps the citrus scent fresh and protected. Your friends will love the sharp and sweet flavor of the fresh lemon juice in every bite.
Ingredients
1 1/2 cups all purpose flour
1/2 cup granulated sugar
1/2 cup softened butter
1 tablespoon poppy seeds
1 cup powdered sugar
3 tablespoons fresh lemon juice
1 tablespoon lemon zest
Equipment
Square baking pan
Parchment paper
Mixing bowl
Whisk
Gold gift tin
DIY Instructions
Line your square pan with parchment paper and heat your oven to 350 degrees Fahrenheit.
Mix the flour, granulated sugar, and softened butter in a bowl. Use a fork to mash them together until a crumbly dough forms.
Stir the poppy seeds into the dough. Press the mixture firmly into the bottom of your prepared pan.
Bake the base for twenty minutes or until the edges look slightly golden. Let it cool in the pan while you make the top layer.
Whisk the powdered sugar and fresh lemon juice together in a small bowl. The glaze should be thick but easy to pour.
Stir in the lemon zest to add extra flavor and color to the glaze.
Pour the yellow liquid over the cooled crust. Use a spoon to spread it out to all the corners.
Let the pan sit on the counter for one hour until the glaze becomes firm and dry.
Use the edges of the paper to lift the block out of the pan. Cut into even bars and stack them inside your gold gift tin.
45. Honey Glazed Heart Baklava
Valentines Day Baking Ideas
Thin layers of pastry create a wonderful crunch in these heart shaped delights. Ground pistachios and a sticky honey drizzle add a touch of luxury to every bite. They look stunning on a gold tray for a romantic dinner.
This dessert offers a complex flavor that feels very high end. The green nuts and pink rose petals provide a beautiful color contrast on the golden pastry. It is a unique choice for anyone who enjoys international treats.
A small glass of strong coffee pairs perfectly with the intense sweetness of the honey. Packaging them in a dark wooden box adds to the elegant feel. Your partner will be impressed by the many layers of flaky dough you prepared.
Ingredients
1 package frozen phyllo pastry thawed
1 cup melted butter
2 cups finely ground pistachios
1/2 cup granulated sugar
1 cup honey
1/2 cup water
Dried edible rose petals
Equipment
Baking sheet
Pastry brush
Heart shaped cookie cutter
Small saucepan
Gold serving tray
DIY Instructions
Lay one sheet of the thin pastry on a clean flat surface. Use your brush to coat the entire sheet with melted butter.
Place a second sheet on top and brush it with more butter. Repeat this until you have ten layers of buttery dough.
Mix the ground pistachios and sugar in a small bowl. Spread a thin layer of the nuts over the top of your pastry stack.
Add ten more layers of pastry on top of the nuts and brush each one with butter.
Use your heart cutter to stamp out shapes from the large stack of dough. Press down hard to cut through all the layers.
Place the hearts on a baking sheet and bake at 325 degrees Fahrenheit for twenty five minutes. They should look golden and crispy.
Put the honey and water in a saucepan over medium heat. Let it simmer for five minutes until it becomes a thin syrup.
Pour the warm honey syrup over the hot baklava as soon as it comes out of the oven.
Sprinkle some extra ground nuts and rose petals on top. Let the hearts sit for four hours to soak up all the sweet honey before serving.
46. Cinnamon Dulce De Leche Truffles
Valentines Day Baking Ideas
These white chocolate balls hide a gooey caramel surprise inside. A coating of cinnamon sugar makes them look like tiny snowballs with a warm flavor. They fit beautifully in a festive paper cone for easy gifting.
The dulce de leche center provides a rich and creamy texture that melts instantly. Using white chocolate for the shell allows the brown cinnamon to stand out. Your recipient will love the combination of spice and sugar in this treat.
Wrapping them in a striped paper bag makes for a casual and fun presentation. You can add a little gift tag with a red string to complete the look. They are very easy to share and travel well to any party.
Ingredients
8 ounces white chocolate chips
1/2 cup heavy cream
1/4 cup jarred dulce de leche caramel
1/2 cup granulated sugar
1 tablespoon ground cinnamon
Equipment
Small saucepan
Heat proof bowl
Small spoon
Shallow dish
Striped paper cones
DIY Instructions
Put the white chocolate chips into a heat proof bowl. Make sure no water gets into the bowl.
Heat the heavy cream in a small pan until it starts to simmer. Pour the hot cream over the chocolate chips.
Let it sit for five minutes and then stir until the chocolate is smooth. Put the bowl in the fridge for two hours.
Scoop out a small spoonful of the cold white chocolate. Press your thumb into the center to make a small hole.
Place a tiny drop of the dulce de leche caramel into the hole.
Fold the white chocolate over the caramel and roll it into a smooth ball. Put the balls back in the fridge for thirty minutes.
Mix the sugar and cinnamon together in a shallow dish.
Roll each cold truffle in the cinnamon sugar until it is completely covered.
Place several truffles into a paper cone and tie the top with a string to finish your gift.
47. Black Forest Cake Jars
Valentines Day Baking Ideas
Layers of rich chocolate cake and whipped cream create a striking visual through the glass. Tart red cherries provide a burst of color and flavor in every spoonful. A green velvet ribbon adds a final touch of class to this portable dessert.
These jars are a great way to give a full cake experience in a small package. The clear glass lets your Valentine see all the delicious tiers before they start eating. They are easy to pack in a picnic basket for a romantic outing.
Using dark chocolate shavings on top makes the jars look very professional. You can use fresh or jarred cherries depending on what you can find. Your partner will appreciate the classic flavors of this traditional German treat.
Ingredients
2 cups chocolate cake crumbs
2 cups heavy whipping cream
1/4 cup powdered sugar
1 cup jarred cherries in syrup
1/4 cup dark chocolate shavings
2 whole fresh cherries for the top
Equipment
2 glass mason jars
Large bowl
Electric whisk
Small spoon
Green velvet ribbon
DIY Instructions
Whisk the heavy cream and powdered sugar in a bowl until the cream is very thick and holds its shape.
Place a layer of chocolate cake crumbs into the bottom of each glass jar. Press them down slightly with your spoon.
Add a layer of cherries on top of the cake. Pour a little bit of the cherry syrup over the crumbs to make them moist.
Spoon a thick layer of the whipped cream over the cherries. Spread it out so it touches the glass all the way around.
Repeat the cake, cherry, and cream layers until you reach the top of the jar.
Sprinkle a generous amount of dark chocolate shavings over the final layer of cream.
Place a whole fresh cherry right in the center of the chocolate shavings.
Wipe the rim of the jar clean and put the lid on tight.
Tie the green velvet ribbon around the neck of the jar in a pretty bow. Keep the jars in the fridge until it is time to give them away.
48. Sweet Cream Heart Chip Dip
Valentines Day Baking Ideas
This interactive snack is a great way to share a sweet moment. Fluffy cream dip topped with chocolate chips sits in the center of a ring of heart shaped crisps. It feels casual yet thoughtful for a movie night at home.
The dip features a smooth texture from ricotta and mascarpone cheese. Sprinkling cinnamon over the heart chips adds a warm scent that fills the room. It is a fun alternative to traditional cakes and cookies for a group.
Serving this on a large blue and white plate creates a beautiful and rustic look. You can package the dip in a jar and the chips in a bag for a gift set. Your friends will love dipping the crunchy hearts into the sweet cream.
Ingredients
1 cup ricotta cheese
1/2 cup mascarpone cheese
1/2 cup powdered sugar
1/2 cup mini chocolate chips
1 package flour tortillas
1/4 cup melted butter
2 tablespoons cinnamon sugar
Equipment
Heart shaped cookie cutter
Baking sheet
Mixing bowl
Whisk
Serving bowl
DIY Instructions
Use your heart cutter to stamp out many shapes from the flour tortillas.
Brush both sides of the heart shapes with melted butter. Sprinkle them with plenty of cinnamon sugar.
Place the hearts on a baking sheet and bake at 350 degrees Fahrenheit for eight minutes. They should be very crispy and golden.
Let the chips cool on the tray while you make the sweet dip.
Put the ricotta, mascarpone, and powdered sugar in a bowl. Whisk them together until the mixture is light and smooth.
Fold half of the mini chocolate chips into the cream mixture with a spoon.
Spoon the dip into a small serving bowl. Scatter the rest of the chocolate chips over the top.
Place the bowl in the center of a large plate. Arrange the cinnamon heart chips in a circle around the bowl.
If you are giving this as a gift, put the dip in a jar and the cold chips in a clear plastic bag with a red bow.
49. Salted Caramel Noir Brownies
Valentines Day Baking Ideas
Deep dark chocolate meets a thick swirl of golden caramel in this indulgent square. Small grains of sea salt on top bring out the richness of the cocoa. A sleek grey gift box makes this feel like a high end bakery find.
The brownie base is very fudgy and dense with a dark color. The orange caramel provides a beautiful visual contrast on the surface. It is a sophisticated choice for anyone who loves intense and salty flavors.
A black wax seal on the gift box adds a touch of mystery and class. You can cut the brownies into large squares to show off the marbled pattern. Your recipient will love the gourmet feel of this simple yet elegant gift.
Ingredients
1 cup melted dark chocolate
1/2 cup melted butter
1 cup granulated sugar
2 large eggs
3/4 cup all purpose flour
1/2 cup jarred thick caramel sauce
1 tablespoon coarse sea salt
Equipment
Square baking pan
Parchment paper
Mixing bowl
Metal spoon
Grey gift box and wax seal
DIY Instructions
Heat your oven to 325 degrees Fahrenheit and line your pan with parchment paper.
Mix the melted dark chocolate, butter, and sugar in a large bowl. Stir until the mixture is smooth and dark.
Add the eggs one at a time and whisk them in until the batter looks shiny.
Fold in the flour gently with your metal spoon. Do not over mix the batter or the brownies will be tough.
Pour the chocolate batter into your prepared pan. Smooth out the surface so it is even.
Drop spoonfuls of the caramel sauce all over the top of the batter. Use a knife to swirl the caramel into the chocolate.
Bake for twenty five minutes. The edges should be set but the middle will still be a little soft.
Sprinkle the coarse sea salt over the hot caramel while it is still liquid.
Let the brownies cool completely in the pan for several hours. Cut them into squares and place them into your grey gift box for the final presentation.
50. Mexican Spice Hot Cocoa Cookies
Valentines Day Baking Ideas
These cookies offer a warm heat thanks to a hint of cinnamon and chili. A molten chocolate center provides a rich surprise when you take a bite. They look charming tied with a leather cord next to a steaming mug of cocoa.
The deep brown dough is rolled in sugar for a sparkling and crisp exterior. They have a rustic look that feels very cozy for a winter evening. This is a great choice for someone who likes a little adventure in their dessert.
Serving them with a cup of hot cocoa topped with toasted marshmallows is a winning idea. The spice in the cookie balances the sweet drink perfectly. Your partner will love the surprising warmth that comes from the tiny pinch of cayenne pepper.
Ingredients
2 cups all purpose flour
1/2 cup cocoa powder
1 teaspoon ground cinnamon
1/4 teaspoon cayenne pepper
1 cup softened butter
1 cup granulated sugar
1/2 cup dark chocolate ganache cold
Equipment
Large baking sheet
Parchment paper
Mixing bowl
Whisk
Leather cord for tying
DIY Instructions
Whisk the flour, cocoa powder, cinnamon, and cayenne pepper in a small bowl.
Cream the butter and sugar in a large bowl until the mixture is light and fluffy.
Add the dry ingredients to the butter and stir until a dark and spicy dough forms.
Scoop out a small piece of dough and flatten it in your hand. Place a tiny cold ball of dark chocolate ganache in the center.
Fold the dough over the chocolate and roll it into a round ball. Make sure the chocolate is completely hidden.
Roll the balls in a bowl of extra sugar to give them a sparkling coat.
Place the cookies on a baking sheet lined with paper. Bake at 350 degrees Fahrenheit for ten minutes.
Let the cookies cool on the tray for five minutes so the molten center stays inside.
Stack three cookies and tie them together with a piece of leather cord. Serve them next to a hot drink for the best experience.
Key Takeaways
Homemade gifts show deep appreciation. Spending time in the kitchen proves you care more than a store bought card ever could.
The collection covers many flavors. You can find citrus, chocolate, or nutty treats to fit the unique tastes of your partner.
Clear instructions help everyone succeed. Even if you rarely bake, the detailed steps ensure your gift looks and tastes wonderful.
Gifting something handmade creates a connection that lasts far beyond the holiday. These recipes help you share your time and talent with those you love. Each bite tells a story of the effort you put into the kitchen.
Choose a recipe that speaks to your Valentine and start your ovens. The joy of giving a sweet treat is just as great as the joy of eating one. Your kitchen will soon fill with wonderful scents and happy memories.
Spread the loveGetting a party started for kids often feels like a puzzle with too many pieces. You want something that looks exciting but does not take all day to prepare. These colorful candy drinks…
Spread the loveValentine’s Day often brings a lot of pressure to create something beautiful. Many bakers worry about their icing skills failing them at the last minute. This guide helps you move past those fears…
Spread the loveIs your holiday baking done? Sharing homemade food is a beautiful way to show you care during the busy winter season. These 40 simple recipes help you create thoughtful gifts without spending days…