Valentine’s Day often brings a lot of pressure to create the most elaborate desserts for your loved ones. You might feel overwhelmed by complicated recipes that require hours of standing over a hot stove or checking the oven. Skip the stress this year by choosing treats that do not require any baking at all.
Valentines Day Treats
These 48 ideas offer a simple way to bring sweetness to your celebration without the mess of flour and baking sheets. You can focus more on making memories and less on whether your cake will rise correctly. From chocolate dipped fruits to creamy truffles, there is something here for every sweet tooth.
Preparing a special meal feels much lighter when the final course is easy to assemble. Your kitchen will stay cool and clean while you craft these romantic snacks for your partner or family. Every recipe on this list ensures that your holiday stays relaxed and focused on love.
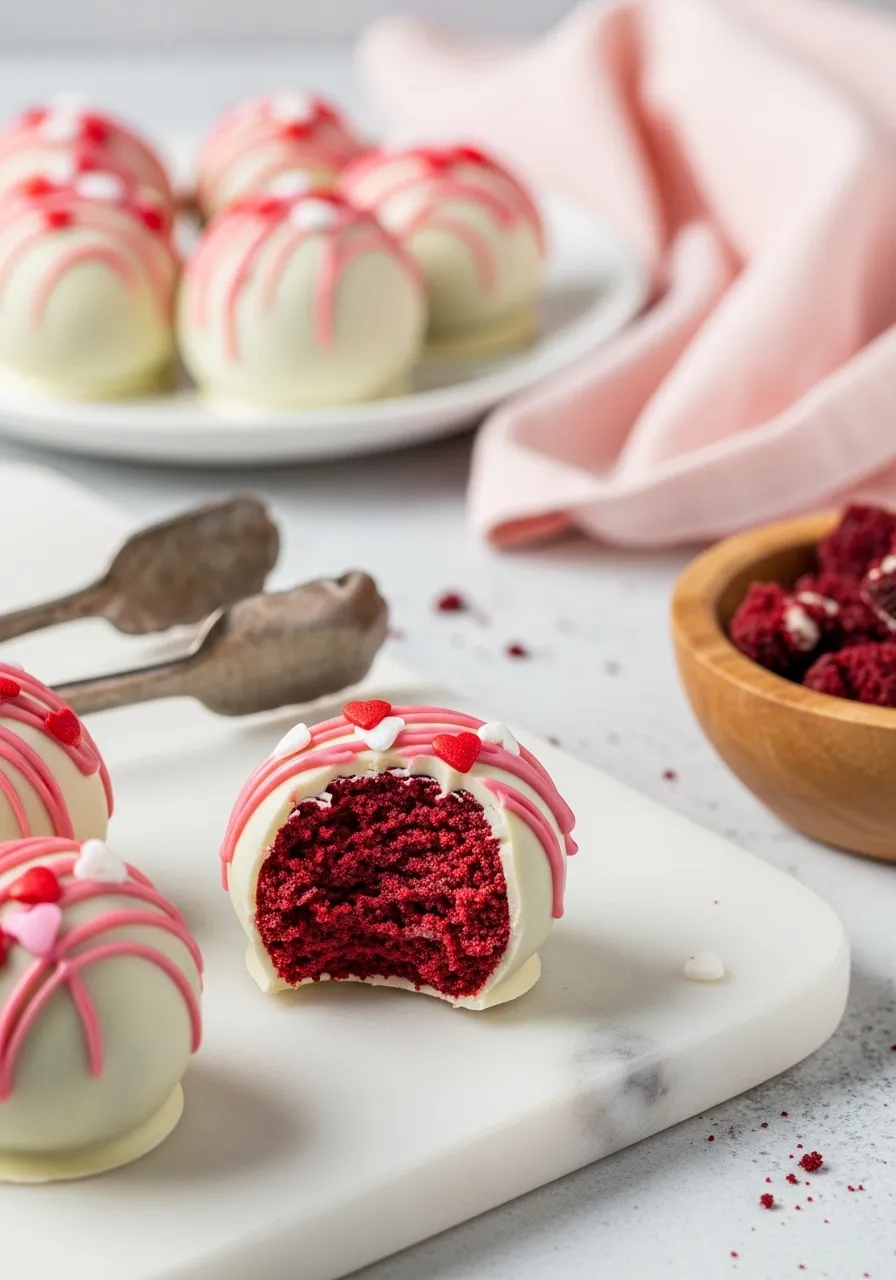
Creating a sweet memory does not require a hot kitchen or hours of work. Valentine’s Day feels more special when you share a bite sized treat with someone you love. These little bites feature a rich red velvet center hidden beneath a smooth white chocolate shell. Tiny heart sprinkles add a festive touch that makes them look professionally made without any oven time.
Kids and adults will enjoy the soft texture paired with the crunchy coating. You can whip these up in a single afternoon and keep them in the fridge until your party starts. They offer a simple way to bring romance to your dessert table using very few ingredients.
Ingredients
1 box of red velvet cake mix (cooked) or a pre made store cake
8 ounces of softened cream cheese
12 ounces of white chocolate melting wafers
2 ounces of pink chocolate wafers
Red and white heart sprinkles
Equipment
Large mixing bowl
Baking sheet
Parchment paper
Microwave safe bowl
Fork
Small piping bag or plastic bag with a clipped corner
DIY Instructions
Crumble your pre made red velvet cake into a large mixing bowl until it looks like fine sand.
Add the softened cream cheese to the crumbs and mix everything together using your hands or a large spoon until a dough forms.
Shape the mixture into small round balls about one inch wide and place them on a baking sheet lined with parchment paper.
Put the tray in the freezer for twenty minutes so the balls become firm and easy to handle.
Melt the white chocolate wafers in a microwave safe bowl by heating them in thirty second intervals and stirring frequently until smooth.
Dip each chilled cake ball into the melted white chocolate using a fork to lift it out and let any extra chocolate drip off.
Place the coated truffles back on the parchment paper and let the white shell harden completely at room temperature.
Melt the pink chocolate wafers and use a small piping bag to drizzle thin lines over the top of each truffle for decoration.
Scatter the heart sprinkles on top while the pink drizzle is still wet so they stay in place before the chocolate sets.
2. Cupid’s Pretzel Arrows
Valentines Day Treats
Making a snack look like a love letter from Cupid is surprisingly easy. These salty pretzel rods transform into festive arrows using just a few sweet additions. Dark chocolate acts as the glue that holds everything together while providing a rich contrast to the crunchy base. Using a dark variety ensures the snack is not too sugary for adults to enjoy alongside the kids.
Bright red gummy hearts serve as the arrowhead for a chewy finish. You can use feather shaped chocolate molds for the fletching to give them a whimsical appearance. Guests will love how these treats balance savory and sweet flavors in every bite. Every guest will enjoy the satisfying snap of the pretzel followed by the soft candy tip.
Ingredients
10 large pretzel rods
1 cup dark chocolate melting wafers
10 red heart gummy candies
20 pink or red chocolate fletching shapes
White sanding sugar
Equipment
Microwave safe bowl
Baking sheet
Parchment paper
Small spoon
DIY Instructions
Place a piece of parchment paper over a flat baking sheet so the chocolate does not stick.
Melt the dark chocolate wafers in a bowl by heating them for thirty seconds at a time and stirring until the liquid is smooth.
Dip the bottom half of a pretzel rod into the melted chocolate and use a spoon to coat it evenly.
Set the dipped pretzel onto the parchment paper.
Press one gummy heart onto the very top of the pretzel while the chocolate is still wet to create the arrow point.
Attach two chocolate fletching shapes to the bottom of the pretzel rod so they look like feathers.
Sprinkle a small amount of white sugar over the chocolate parts to add a little sparkle.
Leave the tray on the counter for thirty minutes until the chocolate becomes hard and firm.
3. Raspberry Pistachio Bark
Valentines Day Treats
Vibrant colors make this chocolate bark a stunning centerpiece for any dessert platter. Tart raspberries cut through the sweetness of the creamy white chocolate base. Bright green pistachios add a satisfying crunch that lingers after the chocolate melts away. This combination of fruit and nuts provides a sophisticated flavor profile that appeals to everyone.
Swirls of red berry sauce create a marbled effect that looks high end and artistic. This treat requires no cooking and sets quickly in the refrigerator. Gift a bag of these shards to friends for a thoughtful handmade present. You can easily scale this recipe up to feed a large group of people during a party.
Ingredients
16 ounces white chocolate baking bars
1/2 cup fresh whole raspberries
1/3 cup shelled pistachios
2 tablespoons raspberry jam
1 teaspoon dried edible rose petals
Equipment
Large microwave safe bowl
Spatula
Baking sheet
Parchment paper
Toothpick
DIY Instructions
Line your baking sheet with parchment paper to ensure easy cleanup.
Chop the white chocolate bars into small even pieces so they melt at the same speed.
Melt the chocolate in the microwave using short bursts of heat and stir it well between each turn.
Pour the smooth melted chocolate onto the parchment paper and spread it into a flat rectangle with your spatula.
Drop small dots of raspberry jam across the surface of the wet chocolate.
Drag a toothpick through the jam dots to create pretty swirls and patterns.
Press the fresh raspberries and pistachios into the chocolate before it starts to harden.
Scatter the rose petals over the top for an extra touch of color.
Place the sheet in the fridge for one hour until the entire block is solid.
Break the hardened chocolate into random jagged pieces using your hands.
4. Strawberry Mousse Shooters
Valentines Day Treats
Individual servings always bring a touch of elegance to a holiday gathering. These tiny glasses contain layers of buttery graham cracker crumbs and airy strawberry mousse. Every spoonful provides a light and fruity experience that feels refreshing after a heavy meal. The pink color fits the holiday theme without being overly bright.
Fresh strawberry slices sit on top of whipped cream clouds for a beautiful presentation. You can prepare these hours in advance to save time on the big day. They fit easily into any party menu because of their small size and concentrated flavor. Using clear glasses allows the beautiful layers to show through for your guests.
Ingredients
1 cup graham cracker crumbs
3 tablespoons melted butter
1 cup strawberry puree
2 cups heavy whipping cream
1/2 cup powdered sugar
5 fresh strawberries cut in half
Equipment
10 small shot glasses
Mixing bowl
Hand mixer or whisk
Two piping bags
DIY Instructions
Mix the graham cracker crumbs with the melted butter in a small bowl until the texture feels like wet sand.
Spoon a small amount of the crumbs into the bottom of each shot glass and press down lightly.
Pour the heavy cream and powdered sugar into a large bowl and beat it with a mixer until stiff peaks form.
Fold the strawberry puree gently into the whipped cream using a spatula until the color is even.
Put the pink mousse into a piping bag and fill each glass about halfway up.
Add another small layer of strawberry jam or puree if you want extra fruit flavor.
Pipe a swirl of plain whipped cream on the very top of each glass.
Garnish each treat with a fresh strawberry slice and a sprig of mint.
Chill the glasses in the refrigerator for at least two hours before you serve them.
5. Sweet Envelope Letters
Valentines Day Treats
Turning standard pantry staples into edible mail is a fun project for the whole family. Graham crackers serve as the sturdy base for these adorable edible envelopes. White frosting creates the lines of a folded letter while red jam mimics a traditional wax seal. This creative approach makes a simple cracker feel like a special gift.
Tiny candy hearts add a final romantic touch that spells out a sweet message. These snacks are great for school parties or a quiet afternoon at home. You can customize the flavor by using different types of jam or even flavored cream cheese. They offer a nostalgic feeling that reminds people of sending paper cards.
Ingredients
1 box of honey graham crackers
1 pouch of white cookie icing
1 small jar of strawberry or raspberry jam
1 pack of pink conversation hearts
Equipment
Flat plate or tray
Small spoon
Paper towels
DIY Instructions
Break the graham cracker sheets into individual rectangles along the dotted lines.
Lay the crackers flat on a clean surface with the smooth side facing up.
Use the white icing pouch to draw a wide V shape starting from the top corners and meeting in the middle.
Draw two more lines from the bottom corners to the center to complete the look of an envelope.
Place a small round dot of red jam right where all the icing lines meet.
Press a pink candy heart into the center of the jam dot so it looks like a seal.
Let the icing dry for about ten minutes so the decorations do not slide off.
Arrange the finished letters on a wooden board for a rustic and charming display.
6. Pink XOXO Rice Treats
Valentines Day Treats
Classic marshmallow treats get a colorful makeover with a splash of pink. Shaping the mixture into letters allows you to send a clear message of love to your friends. The gooey texture remains a favorite for both kids and adults who enjoy a chewy snack. These treats are thick and satisfying for those who want a larger dessert.
Glittering edible dust adds a shimmer that catches the light on a dessert table. Using a mold ensures the shapes stay sharp and easy to recognize from across the room. These large treats make a bold statement and serve as a great centerpiece. You can stack them high on a cake stand for a professional look.
Ingredients
6 cups puffed rice cereal
1 bag of marshmallows
4 tablespoons butter
3 drops of pink food coloring
Edible silver luster dust
Equipment
Large pot
Spatula
X and O shaped cookie cutters
Wax paper
DIY Instructions
Melt the butter in a large pot over very low heat on the stove.
Add the entire bag of marshmallows to the pot and stir constantly until they are completely melted.
Stir in the pink food coloring until the marshmallow mixture is a solid bright color.
Remove the pot from the heat and pour in the rice cereal.
Mix everything together quickly until every piece of cereal is coated in the sticky marshmallow.
Press the mixture firmly into a greased baking pan and let it cool for twenty minutes.
Use your metal cookie cutters to punch out the letters X and O from the treats.
Sprinkle the silver luster dust over the tops of the letters to make them shine.
Serve the treats at room temperature so they stay soft and easy to chew.
7. Dark Chocolate Salted Clementines
Valentines Day Treats
Fruit becomes a decadent dessert when you dip juicy citrus segments into melted dark chocolate. The natural sweetness of the clementine pairs beautifully with the bitter notes of the cocoa. This light option is great for those who want a healthier holiday treat without sacrificing flavor. It feels fancy but takes almost no effort to put together.
Flaky sea salt and gold sprinkles provide a sophisticated finish to each individual piece. Cold fruit helps the chocolate harden almost instantly which saves you time in the kitchen. Arrange them in a circle on a dark plate to highlight the contrasting orange and brown colors. Every bite offers a burst of juice followed by a rich chocolate crunch.
Ingredients
4 clementine oranges
1 cup dark chocolate chips
1 teaspoon flaky sea salt
Gold sanding sugar
Equipment
Small microwave safe bowl
Parchment paper
Baking sheet
DIY Instructions
Peel the oranges and remove all the white stringy bits from the outside of the fruit.
Separate the fruit into individual segments and set them aside on a paper towel to dry.
Melt the chocolate chips in the microwave for thirty seconds and stir until there are no lumps.
Dip each orange segment halfway into the melted chocolate.
Place the dipped fruit onto a sheet of parchment paper.
Sprinkle a tiny pinch of sea salt and a bit of gold sugar onto the wet chocolate.
Repeat this process until all the fruit segments are coated and decorated.
Put the tray in the refrigerator for fifteen minutes to make sure the chocolate is set.
8. Valentine Popcorn Munch
Valentines Day Treats
Popcorn mixes are the ultimate snack for a Valentine movie night at home. This version combines salty pretzels with sweet candy hearts and colorful chocolate gems. Drizzles of pink and white chocolate tie all the pieces together into crunchy clusters. The mix of colors makes the bowl look very festive and inviting for guests.
Large bowls of this mix encourage sharing and grazing throughout the evening. You can vary the ingredients based on whatever candies you have in your pantry. The variety of textures ensures that every handful tastes a little bit different. It is a simple way to feed a crowd without spending a lot of money.
Ingredients
8 cups popped popcorn
2 cups mini pretzels
1 cup conversation hearts
1 cup red and pink chocolate candies
1/2 cup white chocolate chips
1/2 cup pink candy melts
Equipment
Very large mixing bowl
Baking sheet
Parchment paper
Two small spoons
DIY Instructions
Spread the popped popcorn and pretzels out in a single layer on a large baking sheet.
Scatter the conversation hearts and chocolate candies evenly over the top of the popcorn.
Melt the white chocolate chips in a small bowl until they are completely liquid.
Use a spoon to drizzle the white chocolate back and forth over the entire tray.
Melt the pink candy melts and repeat the drizzling process to add more color.
Toss the mixture gently with your hands while the chocolate is still a bit wet so everything sticks together.
Let the tray sit for twenty minutes until the chocolate drizzles are hard.
Break the mix into chunks and serve it in a large glass bowl.
9. Pink Marshmallow Pops
Valentines Day Treats
Putting treats on a stick makes them instantly more festive and easier to eat while walking around. These jumbo marshmallows feature a thick coating of pink chocolate and sparkling red sugar. They look like professional boutique candies but take very little effort to assemble. You can make a large batch of these in under half an hour.
Tiny white chocolate buttons add a cute detail to the center of each individual pop. Striped paper straws provide a sturdy handle and extra color to the overall presentation. Place them in a jar filled with small candies for a beautiful vertical display on your table. Kids especially love these because they are fun to hold and eat.
Ingredients
12 jumbo marshmallows
2 cups pink candy melts
1 cup red sanding sugar
12 small white heart candies
12 striped paper straws
Equipment
Microwave safe bowl
Deep cup for dipping
Small jar or foam block to hold the pops
DIY Instructions
Push a paper straw into the center of each marshmallow about halfway through.
Melt the pink candy melts in a deep cup so it is easy to dip the marshmallows fully.
Dip one marshmallow into the pink chocolate until it is covered almost to the top.
Tap the straw gently on the side of the cup to let any extra chocolate drip off.
Roll the bottom half of the wet marshmallow in the red sanding sugar.
Press one white heart candy into the front of the marshmallow before the chocolate dries.
Stand the straw up in a jar or a piece of foam so the marshmallow does not touch anything.
Allow the pops to dry for fifteen minutes until the pink shell is firm to the touch.
10. Salted Peanut Butter Bites
Valentines Day Treats
Chocolate and peanut butter are a legendary duo that never goes out of style. These dense hearts feature a smooth nut center covered in a crisp dark chocolate shell. A drizzle of extra peanut butter on top adds a beautiful visual texture to the finished dessert. They look like they came from a fancy candy shop but require no baking.
Coarse salt crystals balance the richness of the filling for a very gourmet taste. This recipe uses simple ingredients and does not require a single minute in a hot oven. Keep these in the freezer for a cold and creamy treat whenever a craving hits. They are very rich so one or two pieces are usually enough to satisfy a sweet tooth.
Ingredients
1 cup creamy peanut butter
1/2 cup powdered sugar
2 tablespoons melted butter
2 cups dark chocolate melting wafers
1 tablespoon coarse sea salt
Equipment
Medium mixing bowl
Heart shaped silicone mold
Small spoon
Fork
DIY Instructions
Stir the peanut butter, powdered sugar, and melted butter together in a bowl until a thick dough forms.
Press the peanut butter dough into the heart shaped molds and smooth the tops with a spoon.
Put the mold in the freezer for thirty minutes so the hearts become very firm.
Melt the dark chocolate wafers in the microwave until the mixture is smooth and liquid.
Remove the peanut butter hearts from the mold and dip each one into the melted chocolate using a fork.
Place the coated hearts on a piece of parchment paper to set.
Drizzle a tiny bit of melted peanut butter over the top of each heart in a wavy pattern.
Sprinkle a few grains of sea salt over the top while the chocolate is still wet.
Let the hearts sit at room temperature for twenty minutes before you eat them.
11. Pink Shimmer Truffles
Valentines Day Treats
These elegant bites bring a sparkle to your holiday celebration. Soft strawberry centers hide beneath a crisp white chocolate coating that glistens in the light. A light dusting of edible glitter makes them look like luxury candies from a boutique shop.
Serving these on a mirrored tray adds to the romantic atmosphere. Guests will appreciate the creamy texture and the subtle fruit flavor. They pair wonderfully with a glass of chilled sparkling wine or a light dessert coffee.
Ingredients
1 package of strawberry flavored cake or cookies
4 ounces of softened cream cheese
10 ounces of white chocolate melting wafers
Pink edible luster dust or fine glitter
1 tablespoon of coconut oil
Equipment
Large mixing bowl
Baking sheet
Parchment paper
Small microwave safe bowl
Fork
Soft food grade brush
DIY Instructions
Crush your cookies or cake into very fine crumbs using your hands or a heavy spoon in a large bowl.
Mix the softened cream cheese into the crumbs until the mixture feels like thick dough.
Roll the dough into small balls about the size of a large marble.
Place the balls on a tray lined with parchment paper and freeze them for fifteen minutes.
Melt the white chocolate and coconut oil in the microwave using twenty second bursts until the liquid is smooth.
Use a fork to dip each cold ball into the chocolate and lift it out while letting the excess drip off.
Set the coated truffles back on the parchment paper and let them harden at room temperature.
Dip a soft brush into the luster dust and gently tap it over the truffles to create a shimmering effect.
12. No Bake Raspberry Thumbprints
Valentines Day Treats
Chewy oats and sweet jam combine to create a rustic yet beautiful cookie. You do not need an oven to achieve this satisfying texture. Every bite offers a balance of earthy grains and tart fruit.
These treats look wonderful on a wooden serving board. Using high quality preserves ensures the red color pops against the golden base. They provide a healthier alternative to traditional cookies while still feeling like a decadent indulgence.
Ingredients
2 cups of quick oats
1 cup of creamy almond butter
1/2 cup of honey or maple syrup
1 teaspoon of vanilla extract
1/2 cup of raspberry jam
Equipment
Medium mixing bowl
Large spoon
Baking sheet
Parchment paper
DIY Instructions
Mix the oats, nut butter, honey, and vanilla in a bowl until the ingredients are fully combined.
Scoop out a tablespoon of the mixture and roll it into a ball between your palms.
Place the ball on a parchment paper sheet and press your thumb into the center to create a small hole.
Repeat this process until you use all the dough.
Fill each small hole with a spoonful of raspberry jam using a small knife or spoon.
Put the tray in the refrigerator for thirty minutes to help the cookies firm up.
Serve the cookies cold so they hold their shape while you eat them.
13. White Chocolate Cherry Fudge
Valentines Day Treats
Thick squares of creamy fudge offer a rich and velvety experience. Dried cherries provide a chewy contrast to the smooth white chocolate base. This simple recipe yields a large batch that is great for sharing with neighbors or coworkers.
Swirls of fruit juice create a marbled look that appears very professional. You can cut them into small cubes for a pretty display. They stay fresh for days when kept in a cool spot.
Ingredients
3 cups of white chocolate chips
1 can of sweetened condensed milk (14 ounces)
1 cup of dried tart cherries
1/4 cup of white chocolate shavings for topping
1 teaspoon of almond extract
Equipment
8 by 8 inch baking pan
Parchment paper
Small saucepan
Spatula
DIY Instructions
Line your square baking pan with parchment paper and leave some hanging over the sides for easy lifting.
Combine the white chocolate chips and condensed milk in a small saucepan over low heat.
Stir the mixture constantly until the chocolate melts and the texture is smooth.
Remove the pan from the heat and stir in the almond extract and the dried cherries.
Pour the thick mixture into your prepared pan and spread it out evenly with a spatula.
Sprinkle the chocolate shavings over the top while the fudge is still warm.
Refrigerate the pan for at least three hours until the block is completely solid.
Lift the fudge out of the pan using the parchment paper and cut it into small squares with a sharp knife.
14. Gold Leaf Chocolate Strawberries
Valentines Day Treats
Classic strawberries get a high fashion makeover with a touch of real gold. Dark chocolate provides a bitter snap that complements the juicy sweetness of the fresh fruit. These berries look stunning on a dark fabric backdrop.
Small flakes of edible gold leaf add a layer of luxury to every piece. Preparing these takes very little time but the visual impact is massive. Your partner will feel truly pampered when you present these treats.
Ingredients
12 large fresh strawberries with stems
1 cup of high quality dark chocolate chips
1 sheet of edible gold leaf
1 teaspoon of shortening
Equipment
Small microwave safe bowl
Parchment paper
Tweezers (clean and food safe)
Paper towels
DIY Instructions
Wash the strawberries and dry them very carefully with a paper towel because water will ruin the chocolate.
Melt the dark chocolate and shortening in the microwave in thirty second intervals until smooth.
Hold a strawberry by the green leaves and dip it into the chocolate until it is mostly covered.
Lay the strawberry on parchment paper and repeat the process for the rest of the fruit.
Let the chocolate set for ten minutes at room temperature.
Use your tweezers to pick up tiny pieces of gold leaf and gently press them onto the chocolate.
Place the finished strawberries in the fridge for another ten minutes to ensure the coating is hard.
15. Nutty Stuffed Dates
Valentines Day Treats
Medjool dates act as a natural caramel base for this quick snack. A filling of smooth nut butter adds protein and a rich mouthfeel. Crunchy hazelnuts on top provide a texture that keeps things interesting.
A sprinkle of sea salt brings out the deep sweetness of the fruit. These are great for a mid afternoon energy boost or a light after dinner sweet. You can make a dozen of these in just a few minutes.
Ingredients
10 large Medjool dates
1/4 cup of creamy peanut or hazelnut butter
20 whole hazelnuts or crushed nuts
1/2 cup of melted dark chocolate
Coarse sea salt
Equipment
Small knife
Teaspoon
Parchment paper
DIY Instructions
Slice each date lengthwise with a small knife and remove the hard pit from the center.
Open the date slightly and fill the empty space with a teaspoon of nut butter.
Press two whole hazelnuts or a few crushed nut pieces into the nut butter.
Drizzle a small amount of melted chocolate over the top of the date using a spoon.
Scatter a few grains of sea salt over the wet chocolate.
Set the dates on parchment paper and let them chill in the fridge for twenty minutes.
16. Pink Puppy Chow Mix
Valentines Day Treats
This festive snack mix features a blend of white and pink coated cereal. Tiny heart candies and chocolate gems add bursts of color and extra crunch. It is the ultimate snack for a casual gathering or a movie marathon.
Large bowls of this mix look very inviting on a party table. The powdery coating ensures every piece is sweet and satisfying. Kids will love the playful colors while adults enjoy the nostalgic flavors.
Ingredients
6 cups of corn or rice cereal squares
1 cup of pink candy melts
1 cup of white chocolate chips
1 cup of powdered sugar
1 cup of red and pink chocolate candies
Equipment
Two large mixing bowls
Two large plastic zipper bags
Microwave safe bowls
DIY Instructions
Divide the cereal into two separate mixing bowls.
Melt the pink candy melts in the microwave and pour them over the first bowl of cereal.
Stir gently until every piece is pink and then pour the cereal into a plastic bag with half the powdered sugar.
Shake the bag vigorously until the cereal has a white dusty coating.
Repeat these steps with the white chocolate chips and the remaining cereal and sugar.
Mix both colors of cereal together in a large serving bowl.
Stir in the chocolate candies and any other heart shaped sprinkles you like.
17. Heart Shaped Ice Cream Sandwiches
Valentines Day Treats
Cold pink ice cream squeezed between two dark chocolate cookies creates a fun dessert. Shaping the cookies into hearts adds a thematic touch for the holiday. Colorful sprinkles around the edges provide a festive finish.
These are a great way to cool down during a cozy night in. The contrast between the dark biscuit and the bright filling is very eye catching. You can store them in the freezer until you are ready to serve.
Ingredients
12 large chocolate wafer cookies
1 pint of strawberry ice cream
1/2 cup of small white and pink sprinkles
Equipment
Heart shaped cookie cutter
Baking sheet
Parchment paper
Small bowl for sprinkles
DIY Instructions
Soften the ice cream on the counter for five minutes so it is easier to scoop.
Spread a thick layer of ice cream onto a baking sheet lined with parchment paper.
Freeze the sheet of ice cream for one hour until it is very firm.
Use your heart shaped cutter to punch out shapes from the frozen ice cream.
Place one ice cream heart between two chocolate cookies and press down gently.
Roll the edges of the sandwich in a bowl of sprinkles so they stick to the ice cream.
Wrap each sandwich in plastic wrap and keep them in the freezer until you are ready to eat.
18. Chocolate Strawberry Mousse Bars
Valentines Day Treats
Layered bars offer a sophisticated look with three distinct textures. A graham cracker base supports a thick layer of airy strawberry mousse. Dark chocolate ganache on top provides a smooth and glossy finish.
Cutting these into sharp squares reveals the beautiful layers inside. They feel light and fluffy on the tongue while delivering a deep chocolate flavor. This dessert is sure to impress any guest at your table.
Ingredients
2 cups of graham cracker crumbs
1/2 cup of melted butter
2 cups of strawberry mousse (store bought or whipped)
1 cup of semi sweet chocolate chips
1/2 cup of heavy cream
Equipment
8 inch square pan
Small saucepan
Spatula
DIY Instructions
Stir the graham cracker crumbs and melted butter together until they look like wet sand.
Press the crumbs firmly into the bottom of your pan to create a solid crust.
Spread the strawberry mousse over the crust and smooth it out with a spatula.
Place the pan in the freezer for thirty minutes to let the mousse firm up.
Heat the heavy cream in a saucepan until it begins to simmer and then pour it over the chocolate chips.
Let the chocolate sit for two minutes and then stir it until it becomes a shiny liquid.
Pour the chocolate ganache over the cold mousse layer and spread it to the edges.
Chill the bars in the refrigerator for two hours before you cut them into squares.
19. White Chocolate Dipped Apricots
Valentines Day Treats
Dried apricots provide a chewy and tangy foundation for this elegant treat. Half the fruit is dipped in creamy white chocolate for a striking visual contrast. Gold leaf accents make these simple fruits feel like expensive confections.
The bright orange color of the fruit shines through the white coating. These are a great option for people who prefer fruit based desserts. You can arrange them in a circle for a beautiful platter.
Ingredients
20 dried apricots
1 cup of white chocolate melting wafers
1 sheet of edible gold leaf
1 tablespoon of coconut oil
Equipment
Microwave safe bowl
Parchment paper
Tweezers
DIY Instructions
Melt the white chocolate and coconut oil together in the microwave until smooth.
Dip each dried apricot halfway into the melted white chocolate.
Place the fruit on a sheet of parchment paper.
Use tweezers to apply a small piece of gold leaf to the wet chocolate on each apricot.
Allow the chocolate to harden at room temperature for fifteen minutes.
Store the treats in an airtight container in a cool place.
20. Raspberry Cream Nests
Valentines Day Treats
Pre made meringue shells allow you to create a stunning dessert without any baking. A generous dollop of whipped cream fills the center of each snowy nest. Fresh raspberries and silver sprinkles add a touch of elegance to the final plate.
These treats are incredibly light and airy. The tartness of the berries cuts through the sweetness of the base beautifully. They look like professional pastries but take only minutes to assemble.
Ingredients
6 store bought meringue nests
1 cup of heavy whipping cream
2 tablespoons of powdered sugar
1 cup of fresh raspberries
Edible silver sprinkles
Equipment
Mixing bowl
Hand mixer or whisk
Large spoon
DIY Instructions
Pour the heavy cream and powdered sugar into a bowl and beat them with a mixer until stiff peaks form.
Place the meringue nests on a serving platter.
Spoon a large amount of the whipped cream into the center of each nest.
Top the cream with three or four fresh raspberries.
Sprinkle a small amount of silver sugar or beads over the top for a glittery finish.
Serve these immediately because the meringue will soften if it sits too long.
21. Salted Chocolate Ruffles
Valentines Day Treats
Salty snacks meet sweet toppings in this quick recipe. Ruffled potato chips provide a sturdy base for rich dark chocolate. This snack satisfies every craving with just a few simple steps. You will enjoy the crunch followed by a smooth cocoa finish.
Pink sea salt adds a beautiful touch of color to the dark coating. These treats look wonderful in a glass bowl on your coffee table. Share them with friends during a movie night at home. Every bite offers a bold flavor that surprises the senses.
Ingredients
1 bag ruffled potato chips
1 cup dark chocolate melting wafers
2 tablespoons pink sea salt
1 teaspoon coconut oil
Equipment
Microwave safe bowl
Baking sheet
Parchment paper
Small spoon
DIY Instructions
Line a large baking sheet with parchment paper so the chocolate does not stick to the surface.
Pour the dark chocolate wafers and coconut oil into a microwave safe bowl.
Heat the mixture for thirty seconds and stir until the liquid becomes smooth and glossy.
Pick up a single potato chip and dip it halfway into the melted chocolate.
Use a small spoon to scrape off any extra chocolate so it does not pool on the tray.
Place the dipped chip onto the parchment paper.
Sprinkle a tiny amount of pink sea salt over the wet chocolate immediately.
Repeat this process until you have used all your chocolate or filled the tray.
Leave the chips at room temperature for forty minutes until the coating is firm.
22. Raw Dough Hearts
Valentines Day Treats
Edible cookie dough is a dream for anyone who loves treats without the wait. These heart shaped bites feature mini chocolate chips and a buttery texture. You do not have to worry about raw eggs since this recipe is completely safe. Kids will have a blast helping you press out the shapes.
Drizzles of melted chocolate across the top add an extra layer of sweetness. Tiny red hearts provide a pop of color that fits the holiday theme. Store these in the fridge to keep them firm and ready for snacking. They make a great addition to any holiday platter.
Ingredients
1.5 cups heat treated flour
1/2 cup softened butter
1/2 cup brown sugar
1/4 cup granulated sugar
1 teaspoon vanilla extract
1/2 cup mini chocolate chips
1/4 cup melted dark chocolate
Red heart sprinkles
Equipment
Large mixing bowl
Heart shaped cookie cutter
Rolling pin
Parchment paper
Spatula
DIY Instructions
Mix the softened butter and both types of sugar in a large bowl until the texture is light and fluffy.
Stir in the vanilla extract and the heat treated flour until a thick dough forms.
Fold in the mini chocolate chips using a spatula so they are spread evenly throughout.
Lay a piece of parchment paper on your counter and place the dough on top.
Roll the dough out until it is about half an inch thick.
Use your heart shaped cutter to punch out as many hearts as possible.
Arrange the hearts on a tray and drizzle the melted dark chocolate over them in a wavy pattern.
Scatter the red heart sprinkles over the wet drizzle.
Place the tray in the refrigerator for twenty minutes to let the dough firm up before serving.
23. Pomegranate Clusters
Valentines Day Treats
Fresh fruit segments wrapped in dark chocolate offer a refreshing change of pace. Pomegranate seeds provide a tart burst of juice that pairs well with cocoa. These tiny clusters look like glowing red jewels once they are finished. They are light enough to enjoy after a large dinner.
A small pinch of flaky salt balances the natural sweetness of the fruit. These treats are naturally gluten free and very easy to prepare. You can assemble a whole batch in less than fifteen minutes. Your guests will love the sophisticated appearance and the unique texture.
Ingredients
1 cup fresh pomegranate seeds
1 cup dark chocolate melting wafers
1/2 teaspoon flaky sea salt
Equipment
Small microwave safe bowl
Baking sheet
Parchment paper
Two small spoons
DIY Instructions
Wash the pomegranate seeds and pat them dry with a paper towel.
Melt the dark chocolate wafers in your bowl using twenty second intervals in the microwave.
Stir the seeds into the melted chocolate until every single one is coated.
Scoop out a small spoonful of the mixture and drop it onto a parchment paper sheet.
Shape the mixture into a round cluster while it is still wet.
Sprinkle a tiny bit of sea salt over the top of each little mound.
Repeat the steps until all the mixture is used up.
Put the tray in the fridge for ten minutes so the chocolate can harden quickly.
24. Cherry Brownie Bites
Valentines Day Treats
Dark chocolate squares topped with whipped ganache make a decadent statement. Each bite features a bright red maraschino cherry for a classic flavor combination. The rich cocoa base feels like a traditional brownie without ever touching the oven. These are the ultimate treat for a true chocolate lover.
Tiny chocolate shavings add a professional touch to the presentation. These small servings are great for a party where people want to sample many things. You can keep them in a cool container for several days. They look beautiful when arranged on a silver cake stand.
Ingredients
1 pan of pre made no bake brownies
1 cup chocolate frosting or ganache
12 maraschino cherries with stems
1 tablespoon chocolate shavings
Equipment
Sharp knife
Piping bag with a star tip
Serving tray
DIY Instructions
Cut your no bake brownies into small squares about two inches wide.
Place the squares onto your serving tray with a little space between them.
Fill a piping bag with the chocolate frosting and attach a star tip.
Squeeze a small swirl of frosting onto the center of each brownie square.
Dry the maraschino cherries with a paper towel so the juice does not run.
Press one cherry firmly into the top of the frosting swirl.
Sprinkle the chocolate shavings over the frosting for a bit of extra detail.
Keep the treats in a cool spot until you are ready to share them.
25. Rose Popcorn Globes
Valentines Day Treats
Popcorn gets a romantic makeover with a sweet pink coating. These large globes are held together by melted marshmallows and butter. They offer a whimsical look that reminds people of vintage candy shops. Wrapping them in clear plastic makes them a wonderful gift for neighbors.
Red ribbons and heart sprinkles add the finishing touches to this snack. The texture is sticky and crunchy at the same time. You can make these in large batches very quickly. They are a fun alternative to traditional cards or boxes of chocolates.
Ingredients
8 cups popped popcorn
4 cups mini marshmallows
3 tablespoons butter
2 drops pink food coloring
Heart shaped sprinkles
Equipment
Large pot
Spatula
Cellophane bags
Red ribbon
DIY Instructions
Melt the butter in a large pot over low heat until it is liquid.
Add the marshmallows and stir constantly until they are completely melted and smooth.
Stir in the pink food coloring until the mixture is a solid bright color.
Pour the popcorn into the pot and toss it with a spatula until every piece is pink.
Add the heart sprinkles while the mixture is still sticky.
Grease your hands with a bit of butter so the popcorn does not stick to your skin.
Roll the mixture into balls about the size of a baseball.
Place the balls on parchment paper to cool for ten minutes.
Put each ball into a cellophane bag and tie it shut with a red ribbon.
26. Strawberry Yogurt Shards
Valentines Day Treats
Frozen yogurt bark is a refreshing treat that looks like a work of art. Heart shaped strawberry slices add a sweet and festive flair to the white base. Blueberries and crunchy granola provide a variety of textures in every bite. This option is great for those who want a lighter dessert.
A drizzle of honey across the top ties all the flavors together. You can break the bark into large shards for a rustic presentation. It stays fresh in the freezer for several weeks. Kids will enjoy this cold and creamy snack during a busy afternoon.
Ingredients
2 cups plain Greek yogurt
2 tablespoons honey
1/2 cup strawberries cut into hearts
1/4 cup blueberries
1/4 cup granola
1 tablespoon coconut flakes
Equipment
Baking sheet
Parchment paper
Spatula
DIY Instructions
Mix the Greek yogurt and honey in a small bowl until the flavor is even.
Spread the yogurt mixture onto a parchment paper lined baking sheet.
Use a spatula to make the yogurt about one quarter of an inch thick.
Press the strawberry hearts and blueberries into the wet yogurt.
Scatter the granola and coconut flakes over the entire surface.
Place the sheet in the freezer for at least four hours until it is solid.
Lift the bark out of the pan and break it into random pieces using your hands.
Keep the pieces in a freezer bag until you are ready to enjoy them.
27. Red Sanded Wafers
Valentines Day Treats
Vanilla wafers are the ultimate shortcut for a beautiful holiday treat. Dipping them in white chocolate gives them a clean and elegant appearance. Red sanding sugar adds a sparkle that catches the light on your table. These are simple to make but look like they came from a bakery.
You can display them in rows on a pink plate for a lovely effect. The crunch of the sugar pairs well with the soft cookie center. They are small enough to pack into school lunch boxes. Every guest will appreciate the light and crispy texture.
Ingredients
20 vanilla wafer cookies
1 cup white chocolate melting wafers
1/2 cup red sanding sugar
Equipment
Small bowl
Small plate
Parchment paper
DIY Instructions
Melt the white chocolate in a small bowl by heating it for thirty seconds at a time.
Pour the red sanding sugar onto a flat plate.
Dip a vanilla wafer halfway into the melted white chocolate.
Press the wet chocolate side of the cookie into the red sugar.
Place the decorated cookie onto a sheet of parchment paper.
Repeat these steps until all your cookies are coated and sparkly.
Let the cookies sit at room temperature for fifteen minutes to let the chocolate set.
28. Skillet Smores Melt
Valentines Day Treats
Warm chocolate and toasted marshmallows create a cozy feeling in this skillet treat. Graham cracker crumbs provide a crunchy base that tastes like a campfire snack. You can use a kitchen torch to get that golden brown look on top. It is a fun dessert to share directly from the pan.
Tiny red heart sprinkles make this classic recipe fit for Valentine’s Day. The gooey texture is irresistible when served with extra crackers for dipping. It brings the outdoors inside without the need for a real fire. Your friends will love the nostalgic flavor of this rich melt.
Ingredients
1 cup graham cracker crumbs
2 cups semi sweet chocolate chips
1/2 cup heavy cream
1 bag jumbo marshmallows
Red heart sprinkles
Equipment
Small cast iron skillet
Kitchen torch or broiler
Spatula
DIY Instructions
Pour the graham cracker crumbs into the bottom of your skillet and press them down into a flat layer.
Melt the chocolate chips and heavy cream together until the mixture is smooth.
Pour the chocolate ganache over the graham cracker layer.
Place the jumbo marshmallows on top of the chocolate until the surface is covered.
Use a kitchen torch to carefully brown the tops of the marshmallows until they are toasted.
Scatter the red heart sprinkles over the warm marshmallows.
Serve the dish immediately while the chocolate is still melted and soft.
29. Blushing Fudge Squares
Valentines Day Treats
Thick cubes of pink fudge offer a creamy and smooth texture. White chocolate drizzles add a beautiful contrast to the bright pink base. Dried fruit pieces on top provide a chewy element that makes each square unique. This recipe is a great way to use up extra baking supplies.
The fudge is rich enough that one small piece is very satisfying. You can wrap these in wax paper for a cute handmade gift. They hold their shape well at room temperature for several days. This treat is a fun way to bring more color to your holiday.
Ingredients
3 cups white chocolate chips
1 can sweetened condensed milk
3 drops pink food coloring
1/2 cup dried strawberries chopped
1/4 cup melted white chocolate for drizzle
Equipment
8 inch square pan
Parchment paper
Spatula
Small piping bag
DIY Instructions
Line your square pan with parchment paper so the fudge is easy to remove later.
Combine the white chocolate chips and condensed milk in a bowl and melt them together.
Stir in the pink food coloring until the shade is bright and even.
Fold in half of the dried strawberry pieces using a spatula.
Pour the mixture into the pan and spread it out into the corners.
Drizzle the melted white chocolate over the top in a zig zag pattern.
Sprinkle the rest of the dried strawberries over the wet drizzle.
Chill the fudge in the refrigerator for three hours until it is very firm.
Lift the fudge out and cut it into small squares with a warm knife.
30. Formal Occasion Cookies
Valentines Day Treats
Dress up your standard sandwich cookies for a fancy holiday dinner. One cookie features a dark chocolate tuxedo with a tiny bow tie. The other cookie mimics a white dress with delicate edible pearls. These are sure to be a conversation starter at any gathering.
Using a toothpick allows you to add the tiny details with precision. They look very impressive but only require a steady hand and some melted chocolate. These treats are a great way to celebrate a special relationship. Every couple will enjoy the playful and romantic design.
Ingredients
12 chocolate sandwich cookies
1 cup white chocolate melting wafers
1/2 cup dark chocolate melting wafers
Edible white pearls
Black food coloring pen
Equipment
Two small bowls
Toothpicks
Parchment paper
DIY Instructions
Dip six cookies entirely into melted white chocolate and let them dry on parchment paper.
Dip the other six cookies entirely into melted white chocolate and let them set as well.
Take a toothpick and use dark chocolate to draw a V shape on the first set of cookies to look like a jacket.
Add three small dots of dark chocolate down the center for buttons and a tiny bow tie at the top.
Take the second set of white cookies and use a toothpick to place tiny dots of white chocolate in a grid pattern.
Press an edible pearl into each wet white dot to create a textured dress look.
Let all the cookies sit for twenty minutes until the decorations are completely hard.
31. Salted Caramel Pecan Snaps
Valentines Day Treats
Crunchy squares bring together the best of salty and sweet worlds for your holiday guests. Smooth caramel stretches between a crisp cracker and a rich chocolate layer in every bite. Topping each piece with a toasted pecan adds a deep woodsy flavor that lingers on your tongue.
Flaky sea salt provides a sharp contrast that makes the sugar pop. You can assemble a whole tray of these in minutes without turning on your oven. They offer a sophisticated look for a casual party or a cozy night in.
Ingredients
20 square butter crackers
1 cup soft caramel bits
2 tablespoons heavy cream
1 cup dark chocolate melting wafers
20 whole toasted pecans
1 tablespoon flaky sea salt
Equipment
Baking sheet
Parchment paper
Microwave safe bowl
Small spoon
DIY Instructions
Place a sheet of parchment paper over your baking sheet so the caramel does not stick.
Arrange the butter crackers in rows on the tray with the salty side facing up.
Put the caramel bits and heavy cream in a bowl and heat them in thirty second bursts until the liquid is smooth.
Spoon a small amount of warm caramel onto the center of each cracker.
Melt the dark chocolate wafers in a separate bowl until the mixture is liquid and glossy.
Pour a teaspoon of chocolate over the caramel on each cracker to seal it in.
Press one whole pecan into the wet chocolate before it starts to harden.
Sprinkle a tiny pinch of sea salt over the top of the nut.
Let the tray sit on your counter for one hour until the treats are firm.
32. Berry Cream Crepe Rolls
Valentines Day Treats
Delicate crepes filled with airy whipped cream offer a light start to your holiday morning. A drizzle of bright red raspberry sauce adds a tart edge to every mouthful. Fresh blueberries and strawberry halves provide a burst of natural juice that feels refreshing.
This elegant presentation makes a simple breakfast feel like a high end brunch. You can find pre made crepes at most stores to keep this recipe entirely no bake. Every guest will enjoy the soft texture paired with the colorful fruit garnish.
Ingredients
6 pre made thin crepes
2 cups heavy whipping cream
1/4 cup powdered sugar
1/2 cup raspberry dessert sauce
1 cup fresh mixed berries
1 tablespoon powdered sugar for dusting
Equipment
Large mixing bowl
Hand mixer
Serving platter
Small sifter
DIY Instructions
Pour the cold heavy cream and powdered sugar into a large mixing bowl.
Beat the cream with your hand mixer on high speed until it looks thick and holds its shape.
Lay one crepe flat on a clean plate or cutting board.
Spread a thick layer of the whipped cream across the middle of the crepe.
Roll the crepe tightly from one side to the other to form a long cylinder.
Place the rolled crepes onto a serving platter with the seam side facing down.
Use a spoon to drizzle the raspberry sauce in a zig zag pattern over the top.
Arrange the fresh berries along the side of the rolls for a beautiful look.
Shake a small amount of powdered sugar through a sifter over the entire plate before you serve it.
33. Frozen Pink Yogurt Hearts
Valentines Day Treats
Cool yogurt treats shaped like hearts provide a healthy way to celebrate the holiday. These bites feature a creamy strawberry base mixed with crunchy granola bits. Dark chocolate chips on top add a tiny bit of indulgence to every serving.
Taking a tray of these from the freezer feels like a special event. They offer a great alternative to heavy baked goods while keeping the festive pink color. You can easily make these ahead of time and store them for a quick snack.
Ingredients
2 cups strawberry Greek yogurt
1/2 cup honey granola
1/4 cup mini dark chocolate chips
1 tablespoon honey
Equipment
Heart shaped silicone mold
Small mixing bowl
Spatula
DIY Instructions
Stir the strawberry yogurt and honey together in a bowl to make the base extra sweet.
Place the heart shaped mold onto a flat baking sheet for stability.
Fill each heart cavity about three quarters of the way with the yogurt mixture.
Tap the mold gently on the counter to remove any air bubbles.
Sprinkle a small amount of granola into each heart and press it down slightly with a spoon.
Drop a few mini chocolate chips on top of the granola for a pretty finish.
Put the mold in the freezer for at least four hours or until the hearts are completely solid.
Pop the frozen treats out of the mold by pressing on the bottom of each cavity.
Serve them immediately while they are cold and firm.
34. Cupid’s Crunch Mix
Valentines Day Treats
Powdery sugar coats every piece of this festive snack mix to create a snowy appearance. Red and chocolate cereal squares mingle with heart shaped candies for a playful texture. This classic treat is a staple for school parties or shared office snacks.
Bright red heart candies act as a sweet surprise in every handful. The mix of salty cereal and sugary coating keeps your taste buds excited. You can toss everything together in a large bowl and serve it immediately.
Ingredients
8 cups rice cereal squares
1 cup white chocolate chips
1/2 cup peanut butter
2 cups powdered sugar
1 cup red and pink chocolate candies
1 cup heart shaped gummy candies
Equipment
Large mixing bowl
Microwave safe bowl
Two large gallon sized plastic bags
DIY Instructions
Measure out the cereal squares and put them into a very large mixing bowl.
Melt the white chocolate chips and peanut butter together in the microwave for one minute.
Stir the melted mixture until it is smooth and then pour it over the cereal.
Use a large spoon to toss the cereal until every piece is white and sticky.
Divide the cereal into two plastic bags and add one cup of powdered sugar to each bag.
Seal the bags tightly and shake them hard until the cereal is coated in white powder.
Pour the coated cereal back into a clean bowl.
Stir in the chocolate candies and gummy hearts so they are spread throughout the mix.
Keep the mix in an airtight container so it stays crunchy.
35. Matcha Swirl Strawberries
Valentines Day Treats
Fresh strawberries look stunning when dipped in a smooth white chocolate shell. Green matcha drizzles create a unique pattern that stands out against the white background. This combination offers a sophisticated flavor profile for those who enjoy earthy notes.
Every berry provides a juicy snap followed by the creamy sweetness of the coating. These treats look like they belong in a professional candy shop window. You only need a few minutes of dipping and decorating to finish a whole batch.
Ingredients
12 large fresh strawberries
1 cup white chocolate melting wafers
1 tablespoon matcha green tea powder
2 tablespoons white chocolate chips
Equipment
Two small microwave safe bowls
Parchment paper
Toothpick or small fork
DIY Instructions
Wash the strawberries and dry them with a paper towel until there is no moisture left.
Melt the white chocolate wafers in a bowl using thirty second intervals until the liquid is smooth.
Hold a strawberry by the stem and dip it into the white chocolate until it is nearly covered.
Set the dipped berry on a piece of parchment paper to let it harden.
Mix the matcha powder with two tablespoons of melted white chocolate chips in a separate small bowl.
Stir the green mixture until the color is solid and there are no lumps.
Use a toothpick or a small spoon to drizzle thin green lines across the white surface of the strawberries.
Let the berries sit at room temperature for twenty minutes until the shells are firm.
Serve them on a dark plate to make the white and green colors stand out.
36. Coconut Almond Snowballs
Valentines Day Treats
Shredded coconut covers these round truffles to mimic the look of fresh snow. A hidden whole almond in the center provides a satisfying crunch that surprises every eater. These white treats offer a clean and elegant look for a winter holiday table.
Creamy white chocolate holds the coconut flakes in place while adding a rich sweetness. They feel light and airy on the tongue despite their decadent ingredients. You can package these in small boxes for a thoughtful handmade gift.
Ingredients
1 cup sweetened condensed milk
2 cups shredded coconut
20 whole roasted almonds
1 cup white chocolate chips
1/2 cup extra coconut for rolling
Equipment
Medium mixing bowl
Small bowl
Baking sheet
Parchment paper
DIY Instructions
Stir the condensed milk and two cups of shredded coconut together in a bowl.
Put the mixture in the refrigerator for one hour so it becomes easy to shape.
Scoop out a tablespoon of the coconut dough and flatten it in your hand.
Place one whole almond in the center of the dough and roll it into a ball.
Melt the white chocolate chips in a small bowl until the liquid is smooth.
Dip each coconut ball into the melted chocolate using a fork.
Roll the wet ball in a bowl of fresh shredded coconut until it is completely covered.
Place the finished truffles on a parchment paper lined tray.
Chill the snowballs in the fridge for thirty minutes before you eat them.
37. Caramel Apple Love Pops
Valentines Day Treats
Crisp apple slices on wooden sticks become a portable dessert for any age group. Thick caramel flows over the fruit before a layer of dark chocolate seals everything in. Colorful heart sprinkles and white dots make each slice look festive and fun.
Biting into the cold apple provides a refreshing contrast to the chewy caramel. These pops are much easier to eat than a whole candied apple. They serve as a wonderful centerpiece when stood up in a small bucket of red paper.
Ingredients
2 large green apples
1 cup caramel dip
1 cup dark chocolate melting wafers
12 wooden treat sticks
Red heart sprinkles
White nonpareils
Equipment
Sharp knife
Two small bowls
Parchment paper
DIY Instructions
Slice the apples into thick rounds about half an inch wide using a sharp knife.
Use a small knife to carefully cut a tiny slit into the bottom of each apple slice.
Push a wooden stick into the slit so the apple slice stays firmly in place.
Dip the top half of the apple into the caramel and let the extra drip off.
Place the apple on parchment paper and put it in the freezer for ten minutes to set the caramel.
Melt the dark chocolate wafers in a bowl until the liquid is smooth.
Dip the caramel portion of the apple into the dark chocolate.
Scatter the sprinkles over the wet chocolate immediately so they stick.
Let the pops sit at room temperature for fifteen minutes before you serve them.
38. Strawberry Wafer Towers
Valentines Day Treats
Pink wafer cookies stacked high create an architectural masterpiece on your dessert plate. Layers of vanilla cream and fresh strawberry slices provide a classic flavor combination. A light dusting of powdered sugar adds a delicate finish to the top of each stack.
Fresh mint leaves offer a tiny green accent that makes the pink color pop. These towers feel special without requiring any difficult techniques or special tools. You can assemble them just before serving to keep the cookies crisp.
Ingredients
1 pack pink vanilla wafer cookies
1 cup heavy cream
2 tablespoons powdered sugar
10 fresh strawberries sliced
5 fresh mint leaves
Equipment
Mixing bowl
Whisk
Serving plate
DIY Instructions
Pour the heavy cream and powdered sugar into a bowl and whisk it until it becomes thick.
Place one pink wafer cookie in the center of a small plate.
Spoon a small amount of the whipped cream onto the center of the cookie.
Press three thin strawberry slices into the cream layer.
Add another wafer cookie on top and repeat the cream and fruit layers.
Finish the stack with a third wafer cookie on the very top.
Place a small dollop of cream and a single strawberry slice as the final garnish.
Tuck a mint leaf into the side of the top cream layer for color.
Sift a tiny bit of powdered sugar over the tower just before you bring it to the table.
39. Sweetheart Cherry Trifles
Valentines Day Treats
Individual glass jars display beautiful layers of graham cracker crust and creamy filling. Bright red cherries sit in a thick syrup that adds a bold color to the middle section. A large swirl of whipped cream on top makes the whole dessert feel complete.
Chocolate heart outlines add a touch of romance to the presentation of each jar. These pre portioned treats are excellent for a dinner party where you want easy cleanup. Every spoonful delivers a mix of crunchy crumbs and smooth fruit.
Ingredients
1 cup graham cracker crumbs
4 tablespoons melted butter
8 ounces softened cream cheese
1/2 cup powdered sugar
1 can cherry pie filling
1 cup whipped cream
4 chocolate heart decorations
Equipment
4 small glass jars
Small mixing bowl
Large mixing bowl
Hand mixer
DIY Instructions
Mix the graham cracker crumbs and melted butter in a small bowl until the texture is like wet sand.
Press two tablespoons of the crumbs into the bottom of each glass jar.
Beat the cream cheese and powdered sugar together in a large bowl until the mixture is light and fluffy.
Spoon a thick layer of the cream cheese filling over the crumbs in each jar.
Add a generous layer of cherry pie filling on top of the cream cheese.
Put the jars in the refrigerator for two hours to let the layers set.
Pipe a large swirl of whipped cream onto the top of each jar using a plastic bag.
Place one chocolate heart on top of the cream for a final romantic touch.
Serve the trifles cold with a small silver spoon.
40. Pink Marshmallow Cocoa Dippers
Valentines Day Treats
Soft marshmallows on striped straws offer a fun way to enjoy a warm drink. A thick coating of pink chocolate and tiny white candies makes them look like festive wands. These dippers transform a standard cup of cocoa into a holiday experience.
Melting the chocolate into your hot drink adds an extra layer of sweetness and creaminess. They are a hit with children who love to watch the colors change in their mugs. You can keep a jar of these ready on your counter for cold winter evenings.
Ingredients
12 jumbo marshmallows
1 cup pink candy melts
1/2 cup white heart sprinkles
12 striped paper straws
1 teaspoon coconut oil
Equipment
Microwave safe bowl
Parchment paper
Tall glass for dipping
DIY Instructions
Push a striped paper straw into the center of each jumbo marshmallow.
Melt the pink candy melts and coconut oil in the microwave until the liquid is smooth.
Pour the melted chocolate into a tall narrow glass to make dipping easier.
Dip one marshmallow into the pink chocolate until it is completely coated.
Tap the straw on the edge of the glass to remove any extra liquid.
Press the white heart sprinkles into the wet chocolate on the sides of the marshmallow.
Lay the finished dippers on a sheet of parchment paper to dry.
Wait twenty minutes for the pink shell to become hard and crunchy.
Place one dipper into a hot cup of cocoa and stir it slowly to release the flavor.
41. Cookie Butter Truffles
Valentines Day Treats
Cookie butter lovers will find these truffles irresistible. Every ball features a crushed biscuit center mixed with creamy spread. A thick white chocolate coating snaps when you take a bite. Gold colored cookie butter sauce decorates the top for a professional look. These treats are great for gifting to a partner who enjoys deep spice flavors.
You can make them ahead of time and keep them in the fridge. The texture stays soft while the outside remains firm. Every guest will enjoy the rich and buttery taste of the filling. This dessert looks very high end without much effort. You will love how the smooth chocolate balances the crunchy biscuit bits inside.
Ingredients
1 jar creamy cookie butter
1 cup crushed spice biscuits
2 cups white chocolate melting wafers
2 tablespoons coconut oil
Equipment
Mixing bowl
Baking sheet
Parchment paper
Fork
Small microwave safe bowl
DIY Instructions
Pour the crushed spice biscuits into a bowl and mix them with half a cup of cookie butter until a thick dough forms.
Scoop out small portions of the dough and roll them into round balls using your hands.
Place the balls on a baking sheet lined with parchment paper and freeze them for twenty minutes.
Melt the white chocolate wafers and coconut oil in the microwave using thirty second bursts until smooth.
Dip each cold ball into the melted chocolate using a fork and lift it out while letting the extra liquid drip back into the bowl.
Put the truffles back on the paper and let the shell harden at room temperature.
Warm up the remaining cookie butter and use a spoon to drizzle it back and forth over the top for decoration.
42. Strawberry Rice Cake Snaps
Valentines Day Treats
Healthy snacks can still feel like a holiday celebration. Crispy rice cakes provide a light base that will not leave you feeling heavy. Dark chocolate covers one half to add a rich cocoa taste. Freeze dried strawberry pieces provide a bright red color and a tart flavor.
This snack is great for people who want to stay on track with their wellness goals. You will love how fast these come together in your kitchen. They look beautiful when stacked on a wooden board. Every bite offers a satisfying crunch and a hint of fruit. You can swap the fruit for nuts if you want more protein. These are great for school lunches too.
Ingredients
6 plain rice cakes
1 cup dark chocolate chips
1/2 cup freeze dried strawberries
1 tablespoon honey
Equipment
Microwave safe bowl
Parchment paper
Baking sheet
DIY Instructions
Line a baking sheet with parchment paper so the chocolate does not stick to the tray.
Melt the dark chocolate chips in a bowl by heating them for thirty seconds at a time and stirring well.
Dip half of a rice cake into the melted chocolate and let the extra liquid drip off.
Place the rice cake on the parchment paper.
Crush the freeze dried strawberries with your fingers and sprinkle them over the wet chocolate.
Drizzle a tiny bit of honey over the fruit if you want extra sweetness.
Let the treats sit for thirty minutes until the chocolate is hard and firm.
43. Raspberry Wafer Squares
Valentines Day Treats
Pink ice cream squares offer a refreshing way to end a romantic dinner. These sandwiches use light wafers to hold a thick layer of fruity frozen cream. A slow drip of red berry sauce adds a touch of drama to the plate. Fresh raspberries on the side finish the look with a natural touch.
This dessert is great for keeping your kitchen cool since no heat is needed. You can prep these days in advance for a stress free evening. The texture is creamy and crisp at the same time. Using clear plates helps the bright colors stand out for your guests. Every spoonful delivers a burst of summer flavor.
Ingredients
12 square vanilla wafers
1 pint raspberry ice cream
1/4 cup raspberry dessert sauce
1 cup fresh raspberries
1 fresh lemon for garnish
Equipment
Baking sheet
Parchment paper
Sharp knife
DIY Instructions
Line a baking sheet with parchment paper and spread the raspberry ice cream into a flat layer about one inch thick.
Freeze the ice cream for two hours until it is very solid.
Use a sharp knife to cut the frozen ice cream into squares that match the size of your wafers.
Place one ice cream square between two vanilla wafers and press down gently.
Set the sandwiches back in the freezer for thirty minutes to firm up.
Place a sandwich on a plate and pour a small amount of raspberry sauce over the top so it drips down the side.
Garnish the plate with fresh raspberries and a thin slice of lemon before serving.
44. Green Apple Heart Bites
Valentines Day Treats
Fresh fruit becomes a work of art with this simple idea. Crisp green apple slices are shaped into hearts to show your love. A spread of creamy peanut butter provides a savory contrast to the tart fruit. Pomegranate seeds sit on top like tiny red jewels.
These bites are great for a mid day snack or a light dessert. They offer a crunch that is both satisfying and nutritious. You can assemble them in minutes for a quick surprise. The colors of green and red look striking together on any table. Using a fresh apple ensures the base stays juicy and sweet.
Ingredients
2 large green apples
1/2 cup creamy peanut butter
1/4 cup pomegranate seeds
2 tablespoons honey
Equipment
Sharp knife
Heart shaped cookie cutter
Small spoon
DIY Instructions
Wash the apples and cut them into thick rounds about half an inch wide.
Use a heart shaped cookie cutter to punch out a heart from the center of each apple round.
Spread a thick layer of peanut butter over the top of each apple heart.
Press several pomegranate seeds into the peanut butter so they stay in place.
Drizzle a small amount of honey over the top for extra shine and sweetness.
Serve the treats immediately so the apple remains crisp and does not turn brown.
45. Toffee Biscuit Bars
Valentines Day Treats
Rich layers make these bars look like they came from a fancy bakery. A crumbly biscuit base supports a thick center of golden toffee. Smooth dark chocolate covers the top to balance out the sweetness. Flaky salt and crushed almonds provide a savory finish that lingers on your tongue.
These bars are thick and very filling for a late night treat. You will enjoy the chewy texture paired with the crunchy nuts. They slice easily after a few hours in the refrigerator. Every square feels like a high end gift for someone special. You can stack them high on a plate for a dramatic display.
Ingredients
2 cups crushed digestive biscuits
1/2 cup melted butter
1 can sweetened condensed milk
2 cups dark chocolate chips
1/4 cup crushed almonds
1 teaspoon sea salt
Equipment
Square baking pan
Parchment paper
Small saucepan
Spatula
DIY Instructions
Mix the crushed biscuits and melted butter in a bowl and press the mixture into the bottom of a lined pan.
Pour the condensed milk into a saucepan and stir over low heat for ten minutes until it turns thick and golden like caramel.
Spread the warm caramel over the biscuit base and let it cool for twenty minutes.
Melt the dark chocolate chips in the microwave and pour them over the caramel layer.
Use a spatula to smooth the chocolate to the edges of the pan.
Sprinkle the crushed almonds and sea salt over the wet chocolate.
Chill the pan in the fridge for three hours and then cut into small bars.
46. Rose and Pistachio Bark
Valentines Day Treats
White chocolate acts as a blank canvas for beautiful floral patterns. Edible rose petals bring a soft pink color and a gentle scent to the bark. Green pistachio pieces offer an earthy crunch that cuts through the creamy base. Small silver beads add a bit of sparkle for a festive holiday look.
This treat is very simple to break into shards for sharing. You can use any nuts or flowers you have in your pantry. It sets quickly on the counter or in the fridge. The combination of green and red looks sophisticated and high end. Every piece is unique because of the random placement of the toppings.
Ingredients
16 ounces white chocolate melting wafers
1/4 cup dried edible rose petals
1/2 cup shelled pistachios
1 tablespoon pink sugar pearls
2 tablespoons strawberry syrup
Equipment
Baking sheet
Parchment paper
Spatula
Toothpick
DIY Instructions
Cover a baking sheet with parchment paper to prevent the chocolate from sticking.
Melt the white chocolate wafers in a bowl until the liquid is smooth and free of lumps.
Pour the chocolate onto the paper and spread it into a large rectangle with a spatula.
Drop small dots of strawberry syrup onto the wet chocolate and swirl them with a toothpick.
Scatter the rose petals and pistachios over the entire surface of the chocolate.
Add the pink sugar pearls for a bit of extra color.
Leave the tray in a cool spot for one hour until the chocolate is completely solid.
Break the block into large jagged pieces using your hands.
47. Nutella Cookie S’mores
Valentines Day Treats
Toasted marshmallows bring the feeling of a cozy campfire into your home. This version uses round cookies to hold a gooey center. A thick layer of hazelnut spread provides a rich and nutty chocolate flavor. A tiny red heart candy adds a festive detail to the side.
These sandwiches are messy in the best possible way. You can use a kitchen torch to get that golden brown color on the fluff. Kids will love watching the chocolate melt over the sides. Every bite is warm and very sweet for a cold night. They are a great alternative to traditional baked cookies.
Ingredients
12 vanilla wafer cookies
6 jumbo marshmallows
1/2 cup hazelnut cocoa spread
6 tiny red heart candies
Equipment
Kitchen torch or broiler
Small spoon
Serving tray
DIY Instructions
Place six cookies on a tray with the flat side facing up.
Spread a large spoonful of hazelnut cocoa spread onto each of the six cookies.
Put a jumbo marshmallow on top of the chocolate spread.
Use a kitchen torch to carefully brown the outside of the marshmallow until it looks toasted.
Press a second cookie onto the top of the warm marshmallow to make a sandwich.
Squeeze the sandwich gently so the marshmallow and chocolate begin to ooze out the sides.
Stick a tiny red heart candy into the side of the marshmallow while it is still sticky.
Serve them immediately while the center is still warm and soft.
48. Red Velvet Trifle
Valentines Day Treats
Large glass bowls show off the stunning layers of this massive dessert. Crimson red velvet cake crumbs alternate with clouds of white whipped cream. A thick fruit filling provides a deep red center that looks dramatic. Tiny heart shapes decorate the top for a romantic finishing touch.
This trifle is the ultimate centerpiece for a large holiday party. You can feed a whole crowd with just one bowl. Every spoonful offers a mix of soft cake and airy cream. It stays fresh for several hours while sitting on your table. Your guests will love the contrast of the bright white and deep red colors.
Ingredients
1 pre made red velvet cake
4 cups heavy whipping cream
1/2 cup powdered sugar
2 cups strawberry pie filling
12 small white chocolate hearts
Equipment
Large glass trifle bowl
Mixing bowl
Hand mixer
Spatula
DIY Instructions
Crumble the pre made red velvet cake into small chunks using your hands.
Pour the heavy cream and powdered sugar into a bowl and beat them until stiff peaks form.
Place a layer of cake crumbs at the bottom of the glass trifle bowl.
Spoon a layer of the whipped cream over the cake and spread it to the edges.
Add a layer of the strawberry pie filling on top of the cream.
Repeat the layers of cake, cream, and fruit until you reach the top of the bowl.
Finish with a very thick layer of whipped cream on top and smooth it with a spatula.
Arrange the white chocolate hearts in a circle around the top of the cream for a beautiful finish.
Key Takeaways
Zero oven time means you can prepare these snacks quickly and enjoy more time with your favorite people.
Most recipes use common pantry staples like chocolate, fruit, and nuts for a budget friendly celebration.
Individual servings like mousse shooters and truffles make serving at parties very easy and organized.
Colorful toppings and simple drizzles provide a high end look with very little effort or technical skill.
Finding the right way to say I love you does not have to be a difficult task in the kitchen. These no bake treats provide all the flavor and charm of traditional desserts with half the effort. You can mix and match these ideas to create a stunning platter that your guests will talk about for weeks.
Take a moment to enjoy the process of crafting these sweet bites today. Your Valentine will surely appreciate the thought and care you put into every chocolate drizzle and sprinkle. Happy snacking and have a wonderful holiday filled with love from your favorite kitchen.
Sharing a handmade dessert is a tradition that brings people closer together every single year. You do not need a professional bakery to show someone how much they mean to you. Simply pick a few of these 48 ideas and start creating a new holiday memory right now.
Spread the loveThe scent of cinnamon, ginger, and melting butter is the true signal that the Christmas season has arrived. There is nothing quite so comforting as spending a cozy afternoon in the kitchen, filling…
Spread the loveThe holiday rush often leaves very little time for complicated baking projects. You might find yourself needing a quick gift or a sweet addition to a party platter at the final hour. These…
Spread the loveValentine Day 2026 deserves something more memorable than a standard supermarket sponge. Shaking up your tradition with unique shapes can turn a simple gift into a lasting memory. The Recipe Fork brings you…