Winter often feels like a season of heavy meats and dense starches. While those main courses are filling, the vegetables on the side frequently get treated like a secondary thought. It is time to change that perspective and let seasonal produce shine.

The cold months offer a surprisingly vibrant array of root vegetables, hardy greens, and versatile squashes. From the deep earthy tones of beets to the bright citrus notes of a winter salad, these ingredients bring life to your table. Roasting, braising, and sautéing can transform humble staples into gourmet experiences.
This collection of recipes focuses on simple techniques that highlight natural flavors. You do not need complex skills to create something remarkable. Whether you are hosting a holiday feast or preparing a quick Tuesday dinner, these sides will elevate every meal.
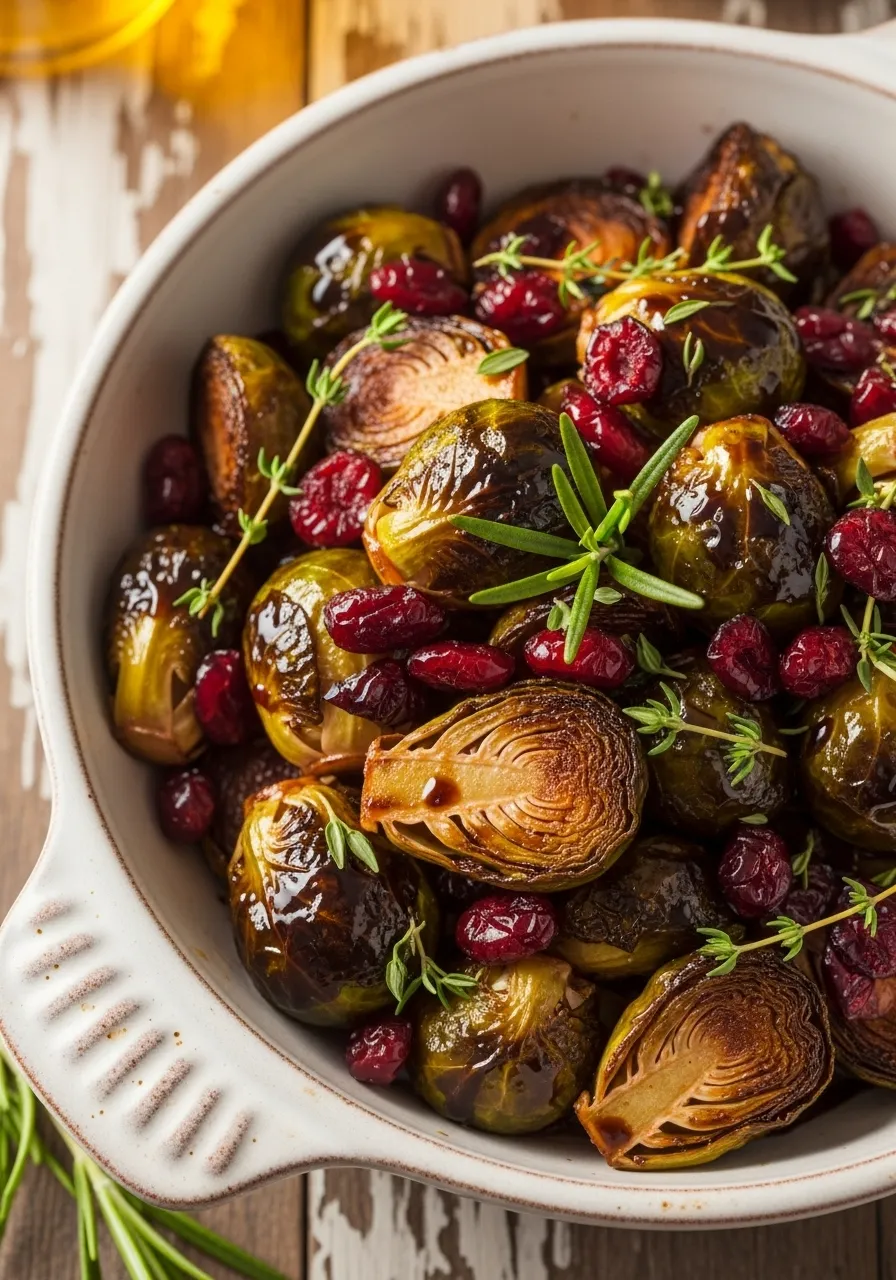
1. Honey Glazed Roasted Brussels Sprouts

Brussels sprouts often get a bad reputation for being bitter or soggy. This recipe changes that narrative by using high heat to create crispy edges and a tender center. The natural sugars in the vegetable caramelize during the roasting process which brings out a deep savory flavor.
Adding a touch of honey or maple syrup after roasting provides a balanced sweetness. These little green gems become a standout side dish that pairs well with any winter main course. You will find that even the pickiest eaters reach for seconds when the sprouts are prepared this way.
The golden brown color and slightly charred leaves offer a satisfying crunch in every bite. This simple preparation highlights how a few quality ingredients can transform a basic winter staple into something remarkable. It is an excellent way to elevate your weeknight dinner routine without much extra effort.
Ingredients
- 1 pound fresh Brussels sprouts
- 2 tablespoons olive oil
- 1 tablespoon honey
- half teaspoon salt
- fourth teaspoon black pepper
- 1 tablespoon balsamic vinegar
Equipment
- Large baking sheet
- Sharp chef knife
- Large mixing bowl
- Measuring spoons
- Parchment paper
DIY Instructions
- Move your oven rack to the center position and heat the oven to 400 degrees Fahrenheit.
- Line your large baking sheet with a piece of parchment paper to prevent sticking and make cleanup easier.
- Wash the Brussels sprouts under cool running water and pat them dry with a clean towel.
- Use your knife to trim off the dry bottom end of each sprout and discard any yellow or damaged outer leaves.
- Cut each sprout in half from the top down through the stem so you have two equal pieces.
- Place all the halved sprouts into your mixing bowl and pour the olive oil over them.
- Sprinkle the salt and black pepper into the bowl then toss everything with your hands or a spoon until every piece is coated.
- Spread the sprouts onto the prepared baking sheet in a single layer making sure the flat cut sides are facing down against the paper.
- Slide the tray into the oven and bake for about 20 to 25 minutes.
- Watch for the edges to turn dark brown and the centers to become soft when poked with a fork.
- Remove the tray from the oven and drizzle the honey and balsamic vinegar over the hot sprouts while they are still on the pan.
- Use a spatula to toss them one last time so the glaze coats the warm vegetables before serving.
2. Moroccan Spiced Rainbow Carrots

Colorful heirloom carrots bring a beautiful visual appeal to your winter table. These root vegetables roast until they are tender with slightly charred tips that offer a deep sweetness. Adding a bold spice paste transforms them from a simple side into a conversation piece.
The aromatic blend of cumin and chili flakes creates a warm heat that balances the natural sugars. Fresh herbs like cilantro or mint provide a cooling finish that brightens the entire dish. It is a fantastic way to introduce bold global flavors to a standard weeknight meal.
Squeezing fresh lime over the carrots just before serving adds a necessary zing. This acidity cuts through the richness of the roasted vegetables and ties the spicy and sweet elements together. Your guests will love the vibrant colors and the complex flavor profile of this rustic dish.
Ingredients
- 1 bunch rainbow carrots with tops removed
- 2 tablespoons olive oil
- 1 tablespoon harissa paste
- 1 teaspoon ground cumin
- half teaspoon red chili flakes
- Fresh cilantro and lime wedges for garnish
Equipment
- Large rimmed baking sheet
- Small mixing bowl
- Pastry brush or spoon
- Vegetable peeler
- Serving platter
DIY Instructions
- Heat your oven to 400 degrees Fahrenheit and place a rack in the middle position.
- Use a vegetable peeler to remove the outer skin from each carrot.
- Wash the peeled carrots under cool water and dry them thoroughly with a kitchen towel.
- Place the carrots on your baking sheet in a single layer without crowding them.
- Combine the olive oil, harissa paste, cumin, and chili flakes in a small bowl.
- Stir the mixture until it forms a smooth and consistent paste.
- Use a brush or spoon to coat each carrot evenly with the spice mixture.
- Place the tray in the oven and roast for 20 to 25 minutes until the carrots feel soft when pierced with a fork.
- Check the carrots halfway through and roll them over to ensure they brown on all sides.
- Remove the tray from the oven once the carrots are tender and the edges look dark.
- Transfer the carrots to a wooden serving board or a clean plate.
- Top with fresh cilantro leaves and serve with lime wedges on the side for squeezing.
3. Maple Tahini Roasted Squash Cubes

Butternut squash is a winter favorite because of its creamy texture and versatility. Cutting the squash into small cubes allows for more surface area to caramelize in the oven. This method results in a delightful contrast between the crispy exterior and the buttery inside.
A drizzle of creamy tahini sauce adds a nutty depth that pairs beautifully with the squash. Sesame seeds provide a subtle crunch while fresh parsley adds a pop of color. This dish is filling enough to satisfy but remains light enough to serve as a side.
The maple syrup in the glaze enhances the natural sweetness of the squash without making it feel like a dessert. It is a hearty addition to any winter menu and works well for meal prep since it tastes great warm or cold. You will enjoy how the savory tahini balances the sweet maple notes.
Ingredients
- 1 medium butternut squash peeled and cubed
- 2 tablespoons olive oil
- 1 tablespoon maple syrup
- 2 tablespoons tahini
- 1 tablespoon toasted sesame seeds
- pinch of salt and pepper
Equipment
- Sharp chef knife
- Large baking sheet
- Small bowl for whisking
- Measuring spoons
- Large mixing bowl
DIY Instructions
- Start by heating your oven to 400 degrees Fahrenheit.
- Cut the top and bottom off the squash then peel away the tough outer skin.
- Slice the squash in half and scoop out the seeds with a large spoon.
- Chop the squash flesh into even one inch cubes so they cook at the same rate.
- Put the cubes into a large bowl and toss them with olive oil, salt, and pepper.
- Spread the cubes onto a baking sheet making sure they have space between them.
- Roast the squash for 25 to 30 minutes until the bottoms are golden brown.
- While the squash cooks, mix the tahini and maple syrup in a small bowl until smooth.
- Add a teaspoon of warm water to the tahini mixture if it feels too thick to drizzle.
- Take the roasted squash out of the oven once it is tender.
- Arrange the hot cubes on a plate and drizzle the tahini maple sauce over the top.
- Finish the dish by sprinkling sesame seeds and fresh parsley over the squash.
4. Garlic Rosemary Roasted Parsnips

Parsnips look like pale carrots but offer a unique earthy and nutty flavor that shines when roasted. They become incredibly sweet in the oven which makes them a great alternative to potatoes. Pairing them with whole garlic cloves and fresh rosemary creates a classic winter aroma.
The high heat of the oven transforms the texture into something slightly chewy and deeply savory. Using whole sprigs of rosemary allows the oils to infuse the vegetables as they cook. This simple side dish feels elegant enough for a holiday gathering but is easy enough for a Monday night.
Roasted garlic cloves become soft and spreadable which adds a rich element to the meal. You can squeeze the softened garlic out of the skin and eat it right along with the parsnips. This dish celebrates the simple beauty of winter root vegetables.
Ingredients
- 1 pound large parsnips
- 2 heads of garlic cut in half horizontally
- 3 sprigs fresh rosemary
- 3 tablespoons olive oil
- half teaspoon sea salt
- fourth teaspoon cracked black pepper
Equipment
- Baking dish or roasting pan
- Sharp knife
- Cutting board
- Large spoon
DIY Instructions
- Preheat your oven to 375 degrees Fahrenheit.
- Peel the parsnips and cut them into long wedges or thick sticks.
- Slice the very tops off the garlic heads so the cloves are exposed but still held together by the skin.
- Place the parsnips, garlic halves, and rosemary sprigs into your roasting pan.
- Pour the olive oil over the ingredients and toss them until everything is glistening.
- Season the mixture with salt and pepper then spread it out evenly in the dish.
- Put the pan in the oven and roast for about 35 to 40 minutes.
- Use a large spoon to turn the parsnips every 15 minutes so they do not burn.
- Remove the pan when the parsnips are golden and the garlic is soft and brown.
- Pick out the woody rosemary stems before you bring the dish to the table.
- Serve the parsnips warm while the edges are still slightly crisp.
- Encourage your guests to squeeze the roasted garlic onto the parsnips for extra flavor.
5. Glazed Beets with Pomegranate Jewels

Beets offer a deep ruby color that makes any dinner table look sophisticated and festive. Roasting them in a balsamic glaze concentrates their earthy flavor and adds a pleasant tang. The dark red hue of the beets creates a stunning visual contrast against a dark serving bowl.
Fresh pomegranate seeds add a burst of tart juice and a crunchy texture to the soft beets. A thick balsamic reduction acts as a syrup that coats each piece in a glossy finish. This combination is both refreshing and savory which makes it a great palate cleanser between heavier dishes.
You can prepare the beets in advance and add the pomegranate seeds just before you eat. This dish stays vibrant for a long time and does not lose its texture. It is a wonderful way to enjoy the seasonal bounty of winter fruits and vegetables together.
Ingredients
- 3 large red beets
- 2 tablespoons balsamic glaze
- third cup fresh pomegranate seeds
- 1 tablespoon olive oil
- pinch of salt
Equipment
- Aluminum foil
- Baking sheet
- Small bowl
- Paring knife
- Serving bowl
DIY Instructions
- Heat your oven to 400 degrees Fahrenheit.
- Trim the greens off the beets and scrub the roots under cold water to remove dirt.
- Wrap each individual beet tightly in a piece of aluminum foil.
- Place the wrapped beets on a baking sheet and roast for 45 to 60 minutes.
- Check for doneness by poking a knife through the foil; it should slide in easily.
- Let the beets cool inside the foil until you can handle them safely with your hands.
- Rub the skin off the beets using a paper towel or your thumb; it should peel away easily.
- Cut the peeled beets into bite sized chunks or wedges.
- Place the beet pieces in a bowl and toss them with olive oil and a pinch of salt.
- Drizzle the balsamic glaze over the beets and stir gently to coat them.
- Transfer the glazed beets to a clean serving bowl.
- Sprinkle the pomegranate seeds over the top and serve immediately.
6. Roasted Squash Rings with Cumin Seeds

Cutting squash into rings instead of cubes creates an interesting shape that looks beautiful on a plate. The skin of certain squash like delicata or acorn is edible which saves time during preparation. These rings develop a wonderful char that enhances their natural nutty profile.
Cumin seeds add an earthy crunch and a toasted aroma that fills the kitchen as they bake. This seasoning is simple but effective at bringing out the savory side of the winter squash. The result is a snackable side dish that people can pick up with their fingers.
The centers of the rings get very tender while the outer edges stay firm. This dual texture makes every bite interesting and keeps the vegetable from feeling mushy. It is a quick way to prepare squash when you want something that looks impressive but requires minimal effort.
Ingredients
- 2 small acorn or delicata squash
- 2 tablespoons olive oil
- 1 tablespoon whole cumin seeds
- half teaspoon salt
- fourth teaspoon black pepper
Equipment
- Sharp knife
- Large spoon
- Baking sheet
- Parchment paper
DIY Instructions
- Set your oven temperature to 400 degrees Fahrenheit.
- Line your baking tray with parchment paper so the squash does not stick.
- Wash the outside of the squash very well since you will be eating the skin.
- Slice the squash into rounds that are about half an inch thick.
- Use a spoon to scrape the seeds and pulp out of the center of each ring.
- Place the rings in a large bowl and add the olive oil, salt, and pepper.
- Toss the rings until they are covered in oil then sprinkle the cumin seeds over them.
- Arrange the squash rings on the baking sheet so they are flat and not overlapping.
- Bake for 15 minutes then use tongs to flip each ring over.
- Continue baking for another 10 to 15 minutes until the squash is soft and brown.
- Check that the cumin seeds look toasted but not burnt before removing the tray.
- Serve the rings warm as a fun and healthy finger food.
7. Charred Broccoli with Lemon and Parmesan

Broccoli takes on a completely different character when you roast it at a very high temperature. The florets become crispy and nutty while the stems stay tender and sweet. This method removes the bitterness often associated with steamed greens.
A dusting of salty parmesan cheese and fresh lemon zest provides a bright finish. The cheese melts into the warm crevices of the broccoli for a savory punch in every bite. It is a fast and reliable way to get green vegetables on the table during the cold months.
Adding fresh lemon juice just before eating wakes up the flavors and balances the salt. This side dish is light yet satisfying and pairs perfectly with pasta or roasted chicken. You will find that roasting is the best way to make broccoli a family favorite.
Ingredients
- 2 large heads of broccoli
- 3 tablespoons olive oil
- fourth cup shredded parmesan cheese
- 1 fresh lemon for zest and juice
- half teaspoon salt
- half teaspoon garlic powder
Equipment
- Large baking sheet
- Microplane or zester
- Knife
- Large bowl
DIY Instructions
- Adjust your oven to 425 degrees Fahrenheit for a high heat roast.
- Cut the broccoli into medium sized florets and peel the tough outer layer off the stems.
- Slice the stems into rounds and keep them with the florets.
- Put the broccoli into a bowl and toss with olive oil, salt, and garlic powder.
- Spread the broccoli onto a large baking sheet in a single layer.
- Roast in the oven for 15 to 20 minutes until the tips of the florets look dark and crispy.
- While the broccoli is hot, use a microplane to grate fresh lemon zest over the top.
- Sprinkle the parmesan cheese evenly over the roasted vegetables.
- Return the pan to the oven for just one minute to help the cheese melt.
- Take the pan out and squeeze half of the lemon over the broccoli.
- Use a spatula to toss everything together so the zest and cheese are distributed.
- Serve immediately while the broccoli is still crunchy and the cheese is warm.
8. Honey Glazed Roasted Beets

Beets are a nutritional powerhouse that provide a vibrant splash of color to your winter meals. Roasting them whole in their skins helps lock in moisture and natural juices. Once they are peeled and sliced, a simple honey glaze brings out their inherent sweetness.
The texture of roasted beets is smooth and substantial which makes them very satisfying. These earthy roots work well as a side dish or as a topping for a winter salad. This recipe is a great introduction for people who think they do not like beets.
Adding a small amount of salt balances the honey and prevents the dish from being too sugary. These beets hold their heat well and stay delicious even as they sit on the table. You can easily scale this recipe up for larger gatherings.
Ingredients
- 4 medium beets
- 2 tablespoons honey
- 1 tablespoon olive oil
- salt to taste
- optional fresh herbs for garnish
Equipment
- Aluminum foil
- Baking sheet
- Small bowl
- Knife
DIY Instructions
- Heat your oven to 400 degrees Fahrenheit.
- Wash the beets and trim off the stems but leave the roots intact.
- Wrap each beet in its own piece of foil and place them on a baking sheet.
- Roast for about 50 minutes or until a knife goes into the center without resistance.
- Open the foil carefully and let the steam escape before handling the beets.
- Once cool enough, peel the skins off with your fingers or a dull knife.
- Slice the beets into thick rounds or wedges and place them in a bowl.
- Whisk the honey and olive oil together in a small container.
- Pour the mixture over the warm beets and toss gently to coat each piece.
- Sprinkle a small amount of salt over the top to enhance the flavor.
- Arrange the beets on a serving plate and add fresh herbs if you have them.
- Serve warm or at room temperature for the best flavor experience.
9. Whole Roasted Sweet Onions with Thyme

Roasting whole onions in their skins allows them to steam in their own juices until they are incredibly sweet. The harsh bite of a raw onion disappears and is replaced by a mellow and savory flavor. This simple technique results in a side dish that is surprisingly elegant.
Fresh thyme sprigs add a subtle herbal note that permeates the layers of the onion as it cooks. The outer skins turn a deep golden brown and protect the soft interior from the direct heat. It is a rustic preparation that requires very little active work.
When you cut into the onion, the layers pull apart easily and are full of natural moisture. These onions are delicious served alongside roasted meats or mashed potatoes. You will be amazed at how a basic pantry staple can become the star of the show.
Ingredients
- 12 small to medium yellow onions
- 4 tablespoons butter or olive oil
- 6 sprigs fresh thyme
- salt and pepper to taste
Equipment
- Ceramic baking dish
- Knife
- Measuring spoons
DIY Instructions
- Preheat your oven to 375 degrees Fahrenheit.
- Peel the very outermost papery layer of the onion skin but leave the rest intact.
- Cut a small slice off the root end so the onions can stand upright in the dish.
- Cut a shallow “X” into the top of each onion about half an inch deep.
- Arrange the onions in a ceramic baking dish so they are snug but not squashed.
- Place a small piece of butter or a drizzle of oil into the “X” on top of each onion.
- Lay the fresh thyme sprigs across the onions in the dish.
- Season the tops with a bit of salt and cracked black pepper.
- Cover the dish with foil and bake for 45 minutes to soften the centers.
- Remove the foil and bake for another 15 minutes to let the tops brown.
- Test one onion with a knife to ensure the center is completely soft.
- Serve the onions whole and let guests peel away the outer layer at the table.
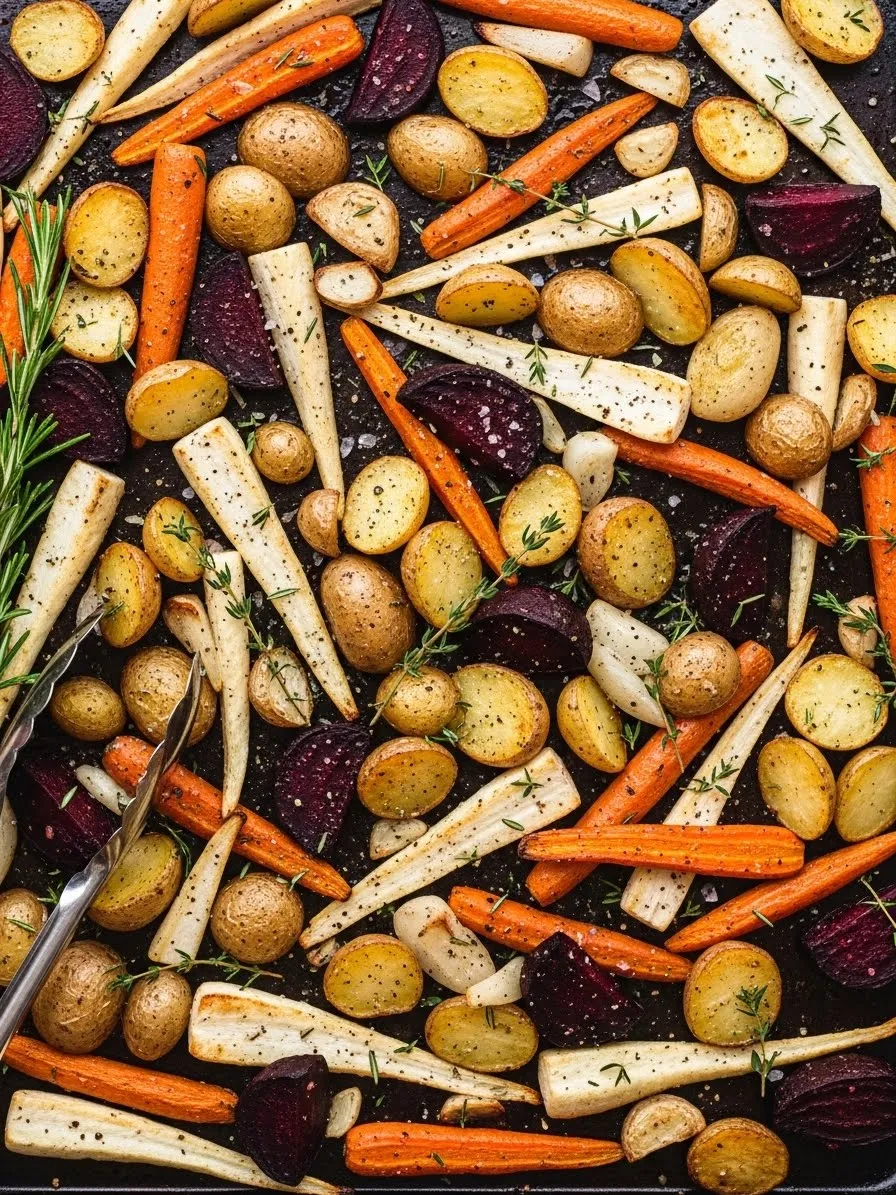
10. Sheet Pan Winter Root Medley

A variety of winter vegetables roasted together creates a beautiful tapestry of colors and textures. Potatoes, carrots, and beets all cook at similar rates when cut to the right size. This one pan method makes cleaning up after dinner a breeze.
The different flavors mingle on the tray as the natural juices release and caramelize. Sprigs of rosemary and thyme add a classic forest aroma that feels right for the season. This medley is a great way to use up whatever root vegetables you have in your pantry.
The key to a great roasted medley is giving the vegetables enough space to breathe. If the pan is too crowded, the vegetables will steam instead of roast. Using a large sheet pan ensures that every piece gets those coveted crispy edges.
Ingredients
- 2 large carrots sliced into rounds
- 2 medium beets peeled and chopped
- 1 pound baby potatoes halved
- 3 tablespoons olive oil
- 2 sprigs each of rosemary and thyme
- 1 teaspoon salt
Equipment
- Extra large baking sheet
- Large mixing bowl
- Chef knife
- Tongs
DIY Instructions
- Heat your oven to 400 degrees Fahrenheit and place the rack in the lower third.
- Scrub all the vegetables clean and peel the beets and carrots if the skins are thick.
- Cut the potatoes and beets into similar sized chunks about one inch wide.
- Slice the carrots into thick coins so they do not cook too fast.
- Put all the vegetables into a large bowl and pour the olive oil over them.
- Add the salt and toss the mixture until every piece is shiny and coated.
- Spread the vegetables onto your largest baking sheet in a single even layer.
- Tuck the whole herb sprigs in between the vegetable pieces on the pan.
- Bake for 20 minutes then use tongs to toss and flip the vegetables.
- Continue roasting for another 20 minutes until everything is tender and browned.
- Remove the tray from the oven and discard the toasted herb stems.
- Serve the hot vegetables directly from the pan or transfer them to a bowl.
11. Savory Roasted Cabbage with Bacon and Apple

Green cabbage takes on a surprisingly mellow and sweet character when roasted in a heavy skillet. The outer leaves become thin and crispy like chips while the inner layers remain tender and juicy. This cooking method removes the sulfurous bite often found in boiled varieties.
Thick slices of salty bacon and tart apple wedges create a classic flavor profile that feels deeply comforting. The rendered fat from the meat coats the vegetable ribbons as they soften in the heat. A few sprigs of fresh thyme add a light herbal fragrance that ties the smoky and sweet elements together.
You can serve this directly from the pan for a rustic presentation that keeps the food warm. It makes a substantial side dish that can almost pass for a main course on a chilly night. This preparation highlights how humble pantry staples can transform into a gourmet experience.
Ingredients
- 1 small head of green cabbage
- 3 slices of thick cut bacon
- 1 firm tart apple like Granny Smith
- 2 tablespoons olive oil
- 3 sprigs fresh thyme
- salt and pepper to taste
Equipment
- Cast iron skillet or oven safe pan
- Sharp chef knife
- Cutting board
- Tongs
DIY Instructions
- Move your oven rack to the middle position and heat the oven to 400 degrees Fahrenheit.
- Remove any wilted or dry outer leaves from the cabbage head.
- Place the cabbage on your cutting board and slice it into four thick wedges through the stem.
- Cut the bacon slices into small one inch pieces using your knife.
- Slice the apple into half inch thick wedges and remove the core and seeds.
- Arrange the cabbage wedges in your skillet so they lay flat on one side.
- Tuck the apple slices and bacon pieces into the gaps between the cabbage.
- Drizzle the olive oil over the vegetables and season everything with salt and pepper.
- Lay the thyme sprigs on top and place the skillet in the hot oven.
- Roast for about 20 minutes then use tongs to carefully flip the cabbage wedges over.
- Continue roasting for another 15 minutes until the bacon is crispy and the cabbage edges are dark brown.
- Remove the skillet from the oven and serve the wedges warm with a bit of the pan juices.
12. Garlic Butter Mushrooms and Leeks

Button mushrooms are flavor sponges that absorb every bit of savory goodness you provide. When sauteed with thick rounds of leek, they develop a rich and earthy profile that is hard to resist. The high heat browns the mushroom caps and softens the centers until they are buttery.
Freshly minced garlic and a splash of olive oil create a simple but potent sauce in the pan. The leeks add a mild onion flavor that is much softer and sweeter than standard white onions. Chopped parsley provides a final touch of brightness that makes the dark vegetables pop.
This dish works beautifully as a topping for steak or as a standalone vegetable side. The different textures of the firm mushrooms and the silky leeks keep every bite interesting. It is a fast and reliable way to add a sophisticated touch to your winter menu.
Ingredients
- 1 pound whole button or cremini mushrooms
- 2 large leeks white and light green parts only
- 3 cloves garlic minced
- 2 tablespoons olive oil
- 2 tablespoons fresh parsley chopped
- pinch of salt
Equipment
- Large heavy skillet
- Chef knife
- Wooden spoon or spatula
- Small bowl
DIY Instructions
- Trim the stem ends off the mushrooms and wipe the caps clean with a damp paper towel.
- Slice the leeks into half inch thick rounds and wash them in a bowl of water to remove any hidden dirt.
- Drain the leeks well and pat them dry with a clean kitchen towel.
- Place your skillet on the stove over medium high heat and add the olive oil.
- Put the whole mushrooms into the pan and cook for 5 minutes without moving them too much.
- Once the mushrooms are brown on the bottom, add the leek rounds to the skillet.
- Stir the vegetables occasionally for another 5 to 7 minutes until the leeks are soft and charred.
- Add the minced garlic and salt to the pan and stir constantly for one minute so the garlic does not burn.
- Turn off the heat once the aroma of the garlic fills the kitchen.
- Sprinkle the fresh parsley over the hot vegetables and give them a final toss.
- Transfer the mixture to a warm serving dish.
- Serve immediately while the mushrooms are plump and the leek layers are tender.
13. Cheesy Gratin Leeks with Herb Garnish

Leeks deserve to be the star of the plate rather than just a base for soup. Baking them in a light cream sauce until they are fork tender brings out their natural elegance. A thick layer of melted cheese on top adds a decadent touch that feels right for a holiday meal.
The golden brown crust of the cheese provides a savory crunch that contrasts with the soft vegetables beneath. Freshly chopped herbs like chives or parsley add a necessary bit of color and a fresh finish. This dish is rich and comforting which makes it an excellent partner for roasted poultry.
You can prepare the leeks ahead of time and add the cheese right before you put the dish in the oven. This allows the centers to cook through slowly without burning the topping. Your family will enjoy the mild and sweet flavor of this often overlooked winter vegetable.
Ingredients
- 4 large leeks trimmed to the white parts
- 1 cup heavy cream or whole milk
- 1 cup shredded gruyere or white cheddar cheese
- 1 tablespoon butter
- 1 tablespoon fresh herbs like parsley
- salt and pepper
Equipment
- Small oval baking dish
- Large pot for boiling
- Sharp knife
- Colander
DIY Instructions
- Preheat your oven to 375 degrees Fahrenheit and grease your baking dish with the butter.
- Slice the leeks into three inch long cylinders and wash them thoroughly under cold water.
- Bring a large pot of salted water to a boil on your stove.
- Place the leeks in the boiling water for about 5 minutes just to soften them slightly.
- Drain the leeks in a colander and let them sit for a minute to release excess moisture.
- Arrange the leeks in a single layer in your prepared baking dish.
- Season the leeks with salt and pepper then pour the cream over the top.
- Sprinkle the shredded cheese evenly over the vegetables until they are well covered.
- Bake the dish in the oven for 20 to 25 minutes.
- Watch for the cream to bubble and the cheese to turn a deep golden brown.
- Remove the dish from the oven and let it rest for 5 minutes so the sauce can thicken.
- Top with fresh herbs and serve the leeks warm using a large spoon.
14. Roasted Cauliflower Steaks with Raisins and Capers

Cauliflower takes on a meaty and substantial texture when you cut it into thick cross sections. These “steaks” roast beautifully in a cast iron pan and develop a deep nutty flavor. The charred edges of the florets provide a wonderful smokiness that is typical of high heat roasting.
Adding salty capers and sweet raisins creates a complex flavor profile that is both savory and bright. Freshly chopped parsley adds a green element that makes the golden cauliflower look vibrant. This preparation is a sophisticated way to serve a vegetable that can sometimes feel bland.
The contrast between the briny capers and the sugary raisins wakes up the palate. This dish is light enough for a side but filling enough to satisfy as a vegetarian main course. It is a visually striking addition to any winter dinner table.
Ingredients
- 1 large head of cauliflower
- 3 tablespoons olive oil
- 2 tablespoons capers drained
- fourth cup dark raisins
- 2 tablespoons fresh parsley chopped
- salt and black pepper
Equipment
- Large cast iron skillet or flat baking sheet
- Long sharp knife
- Small bowl
- Measuring spoons
DIY Instructions
- Set your oven to 425 degrees Fahrenheit and place your skillet inside to heat up.
- Remove the green leaves from the bottom of the cauliflower but keep the stem intact.
- Use your long knife to cut the cauliflower through the center into one inch thick slices.
- Take the hot skillet out of the oven carefully and add two tablespoons of olive oil.
- Place the cauliflower steaks into the pan; they should sizzle upon contact.
- Drizzle the remaining oil over the tops and season with salt and pepper.
- Put the skillet back in the oven and roast for 15 minutes.
- Carefully flip the steaks over using a wide spatula to keep them from breaking.
- Sprinkle the capers and raisins into the pan around the cauliflower.
- Roast for another 10 minutes until the cauliflower is tender and the raisins are plump.
- Remove from the oven and garnish with the fresh parsley while still hot.
- Serve the steaks whole on individual plates or on a large platter.
15. Baked Artichoke and Spinach Casserole

Artichokes provide a unique and tangy flavor that works perfectly in a warm and bubbly casserole. Combining them with fresh spinach and a creamy cheese base creates a rich side dish that everyone will love. The artichoke hearts become soft and buttery as they bake in the oven.
A thick golden crust of melted cheese and breadcrumbs adds a satisfying texture to the creamy center. This dish is excellent for scooping onto pieces of toasted crusty bread or serving alongside roasted chicken. It is a hearty and crowd pleasing way to enjoy winter greens and preserved vegetables.
The heat of the oven wilts the spinach and blends the flavors of the garlic and cream together. This casserole is easy to assemble and can be made in a single dish for less cleanup. It brings a touch of Mediterranean flair to your cold weather meals.
Ingredients
- 2 cans of artichoke hearts drained and chopped
- 10 ounces fresh baby spinach
- 1 cup sour cream or greek yogurt
- 2 cups shredded mozzarella cheese
- 2 cloves garlic minced
- salt and red pepper flakes
Equipment
- Medium baking dish
- Large mixing bowl
- Large spoon
- Measuring cups
DIY Instructions
- Heat your oven to 375 degrees Fahrenheit.
- Place the fresh spinach in a large bowl and pour a little boiling water over it to wilt it down.
- Squeeze as much water as possible out of the spinach once it is cool enough to touch.
- Chop the wilted spinach roughly and put it back into a clean mixing bowl.
- Add the chopped artichoke hearts, sour cream, and half of the cheese to the bowl.
- Stir in the minced garlic, salt, and a pinch of red pepper flakes for heat.
- Mix everything until the ingredients are evenly distributed in the creamy base.
- Spoon the mixture into your baking dish and smooth the top with the back of a spoon.
- Sprinkle the remaining cheese over the top of the casserole.
- Bake for 25 to 30 minutes until the cheese is bubbling and has brown spots.
- Remove the dish from the oven and let it sit for a few minutes before serving.
- Serve the warm casserole with toasted baguette slices or as a side dish.
16. Ginger Garlic Bok Choy with Sesame Seeds

Bok choy is a fast cooking winter green that provides a crisp and refreshing crunch to your plate. Slicing the heads in half allows the leaves to wilt quickly while the stems stay firm and juicy. Adding fresh ginger and garlic creates a bright and zesty flavor that is very energizing.
Toasted sesame seeds and a drizzle of soy sauce provide a nutty and savory finish. The combination of heat and aromatics highlights the natural sweetness of this leafy vegetable. It is a light and healthy side dish that balances out heavier winter stews or roasts.
You can prepare this dish in just a few minutes on the stovetop. The vibrant green color stays bold if you avoid overcooking the leaves. It is a wonderful way to introduce more variety into your vegetable rotation during the colder months.
Ingredients
- 4 heads of baby bok choy
- 1 tablespoon fresh ginger grated
- 2 cloves garlic sliced thin
- 2 tablespoons olive oil
- 1 tablespoon sesame seeds
- 1 tablespoon soy sauce
Equipment
- Large skillet or wok
- Sharp knife
- Grater or microplane
- Tongs
DIY Instructions
- Wash each head of bok choy under cold water and pat them dry.
- Slice the bok choy in half lengthwise through the stem so the leaves stay attached.
- Peel the ginger and use your grater to make a small pile of fresh ginger pulp.
- Slice the garlic cloves into very thin coins using a sharp knife.
- Heat the olive oil in your skillet over medium high heat until it shimmer.
- Place the bok choy halves in the pan with the flat cut side facing down.
- Cook for 2 to 3 minutes without moving them until the bottoms are slightly brown.
- Add the ginger, garlic, and soy sauce to the pan around the vegetables.
- Use your tongs to flip the bok choy over and toss them with the aromatics.
- Cook for another 2 minutes until the green leaves are wilted but the stems are still crisp.
- Turn off the heat and sprinkle the sesame seeds over the top.
- Transfer the bok choy to a plate and pour any remaining pan juices over them.
17. Winter Kale and Roasted Squash Salad

Kale is a sturdy winter green that holds up beautifully to warm toppings and heavy dressings. Massaging the leaves with a bit of oil softens the texture and removes any tough bitterness. This salad uses roasted squash cubes to provide a sweet contrast to the dark and earthy greens.
Dried cranberries add a chewy sweetness and a festive red color to the bowl. The combination of textures makes every forkful interesting and very satisfying. It is a nutritious side dish that stays fresh for hours which makes it great for winter parties.
You will love how the warm squash slightly wilts the kale without making it soggy. This dish brings together the best flavors of the harvest season in one vibrant bowl. It serves as a refreshing break from the heavier stews and roasts typically served during the colder months.
Ingredients
- 1 large bunch of Lacinato kale
- 2 cups roasted butternut squash cubes
- half cup dried cranberries
- 2 tablespoons olive oil
- 1 tablespoon apple cider vinegar
- pinch of salt
Equipment
- Large salad bowl
- Sharp knife
- Measuring spoons
- Small jar for dressing
DIY Instructions
- Wash the kale leaves thoroughly and pat them dry with a clean towel.
- Use your hands to pull the leafy green parts away from the thick center stems.
- Discard the stems and chop the leaves into thin ribbons or bite sized pieces.
- Place the kale in your large bowl and drizzle one tablespoon of olive oil over it.
- Use your clean hands to squeeze and massage the kale for about 3 minutes until it looks dark green and feels soft.
- Add the warm roasted squash cubes to the bowl with the kale.
- Sprinkle the dried cranberries over the top of the mixture.
- In a small jar, whisk together the remaining olive oil, vinegar, and salt.
- Pour the dressing over the salad and toss everything gently with a large spoon.
- Let the salad sit for 10 minutes to allow the flavors to meld together.
- Check the seasoning and add more salt if you feel it needs a boost.
- Serve the salad at room temperature as a healthy and colorful winter side.
18. Shaved Brussels Sprout Salad with Pecans

Shaving Brussels sprouts into thin shreds transforms them into a light and crunchy slaw. This raw preparation highlights their fresh flavor and creates a base that absorbs dressings perfectly. It is a sophisticated alternative to the traditional roasted version of this vegetable.
Toasted pecan halves add a buttery crunch and a deep nutty aroma to the dish. Thinly sliced sprout cross sections look like miniature cabbage roses which adds a beautiful visual element. This salad is bright and zesty which makes it a great palate cleanser for a rich winter meal.
The light dressing of oil and pepper keeps the focus on the freshness of the greens. You can prepare the sprouts ahead of time and they will stay crisp in the refrigerator. It is a quick and elegant way to show off the versatility of winter produce.
Ingredients
- 1 pound Brussels sprouts
- half cup toasted pecan halves
- 2 tablespoons olive oil
- 1 tablespoon lemon juice
- half teaspoon black pepper
- pinch of salt
Equipment
- Mandoline slicer or sharp knife
- Large bowl
- Small whisk
- Cutting board
DIY Instructions
- Trim the stem ends off the Brussels sprouts and remove any loose outer leaves.
- Use a mandoline or a sharp knife to slice the sprouts as thin as possible.
- Place the shredded sprouts into a large bowl and fluff them with your fingers to separate the layers.
- Put the pecans in a dry pan over medium heat for 3 minutes until they smell toasted.
- Let the pecans cool slightly then add them to the bowl with the sprouts.
- Whisk the olive oil, lemon juice, salt, and black pepper together in a small container.
- Pour the dressing over the shredded vegetables.
- Toss the salad thoroughly so every piece is coated in the lemon and oil.
- Taste a small amount and adjust the pepper to your liking.
- Let the salad rest for 5 minutes to allow the sprouts to soften just a bit.
- Transfer the salad to a wooden serving bowl for a rustic look.
- Serve immediately while the pecans are still crunchy.
19. Farro Bowl with Roasted Roots and Jammy Eggs

Farro is an ancient grain with a chewy texture and a nutty flavor that pairs perfectly with roasted vegetables. This hearty bowl combines carrots, parsnips, and potatoes for a filling winter meal. It is a balanced dish that provides plenty of energy during the cold season.
Soft boiled eggs with jammy yolks add a rich and creamy element that acts like a natural sauce. A sprinkle of fresh herbs and crumbled feta cheese provides a salty and bright finish. This bowl is excellent for lunch or a light dinner when you want something wholesome.
The roasted vegetables bring a concentrated sweetness that complements the earthy grain. You can easily customize this bowl with whatever root vegetables you have on hand. It is a beautiful way to present a variety of textures and colors in one simple dish.
Ingredients
- 1 cup dry farro
- 2 cups mixed root vegetables like carrots and parsnips
- 2 large eggs
- 2 tablespoons olive oil
- fourth cup crumbled feta cheese
- fresh parsley for garnish
Equipment
- Medium saucepan
- Small pot for eggs
- Baking sheet
- Knife
- Large serving bowls
DIY Instructions
- Heat your oven to 400 degrees Fahrenheit and cook the farro in a saucepan of boiling water until tender.
- Drain the farro and set it aside in a warm place.
- Peel and chop your root vegetables into small rounds or sticks.
- Toss the vegetables with olive oil and salt on a baking sheet and roast for 25 minutes.
- While the vegetables roast, bring a small pot of water to a gentle boil.
- Lower the eggs into the water and simmer for exactly 7 minutes for a jammy yolk.
- Remove the eggs and place them in a bowl of ice water for 2 minutes before peeling.
- Divide the cooked farro into two large serving bowls.
- Top the grain with the roasted root vegetables and a sprinkle of feta cheese.
- Cut the soft boiled eggs in half and place them on top of the vegetables.
- Garnish with fresh parsley and a final drizzle of olive oil.
- Serve the bowls warm while the egg yolks are still soft and creamy.
20. Citrus and Fennel Salad with Blood Orange

Blood oranges provide a dramatic red color and a sweet tart flavor that brightens up winter days. Pairing the citrus with thinly sliced fennel creates a crisp and refreshing salad. The anise notes of the fennel work beautifully with the juicy orange segments.
Fresh dill and pink peppercorns add a layer of herbal and floral aroma to the dish. This salad is light and vibrant which makes it a perfect starter for a heavy winter dinner. It is a visually stunning dish that celebrates the unique produce available during the cold months.
The juices from the citrus create a natural dressing that requires very little extra oil. This preparation is fast and requires no cooking which keeps the flavors very clean. Your guests will enjoy the sophisticated flavor profile and the beautiful presentation.
Ingredients
- 2 blood oranges
- 1 naval orange
- 1 large fennel bulb
- 1 tablespoon olive oil
- 1 tablespoon fresh dill
- 1 teaspoon pink peppercorns
Equipment
- Sharp paring knife
- Mandoline or chef knife
- Large platter
- Small bowl
DIY Instructions
- Use a sharp knife to cut the top and bottom off the oranges.
- Slice the peel and white pith away from the fruit following the curve of the orange.
- Cut the oranges into thin rounds and remove any seeds you find.
- Trim the green stalks and the bottom root off the fennel bulb.
- Slice the fennel as thin as paper using a mandoline or a very sharp knife.
- Arrange the orange slices and the shaved fennel on a large serving platter.
- Tuck any remaining citrus segments into the gaps to create a full look.
- Drizzle the olive oil over the fruit and vegetables.
- Scatter the fresh dill leaves across the top of the salad.
- Crush the pink peppercorns slightly with the side of your knife and sprinkle them over.
- Let the salad sit for 5 minutes so the fennel can absorb some of the orange juice.
- Serve the salad cold or at room temperature as a vibrant winter appetizer.
21. Golden Beet and Ricotta Salad with Walnuts

Beets come in more than just deep red varieties. Golden beets offer a milder and less earthy flavor that feels light and refreshing on a cold afternoon. This salad pairs the sun colored roots with creamy dollops of ricotta cheese for a rich and smooth texture.
Crunchy walnut halves provide a necessary bite that contrasts with the tender vegetables. A drizzle of golden honey across the top ties the savory greens and sweet beets together. It is a visually stunning dish that looks like a masterpiece on any winter dinner table.
The peppery bite of fresh arugula balances the sweetness of the honey and the richness of the cheese. This combination makes for a sophisticated starter or a light lunch that does not leave you feeling heavy. You will enjoy how the different temperatures and textures play together in every forkful.
Ingredients
- 2 large red beets
- 2 large golden beets
- 1 cup fresh ricotta cheese
- half cup walnut halves
- 2 cups fresh arugula
- 2 tablespoons honey
- 1 tablespoon olive oil
Equipment
- Large roasting pan
- Aluminum foil
- Sharp paring knife
- Large salad bowl
- Small whisk
DIY Instructions
- Heat your oven to 400 degrees Fahrenheit and prepare your beets by scrubbing them clean.
- Wrap the red and golden beets separately in aluminum foil so the colors do not bleed into each other.
- Roast the beets on a tray for about 50 minutes until they are soft through the center.
- Let the beets cool down then rub off the skins using a paper towel.
- Cut the peeled beets into thick wedges and place them in a large mixing bowl.
- Toss the beets gently with a bit of olive oil and a pinch of salt.
- Lay a bed of fresh arugula onto a large serving platter.
- Arrange the colorful beet wedges over the greens in an alternating pattern.
- Use a small spoon to drop mounds of fresh ricotta cheese across the salad.
- Scatter the toasted walnut halves over the top for a bit of crunch.
- Whisk the honey with a teaspoon of warm water if it is too thick to pour.
- Drizzle the honey over the entire salad just before you bring it to the table.
22. Radicchio and Pear Salad with Blue Cheese

Winter salads often rely on sturdy, bitter greens like radicchio to provide a bold base. The deep purple leaves offer a beautiful color and a sharp flavor that wakes up the senses. Slices of sweet, juicy pear soften the bitterness and add a refreshing moisture to the bowl.
Crumbled blue cheese provides a salty and pungent kick that pairs wonderfully with the fruit. Chopped walnuts add an extra layer of crunch and a hint of woodiness. This dish is a sophisticated choice for those who enjoy complex flavor combinations that hit every part of the palate.
A light vinaigrette helps to blend the sharp cheese and the sweet pear together. This salad is best served immediately so the pears stay crisp and do not turn brown. It is a fantastic way to utilize seasonal fruit and greens in a modern and elegant way.
Ingredients
- 1 head of radicchio torn into pieces
- 2 ripe pears sliced thin
- fourth cup crumbled blue cheese
- third cup chopped walnuts
- 2 tablespoons olive oil
- 1 tablespoon balsamic vinegar
Equipment
- Large salad bowl
- Sharp knife
- Cutting board
- Small jar for dressing
DIY Instructions
- Pull the leaves off the radicchio head and wash them under cool running water.
- Pat the leaves very dry with a towel and tear them into bite sized chunks.
- Wash your pears and slice them into thin wedges while leaving the skin on for color.
- Place the radicchio and pear slices into your large salad bowl.
- Sprinkle the crumbled blue cheese over the top of the greens and fruit.
- Add the chopped walnuts to the bowl for a bit of earthy texture.
- Combine the olive oil and balsamic vinegar in a small jar and shake it well.
- Pour the dressing over the salad just before you are ready to eat.
- Use salad tongs to toss the ingredients gently so the cheese stays in visible chunks.
- Taste a leaf to see if you need a pinch of salt or more pepper.
- Transfer the salad to individual plates or a large wooden bowl.
- Serve this right away while the textures are at their best.
23. Creamy Celeriac Remoulade with Fresh Herbs

Celeriac is an often overlooked root vegetable that has a wonderful nutty and celery like flavor. When shredded fine and tossed in a creamy mustard dressing, it becomes a classic French side dish. This remoulade is crisp and refreshing which makes it a great partner for rich winter meats.
Freshly chopped chives and a squeeze of lemon juice add a bright finish to the creamy base. The texture is similar to a coleslaw but with a much more refined and complex taste. It is a great way to enjoy raw root vegetables during the colder months when salads are scarce.
The dressing uses a bit of grainy mustard to add a little heat and visual interest. This dish actually tastes better after sitting for an hour as the flavors have time to mingle. You will find it is a reliable and crunchy addition to any holiday spread or weekend lunch.
Ingredients
- 1 large celeriac root
- half cup mayonnaise
- 1 tablespoon Dijon mustard
- 1 tablespoon fresh lemon juice
- 2 tablespoons fresh chives chopped
- salt and pepper
Equipment
- Sharp knife for peeling
- Box grater or food processor
- Large mixing bowl
- Measuring spoons
DIY Instructions
- Use a sharp knife to cut away the thick and knotty skin from the celeriac root.
- Cut the white flesh into manageable chunks that fit your grater.
- Shred the celeriac into long thin strips using the large holes of a box grater.
- Place the shredded root into a large bowl and squeeze the lemon juice over it immediately.
- Toss the celeriac to coat it in the juice so it does not turn brown.
- In a separate small bowl, whisk together the mayonnaise and Dijon mustard.
- Pour the dressing over the shredded celeriac and stir until everything is well coated.
- Fold in the chopped chives and season the mixture with salt and black pepper.
- Cover the bowl and let it rest in the refrigerator for at least thirty minutes.
- Stir the remoulade once more before serving to redistribute the creamy dressing.
- Garnish with a few extra chives and a lemon slice on the side of the bowl.
- Serve cold alongside roasted beef or as part of a sandwich spread.
24. Red Cabbage and Apple Slaw with Red Onions

Red cabbage provides a stunning pop of magenta that brightens any winter meal. This slaw combines the crunch of raw cabbage with the sweetness of tart apple slices. Thin rounds of red onion add a bit of sharp bite that keeps the flavors interesting.
Fresh herbs like parsley and dill add a garden fresh aroma to the bowl. The dressing is light and acidic which helps to break down the tough fibers of the cabbage slightly. It is a refreshing and healthy side that pairs perfectly with smoky grilled meats or heavy stews.
This dish is very durable and holds its crunch much longer than a lettuce salad. You can make it a few hours in advance without worrying about it wilting. It is an excellent choice for meal prep or for taking to a winter potluck gathering.
Ingredients
- half head of red cabbage shredded
- 1 large green apple sliced into matchsticks
- half red onion sliced into thin rings
- 2 tablespoons apple cider vinegar
- 2 tablespoons olive oil
- 1 tablespoon fresh parsley chopped
Equipment
- Large mixing bowl
- Sharp chef knife
- Cutting board
- Small whisk
DIY Instructions
- Remove the core from the cabbage and slice the leaves into very thin ribbons.
- Place the shredded cabbage into a large bowl and sprinkle a little salt over it.
- Use your hands to massage the cabbage for two minutes to make it more tender.
- Cut the apple into thin slices and then into sticks about the size of a match.
- Slice the red onion into very thin circles and separate the rings with your fingers.
- Add the apple sticks and onion rings to the bowl with the cabbage.
- Whisk the vinegar and olive oil together in a small cup until they are blended.
- Pour the liquid over the vegetables and toss the mixture with a large spoon.
- Add the chopped parsley and a bit of black pepper to the bowl.
- Let the slaw sit for ten minutes so the onion flavor can mellow out.
- Toss one last time before moving the slaw to a clean serving dish.
- Serve this crunchy salad at room temperature or chilled from the fridge.
25. Classic Potato and Leek Gratin

This dish is the definition of comfort during the coldest months of the year. Thin slices of potato and leek are layered together and baked in a rich, creamy sauce. The leeks melt into the cream, providing a subtle sweetness that standard onions simply cannot match.
A thick layer of melted cheese creates a golden crust that bubbles as it comes out of the oven. This preparation turns humble root vegetables into a decadent side dish for a special Sunday roast. You will find the contrast between the soft interior and the crispy edges is truly satisfying.
Fresh thyme leaves tucked between the layers add an earthy fragrance that fills your home. This gratin is hearty enough to be the star of the table, yet it complements any protein beautifully. It is a timeless winter staple that never fails to please a hungry crowd.
Ingredients
- 2 pounds Yukon Gold potatoes
- 3 large leeks white and light green parts only
- 1.5 cups heavy cream
- 2 cups shredded Gruyere or white cheddar cheese
- 2 cloves garlic minced
- 1 tablespoon fresh thyme leaves
- salt and pepper
Equipment
- Mandoline or sharp chef knife
- 9 by 13 inch baking dish
- Small saucepan
- Cutting board
DIY Instructions
- Start by heating your oven to 375 degrees Fahrenheit and grease your baking dish with butter.
- Peel the potatoes and slice them into very thin rounds about an eighth of an inch thick.
- Slice the leeks into thin circles and wash them in a bowl of water to remove any grit.
- Put the heavy cream and minced garlic into a small saucepan over low heat until it just begins to simmer.
- Lay a single layer of potato slices in the bottom of your prepared baking dish.
- Scatter some of the cleaned leeks, a sprinkle of cheese, and some thyme leaves over the potatoes.
- Repeat these layers until you have used all your vegetables, ending with a layer of potatoes.
- Pour the warm garlic cream evenly over the top of the assembled layers.
- Season the top with plenty of salt and black pepper.
- Cover the dish with aluminum foil and bake for 45 minutes to soften the potatoes.
- Remove the foil and sprinkle the remaining cheese over the top of the dish.
- Bake for another 15 to 20 minutes until the top is golden brown and the cream is bubbling.
26. Creamy Mashed Parsnips with Infused Oil

Parsnips offer a complex and nutty alternative to the traditional mashed potato. When boiled and blended until smooth, they take on a silky texture that is incredibly elegant. The natural sugars in the parsnips give the mash a mellow sweetness that pairs well with savory herbs.
A swirl of herb infused oil on top adds a beautiful visual element and a punch of flavor. This dish is lighter than potato mash but feels just as indulgent due to its velvety consistency. It is an excellent way to introduce a different root vegetable to your winter dinner routine.
You can garnish the bowl with a sprig of fresh sage or thyme for a professional look. This puree is smooth enough to serve as a base for seared scallops or roasted lamb. Your guests will appreciate the unique flavor profile of this refined vegetable side.
Ingredients
- 2 pounds parsnips peeled and chopped
- 4 tablespoons butter
- half cup whole milk or heavy cream
- 2 tablespoons olive oil
- 1 teaspoon fresh sage chopped
- salt to taste
Equipment
- Large pot
- Colander
- Vegetable peeler
- Blender or food processor
- Small skillet
DIY Instructions
- Use your peeler to remove the skin from the parsnips and cut them into one inch chunks.
- Place the chunks in a large pot and cover them with cold water and a pinch of salt.
- Bring the water to a boil and cook the parsnips for about 15 to 20 minutes until they are very soft.
- Drain the parsnips in a colander and let them sit for a minute to let the steam escape.
- While they drain, heat the milk and butter in the pot until the butter is completely melted.
- Transfer the hot parsnips to a blender or food processor along with the milk and butter.
- Blend on high speed until the mixture is completely smooth and contains no lumps.
- In a small skillet, heat the olive oil and chopped sage over medium heat for two minutes.
- Watch for the sage to become slightly crisp and the oil to smell fragrant.
- Spoon the mashed parsnips into a warm serving bowl and smooth the surface.
- Use a spoon to create a spiral indentation in the mash and pour the sage oil into it.
- Serve immediately while the puree is hot and the oil is aromatic.
27. Garlic Roasted Cauliflower Mash

This dish provides all the satisfaction of mashed potatoes with a much lighter feel. Roasting the cauliflower before mashing it brings out a deep, toasted flavor that you cannot get from boiling. The addition of a whole head of roasted garlic creates a rich and savory profile.
Fresh chives provide a bright green color and a mild onion bite to the creamy white mash. A drizzle of quality olive oil over the top gives the dish a beautiful sheen and extra richness. It is a fantastic low carb option that does not sacrifice any flavor or texture.
The consistency is thick and creamy, making it the perfect bed for stews or braised meats. You will find that the roasting process removes the watery taste often found in cauliflower. This side dish is sure to become a new favorite for health conscious winter dining.
Ingredients
- 1 large head of cauliflower cut into florets
- 1 head of garlic
- 3 tablespoons olive oil
- fourth cup grated parmesan cheese
- 2 tablespoons fresh chives chopped
- salt and pepper
Equipment
- Large baking sheet
- Aluminum foil
- Food processor
- Chef knife
DIY Instructions
- Preheat your oven to 400 degrees Fahrenheit and line a baking sheet with parchment paper.
- Cut the cauliflower into small pieces and spread them out on the baking sheet.
- Cut the top off the garlic head to expose the cloves and wrap it in a small piece of foil with a drop of oil.
- Drizzle two tablespoons of olive oil over the cauliflower and toss to coat.
- Place the cauliflower and the garlic packet on the tray and roast for 25 to 30 minutes.
- Remove from the oven when the cauliflower edges are brown and the garlic is soft.
- Squeeze the softened garlic cloves out of their skins and into a food processor.
- Add the roasted cauliflower and the parmesan cheese to the processor.
- Pulse the mixture until it reaches your desired consistency, adding a splash of water if needed.
- Stir in the chopped chives by hand to keep their bright color.
- Season the mash with salt and a generous amount of black pepper.
- Transfer to a bowl and serve warm with a final drizzle of olive oil.
28. Creamy Sauteed Spinach with Nutmeg

Spinach wilts down into a silky and tender side dish that takes only minutes to prepare. Adding a touch of cream and a pinch of nutmeg creates a classic flavor that feels very nostalgic. The nutmeg provides a warm, woody aroma that perfectly complements the iron rich greens.
This dish is a great way to get a large amount of leafy greens into your diet in a very tasty way. The texture is smooth and luxurious, making it a favorite for pairing with steak or fish. It is a simple preparation that relies on the quality of the fresh spinach.
A sprinkle of black pepper on top adds a little bit of heat to the mild cream sauce. You can serve this in a small bowl as a concentrated burst of flavor and nutrition. It is a fast and reliable side dish for any night when you are short on time.
Ingredients
- 1 pound fresh baby spinach
- 2 tablespoons heavy cream
- 1 tablespoon butter
- fourth teaspoon ground nutmeg
- 1 clove garlic minced
- salt and pepper
Equipment
- Large skillet or pan
- Tongs or a large spoon
- Measuring spoons
DIY Instructions
- Place a large skillet over medium heat and melt the butter until it starts to foam.
- Add the minced garlic to the pan and stir for thirty seconds until you can smell it.
- Add the fresh spinach to the pan in large handfuls, allowing it to wilt slightly before adding more.
- Use your tongs to toss the spinach so it cooks evenly in the garlic butter.
- Once all the spinach has wilted and turned bright green, pour the heavy cream into the pan.
- Sprinkle the ground nutmeg and a pinch of salt over the greens.
- Continue to stir for one or two minutes until the cream has thickened and coated the leaves.
- Do not overcook the spinach, or it will release too much water and become soggy.
- Taste a small piece and add more salt or nutmeg if you prefer a stronger flavor.
- Turn off the heat and transfer the spinach to a warm serving dish.
- Use a spoon to drizzle any remaining cream sauce from the pan over the top.
- Serve immediately while the greens are vibrant and the sauce is hot.
29. Velvety Carrot and Ginger Puree

This bright orange puree brings a much needed splash of color to the winter dinner table. The natural sweetness of the carrots is sharpened by the zing of fresh ginger. This combination is both warming and refreshing, making it a great palate cleanser between heavy courses.
Fried sage leaves on top provide a sophisticated crunch and a savory herbal note. The texture is incredibly smooth and light, which makes it feel like a gourmet restaurant side. It is an excellent way to turn a bag of basic carrots into something truly impressive.
The ginger adds a subtle heat that lingers on the tongue and aids in digestion. This puree works beautifully alongside roasted pork or as a colorful base for vegetarian dishes. You will love how easy it is to achieve such a professional result with just a few ingredients.
Ingredients
- 1 pound carrots peeled and sliced
- 1 tablespoon fresh ginger grated
- 2 tablespoons butter
- half cup vegetable broth
- 5 fresh sage leaves
- salt to taste
Equipment
- Medium saucepan
- Blender or immersion blender
- Small frying pan
- Microplane or grater
DIY Instructions
- Peel your carrots and slice them into thin rounds so they cook quickly and evenly.
- Place the carrots in a saucepan and add the vegetable broth and the grated ginger.
- Bring the liquid to a simmer and cover the pot with a lid.
- Cook for about 12 to 15 minutes until the carrots are very tender when poked with a fork.
- While the carrots cook, melt the butter in a small frying pan over medium heat.
- Place the sage leaves in the butter and fry them for one minute until they are crisp.
- Remove the sage leaves and set them on a paper towel but keep the butter in the pan.
- Transfer the cooked carrots and their remaining liquid into a blender.
- Add the butter used to fry the sage into the blender as well.
- Blend on high speed until the carrots form a completely smooth and velvety puree.
- Season with a bit of salt and give it one last pulse to combine.
- Spoon the puree into a bowl and top with the crispy sage leaves before serving.
30. Cheesy Potato and Red Onion Bake

This rustic bake features thick rounds of potato layered with rings of red onion for a hearty finish. The onions caramelize in the oven, adding a deep savory sweetness to the dish. A generous topping of melted cheese ties all the layers together into a comforting casserole.
The visible layers of the vegetables make for a beautiful presentation when served in a ceramic dish. Steam rises from the center as you cut into it, revealing the soft and buttery interior. It is a fantastic alternative to mashed potatoes when you want something with more texture.
Fresh thyme sprigs on top add a touch of greenery and a classic winter aroma. This dish is perfect for a cozy family dinner on a snowy evening. You will enjoy how the simple ingredients create such a filling and flavorful result.
Ingredients
- 3 large russet potatoes
- 1 large red onion
- 1.5 cups shredded sharp cheddar cheese
- 2 tablespoons olive oil
- 1 teaspoon dried thyme
- salt and black pepper
Equipment
- Sharp knife
- Circular or oval baking dish
- Measuring cups
- Pastry brush
DIY Instructions
- Heat your oven to 375 degrees Fahrenheit and brush your baking dish with a little olive oil.
- Wash the potatoes and slice them into rounds that are about a quarter inch thick.
- Peel the red onion and slice it into rings of the same thickness.
- Stand the potato and onion slices up in the dish, alternating between the two vegetables.
- Pack them in tightly so they support each other and create a beautiful pattern.
- Drizzle the remaining olive oil over the top of the vegetables.
- Sprinkle the dried thyme, salt, and pepper evenly across the dish.
- Cover the dish with foil and bake for about 40 minutes until the potatoes are tender.
- Remove the foil and scatter the shredded cheese over the top of the bake.
- Return the dish to the oven without the cover for another 10 to 15 minutes.
- Wait for the cheese to become bubbly and develop some brown, crispy spots.
- Let the dish rest for five minutes after it comes out of the oven to help it set before serving.
31. Slow Braised Red Cabbage with Apple

Red cabbage takes on a deep and complex sweetness when cooked slowly with acidic and sugary elements. This method transforms the tough leaves into a tender and melt in your mouth side dish. The dark purple color becomes even more intense as it simmers in a flavorful liquid.
Small cubes of tart apple provide a burst of moisture and a different kind of sweetness. Spices like black peppercorns and fresh rosemary add a woody aroma that is typical of winter comfort food. This preparation is a classic accompaniment to roasted meats or heavy holiday main courses.
You can make this dish a day ahead because the flavors continue to develop over time. It reheats beautifully and adds a sophisticated touch to any meal. Your family will enjoy the balance of tangy vinegar and sweet fruit in every warm bite.
Ingredients
- 1 small head of red cabbage
- 2 tart green apples peeled and diced
- third cup apple cider vinegar
- 2 tablespoons brown sugar
- 1 teaspoon black peppercorns
- 1 sprig fresh rosemary
Equipment
- Large heavy pot or Dutch oven
- Sharp chef knife
- Cutting board
- Large stirring spoon
DIY Instructions
- Start by removing the outer leaves of the cabbage and cutting it into four quarters.
- Slice each quarter into very thin ribbons while discarding the hard white core.
- Place your large pot on the stove over medium heat and add a splash of oil or butter.
- Put the shredded cabbage into the pot and stir it for a few minutes until it begins to soften.
- Add the diced apples, apple cider vinegar, and brown sugar to the cabbage.
- Stir the mixture well so the sugar begins to dissolve and coat the leaves.
- Drop the peppercorns and the rosemary sprig into the liquid.
- Turn the heat down to low and put a lid on the pot.
- Let the cabbage simmer for at least 45 minutes while stirring every 15 minutes.
- Check that the cabbage is very soft and most of the liquid has been absorbed.
- Remove the woody rosemary stem before you get ready to serve.
- Transfer the warm cabbage to a bowl and enjoy its deep and savory flavor.
32. Breaded Celery Hearts in Cream Sauce

Celery is usually a background ingredient but it shines as a main feature when prepared this way. Simmering the hearts in cream makes them incredibly tender and mellow. A topping of golden breadcrumbs and fresh herbs adds a necessary crunch to the soft vegetables.
The mild flavor of the celery absorbs the richness of the cream and the saltiness of the cheese. This dish feels like a lighter version of a traditional gratin. It is an elegant way to use a vegetable that is available all through the winter months.
You can serve this as a side for roasted chicken or as a vegetarian starter. The bright green color of the celery stays vibrant against the white sauce. This preparation will change the way you think about this humble stalks.
Ingredients
- 6 celery hearts trimmed
- 1 cup heavy cream
- half cup panko breadcrumbs
- fourth cup grated parmesan
- 1 tablespoon fresh parsley
- pinch of salt and pepper
Equipment
- Shallow baking dish
- Medium saucepan
- Measuring cups
- Small bowl
DIY Instructions
- Heat your oven to 375 degrees Fahrenheit.
- Wash the celery hearts and cut them so they fit neatly into your baking dish.
- Place the celery in a saucepan with enough water to cover them and a pinch of salt.
- Boil the stalks for 8 minutes until they are just starting to get tender.
- Drain the water and arrange the warm celery in a single layer in your baking dish.
- Pour the heavy cream over the celery so they are partially submerged.
- Season the top with a bit of salt and cracked black pepper.
- In a small bowl, mix the breadcrumbs and parmesan cheese together.
- Sprinkle the crumb mixture evenly over the top of the celery.
- Bake in the oven for 15 to 20 minutes until the cream is bubbling and the top is brown.
- Remove the dish and garnish with freshly chopped parsley.
- Serve the celery warm while the breadcrumbs are still very crispy.
33. Spicy Sautéed Kale with Garlic and Chili

Kale is the ultimate winter superfood because it stays hearty even in the coldest weather. Sautéing it quickly with plenty of garlic creates a bold and savory side dish. Red chili flakes add a lingering heat that warms you up from the inside out.
The leaves wilt down but maintain a bit of a chew which makes them very satisfying. Small bits of toasted garlic provide a nutty crunch throughout the greens. This recipe is a fast way to get a lot of nutrition on the table in under ten minutes.
Adding a squeeze of lemon at the very end brightens the earthy flavor of the kale. This dish pairs excellently with grilled salmon or roasted pork chops. You will find that the simple combination of heat and garlic makes kale a family favorite.
Ingredients
- 2 large bunches of curly kale
- 4 cloves garlic minced
- 1 teaspoon red chili flakes
- 2 tablespoons olive oil
- salt to taste
- half a lemon
Equipment
- Large skillet or wok
- Tongs
- Chef knife
- Measuring spoons
DIY Instructions
- Wash the kale and pull the leaves away from the tough woody stems.
- Tear the leaves into bite sized pieces and pat them dry.
- Place your skillet on the stove over medium high heat and add the olive oil.
- Add the minced garlic and chili flakes to the hot oil.
- Stir the garlic for just 30 seconds until it turns golden but does not burn.
- Add the kale to the pan in large handfuls.
- Use your tongs to toss the kale in the garlic oil as it begins to wilt.
- Continue cooking for about 5 minutes until the kale is dark green and soft.
- Sprinkle a pinch of salt over the greens while they are still in the pan.
- Squeeze the fresh lemon juice over the kale and give it one last toss.
- Turn off the heat and transfer the greens to a warm serving plate.
- Serve immediately while the garlic aroma is still very strong.
34. Honey Balsamic Glazed Carrot Coins

Carrots develop a beautiful glossy finish when cooked in a mixture of honey and balsamic vinegar. Slicing them into thick coins ensures they stay tender without becoming mushy. This preparation highlights the natural sweetness of the root vegetable while adding a tangy depth.
Fresh thyme sprigs add a subtle herbal note that balances the sugary glaze. This dish is visually striking due to the dark amber sauce against the bright orange carrots. It is a reliable side dish that works for both casual dinners and holiday feasts.
The high heat of the pan caramelizes the honey and creates a rich syrup that coats every piece. You can prepare these in a single pan for easy cleanup. Your guests will love the complex flavor profile of this simple winter staple.
Ingredients
- 1 pound large carrots peeled
- 2 tablespoons honey
- 1 tablespoon balsamic vinegar
- 1 tablespoon butter
- 3 sprigs fresh thyme
- pinch of salt
Equipment
- Large skillet
- Vegetable peeler
- Knife
- Measuring spoons
DIY Instructions
- Use your peeler to remove the skin from the carrots.
- Slice the carrots into rounds that are about half an inch thick.
- Melt the butter in your skillet over medium heat.
- Add the carrot coins and the thyme sprigs to the pan.
- Sauté the carrots for about 10 minutes while stirring occasionally until they start to brown.
- Pour the honey and balsamic vinegar over the carrots in the pan.
- Stir the mixture constantly as the liquid begins to bubble and thicken into a syrup.
- Cook for another 5 minutes until the carrots are tender and the glaze is thick.
- Sprinkle a little salt over the top to bring out the flavors.
- Remove the woody thyme stems from the pan and discard them.
- Transfer the glazed carrots to a serving bowl.
- Pour any extra syrup from the pan over the carrots before serving.
35. Sesame Glazed Snap Peas with Sea Salt

Snap peas offer a refreshing crunch that is a welcome change from heavier winter vegetables. Sautéing them quickly keeps them bright green and snap-crisp. A drizzle of sesame oil and a sprinkle of seeds adds a nutty Asian inspired flair.
Large flakes of sea salt provide a clean finish that makes the sweetness of the peas pop. This dish takes very little time to prepare which makes it a great last minute addition to dinner. The heat of the pan brings out a subtle char that adds a layer of smoky flavor.
You can serve these as a side dish or even as a healthy snack. The simple preparation ensures that the natural flavor of the peas remains the star. It is a light and nutritious way to add some green to your winter menu.
Ingredients
- 1 pound sugar snap peas
- 1 tablespoon sesame oil
- 1 tablespoon toasted sesame seeds
- 1 teaspoon flaky sea salt
- 1 tablespoon olive oil
Equipment
- Large skillet
- Tongs
- Small bowl
- Measuring spoons
DIY Instructions
- Trim the stem ends off the snap peas and remove any tough strings.
- Heat the olive oil in your skillet over high heat until it is very hot.
- Toss the snap peas into the pan; they should sizzle immediately.
- Sauté the peas for only 3 to 4 minutes while tossing them constantly.
- Look for the skins to become slightly blistered while the peas stay bright green.
- Remove the pan from the heat so the peas do not overcook.
- Drizzle the sesame oil over the hot peas and stir to coat them.
- Sprinkle the toasted sesame seeds and flaky sea salt over the top.
- Give the mixture one last toss in the pan.
- Move the peas to a clean serving bowl right away.
- Serve them warm while they are still very crunchy.
- Enjoy this light and flavorful dish alongside rice or grilled meat.
36. Smashed Roasted Brussels Sprouts with Lemon

Smashing Brussels sprouts before roasting creates a large surface area for maximum crispiness. These little vegetables turn into salty and crunchy bites that taste almost like chips. Adding fresh lemon slices to the pan infuses the sprouts with a zesty aroma as they bake.
The centers remain tender while the outer leaves become dark and shattered. This method is a fun twist on the traditional roasted sprout that kids and adults will both enjoy. A final dusting of fresh herbs makes the dish look as good as it tastes.
You can serve these with a dipping sauce or simply on their own. The high heat of the oven is the key to getting that perfect golden brown color. This preparation is a great way to make Brussels sprouts the most popular dish on the table.
Ingredients
- 1 pound Brussels sprouts
- 3 tablespoons olive oil
- 1 lemon sliced into thin rounds
- 1 teaspoon garlic powder
- salt and pepper to taste
- fresh parsley for garnish
Equipment
- Large baking sheet
- Small heavy glass or jar for smashing
- Large pot for boiling
- Parchment paper
DIY Instructions
- Heat your oven to 425 degrees Fahrenheit and line your tray with parchment paper.
- Trim the ends of the sprouts and boil them in a pot of water for 10 minutes.
- Drain the sprouts and let them cool for a minute so you can touch them.
- Place the whole sprouts on your baking sheet with plenty of space between them.
- Use the bottom of a heavy glass or jar to press down on each sprout until it is flat.
- Drizzle the olive oil over all the smashed sprouts.
- Sprinkle the garlic powder, salt, and pepper evenly over the tray.
- Tuck the lemon slices between the sprouts on the baking sheet.
- Roast for 20 to 25 minutes until the edges are very dark and crispy.
- Flip the sprouts halfway through the cooking time if you want them extra crunchy.
- Remove from the oven and discard the charred lemon slices if they are too bitter.
- Garnish with fresh parsley and serve these crispy bites while they are hot.
37. Buttered Winter Radish Wedges with Chives

Radishes are often eaten raw but roasting or sautéing them mellows their peppery bite. These white winter radishes become sweet and tender like a turnip when cooked in butter. Fresh chives add a mild onion flavor and a pop of green color to the pale vegetables.
This simple preparation highlights the clean and earthy flavor of the root. It is a light side dish that works well with heavier winter stews. The golden brown edges from the pan provide a savory finish that is very satisfying.
You can use any variety of winter radish for this recipe. The key is to cook them just until they are soft enough to pierce with a fork. It is a unique way to enjoy a vegetable that is often relegated to the salad bowl.
Ingredients
- 2 large white winter radishes
- 2 tablespoons butter
- 2 tablespoons fresh chives chopped
- pinch of salt
- half teaspoon black pepper
Equipment
- Sharp knife
- Large skillet
- Cutting board
- Spatula
DIY Instructions
- Wash the radishes and trim off the tops and the thin root ends.
- Cut the radishes into thick wedges or half moon shapes.
- Melt the butter in your skillet over medium heat until it bubbles.
- Add the radish wedges to the pan in a single layer.
- Cook for about 8 to 10 minutes while turning them occasionally.
- Watch for the radishes to turn translucent and develop golden spots.
- Sprinkle the salt and black pepper over the wedges as they cook.
- Test a piece with a fork to ensure the center is tender.
- Turn off the heat and add the chopped chives to the warm pan.
- Toss the radishes so the chives stick to the buttered surfaces.
- Transfer the wedges to a small serving bowl.
- Serve this warm and simple dish as a refreshing side.
38. Pickled Red Onions and Beet Cubes

Pickling vegetables is a fantastic way to preserve the bright flavors of winter all month long. The deep red juice from the beets dyes the onions a stunning magenta color. These tangy bites add a necessary acidity to rich winter tacos or grain bowls.
Fresh dill and mustard seeds in the jar provide a classic pickling aroma. This recipe requires no cooking and only a few days of waiting for the best results. It is a colorful and healthy condiment that you will want to keep in your fridge at all times.
The crunch of the onion and the softness of the beet create a great texture contrast. You can use the leftover pickling liquid as a base for a vibrant salad dressing. This simple DIY project is a great way to add a gourmet touch to your home cooking.
Ingredients
- 1 large red beet peeled and cubed
- 1 large red onion sliced into rings
- 1 cup white vinegar
- 1 tablespoon sugar
- 1 tablespoon salt
- 1 sprig fresh dill
Equipment
- Large glass jar with a lid
- Small saucepan
- Knife
- Measuring cups
DIY Instructions
- Peel your beet and cut it into small half inch cubes.
- Slice the red onion into thin rings and separate them.
- Pack the beet cubes and onion rings into your clean glass jar.
- Tuck the sprig of fresh dill into the side of the jar.
- In a small saucepan, combine the vinegar, sugar, and salt.
- Heat the liquid over medium heat while stirring until the sugar and salt dissolve.
- Pour the hot liquid over the vegetables in the jar until they are completely covered.
- Let the jar sit on the counter until the liquid reaches room temperature.
- Put the lid on the jar and store it in the refrigerator.
- Wait at least 24 hours before eating so the colors and flavors can blend.
- Use a clean fork to pull out the vegetables as you need them.
- These pickles will stay fresh and crunchy in the fridge for up to two weeks.
39. Warm Radish and Parsley Salad

This warm salad is a great way to enjoy the crispness of radishes with a savory twist. Slicing the radishes into rounds and tossing them with a light dressing makes for a beautiful presentation. Plenty of fresh flat leaf parsley adds a clean and peppery finish to the dish.
The heat from the dressing slightly softens the radishes without making them lose their crunch. It is a refreshing side dish that cuts through the richness of roasted meats. This salad is best served immediately while the flavors are at their peak.
You can add a bit of cracked black pepper for extra heat. The vibrant red skins of the radishes look stunning against the deep green of the parsley. It is a fast and healthy way to brighten up your winter dinner plate.
Ingredients
- 2 bunches of red radishes
- half cup fresh flat leaf parsley chopped
- 2 tablespoons olive oil
- 1 tablespoon lemon juice
- salt and pepper to taste
Equipment
- Sharp knife or mandoline
- Large mixing bowl
- Small whisk
- Serving platter
DIY Instructions
- Trim the leaves and roots off the radishes and wash them well.
- Slice the radishes into thin rounds using your knife or a mandoline.
- Place the radish slices in a large mixing bowl.
- Chop the parsley roughly and add it to the bowl.
- In a small cup, whisk together the olive oil, lemon juice, salt, and pepper.
- Pour the dressing over the radishes and parsley.
- Toss the mixture gently with a spoon to coat every slice.
- Let the salad sit for 5 minutes so the radishes can absorb the lemon juice.
- Arrange the salad on a clean serving platter.
- Sprinkle a little extra black pepper over the top if you like.
- Serve the salad at room temperature as a light and zesty side.
40. Creamy Peas and Pearl Onions with Dill

This classic side dish is the epitome of winter comfort. Sweet green peas and tender pearl onions are bathed in a light and velvety cream sauce. A touch of butter and fresh dill creates a flavor profile that is both rich and refreshing.
The small white onions provide a mild sweetness that complements the pop of the peas. This dish is a staple for holiday dinners but is easy enough for a weeknight meal. It is a great way to make simple frozen or canned vegetables feel like a special treat.
A final dollop of butter melting in the center makes the dish look irresistible. You can serve this in a small ceramic bowl to keep it warm on the table. Your family will love the nostalgic and creamy taste of this traditional winter side.
Ingredients
- 2 cups frozen green peas
- 1 cup frozen or canned pearl onions
- half cup heavy cream
- 2 tablespoons butter
- 1 tablespoon fresh dill chopped
- pinch of salt
Equipment
- Medium saucepan
- Wooden spoon
- Measuring cups
- Serving bowl
DIY Instructions
- Place your saucepan on the stove over medium heat.
- Add the butter and let it melt until it starts to bubble slightly.
- Put the pearl onions into the pan and sauté them for 5 minutes until they are soft.
- Add the green peas to the pan with the onions.
- Pour the heavy cream over the vegetables and stir gently.
- Turn the heat down to low and let the mixture simmer for about 5 to 8 minutes.
- Watch for the cream to thicken slightly and coat the peas and onions.
- Stir in the fresh dill and a pinch of salt.
- Be careful not to overcook the peas or they will lose their bright green color.
- Transfer the creamy mixture to a warm serving bowl.
- Top with an extra small piece of butter if you want it even richer.
- Serve immediately while the sauce is hot and the dill is fragrant.
41. Pan Seared Garlic Thyme Mushrooms

Cremini mushrooms develop a deep and savory flavor when seared in a hot pan. This method allows the moisture to evaporate quickly so the caps can turn golden brown. Whole mushrooms maintain a juicy and meaty texture that makes them a very satisfying side dish for any winter roast.
Freshly chopped thyme and minced garlic provide an aromatic finish that coats every mushroom. The butter in the pan creates a rich and glossy sauce that enhances the earthy notes of the vegetable. It is a simple preparation that results in a high quality and sophisticated dish.
Adding a small splash of balsamic vinegar at the end of the cooking process provides a necessary tang. This acidity cuts through the richness of the butter and balances the savory flavors. You will find that these mushrooms are a versatile addition to your seasonal dinner table.
Ingredients
- 1 pound whole cremini mushrooms
- 2 tablespoons unsalted butter
- 3 cloves garlic minced
- 1 tablespoon fresh thyme leaves
- 1 tablespoon balsamic vinegar
- salt and pepper to taste
Equipment
- Large heavy skillet
- Wooden spoon
- Measuring spoons
- Paper towels
DIY Instructions
- Wipe the mushrooms clean with a damp paper towel to remove any dirt without making them soggy.
- Trim the very ends of the stems if they look dry but keep the mushrooms whole.
- Place your skillet on the stove over medium high heat and melt the butter.
- Add the mushrooms to the pan in a single layer making sure they are not crowded.
- Cook the mushrooms for 5 minutes without stirring so they can develop a dark brown crust.
- Shake the pan to roll the mushrooms over and cook for another 3 to 4 minutes.
- Lower the heat to medium and add the minced garlic and fresh thyme.
- Stir the mixture constantly for one minute to prevent the garlic from burning.
- Pour the balsamic vinegar over the mushrooms and watch as it bubbles and thickens.
- Toss the mushrooms until they are evenly coated in the garlic butter and vinegar glaze.
- Sprinkle a bit of salt and cracked black pepper over the top of the dish.
- Transfer the mushrooms to a warm serving bowl and serve while they are hot and juicy.
42. Zesty Braised Swiss Chard with Lemon

Swiss chard is a vibrant winter green that offers a beautiful contrast between the dark leaves and colorful stems. Braising the leaves gently in a bit of liquid makes them incredibly tender and silky. This preparation removes the slight bitterness often associated with raw leafy greens.
The addition of lemon zest and fresh juice provides a bright and citrusy finish. Minced garlic adds a savory depth that lingers on the palate without being overwhelming. It is a light and nutritious side dish that brings a pop of color to your winter plate.
The stalks of the chard have a crunchy texture similar to celery and should be cooked along with the leaves. This ensures that you get the most flavor and nutrition out of every bunch. You will enjoy how the simple aromatics highlight the natural beauty of this seasonal vegetable.
Ingredients
- 1 large bunch Swiss chard
- 2 tablespoons olive oil
- 2 cloves garlic minced
- half cup vegetable broth
- 1 fresh lemon for zest and juice
- pinch of red pepper flakes
Equipment
- Large pot with a lid
- Sharp chef knife
- Cutting board
- Microplane or zester
DIY Instructions
- Wash the Swiss chard leaves thoroughly in a bowl of cold water to remove any grit.
- Pat the leaves dry and lay them on your cutting board.
- Cut the stems away from the leaves and slice the stems into small half inch pieces.
- Stack the leaves together and slice them into thick ribbons about two inches wide.
- Heat the olive oil in your large pot over medium heat.
- Add the sliced stems and the minced garlic to the pot.
- Sauté the stems for 4 to 5 minutes until they begin to soften.
- Add the leafy green ribbons to the pot along with the vegetable broth.
- Cover the pot with a lid and let the chard steam for about 5 minutes.
- Remove the lid and stir in the lemon zest, lemon juice, and red pepper flakes.
- Continue cooking without the lid for 2 minutes until most of the liquid has evaporated.
- Season with a bit of salt and serve the warm greens immediately.
Key Takeaways
- Embrace High Heat: Roasting vegetables like Brussels sprouts and broccoli at high temperatures creates a savory caramelization that removes bitterness.
- Balance with Acid: Adding lemon juice or balsamic vinegar at the end of cooking wakes up the flavors and cuts through the richness of butter or oils.
- Texture Matters: Incorporating nuts, seeds, or raw shaved elements like fennel adds a satisfying crunch to otherwise soft winter dishes.
- Season Beyond Salt: Using fresh herbs like rosemary, thyme, and sage, or spices like cumin and chili flakes, provides a warm aromatic depth suited for the season.
Vegetable sides should never be boring or predictable. By utilizing the unique textures and flavors of winter produce, you can create a menu that is both balanced and exciting. These forty two recipes prove that with a little creativity, the “side” can easily become the star of the show.
Cooking with the seasons is not just about nutrition; it is about enjoying the best that nature has to offer right now. We hope these ideas inspire you to experiment with new vegetables or rediscover old favorites in your kitchen. Your winter dinners are about to become much more delicious.